G10107 - Bread maker G3 Ferrari - Free user manual and instructions
Find the device manual for free G10107 G3 Ferrari in PDF.

| Product type | Bread maker |
| Brand | G3 Ferrari |
| Model | G10107 |
| Power | 610 W |
| Voltage | 230 V ~ 50 Hz |
| Maximum bread weight | 2 lb (1 kg) |
| Loaf sizes | 1.5 lb (700 g) and 2 lb (1 kg) |
| Number of programs | 12 (Basic, Sweet, French, Whole Wheat, Quick, Rapid, Jam, Dough, Cake, Knead, Bake, Gluten Free) |
| Browning levels | 3 (Light, Medium, Dark) |
| Delay timer | 10 minutes to 13 hours |
| Keep warm | Up to 1 hour automatically |
| Display | LCD |
| Bread pan | Non-stick coating |
| Accessories | Measuring cup, measuring spoon, kneading blade hook |
| Memory function | Resumes program within 10 minutes after power interruption |
| Protection class | Class I (requires earth connection) |
| Overheat protection | Yes (displays H:HH if internal temperature too high) |
| Cleaning | Removable pan; wipe body with damp cloth; do not immerse |
| Usage | Household use only |
Frequently Asked Questions - G10107 G3 Ferrari
User questions about G10107 G3 Ferrari
0 question about this device. Answer the ones you know or ask your own.
Ask a new question about this device
Download the instructions for your Bread maker in PDF format for free! Find your manual G10107 - G3 Ferrari and take your electronic device back in hand. On this page are published all the documents necessary for the use of your device. G10107 by G3 Ferrari.
USER MANUAL G10107 G3 Ferrari
natural_image
Exterior view of a white and gray GFPERRARI bread maker with control panel (no visible text or symbols on body)mod. G10107
Macchina del Pane
II Fornaio
Safety instructions.... p. 16
G10107....p. 17
First use.... p. 17
Functions introduction...... p. 18
Hints for cooking.... p. 20
Operating the bread machine.... p. 20
Maintenance and Cleaning p. 21
Technical features.... p. 21
Troubleshooting....p.21
Recipy book.... p. 22
Waste of electric and electronic equipment (WEEE
Directive).... p. 54
PORTUGUESE...... p. 27
ESPAÑOL ...... p. 34
DEUTCH p. 42
CLASSI DI PROTEZIONE / PROTECTION CLASSES
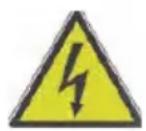
ATTENZIONE RISCHIO DI SCOSSE ELETTRICHE NON ESPORRE A PIOGGIA E UMIDITA'


WARNING ELECTRIC SHOCK RISK DO NOT EXPOSE TO RAIN OR MOISTURE

ATTENZIONE: NON APRITE L'APPARECCHIO. ALL'INTERNO NON VI SONO COMANDI MANIPOLABILI DALL'UTENTE NE' PARTI DI RICAMBIO. PER TUTTE LE OPERAZIONI DI SERVIZIO RIVOLGERSI AD UN CENTRO DI ASSISTENZA AUTORIZZATO.
This symbol warns the user that un-insulated dangerous voltage inside the system may cause an electrical shock. Do not open the case.

Class I Appliance symbol. This means the appliance must have the chassis connected to electrical earth/ground by an earth conductor.

Class II Appliance symbol. The double insulated electrical appliance is one which has been designed in such a way that it does not require a safety connection to electrical earth/ground.

Caution: this symbol reminds the user to read carefully the important operations and maintenance instructions in this owner's guide.
AVVERTENZE PER L'UTILIZZO
ENGLISH: SAFETY INSTRUCTIONS
The following are important notes on the installation, use and maintenance; save this instruction manual for future reference; use the equipment only as specified in this guide; any other use is considered improper and dangerous; therefore, the manufacturer cannot be held responsible in the event of damages caused by improper, incorrect or unreasonable use; before use, ensure the equipment is undamaged; if in doubt, do not attempt to use it and contact the authorized service center; do not leave packing materials (i.e. plastic bags, polystyrene foam, nails, staples, etc.) within the reach of children as they are potential sources of danger; always remember that they must be separately collected; make sure that the rating information given on
the technical label are compatible with those of the electricity grid; the installation must be performed according to the manufacturer's instructions considering the maximum power of the appliance as shown on the label; an incorrect installation may cause damage to people, animals or things, for which the manufacturer cannot be considered responsible thereof; do not leave the unit plugged; better to remove the plug from the mains when the device is not in use; if it is necessary to use adapters, multiple sockets or electrical extensions, use only those that comply with current safety standards; in any case do not exceed the power consumption limits indicated on the electrical adapter and / or extensions, as well as the maximum power shown on multiple adaptor; if the unit is out of order and you do not want to fix it, it must be made inoperable by cutting power cord.
- Do not handle or touch the appliance with wet hands or bare feet.
- Do not use the appliance in the event of damage to the power cord, plug, or in case of short circuits; to repair the product only address an authorized service center.
- Do not allow the power cord to get closer to sharp objects or in contact with hot surfaces; do not pull it to disconnect the plug.
- Do not expose the appliance to harmful weather conditions such as rain, moisture, frost, etc.. Always store it in a dry place.
- This appliance can be used by children aged from 8 years and above and persons with reduced physical, sensory or mental capabilities or lack of experience and knowledge if they have been given supervision or instruction concerning use of the appliance in a safe way and understand the hazards involved; children shall not play with the appliance; cleaning and user maintenance shall not be made by children without supervision.
- Not for commercial use. Household use only
Cleaning operations should be carried out after unplugging the unit; in case of failure and / or malfunction do not tamper with the unit; to repair the appliance, always contact the service center authorized by the manufacturer and request the use of original spare parts; failure to comply with the above may compromise the unit safety and invalidate the warranty.
GENERAL INFORMATION
WARNING: This appliance includes a heating function. Surfaces, other than the functional surfaces may develop high temperatures. Since temperatures are perceived differently by different people, this device should be used with CAUTION. Hold the appliance exclusively to grip surfaces intended to hold and use such heat protection measures as heat protection Gloves or pot holders.
- This appliance is intended to be used in household and similar applications such as: staff kitchen areas in shops, offices and other working environments; by clients in hotels, motels and other residential type environments; farm houses, bed and breakfast type environments.
- Keep the appliance and its cord out of reach of children less than 8 years.
- The rear surface of appliances shall be placed against a wall.
- The appliances is not intended to be operated by means of an external timer or separate remote-control system.
- Place the appliance on a flat and stable surface.
- Do not touch hot surfaces. Always use the handles or knobs.
- To prevent electrical shock, do not immerse the power cord, plug or the body in water or other liquid.
- Disconnect the plug from the outlet when the appliance is not in use, before putting on or taking off accessories and before cleaning.
- The use of attachments not recommended by the manufacturer may cause damages or injuries which are not covered by the warranty.
- Do not place the appliance over or near the gas/electric stove, or near a hot oven.
- Do not touch moving or rotating parts of the unit.
- Never operate the unit without the tray properly inserted and filled with the ingredients.
- Never knock the pan on the top or on the board, since this may cause serious damages.
- Metal sheets or other materials, utensils and cutlery should not be inserted in the bread machine, this may increase the risk of fire or electrical shock.
WARNING! Never cover the unit while it is running, this may cause RISK OF BURNS.
- Operate the device only as intended in this owner's guide.
- Do not use outdoors. Indoor use only.
- The unit is not designed to be operated by means of an external timer or via a remote control system.
- Before cleaning or maintenance, it is necessary to wait for the unit to completely cool down. Do not insert anything in the ventilation windows.
- Use original spare parts and accessories only.
- Never leave the appliance unattended while it is running. Remove the plug after each use.
- Do not use the appliance as a heating unit.

CAUTION: Before starting any cleaning or maintenance, switch off the unit and unplug the power cord from the mains socket.
DESCRIPTION G10107
- Glass window
- Cover
- Kneading blade
- Bread pan
- Control panel
- Housing
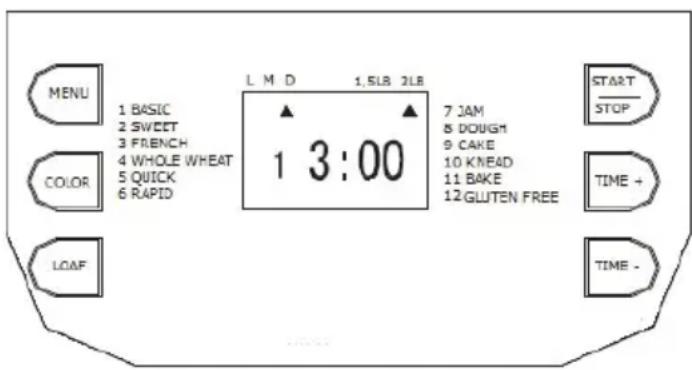
1. CONTROL PANEL
- Hook
- Measuring cup
- Measuring spoon
FIRST USE
The appliance may emit a little 'smoke
and a characteristic smell when you turn it on for the first time. This is normal and will soon finish.
- Place unit on a flat and stable surface and make sure it has adequate ventilation on both sides.
- Ensure that all parts and accessories are intact and free of damage.
- Clean all the parts as shown in the "Cleaning and Maintenance".
- Set the bread machine in "Baking" (Function 11) and make it run for about 10 minutes. When completely cooled, wipe the system again.
- Dry all the parts and reassemble them properly: the machine is now ready for use.
MAIN FUNCTIONS INTRODUCTION
As soon as the bread machine is connected to the electricity, it emits a beep and the words "13:00" appears on the display after a short period of time: "1" indicates the selected program while "3:00" is the processing time. The arrows point to "2LB" (weight/1Kg) and "M" (browning level / MEDIUM) as the default setting.
Start/Stop
Press the START/STOP button on control panel to start or stop the cooking program selected.
To start a program, press once the button "START/STOP": a short beep will sound and the colon in the time display will start to flash.
To stop the program, press the "START/STOP" for about 3 seconds until the beep confirms that the program has been shut down. This feature allows you to avoid any accidental interruption to the operation of the program.
Note: after the program begins, any other button is disable except "START/STOP".
Programs - MENU'
This button is used to set the different programs. Each time you press (accompanied by a short beep) the program will vary. Press the button continuously and the 12 menus will be displayed on the display. Select the desired program.
- BASIC (NORMALE): to knead, rise and bake traditional bread. You can also add extra ingredients to give some flavor.
- SWEET (DOLCE): to knead, rise and bake crisp and sweet bread.
- FRENCH (FRANCESE): to knead, rise and bake with a longer rising time. The bread baked in this way will have a crispy crust and light texture.
- WHOLE WHEAT (INTEGRALE): to knead, rise and bake whole wheat bread. Preheating has longer duration to allow the grain to absorb water and expand. It is recommended not to use the "Delay time" function.
- QUICK (VELOCE): to knead, rise and bake bread with baking soda or baking powder, bread baked with this function is usually smaller and with a thick consistency.
- RAPID (RAPIDO) to knead, rise and bake 2lb (about 1 kg) of bread in a short time. Usually, the bread is smaller and more rough than the one made with QUICK program.
- JAM (MARMELLATA): to make jams and marmalades.
- DOUGH (IMPASTO): kneading and rising, no cooking. Remove the dough to make sandwiches, pizza, loaves of bread.
- CAKE (TORTA): to knead, rise and bake (leavened with soda or baking powder) cakes.
- KNEAD (IMPASTARE): only kneading (without leavening and baking).
- BAKE (CUOCERE): cooking only (no kneading and rising). It can also be used for extra cooking.
- GLUTEN FREE (SENZA GLUTINE): to knead, rise and bake gluten free bread thanks to the longer rising time.
Browning level (COLOR)
This button is used to select the level of browning of the crust of the bread. Press the button repeatedly, and the arrow on the display will move between the following options: "L" (light golden brown), "M" (medium browned) "D" (darker browning).
Loaf - Peso
Press this button repeatedly to select one of the following formats of bread: 2LB (about 1kg) and 1.5LB (approximately 700g).
Delay time (+/-)
If you want the machine does not turn on immediately, you can use this button to set the starting time. Please note the delay time includes the cooking time of the program. At first, select the program (MENU button) and the degree of browning (COLOR button), then press TIME + or TIME- you can set a delayed start from a minimum of 10 minutes to a maximum of 13 hours. Example: It is 8:30 pm and you want the bread to be ready the next morning at 7 am (ie after 10 hours and 30 minutes).
- Select the program, the browning level and the size of the loaf by using the proper buttons.
- Press the TIME + or TIME- button to add time until 10:30 appears on the display.
- Press the STOP/START key to activate the program.
- The LCD display will show the countdown for the remaining time. You will get fresh bread at 7:00 in the morning, which will remain warm for about 1 hour.
Note: With this function, it is recommended not to use fresh and highly perishable ingredients (such as eggs, milk, fruits, onions, etc. ...).
2. BASIC FEATURES
Keep warm
The bread can be automatically kept warm for 60 minutes after cooking. If you want to take the bread first, disable the program by pressing the START/STOP button on the control panel.
Memory
If the power is interrupted during the course of baking, the process will continue automatically within 10 minutes, without pressing any button. If the power outage exceeds 10 minutes, the memory cannot be maintained and the appliance must be restarted. However, if the device has not passed the stage of the dough process before the interruption, you can press the START/STOP button to continue the program from the beginning.
Room temperature
The room temperature recommended for a better utilization of the bread machine must be between 15 and 34°C.
3. SPECIAL WARNINGS
During use, it is possible the following indications appear on the display:

Fig.1

Fig.2
- If the display shows "H: HH" after pressing the START/STOP button (Figure 1), the temperature inside the machine is still too high. Turn the power off, open the lid and allow to cool for about 10-20 minutes.
- If the display shows "E: EE" after pressing START/STOP button (Figure 2), the temperature sensor is disconnected. We recommend that you check the sensor by an Authorized Service Center.
HINTS FOR A BETTER BAKING
1. QUICK PROGRAM (VELOCE)
Selecting the program QUICK, the bread is made with yeast and sodium bicarbonate, which is activated by moisture and heat. To get a perfect result, it is suggested to place all liquids in the bottom of the pan and the dry ingredients on top. During the step of mixing, dry ingredients may collect in the corners of the tray: in this case it may be necessary to help the machine to thoroughly mix the ingredients to avoid lumps of flour. Mix by using a rubber spatula to avoid damaging the walls of the pan.
2. RAPID PROGRAM (RAPIDO)
This unit can bake a loaf 1.5LB (700 g) in 1 hour and 25 minutes setting this specific program. To obtain the best results with this program, it is necessary to add water at a temperature of 45-50°C. It is advisable, therefore, to use a cooking thermometer to measure the water temperature properly since this is a fact that greatly influences on the proper preparation of bread. In fact, if the water temperature is too low, the bread will not be of the size and consistency expected, while if the water temperature is too high, it will block the yeast before growing.
OPERATING
- Put the pan (4) in place, then turn it clockwise until it clicks into place. Attach the kneading blade (3) over the drive shafts. Turn it clockwise until it clicks into place.
- Put all ingredients into the baking pan (4) in this order: water (or other liquid), sugar, salt, flour and always stir the yeast as the last ingredient. In the case of mixture with rye or whole wheat, it is recommended to reverse the order of the ingredients
- Make a small hole on one side of the flour and add the yeast, making sure not to come in contact with liquid ingredients or salt.
- Close the cover (2) and gently insert the power cord into an outlet.
- Press the MENU button to select the desired program.
- Press the LOAF/PESO button to select the desired size (2 to 1.5 LB).
- If necessary, set the delay time by pressing TIME+ or TIME- buttons.
- Press the START/STOP button to turn on the machine.
Note: with BASIC, FRENCH, WHOLE WHEAT, SWEET and SANDWICH programs, the machine will emit a long beep to warn you to add ingredients. If you want, open the lid and add extra ingredients at the beep.
- Once finished cooking, you will hear 10 beeps. Open the cover (2) and, after having wear oven mitts, firmly grasp the handle of the pan (4). Turn it counterclockwise and gently pull the pan straight up. If necessary, use a nonstick spatula to gently loosen the sides of the bread.

CAUTION: bread pan (4) and bread cuold be very hot! Handle with care and always wear oven mitts.
- Overturn the pan (4) on a clean surface and gently shake until the bread will come out.
- Allow the bread to cool for about 20 minutes before slicing.
- At the end of cooking, if you have not pressed the START/STOP button, the bread is kept
warm automatically for 1 hour.
- When the bread machine is not in use, you should unplug the power cord.
Note: before slicing the bread, use hook (7) to remove kneading blade (3) hidden on the bottom of the loaf. The bread is warm and the blade is sharp, so never use your hands to pull it out.
MAINTENANCE AND CLEANING

CAUTION: Unplug the appliance and let it cool down completely before starting any cleaning or maintenance operations.
The pan (4), the blade (3), the glass window (1), the cover (2) and the body (6) can be cleaned using a damp cloth. Do not use any chemical detergents and abrasive and never immerse the body in water or other liquids. Thoroughly dry the pan (4) and the kneading blade (3) before reassembling. If the bar of dough is hard to remove from the pin, fill the container with hot water and let soak for about 30 minutes.
Before storing the bread machine, ensure it has cooled down completely and that it has been cleaned and dried; put the spoon (9), the cup (8), the hook (7) and the kneading blade (3) into the pan (4), and close the cover (2). Store in a clean and dry place, out of reach of children.
TECHNICAL FEATURES
• Power supply: AC 230V, 50 Hz. Power: 610W
• Capacity: MAX 1Kg / 2LB
- LCD Display
• 12 cooking programs
• 3 browning levels
- Dealy time (from 10 mins up to 13 hrs)
• 1 hour automatic keep warm function
- Resting feet
• Accessories: non-sticking bread pan, measuring cup and spoon, hook
TROUBLESHOOTING
| Problem | Cause | Solution |
| The unit emits some smoke | - Heating elements is dirty.- First use: working oil over the heating elements. | - Unplug the appliance and clean the heating elements.- During first use, make it work empty for 20 mins. |
| Dough uneven and poor baking | - Chosen program is incorrect.- Cover has been open too many times during operations.- Kneading blade cannot mix. | - Select another program.- Do not open the cover, leave the bread inside.- Check if anything blocks the kneading blade. Contact an Authorized Service Centre if the problem persists. |
| Noises during use and the dough is not well mixed | The bread pan is not correctly assembled and the dough is too much to be kneaded. | Correctly assemble the bread pan, check the recipe. |
| Too large loaf Too much yeast, flour | or water.Room temperature is too hot. | Check recipe and room temperature. |
| Loaf too small, the bread did not rise | - No yeast or too much yeast.- Water temperature is too high.- Salt came in touch with the yeast.- Room temperature is too low. | - Check the quantity of yeast.- Check water temperature..- Increase the room temperature. |
| The dough comes out of the pan - too much liquids.- Too much yeast. | Decrease liquids and yeast quantity. | |
| The bread falls in the center during baking | - Wrong type of flour.- Yeast temperature is not correct.- Too much water or other liquids. | - Check flour type.- Yeast must be at room temperature- Decrease the water and liquids quantity. |
| Hollow bread - Too much water or salt or yeast.- Water temperature is too high. | - Reduce the yeast and the water and check the salt.- Check water temperature. | |
| Il display shows “H:HH” after having pressed start or stop button | Temperature inside the machine is too high. | Press stop and unplug the unit from the power outlet. By using the oven mitts, extract the bread pan and let it cool down for 10-20 mins If the problem persists, contact and Authorized Service Centre for repairing. |
RECIPEBOOK
Bread is one of the most important daily food, and each city has its own specialties. The varieties of bread are therefore virtually endless.
The goal of this cookbook is to provide the basics and ideas to be able to unleash the imagination and create your own personal recipes in the best way.
The appliance "Il Fornaio" is an excellent machine also for coeliacs, since it allows to make good bread with flour and gluten-free ingredients.
SOME TIPS
1) The order of insertion of the ingredients is important. Place the ingredients in the same order as described.
2) During the first phase of the program, the machine emits a "beep". If you have additional ingredients (eggs, cereals, olives, etc ...), place them at the "beep".
3) If at the end of the program you think that external cooking is not complete, you can continue cooking by using the program 11.
4) Once the program is completed, remove the pan with pot holders, turn it upside down and pull out the bread. Allow to cool the bread before cutting.
5) If the kneading blade gets stuck in the bread, remove it without using metal objects. Better to remove it with your fingers when the bread is cold.
6) If the kneading blade gets stuck in the pin, pour warm water and mild detergent for dishes and wait for the fouling soften.
White Bread
250 ml of warm water
1 teaspoon granulated sugar
1 tablespoon of extra-virgin olive oil
1 teaspoon of salt
500g flour
1 sachet of dried yeast
Program BASIC 1, Weight 900g, Color as you prefer
Or
Program QUICK 5, Weight 900g, Color as you prefer
Note: the same recipe can also be made with other flours: whole wheat, 5 cereals, kamut, etc..
RAPID White Bread
280 ml of warm water
1 teaspoon granulated sugar
1 tablespoon extra-virgin olive oil
2 teaspoons of salt
500g flour
1 sachet of dried yeast
Program RAPID 6, Weight 900g, Color as you prefer
The Gluten Free Bread
300 ml of warm water
1 teaspoon granulated sugar
1 tablespoon extra-virgin olive oil
2 teaspoons of salt
220g gluten free flour
2 teaspoons baking powder gluten-free
Program GLUTEN FREE 12 or BASIC 1, Weight 700g, Color Medium
WARNING: Ensure to avoid any contamination with flour or other foods containing gluten.
WHOLE WHEAT Bread
250 ml of warm water
1 teaspoon granulated sugar
1 tablespoon extra-virgin olive oil
10g of salt
500g whole wheat flour
1/2 sachet of dried yeast
Program WHOLE WHEAT 4, Weight 900g, Color as you prefer
Spelt Bread
230 ml of warm water
1 pinch of sugar
1 tablespoon extra-virgin olive oil
1 teaspoon of salt
400g spelled flour
2 tablespoons of cornstarch
1/2 sachet of dried yeast
Program BASIC 1, Weight 700g, Color as you prefer
Bread with Bacon
280 ml of warm water
1 teaspoon granulated sugar
1 tablespoon of extra-virgin olive oil
1 teaspoon of salt
500g flour
1 sachet of dried yeast
150g bacon, to be added after the "beep"
Program FRENCH 3, Weight 900g, Color Medium
Bread with Olive
200 ml of warm water
1 teaspoon granulated sugar
1 tablespoon extra-virgin olive oil
12 g of salt
380g flour
1 sachet of dried yeast
100g of olives, to be added after the "beep"
Program BASIC 1, Weight 700g, Color Medium
Bread with nuts
280 ml of warm water
1 teaspoon granulated sugar
1 tablespoon of extra-virgin olive oil
1 tablespoon of salt
1 teaspoon of acacia honey
500g flour
1 sachet of dried yeast
100g of chopped walnuts, to be added after the "beep"
Program BASIC 1, Weight 900g, Color as you like it
Bread with Tomatoes
250 ml of warm water
10g of caster sugar
A tablespoon of extra-virgin olive oil
10g of salt
500g whole wheat flour
1 sachet of dried yeast
2 tomatoes and parsley, to be added after the "beep"
Program BASIC 1, Weight 900g, Color as you like it
Note: tomatoes should be washed under running water and peeled. Remove the seeds and cut them into small cubes. Wash and chop parsley too.
Focaccia Genovese
310 ml of warm water
10g caster sugar
A tablespoon of extra-virgin olive oil
12g of salt
480g flour
1 sachet of dried yeast
Program DOUGH 8 Weight - Colors -
At the end of the program, spread out and let it rise for another 30 minutes.
Oil a baking pan and lean the dough.
Mix oil and water and brush the cake thoroughly.
Make some holes with your finger.
Sprinkle salt and rosemary on top (or other ingredients, as you prefer).
Bake at 200 degrees for 15 minutes. During cooking, check it sometimes. In this case of drying too much, put some oil and/or water.
Traditional Pizza
500g flour
A pinch of caster sugar
Two tablespoons of extra-virgin olive oil
A teaspoon of salt
Half cube of yeast in 200ml of warm water
Program DOUGH 8 Weight - Colors -
Crumble the yeast into a bowl and dissolve it with warm water. Mix.
Place the ingredients into the machine and start the program.
At the end of the program, make a ball and wait for 30 minutes.
Roll out the dough and stuff to taste.
Cook with pizza oven G3Ferrari "Delizia" Model G10006.
Piadina Romagnola
250 ml of water (or milk diluted with water)
A pinch of baking soda
A pinch of sugar
10g of salt
200 g of lard (or 3 tablespoons of extra-virgin olive oil)
500g flour
Program DOUGH 8 Weight - Colors -
At the end of the program, make a ball and let sit for another 15 minutes.
Make small balls and roll out the dough thin.
Cooking with "Testo Romagnolo" or with a non-stick pan.
Garnish to taste with cold meats, cheeses, vegetables, etc. ...
Tigella emiliana
Half of a glass of milk
1 coffee cup of sparkling water
A pinch of caster sugar
A tablespoon of extra-virgin olive oil
12g of salt
500g flour
Half cube of yeast dissolved in warm milk
Program DOUGH 8 Weight - Colors -
Crumble the yeast into a bowl and dissolve it with a little of warm milk. Mix.
Place the ingredients into the machine and start the program.
At the end of the program, make a ball and wait for 30 minutes.
Roll out the dough and cut it according to the classic Tigella shape.
Cook with the Tigella Maker G3Ferrari "Tigella Mia" Model G10025.
Garnish to taste with cold meats, cheeses, vegetables, etc. ...
Sweet Bread with Raisins
125 ml of warm water
60g caster sugar
25g of extra-virgin olive oil
10g of salt
260g whole wheat flour
1 sachet of dried yeast
250g sultanas, to be added after the "beep"
Program FRENCH 3, Weight 700g, Color Medium
Plum Cake
125 ml of natural yogurt
125 ml of vegetable oil
3 egg yolks
125g caster sugar
300g whole wheat flour
1 packet of baking powder
Program RAPID 6, Weight 700g, Color Medium
Note: For giving it more flavor, you can use any fruit yogurt instead of the natural one..
Panettone (typical Italian Christmas cake)
190 ml of whole milk
130g caster sugar
5g of salt
130g of melted butter
4 egg yolks
Lemon zest and orange zest
2 packets of vanilla
50g candied fruits
50g of raisins
1 teaspoon yellow dye (optional)
400g flour, Manitoba is recommended
2 sachets of dried yeast
Procedure
Place the ingredients in the same order.
Use the program KNEAD 10, for 10 minutes and then allow to stand for an hour with the lid closed.
Use again program KNEAD 10, for 10 minutes and then allow to stand for an hour with the lid closed. Cook with the following program:
Program BASIC 1, Weight 900g, Color Medium
PORTUGUÊS: ADVERTÊNCIAS
natural_image
Symbol of a trash bin with no text or labels, including a crossed-out box and a solid black rectangle below (no readable text or symbols)WASTE OF ELECTRIC AND ELECTRONIC EQUIPMENT
The product is made of non-biodegradable and potentially polluting substances if not properly disposed of; other parts can be recycled. It's our duty to contribute to the ecological health of the environment following the correct procedures for disposal. The crossed out wheelie bin symbol indicates the product complies with the requirements of the new directives introduced to protect the environment (2002/96/EC, 2003/108/EC, 2002/95/EC) and must be properly disposed at the end of its lifetime. If you need further information, ask for the dedicated waste disposal areas at your place of residence. Who does not dispose of the product as specified in this section shall be liable according to the law.
To find the nearest service center, please call the telephone number 0541 694246, fax number 0541 756430 or contact us at assistenzatecnica@trevidea.it asking for the service centers supervisor.