
SSJ 150 A2 - Juicer SILVERCREST - Free user manual and instructions
Find the device manual for free SSJ 150 A2 SILVERCREST in PDF.


| Product Type | Slow Juicer (Masticating Juicer) |
| Brand | SilverCrest |
| Model | SSJ 150 A2 |
| Power Supply | 220 – 240 V ~, 50/60 Hz |
| Power Consumption | 150 W |
| Motor Speed | 60 ± 25% RPM |
| Continuous Operation Time (CO Time) | 15 minutes |
| Juice Container Capacity | Approx. 900 ml (usable volume: approx. 600 ml to max. marking) |
| Pulp Container Capacity | Approx. 1200 ml |
| Material - Sieve | Stainless steel |
| Safety Features | Safety cut-out (overheat protection), reverse function (R position), reset button |
| Dishwasher Safe Parts | Sieve, transport screw, housing lid, pusher |
| Included Accessories | Pusher, cleaning brush, juice container, pulp container |
| Intended Use | Juicing well-ripened and peeled fruits and vegetables for private household use only |
| Warranty | 3 years from date of purchase |
Frequently Asked Questions - SSJ 150 A2 SILVERCREST
User questions about SSJ 150 A2 SILVERCREST
0 question about this device. Answer the ones you know or ask your own.
Ask a new question about this device
Download the instructions for your Juicer in PDF format for free! Find your manual SSJ 150 A2 - SILVERCREST and take your electronic device back in hand. On this page are published all the documents necessary for the use of your device. SSJ 150 A2 by SILVERCREST.
USER MANUAL SSJ 150 A2 SILVERCREST
natural_image
Black-and-white collage of food products including a hand mixer, a digital kitchen brush, and fresh fruits (no text or symbols visible)SLOW-JUICER SSJ 150 A1
GB
SLOW JUICER
Operating instructions
SE
SLOW JUICER
Bruksanvisning
LT
Before reading, unfold the page containing the illustrations and familiarise yourself with all functions of the device.
FI
Information concerning these operating instructions 2
Copyright 2
Intended use 2
Warning notes 3
Safety....3
Basic safety guidelines 4
Operating components 8
Unpacking and installation....9
Safety instructions 9
Package contents and transport inspection 9
Unpacking 10
Disposal of packaging materials 10
Handling and operation....10
Reset function/Safety cut-out 10
Assembling and operating the appliance 11
Preparing the fruits/vegetables 13
Juicing 14
Dismantling 16
Cleaning and care 17
Safety instructions....17
Storage 19
Storage/disposal 19
Storage 19
Disposal of the appliance 19
Appendix 19
Technical data 19
Read these operating instructions carefully before using the appliance for the first time, and retain them for future reference. Please pass these operating instructions on to any future owner(s).
Introduction
Information concerning these operating instructions
Congratulations on the purchase of your new appliance.
You have selected a high-quality product. The operating instructions are part of this product. They contain important information on safety, usage and disposal. Before using the product, please familiarise yourself with all operating and safety instructions. Use the product only as described and for the specified areas of application. Please also pass on these operating instructions to any future owner.
Copyright
This documentation is protected by copyright.
Any copying or reproduction, including in the form of extracts, or any reproduction of images (even in a modified state), is permitted only with the written authorisation of the manufacturer.
Intended use
The appliance is designed for the juicing of well ripened and peeled fruits and vegetables. Only foodstuffs may be processed with the appliance. Use only the original attachments and accessories as described in these instructions. Any other usage or use of the appliance beyond what is described in these instructions is considered improper and carries a significant risk of accidents. The appliance is not intended for use in commercial or industrial environments. This appliance is intended exclusively for use in private households. This appliance is intended exclusively for use in private households.
The manufacturer accepts no responsibility for damage caused by failure to observe these instructions, improper use or repairs, unauthorised modifications or the use of unapproved replacement parts. The operator bears sole liability.
Warning notes
The following warning notice types are used in these operating instructions:

DANGER
A warning notice at this hazard level indicates an imminently hazardous situation.
If the hazardous situation is not avoided, it could result in death or serious physical injury.
▶ Follow the instructions in this warning notice to avoid the risk of death or serious injury.

WARNING
A warning notice at this hazard level indicates a potentially hazardous situation.
Failure to avoid this hazardous situation could result in injury.
▶ Follow the instructions in this warning notice to prevent injury.
CAUTION
A warning notice at this hazard level indicates a potential for property damage.
Failure to avoid this situation could result in property damage.
▶ Follow the instructions in this warning notice to prevent property damage.
NOTE
▶ A note provides additional information that will assist you in using the appliance.
Safety
This section contains important safety instructions for using the appliance.
This appliance complies with statutory safety regulations. Improper use may result in personal injury and property damage.
Basic safety guidelines
To ensure safe operation of the appliance, follow the safety guidelines set out below:
■ This appliance should not be used by children.
■ The appliance and its connecting cable must be kept away from children.
■ This appliance may be used by persons with limited physical, sensory or mental capabilities or lack of experience and knowledge, provided that they are under supervision or have been told how to use the appliance safely and are aware of the potential risks.
■ Check the appliance for visible external damage before use. Do not operate a appliance that has been damaged or dropped.
■ All repairs must be carried out by authorised specialist companies or by the Customer Service department. Improper repairs may put the user at risk. It will also invalidate any warranty claims.
■ Repairs to the appliance during the warranty period may only be carried out by a customer service department authorised by the manufacturer. Otherwise, no warranty claims will be held for any subsequent damages.
■ Defective components must always be replaced with original replacement parts. Compliance with safety requirements can only be guaranteed if original replacement parts are used.
■ NEVER use the appliance near naked flames, a hotplate or a heated oven.
■ Install the appliance as close as possible to an electrical power socket. Ensure that the plug on the mains cable is easily accessible in case of emergency, and that there is no risk of tripping over the cable.
■ Provide a stable location for the appliance.

RISK OF ELECTRIC SHOCK!
The appliance should only be connected to correctly installed and earthed mains power sockets. Ensure that the rating for your local power supply corresponds with the details on the rating plate of the appliance.
To prevent potential risks, arrange for customer service to repair or replace power cables and/or appliances that are not functioning properly or have been damaged.
▶ Do not expose the appliance to rain, and never use it in a humid or wet environment.
▶ Ensure that the power cable never becomes wet or moist during use.
▶ Never immerse the base of the machine in water or other liquids! There is a risk of a potentially fatal electric shock if residual moisture comes into contact with live components during operation.

RISK OF ELECTRIC SHOCK!
▶ Always take hold of the plug when handling the power cable. Do not pull on the cable itself and never touch the power cable with wet hands, this could result in either a short circuit or an electric shock.
- Do not place the appliance itself, furniture items or similar objects on the power cable, and take steps to ensure it cannot become jammed or trapped in any way.
▶ Do not open the appliance housing or attempt to repair or modify the appliance. If the housing is opened or improper modifications are made, you run the risk of receiving a potentially fatal electric shock and the warranty will be void.
▶ Protect the appliance from drips or splashes of water. Do not place any vessels containing liquid (e.g. flower vases) on or near the appliance.
▶ Unplug the appliance during every period of inactivity, assembly or disassembly, when unattended, after use and before every cleaning.

CAUTION! RISK OF INJURY!
▶ Ensure that the appliance is completely assembled before using it for the first time.
▶ Do not allow children to use the appliance as a plaything.
▶ Always unplug the appliance before fitting or removing accessories.

CAUTION! RISK OF INJURY!

Never put your fingers or other objects into the filler opening. This could lead to grave personal injuries or serious damage to the appliance. If pieces of fruit or vegetable cannot be removed with the pusher, switch the appliance off, unplug it and open the appliance.
▶ After using the appliance, always ensure that the on/off switch is in the "OFF" position ("O"). The motor must come to a complete stop before you begin to disassemble the appliance.

CAUTION! MATERIAL DAMAGE!
▶ Never operate the appliance if it is standing on soft materials such as carpeting. Blockages to the air inlets/outlets on the bottom of the appliance can leading to overheating and the risk of fire!
▶ Do not operate this appliance using an external time switch or a separate remote control system.
▶ Never leave the appliance unattended during operation.
▶ Ensure that the appliance, the power cable and the plug on the power cable do not come into contact with heat sources such as hotplates or naked flames.
▶ Do not use the appliance outdoors.
▶ Operate the appliance only with the original accessories supplied.
Operating components
(For illustrations see fold-out pages)
Figure A:
1 Pusher
② Feed tube
3 Housing lid
4 Sieve tray holder
5 Juice outlet
6 Stopper
7 On/Off switch
8 Appliance base
9 Power cable with mains plug
10 Juice container
11 Container for fruit pulp and vegetable mash
12 Outlet for fruit pulp and vegetable mash
13 Sieve tray
Figure B:
14 Removable sieve frame
15 Sieve (stainless steel)
16 Transport screw
17 Cleaning brush
Figure C:
18 Sieve (with removable sieve frame in the sieve tray)
19 ▲marking/insertion help
20 Drive shaft
Unpacking and installation
Safety instructions
WARNING
During the first use of the appliance there is a risk of injury and/or damage to property!
To avoid risks, observe the following safety instructions:
▶ Do not allow children to play with packaging materials. There is a risk of suffocation.
▶ Please follow the instructions regarding the electrical connection of the appliance to avoid damage to property.
Package contents and transport inspection
The appliance is supplied with the following components:
- Slow Juicer
- Pusher ^1
- Cleaning brush ^17
- Juice container ^10
- Operating instructions
- Container for fruit pulp and vegetable mash ^11
NOTE
▶ Check the package for completeness and for signs of visible damage.
▶ If the delivery is incomplete or damage has occurred as a result of defective packaging or during transport, please contact the Service hotline (see section Service).
Unpacking
◆ Remove all parts of the appliance and the operating instructions from the box.
◆ Remove all packaging material.
Disposal of packaging materials
The packaging protects the appliance from damage during transport. The packaging materials have been selected for their environmental friendliness and ease of disposal, and are therefore recyclable.

Returning the packaging into the material cycle conserves raw materials and reduces the amount of waste generated. Dispose of packaging materials that are no longer needed in accordance with applicable local regulations.
NOTE
▶ If possible, keep the appliance's original packaging during the warranty period so that the appliance can be packed properly for return shipment in the event of a warranty claim.
Handling and operation
This section provides you with important information on handling and using the appliance.

WARNING! RISK OF INJURY!
▶ Always unplug the appliance before fitting or removing accessories.
Reset function/Safety cut-out
This appliance is equipped with a safety cut-out to protect the motor.
If fruit pieces get stuck and the appliance turns itself off, the safety cut-out has tripped. The appliance switches itself off before the motor can be damaged due to overheating. The appliance cannot be switched back on until you reset the safety cut-out.
Proceed as follows to be able to use the appliance again:
- Set the on/off switch ⑦ to the "O" position and pull the plug on the power cable ⑨ out of the socket. Allow the appliance to cool down for 10-15 minutes.
- Turn the housing lid ③ anticlockwise until the ▲ marking points towards the I marking on the sieve tray holder ④ and clicks firmly into place.
-Remove the housing lid③.
- Remove the fruit or vegetable pieces causing the blockage.
- Carefully remove the sieve tray 13 and turn the appliance base 8 over.
- Press the "reset" button on the underside of the appliance base ⑧:
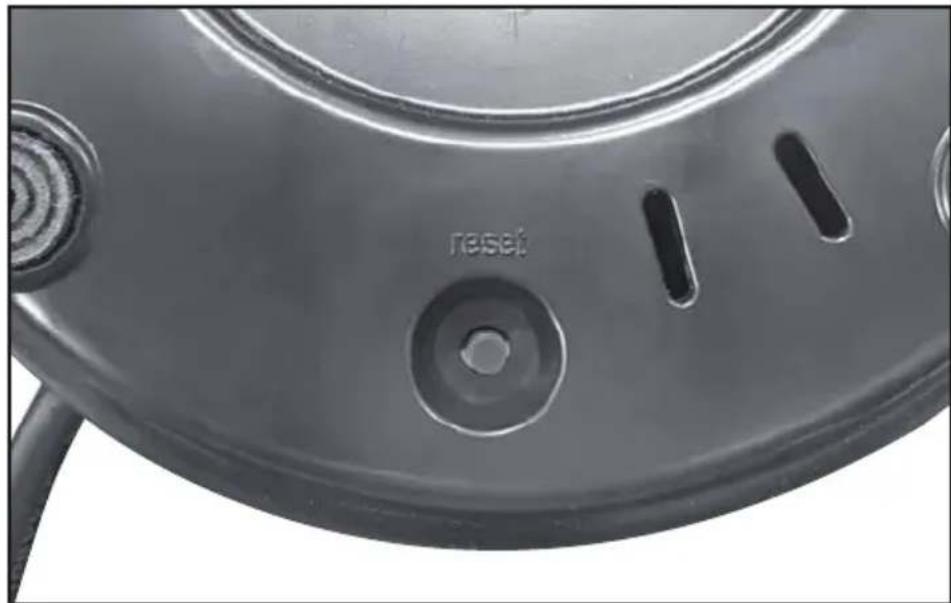
—Reassemble the appliance and resume juice extraction.
Assembling and operating the appliance
Before using the appliance for the first time, clean all component parts thoroughly as described in the section "Cleaning and care".
■ Install the appliance in accordance with the safety instructions.

WARNING! RISK OF INJURY!
▶ Ensure that the plug on the power cable ^9 is not in the socket before assembling the appliance.
When reassembling, follow this diagram and note the markings on the appliance:
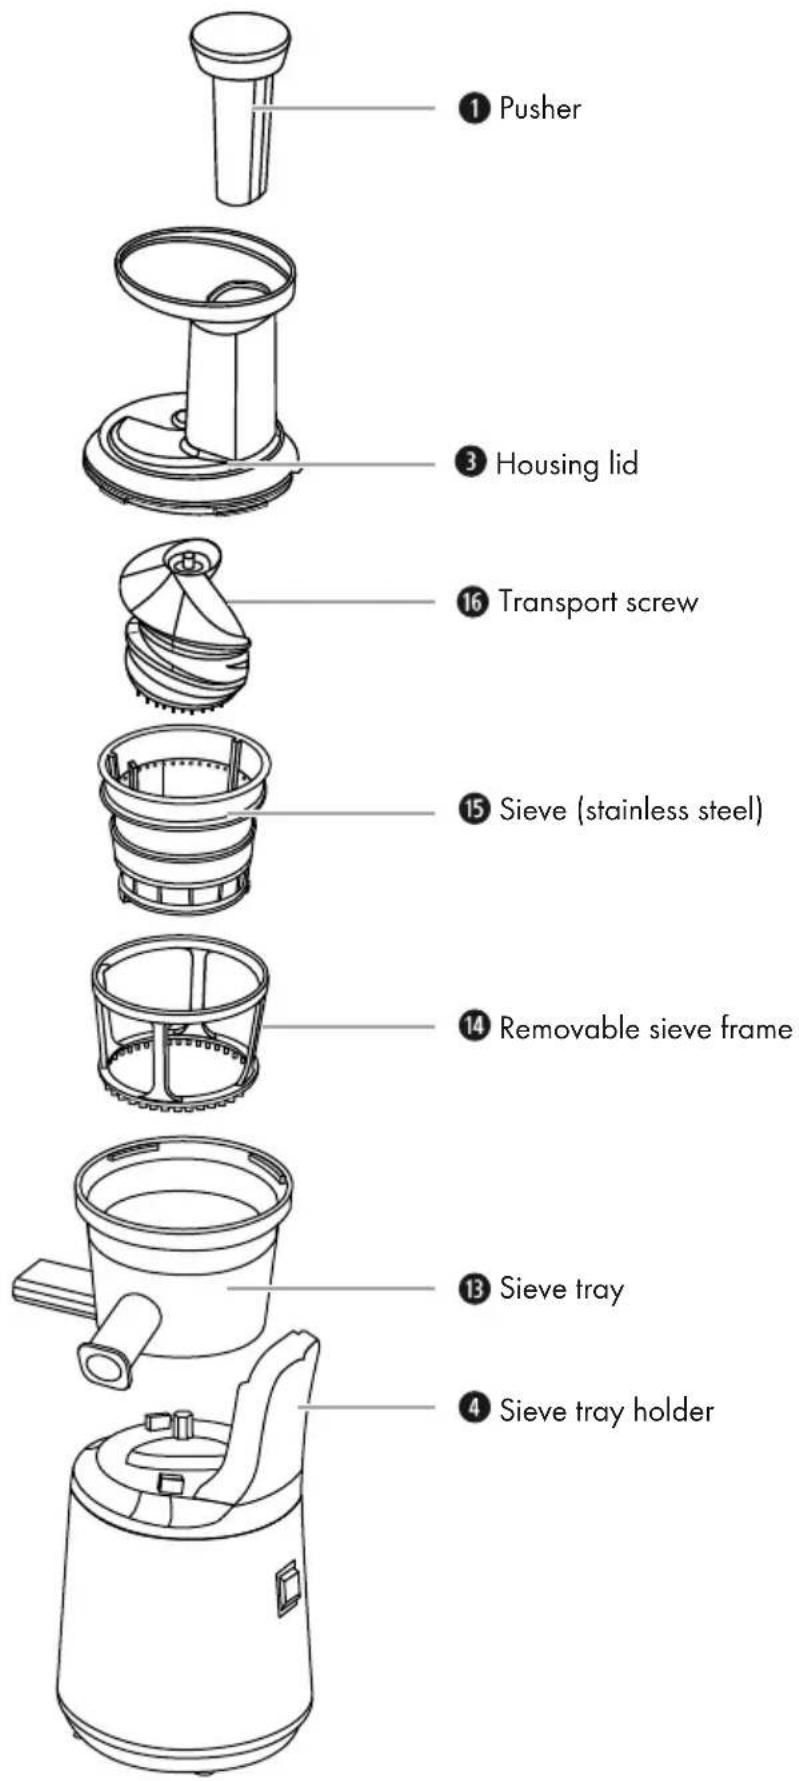
1) Place the sieve tray ⑬ onto the appliance base ⑧ so that the three catches on the base ⑧ fit into the three slots on the underside of the sieve tray ⑬.
natural_image
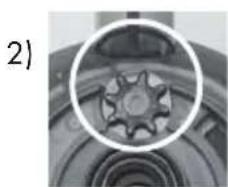
Close-up of a mechanical component with a circular highlight, no visible text or symbolsPlace the removable sieve frame 14 into the sieve tray . 13 Turn the sieve frame 14 back and forth to see whether the gear on the inside at the bottom of the sieve tray 13 turns.
3) Place the sieve 15 into the removable sieve frame 14o that marking 19 at the top of the sieve 15 points towards the 1 marking on the sieve tray holder 4
4) Place the transport screw 16 onto the drive shaft 20 burn it a little and press it down at the same time so that it clicks into place. Ensure that it is firmly seated before continuing with the assembly.
5) Place the housing lid ③ onto the sieve tray ⑬ to that the marking on the housing lid ③ points to the I marking on the sieve tray holder ④.
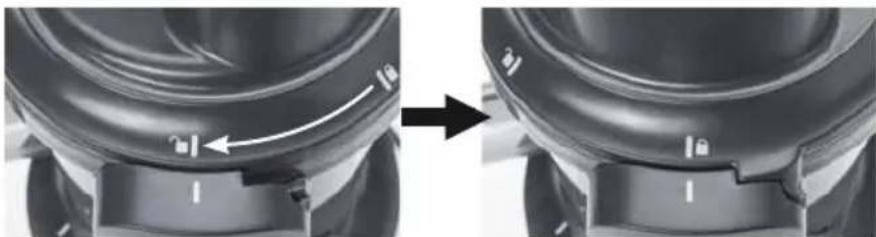
6) Turn the housing lid ③ clockwise until the I marking points towards the I marking on the sieve tray holder ④ and clicks firmly into place.
natural_image
Close-up of a mechanical component before and after assembly, showing a curved arrow indicating rotation (no text or symbols)7) Push the container for fruit pulp and vegetable mash ⑪ under the outlet for fruit pulp and vegetable mash ⑫ see fig. A).
8) Push the juice container 10 under the juice outlet 5 see fig. A).
Preparing the fruits/vegetables
■ Important: Use only well-ripened fruit, as otherwise the sieve 15 could become blocked. This would require repeated cleaning of the sieve 15
■ Wash or peel the fruits/vegetables that you wish to process.
■ Large seeds or stones should always be removed before filling the appliance.
■ Cored fruit (such as apples, pears) can be processed along with the skin and core. Remove all other stones (peaches, plums etc.), all large seeds (melons etc.) and stalks to avoid possible damage to the appliance.
- Fruit and vegetables with peels (e.g. citrus fruits, melons, kiwis, root vegetables) must always be peeled first.
■ Remove the stalks from grapes.
- Cut the fruit or vegetables into pieces that are suitably sized to fit into the feed tube 2.
NOTE
▶ Raisins are not suitable for juicing as they do not contain enough juice. Rhubarb or other fibrous vegetables/fruit are not suitable for juicing as the fibres will block the slow juicer.
Juicing

WARNING! RISK OF INJURY!
▶ Never insert your fingers or other objects into the feed tube ^2 while the appliance is operating. This could lead to serious injuries and/or damage to the slow juicer.
CAUTION! MATERIAL DAMAGE!
- Do not operate the slow juicer for longer than 15 minutes (CO time) without a break. After 15 minutes of continuous use, allow the slow juicer to cool down. Otherwise the appliance could be damaged. - Never operate the slow juicer unless there is fruit/vegetables in the feed tube ②. Do not start the slow juicer until you have added fruit/vegetables to the feed tube ②
1) Insert the plug of the power cable ⑨ into the mains socket.
NOTE
If you want to move the on/off switch from the "I" position into the "R" position or back again, always start by moving the on/off switch into the "O" position (off) and wait until the motor has stopped.
2) Place the fruit/vegetable pieces into the feed tube ②.
3) Place the on/off switch ⑦ of the appliance into the "I" position. The appliance starts juicing.
NOTE
▶ Normally, the appliance draws in the fruit automatically once it has been placed in the feed tube ②. Therefore, push gently with the pusher ① only if you notice that the fruit is not being drawn into the appliance.
4) Add more fruit to the feed tube ②. If required, use the pusher ① to carefully press the fruit/vegetable pieces into the feed tube ②. While the fruit/vegetables are being processed, insert further pieces into the feed tube. Do not switch the appliance off.
TIP
▶ Soak carrots in water for around 24 hours before juicing.
▶ Cut the carrots into small pieces (approx. 2 x 2 cm).
During juicing, press only lightly with the pusher①, otherwise the appliance can block.
NOTE
If fruit/vegetable pieces get stuck in the feed tube ^2 and cannot be freed with the pusher 1 proceed as follows:
- Switch off the appliance immediately and pull the plug on the power cable ⑨ out of the socket.
-Turn the housing lid ③ anticlockwise until the ④ marking points towards the ① marking on the sieve tray holder ④ and clicks firmly into place.
-Remove the housing lid 3 - Remove the fruit or vegetable pieces causing the blockage.
— Reassemble the appliance and continue with juice extraction.
SAFETY CUT-OUT / RESET FUNCTION
If fruit pieces get stuck and the appliance turns itself off automatically, this means that the safety cut-out has tripped. The appliance switches itself off before the motor can be damaged by overheating. The appliance cannot be switched back on until you reset the safety cut-out. Proceed as follows to be able to use the appliance again.
- Set the on/off switch ⑦ into the "O" position and pull the plug on the power cable ⑨ out of the socket. Allow the appliance to cool down for 10-15 minutes.
- Turn the housing lid ③ anticlockwise until the ▪ marking points towards the I marking on the sieve tray holder ④ and clicks firmly into place.
-Remove the housing lid③.
- Remove the fruit or vegetable pieces causing the blockage.
- Carefully remove the sieve tray 13 and turn the appliance base 8 ver.
- Press the "reset" button on the underside of the appliance base 8.
- Reassemble the appliance and continue with juice extraction.
NOTE
If the juice container 10 is full and you want to empty it while juice is still dripping out of the juice outlet 5, seal it using the stopper 6. Remove the stopper 6 again after replacing the empty juice container 10 under the juice outlet 5
NOTE
- If the container for fruit pulp and vegetable mash is full and you want to empty it, stop feeding in fruit/vegetables and wait until the fruit pulp stops coming out of the appliance. After emptying, replace the container for fruit pulp and vegetable mash under the outlet for fruit pulp and vegetable mash - If any fruit pulp remains stuck in the outlet for fruit pulp and vegetable mash, stop the appliance and remove the residue using the handle of the cleaning brush
5) Always switch the off appliance immediately after all of the fruit/vegetables have been processed.
NOTE
If the motor stalls during the juicing process, switch off the appliance and move the on/off switch ⑦ into the "R" position several times in quick succession to run the motor in the opposite direction. If this does not help, dismantle the slow juicer as described in the following section.
CAUTION! MATERIAL DAMAGE!
To avoid blockage and/or damage to the appliance, clean the juice outlet ^5 and the container for fruit pulp and vegetable mash regularly and after every use.
Dismantling
If you wish to dismantle the slow juicer, e.g. to clean it, proceed as follows:
1) Pull the plug on the mains cable ⑨ out of the socket.
2) Close the stopper 6 on the juice outlet 5 that no remaining juice can drip out.
3) Turn the housing lid ③ anticlockwise until the ▼| marking points towards the 1 marking on the sieve tray holder ④nd clicks firmly into place.
4) Remove the housing lid ③ together with the pusher ①
5) Carefully lift the sieve tray 13 with the removable sieve frame 14 sieve 15 and transport screw 16 from the appliance base 8
6) Separate all components.
Cleaning and care
Safety instructions

WARNING! DANGER TO LIFE DUE TO ELECTRIC SHOCK!
Risk of injury when cleaning the appliance!
To avoid risks, observe the following safety instructions:
▶ Always remove the plug on the power cable ⑨ before cleaning the appliance.
▶ Never clean the appliance base ⑧ under running water and never immerse it in water or any other liquid. The appliance could be irreparably damaged!

WARNING! RISK OF INJURY!
▶ Always pull out the plug on the power cable ⑨ before fitting or removing accessories.
CAUTION
Damage to the appliance!
To avoid blockage of the outlet for fruit pulp and vegetable mask ^12 or the juice outlet ^5 and/or damage to the appliance, all fruit and vegetable pulp must be regularly cleaned off the appliance and accessories. Also clean the appliance after every use.
▶ To avoid irreparable damage to the device, ensure that no moisture gets into the appliance base 8 during cleaning.
▶ When cleaning the surfaces, do not use aggressive scourers or chemical cleaners, or sharp or scratchy objects.
▶ Only the sieve (stainless steel) ^15 , transport screw ^16 housing cover and pusher ^17 re dishwasher safe.
■ Clean the appliance housing and the power cable using a lightly moistened cloth. For stubborn soiling use a mild detergent on the cloth.
■ Clean the sieve tray ⑬, sieve ⑮ sieve frame , transport screw , juice container ⑯ container for fruit pulp and vegetable mash , housing cover ⑰ and pusher ⑱ with the supplied cleaning brush ⑲ in warm water with a little washing-up liquid. Then rinse all parts with plenty of clean water to remove all detergent residues.
NOTE
To clean the outlet for fruit pulp and vegetable mash 12, you can pull the rubber plug (on the underside of the sieve tray 13 at the rear end of the outlet for fruit pulp and vegetable mash 14 out a little way so that the water can run through. You can shift difficult-to-remove residue using the handle of the cleaning brush 17 and then flush it out. After cleaning, push the rubber plug back into the rear end of the outlet for fruit pulp and vegetable mash 12
NOTE
▶ You can also clean the sieve ^15 , transport screw ^16 housing cover and pusher in the dishwasher. Place these components only in the top rack of the dishwasher, do not jam them in and use a washing programme with max. 45°C.
A damp cloth is sufficient for cleaning the exterior surfaces of the appliance. Ensure that all parts are completely dry before re-using the appliance.
Storage
You can coil up the cable and fasten it using the cable clip attached to the power cable ⑨.
Store the cleaned appliance in a dry location.
Storage/disposal
Storage
If you plan not to use the appliance for a long period, store it in a clean, dry place away from direct sunlight.
Disposal of the appliance
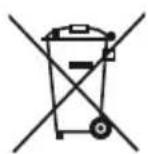
Do not dispose of the appliance in your normal domestic waste. This product is subject to the provisions of European Directive 2012/19/EU-WEEE (Waste Electrical and Electronic Equipment).
Dispose of the appliance via an approved waste disposal company or your municipal waste disposal facility. Please comply with all applicable regulations. Please contact your waste disposal facility if you are in any doubt.
Appendix
Technical data
| Voltage supply 220 – 240 V | ~ | 50/60 Hz |
| Power consumption 150 W | |
| Revolutions per minute 60 ± 25% | |
| CO time 15 minutes | |
| Juice container capacity | approx. 900 ml, usable volume: approx. 600 ml to the max. marking |
| Pulp container capacity approx. 1200 ml | |
 | All of the parts of this appliance that come into contact with food are food-safe. |
CO time
The CO time (continuous operation time) is the amount of time an appliance can be operated without the motor overheating and becoming damaged. After the appliance has been operated for this duration of time, switch it off until the motor has cooled down.
This appliance has a 3-year warranty valid from the date of purchase. If this product has any faults, you, the buyer, have certain statutory rights. Your statutory rights are not restricted in any way by the warranty described below.
Warranty conditions
The validity period of the warranty starts from the date of purchase. Please keep your original receipt in a safe place. This document will be required as proof of purchase.
If any material or production fault occurs within three years of the date of purchase of the product, we will either repair or replace the product for you at our discretion. This warranty service is dependent on you presenting the defective appliance and the proof of purchase (receipt) and a short written description of the fault and its time of occurrence.
If the defect is covered by the warranty, your product will either be repaired or replaced by us. The repair or replacement of a product does not signify the beginning of a new warranty period.
Warranty period and statutory claims for defects
The warranty period is not prolonged by repairs effected under the warranty. This also applies to replaced and repaired components. Any damage and defects present at the time of purchase must be reported immediately after unpacking. Repairs carried out after expiry of the warranty period shall be subject to a fee.
Scope of the warranty
This appliance has been manufactured in accordance with strict quality guidelines and inspected meticulously prior to delivery.
The warranty covers material faults or production faults. The warranty does not extend to product parts subject to normal wear and tear or fragile parts such as switches, batteries, baking moulds or parts made of glass.
The warranty does not apply if the product has been damaged, improperly used or improperly maintained. The directions in the operating instructions for the product regarding proper use of the product are to be strictly followed. Uses and actions that are discouraged in the operating instructions or which are warned against must be avoided.
This product is intended solely for private use and not for commercial purposes. The warranty shall be deemed void in cases of misuse or improper handling, use of force and modifications / repairs which have not been carried out by one of our authorised Service centres.
Warranty claim procedure
To ensure quick processing of your case, please observe the following instructions:
■ Please have the till receipt and the item number (e.g. IAN 12345) available as proof of purchase.
■ You will find the item number on the type plate, an engraving on the front page of the instructions (bottom left), or as a sticker on the rear or bottom of the appliance.
If functional or other defects occur, please contact the service department listed either by telephone or by e-mail.
■ You can return a defective product to us free of charge to the service address that will be provided to you. Ensure that you enclose the proof of purchase (till receipt) and information about what the defect is and when it occurred.

You can download these instructions along with many other manuals, product videos and software on www.lidl-service.com.
Service
GB Service Great Britain
Tel.: 0871 5000 720 (£ 0.10/Min.)
E-Mail: kompernass@lidl.co.uk
IAN 282311
Importer
Please note that the following address is not the service address. Please use the service address provided in the operating instructions.
KOMPERNASS HANDELS GMBH
BURGSTRASSE 21
44867 BOCHUM
GERMANY
www.kompernass.com
Recipes
Summer drink
2 people
Ingredients
• 1 large slice of watermelon
- 1 lemon
- 4 apples, sweet and slightly tangy (e.g. "Jonagold" or "Jonathan")
Preparation
1) Prepare the watermelon, lemon and apples as per the instructions given in the instruction manual for the slow juicer.
2) Juice the watermelon, the lemon and the apples.
3) Serve the summer drink chilled.
Apple-pear-strawberry drink
2 people
Ingredients
• 1 apple, green (e.g. "Granny Smith")
- 3 small, ripe pears
• 10 medium-sized strawberries
Preparation
1) Prepare the apple, pears and strawberries as per the instructions given in the instruction manual for the slow juicer.
2) Juice everything using the slow juicer.
3) Mix the juices together and serve the drink immediately.
Energy drink
2 people
Ingredients
- 2 apples, sweet (e.g. "Red Delicious")
• 2 large apricots - 1 large pear
- 250 ml of mineral water (carbonated)
- A little crushed ice
Preparation
1) Prepare the apples, apricots and pear as per the instructions given in the instruction manual for the slow juicer.
2) Juice the apples, apricots and the pear.
3) Mix the juices together and then add the mineral water.
4) Serve the drink on the crushed ice.
Breakfast drink
2 people
Ingredients
- 4 to 5 carrots
- 2 apples
• 1 tsp. olive oil
Preparation
1) Prepare the carrots and apples as per the instructions given in the instruction manual for the slow juicer.
2) Juice the carrots first and then the apples.
3) Add the olive oil.
4) Stir everything well.
Honeydew melon drink
2 people
Ingredients
- Approx. 1/3 honeydew melon
- 1 mango
- 1 apple, sweet yet slightly sour (e.g. "Jonagold" or "Jonathan")
• 1 apple, green (e.g. "Granny Smith")
Preparation
1) Prepare the melon, lemon and apples as per the instructions given in the instruction manual for the slow juicer.
2) Juice the melon first, then the mango and finally the apples. Stir everything together.
Sweet fruit drink
2 people
Ingredients
- 1/2 honeydew melon
- 4 peaches
- 200 g seedless grapes
- 6 mangoes
Preparation
1) Prepare the honeydew melon, the peaches, the grapes and the mangoes as per the instructions given in the instruction manual for the slow juicer.
2) Juice the fruits one after the other.
3) Mix the juices together and serve the drink slightly cooled.
Pineapple-mango drink
2 people
Ingredients
- 1 / 2 pineapple
- 1 / 2 mango
- 1 apple
- 1 orange
- 2 tsp. wheat germ oil
Preparation
1) Prepare the pineapple, the mango, the apple and the orange as per the instructions given in the instruction manual for the slow juicer.
2) Juice the pineapple first, then the mango.
3) Juice the apple and the orange.
4) Mix the juices together.
5) Then add the 2 tsp. wheat germ oil and stir everything well.
Beetroot drink
2 people
Ingredients
- 1 beetroot
- 3 oranges
- 2 tbsp. currants
Preparation
1) Prepare the beetroot, oranges and redcurrants as per the instructions given in the instruction manual for the slow juicer.
2) Juice the beetroot, the oranges and the redcurrants and then mix the juices well.
Fruit-bell pepper drink
2 people
Ingredients
- 2 yellow bell peppers
- 3 oranges
- 2 apples
- 2 pears
- ½ grapefruit
Preparation
1) Prepare the bell peppers, oranges, apples, pears and grapefruit as per the instructions given in the instruction manual for the slow juicer.
2) Juice all the ingredients one after the other and serve the juice immediately.
Peach-pear-pineapple drink
2 people
Ingredients
- 2 peaches
- 2 small pears
- 1 / 2 pineapple
Preparation
1) Prepare the peaches, pears and pineapple as per the instructions given in the instruction manual for the slow juicer.
2) Juice all the ingredients one after the other and serve the juice immediately.
Tomato juice
Ingredients
- Tomatoes (approx. 6 medium tomatoes for 1 person)
- Possibly, a little honey or salt and pepper
Preparation
1) Prepare the tomatoes by removing all the leaves and then cut them into small slices.
2) Add the tomatoes a little at a time to the appliance.
3) To add a little natural sweetness to the juice, add some honey. If you prefer it savoury, season it with salt and pepper.
4) Serve the juice immediately.
Pepper juice
Ingredients
● Pepper (approx. 2–3 large peppers for 1 person)
- Possibly 1 apple
Preparation
1) Prepare the pepper by removing the stalk and the seeds and then cut it into strips.
2) Add the pepper strips a little at a time to the appliance.
3) If you want a slightly sweeter taste, juice an apple as well.
4) Serve the juice immediately.
Broccoli juice
Ingredients
• Broccoli
- Possibly a pear
Preparation
1) Prepare the broccoli by separating it into small rosettes.
2) Add the broccoli a little at a time to the appliance.
NOTE
As broccoli has a low fluid content, it is possible that the appliance will make unusual squeaking noises. This is normal and not an appliance defect.
3) If desired, add a little pear (prepared according to the instructions) to the appliance. The pear will alleviate the bitterness of the broccoli and also compensate for the broccoli's low liquid content.
Cabbage juice
Ingredients
- Pointed, white or red cabbage
- Possibly an apple
Preparation
1) Cut the cabbage into strips or roll the individual leaves into rolls so that they can be fed into the appliance.
2) Add the cabbage a little at a time to the appliance.
NOTE
As cabbage has a low fluid content, it is possible that the appliance will make unusual squeaking noises. This is normal and not an appliance defect.
3) If desired, add a little apple (prepared according to the instructions) to the appliance. The apple will alleviate the bitterness of the cabbage and also compensate for the cabbage's low liquid content.
NOTE
These recipes are provided without guarantee. All information regarding ingredients and preparation is provided as guide values. Modify the suggested recipes to your personal taste.
Sisällysluettelo
Johdanto 30
natural_image
Close-up of a mechanical component with a circular inset highlighting a star-like feature (no text or symbols)natural_image
Close-up of a mechanical component before and after assembly, showing a curved arrow indicating motion (no text or symbols)KOMPERNASS HANDELS GMBH
BURGSTRASSE 21
44867 BOCHUM
GERMANY
www.kompernass.com
Reseptit
Kesäjuoma
2 hengelle
Ainekset
natural_image
Close-up of a mechanical component with a circular inset highlighting a gear-like feature (no text or symbols)natural_image
Close-up of a mechanical component before and after assembly, showing a curved arrow indicating motion (no text or symbols)KOMPERNASS HANDELS GMBH
BURGSTRASSE 21
44867 BOCHUM
GERMANY
www.kompernass.com
Recept
Sommardrink
2 personer
Ingredienser
natural_image
Close-up of a mechanical component with a circular inset highlighting a central gear-like feature (no text or symbols visible)natural_image
Close-up of a mechanical component before and after assembly, showing a curved arrow indicating motion (no text or symbols)KOMPERNASS HANDELS GMBH
BURGSTRASSE 21
44867 BOCHUM
GERMANY
www.kompernass.com
Przepisy
Napój letni
Porcja dla 2 osób
Składniki
• 1 duży arbuz
• 1 cytryna
natural_image
Close-up of a mechanical component with a circular inset highlighting a central gear-like feature (no text or symbols)natural_image
Close-up of a mechanical component before and after assembly, showing a curved arrow indicating motion (no text or symbols)KOMPERNASS HANDELS GMBH
BURGSTRASSE 21
44867 BOCHUM
GERMANY
www.kompernass.com
Receptai
Vasaros gèrimas
2 asmenims
Sudedamosios dalys
natural_image
Close-up of a mechanical component with a circular inset highlighting a star-like feature (no text or symbols)natural_image
Close-up of a mechanical component before and after assembly, showing a curved arrow indicating motion (no text or symbols)KOMPERNASS HANDELS GMBH
BURGSTRASSE 21
44867 BOCHUM
GERMANY
www.kompernass.com
Rezepte
Sommer-Drink
2 Personen
Zutaten
KOMPERNASS HANDELS GMBH
BURGSTRASSE 21
44867 BOCHUM
DEUTSCHLAND / GERMANY
www.kompernass.com
Last Information Update · Tietojen tila · Informationsstatus

- SLOW-JUICER SSJ 150 A1
- FI
- Safety....3
- Operating components 8
- Unpacking and installation....9
- Handling and operation....10
- Cleaning and care 17
- Storage 19
- Storage/disposal 19
- Appendix 19
- Introduction
- Information concerning these operating instructions
- Copyright
- Intended use
- Warning notes
- DANGER
- A warning notice at this hazard level indicates an imminently hazardous situation.
- WARNING
- A warning notice at this hazard level indicates a potentially hazardous situation.
- CAUTION
- A warning notice at this hazard level indicates a potential for property damage.
- NOTE
- Safety
- Basic safety guidelines
- RISK OF ELECTRIC SHOCK!
- CAUTION! RISK OF INJURY!
- CAUTION! MATERIAL DAMAGE!
- Operating components
- (For illustrations see fold-out pages)
- Figure A:
- Figure B:
- Figure C:
- Unpacking and installation
- Safety instructions
- During the first use of the appliance there is a risk of injury and/or damage to property!
- Package contents and transport inspection
- Unpacking
- Disposal of packaging materials
- Handling and operation
- WARNING! RISK OF INJURY!
- Reset function/Safety cut-out
- Assembling and operating the appliance
- Preparing the fruits/vegetables
- Juicing
- TIP
- SAFETY CUT-OUT / RESET FUNCTION
- Dismantling
- Cleaning and care
- WARNING! DANGER TO LIFE DUE TO ELECTRIC SHOCK!
- Risk of injury when cleaning the appliance!
- Damage to the appliance!
- Storage
- Storage/disposal
- Disposal of the appliance
- Appendix
- Technical data
- CO time
- Warranty conditions
- Warranty period and statutory claims for defects
- Scope of the warranty
- Warranty claim procedure
- Service
- Importer
- Recipes
- Summer drink
- Ingredients
- Preparation
- Apple-pear-strawberry drink
- Energy drink
- Breakfast drink
- Honeydew melon drink
- Sweet fruit drink
- Pineapple-mango drink
- Beetroot drink
- Fruit-bell pepper drink
- Peach-pear-pineapple drink
- Tomato juice
- Pepper juice
- Broccoli juice
- Cabbage juice
- Sisällysluettelo
- Johdanto 30
- Reseptit
- Kesäjuoma
- Ainekset
- Recept
- Sommardrink
- personer
- Ingredienser
- Przepisy
- Napój letni
- Składniki
- Receptai
- Vasaros gèrimas
- Sudedamosios dalys
- Rezepte
- Sommer-Drink
Brand : SILVERCREST
Model : SSJ 150 A2
Category : Juicer