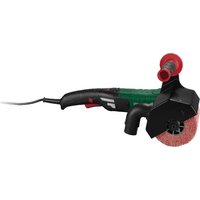
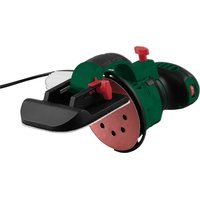
PDMS A1 - Sander PARKSIDE - Free user manual and instructions
Find the device manual for free PDMS A1 PARKSIDE in PDF.


| Product Type | Random Orbital Sander |
| Brand | Parkside |
| Model | PDMS A1 |
| Category | Sander |
| Power Source | Mains-powered |
| Voltage | 220-240 V |
| Frequency | 50/60 Hz |
| Power Consumption | 150 W |
| No Load Speed | 6000-12000 rpm (variable) |
| Orbit Diameter | 5 mm |
| Sanding Pad Size | 125 mm (5 inch) |
| Sanding Pad Type | Hook and loop (Velcro) |
| Dust Extraction | Built-in dust bag and external vacuum adapter |
| Weight | 1.3 kg |
| Dimensions (L x W x H) | 200 x 120 x 150 mm |
| Cable Length | 2.0 m |
| Sound Pressure Level | 82 dB(A) |
| Vibration Level | 5.0 m/s² (typical) |
| Safety Features | Double insulation, locking switch, soft-grip handle |
| Replacement Parts Availability | Sandpaper, dust bags, carbon brushes, pad |
| Reparability | Modular design, screws accessible for repair |
| Included Accessories | 3 sanding sheets (grit 60, 120, 240), dust bag, hex key |
| Maintenance | Clean dust bag regularly, replace carbon brushes when worn |
Frequently Asked Questions - PDMS A1 PARKSIDE
User questions about PDMS A1 PARKSIDE
0 question about this device. Answer the ones you know or ask your own.
Ask a new question about this device
Download the instructions for your Sander in PDF format for free! Find your manual PDMS A1 - PARKSIDE and take your electronic device back in hand. On this page are published all the documents necessary for the use of your device. PDMS A1 by PARKSIDE.
USER MANUAL PDMS A1 PARKSIDE
text_image
www.lidl-service.com PDF onlineTranslation of original operation manual
NL
PERSLUCHT-MINISCHUURMACHINE
Before reading, unfold the page containing the illustrations and familiarise yourself with all functions of the device.
6 Montageschlüssel SW 9
⑦ Tefl onband
2 Montageschlüssel SW 9
1m Teflonband
natural_image
Diagram of a coiled tube with threaded ends and a labeled dimension '1' (no text or symbols beyond the label)Abb. 2
KOMPERNASS HANDELS GMBH
BURGSTRASSE 21
44867 BOCHUM
GERMANY
www.kompernass.com
text_image
Sofia Fand CESemi Uguzlu
text_image
CLOSE OPENAfb. 3
natural_image
Pure diagram of a coiled tube with striped pattern and labeled dimension '1' (no text or symbols beyond basic geometry)Afb. 2
KOMPERNASS HANDELS GMBH
BURGSTRASSE 21
44867 BOCHUM
GERMANY
www.kompernass.com
Technical details....22
General safety instructions for compressed air tools 23
Workplace safety 23
Safety instructions. 23
Hazards caused by parts flung out 24
Hazards caused by entanglement 24
Hazards during operation 24
Risks due to repetitive movements....24
Risks due to dust and vapours 25
Risks due to noise....25
Risks due to vibrations 25
Additional safety instructions for pneumatic machines 26
Hazards caused by accessories....26
Initial operation 27
Tool-changing....27
Operation 28
Switching the grinder on and off 28
Maintenance and Cleaning 28
Disposal....28
Warranty and service 28
Importer 29
Translation of the original Conformity Declaration 29
COMPRESSED-AIR MINI GRINDER PDMS A1
Introduction
WARNING
new appliance. You have selected a high-quality product. The operating instructions are part of this product. They contain important information about safety, use and disposal.
Before using the product, familiarise yourself with all operating and safety instructions. Use this product only as described and only for the specified areas of application. Please also pass these operating instructions on to any future owner(s).
Proper use
The compressed air mini grinder (hereinafter referred to as "Appliance" / grinder) is suitable for grinding and deburring of metal. Any other uses of or modifications to the appliance are deemed to be improper usage and may result in serious physical injury. Not for commercial use.
Features
① Clamping chuck
② Compressed air mini grinder
3 Speed setting wheel
4 Compressed air hose
⑤ Threaded connector 1/4"
6 Installation spanner SW 9
⑦ Tefl on tape
8 Threaded connector 1/4"
9 Mini compressed air oiler
10 Female threaded connector 1/4"
⑪ Crosshead screw for oil filler opening
12 Compressed air connector plug
13 Threaded nipple1/4"
14 Oil bottle
15 Whetstone
Package contents
1 compressed air mini grinder
2 installation spanners SW 9
1m Tefl on tape
1 compressed air oil container
1 compressed air connector plug
1 mini compressed air oiler
10 whetstones
1 transport case with inspection window
1 operating instructions
Technical details
Rotational speed: 0 - 54000 rpm
Working pressure: max. 6.3 bar
Chuck capacity 3.2 mm
Airflow: max. 200 l/min
Air inlet: 1/4"
Housing material: Aluminium
Weight
(compressed air mini
grinder with hose): approx. 175 g
Sound pressure level: 79.0 dB(A)
Sound power level: 90.0 dB(A)
Uncertainty K: 3 dB
Measured values determined in
accordance with: ISO 15744, ISO 4871

ear protection!
Vibration emission value = 0.744 m/s ^2
Uncertainty K = 0.043 m/s ^2
Measured values determined
in accordance with: ISO 28927-12,
EN 12096

WARNING!
The noise emission values specified in these instructions have been measured in accordance with the standardised measuring procedure specified in EN ISO 15744 and can be used to make equipment comparisons. The noise emission values vary in accordance with the use of the compressed air tool and may be higher than the values specified in these instructions in some cases. It is easy to underestimate the noise emission load if the compressed air tool is used regularly in a certain manner.
NOTE
For an accurate estimate of the noise emission load during a certain working period, the times during which the appliance is switched off or is running but not actually being used must also be taken into consideration. This can significantly reduce the noise emission load over the total working period.

General safety instructions for compressed air tools

WARNING!
For multiple hazards: Please ensure that you have read and understood the safety instructions before adjusting, operating, repairing, maintaining or replacing accessories on the mini die grinder as well as before working in the vicinity of the machine. Failure to do this can result in serious bodily injury.
■ The mini die grinder should only be adjusted, set or used by adequately qualified and trained operators.
This mini die grinder must not be modified. Modifi cations can reduce the eff ectiveness of the safety measures and increase the risks for the operator.
■ Never use damaged machines.
Save all warnings and instructions for future reference! The safety instructions should not be lost – give them to the operator.
Workplace safety
- Keep your working area clean and well lit. Cluttered and dark areas invite accidents.
■ Slipping, tripping up and falling are the main causes of injuries at the workplace. Take note of surfaces which could have become slippery through use of the machine, and also any tripping hazards caused by air or hydraulic hoses.
■ Proceed with caution in unknown surroundings. Hidden hazards caused by power or other supply lines may be present.
■ Do not work with the compressed air tool in areas subject to the risk of explosions, or in areas where fl ammable liquids, gases or dusts are located. Grinding work creates sparks which may ignite the dust or fumes.
- Keep children and other unauthorised personnel at a safe distance when using compressed air tools. Distractions can cause you to lose control.
■ The grinder is not insulated against electrical power sources.
Safety instructions
■ Always wear eye protection when using or servicing the grinder.
■ Always wear suitable protective clothing. Protect your hands, hair and clothes from being drawn in by rotating parts.
■ Always wear respiratory protection in the presence of dust.
■ Always wear hearing protection.
■ Always wear safety gloves.
■ Only connect the grinder to the compressed air supply when it has been switched off and when the tool has been clamped.
■ Sparks are created during grinding. Ensure that nobody can be endangered by fl ying sparks. You should also remove any fl ammable materials or objects.
■ Do not carry the grinder if it has been connected to the compressed air hose.
■ Be aware of the hazards caused by a fl ailing compressed air hose!
■ The grinder may not be used for drilling or screwing!
■ The grinder is not approved for the use of cut-off wheels!
■ The flow pressure of 6.3 bar may on no account be exceeded during operation.
■ Never use oxygen or other fl ammable gases as an energy source.
■ Once you have completed your work, switch the grinder off and place it down securely once it has come to a standstill.
Caution! Grinder continues to run.
■ Once you have completed your work, disconnect the grinder from the compressed air supply.
■ Be aware of the danger that dust and vapours, which can create an explosion-hazardous atmosphere, can occur when processing certain materials. Use vacuum cleaners and suitable protective equipment.
Hazards caused by parts fl ung out
If a workpiece or accessory or even part of the machine tool itself breaks, parts can be fl ung out at high speeds.
■ When using the grinder for grinding pencils or when replacing accessories on the machine, impact-proof eye protection must be worn. The degree of necessary protection must be evaluated especially for each individual purpose.
■ You must ensure that the workpiece has been securely fixed.
- Check regularly to ensure that the grinder rotational speed does not exceed the rotational speed stated on the grinding pencils. This rotational speed monitoring must take place without an installed grinding pencil / grinding aid and in agreement with the manufacturer's instructions.
■ Ensure that any sparks and fragments caused during use do not present any hazards.
■ Disconnect the grinder from the power supply before replacing the grinding material and before servicing.
In this case, the risks for others should also be assessed.
Hazards caused by entanglement
Suff ocation, scalping or and/or cut wounds can occur if loose clothing, jewellery, necklaces, hair or gloves are not kept away from the machine and its accessories.
Hazards during operation
■ Avoid contact with the rotating shaft and the installed tools in order to prevent cuts to the hands and other body parts.
■ When using the machine, the operator's hands can be subject to hazards such as cuts, grazing and heat. Wear suitable gloves to protect your hands.
■ The operator and maintenance personnel must be physically capable of handling the size, mass and power of the machine.
■ Hold the machine correctly: be ready to counteract any normal or sudden movements - have both hands ready.
■ Ensure that your body is balanced and that you have a secure standing position.
■ Use only lubricants recommended by the manufacturer.
■ Suitable protective goggles must be worn; wearing of safety gloves and safety clothing is recommended.
■ A rotating fi le may not be operated at a speed higher than its nominal speed.
■ Wear a safety helmet if working above your head.
■ Please note that the machine tool continues to run after completion of the working process.
■ Warning is hereby made of the risk of explosion or fire due to the material being worked.
■ Release the start/stop control in case of a disruption to the electricity supply.
Risks due to repetitive movements
■ When using a mini die grinder to perform work-related activities, operators may experience uncomfortable sensations in their hands and arms, as well as in the neck and shoulders or other parts of the body.
■ When using a mini die grinder, the operator
should adopt a comfortable posture whilst ensuring a secure hold and avoiding awkward postures or positions in which it is difficult to maintain balance. The operator should change positions during the course of long-lasting tasks. This can be helpful in the prevention of discomfort and fatigue.
If the operator notices symptoms such as persistent or recurring illness, discomfort, throbbing, pain, tingling, burning or stiff ness, these indications should not be ignored. In this case, the operator should consult a suitably qualified physician.
Risks due to dust and vapours
■ The dust and vapours produced by using the mini die grinder can be hazardous to health (e.g. cause cancer, birth defects, asthma and/or dermatitis); it is essential to carry out a risk assessment relating to these risks and to implement corresponding regulatory mechanisms.
■ The risk assessment should include all dust caused by the use of the machine and any existing dust that may be whirled up at the same time.
■ The mini die grinder must be operated and maintained in accordance with the recommendations contained in this manual to reduce the release of dust and vapours to a minimum.
■ The exhaust air should be routed so that the raising of dust in already dusty environments is kept to a minimum.
If dusts or vapours are created, the main priority must be to control these at the site of their release.
All inserts or accessories of the machine intended for collecting, extracting or suppressing airborne dust or vapours or should be used and serviced in accordance with the manufacturer's instructions.
■ Consumables/machine tools must be selected, maintained and replaced in accordance with the recommendations in this guide in order to avoid unnecessary intensifi cation of dust or vapour production.
■ Use breathing equipment as per the instructions
provided by your employer or as required by health and safety regulations.
■ Working with certain materials can lead to emissions of dust and vapours that are potentially explosive.
Risks due to noise
Excessive noise levels in conjunction with insufficient hearing protection may lead to permanent hearing damage, hearing loss and other problems, such as tinnitus (ringing, buzzing, whistling or humming in your ears). Therefore it is essential that a risk assessment is carried out with respect to these risks and that appropriate regulatory mechanisms are implemented.
■ Suitable regulatory mechanisms include measures such as the use of insulation materials to avoid pinging occurring on the workpieces.
■ Use ear protection equipment as per the instructions provided by your employer or as required by health and safety regulations.
■ The mini die grinder must be operated and maintained in accordance with the recommendations contained in this manual to reduce any unnecessary increase in noise levels.
■ Consumables/machine tools must be selected, maintained and replaced in accordance with the recommendations in this guide in order to avoid unnecessary increase in noise levels.
If the mini die grinder is equipped with a silencer, always ensure that this is in place and is operational while the machine is being operated.
Risks due to vibrations
■ Vibrations can damage the nerves and cause disruptions to the blood circulation in the hands and arms.
■ When working in a cold environment, wear warm clothing and keep your hands warm and dry.
If you notice numbness, tingling or pain in your fingers or hands or notice that the skin of your fingers or hands has become pale, stop working with the mini die grinder and consult a doctor.
■ The mini die grinder must be operated and maintained in accordance with the recommendations contained in this manual to reduce any unnecessary increase in vibration.
■ Consumables/machine tools must be selected, maintained and replaced in accordance with the recommendations in this guide in order to avoid unnecessary increase in vibration.
■ Always use a stand, a clamp or a compensation device to support the weight of the machine.
- Hold the machine securely but not too firmly while maintaining the necessary hand-reaction force, as the vibration risk generally increases the harder the machine is held.
■ An inadequately mounted or damaged machine tool can lead to excessive vibrations.
Additional safety instructions for pneumatic machines
■ Compressed air can cause serious injury. Ensure that the air supply is switched off, the hose is not under pressure and that the machine is disconnected from the air supply when the machine is not in us, and also before exchanging accessories or carrying out repairs. Never aim the airflow towards yourself or any other person.
■ Thrashing hoses can cause serious injury. Therefore, always check that the hoses and their fixings are not damaged or have not come loose.
If universal rotary joints (claw couplings) are used, locking pins must be used to provide protection; Whipchek® air hose restraints must be used to provide protection in case of a failure at the connection of the hose to the machine.
■ Ensure that the maximum permissible pressure stated on the machine is not exceeded.
■ Never carry compressed-air-powered machines by the hose.
Hazards caused by accessories
■ Disconnect the grinder for whetstones from the power supply before fitting or replacing the machine tools or accessories.
■ Use only accessories and consumables of the size and type recommended by the manufacturer of the grinder for whetstones.
■ Avoid direct contact with the machine tool during and after use, since this can have heated up or have become sharp.
■ The maximum operating speed recommended by the manufacturer of the grinder for whetstones must be the same or higher than the rotational speed labelled on the machine.
■ Never fit a grinding disc, cut-off disk or milling cutter to a grinder for whetstones. A bursting grinding disc can lead to extremely serious injuries or death.
■ Do not use discs which are damaged, cracked or could have fallen down.
■ Only approved machine tools with the correct shaft diameter may be used.
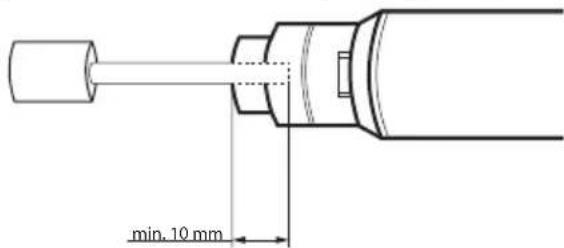
■ Please note that you must ensure that the permissible rotational speed of small grinding tools is reduced due to raising the position of the shaft between the end of the chuck and the small grinding tool (overhang). You must ensure that the minimum clamping length of 10 mm is retained. (see Figure 1)
text_image
min. 10 mmFig. 1
■ You must be aware that there is a danger of mismatching between the shaft diameter of the small grinding tool and of the chuck.
Initial operation
NOTE
The grinder may only be operated on cleaned, oil-atomised compressed air and may not exceed the maximum operating pressure of 6.3 bar at the appliance. The compressor must be fitted with a pressure reducer to regulate the working pressure.
▶ Wind the Tefl on tap supplied around all threaded connectors.
Connect the appliance to a suitable compressed air source.
First screw the 1/4" threaded nipple onto the mini compressed air oiler 9/4" threaded connector 8
Then fi ll the mini compressed air oil with 1-2 drops of special compressed air oil. To do this, undo the crosshead screw at the mini compressed air oiler 9 oil fi ller opening 11 and allow a few drops of oil to enter the oil fi ller opening with the help of the oil bottle 14 included in delivery.
NOTE
A mist oiler continuously and optimally lubricates the grinder as a preparation stage after the pressure reducer. A mist oiler adds fi ne drops of oil to air fl owing through the appliance and therefore guarantees regular lubrication.
Now screw the 1/4" threaded nippl onto the mini compressed air oiler 9/4" female threaded connector 10
Now press the quick connector on the compressed air hose (not included in delivery) onto the Compressed air connector plug 12 The connection locks automatically.
Now connect the other end of the compressed air hose to the (fi lter) pressure reducer on the compressor.
Tool-changing
Always disconnect the grinder from the compressed air supply before changing tools.
Only ever use tools which are ready for use. Furthermore, you must ensure that the minimum clamping length of the shaft in the chuck is not fallen below.
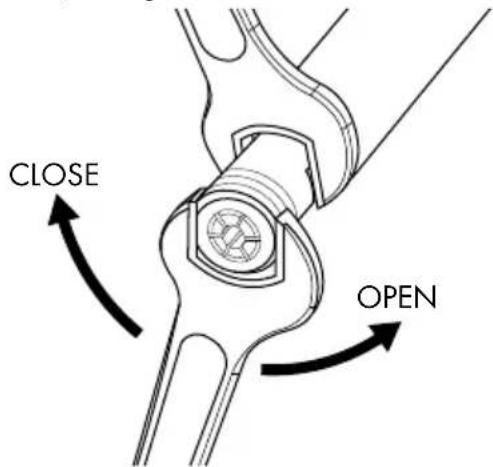
Using the spanners included in the accessories, hold the spindle and chuck 1 rmly and open or close the chuck 1 in the direction of the arrows (see Fig. 3).
text_image
CLOSE OPENFig. 3
Now insert one of the 10 different whetstones.
NOTE
▶ Please note the danger caused by mismatching the diameter of the grinding tool shaft and the chuck. Incorrectly-fi xed grinding tools can cause severe vibration - injury hazard!
◆ Ensure that the grinding tool is correctly fixed, and carry out a trial run of 30 seconds in a safe area at idling speed.
Operation
Switching the grinder on and off
Use the pressure reducer to set the correct working pressure. Operate the appliance at a working pressure of maximum 6.3 bar.
NOTE
An excessive working pressure does not improve performance, but only increases compressed air consumption and increases wear on the appliance.
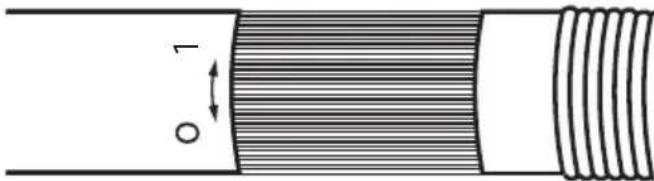
Switch the grinder on and increase or decrease the speed by turning the speed setting wheel ③ (labelled 0 / 1) appropriately (see Figure 2).
natural_image
Pure diagram of a coiled spring with no text or symbolsFig. 2
Maintenance and Cleaning

NING! RISK OF INJURY!
Disconnect the grinder from the compressed air supply before carrying out maintenance work.
NOTE
In order to guarantee correct functioning and long service life of the grinder, please observe the following information:
■ Sufficient and continuous intact oil lubrication is of decisive importance for optimum functioning.
- Check the idle speed regularly and after any maintenance is performed: use a rev counter and perform the measurement without any clamped tools. The idle speed may not be exceeded under any circumstances at a residual pressure of 6.3 bar.
■ Clean any dirt from the air inlet on the compressed air mini grinder.
■ To protect against contamination, the compressed air mini grinder should packed away in the supplied carrying case after each use.
■ Do not pack the appliance away until it has cooled down completely.
If, despite this, the compressed air mini grinder has become dirty, observe the following instructions when cleaning.
■ Only use a dry, soft cloth or compressed air to clean the grinder.
■ Never use sharp or scratchy cleaning agents under any circumstances.
Disposal

packaging consists of environmentally friendly material. It can be disposed of in the local recycling containers.
Do not dispose of the appliance in the normal domestic waste.
Your local community or municipal authorities can provide information on how to dispose of the worn-out appliance.
Warranty and service
The warranty provided for this appliance is 3 years from the date of purchase. This appliance has been manufactured with care and inspected meticulously prior to delivery. Please retain your receipt as proof of purchase. In the event of a warranty claim, please contact your Customer Service by telephone. This is the only way to guarantee free return of your goods.
The warranty only covers claims for material and manufacturing defects, not for transport damage, wearing parts or for damage to fragile components such as switches or batteries. This appliance is intended solely for private use and not for commercial purposes. The warranty is deemed void if this product has been subjected to improper or inappropriate handling, abuse or modifications which were not carried out by one of our authorised service centres. Your statutory rights are not restricted in any way by this warranty. The warranty period is not prolonged by repairs made under the warranty. This also applies to replaced and repaired parts. Damage and defects present at the time of purchase must be reported immediately after unpacking, or no later
than two days after the date of purchase. Repairs made after expiry of the warranty period are chargeable.
GB Service Great Britain
Tel.: 0871 5000 720 (£ 0.10/Min.)
E-Mail: kompernass@lidl.co.uk
IAN 43105
Hotline availability:
KOMPERNASS HANDELS GMBH
BURGSTRASSE 21
44867 BOCHUM
GERMANY
www.kompernass.com
Translation of the original Conformity Declaration
We, KOMPERNASS HANDELS GMBH, Custodian of Documents: Mr. Semi Uguzlu, BURGSTR. 21, 44867 BOCHUM, DEUTSCHLAND, hereby declare that this product complies with the following standards, normative documents and the EC directives:
Machinery Directive (2006/42/EC)
Applied harmonised standards:
EN ISO 11148-9: 2011
Type designation of machine:
Year of manufacture: 01 - 2014
Serial number: IAN 43105
Bochum, 30/06/2013

text_image
Sofia Fyush CESemi Uguzlu
- Quality Manager -
Subject to technical changes in the course of further developments.
KOMPERNASS HANDELS GMBH
BURGSTRASSE 21
44867 BOCHUM
DEUTSCHLAND / GERMANY
www.kompernass.com
Stand der Informationen · Stand van de informatie
Last Information Update:
05 / 2014 · Ident.-No.: PDMSA1-022014-3