
COMPLÉMENT TAILLE-HAIE - Hedge trimmer accessory HUSQVARNA - Free user manual and instructions
Find the device manual for free COMPLÉMENT TAILLE-HAIE HUSQVARNA in PDF.

| Product type | Hedge trimmer attachment |
| Brand | HUSQVARNA |
| Intended use | Trimming bushes and branches |
| Compatibility | Specific Husqvarna brushcutters/trimmers (see manual) |
| Blade speed | 4184 cuts/min |
| Gear type | Angular |
| Gear lubrication | Special Husqvarna grease No 503 98 96-01 every 20 h |
| Blade lubrication | Special Husqvarna lubricant 531 00 60-74 (UL21) at each use |
| Cleaning | Husqvarna cleaning agent 531 00 60-75 (UL22) after each use |
| Safety devices | Hand guard, blade guard |
| Safety distance | At least 15 m from people/animals |
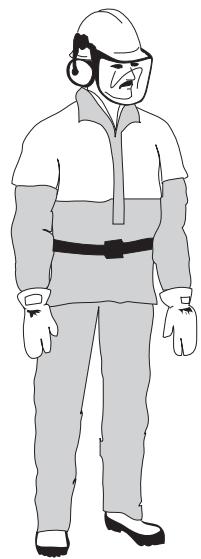
| Mandatory protective equipment | Approved goggles, gloves, non-slip boots, ear protection |
| Handle | Loop handle with adjustment |
| Angle adjustment | Angle limiter lever |
| Assembly | Mounting the hand guard and cutting unit |
| Maintenance | Daily visual inspection; weekly lubrication |
| Spare parts | Use only genuine Husqvarna parts |
| Blade adjustment | Clearance of 0.2-0.4 mm between blades |
| Sharpening | Use a sharpening device (blades too hard for filing) |
| Blade replacement | Replace bent or damaged blades |
Frequently Asked Questions - COMPLÉMENT TAILLE-HAIE HUSQVARNA
User questions about COMPLÉMENT TAILLE-HAIE HUSQVARNA
0 question about this device. Answer the ones you know or ask your own.
Ask a new question about this device
Download the instructions for your Hedge trimmer accessory in PDF format for free! Find your manual COMPLÉMENT TAILLE-HAIE - HUSQVARNA and take your electronic device back in hand. On this page are published all the documents necessary for the use of your device. COMPLÉMENT TAILLE-HAIE by HUSQVARNA.
USER MANUAL COMPLÉMENT TAILLE-HAIE HUSQVARNA
GB Operator's manual
HEDGE TRIMMER ATTACHMENT
WARNING! The hedge trimmer can be dangerous!
Careless or incorrect use can result in serious, even fatal injury.

Read through the Operator's Manual carefully and understand the content before using the hedge trimmer.

Always use
- Ear protection
Approved eye protection

This product is in accordance with applicable CE directives.

Cutting tool. Do not touch the tool without first switching off the engine.
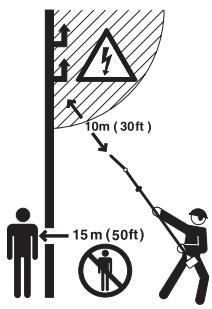
This machine is not electrically insulated. If the machine touches or comes close to high-voltage power lines it could lead to death or serious injury. Electricity can jump from one point to another by arcing. The higher the voltage, the greater the distance electricity can jump. Electricity can also travel through branches and other objects, especially if they are wet.
Always keep a safe distance of at least 10m (30 ft) between the machine and high-voltage power lines and/or any objects that are touching them. If you need to work closer than this always contact the relevant power company to make sure the power is switched off before you start work.
The machine can be dangerous. Make sure that no people or animals come closer than 15m (45 ft) when the machine is running.


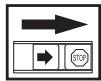
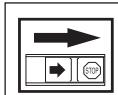
Arrows which show limits for handle mounting.

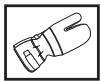
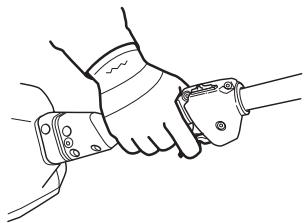
Always wear approved protective gloves.

Use anti-slip and stable boots.
Other symbols/decals on the machine refer to special certification requirements for certain markets.
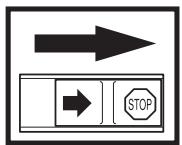
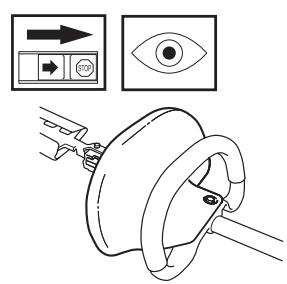
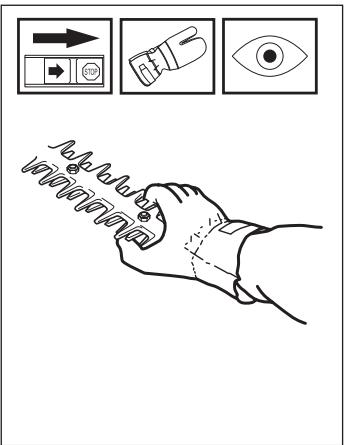
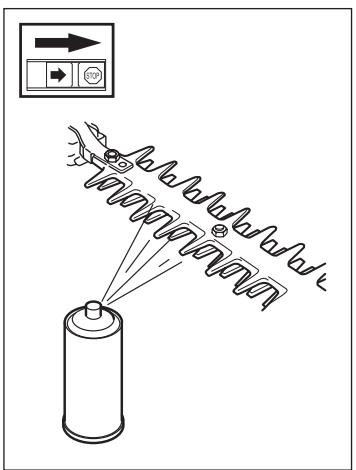
Checks and/or maintenance should be carried out with the engine switched off, with the stop switch in the STOP position.
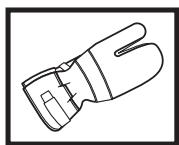
Always use approved protective gloves.
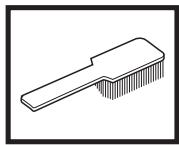
Regular cleaning required.

Ocular control.

Approved eye protection must always be used.
Husqvarna AB has a policy of continuous product development and therefore reserves the right to modify the design and appearance of products without prior notice.

Read through the Operator's manual carefully and understand the content before using the machine.
These instructions supplement the instructions that were included with the machine. For other procedures, please refer to the opertaining instructions forhte machine.

WARNING!
Under no circumstances may the design of the machine be modified without the permission of the manufacturer. Always use genuine accessories. Non-authorised modifications and/or accessories can result in serious personal injury or the death of the operator or others.

WARNING!
This accessory may only be used together with the intended clearing saw/ trimmer, see under heading "Approved accessories" in chapter Technical data in the machine's Operator's Manual.
The machine is only designed for cutting branches and twigs.
List of contents
SYMBOL EXPLANATION
Symbols 2
CONTENTS
List of contents 3
SAFETY INSTRUCTIONS
The machine's protective equipment 4
Control, maintenance and service of the hedge trimmer's protective equipment 4
Safety instructions when using the hedge trimmer 5
WHAT IS WHAT?
What is what on the hedge trimmer attachment? 7
ASSEMBLY
Fitting the hand guard and loop handle 8
Fitting the cutting attachment 8
START AND STOP
Control before starting 8
MAINTENANCE
Carburetor 9
Gearbox 10
Lubrication 10
Maintenance schedule 11
TECHNICAL DATA
Technical Data 11
The machine's protective equipment
This section describes the hedge trimmer's protective equipment, its function and how checks and maintenance are carried out to ensure that it operates correctly. (See the chapter "What is what" to locate where this equipment is positioned on your machine.)

WARNING!
Never use a hedge trimmer with defective protective equipment. Follow the control, maintenance and service instructions described in this section.
1. Hand guard
The hand guard is intended to protect the hand from coming into contact with the working blades. For example, if the user looses his grip on the front handlebars.

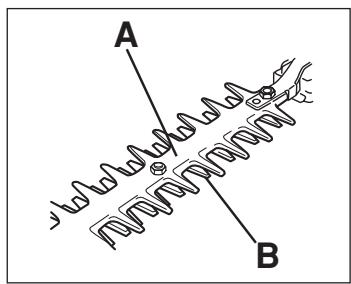
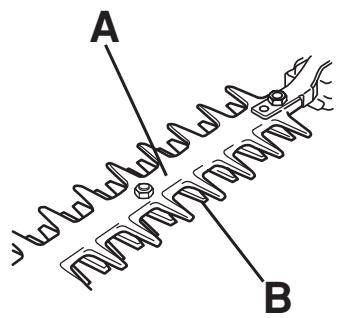
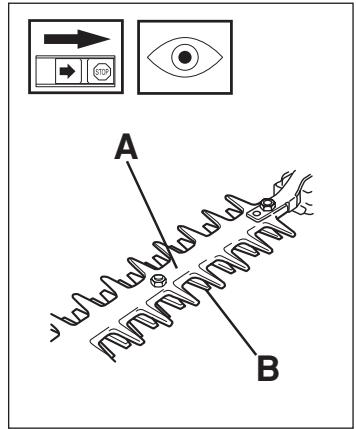
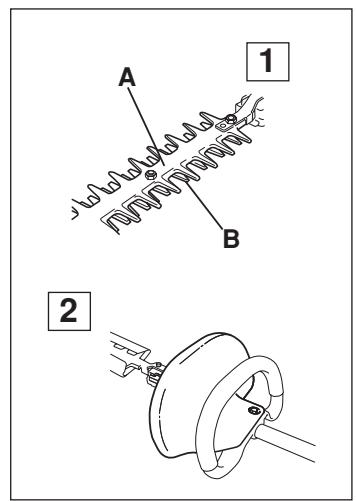
2. Blade guard
The blade guard (A) is intended to protect against any part of the body coming into contact with the blades (B).
Control, maintenance and service of the hedge trimmer's protective equipment

WARNING!
Never use a machine with defective safety equipment. The safety equipment should be maintained as described in this section. If your machine does not meet any of these controls you should contact your service workshop.

WARNING!
Always stop the engine before starting work on any part of the cutting equipment. This continues to rotate even after the throttle has been released. Ensure that the cutting equipment has stopped completely and remove the cable from the spark plug before you start to work on it.
1. Hand guard
- Ensure that the blade guard is fitted correctly.
Make sure the hand guard is not damaged in anyway.
2. Blades
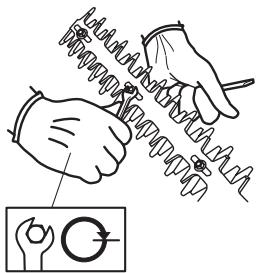
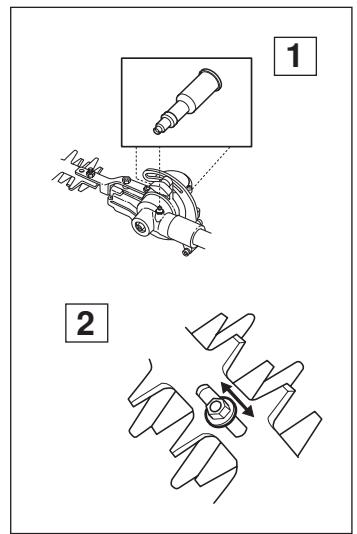
To ensure good cutting results it is important that the contact pressure between the blades is correct.
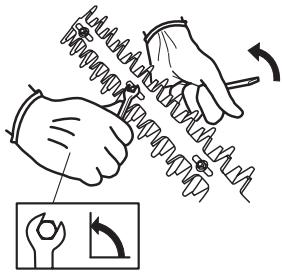
The contact pressure between the blades is adjusted by tightening the screws on the underside of the bar as far as they will go, then backing them off 1/4 turn. Lock the screws using the locking nuts on the top face of the bar. The washers should still slide freely under the screw heads after the screws have been tightened.
When the blades are correctly adjusted the play between the blades should be 0.2 - 0.4mm measured at the screws.
The edges of the blade are too hard to be filed. Dull blades should be sharpened using a grinder.
Replace the blades if they are bent or damaged.
3. Blade guard
- Check that the blade guard is not damaged or distorted.
- Replace the blade guard if it is bent or damaged.

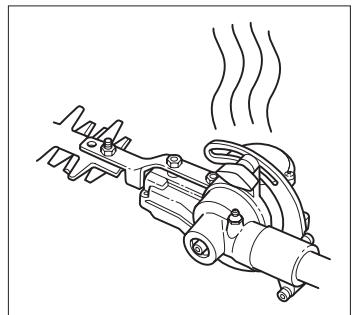
4. Gearbox
- The gearbox gets hot when the hedge trimmer is in use. To avoid burning yourself do not touch the gearbox.
Safety instructions when using the hedge trimmer

WARNING!
The hedge trimmer can cause serious personal injury. Read the safety instructions carefully. Learn how to use the machine.

WARNING!
Cutting blades.
Do not touch the blades without first switching off the engine.
NOTE! Read the Operator's Manual carefully before using the hedge trimmer.
Personal protection
- Always wear boots, and the other safety equipment described in the section "Personal protective equipment" in the machine's Operator's Manual.
Always wear working clothes and thick, long trousers. - Never wear loose fitting clothes or jewellery
- Secure hair so it is above shoulder level.
Protective instructions regarding the surroundings
- Never allow children to use the machine.
- Ensure no one comes within 15 metres while working.
- Never allow anyone to use the machine without first being absolutely sure that they understand the contents of the Operator's Manual.
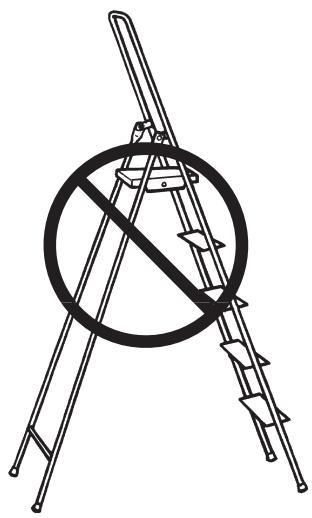
- Never work on a ladder, stool or any other raised position that is not fully secured.
Protective instructions while working
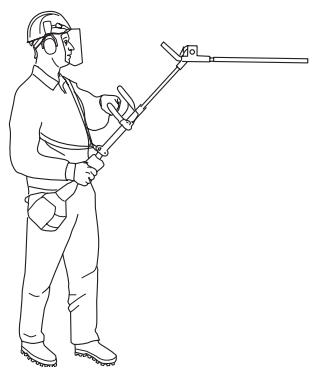
- Always ensure you have a safe and firm working position.
Always use both hands to hold the machine. Hold the machine on the side of the body. - Use your right hand to operate the throttle.
Make sure that your hands and feet cannot come into contact with the blades when the engine is running. - When the engine is switched off, keep your hands and feet away from the blades until they have stopped.
- Watch out for stumps of branches that can be thrown out during cutting.
Always lay the hedge trimmer on the ground when you are not using it.

- Do not cut too close to the ground. Stones and other objects can be thrown.
- Check the hedge you intend to trim for foreign objects such as electricity cables, insects and animals, etc, and for other objects that could damage the cutting attachment, such as metal items.
- If any object is hit or if vibrations occur stop the machine immediately. Remove the spark plug cable from the spark plug. Check that the machine is not damaged. Repair any damage.
- If anything jams in the blades while you are working, switch off the engine and wait until it has stopped completely before cleaning the blades. Disconnect the HT lead from the spark plug.
Protective instructions when work is completed
- The transport guard should always be fitted to the blades when the machine is not in use.
- Ensure the blades have stopped and remove the spark plug cable from the spark plug before carrying out cleaning, repairs or an inspection.
Always wear heavy duty gloves when repairing the blades. The blades are extremely sharp and can easily causes cuts. - Store the machine out of reach from children.
- Only use original spare parts when carrying out repairs.
Basic working techniques
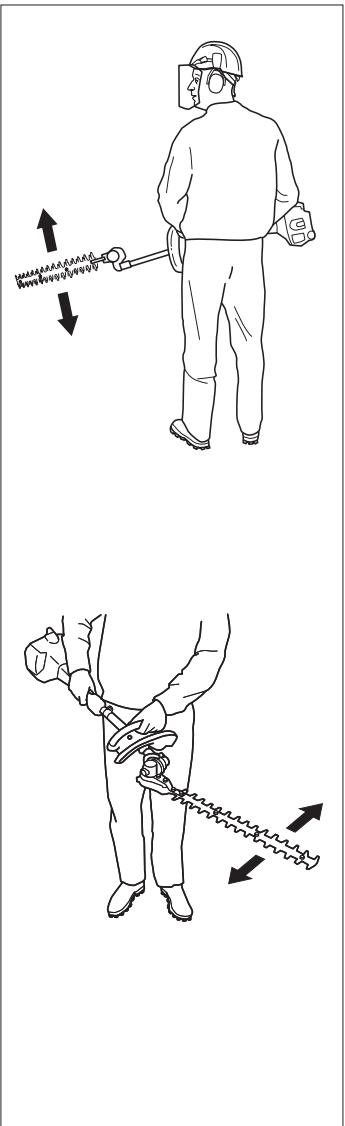
- Work with a swinging action from the bottom upwards when trimming sides.
- Adapt the throttle according to resistance.
- When trimming a hedge the engine should always be turned away from the hedge.
- The hedge trimmer should be held as close to the body as possible to get the best balance.
Make sure that the tip does not touch the ground. - Do not try to force the work, but move at a steady speed so that all the stems are cut evenly.
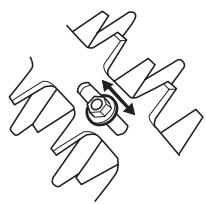
Changing the hedge trimmer angle
- Loosen the knob on the angle adjuster.
- Press the cutting attachment against the ground or some other solid object to set the desired angle.
- Tighten the knob.
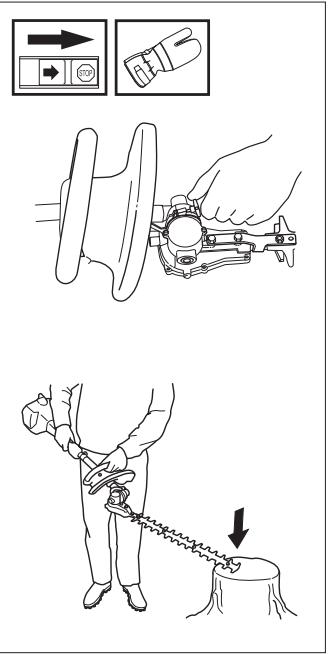
NOTE! Do not hold the cutting attachment when you adjust the angle. The blades are sharp and you could easily cut yourself.

What is what on the hedge trimmer attachment?
- Blade
- Grease nipple (3)
- Gearbox
- Blade guard
-
Front handle
-
Hand guard fastening screw
- Angle adjuster knob
- Hand guard
- Operator's manual
- Transport guard
- Shaft coupling
Fitting the hand guard and loop handle
- Loosen the clutch sleeve's two mounting bolts and dismantle the clutch sleeve.
- Assemble the hand guard and loop handle by screwing them together. Take care to align the holes in both parts.
- Slide the loop handle and the hand guard onto the shaft.
- Slide the spacer into the slot in the loop handle.
- Fit the nut and bolt. Do not over-tighten.
- Adjust to give a comfortable working position. Tighten the nut. NOTE! The loop handle and hand guard must not be fitted behind the arrow marked on the shaft.
- Fit the clutch sleeve and tighten the two mounting bolts.

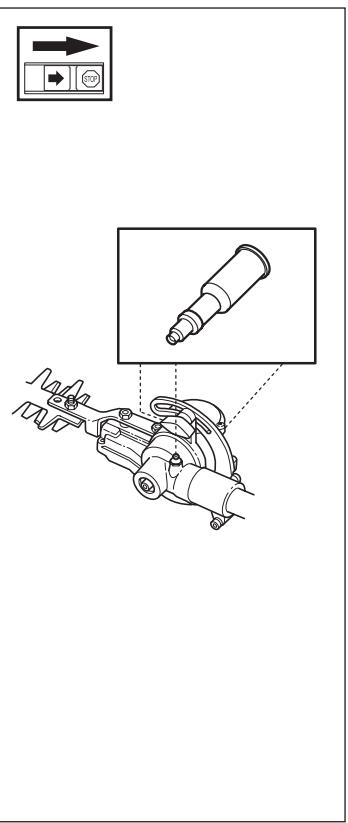
Fitting the cutting attachment
Lay the hedge trimmer on a flat surface before fitting the cutting attachment. Otherwise the cutting attachment may not be fitted straight.
- Fit the cutting attachment to the shaft. NOTE! Make sure the drive shaft on the shaft is aligned with the cut-out in the cutting attachment.
- Tighten the lower screw, followed by the upper screw.

Control before starting
- Inspect the working area. Remove objects that can be thrown.
- Check the blades. Never use blades that are dull, cracked or damaged.
- Check that the hedge trimmer is in full working order. Check that all nuts and bolts are tightened correctly.
- Check that the blade guard is not damaged or distorted.
- Replace the blade guard if it is bent or damaged.
- Make sure the gearbox is lubricated correctly. See the section "Lubricating the blades".
- Ensure the blades always stop when the engine is idling.
- Only use the machine for what it is intended for.
- Ensure that the handle and safety functions are in order. Never use a machine that lacks a part or has been modified outside of the specifications.
Carburettor
Your Husqvarna product has been designed and manufactured to specifications that reduce harmful emissions. After your unit has been run 8-10 tanks of fuel the engine has broken in. To ensure that your unit is at peak performance and producing the least amount of harmful emissions after break in, have your authorized servicing dealer, who has a revolution counter at his disposal, to adjust your carburettor for optimum operating conditions.

WARNING!
The complete clutch cover and gear must be fitted before the machine is started, otherwise the clutch may come loose and cause injury.
Operation
-
The carburettor governs the engine's speed via the throttle. Air/fuel is mixed in the carburettor. The air/fuel mixture is adjustable. To take advantage of the engine's optimal output the adjustment must be correct.
-
The setting of the carburettor means that the engine is adapted to local conditions, for example, the climate, altitude, petrol and the type of 2-stroke oil.
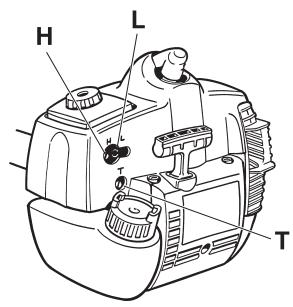
- The carburettor is equipped with three adjustment possibilities:
H = High speed needle
L = Low speed needle
T = Idle speed adjuster screw
- The fuel quantity in relation to the air flow permitted by the throttle opening is adjusted using the L and H-needles. Turning the needles clockwise gives a leaner fuel mixture (less fuel) and turning them anti-clockwise gives a richer fuel mixture (more fuel). A leaner mixture gives high revs while a richer mixture gives less revs.
- The T-screw regulates the position of the throttle while the engine is idling. Turning the screw clockwise gives a higher idling speed while turning it anti-clockwise gives a lower idling speed.
Basic setting
- The carburettor is set to its basic setting when test run at the factory. The basic setting is richer than the optimal setting and should be kept during the machine's first working hours. Thereafter the carburettor should be finely adjusted. Fine adjustment should be carried out by a skilled technician.
NOTE! If the cutting attachment rotates/moves while the engine is idling the T-screw should be turned anti-clockwise until the cutting attachment stops.
Recommended idling speed is 2 700 rpm.
Recommended max. speed: See "technical data".

WARNING!
If the idling speed cannot be adjusted so that the cutting attachment stops, contact your service workshop. Do not use the machine until it has been correctly adjusted or repaired.
Fine adjustment
- When the machine has been "run-in" the carburettor should be finely adjusted. The fine adjustment should be carried out by qualified person. First adjust the L-jet, then the idling screw T and then the H-jet.
Conditions
- Before any adjustments are made the airfilter should be clean and the airfilter cover fitted. Adjusting the carburettor while a dirty airfilter is in use will result in a leaner mixture when the filter is finally cleaned. This can give rise to serious engine damage.
- Carefully turn the L and H needle to the mid point between fully turned in and fully turned out.
- Do not attempt to adjust the needles beyond the stops as damage can occur.
- Now start the machine according to the starting instructions and run it warm for 10 minutes.
NOTE! If the cutting attachment rotates/moves the T screw should be turned anti-clockwise until the cutting attachment stops.
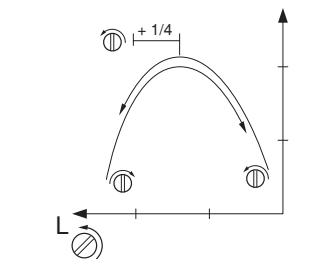
Low speed needle L
Try to find the highest idling speed, turning the low speed needle L clockwise respectively counter-clockwise.
When the highest speed has been found, turn the low speed needle L 1/4 turn counter-clockwise.
NOTE! If the blades move when the engine is idling, turn the idling speed screw T counter-clockwise until the blades stop.
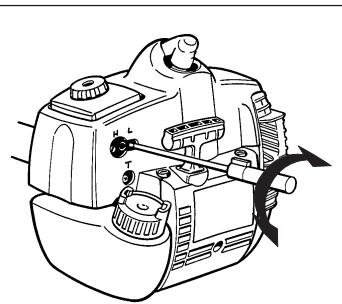
Adjusting the idle speed, T
Adjust the idling speed with the screw T, if it is necessary to readjust. First turn the idle speed adjusting screw T clockwise until the cutting attachment starts to rotate/ move.
Then turn, counter-clockwise until the cutting attachment stops. A correctly adjusted idle speed setting occurs when the engine runs smoothly in every position. It should also be good margin to the rpm when the cutting attachment starts to move.
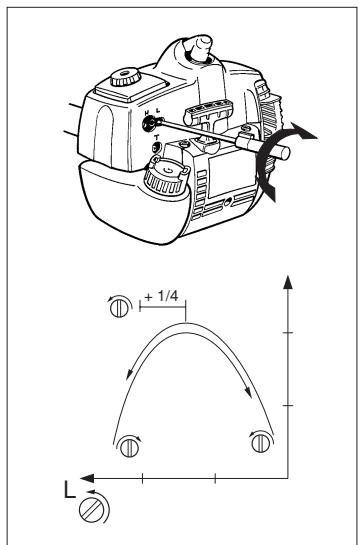
CAUTION! Contact your servicing dealer, if the idle speed setting cannot be adjusted so that the cutting attachment stops. Do not use the machine until it has been properly adjusted or repaired.
High speed needle H
The high speed needle affects the machine's power, speed, temperature and fuel consumption. A too lean adjustment on the high speed needle H (the high speed needle H is screwed in too much) gives a too high speed resulting in engine damage. Do not allow the engine to run at full speed for more than 10 seconds. Apply full throttle and turn the high speed needle H slowly anticlockwise until the engine runs unevenly. The high speed needle H is then turned slowly clockwise a little until the engine runs smoothly.
Note the engine should be run unloaded when adjusting the high speed needle. Therefore dismantle the cutting equipment, nut, support flange and disc drive before adjusting the high speed needle. The high speed needle is adjusted correctly
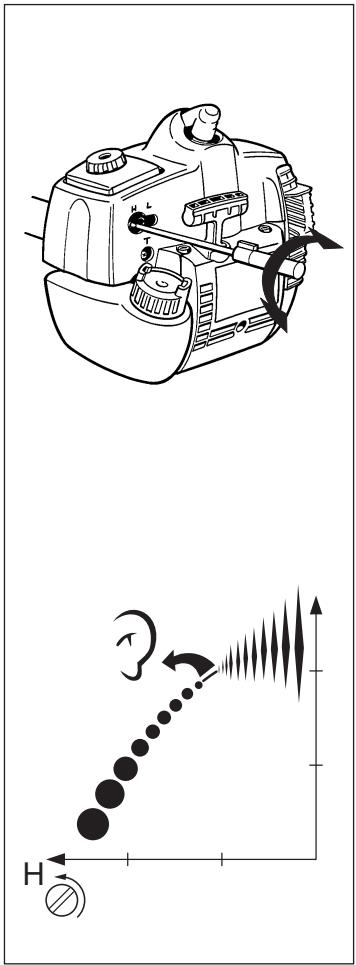
when the machine 'splatters' a little. If the machine smokes heavily at the same time as it 'splatters' heavily the adjustment is too rich.
NOTE! For optimum setting of the carburettor, contact a qualified servicing dealer who has a revolution counter at his disposal.
Correctly adjusted carburettor
A correctly adjusted carburettor means that the machine accelerates without hesitation and the machine 4-cycles a little at max speed. Furthermore, the cutting attachment must not rotate/move at idling. A too lean adjusted low speed needle L may cause starting difficulties and bad acceleration.
A too lean adjusted high speed needle H gives lower power = less capacity, bad acceleration and/or damage to the engine. A too rich adjustment of the two speed needles L and H gives acceleration problems or too low working speed.
Gearbox
There are three grease nipples (A) on the gearbox. Use a grease gun to top up with grease. This should be carried out after approximately every 20 working hours. Use Husqvarna special grease, No. 503 98 96-01.
Note that the gearbox must not be filled completely with grease. The grease expands as the machine heats up during operation. If the gearbox was completely filled with grease it could damage the seals and lead to leakage.
The lubricant in the gearbox does not normally need to be replaced other than with repair.
Cleaning and lubrication
After you have used the machine clean any resin and plant residue from the blades using cleaning agent 531 00 60-75 (UL22).
Always lubricate the blade runners with special grease 531 00 60-74 (UL 21) before use.
Maintenance schedule
Below follows some general maintenance instructions. If you need further information please contact your service workshop.
Daily maintenance
- Check that the blades do not rotate while idling or when the choke is in the start position.
- Check that the hand guard is not damaged. Replace the guard if damaged.
Weekly maintenance
- Fill the gearbox with grease. This should be carried out after approximately every 20 working hours.
- Check that the bolts keeping the blades together are tightened.
Technical data
Weight
Weight without fuel, Lbs/kg 2,0
Blades
Length, mm 550
Blade speed, Cut/min 4184
Symboles

Poids,sans carburant,kg 2,0
Lames
Longueur, mm 550