000-700 - Tour Meec Tools - Free user manual and instructions
Find the device manual for free 000-700 Meec Tools in PDF.


| Product Type | Cordless Drill Driver |
| Brand | Meec Tools |
| Model | 000-700 |
| Operating Voltage | 18 V DC |
| Battery Capacity | 1.5 Ah |
| Torque | 35 Nm |
| Speed Settings | 0-350 / 0-1200 rpm (2-speed) |
| Chuck Size | 1-13 mm |
| Drilling Capacity (Steel) | 10 mm |
| Drilling Capacity (Wood) | 20 mm |
| Sound Pressure Level | 70.93 dB(A) (K=3 dB) |
| Sound Power Level | 81.93 dB(A) (K=3 dB) |
| Vibration (Drilling in Metal) | 2.300 m/s² (K=1.5 m/s²) |
| Vibration (Screwdriving) | 1.061 m/s² (K=1.5 m/s²) |
| Charger Input | 230 V AC |
| Charger Output | 14.4-18 V DC / 1.5 A |
| Charging Time | 1 hour |
| Safety Class (Charger) | II (Double insulated) |
| Key Features | Variable speed trigger, LED work light, torque selector (1-19 + drill mode), rotation selector (right/left/lock), battery charge level indicator |
| Included Accessories | Battery (1.5 Ah), charger, belt clip (assumed), screwdriver bits (not specified but typical) |
| Maintenance | Wipe with dry cloth; keep ventilation openings free of dust; remove battery before maintenance |
| Spare Parts & Reparability | Only use original spare parts; repairs by qualified service personnel only |
Frequently Asked Questions - 000-700 Meec Tools
User questions about 000-700 Meec Tools
0 question about this device. Answer the ones you know or ask your own.
Ask a new question about this device
Download the instructions for your Tour in PDF format for free! Find your manual 000-700 - Meec Tools and take your electronic device back in hand. On this page are published all the documents necessary for the use of your device. 000-700 by Meec Tools.
USER MANUAL 000-700 Meec Tools
natural_image
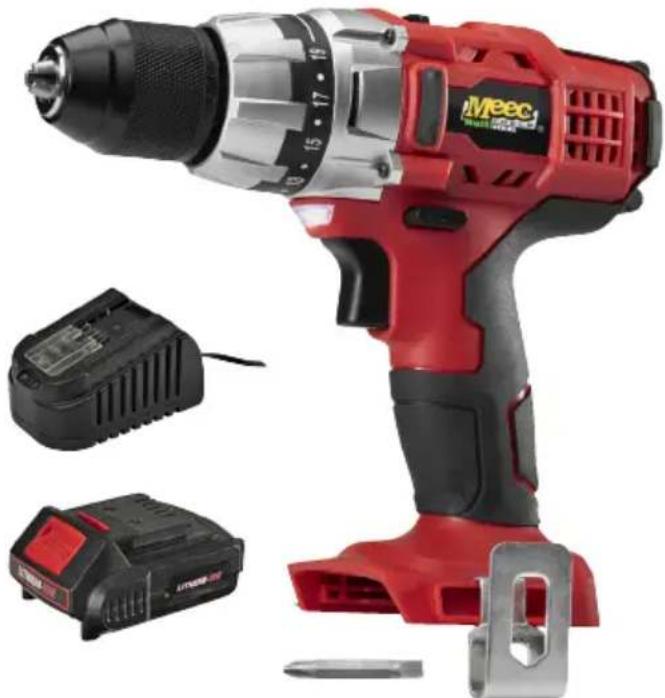
Red Meec 1500 electric drill with attached battery and screwdriver (no visible text or symbols)
SE BORRSKRUVDRAGARE
Operating instructions (Translation of the original instructions) Important! Read the user instructions carefully before use. Save them for future reference.
Värna om miljön!
Care for the environment!
Must not be discarded with household waste! This product contains electrical or electronic components that should be recycled. Leave the product for recycling at the designated station e.g. the local authority's recycling station.
Jula reserves the right to make changes. In the event of problems, please contact our customer service.
www.jula.com
Tillverkare/Produsent/Producenci/Manufacturer
Jula AB, Box 363, 532 24 SKARA
Distributör/Distributør/Dystrybutor/Distributor
Jula Poland Sp. z o.o., ul.
EC DECLARATION OF CONFORMITY
EG FÖRSÄKRAN OM ÖVERENSSTÄMMELSE
EF SAMSVARSERKLÆRING
DEKLARACJA ZGODNOŚCI WE

Jula AB, Box 363, SE-532 24 SKARA, SWEDEN
Machinery Directive 2006/42/EC
EN 60745-1:2009+A11, EN 60745-2-1:2010, EN 60745-2-2:2010
Low Voltage Directive 2014/35/EU
EN 60335-1:2012+A11, EN 60335-2-29:2004+A2
EN 62233:2008
Electromagnetic Compatibility Directive 2014/30/EU
EN 55014-1:2006+A1+A2, EN 55014-2:1997+A1+A2
EN 61000-3-2:2014, EN 61000-3-3:2013
RoHS Directive 2011/65/EU
EN 62321:2009
This product was CE marked in year -15
Name and address of the person authorised to compile the technical file:
WARNING: Read all the safety instructions and other instructions. Failure to follow the safety instructions and other instructions can result in electric shock, fire and/or serious personal injury. Save all the safety instructions and other instructions for future reference. The term "power tool" in the safety instructions refers to your mains-powered (corded) or battery-powered (cordless) power tool.
Safety in the work area
- Make sure the work area is clean and well lit. Untidy or poorly lit work areas can cause accidents.
- Do not work with this power tool in environments where there is a risk of explosion, or where there are flammable liquids, gas or dust. Power tools produce sparks that can ignite dust and fumes.
- Keep children and other persons at a safe distance when using the power tool.
- Distractions can cause you to lose control of the tool.
Electrical safety
- The plug on the power tool must match the power point. The plug must not be modified in any way. Do not use adapter plugs together with earthed power tools. Unmodified plugs and suitable sockets reduce the risk of electric shock.
- Avoid body contact with earthed surfaces such as pipes, radiators, cookers and refrigerators. There is an increased risk of electric shock if your body is earthed.
- Do not expose the power tool to rain or moisture. There is an increased risk of electric shock if water enters a power tool.
- Do not use the power cord for other purposes, e.g. to carry or hang up the power tool, or to pull the plug out of the power point. Protect the power cord from heat, oil, sharp edges and moving machine parts. Damaged or tangled power cords increase the risk of electric shock.
- When working outdoors with the power tool only use an extension cord intended for outdoor use.
- If you have to use the power tool in damp conditions use a residual current device. Use of a residual current device reduces the risk of electric shock.
Personal safety
- Pay full attention to what you are doing.
- Use your common sense when working with power tools. Do not use power tools if you are tired or under the influence of drugs, alcohol or medication. A moment of inattention can result in serious personal injury.
- Use personal safety equipment and always wear safety glasses. The use of personal protective equipment, e.g. dust mask, non-slip safety shoes, helmet and ear protection, according to the type of power tool and application, reduces the risk of injury.
- Avoid accidentally starting the power tool. Check that the tool is switched off before connecting it to the power supply and/or battery, or before lifting it or carrying it. Avoid holding your finger on the power switch when carrying the power tool. If the power tool is connected to the power supply when the power switch is switched on this can result in personal injury.
- Remove adjusting tools before starting the power tool. A tool or screwdriver left in a rotating machine part can result in personal injury.
- Avoid awkward body positions. Make sure you have a firm footing and can maintain your balance at all times. This will ensure you have better control over the power tool in unexpected situations.
- Wear appropriate clothing. Do not wear loose-fitting clothing or jewellery. Do not allow your hair, clothes or gloves to come near moving parts. Loose-fitting clothing, jewellery or long hair can get caught in moving parts.
- If dust extraction devices can be fitted, make sure they are properly connected and used. Dust extraction reduces dust related risks.
Using and looking after power tools
- Do not overload the machine. Use power tools that are intended for the job on hand. The use of the right tools means you work better and safer.
- Do not use power tools with defective switches. A power tool that cannot be switched on or off is dangerous and must be repaired.
- Unplug the plug from the power point and/or remove the battery before making any adjustments, changing accessories, or putting away the tool.
- Store power tools not in use out of the reach of children. Do not allow anyone to use the power tool if they are not familiar with it, or have not read these instructions. Power tools are dangerous if used by inexperienced persons.
- Look after the power tool carefully. Check that moving parts function perfectly and do not jam, and that no parts are defective or damaged. Have damaged
parts repaired before using the machine. Many accidents are a result of poorly maintained power tools.
- Keep sharp-edged tools clean and well sharpened. Carefully looked after sharp-edged tools with sharp blades jam less frequently and are easier to control.
- Use power tools, accessories and tool inserts etc. in accordance with these instructions. Pay attention to the actual working conditions and the job to be done. Using power tools for purposes they are not intended to be used for can result in dangerous situations.
Using and maintaining battery-powered tools
- Charge the batteries only with the charger recommended by the manufacturer. The use of another charger can result in the risk of personal injury and fire.
- Only use batteries intended for the power tool. The use of other batteries can result in the risk of personal injury and fire.
- Do not allow batteries to come into contact with paper clips, coins, keys, nails, screws and other small metal objects that can result in short circuiting. Short circuiting the battery terminals can result in the risk of burn injuries or fire.
- Incorrect use can cause liquid to leak from the battery. Avoid touching this. Rinse with water after unintentional contact. Seek medical attention if you get battery fluid in your eyes. Leaking battery fluid can cause skin irritation or burn injuries.
Service
Only allow qualified service personnel to repair the power tool, and only use original spare parts. This will guarantee the safety of your machine.
Drilling safety instructions
- Use ear protection. High noise levels can cause hearing impairment.
- Hold the power tool in the insulated grips when working where the drill can damage concealed electric cables, or the power cord on the tool.
- Check that the power is disconnected with the main fuse before working on walls, floors or doors. Check before drilling that there are no gas pipes, power cables or water pipes in the vicinity. Use a current detector, metal detector or other suitable instrument. Consult an authorised electrician if in doubt.
- The power tool and drill can get hot when in use. Allow the power tool and drill to cool.
- Wear safety gloves.
Other risks
- Even if the power tool is used in accordance with these instructions there are always other potential risks. The following risks can be anticipated as a result of the design and performance of the power tool.
– Damage to lungs if dust mask is not used.
– Hearing impairment if ear protection is not used. - Health hazard resulting from hand and arm vibrations if the machine is used for longer than specified in the instructions, or not used and maintained according to the instructions.
WARNING: This power tool produces an electromagnetic field when in use. This field can in some circumstances affect active or passive medical implants. To reduce the risk of serious or life-threatening personal injury we therefore recommend that persons with medical implants consult their doctor and the manufacturer of the medical implant before using this machine.
Safety instructions for batteries and chargers
Only use the supplied battery and charger. The charger must only be connected to a power point with a voltage of 230 V. Protect the battery and charger from moisture. Do not use the charger outdoors. Before cleaning the charger, unplug it from the mains.
Handle the battery with due care and attention. Do not allow it to fall on a hard surface, or expose it to severe mechanical stress. Do not expose the battery to very high or low temperatures. Do not attempt to repair the battery or charger. Only charge the battery when the ambient temperature is between 10^ C and 40^ C. The charged battery will function at an ambient temperature of 0^ C to 50^ C. When the battery is not in use it should be stored at a temperature of 10^ to 30^ C.
DANGER:
- Never short-circuit the battery or expose it moisture. Do not place the battery among metal parts that can short circuit the battery. The battery could overheat, catch fire, or explode.
- Rinse immediately with water after contact with battery acid or other battery fluids. Rinse immediately with water and seek medical attention if your eyes are affected.
- Do not expose the battery to naked flames, or water (risk of explosion). Do not discard the battery together with household waste. Hand in the product for recycling at the designated place, e.g. the local recycling centre.
IMPORTANT INFORMATION ON BATTERY
- Do not dismantle the battery or attempt to replace the battery cells.
- Short circuiting the battery terminals on this battery by jewellery or tools can result in serious burn injuries.
- Store the battery in a dry place at no more than 27^ C .
- Store the battery with a 30% – 50% charge.
- Charge the battery every seven months during long-term storage.
Symbols
 | Read the operating instructions before use. |  | The charger is only intended for indoor use. |
 | Use ear protection. |  | Approved as per applicable directives. |
 | Wear safety glasses. |  | Recycle discarded product. |
TECHNICAL DATA
Chuck 1–13 mm
Drilling capacity Steel: 10 mm
Wood: 20 mm
Torque 35 Nm
Speed 0 - 350 / 0 - 1200/min
Operating voltage 18 V DC
Battery capacity 1.5 Ah
Sound pressure level, LpA 70.93 dB(A), K = 3 dB
Sound power level, LwA 81.93 dB(A), K = 3 dB
Drilling in metal 2.300 m/s ^2 , K = 1.5 m/s ^2
Screw driving without impact mode 1.061 m/s^2 , K = 1.5 m/s^2
Charger
Operating voltage 230 V AC
Output current 14.4 – 18 V DC / 1.5 A / 80 mA
Charging time 1 h
Safety class II
Always wear ear protection.
The declared vibration value, which has been measured by a standardised test method, can be used to compare different tools with each other and for a preliminary assessment of exposure.
WARNING: The actual vibration level when using power tools may differ from the specified maximum value, depending on how the tool is used. It is therefore necessary to determine which safety precautions are required to protect the user, based on an estimate of exposure in actual operating conditions (taking into account all stages of the work cycle, e.g. the time when the tool is switched off and when it is idling, in addition to the start-up time).
DESCRIPTION
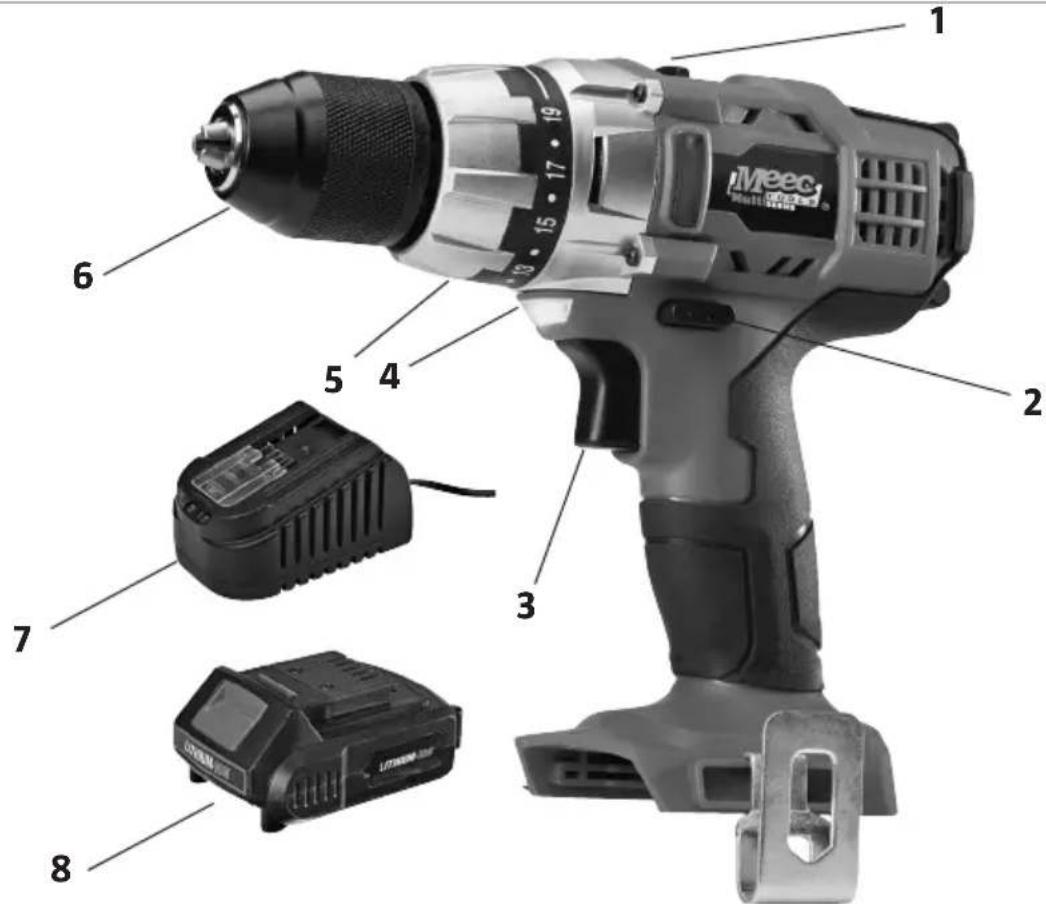
- Switch drilling/screwing
- Rotation selector
- Power switch
-
LED light
-
Torque selector
- Chuck
- Battery charger
- Battery
USE
Battery and charger
NOTE: Only use the supplied charger to charge the battery. Fully charge the battery before using it for the first time.
Charging the battery
- Align the guide slots on the battery to the slots on the charger and firmly push in the battery until it clicks in place. The battery is shaped so that it can only fit one way in the charger. This connects the positive (+) and negative (-) terminals correctly.
- Connect the battery charger to the power point. The red LED on the charger goes on.
- When the battery is put in the charger the green LED goes on and starts flashing. This indicates that the battery is charging. At the same time the red LED on the charger starts flashing briefly before remaining constantly red.
- The battery is fully charged when the green LED stops flashing and remains constantly green. The red LED will then go off. It takes about one hour to charge a fully discharged battery. It will go quicker if the battery is only partially discharged.
- The status of the battery can be checked during the charging by pressing the black square button on the short side of the battery. One, two, three or four LEDs will light up beside the button to indicate the charging level. Four LEDs mean that the battery is fully charged.
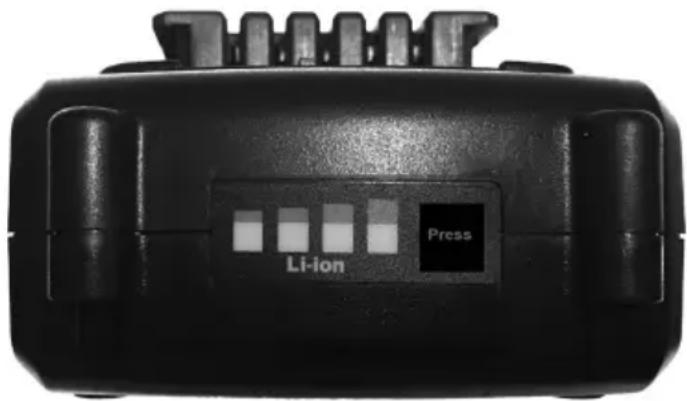
- When the red LED on the charger goes on the battery is discharged, with a red and yellow light it is partially charged, and with red, yellow and green it is fully charged.
- Unplug the charger from the power point. Release the battery from the charger by pressing in the red lock button on the battery and pushing it along the guide slots until the battery comes loose from the charger. Set the rotation selector on the drill driver to the OFF position and connect the battery by pushing it into the drill driver's guide slots until it hooks on. The drill driver is now ready to use.
Power switch
The power switch has variable speed control, which means that the speed increases the more the power switch is pressed in, decreases when the power switch is released.
Rotation selector
NOTE: The drill driver must have stopped before using the rotation selector, otherwise it can be damaged.
Use the rotation selector to switch between right and left drive. When the rotation selector is in the middle position the power switch is locked and cannot be pressed in. Put the rotation switch in the middle position when the drill driver is not in use to prevent unintentional starting.
Adjusting the torque
NOTE: Only use this control when the machine is switched off, otherwise the machine can be damaged.
Set the machine to its lowest torque by turning the control so that the arrow points to "1". In this position the machine is set to the lowest possible drilling resistance. The higher the value the control is set to, the higher the torque. Set the machine to its highest torque by turning the control to the drill symbol.
A low torque should be selected for screwing. A high torque can damage the screw head slot, or even break the screw. Select the position marked with a drill when drilling. Before working, test different torques on a sample of the same material.
USING AS A DRILL
NOTE: Remove the battery before changing drills to avoid personal injury and/or material damage. Only use drills intended for the actual job.
Fitting drills
Make sure to release the collet jaws on the chuck before inserting the drill by holding the lower ring on the chuck and turning the lock ring anticlockwise. Open the collet jaws enough to take the drill. Push the drill in all the way into the chuck. Hold the bottom ring firm and tighten the lock ring clockwise. Make sure that the drill is correctly positioned.
Release the drill by holding the bottom ring on the collet jaws and turning the lock ring anticlockwise. Open the collet jaws enough to take out the drill.
Drilling
Check that the drill is correctly fitted and secured before starting the drill driver. Use suitable and sharp drills. Select a low speed when using large drill. Large holes should be predrilled with a smaller drill.
Drilling in wood
- Use a drill intended for drilling in wood.
- Secure the wooden part in a suitable manner.
- Mark out the position of the hole with an awl or other sharp implement.
- Set the switch on top of the drill driver to position 2.
- Set the torque selector to position .
- Do not press too hard on the drill driver when drilling.
Drilling in metal
- Use a drill for steel when drilling in metal. Ensure there is adequate cooling with a non-flammable coolant.
- Secure the metal part in a suitable manner. The metal part should lie flat on the workbench.
- Mark out the position of the hole with a punch.
- Set the switch on top of the drill driver to position 2.
- Set the torque selector to position .
- Do not press too hard on the drill driver when drilling.
NOTE:
- Select a low speed when you start drilling so that the drill does not slip away from the drill hole.
- The drill can jam if the hole is a deep one. In such cases a high torque can damage the drill or the drill driver. Release the power switch if the drill jams. Set the machine to left drive and release the drill at low speed.
Drilling in plastic
- Use a steel drill.
- Secure the plastic part in a suitable manner.
- Mark out the position of the hole with an awl or other sharp implement.
- Set the switch on top of the drill driver to position 2.
- Set the torque selector to position .
- Do not press too hard on the drill driver when drilling.
USING AS A SCREWDRIVER
Check that the bit is corrected fitted. Make sure not to screw in the screws too far. The bit or the thread can be damaged otherwise.
Screwing in screws
- Set the drill driver to right drive.
- Set the switch on top of the drill driver to position 1.
- Set the torque selector to one of the positions 1 - 19.
- Put the bit in the slot on the screw head.
- Press the bit against the screw with a firm pressure and screw in the screw.
- Hold the drill driver firmly until the screw is screwed in and then release the power switch.
Unscrewing screws
- Set the drill driver to left drive.
- Set the switch on top of the drill driver to position 1.
-
Set the torque selector to one of the positions 1 - 19.
-
Put the bit in the slot on the screw head.
- Press the bit against the screw with a firm pressure and unscrew the screw.
- Hold the drill driver firmly until the screw is unscrewed and then release the power switch.
MAINTENANCE
NOTE: Always remove the battery from the drill driver before carrying out maintenance.
- Wipe the drill driver with a dry cloth. Do not use detergents or solvents.
- Keep the ventilation openings free from dust and dirt.
- SE BORRSKRUVDRAGARE
- EC DECLARATION OF CONFORMITY
- EG FÖRSÄKRAN OM ÖVERENSSTÄMMELSE
- EF SAMSVARSERKLÆRING
- DEKLARACJA ZGODNOŚCI WE
- Safety in the work area
- Electrical safety
- Personal safety
- Using and looking after power tools
- Using and maintaining battery-powered tools
- Service
- Drilling safety instructions
- Other risks
- Safety instructions for batteries and chargers
- DANGER:
- IMPORTANT INFORMATION ON BATTERY
- TECHNICAL DATA
- Charger
- Always wear ear protection.
- USE
- Battery and charger
- Charging the battery
- Power switch
- Rotation selector
- Adjusting the torque
- USING AS A DRILL
- Fitting drills
- Drilling
- Drilling in wood
- Drilling in metal
- NOTE:
- Drilling in plastic
- USING AS A SCREWDRIVER
- Screwing in screws
- Unscrewing screws
- MAINTENANCE
Brand : Meec Tools
Model : 000-700
Category : Tour