GR4670-TB3 - NAS Raidon - Free user manual and instructions
Find the device manual for free GR4670-TB3 Raidon in PDF.


User questions about GR4670-TB3 Raidon
0 question about this device. Answer the ones you know or ask your own.
Ask a new question about this device
Download the instructions for your NAS in PDF format for free! Find your manual GR4670-TB3 - Raidon and take your electronic device back in hand. On this page are published all the documents necessary for the use of your device. GR4670-TB3 by Raidon.
USER MANUAL GR4670-TB3 Raidon
- Environmental Requirements .... 1
- Product Appearance and Packaging Content ....1
- Hardware Requirements and Precautions ......2
- Hardware Installation....3
- Troubleshooting Fan Errors....4
- The MSU, and easy RAID configurator ....4
- Description of HDD Indicators 11
- Connect with other devices .... 11
- Frequently Asked Questions 12
Thank you for choosing the RAIDON product. This manual will familiarize you with the RAIDON GR4670-TB3 product. We recommend reading through this manual before using the RAIDON GR4670-TB3 product. The information provided in this manual was checked before publication, but the actual product specifications may have changed before shipping; Latest product specifications and updates can be found at www.RAIDON.com.tw. No separate notifications will be provided by our company. If you would like to receive the latest RAIDON product information, manuals, and firmware, or have any questions regarding RAIDON products, please contact your local supplier or visit www.RAIDON.com.tw for more information.
All product-related content in this manual are copyrighted by RAIDON TECHNOLOGY, INC.
1. Environmental Requirements
Operating temperature: 0 \~ 40 °C (32 \~ 104 °F)
Storage temperature : -20 \~ 47°C (-4 \~ 116 °F )
Operating voltage: 100 \~ 240V AC
2. Product Appearance and Packaging Content
The following items should be inside the package upon opening:
| GR4670-TB3 |
| GR4670-TB3 product x 1 (containing HDD enclosure x 4) |
| ThunderboltTM cable x 1 |
| Power cable x 1 |
| Quick Setup Guide x 1 |
| Screws and key |
- Please check the product and accessories for any defect or missing parts. If you have any questions, please contact your product supplier.
- Please visit the official website - Download page (http://www.RAIDON.com.tw/RAIDON2016/download.php) to download drivers and other related resources.
Front View
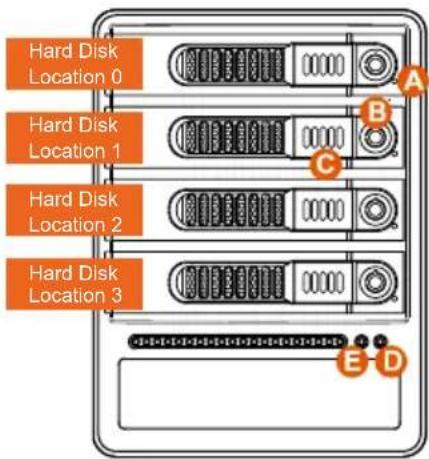
text_image
Hard Disk Location 0 Hard Disk Location 1 Hard Disk Location 2 Hard Disk Location 3 A B C D ERear View
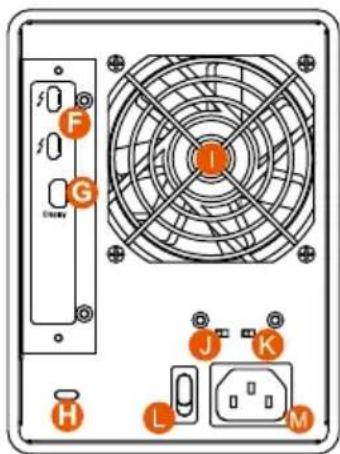
text_image
F G Uday I J K H L MNote: A hard disk must be installed at HDD location 0
A. HDD access light
B. HDD enclosure key lock
C. HDD enclosure button
D. Power status light
E. System status light
F. Thunderbolt™ port
G. Mini DisplayPort
H. Anti-theft lock
I. Fan
J. Fan speed switch
K. Mute switch
L. Power switch
M. Power socket
3. Hardware Requirements and Precautions
- This system can only transfer data to one computer through one interface at a time.
- The capacity of RAID 5 is the size of capacity of the smallest hard disk multiplied by 3 while RAID 0 is multiplied by 4. The result will be treated as one single high-capacity drive. A hard disk must therefore be installed in every bay before this system can be used. We also recommend using brand new hard disks with identical specifications from the same brand. If a hard disk needs to be changed, please be sure to buy a hard disk with the same specifications, capacity, and brand. If this is not possible, then the capacity of the new hard disk should be at least 20GB larger than the existing hard disk.
- After the hard disk is formatted, the actual total capacity of the GR4670-TB3 detected by the computer operating system will vary from the sum of all hard disk capacities stated by the manufacturer.
- All existing data will be deleted when this product is set up for the first time. Please ensure that all data on the hard disk has been backed up before installation to avoid data loss.
- Before a new HDD is installed in the GR4670-TB3, please make sure that there are no bad tracks or defects to avoid data loss.
- If the GR4670-TB3 needs to be shut down or disconnected, please ensure the HDD is safely removed through your operating system before turning off the power.
- To prevent data loss, do not remove any of the hard disks while the system is running.
-
Once the system has been initialized, do not switch hard disks around during use. Doing so may prevent the RAID from being recognized by the system.
-
Once RAID mode has been set up, the switching of hard drives will lead to the removal of data from the hard disks. Please be sure to backup the data on the hard disk before making any switches.
- Under RAID 5 mode, the system can only tolerate the failure of one hard disk. If the system shows that two or more of your hard disks have failed, your stored data may already be damaged or lost. In RAID 0 mode, If the system shows that one of your hard disks has failed, your stored data may already be damaged or lost.
- If the GR4670-TB3 needs to be shut down or disconnected, please ensure the HDD is safely removed through your operating system before turning off the power.
- While the In-chassis temperature reaches up to 55 degree-C (131 degree-F), in order to get rid of the heat efficiently, your DR8-TB3 will turn fan parts to full speed automatically. And once the In-chassis temperature drops down to 50 degree-C (122 degree-F), you could then set fan speed at Fan Speed Switch manually to reduce its fan noise for a better green environment at both of a lower fan noise and the power saving.
- We strongly recommend backing up important data stored on the GR4670-TB3 to another storage device or a remote site. RAIDON will not be held liable for the damage or loss of data you stored on the GR4670-TB3.
4. Hardware Installation
Please follow the steps below to complete the hardware installation process:
Step 1 When you open the package, please immediately check the product and included parts for any damage or missing parts. If there is a problem with the product or included parts please contact your supplier immediately.
Step 2 Place the device on a flat, even surface. Make sure that the cooling fan is not blocked and there is sufficient surrounding space for cooling. (Keep away from water or other environments that may cause product damage)
Step 3 Please insert the key included with the parts pack into the keyhole to release the HDD enclosure handle and remove the HDD enclosure.
Step 4 Place the hard disk in the HDD enclosure and secure it in place with the included screws; this will prevent damage to the hard disk from external vibration.
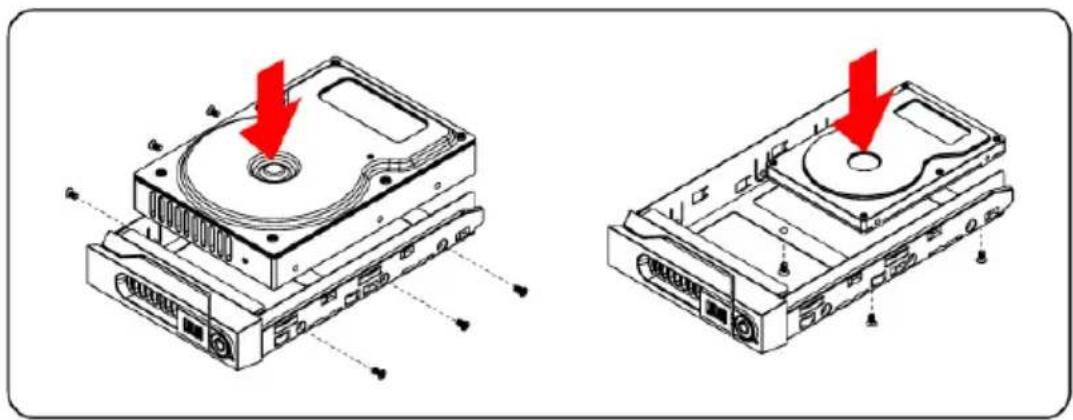
natural_image
Technical line drawings of a hard disk drive assembly with red arrows indicating component removal (no text or symbols present)Note: Please avoid using hard disk drives from different manufacturers or different models from the same manufacturer as this may impact system performance.
Step 5 Once the hard disk is installed, slide the enclosure into the system and close the handle.
Step 6 Select the appropriate cable from the accessories pack depending on the interface. Connect the GR4670-TB3 backplate connection port to the corresponding port on the computer.
Step 7 Connect the AC Power cable to the GR4670-TB3. Plug the connector into the power socket then start the system.
Step 8 Your operating system will automatically detect available capacity once the device finishes booting. Once the device has been detected, please follow instructions given by the operating system and format the system. Once the hard disk has been formatted, the GR4670-TB3 system can be used.
Step 9 If the computer is unable to detect the system, please install the drivers from official website - Download page (http://www.RAIDON.com.tw/RAIDON2016/download.php).
5. Troubleshooting Fan Errors
The GR4670-TB3 includes a fan failure warning function. When the fan of the GR4670-TB3 fails, the built-in buzzer will sound. The red warning light on the front plate will also light up; If this happens, press the mute switch at the back of the system to turn off the buzzer. Next, turn off power to the GR4670-TB3 as soon as possible to let the machine cool down. Check to make sure that the machine is placed in a well-ventilated location with nothing obstructing the fan, also check to see if the GR4670-TB3's fan has stopped turning. Once the above checks have been completed, turn the power back on to continue using this system. If this doesn't solve the problem, please contact the product supplier or RAIDON for further technical assistance.
6. The MSU, and easy RAID configurator
Please visit the official website - Download page (http://www.RAIDON.com.tw/RAIDON2016/download.php) to download Marvell Storage Utility (MSU). After GR4670-TB3 connected to the computer and install the MSU, multiple RAID modes can be set up through the MSU.
A. Set up RAID Mode:
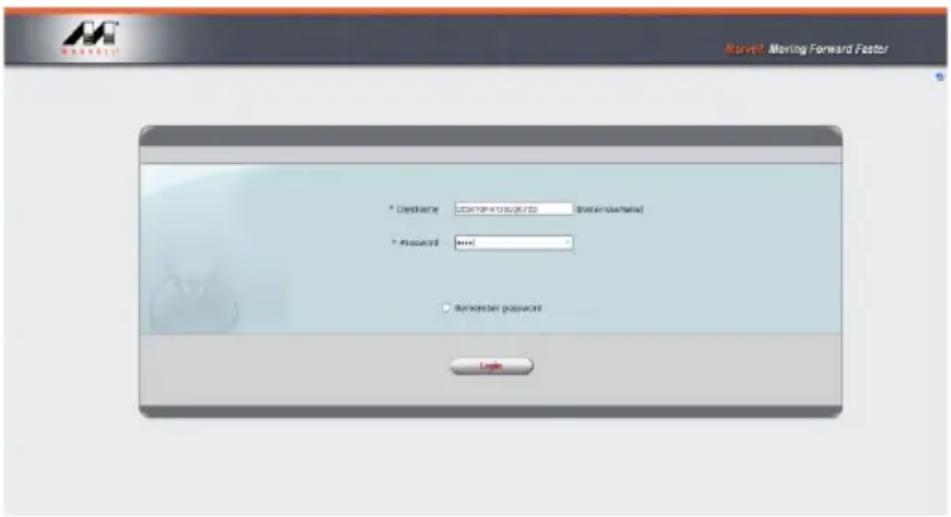
- Use your Windows username and password to log into the MSU. If you have a username but no password, then leave the password field blank.
text_image
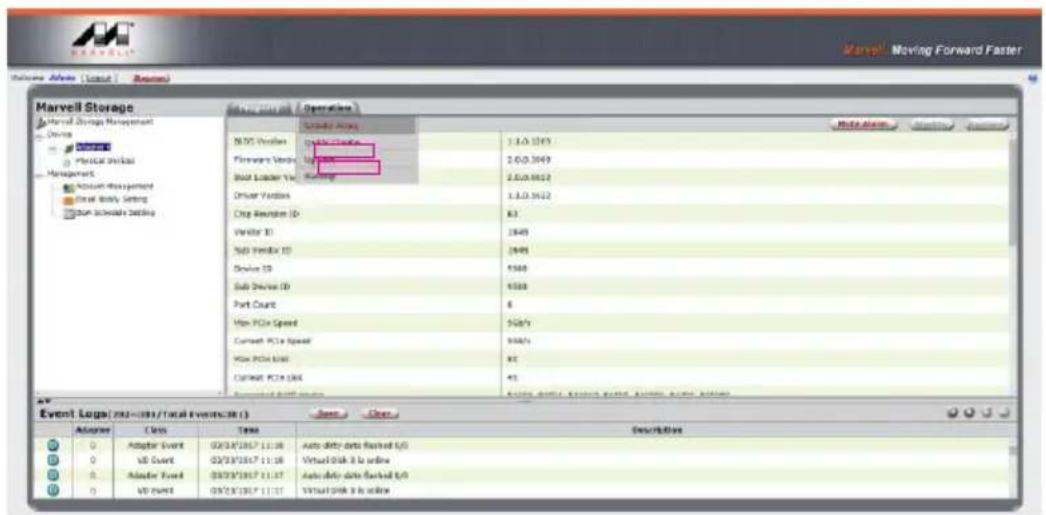
StarNet Moving Forward Factor * Certificate: 20190410306/10 (davon-davon) * Password ***** □ masked password Login- Click 【Operation】 and 【Create Array】.
text_image
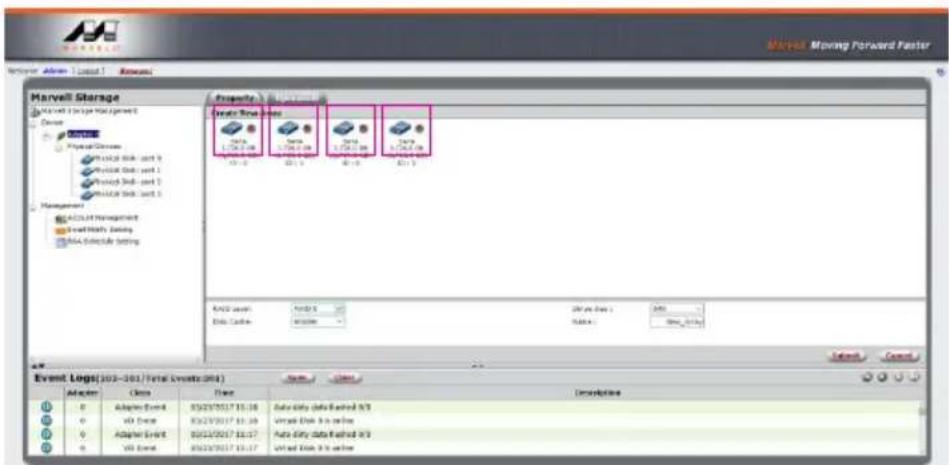
Marvell Storage Marvell Storage Management Device Physical Shock Management Actual Management Static Body Setting Program Schedule Setting Events (10) Operations Utility Area NOS Volumes Firewall Volumes Stop Loader Test Driver Volumes Chip Revelator ID Vendor ID Sub Volumes ID Device ID Sub Device ID Port Count High PCIe Speed Current PCIe Speed High PCIe Max Current PCIe Max Event Logs (20-34) / Total Events (1) Adder Adder Event UI Event Adder Viewd UI Event Auto differ data backed 0/0 Virtual Disk & in online Auto differ data backed 0/0 Virtual Disk & in online Details 1.0.0.1269 2.0.0.3049 2.0.0.6619 1.0.0.3622 83 1849 1849 5560 5560 6 5567s 5567s 8C 8C 8C- Click at the selected HDDs.
text_image
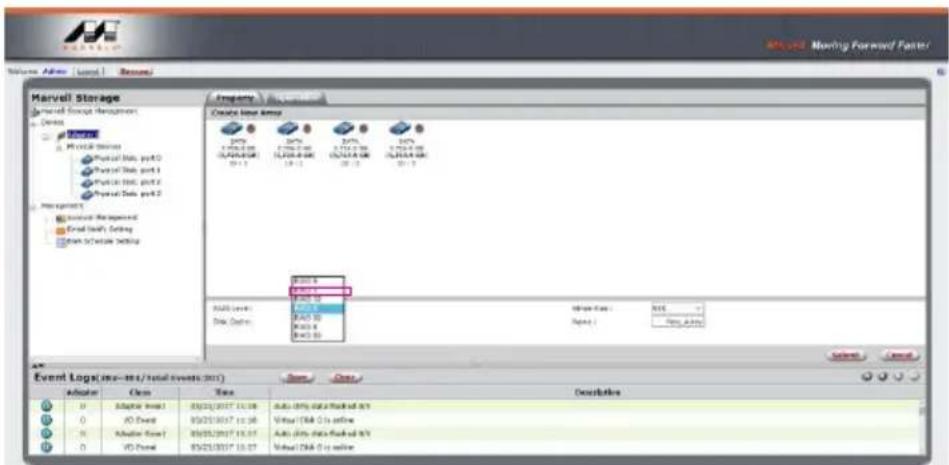
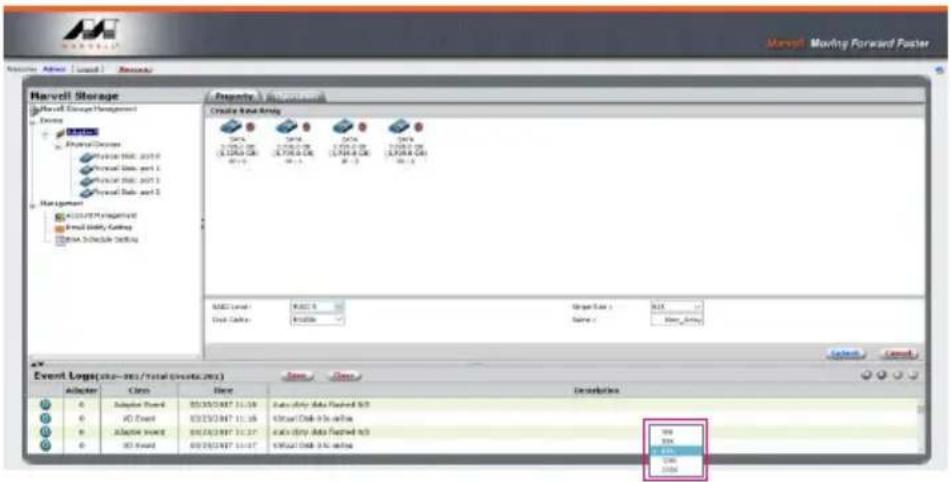
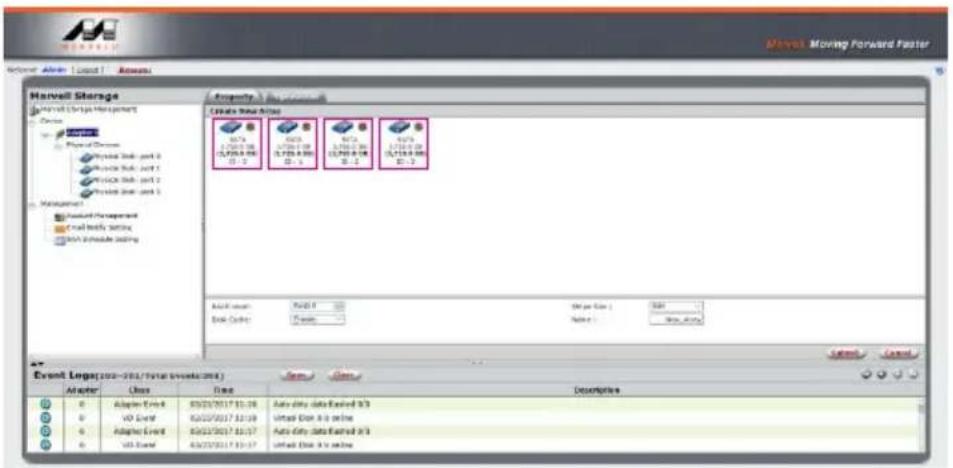
Marvell Moving Forward Faster Marvell Storage Status: 1.274.00 Status: 1.274.00 Status: 1.274.00 Status: 1.274.00 Status: 1.274.00 Status: 1.274.00 Status: 1.274.00 Status: 1.274.00 Status: 1.274.00 Status: -1 Status: -1 Status: -1 Status: -1 Status: -1 Status: -1 Status: -1 Status: -1 Status: -1 Status: -1 Status: -1 Status: -1 Status: -1 Status: -1 Status: -1 Status: -1 Status: -1 Status: -1 Status: -1 Status: -1 Status: -2 Status: -2 Status: -2 Status: -2 Status: -2 Status: -2 Status: -2 Status: -2 Status: -2 Status: -2 Status: -2 Status: -2 Status: -2 Status: -2 Status: -2 Status: -2 Status: -2 Status: -2 Status: -2 Status: -2 Status: -3 Status: -3 Status: -3 Status: -3 Status: -3 Status: -3 Status: -3 Status: -3 Status: -3 Status: -3 Status: -3 Status: -3 Status: -3 Status: -3 Status: -3 Status: -3 Status: -3 Status: -3 Status: -3 Status: -3 Status: -4 Status: -4 Status: -4 Status: -4 Status: -4 Status: -4 Status: -4 Status: -4 Status: -4 Status: -4 Status: -4 Status: -4 Status: -4 Status: -4 Status: -4 Status: -4 Status: -4 Status: -4 Status: -4 Status: -4 Status: -5 Status: -5 Status: -5 Status: -5 Status: -5 Status: -5 Status: -5 Status: -5 Status: -5 Status: -5 Status: -5 Status: -5 Status: -5 Status: -5 Status: -5 Status: -5 Status: -5 Status: -5 Status: -5 Status: -5 Status: -6 Status: -6 Status: -6 Status: -6 Status: -6 Status: -6 Status: -6 Status: -6 Status: -6 Status: -6 Status: -6 Status: -6 Status: -6 Status: -6 Status: -6 Status: -6- Select【RAID 5】(or other RAID).
text_image
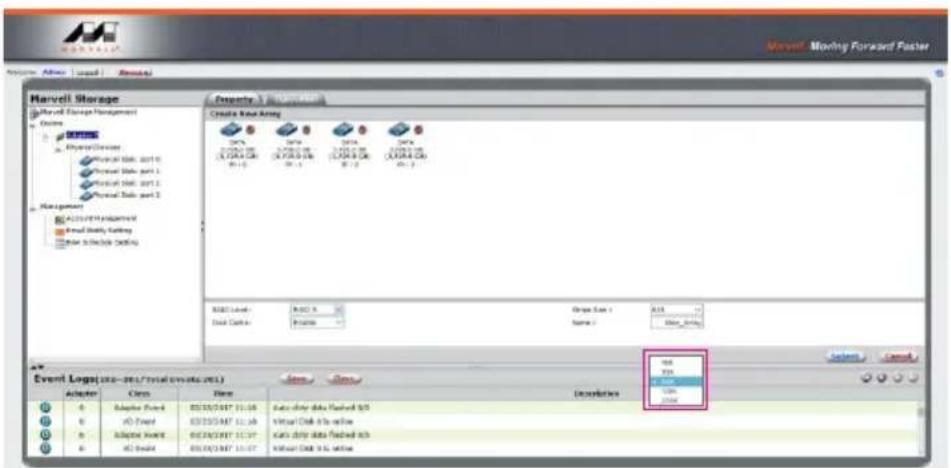
Marvell Storage Marvell Store Management Dora MOSO MOSO Server Physical Data port0 Physical Data port1 Physical Data port2 Physical Data port3 Internal Management External Security Setting System Software Setting Event Log(s): (no - int/total events: 2017) Operator Class Time Description N Adaptive Level1 05/25/2017 10:38 N NDA Event 05/25/2017 10:38 N Adaptive Level1 05/25/2017 10:37 N NDA Event 05/25/2017 10:37 Auto Only data flash and N/Y Virtual DNA C is online Auto Only data flash and N/Y Virtual DNA C is online5. Setup Stripe Size.
text_image
Harvell Storage Harvell Group Management Design Material Deserts Physical Data: 2013 Physical Data: 2014 Physical Data: 2015 Management ACOS/FTM Management Email Security, Accounting Email Schedule Setting Create Text Array Select Text Array Select Text Array Select Text Array Select Text Array Select Text Array Select Text Array Select Text Array Select Text Array Select Text Array Select Text Array Select Text Array Select Text Array Select Text Array Select Text Array Select Text Array Select Text Array Select Text Array Select Text Array Select Text Array Select Text Array Select Text Array Select Text Array Select Text Array Select Text Array Select Text Array Event Log(s): 2013-2017/total records/2017 Actions: Class: Name: Description: A0 A1 A2 A3 A4 A5 A6 A7 A8 A9 A10 A11 A12 A13 A14 A15 A16 A17 A18 A19 A20 A21 A22 A23 A24 A25 A26 A27 A28 A29 A30 A31 A32 A33 A34 A35 A36 A37 A38 A39 A40 A41 A42 A43 A44 A45 A46 A47 A48 A49 A50 A51 A52 A53 A54 A55 A56 A57 A58 A59 A60 A61 A62 A63 A64 A65 A66 A67 A68 A69 A70 A71 A72 A73 A74 A75 A76 A77 A78 A79 A80 A81 A82 A83 A84 A85 A86 A87 A88 A89 A90 A91 A92 A93 A94 A95 A96 A97 A98 A99 C100- The more Stripe Sizes helps a better data transfer for large data files which is good for video and audio editing works.
- The less Stripe Sizes helps a better efficiency at random files which is good for daily word processing, frequent read-&-write works.
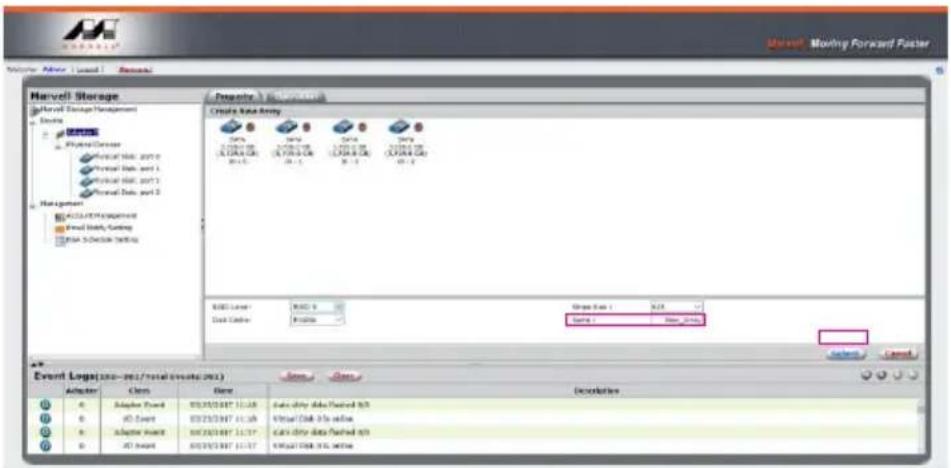
6. Type Storage Name and Submit RAID setting.
7. After submitting RAID setting:

text_image
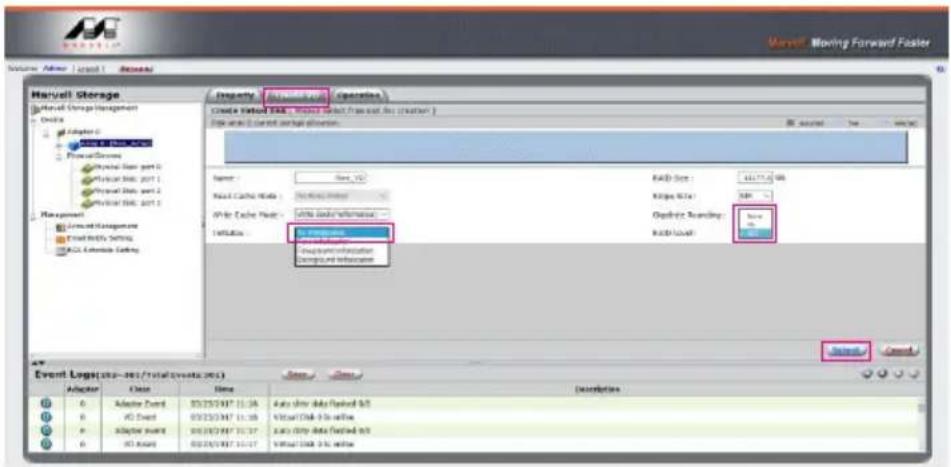
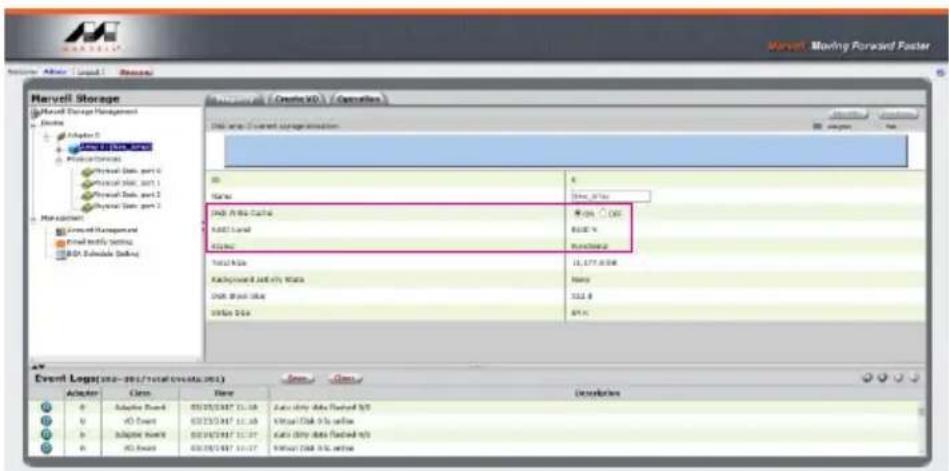
Marvell Storage Harvell Storage Management Actions Adapters 0 MORANT RED DATA Physical Data Physical Data, part 0 Physical Data, part 1 Physical Data, part 2 Physical Data, part 3 Parameters Access to Resources Test Modify Setting RSA Exchange Setting Status: C:\Users\Control\Storage\Duration ID 6 Status: 000.0000 Disk Alpha Cache 80% C (C) NASS Load 80% S Status: 000.0000 Total Rate 11.377.9.08 Background & All With Status Disk Black Rate 512.8 USBx PSX 94.5 Event Log(s): 26-26/total records: 2011 Adapters Cases Dose Definitions 0 Adapters Event 05/30/2017 11:36 Case data Data Packed MS 0 ISO Event 05/30/2017 11:36 Case data Data Packed MS 0 Adapters Event 05/30/2017 11:37 Case data Data Packed MS 0 ISO Event 05/30/2017 11:37 Case data Data Packed MS- Click 【Create VD】, 【Initialize】option is set to 【No Initialization】; 【Gigabyte Rounding】options set to 【10G】, then click 【Submit】.
text_image
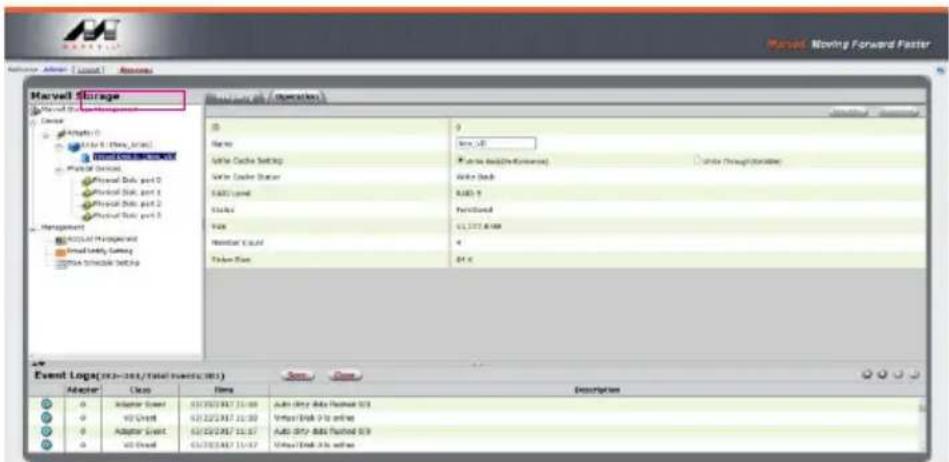
Marvell Moving Forward Faster Volume Author Load 1 Summary Harvell Storage Default Storage Management • Design Adapter 0 • Process Description Physical Data port 0 Physical Data port 1 Physical Data port 2 Physical Data port 3 Management Current Log Maintenance Fixed Modify Settings MAC Calendar Setting Inventory Operating Name: Size: 50 Load Cache Width: 0.0000000000000000000000000000000000000000000000000000000000000000000000000000000000000000000000000000 IP-IR Cache Mode: Active Data Information INPUT: Storage Capacity Information Capacity Information Storage Information Event Log(usr -irc/total events, 265) Adapter Close Date Description A1 Adaptor Event 55/25/247 11:34 Auto Show Data Flashed &S A2 AC Event 55/25/247 11:38 Visual Disk 3x wire A3 Adaptor Event 55/25/247 12:37 Auto Show Data Flashed &S A4 AC Event 55/25/247 13:37 Visual Disk 3x wire- After submit, you get a New_VD.
text_image
Marvel Storage Status: 0 Name: New All Active Cache Setup Active Cache Status SAMS Level Standard Value Standard Found Standard Value Event Log(s): 201-203/Total Power(s) (R1) Operator Case Time Description Adaptor Event 01/25/2017 11:00 01/22/2017 11:30 01/25/2017 11:37 01/25/2017 11:47 Auto Only Data Flashed 0.9 Video Link 0 to online Auto Only Data Flashed 0.9 Video Link 0 to onlineP.S. VD is the abbreviation of Virture Disk.
- To initiate and format HDD/SSD at OS level.

text_image
Disk Utility Internal ST31000528AS... Mac27 External MARVELL Raid V... MART MART Erase "MARVELL Raid VD 0 Media"? Erase "MARTVELL Raid VD 0 Media" will select all data stored on IL and cannot be undefined. Provide a name, choose a partition map and format, and click Erase to proceed. Name: Untitled Format: Mac OS (Extended Jourmaled) Scheme: QUID Partition Map Security Options... Cancel Erase 3TB Connection MP Christoort 0 Partition Map Not Supported Type Disk S.M.R.T.stater Not Supported Device:dsw1- After completing the format, you could start using your GR4670-TB3.
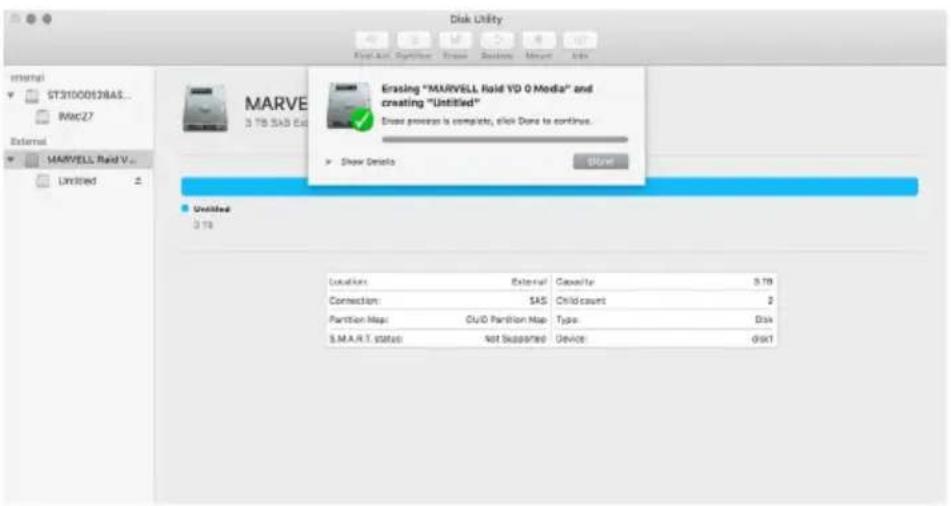
text_image
Disk Utility Internal ST31000138AS... MAC27 External MARVELL Raid V... Unlisted 3 TB SAS Ext Erase "MARVELL Raid VD 0 Media" and creating "Untitled" Show process is complete, click Done to continue. Show Details Show Untitled 3 TB Location: External Capacity: 5 TB Connection: SAS Child count: 2 Partition Map: C/O Partition Map Type: Disk S.M.A.R.T. status: Not Sessarted Device: disk1B. Delete a RAID for a new RAID setting
- Click 【Operation】 and 【Delete VD】.

text_image
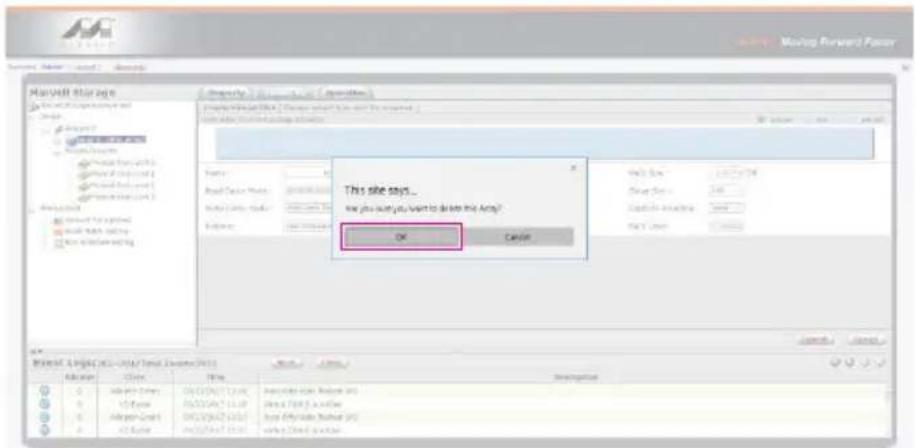
Marvell Storage Marvell Storage Management Source: Chapter 1 Program Files Physical Data Physical Data Physical Data Physical Data Management ACCEL Management Serial Data Set NSA Estimate Setting Event Log(100-300/total events) Adapter Class Time Description Adapter Event: 05/05/2017 11:36 Auto data feedback 073 Vit Cond: 05/05/2017 11:36 Virtual Disk 3 to online Adapter Speed: 05/05/2017 11:37 Auto data feedback 074 Vit Cond: 05/05/2017 11:37 Virtual Disk 3 to online- Click 【OK】 at first warning message.
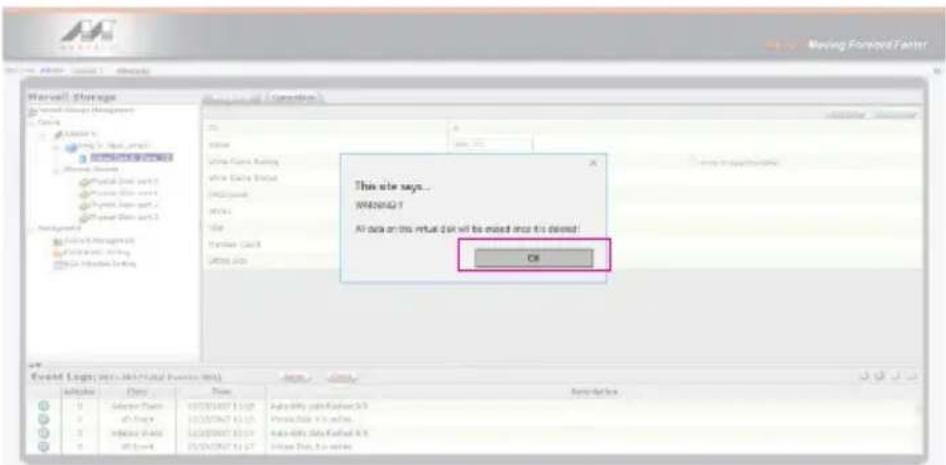
text_image
This site says... WANNAQ 1 All data on this market can be mixed once it opened! Off- Click 【OK】 at the second warning message.
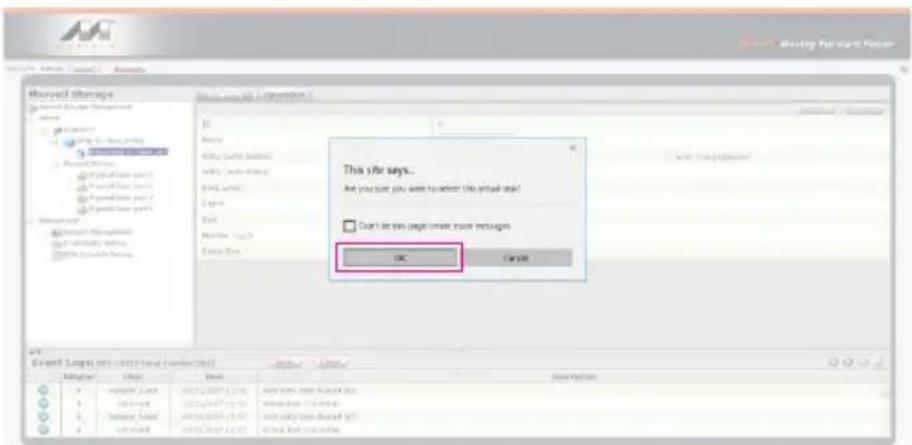
text_image
Microsoft Storage This site says... Are you sure you want to answer this email age! Don't let this page create more reticups OK Cancel Expand Settings (1) (2) (3) (4) (5) Add Import (Add Import) Add Import (Add Import) Add Import (Add Import) Add Import (Add Import) Add Import (Add Import) Add Import (Add Import) Add Import (Add Import) Add Import (Add Import) Add Import (Add Import) Add Import (Add Import) Add Import (Add Import) Add Import (Add Import) Add Import (Add Import) Add Import (Add Import) Add Import (Add Import) Add Import (Add Import) Add Import (Add Import) Add Import(1) Add Import Add Import(1) Add Import Add Import(1) Add Import Add Import(1) Add Import Add Import(1) Add Import Add Import(1) Add Import Add Import(1) Add Import Add Import(1) Add Import Add Import(1) Add Import Add Import(1) Add Import Add Import(1) Add Import Add Import(1) Add Import Add Import(1) Add Import Add Import(2) Add Import Add Import(2) Add Import Add Import(2) Add Import Add Import(2) Add Import Add Import(2) Add Import Add Import(2) Add Import Add Import(2) Add Import Add Import(2) Add Import Add Import(2) Add Import Add Import(2) Add Import Add Import(2) Add Import Add Import(2) Add Import Add Import(2) Add Importtext_image
Microsoft Storage This file says... How you want you want to drive the Army? OK Cancel- It returns to JBOD mode, you just have to format every individual HDD or just to set up another RAID.
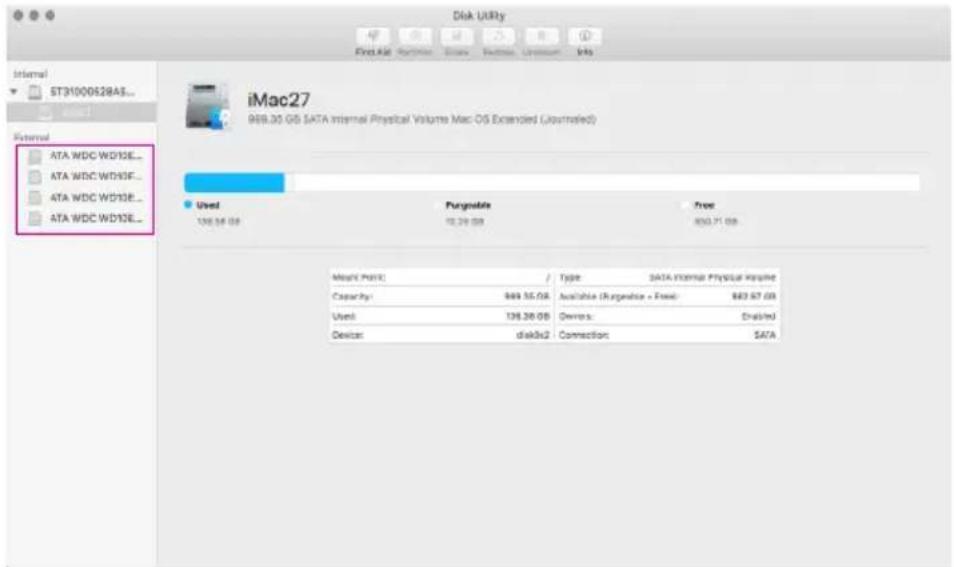
text_image
Disk Utility File Edit View Insert Window Help Internal ST31000528A3... Internal ATA WDC WD13E... ATA WDC WD13F... ATA WDC WD13E... ATA WDC WD13E... iMac27 949.35 GB SATA Internal Physical Volume Mac OS Extended (Journated) Used Pargnable Free 106.54 GB 12.24 GB 850.71 GB Mnkt Point: / Type: DATA Internal Physical Volume Capacity: 849.35 GB Available (Risperse + Fixed): $83.67 GB Used: 138.26 GB Devices: Disabled Device: disk3x2 Connection: SATAPlease refer to "RAIDON All TB2&TB3 RAID 5 Storage MSU User Manual.pdf" for the RAID setting.
7. Description of HDD Indicators
| Status Power status light | System indicator Light | HDD Status Light | Buzzer |
| No HDD detected Blue light always on N/A | Red light always on N/A | ||
| HDD failed Blue light always on | Red light flashing | Red light always on YES | |
| Data access Blue light always on N/A | Blue light flashing | N/A | |
| HDD idle Blue light always on N/A | Blue light always on | N/A | |
| Rebuilding data - Source HDD | Blue light always on | N/A Blue light flashing | N/A |
| Rebuilding data - Target HDD | Blue light always on | N/A Purple light flashing | N/A |
| Fan failure Blue light always on | Red light flashing | Blue light always on | YES |
| Overheat | Blue light always on | Red light flashing | Blue light always on |
8. Connect with other devices
- TB port: Thunderbolt™ 3 ports can be connected to TB3, USB3.1 and Display port device. It is downward to support USB3.0 / USB2.0. This product can connect with different USB devices by USB Type C to Type A/B cable. It supports TB port power delivery (PD) function, which can provide 15W (5V / 3A) power output to support 5V / 3A rechargeable notebook computer use. There is no additional power supply need.
- Mini Display port: configured with Mini Display Port connection port to provide additional screen output.
Two System Connections:
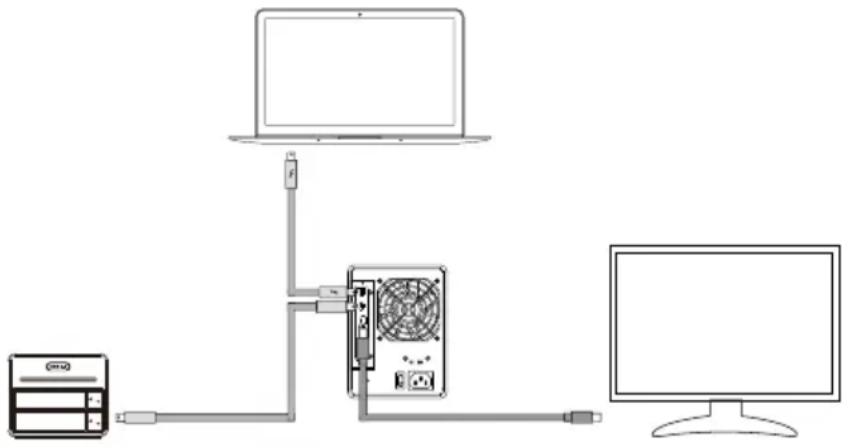
A. GR4670-TB3: Let its TB A port connect to Host (PC/Workstation/Server), TB B port to other Device (USB or TB), and mDP (Mini Display) port to monitor.
flowchart
graph TD
    A["Server"] -->|USB| B["Laptop"]
    B --> C["CPU"]
    C --> D["Monitor"]
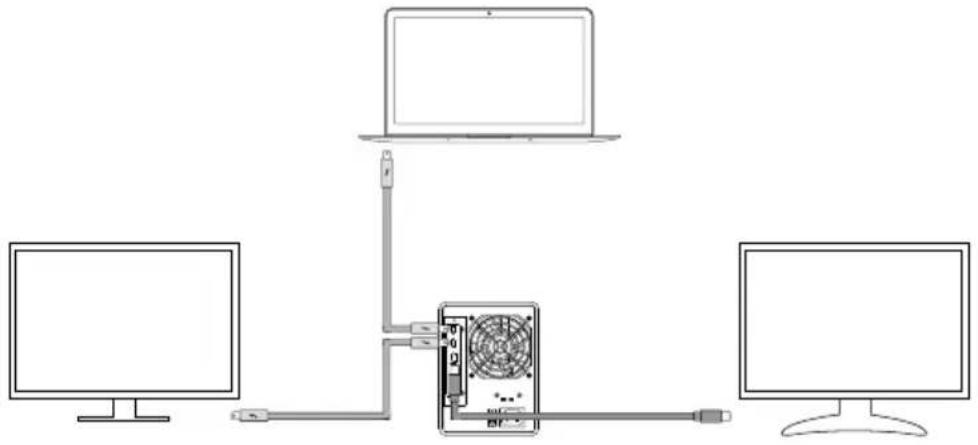
B. GR4670-TB3: Let its TB A port connect to Host (PC/Workstation/Server), TB B port to a monitor, and mDP port to the second monitor.
natural_image
Diagram showing three computers connected via a central device with cable, no text or symbols present9. Frequently Asked Questions
- If the GR4670-TB3 is turned on, but the Thunderbolt™ cable is not connected, the fan and power status lights will both be in stopped/hibernation mode. The fan and power status light will not come on until the Thunderbolt™ cable is connected to the computer.
- When the computer enters hibernation mode, the fan and power status lights will both be in stopped/ hibernation mode. The fan and power status light will not come on until the computer is awake.
- If a hard disk already contains data from another RAID product or RAID mode has already been set, we recommend reverting back to JBOD mode before the drive is used with the GR4670-TB3 again to avoid problems accessing the hard drive.
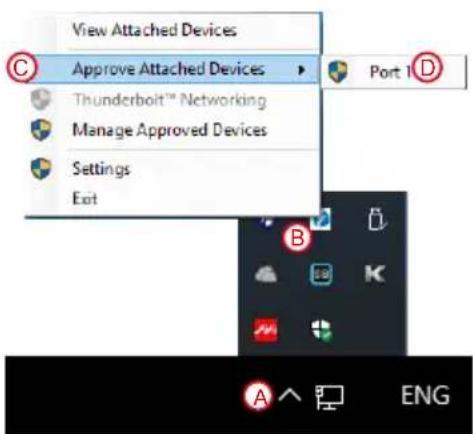
- If the DR8M-TB3 is installed on the Windows OS but can not be connected, refer to the following steps:
A. Open the Windows Taskbar.
B. right-click the Thunderbolt™ icon.
C. Select "Approve Attached Devices".
D. Select the port to which the device is connected.
E. Wait for the dialog box "Approve Thunderbolt™™ Devices" to appear.
F. Select "Always Connect"
G. Press "OK"。
text_image
View Attached Devices Approve Attached Devices Thunderbolt™ Networking Manage Approved Devices Settings Exit Port 1 D A ENG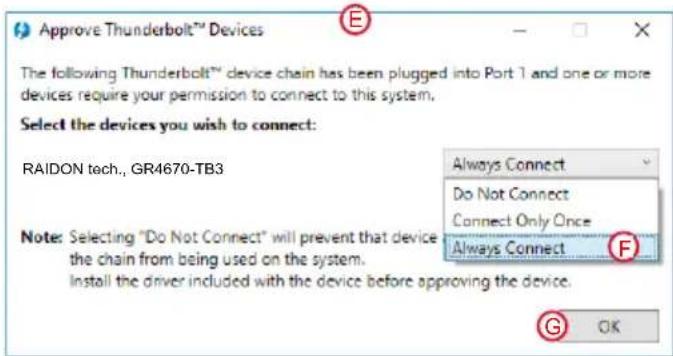
text_image
Approve Thunderbolt™ Devices The following Thunderbolt™ device chain has been plugged into Port 1 and one or more devices require your permission to connect to this system. Select the devices you wish to connect: RAIDON tech., GR4670-TB3 Note: Selecting "Do Not Connect" will prevent that device the chain from being used on the system. Install the driver included with the device before approving the device. Always Connect Do Not Connect Connect Only Once Always Connect G OK5. How to install software on macOS:
A. Unzip the downloaded tarball and execute msu.dmg.
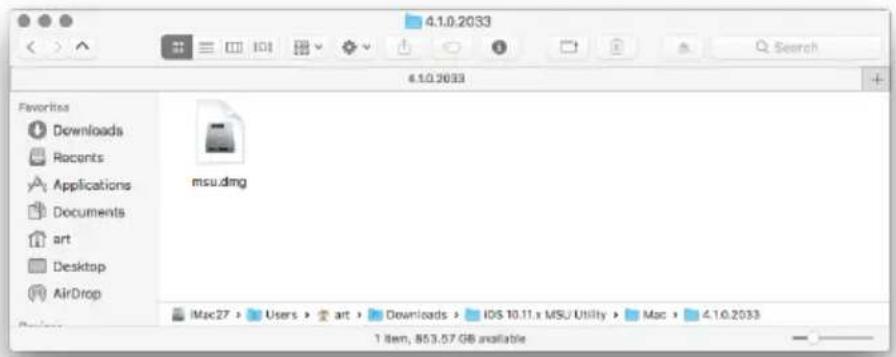
text_image
4.1.0.2033 4.1.0.2033 Favorites Downloads Recents Applications Documents art Desktop AirDrop msu.dmg iMac27 > Users > art > Downloads > IDS 10.11.x MSU Utility > Mac > 4.1.0.2033 1 item, 853.57 GB availableB. Get the installation program MSUSetup.pkg, execute the program, and enter the installation process.
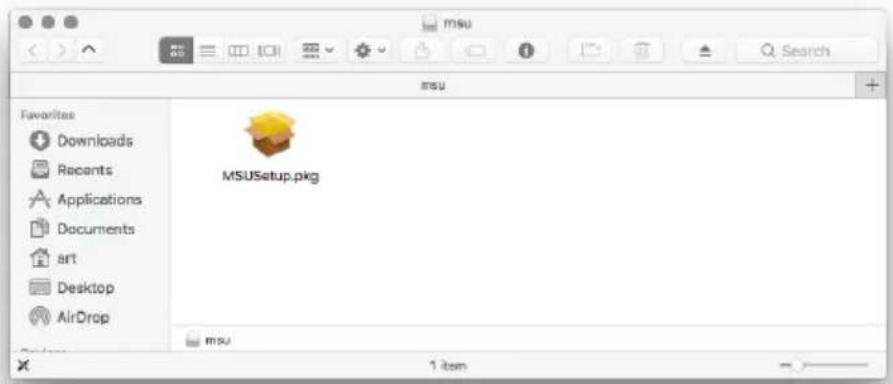
text_image
MSU Favorites Downloads Recents Applications Documents art Desktop AirDrop MSUSetup.pkg 1 itemC. Follow the flow instructions and actual conditions to complete the installation.
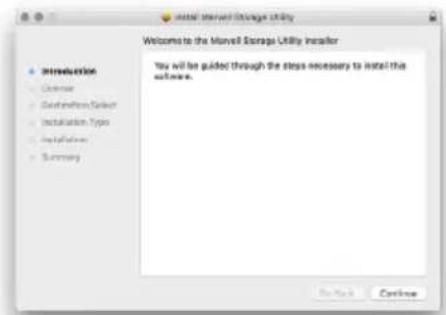
text_image
Welcome to the Murell Storage Utility Installer You will be guided through the steps necessary to install this software. Introduction Custom Customs/Stack System Installation Type Installation Summary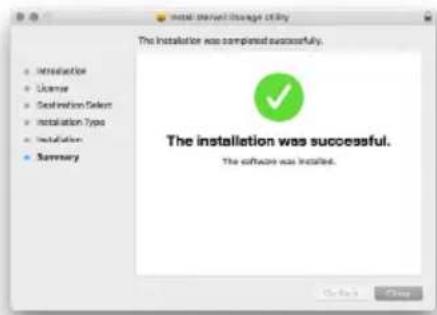
text_image
Initial service change utility The installation was completed successfully. The installation was successful. The software was installed.- There are three ways to start the program:
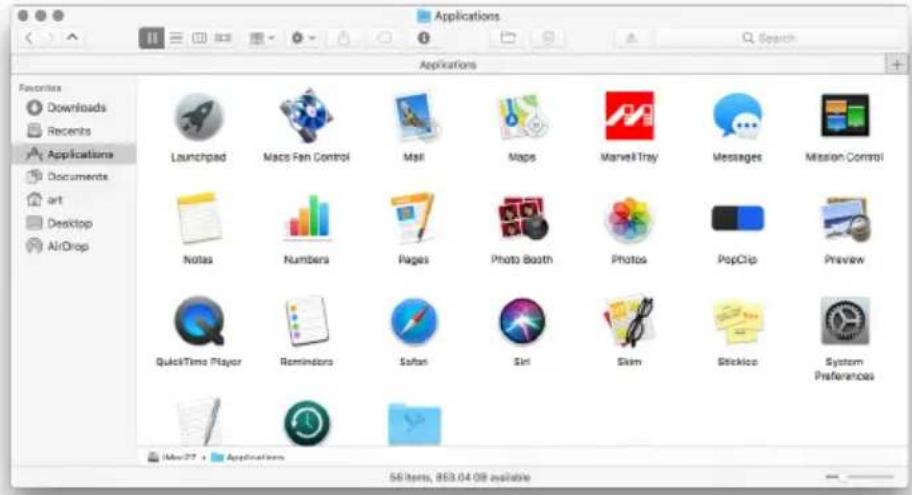
A. Find MarvellTray in the folder "Applications", hit the point and execute the program.
text_image
Applications Favorites Downloads Recents Applications Documents art Desktop AirDrop Launchpad Macs Fan Control Mail Maps MarvelTray Messages Mission Control Notes Numbers Pages Photo Booth Photos PopClip Preview QuickTime Player Reminders Safari Siri Skim Stickbox System Preferences Mac27 + Applications 56 items, 853.04.08 availableB. Hit the Launchpad on the Dock and hit the MarvellTray icon to execute the program.
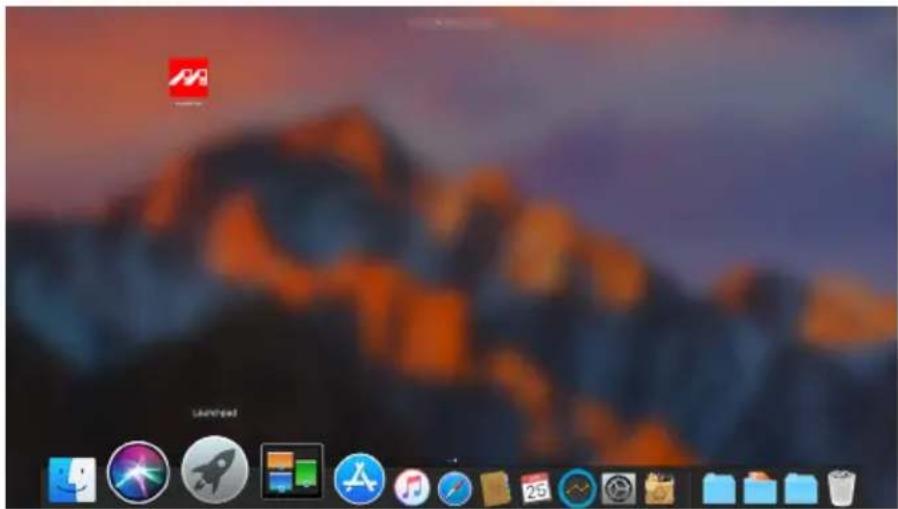
text_image
Desktop screenshot with macOS and network icons, showing a cityscape background and status bar at bottomC. Using Spotlight's search function, type MarvellTray to find the program and press Enter to execute the program.
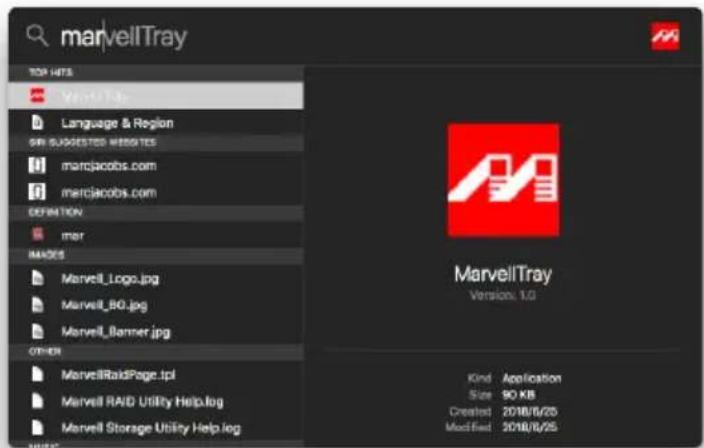
text_image
marvellTray TOP HITS Language & Region GRI SUGGESTED WEGETES marcjacobs.com marcjacobs.com DEFINITION mer MAYOGS Marvell_Logo.jpg Marvell_BO.jpg Marvell_Banner.jpg OTHER MarvellRaidPage.tpl Marvell RAID Utility Help.log Marvell Storage Utility Help.log Kind Application Size 90 KB Created 2018/8/25 Modified 2018/8/25- The new macOS 10.13 (High Sierra) requires user approval before loading new, third-party kernel extensions:
A. Execute MarvellMvumi.pkg.
B. Appear from an unidentified developer warning, click on the lower right corner of the "OK."
C. Open System Preferences, and go to Security & Privacy.
D. Click on the "Allow" button.
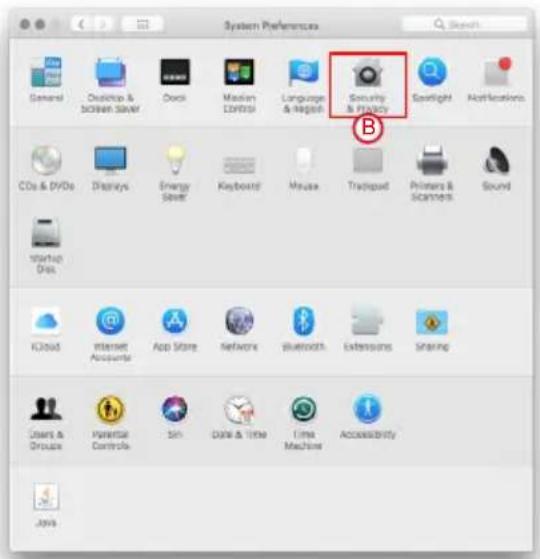
text_image
System Preferences General Desktop & Screen Server Quick Medium Controller Language & Graphic Security & Privacy Spotlight Availability CDs & DVDs Displays Energy Server Keyboard Mouse Trackpad Printers & Scanners Sound Startup Docs ICloud Internet Accounts App Store Network Bluetooth Extensions Sharing Users & Groups Parental Controls Spin Guide & Write Time Machine Accessibility Java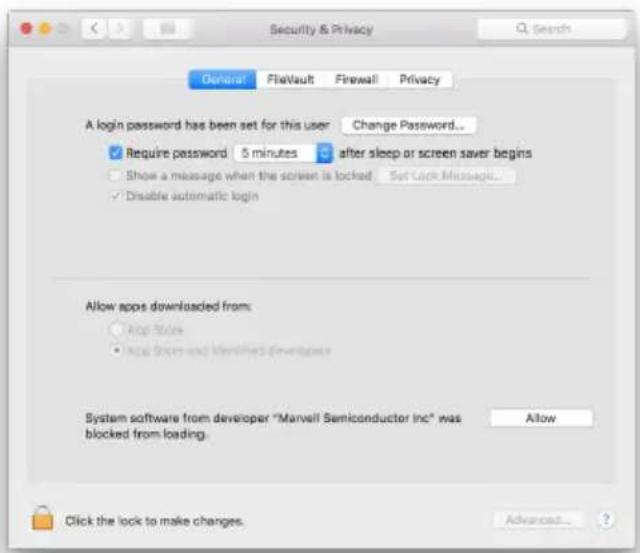
text_image
Security & Privacy General? Flavault Firewall Privacy A login password has been set for this user Change Password... ✓ Require password 5 minutes after sleep or screen saver begins Show a message when the screen is locked Set Lock Message... ✓ Disable automatic login Allow apps downloaded from: App Store App Store and Identifies Developer System software from developer "Marvell Semiconductor Inc" was blocked from loading. Allow Click the lock to make changes. Advanced... ?Note: If you can not click the allow button, click the lower left corner of the lock icon, and enter the administrator password.
關於這份手冊
text_image
Diagram of a computer power connector with labeled ports and fan structure注意:硬碟位置0一定要安装硬碟。
natural_image
Technical line drawings of a hard disk drive assembly with red arrows indicating component removal (no text or symbols present)text_image
Marvell Storage Marvell Storage Maintenance Centers MOS MOS (6.0.1) MOS (6.0.2) Management Reported by approved Test Tools Setting MOS Software Setting Operation Properties MOS File Size LSTM Create Update Read Leader V: Winning Driver Version CPU Edition ID Vendor ID Sub Driver ID Device ID Sub Device ID Part Count Main PCIe Speed Current PCIe Speed Auto PCIe Grid Current PCIe Grid Event Logs (95-101/total events:301) Actions Class Time Description 0 0 0 0 0 0 0 0 0 0 0 0 0 0 0 0 0 0 0 0 0 0 0 0 0 0 0 0 0 0 0 0 0 0 0 0 0 0 0 0 0 0 0 0 0 0 0 0 0 0 Event Logs (95-101/total events:301) Actions Class Time Data Data Data Packed 8.3% Virtual Disk 3 is online Auto Data Data Packed 8.3% Virtual Disk 3 is online3. 點擊選擇硬碟。
text_image
Marvell Moving Forward Poster Market - Altion | Load | Amounts Marvell Storage Marvell Storage Management Device Physical Devices Physical Task - part 1 Physical Task - part 2 Physical Task - part 3 Physical Task - part 4 Management Standard Management Mail Tokey Setting Mail Schedule Setting Status: Status Event Log(s): 2023-2024/Total events:mt Operator | Status | Time | Description 0 | Adapter Event | 05/27/2017 10:16 | Auto City Data Earned 9.3 | 0 | VIO Event | 05/27/2017 10:19 | Virtual Dot A to online 0 | Adapter Event | 05/27/2017 10:17 | Auto City Data Earned 9.3 | 0 | VIO Event | 05/27/2017 10:17 | Virtual Dot A to onlinetext_image
Marvell Storage Market Storage Management Design Source: M1000000000000000000000000000000000000000000000000000000000000000000000000000000000 Property Create Store Arms GPs 2.25E+39 1.25E+38 1.25E+37 1.25E+36 1.25E+35 1.25E+34 1.25E+33 1.25E+32 1.25E+31 1.25E+30 1.25E+29 1.25E+28 1.25E+27 1.25E+26 1.25E+25 1.25E+24 1.25E+23 1.25E+22 1.25E+21 1.25E+20 1.25E+19 1.25E+18 1.25E+17 1.25E+16 1.25E+15 1.25E+14 1.25E+13 1.25E+12 1.25E+11 1.25E+10 1.25E+9 1.25E+8 1.25E+7 1.25E+6 1.25E+5 1.25E+4 1.25E+3 1.25E+2 1.25E+1 Event Log(s): 96-98/total events: 397 Source: Cncls Date: Date: Date Time: Time Name: Auto Only Data Rated: 97% Video Click: 9% online Auto Only Data Rated: 97% Video Click: 9% online5. 設定 Stripe Size
text_image
Marvell Storage Marvell Storage Management Options MOS Physical Devices Physical Data: 2017 Physical Data: 2017 Physical Data: 2017 Management ACOS/FTM/ADAM/ATM Mail Security Tracking Mail Schedule Tracking Create Data Array 3.000 GB 3.000 GB 3.000 GB 3.000 GB 3.000 GB 3.000 GB 3.000 GB 3.000 GB 3.000 GB 3.000 GB 3.000 GB 3.000 GB 3.000 GB 3.000 GB 3.000 GB Event Log(s): 26-29/Total events/2017 Adapter Cells Time Description Adaptive Front OS/OS/OS/OS/OS Adaptive Front OS/OS/OS/OS Adaptive Front OS/OS/OS/OS Adaptive Front OS/OS/OS/OS Adaptive Front OS/OS/OS/OS Adaptive Front OS/OS/OS/OS Adaptive Front OS/OS/OS/OS Adaptive Front OS/OS/OS/OS Adaptive Front OS/OS/OS/OS Adaptive Front OS/OS/OS/OS Adaptive Front OS/ Adaptive Front OS/ Adaptive Front OS/ Adaptive Front OS/ Adaptive Front OS/ Adaptive Front OS/ Adaptive Front OS/ Adaptive Front OS/ Adaptive Front OS/ Adaptive Front OS/ Adaptive Front OS/ Adaptive Front OS/ Adaptive Front OS/ Adaptive Front OS/ Adaptive Front OS/ Adaptive Front OS/ Adaptive Front OS/ Adaptive Front OS/ Adaptive Front OS/ Adaptive Front OS/ Adaptive Front OS/text_image
Marvell Storage Marvell Forward Management History MOSO Physical Devices Physical Data 2019 Physical Data port 1 Physical Data port 2 Physical Data port 3 Management ACSLUT Maintenance Focal Daily Running Focal Schedule Setting Create Data Store MOSO Physical Devices Physical Devices Physical Data Port 1 Physical Data Port 2 Physical Data Port 3 MOSO Data Center MOSO Data Center MOSO MOSO MOSO MOSO MOSO MOSO MOSO MOSO MOSO MOSO MOSO MOSO MOSO MOSO MOSO MOSO MOSO MOSO MOSO MOSO Event Log(s:202-203/total events:203) Adapter Cells Name Description A0000000000000000000000000000000000000000000000000000000000000000000000000000000000000000000000000000 A14 Event MOSO A15 Event MOSO A16 Event MOSO A17 Event MOSO- 提交 RAID 設置後的回饋如下:
text_image
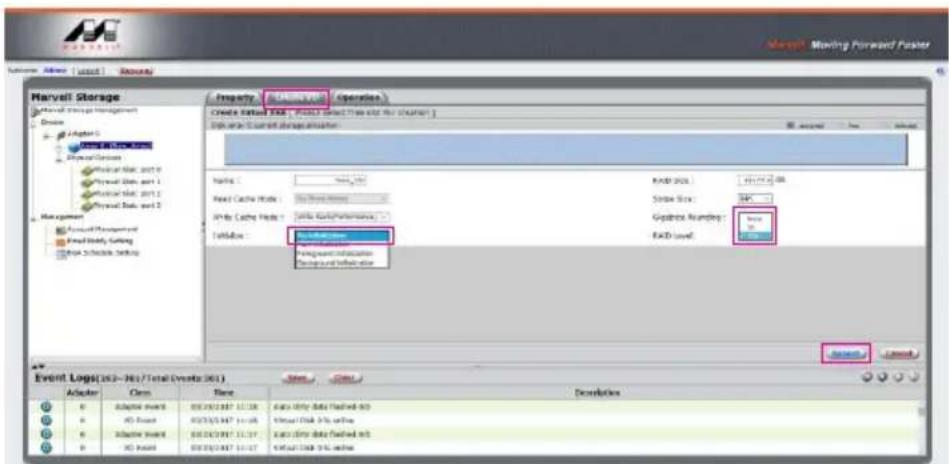
Harvell Storage Harvell Storage Management Index Adapter 0 Harvell Storage Production Services Physical Data port 0 Physical Data port 1 Physical Data port 2 Physical Data port 3 Management Current Management Fixed notify setting Auto Schedule Setting Event Log(s): (sca - sca/total events.sca) Adapter Cells Date Details 0 Adaptive Event: 00:00:00'07 15:38 Data Only Data Flawed N/S 0 xD Event: 00:00:00'07 15:38 Virtual Disk N/S active 0 Adaptive Event: 00:00:00'07 15:37 Data Only Data Flawed N/S 0 xD Event: 00:00:00'07 15:37 Virtual Disk N/S active Event Log(s): (sca - sca/total events.sca) Editor Case Date Descriptions- 點擊【Create VD】,將【Initialize】的選項設定為【No Initialization】;將【Gigabyte Rounding】的選項設定為【10G】,再點擊【Submit】。
text_image
Harvell Storage Harvell Storage Management Device Adapter 0 Physical Data Physical Data: 2017.9 Physical Data: 2017.1 Physical Data: 2017.2 Management Account Management Food Security Cutting Show Schedule Setting Property Status Operations Create Event: FAD - FAD3 - CNT - CNT - CNT - CNT - CNT File Path to Start Storage Allocation Name: FAD3-2017 FAD3-2018 FAD3-2019 FAD3-2020 FAD3-2021 FAD3-2022 FAD3-2023 FAD3-2024 FAD3-2025 FAD3-2026 FAD3-2027 FAD3-2028 FAD3-2029 FAD3-2030 FAD3-2031 FAD3-2032 FAD3-2033 FAD3-2034 FAD3-2035 FAD3-2036 FAD3-2037 FAD3-2038 FAD3-2039 FAD3-2040 FAD3-2041 FAD3-2042 FAD3-2043 FAD3-2044 FAD3-2045 FAD3-2046 FAD3-2047 FAD3-2048 FAD3-2049 FAD3-2050 FAD3-2051 FAD3-2052 FAD3-2053 FAD3-2054 FAD3-2055 FAD3-2056 FAD3-2057 FAD3-2058 FAD3-2059 FAD3-2060 FAD3-2061 FAD3-2062 FAD3-2063 FAD3-2064 FAD3-2065 FAD3-2066 FAD3-2067 FAD3-2068 FAD3-2069 FAD3-2070 FAD3-2071 FAD3-2072 FAD3-2073 FAD3-2074 FAD3-2075 FAD3-2076 FAD3-2077 FAD3-2078 FAD3-2079 FAD3-2080 FAD3-2081 FAD3-2082 FAD3-2083 FAD3-2084 FAD3-2085 FAD3-2086 FAD3-2087 FAD3-2088 FAD3-2089 FAD3-2090 FAD3-2091 FAD3-2092 FAD3-2093 FAD3-2094 FAD3-2095 FAD3-2096 FAD3-2097 FAD3-2098 FAD3-2099 FAD3-2100text_image
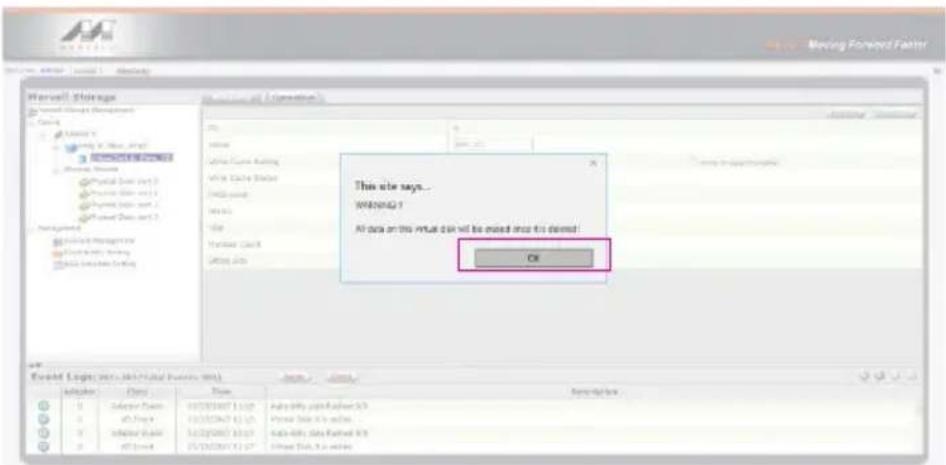
Marvell Storage Marvell Storage Management Source Adapter 5 Operator: VDD Operator: VDD Operator: VDD Operator: VDD Operator: VDD Operator: VDD Operator: VDD Operator: VDD Operator: VDD Operator: VDD Operator: VDD Operator: VDD Operator: VDD Operator: VDD Operator: VDD Operator: VDD Operator: VDD Operator: VDD Operator: VDD Operator: VDD Operator: Vdd Operator: VDD Operator: VDD Operator: VDD Operator: VDD Operator: VDD Operator: VDD Operator: VDD Operator: VDD Operator: VDD Operator: VDD Operator: VDD Operator: VDD Operator: VDD Operator: VDD Operator: VDD Operator: VDD Operator: VDD Operator: VDD Operator: VDD Operator: VD Operator: VDD Operator: VDD Operator: VDD Operator: VDD Operator: VDD Operator: VDD Operator: VDD Operator: VDD Operator: VDD Operator: VDD Operator: VDD Operator: VDD Operator: VDD Operator: VDD Operator: VDD Operator: VDD Operator: VDD Operator: VDD Operator: VDD Operator: VDDD Operator: VDD Operator: VDD Operator: VDD Operator: VDD Operator: VDD Operator: VDD Operator: VDD Operator: VDD Operator: VDD Operator: VDD Operator: VDD Operator: VDD Operator: VDD Operator: VDD Operator: VDD Operator: VDD Operator: VDD Operator: VDD Operator: VDD Operator: VOD Operator: VDD Operator: VDD Operator: VDD Operator: VDD Operator: VDD Operator: VDD Operator: VDD Operator: VDD Operator: VDD Operator: VDD Operator: VDD Operator: VDD Operator: VDD Operator: VDD Operator: VDD Operator: VDD Operator: VDD Operator: VDD Operator: VDD Operator: VDO Operator: VDD Operator: VDD Operator: VDD Operator: VDD Operator: VDD Operator: VDD Operator: VDD Operator: VDD Operator: VDD Operator: VDD Operator: VDD Operator: VDD Operator: VDD Operator: VDD Operator: VDD Operator: VDD Operator: VDD Operator: VDD Operator: VDD Operator: VOOI- 在第一條警告消息中點擊【OK】。
text_image
Microsoft Excel Event Log: 10.1.1 (MIL-1/2017) (MIL) Adder: 0 Adder: 0 Adder: 0 Adder: 0 Adder: 0 Adder: 0 Adder: 0 Adder: 0 Adder: 0 Adder: 0 Adder: 0 Adder: 0 Adder: 0 Adder: 0 Adder: 0 Adder: 0 Adder: 0 Adder: This else says... WARNING? All data on this virtual disk will be mixed once it opened! OK- 在第二條警告信息中點擊【OK】。

text_image
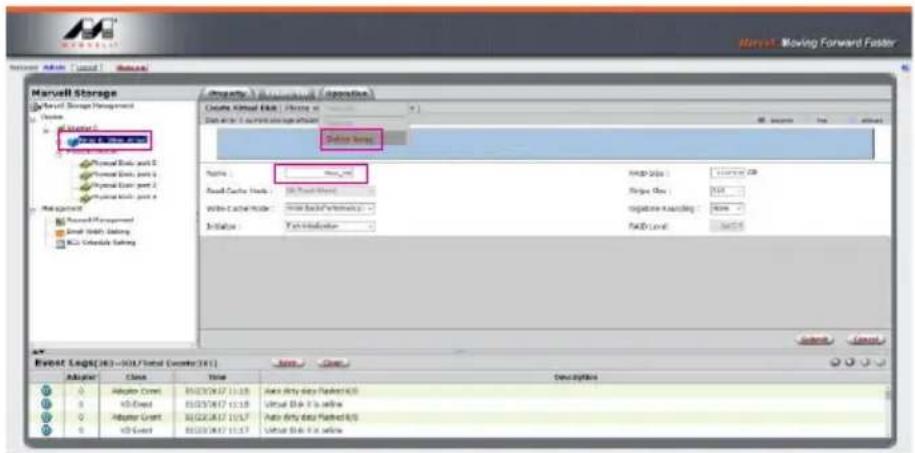
Microsoft SQL Server Management This site says... Are you sure you want to create this email draft! Don't at this page create your flights OK Cancel Event Log(s) 2013-2015 (local server: 2013) Name Class Order Specification A Service User SQL Server SQL Server SQL Server SQL Server SQL Server SQL Server SQL Server SQL Server SQL Server SQL Server SQL Server SQL Server SQL Server SQL Server SQL Server SQL Server SQL Server SQL Server SQL Server SQL Server SQL Server SQL Server SQL Server SQL Server SQL Server SQL Server SQL Server SQL Server SQL Server SQL Server SQL Server SQL Server SQL Server SQL Server A Service User SQL Server SQL Server SQL Server SQL Server SQL Server SQL Server SQL Server SQL Server SQL Server SQL Server SQL Server SQL Server SQL Server SQL Server SQL Server SQL Server SQL Server SQL Server SQL Server SQL Server SQL Server SQL Server SQL Server SQL Server SQL Server SQL Server SQL Server SQL Server SQL Server SQL Server SQL Server SSL Server B Service User SQL Server SQL Server SQL Server SQL Server SQL Server SQL Server SQL Server SQL Server SQL Server SQL Server SQL Server SQL Server SQL Server SQL Server SQL Server SQL Server SQL Server SQL Server SQL Server SQL Server SQL Server C Service User SQL Server SQL Server SQL Server SQL Server SQL Server SQL Server SQL Server SQL Server SQL Server SQL Server SQL Server SQL Server SQL Server SQL Server SQL Server C Service User SQL Server SQL Server SQL Server SQL Server SQL Server SQL Server SQL Server SQL Server SQL Server SQL Server SQL Server SQL Server C,D,E,F,G,H,I,J,K,L,M,N,O,P,Q,R,S,T,U,V,X,Y,Z,X,U,U,U,U,U,U,U,U,U,U,U,U,U,U,U,U,U,U,U,U,U,U,U,U,U,U,U,U,U,U,U,U,U,U,U,U,U,U,U,U,U,U,U,U,U,U,U,U,U,U,U,U,U,U,U,U,U,U,U,U,U,U,U,U,U,U,U,U,U,U,U,U,U,U,U,U,U,U,U,U,U,U,U,U,U,U,U,U,U,U,U,U,U,U,U,U,U,U,U,U/U U U U U U U U U U U U U U U U U U U U U U U U U U U U U U U U U U U U U U U U U U U U U U U U U U U U U U U U U U U U U U U U U U U U U U U U U U U U U U U U U U U U U U U U U U U U U U U U U U U U U This site says... Are you sure you want to create this email draft! Don't at this page create your flights OK Cancel4. 點擊【Operation】、【Delete Array】與【Submit】
text_image
Marvell Storage Marvell Storage Management Name: 12 March 2017 Physical Data, part 2 Physical Data, part 3 Physical Data, part 4 Physical Data, part 5 Management Record Management Send Data, Setting RCL Slovakia Setting Property: Moving Forward Faster Create Wizard Key / History in Data and to create storage software Balance Range Name: max_rml Auto Cache Work: 80.0 Pack Sheet Write Active Mode: New Back/Write Back Initiate: Text Indicate Auto Tools: Current On: Sign In: 100% negative Sampling: None Fixed Level: Not Off Event Log(16) = (90)/Total (Count) (X1) Name Close Adapter Cancel Time Description Adaptor Control BEZECH17 11:15 Auto Only data Pushed 0/0 v0-Event BEZECH17 11:15 Virtual Disk 0 to below Adaptor Control BEZECH17 11:17 Auto Only data Pushed 0/0 v0-Event BEZECH17 11:17 Virtual Disk 0 to below5. 在警告信息中點擊【OK】。