
P318S - Vidéo-projecteur DELL - Free user manual and instructions
Find the device manual for free P318S DELL in PDF.


| Product Type | Video Projector |
| Brand | Dell |
| Model | P318S |
| Display Technology | 0.55" SVGA DLP DMD (DarkChip3) |
| Brightness | 3200 ANSI Lumens (Max) |
| Contrast Ratio | 2200:1 Typical (Full On/Off); 10,000:1 High Contrast Mode |
| Native Resolution | SVGA (800 x 600) |
| Aspect Ratio | 4:3 |
| Projection Lens | F-Stop: F/2.41-2.55; Focal Length: 21.8-24 mm; Manual Zoom 1.1x |
| Throw Ratio | 1.95-2.15 (Wide to Tele) |
| Projection Distance | 1.2 m - 10 m (3.94 ft - 32.81 ft) |
| Projection Screen Size (Diagonal) | 27.5" - 252.4" |
| Lamp | Philips 195 W User-Replaceable |
| Lamp Life | Up to 5000 h (Normal); Up to 6000 h (Eco) |
| Audio | 1 x 2W Speaker |
| Noise Level | 34 dB(A) (Normal); 31 dB(A) (Eco) |
| Dimensions (W x H x D) | 314.4 x 86.7 x 223.5 mm (12.38" x 3.45" x 8.8") |
| Weight | 2.4 kg (5.4 lbs) |
| Power Supply | AC 100-240 V, 50/60 Hz (PFC Input) |
| Power Consumption | 245 W (Normal); 200 W (Eco); <0.5 W (Standby) |
| Keystone Correction | ±40° Vertical (via remote control) |
| I/O Connectors | VGA In (D-sub), VGA Out (Loop-through), HDMI, Composite Video (RCA), Audio In (3.5mm), Audio Out (3.5mm), Mini USB (Type B), USB Type A (5V/1.5A) |
| Remote Control Included | Yes (with AAA batteries) |
| Displayable Colors | 1.07 Billion |
| Uniformity | 85% Typical (JBMA) |
Frequently Asked Questions - P318S DELL
User questions about P318S DELL
0 question about this device. Answer the ones you know or ask your own.
Ask a new question about this device
Download the instructions for your Vidéo-projecteur in PDF format for free! Find your manual P318S - DELL and take your electronic device back in hand. On this page are published all the documents necessary for the use of your device. P318S by DELL.
USER MANUAL P318S DELL
Dell Professional Projector P318S User's Guide
Notes, Cautions, and Warnings

NOTE: A NOTE indicates important information that helps you make better use of your projector

CAUTION: A CAUTION indicates potential damage to hardware or loss of data if instructions are not followed.

WARNING: A WARNING indicates a potential for property damage, personal injury, or death.
Information in this document is subject to change without notice. © 2017 Dell Inc. All rights reserved.
Reproduction of these materials in any manner whatsoever without the written permission of Dell Inc. is strictly forbidden.
Trademarks used in this text: Dell and the DELL logo are trademarks of Dell Inc.; DLP and DLP logo are trademarks of TEXAS INSTRUMENTS INCORPORATED; Microsoft and Windows are either trademarks or registered trademarks of Microsoft Corporation in the United States and/or other countries.
Other trademarks and trade names may be used in this document to refer to either the entities claiming the marks and names or their products. Dell Inc. disclaims any proprietary interest in trademarks and trade names other than its own.
Model: Dell Projector P318S
May 2017 Rev. A00
Contents
1 About Your Dell Projector.... 4
Projector Box Contents 4
Projector Top and Bottom View 5
Projector Connections. 6
Using Remote Control.... 8
2 Adjusting Projector Image 12
Adjusting Projected Zoom 12
Adjusting Projector Focus 13
Adjusting Image Size 14
3 Troubleshooting.... 17
Troubleshooting Tips. 17
Guiding Signals 21
4 Maintenance 22
Changing the Lamp 22
Replacing Remote Control Batteries 24
5 Specifications 25
6 Additional Information 28
7 Contacting Dell 29
1
About Your Dell Projector
Your projector comes with all the items shown below. Ensure that you have all the items, and contact Dell if anything is missing.
Projector Box Contents
Package Contents
Power cable VGA cable (VGA to VGA)
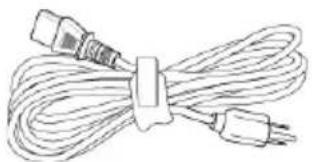
natural_image
Line drawing of a bundle of cables with two connectors (no text or symbols)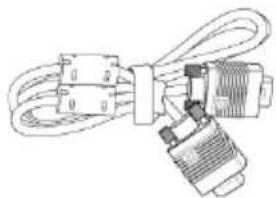
natural_image
Pure electrical circuit lines without any symbolsRemote control AAA Batteries (2)
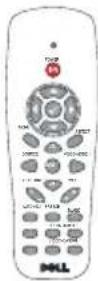
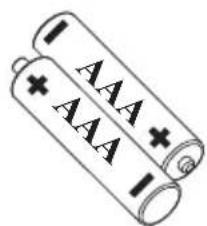
Documentation (User's Guide on line)
Projector Top and Bottom View
Top View Bottom View
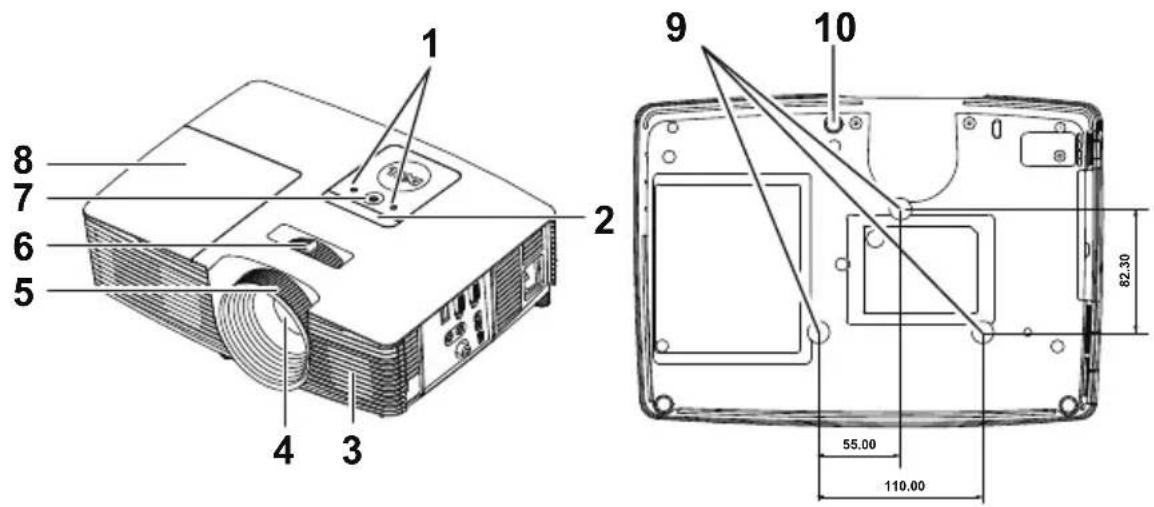
| 1 Status indicators |
| 2 IR receivers |
| 3 2W Speaker |
| 4 Lens |
| 5 Focus ring |
| 6 Z o o m t a b |
| 7 Power button |
| 8 Lamp cover |
| 9 Mounting holes for ceiling mount |
| 10 Tilt adjustment wheel |

NOTE: Ceiling mount screw hole M3 x 6.5 mm depth. Recommended torque < 15 kgf-cm.
Projector Connections
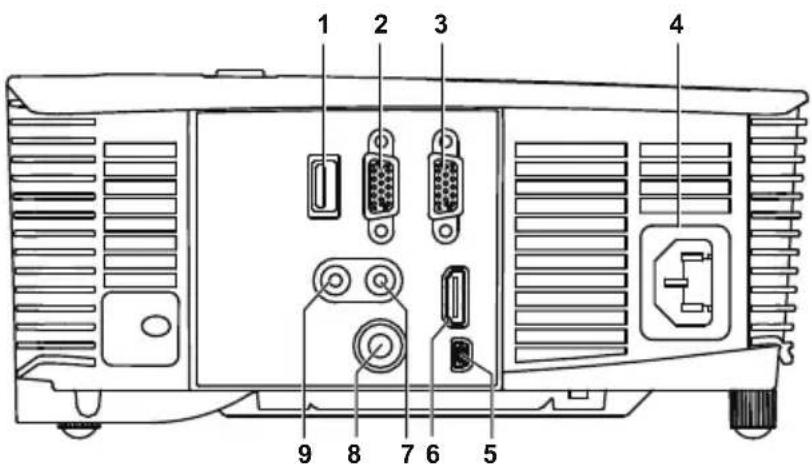
| 1 + 5V/1A DC out connector 6 HDMI connector | |
| 2 VGA output (monitor loop through) connector | 7 Audio input connector |
| 3 VGA input (D-sub) connector 8 Composite Video connector | |
| 4 Power cord connector 9 Audio output connector | |
| 5 Mini USB (mini type B) connector for remote mouse and firmware upgrade | |

CAUTION: Before you begin any of the procedures in this section, follow the Safety Instructions as described on page 7.

CAUTION: Safety Instructions
1 Do not use the projector near appliances that generate a lot of heat.
2 Do not use the projector in areas where there is an excessive amount of dust. The dust may cause the system to fail and the projector will automatically shutdown.
3 Ensure that the projector is mounted in a well-ventilated area.
4 Do not block the ventilation slots and openings on the projector.
5 Ensure the projector operates between ambient temperatures 5^ C to 40^ C ( 41^ F to 104^ F).
6 Do not try to touch the ventilation outlet as it can become very hot after the projector has been turned on or immediately after it is turned off.
7 Do not look into the lens while the projector is on as it may cause injury to your eyes.
8 Do not place any objects near or in front of the projector or cover its lens while the projector is on as the heat may cause the object to melt or burn.
9 Do not use alcohol to wipe the lens.
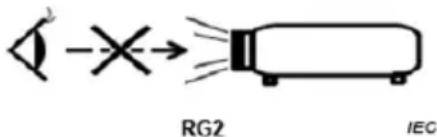
10 Do not stare into the beam (RG2 type).

NOTE:
- Do not attempt to ceiling mount the projector by yourself. It should be installed by a qualified technician.
- Recommended Projector Ceiling Mount Kit (P/N: C3505). For more information, see the Dell Support website at dell.com/support.
- For more information, see the Safety Information that shipped with your projector.
• The P318S projector can only be used indoors.
Using Remote Control
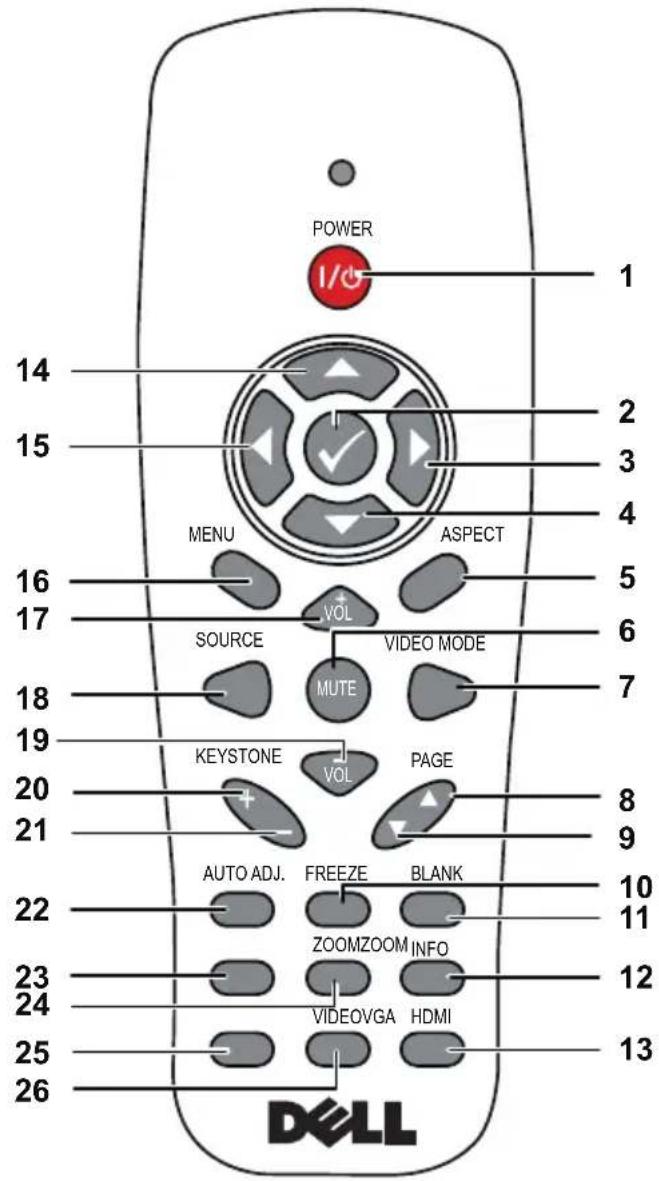
| 1 Power Turns the projector on or off. | |
| 2 Enter Press to confirm the selection. | |
| 3 Right Press to navigate through the On-Screen Display (OSD) Menu items. | |
| 4 Down Press to navigate through the On-Screen Display (OSD) Menu items. | |
| 5 Aspect Ratio Press to change the aspect ratio of a displayed image. | |
| 6 Mute Press to mute or un-mute the projector speaker. | |
| 7 Video mode The projector has preset configurations that are optimized for displaying data (presentation slides) or video (movies, games, etc.).Press the Video Mode button to toggle between Presentation mode, Bright mode, Movie mode, sRGB, or Custom mode.Pressing the Video Mode button once will show the current display mode. Pressing the Video Mode button again will switch between modes. | |
| 8 Page up Press to move to the previous page.NOTE: The Mini USB cable must be connected if you want to use the Page Up feature. | |
| 9 Page down Press to move to the next page.NOTE: The Mini USB cable must be connected if you want to use the Page Down feature. | |
| 10 Freeze Press to pause the screen image, then press "Freeze" again to unfreeze the image. | |
| 11 Blank screen Press to hide/unhide the image. | |
| 12 Information Press to provide projector native resolution information. | |
| 13 HDMI Press to choose HDMI source. | |
| 14 Up Press to navigate through the On-Screen Display (OSD) Menu items. | |
| 15 Left Press to navigate through the On-Screen Display (OSD) Menu items. | |
| 16 Menu Press to activate the OSD. | |
| 17 Volume up Press to increase the volume. | |
| 18 Source Press to switch between Analog RGB, Composite, Component (YPbPr, via VGA), and HDMI source. | |
| 19 Volume down Press to decrease the volume. | |
| 20 Keystone adjustment + | Press to adjust image distortion caused by tilting the projector (+/-40 degrees). |
| 21 Keystone adjustment - | Press to adjust image distortion caused by tilting the projector (+/-40 degrees). |
| 22 Auto Adjust Press to synchronize the projector with the input source. Auto adjust does not operate if the OSD is displayed. | |
| 23 Zoom + Press to increase the image. | |
| 24 Zoom - Press to decrease the image. | |
| 25 VGA Press to choose VGA source. | |
| 26 Video Press to choose Composite Video source. | |
Remote Control Operating Range
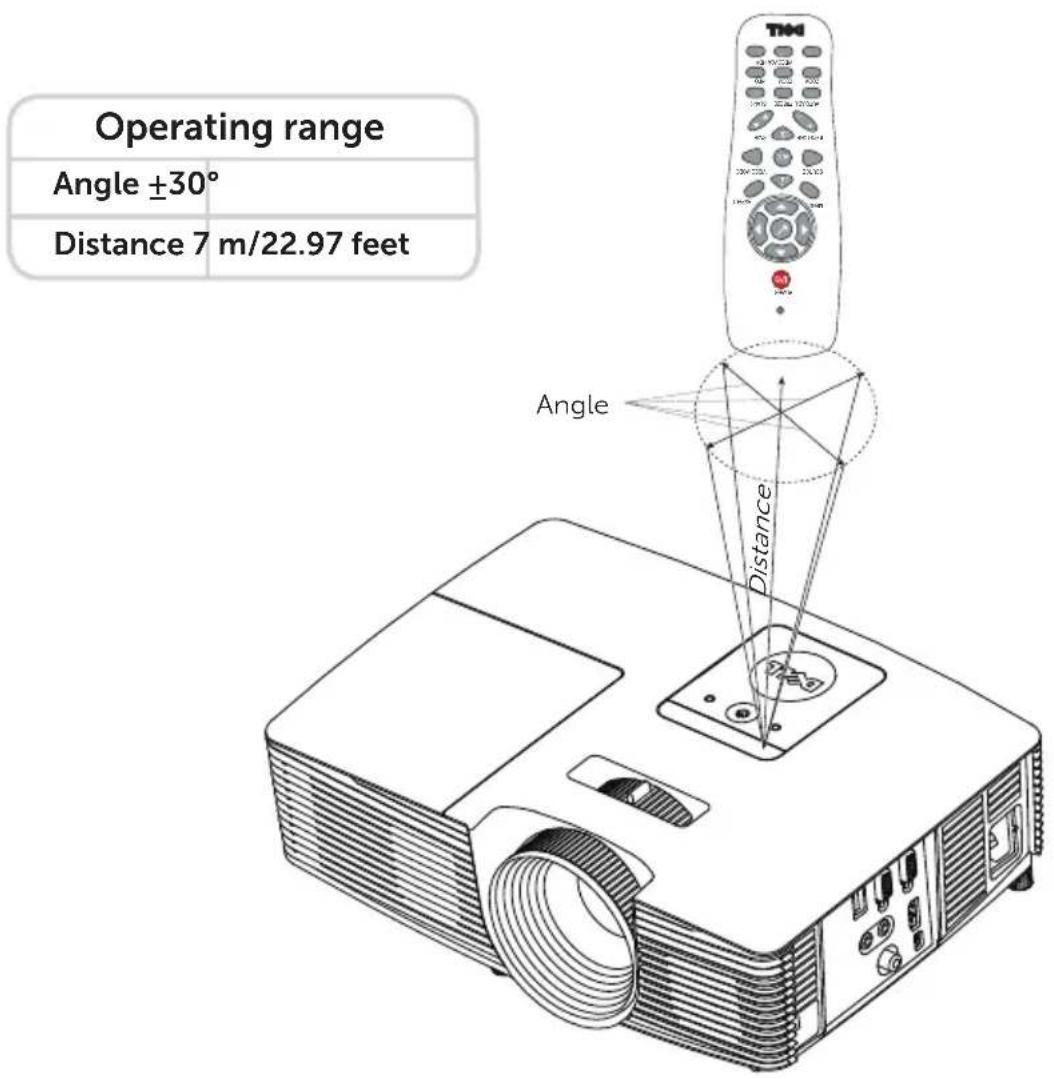

NOTE: Actual operating range may slightly differ from the diagram.
Weak batteries will also prevent the remote control from properly operating the projector.
2
Adjusting Projector Image
Adjusting Projected Zoom
Raising the Projector Height
1 Raise the projector to the desired display angle, and use the front tilt adjustment wheel to fine-tune the display angle.
2 Use the tilt adjustment wheels to fine-tune the display angle.
Lowering the Projector Height
1 Lower the projector, and use the front tilt adjustment wheel to fine-tune the display angle.
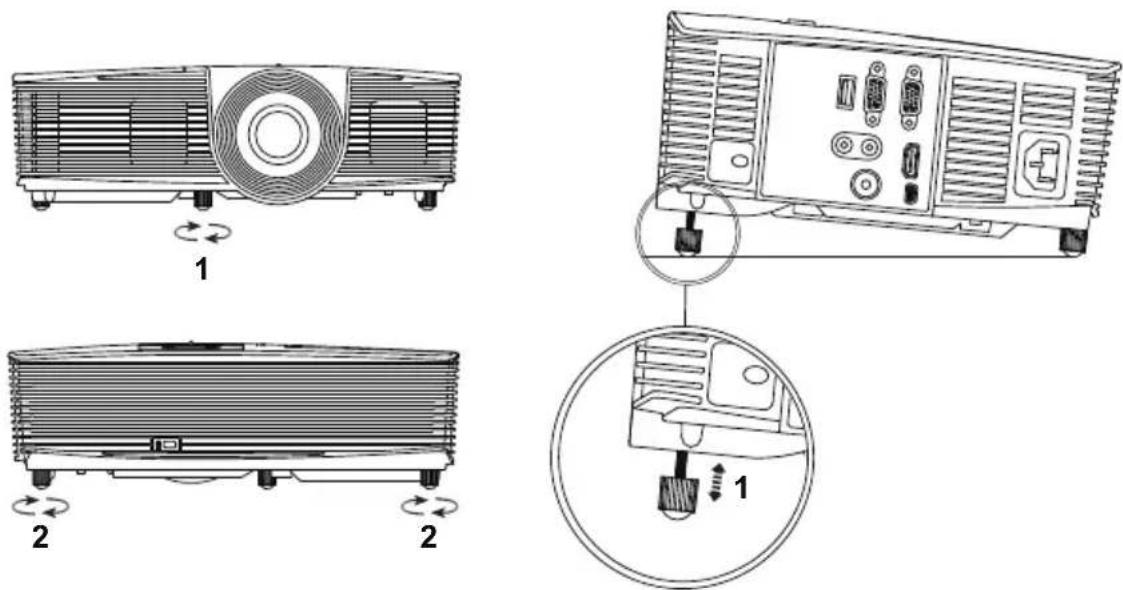
1 Front tilt adjustment wheel (Angle of tilt: -5 to 5 degrees)
2 Rubber foot
Adjusting Projector Focus
1 Rotate the focus ring until the image is clear. The projector focuses at distances ranging between 4.27 ft to 23.29 ft (1.3 m to 7.1 m).
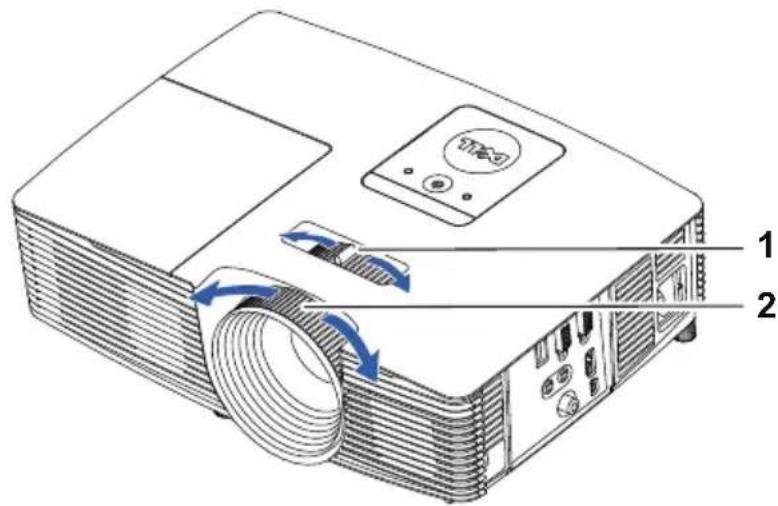
1 Z o o m t a b
2 Focus ring
Adjusting Image Size
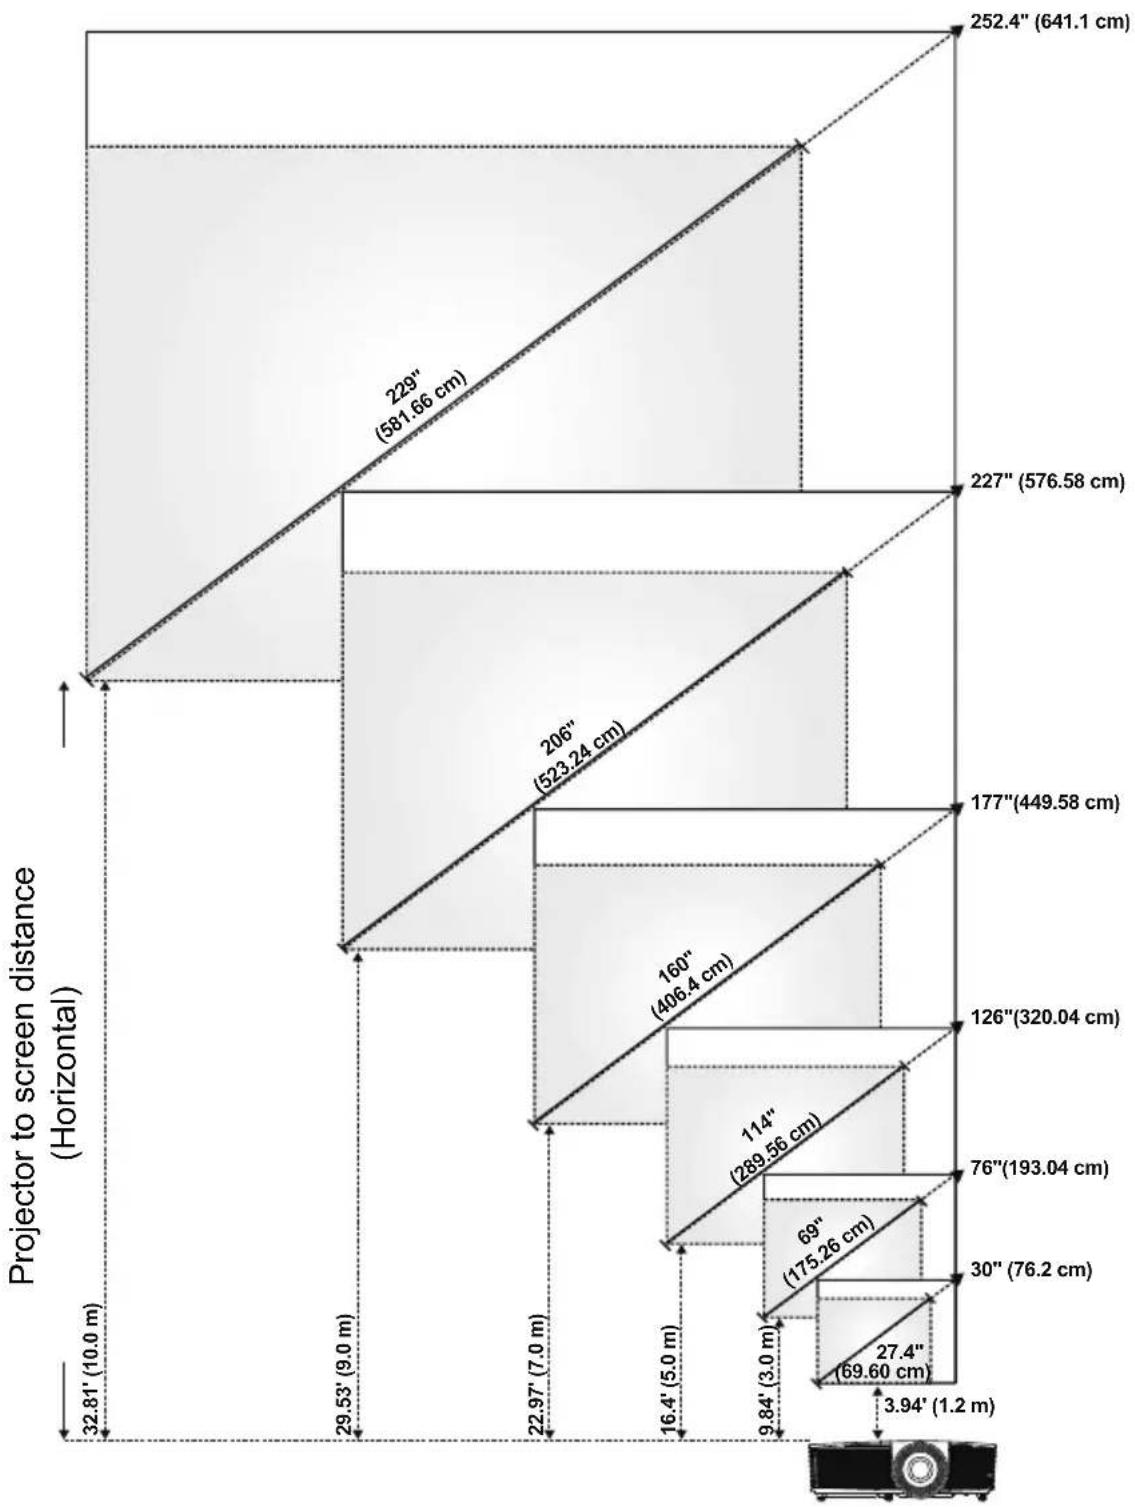
bar
| Projection | Horizontal Distance (m) | Vertical Distance (cm) | | ---------- | ------------------------ | ---------------------- | | Top Left | 32.81' | - | | Top Right | 29.53' | - | | Bottom Left| 30" | 69" | | Bottom Right| 76" | 114" | | Bottom Right| 126" | 160" | | Bottom Right| 177" | 206" | | Bottom Right| 227" | 229" | | Bottom Right| 252.4" | - |Adjusting Image Shape
| Projection Distance (m) [A] | Min Zoom | ||||
| Image size | Projector base to top of image (cm) [C] | Projector base to bottom of image (cm) [D] | |||
| Diagonal (inch/cm) [B] | Width (cm) [W] | Height (cm) [H] | |||
| 1.2 27.4"/69.6 cm 56 42 48 6 | |||||
| 3 69"/ 175.26 cm 140 105 120 15 | |||||
| 5 114"/ 289.56 cm 233 174 201 27 | |||||
| 7 160"/ 406.4 cm 326 244 281 37 | |||||
| 9 206"/ 523.24 cm | 419 314 361 47 | ||||
| 10 | 229"/ 581.66 cm | 465 349 401 52 | |||
| Projection Distance (m) [A] | Max Zoom | ||||
| Image size | Projector base to top of image (cm) [C] | Projector base to bottom of image (cm) [D] | |||
| Diagonal (inch/cm) [B] | Width (cm) [W] | Height (cm) [H] | |||
| 1.2 | 30"/ 76.2 cm | 62 46 53 7 | |||
| 3 76"/ 193.04 cm 154 115 | 133 18 | ||||
| 5 126"/ 320.04 cm | 256 192 221 29 | ||||
| 7 177"/ 449.58 cm | 359 269 310 41 | ||||
| 9 227"/ 576.58 cm | 462 346 398 52 | ||||
| 10 | 252.4"/ 641.1 cm | 513 385 442 57 | |||
| * This graph is for user reference only.* Offset Ratio: 115±5% | |||||
![Image Width [M] Image Height [H] Image Diagonal [B] Photoor Distance [A] Height [C] [ D ]](/content/2026/05/790684/images/5ffaeb3160691ad34479807c8f0e474df4e32d6b45ba0a2fd0c2e111e61aae8a.jpg)
Troubleshooting Tips
If you experience problems with your projector, see the following troubleshooting tips. If the problem persists, contact Dell.
Problem Possible Solution
No image appears on the screen
- Ensure that you have chosen the correct input source on the INPUT SOURCE menu.
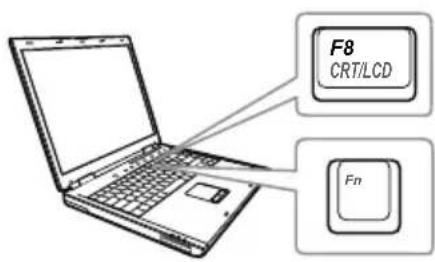
- Ensure the external graphics port is enabled. If you are using a Dell laptop computer, press Fn F8 ORTLED (Fn+F8). For other computers, see your respective documentation. If images are not displayed properly, please upgrade the video driver of your computer. For Dell computers, see www.dell.com/support.
- Ensure that all the cables are securely connected. See "Adjusting Projector Image" on page 12.
- Ensure that the pins of the connectors are not bent or broken.
- Ensure that the lamp is securely installed (see "Changing the Lamp" on page 22).
- Use the Test Pattern in the Projector Settings of the Advanced Settings menu. Ensure that the colors of the test pattern are correct.
| Problem (continued) Possible Solution (continued) | |
| Partial, scrolling, or incorrectly displayed image | 1 Press the Auto Adjust button on the remote control.2 If you are using a Dell laptop computer, set the resolution of the computer to SVGA (800 x 600):a Right-click the unused portion of your Microsoft® Windows® desktop, click Properties, and then select Settings tab.b Verify that the setting is 800 x 600 pixels for the external monitor port.c Press Fn F# ORTULOSF (Fn+F8).If you experience difficulty in changing resolutions, or if your monitor freezes, restart all the equipment and the projector.If you are not using a Dell laptop computer, see your documentation. If images are not displayed properly, please upgrade the video driver of your computer. For a Dell computer, see www.dell.com/support. |
| The screen does not display your presentation | If you are using a portable computer, press Fn F# ORTULOSF (Fn+F8). |
| Image is unstable or flickering | Adjust the tracking in the OSD Display Settings of the Advanced Settings menu (in PC Mode only). |
| Image has vertical flickering bar | Adjust the frequency in the OSD Display Settings of the Advanced Settings menu (in PC Mode only). |
| Image color is incorrect | • If the display receives the wrong signal output from the graphics card, please set the signal type to RGB in the OSD Image Settings of the Advanced Settings tab.• Use Test Pattern in the Projector Settings of the Advanced Settings menu. Ensure that the colors of the test pattern are correct. |
| Image is out of focus 1 | Adjust the focus ring on the projector lens.2 Ensure that the projection screen is within the required distance from the projector (3.94 ft [1.2 m] ~ 32.81 ft [10 m]). |
| The image is stretched when displaying a 16:9 DVD | The projector automatically detects the input signal format. It will maintain the aspect ratio of the projected image according to the input signal format with an Original setting.If the image is still stretched, adjust the aspect ratio in the Display Settings of the Advanced Settings menu in the OSD. |
| Image is reversed Select Projector Settings of the Advanced Settings from the OSD and adjust the projector mode. | |
| Lamp is burned out or makes a popping sound | When the lamp reaches its end of life, it may burn out and may make a loud popping sound. If this occurs, the projector does not turn back on. To replace the lamp, see "Changing the Lamp" on page 22. |
| LAMP light is solid amber | If the LAMP light is solid amber, replace the lamp. |
| LAMP light is blinking amber | If the LAMP light is blinking amber, the lamp module connection may be disrupted. Please check the lamp module and ensure that it is properly installed.If the LAMP lights and the Power light is blinking amber, the lamp driver has failed and the projector will automatically shut down.If the LAMP and TEMP lights are blinking amber and the Power light is solid blue, the color wheel has failed and the projector will automatically shut down.To clear the protection mode, press and hold the POWER button for 10 seconds. |
| TEMP light is solid amber The projector has overheated. The display automatically shuts down. Turn the display on again after the projector cools down. If the problem persists, contact Dell. | |
| TEMP light is blinking amber | If the projector fan fails, the projector will automatically shut down. Try to clear the projector mode by pressing and holding the Power button for 10 seconds. Please wait for about 5 minutes and try to power up again. If the problem persists, contact Dell. |
| The remote control is not operating smoothly or works only within a limited range | The battery may be low. If so, replace with two new AAA batteries. |
Guiding Signals
| Projector Status | Description | Control Buttons Indicator | ||
| Power | TEMP (Amber) | LAMP (Amber) | ||
| Standby mode | Projector in Standby mode. Ready to power on. | White Flashing OFF OFF | ||
| Warming up mode | Projector takes some time to warm up and power on. | White OFF OFF | ||
| Lamp on | Projector in Normal mode, ready to display an image.Note: The OSD menu is not accessed. | White OFF OFF | ||
| Cooling mode | Projector is cooling to shutdown. White OFF OFF | |||
| Projector overheated | Air vents might be blocked or ambient temperature may be above 40°C. The projector automatically shuts down.Ensure that the air vents are not blocked and that the ambient temperature is within operational range. If the problem persists, contact Dell. | OFF AMBER OFF | ||
| Fan breakdown | One of the fans has failed. The projector automatically shuts down. If the problem persists, contact Dell. | OFF | AMBER Flashing | OFF |
| Lamp driver breakdown | The lamp driver has failed. The projector automatically shuts down.Unplug the power cord after three minutes and then turn the display on again. If this problem persists, contact Dell. | AMBER Flashing OFF | AMBER Flashing | |
| Color Wheel breakdown | Color wheel cannot start. The projector has failed and the projector automatically shuts down. Unplug the power cord after three minutes and then turn on the projector. If this problem persists, contact Dell. | White | AMBER Flashing | AMBER Flashing |
| Lamp failure Lamp is defective. Replace the lamp. OFF OFF AMBER | ||||
| Fault - DC supply (+12V) | Power supply has been interrupted.The projector automatically shuts down. Unplug the power cord after three minutes and then turn on the projector. If this problem persists, contact Dell. | AMBER Flashing AMBER AMBER | ||
| Lamp module connection failed | Lamp module connection may be disrupted. Check the lamp module and ensure that it is properly installed. If the problem persists, contact Dell. | OFF OFF | AMBER Flashing | |
Changing the Lamp
△ CAUTION: Before you begin any of the procedures in this section, follow the Safety Instructions as described on page 7.
Replace the lamp when the message "Lamp is approaching the end of its useful life in the operation. Replacement suggested!
www.dell.com/lamps" appears on the screen. If this problem persists after replacing the lamp, contact Dell.
△ CAUTION: Use an original lamp to ensure safe and optimal working condition of your projector.
CAUTION: The lamp becomes very hot when in use. Do not attempt to replace the lamp until the projector has been allowed to cool down for at least 30 minutes.
CAUTION: Do not touch the bulb or the lamp glass at any time. Projector lamps are very fragile and may shatter if touched. The shattered glass pieces are sharp and can cause injury.
CAUTION: If the lamp shatters, remove all broken pieces from the projector and dispose or recycle according to state, local, or federal law. For more information see www.dell.com/hg.
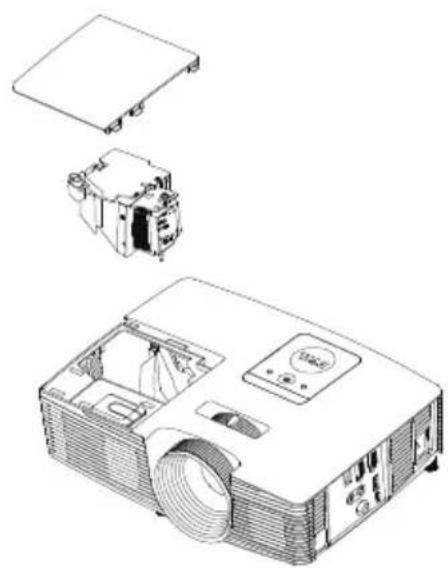
1 Turn off the projector and disconnect the power cord.
2 Let the projector cool for at least 30 minutes.
3 Loosen the screw that secures the top cover, and remove the cover.
4 Loosen the screw that secures the lamp.
5 Pull the lamp up by its metal handle.
NOTE: Dell may require lamps replaced under warranty to be returned to Dell. Otherwise, contact your local waste disposal agency for the address of the nearest deposit site.
natural_image
Technical line drawing of an projector with internal components and external casing (no text or symbols)6 Replace with the new lamp.
7 Tighten the screw that secures the lamp.
8 Replace the top cover and tighten the screw.
9 Reset the lamp usage time by selecting "Yes" for Lamp Reset in the OSD Power Settings of the Advanced Settings menu. When a new lamp module has been changed, the projector will automatically detect and reset the lamp hours.

CAUTION: Lamp Disposal (for the US only)
Hg LAMP(S) INSIDE THIS PRODUCT CONTAIN MERCURY AND MUST BE RECYCLED OR DISPOSED OF ACCORDING TO LOCAL, STATE, OR FEDERAL LAWS. FOR MORE INFORMATION, GO TO WWW.DELL.COM/HG OR CONTACT THE ELECTRONIC INDUSTRIES ALLIANCE AT WWW.EIAE.ORG. FOR LAMP-SPECIFIC DISPOSAL INFORMATION, CHECK WWW.LAMPRECYCLE.ORG.
Replacing Remote Control Batteries

NOTE: Remove the batteries from the remote control when not in use.
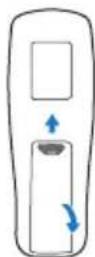
1 Press the tab to lift the battery compartment cover.
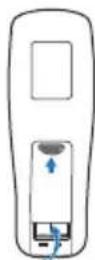
2 Check the polarity (+/-) marking on the batteries.
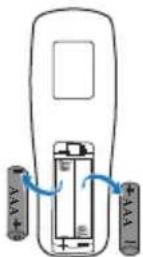
3 Insert the batteries and align their polarity correctly according to the marking in the battery compartment.
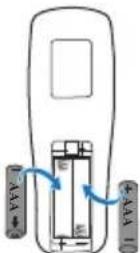

NOTE: Avoid mixing different types of batteries or using new and old batteries together.
4 Slip the battery cover back.
Light Valve 0.55" SVGA S450 DMD, DarkChip3™
Brightness 3200 ANSI Lumens (Max.)
Contrast Ratio 2200:1 Typical (Full On/Full Off)
10,000:1 High Contrast Mode
Uniformity 85% Typical (Japan Standard - JBMA)
Number of Pixels 800 x 600 (SVGA)
Aspect Ratio 4:3
Displayable Color 1.07 billion colors
Color Wheel Speed 2 X
1 X for 3D Display
Projection Lens F-Stop: F/2.41\~2.55
Focal length, f=21.8\~24 mm
1.1X manual Zoom Lens
Throw ratio =1.95\~2.15 wide and tele
Offset ratio: 115 ± 5%
Projection Screen Size 27.5\~252.4 inches (diagonal)
Projection Distance 3.94 \~ 32.81 ft (1.2 \~ 10 m)
Video Compatibility Composite Video:
NTSC: M (3.58 MHz), 4.43 MHz
PAL: B, D, G, H, I, M, N, 4.43 MHz
SECAM: B, D, G, K, K1, L, 4.25/4.4 MHz
Component Video input via VGA: 1080i (50/60
Hz), 720p (50/60 Hz), 576i/p, 480i/p
HDMI input: 1080p, 720p, 576i/p, 480i/p
Power Supply Universal AC 100-240 V 50-60 Hz with PFC input
Power Consumption Normal mode: 245 W ± 10% @ 110 Vac
Eco mode: 200 W ± 10% @ 110 Vac
Standby mode: < 0.5 ~W
Audio 1 speaker x 2 watt RMS
Noise Level Normal mode: 34 dB(A)
Eco mode: 31 dB(A)
Projector Weight 5.4 lbs (2.4 kg)
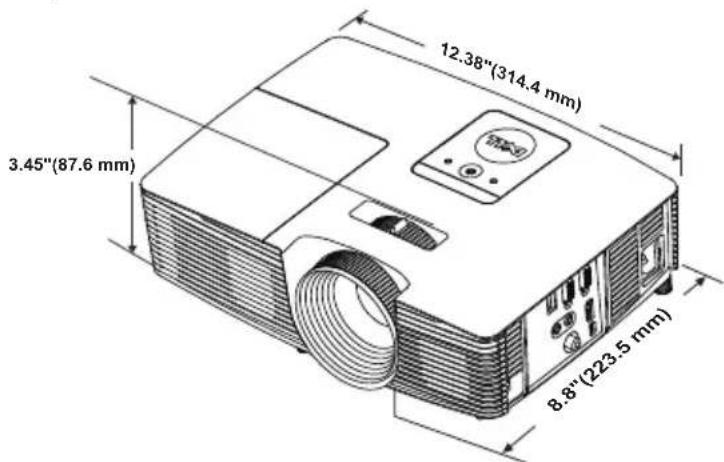
Dimensions (W x H x D) 12.38 x 3.45 x 8.8 inches (314.4 x 86.7 x 223.5 mm)
Environmental Operating temperature: 5°C - 40°C (41°F - 104°F)
Humidity: 80% maximum
Storage temperature: 0°C to 60°C (32°F to 140°F)
Humidity: 90% maximum
Shipping temperature: -20°C to 60°C (-4°F to 140°F)
Humidity: 90% maximum
I/O Connectors Power: One AC power socket (3-pin - C14 inlet)
VGA input: One 15-pin D-sub connector (Blue), VGA In, for analog RGB/Component input signals.
VGA output: One 15-pin D-sub connector (Black) for VGA-A loop through.
Composite Video input: One Yellow RCA jack for CVBS signal.
HDMI input: One HDMI connector for supporting HDMI 1.4a. specification HDCP compliant.
Analog Audio input: One 3.5 mm stereo mini phone jack (Blue).
Variable audio output: One 3.5 mm stereo mini phone jack (Green).
USB (type B) port: One mini USB slave for remote support and firmware upgrade.
5V/1.5A output: One USB type A 5V DC / 1.5 A outputs for supporting wireless display dongle.
Lamp PHILIPS 195 W user-replaceable lamp
Lamp life Normal mode: Up to 5000 hours
Eco mode: Up to 6000 hours

NOTE: The lamp life rating for any projector is a measure of brightness degradation only, and is not a specification for the time it takes a lamp to fail and cease light output. Lamp life is defined as the time it takes for more than 50 percent of a lamp sample population to have brightness decrease by approximately 50 percent of the rated lumens for the specified lamp. The lamp life rating is not guaranteed in any way. The actual operating life span of a projector lamp will vary according to operating conditions and usage patterns. Usage of a projector in stressful conditions which may include dusty environments, under high temperatures, many hours per day, and abrupt powering-off will most likely result in a lamp's shortened operating life span or possible lamp failure.
For additional information on how to use your projector, please see the Dell Projectors User Guide at www.dell.com/support/manuals.
For customers in the United States, call 800-WWW-DELL (800-999-3355).

NOTE: If you do not have an active Internet connection, you can find contact information on your purchase invoice, packing slip, bill, or Dell product catalog.
Dell provides several online and telephone-based support and service options. Availability varies by country and product, and some services may not be available in your area. To contact Dell for sales, technical support, or customer service issues:
1 Visit go to www.dell.com/contactDell.
2 Select your region on the interactive map.
3 Select a Segment for Contact.
4 Select the appropriate service or support link based on your need.
Index
A
Adjusting Projector Focus 13
Adjusting the Projected Image Adjusting the Projector Height 12
lower the projector Front tilt adjustment wheel 12 Rubber foot 12
Adjusting the Projector Zoom and Focus
Focus ring 13 Zoom tab 13
C
Changing the Lamp 22
Connection Ports + 5V/1A DC out connector 6 Audio input connector 6 Audio output connector 6 Composite Video connector 6 HDMI connector 6 Mini USB (mini type B) connector for remote mouse and firmware upgrade 6 Power cord connector 6 VGA input (D-sub) connector 6 VGA output (monitor loop through) connector 6
Contact Dell 4, 22
D
Dell contacting 28, 29
M
Main Unit 5 2W Speaker 5 Focus ring 5 IR receivers 5 Lamp cover 5 Lens 5 Power button 5 Status indicators 5 Tilt adjustment wheel 5 Zoom tab 5
P
phone numbers 29
R
Remote Control 8
s
Specifications Aspect Ratio 25 Audio 26 Brightness 25
Color Wheel Speed 25
Contrast Ratio 25
Dimensions 26
Displayable Color 25
Environmental 26
I/O Connectors 26
Light Valve 25
Noise Level 26
Number of Pixels 25
Power Consumption 26
Power Supply 25
Projection Distance 25
Projection Lens 25
Projection Screen Size 25
Projector Weight 26
Uniformity 25
Video Compatibility 25
support
contacting Dell 28, 29
T
telephone numbers 29



- Dell Professional Projector P318S User's Guide
- Notes, Cautions, and Warnings
- Contents
- About Your Dell Projector.... 4
- Adjusting Projector Image 12
- Troubleshooting.... 17
- Maintenance 22
- Specifications 25
- Additional Information 28
- Contacting Dell 29
- 1
- About Your Dell Projector
- Projector Box Contents
- Package Contents
- Projector Top and Bottom View
- CAUTION: Safety Instructions
- NOTE:
- Remote Control Operating Range
- 2
- Adjusting Projector Image
- Adjusting Projected Zoom
- Raising the Projector Height
- Lowering the Projector Height
- Adjusting Projector Focus
- Adjusting Image Size
- Troubleshooting Tips
- Problem Possible Solution
- Changing the Lamp
- Replacing Remote Control Batteries
- Index
- A
- C
- D
- M
- P
- R
- s
- T
Brand : DELL
Model : P318S
Category : Vidéo-projecteur