
7760 - Vidéo-projecteur DELL - Free user manual and instructions
Find the device manual for free 7760 DELL in PDF.


| Product Type | Video Projector |
| Brand | Dell |
| Model | Advanced Projector 7760 |
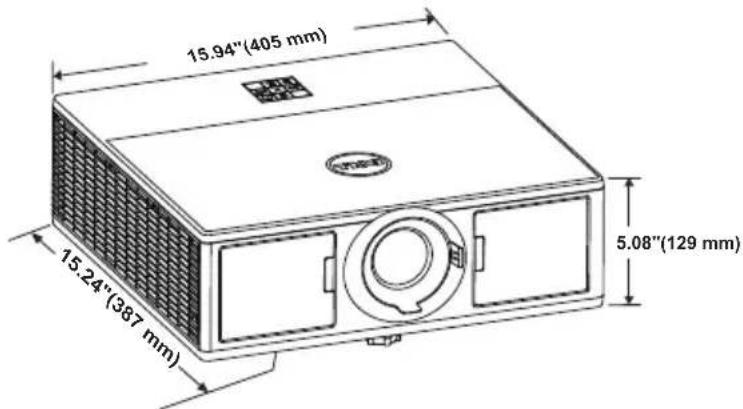
| Dimensions (W x D x H) | 15.94 x 15.24 x 5.08 inches (405 x 387 x 129 mm) |
| Weight | < 24.47 lbs (11.1 kg) |
| Power Supply | Universal AC 100-240 V 50-60 Hz with PFC input |
| Power Consumption (Normal) | 455 W ± 15% @ 110 Vac |
| Power Consumption (Eco) | 280 W ± 15% @ 110 Vac |
| Standby Power | < 0.5 W |
| Brightness | 5400 ANSI Lumens (Max.) |
| Contrast Ratio | 1800:1 Typical (Full On/Full Off); 100000:1 High Contrast |
| Resolution | 1920 x 1080 (1080p) |
| Aspect Ratio | 16:9 |
| Displayable Colors | 1.07 billion colors |
| Light Source Life | Up to 20,000 hours in Normal mode |
| Projection Lens | F/2.5~3.39, f=17.63~31.36 mm, 1.78X manual zoom |
| Throw Ratio | 1.2~2.1 |
| Projection Distance | 4.27 to 26.25 ft (1.3 to 8 m) |
| Screen Size (Diagonal) | 27.2 to 301.1 inches |
| Audio | 2 x 10W RMS speakers |
| Noise Level (Normal) | 36 dB(A) |
| Noise Level (Eco) | 32 dB(A) |
| Connections | VGA In/Out, HDMI (3), Mini USB, RJ45, RS232, Audio In/Out, Mic, 12V DC out, 5V/1.8A USB |
| Wireless | Optional Dell WR517 Wireless Receiver (Miracast), internal compartment for wireless adapter |
| Keystone Correction | ±30 degrees vertical/horizontal, four corner adjustment |
| Lens Shift | Vertical and horizontal, lockable |
| Remote Control | Included with laser pointer, freeze, blank, zoom, keystone, etc. |
| Operating Temperature | 5°C to 40°C (41°F to 104°F) |
| Box Contents | Projector, power cable, VGA cable, remote control, AAA batteries (2), CD, documentation |
Frequently Asked Questions - 7760 DELL
User questions about 7760 DELL
0 question about this device. Answer the ones you know or ask your own.
Ask a new question about this device
Download the instructions for your Vidéo-projecteur in PDF format for free! Find your manual 7760 - DELL and take your electronic device back in hand. On this page are published all the documents necessary for the use of your device. 7760 by DELL.
USER MANUAL 7760 DELL
Dell Advanced Projector 7760 User's Guide
Notes, Cautions, and Warnings

NOTE: A NOTE indicates important information that helps you make better use of your projector

CAUTION: A CAUTION indicates potential damage to hardware or loss of data if instructions are not followed.

WARNING: A WARNING indicates a potential for property damage, personal injury, or death.
Information in this document is subject to change without notice. © 2016 Dell Inc. All rights reserved.
Reproduction of these materials in any manner whatsoever without the written permission of Dell Inc. is strictly forbidden.
Trademarks used in this text: Dell and the DELL logo are trademarks of Dell Inc.; DLP and DLP logo are trademarks of TEXAS INSTRUMENTS INCORPORATED; Microsoft and Windows are either trademarks or registered trademarks of Microsoft Corporation in the United States and/or other countries.
Other trademarks and trade names may be used in this document to refer to either the entities claiming the marks and names or their products. Dell Inc. disclaims any proprietary interest in trademarks and trade names other than its own.
Model: Dell Advanced Projector 7760
September 2016 Rev. A00
Contents
1 About Your Dell Projector 4
Projector Box Contents 4
Projector Top and Bottom View. 5
Projector Connections.... 6
Remote Control 9
2 Adjusting Projector Image.... 13
Adjusting Projected Zoom. 13
Adjusting Projector Focus and Zoom ..... 14
Adjusting Projector Position 15
Adjusting Image Corners. 17
Adjusting Image Size 18
3 Connecting Wireless Display Adapter ..... 21
Installing Wireless Display Adapter 21
Setting up the Wireless Display Adapter. 23
Setting up the Optional Dell WR517 Wireless Receiver 24
Using LAN Display 26
4 Troubleshooting 34
Troubleshooting Tips 34
Guiding Signals 38
5 Maintenance.... 39
Replacing Remote Control Batteries ..... 39
6 Specifications 41
7 Additional Information 44
8 Contacting Dell 45
1
About Your Dell Projector
Your projector comes with all the items shown below. Ensure that you have all the items, and contact Dell if anything is missing.
Projector Box Contents
Package Contents
Power cable VGA cable (VGA to VGA)
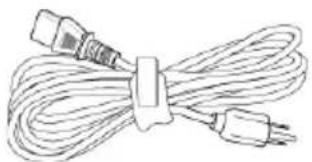
natural_image
Line drawing of a bundle of cables with two connectors (no text or symbols)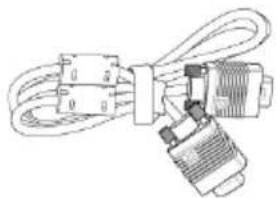
natural_image
Pure electrical circuit lines without any symbolsRemote control AAA Batteries (2)
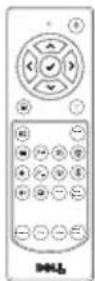
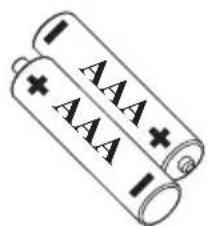
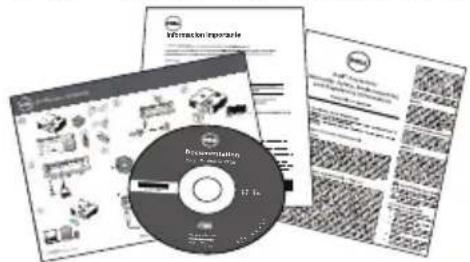
CD, User's Guide, and Documentation
Projector Top and Bottom View
Top View Bottom View
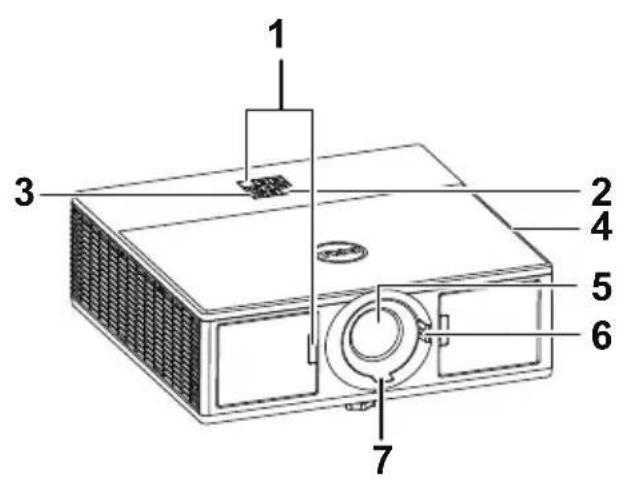
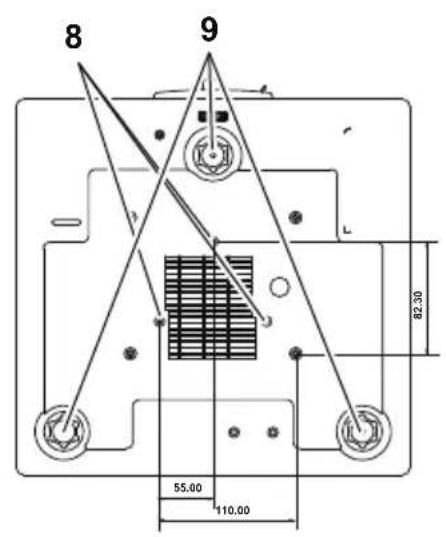
| 1 | I | R | r | e | c | e | i | v | e | r | s |
| 2 Status indicators | |||||||||||
| 3 Power button | |||||||||||
| 4 20W (2 x 10W) speakers | |||||||||||
| 5 Lens | |||||||||||
| 6 Zoom ring | |||||||||||
| 7 | F | o | c | u | s | r | i | n | g | ||
| 8 Mounting holes for ceiling mount | |||||||||||
| 9 Tilt adjustment wheel | |||||||||||

NOTE: Ceiling mount screw hole M3 x 6.5 mm depth.
Recommended torque < 15 kgf-cm.
Projector Connections
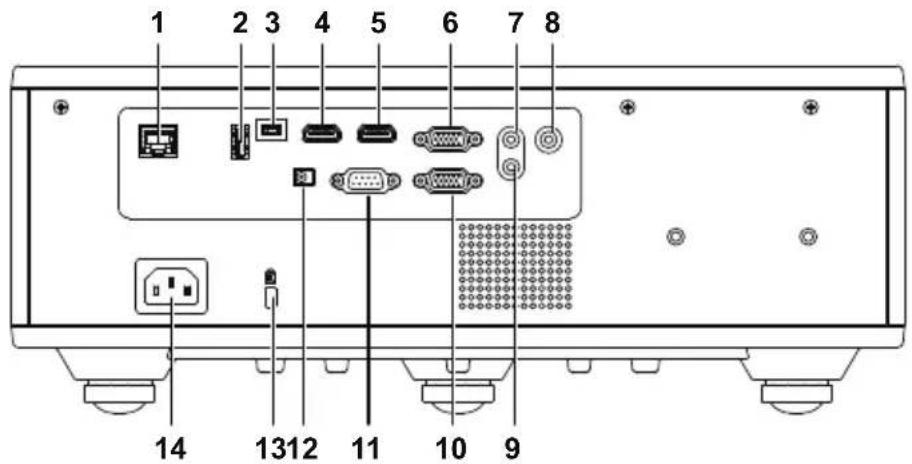
| 1 RJ45 connector 8 Microphone connector | |
| 2 + 5V/1.8A DC out connector 9 Audio output connector | |
| 3 Mini USB (mini type B) | 10 VGA output (monitor loop |
| connector for firmware upgrade | through) connector |
| 4 HDMI 2 connector 11 RS232 connector | |
| 5 HDMI 1 connector 12 + 12V DC out connector | |
| 6 VGA input connector 13 Security cable slot | |
| 7 Audio input connector 14 Power cord connector | |

CAUTION: Before you begin any of the procedures in this section, follow the Safety Instructions as described on page 7.

CAUTION: Safety Instructions
1 Do not use the projector near appliances that generate a lot of heat.
2 Do not use the projector in areas where there is an excessive amount of dust. The dust may cause the system to fail and the projector will automatically shutdown.
3 Ensure that the projector is mounted in a well-ventilated area.
4 Do not block the ventilation slots and openings on the projector.
5 Ensure the projector operates between ambient temperatures (5 °C to 40 °C).
6 Do not try to touch the ventilation outlet as it can become very hot after the projector has been turned on or immediately after it is turned off.
7 Do not look into the lens while the projector is on as it may cause injury to your eyes.
8 Do not place any objects near or in front of the projector or cover its lens while the projector is on as the heat may cause the object to melt or burn.
9 Do not use alcohol to wipe the lens.

NOTE:
- Do not attempt to ceiling mount the projector by yourself. It should be installed by a qualified technician.
- Recommended Projector Ceiling Mount Kit (P/N: C3505). For more information, see the Dell Support website at dell.com/support.
- For more information, see the Safety Information that shipped with your projector.
- The 7760 projector can only be used indoors.
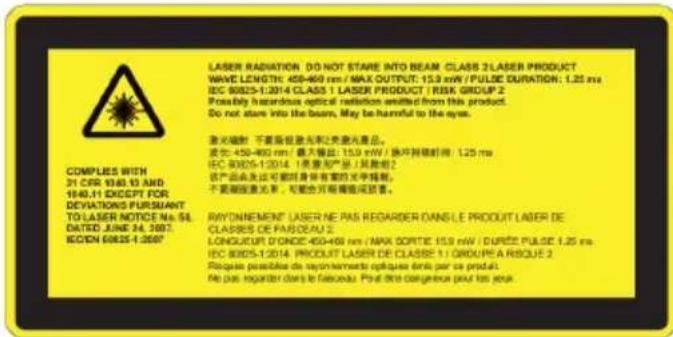
- This projector is a Class 2 laser device that conforms with IEC 60825-1:2007 and CFR 1040.10 and 1040.11.
• Class 2 Laser product - Do not stare into the laser beam.
- This product contains Class-4 laser module. Do not attempt to dismantle the product.
- Any operation or adjustment not specifically instructed by the user's guide creates the risk of hazardous laser radiation exposure.
- Do not stare into beam when the projector is on. The bright light may result in permanent eye damage.
- Without following the control, adjustment or operation procedure may cause damage by the exposure of laser radiation.
- Adequate instructions for assembly, operation, and maintenance, including clear warnings concerning precautions to avoid possible exposure to laser and collateral radiation in excess of the accessible emission limits in Class 2.
Remote Control
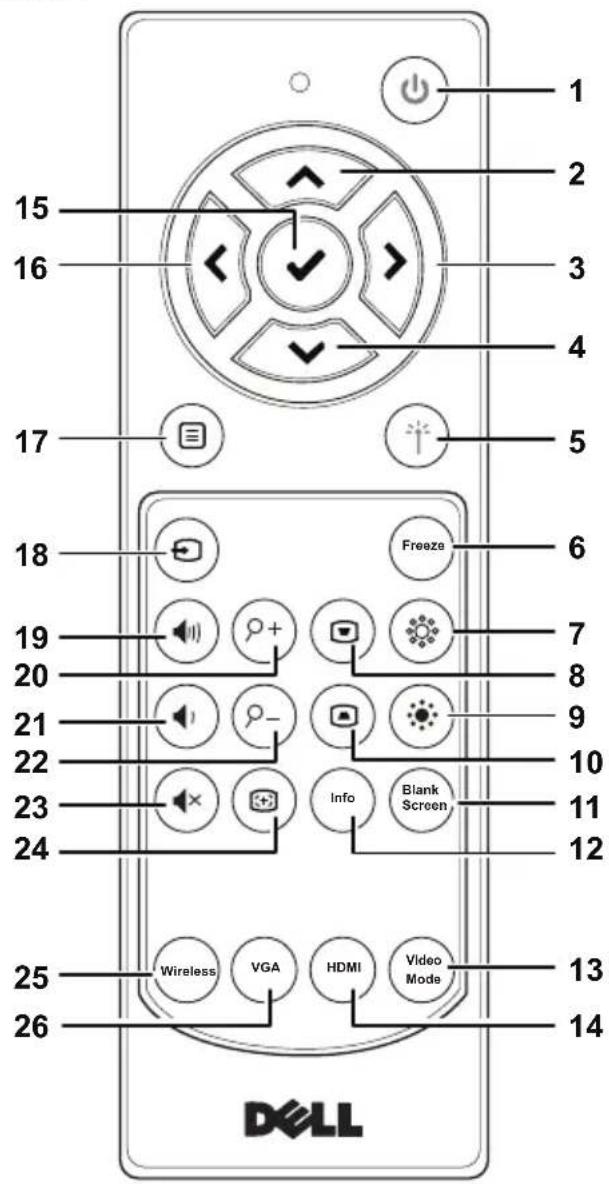
| 1 Power Turns the projector on or off. | |
| 2 Up Press to navigate through the On-Screen Display (OSD) Menu items. | |
| 3 Right Press to navigate through the On-Screen Display (OSD) Menu items. | |
| 4 Down Press to navigate through the On-Screen Display (OSD) Menu items. | |
| 5 Laser Point the remote control at the screen, press and hold the laser button to activate the laser light. ⚠️ WARNING: Do not look at the laser when it is active. Avoid pointing the laser at your eyes. | |
| 6 Freeze Press to pause the screen image, then press "Freeze" again to resume normal projection. | |
| 7 Brightness + Press to increase the brightness. | |
| 8 Keystone adjustment + | Press to adjust image distortion caused by tilting the projector (+/-30 degrees). |
| 9 Brightness - Press to decrease the brightness. | |
| 10 Keystone adjustment - | Press to adjust image distortion caused by tilting the projector (+/-30 degrees). |
| 11 Blank screen Press to hide/unhide the image. | |
| 12 Info Press to display the projector information. | |
| 13 Video mode The projector has preset configurations that are optimized for displaying data (presentation slides) or video (movies, games, etc.).Press theVideo Modebutton to toggle betweenPresentation mode,Bright mode, Movie mode, sRGB, orCustom mode.Pressing theVideo Modebutton once will show the current display mode. Pressing theVideo Modebutton again will switch between modes. | |
| 14 HDMI Press to choose HDMI 1 or HDMI 2 source. | |
| 15 Enter Press to confirm the selection. | |
| 16 Left | Press to navigate through the On-Screen Display (OSD) Menu items. |
| 17 Menu | Press to activate the OSD. |
| 18 Source | Press to switch between sources: VGA, HDMI 1, HDMI 2, Wireless Display, and LAN Display. |
| 19 Volume up | Press to increase the volume. |
20 Zoom + Press to increase the image.
21 Volume down Press to decrease the volume.
22 Zoom - Press to decrease the image.
23 Mute Press to mute or un-mute the projector speaker.
24 Auto Adjust Press to auto adjust the displayed image.
25 Wireless Press to choose Wireless Display source.
26 VGA Press to choose VGA source.
Remote Control Operating Range
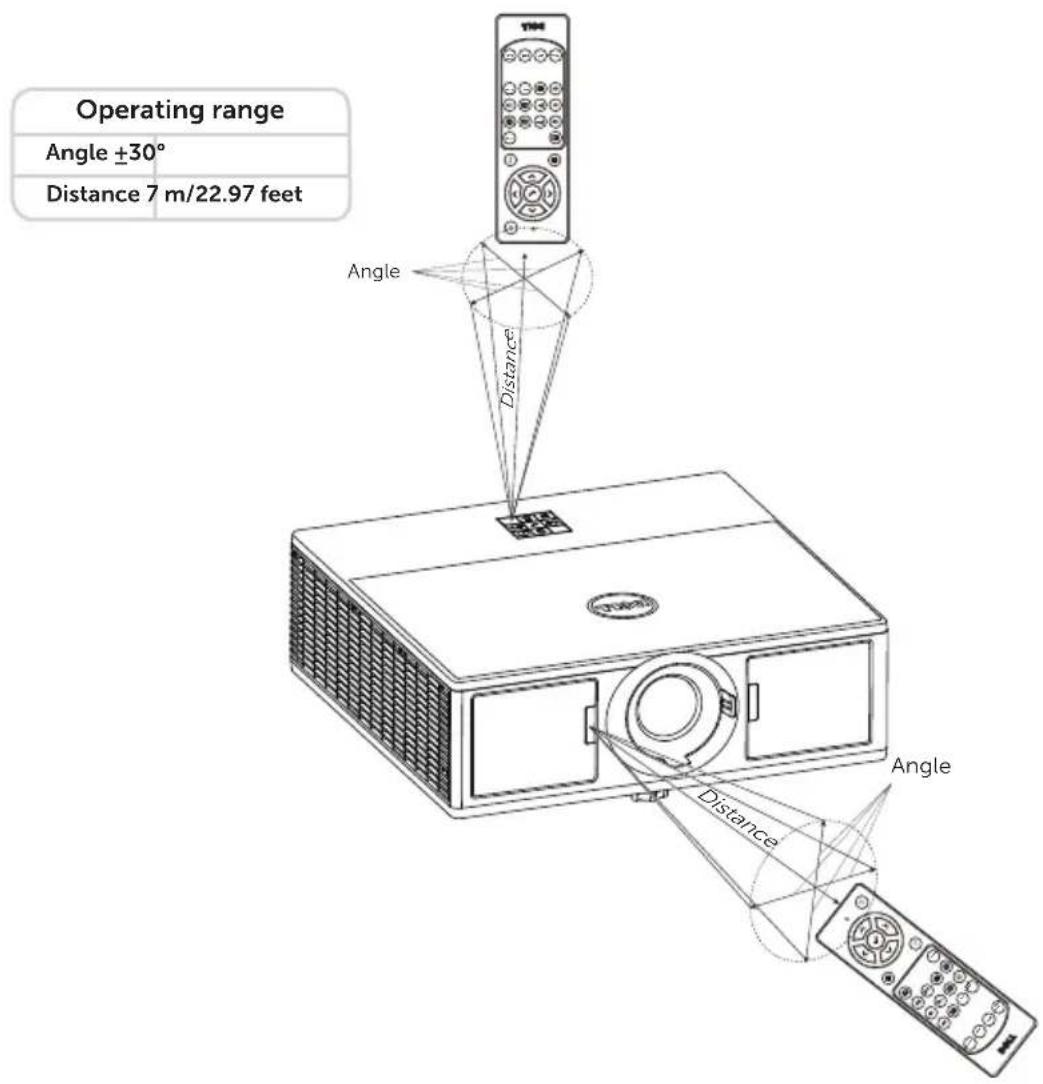

NOTE: Actual operating range may slightly differ from the diagram. Weak batteries will also prevent the remote control from properly operating the projector.
2
Adjusting Projector Image
Adjusting Projected Zoom
Raising the Projector Height
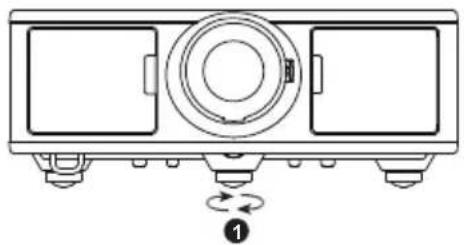
1 Raise the projector to the desired display angle, and use the front tilt adjustment wheel to fine-tune the display angle.
Lowering the Projector Height
1 Lower the projector, and use the front tilt adjustment wheel to fine-tune the display angle.
natural_image
Technical line drawing of a mechanical device with two doors and a central circular component, showing rotational motion indicator (no text or symbols)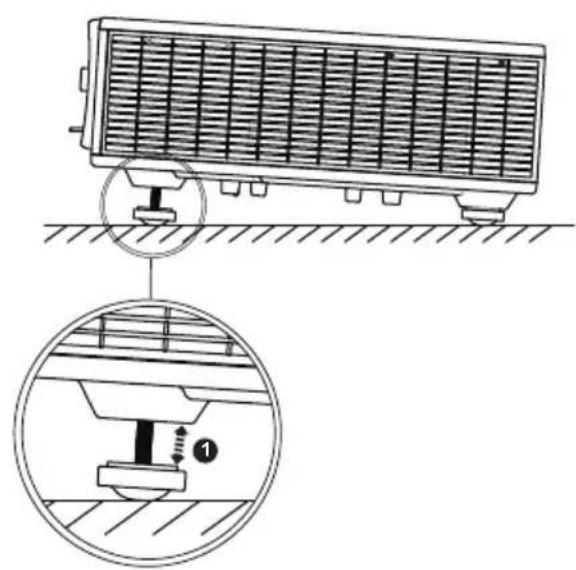
natural_image
Technical diagram of a vehicle-mounted air conditioner unit with a close-up inset showing internal components (no text or labels)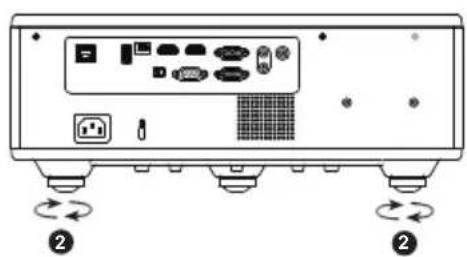
natural_image
Back panel of a computer with ports and indicators, showing two circular arrows labeled '②' indicating rotation or synchronization (no text or symbols on the device itself)1 Front tilt adjustment wheel (Angle of tilt: 0 to 3.6 degrees)
2 Tilt adjustment wheel
Adjusting Projector Focus and Zoom
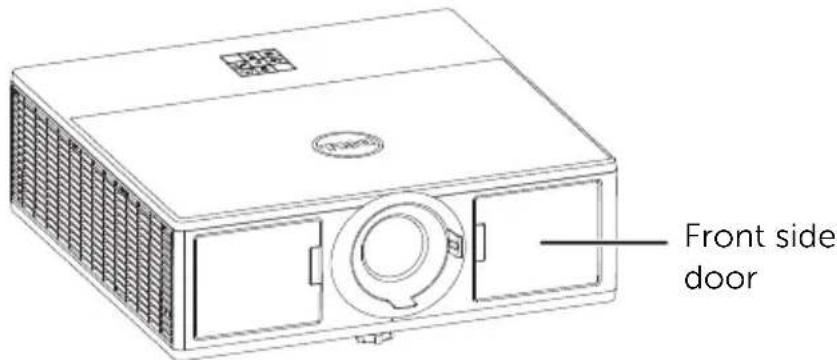
1 Open the front side door of the projector.
2 Unlock the lens shift lock, before you adjust the lens shift.
3 Turn the vertical/horizontal lens shift knob to shift the lens.
4 After adjusting the lens shift, lock the lens shift lock.
5 Pull the zoom ring adjustment up and down to zoom in and out.
6 Rotate the focus ring until the image is clear. The projector focuses at distances ranging between 4.27 ft to 26.25 ft (1.3 m to 8.0 m).
7 Close the front side door of the projector.
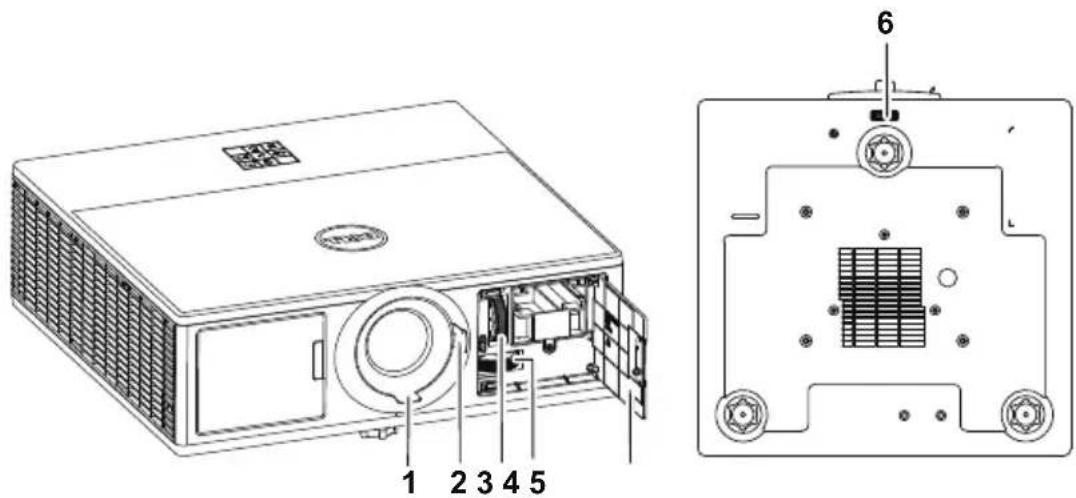
| 1 | F | o | c | u | s | r | i | n | g |
| 2 | Zoom ring | ||||||||
| 3 | Vertical lens shift knob | ||||||||
| 4 | Horizontal lens shift knob | ||||||||
| 5 | Front side door | ||||||||
| 6 | Lens shift lock | ||||||||
Adjusting Projector Position
When you select a position for the projector, consider the size and shape of your screen, the location of your power outlets, and the distance between the projector and the rest of your equipment. Follow these general guidelines:
- Position the projector on a flat surface at a right angle to the screen. The projector (with the standard lens) must be at least 3.28 feet (1 m) from the projection screen.
- Position the projector to the required distance from the screen. The distance from the lens of the projector to the screen, the zoom setting, and the video format determine the size of the projected image.
- Lens throw ratio: 1.2 \~ 2.13
• 360 degree free orientation operation
You can set up or install the 7760 in the following ways:
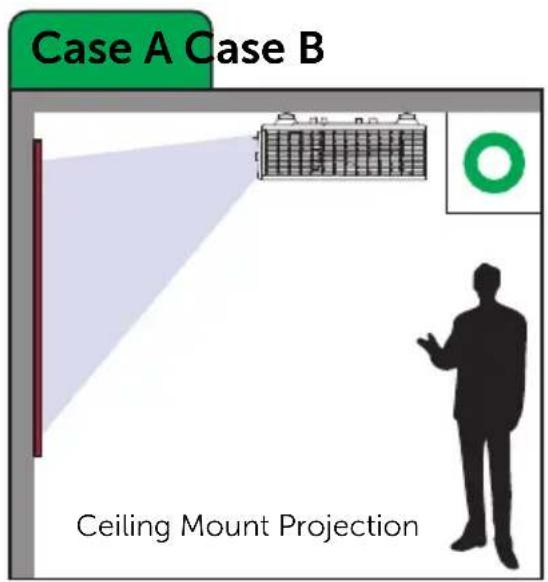
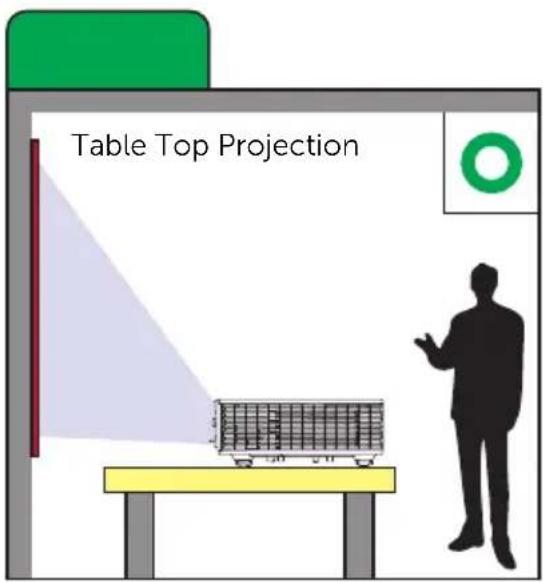
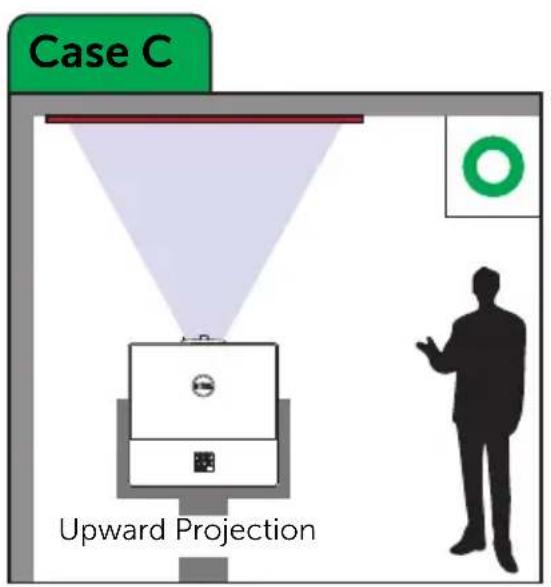
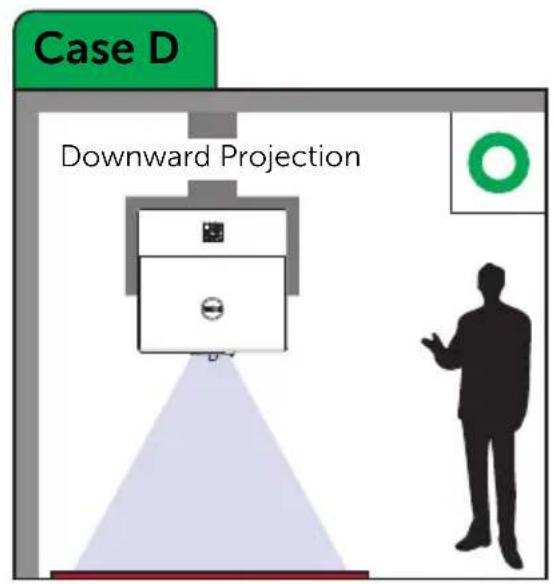
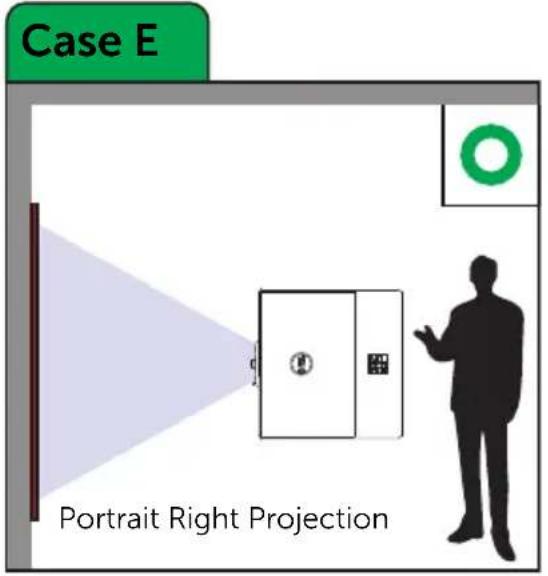

Adjusting Image Corners
You can use the four corner setting to adjust the shape and size of an image that is unevenly rectangular on all sides.
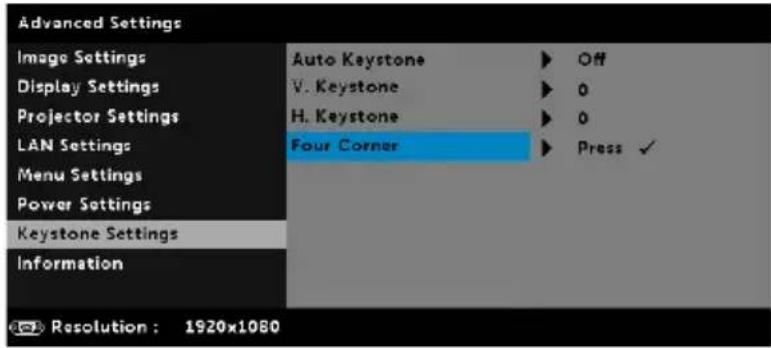
1 Advanced Settings -> Keystone Settings -> Four Corner
2 At four corner screen, use ∧, √, ◀ and to select one corner and press to confirm.
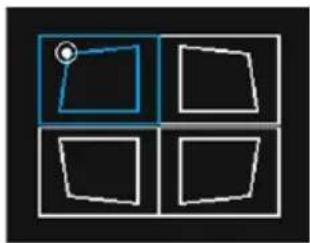
natural_image
Four white rectangular shapes arranged in a 2x2 grid, one highlighted with a small circle (no text or symbols)3 Use ⬆, ⬇, ⬇ and ⬆ to adjust the image shape as necessary.
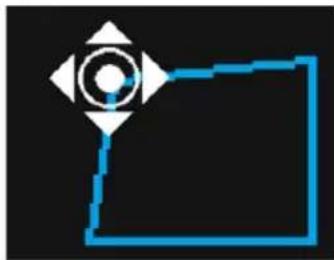
natural_image
Abstract geometric design with a blue outline and white circular elements on black background (no text or symbols)4 When you are finished, press "Menu" button to exit.

NOTE: The function is unavailable when H./V. Keystone is adjusted.
Adjusting Image Size

bar
| Projection to screen distance | Projector to screen distance (m) | | ----------------------------- | -------------------------------- | | 26.25' | 8 | | 21.85' | 6.66 | | 17.45' | 5.32 | | 13.06' | 3.98 | | 8.66' | 2.64 | | 60" | 152.4 | | 44" | 111.76 | | 33" | 88.8 | | 23" | 44.958 | | 17" | 337.82 | | 120" | 304.8 | | 80" | 457.2 | | 440" | 609.6 | | 240" | - | | 300.3" | - |Adjusting Image Shape
| Projection Distance (m) [A] | Min Zoom | ||||
| Image size | Projector base to top of image (cm) [C] | Projector base to bottom of image (cm) [D] | |||
| Diagonal (inch/cm) [B] | Width (cm) [W] | Height (cm) [H] | |||
| 1.3 27.2"/69.09 cm 61 34 36 2 | |||||
| 2.64 | 56"/142.24 cm | 124 | 70 | 73 | 3 |
| 3.98 84"/213.36 cm 187 105 110 5 | |||||
| 5.32 | 113"/287.02 cm | 250 | 140 | 148 | 8 |
| 6.66 | 141"/358.14 cm | 313 176 185 | 9 | ||
| 8 | 169"/429.26 cm | 376 | 211 | 222 | 11 |
| Projection Distance (m) [A] | Max Zoom | ||||
| Image size | Projector base to top of image (cm) [C] | Projector base to bottom of image (cm) [D] | |||
| Diagonal (inch/cm) [B] | Width (cm) [W] | Height (cm) [H] | |||
| 1.3 | 49"/124.46 cm | 108 61 64 3 | |||
| 2.64 | 99"/251.46 cm | 220 | 124 | 130 | 6 |
| 3.98 | 150"/381 cm | 332 | 187 | 196 | 9 |
| 5.32 | 200"/508 cm | 443 | 249 | 262 | 13 |
| 6.66 | 251"/637.54 cm | 555 | 312 | 328 | 16 |
| 8 | 301.1"/764.79 cm | 667 | 375 | 394 | 19 |
| * This graph is for user reference only.* Offset Ratio: 105%~130% | |||||
![Image Height [H] Image Width [M] Image Diagonal [B] Protractor Distance [A] [D] Height [C]](/content/2026/05/788507/images/5b881f3af07359ab7e49e306c92b075962189bb5f391c857a739238a6f4cfd2b.jpg)
3
Connecting Wireless Display Adapter
Installing Wireless Display Adapter
Your projector comes with a secured internal compartment for wireless display adapter. The wireless display adapter is not shipped with your 7760 projector. The internal compartment has a HDMI and USB power port.
The installation steps are as below:
1 Open the front side door, making sure projector is already powered off.
2 Attach the power USB cable to the wireless display adapter.
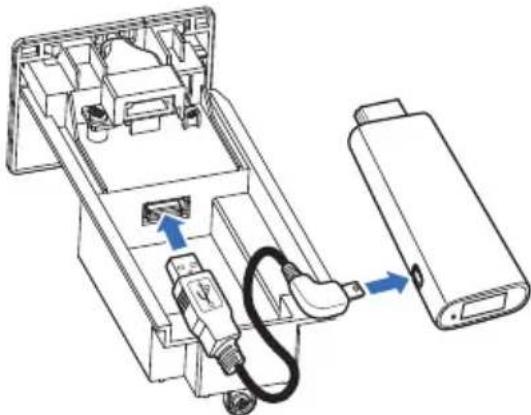
natural_image
Technical diagram of a device's internal components, showing a connector with blue arrows indicating connection (no text or symbols present)3 Attach the wireless display adapter.
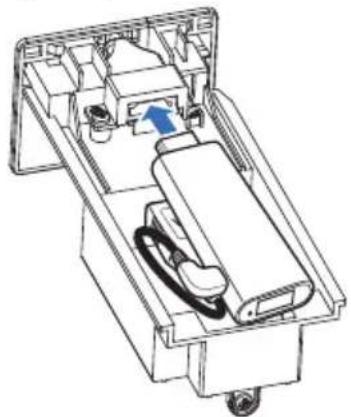
natural_image
Technical line drawing of a mechanical device with no visible text or symbols4 Replace the top cover and tighten the screw.
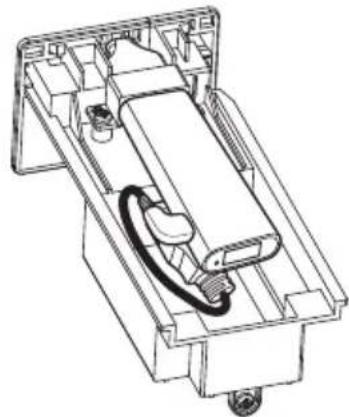
natural_image
Technical line drawing of a mechanical device with internal components and housing (no text or symbols)Setting up the Wireless Display Adapter
1 Power on the projector.
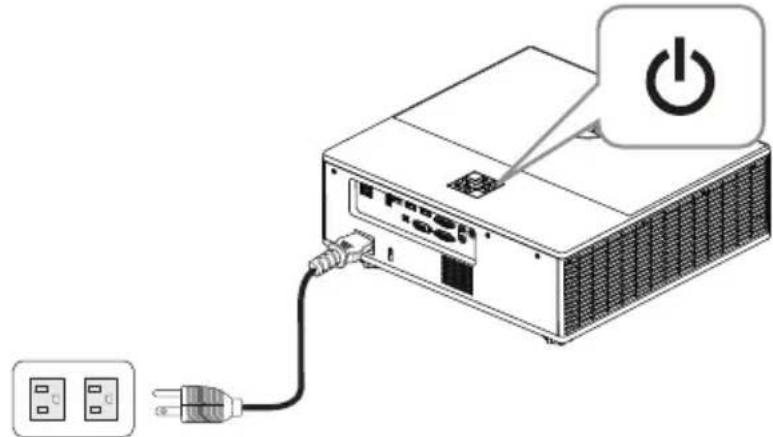
2 Switch to "Wireless Display" source.
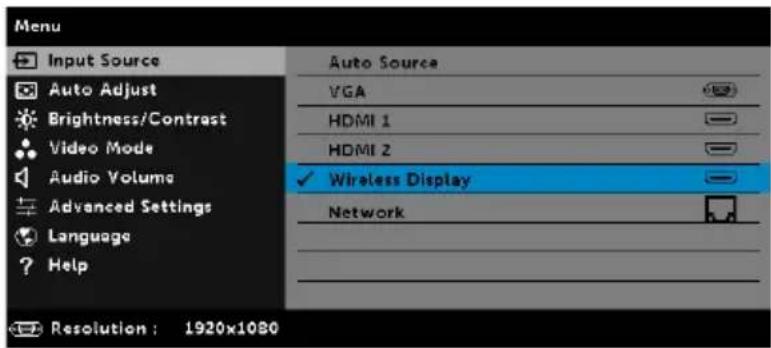
3 Follow the on-screen instructions to proceed with wireless projection.
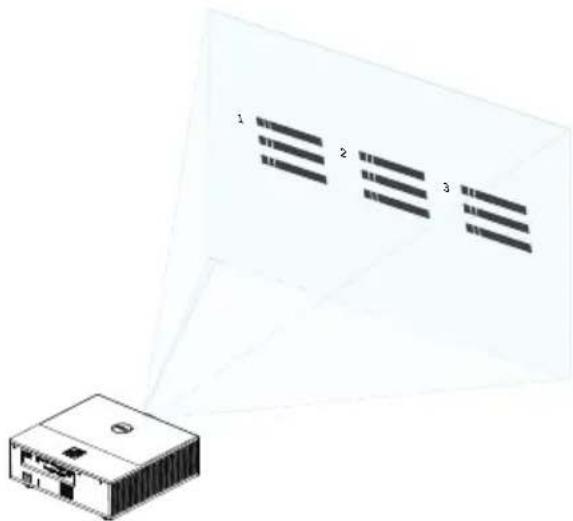
Setting up the Optional Dell WR517 Wireless Receiver
Dell WR517 wireless receiver enables your Windows laptop computer, Android smartphone or tablet with Miracast capability to display the screen image to Dell 7760 using a Wi-Fi Direct interface.
The Dell WR517 wireless receiver features include:
- Wireless connectivity via IEEE 802.11 ac (Wi-Fi), bluetooth and Screencast.
- The connectivity makes it simple and easy to connect with legacy and new systems.
- Dell Wireless Monitor drivers/app to support additional/enhanced HID sharing features will be included for Windows 10, Windows 8.x and Windows 7.
The Dell wireless module is not shipped with your 7760 projector. You can purchase it on the Dell website at www.dell.com.
Connecting your Dell WR517 wireless receiver with Dell 7760 projector:
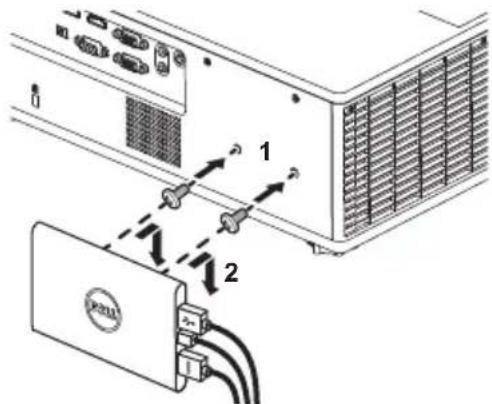
1 Use a Philips crosshead screwdriver to fasten the two screws (shipped with the receiver) to the mounting rack on the rear of your projector.
2 Align the mounting holes of the Dell WR517 wireless receiver with the two screws that were secured on the rear side of the projector, and then push the receiver downward until it is locked it into place.
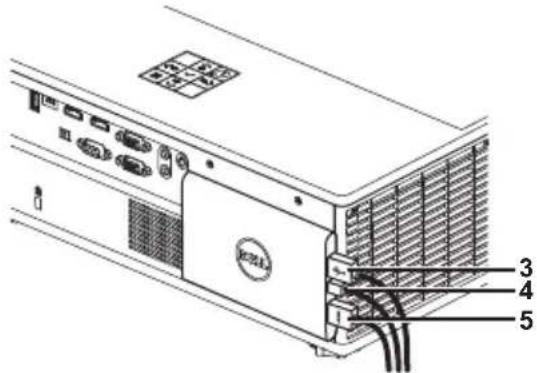
3 Connect the micro USB cable (supplied with the receiver) from the Dell WR517 wireless receiver to the USB port on the projector to get power.
4 Connect the HDMI cable (supplied with the receiver) from the Dell WR517 wireless receiver to the projector.
5 Connect your USB cable from the Dell WR517 wireless receiver to your USB keyboard and mouse.
6 Turn On the projector and the Dell WR517 wireless receiver will be activated at the same time.
Setting up the wireless receiver with a display. Steps 1 & 2.
Setting up the wireless receiver with a display. Steps 3, 4 & 5.
Using LAN Display

NOTE: LAN display setting steps are the same for Windows and Mac operating system.
Enable LAN on Projector
1 Connect the power cable and press the power button.
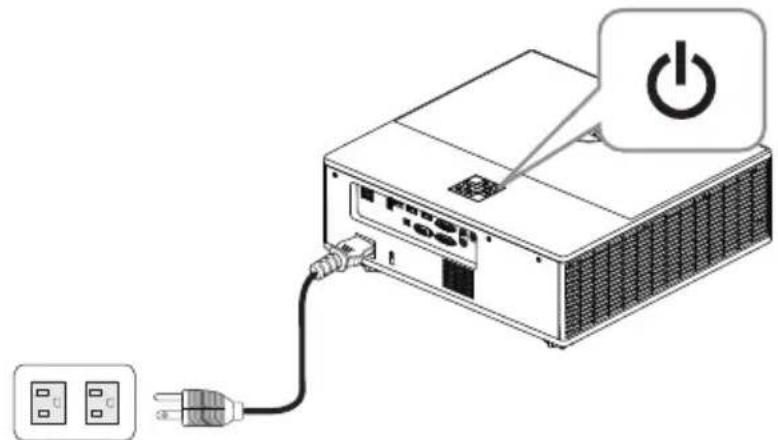
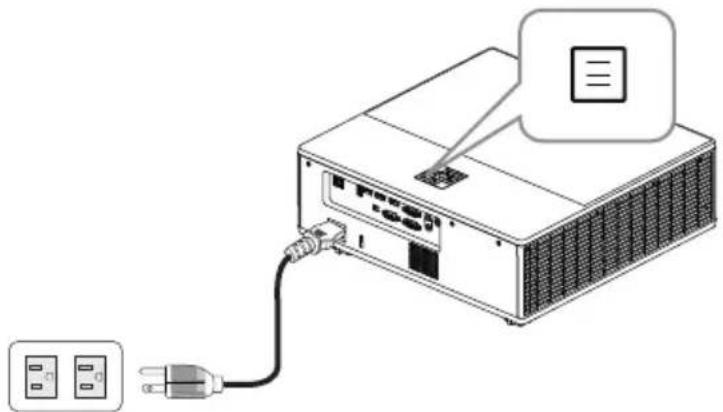
2 Press the Menu button on your projector control panel or remote control.
natural_image
Diagram of an electronic device connected to a power outlet, showing internal components and wiring (no text or symbols)
NOTE: Use , ^, and ▼buttons to navigate and to select.

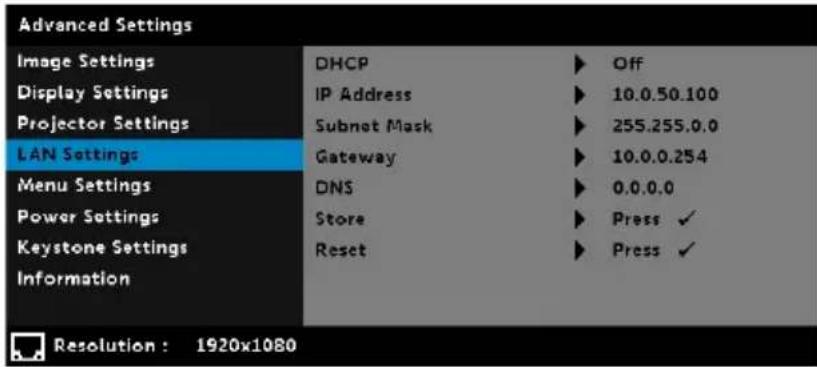
3 Ensure DHCP optional is Off from LAN settings of Advanced Settings menu.
4 Access the Input Source menu, and then select Network source.
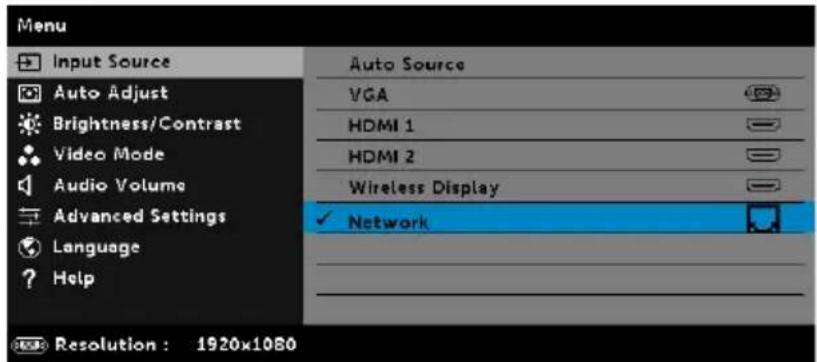
The LAN Guide Screen shown below appears:
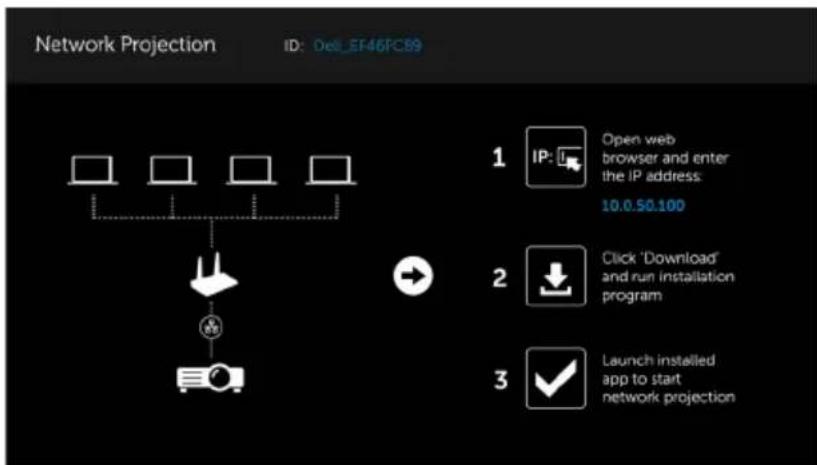
flowchart
graph TD
    A["Start"] --> B{Initial Setup}
    B --> C["Node 1"]
    B --> D["Node 2"]
    B --> E["Node 3"]
    B --> F["Node 4"]
    B --> G["Node 5"]
    G --> H["Down Arrow"]
    H --> I["User Icon"]
    I --> J["Next Step"]
    J --> K["OK"]
    K --> L["Launch Installed App to Start Network Projection"]
Install the Dell Network Projection on Your Computer
5 Connect the LAN cable to the projector and the computer.
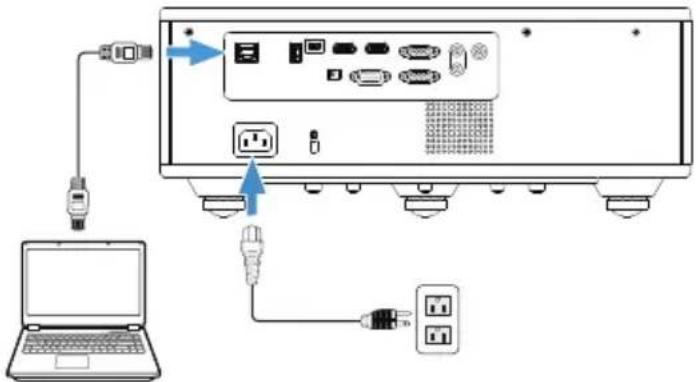

NOTE: You can also connect the LAN cable to the projector and the computer via a hub. Follow these steps to settings:
a DHCP optional change to On. Steps: Advanced Settings -> LAN Settings -> DHCP -> On.
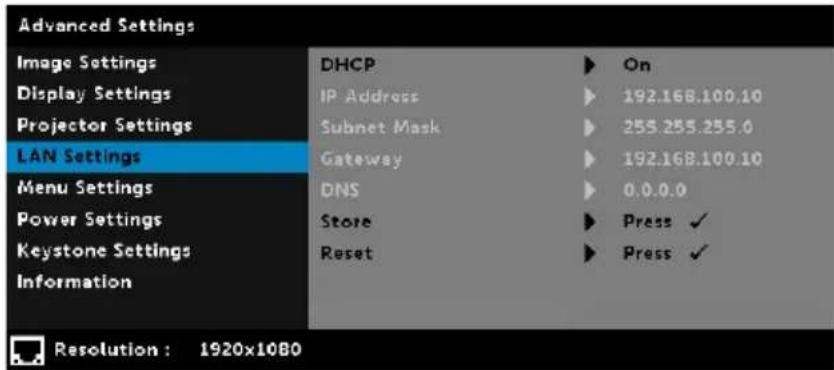
This IP address is generated via the DHCP, it is not the same.
b Input Source change to Network source. Steps: Input Source -> Network (same Step 4).
c Open the Internet browser on your computer, and enter the 192.168.100.10 (as on-screen) in the browser's address bar.
d Go to Step 8.
6 Open and enter the Internet Protocol (TCP/IP) on your computer, please enter IP address and Subnet mark, then click OK.
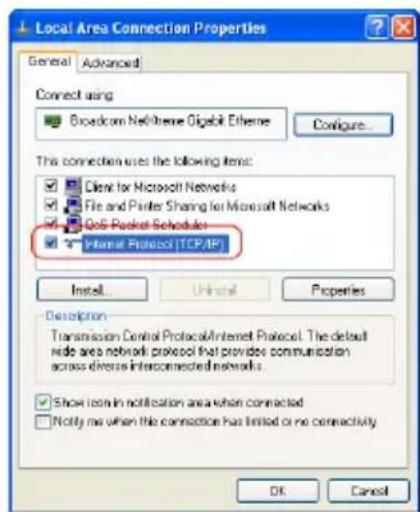
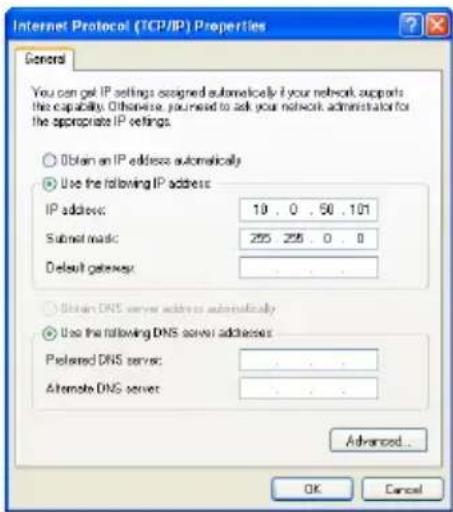
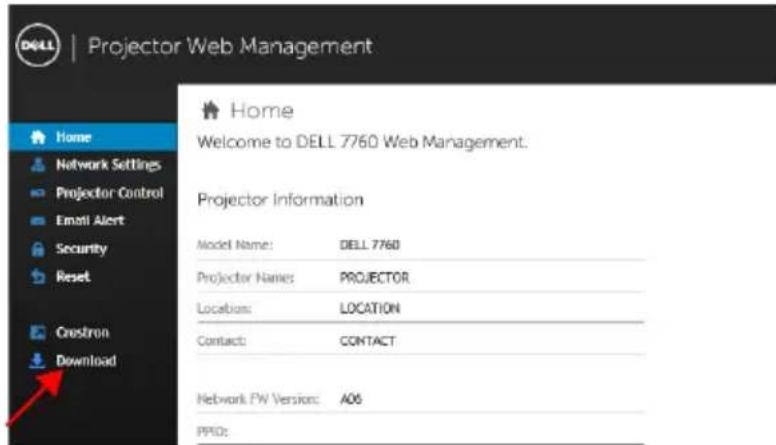
7 Open the Internet browser on your computer, and enter the 10.0.50.100 (default) in the browser's address bar. You will be directed to the Dell 7760 Web Management page.

8 The 7760 Web Management page opens. For first-time use, click Download.
9 At Download page, select the appropriate operating system, and click Download Network Projection App and install it on your computer.
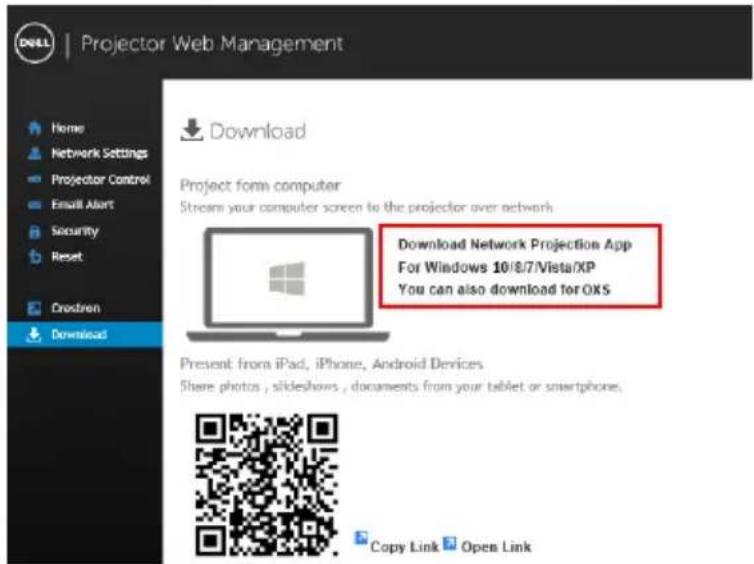

NOTE: If you are unable to install the application because of inadequate rights on the computer, please contact your network administrator.
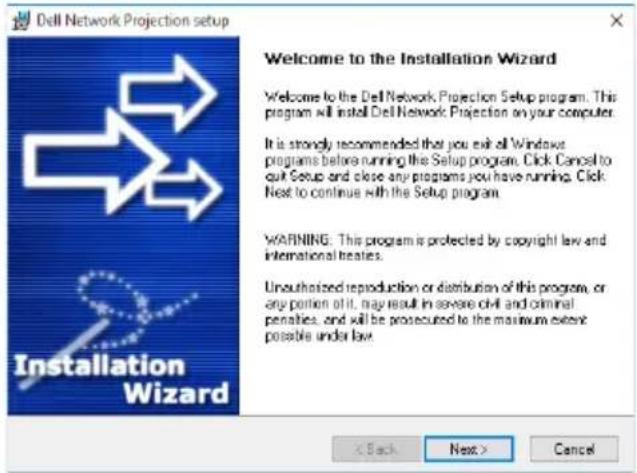
10 Click Run to proceed with the one-time installation of the software.
11 The installation software will launch. Follow the on-screen instructions to complete setup.
Launch the Dell Network Projection App
Once the installation is completed, you can double-click icon on the desktop to start the application.
The Dell Network Projection Screen shown below appears:
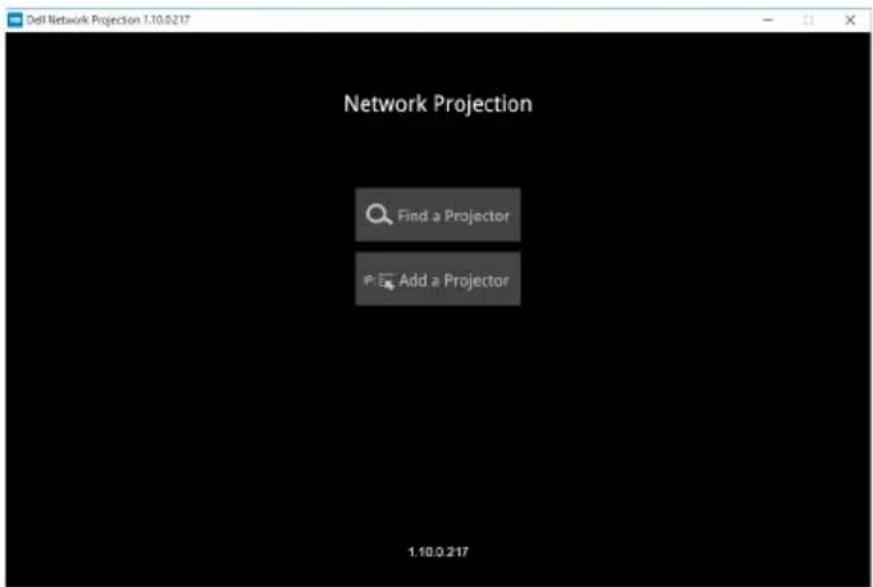
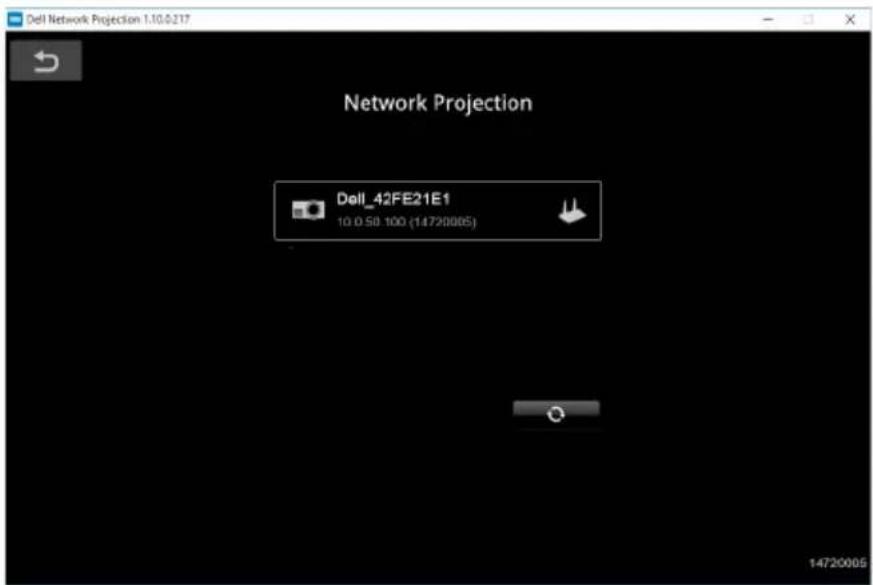
12 At Dell Network Projection screen, click Find a Projector, and then select Dell_42FE21E1 (random code).
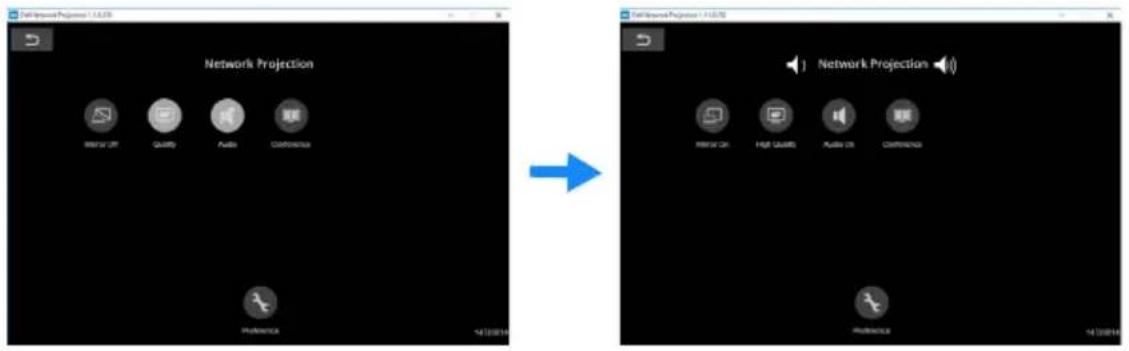
13 Click Mirror Off option to start the Dell 7760 network projection.
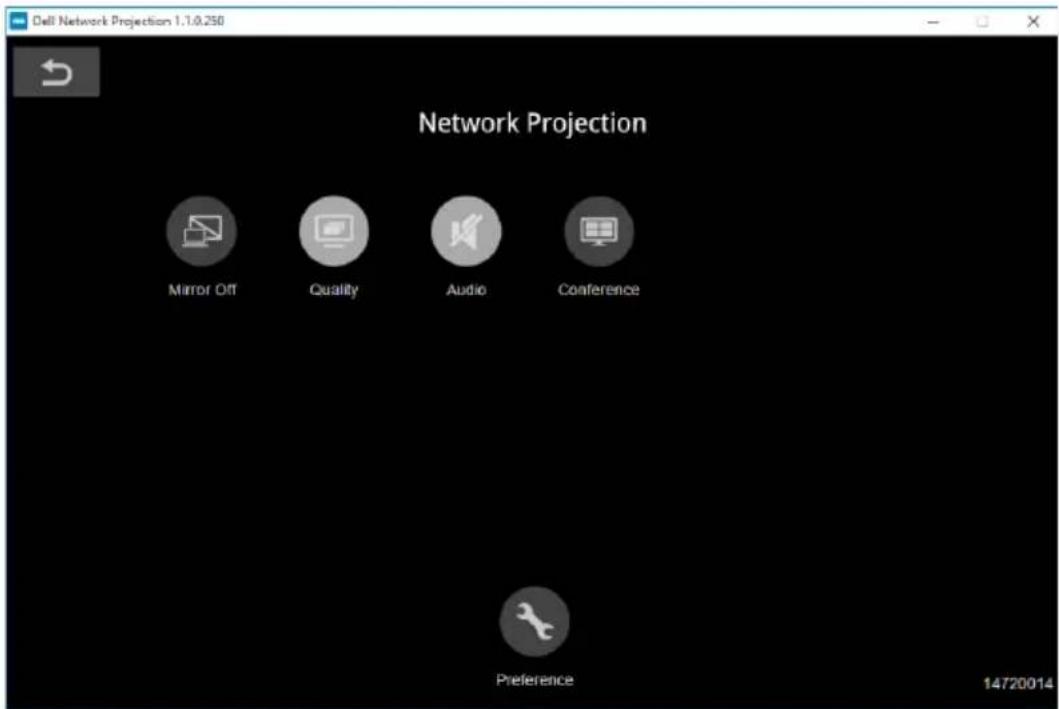
Understanding the Buttons
| Item Description | ||
| Control Toolbar | ||
 | Mirror Off/On | Click to toggle network projection On/Off and screen extension. |
 | Quality Click to toggle High/Low quality. | |
 | Audio Click to toggle audio On/Off. | |
 | Conference | Click to activate the conference control settings. |
 | Preference Click to activate the fast connection settings. | |
4
Troubleshooting
Troubleshooting Tips
If you experience problems with your projector, see the following troubleshooting tips. If the problem persists, contact Dell.
Problem Possible Solution
No image appears on the screen
- Ensure that you have chosen the correct input source on the INPUT SOURCE menu.
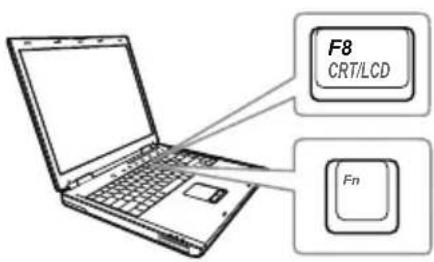
- Ensure the external graphics port is enabled. If you are using a Dell laptop computer, press (Fn4F8). For other computers, see your respective documentation. If images are not displayed properly, please upgrade the video driver of your computer. For Dell computers, see www.dell.com/support.
- Ensure that all the cables are securely connected. See "Adjusting Projector Image" on page 13.
- Ensure that the pins of the connectors are not bent or broken.
- Use the Test Pattern in the Projector Settings of the Advanced Settings menu. Ensure that the colors of the test pattern are correct.
| Problem (continued) Possible Solution (continued) | |
| Partial, scrolling, or incorrectly displayed image | 1 Press the Auto Adjust button on the remote control.2 If you are using a Dell laptop computer, set the resolution of the computer to 1080p (1920 x 1080):a Right-click the unused portion of your Microsoft® Windows® desktop, click Properties, and then select Settings tab.b Verify that the setting is 1920 x 1080 pixels for the external monitor port.c Press Fn F8ORTLCD (Fn+F8).If you experience difficulty in changing resolutions, or if your monitor freezes, restart all the equipment and the projector.If you are not using a Dell laptop computer, see your documentation. If images are not displayed properly, please upgrade the video driver of your computer. For a Dell computer, see www.dell.com/support. |
| The screen does not display your presentation | If you are using a portable computer, press Fn F8ORTLCD (Fn+F8). |
| Image is unstable or flickering | Adjust the tracking in the OSD Display Settings of the Advanced Settings menu (in PC Mode only). |
| Image has vertical flickering bar | Adjust the frequency in the OSD Display Settings of the Advanced Settings menu (in PC Mode only). |
| Image color is incorrect | If the display receives the wrong signal output from the graphics card, please set the signal type toRGBin the OSD Image Settings of the Advanced Settings tab.Use Test Pattern in the Projector Settings of the Advanced Settings menu. Ensure that the colors of the test pattern are correct. |
| Image is out of focus 1 | Adjust the focus ring on the projector lens.Ensure that the projection screen is within the required distance from the projector (4.27 ft [1.3 m] ~ 26.25 ft [8 m]). |
| The image is stretched when displaying a 16:9 DVD | The projector automatically detects the input signal format. It will maintain the aspect ratio of the projected image according to the input signal format with an Original setting.If the image is still stretched, adjust the aspect ratio in the Display Settings of the Advanced Settings menu in the OSD. |
| Image is reversed Select Projector Settings of the Advanced Settings from the OSD and adjust the projector mode. | |
| TEMP light is solid amber The projector has overheated. The display automatically shuts down. Turn the display on again after the projector cools down. If the problem persists, contact Dell. | |
| TEMP light is blinking amber | If the projector fan fails, the projector will automatically shut down. Try to clear the projector mode by pressing and holding thePowerbutton for 10 seconds. Please wait for about 5 minutes and try to power up again. If the problem persists, contact Dell. |
| The remote control is not operating smoothly or works only within a limited range | The battery may be low. If so, replace with two new AAA batteries. |
| LAN control support | Web Control functions were verified on IE9, IE10, and IE11. The other version may have compatibility problem.The Compatibility View setting should be disabled. Otherwise the web control page may have icon or content display abnormal issue. |
Guiding Signals
| Projector Status | Description | Control Buttons Indicator | ||
| Power | TEMP (Amber) | LAMP (Amber) | ||
| Standby mode | Projector in Standby mode. Ready to power on. | White Flashing OFF OFF | ||
| Warming up mode | Projector takes some time to warm up and power on. | White OFF OFF | ||
| LD on Projector in Normal mode, ready to display an image.Note: The OSD menu is not accessed. | White OFF OFF | |||
| Cooling mode | Projector is cooling to shutdown. | White OFF OFF | ||
| Projector overheated | Air vents might be blocked or ambient temperature may be above 40°C. The projector automatically shuts down. Ensure that the air vents are not blocked and that the ambient temperature is within operational range. If the problem persists, contact Dell. | OFF AMBER OFF | ||
| Fan breakdown | One of the fans has failed. The projector automatically shuts down. If the problem persists, contact Dell. | OFF | AMBER Flashing | OFF |
| LD driver overheated | Air vents might be blocked or the LD driver has overheated. The projector will automatically shut down. Turn the display on again after the projector cools down. If the problem persists, contact Dell. | AMBER AMBER OFF | ||
| Color Wheel breakdown | Color wheel cannot start. The projector has failed and the projector automatically shuts down. Unplug the power cord after three minutes and then turn on the projector. If this problem persists, contact Dell. | White | AMBER Flashing | AMBER Flashing |
| LD failure LD is defective. OFF OFF AMBER | ||||
| Fault - DC supply (+12V) | Power supply has been interrupted. The projector automatically shuts down. Unplug the power cord after three minutes and then turn on the projector. If this problem persists, contact Dell. | AMBER Flashing AMBER AMBER | ||
5
Maintenance
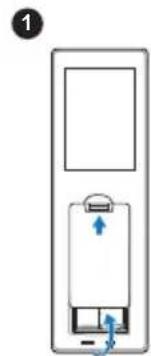
Replacing Remote Control Batteries

NOTE: Remove the batteries from the remote control when not in use.
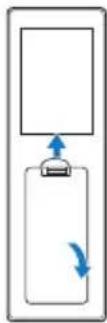
1 Press the tab to lift the battery compartment cover.
2 Check the polarity (+/-) marking on the batteries.
3 Insert the batteries and align their polarity correctly according to the marking in the battery compartment.

NOTE: Avoid mixing different types of batteries or using new and old batteries together.
natural_image
Diagram of a vertical device with a handle and internal components, showing no text or symbols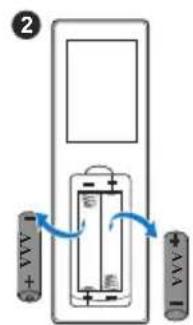
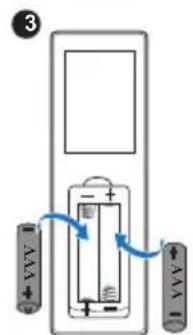
4 Slip the battery cover back.
4
Light Valve 0.65" 1080p S600HB DMD, DarkChip3™
Brightness 5400 ANSI Lumens (Max.)
Contrast Ratio 1800:1 Typical (Full On/Full Off)
100000:1 High Contrast Ratio
Uniformity 85% Typical (Japan Standard - JBMA)
Number of Pixels 1920 x 1080 (1080p)
Aspect Ratio 16:9
Displayable Color 1.07 billion colors
Color Wheel Speed 2 X for Normal
1 X for 3D Display
Projection Lens F-Stop: F/2.5\~3.39
Focal length, f=17.63\~31.36 mm
1.78X manual Zoom Lens
Throw ratio =1.2\~2.13 wide and tele
Offset ratio: 105%\~130%
Projection Screen Size 27.2 \~ 301.1 inches (diagonal)
Projection Distance 4.27 \~ 26.25 ft (1.3 \~ 8 m)
Video Compatibility Component Video input via VGA: 1080i (50/60
Hz), 720p (50/60 Hz), 576i/p, 480i/p
HDMI input: 1080p, 720p, 576i/p, 480i/p
Power Supply Universal AC 100-240 V 50-60 Hz with PFC input
Power Consumption Normal mode: 455 W ± 15% @ 110 Vac
Eco mode: 280 W ± 15% @ 110 Vac
Standby mode: < 0.5 W
Network standby: < 3 W

NOTE: By default, the projector is set to enter power saving mode after 20 minutes of no activity.
Audio 2 speakers x 10 watt RMS
Noise Level Normal mode: 36 dB(A)
Eco mode: 32 dB(A)
Projector Weight < 24.47 lbs (11.1 Kg)
Dimensions (W x D x H) 15.94 x 15.24 x 5.08 inches (405 x 387 x 129 mm)
Environmental Operating temperature: 5 °C - 40 °C (41 °F - 104 °F)
Humidity: 80% maximum
Storage temperature: 0 °C to 60 °C (32 °F to 140 °F)
Humidity: 90% maximum
Shipping temperature: -20 °C to 60 °C (-4 °F to 140 °F)
Humidity: 90% maximum
I/O Connectors Power: One AC power socket (3-pin - C14 inlet)
VGA input: One 15-pin D-sub connector (Blue), VGA In, for analog RGB/Component input signals.
VGA output: One 15-pin D-sub connector (Black) for VGA-A loop through.
HDMI input: Three HDMI connectors (one in the internal compartment) for supporting HDMI 1.4a. specification HDCP compliant.
Analog Audio input: One 3.5 mm stereo mini phone jack (Blue).
Variable audio output: One 3.5 mm stereo mini phone jack (Green).
Microphone input: One 3.5 mm stereo mini phone jack (Pink).
USB (type B) port: One mini USB slave for firmware upgrade.
5V/1.8A output: Two USB type A 5V DC / 1.8 A outputs (one in internal compartment) for supporting wireless display dongle.
RS232 port: One 9-pin D-sub for RS232 communication.
RJ-45 port: One RJ-45 connector for build-in for network control and LAN display.
12 V output: One 12V DC / 200 mA max. relay output for driver automatic screen.
Light Source Up to 20,000 hours in Normal mode
7
Additional Information
For additional information on how to use your projector, please see the Dell Projectors User Guide at www.dell.com/support/manuals.
For customers in the United States, call 800-WWW-DELL (800-999-3355).

NOTE: If you do not have an active Internet connection, you can find contact information on your purchase invoice, packing slip, bill, or Dell product catalog.
Dell provides several online and telephone-based support and service options. Availability varies by country and product, and some services may not be available in your area. To contact Dell for sales, technical support, or customer service issues:
1 Visit go to www.dell.com/contactDell.
2 Select your region on the interactive map.
3 Select a Segment for Contact.
4 Select the appropriate service or support link based on your need.
Index
A
Adjusting Projector Focus 14
Adjusting the Projected Image
Adjusting the Projector
Height 13
lower the projector
Front tilt adjustment
wheel 13
Tilt adjustment wheel
13
Adjusting the Projector Zoom and Focus
Focus ring 14
Front side door 14
Horizontal lens shift knob 14
Lens shift lock 14
Vertical lens shift knob 14
Zoom ring 14
C
Connecting the Projector
To Computer 21
Connection Ports
+ 12V DC out connector 6
+ 5V/1.8A DC out connector
6
Audio input connector 6
Audio output connector 6
HDMI 1 connector 6
HDMI 2 connector 6
Microphone connector 6
Mini USB (mini type B)
connector for firmware
upgrade 6
Power cord connector 6
RJ45 connector 6
RS232 connector 6
Security cable slot 6
VGA input connector 6
VGA output (monitor loop
through) connector 6
Contact Dell 4
D
Dell
contacting 44, 45
M
Main Unit 5
20W (2 x 10W) speakers 5
Focus ring 5
IR receivers 5
Lens 5
Mounting holes for ceiling
mount 5
Power button 5
Status indicators 5
Tilt adjustment wheel 5
Zoom ring 5
P
phone numbers 45
T
telephone numbers 45
R
Remote Control 9
Replacing 39
S
Specifications
Aspect Ratio 41
Audio 42
Brightness 41
Color Wheel Speed 41
Contrast Ratio 41
Dimensions 42
Displayable Color 41
Environmental 42
I/O Connectors 42
Light Valve 41
Noise Level 42
Number of Pixels 41
Power Consumption 41
Power Supply 41
Projection Distance 41
Projection Lens 41
Projection Screen Size 41
Projector Weight 42
Uniformity 41
Video Compatibility 41
support
contacting Dell 44, 45



- Dell Advanced Projector 7760 User's Guide
- Notes, Cautions, and Warnings
- Contents
- About Your Dell Projector 4
- Adjusting Projector Image.... 13
- Connecting Wireless Display Adapter ..... 21
- Troubleshooting 34
- Maintenance.... 39
- Specifications 41
- Additional Information 44
- Contacting Dell 45
- 1
- About Your Dell Projector
- Projector Box Contents
- Projector Top and Bottom View
- CAUTION: Safety Instructions
- NOTE:
- Remote Control Operating Range
- 2
- Adjusting Projector Image
- Adjusting Projected Zoom
- Raising the Projector Height
- Lowering the Projector Height
- Adjusting Projector Focus and Zoom
- Adjusting Projector Position
- Adjusting Image Corners
- Adjusting Image Size
- 3
- Connecting Wireless Display Adapter
- Installing Wireless Display Adapter
- Setting up the Wireless Display Adapter
- Setting up the Optional Dell WR517 Wireless Receiver
- Using LAN Display
- Enable LAN on Projector
- Install the Dell Network Projection on Your Computer
- Launch the Dell Network Projection App
- Understanding the Buttons
- 4
- Troubleshooting
- Troubleshooting Tips
- Problem Possible Solution
- 5
- Maintenance
- Replacing Remote Control Batteries
- 7
- Additional Information
- Index
- A
- C
- D
- M
- P
- T
- R
- S
Brand : DELL
Model : 7760
Category : Vidéo-projecteur