
HT-CN500DVH - Audio System SHARP - Free user manual and instructions
Find the device manual for free HT-CN500DVH SHARP in PDF.

| Brand | SHARP |
| Model | HT-CN500DVH |
| Product type | Audio system with CD/DVD player |
| Dimensions (W × H × D) | Approx. 430 × 65 × 300 mm (estimate) |
| Weight | Approx. 3.5 kg (estimate) |
| Power supply | 220-240 V ~ 50/60 Hz |
| Power consumption | Approx. 45 W (estimate) |
| Standby power consumption | Less than 1 W |
| Compatible formats | Audio CD, CD-R/RW, DVD Video, DVD±R/RW |
| Audio output power | 2 × 20 W RMS (estimate) |
| Built-in speakers | 2-way (woofer + tweeter) per speaker |
| Main functions | CD/DVD player, FM radio, amplification, USB playback, auxiliary input |
| Remote control | Included, operates with AAA batteries |
| Laser diode | AlGaAs/AlGaInP type, wavelengths 785 nm (CD) and 650 nm (DVD) |
| Laser safety class | Class 1 (safe under normal use) |
| Water protection | None (do not expose to liquids) |
| Care and cleaning | Unplug before cleaning; use a dry, soft cloth |
| Spare parts and repairability | No user-serviceable parts; contact an authorized service |
| Warranty | 2 years (except legal conditions) |
Frequently Asked Questions - HT-CN500DVH SHARP
User questions about HT-CN500DVH SHARP
0 question about this device. Answer the ones you know or ask your own.
Ask a new question about this device
Download the instructions for your Audio System in PDF format for free! Find your manual HT-CN500DVH - SHARP and take your electronic device back in hand. On this page are published all the documents necessary for the use of your device. HT-CN500DVH by SHARP.
USER MANUAL HT-CN500DVH SHARP
HOME CINEMA WITH DVD
MODELL MODELLO
MODÈLE MODEL
MODELO MODELO
MODELL MODEL
HT-CN400DVH HT-CN500DVH
BEDIENUNGSANLEITUNG
MODE D'EMPLOI
MANUAL DE MANEJO
BRUKSANVISNING
natural_image
Illustration of a modern audio streaming setup with a Sharp TV, speaker, and remote control (no text or symbols)DIGITAL

SURROUND


DEUTSCH
Siehe Seiten i
bis vi und D-1 bis
D-52.
FRANÇAIS
Se reporter aux
pages i à vi et F-1
à F-52.
ESPAÑOL
Consulte las
páginas i a vi y
S-1 a S-52.
SVENSKA
Hänvisa till
sidorna i till vi
och V-1 till V-52.
ITALIANO
Leggere le
pagine i a vi e l-1
a I-52.
NEDERLANDS
Raadpleeg de
bladzijden i t/m
vi en N-1 t/m N-52.
PORTUGUÊS
Favor consultar
as páginas i a vi
e P-1 a P-52.
ENGLISH
Please refer to
pages i to vi and
E-1 to E-52.

HT-CN400DVH HT-CN500DVH
BESONDERE ANMERKUNGEN REMARQUES SPÉCIALES NOTAS ESPECIALES SÄRSKILDA ANMÄRKNINGAR
NOTE PARTICOLARI BIJZONDERE OPMERKINGEN NOTAS ESPECIAIS SPECIAL NOTES
- Dieses Gerät entspricht den Anforderungen der EG-Richtlinien 89/336/EWG und 73/23/EWG mit Änderung 93/68/EWG.
- Ce matériel répond aux exigences contenues dans les directives 89/336/CEE et 73/23/CEE modifiées par la directive 93/68/CEE.
- Este aparato satisface las exigencias de las Directivas 89/336/CEE y 73/23/CEE, modificadas por medio de la 93/68/CEE.
- Denna utrustning uppfyller kraven enligt riktlinjerna 89/336/EEC och 73/23/EEC så som kompletteras av 93/68/EEC.
- Quest'apparecchio è conforme ai requisiti delle direttive 89/336/EEC e 73/23/EEC, come emendata dalla direttiva 93/68/EEC.
- Dichiarazione di conformità
La società SHARP ELECTRONICS EUROPE GmbH dichiara che il prodotto SHARP HT-CN400DVH/HT-CN500DVH HOME CINEMA CON DVD è costruito in conformità alle prescrizioni del D.M.n°548 del 28/8/95, pubblicato sulla G.U.n°301 del 28/12/95 ed in particolare è conforme a quanto indicato nell'art. 2, comma 1 dello stesso decreto. - Dit apparaat voldoet aan de eisen van de richtlijnen 89/336/EEG en 73/23/EEG, gewijzigd door 93/68/EEG.
-
Este equipamento obedece às exigências das directivas 89/336/CEE e 73/23/CEE, na sua versão corrigida pela directiva 93/68/CEE.
● This equipment complies with the requirements of Directives 89/336/EEC and 73/23/EEC as amended by 93/68/EEC. -
Dette udstyr overholder kravene i direktiv nr. 89/336/EEC og 73/23/EEC med tillaeg nr. 93/68/EEC.
- Este equipamento obedece às exigências das directivas 89/336/CEE e 73/23/CEE, na sua versão corrigida pela directiva 93/68/CEE.
- Dette produktet oppfyller betingelsene i direktivene 89/336/EEC og 73/23/EEC i endringen 93/68/EEC.
- Tämä laite täyttää direktiivien 89/336/EEC ja 73/23/EEC vaatimukset, joita on muutettu direktiivillä 93/68/EEC.
Η εγκατάσταση αυτή ανταποκρίνεται στις απαιτήσεις των οδηγιών της Ευρωπαϊκής Ενωσης 89/336/ΕΟΚ και 73/23/ΕΟΚ, όπως οι κανονισμοί αυτοί συμπληρώθηκαν από την οδηγία 93/68/ΕΟΚ.
- When the ON/STAND-BY button is set at STAND-BY position, mains voltage is still present inside the unit. When the ON/STAND-BY button is set at STAND-BY position, the unit may be brought into operation by the remote control.
Warning:
This unit contains no user serviceable parts. Never remove covers unless qualified to do so. This unit contains dangerous voltages, always remove mains plug from the socket before any service operation and when not in use for a long period.
- Når ON/STAND-BY-knappen er sat i STAND-BY positionen, er der stadig netspaending til stede i apparatet.
Når ON/STAND-BY-knappen er sat i STAND-BY position, kan apparatet startes v.hj.a. fjernbetjeningen.
Advarsel:
HT-CN400DVH HT-CN500DVH
● Vorsicht:
To prevent fire or shock hazard, do not expose this appliance to dripping or splashing. No objects filled with liquids, such as vases, should be placed on the apparatus.
- Advarsel:
Use of controls, adjustments or performance of procedures other than those specified herein may result in hazardous radiation exposure.
As the laser beam used in this compact disc player is harmful to the eyes, do not attempt to disassemble the cabinet. Refer servicing to qualified personnel only.
- Dieses Produkt ist ein Laserprodukt der Klasse 1.
- Ce produit est classifié comme étant un LASER DE CLASSE 1.
- Este producto está clasificado como un PRODUCTO LÁSER DE CLASE 1.
● Denna produkt klassificeras som KLASS 1 LASERPRODUKT. - Questo prodotto è classificato come CLASS 1 LASER PRODUCT.
- Dit product is geclassificeerd als een KLASSE 1 LASER PRODUCT.
- Este produto é classificado como PRODUTO LASER DE CLASSE 1.
● This product is classified as a CLASS 1 LASER PRODUCT. - Dette produktet er klassifisert som et KLASSE 1 LASERPRODUKT.
- Dette produkt er klassificeret som et KLASSE 1 LASERPRODUKT.
- Tämä laite on luokiteltu LUOKAN 1 LASERLAITTEEKSI.
● Denna produkt klassificeras som KLASS 1 LASERAPPARAT. - Tento výrobek je klasifikován jako LASEROVÝ VÝROBEK TŘÍDY 1.
- Tento výrobok je klasifikovaný ako LASEROVÝ VÝROBOK TRIEDY 1.
VÝSTRAHA: VÝROBEK JE VYBAVEN LASEREM. PŘI NESPRÁVNÉ MANIPULACI S PŘÍSTROJEM V ROZPORU S TÍMTO NÁVODEM MŮŽE DOJÍT K NEBEZPEČNÉMU OZÁŘENÍ. NEOTVÍREJTE A NESNÍMEJTE PROTO ŽÁDNÉ KRYTY A PŘÍSTROJ NEOPRAVUJTE. OPRAVU A SERVIS SVĚŘTE ODBORNÉMU SERVISU.
VÝSTRAHA: VÝROBOK JE VYBAVENÝ LASEROM.
PRI NESPRÁVNOM MANIPULOVANÍ S PRÍSTROJOM V ROZPORE S TÝMTO NÁVODOM MÓŽE DÔJSŤ K NEBEZPEČNÉMU OŽIARENIU. NEODKRÝVAJTE PRETO ŽIADNE KRYTY A PRÍSTROJ NEOPRAVUJTE. OPRAVU A SERVIS PRENECHAJTE ODBORNÉMU SERVISU.
HT-CN400DVH
HT-CN500DVH
HT-CN400DVH HT-CN500DVH
Wavelength: 785 nm/650 nm
Emission Duration: continuous
Laser Output: max. 0.6 mW
ADVERSEL-SYNLIG OG USYNLIG LASERSTRÅLING VED ÅBNING. SE IKKE IND I STRÅLEN-HELLER IKKE MED OPTISKE INSTRUMENTER.
VARO! AVATTAESSA OLET ALTTIINA NÄKYVÄLLE JA NÄKYMÄTTÖMÄLLE LASERSÄTEILYLLE ÄLÄ TUIJOTA SÄTEESEEN ÄLÄKÄ KATSO SITÄ OPTISEN LAITTEEN LÄPI.
VARNING-SYNLIG OCH OSYNLIG LASERSTRÅLNING NÄR DENNA DEL ÄR ÖPPNAD. STIRRA EJ IN I STRÅLEN OCH BETRAKTA EJ STRÅLEN GENOM OPTISKT INSTRUMENT.
VAROITUS! LAITTEEN KÄYTTÄMINEN MUULLA KUIN TÄSSÄ KÄYTTÖOHJEESSA MAINITULLA TAVALLA SAATTAA ALTISTAA KÄYTTÄJÄN TURVALLISUUSLUOKAN 1 YLITTÄVÄLLE NÄKYVÄLLE JA NÄKYMÄTTÖMÄLLE LASERSÄTEILYLLE.
VARNING - OM APPARATEN ANVÄNDS PÅ ANNAT SÄTT ÄN I DENNA BRUKSANVISNING SPECIFICERAS. KAN ANVÄNDAREN UTSÄTTAS FÖR SYNLIG OCH OSYNLIG LASERSTRÅLNING, SOM ÖVERSKRIDER GRÄNSEN FÖR LASERKLASS 1.
- In Lizenz von Digital Theater Systems, Inc. hergestellt. US Pat. Nr. 5,451,942, 5,956,674, 5,974,380, 5,978,762 und andere, ausgegebene und schwebende, weltweite Patente. "DTS" und "DTS Digital Surround" sind eingetragene Warenzeichen der Digital Theater Systems, Inc. Copyright 1996, 2000 Digital Theater Systems, Inc. Alle Rechte vorbehalten.
- Fabriqué, sous licence de Digital Theater Systems, Inc. Les brevets US Pat. No. 5,451,942, 5,956,674, 5,974,380, 5,978,762 et autres internationaux délivrés et demandés. "DTS" et "DTS Digital Surround" sont des marques déposées de Digital Theater Systems, Inc. Copyright 1996, 2000 Digital Theater Systems, Inc. Tous droits réservés.
- Fabricado con licencia de Digital Theater Systems, Inc. Patentes de EE.UU.N.º 5,451,942, 5,956,674, 5,974,380, 5,978,762 y otras patentes mundiales emitidas y pendientes. “DTS” y “DTS Digital Surround” son marcas registradas de Digital Theater Systems, Inc. Copyright 1996, 2000 Digital Theater Systems, Inc. Todos los derechos reservados.
- Tillverkad under licens från Digital Theater Systems, Inc. US Pat. No. 5,451,942, 5,956,674, 5,974,380, 5,978,762 och andra världspatent utgivna och oavgjorda. "DTS" och "DTS Digital Surround" är registrerade varumärken för Digital Theater Systems, Inc. Copyright 1996, 2000 Digital Theater Systems, Inc. Alla rättigheter förbehållna.
- Costruito su licenza della Digital Theater Systems, Inc. US Pat. No. 5,451,942, 5,956,674, 5,974,380, 5,978,762 e brevetti già concessi o in attesa di esserlo di altri Paesi. "DTS" e "DTS Digital Surround" sono marchi di fabbrica registrati della Digital Theater Systems, Inc. Copyright 1996, 2000 Digital Theater Systems, Inc. Tutti i diritti riservati.
- Gefabriceerd onder licentie van Digital Theater Systems, Inc. US patentnummer 5,451,942, 5,956,674, 5,974,380, 5,978,762 en andere wereldwijde patenten verstrekt en aangevraagd. "DTS" en "DTS Digital Surround" zijn geregistreerde handelsmerken van Digital Theater Systems, Inc. Copyright 1996, 2000 Digital Theater Systems, Inc. Alle rechten voorbehouden.
-
Produzido sob licença da Digital Theater Systems, Inc. Patente nos Estados Unidos N° 5,451,942, 5,956,674, 5,974,380, 5,978,762 e outras patentes ao redor do mundo emitidas e pendentes. “DTS” e “DTS” Digital Surround” são marcas comerciais registradas da Digital Theater Systems, Inc. Direitos autorais 1996, 2000 Digital Theater Systems, Inc. Todos os direitos reservados.
● Manufactured under license from Digital Theater Systems, Inc. US Pat. No. 5,451,942, 5,956,674, 5,974,380, 5,978,762 and other world-wide patents issued and pending. "DTS" and "DTS Digital Surround" are registered trademarks of Digital Theater Systems, Inc. Copyright 1996, 2000 Digital Theater Systems, Inc. All Rights Reserved. -
In Lizenz von Dolby Laboratories hergestellt. "Dolby", "Pro Logic" und das Doppel-D-Symbol sind Warenzeichen der Dolby Laboratories.
- Fabriqué sous licence de Dolby Laboratories. «Dolby», «Pro Logic» et le symbole double D sont des marques de commerce de Dolby Laboratories.
- Fabricado bajo licencia de Dolby Laboratories. "Dolby", "Pro Logic" y el símbolo con una doble D son marcas registradas de Dolby Laboratories.
- Tillverkad på Dolby Laboratories licens. "Dolby", "Pro Logic" och dubbel-D-symbol är varumärken som tillhör Dolby Laboratories.
- Prodotto sotto licenza dalla Dolby Laboratories. "Dolby", "Pro Logic" ed il simbolo doppia D sono marchi registrati della Dolby Laboratories.
- Vervaardigd in licentie van Dolby Laboratories. "Dolby", "Pro Logic" en het dubbel D-symbol zijn handelsmerken van Dolby Laboratories.
- Fabricado sob licença da Dolby Laboratories. “Dolby,” “Pro Logic” e o símbolo do “D” duplo são marcas registradas da Dolby Laboratories.
● Manufactured under license from Dolby Laboratories. "Dolby", "Pro Logic" and the double-D symbol are trademarks of Dolby Laboratories.
HT-CN400DVH HT-CN500DVH
ENGLISH
Introduction
Thank you for purchasing this SHARP product. To obtain the best performance from this product, please read this manual carefully. It will guide you in operating your SHARP product.
- HT-CN400DVH Home Cinema with DVD consisting of HT-CN400DVH (main unit), CP-CN400HF (front speakers), CP-CN400HC (centre speaker), CP-CN400HR (surround speakers) and CP-CN400HSW (subwoofer).
- HT-CN500DVH Home Cinema with DVD consisting of HT-CN500DVH (main unit), CP-CN500HF (front speakers), CP-CN500HC (centre speaker), CP-CN500HR (surround speakers) and CP-CN500HSW (subwoofer).
Icons used in this operation manual
Some functions may not be available depending on discs. The following icons indicate the discs that can be used in the section.
DVD ... Indicates DVDs.
SVCD ... Indicates Super video CDs.
VCD ... Indicates video CDs.
CD ... Indicates audio CDs.
MP3 ... Indicates CD-R/RW with MP3 recording.
JPEG ... Indicates CD-R/RW with JPEG recording.
- Some operations may not be performed depending on discs even if they are described in this manual.
- During operation, "☐" may be displayed on the screen. This means that the operations described in this manual are not possible.
Copyright Information:
- Unauthorised copying, broadcast, public display, transmission, public performance and rental (regardless of whether or not such activities are for profit) of disc contents are prohibited by law.
- This system is equipped with copy protection technology that causes substantial degradation of images when the contents of a disc are copied to a videotape.
- This system is protected by U. S. patents and other intellectual property rights, the copyright for which belongs to Macrovision Corporation. The use of Macrovision's copy protection technology in the system is authorised by Macrovision and is intended for home use only, unless otherwise authorised in writing by Macrovision. Reverse engineering or disassembly is prohibited.
Types of playable discs
The DVD player can play back discs bearing any of the following marks:
| Disc type | Disc contents | Disc size |
DVD Video Disc  " VIDEO" " VIDEO" | Audio and video (movies) | 12 cm (5")8 cm (3") |
Super Video CD  | Audio and video (movies) | 12 cm (5")8 cm (3") |
Video CD  | Audio and video (movies) | 12 cm (5")8 cm (3") |
Audio CD | Audio | 12 cm (5")8 cm (3") |
CD-R/CD-RW (*1)  Or CD-R/CD-RW recorded in MP3 format (*2), JPEG format (*3) Or CD-R/CD-RW recorded in MP3 format (*2), JPEG format (*3) | Audio and picture | 12 cm (5")8 cm (3") |
(*1): The CD-R/CD-RW may not be played back properly depending on the recording equipment or the disc.
(*2): If the sampling frequency is 44.1 or 48.1 kHz and the fixed bit rate is 128 kbps or higher, MPEG 1 Audio Layer 3 (MP3) files can be played. However, some of them may not be played depending on their conditions or formats.
(*3): JPEG or JPG picture discs also play on this unit. However, pictures may not be clear (depends on resolution and recording method).
- For unplayable discs, see page 5.
Contents
Page
■ General Information
Accessories 3
Optional accessories ....3
Precautions 4
Description of discs 5,6
Controls and indicators 7 - 10
■ System Connections
Speaker connection .....11, 12
Aerial connection ....12
Connections to TV, VCR, etc. 13, 14
■ Preparation for Use
System installation ....15
Battery installation 16
Turning the power on....16
Changing the setup menu 17 - 21
General control 22
■ DVD Operation
DVD playback
Playback ....23, 24
To resume playback after stopping (resume play) .....24
DVD mode operation indicators ....24
Basic operation
To locate the beginning of a chapter (track) (skip) .....25
Fast forward/Fast reverse (search) .....25
To start playback from the desired point (direct play) .....26
Useful operation
Still picture/Frame advance .....27
Slow-motion play 27
To change the angle 28
To zoom images (zoom) .....28
To play repeatedly (repeat play) .....29
To play the contents between the specified points repeatedly (A-B repeat) ..30
To select a title from the top menu of the disc ....30
To select a subtitle or audio language from the disc menu ....30
HT-CN400DVH HT-CN500DVH
ENGLISH
E-2
Accessories
Please confirm that the following accessories are included.
 Remote control × 1 Remote control × 1 |  "AA" size battery (UM/SUM-3, R6, HP-7 or similar) × 2 "AA" size battery (UM/SUM-3, R6, HP-7 or similar) × 2 |  SCART cable × 1 SCART cable × 1 |  White and Black(for left front speaker) approx. 5 m (16 feet) White and Black(for left front speaker) approx. 5 m (16 feet) |  Green and Black(for centre speaker) approx. 5 m (16 feet) Green and Black(for centre speaker) approx. 5 m (16 feet) |  Red and Black(for right front speaker) approx. 5 m (16 feet) Red and Black(for right front speaker) approx. 5 m (16 feet) | |
 FM aerial × 1 FM aerial × 1 |  AM loop aerial × 1 AM loop aerial × 1 |  Purple and Black(for subwoofer) approx. 5 m (16 feet) Purple and Black(for subwoofer) approx. 5 m (16 feet) |  Blue and Black(for left surround speaker) approx. 15 m (49 feet) Blue and Black(for left surround speaker) approx. 15 m (49 feet) |  Grey and Black(for right surround speaker) approx. 15 m (49 feet) Grey and Black(for right surround speaker) approx. 15 m (49 feet) | ||
| Speaker connection lead × 6 | ||||||
Note:
Only the above accessories are included.
Optional accessories
Use only the specified optional accessories to operate this product properly.
For speaker installation, read instructions supplied with stands or brackets.
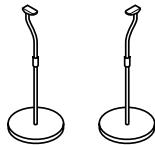
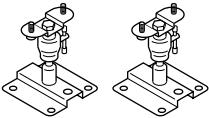
| FLOOR SPEAKER STAND | SPEAKER WALL BRACKET |
| Model: AD-AT11ST | Model: AD-AT10SA |
 |  |
Notes:
● The appearance of optional accessories may differ from the illustrations above.
- Some of the above optional accessories may not be available depending on the area.
Precautions
■ General
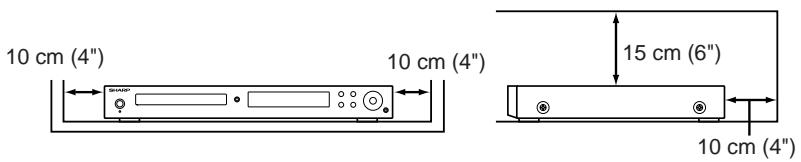
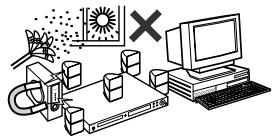
- Please ensure that the equipment is positioned in a well ventilated area and that there is at least 10 cm (4") of free space along the sides and back. There must also be a minimum of 15 cm (6") of free space on the top of the unit.
- Use the unit on a firm, level surface free from vibration.
- Keep the unit away from direct sunlight, strong magnetic fields, excessive dust, humidity and electronic/electrical equipment (home computers, facsimiles, etc.) which generates electrical noise.
- Do not place anything on top of the unit.
- Do not expose the unit to moisture, to temperatures higher than 60°C (140°F) or to extremely low temperatures.
- If the unit does not work properly, unplug and plug it in again. Then turn on the unit.
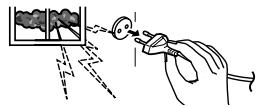
- In case of an electrical storm, unplug the unit for safety.
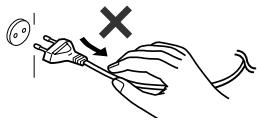
- Hold the AC power plug by the head when removing it from the wall socket, as pulling the lead can damage internal wires.
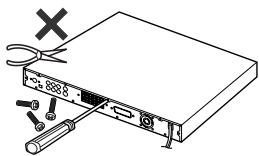
- Do not remove the outer cover, as this may result in electric shock. Refer internal service to your local SHARP service facility.
- The ventilation should not be impeded by covering the ventilation openings with items, such as newspapers, tablecloths, curtains, etc.
- No naked flame sources, such as lighted candles, should be placed on the apparatus.
- Attention should be drawn to the environmental aspects of battery disposal.
● The apparatus is designed for use in moderate climate.
● This unit should only be used within the range of 5^ C - 35^ C ( 41^ F - 95^ F).
Warning:
The voltage used must be the same as that specified by this unit. Using this product with a higher voltage other than that specified is dangerous and may result in a fire or other types of accident, causing damage. SHARP will not be held responsible for any damage resulting from the use of this unit with a voltage other than that specified.
■ Volume control
The sound level at a given volume setting depends on speaker efficiency, location, and various other factors. It is advisable to avoid exposure to high volume levels. Do not turn the volume on to full at switch on and listen to music at moderate levels.
Description of discs
■ Discs that cannot be played
● DVDs without the region number "2" or "ALL".
● DVDs with SECAM system
- DVD-ROM
- DVD-RAM
- DVD-Audio
• CDG
- CDV
- Photo CD
- CD-ROM
- SACD
● Discs recorded in special formats, etc.
- The discs above cannot be played at all, or no sound is heard although images appear on the screen or vice versa.
- Incorrect operation may damage the speakers and can have an negative effect on your hearing when played at high volume settings.
- You cannot play illegally produced discs.
Notes:
- A disc with has scratches or fingerprints may not play properly. Refer to "Care of DVD/CD discs (page 51)" and clean the disc.
- Do not play the discs of special shapes (heart or octagon shaped) as they can be ejected whilst rotating and cause injury.
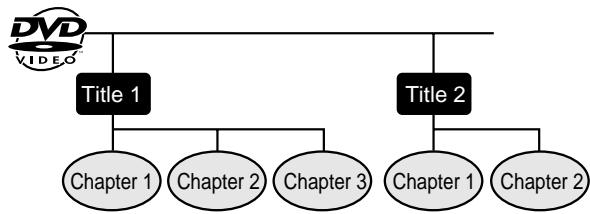
■ Title, chapter and track
DVDs are divided into "titles" and "chapters". If the disc has more than one movie on it, each movie is a separate "title". "Chapters" are subdivisions of titles.
flowchart
graph TD
    A["Title 1"] --> B["Chapter 1"]
    A --> C["Chapter 2"]
    A --> D["Chapter 3"]
    E["Title 2"] --> F["Chapter 1"]
    E --> G["Chapter 2"]
Audio CDs consist of "tracks".
A "track" is each tune on an audio CD.

flowchart
graph LR
    A["COMPACT"] --> B["Track 1"]
    B --> C["Track 2"]
    C --> D["Track 3"]
    D --> E["Track 4"]
    E --> F["Track 5"]
Note:
Title, chapter, or track numbers may not be recorded on some discs.
■ Icons used on DVD discs
Check the icons on the DVD case before playing your discs.
| Display | Description | |
Region number (playable area number) | DVD discs are programmed with region numbers indicating countries in which they can be played. This system can play discs with region number "2" or "ALL". | |
| Format recorded on the DVD | To adopt the video format to the connected TVs ("wide-screen TV" or "4:3 size TV"). | |
| 4:3 | Recorded in 4:3. | |
 | You can enjoy wide images on a wide-screen TV, and letterbox size images on the 4:3 size TV. | |
 | You can enjoy wide images on a wide-screen TV and 4:3 images with the side edges cut on the 4:3 size TV. | |
Type of subtitles recordedExample: 1: English2: French 1: English2: French | Recorded subtitle languages.Language can be selected with the SUB-TITLE button. | |
Number of camera angles | Number of angles recorded on the DVD.Angles can be selected with the ANGLE button. | |
Number of audio tracks and audio recording systemsExample: 1: Original(DTS 5.1 Surround)2: English (Dolby Digital 5.1 Surround) 1: Original(DTS 5.1 Surround)2: English (Dolby Digital 5.1 Surround) | The number of audio tracks and audio recording systems are indicated.The audio recorded on the DVD can be switched by using the LANGUAGE button.The number of audio tracks and recording systems vary depending on the DVD. Check them in the DVD's manual. | |
The list below shows the countries covered by region number 2.
| Hellenic Republic | Names of nations and areas |
| Albania | Republic of Albania |
| Andorra | Principality of Andorra |
| Austria | Republic of Austria |
| Bahrain | State of Bahrain |
| Belgium | Kingdom of Belgium |
| Bosnia and Herzegovina | Bosnia and Herzegovina |
| Bulgaria | Republic of Bulgaria |
| Channel Islands | *Channel Islands |
| Croatia | Republic of Croatia |
| Cyprus | Republic of Cyprus |
| Czech | The Czech Republic |
| Denmark | Kingdom of Denmark |
| Egypt | Arab Republic of Egypt |
| Faeroe Islands | *Faeroe Islands |
| Finland | Republic of Finland |
| France | French Republic |
| Germany | Federal Republic of Germany |
| Gibraltar | *Gibraltar |
| Greece | Hellenic Republic |
| Greenland | *Greenland |
| Hungary | Republic of Hungary |
| Iceland | Republic of Iceland |
| Iran | Islamic Republic of Iran |
| Iraq | Republic of Iraq |
| Ireland | Ireland |
| Isle of Man | *Isle of Man |
| Israel | State of Israel |
| Italy | Italian Republic |
| Japan | Japan |
| Jordan | Hashemite Kingdom of Jordan |
| Kuwait | State of Kuwait |
| Common names | Names of nations and areas |
| Lebanon | Republic of Lebanon |
| Lesotho | Kingdom of Lesotho |
| Liechtenstein | Principality of Liechtenstein |
| Luxembourg | Grand Duchy of Luxembourg |
| Macedonia | Republic of Macedonia |
| Malta | Republic of Malta |
| Monaco | Principality of Monaco |
| Netherlands | Kingdom of the Netherlands |
| Norway | Kingdom of Norway |
| Oman | Sultanate of Oman |
| Poland | Republic of Poland |
| Portugal | Portuguese Republic |
| Qatar | State of Qatar |
| Romania | Romania |
| San Marino | Republic of San Marino |
| Saudi Arabia | Kingdom of Saudi Arabia |
| Slovakia | The Slovak Republic |
| Slovenia | Republic of Slovenia |
| South Africa | Republic of South Africa |
| Spain | Kingdom of Spain |
| Svalbard and Jan Mayen Islands | *Svalbard and Jan Mayen Islands |
| Swaziland | Kingdom of Swaziland |
| Sweden | Kingdom of Sweden |
| Switzerland | Swiss Confederation |
| Syrian Arab Republic | Syrian Arab Republic |
| Turkey | Republic of Turkey |
| United Arab Emirates | United Arab Emirates |
| United Kingdom | United Kingdom of Great Britain and North-em Ireland |
| Vatican City State | State of the City of Vatican |
| Yemen | Republic of Yemen |
| Yugoslavia | Federal Republic of Yugoslavia |
* represents area name.
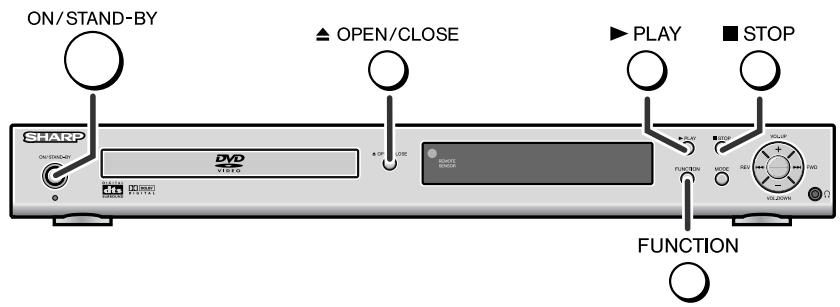
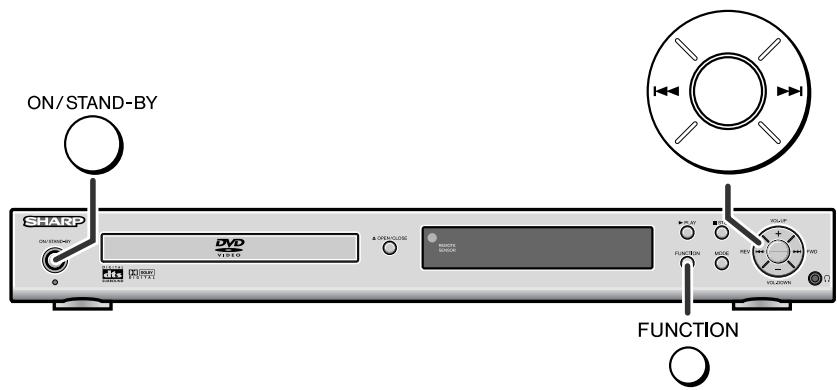
Controls and indicators
■ Main unit (front panel)
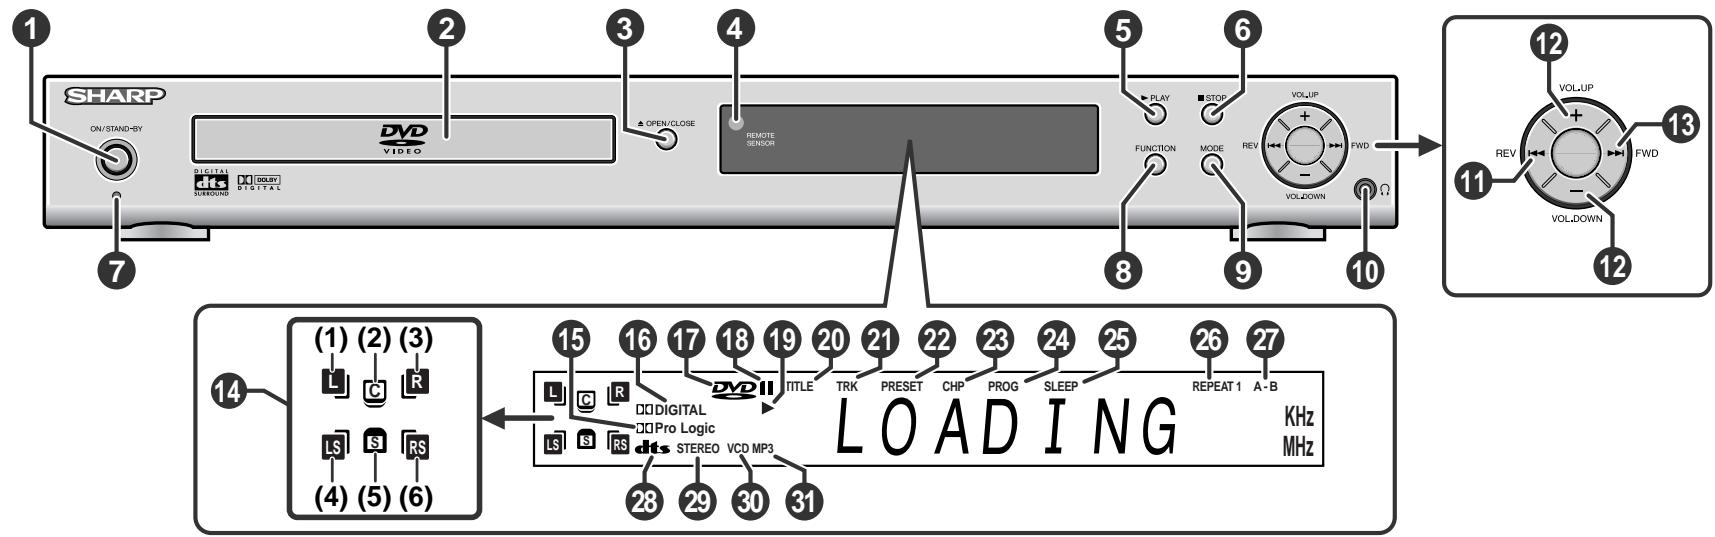
Reference page
- On/Stand-by Button 16
- Disc Tray 23
- Disc Tray Open/Close Button 23
- Remote Sensor 16
- Play or Pause Button 23, 24
- Stop Button 24
- Power Stand-by Indicator 16
- Function Button 14, 23, 39
- Speaker Level Mode Button 22, 46
- Headphone Socket 22
1.Chapter (track) Skip Down or Tuning Down Button 25,39
12.Volume Up and Down or Speaker Level Adjust Buttons .... 22, 46
3.Chapter (track) Skip Up or Tuning Up Button 25, 39
4.Speaker Indicators 44
(1) Left Front Speaker Indicator
(2) Centre Speaker Indicator
(3) Right Front Speaker Indicator
(4) Left Surround Speaker Indicator
(5) Subwoofer Indicator
(6) Right Surround Speaker Indicator
Reference page
15.Dolby Pro Logic Indicator 44
16.Dolby Digital Signal Indicator 43
17.DVD Indicator 24
18.Pause Indicator 24
19.Play Indicator 24
20. Title Indicator ..... 26
21.Track Indicator ....34
22.Tuner Preset Indicator 40
23.Chapter Indicator 26
24.Programme Indicator ....35
25.Sleep Indicator 47
26.Repeat Indicator ....29
27.A-B Repeat Indicator 30
28.DTS Signal Indicator 43
29.Stereo (2-ch) or FM Stereo Receiving Indicator .....39, 43
30.SVCD/VCD/CD Indicator 24
31.MP3 or JPEG Indicator 24
■ Main unit (rear panel)
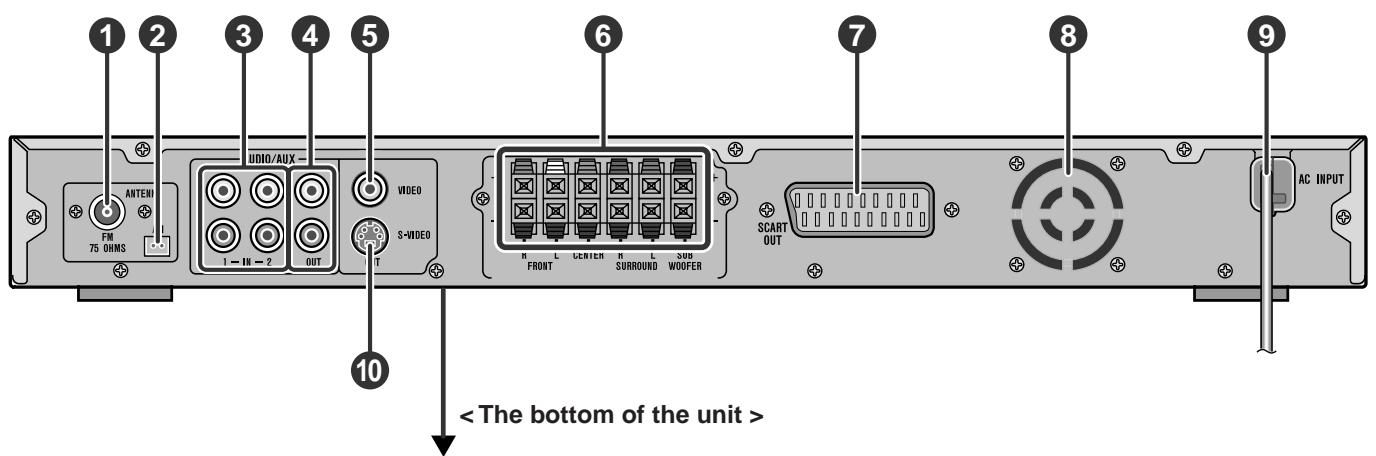
| SHARP | MODEL NO. HT-CN400DVH |
| HOME CINEMA WITH DVD230V ~ 50Hz | 88W |
| SERIAL NO. | |
| SHARP CORPORATION | MADE IN CHINA |
| SHARP | MODEL NO. HT-CN500DVH |
| HOME CINEMA WITH DVD230V ~ 50Hz | 105W |
| SERIAL NO. | |
| SHARP CORPORATION | MADE IN CHINA |
Reference page
- FM 75 Ohms Aerial Socket ....12
- AM Loop Aerial Socket ....12
- Audio Input Sockets 1/2 ..... 14
- Audio Output Sockets ....13, 14
- Video Output Socket ....13
- Speaker Terminals ..... 11
- SCART Output Socket ....13
- Cooling Fan ....8
- AC Power Lead ....14
10.S-video Output Socket 13
Cooling fan
This unit is fitted with a cooling fan at the rear for improved cooling. Do not cover the opening in this section with any obstacles.
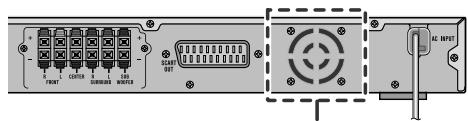
- The unit will get warm whilst being used. Do not touch the warm areas of the unit for prolonged periods to avoid damage to you.
- This unit is equipped with a special function which protects the amplifier circuit from damages. When it is activated, the sound switch is turned off. In this case, unplug the unit and, after 15 minutes or more, plug it in again.
HT-CN400DVH
HT-CN500DVH
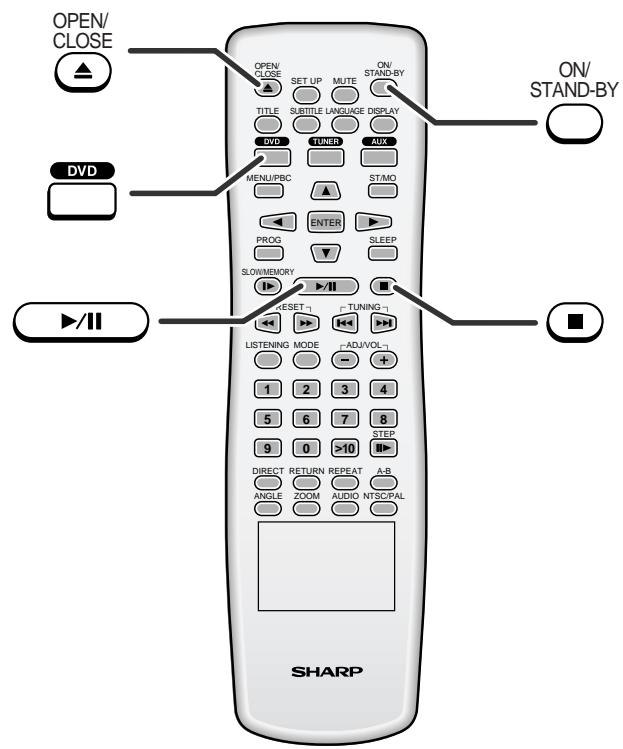
■ Remote control
Reference page
-
Remote Control Transmitter ..... 16
-
Set Up Menu Button .....17
-
Disc Tray Open/Close Button .....23
-
Subtitle Select Button .....31
-
Title Select Button .....30
-
DVD/Tuner/Auxiliary Input Select Buttons .....14, 23, 39
-
Menu/Playback Control On/Off Button .....30, 34, 36
-
Cursor Buttons ..... 17
-
Programme Button 35
10.Slow-motion or Preset Memory Button .....27, 40
11.Fast Reverse or Preset Down Button .....25, 40
12.Fast Forward or Preset Up Button .....25, 40
13.Surround/Stereo (2-ch) Listening Mode Button .....43
14.Speaker Level Mode Button .....22, 46
15.Direct Button 26
16.Angle Select Button 28
- Return Button ....33
18.Zoom Button 28,38
19.Mute Button 22
20.On/Stand-by Button 16
21.Language Select Button 31
22.Display Button 32
23.FM Stereo/Mono Select Button 39
24.Enter Button 17
25.Sleep Button 47
26.Play or Pause Button 23, 24
-
Stop Button ..... 24
-
Chapter (track) Skip Up or Tuning Up Button .....25, 39
29.Chapter (track) Skip Down or Tuning Down Button .....25, 39
30.Volume Up and Down or Speaker Level Adjust Buttons .....22, 46
31.Direct Number Buttons 26
32.Frame Advance Button 27
33.A - B Repeat Button ....30
34.NTSC/PAL Select Button 17, 32
35.Repeat Play Button 29
36.Audio Select Button 32
Buttons with "A" mark in the illustration or highlighted in bold on the list can be operated on the remote control only.
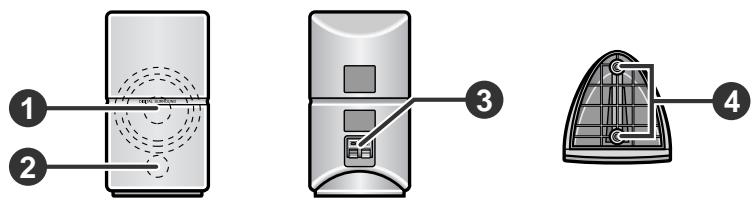
■ Front/centre/surround speakers
Reference page
- Speaker
- Bass Reflex Duct
- Speaker Terminals ..... 11
- Mounting Holes for Stand or Bracket 3
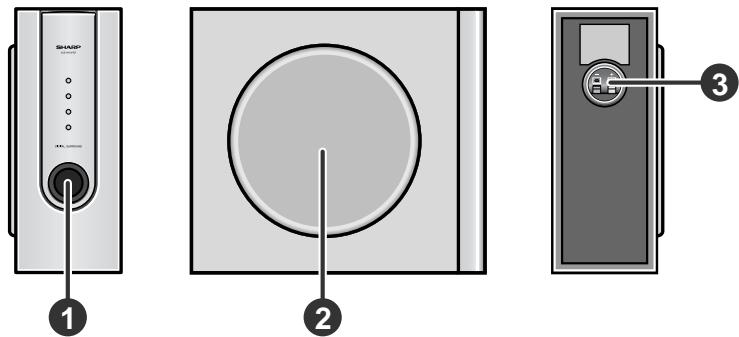
■ Subwoofer
Reference page
- Bass Reflex Duct
- Woofer
- Speaker Terminals ..... 11
Speaker grilles are removable:
Make sure nothing comes into contact with the speaker diaphragms when you remove the speaker grilles.

natural_image
Diagram of a speaker with an external panel showing sound waves (no text or symbols)■ Speaker functions
Front speaker:
Reproduces left and right sound (stereo mode) or front surround sound.
Centre speaker:
Reproduces centre surround sound.
Surround speaker:
Reproduces rear surround sound.
Subwoofer:
Reproduces bass sound.
natural_image
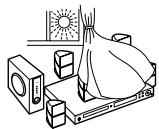
Line drawing of a cozy living room with TV, wall-mounted screens, and a potted plant (no text or symbols)(For speaker installation, see page 15.)
Notes:
- Do not allow any objects to fall into or to be placed in the bass reflex ducts.
● Front and centre speakers are magnetically shielded.
HT-CN400DVH
HT-CN500DVH
Speaker connection
Speaker terminals on the main unit and speakers, and speaker wires are distinguished by colours.
Connect the speaker and the unit by matching the colours.
(For speaker installation, see page 15.)

■ Connecting speaker wires
Make sure to leave the AC power lead disconnected when connecting the speakers.
To prevent accidental short circuits between and terminals, connect the speaker wires to the speakers first and then to the unit.
1 Connect the wires to the speakers.
2 Connect the other end to the main unit.
Caution:
- The supplied speaker for HT-CN400DVH is designed exclusively for HT-CN400DVH. The speaker for HT-CN500DVH is exclusively for HT-CN500DVH. Do not connect speakers for HT-CN400DVH or HT-CN500DVH to other equipment. Also, do not connect other speakers to HT-CN400DVH or HT-CN500DVH. It may cause malfunction.
- Do not mistake the and , and right and left terminals of the speaker wires. (The right speaker is placed on the right when you face the unit.)
- Do not let the bare speaker wires touch each other.
- Do not stand or sit on the speakers. You may be injured.
- Do not short-circuit the speaker wires. If the power is turned on, malfunction may occur.
- When disconnecting the speaker wires, unplug the AC power lead, and then disconnect the speaker wires from the main unit.

Incorrect
Aerial connection
Supplied FM aerial:
Connect the FM aerial wire to the FM 75 OHMS socket and position the FM aerial wire in the direction where the strongest signal can be received.
Supplied AM loop aerial:
Connect the AM loop aerial to the AM socket. Position the AM loop aerial for optimum reception. Place the AM loop aerial on a shelf, etc., or attach it to a stand or a wall with screws (not supplied).
Note:
Placing the aerial on the unit or near the AC power lead may cause noise pickup. Place the aerial away from the unit for better reception.
Installing the AM loop aerial:
< Assembling >
< Attaching to the wall >

Wall
Screws (not supplied)
External FM aerial:
Use an external FM aerial if you require better reception. Consult your dealer.
External FM aerial

HT-CN400DVH HT-CN500DVH
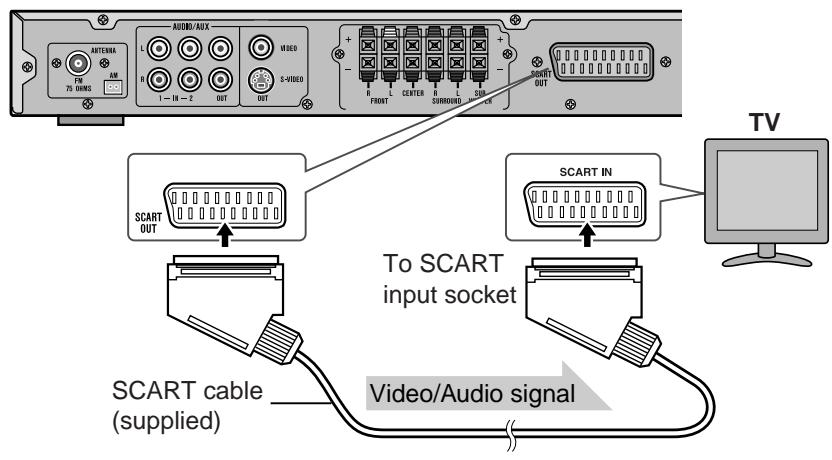
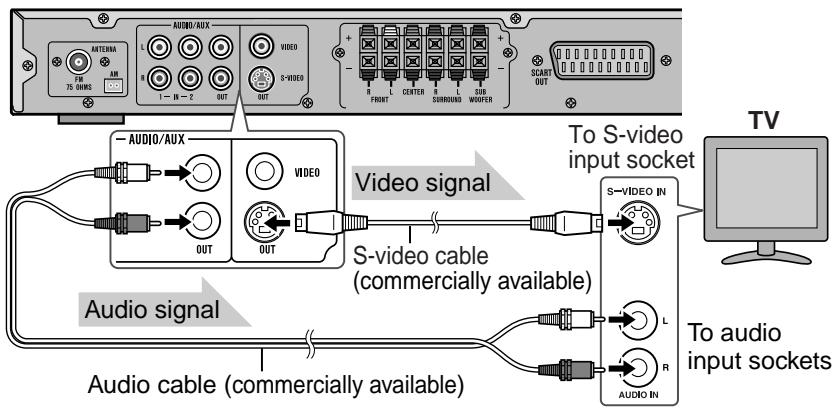
Connections to TV, VCR, etc.
Caution:
● Turn off all other equipment before making connections.
- Do not connect a TV or VCR to SCART OUT, S-VIDEO OUT and VIDEO OUT at the same time. The unit supports only a single connection.
Setting VIDEO OUTPUT
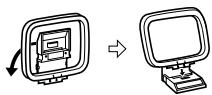
When connecting to the SCART OUT socket or S-VIDEO socket, switch the VIDEO OUTPUT setting accordingly. See page 20 for the method.
■ Connecting to a TV with a SCART socket
■ Connecting to a TV with an S-video input socket
■ Connecting to a TV with a video input socket
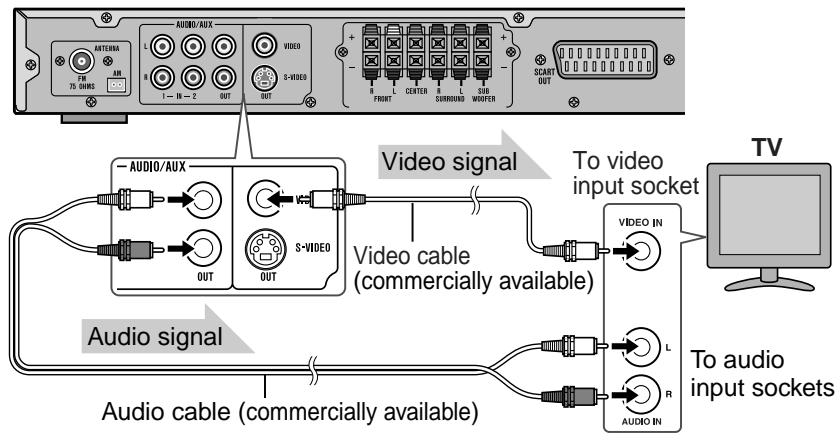
■ Audio connection to TV or VCR
You can enjoy surround sound from TV or VCR by connecting them to the unit as shown.
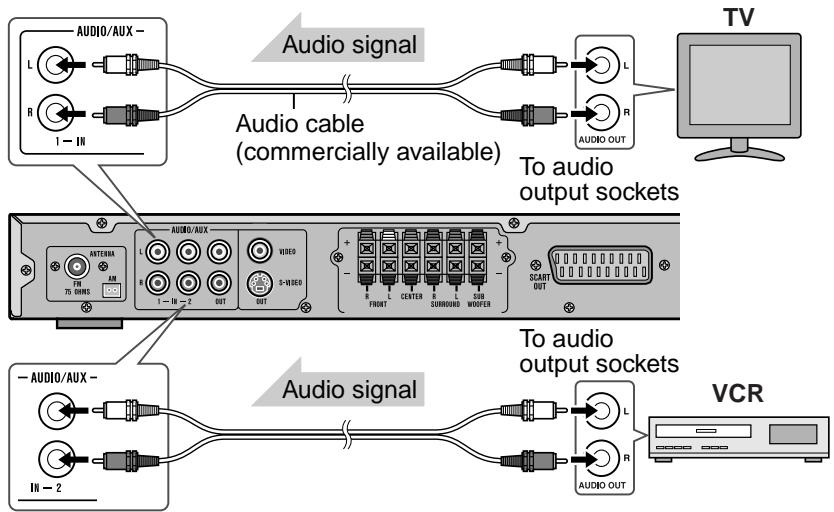
■ Audio connection to other equipment

Notes:
- Change the TV input in accordance with the connected socket.
- Do not connect other equipment (VCR, etc.) between the TV and this unit. Pictures may be distorted.
- Refer to the operation manual of the equipment to be connected.
- Insert the plugs fully to avoid fuzzy pictures or noise.
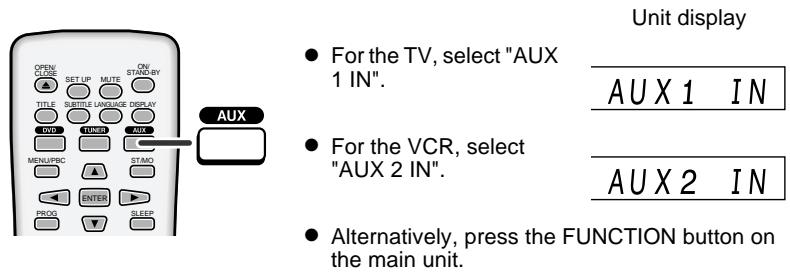
To listen to TV or VCR sound via the speakers of this unit:
Press the AUX button repeatedly to select the desired audio input.
■ Connecting the AC power lead
After checking all the connections have been made correctly, plug the AC power lead of this unit into the wall socket.
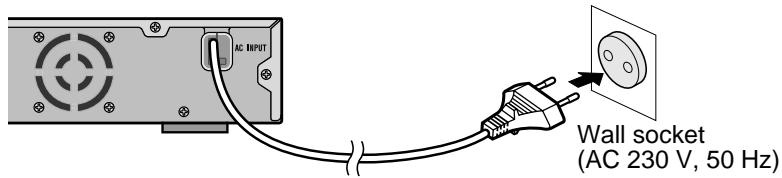
Note:
Unplug the AC power lead from the wall socket if the unit will not be used for a prolonged period of time.
HT-CN400DVH
HT-CN500DVH
System installation
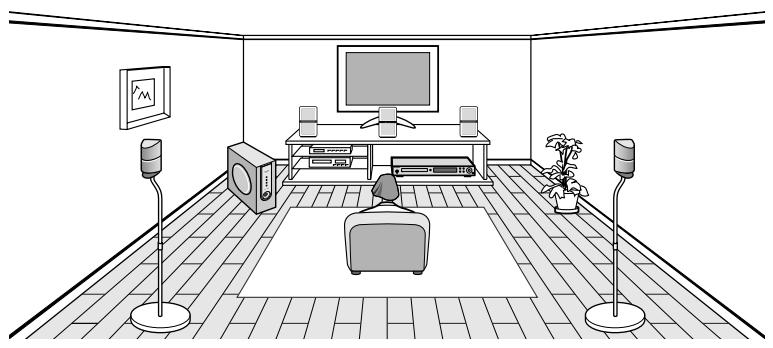
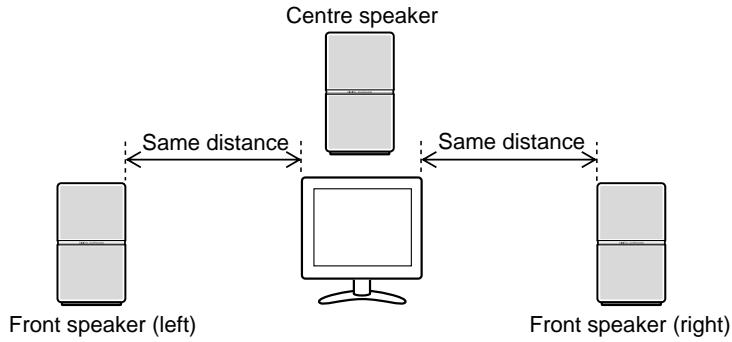
■ Placing the speaker system
The best surround effect will be achieved by placing each speaker at the same distance from the listening position. It is recommended to arrange the speakers as shown below.
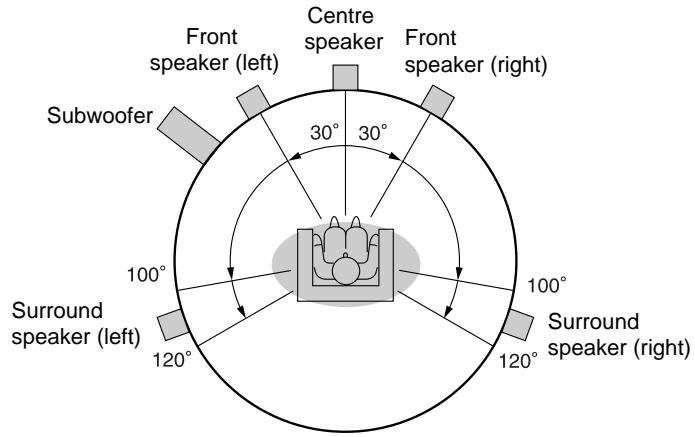
Note:
If speakers cannot be placed at equal distances, refer to "Speaker delay time setting" (see page 45).
Installation image:
The speaker stands and speaker wall brackets are optionally available (see page 3). Refer to their instructions for assembly.
natural_image
Line drawing of a living room with a person seated at a desk, TV, and wall-mounted screens (no text or symbols)Notes:
- Place the TV halfway between the front speakers.
- It is recommended that the centre speaker be placed near the television.
- Place the surround speakers at a position just above the height of your ears.
- The subwoofer vibrates whilst reproducing bass. Place it on a stable, sturdy surface.
● The subwoofer reproduces bass. Place it anywhere you like.
flowchart
graph TD
    A["Front speaker (left)"] -->|Same distance| B["Central Computer"]
    C["Front speaker (right)"] -->|Same distance| B
    B --> D["Centre speaker"]
■ Magnetically shielded speakers
The front and centre speakers may be placed beside or near the TV as they are magnetically shielded. However, discolouration may occur depending on the TV type.
If colour variation occurs...
Turn off the TV (with the power switch).
After 15 - 30 minutes, turn the TV on again.
If the colour variation is still present...
Move the speakers further away from the TV.
Refer to the manual of the TV for details.
Note:
The surround speakers and subwoofer are not magnetically shielded.
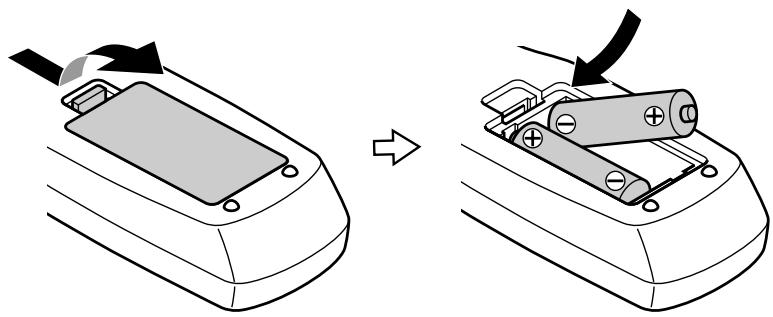
Battery installation
1 Open the battery cover.
2 Insert the supplied batteries according to the direction indicated in the battery compartment.
When inserting or removing the batteries, push them towards the battery terminals.
3 Close the cover.
natural_image
Diagram showing battery charging process: left panel with arrow indicating rotation, right panel with battery holder and switch (no text or symbols)Precautions for battery use:
- Replace all old batteries with new ones at the same time.
- Do not mix old and new batteries.
- Remove the batteries if the unit is not to be used for long periods of time. This will prevent potential damage due to battery leakage.
Caution:
- Do not use rechargeable batteries (nickel-cadmium battery, etc.).
- Incorrect installation may cause the unit to malfunction.
Notes concerning use:
- Replace the batteries if the operating distance is reduced or if the operation becomes erratic. Purchase 2 "AA" size batteries (UM/SUM-3, R6, HP-7 or similar).
- Periodically clean the transmitter on the remote control and the sensor on the unit with a soft cloth.
- Exposing the sensor on the unit to strong light may interfere with operation. Change the lighting or the direction of the unit.
- Keep the remote control away from moisture, heat, shock, and vibrations.
Turning the power on
■ Test of the remote control
Check the remote control operation after making all the connections (see pages 11 - 14). Point the remote control directly at the remote sensor on the unit.
The remote control can be used within the range shown below:
Press the ON/STAND-BY button. Does the power turn on? Now, you can enjoy your system.
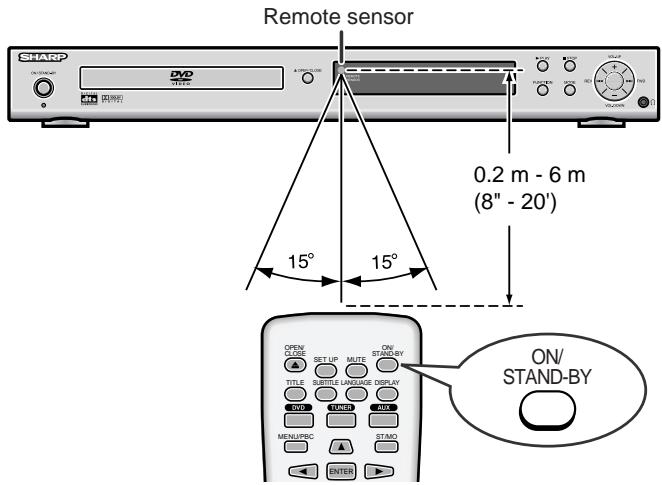
■ To turn the power on

If the power does not turn on, check the AC power lead is plugged in properly.
To set the unit to the stand-by mode:
Press the ON/STAND-BY button again.
The power stand-by indicator lights up.
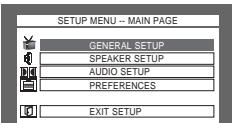
Changing the setup menu
Turn on the TV, and switch the input to the "VIDEO 1", "VIDEO 2", etc. accordingly.
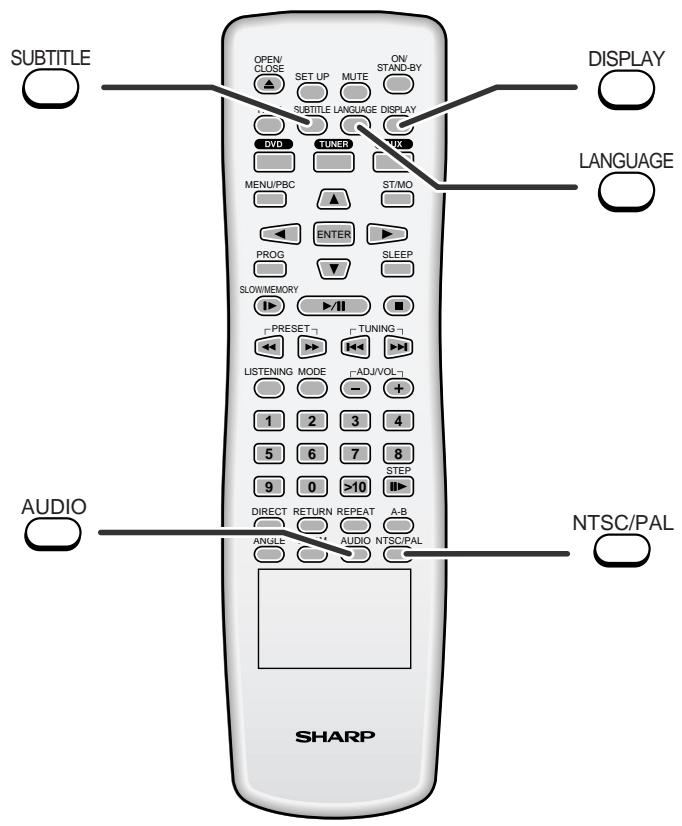
![SET UP DVD OPEN/ CLOSE SET UP MUTE ON/ STAND-BY TITLE SUBTITLE LANGUAGE DISPLAY DVD TUNSH AUX MENU/PBC ST/MO ENTER SLOW/MEMORY ▶/II PRESET TUNING LISTENING MODE [ADJ/VOL] 1 2 3 4 5 6 7 8 STEP 9 0 >10 DIRECT RETURN REPEAT A-B ANGLE ZOOM AUDIO NTSC/PAL NTSC/PAL SHARP](/content/2025/01/79023/images/1d9371c6b7eb3475d2dc7948054bc8f210c56c6855d16c6492e41e80b958ba33.jpg)
1 Press the ON/STAND-BY button to turn the power on.
● The startup screen appears.
- The startup screen does not appear when the input is not set to the disc mode. Press the DVD button.
- If the startup screen is blurred, press the NTSC/PAL button repeatedly to change the TV type.
2 Press the SET UP button.
3 Press the ▲ or ▼ button to select a menu and press the ENTER button.
See the list on pages 18 - 19 for setup menu.
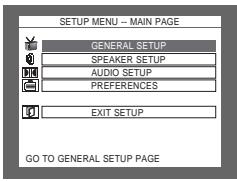
4 Press the ▲, ▼, ◀ or ▶ button to change the setting and press the ENTER button.
- See the list on pages 18 - 19 for the selectable parameters.
- Select "MAIN PAGE" and press the ENTER button. The main page returns.
5 Press the SET UP button.
● The setting is completed.
● To change other settings, begin from step 2.
Notes:
- During playback, "PREFERENCES" settings cannot be changed.
- Settings are stored even if the unit is set to the stand-by mode.
- The backup function protects the stored settings for a few hours should there be a power failure or the AC power lead disconnection.
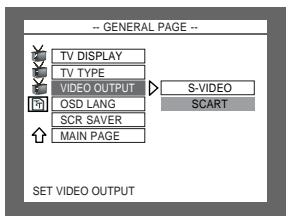
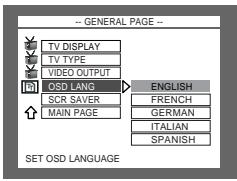
| Setup menu | Selectable parameters (* indicates default settings.) | Description | ||
| GENERAL SETUP | 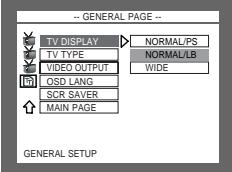 | TV DISPLAY | NORMAL/PS NORMAL/LB * WIDE | The screen mode should be set according to the connected TV type (for details, see page 20). |
| TV TYPE | MULTI * NTSC PAL | Selects the correct colour system (TV standard) (for details, see page 20). | ||
| VIDEO OUTPUT | S-VIDEO SCART * | Video signals are switched according to the connected cable (for details, see page 20). | ||
| OSD LANG | ENGLISH * FRENCH GERMAN ITALIAN SPANISH | You can select the desired OSD (On Screen Display) language for the setup menu or playback control screen. | ||
| SCR SAVER | ON | A screensaver appears. | ||
| OFF * | The screensaver is disabled. | |||
| SPEAKER SETUP | 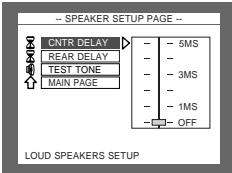 | CNTR DELAY | 1 MS to 5 MS OFF * | Adjust the delay time of the speakers (for details, see page 45). |
| REAR DELAY | 3 MS to 15 MS OFF * | |||
| TEST TONE | ON OFF * | You can check the sound output from the speakers (for details, see page 46). | ||
| AUDIO SETUP | 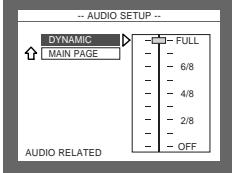 | DYNAMIC (*1) | FULL * | Audio with fully compressed dynamic range. |
| 7/8 : 1/8 | Audio with partially compressed dynamic range. | |||
| OFF | Audio with uncompressed dynamic range. | |||
(*1)
Selects the dynamic range compression to fit the individual listening situation of the audience. This function can be used in DVD playback.
Depending on the disc, sounds may become too loud or inaudible during playback. Dolby Digital's dynamic range control allows you to adjust the sound range.
HT-CN400DVH
HT-CN500DVH
ENGLISH
HT-CN400DVH
HT-CN500DVH
ENGLISH
Changing the setup menu (continued)
| Setup menu | Selectable parameters (* indicates default settings.) | Description | ||
| PREFERENCES | 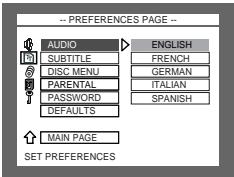 | AUDIO | ENGLISH *FRENCHGERMANITALIANSPANISH | Selects the language audible from the speakers. |
| SUBTITLE | ENGLISH *FRENCHGERMANITALIANSPANISHOFF | Selects the subtitle displayed on the TV screen. | ||
| DISC MENU | ENGLISH *FRENCHGERMANITALIANSPANISH | Selects the disc menu language. | ||
| PARENTAL | 1 G6 PG-RNO_PARENTAL * | Sets a restriction level for DVD viewing (for details, see page 21).Enter a 4-digit password.It is set to 3308 by default. | ||
| PASSWORD | CHANGE | Change the password (for details, see page 21). | ||
| DEFAULTS | RESET | This resets all settings, except for PARENTAL and PASSWORD,to the factory defaults. | ||
| EXIT SETUP | 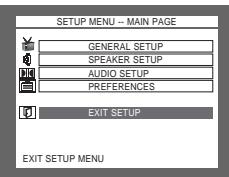 | - | - | The setting is completed. |
■ TV display setting
| Indicator | Setting |
| NORMAL/PS | When playing a wide image (16:9) disc, the left and right sides of the image are cut (pan scan) to display a natural-looking 4:3 size image.A wide image disc without pan scan ^PS is played back in 4:3 letterbox.A 4:3 disc is played in 4:3.  |
| NORMAL/LB | When playing a wide image (16:9) disc, black bands are inserted at the top and bottom and you can enjoy full wide images (16:9) on a 4:3 size TV.A 4:3 disc is played in 4:3.  |
| WIDE | A wide image (16:9) is displayed when playing a wide image (16:9) disc.  ● When playing a 4:3 image disc, the image size depends on the setting of the connected TV.● If you play back a wide image (16:9) disc with this unit connected to a 4:3 TV, the vertically shrunk image is displayed. ● When playing a 4:3 image disc, the image size depends on the setting of the connected TV.● If you play back a wide image (16:9) disc with this unit connected to a 4:3 TV, the vertically shrunk image is displayed. |
Note:
When playing the disc with a fixed video format, it will not change even if the TV screen size is changed.
■ TV type setting
| Indicator | Setting |
| MULTI | Select this mode for the multi-system TV. |
| NTSC | Select this mode for the NTSC TV. |
| PAL | Select this mode for the PAL TV. |
■ Video output setting
1 Select "GENERAL SETUP" on the setup menu screen (see steps 1 - 3 on page 17).
2 After selecting "VIDEO OUTPUT" in step 4 on page 17, select "S-VIDEO" or "SCART" and press the ENTER button.
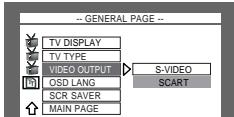
| Indicator | Setting |
| S-VIDEO | Sending video signals from an S-VIDEO OUTPUT socket. |
| SCART | Sending video signals from a SCART OUTPUT socket. |
Changing the setup menu (continued)
■ Language setting
| Indicator | Setting |
| OSD LANG | A language for screen display can be set for the setup menu, messages, etc. |
| AUDIO | A language for audio can be set.You can specify a language for conversation and narration. |
| SUBTITLE | A language for subtitle can be set.The subtitles are displayed in a specified language. |
| DISC MENU | A language for disc menus can be set.Menu screens are displayed in a specified language.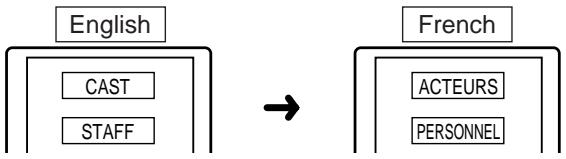 |
■ Parental setting
1 Select "PREFERENCES" on the setup menu screen (see steps 1 - 3 on page 17).
2 After selecting "PARENTAL" in step 4 on page 17, select the parental level and press the ENTER button.
3 Enter a 4-digit password using the direct number buttons and press the ENTER button.
If this is the first time, enter "3308".
| Indicator | Setting |
| 1 G | Only DVD software intended for children can be played back. |
| 2 to 7 NC-17 | Only DVD software intended for general use and children can be played back. |
| 8 ADULT | DVD software of any grade (adult/general/children) can be played back. |
| NO_PARENTAL | Parental lock is cancelled. |
Note:
Whilst playing a disc with parental lock, the display may appear requesting a password in order to watch some restricted scenes. In such a case, enter the password to temporarily change the parental level.
■ Password setting
From the setup menu, select "PREFERENCES", "PASSWORD" and then "CHANGE". A screen appears.
flowchart
graph LR
    A["--PREFERENCES PAGE --"] --> B["→"]
    B --> C["PASSWORD CHANGE PAGE"]
    C --> D["OLD PASSWORD: "]
    C --> E["NEW PASSWORD: "]
    C --> F["CONFIRM PWD: "]
1 Enter the old password using the direct number buttons.
2 Enter the new password using the direct number buttons.
3 Enter the new password again for confirmation.
Note:
When you forget your password, cancel the current password by pressing "3308" using the direct number buttons (0 - 9).
General control

Volume control
Press the VOL.UP + (ADJ/VOL +) button to increase the volume and the VOL.DOWN - (ADJ/VOL -) button for decreasing.
$$ \begin{array}{c} \text {VOLUME} \quad 1 0 \ \hline 0 0 \leftrightarrow 1 \leftrightarrow 2 \dots \dots 3 8 \leftrightarrow 3 9 \leftrightarrow \text {MAX} \end{array} $$
■ Treble and Bass
1 Press the MODE button repeatedly to select the TREB or BASS.
$$ \begin{array}{c} \text {TREB} \quad 0 0 \mathrm{dB} \ \hline - 1 0 \mathrm{dBto} + 1 0 \mathrm{dB} \end{array} $$
2 Within 3 seconds, press the VOL. UP + (ADJ/VOL +) or VOL. DOWN - (ADJ/VOL -) button to adjust the level.
$$ \begin{array}{c} \text {BASS} \quad 0, 0 \mathrm{dB} \ - 1 0 \mathrm{dBto} + 1 0 \mathrm{dB} \end{array} $$
You can adjust the level at 1 dB intervals.
■ Muting
The volume is muted temporarily when pressing the MUTE button on the remote control. Press again to restore the volume.
$$ \begin{array}{c} \text { MUTE ON } \ \text { ↑ } \ \text { MUTE OFF } \end{array} $$
■ Headphones
When headphones are plugged in, the system will enter the stereo mode automatically.
When headphones are unplugged, the system will return to the previous status.
$$ \begin{array}{c c c} \text {STEREO} & \text {PHONE ON} \ \hline \downarrow & \ \text {CCOJITAL} & \text {TITLE} & \text {CHP} \ \text {CDI} & 1 & 2 \quad 0: 2 5: 5 0 \end{array} $$
● Before plugging in or unplugging the headphones, reduce the volume.
- Be sure your headphones have a 3.5 mm (1/8") diameter plug and are between 16 ohms and 50 ohms impedance. The recommended impedance is 32 ohms.
- Plugging in the headphones disconnects the speakers automatically. Adjust the volume using the VOL buttons.
- You cannot use the surround feature with headphones.
- Do not plug in/out headphones when recording on other equipment. Sound may skip.
DVD playback
Turn on the TV, and switch the input to the "VIDEO 1", "VIDEO 2", etc. accordingly.
■ Playback


1 Press the ON/STAND-BY button to turn the power on.
2 When the input is not set to the disc mode, press the FUNCTION button repeatedly to display the startup screen.
● The startup screen appears.
- Alternatively, press the DVD button on the remote control.
3 Press the ▲ OPEN/CLOSE button to open the disc tray.
4 Place the disc on the disc tray, label side up.
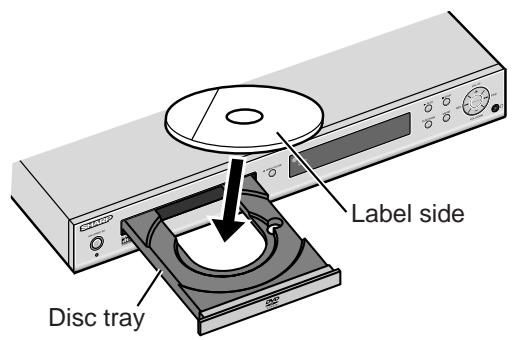
Be sure to place 8 cm (3") discs in the middle of the disc position.
5 Press the ▲ OPEN/CLOSE button to close the disc tray.
Discs supporting auto start will start to play once you close the disc tray even if you do not press the ▶ PLAY (▶/II) button.
6 If playback does not start in step 5, press the ▶ PLAY (▶/II) button.
To interrupt playback
Press the ▶ PLAY (▶/Ⅲ) button.
To resume playback from the same point, press the ▶ PLAY (▶/■) button.
To stop playback
DVD:
Press the ■ STOP (■) button twice.
Audio CD/MP3/JPEG:
Press the ■ STOP (■) button.
When the unit is left unoperated for more than 5 minutes after pressing the ■ STOP
(■) button, a screen saver appears (see page 18 when the screen saver setting is "ON").
Press any button on the main unit or remote control. The startup screen returns.
Caution:
- Close the disc tray when not in use. Otherwise, dust may accumulate inside and cause malfunction.
- The unit gets slightly warm when used for a long time. It does not mean the unit is damaged.
- When attempting to play discs with scratches or of a different region number, or unplayable or restricted (*1) discs, an error message will appear on the TV display and the disc will not play.
(*1) Viewing is prohibited on some DVDs according to the audience age.
Notes:
- Stop positions may be recorded on some discs. When you play such a disc, play-back stops there.
- During an operation, "☐" may appear indicating that the operation is disabled by the disc.
- The main unit detects loaded discs automatically and then the indicators light up.
■ To resume playback after stopping (resume play) DVD
You can resume playback from the point playback is stopped.
1 Whilst a disc is playing, press the ■ STOP (■) button.
The system stores the point you stopped.
2 To restart play, press the ▶ PLAY (▶/II) button.
Play resumes from the point you stopped.
To cancel the resume playback:
Press the ■ STOP (■) button twice.
Notes:
- The resume playback feature is disabled on some discs.
- Depending on the disc, playback may resume from slightly before the stopped position.
■ DVD mode operation indicators DVD
The following are examples of operation indicators that appear during DVD playback.
| Operation | TV screen | Unit display |
| When the power is on without a disc | NO DISC | NO DISC |
| Disc data is being read | DISC LOADING | LOADING |
| Stop | STOP | 2 10 |
| Play | PLAY | 1 1 |
| Pause | PAUSE | 1 1 |
HT-CN400DVH
HT-CN500DVH
Basic operation
■ To locate the beginning of a chapter (track) (skip) DVD SVCD VCD CD MP3 JPEG
You can move to other tracks with simple operations. When playing SVCD or VCD, cancel the P.B.C. (playback control) (see page 34).
Whilst a disc is playing, press the ◀◀ or ▶▶ button.
- Use the ▶▶I button to skip to the next chapter (track).
- Use the ◀◀ button to skip to the previous chapter (track).
- On SVCD, VCD and Audio CD, the ◀◀ button skips to the beginning of the current track. Press the ◀◀ button again to skip to the beginning of the previous track.
Notes:
- Some discs do not display the chapter (track) and the skip feature is disabled.
- On a DVD, skip does not operate between titles.
- Alternatively, press the ◀◀ or ▶▶I button on the main unit.
■ Fast forward/Fast reverse (search)

You can search the desired point as you play the disc.
1 Whilst a disc is playing, press the ◀◀ or ▶▶ button.
Example: When the ▶ button is pressed
On DVD, the speed changes as follows:
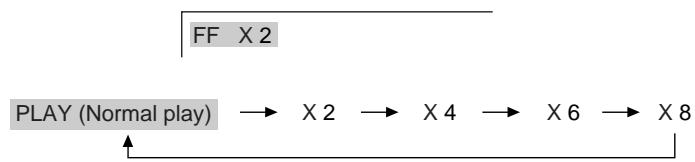
flowchart
graph LR
    FF["FF X 2"] --> X2["X 2"]
    X2 --> X4["X 4"]
    X4 --> X6["X 6"]
    X6 --> X8["X 8"]
    X8 --> PLAY["PLAY (Normal play)"]
On SVCD/VCD/Audio CD/MP3, the speed changes as follows:

flowchart
graph LR
    A["PLAY (Normal play)"] --> B["X 1"]
    B --> C["X 2"]
    C --> D["X 3"]
    D --> E["X 4"]
The disc is forwarded by the ▶ button and reversed by the ◀ button.
2 Press the ▶/II button to return to the normal playback.
Notes:
- On some discs, the search function is disabled.
- On a DVD, search does not operate between titles.
- On SVCD, VCD, audio CD and MP3, the search does not operate between tracks.
- Whilst searching on a DVD, the sound is not heard and the subtitles do not appear.
- Whilst searching on an SVCD or a VCD, the sound is not heard.
- Audio CD or MP3 disc sounds will break up during search. This is not a malfunction.
- When search is performed during the DVD playback, pictures may not be forwarded or reversed in the search speed specified in this manual, depending on the disc or the scene being played.
● The search does not operate on JPEG discs.
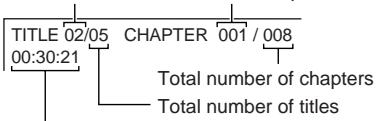
■ To start playback from the desired point (direct play) DVD
To select and play the desired title and chapter:
1 Whilst in the stop or playback mode, press the DIRECT button.
TV screen
TITLE 01/02 CHAPTER 001/002
Unit display
| TITLE | CHP | |
| TITLE | CHP | |
| 1 | 1 | 0:00:05 |
2 Within 10 seconds, select the title or chapter by pressing the ◀ or ▶ button and enter the title or chapter number using the direct number buttons.
If the track number is 2 digits or more, press ">10" and enter the number.
Example:
To select chapter 1: Press "1".
To select chapter 12: Press ">10" and "2".
To select chapter 22: Press ">10", ">10" and "2".
3 Within 10 seconds, press the ENTER button.
Notes:
- Direct play feature is disabled on some discs.
- Some discs may not display the chapter number.
- With DVDs, you can specify the desired point only in the current title and not in another title.
To play by specifying time (time search):
You can play back from the desired point by specifying the time.
1 Whilst in the stop or playback mode, press the DIRECT button twice.
TITLE 02/12 TIME

If the "____:_":____" is not highlighted, press the ◀ or ▶ button repeatedly.
2 Within 10 seconds, specify the time with the direct number buttons, and then press the ENTER button.
TITLE 02/12 TIME
01:23:40
- To specify 1 hour 23 minutes and 40 seconds, enter "012340".
- If you enter the wrong number, start over from step 1.
Notes:
- Some discs cannot play from the specified point.
● Time search feature is disabled on some discs.
Useful operation
■ Still picture/Frame advance
DVD SVCD VCD
You can freeze the image and advance frame by frame.
1 Whilst a disc is playing, press the STEP ▶ button.
Each press of the STEP ▶ button advances the frame.
2 Press the ▶/II button to return to the normal playback.
Note:
Still picture and frame advance features are disabled on some discs.
■ Slow-motion play
DVD SVCD VCD
You can slow down the playback speed.
1 Whilst a disc is playing, press the SLOW/MEMORY ▶ button repeatedly to select the desired speed.
On DVD, the speed changes as follows:
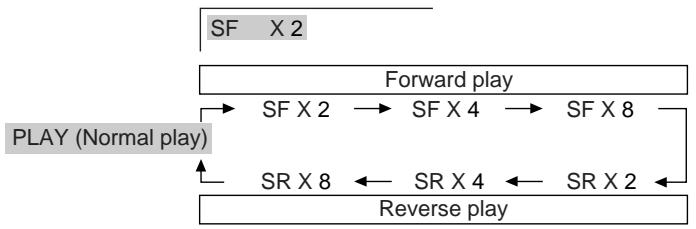
flowchart
graph TD
    A["SF X 2"] --> B["Forward play"]
    B --> C["SF X 2"]
    C --> D["SF X 4"]
    D --> E["SF X 8"]
    E --> F["SR X 8"]
    F --> G["SR X 4"]
    G --> H["SR X 2"]
    H --> I["Reverse play"]
    style A fill:#f9f,stroke:#333
    style B fill:#ccf,stroke:#333
    style C fill:#cfc,stroke:#333
    style D fill:#fcc,stroke:#333
    style E fill:#cff,stroke:#333
    style F fill:#ffc,stroke:#333
    style G fill:#cfc,stroke:#333
    style H fill:#fcc,stroke:#333
    style I fill:#ffc,stroke:#333
On SVCD/VCD, only forward play is possible and the speed changes as follows:
PLAY (Normal play) → SF X 1 → SF X 2 → SF X 3
2 Press the ▶/II button to return to the normal playback.
Note:
On some discs, the slow-motion play functions are disabled.
■ To change the angle DVD
You can change the angle of view when playing a DVD disc that contains scenes recorded from multiple angles.
When "☐" is displayed in the upper right corner of the TV screen, press the ANGLE button repeatedly to select the desired angle number.
Notes:
● The angle number is not displayed if angles are not recorded on the disc.
- Refer to the manual of the disc as the operation may vary depending on the disc.
■ To zoom images (zoom)
You can magnify images during playback.

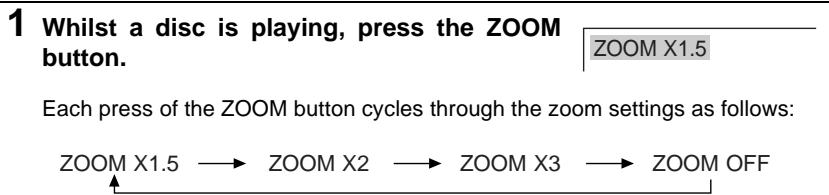
2 To shift the view and display the desired part of a zoomed image, press the ▲, ▼, ◀ or ▶ button repeatedly.
flowchart
graph TD
    A["Top: 🙏"] --> B["Left: 📆"]
    C["Right: 🚗"] --> D["Right: 🧑"]
    E["Bottom: 🥲"] --> F["Left: 🏠"]
    G["Left: 🏠"] --> H["Left: 🏠"]
To return to normal view:
Press the ZOOM button repeatedly to select "ZOOM OFF".
Notes:
● Images may become distorted when zoomed.
- Subtitles cannot be zoomed.
HT-CN400DVH
HT-CN500DVH
ENGLISH
Useful operation (continued)

■ To play repeatedly (repeat play)


You can play a chapter (track) or a title repeatedly by specifying it during playback.
When playing SVCD or VCD, cancel the P.B.C. (playback control) (see page 34).
1 Whilst a disc is playing, press the REPEAT button.
TV screen
CHAPTER REPEAT ON
Unit display

Each time the button is pressed, the repeat play mode changes in the following order.
The repeat play mode changes as follows on DVD:

flowchart
graph TD
    A["CHAPTER REPEAT ON"] --> B["TITLE REPEAT ON"]
    B --> C["REPEAT OFF"]
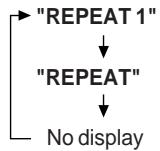
Repeat the currently playing chapter.
Repeat the currently playing title.
The normal playback.
The repeat play mode changes as follows on SVCD/VCD/audio CD/MP3/JPEG:
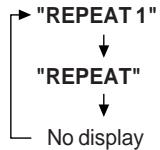
Repeat the currently playing track.
Repeat the currently playing disc.
The normal playback.
MP3 and JPEG are displayed when MP3 menu screen is off (see page 37).
2 To return to the normal playback, press the REPEAT button repeatedly to select "REPEAT OFF".
Caution:
After performing repeat play, be sure to press the ■ button. Otherwise, the disc will play continuously.
Note:
On some discs, the repeat play function is disabled.
■ To play the contents between the specified points repeatedly (A-B repeat)
DVD SVCD VCD CD
You can play the desired portion repeatedly by specifying it during playback.
1 Whilst a disc is playing, press the A - B button.
TV screen
A TO B SET A
Unit display

This registers the start point (A).
2 Press the A - B button again to enter the end point (B).
A TO B SET B

This starts A-B repeat from the start point (A) to the end point (B).
3 Press the A - B button to return to the normal playback.
Notes:
● A-B repeat play is disabled on some discs.
● A-B repeat play for DVD is possible only within a title.
● A-B repeat play for SVCD/VCD is possible only within a track.
- Some scenes on DVD may not allow A-B repeat play.
■ To select a title from the top menu of the disc DVD
On a DVD with multiple titles, you can select a title from the top menu.
1 Whilst in the stop or playback mode, press the TITLE button to display the title menu.
Example
2 Use the ▲, ▼, ◀ or ▶ button to select a title, and then press the EN-TER button.
● The selected title plays.
- Or use the direct number buttons for some discs.
Note:
The procedure shown here provides only general steps. The actual procedure for using the title menu depends on the disc. See the disc jacket for details.
■ To select a subtitle or audio language from the disc menu DVD
You can select the desired subtitle or audio language and sound system [Dolby Digital (5.1ch) or DTS sound] on your DVD if it has a disc menu.
1 Whilst in the stop or playback mode, press the MENU/PBC button to display the disc menu.
Example

2 Press the ▲, ▼, ◀ or ▶ button to change the setting and press the ENTER button.
Or use the direct number buttons for some discs.
Note:
The procedure shown here provides only general steps. The actual procedure for using the disc menu depends on the disc. See the disc jacket for details.
Various settings
The subtitle language, audio language and TV type you select during playback are reset each time you set this unit to the stand-by mode or switch the input. To keep your own settings, set them in the setup menu (see page 17).
■ To change the subtitle language
DVD SVCD
You can change the subtitle language or hide subtitles during playback.
Whilst a disc is playing, press the SUBTITLE button repeatedly to select the desired subtitle language.
SUBTITLE 01/03: ENGLISH
Notes:
- On some discs, the subtitle language cannot be changed.
- If no subtitles are recorded on the disc, "SUBTITLE OFF" is displayed.
- It may take time to switch the subtitle language to the selected one.
- Subtitles cannot be hidden on some DVDs.
■ To change the audio language (audio output) DVD SVCD
During playback, you can change the audio language (audio output).
Whilst a disc is playing, press the LANGUAGE button repeatedly to select the desired audio number.
AUDIO 2/8: AC-3 5.1CH ENGLISH
You can select recorded languages.

Notes:
- On some discs, the audio language cannot be changed.
- For the audio language and audio system, refer to the manual of the disc.
■ To change the TV type


You can select a TV type.
Whilst in the stop or playback mode, press the NTSC/PAL button repeatedly to select a TV type.

■ To change the audio channel


You can select an audio channel.
Whilst a disc is playing, press the AUDIO button repeatedly to select the desired audio channel.
The audio channel changes as follows on DVD:

The audio channel changes as follows on SVCD/VCD:

The audio channel changes as follows on audio CD:

Note:
The audio channel may not be changed on some discs.
■ To change the display on TV screen


You can display or hide the operation indicators on the TV screen.
Whilst a disc is playing, press the DISPLAY button. (The display is changed at each press.)
DVD:
Current title number Current chapter number
Elapsed playback time for the current title

TITLE REMAIN
00:45:00
Remaining playback time for the current title

SINGLE ELAPSE TIME
00:01:23
Elapsed playback time for the current chapter

SINGLE REMAIN TIME
00:03:03
Remaining playback time for the current chapter

OFF
MP3:
SINGLE ELAPSE TIME 00:05:21
Elapsed playback time for the current track

SINGLE REMAIN TIME 00:02:35
Remaining playback time for the current track

OFF
SVCD/VCD/Audio CD:
SINGLE ELAPSED
00:01:16
Elapsed playback time for the current track

SINGLE REMAIN
00:03:21
Remaining playback time for the current track

TOTAL ELAPSED
00:12:40
Total elapsed playback time for the disc

TOTAL REMAIN
00:48:54
Total remaining playback time for the disc

OFF
Note:
When P.B.C. is set to ON for SVCD or VCD, total playback time and total remaining playback time do not appear.
HT-CN400DVH
HT-CN500DVH
ENGLISH
Video CD and Super Video CD playback
The following playback functions are the same as DVD or CD operations.
Page
To locate the beginning of a chapter (track) (skip) 25
Fast forward/Fast reverse (search) 25
Still picture/Frame advance 27
Slow-motion play 27
To zoom images (zoom) 28
To play repeatedly (repeat play) 29
To play the contents between the specified points repeatedly (A-B repeat) .. 30
To change the subtitle language ....31
To change the audio language (audio output) 31
To change the TV type 32
To change the audio channel 32
To change the display on TV screen 32
To play in the desired order (programmed play) 35
![OPEN/ CLOSE SET UP MUTE ON/ STAND-BY TITLE SUBTITLE LANGUAGE DISPLAY DVD TUNER AUX MENU/PBC ST/MO ENTER PROG SLEEP SLOWEN TURRY +PRESET- LISTENING MODE [AVI/VUL-T] 1 2 3 4 5 6 7 8 9 0 >10 DIRECT RETURN REPEAT A-B ANGLE ZOOM AUDIO NTSC/PAL RETURN 1 2 3 4 5 6 7 8 9 0 >10](/content/2025/01/79023/images/7a13b5a562d24763971766b0719418bcc69e334496a912b089f6e973871d634c.jpg)
■ Playback of a video CD (super video CD) with P.B.C. SVCD VCD
1 Press the ▶/II button.
The menu will appear on the TV and playback will be paused.
Example

2 Select the desired menu number using the direct number buttons.
- Playback starts.
● After playback stops, the menu will reappear. Select the menu number to play.
To interrupt playback:
Press the ▶/□ button.
To resume playback from the same point, press the ▶/□ button.
To stop playback:
Press the ■ button.
To stop the current operation and return to the menu:
Press the RETURN button.
To scroll the menu screen (menu screen with more than 1 page):
Press the ◀◀ or ▶▶I button.
The P.B.C. function will not work in the following conditions.
Repeat/programmed/direct play or the skip feature is in operation.
Notes:
- Subtitles and sounds on the super video CD can be switched (see page 31).
● The menu screen cannot be scrolled on some discs.
■ To play without activating the playback control function SVCD VCD
You can play a video CD (super video CD) with P.B.C. without activating the playback control function.
In this case, the menu screen will not appear, and the disc will play in the same way as a video CD (super video CD) without P.B.C.
1 Whilst in the stop or playback mode, press the MENU/PBC button to cancel the P.B.C. mode.

2 Press the ▶/II button. Playback starts.
Note:
Some video CDs (super video CDs) with P.B.C. cannot be played back when the P.B.C. mode is off.
■ To start playback from the desired point (direct play)
To select and play the desired track:

Cancel the P.B.C. (playback control).
Whilst in the stop or playback mode, press the direct number buttons to select the track number.
TV screen
SELECT: 14
Unit display

If the track number is 2 digits or more, press ">10" and enter the number.
Example:
To select track 14: Press ">10" and "4".
Notes:
- Direct play feature is disabled on some discs.
- Some discs cannot play from the specified point.
To play by specifying time (time search):

Cancel the P.B.C. (playback control).
1 During playback, press the DIRECT button.

2 Specify the time with the direct number buttons.
● Enter minutes and seconds.
- To specify 1 hour 23 minutes and 40 seconds, enter "8340".
- If you enter the wrong number, start over from step 1.
Notes:
● Time search feature is disabled on some discs.
● Time search feature is not available on MP3 and JPEG discs.
HT-CN400DVH
HT-CN500DVH
ENGLISH
HT-CN400DVH HT-CN500DVH
ENGLISH
CD operation
The following playback functions are the same as DVD or VCD operations.
Page
Playback 23
To locate the beginning of a chapter (track) (skip) 25
Fast forward/Fast reverse (search) 25
To play repeatedly (repeat play) 29
To play the contents between the specified points repeatedly (A-B repeat) .. 30
To change the audio channel 32
To change the display on TV screen 32
To start playback from the desired point (direct play) .... 34
■ To play in the desired order (programmed play) CD SVCD VCD
You can play back the desired tracks in a specific order.
Maximum of 99 tracks can be programmed.
When playing SVCD or VCD, cancel the P.B.C. (playback control) (see page 34).
1 Whilst stopped, press the PROG button.
TV screen
Unit display
PROGRAM P00:00
PROG
P 00:00
2 Enter a track number with the direct number buttons.
PROGRAM P01:02
P 01:02
- Repeat the procedure above to enter other track numbers.
- If you enter the wrong number, press the PROG button and then start over from step 1.
- If the track number is 2 digits or more, press ">10" and enter the number.
Example:
To select track 14: Press ">10" and "4".
3 Press the ▶/II button to start play.
To change the programmed contents:
Repeat the above procedures from step 1.
Programmed contents will be cleared when you perform the following operations:
- Press the ■ or PROG button in the stop mode.
- Switch the input or remove the discs.
- Set to the stand-by mode.
Notes:
- Programming is not possible whilst paused or during playback.
- Sequential programming does not work if the disc disables programming or does not have track information.
- During programmed play, repeat play can be performed by pressing the REPEAT button (see page 29).
MP3 and JPEG disc operation
The following playback functions are the same as DVD or VCD operations.
Page
Playback 23
To locate the beginning of a chapter (track) (skip) .....25
Fast forward/Fast reverse (search) 25
To play repeatedly (repeat play) .....29
To change the display on TV screen 32
To start playback from the desired point (direct play) ....34
![MENU/PBC OPEN/ CLOSE SET UP MUTE ON/ STAND-BY TITLE SUBTITLE LANGUAGE DISPLAY DVD TUNER AUX MENU/PBC ST/MO ENTER SLOW/MEMORY /II RESET TUNING LISTENING MODE [ADJ/VOL] 1 2 3 4 5 6 7 8 STEP 9 0 >10 DIRECT RETURN REPEAT A-B ANGLE ZOOM AUDIO NTSC/PAL](/content/2025/01/79023/images/557508d135cfb846b9cfc7216e99795c5d553d5cf5dcb08f3bb39f73cfc752f2.jpg)
■ Playback on the MP3 menu screen


You can play CD-R/RW recorded in the MP3 and JPEG formats.
1 Load a disc containing MP3 and JPEG files.
2 Press the MENU/PBC button.
The MP3 menu screen appears.

… Indicates folders.

… Indicates MP3 data.

… Indicates JPEG data.
3 Press the ▲, ▼, ◀ or ▶ button to select a folder or a track and press the ENTER or ▶/II button.
- Playback starts when you select a track.
- When the format is JPEG, the next file is automatically displayed after a while.
- Using the direct number buttons, you can open files or folders directly. Enter the number on the right of the display.
Caution:
If you convert MP3 data to "audio CD" data to record on a CD-R/RW, play it as an audio CD. The MP3 operation cannot be performed.
Note:
Up to 11 characters can be displayed for a folder name and a track name. Underlines, asterisks, and spaces may not be displayed.
HT-CN400DVH
HT-CN500DVH
HT-CN400DVH
HT-CN500DVH
ENGLISH
MP3 and JPEG disc operation (continued)
![MENU/PBC OPEN/CLOSE SET UP MUTE ON/STAND-BY TITLE SUBTITLE LANGUAGE DISPLAY DVD TUNER AUX MENU/PBC ST/MO ENTER SLOW/MEMORY PRESET TUNING LISTEN/ING MODE [ADJ/VOL] 1 2 3 4 5 6 7 8 STEP 9 0 >10 DIRECT RETURN REPEAT A-B ANGLE ZOOM AUDIO NISCEAN ZOOM REPEAT SHARP](/content/2025/01/79023/images/7f853a6d18c3be84f6a3b915d19c45d71411b83c7894893bfc59325cbb033b5d.jpg)
To set the MP3 menu screen to off:
Press the MENU/PBC button.
When the MP3 menu screen is off, tracks are played in the following order.
Playback is performed in the order of 1 to 11 in the following example.
flowchart
graph TD
    A["ROOT"] --> B["1"]
    A --> C["2"]
    B --> D["3"]
    B --> E["4"]
    B --> F["5"]
    C --> G["6"]
    C --> H["7"]
    D --> I["8"]
    E --> J["9"]
    F --> K["10"]
    G --> L["11"]
    H --> M["12"]
    I --> N["Folder"]
    J --> O["Track"]
Tracks on some discs cannot be played in order.
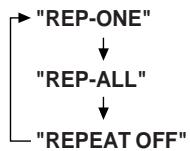
Repeat play on the MP3 menu screen:
Whilst a disc is playing, press the REPEAT button.
Each time the button is pressed, the repeat play mode changes in the following order.
flowchart
graph TD
    A["REP-ONE"] --> B["FOLDER REP"]
    B --> C["FOLDER"]
    D["REPEAT 1"] --> E["REPEAT"]
    E --> F["No display"]
    G["Repeat the currently playing track."] --> H["Repeat play is cancelled."]
    I["Repeat the currently playing folder (directory)."] --> J["Repeat play is cancelled."]
If the MP3 menu screen is off, the play mode is set to the one in use (see page 29).
■ Zoom function

1 During playback, press the ZOOM button.
2 Press the ◀◀ or ▶▶ button.
Each press of the ◀◀ or ▶▶ button cycles through the zoom setting as follows.
ZOOM 025 PCT↔ZOOM 050 PCT↔ZOOM 100 PCT↔ZOOM 150 PCT↔ZOOM 200 PCT
3 To shift the view and display the desired part of a zoomed image, press the ▲, ▼, ◀ or ▶ button repeatedly.
Press the ▲ button.
Press the ▶ button.
Press the ◀ button.
Press the ▼ button.
To return to normal view:
Press the ZOOM button again, "ZOOM OFF" will show on the screen.
■ Rotating a picture

You can rotate images.
During playback, press the ▲, ▼, ◀ or ▶ button.
The image rotates as shown below.
▶ button : 90° rotation in a clockwise direction.
natural_image
Diagram showing a water tank being converted into a container with water and debris (no text or symbols)◀ button : 90° rotation in an anti-clockwise direction.
flowchart
graph TD
    A["Environment with plants and trees"] --> B["Water body with water droplets"]
    style A fill:#f9f,stroke:#333
    style B fill:#bbf,stroke:#333
▲ button : Vertical mirror image.
▼ button : Horizontal mirror image.
HT-CN400DVH
HT-CN500DVH
Listening to the radio
■ Manual or Auto tuning
1 Press the ON/STAND-BY button to turn the power on.
2 Press the FUNCTION (TUNER) button repeatedly to select the desired frequency band.
| FM | ||
| STEREO | FM | 98.80MHz |
| AM | ||
| AM | 5 22KHz | |
3 Press the ◀◀ or ▶▶ (TUNING ◀◀ or ▶▶) button to tune in to the desired station.
Manual tuning:
Press the ◀◀ or ▶▶◆ (TUNING ◀◀ or ▶▶◆) button as many times as required to tune in to the desired station.
Auto tuning:
When the ◀◀ or ▶▶◆ (TUNING ◀◀ or ▶▶◆) button is pressed for 0.5 seconds or more, scanning will start automatically and the tuner will stop at the first receivable broadcast station.
- When radio interference occurs, auto scan tuning may stop automatically at that point.
● Auto scan tuning will skip weak signal stations. - To stop the auto tuning, press the ◀◀ or ▶▶I (TUNING ◀◀ or ▶▶I) button again.
When an FM stereo broadcast is received...
- "STEREO" will appear.
- If the FM reception is weak, press the ST/MO button to extinguish the "STEREO" indicator. The reception changes to monaural, and the sound becomes clearer.

FM stereo receiving indicator
Note:
The sound is produced in 2-channel stereo whilst receiving radio broadcasts.
After use:
Press the ON/STAND-BY button to enter the power stand-by mode.
■ Memorising a station
You can store 40 AM and FM stations in memory and recall them at the push of a button. (Preset tuning)
| 1 Perform steps 1 - 3 in "Manual or Auto tuning" on page 39. | |
| 2 Press the SLOW/MEMORY ▶ button to enter the preset tuning saving mode. | |
| 3 Press the PRESET (◀◀ or ▶▶) button to select the preset channel number. | PROGPROG P01 98.80MHzSTEREO Store the stations in memory, in order, starting with preset channel 1. |
| 4 Press the SLOW/MEMORY ▶ button to save the station to memory. | PROG PROG P01 98.80MHzSTEREO FM 98.80MHz↓STEREO |
| 5 Repeat steps 1 - 4 to set other stations, or to change a preset station.When a new station is stored in memory, the station previously memorised will be erased. | |
Note:
The backup function protects the memorised stations for a few hours should there be a power failure or the AC power lead disconnection.
■ To recall a memorised station
| 1 Press the TUNER button. | |
2 Press the PRESET (◄◄ or ►►) button to select the desired station. Preset channel Frequency and frequency bandYou can use the direct number buttons. Preset channel Frequency and frequency bandYou can use the direct number buttons. |
Using the Radio Data System (RDS)
RDS is a broadcasting service which a growing number of FM stations provide. These FM stations send additional signals along with their regular programme signals. They send their station names, and information about the type of programme such as sports or music, etc.
You can control the RDS by using the remote control only.
![OPEN/ CLOSE SET UP MUTE ON/ STAND-BY TITLE SUBTITLE LANGUAGE DISPLAY DVD TUNER AUTO MENU/PBC ST/MO ENTER SLEEP PROG SLOW/MEMORY ▶▶▶▶▶▶▶▶▶▶▶▶▶▶▶▶▶▶▶▶▶▶▶▶▶▶▶▶▶▶▶▶▶▶▶▶▶▶▶▶▶▶▶▶▶▶▶▶▶▶▶▶▶▶▶▶▶▶▶▶▶▶▶▶▶▶▶▶▶▶▶▶▶▶▶▶▶▶▶▶▶▶▶▶▶▶▶▶▶▶▶▶▶▶▶▶▶▶▶▶> [PRESET] [UP] [UP] LISTENING MODE [ADJ/VOL] 1 2 3 4 5 6 7 8 9 0 >10 STEP DIRECT RETURN REPEAT A-B ANGLE ZOOM AUDIO NTSC/PAL SHARP](/content/2025/01/79023/images/394c8a250960215228ada6aca715c0533db3c9ceefc1c114c9667cdab3d7d7de.jpg)
■ Information provided by RDS
Each time the DISPLAY button is pressed, the display will switch as follows:

flowchart
graph TD
    A["Station name (PS)"] --> B["Programme type (PTY)"]
    B --> C["Frequency"]
    C --> A
If the tuned station is not transmitting an RDS signal or not an RDS station, "NO RDS" will be displayed.
NO RDS
■ Notes for RDS operation
If any of the following events occur, it does not mean that the unit is faulty:
- If a particular station is not broadcasting properly or a station is conducting tests, the RDS reception function may not work properly.
- When you receive an RDS station whose signal is too weak, information like the station name may not be displayed.
Descriptions of the PTY (Programme Type) codes.
You can search for and receive the following PTY.
| NEWS | Short accounts of facts, events and publicly expressed views, report-age and actuality. |
| AFFAIRS | Topical programme expanding or enlarging upon the news, generally in different presentation style or concept, including debate, or analysis. |
| INFO | Programmes whose purpose is to impart advice in the widest sense. |
| SPORT | Programme concerned with any aspect of sport. |
| EDUCATE | Programme intended primarily to educate, of which the formal element is fundamental. |
| DRAMA | All radio plays and serials. |
| CULTURE | Programmes concerned with any aspect of national or regional culture, including language, theatre, etc. |
| SCIENCE | Programmes about the natural sciences and technology. |
| VARIED | Used for mainly speech-based programmes usually of light-entertainment nature, not covered by other categories. Examples include: quizzes, panel games, personality interviews. |
| POP M | Commercial music, which would generally be considered to be of current popular appeal, often featuring in current or recent record sales charts. |
| ROCK M | Contemporary modern music, usually written and performed by young musicians. |
| MOR M | Current contemporary music considered to be "easy-listening", as opposed to Pop, Rock or Classical, or one of the specialised music styles, Jazz, Folk or Country. Music in this category is often but not always, vocal, and usually of short duration. |
| LIGHT M | Classical music for general, rather than specialist appreciation. Examples of music in this category are instrumental music, and vocal or choral works. |
| CLASSICS | Performances of major orchestral works, symphonies, chamber music, etc., and including Grand Opera. |
| OTHER M | Musical styles not fitting into any of the other categories. Particularly used for specialist music of which Rhythm & Blues and Reggae are examples. |
| WEATHER | Weather reports and forecasts and meteorological information. |
| FINANCE | Stock Market reports, commerce, trading, etc. |
| CHILDREN | For programmes targeted at a young audience, primarily for entertainment and interest, rather than where the objective is to educate. |
| SOCIAL | Programmes about people and things that influence them individually or in groups. Includes: sociology, history, geography, psychology and society. |
| RELIGION | Any aspect of beliefs and faiths, involving a God or Gods, the nature of existence and ethics. |
| PHONE IN | Involving members of the public expressing their views either by phone or at a public forum. |
| TRAVEL | Features and programmes concerned with travel to near and far destinations, package tours and travel ideas and opportunities. Not for use for announcements about problems, delays, or roadworks affecting immediate travel where TP/TA should be used. |
| LEISURE | Programmes concerned with recreational activities in which the listener might participate. Examples include, Gardening, Fishing, Antique collecting, Cooking, Food & Wine, etc. |
| JAZZ | Polyphonic, syncopated music characterised by improvisation. |
| COUNTRY | Songs which originate from, or continue the musical tradition of the American Southern States. Characterised by a straightforward melody and narrative story line. |
| NATION M | Current Popular Music of the Nation or Region in that country's language, as opposed to International 'Pop' which is usually US or UK inspired and in English. |
| OLDIES | Music from the so-called "golden age" of popular music. |
| FOLK M | Music which has its roots in the musical culture of a particular nation, usually played on acoustic instruments. The narrative or story may be based on historical events or people. |
| DOCUMENT | Programme concerned with factual matters, presented in an investigative style. |
| ALM TEST | Broadcast when testing emergency broadcast equipment or receivers. |
| ALARM | Emergency announcement made under exceptional circumstances to give warning of events causing danger of a general nature. |
| NONE | No programme type (receive only). |
HT-CN400DVH
HT-CN500DVH
Enjoying various sounds
DTS (Digital Theater Systems)


Digital input from discs with this trademark
One of the digital audio systems for theatrical use. As the sound quality is emphasised, you can enjoy the realistic sound effect in the home theatre system.
The DTS indicator will light up when the disc recorded in DTS is played back.
Dolby Digital

Digital input from discs with this trademark
One of the digital audio systems for theatrical use. You can enjoy the stereophonic effect in the home theatre system.
The ☐ DIGITAL indicator will light up when the disc recorded in ☐ DIGITAL is played back.
Dolby Pro Logic
Inputs from stereo-recorded discs, video tapes, etc.
You can produce 2-channel stereo signals on audio CD, video CD, or AUX1/AUX2 from all the speakers.
The ☐☐ Pro Logic indicator will light up when the Dolby Pro Logic surround is activated.
■ DTS or Dolby Digital Surround
Enjoy DTS or Dolby Digital sound in 5.1 or 2-channel.
Whilst a disc is playing, press the LISTENING button repeatedly to select the desired listening mode.
5.1ch surround sound:
Example:DTS
Unit display
TV screen

DTS


2-ch stereo sound:
STEREO
5.1ch surround sound:
Enjoy 5.1-channel surround sound.

2-ch stereo sound:
Enjoy 2-channel stereo sound.
■ Dolby Pro Logic Surround
You can produce 2-channel stereo signals on audio CD, video CD, or AUX1/AUX2 from all the speakers, or switch to 2-channel.
Whilst a disc is playing, press the LISTENING button repeatedly to select the desired listening mode.
Dolby Pro Logic surround:
Unit display
TV screen
Pro Logic
PRO LOGIC


2-ch stereo sound:
STEREO
When using AUX1 or AUX2, the information does not appear on the TV screen.
Dolby Pro Logic surround:
You can produce sound from all the speakers.

2-ch stereo sound:
Enjoy 2-channel stereo sound.
Speaker indicators:
Speaker indicators show speakers in use.
① Left Front Speaker Indicator
② Centre Speaker Indicator
③ Right Front Speaker Indicator
④ Left Surround Speaker Indicator
⑤ Subwoofer Indicator
⑥ Right Surround Speaker Indicator
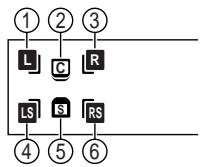
Notes:
- You can switch the audio whilst playing the disc of multiple types (Dolby Digital, DTS, etc.) (page 31).
- When the listening mode is set to stereo, the same monaural sound is reproduced in both the right and left channels.
● The surround function is disabled in the tuner mode (FM or AM).
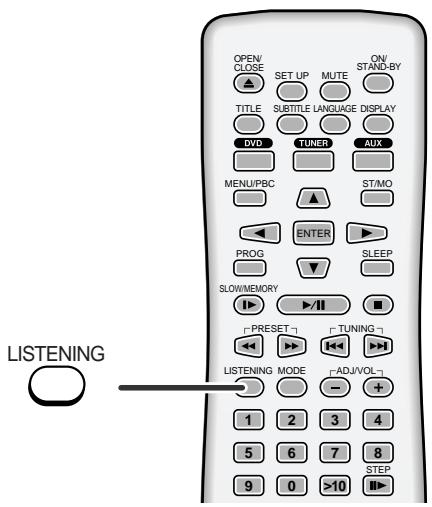
HT-CN400DVH
HT-CN500DVH
Adjusting speaker delay time/speaker level
When speakers cannot be placed at equal distances, change speaker settings to enjoy surround effects as if they were equally placed.
Example:
If the centre speaker is closer to the listening position than others by about 90 cm, set as follows.
Sound from the centre speaker needs to be delayed for 90 cm. The delay time of 1 ms corresponds to 30 cm. Set the delay time to 3 MS. Sound is heard as if all the speakers were equally placed.
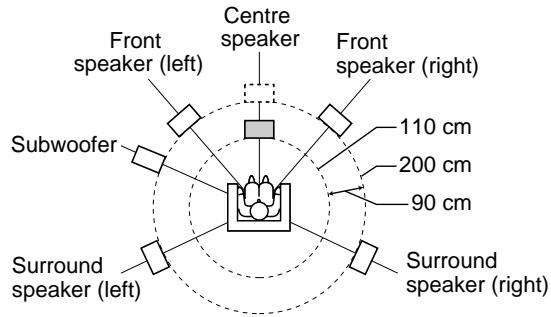
1 In "Speaker delay time setting", set the centre speaker to 3 MS.
2 The centre speaker is closer to the listener than others. In "Speaker level setting", adjust the centre speaker level (see page 46).
3 In "Test tone", check the sound from each speaker (see page 46).
![SET UP DVD MODE OPEN/ SET UP MUTE ON/ STAND-F TITLE SUBTITLE LANGUAGE DISPLAY DVD TUNER AUX ADJ/FRC ST/MO ENTER SLOW/MEMORY TUNING [PRESET] [ADJ/VOL] [ADJ/VOL] ON/ STAND-BY ENTER VOL,UP VOL,DOWN MODE MODE](/content/2025/01/79023/images/1d92301c896806262a57990fa681f6f45fdc4d5bb254b3b85b4ee0205d75b8a7.jpg)
■ Speaker delay time setting
By adjusting speaker delay time, differences in the speaker distance can be corrected. This offers you the sound quality as if the speakers are installed at the same distance from the listening position.
1 Press the ON/STAND-BY button to turn the power on.
2 Press the DVD button.
3 Press the SET UP button.
4 Press the ▲ or ▼ button to select "SPEAKER SETUP" and then press the ENTER button.
5 Press the ▲ or ▼ button to select "CNTR DELAY" or "REAR DELAY".
6 Press the ▶ button and use the ▲ or ▼ button to select the desired delay time.
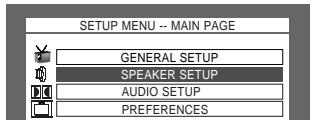
7 To complete the speaker delay time setting, press the SET UP button.
| Speaker type | Delay time range | Default setting | |
| CNTR DELAY | Centre speaker | 1 MS to 5 MS | OFF |
| REAR DELAY | Surround speaker (L, R) | 3 MS to 15 MS | OFF |
Notes:
- When the listening mode is "STEREO", the delay time cannot be changed.
- You cannot change the delay time of the front speakers and the subwoofer.
- In the "REAR DELAY" setting, the left and right speakers are adjusted at the same time, not individually.
■ Test tone
You can check the sound output from the speakers.
| 1 Press the ON/STAND-BY button to turn the power on. | |
| 2 Press the DVD button. | |
| 3 Press the SET UP button. | |
| 4 Press the ▲ or ▼ button to select "SPEAKER SETUP" and then press the ENTER button. | |
| 5 Press the ▲ or ▼ button to select "TEST TONE". | |
| 6 Press the ▶ button and use the ▲ or ▼ button to select "ON". | |
| 7 Press the ENTER button.Speakers emit the test tone for 2 seconds in turn, starting with the front speaker (left).Front speaker (left) → Centre speaker → Front speaker (right)↑ Subwoofer ← Surround speaker (left) ← Surround speaker (right) | |
| 8 To end the test tone, press the SET UP button. | |
| 1 Press the ON/STAND-BY button to turn the power on. |
| 2 Press the DVD button. |
| 3 Press the SET UP button. |
| 4 Press the ▲ or ▼ button to select "SPEAKER SETUP" and then press the ENTER button. |
| 1 Press the ON/STAND-BY button to turn the power on. |
| 2 Press the DVD button. |
| 3 Press the SET UP button. |
| 4 Press the ▲ or ▼ button to select "SPEAKER SETUP" and then press the ENTER button. |
| 1 Press the ON/STAND-BY button to turn the power on. |
| 2 Press the DVD button. |
| 3 Press the SET UP button. |
| 4 Press the ▲ or ▼ button to select "SPEAKER SETUP" and then press the ENTER button. |
| 1 Press the ON/STAND-BY button to turn the power on. |
| 2 Press the DVD button. |
| 3 Press the SET UP button. |
| 4 Press the ▲ or ▼ button to select "SPEAKER SETUP" and then press the ENTER button. |
| 1 Press the ON/STAND-BY button to turn the power on. |
| 2 Press the DVD button. |
| 3 Press the SET UP button. |
| 4 Press the ▲ or ▼ button to select "SPEAKER SETUP" and then press the ENTER button. |
| -- SPEAKER SETUP PAGE -- | |
| CNTR DELAY | |
| REAR DELAY | |
| TEST TONE | ON |
| MAIN PAGE | OFF |
| -- SPEAKER SETUP PAGE -- | |
| CNTR DELAY | |
| REAR DELAY | |
| TEST TONE | ON |
| MAIN PAGE | OFF |
| -- SPEAKER SETUP PAGE -- | |
| CNTR DELAY | |
| REAR DELAY | |
| TEST TONE | ON |
| MAIN PAGE | OFF |
| -- SPEAKER SETUP PAGE -- | |
| CNTR DELAY | |
| REAR DELAY | |
| TEST TONE | ON |
| MAIN PAGE | OFF |
| -- SPEAKER SETUP PAGE -- | |
| CNTR DELAY | |
| REAR DELAY | |
| TEST TONE | ON |
| MAIN PAGE | OFF |
| -- SPEAKER SETUP PAGE -- | |
| CNTR DELAY | |
| REAR DELAY | |
| TEST TONE | ON |
| MAIN PAGE | OFF |
| -- SPEAKER SETUP PAGE -- | |
| CNTR DELAY | |
| REAR DELAY | |
| TEST TONE | ON |
| MAIN PAGE | OFF |
| -- SPEAKER SETUP PAGE -- | |
| CNTR DELAY | |
| REAR DELAY | |
| TEST TONE | ON |
| MAIN PAGE | OFF |
| -- SPEAKER SETUP PAGE -- | |
| CNTR DELAY | |
| REAR DELAY | |
| TEST TONE | ON |
| MAIN PAGE | OFF |
| -- SPEAKER SETUP PAGE -- | |
| CNTR DELAY | |
| REAR DELAY | |
| TEST TONE | ON |
| MAIN PAGE | OFF |
| 7 Press the ENTER button.Speakers emit the test tone for 2 seconds in turn, starting with the front speaker(left).Front speaker (left) → Centre speaker → Front speaker (right)Subwoofer ← Surround speaker (left) ← Surround speaker (right) |
| 7 Press the ENTER button.Speakers emit the test tone for 2 seconds in turn, starting with the front speaker(left).Front speaker (left) → Centre speaker → Front speaker (right)Subwoofer ← Surround speaker (left) ← Surround speaker (right) |
| 7 Press the ENTER button.Speakers emit the test tone for 2 seconds in turn, starting with the front speaker(left).Front speaker (left) → Centre speaker → Front speaker (right)Subwoofer ← Surround speaker (left) ← Surround speaker (right) |
| 7 Press the ENTER button.Speakers emit the test tone for 2 seconds in turn, starting with the front speaker(left).Front speaker (left) → Centre speaker → Front speaker (right)Subwoofer ← Surround speaker (left) ← Surround speaker (right) |
Note:
When the listening mode is "STEREO", you can check the speaker sound of the front speakers and the subwoofer.
■ Speaker level setting
If sounds from the speakers are uneven, you can equalise them by adjusting the speaker levels.
| 1 | Press the ON/STAND-BY button to turn the power on. |
| 2 | Press the DVD button. |
| 3 | Press the MODE button repeatedly to select the desired speaker. |
| 4 | Within 3 seconds, press the ADJ/VOL + (VOL.UP +) or ADJ/VOL –(VOL.DOWN –) button to adjust the level.You can adjust the level at 1 dB intervals.To adjust the levels of other speakers, repeat the operation from step 3. |
| Speaker type | Level range | Default setting | |
| FRONT LEFT | Front speaker (Left) | - 15 DB to + 10 DB | 0 DB |
| CENTER | Centre speaker | - 15 DB to + 10 DB | 0 DB |
| FRONT RIGHT | Front speaker (Right) | - 15 DB to + 10 DB | 0 DB |
| REAR RIGHT | Surround speaker (Right) | - 15 DB to + 10 DB | 0 DB |
| REAR LEFT | Surround speaker (Left) | - 15 DB to + 10 DB | 0 DB |
| SUBWOOFER | Subwoofer | - 15 DB to + 10 DB | 0 DB |
Notes:
- The speaker type appears followed by "TREBLE", "BASS" and "MASTER VOLUME".
- For details on "TREBLE" and "BASS", see page 22.
- The volume can still be adjusted even after "MASTER VOLUME" disappears.
- When the listening mode is "STEREO", you can change the level of the front speakers and the subwoofer.
- If subwoofer sound is distorted, lower the subwoofer level.
Sleep operation
![OPEN/ CLOSE SET UP MUTE ON/ STAND-BY TITLE SUBTITLE LANGUAGE DISPLAY DVD TUNER AUX MENU/PBC ST/MO ENTER PROG SLEEP SLOW/MEMORY PRESET TUNING LISTENING MODE [ADJ/VOL] 1 2 3 4 5 6 7 8 9 0 >10 STEP DIRECT RETURN REPEAT A-B ANGLE ZOOM AUDIO NTSC/PAL ON/ STAND-BY SLEEP SHARP](/content/2025/01/79023/images/263a2c68f05c6efa03a6424c5a3daeed7e6b022130b08de6e56d23b236fca12b.jpg)
■ Setting the sleep timer
You can set the unit to the power stand-by mode at the specified time.
To cancel the sleep operation:
Press the ON/STAND-BY button whilst "SLEEP" is indicated.
To cancel the sleep operation without setting the system to the stand-by mode, press the SLEEP button until "OFF" appears on the display.
To confirm the remaining sleep time:
Press the SLEEP button whilst the sleep timer is set.
The remaining sleep time is displayed for about 3 seconds.
Caution:
This unit cannot set the sleep timer of other equipment.
To use the sleep timer using other equipment, you should also set the timer on the equipment separately.
Error indicators and warnings
When you load an unplayable disc or fail to perform operations properly, the following messages are displayed on the unit and the TV screen.
| Unit display | Meaning |
| NO DISC | ● The disc is not loaded.● The disc is scratched or dirty and cannot be recognised.● The disc is loaded up-side down. |
| WRONG CODE | ● The region number of the DVD is not 2 or ALL. |
| TV screen | Meaning |
| NO DISC | ● The disc is not loaded.● The disc is scratched or dirty and cannot be recognised.● The disc is loaded up-side down. |
| WRONG CODE | ● The region number of the DVD is not 2 or ALL. |
HT-CN400DVH HT-CN500DVH
ENGLISH
References
- Error indicators and warnings -
E-48
Troubleshooting chart
Many potential problems can be resolved by the owner without calling a service technician.
If something is wrong with this product, check the following before calling your authorised SHARP dealer or service centre.
■ General
| Symptom | Possible cause | Reference page |
| No sound is heard. | ● Is the volume level set to "0"?● Are the headphones connected?● Are the speaker wires disconnected? | P. 22P. 22P. 11 |
| The sounds from speakers are not well balanced. | ● Are the speaker leads connected to the wrong channels?● Is each speaker placed at the same distance from the listener?● Are speakers adjusted to the same level? | P. 11P. 15P. 46 |
| Noise is heard during play-back. | ● Move the unit away from any computers or mobile phones. | — |
| When a button is pressed, the unit does not respond. | ● Set this unit to the power stand-by mode and then turn it back on. | P. 50 |
| Interference or noise occurs on the TV image. | ● Is the unit placed near TV with internal aerial? Use an external aerial. | P. 12 |
| The power is not turned on. | ● Is the unit unplugged?● The protection circuit may be activated. Unplug and plug in the power lead again after 15 minutes or more. | P. 14P. 50 |
| No images are displayed. | ● Is TV turned on?● Is the input of TV switched? | P. 17P. 17 |
■ DVD player
| Symptom | Possible cause | Reference page |
| Even though a disc has been loaded, "NO DISC" is displayed.Playback sounds are skipped. | ● Is the disc loaded upside down?● Is the disc very dirty?● Does the disc satisfy the standards?● Is the unit located near excessive vibrations?● Has condensation formed inside the unit? | ——P. 50 |
| The control buttons do not function. Music or video play-back is interrupted. | ● Is the disc very dirty?● Does the disc satisfy the standards?● Is the unit located near excessive vibrations?● Has condensation formed inside the unit? | ——P. 50 |
| Pictures and sound are skipped. | ● Is the disc very dirty?● Is the unit located near excessive vibrations?● Has condensation formed inside the unit? | ——P. 50 |
| The unit does not operate even if the power is on. | ● Is a disc other than a DVD (region number 2 or ALL), SVCD, VCD, audio CD, CD-R or CD-RW loaded? | P. 5 |
| Image cannot be played back. (Sound is not heard.) | ● Are the video and audio cables connected improperly?● Is a disc other than a DVD (region number 2 or ALL), SVCD, VCD, audio CD, CD-R or CD-RW loaded?● Is the disc very dirty?● Is the disc loaded upside down?● Clean the optical pickup if it is dirty.● Is the TV input set to "VIDEO 1/VIDEO 2", etc.?● Is the unit turned on? | P. 13 - 14P. 5——P. 23P. 16 |
Tuner
| Symptom | Possible cause | Reference page |
| The radio makes unusual noises continuously. | ● Is the unit placed near the TV or computer?● Is the FM aerial or AM loop aerial placed properly? Move the aerial away from the AC power lead or the unit if located near. | —P. 12 |
| The preset channel cannot be recalled. | ● Did you remove the plug from the wall socket, or did a power failure occur?Set the channel again. | P. 40 |
■ Remote control
| Symptom | Possible cause | Reference page |
| The remote control does not operate properly. | ● Is the battery polarity respected?● Are the batteries dead?● Is the distance or angle incorrect?● Are there any obstructions in front of the unit?● Is the remote control sensor exposed to strong light (inverter fluorescent light, direct sunlight, etc.)?● Is the remote control for another equipment used simultaneously? | P. 16—P. 16—P. 16— |
| The unit cannot be turned on with the remote control. | ● Is the AC power lead of the unit plugged in?● Are the batteries inserted? | P. 14P. 16 |
■ If trouble occurs
When this product is subjected to strong external interference (mechanical shock, excessive static electricity, abnormal supply voltage due to lightning, etc.) or if it is operated incorrectly, it may malfunction.
If such a problem occurs, do the following:
1 Set the unit to the stand-by mode and turn the power on again.
2 If the unit is not restored in the previous operation, unplug and plug in the unit, and then turn the power on.
When the protection circuit is activated:
When short-circuiting the speaker leads or turning the volume too high, the protection circuit may be activated and the system may enter the stand-by mode.
Unplug the unit and, after 15 minutes or more, plug it in again.
Turn down the volume if set too high.
■ Before transporting the unit
1 Press the ON/STAND-BY button to turn the power on.
2 Press the ▲ OPEN/CLOSE button to open the disc tray.
Remove the disc inserted in the unit.
3 Press the ▲ OPEN/CLOSE button to close the disc tray.
4 Press the ON/STAND-BY button to enter the stand-by mode, and then unplug the AC power lead from the wall socket.
■ Condensation
Sudden temperature changes, storage or operation in an extremely humid environment may cause condensation inside the cabinet (laser pickup, etc.) or on the transmitter on the remote control.
Condensation can cause the unit to malfunction. If this happens, leave the power on with no disc in the unit until normal playback is possible (about 1 hour). Wipe off any condensation on the transmitter with a soft cloth before operating the unit.
Maintenance
■ Cleaning the cabinet
Periodically wipe the cabinet with a soft cloth and a diluted soap solution, then with a dry cloth.
- Do not use chemicals for cleaning (petrol, paint thinner, etc.). It may damage the cabinet finish.
- Do not apply oil to the inside of the unit. It may cause malfunctions.
■ Care of DVD/CD discs
DVD/CD discs are fairly resistant to damage, however mistracking can occur due to an accumulation of dirt on the disc surface. Follow the guidelines below for maximum enjoyment from your DVD/CD collection and player.
- Do not write on either side of the disc, particularly the non-label side from which signals are read. Do not mark this surface.
- Keep your discs away from direct sunlight, heat, and excessive moisture.
- Always hold the DVD/CDs by the edges. Fingerprints, dirt, or water on the DVD/CDs can cause noise or mistracking. If a DVD/CD is dirty or does not play properly, clean it with a soft, dry cloth, wiping straight out from the centre, along the radius.
Specifications
As part of our policy of continuous improvement, SHARP reserves the right to make design and specification changes for product improvement without prior notice. The performance specification figures indicated are nominal values of production units. There may be some deviations from these values in individual units.
- General
| Power source | AC 230 V, 50 Hz |
| Power consumption | HT-CN400DVH:Power on: 88 WPower stand-by: 0.6 W |
| HT-CN500DVH:Power on: 105 WPower stand-by: 0.6 W | |
| Dimensions | Width: 430 mm (16-7/8")Height: 53 mm (2-1/8")Depth: 337 mm (13-1/4") |
| Weight | 4.2 kg (9.3 lbs.) |
| Audio input terminals | Analogue input (IN 1): RCA type × 1 pair (L/R)Analogue input (IN 2): RCA type × 1 pair (L/R) |
| Audio output terminals | Analogue output (OUT): RCA type × 1 pair (L/R)Headphones: 16 - 50 ohms (recommended: 32 ohms) |
| Video output terminals | SCART output: SCART terminal × 1S-video output: S-terminal × 1Video output: RCA type × 1 |
- Amplifier (HT-CN400DVH)
| Output power | Front speakers: RMS: 60 W (30 W + 30 W) (10 % T.H.D., 1 kHz) Centre speaker: RMS: 30 W (10 % T.H.D., 1 kHz) Surround speakers: RMS: 60 W (30 W + 30 W) (10 % T.H.D., 1 kHz) Subwoofer: RMS: 50 W (10 % T.H.D., 100 Hz) |
● Amplifier (HT-CN500DVH)
| Output power | Front speakers: RMS: 100 W (50 W + 50 W) (10 % T.H.D., 1 kHz) Centre speaker: RMS: 50 W (10 % T.H.D., 1 kHz) Surround speakers: RMS: 100 W (50 W + 50 W) (10 % T.H.D., 1 kHz) Subwoofer: RMS: 50 W (10 % T.H.D., 100 Hz) |
- DVD player
| Signal system | PAL/NTSC colour | |
| Supported disc types | DVD (Region number 2, ALL), SVCD, VCD, audio CD, CD-R, CD-RW, MP3 | |
| Video signal | Horizontal resolution: 500 linesS/N ratio: 70 dB | |
| Audio signal | Frequency characteristics | Linear PCM DVD:4 Hz to 22 kHz (sampling rate: 48 kHz)4 Hz to 44 kHz (sampling rate: 96 kHz)CD: 4 Hz to 20 kHz |
| S/N ratio | CD: 96 dB (1 kHz) | |
| Dynamic range | Linear PCM DVD: 95 dBCD: 94 dB | |
| Total harmonic distortion ratio | 0.006 % maximum | |
- Tuner
| Frequency range | FM: 87.5 -108 MHzAM: 522 - 1,620 kHz |
- Front/Centre speakers
| Type | Full range speaker system (magnetic shield)8 cm (3-1/8") speaker |
| Maximum input power | HT-CN400DVH: 45 W |
| HT-CN500DVH: 60 W | |
| Impedance | HT-CN400DVH: 8 ohms |
| HT-CN500DVH: 6 ohms | |
| Dimensions | Width: 94 mm (3-3/4")Height: 169 mm (6-5/8")Depth: 97 mm (3-7/8") |
| Weight | 0.6 kg (1.3 lbs.)/each |
- Surround speaker
| Type | Full range speaker system8 cm (3-1/8") speaker |
| Maximum input power | HT-CN400DVH: 45 W |
| HT-CN500DVH: 60 W | |
| Impedance | HT-CN400DVH: 8 ohms |
| HT-CN500DVH: 6 ohms | |
| Dimensions | Width: 94 mm (3-3/4")Height: 169 mm (6-5/8")Depth: 97 mm (3-7/8") |
| Weight | 0.6 kg (1.3 lbs.)/each |
- Subwoofer
| Type | Sub-woofer system12 cm (4-3/4") subwoofer |
| Maximum input power | 75 W |
| Impedance | 6 ohms |
| Dimensions | Width: 135 mm (5-5/16")Height: 338 mm (13-5/16")Depth: 375 mm (14-3/4") |
| Weight | 5.3 kg (11.7 lbs.) |
SHARP
SHARP CORPORATION
92LCN400E0270
03G R AO ①

NMOD
HT-CN400DVH/HT-CN500DVH HOME CINEMA WITH DVD
SHARP
natural_image
Pure electrical circuit lines without any symbols


- HT-CN400DVH HT-CN500DVH
- DEUTSCH
- FRANÇAIS
- ESPAÑOL
- SVENSKA
- ITALIANO
- NEDERLANDS
- PORTUGUÊS
- ENGLISH
- BESONDERE ANMERKUNGEN REMARQUES SPÉCIALES NOTAS ESPECIALES SÄRSKILDA ANMÄRKNINGAR
- NOTE PARTICOLARI BIJZONDERE OPMERKINGEN NOTAS ESPECIAIS SPECIAL NOTES
- Warning:
- Advarsel:
- ● Vorsicht:
- - Advarsel:
- Introduction
- Icons used in this operation manual
- Copyright Information:
- Types of playable discs
- Contents
- Page
- ■ General Information
- ■ System Connections
- ■ Preparation for Use
- ■ DVD Operation
- Accessories
- Note:
- Optional accessories
- Notes:
- Precautions
- ■ General
- ■ Volume control
- Description of discs
- ■ Discs that cannot be played
- ■ Title, chapter and track
- ■ Icons used on DVD discs
- Controls and indicators
- Reference page
- Cooling fan
- ■ Remote control
- ■ Front/centre/surround speakers
- ■ Subwoofer
- Speaker grilles are removable:
- ■ Speaker functions
- Front speaker:
- Centre speaker:
- Surround speaker:
- Subwoofer:
- Speaker connection
- ■ Connecting speaker wires
- Caution:
- Aerial connection
- Supplied FM aerial:
- Supplied AM loop aerial:
- Installing the AM loop aerial:
- External FM aerial:
- Connections to TV, VCR, etc.
- Setting VIDEO OUTPUT
- ■ Connecting to a TV with a SCART socket
- ■ Connecting to a TV with an S-video input socket
- ■ Connecting to a TV with a video input socket
- ■ Audio connection to TV or VCR
- To listen to TV or VCR sound via the speakers of this unit:
- ■ Connecting the AC power lead
- System installation
- ■ Placing the speaker system
- Installation image:
- ■ Magnetically shielded speakers
- If colour variation occurs...
- If the colour variation is still present...
- Battery installation
- Precautions for battery use:
- Notes concerning use:
- Turning the power on
- ■ Test of the remote control
- The remote control can be used within the range shown below:
- ■ To turn the power on
- To set the unit to the stand-by mode:
- Changing the setup menu
- Press the ON/STAND-BY button to turn the power on.
- Press the SET UP button.
- Press the ▲ or ▼ button to select a menu and press the ENTER button.
- Press the ▲, ▼, ◀ or ▶ button to change the setting and press the ENTER button.
- Press the SET UP button.
- Changing the setup menu (continued)
- ■ TV display setting
- ■ TV type setting
- ■ Video output setting
- ■ Parental setting
- ■ Password setting
- General control
- Volume control
- ■ Treble and Bass
- ■ Muting
- ■ Headphones
- DVD playback
- ■ Playback
- To interrupt playback
- To stop playback
- Audio CD/MP3/JPEG:
- ■ To resume playback after stopping (resume play) DVD
- To cancel the resume playback:
- ■ DVD mode operation indicators DVD
- Basic operation
- ■ To locate the beginning of a chapter (track) (skip) DVD SVCD VCD CD MP3 JPEG
- Whilst a disc is playing, press the ◀◀ or ▶▶ button.
- ■ Fast forward/Fast reverse (search)
- Whilst a disc is playing, press the ◀◀ or ▶▶ button.
- Press the ▶/II button to return to the normal playback.
- ■ To start playback from the desired point (direct play) DVD
- Useful operation
- ■ Still picture/Frame advance
- ■ Slow-motion play
- ■ To change the angle DVD
- ■ To zoom images (zoom)
- To return to normal view:
- Useful operation (continued)
- ■ To play repeatedly (repeat play)
- Whilst a disc is playing, press the REPEAT button.
- To return to the normal playback, press the REPEAT button repeatedly to select "REPEAT OFF".
- ■ To play the contents between the specified points repeatedly (A-B repeat)
- ■ To select a title from the top menu of the disc DVD
- ■ To select a subtitle or audio language from the disc menu DVD
- Various settings
- ■ To change the subtitle language
- ■ To change the audio language (audio output) DVD SVCD
- ■ To change the TV type
- ■ To change the audio channel
- ■ To change the display on TV screen
- DVD:
- MP3:
- SVCD/VCD/Audio CD:
- Video CD and Super Video CD playback
- ■ Playback of a video CD (super video CD) with P.B.C. SVCD VCD
- Press the ▶/II button.
- Select the desired menu number using the direct number buttons.
- To interrupt playback:
- To stop playback:
- ■ To play without activating the playback control function SVCD VCD
- ■ To start playback from the desired point (direct play)
- CD operation
- ■ To play in the desired order (programmed play) CD SVCD VCD
- Whilst stopped, press the PROG button.
- Enter a track number with the direct number buttons.
- Press the ▶/II button to start play.
- MP3 and JPEG disc operation
- ■ Playback on the MP3 menu screen
- MP3 and JPEG disc operation (continued)
- To set the MP3 menu screen to off:
- Repeat play on the MP3 menu screen:
- ■ Zoom function
- ■ Rotating a picture
- Listening to the radio
- ■ Manual or Auto tuning
- When an FM stereo broadcast is received...
- After use:
- ■ Memorising a station
- ■ To recall a memorised station
- Using the Radio Data System (RDS)
- ■ Information provided by RDS
- ■ Notes for RDS operation
- Enjoying various sounds
- DTS (Digital Theater Systems)
- Dolby Digital
- Dolby Pro Logic
- ■ DTS or Dolby Digital Surround
- ■ Dolby Pro Logic Surround
- Dolby Pro Logic surround:
- 2-ch stereo sound:
- Speaker indicators:
- Adjusting speaker delay time/speaker level
- Example:
- ■ Speaker delay time setting
- ■ Test tone
- ■ Speaker level setting
- Sleep operation
- ■ Setting the sleep timer
- To cancel the sleep operation:
- To confirm the remaining sleep time:
- Error indicators and warnings
- Troubleshooting chart
- ■ If trouble occurs
- If such a problem occurs, do the following:
- When the protection circuit is activated:
- ■ Before transporting the unit
- ■ Condensation
- Maintenance
- ■ Cleaning the cabinet
- ■ Care of DVD/CD discs
- Specifications
- SHARP
Brand : SHARP
Model : HT-CN500DVH
Category : Audio System