
HL-XW40 - Garden hose Cocraft - Free user manual and instructions
Find the device manual for free HL-XW40 Cocraft in PDF.


| Product Type | Laser Distance Meter |
| Brand | Cocraft |
| Model | HL-XW40 |
| Measuring Range | 0.05 – 40 m |
| Accuracy | ±1.5 mm |
| Resolution | 0.001 m |
| Laser Type | Class 2, 650 nm, <1 mW |
| Beam Size | 25 mm at 30 m |
| IP Rating | IP52 |
| Power Supply | 2 x AA/LR6 alkaline batteries |
| Battery Life | Up to 10,000 measurements |
| Auto Shut-off (Laser) | 30 seconds |
| Auto Shut-off (Device) | 3 minutes |
| Dimensions | 120 x 55 x 30 mm |
| Operating Temperature | -5 to +40 °C |
| Storage Temperature | -20 to +60 °C |
| Functions | Distance, Area, Volume, Indirect Measurement (Pythagoras), Addition/Subtraction, Continuous Measurement, Backlit Display |
| Measuring Reference Points | Front, Back, Tripod Mount (1/4") |
| Measuring Units | m, ft, in (various fractions), 尺 |
| Package Contents | Laser distance meter, Carry case, Batteries, Instruction manual |
| Care & Maintenance | Store clean and dry; avoid knocks, strong vibrations, high temperatures; remove battery if not used for extended period |
| Safety Features | Class 2 laser; never look into beam; keep away from children; reflective surfaces hazard |
Frequently Asked Questions - HL-XW40 Cocraft
User questions about HL-XW40 Cocraft
0 question about this device. Answer the ones you know or ask your own.
Ask a new question about this device
Download the instructions for your Garden hose in PDF format for free! Find your manual HL-XW40 - Cocraft and take your electronic device back in hand. On this page are published all the documents necessary for the use of your device. HL-XW40 by Cocraft.
USER MANUAL HL-XW40 Cocraft
Please read the entire instruction manual before using the product and save it for future reference. We reserve the right for any errors in text or images and any necessary changes made to technical data. If you have any questions regarding technical problems please contact our customer services.
1. Safety
Warning:
• Class 2 laser product (EN 60825-1:2007).
- Never look into the laser beam.
- Never point the laser beam into the eyes of people or animals.
- Do not use the distance meter on or near highly reflective surfaces since the laser beam can be reflected back into your own or someone else's eyes.
- Keep the distance meter out of children's reach.
2. Product description
- Accurate laser measurements.
- Memory and mathematical functions for calibrating, area, volume, total measurements and indirect height measurements.
- Backlit display.
• Measuring range: 0.05-40 m.
• Automatic shut-off. - 1/4 "Tripod mount.
2.1 Package contains
- Carry case
- Laser distance meter
- Batteries
- Instruction manual
2.2 Buttons and functions
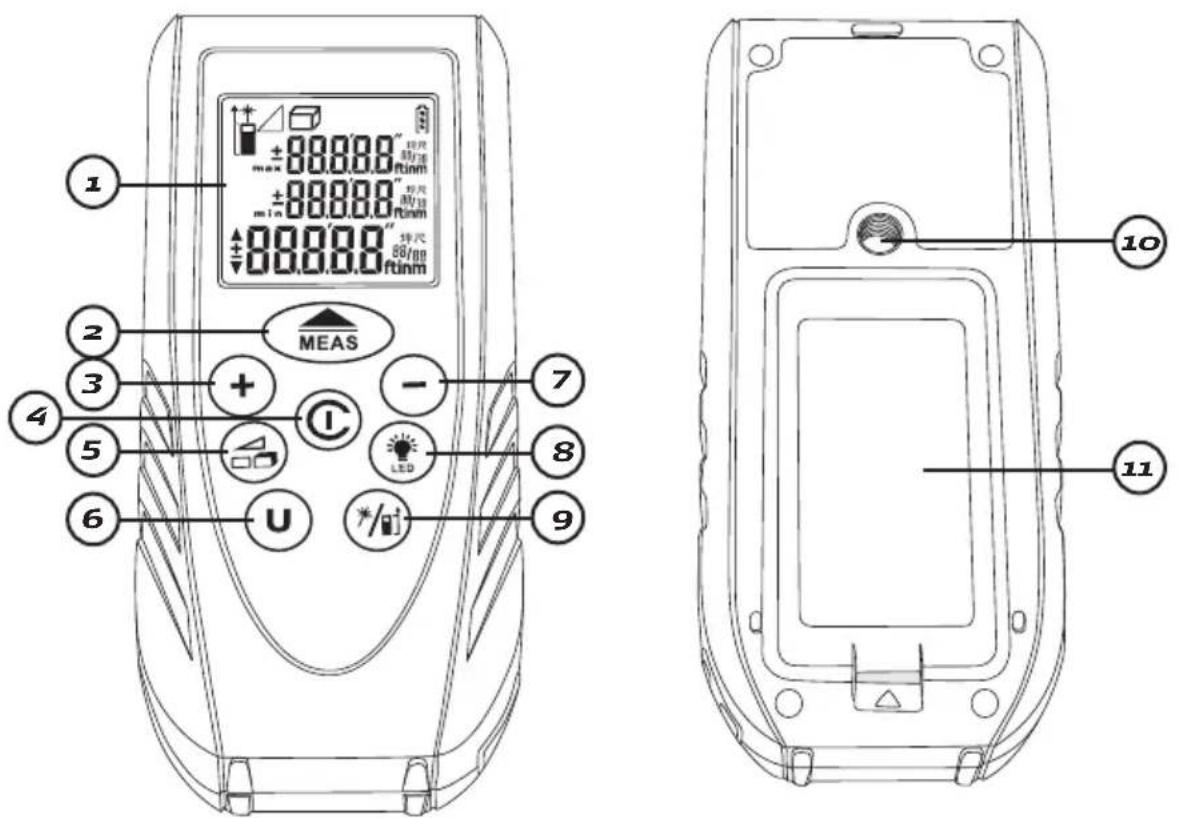
- LCD display
- Press to measure or long press for continuous measure.
- ✅ Press to add a reading to the previous reading.
- Press to turn on and long press to turn off.
- Press to select measuring function for area, volume or indirect measurement.
- ⓤ Press to select units of measure: metre (m), feet (ft) or inches (in).
- ⏻ Press to subtract a reading to the previous reading.
- Press to turn on the display's backlight.
- Press to change measuring reference. The distance meter has three reference points, front, back and the tripod mount. Long press to turn the laser on and off.
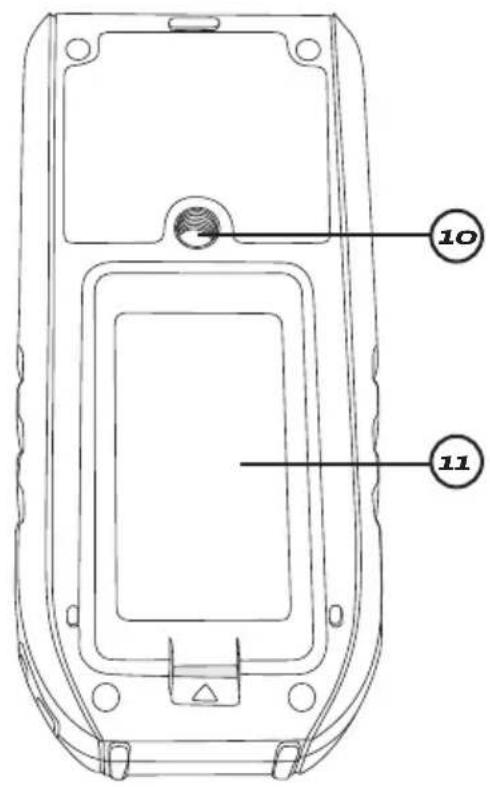
- 1/4" tripod mount
-
Battery compartment
-
Receiving lens
-
Laser lens
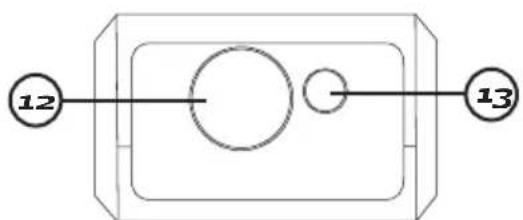
flowchart
graph TD
    A["12"] --> B(( ))
    C["13"] --> D(( ))
2.3 Digital display
The chosen function is shown on the display.
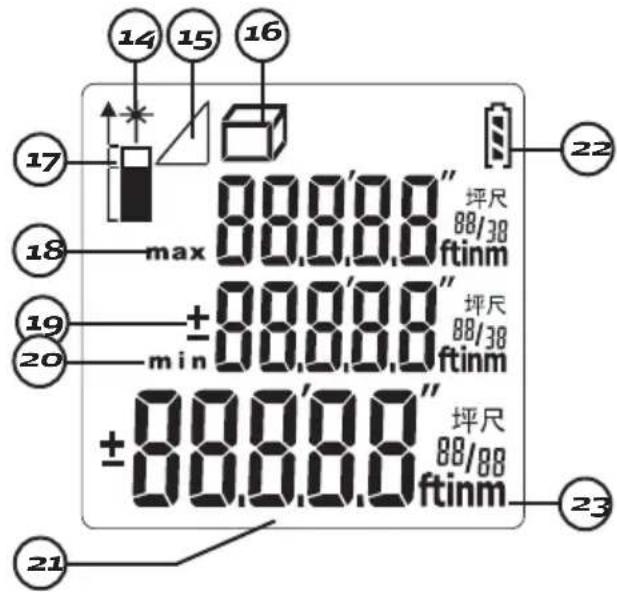
- The laser icon will be displayed showing that the laser pointer is on.
- Indirect measuring according to Pythagoras' theorems.
-
Measuring functions
-
Area measure
• Volume measure -
Selected measuring reference point.
- Max display for continuous measurement.
- Shows any result added or subtracted from the previous measurement.
- Min display for continuous measurement.
- Main screen which displays both measurement results and units.
- Battery status, battery symbol shows empty when it needs changing.
- Displays selected measurement unit.
3. Operation
Important
- Distance can be measured from the front or back of the device or from the tripod mounting point. Make sure that the area between the meter and the measured surface is free from obstructions.
- Make sure that the area between the meter and the measured surface is free from obstructions.
- If you need to measure the distance to a surface which is soft, irregular or too small, place a piece of cardboard in front of the surface.
- The device cannot measure against or through any glass surfaces. Reflections from such measuring may be faulty due to reflections.
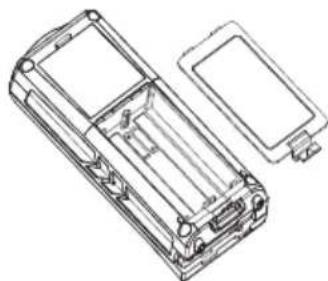
3.1 Inserting batteries
- Open the battery cover on the bottom.
- Insert two AA/LR6 alkaline batteries according to the polarity markings in the battery compartment.
natural_image
Technical line drawing of a battery pack assembly (no text or symbols)3.2 Measuring distance
Note: Always make sure that you have chosen the correct measuring units before measuring. The unit of measure is displayed on the lower right corner of the screen (see Selecting measuring units). Make sure that a reference point is chosen (see Changing measuring reference).
-
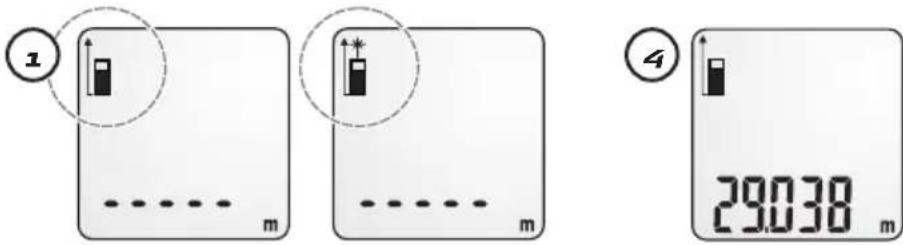
Press turn on the distance meter and laser. The laser indicator will display when the laser is on.
-
Turn on the backlight when needed. Press ⚙️.
-
Point the laser onto the area to be measured and press once to measure (a short beep will be heard once the measurement has been taken).
-
The measured distance will be shown on the display.
-
If no button is pushed for 30 seconds, the laser will turn off automatically and after 3 min the device will also turn off.
3.3 Adding or subtracting measurements
Suitable for situations requiring several measurements because of immovable obstacles.
Example: Adding measurements
-
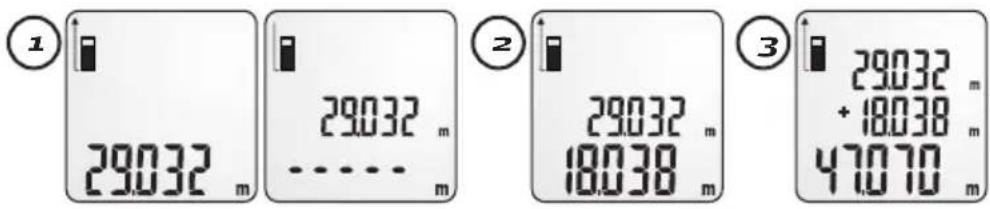
Take the first reading. Select distance, area or volume. Then press ⚠ to save the reading temporarily.
-
Point the laser to the next area to be measured and press 📂 again to measure. Then press + to add the current reading to the previous one.
-
The sum will be shown at the bottom of the display. The two added readings will display on top.
-
Continue adding readings by pressing + and starting again from step 2. The sum will move to the top.
Example: Subtracting measurements
-
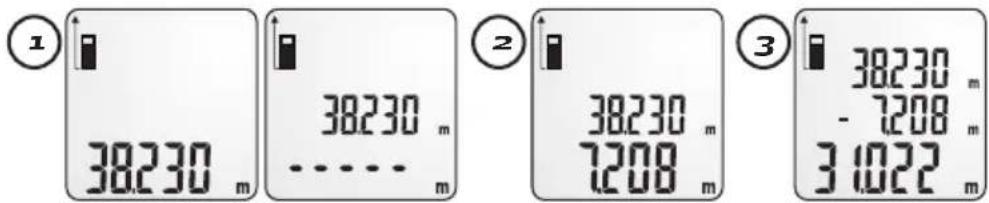
Take the first reading. Select distance, area or volume. Then press ⚠ to save the reading temporarily.
-
Point the laser to the next area to be measured and press 📂 again to measure. Press ⏻ to subtract the current reading from the previous one.
-
The sum will be shown at the bottom of the display. The two previous readings will display on top.
-
Continue subtracting readings by pressing ⏻ and starting again from step 2. The sum will move to the top.
3.4 Continuous measurement
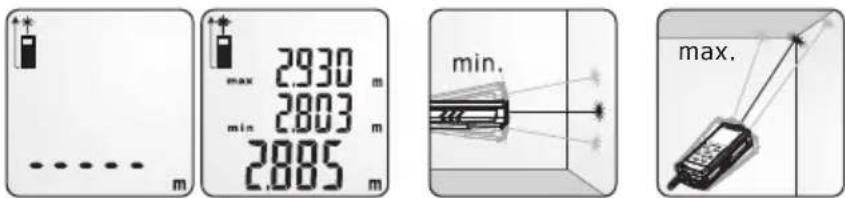
- Long press 📂 for about three seconds. The laser beam will be automatically activated.
- Press ☐ if you want to pause during measuring. Press ☐ to continue measuring.
- During measuring both the min and max values will be displayed.
- To finish measuring, first press Ⓞ to pause and then Ⓗ to finish.
3.5 Changing measuring reference
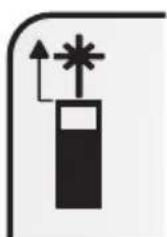
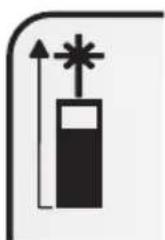
The distance meter has three measuring references. The last measuring reference used will also be pre-selected measuring reference the next time it is used.
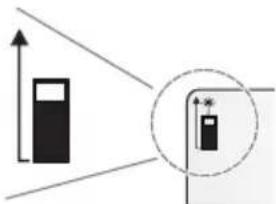
Press until the measuring reference you desire appears in the upper left hand corner of the display.
natural_image
Simple black-and-white diagram of a battery with an arrow indicating upward motion and a starburst symbol above (no text or labels)Measuring from the front of the distance meter.
natural_image
Simple black-and-white diagram of a battery with an upward arrow and star symbol (no text or labels)Measuring from the back of the distance meter.
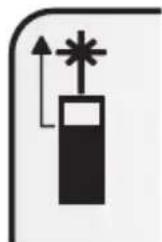
Measuring from the tripod mount.
3.6 Choosing measuring units
Long press Ⓗ until the desired measuring unit is shown in the lower right hand corner. Available measuring units:
| metres feet inches (x, x) | 0'0" 1/32 | inches (x/x) | 尺 | |||
| Length m ft in | 0'0" 1/32 | in | 尺 | |||
| Area m^2 ft^2 ft^2 | ft^2 ft^2 2 | 坪/尺 | ||||
| Volume m^3 ft^3 | ft^3 ft^3 ft^3 | m^3 | ||||
Note: The same measure reference will be pre-selected the next time it is used.
4. Calculation functions
Note: Always make sure that you have chosen the correct measuring units before measuring. The unit of measure is displayed on the lower right corner of the screen (see Selecting measuring units). Make sure that a reference point is chosen (see Changing measuring reference).
4.1 Area Measurement
Follow the instructions on the display. The corresponding symbol for what is to be measured will flash on screen.
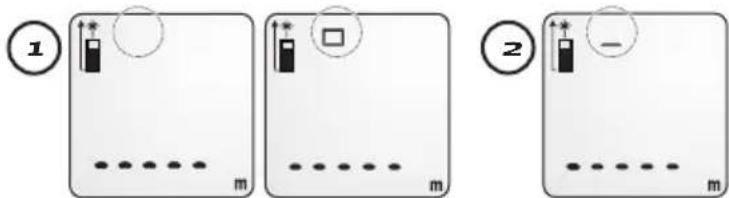
-
Press once to select the area measuring function (the rectangle will show on the display). The length side will begin to flash.
-
Point the laser over the area to be measured to measure length and press once to measure (a short beep will be heard once the measurement has been taken).
-
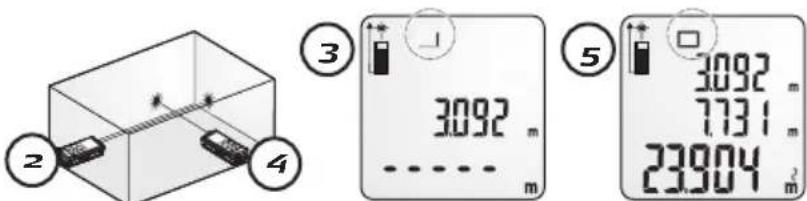
The measured distance will be shown on the display. The width side will begin to flash.
-
Point the laser over the area to be measured, across the previous line measured and press 📄 again to measure width (a short beep will be heard once the measurement has been taken).
-
Both readings will show on top. The sum is shown at the bottom of the display.
4.2 Volume measurement
Follow the instructions on the display. The corresponding symbol for what is to be measured will flash on screen.
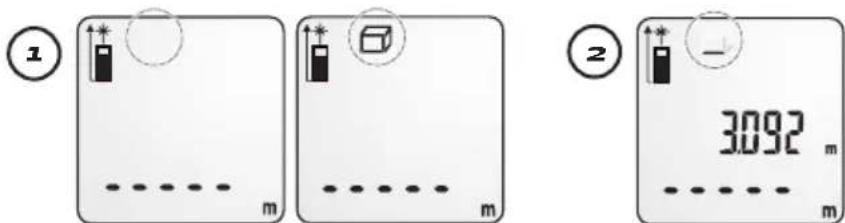
-
Press twice to select the volume measuring function (the cube will show on the display). The length side will begin to flash.
-
Point the laser over the area to be measured to measure length and press once to measure (a short beep will be heard once the measurement has been taken).
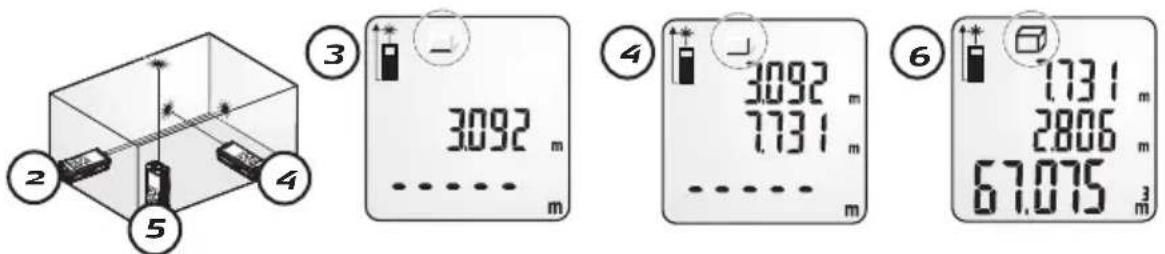
- The measured distance will be shown on the display.
- Point the laser over the area to be measured across the previous line measured to measure width and press once to measure (a short beep will be heard once the measurement has been taken).
- Point the laser vertically on the surface of the area to be measured and press to measure height (a short beep will be heard once the measurement has been taken).
- The two previous readings will display on top. The sum is shown at the bottom of the display.
4.3 Indirect measurement
Follow the instructions on the display. The corresponding symbol for what is to be measured will flash on screen.
The meter uses Pythagoras' formula (a^2 + b^2 = c^2) to calibrate height indirectly.
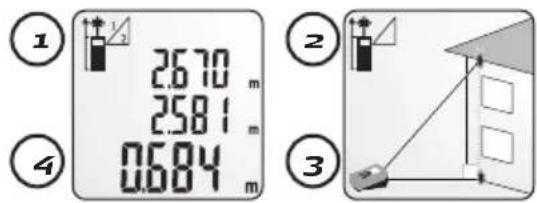
- Press to select indirect measurement (a triangle symbol will show in the display).
- Point the laser to the highest point of the object to be measured (the triangle's hypotenuse will flash). Press NEAS to register the first reading.
- Point the laser directly parallel to the object to be measured (the triangle's base will flash). Press MEAS to start measuring.
- The height (the triangle's vertical line will begin to flash) is calculated automatically and will be shown.
4.4 Turning on the backlight
Press ⏻ to turn on the backlight when needed.
5. Care and maintenance
- The distance meter is a sensitive instrument which should be handled carefully.
- Do not subject the instrument to knocks, strong vibrations or high temperatures.
- Store the meter in a clean and dry environment.
- Do not expose the instrument to dust or moisture since the lens can be damaged.
- Wipe the instrument with a soft cloth when needed.
- Remove the battery from the meter if it is not to be used for an extended period.
- Change the battery when the battery symbol shows empty.
6. Troubleshooting
| Error code Description of fault Possible solution | ||
| Err01 Out of range. Measure shorter distances. | ||
| Err02 The reflected signal is too weak. Select a better area to measure. | ||
| Err03 Out of the display's range, max value 99,999 e.g. when measuring area for example. | Redo the measurement using several stages. | |
| Err04 Pythagoras calculation error. Make sure the measurement was done correctly. | ||
| Err05 Flat battery. Change batteries. | ||
| Err06 Outside the recommended temperature range. | Measure inside the recommended range. | |
| Err07 Background light is too strong. Measure in dimmer lighting conditions. | ||
7. Specifications
Model CA640
Measuring range 0,05–40 metres
Resolution 0.001 metres
Accuracy ± 1.5 mm
Measuring speed 0.5 seconds
Laser type 650 nm, Class 2, < 1 mW
Beam size 25 mm at 30 metres
IP class IP52
Batteries 2 x AA/LR6- batteries
Battery life Up to 10,000 measurements
Dimensions 120 x 55 x 30 mm
Operating temperature - 5 to +40 °C
Storage temperature - 20 to +60 °C
Automatic shut-off Laser 30 seconds
Distance meter 3 minutes
Laseravständsmätare
natural_image
Technical line drawing of a mobile phone case with internal components and a separate housing (no text or symbols)3.2 Avständsmätning
natural_image
Simple diagram of a battery with an arrow indicating upward motion and a starburst symbol above (no text or labels)natural_image
Technical line drawing of a rectangular electronic device with internal components and a separate housing (no text or symbols)3.2 Avstandsmåling
natural_image
Simple diagram of a battery with an arrow indicating upward motion and a star symbol above it (no text or labels)natural_image
Technical line drawing of a mobile phone chassis with front panel and rear panel (no text or symbols)3.2 Etäisyysmittaus
natural_image
Simple diagram of a battery with an arrow indicating upward motion and a star symbol above it (no text or labels)For consumer contact, please visit
www.clasohlson.co.uk and click on
customer service.
Internet www.clasohlson.co.uk
- Safety
- Warning:
- Product description
- Package contains
- Buttons and functions
- Digital display
- Operation
- Important
- Inserting batteries
- Measuring distance
- Adding or subtracting measurements
- Example: Adding measurements
- Example: Subtracting measurements
- Continuous measurement
- Changing measuring reference
- Choosing measuring units
- Calculation functions
- Area Measurement
- Volume measurement
- Indirect measurement
- Turning on the backlight
- Care and maintenance
- Troubleshooting
- Specifications
- Laseravständsmätare
- Avständsmätning
- Avstandsmåling
- Etäisyysmittaus
Brand : Cocraft
Model : HL-XW40
Category : Garden hose