
HS 2800-C - Garden shredder Cocraft - Free user manual and instructions
Find the device manual for free HS 2800-C Cocraft in PDF.


| Type | Garden shredder |
| Brand | Cocraft |
| Model | HS 2800-C |
| Power | 2800 W |
| Voltage | 220–240 V AC, 50/60 Hz |
| Max branch diameter | 45 mm |
| No-load speed | 46 rpm |
| Collection box capacity | 45 L |
| Weight | 25.6 kg |
| Dimensions (L x W x H) | 56 x 46 x 90 cm |
| Noise emission (LpA) | 84 dB(A), K=3 dB(A) |
| Noise emission (LwA) | 92 dB(A), K=3 dB(A) |
| Cutting mechanism | Rotating blade drum with adjustable anvil plate |
| Blade-anvil gap | 0–0.5 mm (adjustable) |
| Safety features | No-volt release switch, motor overload cut-out, collector safety cut-off, RCD recommended |
| Reverse function | Yes (for clearing jams) |
| Assembly required | Yes (wheels, stand, collector) |
| Recommended extension cable | H07RN-F, min 1.5 mm² (≤25 m) or 2.5 mm² (>25 m) |
| Maintenance | Clean with damp cloth; no pressure washer; store dry indoors |
| Spare parts availability | Contact customer service for blades, anvil plate, and adjustment screw |
Frequently Asked Questions - HS 2800-C Cocraft
User questions about HS 2800-C Cocraft
0 question about this device. Answer the ones you know or ask your own.
Ask a new question about this device
Download the instructions for your Garden shredder in PDF format for free! Find your manual HS 2800-C - Cocraft and take your electronic device back in hand. On this page are published all the documents necessary for the use of your device. HS 2800-C by Cocraft.
USER MANUAL HS 2800-C Cocraft
KOMPOSTKVARN OKSASILPPURI
KOMPOSTKVERN GARTENHÄCKSLER
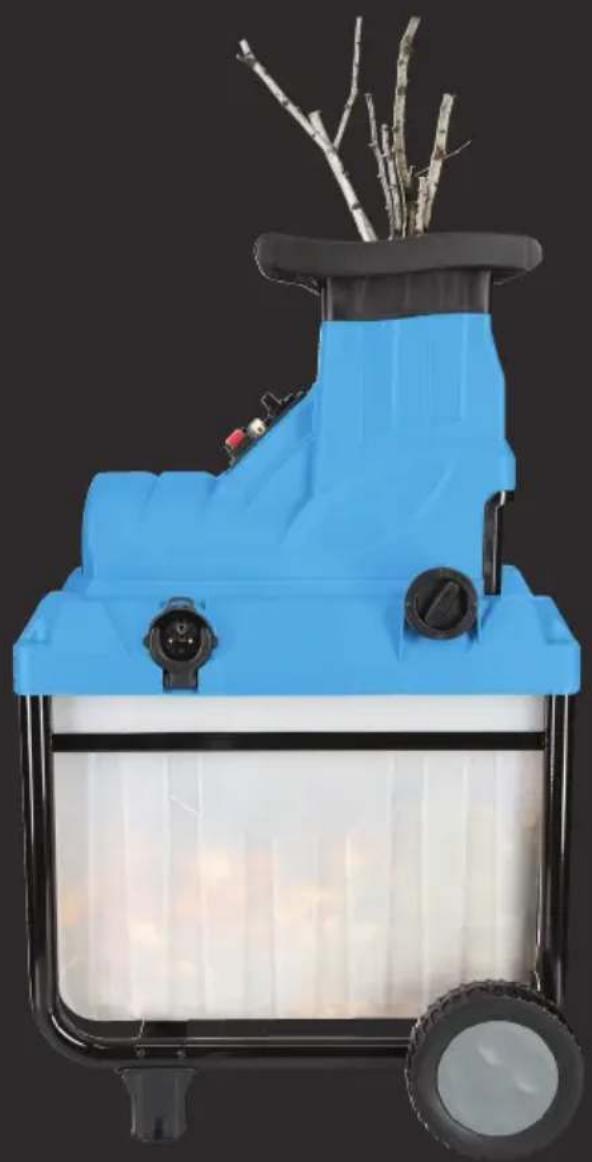
natural_image
Blue industrial machine with black handle and wheels, no visible text or symbolsArt.no Model
18-4735
SHB2800-UK
31-9157
SHB2800

Important!
Read the entire instruction manual carefully and make sure that you fully understand it before you use the equipment. Keep the manual for future reference.
Viktig information:
Original instructions
Bruksanvisning i original
Originalbruksanvisning
Please read the entire instruction manual before using the product and then save it for future reference. We reserve the right for any errors in text or images and any necessary changes made to technical data. In the event of technical problems or other queries, please contact our Customer Services (see address details on the back).
Safety
- Always disconnect the machine from the mains power supply before servicing, adjusting or cleaning it. The motor will continue to rotate a short while after the machine has been turned off.
- Note: The motor must be in operation when the anvil plate is adjusted, refer to the Adjusting the anvil plate section below.
- If the mains lead is damaged it must only be replaced by a qualified electrician.
- The machine may be used by children of 8 years and above and by persons with reduced physical, sensory or mental capability or lack of experience and knowledge provided they have been given supervision or instruction concerning the use of the machine in a safe manner and understand the hazards involved.
- The operator is responsible for the safety of third parties within the working area.
- The garden shredder most be placed on a firm and level surface.
- Use gloves, hearing protection, a face or dust mask and safety goggles or visor when using the machine.
- Never let children play with the machine. Cleaning and user maintenance shall not be made by children without supervision.
- Make sure that the machine is completely and correctly assembled before connecting it to the power supply.
- Never insert your hands into the hopper.
- Never wear loose clothing or jewellery which might get caught in the material being fed into the hopper. Wear protective hair covering to contain long hair.
General safety guidelines
- The machine must never be used if it is in any way damaged or malfunctioning. Never use an extension cable that is in any way damaged.
- The machine must only be used as described in this instruction manual.
- Be careful to ensure that no foreign objects (stones, cans, pieces of metal, etc) are fed into the hopper by accident.
- Never work in dark or poor light conditions.
- Make sure that you are standing steady and well balanced when using the machine.
-
Never leave the machine unattended when it is connected to the power supply.
-
Always switch the machine off and disconnect it from the power supply before moving it to a new location.
- Never operate the machine in the rain. Do not expose the machine to rain.
- Always keep other people at a safe distance from the work area, especially whilst operating the machine. Children and animals should not be allowed in the work area.
- Check regularly for damage and that all screws are tight.
- The machine should only be connected to a 220–240 V, 50/60 Hz mains outlet protected by a 30 mA residual current device (RCD).
- Any extension cables used must be suitable for outdoor use and have a rating of at least H07RN-F and a minimum conductor cross-sectional area of 1.5 ~mm^2 (e.g. a 3G1.5 mm² cable). If the extension lead has too small a conductor cross sectional area the machine's performance will be reduced considerably. For leads under 25 m in length a minimum conductor cross-sectional area of 1.5 ~mm^2 is required, for cables over 25 m in length the cross-sectional area must be at least 2.5 ~mm^2 .
- If the machine should start making any unusual noise or vibration, immediately switch off, allow the cutter to stop, unplug the machine. Investigate the cause of the problem and remedy it before operating the machine again.
- The machine should only be repaired by qualified service technicians using original replacement parts.
Safety symbols
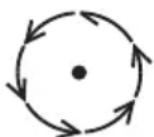
STOP
Caution: Set the power switch to 0 and remove the cable from the machine. Ensure that the blades have stopped completely before servicing, transporting, etc.
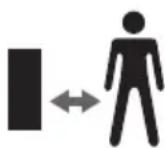
Caution: Ensure that the safety area is of adequate size.
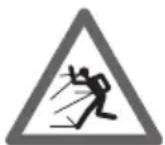
Caution: There is a risk of material being thrown forcefully from the machine during use. Make sure that bystanders and pets are removed from the work area.

Caution: Protect the machine against moisture an do not expose it to rain.

Warning! Always wear safety glasses and ear defenders.

Warning! Read through the entire instruction manual and follow all warnings and safety guidelines. Keep the instruction manual accessible for future reference.
Caution: Rotating blades. Keep hands and feet away from the intake opening and output chute.
Note: The blades continue to rotate a short while after the machine has been turned off.
Warning! Make sure that you have read and understood the entire instruction manual before connecting the machine to the power supply.
Always wear safety gloves.
Always unplug the machine if its mains lead is damaged in any way.
Product description
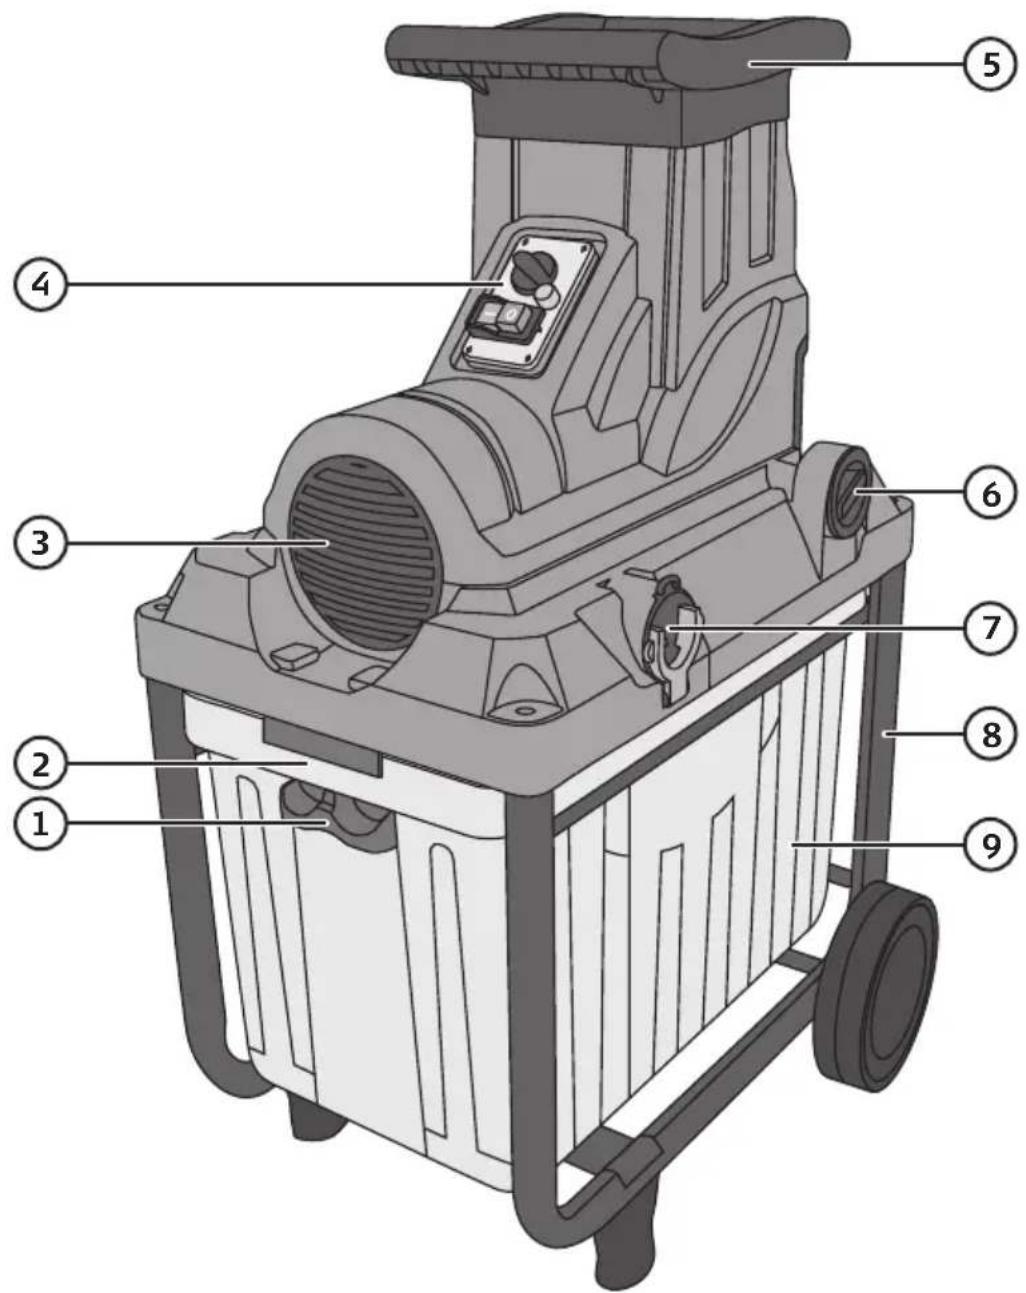
- Chip collector release catch/safety cut-off
- Handle
- Motor housing ventilation slots
- Control panel
- Hopper
- Anvil plate adjustment screw
- Power lead socket
- Stand
- Collector
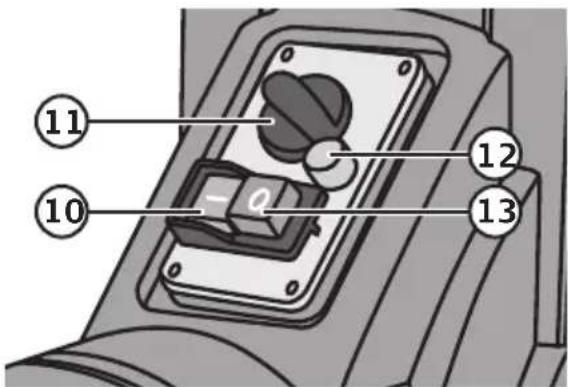
Control panel
- [I] On switch
- Rotation direction selector
- Overload protection reset button
- [O] Off switch
Assembly
Note: The garden shredder is heavy, you may need assistance when lifting it out of the box and assembling it.
natural_image
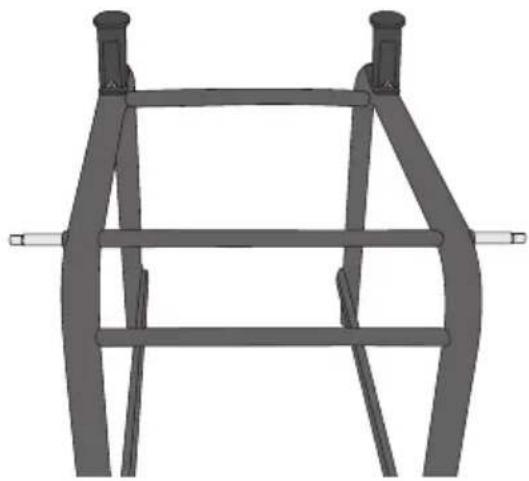
3D rendering of a simple metal frame structure with two vertical posts and horizontal supports (no text or symbols)- Turn the stand upside down and slide the wheel axle into the axle tube.
natural_image
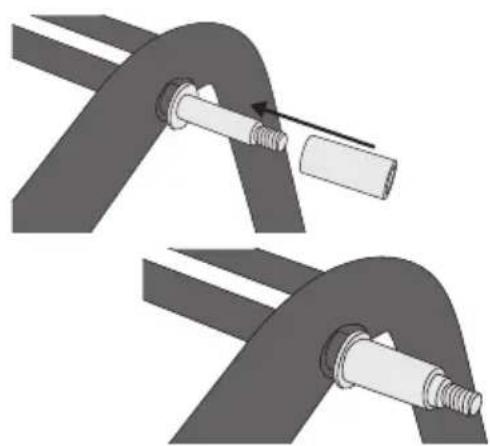
Two diagrams showing mechanical assembly steps with a tool and a cylindrical component (no text or symbols)- Fit a washer and a wheel bearing onto each end of the axle.
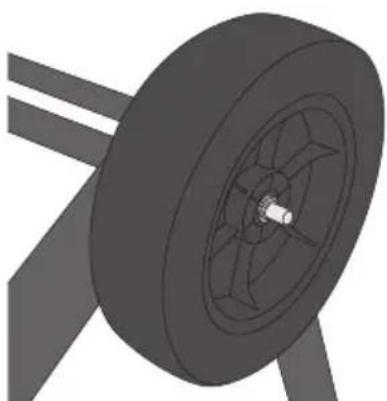
natural_image
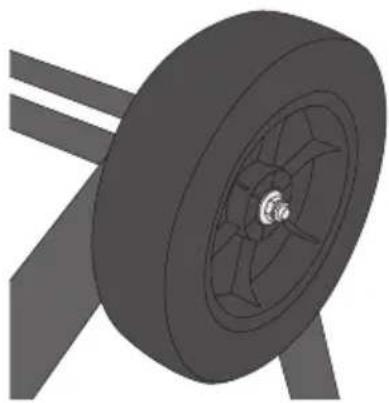
3D rendering of a wheel with spokes and a central hub, mounted on a support frame (no text or symbols visible)- Fit the wheels onto the axle, making sure to face them as shown.
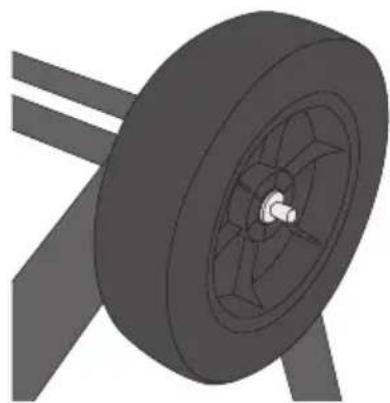
natural_image
3D rendered mechanical component with a wheel and shaft (no text or symbols)- Fit a washer on the outside of each wheel.
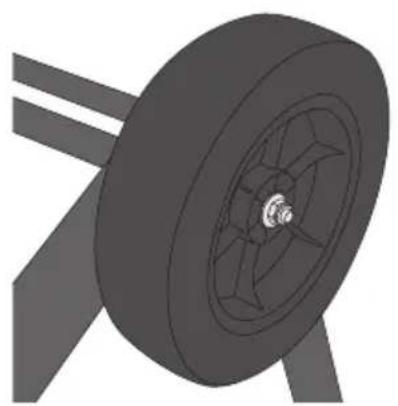
natural_image
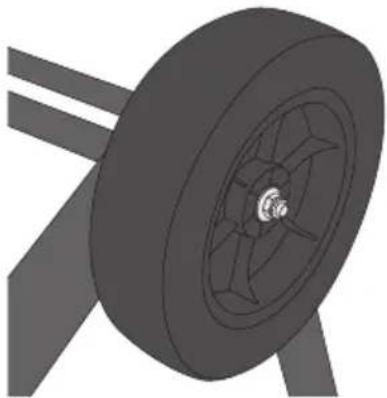
3D rendering of a wheel with spokes and a small circular component, mounted on a support frame (no text or symbols visible)- Secure the wheels in place with the nuts.
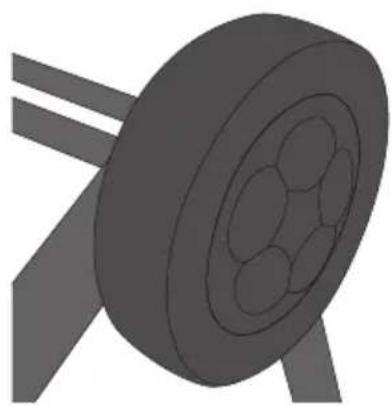
natural_image
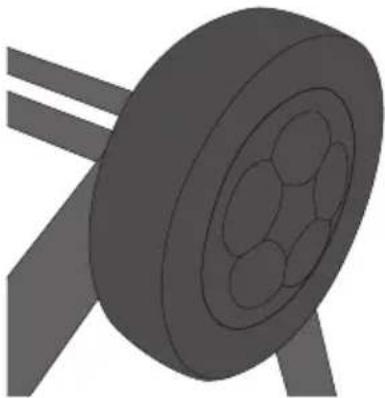
3D rendered diagram of a mechanical component with cylindrical and linear features (no text or symbols)- Fit the hub caps.
natural_image
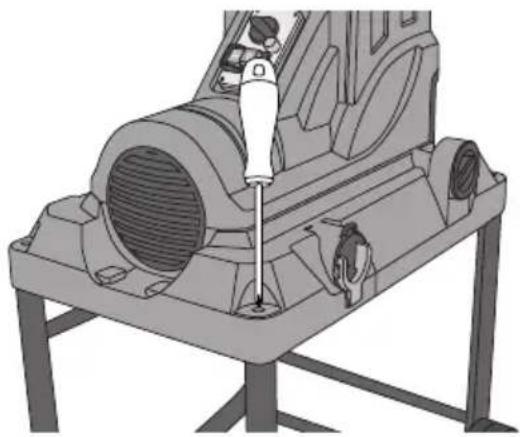
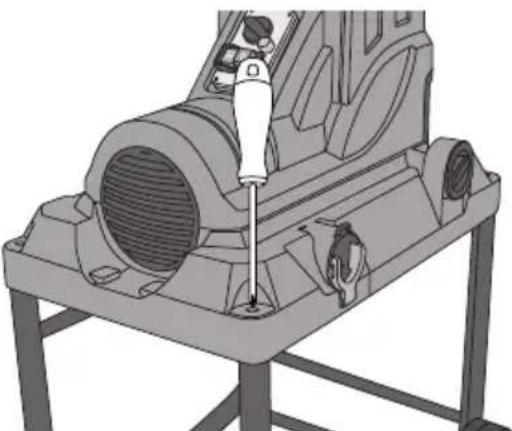
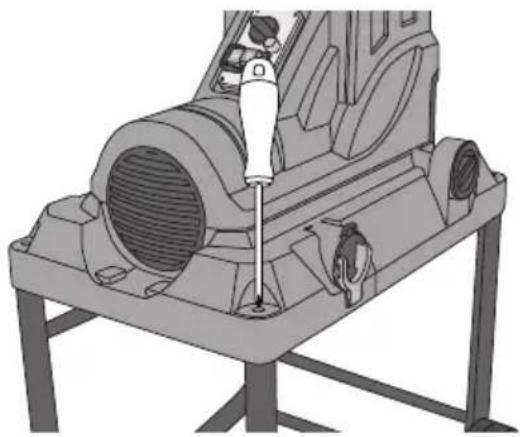
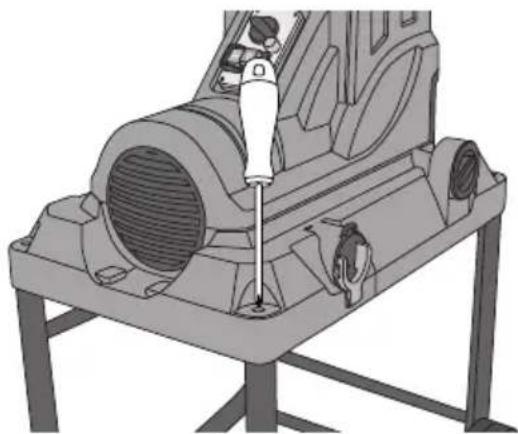
Technical illustration of a mechanical device with a central tool and mounting base (no text or symbols)- Turn the stand the right way up and place the shredder onto it. Fasten the shredder to the with a screw in each of the four corners.
natural_image
Illustration of a trash bin with an arrow indicating direction (no text or symbols present)-
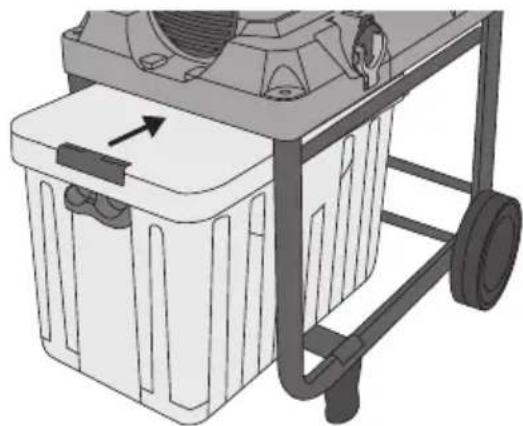
Slide the collector box into place under the shredder.
-
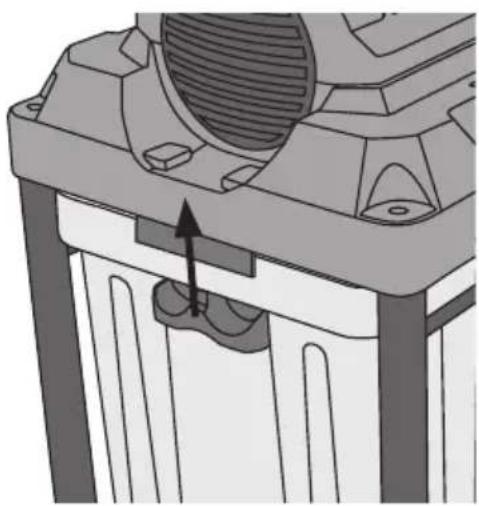
Lock the collector onto the shredder by pushing up the release catch (1). Note: The release catch must be all the way up for the shredder to start.
natural_image
Mechanical component diagram showing a piston-like structure with an arrow indicating force or movement (no text or symbols present)Operating instructions
Note: The machine is only designed for shredding biodegradable garden waste such as twigs and branches from bushes, hedges and small trees. The machine must not be used for processing earth-covered roots, stones, metal, glass, fabric, paper or plastic bags. Neither should the shredder be used for material that does not have a firm consistency, e.g. kitchen waste.
Rated voltage
The machine should only be connected to a 220–240 V, 50/60 Hz mains outlet protected by a 30 mA residual current device (RCD).
Switching the machine on/off
Note: The shredder is fitted with a no-volt release switch which prevents the machine from automatically starting again after a power cut.
- Press [1] to switch the shredder on.
- Press [O] to switch the shredder off.
Rotation direction selector
The direction selector (11) can be used to release or back out twigs or other debris which has stuck in the shredder. Note: The selector switch must only be turned when the shredder is switched off and the blade drum has stopped rotating.
- Set the selector to for normal operation.
- Switch the shredder off, wait until the blade drum has stopped rotating and set the selector to . Hold in [1] to start the shredder, [1] will spring back out. The blade drum will rotate in reverse for as long as the switch is held in. This will enable any material which has fastened in the hopper to be freed and pulled out.
Motor overload cut-out
-
If the shredder is overloaded, e.g. the blade drum is jammed; the motor will automatically stop after a few seconds. The overload cut-out protection switch automatically cuts off the power supply to the motor. Wait at least 1 minute to give the motor time to cool before pressing the reset button (12).
-
Then press [I] to start the shredder again.
Adjusting the anvil plate
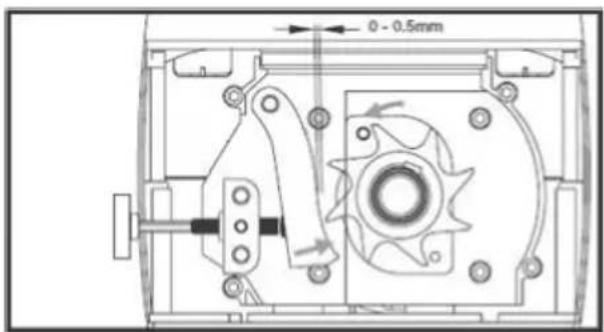
The cutting mechanism consists of a rotating blade drum and an anvil plate which the blades on the drum strike against. For optimum results the distance between the blades on the drum and the anvil plate should be 0–0.5 mm. The distance is pre-set by the manufacturer and should not need to be adjusted before the shredder is used for the first time. After some use, the anvil plate will need to be adjusted in order for the shredder to work effectively. This is done as follows:
-
Set the direction selector (11) to for normal operation. Start the shredder. Turn the adjustment screw (6) slowly and carefully (half a turn moves the anvil about 0.5mm ) clockwise until a scraping sound is heard.
-
The gap between the blades and the anvil plate is now at 0 mm and is set for optimum shredding.
General advice
• Make sure that you have read and understood the entire instruction manual before using the machine.
- Wear protective eyewear, hearing protection, protective gloves and sturdy workwear.
• Use preferably a helmet with a visor.
- Warning: If long objects are placed into the machine there is a risk that the material will begin to whip. Keep a safe distance.
- Feed the material to be shredded into the right-hand side of the hopper, feeding in just the right amount of material so as not to clog the intake opening.
- Wilted or damp garden waste should be processed in alternating turns with dry branches to prevent clogging and jamming.
- Kitchen waste and soft materials must not be fed into the shredder.
- Let branches with lots of twigs and leaves feed all the way into the hopper before attempting to feed in any more material.
- Make sure to empty the collector box before it becomes full to prevent the material in the collector from hindering new material to pass through the cutter.
- Keep the motor housing ventilation slots (3) free from debris.
Care and storage
- Disconnect the shredder from the mains before carrying out any servicing or cleaning operations.
- Clean the exterior of the shredder using a damp cloth. Use only mild cleaning agents, never solvents or corrosive chemicals.
- Never wash the shredder using a pressure washer or hosepipe. Water may under no circumstances get into the machine.
- Disconnect the shredder from the mains and store it in a dry and dust-free area and out of the reach of children whenever it is not to be used for an extended period.
Troubleshooting guide
| The shredder doesn’t start. | Is the extension lead intact and securely connected to both the wall socket and the shredder?Is the wall socket live? Check the RCD.Has the motor overload cut-out tripped?See theMotor overload cut-outsection above for instructions about resetting it.Check that the chip collector release catch is all the way up. |
| The material in the hopper is not feeding down. | Check that the blade drum is rotating in the right direction (refer toRotation direction selector above).The collector box might be full, empty it. |
| The material fed in is not shredded finely enough. | Adjust the anvil plate. Refer to theAdjusting the anvil plate section above. |
Responsible disposal
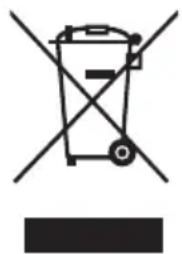
This symbol indicates that this product should not be disposed of with general household waste. This applies throughout the entire EU. In order to prevent any harm to the environment or health hazards caused by incorrect waste disposal, the product must be handed in for recycling so that the material can be disposed of in a responsible manner. When recycling your product, take it to your local collection facility or contact the place of purchase. They will ensure that the product is disposed of in an environmentally sound manner.
natural_image
Symbol of a trash bin crossed with no visible text or labelsSpecifications
Rated voltage 220–240 V AC, 50/60 Hz
Power 2800 W
Collector box 45 |
Max no-load speed 46 rpm
Cutting capacity 45 mm
Noise emission LpA: 84 dB(A), K = 3 dB(A)
LwA: 92 dB(A), K = 3 dB(A)
Size 56 × 46 × 90 cm
Weight 25.6 kg
Kompostkvarn
Art.nr 18-4735 Modell SHB2800-UK
31-9157 SHB2800
Montering
natural_image
3D rendering of a metal frame structure with two vertical posts and horizontal supports (no text or symbols)natural_image
Two diagrams showing a mechanical assembly with a tool inserted into a component, no text or symbols present.natural_image
3D rendering of a wheel with visible blades and central hub, mounted on a support frame (no text or symbols)natural_image
3D rendering of a wheel with a central hub and two legs, no text or symbols visible- Montera brickor.
natural_image
3D rendered mechanical component with a wheel and shaft, no visible text or symbols- Dra fast hjulen med muttrarna.
natural_image
3D rendered diagram of a cable with multiple grooves and shafts (no text or symbols)- Montera navkapslarna.
natural_image
Technical illustration of a mechanical device with a central shaft and mounting base (no text or symbols visible)natural_image
Illustration of a trash bin with an arrow indicating direction, no text or symbols presentnatural_image
Mechanical component diagram showing a piston-like structure with an arrow indicating force or movement (no text or symbols present)Användning
Användningsråd
natural_image
Symbol of a trash bin with no visible text or labelsSpecifikationer
Nätanslutning 230–240 V AC, 50 Hz
Effekt 2800 W
Behållare 45 l
Max varvtal obelastad 46 min -1
Max grendiameter 45 mm
Ljud LpA: 84 dB(A), K = 3 dB(A)
LwA: 92 dB(A), K = 3 dB(A)
Mått 56 × 46 × 90 cm
Vikt 25,6 kg
Kompostkvern
Art.nr. 18-4735 Modell SHB2800-UK
31-9157 SHB2800
Les brukerveiledningen grundig før produktet tas i bruk, og ta vare på den for framtidig bruk. Vi reserverer oss mot eventuelle feil i tekst og bilder, samt endringer av tekniske data. Ved tekniske problemer eller spørsmål, ta kontakt med vårt kundesenter.
(Se opplysninger på baksiden).
Sikkerhet
Advarsel! Les bruksanvisningen grundig og følg aller varslings- og sikkerhetsanvisninger. Ta vare på bruksanvisningen på en slik måte at den er tilgjengelig i framtiden.
Montering
natural_image
3D rendered diagram of a ladder structure with two vertical posts and horizontal bars (no text or symbols)natural_image
Two-step diagram showing a mechanical assembly with threaded components and a shaft, no text or symbols present.- Monter skiver og lagerhylsene til hjulene.
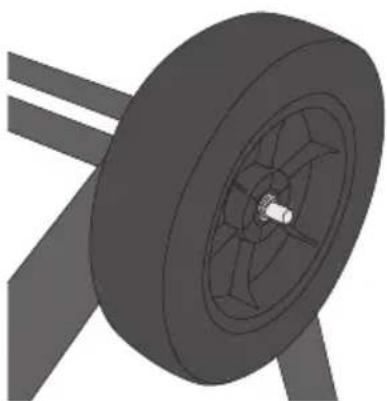
natural_image
3D rendering of a wheel with spokes and a small central hub, mounted on a support frame (no text or symbols visible)natural_image
3D rendering of a wheel with a small central hub and two vertical supports (no text or symbols)- Montere skivene.
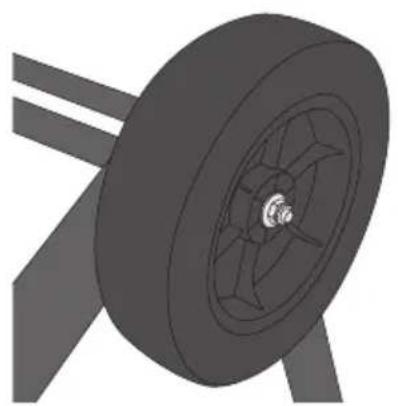
natural_image
3D rendering of a wheel with spokes and a central hub, mounted on a support frame (no text or symbols visible)- Dra til mutrene så hjulene blir godt festet.
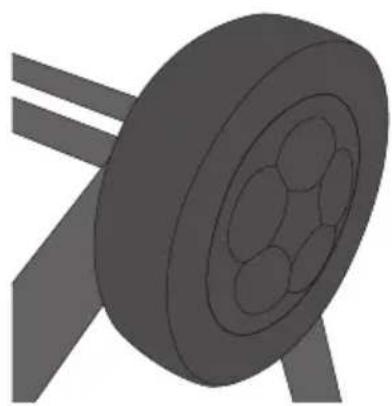
natural_image
3D rendering of a mechanical component with concentric circular holes and two vertical rods (no text or symbols)- Montere navkapslene.
natural_image
Technical illustration of a mechanical device with a central lever and mounting base (no text or symbols)natural_image
Illustration of a trash bin with an arrow indicating direction, no text or symbols presentnatural_image
Mechanical component diagram showing a piston-like structure with an arrow indicating force or movement (no text or symbols present)Bruk
Brukertips
natural_image
Symbol of a trash bin crossed out by two crossed lines, with no text or labels present.Spesifikasjoner
Nettspenning 220–240 V AC, 50/60 Hz
Effekt 2800 W
Asennus
natural_image
3D rendering of a simple metal frame structure with two vertical posts and horizontal bars (no text or symbols)natural_image
Two diagrams showing mechanical assembly steps with a tool inserted into a component (no text or symbols present)natural_image
3D rendering of a wheel with spokes and central hub, no text or symbols visiblenatural_image
3D rendering of a wheel with a central hub and two legs, no text or symbols visible- Asenna aluslaatat.
natural_image
3D rendered mechanical component with a central wheel and flanged arms (no text or symbols visible)natural_image
3D rendering of a mechanical component with circular grooves and two vertical rods (no text or symbols)- Asenna pölykapselit.
natural_image
Technical illustration of a mechanical device with a tool inserted, no visible text or symbolsnatural_image
Illustration of a trash bin with an arrow indicating direction, no text or symbols presentnatural_image
Mechanical component diagram showing a piston-like structure with an arrow indicating force or movement (no text or symbols present)Käyttö
Käyttövinkkejä
natural_image
Symbol of a trash bin crossed with no visible text or labelsTekniset tiedot
Montage
natural_image
3D rendering of a simple metal ladder structure with two vertical posts and horizontal bars (no text or symbols)natural_image
Two-step diagram showing a mechanical assembly with a threaded component being inserted, no text or symbols present.natural_image
3D rendering of a wheel with spokes and central hub, no text or symbols visiblenatural_image
3D rendering of a wheel with a small central hub and two vertical supports (no text or symbols)natural_image
3D rendering of a wheel with spokes and a central hub, mounted on a support frame (no text or symbols visible)natural_image
3D rendering of a mechanical component with concentric circular holes and two vertical rods (no text or symbols)natural_image
Technical illustration of a mechanical device with a central lever and mounting base (no text or symbols)natural_image
Illustration of a trash bin with an arrow indicating direction, no text or symbols presentnatural_image
Mechanical component diagram showing a piston-like structure with an arrow indicating force or movement (no text or symbols present)Gebrauch
natural_image
Symbol of a trash bin crossed with no text or labels, accompanied by a solid black rectangle below (no text or symbols present)Technische Daten
Declaration of Conformity
Declares that this product complies with the requirements of the following directives and standards
Machinery directive 2006/42/EC
EMC directive 2014/30/EU
Low voltage directive 2014/35/EU
EN 50434:2014 EN 55
14-1:2006+A1+A2
EN 55014-2: 2015
EN 61000-3-2: 2014
EN 61000-3-11:2000
EN 60335-1:2012
+A11:2014
AFPS GS 2014:01 PAK
Henrik Alfredsson
Manager Technique & Quality
Insjön, Sweden, 2016-10-04
Sverige
Postal 10 - 13 Market Place
Kingston Upon Thames
Surrey
KT1 1JZ
Deutschland
Kundenservice Hotline: 040 2999 78111
E-Mail: kundenservice@clasohlson.de
Homepage
www.clasohlson.de
- Important!
- Viktig information:
- Safety
- General safety guidelines
- Safety symbols
- Product description
- Control panel
- Assembly
- Operating instructions
- Rated voltage
- Switching the machine on/off
- Rotation direction selector
- Motor overload cut-out
- Adjusting the anvil plate
- General advice
- Care and storage
- Troubleshooting guide
- Responsible disposal
- Specifications
- Kompostkvarn
- Montering
- Användning
- Användningsråd
- Specifikationer
- Kompostkvern
- Sikkerhet
- Bruk
- Brukertips
- Spesifikasjoner
- Asennus
- Käyttö
- Käyttövinkkejä
- Tekniset tiedot
- Montage
- Gebrauch
- Technische Daten
- Declaration of Conformity
- Sverige
- Deutschland
Brand : Cocraft
Model : HS 2800-C
Category : Garden shredder