
DV-RW250S - DVD player SHARP - Free user manual and instructions
Find the device manual for free DV-RW250S SHARP in PDF.

| Brand | SHARP |
| Model | DV-RW250S |
| Product type | VCR/DVD recorder combination |
| Dimensions (W × H × D) | 430 × 99 × 311.5 mm |
| Weight | 5.5 kg |
| Power supply | 230 V AC, 50 Hz |
| Power consumption | Operation: 28 W; Standby: 5.5 W |
| Signal system | PAL (NTSC playback via cassette with PAL/60 Hz) |
| Video heads (VCR) | 4 rotating heads |
| DVD recording formats | VR (DVD-Video Recording) and Video (DVD-VIDEO) |
| Recording discs | DVD-RW, DVD-R |
| Recording time (4.7 GB disc) | XP: ~60 min / SP: ~120 min / LP: ~240 min / SLP: ~360 min |
| Playable discs | DVD-Video, DVD-RW, DVD-R, Audio CD, CD-R, CD-RW, Video CD, SVCD, MP3, WMA, JPEG |
| DVD region | 2 |
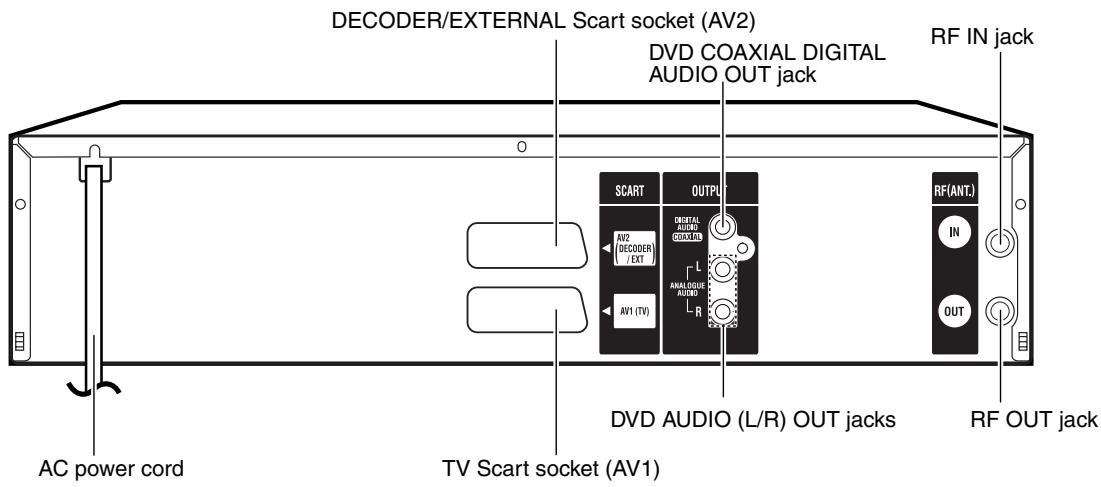
| Connections | SCART (AV1, AV2), analog audio L/R, digital coaxial audio, RF, front AV input (AV3) with S-Video |
| Main functions | Programmed recording (8 programs), OTR (one-touch recording), parental lock, finalization, title editing, playlist creation, cassette/DVD dubbing, zoom playback, multiple angles, subtitles, Spatializer N-2-2 (virtual surround) |
| Maintenance and cleaning | Manual cleaning of video heads with cleaning cassette if snowy image; disc cleaning with soft cloth from center to edges |
| Safety | Protection against playback of inappropriate discs (parental control), disc protection against erasure (VR mode), automatic shutdown in case of overload |
| Spare parts and repairability | Repair only by qualified technician; no spare parts provided in the manual |
| General information | Combined VCR/DVD unit with built-in TV tuner (80 channels), compatible with NICAM Hi-Fi stereo |
Frequently Asked Questions - DV-RW250S SHARP
User questions about DV-RW250S SHARP
0 question about this device. Answer the ones you know or ask your own.
Ask a new question about this device
Download the instructions for your DVD player in PDF format for free! Find your manual DV-RW250S - SHARP and take your electronic device back in hand. On this page are published all the documents necessary for the use of your device. DV-RW250S by SHARP.
USER MANUAL DV-RW250S SHARP
• The region number for this recorder is 2

natural_image
Black-and-white collage of urban scenes including historic buildings, a girl in straw hat, a building at night, and the Pyre pyr (no visible text or symbols)This apparatus complies with the requirements of Council Directives 89/336/EEC and 73/23/EEC as amended by Council Directive 93/68/EEC.
Dieses Gerät entspricht den Anforderungen der EG-Richtlinien 89/336/EWG und 73/23/EWG mit Änderung 93/68/EWG.
Ce matériel répond aux exigences contenues dans les directives 89/336/CEE et 73/23/CEE modifiées par la directive 93/68/CEE.
Dit apparaat voldoet aan de eisen van de richtlijnen 89/336/EEG en 73/23/EEG, gewijzigd door 93/68/EEG.
Dette udstyr overholder kravene i direktiv nr. 89/336/EEC og 73/23/EEC med tillæg nr. 93/68/EEC.
Quest'apparecchio è conforme ai requisiti delle direttive 89/336/EEC e 73/23/EEC, come emendata dalla direttiva 93/68/EEC.
Αυτή η συσκευή συμμορφώνεται με τις απαιτήσεις των οδηγιών του Συμβουλίου 89/336/ΕΟΚ και 73/23/ΕΟΚ όπως τροποποιήθηκαν από την οδηγία του Συμβουλίου 93/68/ΕΟΚ.
Este equipamento obedece às exigências das directivas 89/336/CEE e 73/23/CEE, na sua versão corrigida pela directiva 93/68/CEE.
Este aparato satisface las exigencias de las Directivas 89/336/CEE y 73/23/CEE, modificadas por medio de la 93/68/CEE.
Denna utrustning uppfyller kraven enligt riktlinjerna 89/336/EEC och 73/23/EEC så som kompletteras av 93/68/EEC.
Dette produktet oppfyller betingelsene i direktivene 89/336/EEC og 73/23/EEC i endringen 93/68/EEC.
Tämä laite täyttää direktiivien 89/336/EEC ja 73/23/EEC vaatimukset, joita on muutettu direktiivillä 93/68/EEC.
Bu cihaz Konsey Direktifi 93/68/EEC tarafından düzeltilen 89/336/EEC ve 73/23/EEC Konsey Direktiflerinin gerekliliklerine uygundur.
Tento prístroj je v souladu s požadavky směrnic rady 89/336/EEC a 73/23/EEC, tak jak byly upraveny směrnici rady 93/68/EEC.
See seade on vastavuses Nõukogu Direktiivis nr 89/336/EEC ja 73/23/EEC esitatud nõuetega, vastavalt Nõukogu Direktiivis nr 93/68/EEC esitatud parandustele
Ez a készülék megfelel a Tanács által kiadott, 89/336/EGK és 73/23/EGK Irányelveknek és az utóbbit módosító 93/68/EGK Irányelvnek
Ši ierice atbilst tehniskam prasibam pec 89/336/EEC un 73/23/EEC direktivam papildinats ar direktivu 93/68/EEC.
Šis prietaisas atitinka ES Tarybos direktyvu 89/336/EEC ir 73/23/EEC patikslintos direktyvos 93/68/EEC reikalavimus.
To urządzenie spełnia wymagania dyrektyw 89/336/EEC i 73/23/EEC wraz z poprawkami dyrektywy 93/68/EEC.
Tento prístroj je v súlade s požiadavkami smerníc rady 89/336/EEC a 73/23/EEC tak ako boli upravené smernicou rady 93/68/EEC.
Ta aparat je v skladu z zahtevami Direktiv Sveta 89/336/EEC in 73/23/EEC kot je navedeno v dopolnilu k Direktivi Sveta 93/68/EEC.
OPERATION MANUAL ENGLISH
SAFETY INFORMATION
Note:
This VCR/DVD can be used only where the power supply is AC 230V, 50Hz. It cannot be used elsewhere.
CAUTION:
USE OF CONTROLS OR ADJUSTMENTS OR PERFORMANCE OF PROCEDURES OTHER THAN THOSE SPECIFIED HEREIN MAY RESULT IN HAZARDOUS RADIATION EXPOSURE.
AS THE LASER BEAM USED IN THIS VCR/DVD IS HARMFUL TO THE EYES, DO NOT ATTEMPT TO DISASSEMBLE THE CABINET. REFER SERVICING TO QUALIFIED PERSONNEL ONLY.
WARNING:
TO REDUCE THE RISK OF FIRE OR ELECTRIC SHOCK, DO NOT EXPOSE THIS EQUIPMENT TO RAIN OR MOISTURE.
TO REDUCE THE RISK OF FIRE OR ELECTRIC SHOCK, AND ANNOYING INTERFERENCE, USE THE RECOMMENDED ACCESSORIES ONLY.
Laser Diode Properties
Material: DVD: GaAs
CD: GaAs
Wave length: DVD: 660nm
CD: 780nm
Emission Duration: DVD: Pulse
CD: Continuous
Laser output: Max. DVD: 120mW
CD: 8.5mW
Power Cord Protection
To avoid any malfunctions of the VCR/DVD, and to protect against electric shock, fire or personal injury, please observe the following.
- Hold the plug firmly when connecting or disconnecting the AC power cord.
- Keep the AC power cord away from heating appliances.
- Never put any heavy object on the AC power cord.
- Do not attempt to repair or reconstruct the AC power cord in any way.
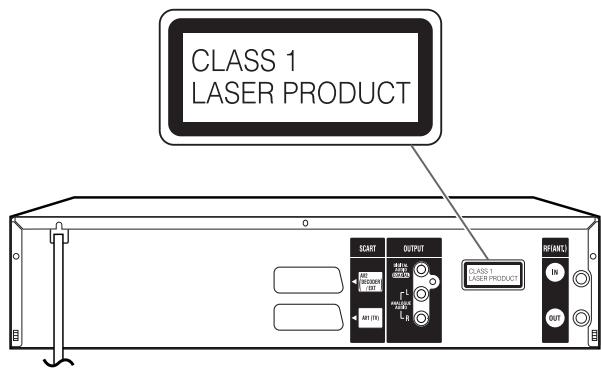
- This Player is classified as a CLASS 1 LASER product.
- The CLASS 1 LASER PRODUCT label is located on the rear cover.
- This product contains a low power laser device. To ensure continued safety do not remove any cover or attempt to gain access to the inside of the product.
Refer all servicing to qualified personnel.
Before using your unit
SAFETY INFORMATION ....1
Precautions 4
Accessories 5
Features 6
Disc 7
Handling discs 7
Discs which can be played back 7
Discs on which video can be recorded 8
Recording format 8
Disc playback in other players 9
Parts and functions ...... 10
Front 10
Rear 10
Display window 11
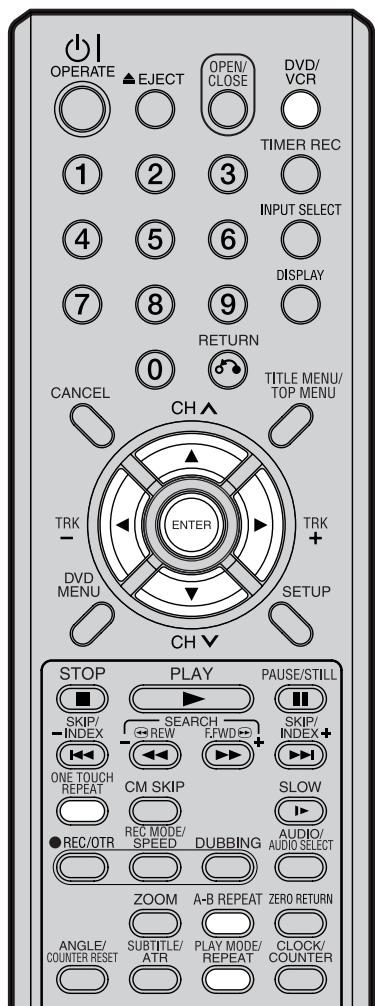
Remote control 12
Basic connections 14
Playback connection 15
Various settings
SETUP MENU....17
Using the SETUP MENU 17
Setting the language 18
OSD LANGUAGE 18
DVD MENU 18
AUDIO 18
SUBTITLE....18
Setting the parental control 19
Selecting parental control 19
Temporarily cancelling parental control 19
Setting the clock 20
Setting the disc 20
REFORMAT 20
NEW DISC FORMAT 21
FINALISE 21
PROTECT DISC 21
UNDO FINALISE 21
Other (SYSTEM SETUP) 22
DIMMER (Brightness of the display window) .....22
DISPLAY/CALL (Turning the screen display "ON" or "OFF") 22
Setting the screen 22
TV SCREEN 22
STILL MODE 23
Setting the audio 24
DRC 24
VIRTUAL SURROUND (Spatializer N-2-2TM) ...... 24
EXTERNAL AUDIO INPUT 24
NICAM 24
DOLBY DIGITAL OUTPUT 24
Setting the recording 24
INITIAL REC TO 24
INITIAL REC MODE 24
AUTO CHAPTER 25
INDEX PICTURE 25
BILINGUAL RECORDING 25
Setting the JPEG INTERVAL 25
JPEG INTERVAL 25
Setting the channel 26
Automatic station presetting 26
To skip a channel position 26
DECODER ON/OFF 26
Replace TV station positions 27
Manual TV station presetting 27
Disc playback
Playback procedure 28
Playback by selecting a title 29
Checking media information 30
Special playback 31
Fast forward playback 31
Review playback 31
Still playback 31
Frame advance 31
Slow motion playback 31
Locating a chapter or track 31
Commercial skip 32
Locating a specific scene 32
Repeat playback 33
One touch repeat 33
A-B repeat playback 33
Title, Chapter repeat playback 33
Title selection 34
DVD menu 34
Changing angles 35
Zooming 35
Changing soundtrack language 36
Subtitles 36
Various operations on CD 37
MP3/WMA/JPEG playback 39
Tape playback
Loading and unloading a cassette tape 42
Cassette tape playback 43
Special playback 44
Picture search 44
Still picture 44
Slow motion 44
Frame by Frame picture 44
Adjusting tracking condition 44
Repeat playback 44
Commercial skip 44
To display VCR operation status 44
ZERO RETURN function 45
Video index search system 45
Recording
Read this before recording on disc 46
Types of disc 46
Recording modes 46
Disc remaining time 47
Images that cannot be recorded 47
Recording a TV program 48
One-touch Timer Recording (OTR) 50
Timer recording 51
Stereo recording and playback 54
Editing the disc
Editing the disc 55
Editing a playlist 56
Creating a playlist 56
Changing a title name 57
Erasing a scene (Edit title) 58
Combining the title 60
Erasing a playlist....61
Editing an original title 62
Adding a chapter mark 62
Combining chapters 63
Changing an original title name 64
Erasing a scene (Edit title) 65
Erasing an original title 66
Changing a disc name 67
Changing a disc name 67
Using the keyboard screen 68
Dubbing
Dubbing a tape onto a disc 70
Dubbing a disc onto a tape 71
Dubbing using other equipment 72
Additional information
Glossary 74
Language code list 76
Error/Warning message list 77
Problems and troubleshooting 78
Video head cleaning 79
Specifications 80
Media mark
Each applicable media are indicated using the symbol shown below.
| DVD-VIDEO : DVD-Video | DVD-R : DVD-R |
| DVD-RW VR : DVD-RW in VR mode | CD : Audio/Video CD and CD-R/CD-RW |
| DVD-RW Video : DVD-RW in Video mode | VCR : Video tape |
Important Warning
Please read this page carefully before attempting to operate your VCR/DVD.
Follow Instructions – All operating and maintenance instructions should be followed and warnings adhered to.
Cleaning – Unplug this product from the wall socket before cleaning. Do not use liquid or aerosol cleaners.
Accessories – Do not use accessories not recommended in this operation manual as they may be hazardous.
Water and Moisture – Hazard of electric shock – Do not use this product near water or in rainy/moist situations.
Placing or Moving – Do not place on an unstable cart, stand, tripod, bracket or table. The product may fall, causing serious injury to a child or adult, and serious damage to the product. A product and cart combination should be moved with care. Quick stops, excessive force, and uneven surfaces may cause the product and cart combination to overturn.
Power Cord Protection – Power cords should be routed so that they are not likely to be walked on or pinched by items placed upon or against them. Pay particular attention to plugs and the point from which the cords exit the product.
Lightning – For added protection of this product during a lightning storm, or when it is left unattended and unused for long periods of time, disconnect it from the wall socket. This will prevent damage to the product due to lightning and power-line surges.
Overloading – Do not overload wall sockets and extension cords as this can result in risk of fire or electric shock.
Objects and Liquid – Never allow objects of any kind or liquids to be pushed/spilled into this product through openings as they may come into contact with dangerous voltage or other hazards. Do not place any objects, such as vases or lighted candles on the product.
Servicing – Do not attempt to service this product yourself as opening or removing covers may expose you to dangerous voltage points or other hazards. Refer all servicing to qualified service personnel.
Damage Requiring Service – Disconnect this product from the wall socket and all power sources including batteries, and refer servicing to qualified service personnel under the following conditions:
a) When the power-supply cord or plug is damaged.
b) If any liquid has been spilled onto, or objects have fallen into the product.
c) If the product has been exposed to rain or water.
d) If the product does not operate normally even if you follow the operation manual. Adjust only those controls that are covered by the operation manual. Improper adjustment of other controls may result in damage and will often require extensive work by a qualified technician to restore the product to its normal operating condition.
e) If the product has been dropped or the cabinet has been damaged.
f) When the product exhibits a distinct change in performance. This indicates a need for service.
Replacement Parts – When replacement parts are required, be sure the service technician has used replacement parts that are specified or that have the same characteristics as the original part. Unauthorised substitutions may result in fire, electric shock or other hazards.
Safety Check – Upon completion of any service or repairs to this product, ask the service technician to perform safety checks to determine that the product is in safe operating order.
MOISTURE CONDENSATION - DO NOT OPERATE THIS VCR/DVD FOR AT LEAST TWO OR THREE HOURS WHEN MOISTURE IN THE AIR CONDENSES ON THE VCR/DVD.
WHAT IS MOISTURE CONDENSATION?
When cold liquid is poured into a glass, for example, water vapour in the air will condense on the surface of the glass. This is called moisture condensation.
MOISTURE WILL CONDENSE ON THE UNIT IN THE FOLLOWING CASES;
- When you move this VCR/DVD from a cold to a warm place.
• After heating a cold room or under extremely humid conditions.
WHEN YOU EXPERIENCE THE ABOVE CONDITIONS;
Plug the power cord into the wall socket, turn on the unit and leave at room temperature until moisture condensation disappears. Depending on the surrounding conditions, this may take from two or three hours.
Copyright
* Audio-visual material may consist of copyrighted works which must not be recorded without the authority of the owner of the copyright. Please refer to relevant laws in your country.
* This product incorporates copyright protection technology that is protected by method claims of certain U.S. patents and other intellectual property rights owned by Macrovision Corporation and other rights owners. Use of this copyright protection technology must be authorised by Macrovision Corporation and is intended for home and other limited viewing uses only unless otherwise authorised by Macrovision Corporation. Reverse engineering or disassembly is prohibited.
Apparatus Claims of U.S. Patent Nos. 4,631,603, 4,577,216, 4,819,098 and 4,907,093 licensed for limited viewing uses only.
* Manufactured under license from Dolby Laboratories. "Dolby" and the double-D symbol are trademarks of Dolby Laboratories.
* "DTS" and "DTS Digital Out" are trademarks of Digital Theater Systems, Inc.
* Unauthorised recording of copyrighted television programs, films, video cassettes and other materials may infringe the rights of copyright owners and be contrary to copyright laws.
* Certain audio features of this product manufactured under a license from Desper Products, Inc. Spatializer®, N-2-2™ and the circle-in-square device are trademarks owned by Desper Products, Inc.
Accessories
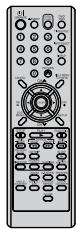
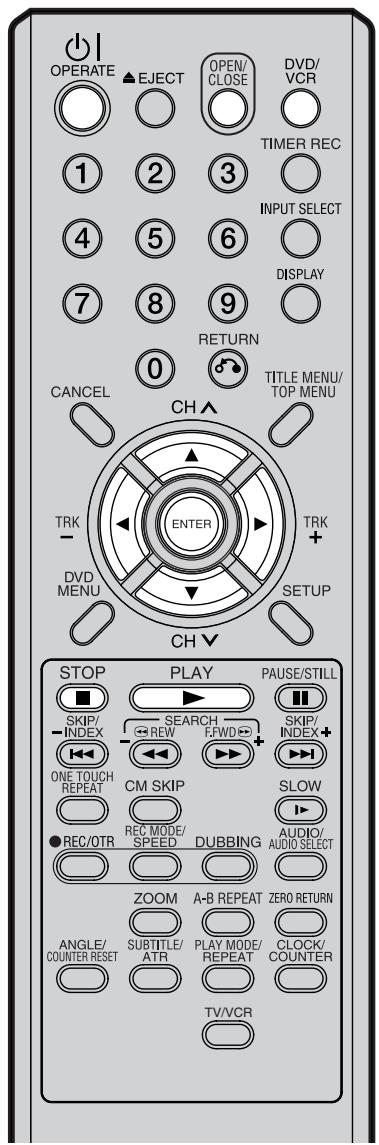
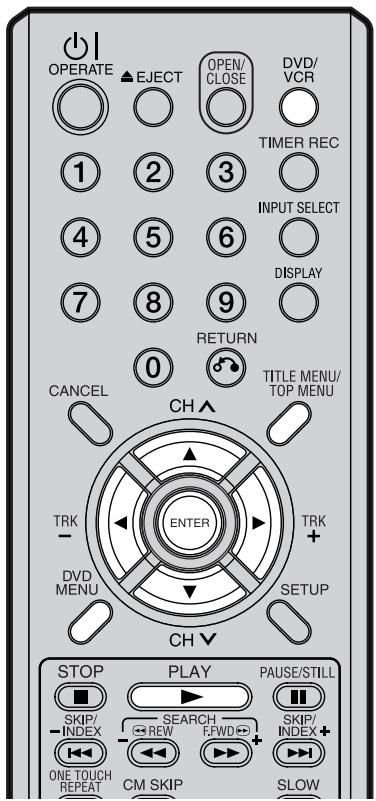
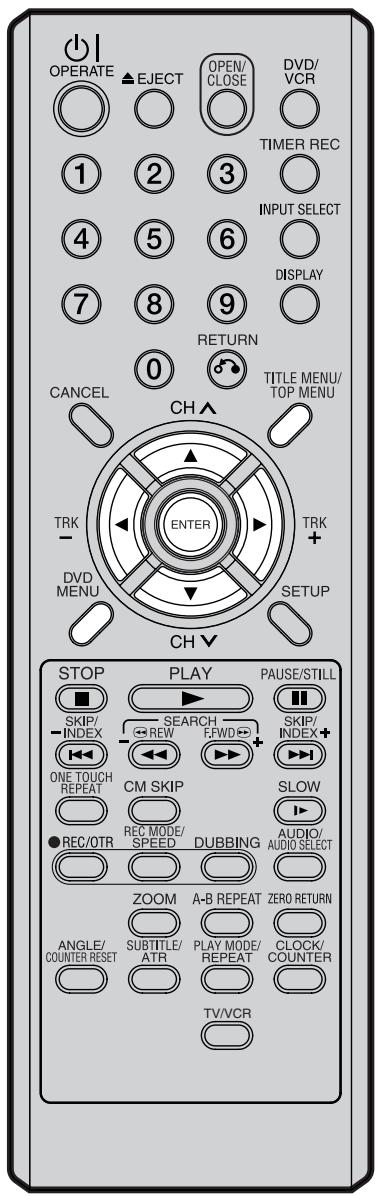
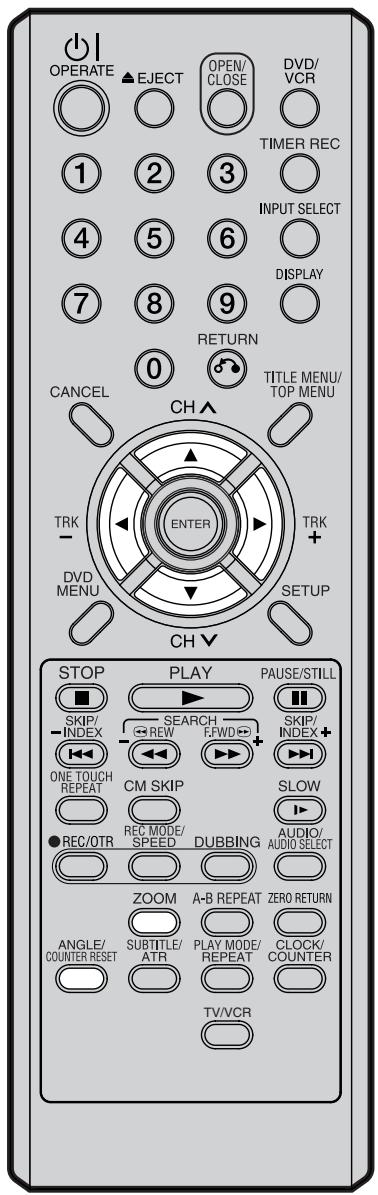
Remote control unit
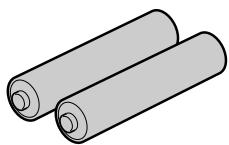
natural_image
Illustration of two cylindrical batteries (no text or symbols)Two R-03 ("AAA" size, UM/SUM-4, HP-16 or similar) size batteries for the remote control unit

21 pin scart cable
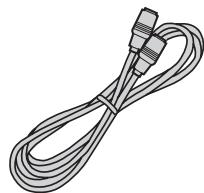
natural_image
Line drawing of a coiled cable with a connector (no text or symbols)75 ohm coaxial cable
Not only can you playback and record video tapes, but you can also playback DVD discs or make recordings using DVD-RW/DVD-R discs with this unit. In addition, you can edit the programs you have recorded.
Playback function
A realistic, powerful, Movie Theater sound

When connected to Dolby Digital and DTS compliant devices, you can enjoy realistic, powerful surround sound.
Playback the scene you want to see immediately

As DVDs do not require rewinding like video tapes, you can get to the scene you wish to watch immediately. A variety of search functions allow you to find the scene you wish to watch.
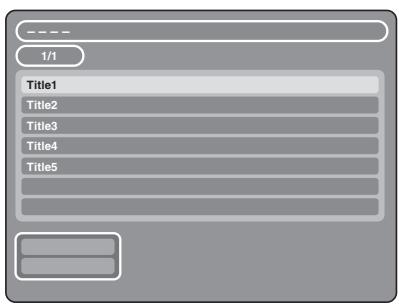
Title menu

As thumbnail images are displayed in the title menu, you can find the title you want to play back quickly.
- The title list appears on finalised DVD-RW disc (recorded in the Video mode) and DVD-R disc.
Video CD/SVCD and MP3/WMA/JPEG playback

Video CD/SVCD/MP3/WMA files can be played back. Also, you can display JPEG files on the TV screen and enjoy them as a slide show.
Recording function
Timer recording

The timer recording system allows you to select the date, time and channel and record the desired programs. Up to 8 timer programs within a month can be stored in this unit.
One-touch Timer Recording (OTR)

The One-touch Timer Recording feature provides a simple and convenient way to make a timed recording.
Edit function
Editing recorded material without changing the original titles

You can create a playlist based on the original titles. The playlist won't affect the original titles. If you erase the playlist, the original titles remain. It is recommended to create and edit the playlist to prevent important titles from being erased accidentally.
Chapter mark

You can add (or delete) a chapter mark to (from) the original title. This function is useful when searching for the scene you wish to watch that you have marked with the Chapter mark function.
Erasing scenes

You can erase an unnecessary scene from the created playlist or the original titles.
Combining titles

You can combine several original titles or playlists to a separate playlist.
Dubbing function
Dubbing a tape onto a disc or a disc onto a tape

With just this one unit, you can dub however you like, from video tape to disc, or from disc to video tape.
- Dubbing cannot be carried out when attempting to copy a “copy guarded” video tape or disc.
Handling discs
Removing the Disc from its case
Be sure to hold the disc by its edges. Do not touch the surface of the disc.
Take the disc carefully from its case.
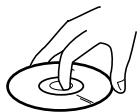
- Do not scratch the disc.
- Do not get dirt on the surface of the disc.
- Do not stick labels or adhesive tapes on the disc.
- Do not drop or bend the disc.
Storing discs
- Store the disc in the case to avoid any risk of scratches, dirt or damage.
- Do not leave the disc exposed to direct sunlight or in hot or humid places.
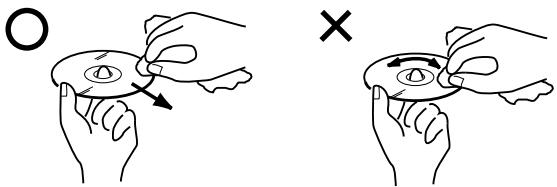
Cleaning discs
Wipe the disc with a clean, dry cloth from the center outward toward the edges.
- Do not wipe the disc in a circular motion around the center.
- Do not use liquid or aerosol cleaners.
Discs which can be played back
In this unit, use only discs that meet the standard, such as those bearing the below logo marks on the disc label surface. If you use a non-standard disc, we cannot guarantee playback. Even if such a disc can be played back, we cannot guarantee the image or sound quality. The DVD logo is a registered trademark.
| Media type | Logo mark |
| DVD-Video |  |
| DVD-RW Ver.1.0 Ver.1.1Ver.1.1CPRM supportVer.1.2CPRM support |  |
| DVD-R Ver.2.0 |  |
| Video CD/SVCD |  |
| Audio CD* |  |
| CD-R/CD-RW |  |
* This unit is designed to playback music Compact Discs (CD) that conform to the CD standard. CDs that contain (copy-restriction) signals to protect copyrights cannot be played back.
Region management information
This unit is designed and manufactured to support the region management information that is recorded on a DVD disc. If the region number written on the DVD disc does not correspond to the region number of this unit, this unit cannot play that disc.
- The region number of this unit is "2".
- The unit will play DVD-Video discs marked with labels containing "2" or "ALL".
Example:

Operating DVD-Video
- Some operations of DVD-Video may be prohibited by the manufacturer, or some operation methods or functions of the DVD-Video may be different from the description in this manual.
- If you attempt an operation that is prohibited by either the disc or the unit, a “💡” mark will appear on the TV monitor. For operations prohibited by the disc, see the information that came with the disc.
- When the menu screen or the operation guide appears during disc playback, follow the displayed information.
Discs which cannot be played back
The discs listed below cannot be played back in general. Even if one of these can be played back, it may not be played back correctly. If a disc is played back by mistake, extensively loud sounds may blow the speakers or may damage the hearing of those in hearing range. Do not playback the discs listed below.
CDG, Photo-CD, CD-ROM, CD-TEXT, CD-EXTRA, SACD, PD, DVD-ROM, DVD-RAM, DVD+R/RW, DVD audio, etc.
The following DVD-Video discs may not be played back on this unit:
- DVD-Video that do not have the region number "2" or "ALL".
- SECAM DVD-Video.
• Prohibited or business-use DVD-Video.
CD-R/CD-RWs cannot be played back for the following reasons.
- Compatibility of the disc and this unit.
- Compatibility of the disc and the recorder used.
- Unfinalised discs.
Do not playback the following discs. Playback of these discs may cause a failure.
• Discs on which paper, labels or stickers are affixed.
• Discs that have sticky areas left by adhesive tape.
- Special-shaped discs.
Discs on which video can be recorded
To record video with this unit, use the discs below:
| Media type | Logo mark |
| DVD-RW Ver.1.0 Ver.1.1Ver.1.1CPRM supportVer.1.2CPRM support |  |
| DVD-R Ver.2.0 |  |
DVD-RW
- The disc can be erased and used again about 1,000 times.
- Only the VR mode can be used for Ver.1.0 discs.
- With Ver.1.1 and later discs, you can record by selecting the VR mode or Video mode.
- When you record in the VR mode, you can repeatedly record and erase. By erasing unnecessary titles, you effectively increase remaining time.
- When you record in the Video mode, you can record until the disc becomes full.
- When you use the Video mode, you can newly record on the disc by formatting the disc. However, if the disc is formatted, all the recorded contents will be erased.
DVD-R
- You can record on the disc only in the Video mode.
- You can record until the disc becomes full.
- Finalising the discs allows playback on other DVD players. However, the finalised discs can no longer be recorded.
- Discs can be recorded to repeatedly until they are finalised.
NOTES:
- There are some players that cannot playback discs that were recorded with this unit. We cannot guarantee the playback with other units.
- This unit cannot record on DVD-R and DVD-RW discs that are 8 cm in diameter.
- This unit cannot record on CD-R or CD-RW.
Recording format
This unit has two modes for formatting discs for recording: VR mode and Video mode.
When a blank, new disc is loaded into this unit, the automatic format function starts to format the disc. (For the disc format setting in this step, see page 21.)
VR mode
• This mode can be used for DVD-RW.
- In this mode, the discs can be recorded and edited repeatedly.
- The disc recorded in this mode can be played back with other DVD-RW-compatible players.
- When a Ver.1.1 and later CPRM disc is used, you can record a "Copy Once" program (see page 47).
Video mode
- This mode can be used for DVD-R and DVD-RW (Ver.1.1 and later).
- When you finalise the disc after recording, the disc recorded with this unit can be played back with other DVD players.
- Recording, editing or playback of an unfinalised disc can be done only with this unit. However, there are some limitation to editing operations.
- In this mode, you cannot record a “Copy Once” program (see page 47).
- When you record a TV program of a bilingual broadcast, only one of the audio modes can be recorded. You have to select it.
Format modes that can be used with each disc
The usable format depends on the media type as shown in the below table.
| Media type | Format | Available functions |
| DVD-RW(Ver.1.0) | VR mode | Playback, recording and editing (Original/playlist) |
| DVD-RW(Ver.1.1 and later) | VR mode | Playback, recording and editing (Original/playlist) |
| Video mode | Playback and recording Editing (with limitation) | |
| DVD-R(Ver.2.0 and later) | Video mode | Playback and recording Editing (with limitation) |
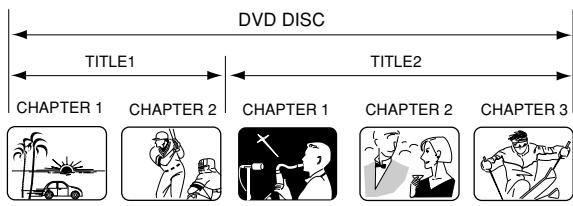
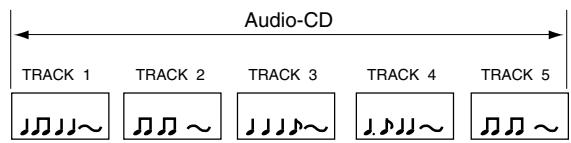
Title/Chapter/Track
A DVD-Video has large partitions called “Titles”, and smaller partitions within them called “Chapters”.
A music CD has other partitions called “Tracks”. A number is allotted to each partition and these numbers are called “title numbers”, “chapter numbers” or “track numbers”.
When recording in the VR mode
One-time recording is set to 1 title (1 chapter). However, if you stop recording temporarily or erase scenes by editing, the chapter will automatically be partitioned. The interval between chapters can be specified. (See page 25.)
When recording in the Video mode
One-time recording is set to 1 title. In recording, chapters are set automatically. The interval between chapters can be specified. (See page 25.)
NOTES:
- The title, chapter and track are numbered, but some discs may not record the numbers.
- Recording on DVD-R/RW in the Video mode is a new standard approved at the 2000 DVD forum. Conformity to this standard varies with each DVD player manufacturer. Some models of DVD player or DVD-ROM drive, therefore, will not playback recorded videos.
Disc playback in other players
A disc recorded in this unit can be finalised. The disc can be played back in other players that can playback DVD-RW and DVD-R.
For more information on finalisation, see “FINALISE” in “Setting the disc” (page 21).
When recording in the VR mode
Even if a disc recorded in the VR mode is finalised, you can record or edit by cancelling the finalisation. (See "UNDO FINALISE" on page 21.)
When you playback the disc with another player, make sure that the DVD player supports DVD-RW and bears the following mark.

When recording in the Video mode
When a disc recorded in the Video mode is finalised, it cannot be recorded onto any more. Therefore, before finalisation, be sure to perform all desired recording. After finalisation, a title list that can be used by the DVD player is automatically created.
NOTES:
- The finalisation process may require from a few minutes up to 1 hour depending on the disc type and the amount of free space on the disc.
- A DVD-RW Ver.1.1 recorded in the Video mode cannot be recorded or edited after finalisation, but if you format the disc by erasing all the content, you can again record on this disc.
- A finalised disc may not play because of the condition of the DVD or the compatibility with the player used for playback.
- Some players may not playback the discs recorded with this unit. We cannot guarantee the playback using other players.
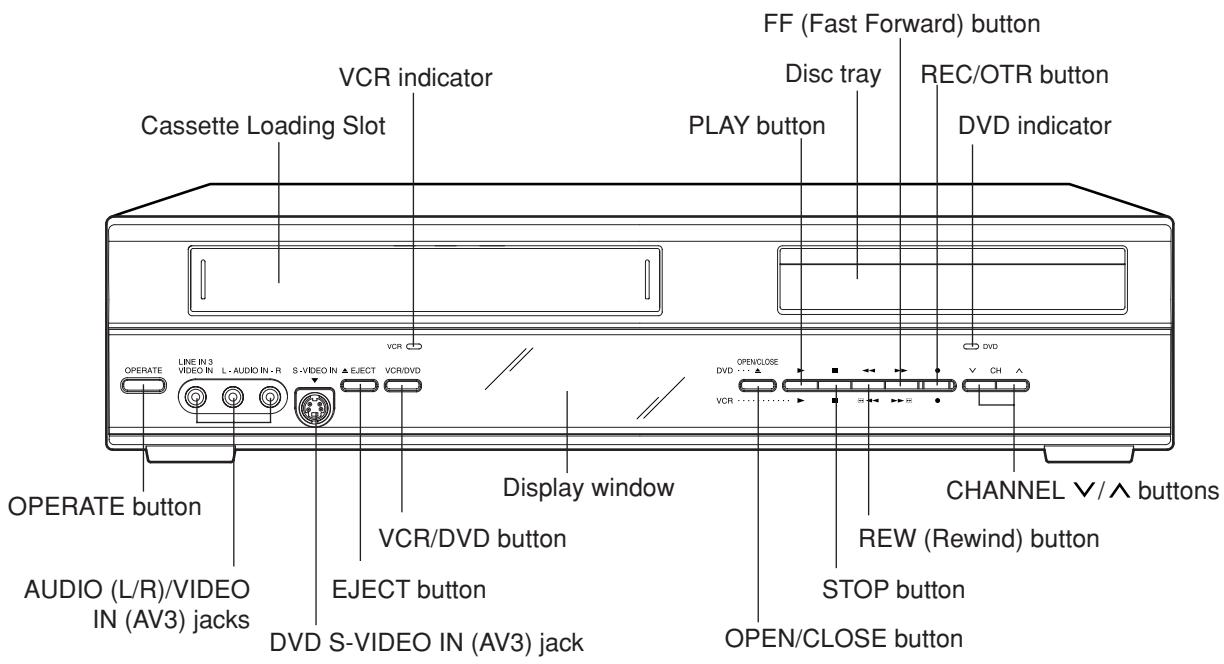
Front
Rear
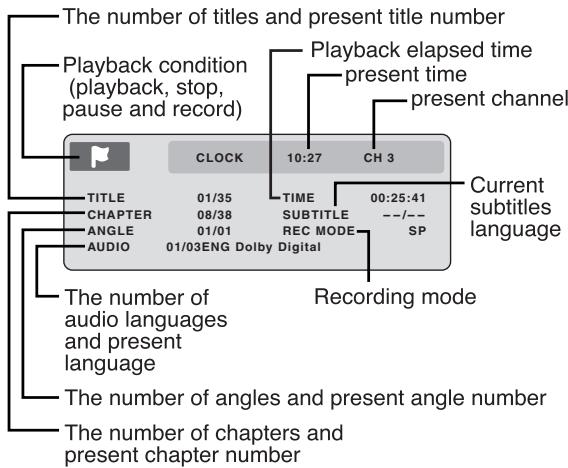
Display window
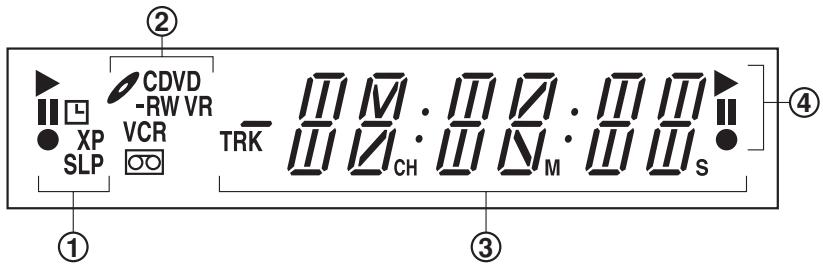
| No. | Display | Description |
| 1 | ▶ | Lights during video tape playback. |
| || | Video tape is temporarily stopped. | |
| ● | Lights during video tape recording. | |
| L | Timer recording display. | |
| XP/SP/LP/SLP | 4 DVD recording modes. XP, SP, LP or SLP can be selected in turn by pressing the REC MODE/SPEED repeatedly. | |
| SP/LP | 2 VCR recording modes. SP or LP can be selected in turn by pressing the REC MODE/SPEED repeatedly. | |
| 2 | CD | Appears when a CD is inserted. |
| CD-R | Appears when a CD-R is inserted. | |
| CD-RW | Appears when a CD-RW is inserted. | |
| DVD | Appears when a DVD-Video is inserted. | |
| DVD-R | Appears when a DVD-R is inserted. | |
| DVD-RW | Appears when a DVD-RW is inserted. | |
| VR | Appears when a DVD-RW in VR mode is inserted. When the disc is set to video mode, VR does not appear. | |
| VCR | Appears when the tuner built into this unit is selected. When you press TV/VCR, VCR disappears. | |
| ○○ | Video tape is in the unit. | |
| 3 | 10:00 | Clock display (Colon [ : ] flashes). |
| 01H00M00S | Counter display in hour/minute/second for VCR/DVD, minute/second for CD. | |
| 2CH | TV channel display. | |
| TRK 002 | Track number display for CD. | |
| A1/A2/A3 | The external input channel (A1, A2, or A3) display. | |
| 4 | ▶ | Lights during playback of DVD and CD. Flashes in auto resume. |
| || | DVD or CD is temporarily stopped. | |
| ● | Lights during DVD recording. |
NOTE:
Some discs may not playback correctly, or chapter number, playback time, etc may not be displayed.
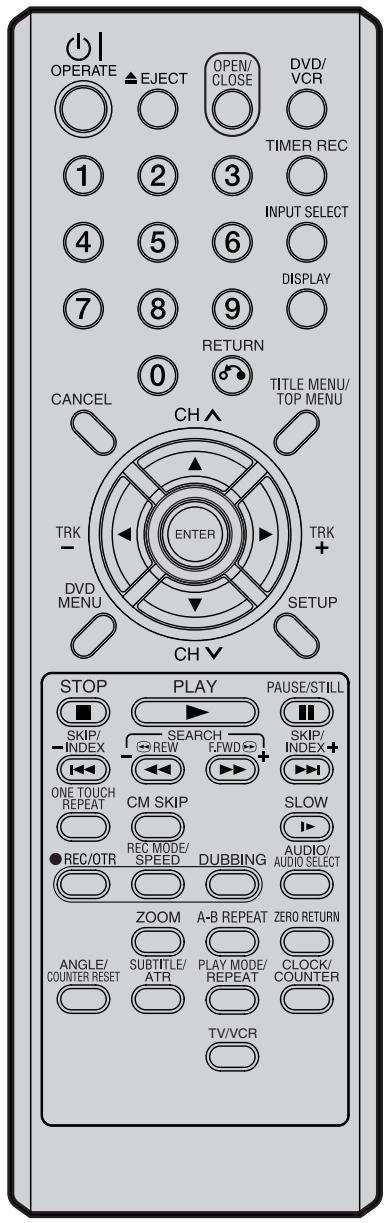
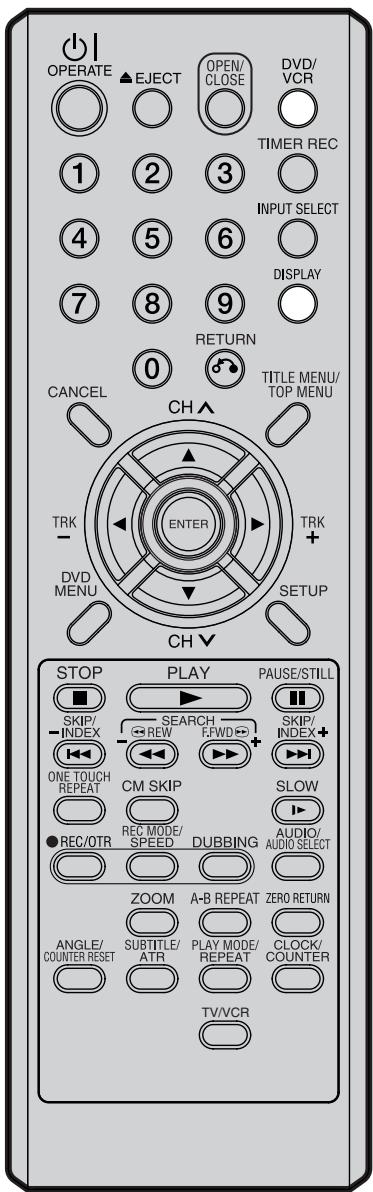
| Page | ||
| OPERATE | Turns power on/off. | 17 |
| EJECT | Ejects the cassette tapes. | 42 |
| OPEN/CLOSE | Opens or Closes the tray. | 28 |
| DVD/VCR | Switches to operation between VCR and DVD. 28, 43, 70, 71 | |
| 0-9 | Direct channel selection of TV. | 48, 50 |
| Setting input. | 18, 32, 68 | |
| Entering a password. | 19 | |
| TIMER REC | Sets the unit to start recording at a preset time. | 53 |
| INPUT SELECT | Scart input or AV-Front input. | 72, 73 |
| DISPLAY | Displays VCR or DVD operation status. | 30, 44, 57 |
| RETURN | Close the menu window. | 17, 40 |
| CANCEL | Deletes the Timer recording program. | 53 |
| Cancels input data in the setting mode. | 18, 69 | |
| TITLE MENU/TOP MENU | Displays titles of a DVD disc. | 29, 34, 37, 56 |
| CH ∧ / √ | Channel selection for VCR. | 48, 50 |
| ▲ / ▼ | Cursor buttons. | |
| TRK (TRACKING) +/- | Manual tracking in the playback mode for VCR. | 44 |
| ◀ / ▶ | Cursor buttons. | |
| ENTER | Option selection in the menu. | |
| DVD MENU | Displays the menu of the DVD disc. | 29, 34 |
| SETUP | Displays the setup menu. | 17, 51 |
| STOP | Stop. | 28, 43, 49 |
| PLAY | Playback. | 28, 43 |
| PAUSE/STILL | Still picture/Recording pause on/off. | 31, 44, 49 |
| SKIP ◀/ ➞ | Skips chapters in the forward or reverse direction. | 31, 41, 64 |
| INDEX - ◀/+ ➞ | Searches for the INDEX mark of a tape. | 45 |
| REW/SEARCH - | Rewind/Review playback. | 31, 43, 44 |
| F.FWD/SEARCH + | Fast Forward/Forward search playback. | 31, 43, 44 |
| ONE TOUCH REPEAT | Skips the DVD playback back 10 seconds. | 33 |
| CM SKIP | Skips commercial breaks. | 32, 44 |
| SLOW | Slow motion playback. | 31, 44 |
| ● REC/OTR | Recording/OTR. | 48, 50, 72 |
| REC MODE/SPEED | Selects the recording mode. | 48, 50, 70 |
| DUBBING | Copies VCR to DVD or DVD to VCR. | 70, 71 |
| AUDIO | Changes the soundtrack language of the DVD. | 36 |
| AUDIO SELECT | Switches sound between mono and stereo. | 54 |
| ZOOM | Zoom (for DVD/VIDEO CD). | 35, 41 |
| A-B REPEAT | Repeats playback between A and B. (DVD/CD) | 33 |
| ZERO RETURN | Stops the tape when the counter reaches 00_H00_M00_s . | 45 |
| ANGLE | Changes playback angle of a DVD disc. | 35, 41 |
| COUNTER RESET | Resets the counter to 00_H00_M00_s . | 45 |
| SUBTITLE | Selects subtitles of the DVD disc. | 36 |
| ATR | Digital AUTO TRACKING. | 44 |
| PLAY MODE | Displays the playback mode. | 32 |
| REPEAT | Repeats playback. | 33, 44 |
| CLOCK/COUNTER | Changes the front panel display mode. | 45 |
| TV/VCR | Select to operate TV/VCR | 49 |
How to install the batteries
Use micro batteries type R-03 (“AAA” size, UM/SUM-4, HP-16 or similar).
These batteries are offered as carbon / zinc-type or as alkaline-type. You may use both, but do not mix types. The alkaline type lasts longer compared to the carbon / zinc type but is more expensive.
Note: Flat, weak batteries will leak. Corrosive electrolyte will damage the remote control handset.
Leak proof batteries will not leak immediately when they are flat. As long as the handset is still working, there is no danger of leakage. To prevent damage, remove the batteries if you do not use the handset for several months.
Damage because of leakage is not covered by the guarantee.
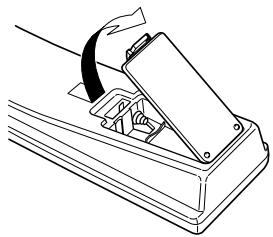
1 Open the battery compartment cover in the direction of the arrow.
natural_image
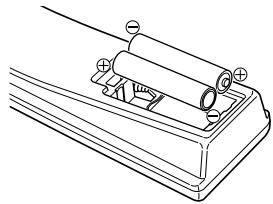
Line drawing of a hand operating a slide on a flat surface (no text or symbols)2 Install two R-03 ("AAA" size, UM/ SUM-4, HP-16 or similar) batteries (supplied), paying attention to the polarity diagram in the battery compartment.
natural_image
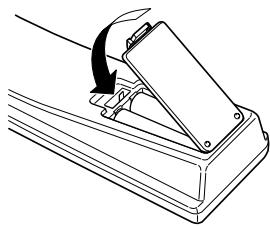
Technical line drawing of a mechanical component with mounting holes and a cylindrical body (no text or symbols)3 Replace the compartment cover.
natural_image
Line drawing of a lever mechanism with a curved arrow indicating motion (no text or symbols)Distance of Remote Control Operation
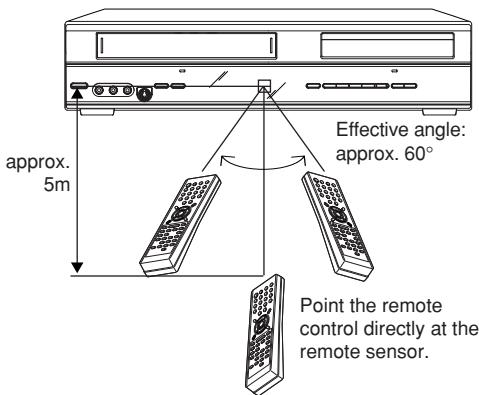
The remote control handset will not work properly in the following cases:
If bright sunlight directly beams onto the unit front.
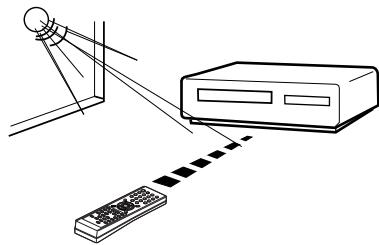
natural_image
Line drawing of a device with a light bulb emitting rays from a server to a remote control (no text or symbols)If an obstacle is placed between the unit and the handset.
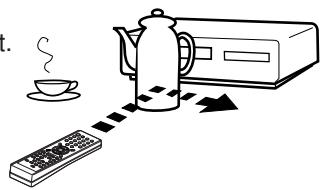
natural_image
Simple line drawing of a kitchen setup with a kettle, microwave, and a coffee cup (no text or symbols)If the batteries have not been installed according to their polarities.
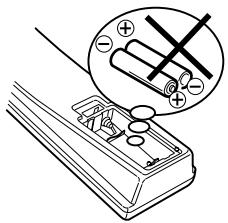
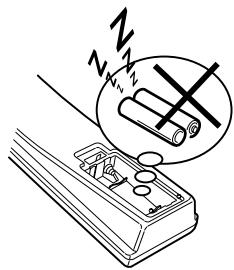
If the batteries are weak.
natural_image
Illustration of a cigarette being stopped by a switch, with no text or symbols present.Connect your VCR/DVD to your main aerial and TV set as shown in the illustration. When you have finished making these connections, connect your VCR/DVD to the mains power supply (230V / 50Hz).

flowchart
graph TD
    A["Antenna"] -->|To Scart socket| B["TV"]
    B --> C["VCR/DVD"]
    C --> D["AC power cord 230V/50 Hz"]
    D --> E["Supplied Coaxial cable"]
    E --> F["RF-Output (to TV)"]
    F --> G["RF-Input (from house antenna)"]
    G --> H["SCART"]
    H --> I["OUTPUT"]
    I --> J["RF(ANCL)"]
    J --> K["IN"]
    K --> L["Output"]
    L --> M["TV Scart socket (AV1)"]
    M --> N["Decoder/EXTERNAL Scart Socket (AV2)"]
    N --> O["Antenna-Input"]
Connecting this unit to your TV using the SCART connections
In addition to the coaxial cable connection, you should also connect the supplied SCART cable from the VCR/DVD to your TV as shown. As well as transferring the high quality pictures and sound to your TV, the SCART connection can automatically switch the TV to its AV channel for playback.
Some TVs may not allow automatic switching to the AV input channel. In this case you should manually select the AV input setting on your TV's controls when playing through this unit.
Playback connection
The exact arrangement you use to interconnect various video and audio components to the VCR/DVD is dependent on the model and features of each component. Check the Operation Manual provided with each component for the location of SCART socket.
Connection to a Satellite Receiver
If a Satellite Receiver is used, we recommend the following configuration:
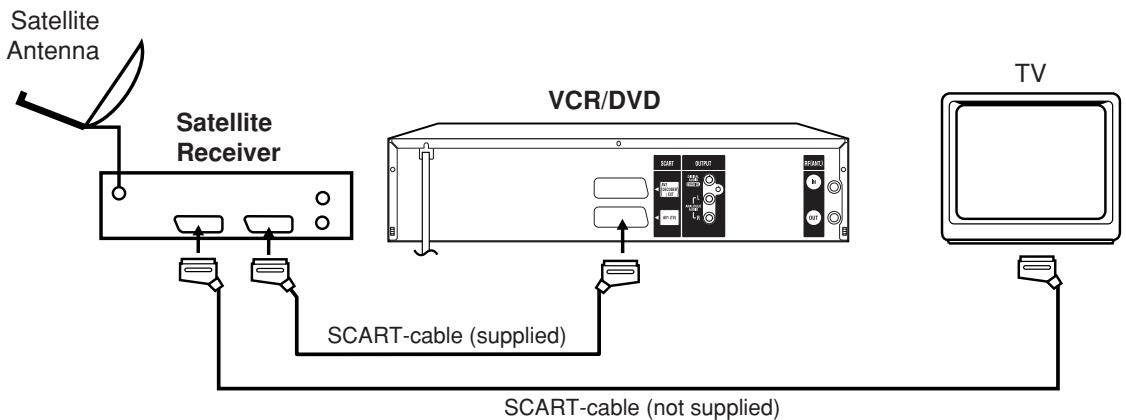
flowchart
graph TD
    A["Satellite Antenna"] --> B["Satellite Receiver"]
    B --> C["SCART-cable (supplied)"]
    C --> D["VCR/DVD"]
    D --> E["TV"]
To record from Satellite Receiver press INPUT SELECT on the remote control of the VCR/DVD. "A1" will appear on the front display. Select the particular satellite channel on the Satellite Receiver.
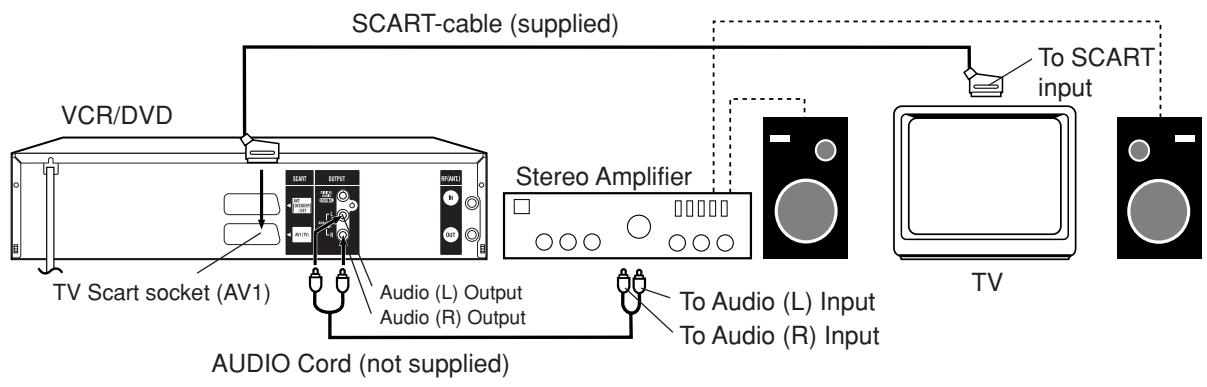
Connect to a Stereo Amplifier with Audio Output
If your VCR/DVD is connected to a stereo amplifier, the video soundtrack can output through the loudspeakers of the stereo system.
Connect to an AV Amplifier with built-in digital surround
If you are using an Amplifier with a built-in digital surround as follows, you can enjoy the various audio systems such as Dolby Digital and DTS by using the Coaxial Digital Output.
Use this connection to connect an:
- AV amplifier with built-in *Dolby Digital decoder
- AV amplifier with built-in *DTS decoder
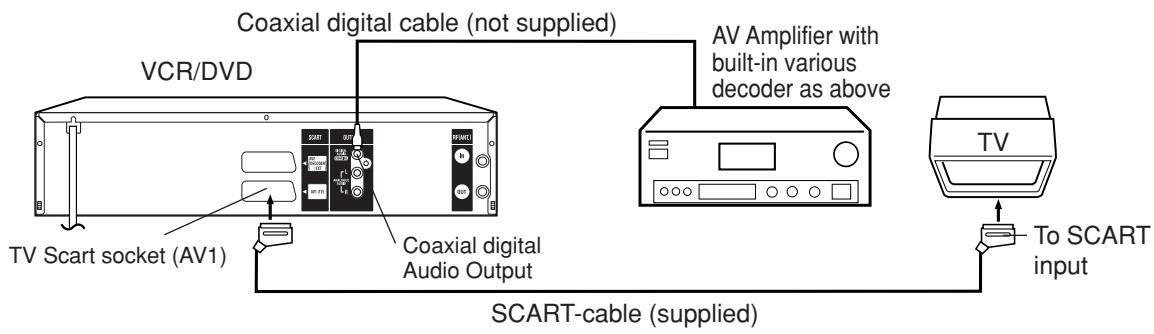
NOTES:
- The COAXIAL jack only outputs the audio from the DVD section.
VHS signal is output only from the SCART-sockets and AUDIO L/R jacks. - When you make the connections above, do not set DOLBY DIGITAL to DOLBY DIGITAL or DTS to ON on the AV Amplifier. If you do, a loud noise will suddenly come out from the speakers, affecting your ears or causing the speakers to be damaged.
- DTS audio is only output via the COAXIAL output jack. You therefore need to connect this unit to a suitable DTS decoder in order to hear the audio from DTS discs.
When playing DTS-encoded CDs, only noise will be heard from the speakers or analog stereo outputs. - Some DTS decoders which do not support DVD-DTS interface may not work properly with the unit.
The SETUP MENU consists of several menus where you can make various settings concerning language, audio functions, and images. In addition, this menu includes a clock, channel and other things that require setting just after purchase.
For details of each menu, see the corresponding section in this chapter.
Preparation:
- Turn ON the TV and select its AV channel (this may be labelled EXT / AUX etc.)
- Press ⏻|OPERATE button to turn on the VCR/DVD.
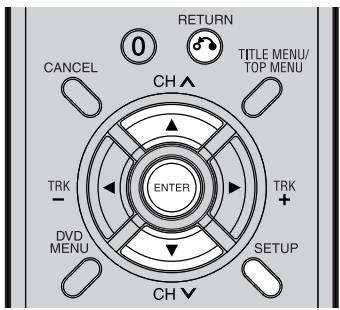
Using the SETUP MENU
The following example shows the basic setting procedure of the SETUP MENU. The remote control keys that operate the SETUP MENU are displayed at the bottom of the screen.
1 Press SETUP while the DVD and video tape are stopped.
The SETUP MENU screen will appear.
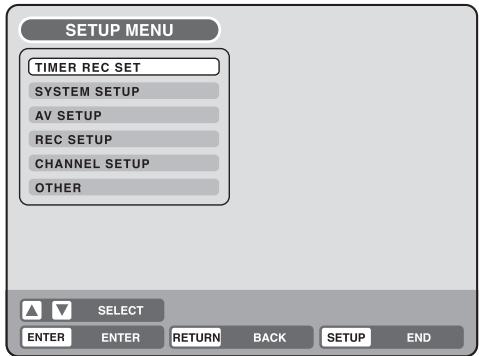
2 Press ▲ or ▼ to select the desired menu and press ENTER.
The submenu screen of the selected menu will appear.
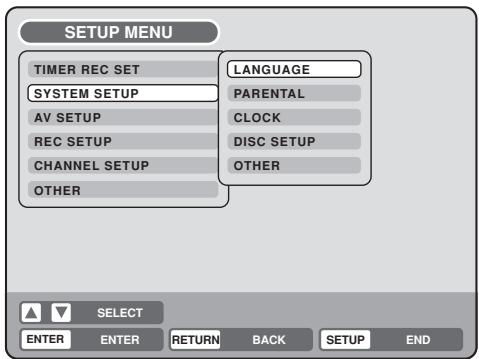
3 Press ▲ or ▼ to select the desired submenu and press ENTER.
The screen for the selected submenu will appear.
4 Press ▲ or ▼ to select the desired item you want, and press ENTER.
Selectable items will be listed.

5 Press ▲ or ▼ to select the desired item and press ENTER.
This completes the setting procedure.
- To return to the previous screen, press RETURN.
- To close the SETUP MENU, press SETUP.
NOTES:
- For items that require different operations from the basic setting procedure, the setting procedure is described in each individual section.
- The item which is indicated by red color cannot be selected.
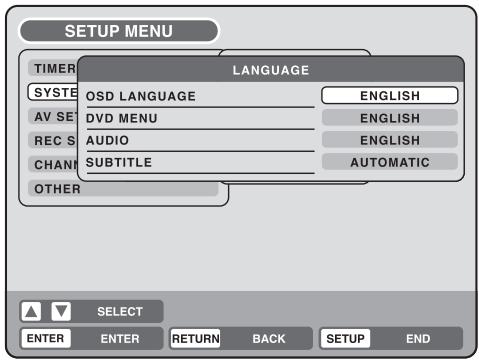
You can choose the language of the menu screen, DVD menu, DVD audio and subtitles.
Preparation:
- Turn ON the TV and select its AV channel (this may be labelled EXT / AUX etc.)
- Select “LANGUAGE” from “SYSTEM SETUP”. For the procedure, see steps 1 to 3 in “Using the SETUP MENU” on page 17.
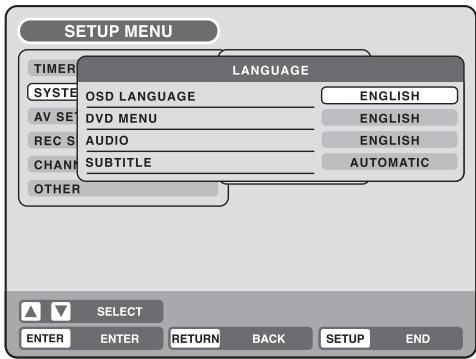
OSD LANGUAGE
You can set the language for on screen display.
Select "OSD LANGUAGE" and select the language from the list below.
Selectable languages:
ENGLISH, FRANCAIS, ESPANOL, DEUTSCH, ITALIANO
DVD MENU
When several menu languages are recorded on a DVD, you can select the language to be used for the DVD menu.
Select "DVD MENU" and select the language from the list below.
Selectable languages:
ENGLISH, FRANCAIS, ESPANOL, DEUTSCH, ITALIANO
The selected language is the first priority menu language.
OTHER
If you want to select another language, before pressing ENTER, input the language code by using the numeric keys. (See the Language code list on page 76). Then press ENTER.
- If you input a wrong number, press CANCEL.
AUDIO
When several audio languages are recorded on a DVD, you can select the audio language to be played back. The selected language remains in effect after the power is turned off or the disc is replaced.
Select "AUDIO" and select the audio language from the list below.
Selectable languages:
ENGLISH, FRANCAIS, ESPANOL, DEUTSCH, ITALIANO
The language you have selected will play if it is recorded on the disc.
ORIGINAL
The unit will select the first priority language of each disc.
OTHER
If you want to select another language, before pressing ENTER, input the language code by using the numeric keys. (See the Language code list on page 76). Then press ENTER.
- If you input a wrong number, press CANCEL.
NOTE:
If the selected language is not recorded on the disc, the first-priority language is selected.
SUBTITLE
When several subtitles languages are recorded on DVD, you can select the language to be used for the subtitles. The selected language remains in effect after the power is turned off or the disc is replaced.
Select "SUBTITLE" and select the menu language from the list below.
Selectable languages:
ENGLISH, FRANCAIS, ESPANOL, DEUTSCH, ITALIANO
The subtitle is displayed with the selected language if it is recorded on the disc.
OTHER
If you want to select another language, before pressing ENTER, input the language code by using the numeric keys. (See the Language code list on page 76). Then press ENTER.
- If you input a wrong number, press CANCEL.
AUTOMATIC
- The unit will automatically select the same language in the AUDIO setting.
- When the unit selects the same language as the AUDIO setting, the subtitles will not appear during playback.
- When you do not use the same language as the AUDIO setting, the subtitles will appear during play-back.
OFF
Subtitles do not appear.
NOTE:
If the selected language is not recorded on the disc, the first-priority language is selected.
Some discs are specified as not suitable for children. This unit can prevent playback of such discs.
Preparation:
- Turn ON the TV and select its AV channel (this may be labelled EXT / AUX etc.)
- Select "PARENTAL" from "SYSTEM SETUP". For the procedure, see steps 1 to 3 in "Using the SETUP MENU" on page 17.

Selecting parental control
Select "PARENTAL" and select the parental control level from the list below.
Level OFF: Parental control is turned off.
Level 1: Adult discs and general discs (R-rated discs included) cannot be played back.
Level 2 to 3: Adult discs and R-rated discs cannot be played back.
Level 4 to 7: Adult discs cannot be played back. (Level 4 to 7 discs contain content children age 15 and younger may not see.)
Level 8: All discs can be played back without restriction.
Select from level 1 to level 8.
On a scale of 1-8, “1” is the most restrictive.
To lock the selected parental control level
1 To lock the selected parental control level, press ▲ or ▼ to select "PASSWORD".
2 Use the numeric keys to input a 4-digit password.
- If you input a wrong number, press CANCEL.
- Be sure to remember this number!
3 Press ENTER.

To cancel the locked parental control level
1 Select "PASSWORD" shown in step 1 of the above section and use the numeric keys to input the password.
2 Press ENTER.
The locked mark “☐” will change to an unlocked mark “☐”.
Then, you can change the parental control level, or enter a new password.
NOTES:
- The selected level will apply to operations executed after this.
- The unit cannot restrict playback of some discs.
- Some discs may not be encoded with specific rating level information though its disc jacket says “adult”. Parental control will not work with those discs.
- If you forget your password, open the disc tray; if there is a disc inside then remove it and close the tray. To reset the code press and hold the number 7 button on the remote control, then press and hold the STOP button on the front panel at the same time. The On-Screen Display will show "PARENTAL UNLOCK". You can now set a new password.
Temporarily cancelling parental control
Parental control can temporarily be cancelled with some DVDs.
1 Playback a DVD. (See page 28.)
2 If the DVD disc has been designed to temporarily cancel the rating level, the screen that follows the "READING" screen will change. If you select "YES" with the ENTER, the message "YOUR DISC EXCEEDS THE PARENTAL CONTROL LEVEL 1." will then appear.
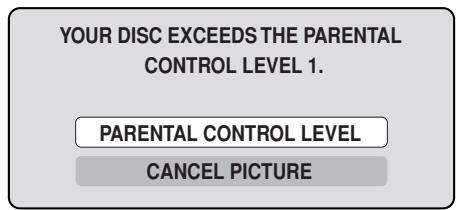
3 If you wish to cancel the set rating level temporarily, select "PARENTAL CONTROL LEVEL" with ▲ or ▼, then press ENTER. If the password has been selected, the password input screen will appear. Alternatively, if the password has not been set, playback will commence. If you don't know (or have forgotten) the password, select "CANCEL PICTURE". The setting screen will disappear. Press OPEN/CLOSE to remove the disc.
4 Use the numeric keys to input the password. • To interrupt the input process, press RETURN.
5 Press ENTER.
6 Playback will commence if the entered password was correct.
NOTE:
This temporary cancellation of the rating level will remain active until the disc is ejected.
When the disc is ejected, the original rating level will be set again automatically.
Setting the clock / Setting the disc
Your VCR/DVD is fitted with a 24 hour clock.
You must set the date and time for timer recordings.
Preparation:
- Turn ON the TV and select its AV channel (this may be labelled EXT / AUX etc.)
- Select "CLOCK" from the "SYSTEM SETUP" section of the SETUP MENU and press ENTER (For the full procedure, see steps 1 to 3 in "Using the SETUP MENU" on page 17).
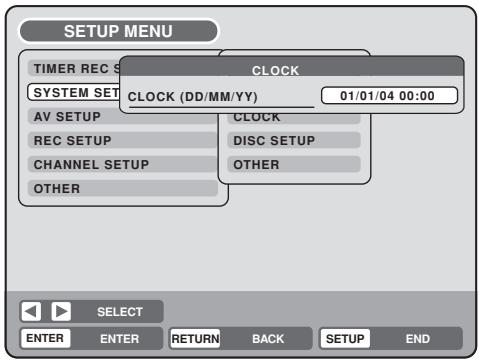
Ex.: Setting the clock to "10:20" September, 27th, 2004.
1 Select the desired items using ◀ or ▶ (date, month, year, hour and minute), then press ENTER.
2 Press ▲ or ▼ to set the value of the selected item.

3 Repeat steps 1 and 2 to set the date, year and present time, and press ENTER. The SETUP MENU will close.
This completes clock time setting.
NOTE:
In case of a power failure, the clock will continue to operate for another 30 minutes with quartz-controlled precision. To indicate that the power failure has lasted for an excessive period of time “0:00” will appear on the display. In this case readjust time and date.
You can format, protect, or finalise a disc.
Preparation:
- Turn ON the TV and select its AV channel (this may be labelled EXT / AUX etc.)
- Select “DISC SETUP” from “SYSTEM SETUP”. For the procedure, see steps 1 to 3 in “Using the SETUP MENU” on page 17.
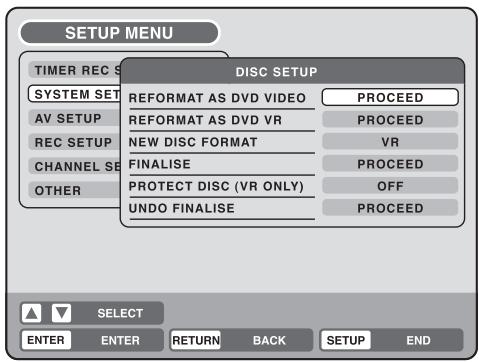
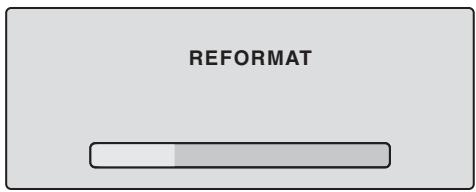
REFORMAT
You can format a recorded DVD-RW.
Check the content of the disc before format. If you format the disc, the recorded content of the disc will be erased.
To format a DVD in the Video mode, select “REFOR-MAT AS DVD VIDEO”, and to format it in the VR mode, select “REFORMAT AS DVD VR”.
The screen below will appear.
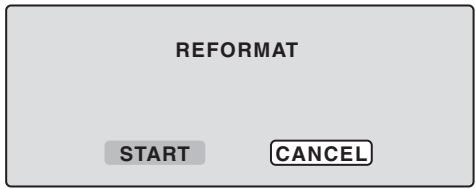
- When you select "START" and press ENTER, format will start. The screen below will appear.
- When you select "CANCEL" and press ENTER, the DISC SETUP screen will appear.
NOTES:
- You cannot format Ver. 1.0 DVD-RW and DVD-R.
- You cannot format a disc if the disc protection is "ON". In such a case, be sure to cancel the disc protection (see page 21) before format.
- During formatting, finalising and undo finalising, the progress will be shown by “—” in the front display window.
NEW DISC FORMAT
If you insert an unused disc, the disc is automatically formatted.
If you use the DVD-RW (Ver.1.1 or later), you can select the mode to be used for automatic format.
Select "NEW DISC FORMAT" and select the mode from the list below.
VR: Format the disc in the VR mode.
VIDEO: Format the disc in the Video mode.
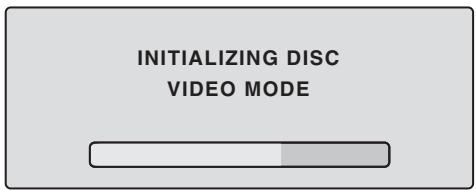
When you insert an unused disc, the following message screen will appear.
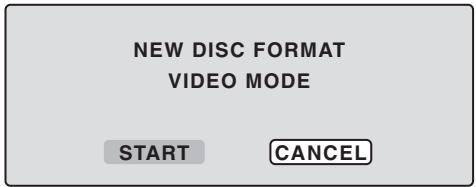
- When you select "START" and press ENTER, the formatting will start. The screen below will appear.
- When you select "CANCEL" and press ENTER, the normal TV screen will appear.
NOTE:
If a recorded disc has scratches or contamination on it, the “NEW DISC FORMAT” screen may appear. If this happens, select “CANCEL”.
FINALISE
To play a DVD disc recorded on this unit you must finalise the disc to ensure compatibility with other DVD players. In addition if you are using a DVD-RW disc you must record in Video mode.
When “FINALISE” is selected, the screen below will appear.

- When you select "START" and press ENTER, finalisation will start. The screen below will appear.

- When you select "CANCEL" and press ENTER, the DISC SETUP screen will appear.
NOTES:
- During the finalisation the cursor will move repeatedly. When the finalisation finished, “FINALISING COMPLETED PRESS ENTER” will appear. Press ENTER, the normal TV screen will appear.
- The finalisation process may require a few minutes to about 1 hour according to disc type or the amount of free space on the disc.
- You can record or edit a finalised DVD-RW (in VR mode) by cancelling the finalising, but you cannot do these operations with a DVD-RW (Video mode), or with a DVD-R.
- For a DVD-RW (in VR mode) which was finalised by another unit, you can record or edit on this unit by cancelling the finalisation.
- You cannot playback a disc recorded on VR mode on a unit that does not support DVD-RW.
- Even if you finalise a disc in the Video mode, the disc cannot be played back in some DVD players.
PROTECT DISC
You can protect a disc to prevent the content recorded on it from being erased, edited or re-recorded.
Only DVD-RW (in VR mode) can be protected.
Select "PROTECT DISC (VR ONLY)" and select "ON" to protect the disc.
To cancel the disc protection, select "OFF".
UNDO FINALISE
You can cancel the finalisation of a finalised DVD-RW (in VR mode).
You cannot cancel the finalisation for discs other than above. You can record or edit on a disc whose finalisation has been cancelled.
Select "UNDO FINALISE", and the screen below will appear.

- When you select "START" and press ENTER, the cancelling finalisation will start. The screen below will appear.

- When you select "CANCEL" and press ENTER, the DISC SETUP screen will appear.
NOTES:
- During the cancelling finalisation the cursor will move repeatedly. When the cancelling finalisation finished, "UNDO FINALISING COMPLETED PRESS ENTER" will appear.
Press ENTER, the normal TV screen will appear. - The cancelling finalisation process may require a few minutes to about 1 hour according to disc type or the amount of free space on the disc.
- When the disc's finalisation cannot be cancelled, you cannot select "UNDO FINALISE".
You can turn the display window and screen display "ON" or "OFF".
Preparation:
- Turn ON the TV and select its AV channel (this may be labelled EXT / AUX etc.)
- Select "OTHER" from "SYSTEM SETUP". For the procedure, see steps 1 to 3 in "Using the SETUP MENU" on page 17.
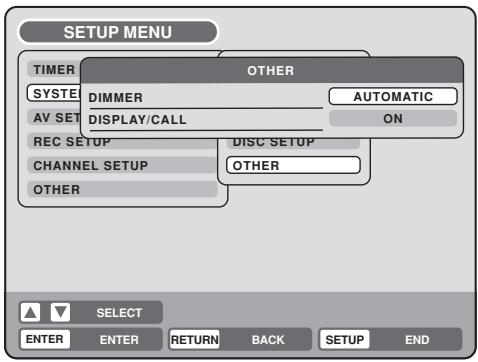
DIMMER (Brightness of the display window)
You may adjust the brightness or turn off the display on the front panel of the unit.
Select "DIMMER" and select the display window status from the list below.
AUTOMATIC: When the power is on, the display window appears bright. When the power is off, it appears dark.
DIM: The window display always appears dark.
OFF: When the power is on, the display window appears dark. When the power is off, it is turned off.
DISPLAY/CALL (Turning the screen display "ON" or "OFF")
You can turn off the screen display that is output to the TV screen by this unit. Select “DISPLAY/CALL”, and select “ON” or “OFF”.
ON: The screen display appears.
OFF: Nothing but the SETUP MENU and error messages appear.
- In the OFF selection, The DISPLAY button on the remote control will be available.
This section describes settings about the screen.
Preparation:
- Turn ON the TV and select its AV channel (this may be labelled EXT / AUX etc.)
- Select "VIDEO" from "AV SETUP". For the procedure, see steps 1 to 3 in "Using the SETUP MENU" on page 17.
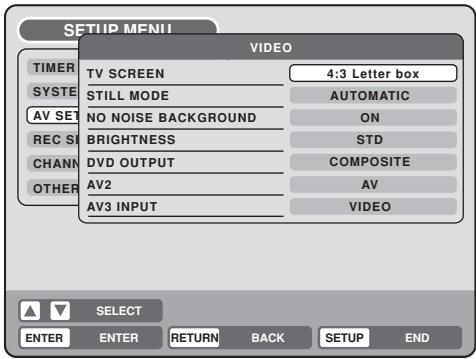
TV SCREEN
You can select the TV screen size to suit the screen image.
Select "TV SCREEN" and select screen size from the list below.
4:3 Panscan
It displays a wide picture across the whole screen with left and right edges automatically cut off.
4:3 Letterbox
Select this mode when connecting to a conventional TV. When playing back a wide screen DVD disc, it displays a wide picture with black bands at the top and bottom of screen.
16:9
Select this mode when connecting to a wide-screen TV. A wide-screen picture is displayed in full size.
NOTE:
If you select 4:3 Pan Scan but the DVD disc is not formatted in the pan scan format, the aspect ratio will be displayed as 4:3 Letterbox.
STILL MODE
You can set the type of image displayed on the TV screen when the playback of the DVD is stilled.
Select "STILL MODE" and select the image to be displayed from the list below.
AUTOMATIC
The field still or frame still is automatically selected. (For normal use.)
STILL BY FRAME
The frame still is set.
Note for the field still and frame still:
(with 480i interlaced scanning mode)
- Field* still (240 lines)
Since only one field (half of the video information) is shown on the TV screen, the picture appears rough but does not shake.
• Frame* still (480 lines)
Two fields are alternatively shown on the TV screen. The picture shakes but the resulting picture quality is superior to the field still pictures.
Field*: A field refers to the video information in one-half of a frame. 1 frame (screen) consists of 2 fields.
Frame*: A frame refers to the total area occupied by each picture on the TV screen.
NO NOISE BACKGROUND
When you select a channel where the broadcast has finished or no broadcast is set, the TV screen will automatically appear blue.
The function above works when you select “NO NOISE BACKGROUND” and select “ON” from the list. If you don’t want to use this blue background function, select “OFF”.
The default setting is "ON".
BRIGHTNESS
You can control the brightness level of the image.
Select "BRIGHTNESS" and select the level from the list below.
MAX: The image becomes brighter.
STD: The image is of standard brightness.
MIN: The image becomes darker.
DVD OUTPUT
You can select the output signal of DVD playback picture to the TV screen as an RGB signal or a COMPOSITE signal.
COMPOSITE: COMPOSITE VIDEO signal
RGB: RGB signal
AV2
If there have a decoder connected to the AV2 Scart socket, select "AV2" and select "DECODER" form the list.
AV3 INPUT
You must select the input mode of AV3 (front AV-input). (see the upper connection on P.73)
S-VIDEO:
Only the S-Video signal will be input. (Composite video signal will be cut.)
VIDEO:
Only the composite video signal will be input. (S-Video input signal will be cut.)
Setting the audio / Setting the recording
This section describes audio settings.
Preparation:
- Turn ON the TV and select its AV channel (this may be labelled EXT / AUX etc.)
- Select “AUDIO” from “AV SETUP”. For the procedure, see steps 1 to 3 in “Using the SETUP MENU” on page 17.

DRC
DRC (Dynamic Range Control) enables you to control the dynamic range so as to achieve a suitable sound for your equipment.
Select "DRC" and select the level from the list below.
MAX: Full dynamic range is maintained.
STD: Full dynamic range is reduced.
TV: Dynamic range is reduced.
NOTES:
- This function works only during playback of Dolby Digital recorded discs.
- When you listen to the sound from TV's speaker, we recommend that you select "TV".
- The level of Dynamic Range Reduction may differ depending on the DVD.
VIRTUAL SURROUND (Spatializer N-2-2 ^TM )
Sound that is not recorded in the surround mode will be changed to artificial surround sound and output.
Select “VIRTUAL SURROUND” and select “ON” from the list to activate the virtual surround function. To not use the virtual surround, select “OFF”.
NOTE:
This function does not work with a video tape.
EXTERNAL AUDIO INPUT
The audio mode for the audio input jack can be selected, choosing either stereo or monaural.
Select "EXTERNALAUDIO INPUT" and select from the list below.
STEREO: The sound is treated as stereo sound.
L CH: The sound is treated as the monaural sound of the left channel.
R CH: The sound is treated as the monaural sound of the right channel.
NICAM
This unit is capable of NICAM stereo. You can select the NICAM mode as follows (see page 54 for NICAM recording and playback).
AUTOMATIC: to record NICAM programs
OFF: to set the NICAM off
DOLBY DIGITAL OUTPUT
You can select the output sound from the DIGITAL AUDIO OUTPUT on the rear panel.
DOLBY DIGITAL: to output with DOLBY DIGITAL
PCM: to output with PCM format
This section describes recording settings.
Preparation:
- Turn ON the TV and set it to the video input mode.
- Select "REC SETUP". For the procedure, see steps 1 to 3 in "Using the SETUP MENU" on page 17.
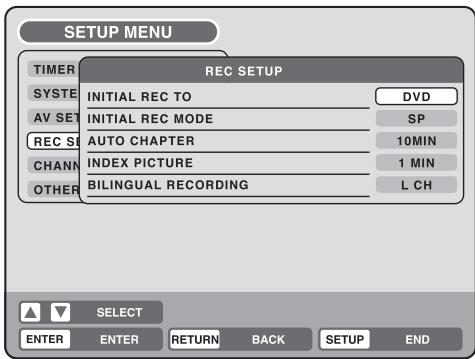
INITIAL REC TO
You can select the recording media that is first displayed in the item "REC TO" on the timer recording screen.
Select "INITIAL REC TO" and select "DVD" or "VCR".
INITIAL REC MODE
You can select the recording mode that is first displayed in the item "REC MODE" on the timer recording screen. Select "INITIAL REC MODE" and select XP, SP, LP, or SLP.
NOTE:
For the DVD recording mode, see page 46. And for the VCR recording mode, see page 42.
AUTO CHAPTER
You can automatically make chapter marks on the DVD to be recorded.
Select "AUTO CHAPTER" and select the interval between chapter marks from the list below.
OFF: The automatic chapter is not used.
5 MIN: The interval is set to 5 minutes.
10 MIN: The interval is set to 10 minutes.
15 MIN: The interval is set to 15 minutes.
30 MIN: The interval is set to 30 minutes.
INDEX PICTURE
You can set the time that the thumbnail image is registered in the title menu of DVD-RW (VR mode).
Select "INDEX PICTURE" and select from the list below.
0 SEC: The image 0 second after a recording start is registered.
1 MIN: The image 1 minute after a recording start is registered.
3 MIN: The image 3 minutes after a recording start is registered.
5 MIN: The image 5 minutes after a recording start is registered.
NOTE:
You cannot select the thumbnail image for Video mode.
BILINGUAL RECORDING
In case of the recording of a bilingual program to a disc with video format, you can select the recording sound.
L CH: to record with left channel
R CH: to record with right channel
You can set the switching interval between played back images in the slide show mode.
Preparation:
- Turn ON the TV and select its AV channel (this may be labelled EXT / AUX etc.)
- Select "OTHER". For the procedure, see steps 1 to 3 in "Using the SETUP MENU" on page 17.
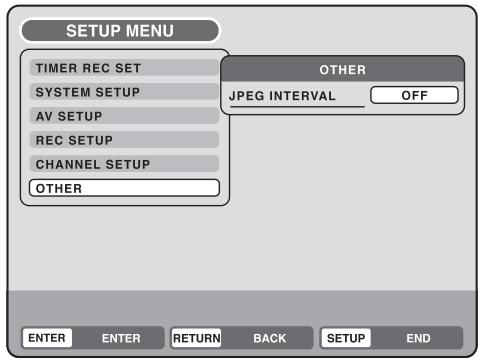
JPEG INTERVAL
You can select the interval time for JPEG slide show (page 41).
Select "JPEG INTERVAL" and select the switching interval between images from the list below.
OFF: The slide show mode is not used.
5 SEC: The interval is set to 5 seconds.
10 SEC: The interval is set to 10 seconds.
15 SEC: The interval is set to 15 seconds.
This VCR/DVD has a built-in tuner to receive TV broadcast transmissions. Before you record a TV-Broadcast, you must set and preset all available channels. This VCR/DVD can preset up to 80 channels.
Preparation:
- Turn ON the TV and select its AV channel (this may be labelled EXT / AUX etc.)
- Select “CHANNEL SETUP”. For the procedure, see steps 1 to 3 in “Using the SETUP MENU” on page 17.
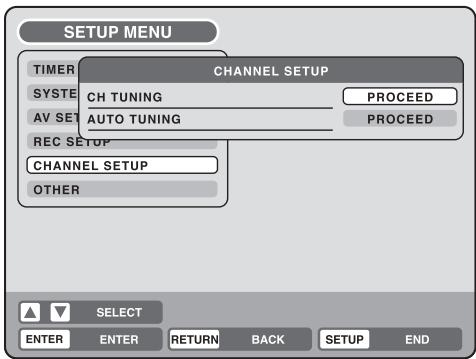
Automatic station presetting
Select "AUTO TUNING" and press ENTER.
The VCR/DVD will begin searching and storing all the broadcasting channels available in your area. While this is happening, “AUTO TUNING” will be shown on the screen. When automatic tuning process is completed, the screen will return to normal.
NOTES:
- TV reception interference or power failure may result in Automatic station presetting malfunctions. In such a case repeat the setting procedure from the beginning.
If the automatic tuning procedure has problems receiving some stations correctly, you can try to preset the station manually (See page 27). - When the unit is in the auxiliary input mode, you cannot preset channels.
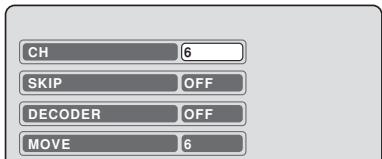
To skip a channel position
Unwanted channels can be skipped so that they cannot be called up by pressing CH ∧/∨.
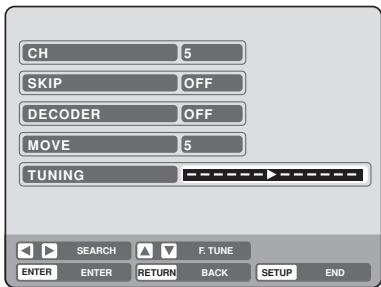
Example: Skip the channel position 29.
1 Select "CH TUNING" and press ENTER.
2 Select "CH" and press ENTER. Then select the skipping channel position number (29) and press ENTER.
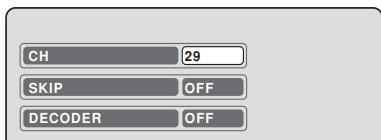
3 Select "SKIP" and press ENTER.
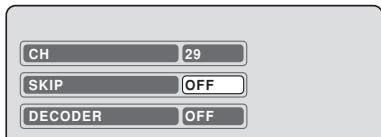
4 Select "ON" and press ENTER. Now this channel position is skipped.
NOTE: To cancel skipping, select "OFF" at step 4 above.
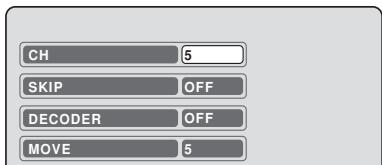
DECODER ON/OFF
You can set the DECODER setting for each channel position.
Example: Set the channel position 5 as decoder on.
1 Select "CH TUNING" and press ENTER.
2 Select "CH" and press ENTER. Then select the desired channel position number (5) and press ENTER.
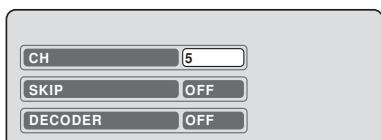
3 Select "DECODER" and press ENTER.
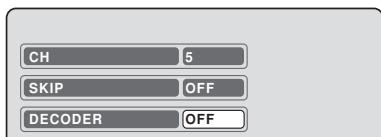
4 Select "ON" and press ENTER. Now this channel position was set as decoder on.
NOTE: To set to decoder off, select "OFF" at step 4 above.
Replace TV station positions
You can replace the channel positions as you like.
Example: Replace the TV station No. 6 with position No. 2.
1 Select "CH TUNING" and press ENTER.
2 Select "CH" and press ENTER. Then select the moving channel position number (6) and press ENTER.
3 Select "MOVE" and press ENTER.
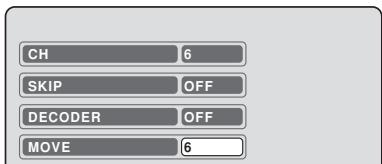
4 Select the channel position number (2) to which the selected position at step 2 above is to be moved and press ENTER. Now these channel positions were replaced with each other.
Manual TV station presetting
The Automatic station presetting function (See page 26) memorises the available broadcasts to suitable CH positions.
Some broadcasts may not be preset correctly by the automatic tuning system - in this case you can tune stations manually as follows.
Example: Presetting a station on program position 5.
1 Select "CH TUNING" and press ENTER.
2 Select "CH" and press ENTER. Then select the channel position number (5) and press ENTER.
3 Select "TUNING" (tuning scale) and press ENTER.
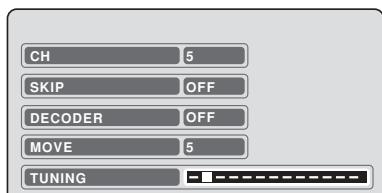
4 Press ▶ (rising frequency) or ◀ (falling frequency) once. The search starts. It stops at each broadcast automatically. ("▶" changes to "■") Press ◀ or ▶ repeatedly until the desired station appears. If the broadcast is too weak (eg. with a drifting picture), the search will not stop. If you want to stop, press ▲/▼ or ◀/▶.
5 If the tuned-up picture is not satisfactory, press ▲ or ▼ until the best picture is achieved. Then press ENTER.
6 Repeat the steps 2 and 5 to preset other TV stations.
NOTE:
Occasionally, the auto search might catch a weak signal and stop. If the TV station signal is weak, you shouldn't store this station. In that case restart the auto search using ◀ or ▶.

Preparation:
- Turn ON the TV and select its AV channel (this may be labelled EXT / AUX etc.)
- Press DVD/VCR to select the DVD mode. (The DVD indicator will light.)
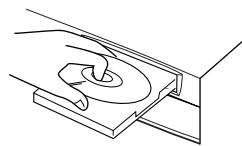
1 Press OPEN/CLOSE. The disc tray will open.

natural_image
Simple gray rounded rectangle with a black triangle symbol in the top-right corner (no text or labels)2 Place a disc onto the tray. Hold the disc, position it with the printed label side up, align it with the guides, and place it in its proper position.
natural_image
Line drawing of a mechanical component with a curved surface and base plate (no text or symbols)3 Press OPEN/CLOSE to close the disc tray. "READING" appears on the screen and some discs start playback automatically.

- A menu screen may appear on the TV screen, if the disc has a menu feature. In this case, press ▲, ▼, ◀, ▶ or ENTER to operate a menu feature.
4 Press PLAY to start playback.
5 Press STOP to end playback.
- The VCR/DVD memorises the stopped point, depending on the disc. “▶” appears on the screen for approx. 4 seconds.
“▶” keeps blinking in the display until the playback is stopped completely. Press PLAY to resume playback (from the scene point). - If you press STOP again ("■" appears on the screen), the VCR/DVD will clear the stopped point.
6 Then press OPEN/CLOSE.
The disc tray opens.
Remove the disc and press ⏻| OPERATE.
The disc tray closes automatically and VCR/DVD turns off.
NOTES:
- If a non-compatible disc is loaded, “INCORRECT DISC”, “REGION CODE ERROR” or “PARENTAL ERROR” will appear on the TV screen according to the type of loaded disc. In this case, check your disc again (See pages 7 and 19).
- Some discs may take a minute or so to start playback.
- A prohibition symbol “√” may appear at the upper right of the screen. This symbol means either the feature you tried is not available on the disc, or the VCR/DVD can not access the feature at this time. This does not indicate a problem with the VCR/DVD.
- When you set a single-faced disc label downwards (ie. the wrong way up) and press PLAY or OPEN/CLOSE, "READING" will appear and then it will change to "NO DISC".
- Some playback operations of DVDs may be intentionally fixed by software producers. Since this VCR/DVD plays DVDs according to the disc contents the software producers designed, some playback features may not be available. Also refer to the operation manual supplied with the DVDs.
- When playing DTS-encoded Audio CDs, excessive noise will be heard from the analog stereo outputs. To avoid possible damage to the audio system, the consumer should take proper precautions when the analog stereo outputs of the VCR/DVD are connected to an amplification system.
- Most discs labelled "Non PC/MAC CD Format" will not playback on this VCR/DVD.
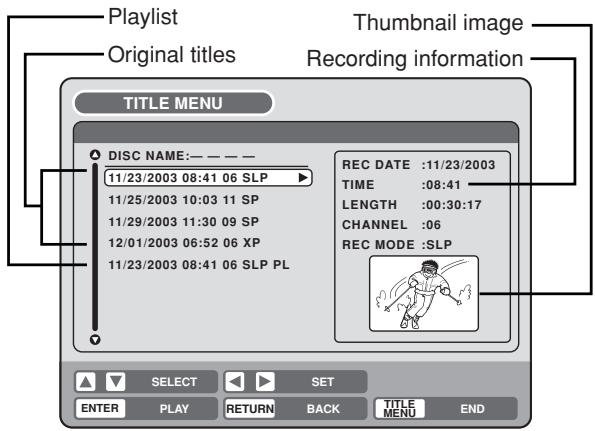
Playback by selecting a title
DVD-RW VR DVD-RW Video DVD-R
When playing back a recorded disc, you can display the title menu and select the title to be played back.
NOTES:
- For a disc recorded in the Video mode, the "REC DATE", "TIME", "CHANNEL" and "REC MODE" will not appear in the title menu.
- When a disc that has been recorded in the Video mode is finalised, a title list is automatically created that can be played back even with other DVD players. Consequently, the menu before finalising is different from that of after finalising.
Preparation:
- Turn ON the TV and select its AV channel (this may be labelled EXT / AUX etc.)
- Load a recorded DVD.
- Press DVD/VCR to select the DVD mode. (The DVD indicator will light.)
1 Press TITLE MENU.
The title menu will appear.
If there are many original titles and playlists...
Before pressing TITLE MENU, press DVD MENU until “VR ORG” or “VR PL” will appear on the upper right of the TV screen, then press TITLE MENU.
The first original title or playlist will be highlighted.
2 Press ▲ or ▼ to select the title you want to playback.
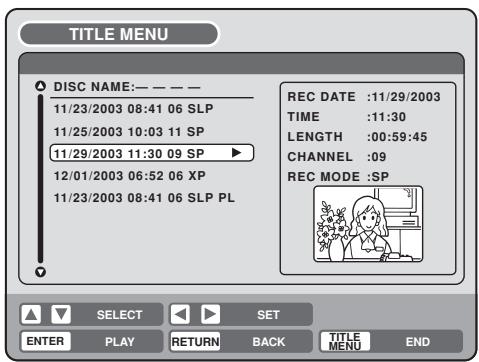
3 Press ENTER.
The selected title is played back.
NOTES:
- If you don't display the title menu and press PLAY, the first title is played back.
- The title menu is used not only for playing back titles but also for editing various discs and titles. For details of editing operation, see page 55.
- If you create a playlist, an original title and playlist appear in the title menu. For creating a playlist, see page 56.
- In case the disc includes more than 10 titles, you can turn to the next or the previous page. Press ◀, then press ▼ or ▲ to display next/previous page. To return to normal use, press ▶.
- You cannot switch to the VCR mode when the title menu is showing. Press TITLE MENU to clear the title menu, then press DVD/VCR to switch to the VCR mode.
Checking media information

Various information on the loaded disc can be displayed on the TV screen.
NOTES:
- The displayed information varies with the type of media.
- Some information may not appear due to media type or operating conditions.
Preparation:
- Turn ON the TV and select its AV channel (this may be labelled EXT / AUX etc.)
- Load the disc.
- Press DVD/VCR to select the DVD mode. (The DVD indicator will light.)
1 Press DISPLAY. Media information will appear.
2 Press DISPLAY while the media information above is displayed. The next media information will appear.
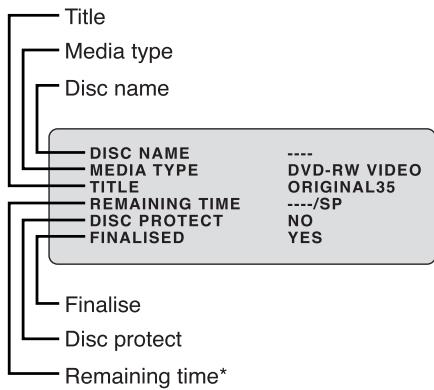
flowchart
graph TD
    A["Title"] --> B["Media type"]
    B --> C["Disc name"]
    C --> D["DISC NAME ----"]
    C --> E["MEDIA TYPE DVD-RW VIDEO"]
    C --> F["TITLE ORIGINAL35"]
    C --> G["REMAINING TIME ----/SP"]
    C --> H["DISC PROTECT NO"]
    C --> I["FINALISED YES"]
    J["Finalise"] --> K["Disc protect"]
    L["Remaining time*"] --> M["..."]
*The remaining time displayed during recording may be different from the actual remaining time. When you want to check the correct remaining time, stop recording and display the media information again.
3 Press DISPLAY again while the media information above is displayed. The media information will disappear.

NOTE: There may be a slight delay between pressing the button and the function activation.
Fast forward playback
Press F.FWD during normal playback.
Each press of F.FWD will increase the speed of the search ▶▶(x2), ▶▶▶(x12), ▶▶▶▶(x24), ▶▶▶▶▶(x60).
(The speed of the search is increased up to only 2 steps in CD.)
• To resume normal playback, press PLAY.
Review playback
Press REW during normal playback.
Each press of REW will increase the speed of the search ◀◀ (x2), ◀◀◀ (x12), ◀◀◀◀ (x24), ◀◀◀◀◀ (x60).
(The speed of the search is increased up to only 2 steps in CD.)
• To resume normal playback, press PLAY.
Still playback
Press PAUSE/ STILL during normal playback.
To resume normal playback, press PLAY.

natural_image
Blank gray rectangular image with a small black 'II' mark in the top-right corner (no other text or symbols)Frame advance
Press PAUSE/ STILL during still play-back.
One frame is advanced each time you press PAUSE/ STILL.
To resume normal playback, press PLAY.

natural_image
Blank gray rectangular image with a black play button icon in the top-right corner (no text or symbols)Slow motion playback
Press SLOW during normal playback or still playback.
Each press of SLOW will change the speed of the slow “▶1/2”, “▶1/4”, “▶1/8”.
• To resume normal playback, press PLAY.
- To resume the still playback, press PAUSE/ STILL.
Locating a chapter or track
Press SKIP (▶▶▶) Forward or SKIP (▶◀◀) Reverse during playback to locate a chapter that you want to watch.
Each time you press the button, a chapter or track is skipped.
NOTES:
- The unit is capable of holding a still video image or On screen display image on your television screen indefinitely. If you leave the still video image or On screen display image displayed on your TV for an extended period of time, you risk permanent damage to your television screen. Projection televisions are very susceptible.
- Fast forward and review playback does not work with a MP3/WMA/JPEG-CD.
• Frame advance and slow motion does not work with a CD.
Commercial skip / Locating a specific scene
DVD-VIDEO DVD-RW VR DVD-RW Video DVD-R
NOTE:
You cannot switch to the VCR mode when the play mode screen is showing. Press PLAY MODE to clear the play mode screen, then press DVD/VCR to switch to the VCR mode.
Commercial skip
Use this function to skip commercials while you playback.
Press CM SKIP during playback.
The time jumps to a point approx. 30 seconds later and playback resumes.
NOTE:
With some DVD-Video, the Commercial skip operation may not work.
Locating a specific scene
Specify the time recorded on the disc, chapter or title to playback.
1 Press PLAY MODE.
The play mode screen will appear.

flowchart
graph LR
    A["TIME SEARCH"] --> B["CHAPTER SEARCH"]
    B --> C["TITLE SEARCH"]
    C --> D["REPEAT"]
2 Press ◀ or ▶ to select "TIME SEARCH", "CHAPTER SEARCH" or "TITLE SEARCH", and press ENTER.
TIME SEARCH: Input the time until the playback is restarted. CHAPTER SEARCH: Select the chapter number to be played back. TITLE SEARCH: Select the title number to be played back.
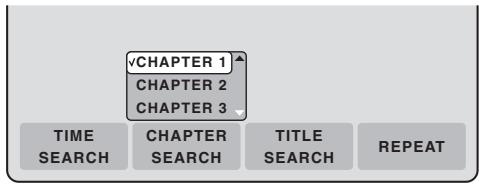
The screen above shows the display when “CHAPTER SEARCH” is selected.
3 When selecting "TIME SEARCH", input the time until the playback is restarted with the numeric or ▲/▼/◄/► keys. When selecting "CHAPTER SEARCH" or "TITLE SEARCH", press ▲ or ▼ to select the chapter number or title number.
4 Press ENTER.
The playback starts at the point you selected.
NOTE:
For “REPEAT”, see “Title, Chapter repeat playback” (page 33).

NOTES:
- Some discs may not work with the repeat operation.
- In A-B repeat mode, subtitles near point A or B may not appear.
- A-B repeat does not work during the Title and the Chapter repeat playback.
- You may not be able to set A-B repeat, depending on the scenes of the DVD.
- A-B repeat and Title, Chapter repeat does not work with a MP3/WMA/JPEG-CD and Video CD.
- You cannot switch to the VCR mode when the play mode screen is showing. Press REPEAT to clear the play mode screen, then press DVD/VCR to switch to the VCR mode.
One touch repeat
This feature can be used to repeat the last 10 seconds of viewed material on a DVD disc - then normal playback will continue.
Press ONE TOUCH REPEAT during playback.
The playback returns to a point 10 seconds earlier, then resumes playing.
NOTES:
- If ONE TOUCH REPEAT is pressed less than 10 seconds after the beginning of the current title, it will just go back to the start of that title.
A-B repeat playback
A-B repeat playback allows you to repeat material between two selected points.
1 Press A-B REPEAT during play-back.
The start point is selected.

2 Press A-B REPEAT again.
The end point is selected. Playback starts at the point that you selected. Playback stops at the end point, returns to point A automatically, then starts again.
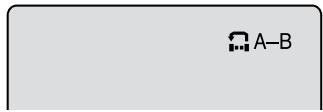
To resume normal playback, press A-B REPEAT again.
"OFF" appears on the screen.
Title, Chapter repeat playback
1 Press REPEAT.
The play mode screen will appear.

flowchart
graph LR
    A["TIME SEARCH"] --> B["CHAPTER SEARCH"]
    B --> C["TITLE SEARCH"]
    C --> D["REPEAT"]
2 Press ◀ or ▶ to select "REPEAT" and press ENTER.
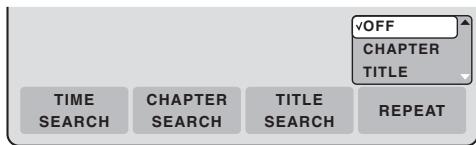
3 Press ▲ or ▼ to select "OFF", "CHAPTER" or "TITLE" from the list.
OFF: Playback is not repeated.
CHAPTER: The chapter in playback is repeatedly played back.
TITLE: The title in playback is repeatedly played back.
4 Press ENTER.
- To cancel the repeat playback, select "OFF" in step 3.
DVD-VIDEO
NOTE:
Depending on the DVD, you may be unable to select the title, and a “title menu” may simply be called a “menu” or “title” in the instructions supplied with the disc.
Title selection
Two or more titles are recorded on some discs. If the title menu is recorded on the disc, you can select the desired title.
1 Press TITLE MENU/TOP MENU during playback.
The title menu appears on the screen.
- Press TITLE MENU/TOP MENU again to resume playback at the scene when you pressed TITLE MENU/TOP MENU.
2 Press ▲/▼ or ◀/► to select the desired title.
3 Press ENTER.
The playback of the selected title will start.
DVD menu
Some DVDs allow you to select the disc contents using the menu. When you playback these DVDs, you can select the subtitles language and soundtrack language, etc. using the DVD menu.
1 Press DVD MENU during playback.
The DVD menu appears on the screen.
- Press DVD MENU again to resume playback at the scene when you pressed DVD MENU.
2 Press ▲/▼ or ◀/► to select the desired item.
3 Press ENTER.
The menu continues to another screen. Repeat steps 2 and 3 to set the item completely.
DVD-VIDEO DVD-RW VR DVD-RW Video DVD-R
NOTES:
- Depending on the DVD, you may not be able to change the angles even if multi-angles are recorded on the disc.
- You can use the Pause, Slow, Search or Skip feature in the zoom mode.
Changing angles
When playing back a disc recorded with multi-angle facility, you can change the angle that you are viewing the scene from.
1 Press ANGLE during playback. The current angle will appear.
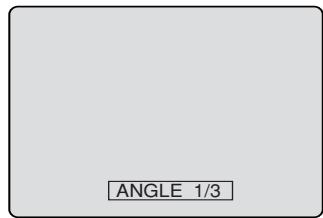
2 Press ANGLE repeatedly until the desired angle is selected.
Zooming
This unit will allow you to zoom in on the frame image. You can then make selections by switching the position of the frame.
1 Press ZOOM during playback. The center part of the image will be zoomed in. Each press of ZOOM will change the ZOOM "x2", "x3" and "x4".
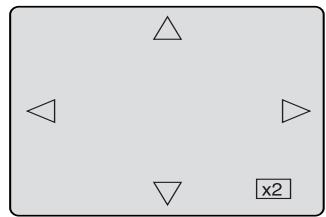
natural_image
Simple diagram with four triangles and a labeled box 'x2' (no text or symbols within the shapes)2 Press ▲/▼ or ◀/▶ to view a different part of the frame. You may move the frame from the center position to UP, DOWN, LEFT or RIGHT direction.
3 In the zoom mode press ZOOM repeatedly to return to a 1:1 view "x1".
Changing soundtrack language / Subtitles
DVD-VIDEO
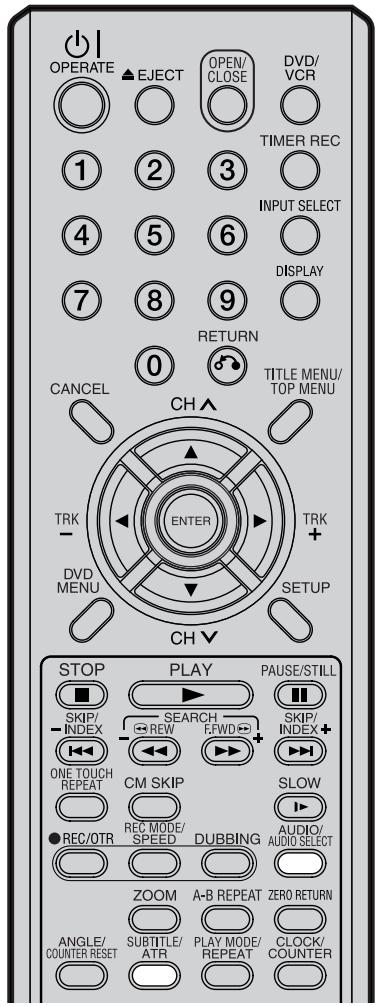
NOTES:
- If the desired language is not heard after pressing the button several times, the language is not recorded on the disc.
- Changing soundtrack or subtitles language is cancelled when you open the disc tray. The initial default language or available language will be heard and seen if the disc is played back again.
- Depending on the DVD you may be unable to turn on, turn off, or change the subtitles, even if they are recorded on the disc. While playing the DVD, the subtitles may change while opening or closing the disc tray, or while changing the title.
- In some cases, the subtitles language is not changed to the selected one immediately.
Changing soundtrack language
You can select the language when you play a multilingual disc.
1 Press AUDIO during playback. The current soundtrack language will appear.
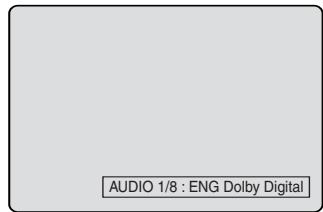
2 Press AUDIO repeatedly until the desired language is selected. The on-screen display will disappear after a few seconds.
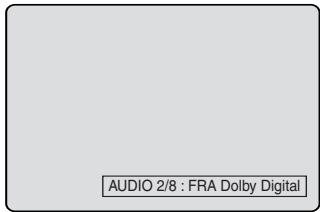
In case of VIDEO CD playback
Audio type will change as follows each time you press AUDIO.
VIDEO CD
flowchart
graph TD
    A["AUDIO LR"] --> B["AUDIO L"]
    B --> C["AUDIO R"]
    D["AUDIO 1/2 LR"] --> E["AUDIO 1/2 L"]
    E --> F["AUDIO 1/2 R"]
    G["AUDIO 2/2 LR"] --> H["AUDIO 2/2 L"]
    H --> I["AUDIO 2/2 LR"]
    J["S-VCD"] --> A
    K["S-VCD"] --> C
    L["S-VCD"] --> D
    M["S-VCD"] --> G
    N["S-VCD"] --> F
    O["S-VCD"] --> I
Turning the subtitles On and Off
When playing back a disc recorded with subtitles, you can turn the subtitles on or off.
Press SUBTITLE during playback until "SUBTITLE OFF" appears.
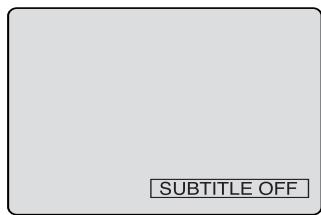
Changing the subtitles language
You can select the language when playing back a disc recorded with multilingual subtitles.
Press SUBTITLE repeatedly during playback until your desired language appears.
The on screen display will disappear after a few seconds.
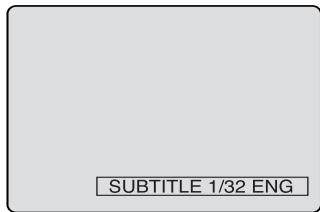

This section describes the TRACK INFO screen where music CDs can be played back using the various operations.
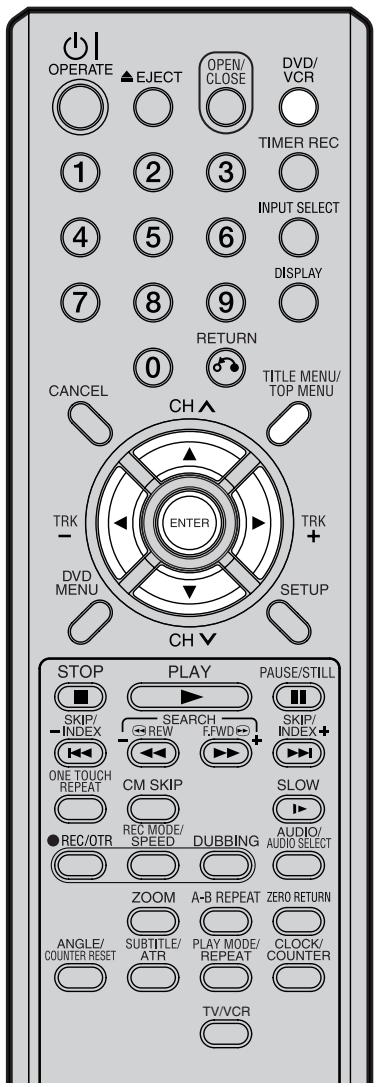
NOTES:
- In case the disc includes more than 10 tracks, you can turn to the next or the previous page. Press ◀, then press ▼ or ▲ to display next/previous page. To return to normal use, press ▶.
- You cannot switch to the VCR mode when the TRACK INFO screen is showing. Press TITLE MENU/TOP MENU to clear the TRACK INFO screen, then press DVD/VCR to switch to the VCR mode.
Preparation:
- Turn ON the TV and select its AV channel (this may be labelled EXT / AUX etc.)
- Load the music CD.
- Press DVD/VCR to select the DVD mode. (The DVD indicator will light.)
Press TITLE MENU/TOP MENU. The TRACK INFO screen will appear.
The elapsed time and total time of the music data (during playback)
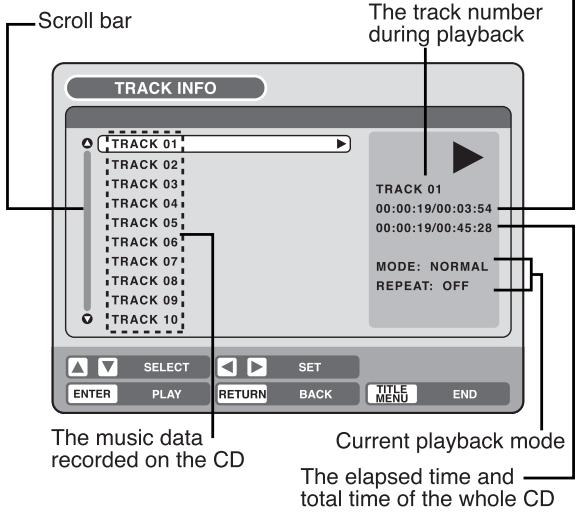
Press ▶. The menu list will appear.
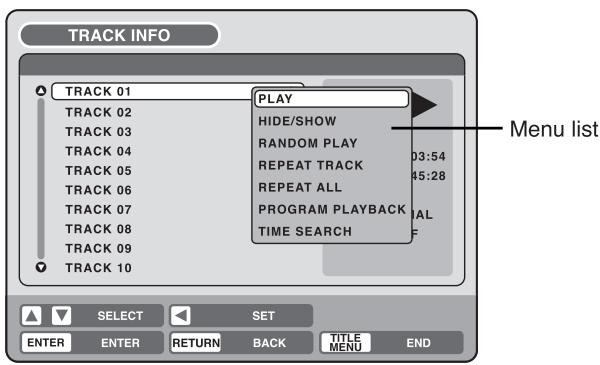
Playing back a selected track
1 Press ▲ or ▼ to select the track number you want to playback and press ▶.
2 Press ▲ or ▼ to select "PLAY" from the menu list and press ENTER. The selected track will be played back.
Excluding specified track
1 During stop, press ▲ or ▼ to select the track number you do not want to playback and press ▶.
2 Press ▲ or ▼ to select "HIDE/SHOW" from the menu list and press ENTER.
The selected track will not be played back. ("H" appears at the side of the track number.)
When you want to cancel the exclusion, press ▲ or ▼ to select the track number with "H" and press ▶. Press ▲ or ▼ to select "HIDE/SHOW" from the menu list and press ENTER, "HIDE" will be cancelled.
CD
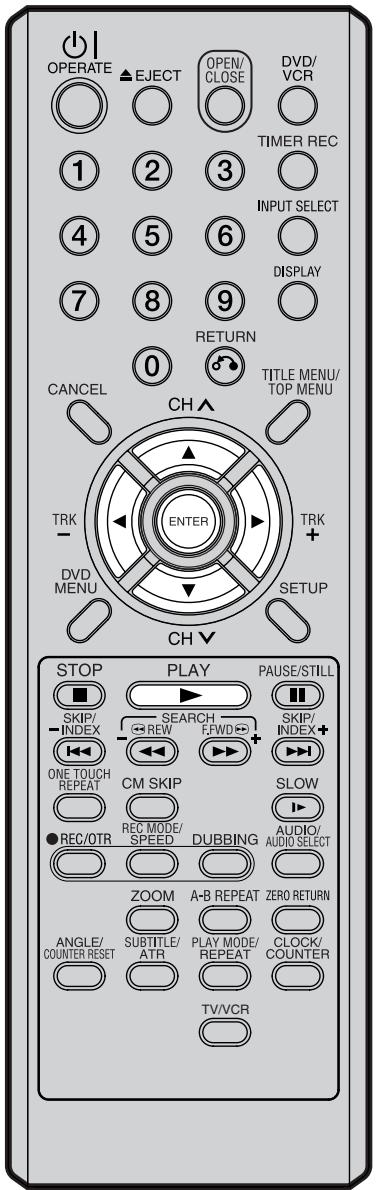
NOTE:
When playing a CD-R/CD-RW recorded in the MP3 or WMA format, "RANDOM PLAY" and "TIME SEARCH" will not appear in the menu list.
Random playback
1 Press ▲ or ▼ to select "RANDOM PLAY" from the menu list and press ENTER.
The order of music tracks is randomly changed.
2 Press PLAY.
Music is played back in random order.
To cancel random playback, select "RANDOM PLAY" from the menu list again, and press ENTER.
Repeat playback of selected track
1 Press ▲ or ▼ to select the track number you want to repeat playback and press ▶.
2 Press ▲ or ▼ to select "REPEAT TRACK" from the menu list and press ENTER.
3 Press PLAY.
The selected track will be played back repeatedly.
To cancel repeat track playback, select "REPEAT TRACK" from the menu list again, and press ENTER.
Repeat playback of all tracks
1 Press ▲ or ▼ to select "REPEAT ALL" from the menu list and press ENTER.
2 Press PLAY.
All tracks on CD will be played back repeatedly.
To cancel the repeat all playback, select "REPEAT ALL" from the menu list again, and press ENTER.
Playing back programs
You can specify the playback order yourself.
1 Press ▲ or ▼ to select "PROGRAM PLAYBACK" from the menu list and press ENTER.
2 Press ▲ or ▼ to select to the track number that you want to change the order of and press ENTER.
The “▶” mark will appear at the right side of the track number.
3 Press ▲ or ▼ to select to the track number that you want to specify and press ENTER.
The track number that you select in step 2 move to the before position that you specified track.
4 Repeat steps 2 and 3 to change the playback order.
5 Press PLAY.
The tracks will be played back in the changed order.
To cancel program playback, select "EXIT PROGRAM MODE" from the menu list and press ENTER.
Playing back track by specifying the time
1 Press ▲ or ▼ to select "TIME SEARCH" from the menu list during playback and press ENTER.
2 Press ▲/▼ or ◀/▶ to specify the elapsed time of the track (this will be the starting point of playback) and press ENTER. Playback will start from the specified elapsed time.

MP3/WMA files can be played back. Also, you can display JPEG files on the TV screen and enjoy them as a slide show.
Some discs may not play due to the condition of the recording.
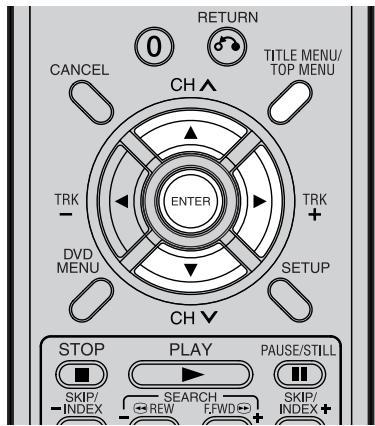
Limitations on MP3/WMA/JPEG CD playback:
- MP3/WMA/JPEG CD is a disc that is standardised by ISO9660.
- The directory and file names of the MP3/WMA/JPEG CD must correspond to the ISO standardised file names.
- This unit can read 200 files per disc. If one directory has more than 200 files, it reads up to 200 files, the remaining files will be omitted.
- The unit is able to recognise up to a maximum of 50 directories per disc.
- MP3/WMA CDs cannot be used for playback for the purpose of duplicating.
- MP3/WMA/JPEG CDs may be used for playback, but not for recording.
- If the CD has both audio tracks and MP3/WMA/JPEG files, only audio tracks are played.
- It may take more than one minute for this unit to read MP3/WMA/JPEG files depending on its structure.
- Music recorded by “Joliet Recording Specification” can be played back. Long file names will be cut.
- The music files recorded by “Hierarchical File System” (HFS) cannot be played.
Preparation:
- Turn ON the TV and select its AV channel (this may be labelled EXT / AUX etc.)
- Load the disc storing MP3, WMA or JPEG.
- Press DVD/VCR to select the DVD mode. (The DVD indicator will light.)
Using the BROWSER screen
1 Press TITLE MENU.
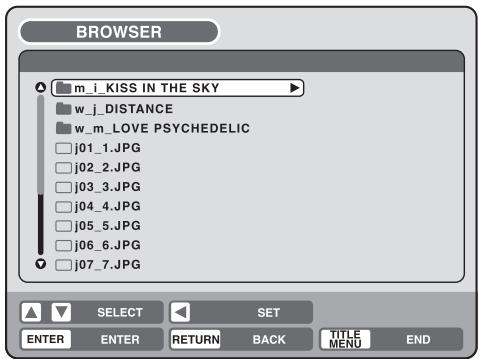
The BROWSER screen will appear.
2 The MP3, WMA and JPEG files and folders stored in the disc are displayed on the BROWSER screen.
- Select a folder and press ENTER. The files in the folder appear.
When the file to be displayed is selected
You can select the file types to be displayed on the BROWSER screen.
1 Press ▶ and then press ▲ or ▼ to select "SELECT FILES" and press ENTER.
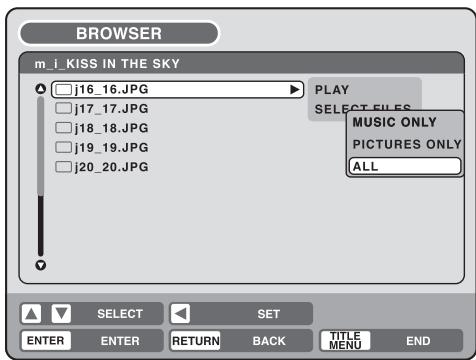
The following list will appear.
MUSIC ONLY: Only the MP3/WMA files appear.
PICTURES ONLY: Only the JPEG files appear.
ALL: All files and folders appear.
2 Select one item in the above list and press ENTER. The display will be changed to the selected display type.
CD
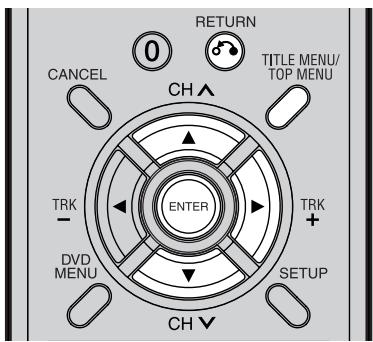
MP3 CD
- MP3 files must have the extension letters “.mp3”.
- Standard, sampling frequency, and the bit rate:
MPEG-1 Audio
32kHz, 44.1kHz, 48kHz
32kbps to 320kbps (constant bit rate or variable bit rate)
- The recommend recording setting for a high quality sound is 44.1kHz of sampling frequency and 128kbps of constant bit rate.
WMA CD
- When creating a WMA disc, make sure that the copyright function is off. DRM (Digital Rights Management) files cannot be played back.
- WMA files must have the extension letters “.wma”.
- Standard, sampling frequency, and the bit rate:
WMA version 7 and 8
32kHz, 48kbps
- Music files recorded as mono, 48kHz, 48kbps cannot be played back by this unit.
Playing back MP3/WMA files
1 Press ▲ or ▼ to select MP3/WMA file.
- In case the disc includes more than 11 files, you can turn to the next or the previous page. (See page 37.)
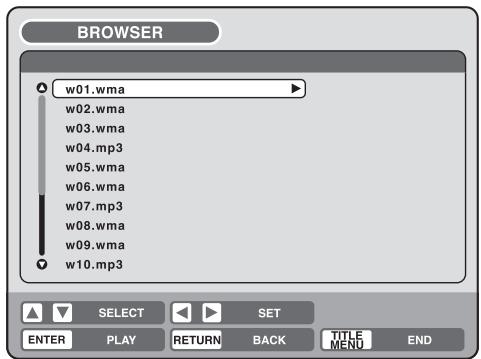
2 Carry out either of the item a or b below.
a: Press ENTER.
b: Press ▶ and then press ▲ or ▼ to select "PLAY" and press ENTER.
The TRACK INFO screen appears to playback the selected file. For the details of the TRACK INFO screen, see “Various operations on CD” on page 37.
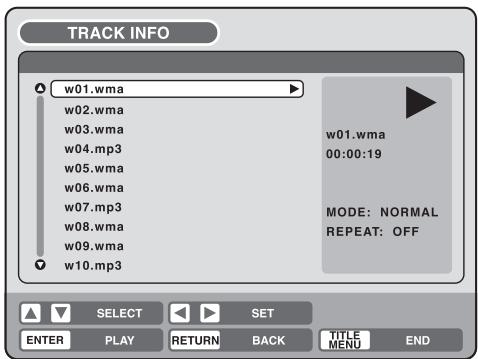
3 To return to the BROWSER screen, press RETURN.
- To stop playback of the MP3/WMA files, press TITLE MENU.
CD
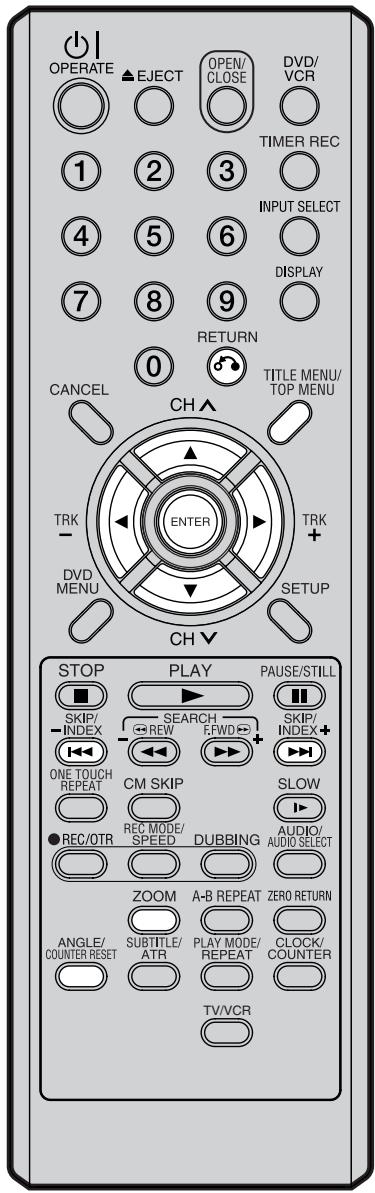
JPEG CD
JPEG files must have the extension letters “.jpe”, “.jpeg” or “.jpg”.
Playing back JPEG files
1 Press ▲ or ▼ to select JPEG file.
- In case the disc includes more than 11 files, you can turn to the next or the previous page. (See page 37.)
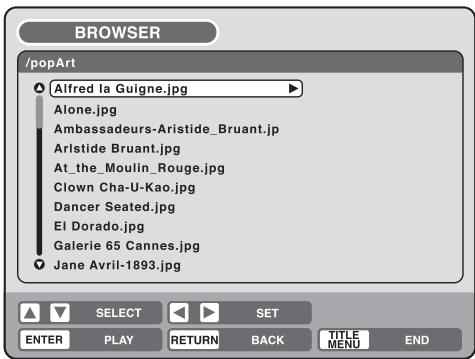
2 Select either a or b as below:
a: Press ENTER.
b: Press ▶ and then press ▲ or ▼ to select "PLAY" and press ENTER.
The thumbnail images of the JPEG files stored in the route directory or the folder appear.
Press ▲, ▼, ◀ or ▶ to select the pages of the thumbnail images, or select the JPEG file to be displayed at first for the slide show.
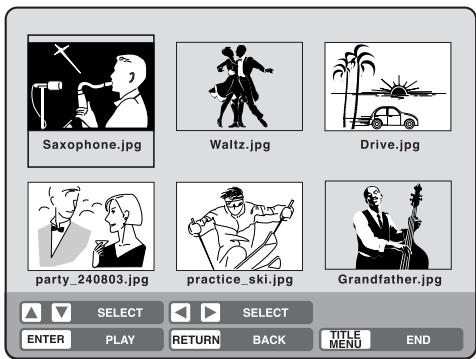
3 Press ENTER to play the selected picture.
If you have set the interval time for JPEG slide show, the pictures will be played back one after another automatically. (See page 25.)
- Press ZOOM to enlarge the displayed image.
- Press ANGLE to rotate the image by 90 degrees each time.
- To display the next or the previous picture, press SKIP ▶▶▶ I or ◀◀◀.

natural_image
Silhouette of a person using a wind turbine to smoke, with a wind turbine and fan in the background (no text or symbols)4 To return to the thumbnail screen, press RETURN.
- To stop the slide show, press TITLE MENU.
Loading and unloading a cassette tape
VCR
Use only video cassette tapes marked VHS. PAL
Loading
Push the center of the tape until it is automatically inserted.
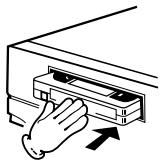
Insert the cassette tape with its labeled side facing up and the erase prevention tab positioned at your left. An inverted cassette tape cannot be inserted.
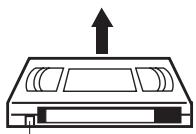
Erase prevention tab

Automatic power ON
When you insert a cassette tape the VCR power will turn ON automatically.
Automatic playback
When loading a cassette tape without an erase prevention tab, playback will start automatically.
Unloading
You can eject the video tape while the unit is turned off.
1
Press

(EJECT) on the unit or the remote con-

natural_image
Simple gray rectangular shape with a black upward-pointing triangle inside, no text or symbols present.2
Remove the cassette tape.
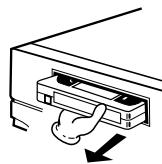
Automatic tape eject
This VCR will automatically rewind the tape when the tape has ended. And when the tape is rewound to its beginning, the cassette tape will be ejected automatically.
To prevent accidental erasure
Remove the erase prevention tab with a screwdriver.
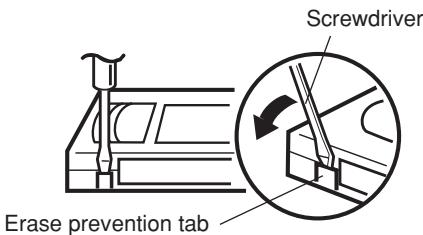
To record again
Cover the hole with a piece of adhesive tape.
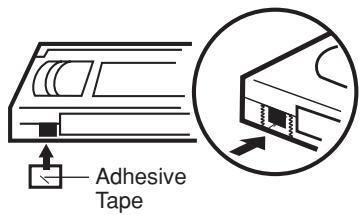
Tape speed and maximum recording time
| Tape speed | Video cassette tape | ||||
| E-240 | E-180 | E-90 | E-60 | E-30 | |
| Standard Play (SP) | 4 hours | 3 hours | 1 1/2 hou. | 1 hour | 30 min. |
| Long Play (LP) | 8 hours | 6 hours | 3 hours | 2 hours | 1 hour |
VCR
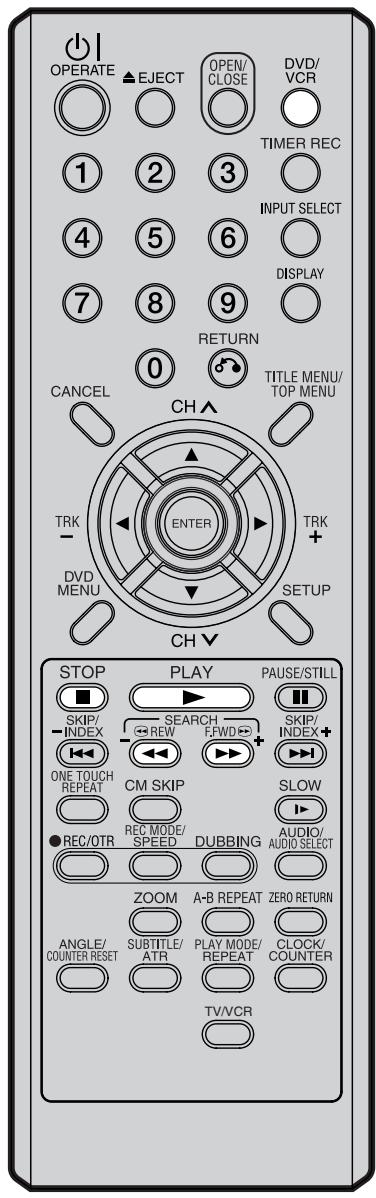
NOTES:
- This VCR selects the playback tape speed SP or LP automatically.
- A cassette tape and DVD disc can be played back simultaneously. If you press DVD/VCR, the tape playback and DVD playback alternate with each other on the screen.
Preparation:
- Turn ON the TV and select its AV channel (this may be labelled EXT / AUX etc.)
- Press DVD/VCR to select the VCR mode. (The VCR indicator will light.)
1 Load a prerecorded tape (When loading a cassette tape without the erase prevention tab, playback will start automatically).
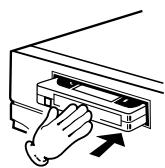
2 To start playback
Press PLAY.
Playback will start.
If the cassette has not loaded yet, will blink for approx. 4 seconds.

natural_image
Blank gray rounded rectangle with a black arrow pointing right (no text or symbols)To stop playback
Press STOP once.
The tape will stop but remain fully loaded and ready to play.

natural_image
Blank gray rectangle with a small black square in the top-right corner (no text or symbols)To rewind the tape or forward it rapidly
Press STOP.
To rewind the tape:
Press REW.

natural_image
Blank gray rounded rectangle with a black double arrow in the top-right corner (no text or symbols)To forward the tape:
Press F.FWD.

natural_image
Blank gray rectangular frame with a black right-pointing arrow in the top-right corner (no text or symbols)To stop the tape winding, press STOP. To switch to playback directly (without STOP), press PLAY.
Forward/Reverse picture search mode
When the tape is being wound, you can switch to picture search mode (see next page). To do this, press REW or F.FWD and hold it down. The unit will resume the tape winding as soon as the button is released.
NTSC video cassette playback
When using a pre-recorded NTSC video cassette tape, the connected TV set must be compatible with a 60Hz vertical frequency (sometimes known as a PAL 60Hz feature). Otherwise the on-screen picture will be affected by vertical rolling. Even if your VCR set is capable of processing NTSC video signals, the picture may be shortened vertically (appearance of black bars at the top and at the bottom of the TV screen). The dubbing of a NTSC video cassette tape to a standard PAL VCR is not possible.

Picture search
Reverse picture search function
Press REW x 1 or x 2 during the playback.
Forward picture search function
Press F.FWD x 1 or x 2 during the playback.
To return to playback: Press PLAY.
Still picture
Press PAUSE/ STILL during playback.
To resume normal playback: Press PLAY.
Slow motion
During playback press SLOW.
You can change the slow speed by the additional pressing of SLOW.
To return to playback: Press PLAY.
Slow tracking and vertical lock adjustment
If noise bars appear in the picture during slow motion, press the TRK (TRACKING) + or – to reduce the noise bars.
If the still picture jitters excessively, press
TRK (TRACKING) + or – to stabilise the still picture.
Frame by Frame picture
Press PAUSE/ STILL during playback.
Press SLOW one by one: The picture advances frame by frame.
To return to playback: Press PLAY or PAUSE/ STILL.
Adjusting tracking condition
Automatic tracking adjustment
Whenever you insert a tape and start playback, automatic tracking starts working and continuously analyses the signal to enable optimum picture quality during playback.
Manual tracking adjustment
If automatic tracking cannot eliminate noises well during playback, press TRK (TRACKING) + / ▶ or TRK
(TRACKING) – / ◀ to eliminate the noises. “MANUAL TR.” will appear. Press it briefly for a fine adjustment, or press and hold for more severe adjustments.
To return to automatic tracking, press ATR.
"AUTO TR." will appear.
NOTES:
- The audio output is muted during SPEED SEARCH, STILL, FRAME ADVANCE and SLOW MOTION.
- During picture search mode there will be noise bars which are caused by the system.
- The Special Playback will automatically change to playback after approx. 5 minutes to protect the video tape against excessive wear.
Repeat playback
The entire video tape will be played until its end. The tape will then automatically rewind to the beginning and the playback will be repeated.
1 Press REPEAT.
2 By pressing REPEAT each time, "REPEAT ON" or "REPEAT OFF" is selected in turn.
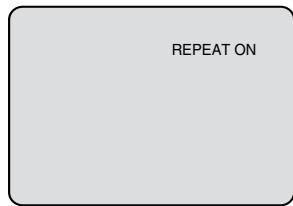
3 When "REPEAT ON" is selected, the tape is played back to the end, and then, it is automatically re-wound to the starting point and played back again. To cancel repeat playback: Press REPEAT to select "REPEAT OFF".
Commercial skip
Press CM SKIP during playback.
The video is rapidly forwarded for approx. 30 seconds and playback resumes.
You may press the button up to six times in a row to move 180 seconds ahead.
To display VCR operation status
Press DISPLAY. The clock, day of the week and more information will be indicated.
While watching TV
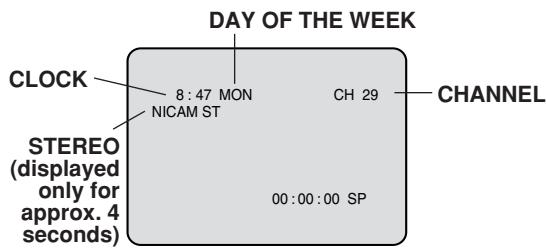
While operating a tape
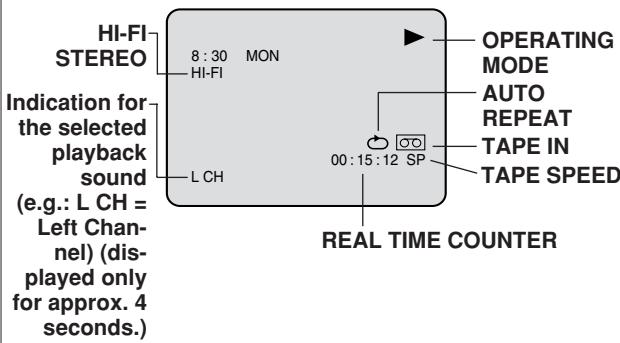
To cancel the display: Press DISPLAY again.
ZERO RETURN function / Video index search system

ZERO RETURN function
This function makes tape rewinding (or forwarding) stop at the counter “00:00:00” position automatically.
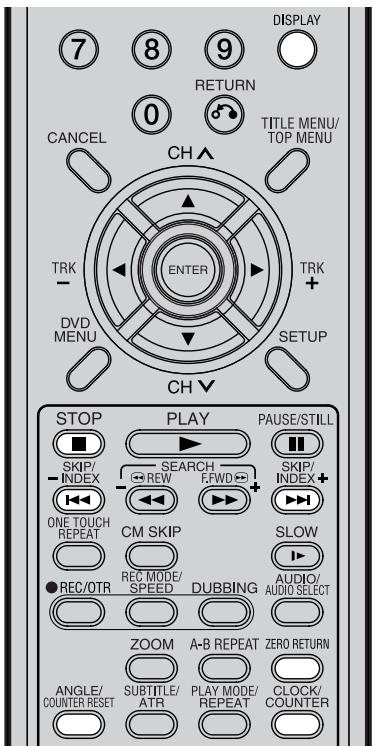
NOTES for Counter Display:
- If you rewind the tape beyond "00:00:00", a minus sign ("−") will be displayed in front of the time.
- When you load a tape, the counter will reset to "00:00:00".
- The counter does not function on nonrecorded (blank) sections of the tape. When you rewind, fast forward or play tapes through blank sections, the counter stops.
NOTES for Video index search system:
- When you record an INDEX mark at the very beginning of the tape, the mark may not be found.
- During INDEX search, the tape may stop and begin to play at a slightly different location.
- INDEX may not function properly with old or worn out video tapes.
- INDEX marks may not be found if it is extremely close to the point where the search began.
- In recording, if you stop recording temporarily, the INDEX mark is not recorded on the tape.
1 Press DISPLAY.
The counter display shows the tape running time during playback or recording.

2 Press COUNTER RESET at the desired tape position. The counter display will be reset to the "00:00:00" position (e.g. the beginning of recording).
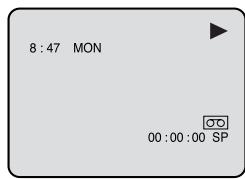
3 Press STOP when playback or recording is finished.
Press ZERO RETURN.
The tape will be rewound or fast forwarded and automatically stop at the "00:00:00" position.
Switching the display between clock and counter
Press CLOCK/COUNTER. The clock and tape counter alternate with each other in the display.
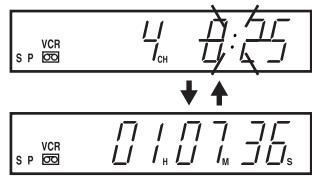
Video index search system
This function enables you to locate the beginning of any recording made on the VCR.
Recording an INDEX MARK
The Index search function automatically records an INDEX mark on the tape whenever a recording is initiated.
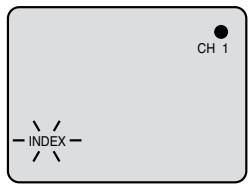
Index search
Press INDEX ▶▶ or ◀◀ during stop or play mode.
For Succeeding programs: Press INDEX ▶▶I.
For Preceding programs: Press INDEX ◀◀. (Additional press increases the INDEX NO. up to 9.)
When the INDEX ▶▶ or ◀◀ is pressed, the unit starts searching the INDEX NO. selected and finds the portion, then playback starts automatically.
To stop the Index Search, press STOP.
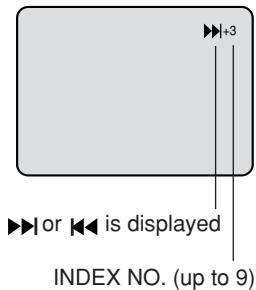
Read this before recording on disc
This section explains things you must know to record onto a disc. Read it before attempting to record.
NOTE:
Should a power failure occur or should the AC cord plug be disconnected while recording, editing, initializing, finalising or any other function, the program being recorded will be lost or the disc may not be playable. Manufacturer can not guarantee against loss of program or disc should this occur. To start recording again, re-format the disc or use a new disc and follow the instruction on recording.
NOTES:
Recording time can change for the following reasons.
- When image quality is poor as during poor TV reception.
- When recording on a disc that has been edited before.
- When the video is followed with recordings of still images or just audio.
Types of disc
You can use DVD-RW and DVD-R discs to record video.
DVD-RW discs
- Ver 1.1 and later discs can be formatted for recording in either of the two modes: the VR mode or the Video mode. Ver.1.0 discs can only be formatted for recording in the VR mode.
- High quality images and sound can be repeatedly recorded about 1,000 times.
- A disc formatted in the VR mode can have as many as 99 original titles and playlist titles each. Discs formatted in the Video mode can have up to 99 original titles.
DVD-R discs
• Discs can only be recorded in the Video mode.
• Discs can be recorded only once.
- Up to 99 titles can be created.
For more information on recording format, see “Recording format” (page 8).
Notes on recording in the Video mode
- The Video mode cannot be selected for Ver. 1.0 DVD-RW discs.
- The remaining available area on the disc decreases as recording progresses. Additional contents can be recorded in the remaining time area, but it cannot be overwritten into the recorded area.
- To format a new DVD-RW in the Video mode, set the automatic format feature to the Video mode. (See page 21.)
Recording modes
There are 4 modes for recording on disc. Recording time and quality vary according to mode.
| Recording mode | Recording time | Quality |
| XP | Approx. 60 min | Can record high quality images. |
| SP | Approx. 120 min | Can record normal quality images. |
| LP | Approx. 240 min | Quality deteriorates slightly, but recording time is longer. |
| SLP | Approx. 360 min | Recording time is prioritised over quality. |
- Recording time above is based on a 4.7GB disc.
Since DVD recording is performed using VBR (Variable Bit Rate), recording time varies according to the recorded content.
To know the correct recording time, stop recording and check the media information. (See page 30.)
NOTES:
- When using one touch timer recording to record on a DVD disc, it takes some time from when you press ● REC/OTR until recording actually starts.
Press ● REC/OTR a little before your preferred starting point. - Even if STOP is pressed during recording, recording does not stop instantly. Recording may continue for as long as 5 seconds maximum in the VR mode or 30 seconds maximum in the Video mode.
- Because of characteristics peculiar to digital video compression technology, scenes with fast motion may appear as a matrix of larger blocks.
- During recording, if the picture noise continues for 1 minute, the recording will stop automatically.
Disc remaining time
VR mode
- Recording is possible as long as there is available space on the disc. (Finalised discs can be recorded by cancelling the finalisation, see “UNDO FINALISE” on page 21.)
- Erasing unnecessary title frees up available space on the disc. (Titles can be erased from finalised discs by first undoing the finalisation. See “UNDO FINALISE” on page 21.)
Video mode
- Up until the disc is finalised, recording is possible as long as there is available space on the disc. (Once the disc has been finalised, additional recording and erasing are not possible.)
- The remaining time cannot be increased, nor can recorded title be overwritten.
- Titles cannot be erased nor can recorded titles be overwritten.
Images that cannot be recorded
Some DVD-Video and broadcasts contain copy-restriction signals to protect copyrights. There are 3 types of copy-restriction signals: "Copy Free", "Copy Never" and "Copy Once".
"Copy Free" (unrestricted recording)
Land-based TV broadcasts and images you record yourself with a video camera allow unrestricted recording. There are no restrictions on recording.
"Copy Never" (recording prohibited)
- Images that contain the recording prohibited signal cannot be recorded.
- If the recording prohibited signal appears halfway through an image you are recording, recording is paused at that instant. When the recording prohibited signal ends, recording resumes.
- This unit incorporates a built-in copy guard. It cannot record software or broadcasted programs that contain copy restriction signals designed to protect copyright, etc.
"Copy Once" (one-time recordable)
Programs (images) that contain the one-time recordable signal can be recorded only in the VR mode using a DVD-RW disc that supports CPRM Ver. 1.1.
Recording a TV program

You can record programs you watch on TV onto video tapes or DVDs.
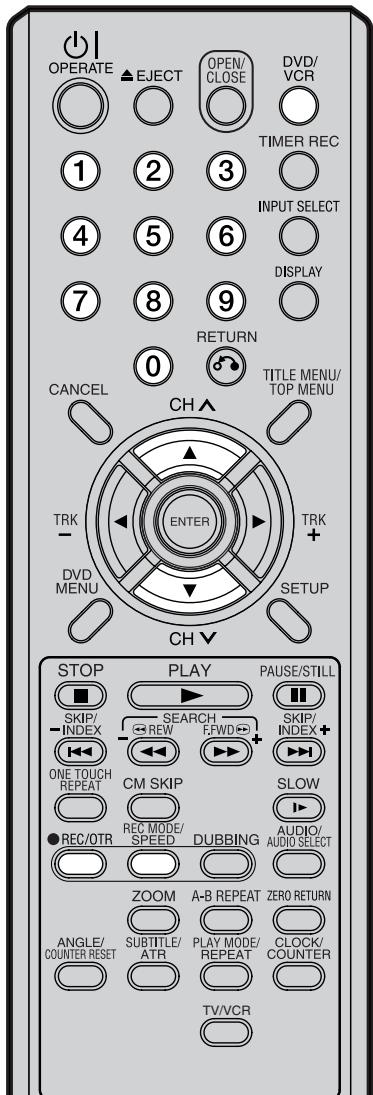
NOTES:
- When recording onto a DVD, it takes some time from when you press ● REC/OTR until recording actually starts.
Press ● REC/OTR a little before your preferred starting point.
With a video tape, recording starts almost at the same time you press
- REC/OTR.
- If the erase prevention tab of video tapes is removed, the tape will eject when ● REC/OTR is pressed for recording.
Preparation:
- Turn ON the TV and select its AV channel (this may be labelled EXT / AUX etc.)
- Load a recordable DVD or video tape into the unit.
- Press DVD/VCR to select the appropriate mode.
1 Press REC MODE/SPEED to select the recording mode.
The recording mode will appear on the TV monitor and change every time REC MODE/SPEED is pressed.
Video recording modes: SP/LP DVD recording modes: XP/SP/LP/SLP
SP is the normal recording mode for video tapes. LP offers 2 times the recording time as SP. For more information on DVD recording modes, see page 46.
VCR mode
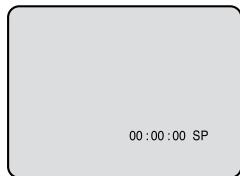
DVD mode

2 Press the numeric keys or CH ∧/∨ to select the channel to be recorded.
1\~9 : e.g. 5 = press "5" 10\~80 : e.g. 29 = press "2" and "9" within 2 seconds.
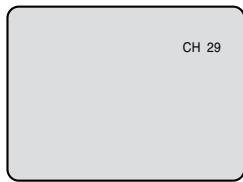
3 Press ● REC/OTR.
“●” appears on the screen for about 4 seconds and recording will start.
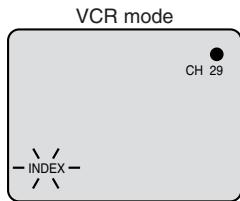
DVD mode

natural_image
Blank gray rectangle with a small black dot in the top-right corner (no text or symbols)DVD-RW VR DVD-RW Video DVD-R VCR
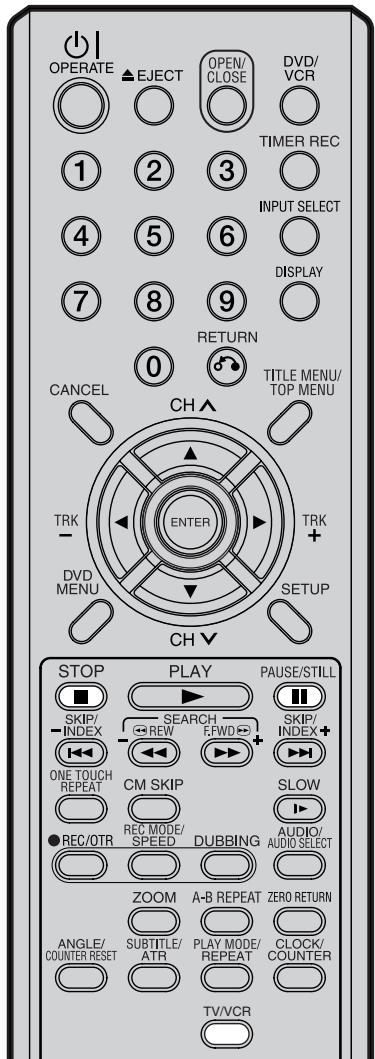
Auto Rewind feature
This VCR will automatically rewind the tape when the tape has ended (except during OTR and TIMER REC). It will also eject the tape.
NOTES:
- If the disc space become full, the recording is stopped and “RE CORDING INTERRUPTED” will appear on the screen.
- In the event of a power failure during DVD recording including OTR and TIMER REC, the program can not be recorded on the disc.
When the power resumes, after the VCR/DVD is turned on, the set checks the disc to repair the error which is caused by a power failure. This checking process may require a few minutes to about 1 hour according to disc condition. In this process “SYSTEM ERROR PLEASE WAIT DISC CHECKING” will appear on the screen.
To stop recording
Press STOP to stop recording.
NOTE:
When recording onto a DVD, even if STOP is pressed during recording, recording does not stop instantly. Recording may continue for as long as approx. 10 seconds in the VR mode or 30 seconds maximum in the Video mode.

natural_image
Blank gray rectangle with a small black square in the top-right corner (no text or symbols)To stop recording temporarily
Press PAUSE/ STILL to avoid recording unwanted material.
“I’ll” will appear on screen for about 4 seconds.
Press again to resume recording.

NOTES:
- In the recording onto a video tape, the pause function will be released after 5 minutes to prevent damage the video tape. The unit will change to the STOP mode.
- When recording onto a video tape, you can change a recording channel in the recording pause mode. (You cannot change a recording channel in the DVD recording pause mode.)
Recording one program while watching another
While the unit is recording, press TV/VCR to select the TV position.
The “VCR” in display window will go off and recording will continue.
Select the TV channel you want to watch by using the TV channel selector.
One-touch Timer Recording (OTR)

The One-touch Timer Recording feature provides a simple and convenient way to make a timed recording.
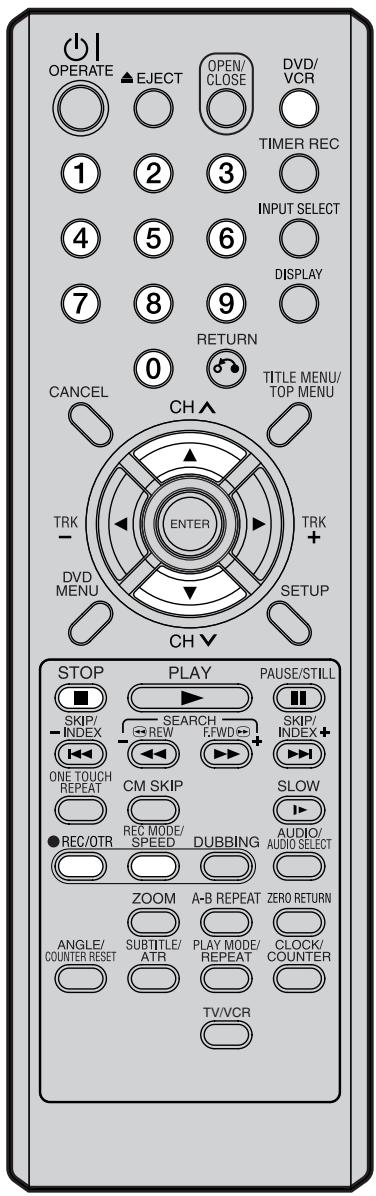
NOTE:
If you wish to watch the DVD playback during the VCR OTR, press DVD/VCR to change to DVD mode and perform the DVD playback. You can also playback the VCR during DVD OTR.
Preparation:
- Turn ON the TV and select its AV channel (this may be labelled EXT / AUX etc.)
- Load a recordable DVD or video tape into the unit.
- Press DVD/VCR to select the appropriate mode.
Example: One-touch Timer Recording for 30 minutes.
1 Press REC MODE/SPEED to select the recording mode. For the recording mode, see the step 1 on page 48.
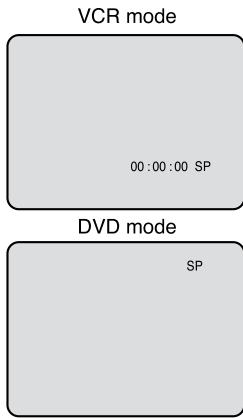
2 Press numeric keys or CH ∧/∨ to select the channel to be recorded.

3 Press ● REC/OTR. Each additional press of ● REC/OTR will increase recording time as shown in the chart below, up to a maximum of 6 hours. The OTR and recording time will appear on the screen for about 4 seconds.
| Press | Recording time | Press | Recording time |
| once | NORMAL REC | 7 times | OTR 3:00 |
| twice | OTR - : - - | 8 times | OTR 4:00 |
| 3 times | OTR 0:30 | 9 times | OTR 5:00 |
| 4 times | OTR 1:00 | 10 times | OTR 6:00 |
| 5 times | OTR 1:30 | 11 times | NORMAL REC |
| 6 times | OTR 2:00 | ||
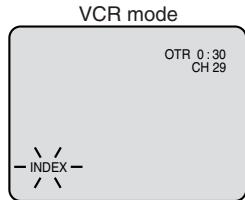
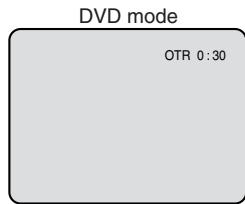
To cancel OTR
Press STOP or turn off the power.

natural_image
Blank gray rectangle with a small black square in the top-right corner (no text or symbols)
The timer recording system allows you to select the date, time and channel and record the desired programs. Up to 8 timer programs within a month can be stored in this unit.
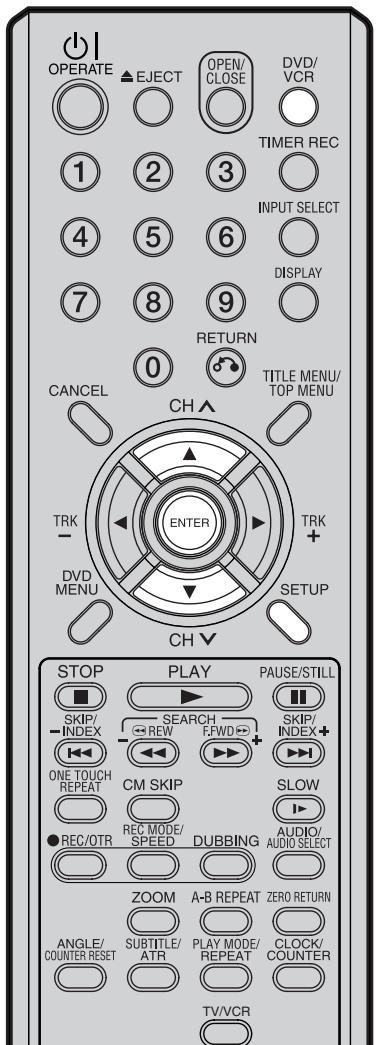
NOTE:
In the event of a power failure the data of the automatic recording will be maintained in the built-in memory for about 30 minutes. Also, the clock will continue to run for this period of time. Thereafter the data will be deleted. When the power resumes, the time display will change to "0:00" that the timer setting will have to be set.
Setting timer recording
Preparation:
- Turn ON the TV and select its AV channel (this may be labelled EXT / AUX etc.)
- Load a recordable DVD or video tape.
- Press DVD/VCR to select the appropriate mode.
- Confirm that the clock is indicating the correct time.
Example: Set the recording mode to LP and record on DVD; the TV program is on channel 1 starting at 20:00 and stopping at 23:00 on a date of 20th.
1 Press SETUP. The SETUP MENU screen appears.
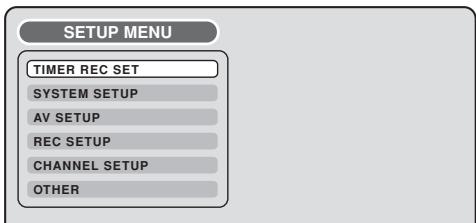
2 Press ▲ or ▼ to select "TIMER REC SET" and press ENTER. The TIMER REC SET screen will appear.
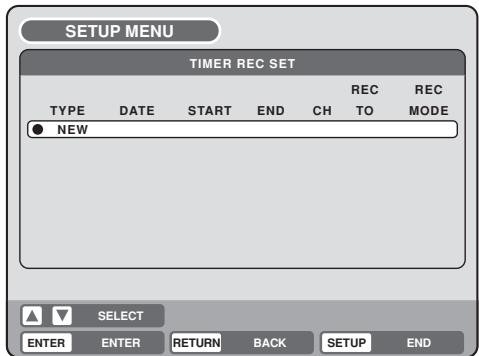
3 Press ▲ or ▼ to select "NEW" and press ENTER. The program screen will appear.
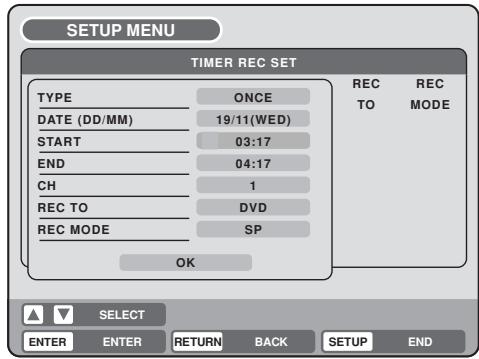
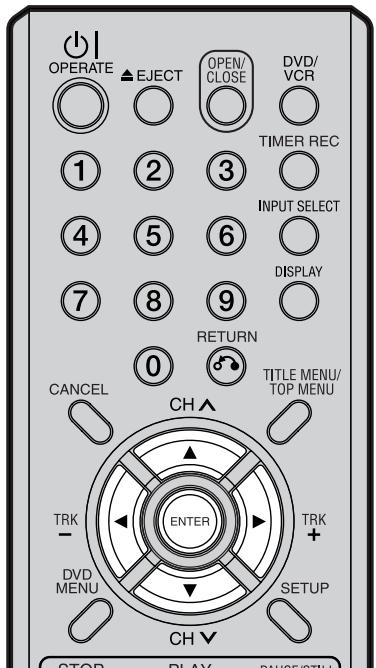
NOTES:
- If you select timer recording on a specified date only one time, select "ONCE" in the "TYPE" for recording. You can record same days of every week or from Monday to Friday using the item "TYPE". The items you can select are as follows: ONCE: Recording on the selected "DATE"
EVERY SUN: Recording every Sun. EVERY MON: Recording every Mon. EVERY TUE: Recording every Tue. EVERY WED: Recording every Wed. EVERY THU: Recording every Thu. EVERY FRI: Recording every Fri. EVERY SAT: Recording every Sat. MON-FRI: Recording from Mon. to Fri. MON-SAT: Recording from Mon. to Sat. EVERY DAY: Recording everyday. - The initial setting of “REC TO” and “REC MODE” can be changed using “Setting the recording”. (See page 24.)
4 Press ▲ or ▼ to select "TYPE" and press ENTER. Press ▲ or ▼ to select "ONCE" from the list and press ENTER.
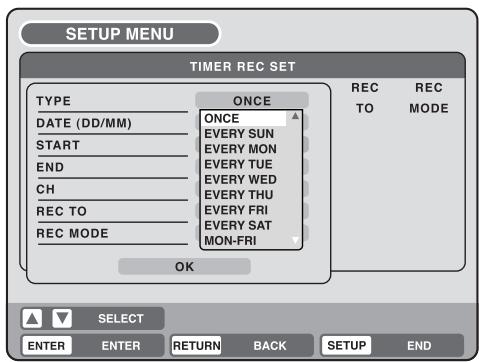
5 Press ▲ or ▼ to select "DATE" and press ENTER.
Press ▲ or ▼ to select the date to be recorded and press ENTER.
6 Press ▲ or ▼ to select "START" and press ENTER. Set the time when the recording is started.
- To switch over the selection item (hour or minute), press ◀ or ▶, then press ENTER.
- Press ▲ or ▼ to adjust the time.
• After setting the time, press ENTER.
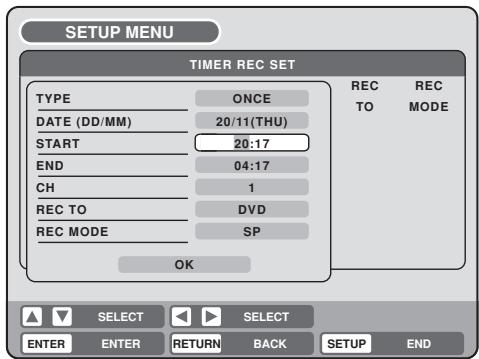
7 Press ▲ or ▼ to select "END" and press ENTER.
Set the stopping time in the same manner for setting the starting time of timer recording.
8 Press ▲ or ▼ to select "CH" and press ENTER.
- Press ▲ or ▼ to select the channel to be recorded and press ENTER.
- You can select the external input setting mode by pressing ▶. Then press ▲ or ▼ to select “AV1”, “AV2” or “AV3” and press ENTER.
9 Press ▲ or ▼ to select "REC TO" and press ENTER. Select the media (DVD or VCR) to be recorded from the list and press ENTER.
10 Press ▲ or ▼ to select "REC MODE" and press ENTER. The recording modes for the media selected in "REC TO" item are listed up. Select the recording mode and press ENTER. For the recording modes in VCR, see page 42, and for the recording modes in DVD, see page 46.
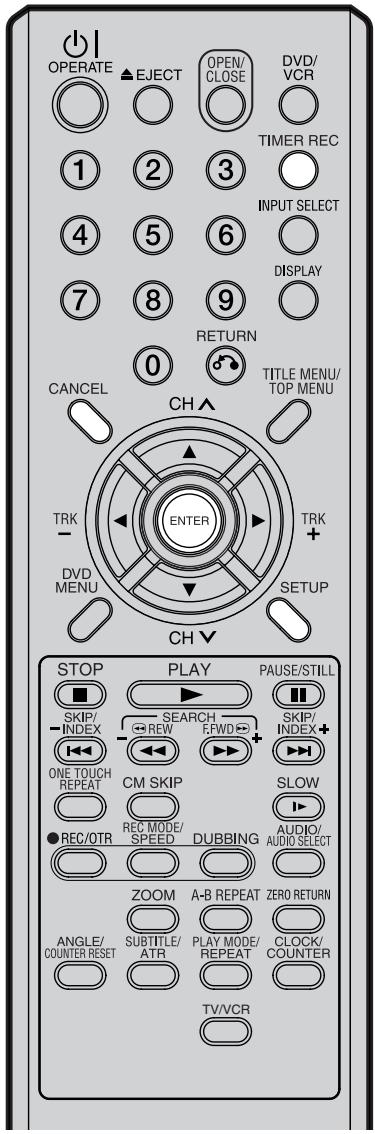
NOTES:
- Recording starts a few seconds before the preset starting time.
- You cannot use the timer recording for the both DVD and VCR at the same time.
- You can playback the DVD during the VCR timer recording, and you can playback the VCR during the DVD timer recording.
- If the clock symbol (☐) blinks when the timer recording ended, the TV program has not been completely recorded because of an insufficient capacity for DVD disc or video tape. Press TIMER REC to cancel the timer program.
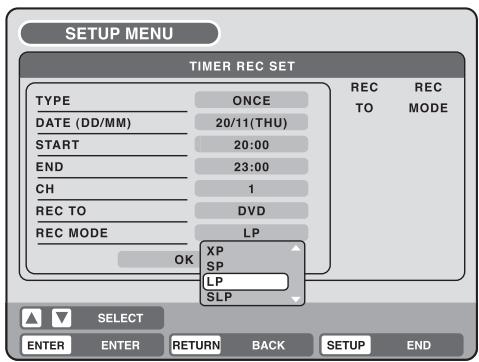
11 Select "OK" and press ENTER. The timer program is determined and the TIMER REC SET screen appears again.
12 When you enter the other program for the timer recording, repeat the steps 3 to 11.
13 Press SETUP. The TIMER REC SET screen disappears and the display will return to the normal screen.
14 Press TIMER REC. The timer indicator “☐” will appear on the display and the unit stands by for recording.
- If the program is DVD recording only, the unit will change to VCR mode automatically. (The DVD mode cannot be selected.)
- If the program is VCR recording only, the unit will change to DVD mode automatically. (The VCR mode cannot be selected.)
- If the programs are DVD and VCR recording, the unit will turn off. If you want to use the unit, press TIMER REC again to deactivate the timer.
- If the clock symbol (☐) blinks in the display in spite of the pressing of TIMER REC, the cassette may not have been loaded yet. (see page 42)
- If the cassette is ejected in spite of the pressing of TIMER REC, the erase prevention tab of the cassette may have been removed. (see page 42)
Checking or changing the timer recording
When you want to check the selected timer recording, follow the steps 1 and 2 of “Setting timer recording” and display the TIMER REC SET screen. To change the timer recording, select the program to be changed and press ENTER. The changing method is the same as that for the recording a program for the first time.
Cancelling the timer recording
Display the TIMER REC SET screen.
Select the program you want to cancel and press CANCEL, then the selected program will be erased from the timer recording list.
In case Timer programs-overlap
Do not overlap timer programs as portions of the conflicting programs will be lost. The first recording time has priority over the next recording time as shown in the diagram below.
In this case, the next recording time is delayed a maximum of about 1 minute.
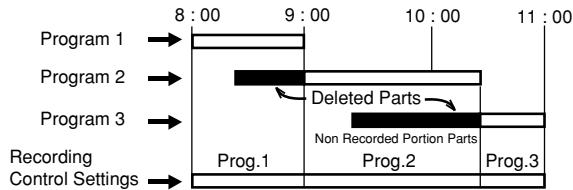
flowchart
graph TD
    A["Program 1"] --> B["8:00"]
    C["Program 2"] --> D["9:00"]
    E["Program 3"] --> F["10:00"]
    G["Recording Control Settings"] --> H["Prog.1"]
    I["Deleted Parts"] --> J["Prog.2"]
    K["Non Recorded Portion Parts"] --> L["Prog.3"]

This VCR/DVD is capable of recording sound in Hi-Fi system. The recording will be performed automatically. NICAM STEREO broadcasts are recorded in its original sound system regardless of the setting. If you wish to record NICAM programmes, select NICAM "AUTOMATIC" at "NICAM"-setting on page 24.
And, this VCR/DVD can also receive and record German A2 stereo program. The tape recording is always both in HiFi and in MONO on the standard longitudinal track. In case of bilingual TV programs always the two audio channels will be recorded (only in case of tape or DVD-RW VR recording).
NICAM programmes are divided into 4 types as shown below.
NICAM STEREO broadcast
“NICAM ST” illuminates when a NICAM STEREO broadcast signal is received.
NICAM ST
NICAM MONO A broadcast
“NICAM M1” illuminates when a NICAM MONO A broadcast signal is received.
NICAM M1
NICAM MONO A B broadcast
“NICAM M1/2” illuminates when a NICAM MONO A and MONO B broadcast signal is received.
NICAM M1/2
NICAM OFF
This will be displayed if a NICAM signal is received when "NICAM OFF" is selected in the AV SETUP MENU.
NICAM OFF
German A2 stereo sound reception:
Stereo program indication
It will be displayed for approx. 4 seconds when stereo programs are being received.
STEREO
Bilingual program indication
It will be displayed for approx. 4 seconds when bilingual programs are being received.
BILINGUAL
Playback
Use AUDIO SELECT to select under stereo/mono or bilingual playback. See the table below for more information.
| On-screen indications (for 4 sec.) | Stereo playback performed in: | Bilingual playback performed as follows: |
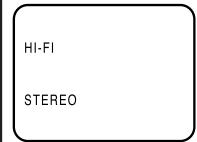 | Stereo | Simultaneously both languages from HiFi track (Mixed sounds) |
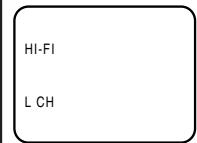 | Left channel signal output from both loudspeakers | One's mother tongue dubbing (Main sound) |
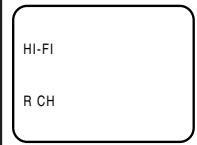 | Right channel signal output from both loudspeakers | Original sound track (Sub sound) |
 | Mono | One's mother tongue dubbing (Main sound) |
NOTE:
When playing HiFi cassette tapes recorded on another VCR, the sound output may be distorted. This is normal and no indication of a unit malfunction. Try to minimise sound distortions by using TRK (TRACKING) +/- or change to MONO by pressing of AUDIO SELECT.
This section explains how to edit the recorded contents on DVD-RWs. However, the items that you can edit vary with the recording formats. In VR mode, you can edit various title menus, whereas in Video mode, you can edit only a few items.
NOTES:
- This unit can not record or edit a disc which was recorded or edited using another DVD recorder.
- You cannot edit or record the disc on which disc protection is set. In such a case, be sure to cancel the disc protection (see page 21) before starting the operation.
- When a scene has been erased, the selected position for erasing may vary slightly from the actual erased position.
Title menu
For the disc in VR mode, when the content is recorded, a title name that includes the date, time, channel number and other information is created automatically.
For the disc in Video mode, when you record a content first time on the disc where nothing is recorded, the recorded content is automatically set to Title1. Then, the second recorded content is set to Title2, and so on. Therefore, the title is numbered according to the recording order. The title is created max. 99. The title menu lists up these titles. The title menu can be used when you playback after confirming the contents (see page 29), or when you check the contents recorded on the disc.
Original title
The titles explained above are called original titles; these will be added with every recording. In VR mode you can do various editing operations i.e., you can rename the titles, or add the chapter marks. In addition, you can erase the unnecessary titles to increase the disc space.
Playlist
You can create a playlist based on the original titles.
You can combine or erase undesired scenes.
If you create a playlist it will become the primary list used by the disc. If you create a playlist to customise your viewing preferences, and choose to delete it, the original titles will not be affected. It is recommended to create and edit the playlist to prevent important titles from being erased accidentally.
If you create a playlist, both the original title and playlist will be displayed on the title menu.
Editable items
The items that can be edited are different between original title and playlist. For the disc in Video mode, only the title name can be edited. The items can be edited in each are as follows:
| Editing items | VR mode | Video mode | |
| Original | Playlist | Original | |
| Playback | Y | Y | Y |
| Adding chapter mark | Y | N | N |
| Combining chapters | Y | N | N |
| Erasing scenes | Y | Y | N |
| Erasing titles | Y | Y | N |
| Renaming titles | Y | Y | Y |
| Creating playlist | Y | N | N |
| Combining titles | N | Y | N |
If you finalise the disc in Video mode, the title list will be created and you cannot use the title menu.

You can create and edit the playlist based on the original title.
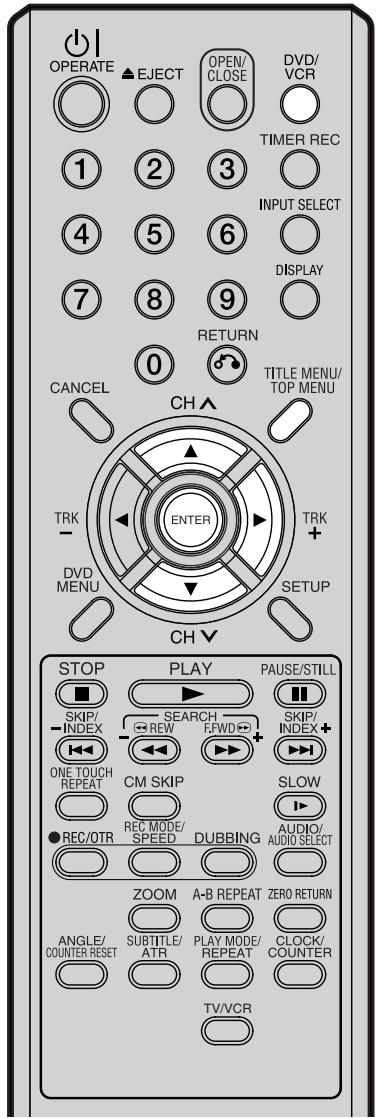
NOTES:
- A playlist can only be created with a DVD-RW in VR mode. You cannot create a playlist with a DVD-RW in Video mode, nor with a DVD-R.
- In case the disc includes more than 10 titles, you can turn to the next or the previous page. (See page 29.)
- You cannot switch to the VCR mode when the title menu is showing. Press TITLE MENU to clear the title menu, then press DVD/VCR to switch to the VCR mode.
Preparation:
- Turn ON the TV and select its AV channel (this may be labelled EXT / AUX etc.)
- Load the recorded DVD-RW (VR).
- Press DVD/VCR to select the DVD mode. (The DVD indicator will light.)
Creating a playlist
1 Press TITLE MENU.
The title menu will appear.
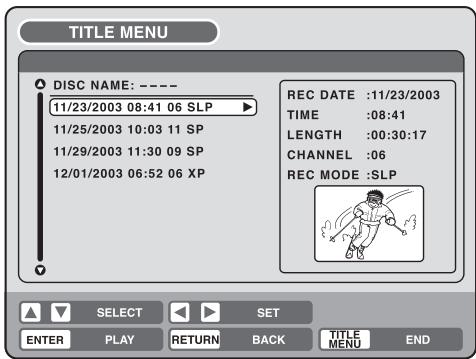
2 Press ▲ or ▼ to select the original title which will be used as the base of a playlist.
3 Press ▶.
The editing menu of original title will appear.
4 Press ▲ or ▼ to select "NEW PLAYLIST".
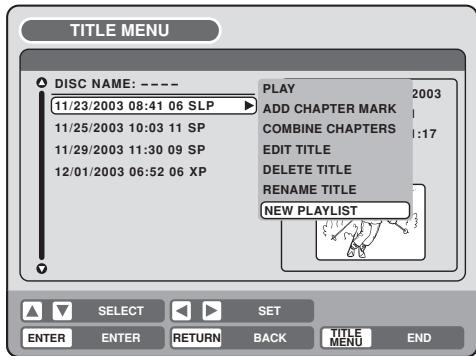
5 Press ENTER.
The editing menu closes and the created playlist appears at the bottom of the list. Created playlist
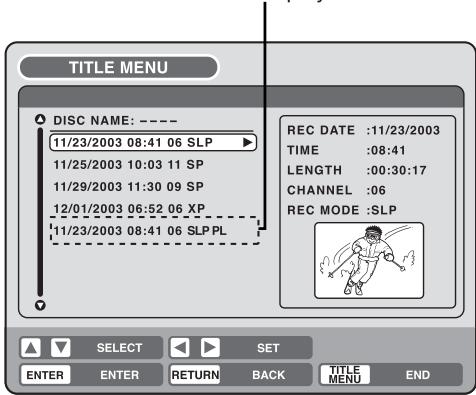
DVD-RW VR
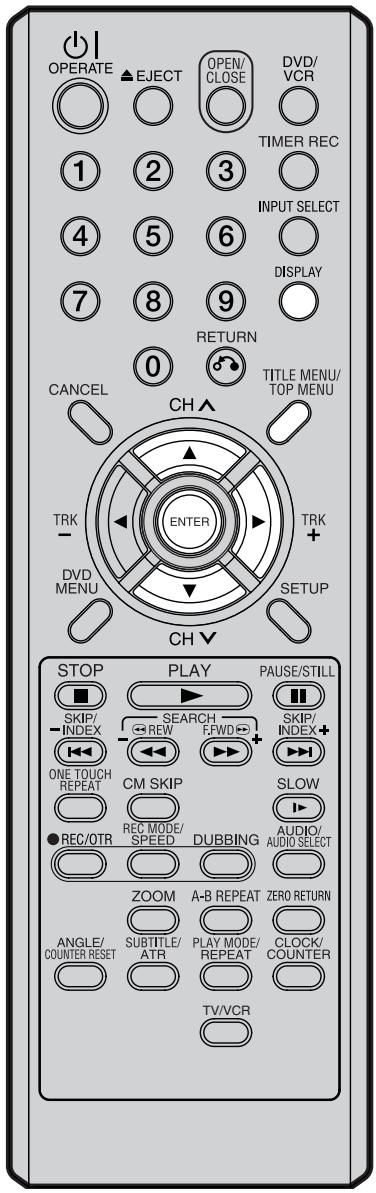
NOTES:
- The title name can be a maximum of 64 characters. Long names will be shortened in the title menu.
- For using the keyboard screen, see "Changing a disc name" (page 68).
Changing a title name
1 Press TITLE MENU to display the title menu.
2 Select the playlist where you want to change the title name.
- Press ▲ or ▼ to select the playlist.
- Press ▶ to display the editing menu of the playlist.
- Press ▲ or ▼ to select "RENAME TITLE".

3 Press ENTER.
The keyboard screen will appear.
4 Use the keyboard screen to enter the title name (See P. 68).
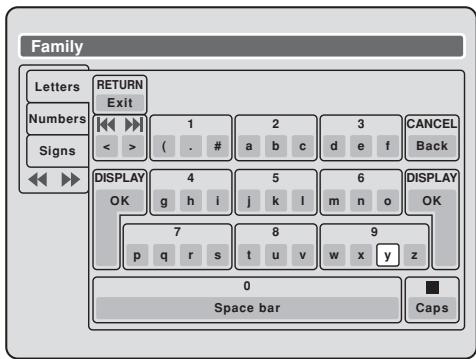
5 Press DISPLAY to return the title menu.
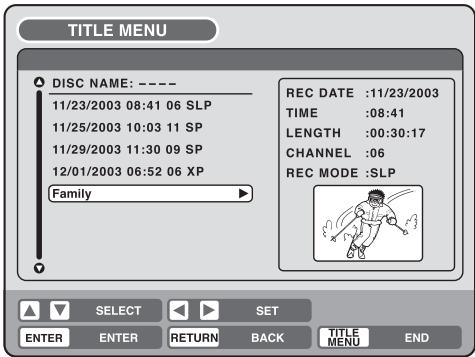

Erasing a scene (Edit title)
You can erase an unnecessary scene from the created playlist.
When you erase the scene from the playlist, the scene is not erased from the original title.
1 Press TITLE MENU to display the title menu.
2 Select the playlist where a scene you want to erase is included.
- Press ▲ or ▼ to select the playlist.
- Press ▶ to display the editing menu of the playlist.
- Press ▲ or ▼ to select "EDIT TITLE".
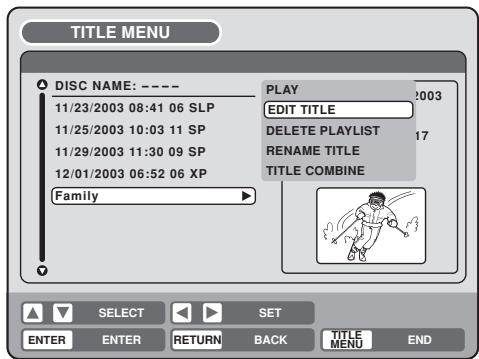
3 Press ENTER. The EDIT TITLE screen appears.
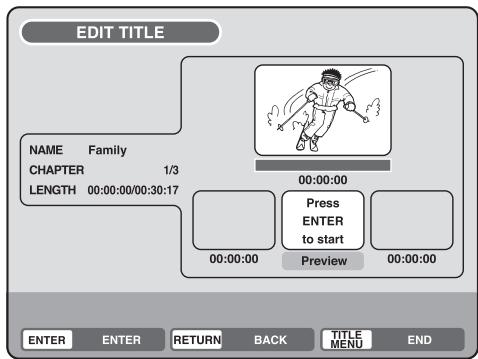
4 Press ENTER to playback the playlist on the EDIT TITLE screen.
- Use each operation button (F.FWD, REW, SKIP +, SKIP -, PLAY, PAUSE/STILL, SLOW, CM SKIP) for the playback to search the starting point of the scene you want to erase.
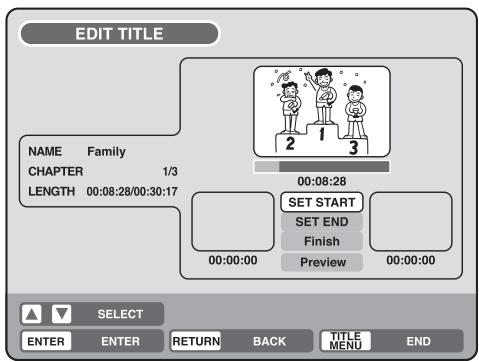
DVD-RW VR
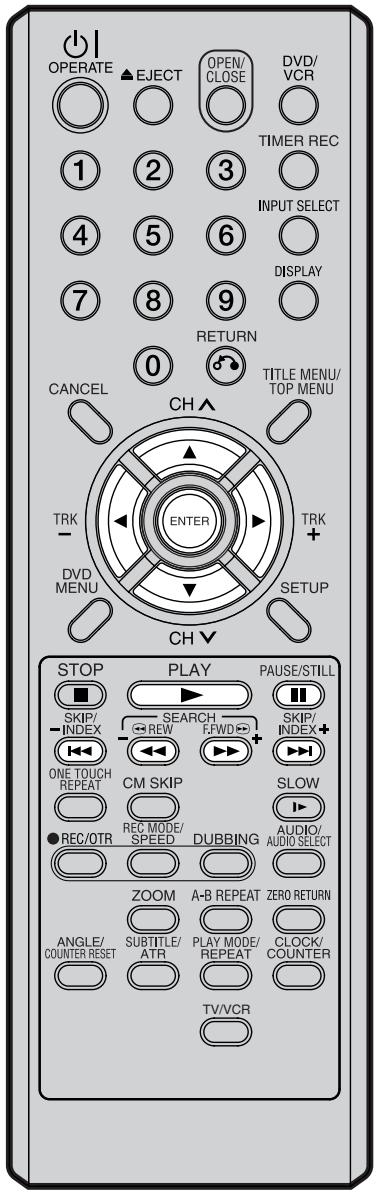
NOTE:
It is no problem to omit the procedures for confirming the scene or adjusting start and end points.
5 Press ▲ or ▼ to select "SET START" at the start point of the scene that you want to erase and press ENTER. (To set the start point easily, search the start point while "SET START" is selected) The still image at the start point appears at the left small screen.
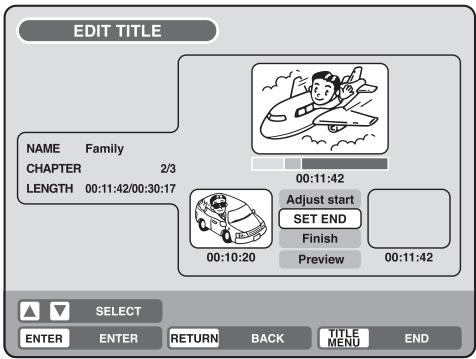
6 Press ▲ or ▼ to select "SET END" at the end point of the scene you want to erase and press ENTER. The still image at the end point appears at the right small screen.
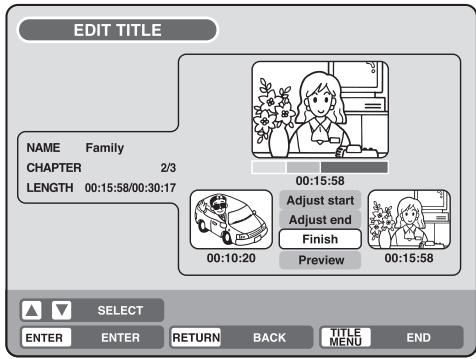
7 Check the erased scenes.
- Select "Preview" and press ENTER. Then the video where the scenes between the start and end points are erased is played back.
- Each operation button (F.FWD, REW, SKIP +, SKIP -, PLAY, PAUSE/STILL) for playback also can be used.
8 Adjust the start and end points.
- To adjust the start point, select "Adjust start" and press ENTER. You can change the start point every one frame by pressing ◀ or ▶.
- To adjust the end point, select "Adjust end" and press ENTER. You can change the end point in the same way as the start point.
9 If you determine the scene to be erased, press ▲ or ▼ to select "Finish" and press ENTER.
- A chapter mark is automatically added at the location of the erased scene.
DVD-RW VR
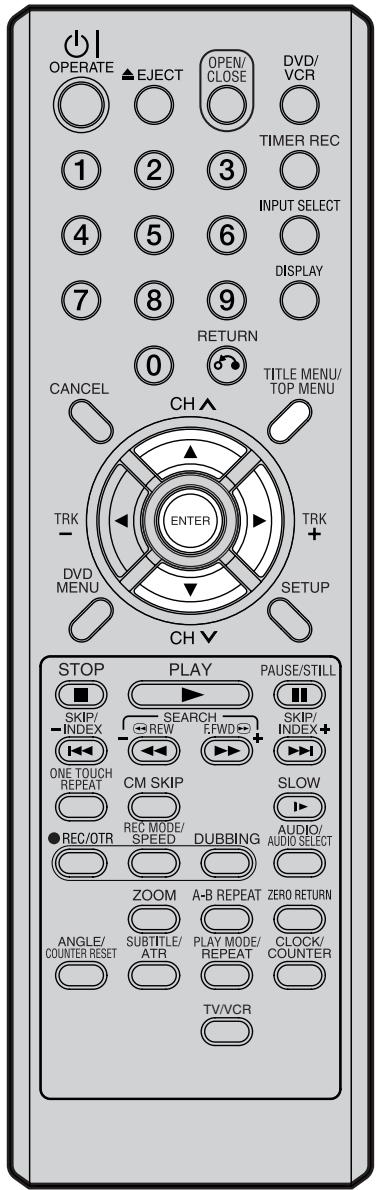
Combining the title
You can create a playlist by combining several original titles or playlists. To combine titles, it is necessary to create a playlist first. By combining the titles in the playlist, a playlist where several titles are combined is created.
1 Press TITLE MENU to display the title menu.
2 Select the playlist where you want to combine the titles.
- Press ▲ or ▼ to select the playlist.
- Press ▶ to display the editing menu of the playlist.
- Press ▲ or ▼ to select "TITLE COMBINE".
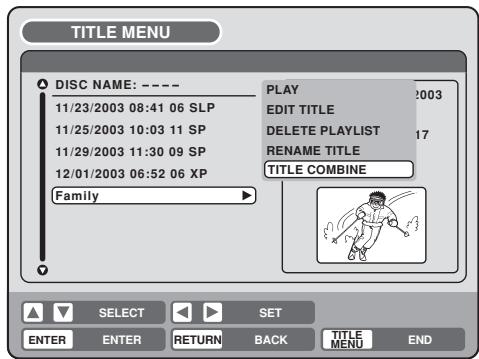
3 Press ENTER.
Select the title that you want to combine from the title menu.
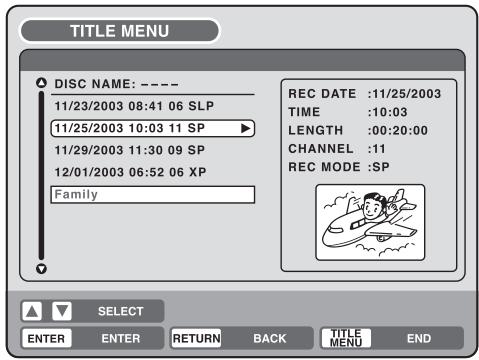
4 Press ENTER.
Following the playlist, the selected title is combined.
The several titles were combined so that the total recording time is displayed.
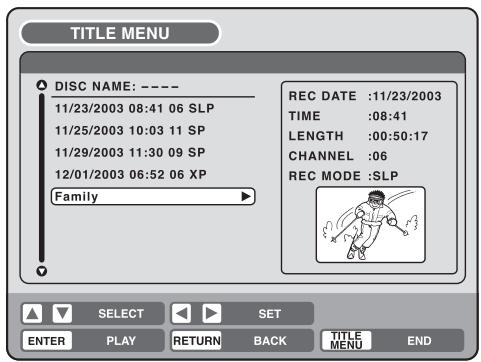
DVD-RW VR
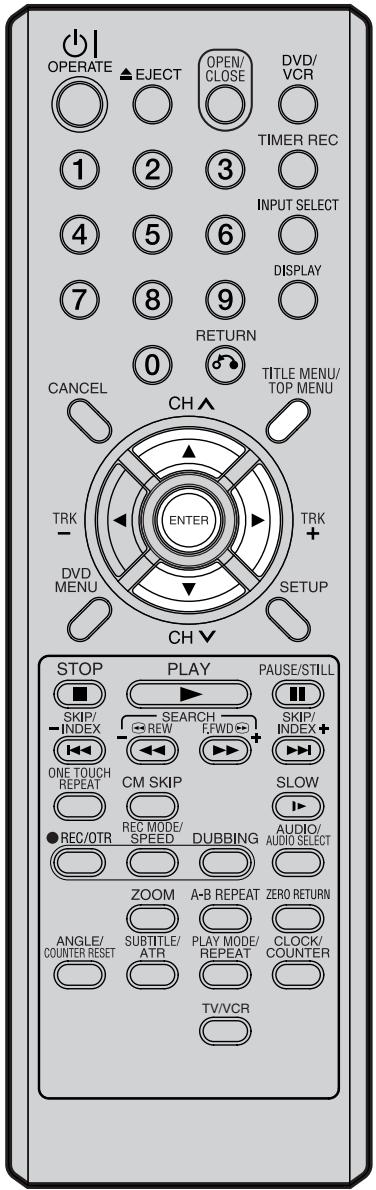
Erasing a playlist
You can erase the created playlist. Even if you erase the playlist, the original title will not be erased.
1 Press TITLE MENU to display the title menu.
2 Select the playlist that you want to erase.
- Press ▲ or ▼ to select the playlist.
- Press ▶ to display the editing menu of the playlist.
- Press ▲ or ▼ to select "DELETE PLAYLIST".
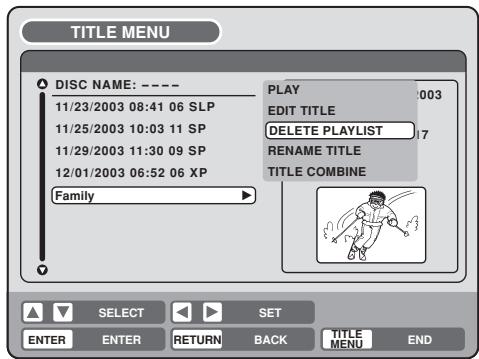
3 Press ENTER.
The selected playlist will be erased.
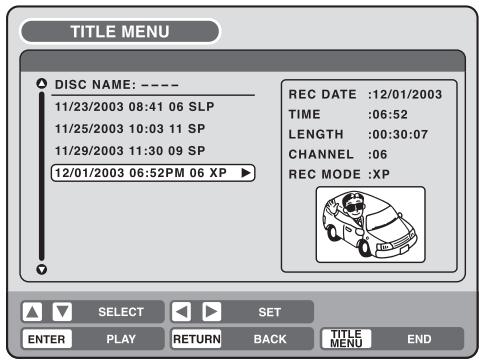

In VR mode, you can edit various items, whereas in Video mode, you can edit the title names only.
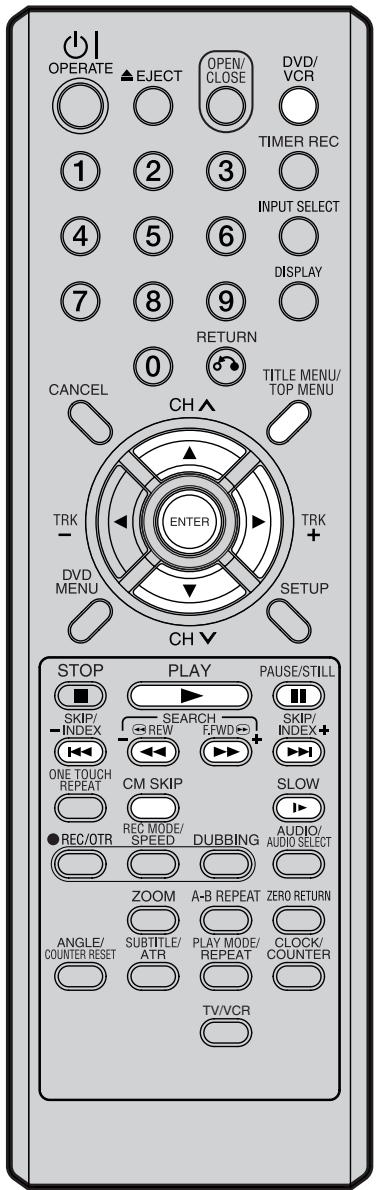
NOTES:
- You can automatically add a chapter mark in recording. For more information, see page 25.
- In case the disc includes more than 10 titles, you can turn to the next or the previous page. (See page 29.)
Preparation:
- Turn ON the TV and select its AV channel (this may be labelled EXT / AUX etc.)
- Load the recorded disc.
- Press DVD/VCR to select the DVD mode. (The DVD indicator will light.)
Adding a chapter mark
You can add a chapter mark to the original title. You can add up to 999 chapter marks to one disc.
1 Press TITLE MENU to display the title menu.
2 Select the original title where a chapter mark is added.
- Press ▲ or ▼ to select the original title.
- Press ▶ to display the editing menu of the original title.
- Press ▲ or ▼ to select "ADD CHAPTER MARK".
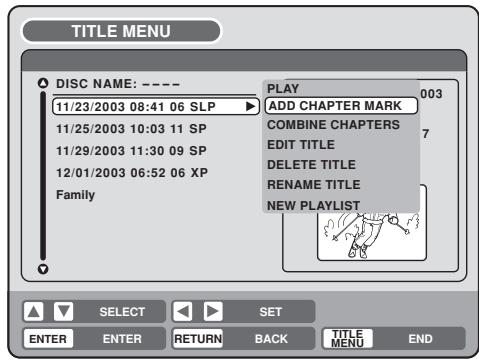
3 Press ENTER. The ADD CHAPTER MARK screen will appear.
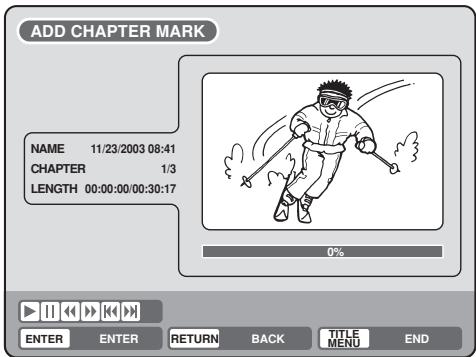
4 Press PLAY to search a scene where you want to add the chapter mark.
- Search the scene by using each operation button (F.FWD, REW, SKIP +, SKIP -, PAUSE/STILL, SLOW, CM SKIP) for the play-back.
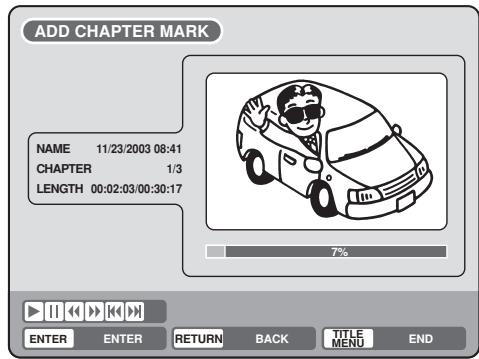
DVD-RW VR
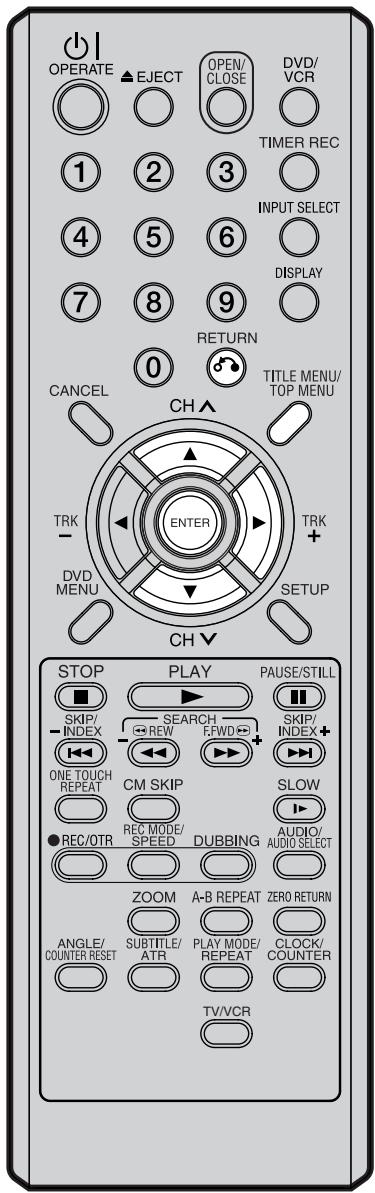
NOTE:
Chapter marks that have been added automatically in the erasing of a scene procedure (page 65) cannot be erased.
5 When the scene you want to add a chapter mark, press ENTER. The playback is paused and the position of the added chapter mark appears green.
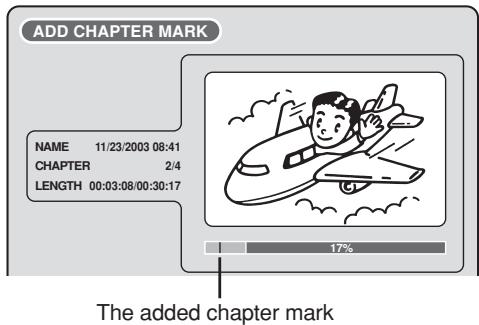
6 If you want to continue to add chapter mark, repeat step 5.
7 Adding chapter marks is finished.
• To display the title menu, press RETURN.
- To return to the normal screen, press TITLE MENU.
Combining chapters
By erasing the added chapter marks, the chapters can be combined.
1 Press TITLE MENU to display the title menu.
2 Select the original titles where you want to combine the chapters.
- Press ▲ or ▼ to select the original title.
- Press ▶ to display the editing menu of original title.
- Press ▲ or ▼ to select "COMBINE CHAPTERS".
3 Press ENTER.
The COMBINE CHAPTERS screen will appear. At the beginning, the top still image in the chapter 2 is displayed.

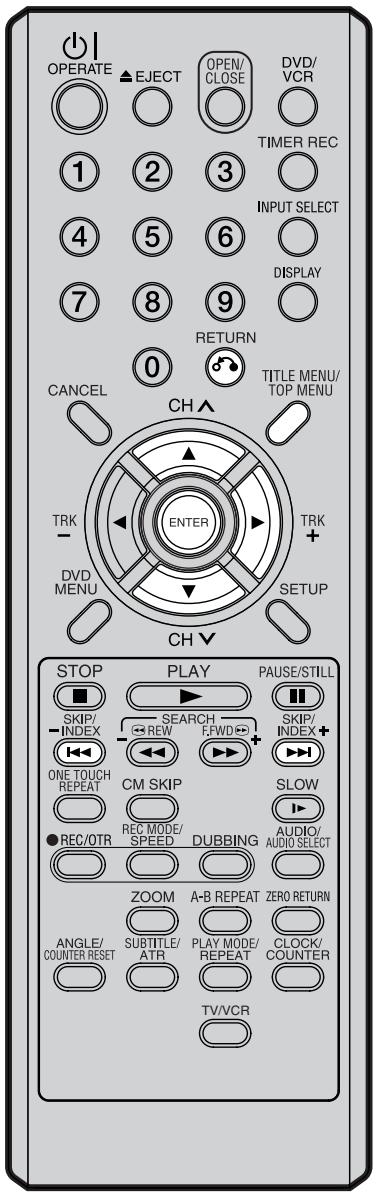
NOTE:
The title name can be a maximum of 64 characters in VR mode and a maximum of 30 characters in Video mode. Long names will be shortened in the title menu.
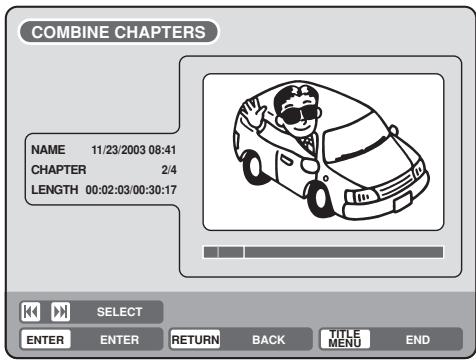
4 Press SKIP + or – to select the chapter marks to be erased.
5 Press ENTER.
The chapter marks are erased and 2 chapters are combined into 1 chapter.
6 To continue erasing the chapter marks, repeat steps 4 and 5.
7 The combining chapters will completed.
- To display the title menu, press RETURN.
- To return to the normal screen, press TITLE MENU.
Changing an original title name

1 Press TITLE MENU to display the title menu.
2 Select the original title that you want to rename.
- Press ▲ or ▼ to select the original title.
- Press ▶ to display the editing menu of original title.
- Press ▲ or ▼ to select "RENAME TITLE".
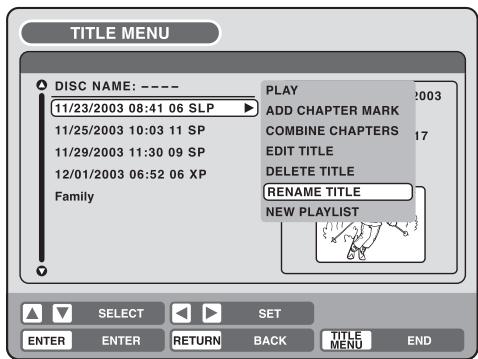
3 Press ENTER.
The keyboard screen will appear.
The entering method of the title name is the same as for the playlist. See the steps 4 and 5 of “Changing a title name” in “Editing a playlist” (page 57) and enter the title name (See also page 68 for more about the keyboard screen).
DVD-RW VR
NOTES:
- If the scene is erased from the original title, the created playlist is erased.
- Disc space will only be freed up if scenes lasting several minutes are deleted.
- A chapter mark is automatically added at the location of the erased scene.
Erasing a scene (Edit title)
You can erase an unnecessary scene from the original title.
Erase the scene after checking the title. You cannot restore the erased scene.
When you erase the scene, you can increase the disc space.
1 Press TITLE MENU to display the title menu.
2 Select the original title where a scene you want to erase is included.
- Press ▲ or ▼ to select the original title.
- Press ▶ to display the editing menu of original title.
- Press ▲ or ▼ to select "EDIT TITLE".
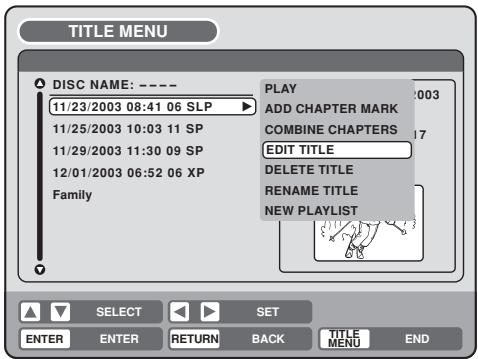
3 By pressing ENTER, the following message screen will appear.

4 Press ◀ or ▶ to select "YES" and press ENTER, then the EDIT TITLE screen will appear.
- By selecting "NO", the title menu appears.
5 The method for erasing a scene is the same as for the playlist. See the steps 4 to 9 of “Erasing scenes (Edit title)” in “Editing a playlist” (page 58).

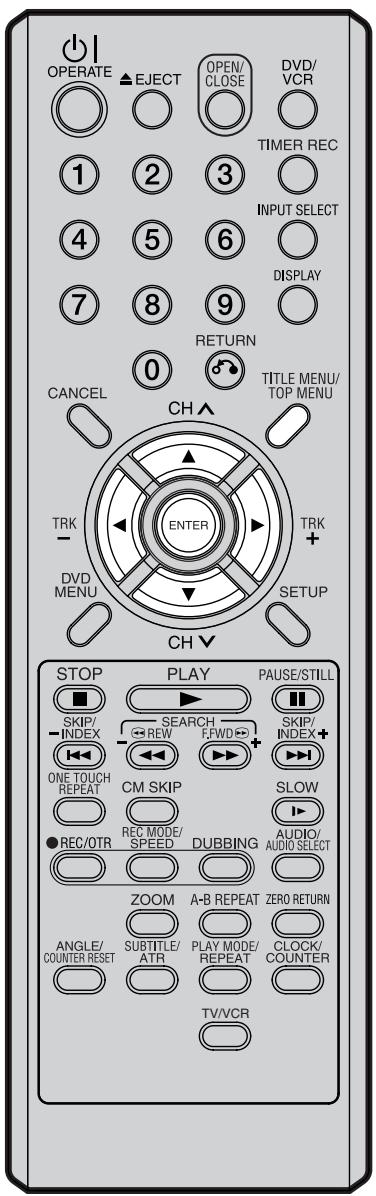
NOTE:
If the original title is erased the created playlist is also erased.
Erasing an original title
You can erase the original title.
Erase the original title after checking its title. The erased title cannot be restored.
When you erase the titles, you can increase the disc space.
1 Press TITLE MENU to display the title menu.
2 Select the original title you want to erase.
- Press ▲ or ▼ to select the original title.
- Press ▶ to display the editing menu of original title.
- Press ▲ or ▼ to select "DELETE TITLE".
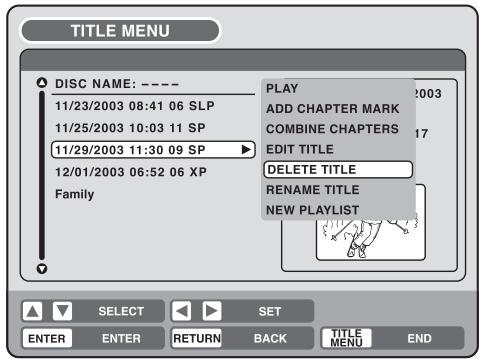
3 By pressing ENTER, the following message screen will appear.

4 Press ◀ or ▶ to select "YES" and press ENTER, then the original title will be erased.
- Erasing the title will be cancelled by selecting "NO".


You can change a disc name from the title menu.
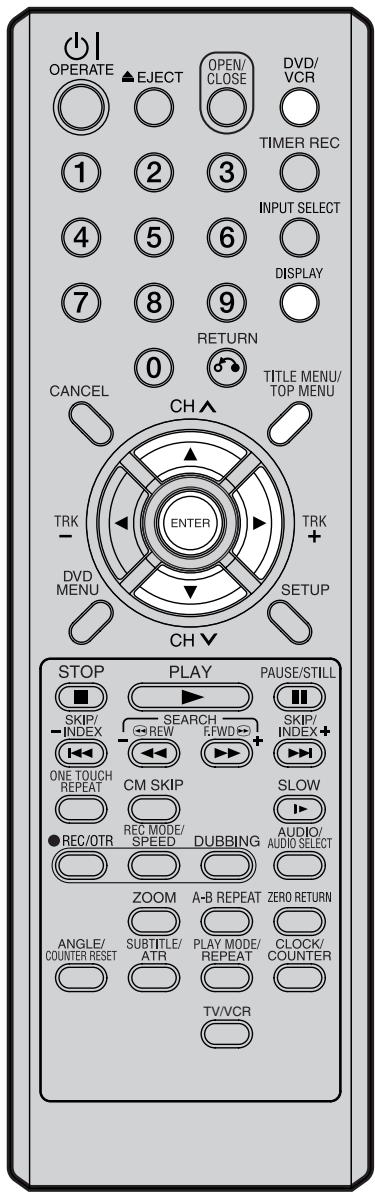
NOTES:
- The disc name can be a maximum of 30 characters. Long names will be shortened in the title menu.
- For using the keyboard screen, see "Using the keyboard screen" (page 68).
Preparation:
- Turn ON the TV and select its AV channel (this may be labelled EXT / AUX etc.)
- Load the recorded DVD disc.
- Press DVD/VCR to select the DVD mode. (The DVD indicator will light.)
Changing a disc name
1 Press TITLE MENU to display the title menu.
2 • Press ▲ or ▼ to select "DISC NAME". • Press ▶ to display the editing menu. • Press ▲ or ▼ to select "RENAME DISC".
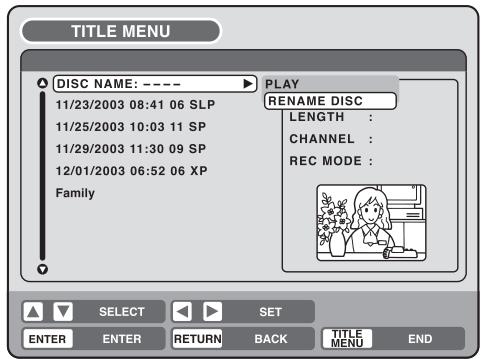
3 Press ENTER. The keyboard screen will appear.
4 Use the keyboard screen to enter the disc name.
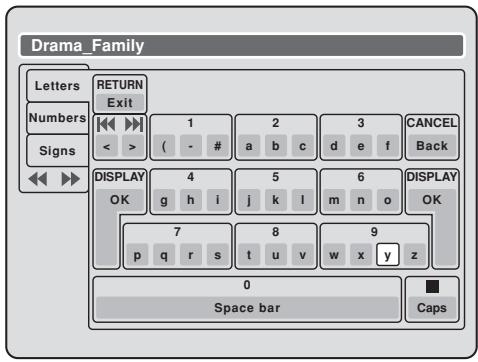
5 Press DISPLAY to return the title menu.
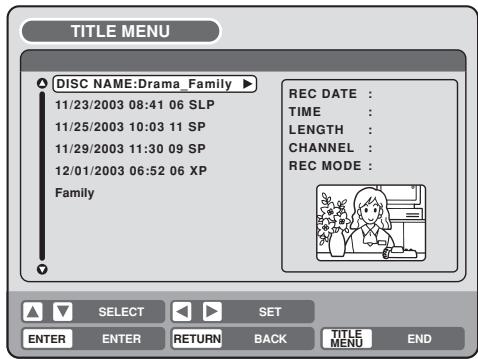


Using the keyboard screen
This section explains the function of the keyboard screen and how to input characters. The disc name and the title name can be changed using the keyboard screen.
Keyboard screen types
The keyboard screen has three types of “Letters”, “Numbers” and “Signs”. The type can be switched over by pressing REW or F.FWD.
Letters: This is mainly used for inputting alphabetical letters.
For the keyboard screen of Letters, see the previous page.
Numbers: This is used for inputting numbers.
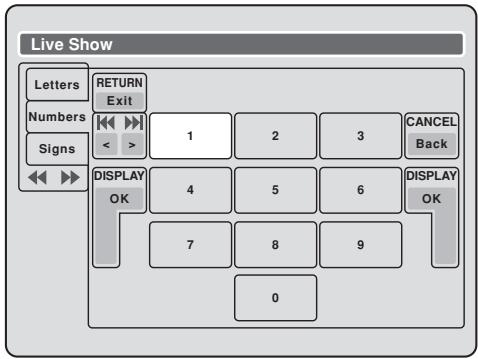
Signs: This is used for inputting symbols.
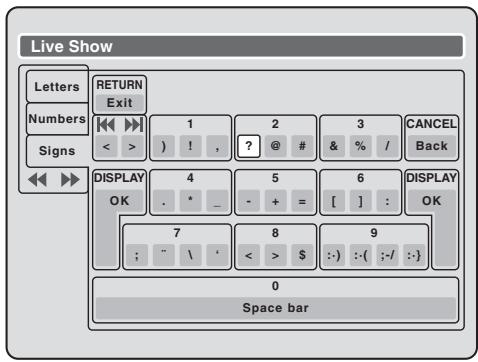
Inputting characters
There are two methods for inputting characters.
Character input 1
1 Press ▲, ▼, ◀ or ▶ to select the character to be input.
2 Press ENTER.
The selected character will be input.
Character input 2
Example: Explained here is the procedure when you input "F" and "J".
1 Press the numeric keys where a character you want to input is assigned.

2 Press the numeric keys continuously and select the character to be input.
To input F, press 3 three times.

NOTE:
When the interval between the pressing numeric keys is 2 seconds or more in selecting the input character, the selected character will automatically be input.
3 Stop the key operation when you select the character to be input. The selected character will automatically be input.

4 Press the numeric keys where the following character is assigned.
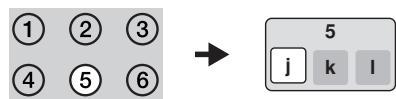
5 When the character to be input is selected, stop the key operation. The selected character is automatically input.

Erasing a character
You can erase the input character.
Erasing method 1
1 Press ▲, ▼, ◀ or ▶ to select "Back".
2 Press ENTER. The last input character will be erased.
3 To erase the characters continuously, press ENTER. The input characters will be erased from the last to the top one by one.
Erasing method 2
1 Press CANCEL on the remote control. The last input character is erased.
2 To erase the characters continuously, press CANCEL. The input characters will be erased from the last to the top one by one.
Erasing method 3
Use the cursor to select the character and erase it.
1 Press SKIP - or + to move the cursor after the character you want to erase.
2 Press CANCEL. Erase the character before the cursor position.
Selecting between uppercase and lowercase letters
You can select either uppercase or lowercase letters when modifying your titles, using the keyboard screen with the “Letters” tab.
1 Press STOP. (Or, press ▲, ▼, ◀ or ▶ to select "Caps", then press ENTER.)
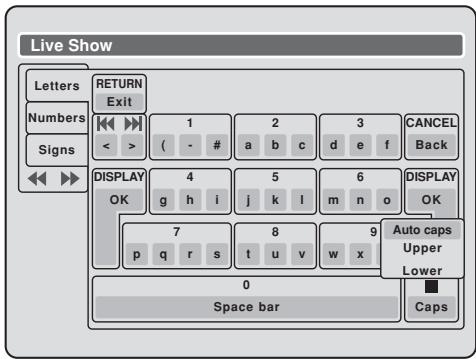
2 Press ▲ or ▼ to select the type of letters in the list below and press ENTER.
Auto caps: Determines uppercase and lower-case automatically.
Upper: Inputs all with uppercase letters.
Lower: Inputs all with lowercase letters.
Determining a name
To determine the entered disc name and title name, press DISPLAY. Or, press ▲, ▼, ◀ or ▶ to select "OK", then press ENTER.
The keyboard screen disappears and the display will return to the title menu.
The entered disc name and title name are displayed in the title menu.
Cancelling character input
When you want to cancel the input and changed characters, press RETURN. Or, press ▲, ▼, ◀ or ▶ to select “Exit”, then press ENTER.
The input and changed characters are cancelled and the title menu will appear.
Dubbing a tape onto a disc

You can record video or audio on a video tape onto a disc.
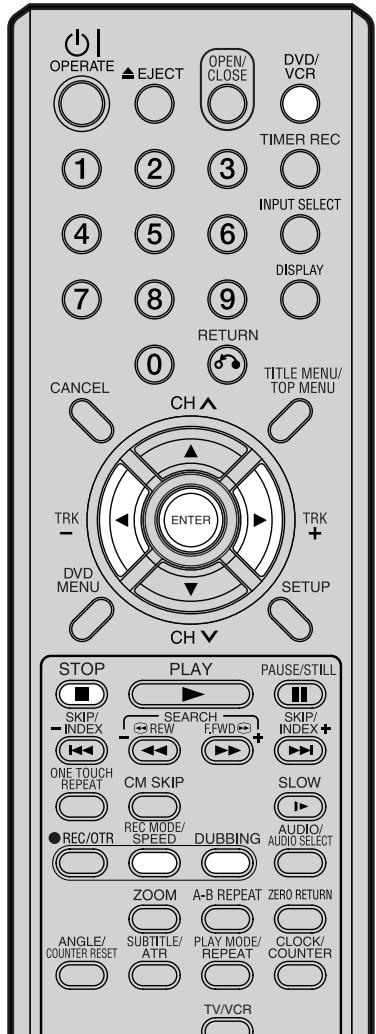
NOTES:
- Dubbing cannot be accomplished when
- a copy protected tape is used.
- a finalised disc is used.
- disc protection is set.
- disc has no recording space.
- Dubbing stops when
- the video tape is played back to the end and stops.
- recording space becomes full.
- the picture noise continues for 10 seconds.
- The videos recorded from TV programs or movies can be used only for your personal enjoyment without permission of the copyright holder.
Preparation:
- Turn ON the TV and select its AV channel (this may be labelled EXT / AUX etc.)
- Load a source video tape and a disc for recording.
- Remove the erase protection tab of the source video tape to prevent the data from accidentally being erased.
- Confirm the disc space before operation.
1 Press DVD/VCR to set this unit to DVD mode. The DVD indicator will light.
2 Press REC MODE/SPEED and select the recording mode SP, LP, SLP or XP.
- The recording mode is indicated on both the TV screen and the display window.
- For the details of the recording mode, see page 46.
3 Press DVD/VCR and set the unit to VCR mode.

NOTE:
Confirm that the VCR indicator lights.
4 Press DUBBING.
- The unit is changed to DVD mode automatically.
- The VCR is waiting for playback and the DVD is waiting for recording. Then the following message will appear.
5 Press ◀ or ▶ to select "YES" and press ENTER.
Dubbing starts.
- To cancel dubbing, select "NO" and press ENTER.
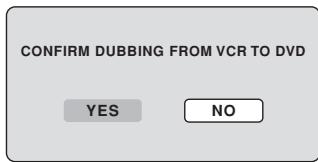
In dubbing, VCR playback, DVD recording and “dub” (dubbing) indicator appear on the display window.
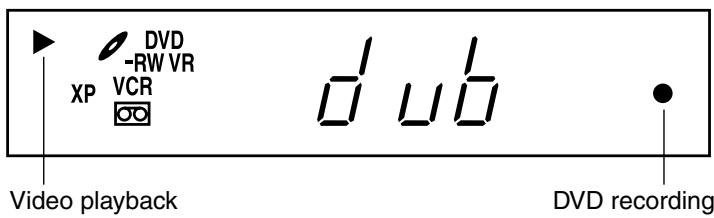
6 To stop dubbing, press STOP.

You can record both video and audio from a disc to a video tape. When a disc with a copy guard is used, a distorted image is recorded onto the video tape.
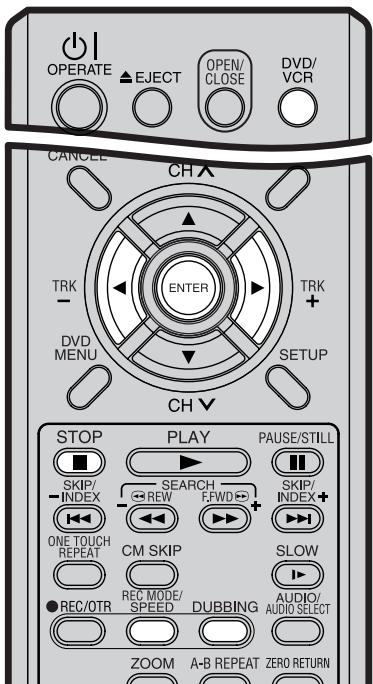
NOTES:
- Dubbing cannot be accomplished when
- a copy protected disc is used.
- the erase prevention tab of video tape is removed.
- Dubbing stops when
- the disc is played back to the end and stops.
- no recording space on the Video tape remains
- If no special permission is obtained from the copyright owner, videos recorded from TV programs or movies can only be used for your own personal enjoyment.
Preparation:
- Turn ON the TV and select its AV channel (this may be labelled EXT / AUX etc.)
- Load a source disc and a video tape for recording.
- Confirm the remaining tape for recording before operation.
1 Press DVD/VCR to set this unit to VCR mode. The VCR indicator will light.
2 Press REC MODE/SPEED and select the recording mode SP or LP.
- The recording mode is indicated on both the TV screen and the display window.
- For the details of the recording mode, see page 42.
3 Press DVD/VCR and set the unit to DVD mode.

NOTE:
Confirm that the DVD indicator lights.
4 Press DUBBING.
- The DVD is waiting for playback and the VCR is waiting for recording. Then the following message appears.
5 Press ◀ or ▶ to select "YES" and press ENTER.
Dubbing starts.
- To cancel dubbing, select "NO" and press ENTER.
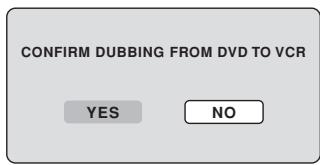
In dubbing, DVD playback, VCR recording and “dub” (dubbing) indicator appear on the display window.
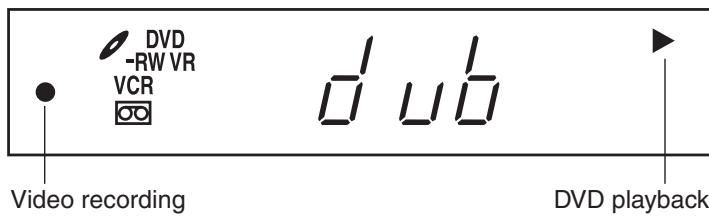
6 To stop dubbing, press STOP.
Dubbing only the specified titles or the playlist
When you want to dub only specific titles or playlists recorded on the disc, start the playback of the desired title or playlist, and then immediately press DUBBING, STOP or PAUSE/STILL. If you press DUBBING, proceed from step 5 above. If you press STOP or PAUSE/STILL, proceed from step 4 above. The first few seconds of the title or playlist may not be recorded. When playback of the title or playlist is completed, the dubbing stops.

You can connect another VCR or camcorder for dubbing.
Typical connection: When using this unit as a recording device See next page for the diagrams of connection.
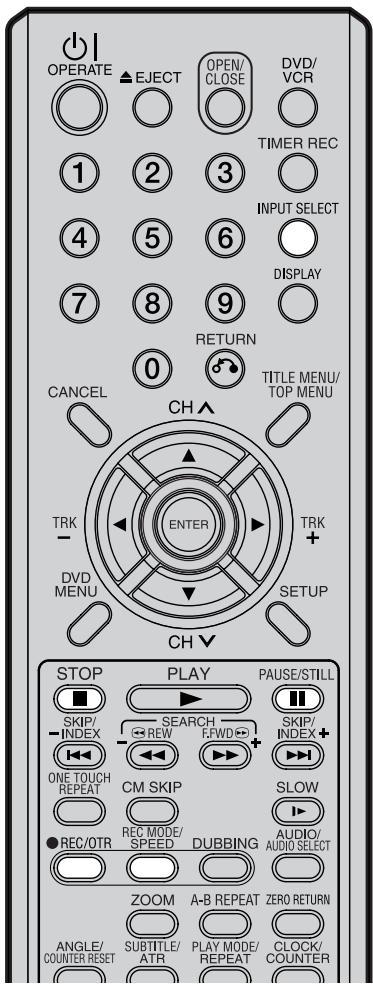
NOTES:
- When this unit is used as a playback device, any on screen displays that appear would also appear on the recording.
However it is possible to set the on screen display to OFF - see the "DISPLAY/CALL" section on page 22 for more information. - If no special permission is obtained from the copyright owner, videos recorded from TV programs or movies can only be used for your own personal enjoyment.
- You may not dub a copy protected video tape or DVD disc.
When a video is recorded using this unit
Preparation:
- Turn ON the TV and select its AV channel (this may be labelled EXT / AUX etc.)
- Load a video tape where the erase-protection tab is not activated or a disc with enough recording space.
- To record onto a video tape, set the unit to VCR mode, whereas to record onto a disc, set it to DVD mode.
1 Press INPUT SELECT and set the channel to A3 (or A2). A2: DECODER/EXTERNAL scart on the rear panel A3: AUDIO/VIDEO input on the front panel Confirm that A3 (or A2) appears on the display window.
A3
2 Press REC MODE/SPEED and select the recording mode.
VCR: SP or LP (See page 42.)
DVD: SP, LP, SLP or XP (See page 46.)
3 Press ● REC/OTR on this unit, then press PAUSE/ STILL.
4 Press the PLAY button on the playback device, then press the PAUSE/ STILL button.
5 Release the recording pause and the playback still simultaneously to begin the duplicating process.
6 To stop dubbing, press STOP.
Dubbing using other equipment
Playback unit connection.
The playback unit can be a camcorder or a video recorder. See each operation manual for each playback operation. The copy protected video or DVD disc cannot be copied.
Dubbing with A/V-cable (or S-Video cable) (not supplied)
To playback unit
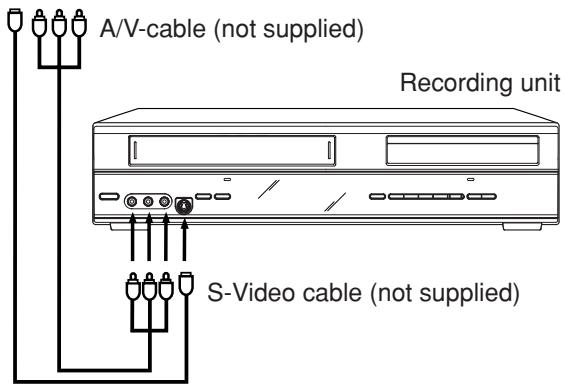
Press INPUT SELECT on the remote control repeatedly until A3 appears on the front display.
If the other VCR or camcorder is equipped with S-Video output, a superior picture will be achieved using an S-Video cable connected to the S-Video-input (AV3) on the front panel with S-Video cable. In this case, you must select "S-VIDEO" mode in AV3 INPUT-setting on page 23.
If you select "VIDEO", only the composite video signal will be input. (S-Video input signal will be cut.)
The S-Video input can be used only for recording on the disc. (The S-Video input cannot be used for recording on the video tape.)
Dubbing with scart cable (not supplied)
To playback unit
TV-unit (not supplied)
Press INPUT SELECT on the remote control repeatedly until A2 appears on the front display.
Select "AV" mode in AV2 setting on page 23.
Note:
The dubbing is not possible if “DECODER” was selected.
A-B Repeat Playback
Playback that repeats between two set points, A and B.
angle
Recorded onto some DVD discs are scenes which have been simultaneously shot from a number of different angles (the same scene is shot from the front, from the left side, from the right side, etc.). With such discs you can select the angle from which to view the scene.
auto chapter
Feature that automatically makes chapter marks on a DVD disc during recording.
blue background
Feature that automatically changes unpleasant noise images to a blue screen when a channel without a broadcast or a channel on which the broadcast has ended has been selected.
BROWSER screen
Screen that appears when TITLE MENU is pressed during MP3/WMA or JPEG CD is inserted.
chapter
A section within a title is called a “chapter”.
CM Skip
When pressed during playback, playback jumps 30 sec ahead and resumes.
copy guard
Copyright protection signal. Software and broadcasts that contain this signal cannot be recorded.
Dolby Digital
A sound system developed by Dolby Laboratories. When this product is connected to a Dolby Digital 5.1 receiver, Dolby Digital can provide up to six channels of crystal clear digital surround sound. Left, Center and Right channels in front of you provide precise, clear positioning of dialogue. Separate or “discrete” Left and Right Surround channels on the side and in the rear immerse you in the film with atmospherics and ambient sounds. A bass effects channel contributes extra punch to action and special effects sequences.
DTS
This is a digital sound system developed by Digital Theater Systems for use in cinemas. This system uses 6 audio channels and provides accurate sound field positioning and realistic acoustics. (By connecting a DTS Digital Surround decoder, you can also listen to DTS Digital Surround sound.)
DVD menu
Menu recorded on a DVD-Video that enables the user to select subtitles language, soundtrack language, etc.
finalise
Operation that enables discs recorded or edited with this unit to be played back on other DVD players.
interlaced scanning
Technology that alternately displays odd-numbered scanning lines and even-numbered scanning lines. Also called “480i”, “i” meaning “interlace”.
letter box
Feature that displays black bands above and below the playback images during playback of a disc recorded in wide (16:9) format on a 4:3 TV connected to this unit.
MP3
One type of audio compression that uses MPEG1. This format compresses the sound to use up about 1/10 of the original file space, without impairing the original sound quality.
one touch repeat
If ONE TOUCH REPEAT is pressed during playback, playback returns to a point 10 sec earlier and resumes.
original title
The file created by recording something is called an "original title".
OTR
One-touch Timer Recording. Start a timed recording by pushing just one button (up to 6 hours).
pan scan
Feature that cuts the left and right edges of playback images to a 4:3 size during playback of a disc recorded in wide (16:9) format on a 4:3 TV connected to this unit.
parental control
Some discs control viewing according to the age of the viewer. A control level can be set for those types of discs.
parental control settings
Level 1: Adult discs and general discs (R-rated discs included) cannot be played back.
Level 2 to 3: Adult discs and R-rated discs cannot be played back.
Level 4 to 7: Adult discs cannot be played back. (Level 4 to 7 discs contain content children age 15 and younger may not see.)
Level 8: All discs can be played back without restriction.
playlist
User-created titles based on each original title.
region number
There is software that enables DVD playback in differing countries. The number of that kind of disc is called the “region number”.
SETUP MENU
Menu that contains settings for various features of this unit, such as recording and playback. Timer recording is also set from the SETUP MENU.
slide show
Technique for flipping through and viewing many images (JPEG files).
subtitle language
Language used for subtitles of movies, etc. Viewers can watch in a language of their choosing.
title
A program recorded on a disc is called a "title".
title menu
Menu that lists titles and tracks recorded on the disc. It is used for playback and disc editing.
top menu
Menu on a DVD-Video for selecting chapters for play-back, subtitle language, etc. The top menu may be referred to as a Title Menu on some DVD discs.
track
A song on a music CD is called a "track".
TRACK INFO screen
The screen that appears when TITLE MENU is pressed, if an Audio disc is in the unit.
Video mode
This recording format is compatible with commercially available DVD players.
virtual surround
Technology that converts audio that is not recorded in surround sound into audio that assimilates surround sound.
VR mode
This recording format is the basic DVD-RW recording format, and lets you enjoy the various editing functions available with this unit.
Enter the appropriate code number for the initial settings "DVD MENU", "AUDIO" and/or "SUBTITLE" (see page 18).
| Code | Language | Code | Language | Code | Language | Code | Language |
| 1112 | Abkhazian | 1530 | Estonian | 2211 | Latin | 2914 | Sindhi |
| 1111 | Afar | 1531 | Basque | 2232 | Latvian, Lettish | 2919 | Singhalese |
| 1116 | Afrikaans | 1611 | Persian | 2224 | Lingala | 2921 | Slovak |
| 2927 | Albanian | 1625 | Faroese | 2230 | Lithuanian | 2922 | Slovenian |
| 1123 | Amharic | 1620 | Fiji | 2321 | Macedonian | 2925 | Somali |
| 1128 | Arabic | 1619 | Finnish | 2317 | Malagasy | 2931 | Sundanese |
| 1835 | Armenian | 1628 | French | 2329 | Malay | 2933 | Swahili |
| 1129 | Assamese | 1635 | Frisian | 2322 | Malayalam | 2932 | Swedish |
| 1135 | Aymara | 1722 | Galician | 2330 | Maltese | 3022 | Tagalog |
| 1136 | Azerbaijani | 2111 | Georgian | 2319 | Maori | 3017 | Tajik |
| 1211 | Bashkir | 2122 | Greenlandic | 2328 | Marathi | 3011 | Tamil |
| 1224 | Bengali; Bangla | 1724 | Guarani | 2325 | Moldavian | 3030 | Tatar |
| 1436 | Bhutani | 1731 | Gujarati | 2324 | Mongolian | 3015 | Telugu |
| 1218 | Bihari | 1811 | Hausa | 2411 | Nauru | 3018 | Thai |
| 1228 | Breton | 1933 | Hebrew | 2415 | Nepali | 1225 | Tibetan |
| 1217 | Bulgarian | 1819 | Hindi | 2425 | Norwegian | 3019 | Tigrinya |
| 2335 | Burmese | 1831 | Hungarian | 2528 | Oriya | 3025 | Tonga |
| 1215 | Byelorussian | 1929 | Icelandic | 2611 | Panjabi | 3028 | Turkish |
| 1311 | Catalan | 1924 | Indonesian | 2629 | Pashto, Pushto | 3021 | Turkmen |
| 2123 | Cambodian | 1911 | Interlingua | 2622 | Polish | 3033 | Twi |
| 3618 | Chinese | 1711 | Irish | 2630 | Portuguese | 3121 | Ukrainian |
| 1325 | Corsican | 1930 | Italian | 2731 | Quechua | 3128 | Urdu |
| 1828 | Croatian | 2011 | Japanese | 2823 | Rhaeto-Romance | 3136 | Uzbek |
| 1329 | Czech | 2033 | Javanese | 2825 | Romanian | 3219 | Vietnamese |
| 1411 | Danish | 2124 | Kannada | 2831 | Russian | 3225 | Volapük |
| 1415 | Deutsch | 2129 | Kashmiri | 2923 | Samoan | 1335 | Welsh |
| 2422 | Dutch | 2121 | Kazakh | 2911 | Sanskrit | 3325 | Wolof |
| 1522 | Greek | 2135 | Kirghiz | 1714 | Scots Gaelic | 3418 | Xhosa |
| 1524 | English | 2125 | Korean | 2928 | Serbian | 2019 | Yiddish |
| 1525 | Esperanto | 2131 | Kurdish | 2918 | Serbo-Croatian | 3525 | Yoruba |
| 1529 | Spanish | 2225 | Laothian | 2924 | Shona | 3631 | Zulu |
Error/Warning message list
| ERROR/WARNING MESSAGE | CAUSE | POSSIBLE SOLUTIONS | PAGE | |
| Power ON | SYSTEM ERROR PLEASE WAIT | The power was shut down without completing the termination process due to a power failure or disconnection of the AC cord plug. (Abnormal termination) | Wait until the message disappears. | -- |
| SYSTEM ERROR PLEASE WAIT DISC CHECKING | The power was abruptly turned off before writing to the disc was completed. | The data is now restoring. | -- | |
| SYSTEM ERROR DISC MIGHT BE FAILED PRESS ENTER | The data restoration was completed. | Press ENTER, then the screen returns to the normal display. The data may not be restored even if the restoration process is performed. | 46 | |
| Playback | NO DISC | PLAY was pressed when a disc was not loaded into the unit. | Load a disc. | 28 |
| REGION CODE ERROR | A disc specified other than “Region 2” or “Region ALL” was loaded. | A disc specified other than “Region 2” or “Region ALL” cannot be played back. | 7 | |
| INCORRECT DISC - C104, C105, C106, C107 | The disc cannot be identified. | Check to make sure that the disc is compatible with this unit. | 7 | |
| Recording | NO DISC | ● REC/OTR was pressed when a disc was not loaded into the unit. | Load a disc. | 48 |
| PROCESSING PLEASE WAIT | The recording termination is processing. | Wait until the process is completed. | -- | |
| RECORDING INTERRUPTED - C204 | Disc became full during recording. | Erase unnecessary titles or load another disc and restart recording. | 66 | |
| CANNOT RECORD - C203 | Recording was tried onto the disc having no space. | Check the disc space. | 30 | |
| CANNOT RECORD - C206 | Recording was tried onto the disc which does not support recording. | Load a recordable disc. | 8 | |
| CANNOT RECORD - C207 | Disc erase-protection is applied. | Set “Protect disc” to “OFF”. | 21 | |
| CANNOT RECORD - C208 | Recording was tried onto the finalised disc. | Undo finalisation or load another disc for recording. | 21 | |
| CANNOT RECORD - C209 | Adding data was tried onto the disc recorded in the other unit. | Load another disc for recording. | -- | |
| CANNOT RECORD - C210 | Adding data was tried to the disc where PC data was recorded. | Load another disc for recording. | -- | |
| DISC ERROR - C205, C211, C212, C213 | A scratch or contamination was found on the disc. | Check the disc and reload it, or use another disc for recording. | -- | |
| CANNOT RECORD EXCEEDS LIMITED NUMBER OF TITLES. | 99 titles were recorded on the disc. | Erase unnecessary titles or load another disc. | 66 | |
| CANNOT RECORD, EXCEEDS LIMITED NUMBER OF CHAPTER. | 999 chapters were existed on the disc. | Erase unnecessary chapters or load another disc. | 47 | |
| CANNOT RECORD PROTECTED IMAGE. | You tried to record a copy-guard video. | You cannot record the video containing copy-guard signal. | 47 | |
| RECORDING INTERRUPTED PROTECTED IMAGE. | The video was changed to a copy-guard format in recording. | You cannot record the video containing copy-guard signal. | 47 | |
| CANNOT RECORD IN VIDEO MODE. COPY IMAGE ONCE ONLY. | You tried to record the “Copy Once” program onto a disc (Video mode). | Load a DVD-RW Ver. 1.1 or later (VR mode) with CPRM. | 47 | |
| CANNOT RECORD ON DISC. THIS IS NOT CPRM DISC. | You tried to record the “Copy Once” program onto a disc without CPRM. | Load a DVD-RW Ver. 1.1 or later (VR mode) with CPRM. | 47 | |
| Dubbing | CANNOT COPY DATA - C251 | No video tape or disc is inserted as a source for the recording. | Load a video tape or disc into the source drive. | 70, 71 |
| CANNOT COPY DATA - C254, C255 | The source video or disc to be copied is copy-guarded. | You cannot dub a video containing copy-guarded material. | 47 | |
| COPYING INTERRUPTED | The video tape or disc became full during dubbing. | Load another video tape or disc for recording and restart. | 70, 71 | |
| Disc setup | DISC ERROR - C302, C303 | Cannot Format disc due to a scratch or contamination on the disc. | Check the disc and reload it, or use another disc for recording. | -- |
| DISC ERROR - C304, C305 | Cannot Finalise disc due to a scratch or contamination on the disc. | Check the disc and reload it, or use another disc for recording. | -- | |
| DISC ERROR - C306 | Cannot Undo Finalise disc due to a scratch or contamination on the disc. | Check the disc and reload it, or use another disc for recording. | -- | |
| DISC ERROR - C307, C308 | Cannot Protect disc ON/OFF due to a scratch or contamination on the disc. | Check the disc and reload it, or use another disc for recording. | -- | |
| Title Menu | CANNOT EDIT | Editing cannot be performed due to a scratch or contamination on the disc. | Check the disc and reload it, or use another disc for recording. | -- |
| CANNOT EDIT - C408 | Combining chapters cannot be performed. | Chapter marks that have been added automatically in the erasing of a scene procedure cannot be erased. | 69 | |
| PROCESSING PLEASE WAIT | A process requiring a longer time such as editing is being performed. | Wait until the process is complete. | -- |
NOTE: It is possible that other warning messages other than this listed above could appear.
If this happens, please check the possible solutions above as they could still provide an explanation.
Problems and troubleshooting
| SYMPTOMS | POSSIBLE SOLUTIONS | PAGE |
| VCR/DVD | ||
| VCR/DVD does not operate. | Make sure the power cord is plugged in.Try another AC outlet.Power is off, check fuse or circuit breaker.Unplug unit, then plug it back in.Select the DVD or VCR mode before operating. | ––28 |
| No picture. | Antenna connection is not correct or antenna cable is disconnected.Check the unit is connected correctly.The video input selector of the TV is not set to VIDEO. Set to VIDEO (or equivalent).Channel is set to the external mode. | 1414–– |
| No sound. | Check the unit is connected correctly.Check the input selector of the amplifier is set properly.The unit is in the Special playback mode. | 14~16–31, 44 |
| The remote control does not function. | Aim at the remote control at the remote sensor.Operate within Approx. 5 metres or reduce the light in the room.Clear the path of the beam.The batteries are weak. Replace the batteries.Check the batteries are inserted correctly. | 13 |
| No function in DVD mode. | Press OPERATE button on the unit approx. 10sec. to reset. | - |
| DVD | ||
| Display is not shown in your language. | Your preferred language may not be available on the disc. | 18 |
| Playback doesn't start. | No disc is inserted.The disc may be dirty. Clean up the disc.The unit cannot play DVD-ROMs, etc. | 2877 |
| Stopping playback, search, slow-motion play, repeat play, or program play, etc. cannot be performed. | Some discs may not do some of the functions. | - |
| Recording does not work. | Check the disc space, using the disc information.Check the disc for protection.Check if the video to be recorded is not “copy-guarded”.Check that the number of recorded titles is 99 or less, using the disc information.Check that the total number of chapters for the recorded titles does not exceed 999 in the disc information section.In a DVD-RW of Ver.1.0, recording in Video mode does not work. Check the disc type. | 30214730, 4630, 468 |
| A disc recorded using this recorder cannot be played back in other players. | Check that the disc is finalised.Some DVD players will not play even if the disc has been finalised.If the disc was recorded in VR mode, the other player must be RW compatible in order to play the disc. | 219, 219, 21 |
Problems and troubleshooting / Video head cleaning
| SYMPTOMS | POSSIBLE SOLUTIONS | PAGE |
| VCR | ||
| TV recording does not work. | The erase prevention tab of the video cassette is broken off.The unit is in the external input mode. | 42, 48 |
| Timer recording does not work. | The time is not set correctly.The recording start/end time is not set correctly.TIMER REC has not been pressed (☐ is not lit). | 205253 |
| Noise bars on screen. | Tracking adjustment beyond range of automatic tracking circuit.Try Manual tracking adjustment.Video heads are dirty.The tape is worn or damaged. | 4479- |
| OTHER | ||
| No 4:3 (16:9) picture. | The setup does not match your TV. | 22 |
| No on-screen display. | Select Display “ON”. | 22 |
| Nothing appears in the display window. | Check the DIMMER setting for SETUP. | 22 |
| No surround sound. | The setup does not match your stereo system. | 16 |
| The unit or remote operation key is not functioning. | Turn off the unit and unplug the AC power cord for several minutes, then replug it. | - |
| Playback does not start when the title is selected. | Check the Parental setup. | 19 |
| Audio soundtrack and/or subtitle language is not changed when you playback a DVD. | Multilingual language is not recorded on the DVD disc. | 18 |
| No subtitles. | Some discs have no subtitles.Subtitles are cleared. Press SUBTITLE. | 18, 36 |
| Angle cannot be changed. | Multi-angles are not recorded on the DVD disc. | - |
| “” appears on the screen. | The function is prohibited with the unit or the disc. | - |
Video head cleaning
Video Head Clogging
The video heads record and playback pictures and sound on the video tape. In the event that they become dirty you won't be able to do a perfect recording and the playback picture will be extremely snowy. Also, keep in mind that a poor tape quality and a damaged cassette may contribute to the rapid accumulation of dirt on the heads.

natural_image
Portrait of a smiling woman with curly hair and earrings (no text or symbols visible)Good Picture
natural_image
Grainy black-and-white image of a noisy, pixelated surface with no discernible text or symbolsSnowy Picture
Automatic Head Cleaning System
The Automatic Head Cleaning System cleans the video heads automatically when a cassette is inserted and ejected to prevent dirt from accumulating on the heads. However, manual head cleaning is needed if the picture on playback is still unclear although the picture on program is normal. This failure signifies that the head is getting dirty and can occur when playing poor quality or damaged tapes. If the heads require cleaning, use a high quality head-cleaning cassette or have them cleaned professionally.
Attention:
Video heads may eventually wear out and should be replaced when they fail to produce clear pictures even after having been carefully cleaned.
GENERAL
| Power supply: | AC 230V 50Hz |
| Power consumption: | Operation: 28WStandby: 5.5W (if display window is off.) |
| Weight: | 5.5 kg |
| Dimensions: | Width : 430 mmHeight : 99 mmDepth : 311.5 mm |
| Operating temperature: | 5°C to 35°C |
| Operating humidity: | Less than 80% RH |
| Input Level: | SCART-socket: Video : 1 Vp-p, 75 ΩAudio : 500 mV, 50 k Ω |
| Audio IN jack: 500 mV, 50 k Ω | |
| Output Level: | SCART-socket: Video : 1 Vp-p, 75 ΩAudio : 500 mV, 1 k Ω |
| Audio OUT jack: 500 mV, 1 k Ω |
VCR section
| Signal system: | PALNTSC tape playback with PAL/60 Hz |
| Video head: | 4 Rotary Heads |
| Audio track: | Hi-Fi Sound - 2 Tracks / MONO Sound - 1 Track |
| Channel coverage: | 2-12,X,Y,Z,S1-S41,21-69 |
| F.FWD/REW Time: | Approx. 1minute and 12 seconds (with E-180 Cassette Tape)(at+25°C) |
| Hi-Fi Frequency Response: | 20Hz to 20,000Hz |
| Hi-Fi Dynamic Range: | More than 75dB |
DVD section
| Signal system: | PAL |
| Applicable disc: | DVD (12cm, 8cm), CD (12cm, 8cm) |
| Recording format: | DVD-Video Recording (VR mode) DVD-VIDEO (Video mode) |
| Recording discs: | DVD-RW, DVD-R |
| Recording time: | XP: Approx. 60 min |
| (based on a 4.7GB disc) | SP: Approx. 120 min LP: Approx. 240 min SLP: Approx. 360 min |
Audio characteristics
| frequency response: | DVD: 4Hz - 22kHzCD: 4Hz - 20kHz |
| S/N Ratio: | 90dB |
| Harmonic distortion: | Less than 0.06% |
| Wow and flutter: | Less than 0.01% Wrms |
| Output: | Video : (RCA) 1 Vp-p/75 ohmAudio : (RCA) -12 dBm/1k ohmDigital Audio : 0.5Vp-p/75 ohm |
| Pickup: | CD : Wavelength: 780 nmMaximum output power: 8.5 mWDVD : Wavelength: 660 nmMaximum output power: 120 mW |
ACCESSORIES:
| Remote control unit x 1 |
| 75 ohm Coaxial Cable x 1 |
| 21 pin Scart Cable x 1 |
| Battery R-03 (“AAA” size, UM/SUM-4, HP-16 or similar) x 2 |
| Operation Manual |
SHARP®
SHARP CORPORATION
- OPERATION MANUAL ENGLISH
- SAFETY INFORMATION
- Note:
- CAUTION:
- WARNING:
- Laser Diode Properties
- Power Cord Protection
- Before using your unit
- Various settings
- Disc playback
- Tape playback
- Recording
- Editing the disc
- Dubbing
- Additional information
- Media mark
- Important Warning
- Copyright
- Accessories
- Playback function
- A realistic, powerful, Movie Theater sound
- Playback the scene you want to see immediately
- Title menu
- Video CD/SVCD and MP3/WMA/JPEG playback
- Recording function
- Timer recording
- One-touch Timer Recording (OTR)
- Edit function
- Editing recorded material without changing the original titles
- Chapter mark
- Erasing scenes
- Combining titles
- Dubbing function
- Dubbing a tape onto a disc or a disc onto a tape
- Handling discs
- Removing the Disc from its case
- Storing discs
- Cleaning discs
- Discs which can be played back
- Region management information
- Example:
- Operating DVD-Video
- Discs which cannot be played back
- The following DVD-Video discs may not be played back on this unit:
- CD-R/CD-RWs cannot be played back for the following reasons.
- Do not playback the following discs. Playback of these discs may cause a failure.
- Discs on which video can be recorded
- DVD-RW
- DVD-R
- NOTES:
- Recording format
- VR mode
- Video mode
- Format modes that can be used with each disc
- Title/Chapter/Track
- When recording in the VR mode
- When recording in the Video mode
- Disc playback in other players
- How to install the batteries
- Connecting this unit to your TV using the SCART connections
- Playback connection
- Connection to a Satellite Receiver
- Connect to a Stereo Amplifier with Audio Output
- Connect to an AV Amplifier with built-in digital surround
- Use this connection to connect an:
- Preparation:
- Using the SETUP MENU
- OSD LANGUAGE
- Selectable languages:
- DVD MENU
- OTHER
- AUDIO
- ORIGINAL
- SUBTITLE
- AUTOMATIC
- OFF
- Selecting parental control
- To lock the selected parental control level
- To cancel the locked parental control level
- Temporarily cancelling parental control
- Setting the clock / Setting the disc
- REFORMAT
- NEW DISC FORMAT
- FINALISE
- PROTECT DISC
- UNDO FINALISE
- DIMMER (Brightness of the display window)
- DISPLAY/CALL (Turning the screen display "ON" or "OFF")
- TV SCREEN
- 4:3 Panscan
- 4:3 Letterbox
- 16:9
- STILL MODE
- STILL BY FRAME
- Note for the field still and frame still:
- NO NOISE BACKGROUND
- BRIGHTNESS
- DVD OUTPUT
- AV2
- AV3 INPUT
- S-VIDEO:
- VIDEO:
- Setting the audio / Setting the recording
- This section describes audio settings.
- DRC
- VIRTUAL SURROUND (Spatializer N-2-2 TM )
- EXTERNAL AUDIO INPUT
- NICAM
- DOLBY DIGITAL OUTPUT
- This section describes recording settings.
- INITIAL REC TO
- INITIAL REC MODE
- AUTO CHAPTER
- INDEX PICTURE
- BILINGUAL RECORDING
- JPEG INTERVAL
- Automatic station presetting
- To skip a channel position
- DECODER ON/OFF
- Replace TV station positions
- Manual TV station presetting
- Playback by selecting a title
- DVD-RW VR DVD-RW Video DVD-R
- Press TITLE MENU.
- Press ▲ or ▼ to select the title you want to playback.
- Press ENTER.
- Checking media information
- Fast forward playback
- Review playback
- Still playback
- Frame advance
- Slow motion playback
- Locating a chapter or track
- Commercial skip / Locating a specific scene
- Commercial skip
- Locating a specific scene
- Press PLAY MODE.
- Press ◀ or ▶ to select "TIME SEARCH", "CHAPTER SEARCH" or "TITLE SEARCH", and press ENTER.
- When selecting "TIME SEARCH", input the time until the playback is restarted with the numeric or ▲/▼/◄/► keys. When selecting "CHAPTER SEARCH" or "TITLE SEARCH", press ▲ or ▼ to select the chapter number or title number.
- Press ENTER.
- One touch repeat
- A-B repeat playback
- Title, Chapter repeat playback
- DVD-VIDEO
- Title selection
- Changing angles
- Zooming
- Changing soundtrack language / Subtitles
- Changing soundtrack language
- In case of VIDEO CD playback
- Turning the subtitles On and Off
- Changing the subtitles language
- Playing back a selected track
- Excluding specified track
- Random playback
- Repeat playback of selected track
- Repeat playback of all tracks
- Playing back programs
- Playing back track by specifying the time
- Limitations on MP3/WMA/JPEG CD playback:
- Using the BROWSER screen
- When the file to be displayed is selected
- MP3 CD
- WMA CD
- Playing back MP3/WMA files
- Press ▲ or ▼ to select MP3/WMA file.
- Carry out either of the item a or b below.
- To return to the BROWSER screen, press RETURN.
- JPEG CD
- Playing back JPEG files
- Press ▲ or ▼ to select JPEG file.
- Select either a or b as below:
- Press ENTER to play the selected picture.
- To return to the thumbnail screen, press RETURN.
- Loading and unloading a cassette tape
- Loading
- Automatic power ON
- Automatic playback
- Unloading
- Automatic tape eject
- To prevent accidental erasure
- To record again
- To start playback
- To stop playback
- To rewind the tape or forward it rapidly
- Forward/Reverse picture search mode
- NTSC video cassette playback
- Picture search
- Still picture
- Slow motion
- Frame by Frame picture
- Adjusting tracking condition
- Manual tracking adjustment
- Repeat playback
- To display VCR operation status
- ZERO RETURN function / Video index search system
- ZERO RETURN function
- NOTES for Counter Display:
- NOTES for Video index search system:
- Press DISPLAY.
- Press STOP when playback or recording is finished.
- Switching the display between clock and counter
- Video index search system
- Recording an INDEX MARK
- Index search
- Read this before recording on disc
- Types of disc
- DVD-RW discs
- DVD-R discs
- Notes on recording in the Video mode
- Recording modes
- Disc remaining time
- Images that cannot be recorded
- "Copy Free" (unrestricted recording)
- "Copy Never" (recording prohibited)
- "Copy Once" (one-time recordable)
- Recording a TV program
- - REC/OTR.
- Press REC MODE/SPEED to select the recording mode.
- Press the numeric keys or CH ∧/∨ to select the channel to be recorded.
- Press ● REC/OTR.
- Auto Rewind feature
- To stop recording
- To stop recording temporarily
- Recording one program while watching another
- To cancel OTR
- Setting timer recording
- Checking or changing the timer recording
- Cancelling the timer recording
- In case Timer programs-overlap
- NICAM programmes are divided into 4 types as shown below.
- NICAM STEREO broadcast
- NICAM MONO A broadcast
- NICAM MONO A B broadcast
- NICAM OFF
- German A2 stereo sound reception:
- Stereo program indication
- Bilingual program indication
- Playback
- Original title
- Playlist
- Editable items
- Creating a playlist
- Press ENTER.
- Changing a title name
- Erasing a scene (Edit title)
- Combining the title
- Erasing a playlist
- Adding a chapter mark
- Combining chapters
- Changing an original title name
- Erasing an original title
- Changing a disc name
- Using the keyboard screen
- Keyboard screen types
- Inputting characters
- Character input 1
- Character input 2
- Erasing a character
- Erasing method 1
- Erasing method 2
- Erasing method 3
- Selecting between uppercase and lowercase letters
- Determining a name
- Cancelling character input
- Dubbing a tape onto a disc
- Dubbing only the specified titles or the playlist
- You can connect another VCR or camcorder for dubbing.
- When a video is recorded using this unit
- Dubbing using other equipment
- Playback unit connection.
- Dubbing with A/V-cable (or S-Video cable) (not supplied)
- Dubbing with scart cable (not supplied)
- angle
- blue background
- BROWSER screen
- chapter
- CM Skip
- copy guard
- Dolby Digital
- DTS
- interlaced scanning
- letter box
- MP3
- OTR
- pan scan
- parental control
- parental control settings
- region number
- SETUP MENU
- slide show
- subtitle language
- title
- top menu
- track
- TRACK INFO screen
- virtual surround
- Problems and troubleshooting / Video head cleaning
- Video head cleaning
- Video Head Clogging
- Automatic Head Cleaning System
- Attention:
- SHARP®
- SHARP CORPORATION
Brand : SHARP
Model : DV-RW250S
Category : DVD player