
DV-NC150U - DVD player SHARP - Free user manual and instructions
Find the device manual for free DV-NC150U SHARP in PDF.


| Product Type | DVD Player |
| Brand | Sharp |
| Model | DV-NC150U |
| Dimensions (W x H x D) | 430 x 80 x 300 mm (approx.) |
| Weight | 3.0 kg (approx.) |
| Power Supply | AC 120V, 60Hz |
| Power Consumption | 15 W (typical) |
| Disc Playback | DVD, DVD-R/RW, CD, CD-R/RW, MP3, JPEG |
| Video Outputs | Composite, S-Video, Component (Y, Pb, Pr) |
| Audio Outputs | Stereo RCA, Coaxial Digital, Optical Digital |
| Audio Decoding | Dolby Digital, DTS (2-channel downmix) |
| Progressive Scan | Yes (via component) |
| Remote Control | Included (batteries not included) |
| Disc Loading | Tray loading |
| Playback Features | Play, Pause, Stop, Fast Forward, Rewind, Skip, Repeat, A-B Repeat, Zoom |
| On-Screen Display | Yes |
| Parental Control | Yes (rating limits) |
| Maintenance | Clean lens with dry soft cloth; avoid liquids |
| Safety | Class 1 laser product; do not open casing |
| Operating Temperature | 41°F - 95°F (5°C - 35°C) |
| Spare Parts | Contact Sharp customer service or authorized dealers |
Frequently Asked Questions - DV-NC150U SHARP
User questions about DV-NC150U SHARP
0 question about this device. Answer the ones you know or ask your own.
Ask a new question about this device
Download the instructions for your DVD player in PDF format for free! Find your manual DV-NC150U - SHARP and take your electronic device back in hand. On this page are published all the documents necessary for the use of your device. DV-NC150U by SHARP.
USER MANUAL DV-NC150U SHARP
Please read this Operation Manual carefully before using your VCR/DVD COMBINATION.
natural_image
Line drawing of a computer case with two slots and a labeled 'RW COMPATIBLE' logo (no other text or symbols)
The region number for this VCR/DVD is 1.


Basic TV Connection
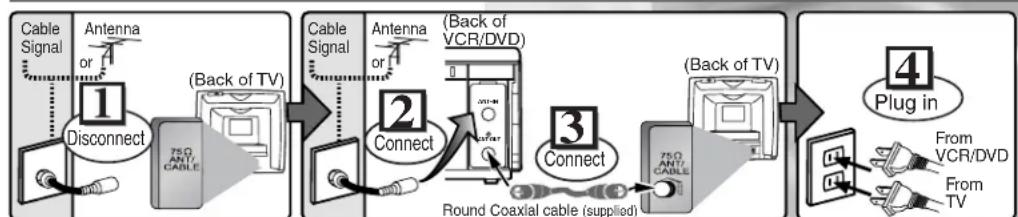
flowchart
graph LR
    A["Cable Signal"] --> B["1 Disconnect"]
    B --> C["2 Connect"]
    C --> D["3 Connect"]
    D --> E["4 Plug in"]
    E --> F["From VCR/DVD"]
    E --> G["From TV"]
    style A fill:#f9f,stroke:#333
    style B fill:#ccf,stroke:#333
    style C fill:#cfc,stroke:#333
    style D fill:#fcc,stroke:#333
    style E fill:#cff,stroke:#333
    style F fill:#ffc,stroke:#333
    style G fill:#cfc,stroke:#333
5 Please refer to "Connections" on page 7.
For future reference, record the serial number (located on the rear of the Unit) in the space provided.
Model No.: DV-NC150U
Serial No.:
WARNING: TO REDUCE THE RISK OF FIRE OR ELECTRIC SHOCK, DO NOT EXPOSE THIS APPLIANCE TO RAIN OR MOISTURE.
CAUTION: TO PREVENT ELECTRIC SHOCK, MATCH WIDE BLADE OF PLUG TO WIDE SLOT, FULLY INSERT.
ATTENTION: POUR ÉVITAR LES CHOC ÉLECTRIQUES, INTRODUIRE LA LAME LA PLUS LARGE DE LA FICHE DANS LA BORNE CORRESPONDANTE DE LA PRISE ET POUSSER JUSQU'AU FOND.

CAUTION
RISK OF ELECTRIC SHOCK DO NOT OPEN

CAUTION:
TO REDUCE THE RISK OF ELECTRIC SHOCK, DO NOT REMOVE COVER (OR BACK). NO USER SERVICEABLE PARTS INSIDE. REFER SERVICING TO QUALIFIED SERVICE PERSONNEL.

This symbol warns the user of uninsulated voltage within the unit that can cause dangerous electric shocks.

This symbol alerts the user that there are important operating and maintenance instructions in the literature accompanying this unit.
“WARNING—FCC Regulations state that any unauthorized changes or modifications to this equipment not expressly approved by the manufacturer could void the user’s authority to operate this equipment.”
This device complies with Part 15 of the FCC Rules. Operation is subject to the following two conditions:
(1) This device may not cause harmful interference, and
(2) this device must accept any interference received, including interference that may cause undesired operation.
INFORMATION
This equipment has been tested and found to comply with the limits for a Class B digital device, pursuant to Part 15 of the FCC Rules. These limits are designed to provide reasonable protection against harmful interference in a residential installation. This equipment generates, uses and can radiate radio frequency energy and, if not installed and used in accordance with the instructions, may cause harmful interference to radio communications. However, there is no guarantee that interference will not occur in a particular installation. If this equipment does cause harmful interference to radio or television reception, which can be determined by turning the equipment off and on, the user is encouraged to try to correct the interference by one or more of the following measures:
—Reorient or relocate the receiving antenna.
—Increase the separation between the equipment and receiver.
—Connect the equipment into an outlet on a circuit different from that to which the receiver is connected.
—Consult the dealer or an experienced radio/TV technician for help.
This Class B digital apparatus complies with Canadian ICES-003.
This reminder is provided to call CATV system installer's attention to Article 820-40 of the National Electrical Code that provides guidelines for proper grounding and, in particular, specifies that the cable ground shall be connected to the grounding system of the building, as close to the point of cable entry as practical.
CAUTION:
THIS UNIT IS A CLASS 1 LASER PRODUCT.
USE OF CONTROLS OR ADJUSTMENTS OR PERFORMANCE OF PROCEDURES OTHER THAN THOSE SPECIFIED HEREIN MAY RESULT IN HAZARDOUS RADIATION EXPOSURE.
AS THE LASER BEAM USED IN THIS UNIT IS HARMFUL TO THE EYES, DO NOT ATTEMPT TO DISASSEMBLE THE CABINET.
REFER SERVICING TO QUALIFIED PERSONNEL ONLY.
Products that have earned ENERGY STAR ^® are designed to protect the environment through superior energy efficiency.
Important Safeguards
-
Read Instructions - All the safety and operating instructions should be read before the appliance is operated.
-
Retain Instructions- The safety and operating instructions should be retained for future reference.
-
Heed Warnings - All warnings on the appliance and in the operating instructions should be adhered to.
-
Follow Instructions - All operating and use instructions should be followed.
-
Cleaning - Unplug this video product from the wall outlet before cleaning. Do not use liquid cleaners or aerosol cleaners. Use a damp cloth for cleaning. EXCEPTION: A product that is meant for uninterrupted service and, that for some specific reason, such as the possibility of the loss of an authorization code for a CATV converter, is not intended to be unplugged by the user for cleaning or any other purpose, may exclude the reference to unplugging the appliance in the cleaning description otherwise required in item 5.
-
Attachments - Do not use attachments not recommended by the video product manufacturer as they may cause hazards.
-
Water and Moisture- Do not use this video product near water, for example, near a bath tub, wash bowl, kitchen sink, or laundry tub, in a wet basement, or near a swimming pool, and the like.
-
Accessories - Do not place this video product on an unstable cart, stand, tripod, bracket, or table. The video product may fall, causing serious injury to a child or adult, and serious damage to the appliance. Use only with a cart, stand, tripod, bracket, or table recommended by the manufacturer, or sold with the video product. Any mounting of the appliance should follow the manufacturer's instructions and should use a mounting accessory recommended by the manufacturer.
-
Transportation - A product and cart combination should be moved with care. Quick stops, excessive force, and uneven surfaces may cause the appliance and cart combination to overturn.
-
Ventilation - Slots and openings in the cabinet are provided for ventilation and to ensure reliable operation of the video product and to protect it from overheating, and these openings must not be blocked or covered. The openings should never be blocked by placing the video product on a bed, sofa, rug, or other similar surface. This video product should not be placed in a built-in installation such as a bookcase or rack unless proper ventilation is provided or the manufacturer's instructions have been adhered to.
-
Power Sources - This video product should be operated only from the type of power source indicated on the marking label. If you are not sure of the type of power supply to your home, consult your appliance dealer or local power company. For products intended to operate from battery power, or other sources, refer to the operating instructions.
-
Grounding or Polarization - This video product is equipped with a polarized alternating-current line plug (a plug having one blade wider than the other). This plug will fit into the power outlet only one way. This is a safety feature. If you are unable to insert the plug fully into the outlet, try reversing the plug. If the plug should still fail to fit, contact your electrician to replace your obsolete outlet. Do not defeat the safety purpose of the polarized plug.
-
Power Cord Protection - Power supply cords should be routed so that they are not likely to be walked on or pinched by items placed upon or against them, paying particular attention to cords at plugs, convenience receptacles, and the point where they exit from the appliance.
-
Outdoor Antenna Grounding - If an outside antenna or cable system is connected to the video product, be sure the antenna or cable system is grounded so as to provide some protection against voltage surges and built-up static charges. Article 810 of the National Electrical Code,
ANSI/NFPA No. 70, provides information with regard to proper grounding of the mast and supporting structure, grounding of the lead-in wire to an antenna discharge unit, size of grounding conductors, location of antenna-discharge unit, connection to grounding electrodes, and requirements for the grounding electrode. (Fig. A)

- Lightning - For added protection for this video product during a lightning storm, or when it is left unattended and unused for long periods of time, unplug it from the wall outlet and disconnect the antenna or cable system. This will prevent damage to the video product due to lightning and power-line surges.
- Power Lines - An outside antenna system should not be located in the vicinity of overhead power lines or other electric light or power circuits, or where it can fall into such power lines or circuits. When installing an outside antenna system, extreme care should be taken to keep from touching such power lines or circuits as contact with them might be fatal.
- Overloading - Do not overload wall outlets and extension cords as this can result in a risk of fire or electric shock.
- Object and Liquid Entry - Never push objects of any kind into this video product through any openings as they may touch dangerous voltage points or short-out parts that could result in a fire or electric shock. Never spill liquid of any kind on the video product.
- Servicing - Do not attempt to service this video product yourself as opening or removing covers may expose you to dangerous voltage or other hazards. Refer all servicing to qualified service personnel.
- Damage Requiring Service - Unplug this video product from the wall outlet and refer servicing to qualified service personnel under the following conditions:
a. When the power-supply cord or plug is damaged.
b. If liquid has been spilled, or objects have fallen into the video product.
c. If the video product has been exposed to rain or water.
d. If the video product does not operate normally by following the operating instructions. Adjust only those controls that are covered by the operating instructions as an improper adjustment of other controls may result in damage and will often require extensive work by a qualified technician to restore the video product to its normal operation.
e. If the video product has been dropped or damaged in any way.
f. When the video product exhibits a distinct change in performance this indicates a need for service.
- Replacement Parts - When replacement parts are required, be sure the service technician has used replacement parts specified by the manufacturer or have the same characteristics as the original part. Unauthorized substitutions may result in fire, electric shock or other hazards.
- Safety Check - Upon completion of any service or repairs to this video product, ask the service technician to perform safety checks to determine that the video product is in proper operating condition.
- Heat - This video product should be situated away from heat sources such as radiators, heat registers, stoves, or other products (including amplifiers) that produce heat.
Table of Contents
Precautions
■ Important Safeguards .... 3
Symbol Used in This Manual 4
Supplied Accessory 4
Service 5
Copy Protection 5
Recommended Measures for
Optimum Picture Excellence .... 5
Notice for progressive scan outputs ..... 5
No Fingers or Other Objects Inside .... 5
Warning of Dew Formation. 5
Others 5
Maintenance 6
Setup
■ About the Video Cassettes and Discs ..... 7
Playable Video Cassettes....7
Playable Discs 7
Unplayable Discs 7
■ Connections .... 7
RF Output Channel 7
Hint for Cable Box or Satellite Box 8
Connection to an Audio System 8
Connection to a TV 9
Front & Rear Terminals 9
■ About the Remote Control and Front Panel .. 10
■ VCR/DVD Switching.....11
■ Preparation for Use .... 12
Turn on the unit for the first time. 12
Clock Set Up 12
VCR Functions
■Playback 13
■ Recording & OTR (One Touch Recording) ... 13
■ Other Operations....13
■ On-Screen Operations....14
■ Recording Features. 14
Timer Recording 14
Hint for Timer Recording ..... 15
Copying a Video Tape 15
■ MTS System (Multi-Channel Television Sound)....15
■ Special Features .... 16
Time Search / Index Search / Auto Repeat. . . . 16
DVD Functions
■Playback....17
■ MP3 Playback .... 19
■ The On-Screen Display ..... 19
■ Search Function ..... 20 Track Search / Title/Chapter Search / Time Search .. 20
■ Marker Setup 20
■ Repeat / Random / Programmed Playback . . . 21 Repeat Playback / Repeat A-B Playback / Random Playback / Programmed Playback . . . 21
■ Special Settings....22 Subtitle Language / Audio Language / Camera Angle / Stereo Sound Mode....22 Black Level Setting / Virtual Surround....23
■ DVD Set Up .... 23 LANGUAGE Setting.... 24 DISPLAY Setting.... 24 AUDIO Setting.... 25 PARENTAL Setting.... 26 To return the All Selections of SET UP (except for PARENTAL) to the Default Setting... 26
Information
■ Language List 27
■ Specifications 28
Service Information 28
■ Troubleshooting Guide 29
Español 30
Symbol Used in This Manual
The following symbols appear in some headings and notes in this manual.

Description refers to playback or recording of video cassette tapes.

Description refers to playback of the VR mode (Video Recording format). *The VR mode (Video Recording format) is a recording mode to enjoy editing the program or “manual mode” for recording in desired resolution and time.
DVD-W: Description refers to playback of DVD-Video discs.
: Description refers to playback of Audio CDs.
: Description refers to playback of MP3 files.
QUICK: Indicates DVD Setup menus also accessible from the QUICK SETUP Menu. (Refer to page 23.)
Supplied Accessory
- Remote control (9HSNA276UD) with two AA batteries
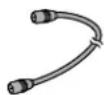
• Round Coaxial cable (9HSWPZ0901TM003)
- Audio cable/ Video cable (9HSWX1E56B5-001) - Operation Manual (9HS1VMN20342)



Location and Handling
Location and Handling
- Do not cover or place the VCR/DVD in enclosed spaces to prevent excessive temperature build up.
- Do not place the VCR/DVD in direct sunlight, or near heat sources.
- Depending on the use environment, the temperature of the VCR/DVD may increase slightly. This is not a malfunction.
- Keep the VCR/DVD away from strong magnetic objects.
- Do not place any object containing water or other liquids on the VCR/DVD. In the event that liquid should enter the cabinet, unplug the VCR/DVD immediately and contact the retailer or service centre approved by SHARP immediately.
- Do not remove the VCR/DVD cabinet. Touching parts inside the cabinet could result in electric shock and/or damage to the VCR/DVD. For service and adjustment inside the cabinet, call a qualified dealer or service centre approved by SHARP.
Nonuse Periods
Location and Handling
- When the VCR/DVD is not being used, switch the VCR/DVD to the Standby mode.
- When left unused for a long period of time, the VCR/DVD should be unplugged from the household AC outlet.
- Do not place the VCR/DVD in direct sunlight, or near heat sources.
Copy Protection
This Unit supports Macrovision copy protection. On DVD discs that include a copy protection code, if the contents of the DVD disc are copied using a VCR, the copy protection code prevents the videotape copy from playing normally.
Apparatus Claims of U.S. Patent Nos. 4,631,603, 4,577,216, 4,819,098 and 4,907,093 licensed for limited viewing uses only.
This product incorporates copyright protection technology that is protected by method claims of certain U.S. patents and other intellectual property rights owned by Macrovision Corporation and other rights owners. Use of this copyright protection technology must be authorized by Macrovision Corporation, and is intended for home and other limited viewing uses only unless otherwise authorized by Macrovision Corporation. Reverse engineering or disassembly is prohibited.
Notice for progressive scan outputs
Consumers should note that not all high definition television sets are fully compatible with this product and may cause artifacts to be displayed in the picture. In case of 525 progressive scan picture problems, it is recommended that the user switch the connection to the 'standard definition' output. If there are questions regarding our TV set compatibility with this model 525p DVD player, please contact our customer service center.
No Fingers or Other Objects Inside
Do not put your fingers or objects on the disc tray or in the cassette compartment.
Warning of Dew Formation
Moisture may form inside the VCR/DVD under the following conditions:
- Immediately after a heater is turned on.
• In a steamy or humid room.
- When the VCR/DVD is suddenly moved from a cold to warm environment.
If moisture forms inside this VCR/DVD, it may not operate properly or damage the video cassette. In such case, turn on the power and wait for more than two hours for the moisture to evaporate.
Others
It is the intent of Sharp that this product be used in full compliance with the copyright laws of the United States and that prior permission be obtained from copyright owners whenever necessary.
“Licensed under one or more of U.S. Pat. 4,972,484, 5,214,678, 5,323,396, 5,530,655, 5,539,829, 5,544,247, 5,606,618, 5,610,985, 5,740,317, 5,777,992, 5,878,080, or 5,960,037.”
A NOTE ABOUT RECYCLING
This product's packaging materials are recyclable and can be reused. Please dispose of any materials in accordance with your local recycling regulations.
Batteries should never be thrown away or incinerated but disposed of in accordance with your local regulations concerning chemical wastes.
Make your contribution to the environment!!!
• Used up batteries do not belong in the dust bin.
- You can dispose of them at a collection point for used up batteries or special waste. Contact your council for details.

Maintenance
SERVICING
- Please refer to relevant topics in the Troubleshooting Guide on page 29 before returning the product.
- Do not attempt to service this Unit yourself. Instead, unplug it and contact a Sharp Authorized Service Center for inspection. (See Service Information on page 28.)
- Be sure the service technician uses authorized replacement parts or their equivalents. Unauthorized parts may cause fire, electrical shock, or other hazards.
- Following any service or repair, be sure the service technician performs safety checks to certify that this Unit is in safe operating order.
CLEANING THE CABINET
- Use a soft cloth slightly moistened with a mild detergent solution. Do not use a solution containing alcohol, spirits, ammonia or abrasive.
- When a disc becomes dirty, clean it with a cleaning cloth. Wipe the disc from the center out. Do not wipe in a circular motion.
- Do not use solvents such as benzine, thinner, commercially available cleaners, detergent, abrasive cleaning agents or antistatic spray intended for analogue records.
CLEANING DISCS
RECOMMENDED MEASURES FOR OPTIMUM PICTURE EXCELLENCE
This Unit is a precision device constructed using extremely accurate technology.
- The disc cannot be played if the disc drive component is worn out or if the internal pick up lens is dirty.
- If this unit still does not perform properly although you refer to the relevant sections and to Troubleshooting Guide on page 29, the laser optical pickup unit may be dirty. Consult a Sharp Authorized Service Center for inspection and cleaning of the laser optical pickup unit.
DISC HANDLING
- Handle the discs so that fingerprints and dust do not adhere to the surfaces of the discs.
● Always store the disc in its protective case when it is not used.
AUTO HEAD CLEANING
- Automatically cleans video heads as you insert or remove a cassette, so you can see a clear picture.
- Playback picture may become blurred or interrupted while the TV program reception is clear. Dirt accumulated on the video heads after a long period of use, or the usage of rental or worn tapes can cause this problem. If a streaky or snowy picture appears during playback, the video heads in your VCR/DVD may need to be cleaned.
- Please visit your local Audio/Video store and purchase a good quality VHS Video Head Cleaner.
- If a Video Head Cleaner does not solve the problem, please call our help line mentioned on page 28 to locate a Sharp Authorized Service Center.
Hint
- Remember to read the instructions along with the video head cleaner before use.
- Clean video heads only when problems occur.
Note to CATV system installer
This reminder is provided to call the CATV system installer's attention to Article 820-40 of the NEC that provides guidelines for proper grounding and, in particular, specifies that the cable ground should be connected to the grounding system of the building, as close to the point of cable entry as practical.
Manufactured under license from Dolby Laboratories. "Dolby" and the double-D symbol are trademarks of Dolby Laboratories.
"DTS" and "DTS Digital Out" are trademarks of Digital Theater Systems, Inc.
Setup
About the Video Cassettes and Discs
Playable Video Cassettes
Use only cassettes marked VHS with this unit.
playable Discs
| Playable discs | Mark (logo) | Region code | Recorded signals | Disc size | Disc types | |
| DVD-Video*1,2,4,6 |  |  | [H630] 01  | Digital video (MPEG2) | 12 cm or 8cm |  |
| DVD-R DVD-RW*1,2,3,4,5,6 | [SW2X] |  | — | |||
| [08D5] | [02H5] | |||||
| DVD+R DVD+RW*1,2,3,4,5,6 |  DVD+R DVD+R | [A420] DVD+ReWritable | — | |||
| Audio CD*4,6 | [KXW7] | — | Digital audio or MP3 | 12 cm or 8cm |  | |
| CD-R CD-RW*4,5,6 |  |  |  | |||
If you cannot play back a disc which bears one of the marks above, check the following notes.
*1: This unit conforms to the NTSC color system. Discs recorded in other color systems such as PAL cannot be played back.
*2: Certain DVD-Video discs do not operate as described in this manual due to the intentions of the disc's producers.
*3: TRW label indicates playback compatibility with DVD-COMPATIBLE RW discs recorded in VR mode (Video Recording Format).
This player cannot play the DVD-RW that supports CPRM (Contents Protection for Recordable Media).
*4: Scratched or stained discs may not be played back.
*5: Some discs cannot be played back because of incompatible recording conditions, characteristics of the recorder or special properties of discs.
*6: You can play back discs which bear the marks above. If you use nonstandardized discs, this unit may not play them back. Even if they are played back, the sound or video quality will be compromised.
Unplayable Discs
- On the following discs, only the sound can be heard (picture cannot be viewed). CDV, CD-G
- NEVER play back the following discs. Otherwise, malfunction may result! DVD-RAM, CD-I, Photo CD, Video CD, DVD with region codes other than 1 or ALL,
DVD-ROM for personal computers, CD-ROM for personal computers - On the following disc, the sound MAY NOT be heard. Super Audio CD
• Any other discs without compatibility indications.
Hint
- Only the sound recorded on the normal CD layer can be delivered. The sound recorded on the high density Super Audio CD layer cannot be delivered.
Connections
Please refer to "Basic TV Connection" on the front page before you use this unit.
RF Output Channel
If channel 3 is already occupied for broadcasting,
1) Set your TV to channel 4.
2) Insert a pre-recorded tape into this unit.
3) Press the OUTPUT button on the VCR/DVD so that the VCR OUTPUT light is lit.
- If "VCR" light does not appear on the display of this unit, press the VCR/TV button on the remote control.
4) Press the PLAY button once.
5) After a few seconds, press the PLAY button on the VCR/DVD for 3 seconds.
- The RF output channel will change to channel 4 from channel 3 and you will see a playback picture. In this case, "ch04" will appears on the front panel.
- When a picture does not appear on the TV screen, repeat step 4.
6) Press the STOP button to stop playback.
Hint
- The RF output channel may not change when you adjust tracking during playback. In this case, stop the playback, and start the playback again. After that, press the PLAY button on the VCR/DVD for 3 seconds again.
Hint for Cable Box or Satellite Box
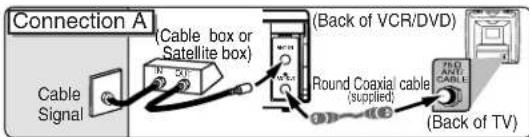
Select this connection when you want to view or record a scrambled channel. With this connection, channels cannot be changed on the VCR/DVD. You can view or record ONLY the channels you have selected on the cable box or the satellite box.
- While you are recording, only the recorded channel can be viewed.
To select channels of the cable box or satellite box
1) Turn on the VCR/DVD by pressing the POWER button, and then, press the VCR/TV button. The "POWER" and "VCR" lights on the front panel will appear. Then, press the SKIP/CH. (▲/▼) buttons to select channel 3 or 4 (the same channel as the output channel of the cable box or satellite box).
- If you use the channel 4, you need to change the VCR/DVD's RF output to channel 4. Refer to "RF Output Channel".
2) At the TV, select channel 3 or 4 (the same channel as you have selected at step 1).
3) At the cable box or satellite box, select the channel you want to view or record.

Select this connection when you want to change channels on the VCR/DVD. With this connection, you may watch one channel while recording another.
- You may not view or record a scrambled channel.
To select channels of the cable box or satellite box
1) At the cable box or satellite box, select channel 3 or 4 (the same channel as the VCR/DVD's RF output channel.)
- Refer to "RF Output Channel".
2) At the TV, select the same channel as the output channel (3 or 4) of the cable box or satellite box.
3) Turn on the VCR/DVD by pressing the POWER button, and then, press the VCR/TV button. The "POWER" and "VCR" lights on the front panel will appear. Then, select the channel you want to view or record.
To play back a tape
Follow the steps 1) to 2) above. Then, play back a tape.
• Refer to "Playback" on page 13
To view one channel while recording another
1) While you are recording on the VCR/DVD, press the VCR/TV button so that the "VCR" light disappears on the VCR/DVD.
2) At the cable box or satellite box, select the channel you want to view.
Connection to an Audio System

flowchart
graph TD
    A["Method 1"] --> B["Stereo system"]
    B --> C["Analog audio input jacks"]
    C --> D["Audio cable (supplied)"]
    D --> E["VCR/DVD"]
    E --> F["(Analog) AUDIO OUT"]
    F --> G["or"]
    G --> H["DVDC/DAVDC"]
    H --> I["VIDEO OUT"]
    H --> J["VIDEO OUT"]
    I --> K["COADUAL"]
    J --> L["R"]
    K --> M["L"]
    L --> N["Y"]
    M --> O["Cp/Pa"]
    N --> P["Cp/Pa"]
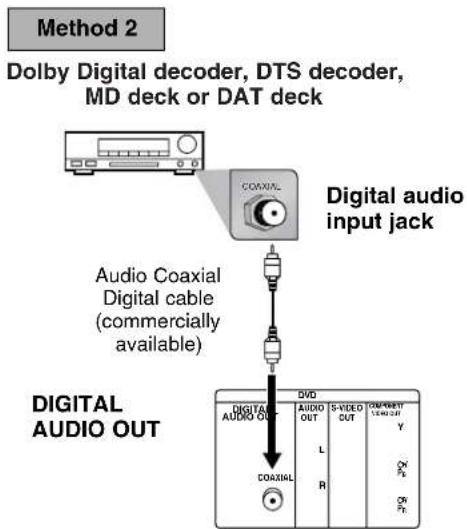
flowchart
graph TD
    A["Method 2"] --> B["Digital audio input jack"]
    B --> C["Audio Coaxial Digital cable (commercially available)"]
    C --> D["Digital Audio OUT"]
    D --> E["COAXIAL"]
    E --> F["DVD"]
    F --> G["VIDEO OUT"]
    F --> H["VIDEO OUT"]
    F --> I["IS-VIDEO OUT"]
    F --> J["COM-KEY TENT OUT"]
Hint
- If the output is Dolby Digital-encoded audio, connect a Dolby Digital decoder and set "DOLBY DIGITAL" to "BITSTREAM" for the AUDIO setting in the setup mode. (Refer to pages 23 and 25.)
- If the output is DTS-encoded audio, connect a DTS decoder and set "DTS" to "BITSTREAM" for the AUDIO setting in the setup mode. (Refer to pages 23 and 25.)
- The audio source on a disc in a Dolby Digital 5.1 channel surround format cannot be recorded as digital sound by an MD or DAT deck.
- Unless connected to a Dolby Digital and/or DTS decoder, set "DOLBY DIGITAL" and "DPCM" or "DTS" to "OFF" for audio output in the setup mode. Playing a DVD using incorrect settings may generate noise distortion, and may also damage the speakers. (Refer to pages 23 and 25.)
- By hooking this unit up to a Multi-channel Dolby Digital decoder, you can enjoy high-quality Dolby Digital 5.1 channel surround sound as heard in the movie theaters.
Connection to a TV

flowchart
graph TD
    A["TV"] --> B["Basic Audio"]
    B --> C["Audio cable (supplied)"]
    C --> D["Video OUT"]
    D --> E["VIDEO OUT"]
    E --> F["Method 1 Good picture"]
    F --> G["VIDEO IN"]
    G --> H["Video cable (supplied)"]
    H --> I["VIDEO OUT"]
    I --> J["Method 2 Method 3 Better picture"]
    J --> K["S-VIDEO IN"]
    K --> L["S-Video cable (commercially available)"]
    L --> M["Best Picture"]
    M --> N["Component Video cables (commercially available)"]
    N --> O["COMPONENT VIDEO OUT"]
    O --> P["Setup"]

    Q["VCR/DVD"] --> R["Audio OUT"]
    R --> S["VIDEO OUT"]
    S --> T["VIDEO OUT"]
    T --> U["VIDEO OUT"]

    V["Analog"] --> W["DVD"]
    W --> X["AUDIO OUT"]
    X --> Y["S-VIDEO OUT"]
    Y --> Z["COAXIAL"]

    style A fill:#f9f,stroke:#333
    style Q fill:#f9f,stroke:#333
    style R fill:#f9f,stroke:#333
    style S fill:#f9f,stroke:#333
    style T fill:#f9f,stroke:#333
    style U fill:#f9f,stroke:#333
• The COAXIAL, DVD AUDIO OUT, S-VIDEO OUT, and COMPONENT VIDEO OUT jacks are only useful in DVD mode.
If your TV is compatible with 480p progressive scanning and you want to enjoy that high quality picture:
You must select the connection Method 3 above and progressive scanning mode. To set the mode, set "PROGRESSIVE" to "ON" in the DISPLAY menu so that "P.SCAN" will appear on the display of this unit. (The progressive scanning is not available in the VCR mode.) See page 23 for more details.
If your TV is not compatible with progressive scanning;
Use this unit in interlace mode. Make sure that no "P.SCAN" is on the display of this unit. If so, set "PROGRESSIVE" to "OFF" in the DISPLAY menu so that "P.SCAN" on the display of this unit will disappear.
Front & Rear Terminals
![DVD ANALOG AUDIO OUT jacks Connect the supplied audio cables here through the Audio In jacks of a television or other audio equipment. (DVD only) DVD/VCR AUDIO OUT jacks Connect the supplied audio cables here through the audio In jacks of a television or other audio equipment. AUDIO IN jacks Connect audio cables coming from the audio out jacks of a camcorder, another VCR, or an audio source here. ANT IN jack Connect your antenna or cable box here. COAXIAL jack Connect an optional coaxial digital audio cable here through the coaxial digital audio in jack of a decoder or audio receiver. (DVD only) [Back of VCR/DVD] ANT-IN ANT-OUT [S-VIDEO OUT jack] Connect an optional S-Video cable here through the S-video in jack of a television. (DVD only) COMPONENT VIDEO OUT jacks Connect optional component video cables here through the component video in jacks of a television. (DVD only) DVD/VCR VIDEO OUT jack Connect the supplied yellow video cable here through the TV's video in jack. VIDEO IN jack Connect a cable coming from the video out jack of a camcorder, another VCR, or an audio-visual source (laser disc player, video disc player, etc.) here. ANT OUT jack Connect the supplied Round Coaxial cable to the antenna input jack on your TV.](/content/2026/05/1052906/images/5a428ac1bfe2b69514d7e5288227344da4660b53327d4d87509c0c8a60f5c827.jpg)
About the Remote Control and Front Panel About the Remote C
Remote Control

Installing the Batteries for the Remote Control
Install two AA batteries (supplied) matching the polarity indicated inside battery compartment of the remote control.
1

2

3

Keep in mind the following when using the remote control:
- Make sure that there is no obstacle between the remote and the remote sensor on the unit.
- Use within the operating range and angle, as shown.

Remote control
| DVD mode | VCR mode | ||
| ButtonDisc/Tape(Alphabetical order) | |||
| To select chapter or title directly | To select track directly | To select channelThe +10 button has no effect in VCR mode. | |
| To search forward/backward through a discTo begin slow forward/reverse playback during the pause mode | To search forward/backward through a disc | To forward/backward a tape | |
| To move the cursor and determine its position | To move the cursor and determine its position | To select an item on the VCR MenuTo advance to the next VCR MenuTo go back one step during clock and timer setting | |
| To repeat between your chosen point A and B | To repeat between your chosen point A and B (CD) | — | |
| ANGLE | To select camera angles on a disc | — | — |
| AUDIO | To select audio languages on a disc | To select STEREO, L-CH or R-CH (CD) | — |
| To clear the markersTo clear the numbers entered incorrectly | To clear the markers (CD)To remove status number in program inputTo clear the numbers entered incorrectly | To exit the VCR MenuTo reset the tape counter | |
| DISPLAY | To display the current disc mode | To display the current disc mode | To display the current time, tape counter, and channel |
| To select the DVD output modeTo activate the remote control in DVD mode | To select the DVD output modeTo activate the remote control in DVD mode | — | |
| MENU | To call up the Menu on a disc | To call up the MP3 menu (MP3) | To call up the VCR Menu |
| MODE | To set black level on/offTo set virtual surround on/offTo set Rapid Play on/off | To arrange the playing order or play randomlyTo set virtual surround on/off | — |
| PAUSE | To pause disc playbackTo advance playback one frame at a time | To pause disc playback | To pause tape playback or recordingTo advance playback one frame at a time |
| To begin disc playback To begin disc playback | To begin disc playback | To begin tape playback | |
| POWER | To turn the unit on or off | To turn the unit on or off | To turn the unit on or off |
| REC/OTR | — | — | To start a recording or One Touch Recording |
| To play a chapter or title repeatedly | To play a track or disc repeatedly (CD)To play a track, group or disc repeatedly (MP3) | — | |
| RETURN | To return to the previous operation on the DVD setup menu | To return to the previous operation on the DVD setup menu | — |
| SEARCH MODE | To search chapter, title or timeTo rapidly return to a location of discSearch the markers. | To search trackTo search time (CD)To rapidly return to a location of discSearch the markers. (CD) | To call up the index or time search menu |
| SETUP | To call up the DVD setup menu | To call up the DVD setup menu | — |
| SKIPICH SKIPICH | To skip chapters To skip tracks | To change channelsTo adjust the tracking manually during playback | |
| SLOW | — | — | To view the tape in slow motion |
| SPEED | — | — | To select the recording speed |
| To stop playback To stop playback | To stop playback or recording | ||
| SUBTITLETSET | To select subtitles on a disc | — | To put the VCR into standby mode for a timer recording |
| TOP MENU | To call up the Top Menu on a disc | To return to the top file of the highest hierarchy in the program and MP3 menu (MP3) | — |
| — | — | To select the VCR output modeTo activate the remote control in VCR mode | |
| VCRTV | To select DVD position or TV position | To select CD/MP3 position or TV position | To select VCR position or TV position |
| ZOOM | To magnify the part of picture (x2/x4) | — | — |
Front Panel Display
Lights up when power is on.


VCR/DVD Switching
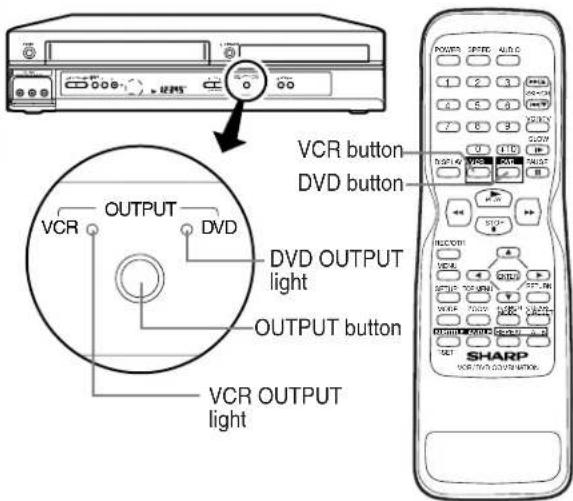
Because this product is a combination of a VCR and a DVD player, you must select first which component you wish to operate with the OUTPUT button.
VCR MODE
Press the VCR button on the remote control. (Verify that the VCR OUTPUT light is lit.)
DVD MODE
Press the DVD button on the remote control. (Verify that the DVD OUTPUT light is lit.)
Hint
- Pressing only the OUTPUT button on the front panel DOES NOT switch the mode of the remote control. You MUST select the correct mode on the remote control.
Preparation for Use
Turn on the unit for the first time


Turn on the TV and set it to channel 3.
- If channel 3 is already occupied for broadcasting, see "RF Output Channel" section.

![2 POWER TV Screen LANGUAGE SELECT ►ENGLISH [ON] FRANCAIS ESPAÑOL](/content/2026/05/1052906/images/ab2c88289299e2fad497d0a98316db729e92061f66dc4c84d774773f03d5ff7a.jpg)


Do you connect the cable from the cable box or the satellite box to the VCR/DVD's ANT IN jack?
Yes Press the MENU button to exit
- Refer to "Hint for Cable Box or Satellite Box" section on page 8.
No/ Please wait for a few minutes. After scanning...
• The tuner stops on the lowest memorized channel.
- You can select only the channels memorized in this unit by using the SKIP/CH. (▲/▼) buttons.
- If "AUTO SET UP" appears on the TV screen again, check the cable connections. Then, press the ▶ button once again.
Hint
- Repeat these steps only if either there was a power failure or this unit has been unplugged for more than 30 seconds.
To Select a Channel
You can select a channel by directly entering channel using the Number buttons on the remote control.
Notes for using the Number buttons:
- When selecting cable channels which are higher than 99, enter channel numbers as a three-digit number.(For example: 117, press 1,1,7)
- You must precede single-digit channel numbers with a zero (For example: 02, 03, 04 and so on).
To Preset the Channel Again
1) Press the MENU button until the main menu appears.
2) Select "CHANNEL SET UP" by pressing the ▲ or ▼ button. Then, press the ▶ button.
3) Select "AUTO SET UP" by pressing the ▲ or ▼ button. Then, press the ▶ button. After scanning, the tuner stops on the lowest memorized channel.
To Change the On-Screen Language
1) Press the MENU button until the main menu appears.
2) Select "LANGUAGE SELECT" by pressing the ▲ or ▼ button. Then, press the ▶ button.
3) Select "ENGLISH", "FRANCAIS" or "ESPAÑOL" by pressing the ▲ or ▼ button. Then, press the CLEAR/C.RESET button.
Hint
- If you accidentally select Spanish or French and need English: Press the MENU button and choose SELEC. IDIOMA, or SELECTION LANGUE. Press the ▶ button, and select ENGLISH. Finally, press the CLEAR/C.RESET button.
Clock Set Up

![MENU -MENU- TIMER PROGRAMMING AUTO REPEAT [OFF] CHANNEL SET UP ▶ CLOCK SET LANGUAGE SELECT AUDIO OUT TV STEREO [ON] SAP or • If the clock is not set, the CLOCK SET screen appears when you press the MENU button. In this case, go to step [2].](/content/2026/05/1052906/images/ace3866956eaa458e84808a87eaf1b314df6c7459e9fc382d6f3fc3d51a3183b.jpg)
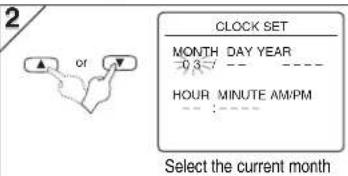
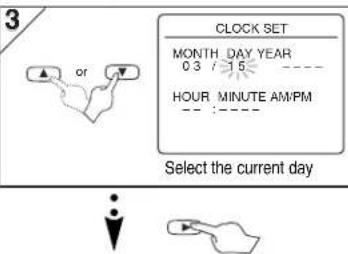


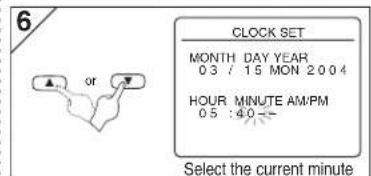

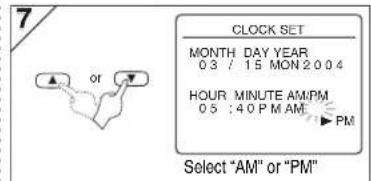

8 To exit the CLOCK SET screen.

Hint
• To go back one step, press the ◀button (during the steps [2] to [7].)
- Your clock setting will be lost if either there is a power failure or this unit has been unplugged for more than 30 seconds.
VCR Functions
Playback
Before:
Turn on the TV and set it to channel 3.
- If channel 3 is already occupied for broadcasting, see "RF Output Channel" section.


See page 11 to switch the VCR/DVD function.
![1 2 PLAY ▶ PLAY▶ 3 STOP ■ STOP 4 [VCR/DVD] STOP/LEFT EJECT ▲](/content/2026/05/1052906/images/f1add1da25e5703b2f1da44c7e9a8891d8bb881c8e57e983f88a5392d90a8cd9.jpg)
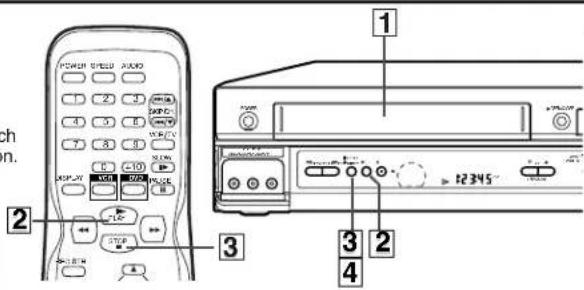
Hint
- When a tape without record tab is inserted, the VCR/DVD will start playback automatically.
- Tracking will be automatically adjusted upon play-back. To adjust the tracking manually, press the SKIP/CH. (▲/▼) buttons.
Recording & OTR (One Touch Recording)
Before:
Turn on the TV and set it to channel 3.
- If channel 3 is already occupied for broadcasting, see "RF Output Channel" section.




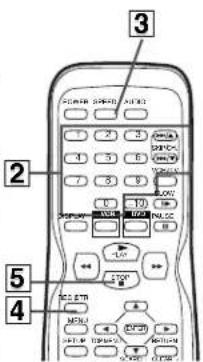

Accidental erasure prevention
To prevent accidental recording on a recorded cassette, remove its record tab. To record on it later, cover the hole with cellophane tape.

You CANNOT copy a DVD to a videotape.
To stop recording temporarily (Pause mode)
Press the PAUSE button.
- During the rec-pause mode, five ■ marks appear on the TV screen. Each ■ mark represents one minute.
- Press it again to resume recording.
Other Operations
To cue or review picture during playback (Picture Search)
Press the ▶▶ or ◀◀ button.
- Press it again and the VCR/DVD will search in super high speed. (in the SLP mode only)
To freeze the picture on TV screen during play-back (Still mode)
Press the PAUSE button. Each time you press the button, the picture will be forwarded by one frame.
- If the picture begins to vibrate vertically during the still mode, stabilize the picture by pressing the SKIP/CH. (▲/▼) buttons.
- If the picture is distorted or rolling vertically, adjust the vertical hold control on your TV, if equipped.
Counter Reset
Press the CLEAR/C.RESET button.
To play back in slow motion
Press the SLOW button during playback or the still mode.
- If the noise bars appear on the TV screen, you can reduce it by pressing the SKIP/CH. (▲/▼) buttons.
Auto Rewind
When a tape reaches its end during playback, fast-forward, or recording (except timer recording and One Touch Recording), the tape will automatically rewind to the beginning. After rewinding finishes, the VCR/DVD will eject the tape.
Hint
• To view one channel while recording another
1) While you are recording on the VCR/DVD, press the VCR/TV button so that the "VCR" light disappears on the VCR/DVD.
2) At the cable box or satellite box, select the channel you want to view.
- If you have connected the VCR/DVD to a cable box or satellite box, refer to "Hint for Cable Box or Satellite Box" section on page 8.
Hint
- Still/Slow/Pause mode will be automatically cancelled after 5 minutes to prevent damage to the tape and the video head.
• To return to playback from the Picture Search/Still/ Slow mode, press the PLAY button.
On-Screen Operations

1/To call up the main menu

3/To decide

CHANNEL SET UP
AUTO SET UP ▶ MANUAL SET UP
2/To select an item 4/To exit the menu


4 To exit the menu

OR

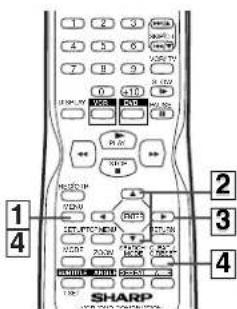
Recording Features
Timer Recording
- Insert a tape with its record tab into the VCR/DVD.

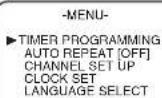
![1 MENU -MENU- ▶TIMER PROGRAMMING AUTO REPEAT [OFF] CHANNEL SET UP CLOCK SET LANGUAGE SELECT AUDIO OUT TV STEREO [ON] SAP](/content/2026/05/1052906/images/ebd7b262f3f5a985e887546bee849d0a2a1e542ccdcc0c6cb4e224701662b9dc.jpg)
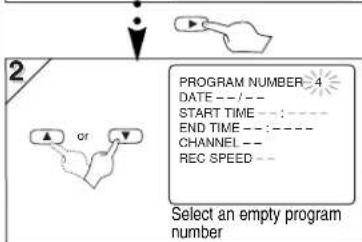

flowchart
graph TD
    A["Start"] --> B{ONCE}
    B --> C["Select "ONCE", "DAILY" (Mon-Fri), or "WEEKLY""]
    B --> D["PROGRAM NUMBER 4"]
    D --> E["OR"]
    style A fill:#f9f,stroke:#333
    style B fill:#ccf,stroke:#333
    style C fill:#cfc,stroke:#333
    style D fill:#fcc,stroke:#333


5 Select the desired start time (hour)
ONE TIME PROGRAM PROGRAM NUMBER 4 DATE 05/03 MON START TIME 07:30 -- END TIME --:---- CHANNEL -- REC SPEED --
Select the minute


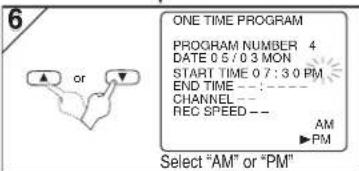
7 Repeat the procedure in steps 5 and 6 to set the end time.


Select the desired channel
- If you have connected the VCR/DVD to a cable box or satellite box as the Connection A on page 8, select the VCR to channel 3 or 4 (the RF output channel of the VCR). Then, select the desired channel at the cable box or satellite box. Leave the cable box or satellite box on for timer recording.

![9 ONE TIME PROGRAM PROGRAM NUMBER 4 DATE 05/03 MON START TIME 07:30 PM END TIME 08:30 PM CHANNEL 16 REC SPEED SP ▶ SP SLP Select the desired recording speed • To set another program after step [9], press the ▶ button. Then, continue with step [2].](/content/2026/05/1052906/images/4f239fffa4836ef507bc53e854729b5439c42d8952846d04ff8430ebf6f20a89.jpg)

To Check, Correct, or Cancel a Timer Program
1) Press the SUBTITLE/T-SET button then, the VCR button on the remote control.
2) Select main menu by pressing the MENU button.
3) Select "TIMER PROGRAMMING" by pressing the ▲ or ▼ button. Then, press the ▶ button.
4) Select the program number which you want to check by pressing the ▲ or ▼ button. The details of the program you selected will appear on the TV screen.
- Go to the digit you want to change by pressing the ▶ or ◀ button. Then, enter correct numbers by pressing the ▲ or ▼ button.
- You may cancel the entire program by pressing the ◀button while the program number flashes.
5) Press the CLEAR/C.RESET button to exit.
6) Press the SUBTITLE/T-SET button to return to timer stand-by mode.
To cancel a Timer Recording in progress
Press the STOP/EJECT button on the VCR/DVD. EN
Hint for Timer Recording
- If there is a power failure or the VCR/DVD has been unplugged for more than 30 seconds, the clock setting and all timer settings will be lost.
- If a tape is not in the VCR/DVD or does not have the record tab, the TIMER and lights flash and timer recording cannot be performed. Please insert a recordable tape.
- If a tape ends during timer recording, the VCR will stop, eject the tape, and switch to the DVD mode automatically as the TIMER and lights flash. (If the DVD power is off, the VCR will become STANDBY status).
- When all timer recordings are finished, the TIMER and lights will flash.
- When timer recordings are set, the TIMER and lights will appear. To use the VCR as usual until the time for the recording, press the SUBTITLE/T-SET button so that the TIMER and lights disappear. Press the VCR/TV button to choose the VCR position. Select either VCR or DVD mode, then continue with the other features as described in this manual.
If you want to use the DVD player during a VCR timer recording or while the TIMER and lights are on or flashes.
- You can use the DVD player while the TIMER and lights are on or flashes, or during a timer recording. Press the POWER button to turn on the VCR/DVD. Press the DVD button on the remote control to choose DVD mode, then continue with the other DVD features as described in this manual. You don't have to set the TIMER off to use the DVD only.
Copying a Video Tape
Warning: Unauthorized recordings of copyrighted video tapes may be an infringement of copyright laws.

flowchart
graph LR
    A["or"] --> B["KDD/LF"]
    B --> C["ACX/XT"]
    C --> D["Audio/Video cables (supplied)"]
    D --> E["1 Connect"]
    E --> F["Back of Recording VCR/DVD*"]
    F --> G["2 Connect"]
    G --> H["Round Coaxial cable (supplied)"]
    H --> I["*Front input jacks are also available"]
    I --> J["Back of TV"]
Hint
- For best results during dubbing, use the front panel controls whenever possible. The remote control might affect another source's operation.
• Always use video-quality shielded cables with RCA-type connectors. Standard audio cables are not recommended. - You can use a video disc player, satellite receiver, or other audio/video component with A/V outputs.
- "L1" or "L2" is found before the lowest memorized channel. (Example: CH02)
• "L2" input jacks are on the front of this VCR/DVD.
1) Insert a pre-recorded tape into the playing VCR.
2) Insert a tape with its record tab into the recording VCR/DVD.
3) Press the SPEED button on the remote control of the recording VCR/DVD to select the desired recording speed (SP/SLP).
4) Select the "L1" or "L2" position on the recording VCR/DVD.
- To use the input jacks on the back of this unit, select "L1" position by pressing [0], [0], [1] on the remote control or the SKIP/CH. (▲/▼) buttons.
- To use the input jacks on the front of this unit, select "L2" position by pressing [0], [0], [2] on the remote control or the SKIP/CH. (▲/▼) buttons.
5) Press the REC button on the recording VCR/DVD.
6) Begin playback of the tape in another source.
7) To stop recording, press the STOP/EJECT button on the recording VCR/DVD, then stop playback of the tape in another source.
MTS System (Multi-Channel Television Sound)
When You Receive or Record a Program Broadcast in MTS
- When you receive a broadcast on the VCR, you can check the type of the broadcast by pressing the DISPLAY button.
- When "TV STEREO" or "SAP" selection is valid, select them by following steps. This selection is needed when you record the program.
- SAP means Second Audio Program (usually second language).
| Display on the TV screen | Type of broadcast | STEREO/SAP Selection |
| -None- | Regular (non audio, audio) | -Inwald- |
| STEREO | Stereo broadcast | -Inwald- |
| SAP | Bilingual broadcast | TV STEREO (main audio program) |
| SAP (second audio program) | ||
| STEREO SAP | Stereo A Bilingual broadcast | TV STEREO (stereo main audio program) |
| SAP (second audio program) |
![1 MENU -MENU- TIMER PROGRAMMING AUTO REPEAT [OFF] CHANNEL SET UP CLOCK SET LANGUAGE SELECT AUDIO OUT ▶ TV STEREO [ON] SAP Select "TV STEREO" or "SAP"](/content/2026/05/1052906/images/a2959ea70d808db210d72ef99c74bb2f03b8988d321cbbbf45eef255bd0dc192.jpg)
When You Play Back a Tape Recorded in Hi-Fi Stereo
- If you have connected a stereo TV to this VCR/DVD, select "STEREO".
- If you have connected a monaural TV to this VCR/DVD, select "MONO".
| Your SelectionType of recorded tape | STEREO | MONO | |
| L-channel | R-channel | ||
| non Hi-Fi tapes | Monaural | Monaural | Monaural |
| Hi-Fi tapes recorded in Hi-Fi stereo | L | II | L+II |
| Hi-Fi tapes recorded man audio program | Main audio program | Main audio program | Main audio program |
| Hi-Fi tapes recorded second audio program | Second audio program | Second audio program | Second audio program |
![1 MENU -MENU- TIMER PROGRAMMING AUTO REPEAT [OFF] CHANNEL SET UP CLOCK SET LANGUAGE SELECT AUDIO OUT TV STEREO [ON] SAP](/content/2026/05/1052906/images/b6a90e8c3ad5bccd55703751450c28e59ced989d62fe476a6fb693fde2ac5794.jpg)
![2 AUDIO OUT HIFI [ON] MONO Select "HIFI" or "MONO"](/content/2026/05/1052906/images/4dd43a692c38398a133c6f3243bc951d72074c84145a1cdc472fe6b50bc77938.jpg)

Special Features
Time Search Index Search Auto Repeat
You can specify the time for fast forwarding or rewinding.
- Insert a tape into this unit.


flowchart
graph TD
    A["x2 (Twice)"] --> B["TIME SEARCH"]
    B --> C["↓"]
    style A fill:#f9f,stroke:#333
    style B fill:#ccf,stroke:#333
    style C fill:#fff,stroke:#333
2 Select the desired length of time for fast forwarding or rewinding

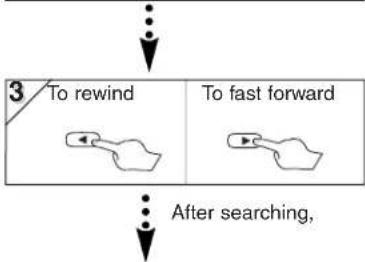
flowchart
graph TD
    A["..."] --> B["3 To rewind"]
    B --> C["To fast forward"]
    C --> D["... After searching,"]

You can specify the number of programs to be skipped.
- Insert a tape into this unit.


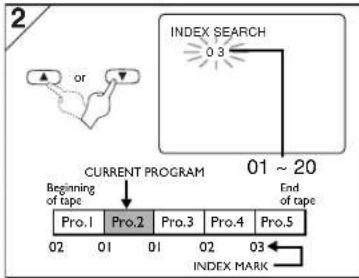
flowchart
graph TD
    A["INDEX SEARCH 0.3"] --> B["01 ~ 20"]
    B --> C["CURRENT PROGRAM"]
    C --> D["Beginning of tape"]
    D --> E["Pro.1"]
    E --> F["02"]
    E --> G["01"]
    E --> H["01"]
    E --> I["02"]
    E --> J["03"]
    E --> K["Pro.2"]
    K --> L["02"]
    K --> M["01"]
    K --> N["01"]
    K --> O["02"]
    K --> P["Pro.3"]
    P --> Q["02"]
    P --> R["01"]
    P --> S["01"]
    P --> T["02"]
    P --> U["Pro.4"]
    U --> V["03"]
    U --> W["02"]
    U --> X["01"]
    U --> Y["01"]
    U --> Z["02"]
    U --> AA["Pro.5"]
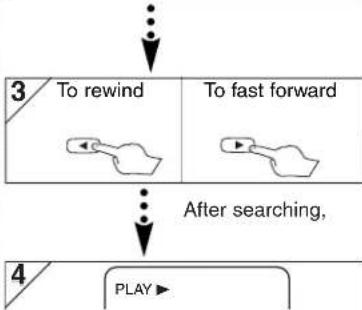
flowchart
graph TD
    A["To rewind"] --> B["To fast forward"]
    B --> C["After searching,"]
    C --> D["PLAY"]
Hint
- This unit stores index mark at the beginning of the recording. There should be time gap between two index marks for the Index Search.
You can repeat playback of a whole tape automatically.
- Insert a tape into this unit.


![1 MENU -MENU- TIMER PROGRAMMING ▶ AUTO REPEAT [OFF] CHANNEL SET UP CLOCK SET LANGUAGE SELECT AUDIO OUT TV STEREO [ON] SAP](/content/2026/05/1052906/images/6a5d8aaea1ebb2b26227fb9887f0b58bd560f763a53e0b47690293869e220360.jpg)
![-MENU- TIMER PROGRAMMING ▶ AUTO REPEAT [ON] CHANNEL SET UP CLOCK SET LANGUAGE SELECT AUDIO OUT TV STEREO [ON] SAP](/content/2026/05/1052906/images/43fc71a279189279650c4e8a112c710b1b2bab631c0557a1f2507e80ce90ac9a.jpg)
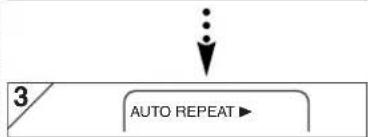
Hint
- To cancel Auto Repeat, follow steps [1]-[2] above. Then, press the ▶ button, so that [OFF] appears beside AUTO REPEAT. Press the CLEAR/C.RESET button to exit.
- If menu remains on the TV screen at step [3], press the CLEAR/C.RESET button to exit.
Hint for Timer Search & Index Search
• These functions are not available during recording.
- Press the STOP button to stop the search.
- If the end of the tape is reached during a Search, this unit will cancel the search and rewind the tape.
DVD Functions
Playback
Before: Turn on the TV, amplifier and any other components which are connected to this unit. Make sure the TV and audio receiver (commercially available) are set to the correct channel.
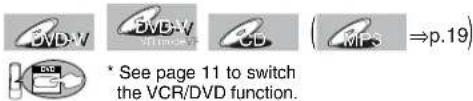

flowchart
graph TD
    A["POWER"] --> B["[VCR/DVD"] OPENCLOSE]
    B --> C["3. Remote Control (TV Screen)"]
    C --> D["PLAY"]
    D --> E["STOP"]
    E --> F["[VCR/DVD"] OPENCLOSE]


Hint
- When you play an MP3 file, details on page 19.
- A "prohibited icon" may appear at the top-right on the TV screen when the operation is prohibited by the disc or this unit.
• Some DVDs may be played from title 2 or 3 due to specific programs. - During the playback of a two-layered disc, pictures may stop for a moment. This happens while the 1st layer is being switched to the 2nd layer. This is not a malfunction.
- A DVD-RW disc recorded in the VR mode may freeze momentarily during playback depending on how the playlist was made and edited (deleted titles, repeated recording).
DVD menu
DVDs may contain menus to access special features. Press appropriate Number buttons or use the arrow (▲/▼/◄/►) buttons to highlight your selection on the DVD main menu and press the ENTER button to confirm.
Calling up a Menu Screen during Playback
- Press the MENU button to call up the DVD menu.
- Press the TOP MENU button to call up the title menu.
Hint
- Menu operations may vary depending on the disc. Refer to the manual accompanying the disc for details.
Resume

Press the STOP button. Resume message will appear on the TV screen.
Press the PLAY button, playback will resume from the point at which playback was stopped.
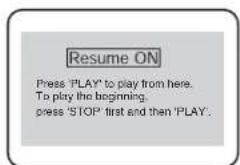
- To cancel resume, press the STOP button one more time during the Stop mode.
- For MP3, playback will resume from the beginning of the track at which playback was stopped.
Paused and Step-by-Step Playback

Press the PAUSE button during playback. To continue playback, press the PLAY button.
||

The disc goes forward by one frame each time the PAUSE button is pressed during the pause mode. To continue playback, press the PLAY button.
Hint
- Set "STILL MODE" to "FIELD" in the Display menu if pictures in the pause mode are blurred. (Refer to pages 23-24.)
Rapid Play

Available only on discs recorded in the Dolby Digital format, Rapid Play plays back in slightly faster/ slower speed while keeping the sound quality as in the normal playback.
1) During playback, press the MODE button.
• The current setting appears.

2) Press the ENTER button to switch among 🎯 (x1.3), 🎯 (x0.8) and OFF.
: Plays back approximately at 0.8 times of normal playback. : Plays back approximately at 1.3 times of normal playback.
3) To return to normal playback, press the PLAY button.
Hint
- Audio (language) setting cannot be changed while using this mode.
• Virtual Surround and Black Level settings cannot be changed while using this mode.
• Virtual Surround does not function while using this mode.
• This feature may not work at some point in a disc. - When using digital audio connection (COAXIAL), the PCM sound will be output.
Playing the disc recorded in VR mode (Video Recording format)

DVDs recorded in VR mode can have a PLAYLIST assigned to alter the order or content to be played. If a PLAYLIST has been created, you can choose the ORIGINAL or PLAYLIST option.
1) Press the MENU button in stop mode.
• The current setting screen will appear.
- Pressing the MENU button during playback is not valid.

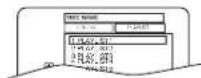
2) Press the ◀ or ▶ button to select ORIGINAL or PLAYLIST.
- PLAYLIST will not be displayed when it has not been made.
- Resume playback will not be possible if you change the setting.
3) Press the ▲ or ▼ button to select a title, then press the ENTER button.
- Playback will start.
Hint
• [ORIGINAL]: A list of titles which are recorded with a DVD recorder.
[PLAYLIST]: A list of titles which is made based on the ORIGINAL edited list.
Fast Forward/Reverse


Press the ▶▶ or ◀◀ button repeatedly during playback to select the required forward or reverse speed.

To continue playback, press the PLAY button.
- For DVDs, fast forward or reverse speed is different depending on the disc. Approximate speed is 1(x2), 2(x8), 3(x50), 4(x100).
- For Audio CDs, approximate speed is x16.
- For MP3, approximate speed is x8.
Slow Forward/Slow Reverse


Press the ▶▶ or ◀◀ button repeatedly during the pause mode to select the required forward or reverse speed.
To continue playback, press the PLAY button.
- Slow forward or reverse speed is different depending on the disc. Approximate speed is 1(1/16),2(1/8),3(1/2).
Hint
- Set "STILL MODE" to "FIELD" in the Display menu if pictures in the slow playback mode are blurred. (Refer to pages 23-24.)
Zoom


1) Press the ZOOM button during playback.
2) Press the ZOOM button repeatedly to select the required zoom factor: x2, x4 or OFF.

flowchart
graph LR
    A["User Input: 2 x4"] --> B["Processing Step"]
    B --> C["Output: Child Icon"]
3) Use the arrow (▲/▼/◄/►) buttons to slide the zoomed picture across the screen.
4) To exit zoom mode, press the ZOOM button to select OFF.
Hint
- Zooming function does not work while the disc menu is showing up.
• x4 zoom is not available on some discs.
MP3 Playback
MP3 is a method of compressing files. You can copy MP3 files on CD-RW/Rs from the computer and play the files on this unit.

Insert a MP3-format disc, then press the MENU button to call up the MP3 menu on the TV screen.


flowchart
graph TD
    A["MENU"] --> B["Action"]
    B --> C["Next Step"]
    C --> D["Exit"]
    style A fill:#f9f,stroke:#333
    style D fill:#ccf,stroke:#333
Hint
• Some selections may take a while to be recognized.
- Press the TOP MENU button to return to the first item.
- Folders are known as Groups; files are known as Tracks.
- MP3 files are accompanied by 📁 icon.
- Folders are accompanied by icon.
• A maximum of 255 folders can be recognized.
• A maximum of 512 files can be recognized.
- Up to 8 hierarchies can be created.
This player recommends the files recorded under the following circumstances:
• Sampling frequency: 44.1kHz or 48kHz
- Constant bit rate: 112kbps \~ 320kbps
The On-Screen Display
You can check the information about the current disc by pressing the DISPLAY button on the remote control.

flowchart
graph TD
    A["11/16 0:00:00 - 0:03:30"] --> B["Current playback status"]
    B --> C["Remaining time of the current chapter"]
    C --> D["Elapsed time of the current chapter"]
    D --> E["C(Chapter): Current chapter number / Total chapters"]
    E --> F["1:3 0:00:00 - 1:23:45"]
    F --> G["Remaining time of the current title"]
    G --> H["Elapsed time of the current title"]
    H --> I["T(Title): Current title number / Total titles"]
    I --> J["Layer numbers, appears only when playing a two-layered Disc"]
    I --> K["L0: Layer 0 is playing"]
    I --> L["L1: Layer 1 is playing"]
    I --> M["If you are playing a DVD-RW with setting the PLAYLIST, the following will also be displayed. ORG: Playing the ORIGINAL. PL: Playing the PLAYLIST"]
    J --> N["Current repeat setting appears only when the repeat setting is active"]
    K --> O["C: Chapter repeat / T: Title repeat / A B: A-B repeat"]
    L --> P["A: Disc repeat (DVDs recorded in VR mode only)"]
    M --> Q["BIT RATE: The amount of audio and video data currently being read"]
    N --> R["DISPLAY"]
    O --> R
    P --> R
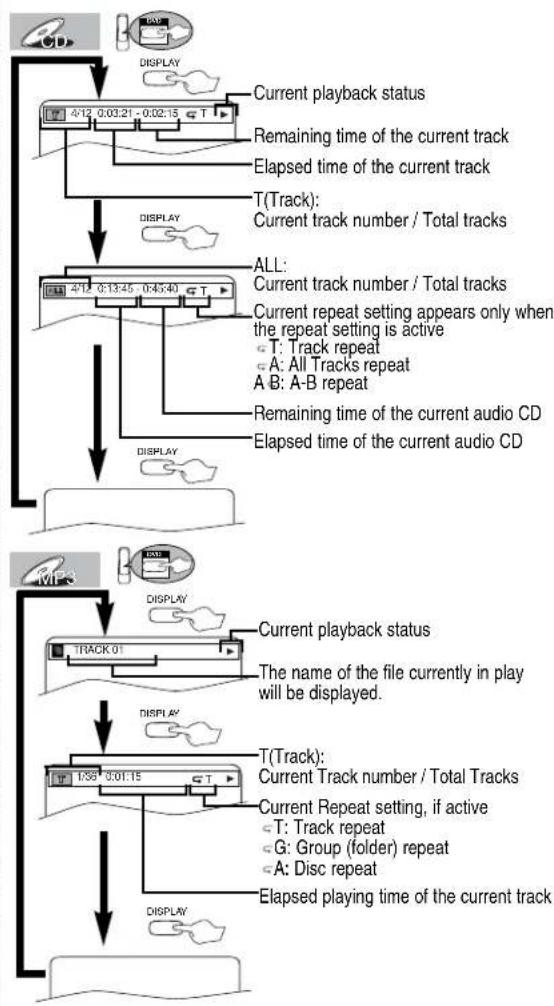
flowchart
graph TD
    A["Current playback status"] --> B["Remaining time of the current track"]
    B --> C["Elapsed time of the current track"]
    C --> D["T(Track): Current track number / Total tracks"]
    D --> E["ALL: Current track number / Total tracks"]
    E --> F["Current repeat setting appears only when the repeat setting is active"]
    F --> G["T: Track repeat"]
    G --> H["A: All Tracks repeat"]
    H --> I["A-B: A-B repeat"]
    I --> J["Remaining time of the current audio CD"]
    J --> K["Elapsed time of the current audio CD"]
    K --> L["DISPLAY"]
    L --> M["MP3"]
    M --> N["Current playback status"]
    N --> O["The name of the file currently in play will be displayed."]
    O --> P["DISPLAY"]
    P --> Q["T(Track): Current Track number / Total Tracks"]
    Q --> R["Current Repeat setting, if active"]
    R --> S["T: Track repeat"]
    S --> T["G: Group (folder) repeat"]
    T --> U["A: Disc repeat"]
    U --> V["Elapsed playing time of the current track"]
Search Function
Track Search


Using the number buttons

- For single digit tracks (1-9), press a single number (eg. track 3, press 3). - To play track 26, press +10, 2, 6 of the Number buttons.
Using the SEARCH MODE button


Using the SKIP /◀◀, ▶▶/buttons

flowchart
graph TD
    A["PLAY"] --> B["SKIP/CH"]
    B --> C{Current Track (TR)}
    C --> D["TR 1 TR 2 TR 3 TR 4"]
    C --> E["SKIP"]
Title / Chapter Search

Using the SEARCH MODE button
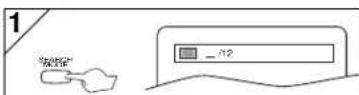
x1(Press once) for the chapter search x2 (Press twice) for the title search
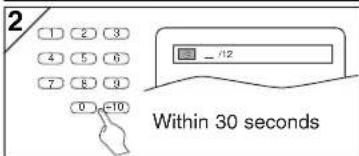
Using the SKIP ◀◀, ▶▶/buttons

flowchart
graph TD
    A["PLAY"] --> B["SKIP/CH"]
    B --> C["Current Chapter (CH)"]
    C --> D["CHK 1 CH 2 CH 3 CH 4"]
    D --> E["SKIP"]
Hint
- Depending on the disc being played, this function can also be performed by directly entering the desired chapter number with the number buttons. Refer to the manual accompanying the disc.
Time Search



- When there is no need to enter a number, "0" appears automatically. For example, "0:0_:_ _" appears in the Time Search display if the total time of the disc is less than 10 minutes.
Marker Setup


This feature allows you to assign a specific point on a disc to be called back later.
To set a marker
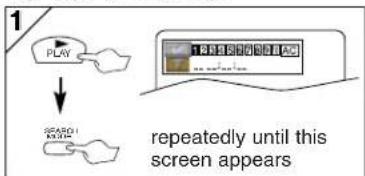
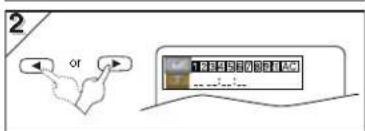

To return to the marker later

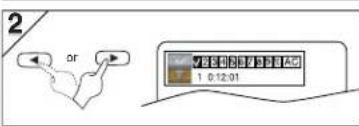

at the desired marker
- Playback will restart from the specific point which you set.
To exit the marker screen
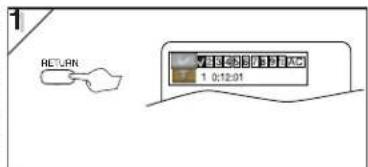
Hint
- Opening the disc tray or turning off the power will erase all markers.
- Selecting "AC" at step [2] in the section "To set a marker" will also erase all markers.
- To clear a marker, select the marker to be cleared at step [2] in the section "To return to the marker later," and then press the CLEAR/C.RESET button.
Repeat / Random / Programmed Playback
Repeat Playback Programmed

Repeat function is available only during playback.

flowchart
graph TD
    A["PLAY"] --> B["REPEAT"]
    B --> C["CHAPTER"]
Each time the REPEAT button is pressed...

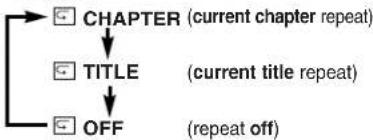
flowchart
graph TD
    A["CHAPTER (current chapter repeat)"] --> B["TITLE (current title repeat)"]
    B --> C["OFF (repeat off)"]


flowchart
graph TD
    A["CHAPTER (current chapter repeat)"] --> B["TITLE (current title repeat)"]
    B --> C["ALL (entire disc repeat)"]
    C --> D["OFF (repeat off)"]


flowchart
graph TD
    A["TRACK"] --> B["ALL"]
    B --> C["OFF"]
    style A fill:#f9f,stroke:#333
    style B fill:#f9f,stroke:#333
    style C fill:#f9f,stroke:#333


flowchart
graph TD
    A["TRACK"] --> B["GROUP"]
    B --> C["ALL"]
    C --> D["OFF"]
    style A fill:#f9f,stroke:#333
    style B fill:#f9f,stroke:#333
    style C fill:#f9f,stroke:#333
    style D fill:#f9f,stroke:#333
- Repeat setting will be cleared when moving to another title, chapter, or track.
- Repeat playback are not available with all discs or during repeat A-B playback.
PlaybackA-B Playback


at your desired end point (B)
- Point B should be in the same title or track as point A is.
- To exit the sequence, press the A-B button.
- To cancel Point A, press the CLEAR/C.RESET button.
- This function does not work in the other repeat modes.
Random Playback
This shuffles the playing order of tracks instead of playback in the sequence.

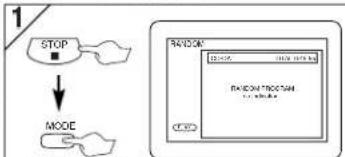
flowchart
graph TD
    A["STOP"] --> B["MODE"]
    B --> C["RANDOM Selection Interface"]
x2 (Press twice)
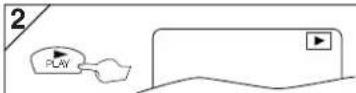
Hint
- If you want to repeat the current track in the random selections, press the REPEAT button repeatedly until TRACK appears during playback. If you want to repeat the entire random selections, press the REPEAT button repeatedly until ALL appears during playback.

You may determine the order in which tracks will play.
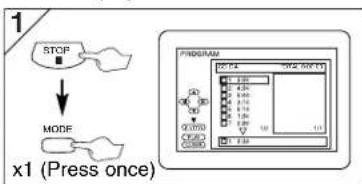
flowchart
graph TD
    A["STOP"] --> B["MODE"]
    B --> C["x1 (Press once)"]
    D["PROGRAM"] --> E["1: 0.4"]
    D --> F["2: 0.3"]
    D --> G["3: 0.2"]
    D --> H["4: 0.1"]
    D --> I["5: 0.05"]
    D --> J["6: 0.03"]
    D --> K["7: 0.02"]
    D --> L["8: 0.01"]
    D --> M["9: 0.005"]
    D --> N["10: 0.003"]
    D --> O["11: 0.002"]
    D --> P["12: 0.001"]

While a MP3 folder is open:
- For the next hierarchy,
press the ▶button.
- For the previous hierarchy, press the ◀button.

Hint
- Press the CLEAR/C.RESET button at step [2] to erase the most recently entered program.
- To erase all tracks in the program at once, select "ALL CLEAR" and press the ENTER button at step [2].
- While a program is being played back, the STOP button works as follows;
⇒Press the STOP button and the PLAY button next, so that the programmed playback restarts. (CD playback restarts from the current point. MP3 playback restarts from the beginning of the current track.)
⇒Press the STOP button twice and the PLAY button next, so that play-back restarts from the first track in the original order. However, your programmed playback can be restarted when you follow the above steps. (Your programs are still stored until either the disc tray is open or power is turned off.)
- To repeat the current track in the program, press the REPEAT button repeatedly until "TRACK" appears during playback.
- To repeat the entire program press the REPEAT button repeatedly until "ALL" appears during playback.
Special Settings
Subtitle Language


This unit allows you to select a subtitle language (if available) during DVD play-back.

flowchart
graph TD
    A["PLAY"] --> B["T-SET"]
    C["1.ENG/6"] --> D["End"]
Each time you press the SUBTITLE/T-SET button, subtitle languages change.
For example
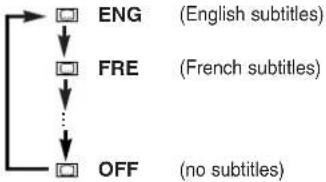
flowchart
graph TD
    A["ENG"] --> B["FRE"]
    B --> C["..."]
    C --> D["OFF"]
    style A fill:#fff,stroke:#000
    style B fill:#fff,stroke:#000
    style C fill:#fff,stroke:#000
    style D fill:#fff,stroke:#000
To set subtitle ON/OFF
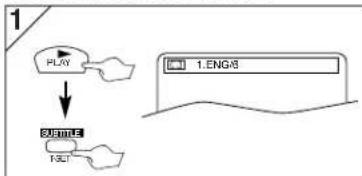
flowchart
graph TD
    A["PLAY"] --> B["SIN"]
    B --> C["1.ENG-B"]

Hint
- If your language is not shown after pressing the AUDIO or SUBTITLE/T-SET button several times, the disc may not have that language. However, some discs allow audio language or subtitle language setting on the disc menu. (Operation varies depending on the discs, so refer to the manual along with the disc.)
- When "NOT AVAILABLE" appears on the TV screen, it means no subtitle is recorded on the scene.
- If you choose a language that has a 3 letter language code, the code will be displayed every time you change the subtitle language setting. If you choose any other languages, ‘---’ will be displayed instead. (Refer to page 27.)
Audio Language

This unit allows you to select an audio language (if multiple languages are available) during DVD playback.

flowchart
graph TD
    A["PLAY"] --> B["AUDIO"]
    B --> C["1.ENG 32-bit 48k3"]
Each time you press the AUDIO button; For example

flowchart
graph TD
    A["ENG"] --> B["SPA"]
    B --> C["..."]
    C --> D["FRE"]
    style A fill:#f9f,stroke:#333
    style B fill:#f9f,stroke:#333
    style C fill:#f9f,stroke:#333
    style D fill:#f9f,stroke:#333
Hint
- For DVD-RW (VR mode), Pressing the AUDIO button cycles the sound mode through MAIN, SUB, MAIN + SUB.
- For DVD-RW (VR mode), the discs recorded in double sound (two languages) can be played back in either sound mode of MAIN, SUB or MAIN + SUB.
- The sound mode cannot be changed during playback of discs not recorded in double sound.
• Audio language selection cannot be made during Rapid Play. (Refer to page 17.) - Pressing the AUDIO button may not work on some DVDs with multiple audio languages (e.g. DVDs which allow audio language setting on the disc menu).
- With discs recorded in VR mode, changing the audio (MAIN, SUB or MAIN+SUB) is effective only when using an analogue connection. Although you may be able to change the settings of the on-screen display, it will not affect the sound when using a digital connection.
Camera Angle

Some DVD discs may con- tain scenes which have
been shot simultaneously from various angles. You can change the camera angle if the (ICON) appears on the screen. If the "ANGLE ICON" setting is "OFF" in the Display menu, the (ICON) will not appear. (Refer to pages 23-24.)

Stereo Sound mode
This unit allows you to select a sound mode during CD playback.
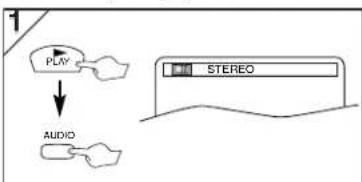
flowchart
graph TD
    A["PLAY e"] --> B["AUDIO"]
    B --> C["STEREO"]
Each time you press the AUDIO button;
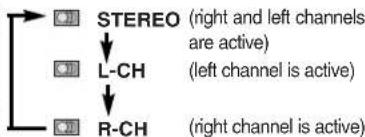
flowchart
graph TD
    A["STEREO"] --> B["L-CH"]
    A --> C["R-CH"]
    B --> D["(right channel is active)"]
    C --> E["(right channel is active)"]
    style A fill:#f9f,stroke:#333
    style B fill:#ccf,stroke:#333
    style C fill:#cfc,stroke:#333
Hint
- If the Virtual Surround setting is "1" or "2", the sound mode will be fixed to STEREO, and cannot be changed.
- Stereo sound mode will not be changed when playing DTS CD.
Black Level Setting


Adjust the Black Level Setting to make the dark areas of the TV picture brighter.
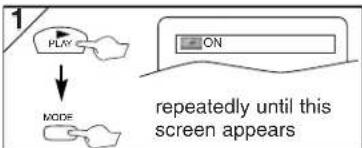
flowchart
graph TD
    A["PLAY"] --> B["MODE"]
    B --> C["ON"]
    style A fill:#f9f,stroke:#333
    style B fill:#ccf,stroke:#333
    style C fill:#cff,stroke:#333
    note right of C: "repeatedly until this screen appears"


Hint
- The setting will be saved even if the player is turned off.
- This function cannot be used during Rapid Play. (Refer to page 17.)
Virtual Surround


You can enjoy stereophonic virtual world on your existing 2 channel stereo system.

flowchart
graph TD
    A["PLAY"] --> B["MODE"]
    B --> C["OFF"]
    style C fill:#fff,stroke:#000
    note right of C: repeatedly until this screen appears


Hint
- The setting will not be effective unless the sound mode is set to STEREO. (for CD play only)
• This function cannot be used during Rapid Play. (Refer to page 17.) - The setting will be saved even if the player is turned off.
DVD Set Up

QUICK SETUP Menu
You can select the "PLAYER MENU", "TV ASPECT", "DOLBY DIGITAL" or "DTS" from the QUICK SETUP menu quickly.

flowchart
graph TD
A["1 STOP"] --> B["SETUP"]
B --> C["2 OF"]
C --> D["Select the desired item"]
D --> E["QUICK SETUP"]
E --> F["PLAYER MENU ENGLISH 43 LETTER BOX TOLBY DIGITAL BITSTREAM OFF"]
F --> G["P24 A (Step 5)"]
F --> H["P24 B (Step 5)"]
F --> I["P25 C (Step 5)"]
J["<SETUP MENU> Confirm that QUICK is selected"] --> K["QUICK SETUP"]
K --> L["PLAYER MENU ENGLISH 43 LETTER BOX TOLBY DIGITAL BITSTREAM OFF"]
L --> M["• Refer to the sections "PLAYER MENU", "TV ASPECT", "DOLBY DIGITAL" or "DTS" section on pages 23-25."]
CUSTOM Menu
You can change the DVD player's settings.

flowchart
graph TD
    A["1. <SETUP MENU>"] --> B["2. Select CUSTOM"]
    B --> C["3. To select the desired item"]
    A --> D["LANGUAGE menu"]
    A --> E["DISPLAY menu"]
    A --> F["AUDIO menu"]
    A --> G["PARENTAL menu"]
    D --> H["page 24 A"]
    E --> I["page 24 B"]
    F --> J["page 25 C"]
    G --> K["page 26 D"]
    style A fill:#f9f,stroke:#333
    style B fill:#ccf,stroke:#333
    style C fill:#cfc,stroke:#333
    style D fill:#fcc,stroke:#333
    style E fill:#cff,stroke:#333
    style F fill:#ffc,stroke:#333
    style G fill:#fcc,stroke:#333

LANGUAGE Setting
Follow the step 1) to 3) in the "CUSTOM Menu" section on page 23.
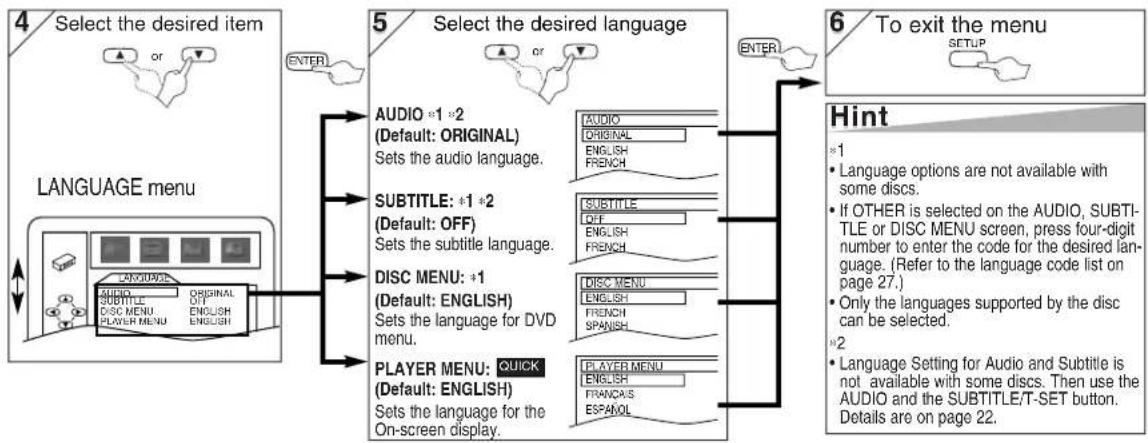
flowchart
graph TD
    A["4 Select the desired item"] --> B["5 Select the desired language"]
    B --> C["6 To exit the menu"]
    A --> D["LANGUAGE menu"]
    D --> E["ENTER"]
    B --> F["AUDIO *1 *2 (Default: ORIGINAL) Sets the audio language."]
    B --> G["SUBTITLE: *1 *2 (Default: OFF) Sets the subtitle language."]
    B --> H["DISC MENU: *1 (Default: ENGLISH) Sets the language for DVD menu."]
    B --> I["PLAYER MENU: QUICK (Default: ENGLISH) Sets the language for the On-screen display."]
    C --> J["SETUP"]
    J --> K["Hint"]
    K --> L["*1"]
    K --> M["*2"]
    K --> N["*1"]
    K --> O["*2"]

DISPLAY Setting
You can change the display functions. Follow the step 1) to 3) in the "CUSTOM Menu" section on page 23.

flowchart
graph TD
A["Select the desired item"] --> B["Display menu"]
B --> C["4"]
C --> D["5"]
D --> E["6"]
E --> F["To exit the menu"]
subgraph Section 1
G["TV ASPECT: QUICK (Default: 4:3 LETTER BOX)<br>See Tips to the right."] --> H["TV ASPECT: 4:3 LETTER BOX<br>STILL MODE AUTO<br>ANGLE ICON ON<br>PROGRESSIVE OFF"]
end
subgraph Section 2
I["STILL MODE: (Default: AUTO)<br>See Tips to the right."] --> J["TV ASPECT: 4:3 LETTER BOX<br>STILL MODE AUTO<br>ANGLE ICON ON<br>PROGRESSIVE OFF"]
end
subgraph Section 3
K["ANGLE ICON: (Default: ON)<br>Set to "ON" to show the angle icon when multiple camera angles are available during DVD playback."] --> L["TV ASPECT: 4:3 LETTER BOX<br>STILL MODE AUTO<br>ANGLE ICON ON<br>PROGRESSIVE OFF"]
end
subgraph Section 4
M["PROGRESSIVE: (Default: OFF)<br>Set to "ON" if your TV is compatible with progressive scan.<br>When "PROGRESSIVE" is "ON", "P. SCAN" appears on the front panel display."] --> N["TV ASPECT: 4:3 LETTER BOX<br>STILL MODE AUTO<br>ANGLE ICON ON<br>PROGRESSIVE OFF"]
end
subgraph Section 5
O["Select the desired setting"] --> P["Select the desired setting"]
P --> Q["ENTER"]
Q --> R["ENTER"]
R --> S["ENTER"]
S --> T["ENTER"]
T --> U["ENTER"]
U --> V["ENTER"]
V --> W["ENTER"]
W --> X["ENTER"]
X --> Y["ENTER"]
Y --> Z["ENTER"]
end
subgraph Section 6
AA["To exit the menu"] --> AB["SETUP"]
end
AC["Hint"]
subgraph Section 7
AC1["TV ASPECT:<br>Select "4:3 LETTER BOX", so that black bars appear on top and bottom of the screen.<br>Select "4:3 PAN & SCAN" for a full height picture with both sides trimmed.<br>Select "16:9 WIDE" if a wide-screen TV is connected to this unit.<br>STILL MODE:<br>Select "AUTO" usually.<br>If you select "FIELD", the picture in the still mode will be stabilized.<br>If you select "FRAME", the picture in the still mode will be highly defined."]
end

AUDIO Setting
Choose the appropriate audio settings for your equipment. It only affects during the playback of DVD discs. Follow the step 1) to 3) in the "CUSTOM Menu" section on page 23.

flowchart
graph TD
    A["Select the desired item"] --> B["4"]
    B --> C["AUDIO menu"]
    C --> D["5"]
    D --> E["6 To exit the menu"]

    subgraph Section 1
        F["DRC (Dynamic Range Control): (Default: ON)"]
        F --> G["SET TO "ON" to compress the range between soft and loud sounds."]
        G --> H["DOWN SAMPLING: (Default: ON)"]
        H --> I["SET TO "ON" when outputting in 48 kHz."]
        I --> J["SET TO "OFF" when outputting the original sound."]
        J --> K["DOLBY DIGITAL: QUICK (Default: BITSTREAM)"]
        K --> L["SET TO "BITSTREAM" when the unit is connected to a Dolby Digital receiver."]
        L --> M["BITSTREAM: Outputs a Dolby Digital Signals"]
        M --> N["DPCM: Convert the Dolby Digital into PCM (2 channel)."]
        N --> O["DTS: QUICK (Default: OFF)"]
        O --> P["SET TO "BITSTREAM" when the unit is connected to a DTS decoder."]
    end

    subgraph Section 2
        Q["DRC ON DOWN SAMPLING ON DOLBY DIGITAL BITSTREAM DTS OFF"] --> R["SET TO "ON" to compress the range between soft and loud sounds."]
        R --> S["OPEN OFF ON BITSTREAM OFF"]
        S --> T["SET TO "ON" when outputting in 48 kHz."]
        T --> U["SET TO "OFF" when outputting the original sound."]
        U --> V["OPEN OFF BITSTREAM OFF"]
        V --> W["DOLBY DIGITAL ON DOLBY DIGITAL DTS OFF"]
        W --> X["SET TO "ON" when outputting in 48 kHz."]
        X --> Y["SET TO "OFF" when outputting the original sound."]
        Y --> Z["OPEN OFF BITSTREAM OFF"]
        Z --> AA["DOLBY DIGITAL ON DOLBY DIGITAL DTS OFF"]
        AA --> AB["SET TO "ON" when outputting in 48 kHz."]
        AB --> AC["SET TO "OFF" when outputting the original sound."]
        AC --> AD["OPEN OFF BITSTREAM OFF"]
        AD --> AE["DOLBY DIGITAL ON DOLBY DIGITAL DTS OFF"]
        AE --> AF["SET TO "ON" when outputting in 48 kHz."]
        AF --> AG["SET TO "OFF" when outputting the original sound."]
        AG --> AH["OPEN OFF BITSTREAM OFF"]
        AH --> AI["DOLBY DIGITAL ON DOLBY DIGITAL DTS OFF"]
        AI --> AJ["SET TO "ON" when outputting in 48 kHz."]
        AJ --> AK["SET TO "OFF" when outputting the original sound."]
        AK --> AL["OPEN OFF BITSTREAM OFF"]
        AL --> AM["DOLBY DIGITAL ON DOLBY DIGITAL DTS OFF"]
        AM --> AN["SET TO "ON" when outputting in 48 kHz."]
        AN --> AO["SET TO "OFF" when outputting the original sound."]
        AO --> AP["OPEN OFF BITSTREAM OFF"]
        AP --> AQ["DOLBY DIGITAL ON DOLBY DIGITAL DTS OFF"]
        AQ --> AR["SET TO "ON" when outputting in 48 kHz."]
        AR --> AS["SET TO "OFF" when outputting the original sound."]
        AS --> AT["OPEN OFF BITSTREAM OFF"]
        AT --> AU["DOLBY DIGITAL ON DOLBY DIGITAL DTS OFF"]
        AU --> AV["SET TO "ON" when outputting in 48 kHz."]
        AV --> AW["SET TO "OFF" when outputting the original sound."]
        AW --> AX["OPEN OFF BITSTREAM OFF"]
        AX --> AY["DOLBY DIGITAL ON DOLBY DIGITAL DTS OFF"]
        AY --> AZ["SET TO "ON" when outputting in 48 kHz."]
        AZ --> BA["SET TO "OFF" when outputting the original sound."]
        BA --> BB["OPEN OFF BITSTREAM OFF"]
        BB --> BC["DOLBY DIGITAL ON DOLBY DIGITAL DTS OFF"]
        BC --> BD["SET TO "ON" when outputting in 48 kHz."]
        BD --> BE["SET TO "OFF" when outputting the original sound."]
        BE --> BF["OPEN OFF BITSTREAM OFF"]
        BF --> BG["DOLBY DIGITAL ON DOLBY DIGITAL DTS OFF"]
        BG --> BH["SET TO "ON" when outputting in 48 kHz."]
        BH --> BI["SET TO "OFF" when outputting the original sound."]
        BI --> BJ["OPEN OFF BITSTREAM OFF"]
        BJ --> BK["DOLBY DIGITAL ON DOLBY DIGITAL DTS OFF"]
        BK --> BL["SET TO "ON" when outputting in 48 kHz."]
        BL --> BM["SET TO "OFF" when outputting the original sound."]
        BM --> BN["OPEN OFF BITSTREAM OFF"]
        BN --> BO["DOLBY DIGITAL ON DOLBY DIGITAL DTS OFF"]
        BO --> BP["SET TO "ON" when outputting in 48 kHz."]
        BP --> BQ["SET TO "OFF" when outputting the original sound."]
        BQ --> BR["OPEN OFF BITSTREAM OFF"]
        BR --> BS["DOLBY DIGITAL ON DOLBY DIGITAL DTS OFF"]
        BS --> BT["SET TO "ON" when outputting in 48 kHz."]
        BT --> BU["SET TO "OFF" when outputting the original sound."]
        BU --> BV["OPEN OFF BITSTREAM OFF"]
        BV --> BW["DOLBY DIGITAL ON DOLBY DIGITAL DTS OFF"]
        BW --> BX["SET TO "ON" when outputting in 48 kHz."]
        BX --> BYD["DOLBY DIGITAL ON DOLBY DIGITAL DTS OFF"]
        BYD --> BZ["DOLBY DIGITAL ON DOLBY DIGITAL DTS OFF"]
        BZ --> CA["DOLBY DIGITAL ON DOLBY DIGITAL DTS OFF"]
    end

PARENTAL Setting
Parental Control limits the disc viewing that exceed your settings. (if an incorrect password is entered, the disc will not play) This feature prevents your children from viewing inappropriate materials.
Parental Levels
Parental Level allows you to set the rating levels of your DVD discs. Playback will stop if the ratings exceed the levels you set. Follow the steps 1) to 3) in the "CUSTOM Menu" section on page 23.
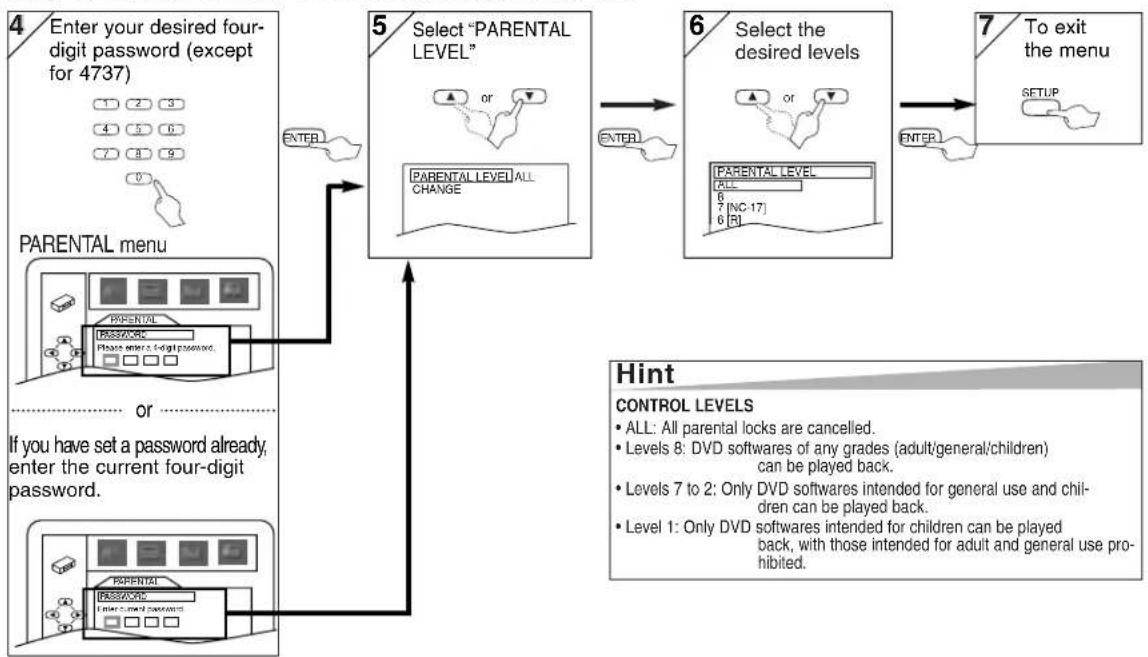
flowchart
graph TD
    A["Enter your desired four-digit password (except 4737)"] --> B["PARENTAL menu"]
    B --> C{Select "PARENTAL LEVEL"}
    C -->|YES| D["Select the desired levels"]
    C -->|NO| E["Select the desired levels"]
    D --> F["To exit the menu"]
    E --> F
    F --> G["SETUP"]
    style A fill:#f9f,stroke:#333
    style B fill:#ccf,stroke:#333
    style C fill:#cfc,stroke:#333
    style D fill:#fcc,stroke:#333
    style E fill:#cff,stroke:#333
    style F fill:#ffc,stroke:#333
To Change the Password for Parental Controls
You can change your password for parental controls. Follow the steps 1) to 3) in the "CUSTOM Menu" section on page 23.

flowchart
graph TD
    A["Enter your desired four-digit password (except for 4737)"] --> B["PARENTAL menu"]
    B --> C["Select "CHANGE""]
    C --> D["Enter your new four-digit password (except for 4737)"]
    D --> E["To exit the menu"]
    E --> F["Setup Setup"]
    F --> G["Hint"]
    G --> H["Record the password in case you forget it."]
    G --> I["If you forget the password, press 4, 7, 3, 7 at step 4, then enter your new password."]
    G --> J["Password will be cleared and parental levels will be set to ALL."]
To return the All Selections of SET UP (except for PARENTAL) to the Default Setting

flowchart
graph LR
A["1. STOP <SETUP MENU>"] --> B["2. Select INITIALIZE Select YES"]
B --> C["3. Connection logic"]
C --> D["4. To exit the menu, SETUP, ENTER, x2 (twice)"]
D --> E["Hint: When you cancel to initialize at step 3, select "NO"."]
Information
Language List
| Language | Code | Language | Code | Language | Code | Language | Code |
| A-B | French [FRE] | 5264 | Macedonian | 5957 | Siswat | 6565 | |
| Abkhazian 4748 | Frisian 5271 | Malagasy 5953 | Slovak 6557 | ||||
| Afar 4747 | Galician | 5358 | Malay | 5965 | Slovenian | 6558 | |
| Afrikaans 4752 | Georgian | 5747 | Malayalam | 5958 | Somali | 6561 | |
| Albanian 6563 | German [GER] | 5051 | Maltese | 5966 | Spanish [SPA] | 5165 | |
| Amharic 4759 | Greek [GRE] | 5158 | Maori | 5955 | Sundanese | 6567 | |
| Arabic 4764 | Greenlandic | 5758 | Marathi 5964 | Swahili | 6569 | ||
| Armenian 5471 | Guarani 5360 | Moldavian | 5961 | Swedish [SWE] | 6568 | ||
| Assamese 4765 | Gujarati | 5367 | Mongolian | 5960 | T | ||
| Aymara 4771 | Hausa | 5447 | Nauru | 6047 | Tagalog | 6658 | |
| Azerbaijani 4772 | Hebrew | 5569 | Nepali 6051 | Tajik | 6653 | ||
| Bashkir 4847 | Hindi | 5455 | Norwegian [NOR] | 6061 | Tamil | 6647 | |
| Basque 5167 | Hungarian [HUN] | 5467 | O-R | Tatar | 6666 | ||
| Bengali;Bangla 4860 | I-K | Occitan 6149 | Telugu 6651 | ||||
| Bhutani 5072 | Icelandic [ICE] | 5565 | Oriya | 6164 | Thai | 6654 | |
| Bihari 4854 | Indonesian | 5560 | Oromo(Afan) | 6159 | Tibetan 4861 | ||
| Bislama 4855 | Interlingua 5547 | Panjabi | 6247 | Tigrinya 6655 | |||
| Breton 4864 | Interlingue 5551 | Pashto;Pushto | 6265 | Tonga | 6661 | ||
| Bulgarian 4853 | Inupiak | 5557 | Persian 5247 | Tsonga 6665 | |||
| Burmese | 5971 | Irish [IRI] | 5347 | Polish | 6258 | Turkish [TUR] | 6664 |
| Byelorussian | 4851 | Italian [ITA] 5566 | Portuguese [POR] | 6266 | Turkmen | 6657 | |
| C-E | Japanese [JPN] | 5647 | Quechua | 6367 | Twi | 6669 | |
| Cambodian | 5759 | Javanese 5669 | Rhaeto-Romance | 6459 | U-Z | ||
| Catalan | 4947 | Kannada | 5760 | Romanian [RUM] | 6461 | Ukrainian 6757 | |
| Chinese [CHI] | 7254 | Kashmiri 5765 | Russian [RUS] | 6467 | Urdu | 6764 | |
| Corsican | 4961 | Kazakh 5757 | S | Uzbek 6772 | |||
| Croatian | 5464 | Kinyarwanda | 6469 | Samoan | 6559 | Vietnamese | 6855 |
| Czech 4965 | Kirghiz | 5771 | Sangho | 6553 | Volapuk 6861 | ||
| Danish [DAN] | 5047 | Kirundi | 6460 | Sanskrit | 6547 | Welsh | 4971 |
| Dutch [DUT] | 6058 | Korean [KOR] | 5761 | Scots Gaelic | 5350 | Wolof 6961 | |
| English [ENG] | 5160 | Kurdish 5767 | Serbian | 6564 | Xhosa 7054 | ||
| Esperanto | 5161 | L-N | Serbo-Croatian | 6554 | Yiddish | 5655 | |
| Estonian 5166 | Laothian | 5861 | Sesotho 6566 | Yoruba | 7161 | ||
| F-H | Latin | 5847 | Setswana | 6660 | Zulu | 7267 | |
| Faroese | 5261 | Latvian; Lettish | 5868 | Shona | 6560 | ||
| Fiji | 5256 | Lingala | 5860 | Sindhi | 6550 | ||
| Finnish [FIN] | 5255 | Lithuanian | 5866 | Singhalese 6555 |
If you choose a Language that has a 3 letter language code, the code will be displayed every time you change the Audio or Subtitle language setting on page 22. If you choose any other languages, ‘---’ will be displayed instead. (3 letter language code is written in bracket.)
Specifications
PRODUCT TYPE
DVD Player with Video Cassette recorder
CONNECTIONS
Front panel:
Video input RCA connector × 1
Audio input RCA connector×2
Rear panel:
AUDIO input RCA connector (left, right)
VIDEO input RCA connector
AUDIO output RCA connector (left, right)
VIDEO output RCA connector
S-Video output Mini DIN 4-pin jack (75 Ω)
Analog audio output RCA connectors ×2 (one left
channel, one right channel)
2 Vrms (47 kΩ)
Coaxial digital audio output One pin jack, 500mVpp (75 Ω)
Component output Y output level: 1Vp-p (75Ω)
CB/PB output level: 0.7Vp-p (75Ω)
CR/PR output level: 0.7Vp-p (75Ω)
[VCR section]
NUMBER OF VIDEO HEADS
4
VIDEO SIGNAL STANDARD
NTSC color system
1 Stationary head for liner audio
2 Rotary heads for Hi-Fi stereo
WOW AND FLUTTER
Below the measurement limitation (±0.001% W PEAK) (JEITA)
CHANNEL COVERAGE
VHF 2-13
UHF 14-69
CATV 1-125
TIMER BACKUP
30 seconds
[DVD section]
DISCS (PLAYBACK COMPATIBILITY)
DVD Video, Audio CD, CD-RW/R
DVD-RW/R, DVD+RW/R
FREQUENCY RESPONSE
DVD (linear sound) : 20 Hz to 20 kHz (sample rate: 48 kHz) 20 Hz to 44 kHz (sample rate: 96 kHz)
CD:20 Hz to 20 kHz
SIGNAL-TO-NOISE RATIO (S/N RATIO)
CD : 110 dB (JEITA)
DYNAMIC RANGE
DVD (linear sound) : 90 dB
CD : 90 dB (JEITA)
TOTAL DISTORTION FACTOR
W: 17 3/16" (435 mm)
H: 3 3/4" (94 mm)
D: 9 3/16" (233 mm)
WEIGHT
Approx. 6 lbs (2.7 kg)
- Designs and specifications are subject to change without notice.
- If there is a discrepancy between languages, the default language will be English.
Service Information (For the U.S.)
For the location of the nearest Sharp Authorized Service Center, or to obtain product literature, accessories, supplies or customer assistance, please call 1-800-BE-SHARP (1-800-237-4277) or visit SHARP's website (http://www.sharpusa.com).
Troubleshooting Guide
If this unit does not perform properly when operated as instructed in this Operation Manual, check this unit consulting the following checklist.
| DVDVCR | PROBLEM | CORRECTIVE ACTION |
| No power. | Make sure the power plug is connected to an AC outlet.Make sure the power is turned on. | |
| This unit does not respond to the remote control. | Check if the power plug is connected to an AC outlet.Check the batteries in the remote control.Aim the remote control directly at the remote sensor. If necessary, remove all the obstacles between the sensor and the remote.You have to be within 23 feet of this unit.Check if the right mode is selected. If it's not in the right mode, press the DVD or VCR buttons, whichever you need, on the remote control.Check if a cassette tape is in this unit.Tune your radio to an empty AM station so that you hear a lot of noises. Turn the volume up, then. If you hear some signal sound from the radio in response to your pressing buttons on the remote, the remote control is working. | |
| VCR | Timer recording is impossible. | Make sure the timer recording is set correctly.Make sure the TIMER and lights appear on the VCR/DVD. If not, press the SUBTITLE/T-SET button.Make sure the VCR clock is set correctly. |
| Cannot go into Record mode. | Make sure the tape has a safety tab. If needed, cover the hole with cellophane tape.Activate this unit in VCR mode. Press the VCR button on the remote control so that the green VCR OUTPUT light is lit. | |
| Playback picture is partially noisy. | Adjust tracking control for a better picture by pressing the CH (▼/▲) buttons on the VCR/DVD or the SKIP/CH.(▲/▼) buttons on the remote control. | |
| Cannot view a tape but the audio is OK. | Head cleaning may be necessary. Refer to “AUTO HEAD CLEANING”.Make sure the VCR is not in the Menu mode. | |
| No, or poor, playback picture. | Change the RF output channel to CH4. Then select the same channel on the TV.Fine tune your TV. | |
| TV programs cannot be seen normally. | Re-check the ANT. IN and ANT. OUT connections. See pages 1 and 7.Press the VCR/TV button.Press the VCR button on the remote control to activate it in the VCR mode. Check if the green VCR OUTPUT light is lit. Then, set it to the TV position by pressing the VCR/TV button. | |
| Video or color fades in and out when making a copy of a video tape. | You cannot copy a copyrighted video tape. You are experiencing copy guard protection | |
| DVD | No picture. | Connect the video cables firmly.Insert a correct video disc that plays on this unit.Press the DVD button on the remote control. Check if the DVD OUTPUT light is lit. Then try other DVD features. |
| Disc cannot be played. | Insert the disc.Clean the disc.Place the disc correctly with the label side up.Cancel the parental lock or change the control levels.Handle a disc with special care so that it does not have fingerprints, scratches, or dusts on its surface. | |
| No sound. | Connect the audio cables firmly.Turn the power of the audio component on.Correct the audio output settings.Correct the input settings on the audio component. | |
| No DTS audio is output. | Use a DIGITAL AUDIO OUT jack when outputting the DTS audio. | |
| Distorted picture. | Connect this unit directly to the TV.There are some cases where pictures may be slightly distorted, and those are not a sign of a malfunction.Although pictures may stop for a moment, this is not a malfunction.Check if the INTERLACE/PROGRESSIVE mode is set correctly according to your TV. See page 9. | |
| Audio or subtitle language does not match the set up. | The selected language is not available for audio or subtitles on the DVD.This is not a malfunction. | |
| The camera angle cannot be changed. | The DVD does not contain sequences recorded from different camera angles.This is not a malfunction. | |
| Audio or subtitle language cannot be changed. | The DVD does not contain audio source or subtitles in the selected language.This is not a malfunction. | |
| “Prohibited icon” appears on the screen, prohibiting an operation. | That operation is prohibited by this unit or the disc. This is not a malfunction. |
- Some functions are not available in specific modes, but this is not a malfunction. Read the description in this Operation Manual for details on correct operations.
- Playback from a desired track and random playback are not available during program playback.
- Some functions are prohibited on some discs.
This Class B digital apparatus complies with Canadian ICES-003.
Español
Mando a distancia
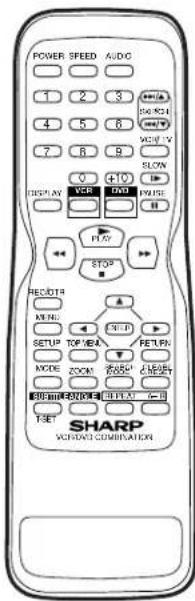
(Valid for warranty service in the U.S. only)
SHARP ELECTRONICS CORPORATION warrants to the first consumer purchaser that this Sharp brand product (the "Product"), when shipped in its original container, will be free from defective workmanship and materials, and agrees that it will, at its option, either repair the defect or replace the defective Product or part thereof with a new or remanufactured equivalent at no charge to the purchaser for parts or labor for the period(s) set forth below.
This warranty does not apply to any appearance items of the Product nor to the additional excluded item(s) set forth below nor to any Product the exterior of which has been damaged or defaced, which has been subjected to improper voltage or other misuse, abnormal service or handling, or which has been altered or modified in design or construction.
In order to enforce the rights under this limited warranty, the purchaser should follow the steps set forth below and provide proof of purchase to the servicer.
The limited warranty described herein is in addition to whatever implied warranties may be granted to purchasers by law. ALL IMPLIED WARRANTIES INCLUDING THE WARRANTIES OF MERCHANTABILITY AND FITNESS FOR USE ARE LIMITED TO THE PERIOD(S) FROM THE DATE OF PURCHASE SET FORTH BELOW. Some states do not allow limitations on how long an implied warranty lasts, so the above limitation may not apply to you.
Neither the sales personnel of the seller nor any other person is authorized to make any warranties other than those described herein, or to extend the duration of any warranties beyond the time period described herein on behalf of Sharp.
The warranties described herein shall be the sole and exclusive warranties granted by Sharp and shall be the sole and exclusive remedy available to the purchaser. Correction of defects, in the manner and for the period of time described herein, shall constitute complete fulfillment of all liabilities and responsibilities of Sharp to the purchaser with respect to the Product, and shall constitute full satisfaction of all claims, whether based on contract, negligence, strict liability or otherwise. In no event shall Sharp be liable, or in any way responsible, for any damages or defects in the Product which were caused by repairs or attempted repairs performed by anyone other than an authorized servicer. Nor shall Sharp be liable or in any way responsible for any incidental or consequential economic or property damage. Some states do not allow the exclusion of incidental or consequential damages, so the above exclusion may not apply to you.
THIS WARRANTY GIVES YOU SPECIFIC LEGAL RIGHTS. YOU MAY ALSO HAVE OTHER RIGHTS WHICH VARY FROM STATE TO STATE.
Model Specific Section
Your Product Model Number & Description: DV-NC150U VCR/DVD Combination
(Be sure to have this information available when you need service for your Product.)
Warranty Period for this Product:
One (1) year parts and ninety (90) days labor from date of purchase.
Additional Item(s) Excluded from warranty Coverage (if any):
Non-rechargeable batteries.
Where to Obtain Service:
Call Sharp Electronics corporation toll free at 1-800-BE-SHARP for instructions on how to obtain service on your VCR/DVD combination.
What to do to Obtain Service:
Ship your product, prepaid, as per the instruction given by the Sharp representative at the toll free number (1-800-BE-SHARP). BE sure to have your proof of purchase available. Be sure to ship the product securely packaged and insured against shipping damage.
TO OBTAIN SUPPLY, ACCESSORY OR PRODUCT INFORMATION, GO TO OUR WEBSITE AT www.sharpusa.com OR CALL 1-800-BE-SHARP.
SHARP®
SHARP ELECTRONICS CORPORATION
Sharp Plaza, Mahwah, New Jersey 07430-2135
SHARP CORPORATION
Osaka, JapanOsaka, Japan
- WARNING: TO REDUCE THE RISK OF FIRE OR ELECTRIC SHOCK, DO NOT EXPOSE THIS APPLIANCE TO RAIN OR MOISTURE.
- CAUTION: TO PREVENT ELECTRIC SHOCK, MATCH WIDE BLADE OF PLUG TO WIDE SLOT, FULLY INSERT.
- CAUTION
- CAUTION:
- “WARNING—FCC Regulations state that any unauthorized changes or modifications to this equipment not expressly approved by the manufacturer could void the user’s authority to operate this equipment.”
- INFORMATION
- Important Safeguards
- Table of Contents
- Precautions
- Setup
- VCR Functions
- DVD Functions
- Español 30
- Symbol Used in This Manual
- The following symbols appear in some headings and notes in this manual.
- Supplied Accessory
- Location and Handling
- Nonuse Periods
- Copy Protection
- Notice for progressive scan outputs
- No Fingers or Other Objects Inside
- Warning of Dew Formation
- Others
- A NOTE ABOUT RECYCLING
- Make your contribution to the environment!!!
- Maintenance
- SERVICING
- CLEANING THE CABINET
- CLEANING DISCS
- RECOMMENDED MEASURES FOR OPTIMUM PICTURE EXCELLENCE
- DISC HANDLING
- AUTO HEAD CLEANING
- Hint
- Note to CATV system installer
- About the Video Cassettes and Discs
- Playable Video Cassettes
- Unplayable Discs
- Connections
- RF Output Channel
- Hint for Cable Box or Satellite Box
- To select channels of the cable box or satellite box
- To play back a tape
- To view one channel while recording another
- Connection to an Audio System
- Connection to a TV
- Front & Rear Terminals
- About the Remote Control and Front Panel About the Remote C
- Installing the Batteries for the Remote Control
- Front Panel Display
- VCR/DVD Switching
- VCR MODE
- DVD MODE
- Preparation for Use
- Turn on the unit for the first time
- Yes Press the MENU button to exit
- No/ Please wait for a few minutes. After scanning...
- To Select a Channel
- Notes for using the Number buttons:
- To Preset the Channel Again
- To Change the On-Screen Language
- Clock Set Up
- To exit the CLOCK SET screen.
- Playback
- Recording & OTR (One Touch Recording)
- Accidental erasure prevention
- To stop recording temporarily (Pause mode)
- Other Operations
- To cue or review picture during playback (Picture Search)
- Counter Reset
- To play back in slow motion
- Auto Rewind
- On-Screen Operations
- Recording Features
- Timer Recording
- To Check, Correct, or Cancel a Timer Program
- To cancel a Timer Recording in progress
- Hint for Timer Recording
- Copying a Video Tape
- MTS System (Multi-Channel Television Sound)
- When You Receive or Record a Program Broadcast in MTS
- When You Play Back a Tape Recorded in Hi-Fi Stereo
- Special Features
- Time Search Index Search Auto Repeat
- Hint for Timer Search & Index Search
- DVD menu
- Calling up a Menu Screen during Playback
- Resume
- Paused and Step-by-Step Playback
- Rapid Play
- Playing the disc recorded in VR mode (Video Recording format)
- Fast Forward/Reverse
- Slow Forward/Slow Reverse
- Zoom
- MP3 Playback
- The On-Screen Display
- Search Function
- Track Search
- Using the number buttons
- Using the SEARCH MODE button
- Using the SKIP /◀◀, ▶▶/buttons
- Title / Chapter Search
- Using the SKIP ◀◀, ▶▶/buttons
- Time Search
- Marker Setup
- To set a marker
- To return to the marker later
- To exit the marker screen
- Repeat / Random / Programmed Playback
- Repeat Playback Programmed
- PlaybackA-B Playback
- Random Playback
- Special Settings
- Subtitle Language
- Audio Language
- Camera Angle
- Stereo Sound mode
- Black Level Setting
- Virtual Surround
- DVD Set Up
- QUICK SETUP Menu
- CUSTOM Menu
- LANGUAGE Setting
- DISPLAY Setting
- AUDIO Setting
- PARENTAL Setting
- Parental Levels
- To Change the Password for Parental Controls
- Specifications
- PRODUCT TYPE
- [VCR section]
- NUMBER OF VIDEO HEADS
- VIDEO SIGNAL STANDARD
- WOW AND FLUTTER
- CHANNEL COVERAGE
- TIMER BACKUP
- [DVD section]
- DISCS (PLAYBACK COMPATIBILITY)
- FREQUENCY RESPONSE
- SIGNAL-TO-NOISE RATIO (S/N RATIO)
- DYNAMIC RANGE
- TOTAL DISTORTION FACTOR
- WEIGHT
- Service Information (For the U.S.)
- Troubleshooting Guide
- Español
- Mando a distancia
- Model Specific Section
- SHARP®
- SHARP ELECTRONICS CORPORATION
- SHARP CORPORATION
Brand : SHARP
Model : DV-NC150U
Category : DVD player