
DV-SL20U - DVD player SHARP - Free user manual and instructions
Find the device manual for free DV-SL20U SHARP in PDF.

| Product Type | DVD Player |
| Model | DV-SL20U |
| Brand | Sharp |
| Power Supply | AC 120V, 60Hz, 11W (Standby 0.3W) |
| Weight | Approx 4.0 lbs (1.8 kg) |
| Disc Compatibility | DVD, DVD-R/RW, Audio CD, CD-R/RW, MP3 |
| Video Output | Component Video, S-Video, Composite Video |
| Audio Output | Stereo RCA, Coaxial Digital |
| Progressive Scan | Yes (480p) |
| Dolby Digital Support | Yes (Bitstream/DPCM selectable) |
| DTS Support | Yes (Bitstream output) |
| Parental Control | Yes (adjustable levels, password protected) |
| Language Options | Multiple subtitle and audio languages, DVD menu language |
| Playback Modes | Normal, Repeat (Chapter/Title/Track/A-B), Program, Random |
| Search Functions | Chapter, Title, Time, Track search |
| Zoom Function | 2x, 4x |
| Screen Saver & Auto Power Off | Yes (auto power off after 35 min of inactivity) |
| Marker Function | Up to 10 bookmarks |
| Virtual Surround | Yes (2 modes: Natural, Emphasized) |
| Accessories Included | Remote control with batteries, AV cables, operation manual |
Frequently Asked Questions - DV-SL20U SHARP
User questions about DV-SL20U SHARP
0 question about this device. Answer the ones you know or ask your own.
Ask a new question about this device
Download the instructions for your DVD player in PDF format for free! Find your manual DV-SL20U - SHARP and take your electronic device back in hand. On this page are published all the documents necessary for the use of your device. DV-SL20U by SHARP.
USER MANUAL DV-SL20U SHARP
natural_image
Black-and-white photo collage showing giraffes in a savanna landscape and a whale swimming in water (no text or symbols)RW
COMPATIBLE

Please read this Operation Manual carefully before using your DVD Video Player.
For future reference, record the serial number (located on the rear of the Unit) in the space provided.
Model No.: DV-SL20U
Serial No.: ____
WARNING: TO REDUCE THE RISK OF FIRE OR ELECTRIC SHOCK, DO NOT EXPOSE THIS APPLIANCE TO RAIN OR MOISTURE.

CAUTION
RISK OF ELECTRIC SHOCK DO NOT OPEN

CAUTION:
TO REDUCE THE RISK OF ELECTRIC SHOCK, DO NOT REMOVE COVER (OR BACK). NO USER SERVICEABLE PARTS INSIDE. REFER SERVICING TO QUALIFIED SERVICE PERSONNEL.

This symbol warns the user of uninsulated voltage within the unit that can cause dangerous electric shocks.

This symbol alerts the user that there are important operating and maintenance instructions in the literature accompanying this unit.
“WARNING—FCC Regulations state that any unauthorized changes or modifications to this equipment not expressly approved by the manufacturer could void the user’s authority to operate this equipment.”
This device complies with Part 15 of the FCC Rules. Operation is subject to the following two conditions:
(1) This device may not cause harmful interference, and
(2) this device must accept any interference received, including interference that may cause undesired operation.
INFORMATION
This equipment has been tested and found to comply with the limits for a Class B digital device, pursuant to Part 15 of the FCC Rules. These limits are designed to provide reasonable protection against harmful interference in a residential installation. This equipment generates, uses and can radiate radio frequency energy and, if not installed and used in accordance with the instructions, may cause harmful interference to radio communications. However, there is no guarantee that interference will not occur in a particular installation. If this equipment does cause harmful interference to radio or television reception, which can be determined by turning the equipment off and on, the user is encouraged to try to correct the interference by one or more of the following measures:
—Reorient or relocate the receiving antenna.
—Increase the separation between the equipment and receiver.
—Connect the equipment into an outlet on a circuit different from that to which the receiver is connected.
—Consult the dealer or an experienced radio/TV technician for help.
CAUTION:
THIS UNIT IS A CLASS 1 LASER PRODUCT.
USE OF CONTROLS OR ADJUSTMENTS OR PERFORMANCE OF PROCEDURES OTHER THAN THOSE SPECIFIED HEREIN MAY RESULT IN HAZARDOUS RADIATION EXPOSURE.
AS THE LASER BEAM USED IN THIS UNIT IS HARMFUL TO THE EYES, DO NOT ATTEMPT TO DISASSEMBLE THE CABINET.
REFER SERVICING TO QUALIFIED PERSONNEL ONLY.
As an Energy Star® Partner, SHARP has determined that this product meets the Energy Star® guidelines for energy efficiency. Energy Star is a U.S. registered mark.
IMPORTANT SAFEGUARDS
1) Read Instructions - All the safety and operating instructions should be read before the product is operated.
2) Retain Instructions - The safety and operating instructions should be retained for future reference.
3) Heed Warnings - All warnings on the product and in the operating instructions should be adhered to.
4) Follow Instructions - All operating and use instructions should be followed.
5) Cleaning - Unplug this product from the wall outlet before cleaning. Do not use liquid cleaners or aerosol cleaners. Use a damp cloth for cleaning.
6) Attachments - Do not use attachments not recommended by the product manufacturer as they may cause hazards.
7) Water and Moisture - Do not use this product near water - for example, near a bath tub, wash bowl, kitchen sink, or laundry tub; in a wet basement; or near a swimming pool; and the like.
8) Accessories - Do not place this product on an unstable cart, stand, tripod, bracket, or table. The product may fall, causing serious injury to a child or adult, and serious damage to the product. Use only with a cart, stand, tripod, bracket, or table recommended by the manufacturer, or sold with the product. Any mounting of the product should follow instructions, and should use a mounted by the manufacturer.
PORTABLE CART WARNING (Symbol provided by RETAC)
9) A product and cart combination should be moved with care. Quick stops, excessive force, and uneven surfaces may cause the product and cart combination to overturn.
10) Ventilation - Slots and openings in the cabinet are provided for ventilation and to ensure reliable operation of the product and to protect it from overheating, and these openings must not be blocked or covered. The openings should never be blocked by placing the product on a bed, sofa, rug, or other similar surface. This product should not be placed in a built-in installation such as a bookcase or rack unless proper ventilation is provided or the manufacturer's instructions have been adhered to.
11) Power Sources - This product should be operated only from the type of power source indicated on the marking label. If you are not sure of the type of power supply to your home, consult your product dealer or local power company. For products intended to operate from battery power, or other sources, refer to the operating instructions.
12) Grounding or Polarization - This product may be equipped with a polarized alternating-current line plug (a plug having one blade wider than the other). This plug will fit into the power outlet only one way. This is a safety feature. If you are unable to insert the plug fully into the outlet, try reversing the plug. If the plug should still fail to fit, contact your electrician to replace your obsolete outlet. Do not defeat the safety purpose of the polarized plug.
13) Power-Cord Protection - Power-supply cords should be routed so that they are not likely to be walked on or pinched by items placed upon or against them, paying par-

ticular attention to cords at plugs, convenience receptacles, and the point where they exit from the product.
14) Lightning - For added protection for this product during a lightning storm, or when it is left unattended and unused for long periods of time, unplug it from the wall outlet and disconnect the antenna or cable system. This will prevent damage to the product due to lightning and power-line surges.
15) Power lines - An outside antenna system should not be located in the vicinity of overhead power lines or other electric light or power circuits, or where it can fall into such power lines or circuits. When installing an outside antenna system, extreme care should be taken to keep from touching such power lines or circuits as contact with them might be fatal.
16) Overloading - Do not overload wall outlets, extension cords, or integral convenience receptacles as this can result in a risk of fire or electric shock.
17) Object and Liquid Entry - Never push objects of any kind into this product through openings as they may touch dangerous voltage points or short-out parts that could result in a fire or electric shock. Never spill liquid of any kind on the product.
18) Servicing - Do not attempt to service this product yourself as opening or removing covers may expose you to dangerous voltage or other hazards. Refer all servicing to qualified service personnel.
19) Damage Requiring Service - Unplug this product from the wall outlet and refer servicing to qualified service personnel under the following conditions:
a) When the power-supply cord or plug is damaged,
b) If liquid has been spilled, or objects have fallen into the product,
c) If the product has been exposed to rain or water,
d) If the product does not operate normally by following the operating instructions. Adjust only those controls that are covered by the operating instructions as an improper adjustment of other controls may result in damage and will often require extensive work by a qualified technician to restore the product to its normal operation,
e) If the product has been dropped or damaged in any way, and
f) When the product exhibits a distinct change in performance - this indicates a need for service.
20) Replacement Parts - When replacement parts are required, be sure the service technician has used replacement parts specified by the manufacturer or have the same characteristics as the original part. Unauthorized substitutions may result in fire, electric shock, or other hazards.
21) Safety Check - Upon completion of any service or repairs to this product, ask the service technician to perform safety checks to determine that the product is in proper operating condition.
22) Heat - The product should be situated away from heat sources such as radiators, heat registers, stoves, or other products (including amplifiers) that produce heat.
Service
- Do not attempt to service this Unit yourself. Instead, unplug it and contact a qualified service technician. (See CONSUMER LIMITED WARRANTY at the end of this manual.)
- Be sure the service technician uses authorized replacement parts or their equivalents. Unauthorized parts may cause fire, electrical shock, or other hazards.
- Following any service or repair, be sure the service technician performs safety checks to certify that this Unit is in safe operating order.
Copy Protection
This Unit supports Macrovision copy protection.
On DVD discs that include a copy protection code, if the contents of the DVD disc are copied using a VCR, the copy protection code prevents the videotape copy from playing normally.
Apparatus Claims of U.S. Patent Nos. 4,631,603, 4,577,216, 4,819,098 and 4,907,093 licensed for limited viewing uses only.
This product incorporates copyright protection technology that is protected by method claims of certain U.S. patents and other intellectual property rights owned by Macrovision Corporation and other rights owners. Use of this copyright protection technology must be authorized by Macrovision Corporation, and is intended for home and other limited viewing uses only unless otherwise authorized by Macrovision Corporation. Reverse engineering or disassembly is prohibited.
Recommended Measures for Optimum Picture Excellence
This Unit is a precision device constructed using extremely accurate technology.
- The disc cannot be played if the disc drive component is worn out or if the internal pick up lens is dirty.
To obtain optimum picture quality, the Unit should be checked (cleaning and replacement of some parts) every 1,000 hours.
Note that this period varies depending on the environment (temperature, humidity, dust, etc.) in which the Unit is used.
Contact your authorized Sharp supplier for details.
Warning of Dew Formation
Dew may form on the pickup lens in the following conditions.
- Immediately after a heater has been turned on.
• In a steamy or very humid room.
- When the unit is suddenly moved from a cold environment to a warm one.
If dew forms inside this unit, it may not operate properly.
In this case, turn on the power and wait about one hour for the dew to evaporate.
Others
It is the intent of Sharp that this product be used in full compliance with the copyright laws of the United States and that prior permission be obtained from copyright owners whenever necessary.
“Licensed under one or more of U.S. Pat. 4,972,484, 5,214,678, 5,323,396, 5,530,655, 5,539,829, 5,544,247, 5,606,618, 5,610,985, 5,740,317, 5,777,992, 5,878,080, or 5,960,037.”
FEATURES
- Progressive Scan system
• Dolby Digital sound
This player can handle Dolby Digital surround sound having 5.1 channels when connected to a Dolby Digital decoder.
- Still/fast/slow/step playback
- Random playback for audio CD and MP3
- Program playback for audio CD and MP3
• DVD menus in a desired language
- Screen saver/Auto power-off functions
The screen saver program starts when there is no input from the player for five minutes in the stop mode. When the screen saver program is activated for 30 minutes, the power is automatically turned off.
- Subtitles in a desired language
- Selecting a camera angle
- Choices for audio language and sound mode
- Parental lock
• Automatic detection of discs
This player automatically detects if a loaded disc is DVD, audio CD or MP3 on disc.
- Playing an MP3 disc
- Direct Search
• DTS (Digital theater System)
Sound system different from Dolby Digital sound system.
- On-screen display
Information about the current operation can be displayed on a TV screen, allowing you to confirm the currently active functions (such as program playback), on the TV screen using the remote control.
- Search
Chapter search / Title search / Track search / Time search
- Repeat
Chapter / Title / Track / Group / All / A-B
- Zoom
- Marker
The part designated by user can be called back.
- Resume Play
- Virtual Surround
- Component Video Out Jacks
Jacks located on the back of the DVD Player which are used to send high-quality video to a TV via Component Video In Jacks.
- Dimmer
- Bit rate indication
• DRC (Dynamic range control)
You can control the range of sound volume.
• Digital Gamma Setting & Black Level Setting
TABLE OF CONTENTS
■ IMPORTANT SAFE GUARDS....3
■ FEATURES....4
■ INTRODUCTION....4
Symbols Used in this Manual. 5
Supplied Accessories 6
■ ABOUT THE DISCS 6
Playable Discs. 6
Disc Types. 6
■ FUNCTIONAL OVERVIEW....7
FRONT PANEL 7
REAR VIEW 7
REMOTE CONTROL 7
Display 8
Displays During Operation....8
Loading the Batteries....8
■ HOOK UPS....8
Connecting to a TV using a VIDEO OUT Jack
or a S-VIDEO OUT Jack 8
Connecting to an Amplifier Equipped with Digital Input
Jacks such as MD deck or DAT deck 9
Connecting to a Dolby Digital decoder or DTS decoder . 9
Connecting to a TV or a Stereo TV that has
Component VIDEO In Jacks 9
■ PLAYING A DISC....10
Basic Playback 10
General Features. 10
Pause 10
Disc Menus 10
Title Menu 10
CALLING UP A MENU SCREEN DURING
PLAYBACK 10
Step by Step Playback....10
Resume / Stop 10
Playing the disc recorded in VR mode
(Video Recording format)....10
Fast Forward / Reverse Search 11
Slow Forward / Slow Reverse ..... 11
Zoom. 11
Track 11
Title / Chapter Search 11
Time Search 11
Repeat 11
REPEAT TITLE / CHAPTER. 11
REPEAT TRACK 12
A-B REPEAT 12
Program 12
Random Playback 12
MP3 Playback 12
On-Screen Information. 12
Track Selection 13
Random Playback 13
Program 13
Audio Language 13
Stereo Sound Mode. 13
Subtitle Language 13
Camera Angle 13
Changing the On-Screen Display....13
Marker Setup Screen. 14
Digital Gamma Setting....14
Black Level Setting 14
Virtual Surround 14
■ DVD SETUP 14
Audio Setting....14
Parental Control....14
PARENTAL LEVEL. 14
IF YOU FORGET THE PASSWORD. . . . . . . . . . . . 14
PARENTAL CONTROL LEVELS. 14
Display Setting....15
Language Setting 15
■ TROUBLESHOOTING GUIDE....16
■ SPECIFICATIONS....17
■ MAINTENANCE....17
■ SERVICE INFORMATION (For the U.S.). 17
INDICE
Symbols Used in this Manual
The following symbols appear below in some headings and notes in this manual, with the following meanings!
DVD
: Description refers to playback of DVD video discs. (including DVD-RW/R discs)
CD
: Description refers to playback of audio CDs.
MP3
: Description refers to playback of MP3 discs.
Manufactured under license from Dolby Laboratories. "Dolby" and the double-D symbol are trademarks of
Dolby Laboratories.
DVD-RW
VR mode
: Description refers to playback of the VR mode (Video Recording format).
*The VR mode (Video Recording format) is a recording mode to enjoy editing the program or "manual mode" for recording in desired resolution and time.
目(QUICK)
:You can select the setting item by pressing QUICK setup menu) as more quick way than selecting from (Refer to pages 14 and 15.)
"DTS" and "DTS Digital Out" are trademarks of Digital Theater Systems, Inc.
Supplied Accessories
- Remote control (9HSNA520UD)
- Two AA batteries
• Operation Manual
• VIDEO/AUDIO cables
ABOUT THE DISCS
playable Discs
The following discs can be played back on this DVD player.
- DVD video - DVD-R/RW* - Audio CD - CD-R/RW* - MP3*
*Depending on the types or the writing method of the medium some discs can not be played.
- Some DVD-R/RW, or CD-R/RW discs made on personal computers, or on DVD recorders may not be played back properly due to the factors such as scratches, dirt or special properties of the disc.
- Discs made on personal computers may not be played back properly due to the different environment or the settings of the application you use. We recommend always to use the standardized, rightly formatted discs. (Please contact the sales agency for more detail).
This player conforms to the NTSC color system. You cannot play discs recorded in other color systems such as PAL or SECAM. - Some discs include region codes as shown below.


- The number inside the symbol refers to a region of the world, and a disc encoded in a specific region format can only be played back on DVD player with the same region code.
RW COMPATRUE: This label indicates playback compatibility with DVD-RW discs recorded in VR mode (Video Recording Format).
NOTE:
• This player cannot play the DVD-RW that supports CPRM (Contents Protection for Recordable Media).
The following discs cannot be played back on this DVD player.
• DVD with region codes other than 1 or ALL. • DVD-ROM
- DVD-RAM (Never play back, otherwise malfunction may result.)
- CD-ROM • VSD • CDV (Only plays back the audio part.)
- CD-G (Only plays back the sound.) • CD-I (Never play back, otherwise malfunction may result.)
- Super Audio CD • Photo CD (Never play back, otherwise malfunction may result.)
- Video CD (Never play back, otherwise malfunction may result.)
Any other discs without compatibility indications.
Disc Types
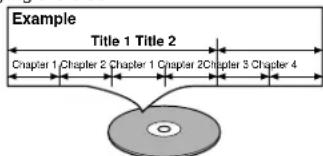
[DVD]
Data on a DVD is divided into sections called "titles", and then into subsections called "chapters", each of which is given a title or chapter number. Playback conditions are preset on some DVD video discs, and these playback conditions take priority over user operations on this player. If a function you selected do not run as desired, refer to the manual accompanying the disc.
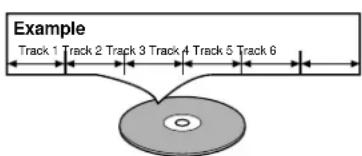
[Audio CD]
Data on an audio CD is divided into sections called "tracks", each of which is given a track number.
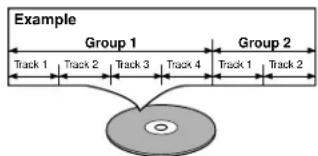
[MP3]
Data on a MP3 is divided into sections called "groups", and then into subsections called "tracks", each of which is given a group or track number.
Selecting Progressive Scan (480p or Interlaced 480i) Playback
- If your TV is compatible with progressive scanning (480p), connect the TV to the Component Video Output jacks of the DVD player and set the INTERLACE/PROGRESSIVE SCAN SELECTOR on the back of the DVD player to PROGRESSIVE. Next, set your TV to the progressive scan mode.
- If your TV is not compatible with progressive scan, set the INTERLACE/PROGRESSIVE SCAN SELECTOR to INTERLACE.
- Use a commercially available adaptor if the video input jacks of your TVs or monitors are the BNC type.
What is Progressive Scanning?
- Unlike conventional interlace scanning, the progressive scan system provides less flickering and images in higher resolution than that of traditional (480i) television signals.
- When PROGRESSIVE is selected, no video signal will be output from the VIDEO OUT, or S-VIDEO OUT jack.
FUNCTIONAL OVERVIEW
FRONT PANEL
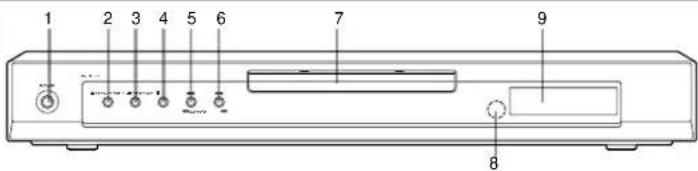
[Fig. 1]
REAR VIEW
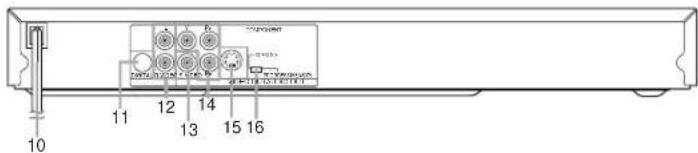
[Fig. 2]
- POWER
to switch the player to ON or OFF - OPEN/CLOSE
to open/close the disc tray - PLAY
to start or resume disc playback - STOP
to stop playback - SKIP |◀◀ / SEARCH ◀◀
goes to previous chapter or track during playback; press and hold for 1.5 seconds for a reverse search - SKIP ▶▶/ SEARCH ▶▶
goes to next chapter or track during playback; press and hold for 1.5 seconds for a forward search - Disc tray
- Remote sensor window
- Display
- MAIN (AC Power Cord)
connect to a standard AC outlet
REMOTE CONTROL

[Fig. 3]
- POWER Button [page 10]
Press to turn the power on and off. - ON SCREEN Button [page 12]
Displays the current status on the TV screen for checking purposes. - DIMMER Button [page 15]
Press to change the Panel Display settings. - GAMMA/B.LEVEL Button [page 14]
Press to adjust the black parts of the picture brighter. - ZOOM Button [page 11]
Enlarges part of a DVD-reproduced image. - SUBTITLE Button [page 13]
Press to select a desired subtitle language. - TITLE Button [page 10]
Displays the title menu. - RETURN Button [page 14]
Returns to the previous operation. - Numeric Buttons [page 11]
- CLEAR Button [page 11]
Resets a setting. - REV Button [page 11]
Fast reverse playback to a desired point. -
PLAY Button [page 10]
Starts playback of the disc contents. -
COAXIAL (Digital audio out)
connect to AUDIO inputs of a digital (coaxial) audio equipment - AUDIO OUT (Left/Right)
connect to AUDIO inputs of an amplifier, receiver or stereo system - VIDEO OUT
connect to the Video Input of a TV - COMPONENT VIDEO OUT
connect to a TV with Component video in jacks - S-VIDEO OUT
connect to a TV with S-Video inputs - INTERLACE/PROGRESSIVE SCAN SELECTOR
to select interlace or progressive scanning (See page 6)
Caution: Do not touch the inner pins of the jacks on the rear panel. Electrostatic discharge may cause permanent damage to the player.
- DIRECT SKIP Button [page 11]
Press to locate a desired point
- STOP Button [page 10]
Stops operation of the disc.
- OPEN/CLOSE Button [page 10]
Press to insert discs into or remove them from the tray.
- SETUP Button [page 14]
Press to enter the setup mode or to change setup items.
- MARKER Button [page 14]
Press to call back the Marker display.
- MODE Button [page 13]
Activates program playback or random playback mode.(CD/MP3)
Activates the 3D sound.(DVD)
- AUDIO Button [page 13]
Press to select a desired audio language or sound mode.
- ANGLE Button [page 13]
Press to change the camera angle to see the sequence being played back from a different angle.
- MENU Button [page 10]
Displays the DVD menus.
- Arrow Buttons [page 10]
Use when making settings while watching the display on a TV screen.
- ENTER Button [page 10]
Press to accept a setting
- REPEAT Button [page 11]
Repeats playback of the current disc, title, chapter or track.
- A-B REPEAT Button [page 12]
Repeats playback of a selected section.
- SKIP UP Button [page 11]
Plays back from the beginning of the next chapter or track.
- SKIP DOWN Button [page 11]
Plays back from the beginning of the current chapter or track.
- FWD Button [page 11]
Fast forwards playback to a desired point.
- STILL/PAUSE Button [page 10]
Pause playback temporarily/frame-by-frame playback.
FUNCTIONAL OVERVIEW
Display
![Stays on when repeat title function is on. Stays on when the repeat function is on. Stays on when the A-B repeat function is on. Stays on when the inserted disc is being played back. REPEAT A-B TITLE 0:00:000 CHP. TRK. DVD CD Stays on when repeat chapter function is on. Stays on when repeat track function is on. Lights up when a DVD is inserted on the tray. Lights up when a CD is inserted on the tray. Lights up when the inserted disc comes to a pause. Displays how long a current title or track has been played back. When a chapter or track has switched, the number of a new title, chapter or track is displayed. [Fig. 4]](/content/2026/06/1195592/images/4f2a10c766c1ebc6c7d0a427ceead3acb1197dd513a4a395649a819fc7cdc99f.jpg)
Displays During Operation
Loading the Batteries
- Open the battery compartment cover.
2. Insert two AA batteries, with each one oriented correctly.
3. Close the cover.

NOTES
- Do not mix alkaline and manganese batteries.
- Do not mix old and new batteries.
HOOK UPS
CAUTION:
- Be sure to turn off the Player and equipment to be connected before connecting.
- Read through the operation manual for the equipment to be connected.
- Be sure that the colors of the jacks and plugs match up when using VIDEO/AUDIO cables.
- Be sure to keep the Player connection cables separate from the TV antenna cable when you install the Player, because it may cause electrical interference when you are watching television programs.
• DTS audio cannot be produced with an analogue connection.
Connecting to a TV using a VIDEO OUT Jack or a S-VIDEO OUT Jack
Use an S-Video cable (commercially available) in place of the yellow video cable to enjoy pictures at higher quality.
![A/V-compatible or wide screen TV To Right (red) and Left (white) AUDIO OUT jacks To Right (red) and Left (white) AUDIO INPUT jacks To VIDEO INPUT jack or To VIDEO OUT jack To S-VIDEO OUT jackTo S-VIDEO INPUT jack [Fig. 5]](/content/2026/06/1195592/images/6d46cbd518a8d8795fb5e536adfbbf3ef7853f210310cbf655135b4ed7b71374.jpg)
[Fig. 5]
![Stereo system To Right (red) and Left (white) AUDIO OUT jacks To S-VIDEO OUT jack To S-VIDEO INPUT jack or To VIDEO OUT jack To VIDEO INPUT jack A/V-compatible or wide screen TV [Fig. 6]](/content/2026/06/1195592/images/caa734a6a99ea5b3531a58bd6b4439638daa6c8ebfc82b84bf7dd020cadfc58b.jpg)
EN
HOOK UPS
NOTES:
- Connect the DVD player directly to a TV. If the A/V cables are connected to a VCR, pictures may be distorted due to the copy protection system.
- Be sure to turn off the power to all components in the system before connecting another component.
• Refer to the Operation Manuals for your TV, stereo system and any other components to be connected to the DVD player.
Connecting to an Amplifier Equipped with Digital Input Jacks such as MD deck or DAT deck
Use an audio coaxial digital cables (not included) for the audio connections. Connecting to an amplifier equipped with digital input jacks such as MD Deck or Dat Deck.

[Fig. 7]
NOTES:
- The audio source on a disc in a 5.1 channel Dolby Digital surround format cannot be recorded as digital sound by an MD or DAT deck.
- Set Dolby Digital to DPCM and DTS to OFF for audio output in the setup mode. Playing a DVD using incorrect settings may generate noise distortion, and may also damage the speakers.(See page 14 to set ON for Dolby Digital)
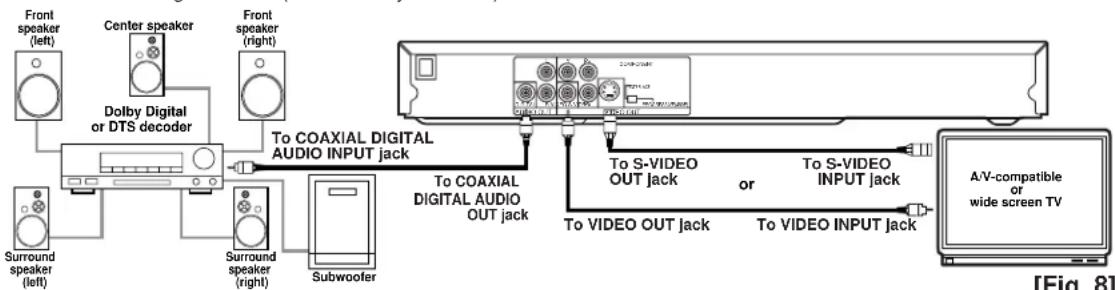
Connecting to a Dolby Digital decoder or DTS decoder
If using this DVD player to play back a DVD in a 5.1 channel Dolby Digital surround or DTS surround format, the DVD player outputs a Dolby Digital or DTS data stream from its COAXIAL DIGITAL AUDIO OUT jack. By hooking the player up to a Dolby Digital or DTS decoder, you can enjoy a more convincing, realistic ambience with powerful and high-quality surround sound of a professional standard such as can be heard in movie theaters.
Use audio coaxial digital cables (commercially available) for the audio connections.
flowchart
graph TD
    A["Front speaker (left)"] --> B["Dolby Digital or DTS decoder"]
    C["Center speaker"] --> B
    D["Front speaker (right)"] --> B
    E["Surround speaker (left)"] --> B
    F["Surround speaker (right)"] --> B
    G["Subwoofer"] --> B
    H["To COAXIAL DIGITAL AUDIO INPUT jack"] --> I["Digital audio jack"]
    J["To S-VIDEO OUT jack"] --> K["Video output jack"]
    L["To S-VIDEO INPUT jack"] --> M["Video input jack"]
    N["A/V-compatible or wide screen TV"] --> M
    style A fill:#f9f,stroke:#333
    style C fill:#f9f,stroke:#333
    style D fill:#f9f,stroke:#333
    style E fill:#f9f,stroke:#333
    style F fill:#f9f,stroke:#333
    style G fill:#f9f,stroke:#333
    style H fill:#f9f,stroke:#333
    style I fill:#ccf,stroke:#333
    style J fill:#ccf,stroke:#333
    style K fill:#ccf,stroke:#333
    style L fill:#ccf,stroke:#333
    style M fill:#ccf,stroke:#333
[Fig. 8]
NOTES:
- If output Dolby Digital or DTS audio, connect to a Dolby Digital or DTS decoder, and set Dolby Digital or DTS to BITSTREAM for audio output in the setup mode.
- Unless connected to a Dolby Digital or DTS decoder, set Dolby Digital to DPCM or DTS to OFF for audio output in the setup mode. Playing a DVD using incorrect settings may generate noise distortion, and may also damage the speakers.
Connecting to a TV or a Stereo TV that has Component VIDEO In Jacks
![To Right (red) and Left (white) AUDIO OUT jacks To COMPONENT VIDEO OUT jack Stereo system To Right (red) and Left (white) ANALOG AUDIO INPUT jacks To COMPONENT VIDEO INPUT jack A/V-compatible or wide screen TV [Fig. 9]](/content/2026/06/1195592/images/334c266b36e99cfc0daaae980bf91537578ef42e53a49fcce2803d6054f8d832.jpg)
NOTE:
- If your TV is compatible with progressive scanning (480p), connect the TV to the Component Video Output jacks of the DVD player, and make sure INTERLACE/PROGRESSIVE SCAN SELECTOR is set to PROGRESSIVE.
HOW TO CONNECT TO A TV WITHOUT AUDIO/VIDEO INPUT JACKS
If your TV does not have RCA type audio and video input jacks it is still possible to connect this DVD player to your TV's 75-ohm coaxial antenna terminal using a commercially available Stereo Audio/Video RF Modulator. Connect the audio and video outputs of the DVD player to the audio and video inputs on the RF Modulator, and then connect the coaxial output of the RF Modulator (usually marked "TO TV") to the 75 ohm coaxial antenna terminal on your TV. Follow the instruction supplied with the RF Modulator for more details. If your TV's 75 ohm coaxial antenna terminal is already occupied by an antenna or cable box connection, remove that cable from your TV's antenna terminal and reconnect it to the coaxial antenna input terminal of the RF Modulator (usually marked "ANT IN"), then connect the RF modulator to your TV's antenna terminal as described above.
NOTE
• The picture quality from DVD discs will not be as good if the DVD player is connected to the TV's antenna terminal through an RF Modulator.
PLAYING A DISC
Basic Playback


DVD-RWCDDVD
VR mode
Getting started
- Turn on the power of the TV, amplifier and any other components which are connected to the DVD.
- Make sure the TV and audio receiver (commercially available) are set to the correct channel.
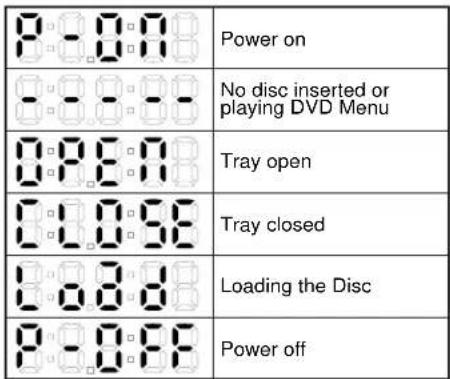
Press POWER.
- "P-ON" will appear briefly on the display panel.
2 Press OPEN/CLOSE to open disc loading tray.
3 Place the chosen disc in the tray, with the label facing up.
4 Press PLAY
- The tray will close automatically, and playback will then start from the first chapter or track of the disc. If the playback does not start automatically, press PLAY.
- When you playback the DVD which a title menu is recorded, it may appear on the screen. In this case, refer to "TITLE MENU".
5 Press STOP to stop playback.
NOTES:
- A "prohibited icon" may appear at the top-right on the TV screen during operation, warning that a prohibited operation has been encountered by the DVD player or the disc.
- With DVDs that use some titles for playback program signals, playback may start from the second title, or it may skip these titles.
- During the playback of two layered disc, pictures may stop for a moment. This happens when the 1st layer switches to the 2nd layer. This is not a malfunction.
- A DVD-RW disc recorded in the VR mode may freeze momentarily during playback depending on how the playlist was made and edited (deleted titles, repeated recording).
General Features
DVD may contain menus to navigate the disc and access special features. Press the appropriate numerical key or use Arrow (▼/▲/▶/◀) to highlight your selection in the DVD main menu and press ENTER to confirm.
NOTE:
- Unless stated, all operations described are based on remote control use. Some operations can be carried out using the menu bar on the TV screen.
Pause


DVD-RWN
VR mode
During playback, press STILL/PAUSE.
- Playback will pause and sound will be muted.
2 To continue playback, press PLAY.
Disc Menus
1 Press MENU.
• The DVD main menu will appear
2 If the feature is not available, symbol may appear on the TV screen.
3 If disc menu is available on the disc, audio language, subtitle options, chapters for the title and other options will appear for selection.
4 Press Arrow (▼/▲/▶/◀) to select an item, and ENTER to confirm selection.
DVD
Title Menu
DVD
1 Press TITLE.
• The title menu will appear.
2 If the feature is not available, symbol may appear on the TV screen.
3 Press Arrow (▼/▲/►/◄) to select an item, and ENTER to confirm selection.
- Playback will begin at the selected Title.
CALLING UP A MENU SCREEN DURING PLAYBACK
- Press MENU to call up the DVD main menu.
- Press TITLE to call up the title menu.
NOTE:
- Contents of menus and corresponding menu operations may vary between discs. Refer to the manual accompanying the disc for details.
Step by Step Playback

DVD-RWDVD
VR mode
1 During playback, press STILL/PAUSE.
- Playback will pause and sound will be muted.
2 The disc goes forward by one frame each time STILL/PAUSE is pressed.
3 To exit step by step playback, press PLAY.
Resume / Stop

CDDVD
1 During playback, press STOP.
Resume message will appear on the TV screen.
2 Press PLAY, playback will resume from the point at which playback was stopped.
• To cancel resume, press STOP again.
• To stop playback, press STOP twice from playback mode.
Playing the disc recorded in VR mode (Video Recording format)
DVD-RW
VR mode
You can choose ORIGINAL or PLAYLIST when you play the disc which had set the PLAYLIST.
1 Press MENU in stop mode.
• The current setting screen will appear.
- Pressing MENU during playback is not valid.
2 Press ◀or ▶ to select ORIGINAL or PLAYLIST.
- PLAYLIST will not be displayed when it has not been made.
- Resume playback will not be possible if you change the setting.
3 Press ▲ or ▼ to select a title, then press ENTER.
- Playback will start.
NOTES:
- [ORIGINAL]: A list of titles which are recorded with a DVD recorder. [PLAYLIST]: A list of titles which is made based on the ORIGINAL list for editing.
- With discs recorded in VR mode, changing the audio (MAIN, SUB or MAIN+SUB) is effective only when using an analogue connection. Although you may be able to change the settings of the on-screen display, it is not affect the sound when using a digital connection. EN
EN
Fast Forward / Reverse Search

DVD-RWMP3CDDVD VR mode Within 80 seconds, select a desired track number using numerical buttons. For single digits press "0" first.
- Playback will start at the selected track.
During playback, press FWD▶▶ or REV◀◀ repeatedly to select the required forward or reverse speed: x2, x8, x50, x100.
- If you are using SKIP ▶▶/ SEARCH ▶▶ on the front panel, press and hold it for more than 1.5 sec (the longer you hold it, the faster the speed will be). When you reach the desired speed, release the button.
- For audio CDs, the speed is fixed at x16.
- For MP3, the speed is fixed at x8.
② To return to normal playback, press PLAY.
Slow Forward / Slow Reverse

DVD-RWDVD Title / Chapter Search

DVD-RWDVD VR mode
1 During playback, press STILL/PAUSE.
2 Press FWD▶▶ or REV◀◀
- Slow motion playback will begin and sound will be muted.
3 Press FWD▶▶ or REV◀◀ repeatedly to select the required speed: 1/16, 1/8, 1/2 of the normal playback.
- If you are using SKIP ◀◀ / SEARCH ◀◀ on the front panel, press and hold it for more than 1.5 sec (the longer you hold it, the slower the speed will be). When you reach the desired speed, release the button.
4 To return to normal playback, press PLAY.
Zoom
DVD-RWDVD Time Search
The Zoom function allows you to enlarge the video image and to pan through the enlarged image.
1 Press ZOOM during playback.
- Playback will continue.
2 Press ZOOM repeatedly to select the required zoom factor: x2, x4 or OFF.
3 Use Arrow (▼/▲/▶/◀) to move the zoomed picture across the screen.
4 To exit zoom mode, press ZOOM to OFF.
NOTES:
- Zooming function does not work while disc menu is shown.
• x4 zoom is not available on some discs.
Track
CD
There are three ways to begin playback on an Audio CD at a specific Track.
Using the Numerical buttons
Press numerical buttons to enter the desired Track number.
- Playback will start at the selected track.
- For single digit tracks (1-9), press a single number (eg. track 3, press 3).
• To play track 26, press +10, 2, 6 on the numerical button.
Using the DIRECT SKIP.
1 Press DIRECT SKIP.
• The track search display appears.
Press DIRECT SKIP once for the Chapter search, twice for the Title search during playback.
2 Enter the desired chapter/title number using numerical buttons.
During playback, press DIRECT SKIP three times (CD: twice) to display the Time Search on the TV screen.
2 Within 30 seconds, enter a desired disc time using numerical buttons.
- Playback will start at the specified time.
3 Press CLEAR to erase the incorrect input.
Repeat
- REPEAT are available only during playback.
REPEAT TITLE / CHAPTER

DVD-RWDVD
To activate the repeat function, press REPEAT during playback.
- The repeat mode changes as described below every time you press the button.

flowchart
graph LR
    A["CHAPTER"] --> B["TITLE"]
    B --> C["OFF"]
    C --> D["(repeat off)"]
    style A fill:#f9f,stroke:#333
    style B fill:#f9f,stroke:#333
    style C fill:#f9f,stroke:#333
    style D fill:#ccf,stroke:#333
NOTES:
- Repeat Title/Chapter is not available with some scenes. - The REPEAT setting will be cleared when moving to other title or chapter.
PLAYING A DISC
REPEAT TRACK
CD
To activate the repeat function, press REPEAT during playback.
- The repeat mode changes as described below every time you press the button.

flowchart
graph LR
    A["TRACK"] --> B["ALL"]
    B --> C["OFF"]
    C --> A
    style A fill:#f9f,stroke:#333
    style B fill:#f9f,stroke:#333
    style C fill:#f9f,stroke:#333
NOTES:
- The REPEAT setting will be cleared when moving to other track.
- Repeat playback does not function during A-B REPEAT play-back.
A-B REPEAT
DVD
CD
DVD-RW
VR mode
1 Press A-B REPEAT at your chosen starting point.
- A- appears briefly on the TV screen.
2 Press A-B REPEAT again at your chosen end point. - A-B appears briefly on the TV screen, and the repeat sequence begins.
3 To exit the sequence, press A-B REPEAT.
NOTES:
- The A-B REPEAT section can only be set within the current title (for DVDs), or current track (for audio CDs).
- A-B REPEAT is not available with some scenes in DVD.
• To cancel the A point which was set, press CLEAR. - A-B REPEAT playback does not function during title, chapter, track or all repeat playback.
Program
CD
You may determine the order in which tracks will play.
1 In stop mode press MODE.
• The PROGRAM screen will appear.
2 Press ▲ or ▼ to select a track, then press ENTER.
- Press CLEAR to erase the most recently entered program.
3 Press PLAY to play the programmed tracks.
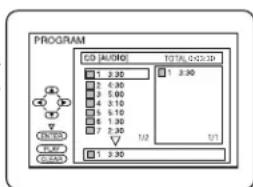
NOTES:
• While the program is being played back, the STOP works as follows.
- Press STOP once and then PLAY again, playback will restart from the point where STOP was pressed. (Program continued)
- Press STOP twice and then PLAY again, playback will restart from the track in the usual way. (Program cleared)
- Up to 99 programs can be entered.
- If you like to repeat the current track in the program, press REPEAT repeatedly until ☑ TRACK appears during playback. If you like to repeat the entire program press REPEAT repeatedly until ☑ ALL appears during playback.
Random Playback
CD
This shuffles the playing order of tracks instead of playback in the sequence.
In stop mode, press
MODE twice.
• RANDOM screen appears.
2 Press PLAY to start random playback.
![RANDOM CD [AUDIO] TOTAL 0:45.55 RANDOM PROGRAM no Indication START](/content/2026/06/1195592/images/fb1edb28a0cc5e478e2ee4fd1aee21d318163e718afae298b60ca9f01ccb62ae.jpg)
NOTES:
- If you like to repeat the current track in the random
selection, press REPEAT repeatedly until ☑TRACK appears during playback. If you like to repeat the entire random selection press REPEAT repeatedly until ☑ALL appears during playback.
MP3 Playback
MP3
When a CD with MP3 files is inserted in the DVD player, the MP3 menu will appear on the TV screen, and number of tracks is displayed on the front panel.
In stop mode, press ▲ or ▼ to select the desired group or track.
- If a group is selected, press ▶ or ENTER to go on to the track selection
screen. Press ▲ or ▼ to choose a track, then press PLAY or ENTER
- If a track is selected, press PLAY or ENTER to start playing tracks. Starting from the one you've just chosen the subsequent tracks will be played.
- Choose FIRST PLAY to start playback from the beginning of the listed tracks.
- Press TITLE to return to the first item.
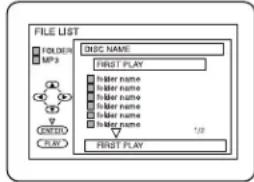
2 Press STOP to stop playback.
NOTES:
- Folders are known as Groups; files are known as Tracks.
- MP3 files are accompanied by icon.
• Maximum of 255 folders can be recognized.
• Maximum of 256 files can be recognized. - Up to 8 hierarchies can be created.
This player recommends the use of files recorded at the below specifications:
- Sampling frequency: 44.1kHz or 48kHz
- Constant bit rate: 112kbps \~ 320kbps.
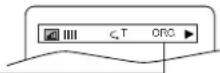
On-Screen Information
MP3
You can check the MP3 files during playback.
1 Press ONSCREEN.
- The name of the file currently in play will be displayed.
2 Press ONSCREEN again to show the track number, the elapsed time, the repeat status, and the playback status at the top of the screen.
- will be displayed when the repeat play has been selected.
T - indicates Track repeat
G- indicates Group (folder) repeat
A - indicates Disc repeat
3 Press ONSCREEN again to exit.
PLAYING A DISC
Track Selection
MP3
1 Press DIRECT SKIP during playback.
• The FILE LIST will appear.
2 Select a desired track using Arrow (▼/▲/▶/◀).
- Press ▶ when you want to go to the next hierarchy.
- Press ◀ when you want to go back to the previous hierarchy.
3 Press PLAY to start playing
NOTES:
- Press DIRECT SKIP to EXIT.
- Some selections may take a while to be recognized.
Random Playback
MP3
Press MODE twice while playback is stopped.
2 Press PLAY to play the tracks in random order.
Program
MP3
This feature allows you to program a mp3 disc to play in a desired sequence.
1 Press MODE during playback is stopped.
• The PROGRAM screen will appear.
2 Press ▲ or ▼ to select a track, then press ENTER, to save it in a program.
- Press CLEAR to erase the incorrect input.
3 Press PLAY to start programmed playback.
Audio Language
DVD-RWDVD
VR mode
The DVD player allows you to select a language during DVD disc (if multi language available) playback.
f Press AUDIO during playback.
2 Press AUDIO repeatedly to select your desired language.
NOTES:
- Pressing AUDIO cycles the sound mode through MAIN, SUB, MAIN + SUB.
- DVD-RW discs recorded in double sound (two languages) can be played back in either sound mode of MAIN, SUB or MAIN + SUB.
- The sound mode cannot be changed during playback of discs not recorded in double sound.
Stereo Sound Mode
CD
Press AUDIO repeatedly during playback to select between STEREO, L-CH or R-CH.
STEREO - both right and left channels are active (stereo)
L-CH - only left channel is active
R-CH - only right channel is active
NOTES:
- If the Virtual Surround setting is ON, the sound mode will be fixed to STEREO, and can not be changed.
- Stereo sound mode will not be changed when playing DTS CD.
Subtitle Language
DVD-RWDVD
B mode
The DVD player allows you to select a language for subtitle during DVD disc (if available) playback.
1 Press SUBTITLE during playback.
2 Press SUBTITLE repeatedly to select your desired subtitle language.
- The selected language will be displayed on the display bar at the top of the screen.
3 To turn off subtitles, press SUBTITLE repeatedly until OFF appears.
NOTES:
- Pressing AUDIO may not work on some DVDs with multiple audio languages (e.g. DVDs which allow audio language setting on the disc menu).
- Some discs allow audio language setting/subtitle language setting on the disc menu. (Operation varies between discs, so refer to the manual accompanying the disc.)
- If the desired language is not shown after pressing SUBTITLE several times, the disc does not have subtitles in that language.
- If you choose a Language that has a 3 letter language code, the code will be displayed every time you change the Subtitle language setting. If you choose any other languages, ‘---’ will be displayed instead. (Refer to page 15.)
Camera Angle
DVD
Some DVD discs contain scenes which have been shot simultaneously from various angles. You can change the camera angle when the ( on appears on the screen.
Press ANGLE during playback.
- The selected angle will be displayed on the display bar at the top of the screen.
2 Press ANGLE repeatedly to select your desired angle.
Changing the On-Screen Display
DVD-RWDVD
VB mode
You can check information about the current disc by pressing ONSCREEN on the remote control.
1 Press ONSCREEN during play-back to show current Chapter.
- The elapsed and remaining playing time of the current chapter will be displayed.

2 Press ONSCREEN again to show current Title.
- The elapsed and remaining playing time of the current title will be displayed.
3 Press ONSCREÉN again.
- The BIT RATE and the current repeat setting will be displayed. - If you are playing a dual layered disc, the layer number will also be displayed (L0: Layer 0 is playing. L1: Layer 1 is playing).
If you are playing a DVD-RW with setting the PLAYLIST, the following will also be displayed.
ORG: Playing the ORIGINAL PL: Playing the PLAYLIST.
4 Press ONSCREEN the fourth time to remove the display.
CD
Press ONSCREEN during playback, the current Track will be displayed on the TV screen.
- The elapsed and remaining playing time of the current track will be displayed.
2 Press ONSCREEN again to show current Total Track
- The elapsed and remaining playing time of the current total track will be displayed.
3 Press ONSCREEN again to remove the display.
PLAYING A DISC
Marker Setup Screen

DVD-RWCD
1 Press GAMMA/B.LEVEL during play-back.

Use markers to memorise your favourite places on a disc.
i Press MARKER during playback.
- The display screen and Markers will appear on the TV screen.
2 Press ◀ or ▶ to select 1, 2, 3, 4, 5, 6, 7, 8, 9, or 10 and ensure that “- : - - : - -” appears in the display.
3 When reaches the desired point, press ENTER.
- Selected number will turn to √d the point will be marked. - The Title or Track and elapsed playing time will appear in the TV screen.
4 To return to the Marker later, press MARKER during playback and ◀ or ▶ to choose the desired marker (one of the ▼ark), then press ENTER.
NOTES:
- Opening the disc tray or turning off the power or select AC (All Clear) at step 2 and press ENTER will erase all Markers.
- To clear a marker, using ◀ or ▶, position the cursor on to the marker number to be cleared and press CLEAR.
- You can mark up to 10 points.
5 Press MARKER or RETURN to exit.
Digital Gamma Setting

DVD-RWD
DVD the current setting appears.
ess ENTER to switch 1,2,3,OFF.
1,2,3: Makes the dark parts brighter.
OFF: Shows the original picture as recorded.
3 Press RETURN to exit.
Black Level Setting

DVD-RWDVD
VR mode
Adjust the Black Level Settings to make the black parts of the picture as bright as you preferred.
1 Press GAMMA/B.LEVEL twice during playback.
2 Press ENTER to switch ON/OFF
ON: Makes the dark parts brighter.
OFF: Shows the original picture as recorded.

3 Press GAMMA/B.LEVEL or RETURN to exit.
Virtual Surround
You can enjoy stereophonic visual space on your existing stereo system.

DVD-RWMP3CDI
VR mode
1 Press MODE during playback.
Press ENTER to set it 1(Natural effect), 2(Emphasized effect) or OFF.
3 Press MODE or RETURN to exit.
NOTE (for CD play only):
Virtual Surround will not be effective if the sound mode is set to something other than STEREO.
DVD SETUP
Audio Setting
Choose the appropriate Audio settings for your equipment as it only affect during the playback of DVD discs of the DVD player.
1 Press SETUP in STOP mode.
2 Press▶ to select 📋 (CUSTOM), then press ENTER.
- On screen menu will appear. 3 Press ◀ or ▶ to select 📂 (AUDIO), then ENTER to confirm.
4 Press ▲ or ▼ to select the below items, then press ENTER.
DRC (Dynamic Range Control) : • To compress the range of sound volume. • The default setting is OFF.

DOLBY DIGITAL :
Set to BITSTREAM when the player is connected to Dolby Digital Decoder.
(BITSTREAM : Output by Dolby Digital)
(DPCM : Convert the Dolby Digital to PCM)
• The default setting is ON.
- You can also adjust the setting from (QUICK) setup menu.
DTS : Set to BITSTREAM when the player is connected to DTS Decoder. (BITSTREAM : Output by DTS)
The default setting is OFF.
DOWN SAMPLING :
- Set to ON when outputting in 48kHz.
- Set to OFF when outputting in 96kHz.
• The default setting is ON.
NOTE:
- When you play a disc that has copyright protection, down sampling will be at 48 kHz, even if you set DOWN SAMPLING to OFF.
5 Press SETUP to exit.
Parental Control
Parental Control limits the disc viewing that exceed your settings. (with a password or playback will stop.)
This feature allows you to prevent discs with alternative scenes from being played by your children
PARENTAL LEVEL
Parental Level allows you to set the rating level of your DVD discs. Playback will stop if the disc's ratings exceed the level you set.
1 Press SETUP in STOP mode.
2 Press ▶ to select 📋 (CUSTOM), then press ENTER.
3 Press ◀ or ▶ to select
(PARENTAL), then press ENTER.
4 Enter your four-digit password then press ENTER.
5 Press ▲ or ▼ to select PARENTAL LEVEL, then press ENTER.
6 Press ▲ or ▼ to select the desired level. (ALL to LEVEL 1) • The rating levels continue on two menu screens. Press ▲ or ▼ to move to the next or previous screen to find the rating level.
7 Press SETUP to exit.
NOTES:
- When doing this for the first time, enter any 4 digits. (except for 4737) That number will be used as the password from the second time onward.
- To change the password, press ▲ or ▼ to select CHANGE at step 5, then press ENTER. Enter the four-digit pass-word, then press ENTER.
- With some DVDs, it may be difficult to find if they are compatible with parental lock. Be sure to check if the parental lock function operates in the way that you have set.
• Record the password in case you forget it.
1 Press 4, 7, 3, 7 at step 4 in the PARENTAL LEVEL section.
• Password will be cleared and parental level will be set to ALL.
② Proceed the above steps 4 -7 gain to set parental level.
PARENTAL CONTROL LEVELS
- ALL All parental lock is cancelled.
- Level 8 DVD software of any grade (adult/general/children) can be played back.
• Levels 7 to 2 Only DVD software intended for general use and children can be played back - Level 1 Only DVD software intended for children can be played back, with those intended for adult and general use prohibited.
EN
DVD SETUP
Display Setting
You can change certain aspects of the DVD display screens, on-screen messages and the display panel on the front of the DVD player.
1 Press SETUP in STOP mode.
2 Press ▶ to select 📋 (CUSTOM), then press ENTER.
- On screen menu will appear.
3 Press ◀ or ▶ to select ☐ (DISPLAY), then ENTER to confirm.
4 Press ▲ or ▼ to select the below items, then press ENTER.

TV ASPECT : ☐
- Press ▲ or ▼ for an item selection, then press ENTER.
- Select 4:3 LETTER BOX for a black bars appears on top and bottom of the screen.
- Select 4:3 PAN & SCAN for a full height picture with both sides trimmed.
- Select 16:9 WIDE if a wide-screen TV is connected to the DVD player.
• The default setting is 4:3 LETTER BOX. - You can also adjust the setting from (QUICK) setup menu.
PANEL DISPLAY :
- Press ▲ or ▼ for an item select BRIGHT, DIMMER and AUTO, then press ENTER.
- This adjust the brightness of the display panel with the factory default BRIGHT.
- When AUTO is selected, the display dims only during playback.
NOTE:
- You can change the PANEL DISPLAY setting (BRIGHT or DIMMER) by pressing DIMMER on the remote control.
ANGLE ICON :
- Press ENTER repeatedly to turn Angle icon ON or OFF. - The default setting is ON.
AUTO POWER OFF :
- Press ENTER repeatedly to turn Auto Power off ON or OFF.
- The default setting is ON and it will turn the DVD player to off automatically after 35 minutes of no use.
5 Press SETUP to exit.
| Language | Code | Language | Code |
| A-B | Frisian | 5271 | |
| Abkhazian 4748 | Galician | 5358 | |
| Afar 4747 | Georgian | 5747 | |
| Afrikaans 4752 | German [GER] | 5051 | |
| Albanian 6563 | Greek [GRE] | 5158 | |
| Amharic | 4759 | Greenlandic | 5758 |
| Arabic | 4764 | Guarani | 5360 |
| Armenian | 5471 | Gujarati | 5367 |
| Assamese 4765 | Hausa | 5447 | |
| Aymara | 4771 | Hebrew | 5569 |
| Azerbaijani | 4772 | Hindi | 5455 |
| Bashklr | 4847 | Hungarian [HUN] | 5467 |
| Basque | 5167 | I-K | |
| Bengall;Bangla | 4860 | Icelandic [ICE] | 5565 |
| Bhutani | 5072 | Indonesian | 5560 |
| Bihari | 4854 | Interlingua 5547 | |
| Bislama | 4855 | Interlinguo 5551 | |
| Breton | 4864 | Inupiak | 5557 |
| Bulgarian | 4853 | Irish [IRI] | 5347 |
| Burmese | 5971 | Italian [ITA] | 5566 |
| Byelorussian | 4851 | Japanese [JPN] | 5647 |
| C-E | Javanese | 5669 | |
| Cambodian | 5759 | Kannada | 5760 |
| Catalan | 4947 | Kashmiri 5765 | |
| Chinese [CHI] | 7254 | Kazakh | 5757 |
| Corsican | 4961 | Kinyarwanda | 6469 |
| Croatian | 5464 | Kirghiz | 5771 |
| Czech | 4965 | Kirundi | 6460 |
| Danish [DAN] | 5047 | Korean [KOR] | 5761 |
| Dutch [DUT] | 6058 | Kurdish | 5767 |
| English [ENG] | 5160 | L-N | |
| Esperanto | 5161 | Laothian | 5861 |
| Estonian 5166 | Latin | 5847 | |
| F-H | Latvian; Lettish | 5868 | |
| Faroese | 5261 | Lingala | 5860 |
| Fiji | 5256 | Lithuanian | 5866 |
| Finnish [FIN] | 5255 | Macedonian | 5957 |
| French [FRE] | 5264 | Malagasy | 5953 |
NOTES:
- Be sure to press the SETUP button, or the setting will not work.
- You can also choose the item by pressing the numbers.
Language Setting
Language options are not available with some discs.
1 Press SETUP in STOP mode.
2 Press ▶ to select 📋, then press ENTER. • On screen menu will appear.
3 Press ◀ or ▶ to select 📄 (LAN-GUAGE), then ENTER to confirm.
4 Press ▲ or ▼ to select the below items, then press ENTER.
AUDIO :
- Sets the audio language.
SUBTITLE :
- Sets the subtitle language.
DISC MENU :
- Sets the language for DVD Menu.
PLAYER MENU : ☐
- Sets the language for the On-Screen display.
- You can also change the setting from [EQUICK) setup menu.
5 Press ▲ or ▼ to select a setting, then press ENTER.
- If OTHER is selected in the AUDIO, SUBTITLE or DISC MENU screen, press four-digit number to enter the code for the desired language. (Refer to the language code list below).
- Only the languages supported by the disc can be selected.
6 Press SETUP to exit.
NOTE:
- Language Setting for Audio and Subtitle is not available with some discs. Then use AUDIO and SUBTITLE. Details are on page 13.
| Language | Code | Language | Code |
| Malay | 5965 | Somali | 6561 |
| Malayalam | 5958 | Spanish [SPA] | 5165 |
| Maltese | 5966 | Sundanese | 6567 |
| Maori | 5955 | Swahili | 6569 |
| Marathi | 5964 | Swedish [SWE] | 6568 |
| Moldavian | 5961 | T | |
| Mongolian | 5960 | Tagalog | 6658 |
| Nauru | 6047 | Tajik | 6653 |
| Nepali | 6051 | Tamil | 6647 |
| Norwegian [NOR] | 6061 | Tatar | 6666 |
| O-R | Telugu | 6651 | |
| Occitan | 6149 | Thai | 6654 |
| Oriya | 6164 | Tibetan | 4861 |
| Oromo(Afan) | 6159 | Tigrinya | 6655 |
| Panjabi | 6247 | Tonga | 6661 |
| Pashto;Pushto | 6265 | Tsonga | 6665 |
| Persian | 5247 | Turkish [TUR] | 6664 |
| Polish | 6258 | Turkmen | 6657 |
| Portuguese [POR] | 6266 | Twi | 6669 |
| Quechua | 6367 | U-Z | |
| Rhaeto-Romance | 6459 | Ukrainian | 6757 |
| Romanian [RUM] | 6461 | Urdu | 6764 |
| Russian [RUS] | 6467 | Uzbek | 6772 |
| S | Vietnamese | 6855 | |
| Samoan | 6559 | Volapuk | 6861 |
| Sangho | 6553 | Welsh | 4971 |
| Sanskrit | 6547 | Wolof | 6961 |
| Scots Gaelic | 5350 | Xhosa | 7054 |
| Serbian | 6564 | Yiddish | 5655 |
| Serbo-Croatian | 6554 | Yoruba | 7161 |
| Sesotho | 6566 | Zulu | 7267 |
| Setswana | 6660 | ||
| Shona | 6560 | ||
| Sindhi | 6550 | ||
| Singhalese | 6555 | ||
| Siswat | 6565 | ||
| Slovak | 6557 | ||
| Slovenian | 6558 | ||
If you choose a Language that has a 3 letter language code, the code will be displayed every time you change the Audio or Subtitle language setting on page 13. If you choose any other languages, ‘---’ will be displayed instead. (3 letter language code is written in bracket.)
TROUBLESHOOTING GUIDE
If the DVD player does not perform properly when operated as instructed in this Operation Manual, check the player, consulting the following checklist.
Problem Solution
No power –Check if the AC power cord is properly connected.
No picture –Check if the TV is switched on.
—Check the video connection.
Distorted picture – Sometimes a small amount of picture distortion may appear.
This is not a malfunction.
Completely distorted picture or -Connect DVD player directly to the TV.
black/white picture with DVD –Make sure the disc is compatible with the DVD player.
No sound or distorted sound –Adjust the volume.
—Check that the speakers are connected correctly.
No audio at digital output –Check the digital connections.
-Check if the audio format of the selected audio language matches your receiver capabilities.
No DTS audio at analogue output. –Use a DIGITAL AUDIO OUT jack when outputting the DTS audio.
No sound and picture -Check that the VIDEO/AUDIO
device (See Connecting to a TV).
-Check if the INTERLACE/PROGRESSIVE SCAN SELECTOR is set correctly according to your TV.
Picture freezes momentarily –Check the disc for fingerprints/scratches and
during playback
clean with a soft cloth wiping from center to edge.
Disc can't be played
—Ensure the disc label is facing up.
—Check if the disc is defective by trying another disc.
No return to start-up screen when disc is removed
-Reset the player by switching the player off, then on again.
The player does not respond to
—Aim the remote control directly at the sensor on the front of the player.
the remote control
—Reduce the distance to the player.
-Replace the batteries in the remote control.
-Re-insert the batteries with their polarities (+/- signs) as indicated.
Buttons do not work or player stops responding
-To completely reset the player, unplug the AC cord from the AC outlet for 5-10 seconds.
Player does not respond to some –Operations may not be permitted by the disc.
operating commands during playback.
Refer to the instructions of the disc.
DVD player cannot read
-Use a commonly available cleaning CD/DVD to clean the lens before sending the DVD player for repair.
CDs/DVDs
NOTES:
Some functions are not available in specific modes, but this is not a malfunction. Read the description in this Operation Manual for details on correct operations.
- Playback from a desired track and random playback are not available during program playback.
SPECIFICATIONS
OUTPUT SIGNAL FORMAT
NTSC color
POWER SOURCE
120 V AC +/- 10%, 60 Hz +/- 0.5%
POWER CONSUMPTION
11 W (standby: 0.3W)
Approx 4.0lbs. (1.8kg)
- Designs and specifications are subject to change without notice.
- If there is a discrepancy between languages, the default language will be English.
MAINTENANCE
Cleaning the Cabinet
- Use a soft cloth slightly moistened with a mild detergent solution. Do not use a solution containing alcohol, spirits, ammonia or abrasives.
Cleaning Discs
- When a disc becomes dirty, clean it with a cleaning cloth. Wipe the disc from the center out. Do not wipe in a circular motion.
- Do not use solvents such as benzine, thinner, commercially available cleaners, detergent, abrasive cleaning agents or antistatic spray intended for analogue records.
Cleaning the disc lens
- If the player still does not perform properly when it is operated while referring to the relevant sections and to "TROUBLESHOOTING GUIDE" in this Operation Manual, the laser optical pickup unit may be dirty. Consult your dealer or an Authorized Service Center for inspection and cleaning of the laser optical pickup unit.
Disc Handling
- Use discs which have the following logos on them. (Optical audio digital discs.)


- Handle the discs so that fingerprints and dust do not adhere to the surfaces of the discs.
• Always store the disc in its protective case when it is not used.
SERVICE INFORMATION (For the U.S.)
For the location of the nearest Sharp Authorized Service Center, or to obtain product literature, accessories, supplies or customer assistance, please call 1-800-BE-SHARP (1-800-237-4277) or visit SHARP's website (http://www.sharpusa.com).
Make your contribution to the environment!!!
• Used up batteries do not belong in the dust bin.
- You can dispose of them at a collection point for used up batteries or special waste. Contact your council for details.

(Valid for warranty service in the U.S. only)
CONSUMER LIMITED WARRANTY
SHARP ELECTRONICS CORPORATION warrants to the first consumer purchaser that this Sharp brand product (the "Product"), when shipped in its original container, will be free from defective workmanship and materials, and agrees that it will, at its option, either repair the defect or replace the defective Product or part thereof with a new or remanufactured equivalent at no charge to the purchaser for parts or labor for the period(s) set forth below.
This warranty does not apply to any appearance items of the Product nor to the additional excluded item(s) set forth below nor to any Product the exterior of which has been damaged or defaced, which has been subjected to improper voltage or other misuse, abnormal service or handling, or which has been altered or modified in design or construction.
In order to enforce the rights under this limited warranty, the purchaser should follow the steps set forth below and provide proof of purchase to the servicer.
The limited warranty described herein is in addition to whatever implied warranties may be granted to purchasers by law. ALL IMPLIED WARRANTIES INCLUDING THE WARRANTIES OF MERCHANTABILITY AND FITNESS FOR USE ARE LIMITED TO THE PERIOD(S) FROM THE DATE OF PURCHASE SET FORTH BELOW. Some states do not allow limitations on how long an implied warranty lasts, so the above limitation may not apply to you.
Neither the sales personnel of the seller nor any other person is authorized to make any warranties other than those described herein, or to extend the duration of any warranties beyond the time period described herein on behalf of Sharp.
The warranties described herein shall be the sole and exclusive warranties granted by Sharp and shall be the sole and exclusive remedy available to the purchaser. Correction of defects, in the manner and for the period of time described herein, shall constitute complete fulfillment of all liabilities and responsibilities of Sharp to the purchaser with respect to the Product, and shall constitute full satisfaction of all claims, whether based on contract, negligence, strict liability or otherwise. In no event shall Sharp be liable, or in any way responsible, for any damages or defects in the Product which were caused by repairs or attempted repairs performed by anyone other than an authorized servicer. Nor shall Sharp be liable or in any way responsible for any incidental or consequential economic or property damage. Some states do not allow the exclusion of incidental or consequential damages, so the above exclusion may not apply to you.
THIS WARRANTY GIVES YOU SPECIFIC LEGAL RIGHTS. YOU MAY ALSO HAVE OTHER RIGHTS WHICH VARY FROM STATE TO STATE.
Model Specific Section
| Your Product Model Number & Description: | DV-SL20U DVD Video Player(Be sure to have this information available when you need service for your Product.) |
| Warranty Period for this Product: | One (1) year parts and ninety (90) days labor from date of purchase. |
| Additional Item(s) Excluded from Warranty Coverage (if any): | Non-rechargeable batteries. |
| Where to Obtain Service: | Call Sharp Electronics corporation toll free at 1-800-BE-SHARP for instructions on how to obtain service on your DVD player. |
| ____:What to do to Obtain Service product, prepaid, as per the instruction given by the Share representative at the toll free number (1-800-BE-SHARP). BE sure to have your proof of purchase available. Be sure to ship the product is securely packaged and insured against shipping damage. | |
TO OBTAIN SUPPLY, ACCESSORY OR PRODUCT INFORMATION, GO TO OUR WEBSITE AT www.sharpusa.com OR CALL 1-800-BE-SHARP.
SHARP®
SHARP ELECTRONICS CORPORATION
Sharp Plaza, Mahwah, New Jersey 07430-2135
SHARP CORPORATION
Osaka, Japan
Printed in China
Impreso en China
- WARNING: TO REDUCE THE RISK OF FIRE OR ELECTRIC SHOCK, DO NOT EXPOSE THIS APPLIANCE TO RAIN OR MOISTURE.
- CAUTION
- RISK OF ELECTRIC SHOCK DO NOT OPEN
- CAUTION:
- “WARNING—FCC Regulations state that any unauthorized changes or modifications to this equipment not expressly approved by the manufacturer could void the user’s authority to operate this equipment.”
- INFORMATION
- IMPORTANT SAFEGUARDS
- Service
- Copy Protection
- Recommended Measures for Optimum Picture Excellence
- Warning of Dew Formation
- Others
- FEATURES
- TABLE OF CONTENTS
- INDICE
- Symbols Used in this Manual
- DVD
- CD
- MP3
- DVD-RW
- 目(QUICK)
- Supplied Accessories
- ABOUT THE DISCS
- playable Discs
- NOTE:
- Disc Types
- [DVD]
- [Audio CD]
- [MP3]
- Selecting Progressive Scan (480p or Interlaced 480i) Playback
- What is Progressive Scanning?
- FUNCTIONAL OVERVIEW
- FRONT PANEL
- REAR VIEW
- REMOTE CONTROL
- NOTES
- HOOK UPS
- Connecting to a TV using a VIDEO OUT Jack or a S-VIDEO OUT Jack
- NOTES:
- Connecting to an Amplifier Equipped with Digital Input Jacks such as MD deck or DAT deck
- Connecting to a Dolby Digital decoder or DTS decoder
- Connecting to a TV or a Stereo TV that has Component VIDEO In Jacks
- HOW TO CONNECT TO A TV WITHOUT AUDIO/VIDEO INPUT JACKS
- NOTE
- PLAYING A DISC
- Basic Playback
- DVD-RWCDDVD
- Getting started
- Press POWER.
- General Features
- Pause
- DVD-RWN
- Disc Menus
- Title Menu
- CALLING UP A MENU SCREEN DURING PLAYBACK
- Step by Step Playback
- DVD-RWDVD
- Resume / Stop
- CDDVD
- Playing the disc recorded in VR mode (Video Recording format)
- Fast Forward / Reverse Search
- Slow Forward / Slow Reverse
- DVD-RWDVD Title / Chapter Search
- Zoom
- DVD-RWDVD Time Search
- Track
- Using the Numerical buttons
- Using the DIRECT SKIP.
- Repeat
- REPEAT TITLE / CHAPTER
- REPEAT TRACK
- A-B REPEAT
- Program
- Random Playback
- MP3 Playback
- On-Screen Information
- Track Selection
- Audio Language
- Stereo Sound Mode
- Subtitle Language
- Camera Angle
- Changing the On-Screen Display
- Marker Setup Screen
- DVD-RWCD
- Digital Gamma Setting
- DVD-RWD
- Black Level Setting
- Virtual Surround
- DVD-RWMP3CDI
- DVD SETUP
- Audio Setting
- Parental Control
- PARENTAL LEVEL
- PARENTAL CONTROL LEVELS
- Display Setting
- TV ASPECT : ☐
- PANEL DISPLAY :
- ANGLE ICON :
- AUTO POWER OFF :
- Press SETUP to exit.
- Language Setting
- AUDIO :
- SUBTITLE :
- DISC MENU :
- PLAYER MENU : ☐
- Press SETUP to exit.
- TROUBLESHOOTING GUIDE
- SPECIFICATIONS
- OUTPUT SIGNAL FORMAT
- POWER SOURCE
- POWER CONSUMPTION
- MAINTENANCE
- Cleaning the Cabinet
- Cleaning Discs
- Cleaning the disc lens
- Disc Handling
- SERVICE INFORMATION (For the U.S.)
- Make your contribution to the environment!!!
- CONSUMER LIMITED WARRANTY
- SHARP®
- SHARP ELECTRONICS CORPORATION
- SHARP CORPORATION
Brand : SHARP
Model : DV-SL20U
Category : DVD player