OVR 100 - Vacuum Cleaner OK - Free user manual and instructions
Find the device manual for free OVR 100 OK in PDF.

| Product Type | Upright Vacuum Cleaner |
| Brand | OK |
| Model | OVR 100 |
| Dimensions (L x W x H) | 29 x 25 x 112 cm |
| Weight | 4.5 kg |
| Power Supply | AC 220-240V, 50/60Hz |
| Power Consumption | 1200 W |
| Dust Capacity | 2.0 L (bagged) |
| Filtration System | HEPA washable filter |
| Cord Length | 6 m |
| Cleaning Radius | 9 m |
| Noise Level | 75 dB |
| Functions | Carpet & hard floor, crevice tool, upholstery brush |
| Bag Replacement | Every 3 months or when full indicator lights |
| Filter Cleaning | Rinse with water every 3 months, dry 24h |
| Safety Features | Thermal overload protection, child lock on handle |
| Spare Parts Available | Dust bags, filters, belt, brush roll |
| Repairability Index | 7.0 / 10 |
| Manual Language | English (PDF download) |
Frequently Asked Questions - OVR 100 OK
User questions about OVR 100 OK
0 question about this device. Answer the ones you know or ask your own.
Ask a new question about this device
Download the instructions for your Vacuum Cleaner in PDF format for free! Find your manual OVR 100 - OK and take your electronic device back in hand. On this page are published all the documents necessary for the use of your device. OVR 100 by OK.
USER MANUAL OVR 100 OK
natural_image
Black handheld vacuum cleaner with visible ports and label 'OK' (no text or symbols on device body)| DE | OBRASUCHSANWEISUNG | 1 | IT | NARUALE DELL'UTENTE | 32 |
| EL | OMITICE XPHIDZ | 7 | NL | GEBRIKSAANMUZING | 37 |
| EN | USER MANUAL | 12 | PL | INSTRUCIA OBSLUGI | 42 |
| ES | MANUAL DE INSTRUCCIONES | 17 | PT | NARUAL DE UTILIZAZION | 47 |
| FR | WORK & EMPLOYE | 22 | RV | BRUKSAVVISNING | 52 |
| HJ | PROVASZNAŁÓ KIEZNÓWY | 27 | TR | KULLANIM KILAVUZU | 57 |

DE
2
Thanks for your purchase of this ok. product.
IMPORTANT SAFETY INSTRUCTIONS. READ CAREFULLY AND KEEP FOR FUTURE REFERENCE.
- This appliance can be used by children aged from 8 years and above and persons with reduced physical, sensory or mental capabilities or lack of experience and knowledge if they have been given supervision or instruction concerning use of the appliance in a safe way and understand the hazards involved.
- Children shall not play with the appliance.
- Cleaning and user maintenance shall not be made by children without supervision. Keep the appliance and its cord out of reach of children less than 8 years.
- Danger of electric shock! Do not attempt to repair the appliance yourself. In case of malfunction, repairs are to be conducted by qualified personnel only.
s. Caution! Do not vacuum flammable materials. Do not vacuum burning materials or hot ashes. - Warning! During cleaning or operation do not immerse the electrical parts of the appliance in water or other liquids. Never hold the appliance under running water.
- Disconnect the charging adaptor from the electrical outlet when not in use and before cleaning.
- Regularly check the charging adaptor and power cord for damage. If the supply cord is damaged, it must be replaced by the manufacturer, its service agent or similarly qualified persons in order to avoid a danger or injury.
- Caution! Keep pets and bystanders away from the vacuum openings! Do not use on people or pets! Risk of injury!
- After wet vacuuming, always dry the appliance and all accessory parts.
- Switch off appliance immediately if foam or liquid exits the appliance.
- Do not use the vacuum cleaner when it is being charged.
- During use keep the appliance away from eyes and hair.
- Do not expose the appliance to the direct sunlight or other heat sources, especially when it is being charged.
- The appliance is only to be used with the charging adaptor provided with the appliance.
13
EN
- Observe all safety instructions to avoid damage through improper use! Follow all safety warnings on the appliance and in this instruction manual.
- Keep this instruction manual for future use. Should this appliance be passed on to a third party, then this instruction manual must be included.
- No liability will be accepted for damage resulting from improper use or non-compliance with these instructions.
- Only use this appliance for its intended use. The appliance is not suitable for commercial use. This appliance is only suitable for indoor and household use.
- Before connecting the appliance to the power supply, check that the power supply voltage and current rating corresponds with the power supply details shown on the appliance rating label.
- Never use a damaged appliance! Disconnect the appliance from the electrical outlet and contact your supplier if it is damaged.
- To avoid damaging to the power cord, do not squeeze, bend or rub it on sharp edges. Keep it away from hot surfaces and open flames as well.
- Place the cord in such a way that no unintentional pulling or tripping over it is possible. Keep the appliance and its cord out of reach of children.
- Do not operate the appliance with wet hands or while standing on a wet floor. Do not touch the charging adaptor with wet hands.
- Do not open the appliance casing under any circumstances. Do not insert any foreign objects into the inside of the casing.
- Never use accessories which are not recommended by the manufacturer. They could present a safety risk to the user and might damage the appliance. Only use original parts and accessories.
- Do not place objects with open flames, e.g. candles, beside the appliance. Do not place objects filled with water, e.g. vases, near the appliance.
- Keep the appliance away from any hot surfaces and open flames. Protect the appliance against heat and cold, dust, direct sunlight, moisture, dripping and splashing water.
- Connect the charging adaptor to an easily reachable electrical outlet so that in case of an emergency the appliance can be unplugged immediately. Pull the charging adaptor out of the electrical outlet to completely switch off the appliance. Use the charging adaptor as the disconnection device.
- Do not leave the appliance unattended, if it is in use or the charging adaptor is connected to an electrical outlet.
- Remove any blockage before using the appliance again.
- Do not store or use the appliance close to heat sources.
- Only use the accessories provided with the appliance.
- Caution! Always unplug the appliance before assembling, checking, changing or removing accessories!
- Prior to vacuuming, remove pointy, sharp or large items to avoid damage of the appliance.
- Never use the vacuum cleaner without the filter in place!
EN
14
INTENDED USE
This appliance is intended to vacuuming dust and small quantities of water.
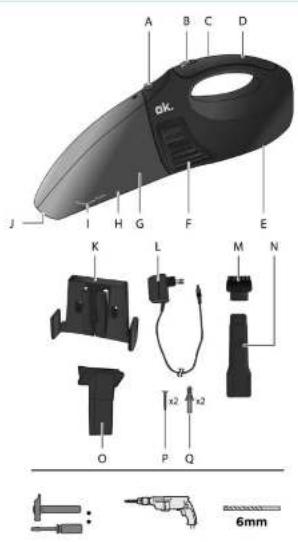
COMPONENTS
Fold out front and rear page for product illustrations.
A. Dust container release button
B. On/off switch O/I
C. Indicator light
D. Handle
E. Charging socket
F. Air outlet
G. Dust filter
H. Dust container
- MAX water level marking
J. Nozzle opening
K. Wall mount bracket with recharging socket
L. Charging adaptor
M.Brush
N. Crevice tool
O. Rubber saqueegee
P. Screw (x2)
Q. Dowel (x2)
The product may be available in different colours.
BEFORE FIRST TIME USE
- Remove all packaging materials.
- Check for completeness and transport damage. In case of damages or incomplete delivery please contact your dealer.
• Clean the appliance (→ Cleaning and care).
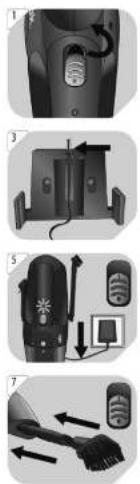
1 Note: Remove the stopper at the switch.
WALL MOUNT INSTALLATION
- Preparation: Find a suitable mounting location, within sufficient reach to a wall outlet.
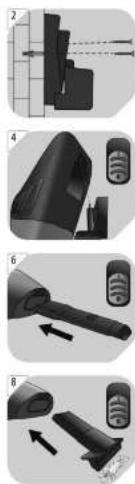
2 Place the wall mount bracket against the wall. Use a pencil to mark the position of the holes. Drill the hole as marked. Insert the dowels into the hole.
CAUTION! Do not drill into electric cables or water pipes. Use a pipe finder.
Place the wall mount bracket on to the wall, use the screws to secure the position.
3 Insert the charging adaptor into the wall mount bracket.
CHARGING THE BUILT-IN BATTERY
• Note: Charge the built-in battery before the first use. Charge the appliance at room temperature.
4 Slide the vacuum cleaner gently onto the wall mount bracket to insert the adaptor plug into the charging socket.
CAUTION!
• Do not use the vacuum cleaner whilst it is being charged.
- If the vacuum cleaner is not in use for a long time, the battery discharge on its own. Charge the battery at least monthly. For a longer battery life, it is advised to recharge the battery when the battery is almost flat or the suction power is too weak.
5 Set the on/off switch to the O position.
Connect the adaptor to a suitable wall outlet. The built-in battery is being charged now. The indicator is always on when charging.
- For the first time, charge the vacuum cleaner for at least 14 hours. The general charging time is about 3 - 6 hours which also depends on the condition of the battery.
- When the battery is fully charged, the vacuum cleaner can be used for 8 to 10 minutes. The time may vary (depending on the battery condition).
Note: Crevice tool, brush and rubber squeegee can be attached onto the bracket when not in use.
15
EN
OPERATION
Vacuuming methods
| Method | Tool | Usage |
| Dry vacuuming | Without the crevice tool.With the crevice tool.With the crevice tool and the additional brush. | For dry dirt.For cleaning crevices, small corners and slots.For cleaning upholstery and cushions. |
| Wet vacuuming | Without the rubber squeegee.With the rubber squeegee. | For damp dirt.For small amounts of liquid. |
| Note: The maximum amount of liquid is indicated by MAX. | ||
Attaching the crevice tool
6 Set the on/off switch to the O position.
Insert the crevice tool and slightly push it to lock it in place.
Attaching the additional brush
7 Set the on/off switch to the O position.
Insert the crevice tool and slightly push it to lock it in place.
Insert the brush into the opening of the crevice tool.
Attaching the rubber squeegee
8 Set the on/off switch to the O position.
Insert the rubber squeegee into the nozzle opening.
Switching on/off
9 Switching on: Set the on/off switch to the I position. Switching off: Set the on/off switch to the O position
10 Never cover the air outlet during operation.
- HINT: If, after switching off, dust falls out of the appliance, it indicates that the dust container is full and needs to be emptied (→ Cleaning and care).
TROUBLESHOOTING
| Problem | Cause | Solution |
| The vacuum cleaner does not work or only works for a short time. | The built-in battery is empty or not fully charged.The dust container is full. | Charge the battery(→ Charging the built-in battery).Empty the dust container. |
| The vacuum cleaner is connected to the adaptor, but the battery is not charged. | The charging adaptor is not connected to the mains supply.The on/off switch is set to the I position. | Connect the charging adaptor to a suitable power outlet.Slide the on/off switch to the O position. |
| The suction power decreases or the motor vibrates. | The nozzle opening is blocked.The filter is blocked by fine dust.The dust compartment is full | Check the nozzle opening or clean the filter.Empty the dust compartment |
EN
16
CLEANING AND CARE
• Clean the appliance after each use.
- Disconnect the charging adaptor from the charging socket. Set the on/off switch to the O position.
• Use a damp cloth and a mild cleaning agent to clean the surfaces of the vacuum cleaner.
- Do not use aggressive or abrasive cleaning agents, petrol, solvents, chemically treated cloths or other cleaning agents. These can damage the casing.
Cleaning the dust container/filter
11 Empty the dust container...
→ after every use,
→ when vacuumed liquids have reached the MAX marking.
→ before storing.
12 Press the dust container release button to release the dust container.
13 Remove the dust container.
14 Remove the dust filter from the dust container.
15 Hold the dust filter over a bin and shake out the dry dirt. Rinse the dust filter with fresh water. Hold the dust container over a bin and shake out the dry dirt or pour out the water. Then rinse the dust container with fresh water.
16 CAUTION! Never immerse the motor unit into water or any other liquid.
• Dry all the parts after cleaning.
- When dry, re-attach the dust filter and dust container.
- Store the appliance in a dry place away from moisture and direct sunlight and inaccessible to children.
- Never use the vacuum cleaner without the dust filter installed.
- Clean or change the dust filter regularly to achieve best performance.
SPECIFICATIONS
Vacuum cleaner
| Operating voltage | : | 7.2 V ——, Ni-MH battery |
| Dust container capacity | : | 0.5 litres |
| Water capacity | : | 65 ml |
| IP protection class | : | IPX4, splash-proof |
Charging adaptor
| Input | : | 230 V~50 Hz |
| Output | : | 9 V=, 250 mA |
| Protection class | : | Class II |
DISPOSAL
| The crossed-out wheeled bin logo requires the separate collection of waste electric and electronic equipment (WEEE). Electric and electronic equipment may contain dangerous and hazardous substances. Do not dispose of this appliance as unsorted municipal waste. Return it to a designated collection point for the recycling of WEEE. By doing so, you will help to conserve resources and protect the environment. Contact your retailer or local authorities for more information. |
Do not dispose of in the household waste, as the appliance contains a built-in battery.
17
ES