721-344 - Brush cutter Meec Tools - Free user manual and instructions
Find the device manual for free 721-344 Meec Tools in PDF.


| Product Type | Brush cutter |
| Brand | Meec Tools |
| Model | 721-344 |
| Engine Displacement | 25.4 cm³ |
| Power Output | 0.75 kW |
| Max Speed (unloaded) | 9,000 rpm |
| Idle Speed | 3,100 ± 400 rpm |
| Fuel Mixture Ratio | 1:40 (petrol:2-stroke oil) |
| Fuel Tank Capacity | 0.65 L |
| Spark Plug Type | L8RTF |
| Sound Pressure Level (LpA) | 89.5 dB(A), K=3 dB(A) |
| Sound Power Level (LwA) | 107.4 dB(A), K=3 dB(A) |
| Guaranteed Sound Power Level | 112 dB(A) |
| Vibration Level | 3.72 m/s², K=1.5 m/s² |
| Weight | 5.0 kg |
| Cutting Attachment | Trimmer head with synthetic line (no metal blades) |
| Safety Features | Throttle lockout, vibration damping system, quick-release harness, trimmer guard |
| Personal Protective Equipment Required | Hearing protection, eye protection, gloves, safety shoes, long pants |
| Maintenance Interval (Air Filter) | Clean every 25 hours of operation |
| Spark Plug Gap | 0.6–0.7 mm |
| Compliance | CE, Machinery Directive 2006/42/EC, EMC 2004/108/EC, Outdoor Noise 2000/14/EC |
Frequently Asked Questions - 721-344 Meec Tools
User questions about 721-344 Meec Tools
0 question about this device. Answer the ones you know or ask your own.
Ask a new question about this device
Download the instructions for your Brush cutter in PDF format for free! Find your manual 721-344 - Meec Tools and take your electronic device back in hand. On this page are published all the documents necessary for the use of your device. 721-344 by Meec Tools.
USER MANUAL 721-344 Meec Tools
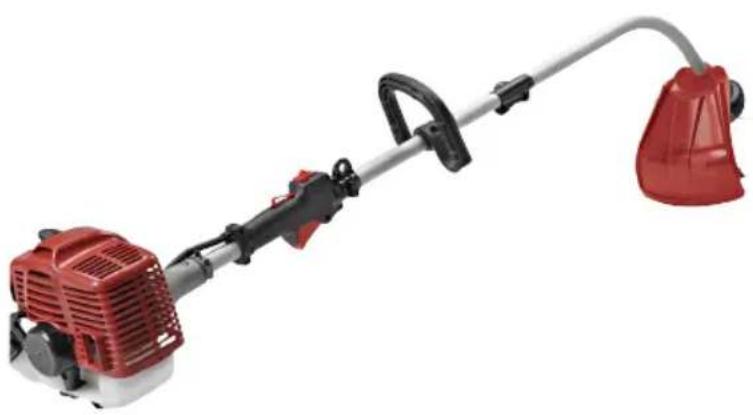
natural_image
Red manual lawn brush tool with attached hose and spray can (no text or symbols visible)EN User instructions for grass trimmer
SE - Bruksanvisning i original
NO - Bruksanvisning i original
EN - Operating instructions in original
Date of production: 2015-01-29
© Jula AB
SVENSKA....5
SÄKERHETSANVISNINGAR....5
PERSONLIG SKYDDSUTRUSTNING....6
ALLMÄNNA ARBETSINSTRUKTIONER....17
SAFETY INSTRUCTIONS....63
PERSONAL PROTECTIVE EQUIPMENT 64
Basic safety rules 64
THE MACHINE'S SAFETY EQUIPMENT 65
Handling fuel 67
Symbols on the machine 67
TECHNICAL DATA....69
DESCRIPTION 70
INSTALLATION 71
OPERATION....72
USE 73
GENERAL WORKING INSTRUCTIONS 76
Grass trimming with a trimmer head 76
MAINTENANCE 77
Maintenance schedule....79
TROUBLESHOOTING 80
SÄKERHETSANVISNINGAR
natural_image
Four-panel technical illustration of mechanical assembly, showing progressive assembly steps with arrows indicating motion (no text or symbols)natural_image
Technical diagram of a mechanical assembly with labeled components and directional arrows (no readable text or symbols)Rengör luftfiltret
natural_image
Technical illustration of a mechanical assembly with labeled components (no text or symbols)natural_image
Technical line drawing of a mechanical assembly with a belt and clamped component (no text or symbols)Tändstift
- Trimmerhode
- Låsemutter
- Klingeskjerm
- Fremre stang
- Låsestift
- Låseknott
- Kobling
- Fremre håndtak
- Strømbryter
- Gassregulatorsperre
- Låseknapp for gassregulator
- Bakre håndtak
- Bakre stang
- Tennplugg
- Motor
- Starthåndtak
- Drivstofftank
- Chokeregulator
- Drivstoffpumpe
- Filterdeksel
- Gassregulering
MONTERING
natural_image
Four-panel technical illustration of a mechanical assembly with directional arrows indicating motion (no text or symbols)natural_image
Technical diagram of a mechanical assembly with labeled component T and rotation arrow (no readable text or symbols)natural_image
Technical illustration of a mechanical assembly with three components (no text or symbols visible)natural_image
Line drawing of a car's seatbelt mechanism (no text or symbols)Tennplugg
natural_image
Symbol of a trash bin with no visible text or labelsVerne om miljøet!
natural_image
Four-panel technical illustration of a mechanical assembly with directional arrows indicating motion (no text or symbols)natural_image
Technical diagram of a mechanical device with labeled components and directional arrows (no readable text or symbols)natural_image
Technical illustration of a mechanical assembly with labeled components (no text or symbols)natural_image
Line drawing of a car seatbelt mechanism (no text or symbols)Świeca zapłonowa
natural_image
Pure electrical circuit lines without any symbolsDBAJ O ŚRODOWISKO!
Read the operating instructions carefully before use!
Please retain for future reference.
IMPORTANT!
- The machine is only intended for trimming grass and clearing bushes.
- The only accessories which may be used with this power tool are the trimmer heads recommended by the retailer.
- Never use the machine if you are tired, if you are ill, if you have drunk alcohol, or if you are taking medication that could affect your vision, your judgement or your coordination.
- Wear personal protective equipment.
- Never use a machine that has been modified in any way from its original specification.
- Never use a machine that is faulty. Carry out the checks, maintenance and service instructions described in this manual. Some maintenance and service measures must be carried out by qualified service personnel.
- All guards, covers and handles must be fitted before starting the machine. Check that the spark plug cap and ignition lead are undamaged in order to avoid any risk of electric shock.
- Machine operators must ensure they keep both people and animals at a safe distance of at least 15 metres while working with the machine.
- Never allow children or people unfamiliar with these instructions to use the machine. Local laws can restrict the minimum age of the operator.
- Properly secure the machine during transportation to avoid fuel leakage, damage or personal injury.
- Clean and maintain the machine before placing into storage.
- Use of a transport cover for metal blades during transport and storage;
- Alert! national regulations (Occupational Safety and Health, environment) may be present, which can restrict the use of the machine;
- Daily inspect the machine before use and after dropping or other impacts to identify any significant defects;
- Keep a firm footing and balance during operation, and use the harness provided.
- Take frequent and adequate breaks during the working day to prevent damage from vibration and damage to the ears.
This machine produces an electromagnetic field during operation. This field may, under certain circumstances, affect active or non-active medical implants. To reduce the risk of serious injury or death, persons with medical implants should consult their doctor and the manufacturer of the medical implant before using the machine.
The exhaust gases emitted from engine contain dangerous carbon monoxide. Running an engine in an enclosed or badly ventilated area can result in death due to suffocation or carbon monoxide poisoning.
Prolonged exposure to vibrations can cause injuries and neurovascular disorders (also called "Raynaud's syndrome" or "white hand"), especially to people suffering from circulation disorders.
The symptoms can regard the hands, wrists and fingers and are shown through loss of sensitivity, torpor, itching, pain and discolouring of or structural changes to the skin. These effects can be worsened by low ambient temperatures and/or by gripping the handgrips excessively tightly. If the symptoms occur, the length of time the machine is used must be reduced and a doctor consulted.
PERSONAL PROTECTIVE EQUIPMENT
IMPORTANT!
- Approved protective equipment must be worn every time the machine is used. Personal protective equipment cannot eliminate the risk of injury but it will reduce the degree of injury if an accident does happen. Ask the retailer for help in choosing the right equipment.
- Pay attention to warning signals or warning calls when ear protection is being used. Always remove your hearing protection as soon as the engine stops.
- Wear hearing protection which provides sufficient noise reduction. Always wear approved eye protection.
- Gloves should be worn when required.
- Wear safety shoes with steel toes and non-slip soles.
- Wear clothes made of a strong fabric and avoid loose clothing that can catch on twigs and branches. Always wear heavy, long pants. Do not wear jewellery, shorts sandals or go barefoot. Tie up hair so it is above shoulder level.
BASIC SAFETY RULES
Look around you:
— To ensure that people, animals or other things cannot affect your control of the machine.
- To ensure that people, animals, etc., do not come into contact with the cutting attachment or loose objects that are thrown out by the cutting attachment.
- Do not use the machine unless you are able to call for help in the event of an accident.
- Inspect the working area. Remove all loose objects, such as stones, broken glass, nails, steel wire, string, etc. that could be thrown out or become wrapped around the cutting attachment.
- Do not use the machine in bad weather, such as dense fog, heavy rain, strong wind, intense cold, etc. Working in bad weather is tiring and often means increased risk.
- Make sure you can move and stand safely. Check the area around you for possible obstacles (roots, rocks, branches, ditches, etc.) in case you have to move suddenly. Take great care when working on sloping ground.
- Keep a good balance and a firm foothold.
• Always hold the machine with both hands. Hold the machine on the right side of your body.
- Keep the trimmer head below waist level.
- Switch off the engine before moving to another area.
- Never put the machine down with the engine running unless you have it in clear sight.
- It is not permitted for the operator of the machine or anyone else to attempt to remove the cut material while the engine is running or the trimmer head is rotating, as this can result in serious injury.
- Stop the engine and trimmer head before you remove material that has wound around the machine's shaft as otherwise there is a risk of injury.
- The gear drive can become hot during use and remain so for a while. You could get burnt if you touch it.
- Watch out for objects being ejected. Always wear approved eye protection. Never lean over the trimmer guard. Stones, rubbish, etc. can be thrown up towards the eyes and cause blindness or serious injury.
- Keep unauthorised persons at a distance. Children, animals, onlookers and helpers should be kept outside the safety zone of 15 m. Stop the machine immediately if anyone approaches.
Never swing the machine around without first checking behind you to make sure no one is within the safety zone.
THE MACHINE'S SAFETY EQUIPMENT
WARNING! Never use a machine with safety equipment that is not working. The machine's safety equipment must be checked and maintained according to the instructions in this section. If your machine fails any of these checks contact your service agent to get it repaired.
Vibration damping system
- Your machine is equipped with a vibration damping system that is designed to minimize vibration and make operation easier.
- Vibrations increase when using an incorrectly wound cord or a blunt or faulty blade (wrong type or incorrectly sharpened).
- The machine's vibration damping system reduces the transfer of vibration between the engine unit and the machine's handle.
- Check regularly that the vibration damping devices have not become cracked or damaged.
- Check that the vibration damping element is undamaged and securely attached.
The harness quick-release
There is an easily accessible quick-release alongside the suspension ring. This is a safety device to be used if the engine should begin to catch fire or in other situations where the operator needs to free themselves from the machine.
Trimmer guard
- The trimmer guard is intended to prevent loose objects being thrown towards the operator. The guard also protects the operator from accidental contact with the trimmer head.
- Check that the guard is undamaged and not cracked. Replace the guard if it is damaged.
• Always use the recommended guard for the trimmer head you are using. - Never use a trimmer head without an approved guard. If an incorrect or faulty guard is fitted this can cause serious personal injury.
Muffler
- The muffler is designed to keep noise levels to a minimum and to direct exhaust fumes away from the operator.
- Never use a machine that has a faulty muffler.
- Regularly check that the muffler is securely attached.
- The inside of the muffler contain chemicals that may be carcinogenic. Avoid contact with these elements in the event of a damaged muffler.
- Remember that the muffler and exhaust fumes from the engine are hot and may contain sparks which can cause a fire. Never start the machine indoors or near combustible material!
Trimmer head
IMPORTANT!
- Always ensure the trimmer cord is wound tightly and evenly around the drum, otherwise the machine will generate harmful vibration.
- Only use the recommended trimmer heads and trimmer cords. These have been tested by the manufacturer to suit a particular engine size. This is especially important when a fully automatic trimmer head is used. Only use recommended cords.
- Smaller machines generally require small trimmer heads and vice versa. This is due to the fact that when clearing, the engine has to eject the line radially from the trimmer head, and must be able to handle the resistance from the grass being cleared.
- The length of the cord is also important. A longer cord requires greater engine power than a shorter cord of the same diameter.
- Make sure that the cutter on the trimmer guard is intact. This is used to cut the line to the correct length.
IMPORTANT!
- Only use a trimmer reel with the recommended guard! Refer to the instructions for the cutting attachment to check the correct way to load the cord and the correct cord diameter.
- Always stop the engine before carrying out any work on the machine. The trimmer head continues to rotate even after the throttle has been released. Check that the trimmer head has completely stopped and the spark plug lead has been disconnected from the spark plug before carrying out any work on the machine. Using a faulty accessory or faulty trimmer head increases the risk of blade thrust.
HANDLING FUEL
Fuel safety
Never start the machine in the following situations:
- If fuel has spilt onto the machine. Wipe off the spillage and allow remaining fuel to evaporate.
- If fuel has spilt onto your body or clothes. Change clothes and wash the body parts which came into contact with the fuel using soap and water.
- If the machine is leaking fuel. Check regularly for leaks from the fuel cap and fuel lines.
Transport and storage
- Store and transport the machine and fuel so that there is no risk of any leakage or fumes coming into contact with sparks or naked flames, for example from electrical machinery, electric motors, electrical relays/switches or boilers.
- When storing and transporting fuel always use approved containers intended for this purpose.
- When storing the machine for long periods the fuel tank must be emptied. Contact a local petrol station to find out how excess fuel should be disposed of.
- Ensure the machine has been cleaned and that a full service has been carried out before the machine is stored for a long period.
– Secure the machine during transport. - To prevent the engine accidentally starting, the spark plug cap must always be removed during long-term storage if the machine is not under constant supervision. This also applies to all service measures.
— Take care when handling fuel. Bear in mind the risk of fire, explosion and inhaling fumes.
– Secure the machine during transport. - To prevent the engine accidentally starting, the spark plug cap must always be removed during long-term storage if the machine is not under constant supervision. This also applies to all service measures.
— Take care when handling fuel. Bear in mind the risk of fire, explosion and inhaling fumes.
SYMBOLS ON THE MACHINE


WARNING! A brush cutter or trimmer can be dangerous if used incorrectly or carelessly, and can cause serious or fatal injury to the operator or others. It is extremely important that the operator reads and understands the contents of these operating instructions.
Please read the operator's manual carefully and make sure you understand the instructions before using the machine.

Always wear safety goggles.

Always wear hearing protection.

Always wear protective gloves.

Always wear safety shoes.

Watch out for thrown objects and ricochets.

Do not use metal blades. Only use synthetic trimmer line.
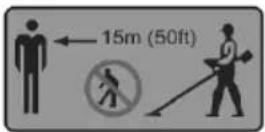
The operator of the machine must ensure, while working, that no persons or animals come closer than 15 metres.
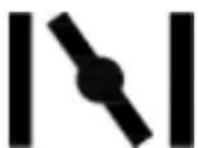
Closed choke.
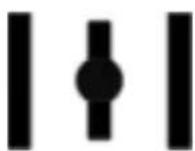
Open the choke.

Fuel tank.
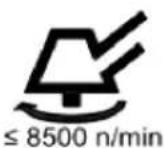
Max. speed of output shaft, rpm.

Carburettor adjustment.
H = high idle speed.
L = low idle speed.

Guaranteed A-weighted emission noise power lever.
TECHNICAL DATA
| Engine volume 25.4 cm3 | |
| Power 0.75 kW | |
| Max. rpm (unloaded) | 9,000 rpm |
| Speed of output shaft | 9,000 rpm |
| Idling speed 3,100±400 rpm | |
| Fuel mixture 40:1 (petrol:two-stroke oil) | |
| Fuel tank capacity 0.65 L | |
| Spark plug L8RTF | |
| Sound pressure level, LpA 89.5 dB(A), K=3 dB(A) | |
| Sound power level, LwA 107.4 dB(A), K=3 dB(A) | |
| Guaranteed sound power level 112 dB(A) | |
| Vibration level 3.72 m/s2, K=1.5 m/s2 | |
| Weight 5.0 kg | |
Always use hearing protection!
The declared vibration value, which has been measured in line with a standardised testing method, can be used to compare different tools with each other and for a preliminary assessment of exposure.
WARNING! The actual vibration level during the power tool's use can vary from the specified total value depending on how the tool is used. You must therefore identify the safety measures required to protect the user, based on an estimate of exposure during actual operating conditions (taking into account all parts of the work cycle as well as the time the tool is switched off and when running idle, in addition to
the start-up time).
DESCRIPTION
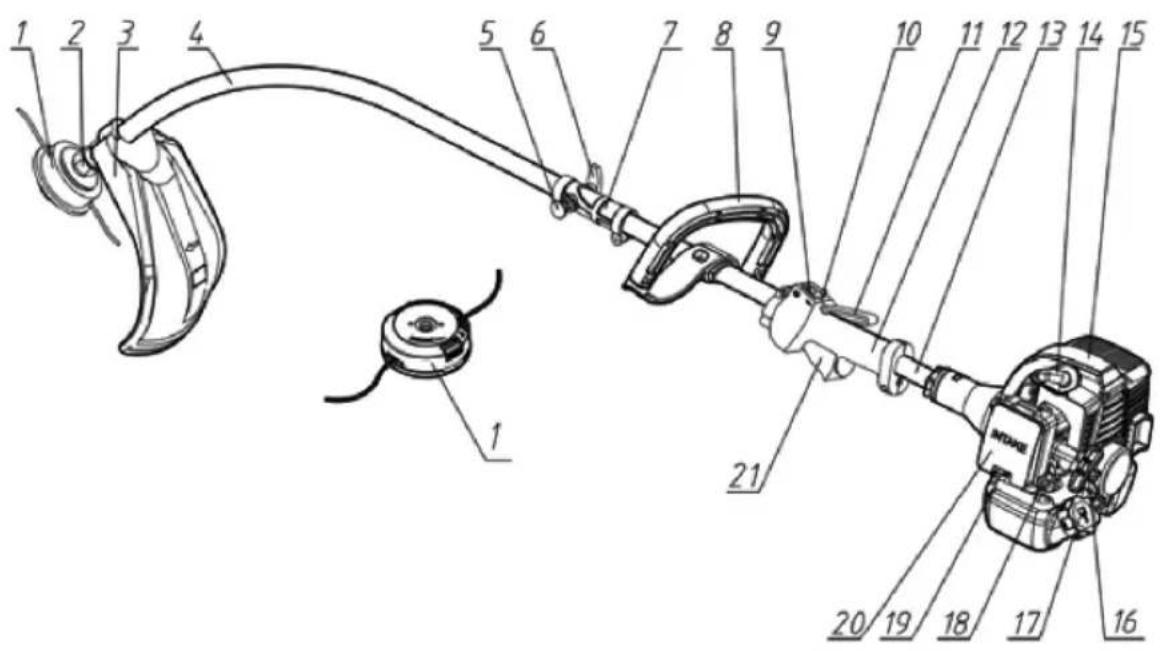
- Trimmer head
- Locking nut
- Cutting attachment guard
- Front pole
- Locking pin
- Locking knob
- Coupling
- Front handle
- On-Off switch
- Throttle trigger lockout
- Locking button for throttle
- Rear handle
- Rear pole
- Spark plug
- Engine
- Starter handle
- Fuel mixture tank
- Choke
- Primer bulb
- Filter cover
- Throttle
INSTALLATION
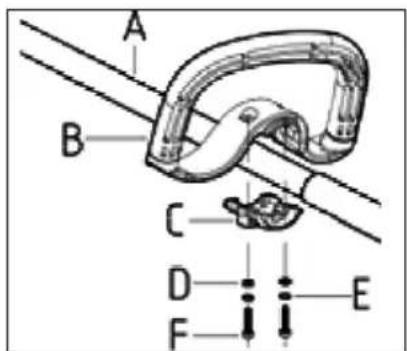
Assembling the front handle
Fit the front handle (B) and clamp (C) onto the tube (A) using two sets of washers (D), spring washers (E) and screws (F).
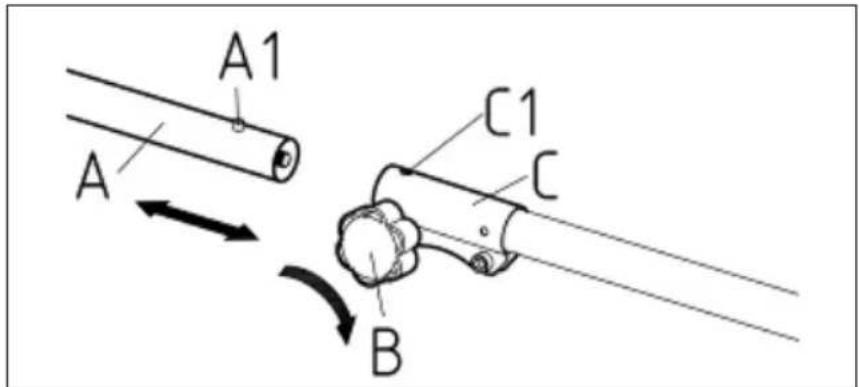
Fitting the pole
- Align the hole (A1) on the front tube (A) and the locking pin (B).
- Then pull out the locking pin while inserting the front tube all the way into the connector (D).
- Release the locking pin. It will spring back to its original position and come out through the hole on the front tube.
- Check that the front tube cannot be rotated once the locking pin is in the correct position.
- Turn the locking knob (C) to tighten the front tube securely.
Fitting trimmer heads
If the trimmer head is incorrectly fitted this could lead to serious injury and/or death. Never use a trimmer head without an approved guard. If a faulty or broken guard is fitted, this could lead to serious injury.
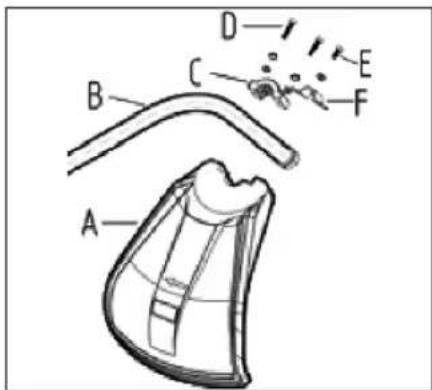
Fitting the trimmer guard
- Use a screw (E) to secure the bracket (F) on the drive shaft tube (B).
- Hook the guard (A) onto the shaft bracket, and then secure with the clamp (C) and two screws (D).
Fitting trimmer heads
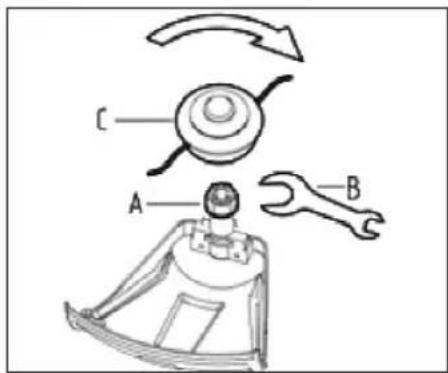
- Use a wrench (B) for the locking nut (A).
- Screw on the trimmer head (C) in the opposite direction to the direction of rotation.
- Follow the instructions in reverse order to dismantle.
Adjusting the brush cutter's working height
- Adjust the shoulder strap so that the cutting attachment is parallel to the ground.
- Let the cutting attachment rest lightly on the ground.
- Adjust the position of the suspension ring to balance the brush cutter correctly. Tighten the side straps so the weight is evenly distributed across both shoulders.
NB
- When the brush cutter is in use it must always be fastened securely to the harness. If it is not, the brush cutter cannot be controlled in a safe manner which could lead to the operator or other people being injured.
- Never use a harness with a defective quick release.
- Use the quick release if the engine for instance catches fire or in other emergency situations where the operator needs to free themselves from the machine or harness.
- A well-adjusted harness and machine makes work much easier. Adjust the harness for the best working position.
OPERATION
Fuel
The machine is equipped with a 2-stroke engine and must always be operated with a mixture of petrol and 2-stroke oil. For best results and performance use 2-stroke engine oil which is specially formulated for air-cooled 2-stroke engines. Never use 2-stroke oil intended for water-cooled engines or oil intended for 4-stroke engines. A low quality oil and/or too much oil in relation to petrol can jeopardise function and reduce the engine's lifespan. It is important to accurately measure the amount of oil to be mixed to ensure that the correct mixture is obtained.
Mixing ratio: 1:40 (2.5%).
| Petrol 2-stroke oil 1:40 (2.5%) | |
| 1 litre 25 ml | |
| 5 litres 125 ml | |
| 10 litres 250 ml |
NB
Fuel and fuel fumes are highly inflammable and can cause serious injury when inhaled or allowed to come in contact with the skin. For this reason observe caution when handling fuel and make sure there is adequate ventilation.
Mixing
- Always start by filling half the amount of the petrol to be used.
- Then add the entire amount of oil. Mix (shake) the fuel mixture.
- Add the remaining amount of petrol.
- Mix (shake) the fuel mixture thoroughly before filling the machine's fuel tank.
Always mix the petrol and oil in a clean container intended for fuel. Do not mix more than one month's supply of fuel at a time. If the machine will not be used for some time, the fuel tank should be emptied and cleaned.
Fuelling
Taking the following precautions, will lessen the risk of fire:
- Do not smoke or place hot objects near the fuel.
– Always shut off the engine before refuelling. - Always stop the engine and let it cool for a few minutes before refuelling.
- When refuelling, open the fuel cap slowly so that any excess pressure is released gently.
– Tighten the fuel cap carefully after refuelling. - Always move the machine away from the refuelling area before starting.
- Always use a fuel container with an anti-spill valve.
- Clean the area around the fuel cap. Contamination in the tank can cause operating problems.
- Ensure that the fuel is well mixed by shaking the container before filling the tank.
USE
Check before starting
- Never use the machine without a guard nor with a defective guard.
- All guards and covers must be correctly fitted and undamaged before you start the machine.
- Check the blade to ensure that no cracks have formed at the bottom of the teeth or by the centre hole. The most common reason why cracks are formed is that sharp corners have been formed at the bottom of the teeth while sharpening or that the blade has been used with dull teeth. Discard a blade if cracks are found.
- Check that the mounting flange is not cracked due to fatigue or due to being tightened too much. Discard the support flange if it is cracked.
- Ensure the locking nut has not lost its captive force. The nut lock should have a locking force of at least 1.5 Nm. The tightening torque of the locking nut should be 35-50 Nm.
-
Check that the blade guard has not become damaged or cracked. Replace the blade guard if it is exposed to impact or is cracked.
-
Check that the trimmer head and trimmer guard have not become damaged or cracked. Replace the trimmer head or trimmer guard if they have been exposed to impact or are cracked.
- The complete clutch cover and shaft must be fitted before the machine is started, otherwise the clutch can come loose and cause personal injury.
• Always move the machine away from the refuelling area before starting. - Place the machine on a flat surface. Ensure the cutting attachment cannot come into contact with any object.
- Make sure no unauthorised persons are in the working area, otherwise there is a risk of serious personal injury. The safety distance is 15 metres.
Throttle trigger lockout
The throttle lockout is designed to prevent accidental operation of the throttle control. When you press the lock-out (A) (i.e. when you grasp the handle) it releases the throttle trigger (B). When you release the handle the throttle control and the throttle lockout both move back to their original positions. The movement is controlled by two independent return springs. This arrangement means that the throttle control is automatically locked at the idle setting. Make sure the throttle control is locked at the idle setting when the throttle lockout is released. Press the throttle lockout and make sure it returns to its original position when released.
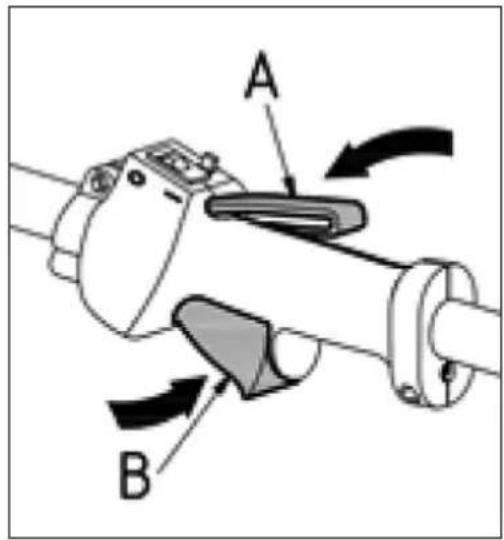
Check that the throttle control and throttle lockout move freely and that the return springs work properly. Start the machine and apply full throttle. Release the throttle and check that the blade stops and remains still. If the cutting attachment rotates with the throttle in the idle position then the carburettor idle setting must be checked.
Cold start
A "cold" start of the engine means starting it after at least 5 minutes from when it was switched off or after refuelling.
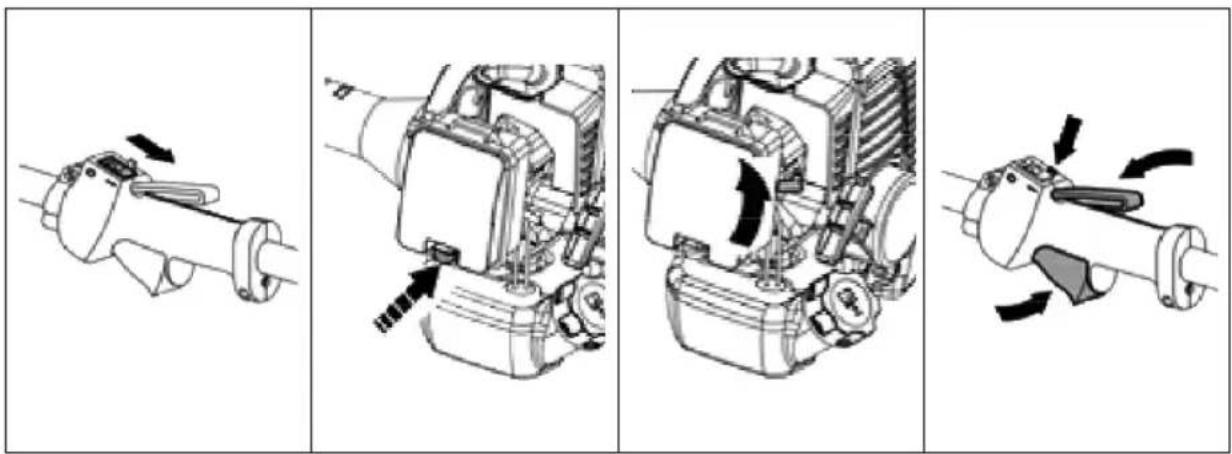
- Press down the "I" side of the engine switch.
- Press the primer bulb repeatedly until fuel begins to fill the bulb. It does not have to be completely filled.
- Close the choke.
- When pressing throttle trigger lock-out and throttle trigger, press the throttle lock button simultaneously, and then release throttle trigger and throttle trigger lock-out.
natural_image
Four-panel technical illustration of a mechanical assembly with directional arrows indicating motion (no text or symbols)- Hold the machine against the ground using your left hand. NB Do not use your foot. Grip the starter handle, pull out the starter cord slowly with your right hand until it begins to tighten and then pull the cord strongly. Never twist the starter cord around your hand. Continue pulling the starter cord until the engine starts.
- Set the choke to the open position
- Repeat pulling the cord until engine firing occur. When the engine starts, allow the engine to warm up with the throttle pulled slightly. Then, pressing throttle trigger to release the throttle lock.
NB The throttle lock will automatically release by pressing the throttle trigger again. If you manually turn the choke knob from choke position to run position before releasing the throttle lock, the cutting attachment will start to rotate immediately when the engine is started.
IMPORTANT!
- Do not pull the starter cord all the way out and do not let go of the starter handle when the cord is fully extended. This can damage the machine
- Avoid letting any part of your body enter the marked area. Body contact with this area could result in burns or electrical shock if the spark plug cap is damaged. Always use gloves. A machine which has a damaged spark plug cap must not be used.
- If the starter cord is pulled repeatedly when the choke is on, the engine could be flooded making it difficult to start.
- If the engine does flood, the warm start procedure should be repeated several times until the excess fuel has been removed.
Warm start
Warm start the engine immediately after it has stopped by following steps 1, 2, 4 and 7 according to the procedure above and remember to not press the primer button more than 2 to 3 times.
Switching off
Switch the engine off by setting the engine switch to the "0" position.
GENERAL WORKING INSTRUCTIONS
IMPORTANT! In this section the basic safety measures for working with brush cutters and trimmers are described. If you encounter a situation where you are uncertain how to proceed you should ask an expert. Contact the retailer or service centre if the equipment is not working as intended. You must understand the difference between grass clearing and grass trimming before use.
Basic working techniques
Always allow the engine to slow down to idle speed when not cutting or trimming. Long periods at full throttle without any load on the engine can lead to serious engine damage. Sometimes branches or grass get caught between the guard and cutting attachment. Always stop the engine before cleaning.
GRASS TRIMMING WITH A TRIMMER HEAD
Trimming
Hold the trimmer head just above the ground at an angle. It is the end of the cord that does the work. Let the cord work at its own pace. Never press the cord into the area to be cut. The cord can easily remove grass and weeds up against walls, fences, trees and borders, however it can also damage sensitive bark on trees and bushes, and damage fence posts. Reduce the risk of damaging plants by shortening the cord to 10-12 cm and reducing the engine speed.
Clearing
Hold the trimmer head just above the ground at an angle. Let the end of the cord strike the ground around trees, posts, statues and the like. NB This technique increases the wear on the cord. The cord wears quicker and must be fed forward more often when working against stones, brick, concrete, metal fences, etc., than when coming into contact with trees and wooden fences. When trimming and clearing you should use less than full throttle so that the cord lasts longer and to reduce the wear on the trimmer head.
Cutting
The trimmer is ideal for cutting grass that is difficult to reach using a normal lawn mower. Keep the line parallel to the ground when cutting. Avoid pressing the trimmer head against the ground as this can ruin the lawn and damage the tool. Do not allow the trimmer head to constantly come into contact with the ground during normal cutting. Constant contact of this type can cause damage and wear to the trimmer head.
Clearing up
The rotating fan effect of the line can be used for quick and easy clearing up. Hold the cord parallel to and above the area to be swept and move the tool to and fro. When cutting and sweeping you should use full throttle to obtain the best results.
MAINTENANCE
Adjusting idle speed
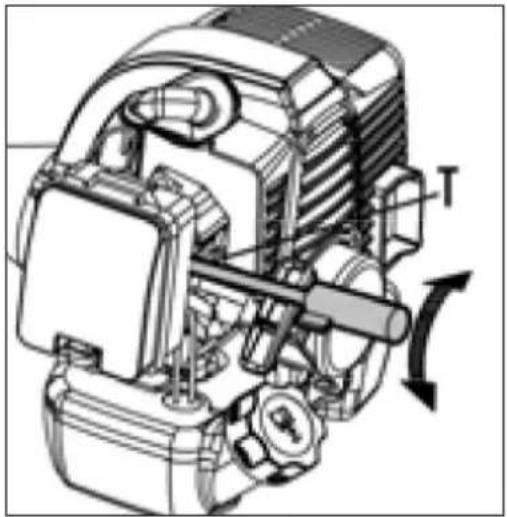
Check that the air filter is clean. When the idle speed is correct, the cutting attachment should not rotate. If adjustment is required, the idle adjustment screw T must be turned clockwise until the blade begins to rotate. Open (turn anticlockwise) the screw until the cutting attachment stops. The idle speed is correctly set when the engine runs smoothly in all positions, and there is a clear margin to the speed at which the trimmer head starts to rotate. If the idle speed cannot be adjusted so that the trimmer head stops, contact your dealer/service workshop. Do not use the machine until it has been correctly adjusted. If you need to adjust the "L" and/or "H" mixture screw contact your service centre for assistance.
natural_image
Technical diagram of a mechanical device with labeled components and directional arrows (no readable text or symbols)Cleaning the air filter
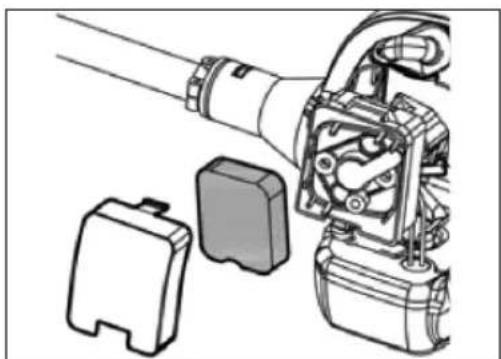
- Remove the air filter guard and then the filter.
- Wash it with warm water and washing-up liquid.
- Check that the filter has dried out fully before refitting.
natural_image
Technical illustration of a mechanical assembly with a clamped component and two separate parts (no text or symbols)The air filter must be regularly cleaned to remove dust and dirt in order to avoid:
– Carburettor malfunction
- Starting problems
— Loss of engine power
– Unnecessary wear to engine parts
– Excessive fuel consumption.
Clean the filter every 25 hours, or more regularly if conditions are exceptionally dusty. An air filter that has been in use for a long time cannot be cleaned completely. The filter must therefore be replaced with a new one at regular intervals. A damaged air filter must always be replaced.
Fuel Filter
When the fuel supply to the engine is interrupted, the fuel cap and fuel filter must be checked to ensure they are not blocked.
natural_image
Line drawing of a car's seatbelt mechanism (no text or symbols)Spark plug
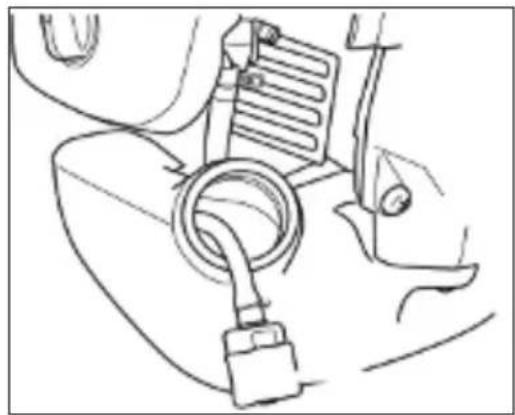
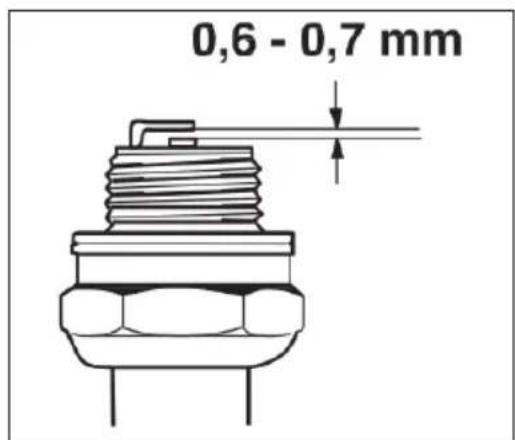
If the machine is low on power, difficult to start or runs poorly at idle speed: always check the spark plug first before taking any further action. If the spark plug is dirty, clean it and check that the electrode gap is 0.6–0.7 mm. The spark plug should be replaced after about a month in operation or earlier if necessary. Always use the recommended spark plug type! Using the wrong type of spark plug could damage the piston/cylinder. Check that the spark plug is fitted with a suppressor.
The condition of the spark plug is affected by the following factors:
- Incorrect carburettor adjustment.
- An incorrect fuel mixture (too much or incorrect type of oil).
- A dirty air filter.
MAINTENANCE SCHEDULE
The following intervals only apply under normal operating conditions. If your daily working hours are longer or operating conditions are more difficult (extremely dusty environments, etc.), the indicated intervals should be shortened to correspond to this.
| Before starting working | After finishing work daily | After each refueling stop | Weekly | Monthly | Every 12 months | If problem | If damaged | If required | ||
| Complete machine Visual inspection(condition, wear, leaks) | * | * | ||||||||
| Cleaning * | ||||||||||
| Control handle Check operation ** | ||||||||||
| Air Filter Cleaning ** | * | |||||||||
| Replace ** | ||||||||||
| Filter in fuel tank Check | * | |||||||||
| Replace filter | *** | * | ||||||||
| Carburettor | Check idle setting | ** | ||||||||
| Readjust idle | * | |||||||||
| Spark plug | Readjust electrode gap | * | ||||||||
| Replace after 100 hours of operation | ||||||||||
| Cooling inlets | Cleaning | * | ||||||||
| All accessible screws | Check * | |||||||||
| Retighten | * | |||||||||
| Anti-vibration elements | Check | * | ** | |||||||
| Replace * | ||||||||||
| Safety labels | Replacement# | * | ||||||||
| Muffler | Cleaning# | * | ||||||||
We recommend that this is carried out by an authorised service centre.
TROUBLESHOOTING
| Problem Cause Action | ||
| The engine will not start or will not keep running. | Incorrect starting procedure. Follow the instructions. | |
| Dirty spark plug or incorrect distance between electrodes. | Check the spark plug. | |
| Clogged air filter. Clean or replace the filter. | ||
| Problem with the carburettor. Contact service centre. | ||
| Engine starts but lacks power. Clogged air filter. Clean or replace the filter. | ||
| Problem with the carburettor. Contact service centre. | ||
| The engine runs erratically and lacks power when revving. | Dirty spark plug or incorrect distance between electrodes. | Check the spark plug. |
| Problem with the carburettor. Contact service centre. | ||
| The engine gives off excessive smoke. | Incorrect fuel mixture. Follow the instructions for mixing fuel. | |
| Problem with the carburettor. Contact service centre. | ||
| The machine vibrates abnormally. Damaged or loose parts. Stop the machine and disconnect the spark plug cable. Inspect for damage. Check for and tighten any loose parts. Contact an authorised service centre. | ||
Jula reserves the right to make changes. In the event of problems, please contact our service department. www.jula.com
natural_image
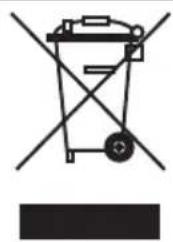
Pure mechanical diagram showing a binocular device with no text or symbolsCare for the environment!
Must not be discarded with household waste!
This product contains electrical or electronic components that should be recycled.
Leave the product for recycling at the designated station e.g. the clocal authority's recycling station.
CE
EC DECLARATION OF CONFORMITY
EG FÖRSÄKRAN OM ÖVERENSSTÄMMELSE
EF SAMSVARSERKLÆRING
DEKLARACJA ZGODNOŚCI WE

Jula AB, Box 363, SE-532 24 SKARA, SWEDEN
25.4CC, 0.75kW, 380mm
Item number / Artikelnummer / Artikkelnummer / Numer artykułu
721-344
conforms to the following directives and standards / överensstämmer med följande direktiv och standarder: er i samsvar med fölgende direktiver og standarder / są zgodne z następującymi dyrektywami i normami:
Machinery Directive 2006/42/EC
EN ISO 11806-1:2011
Electromagnetic Compatibility Directive 2004/108/EC
EN ISO 14982:2009
Outdoor Noise Directive 2000/14/EC, amended by 2005/88/EC
This product was CE marked in year -15
- SVENSKA....5
- SÄKERHETSANVISNINGAR....5
- SAFETY INSTRUCTIONS....63
- SÄKERHETSANVISNINGAR
- Rengör luftfiltret
- Tändstift
- MONTERING
- Tennplugg
- Verne om miljøet!
- Świeca zapłonowa
- DBAJ O ŚRODOWISKO!
- Read the operating instructions carefully before use!
- IMPORTANT!
- PERSONAL PROTECTIVE EQUIPMENT
- BASIC SAFETY RULES
- THE MACHINE'S SAFETY EQUIPMENT
- Vibration damping system
- The harness quick-release
- Trimmer guard
- Muffler
- Trimmer head
- HANDLING FUEL
- Fuel safety
- Transport and storage
- SYMBOLS ON THE MACHINE
- TECHNICAL DATA
- Always use hearing protection!
- DESCRIPTION
- INSTALLATION
- Assembling the front handle
- Fitting the pole
- Fitting trimmer heads
- Fitting the trimmer guard
- Adjusting the brush cutter's working height
- NB
- OPERATION
- Fuel
- Mixing
- Fuelling
- USE
- Check before starting
- Throttle trigger lockout
- Cold start
- Warm start
- Switching off
- GENERAL WORKING INSTRUCTIONS
- Basic working techniques
- GRASS TRIMMING WITH A TRIMMER HEAD
- Trimming
- Clearing
- Cutting
- Clearing up
- MAINTENANCE
- Adjusting idle speed
- Cleaning the air filter
- Fuel Filter
- Spark plug
- MAINTENANCE SCHEDULE
- We recommend that this is carried out by an authorised service centre.
- TROUBLESHOOTING
- Care for the environment!
- CE
- EC DECLARATION OF CONFORMITY
- EG FÖRSÄKRAN OM ÖVERENSSTÄMMELSE
- EF SAMSVARSERKLÆRING
- DEKLARACJA ZGODNOŚCI WE
- This product was CE marked in year -15
Brand : Meec Tools
Model : 721-344
Category : Brush cutter