EIP-WSS3100 - Video projector EIKI - Free user manual and instructions
Find the device manual for free EIP-WSS3100 EIKI in PDF.


User questions about EIP-WSS3100 EIKI
0 question about this device. Answer the ones you know or ask your own.
Ask a new question about this device
Download the instructions for your Video projector in PDF format for free! Find your manual EIP-WSS3100 - EIKI and take your electronic device back in hand. On this page are published all the documents necessary for the use of your device. EIP-WSS3100 by EIKI.
USER MANUAL EIP-WSS3100 EIKI
natural_image
Line drawing of a portable electronic device with ventilation grilles and a top panel (no text or symbols)EIP-WSS3100
Table of Contents
Table of Contents 1
Usage Notice 2
Precautions 2
Regulation & Safety Notices 4
Introduction 6
Package Overview 6
Product Overview 7
Main Unit 7
Control Panel 8
Connection Ports 9
Remote Control 10
Installation 11
Connecting to Computer/Notebook .....11
Connecting to Video Sources .... 12
Powering On/Off the Projector 13
Powering On the Projector 13
Powering Off the Projector 14
LED Indicator Messages 14
Adjusting the Projected Image 15
Adjusting the Projector's Height ..... 15
Adjusting the Projector's Focus ..... 16
Adjusting Projection Image Size ..... 16
User Controls 17
Using the Control Panel 17
Using the Remote Control 18
On-screen Display Menus 20
How to operate 20
Structure 21
Picture 23
Screen 25
Setting 27
Setting | Security 29
Volume 30
Options 31
Options | Lamp Settings .... 33
3D 34
Interactive 35
LAN 36
Web Management 37
Appendices 43
Troubleshooting 43
Image Problems 43
Projector Problems 46
Remote Control Problems .... 46
Sound Problems 46
3D Problems 46
On Screen Messages 47
Compatibility Modes 48
Replacing the lamp 52
Replacing and cleaning the optional dust filter 53
Ceiling Mount Installation 54
Specifications 55
Usage Notice
Precautions

Please follow all warnings, precautions and maintenance as recommended in this user's guide.
Warning- Do not look into the projector's lens when the lamp is on. The bright light may hurt and damage your eyes.
Warning- To avoid the risk of fire or electric shock, do not expose this projector to rain or moisture.
Warning- Please do not open or disassemble the projector as this may cause electric shock.
Warning- When replacing the lamp, please allow the unit to cool down. Follow instructions as described on pages 52.
Warning- This projector will detect the life of the lamp itself. Please be sure to change the lamp when it shows warning messages.
Warning- When the lamp is approaching the end of its lifetime, the message "Lamp Warning: Lamp life exceeded." will show on the screen. Please contact your local reseller or service center to change the lamp as soon as possible.
Warning- Reset the "Clear Lamp Hours" function from the on-screen display "Options | Lamp Settings" menu after replacing the lamp module (refer to page 34).
Warning- When switching the projector off, please ensure the cooling cycle has been completed before disconnecting power. Allow 90 seconds for the projector to cool down.
Warning- Do not block the light path between the light source and the lens with any objects. Doing so could cause the object to catch on fire.
Do:
Turn off and unplug the power plug from the AC outlet before cleaning the product.
Use a soft dry cloth with mild detergent to clean the display housing.
Disconnect the power plug from AC outlet if the product is not being used for a long period of time.
Do not:
Clean the lens.

When the PJ-lens is dirty, please contact the service center. Do not own wipe to avoid scratching the lens.
Block the slots and openings on the unit provided for ventilation.
Use abrasive cleaners, waxes or solvents to clean the unit.
Use under the following conditions:
- In extremely hot, cold or humid environments.
▶ Ensure that the ambient room temperature is within 5 - 40°C.
▶ Relative Humidity is 5 - 40°C, 80% (Max.), non-condensing.
- In areas susceptible to excessive dust and dirt.
- Near any appliance generating a strong magnetic field.
- In direct sunlight.
Regulation & Safety Notices
This appendix lists the general notices of your projector.
FCC notice
This device has been tested and found to comply with the limits for a Class B digital device pursuant to Part 15 of the FCC rules. These limits are designed to provide reasonable protection against harmful interference in a residential installation. This device generates, uses and can radiate radio frequency energy and, if not installed and used in accordance with the instructions, may cause harmful interference to radio communications.
However, there is no guarantee that interference will not occur in a particular installation. If this device does cause harmful interference to radio or television reception, which can be determined by turning the device off and on, the user is encouraged to try to correct the interference by one or more of the following measures:
- Reorient or relocate the receiving antenna.
- Increase the separation between the device and receiver.
- Connect the device into an outlet on a circuit different from that to which the receiver is connected.
- Consult the dealer or an experienced radio/television technician for help.
Notice: Shielded cables
All connections to other computing devices must be made using shielded cables to maintain compliance with FCC regulations.
Caution
Changes or modifications not expressly approved by the manufacturer could void the user's authority, which is granted by the Federal Communications Commission, to operate this projector.
Operation conditions
This device complies with Part 15 of the FCC Rules. Operation is subject to the following two conditions:
- This device may not cause harmful interference and
- This device must accept any interference received, including interference that may cause undesired operation.
Notice: Canadian users
This Class B digital apparatus complies with Canadian ICES-003.
Declaration of Conformity for EU countries
• EMC Directive 2004/108/EC (including amendments)
- Low Voltage Directive 2006/95/EC
• R & TTE Directive 1999/5/EC (if product has RF function)
Disposal instructions

Do not throw this electronic device into the trash when discarding. To minimize pollution and ensure utmost protection of the global environment, please recycle it.
Introduction
Package Overview
Unpack and inspect the box contents to ensure all parts listed below are in the box. If something is missing, please contact our customer service.
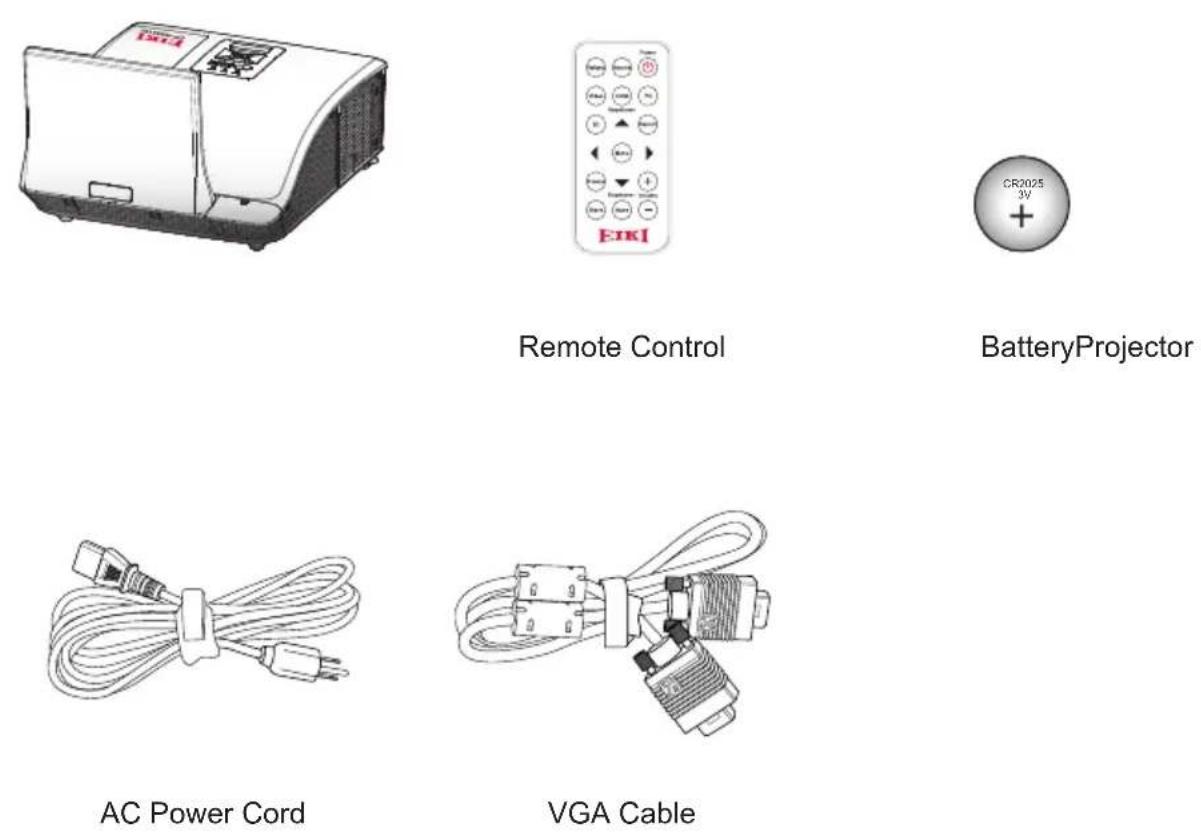
Documentation:
User's Manual (CD) •
Quick Start Guide •

Due to different applications in each Country, some regions may have different accessories.
Product Overview
Main Unit
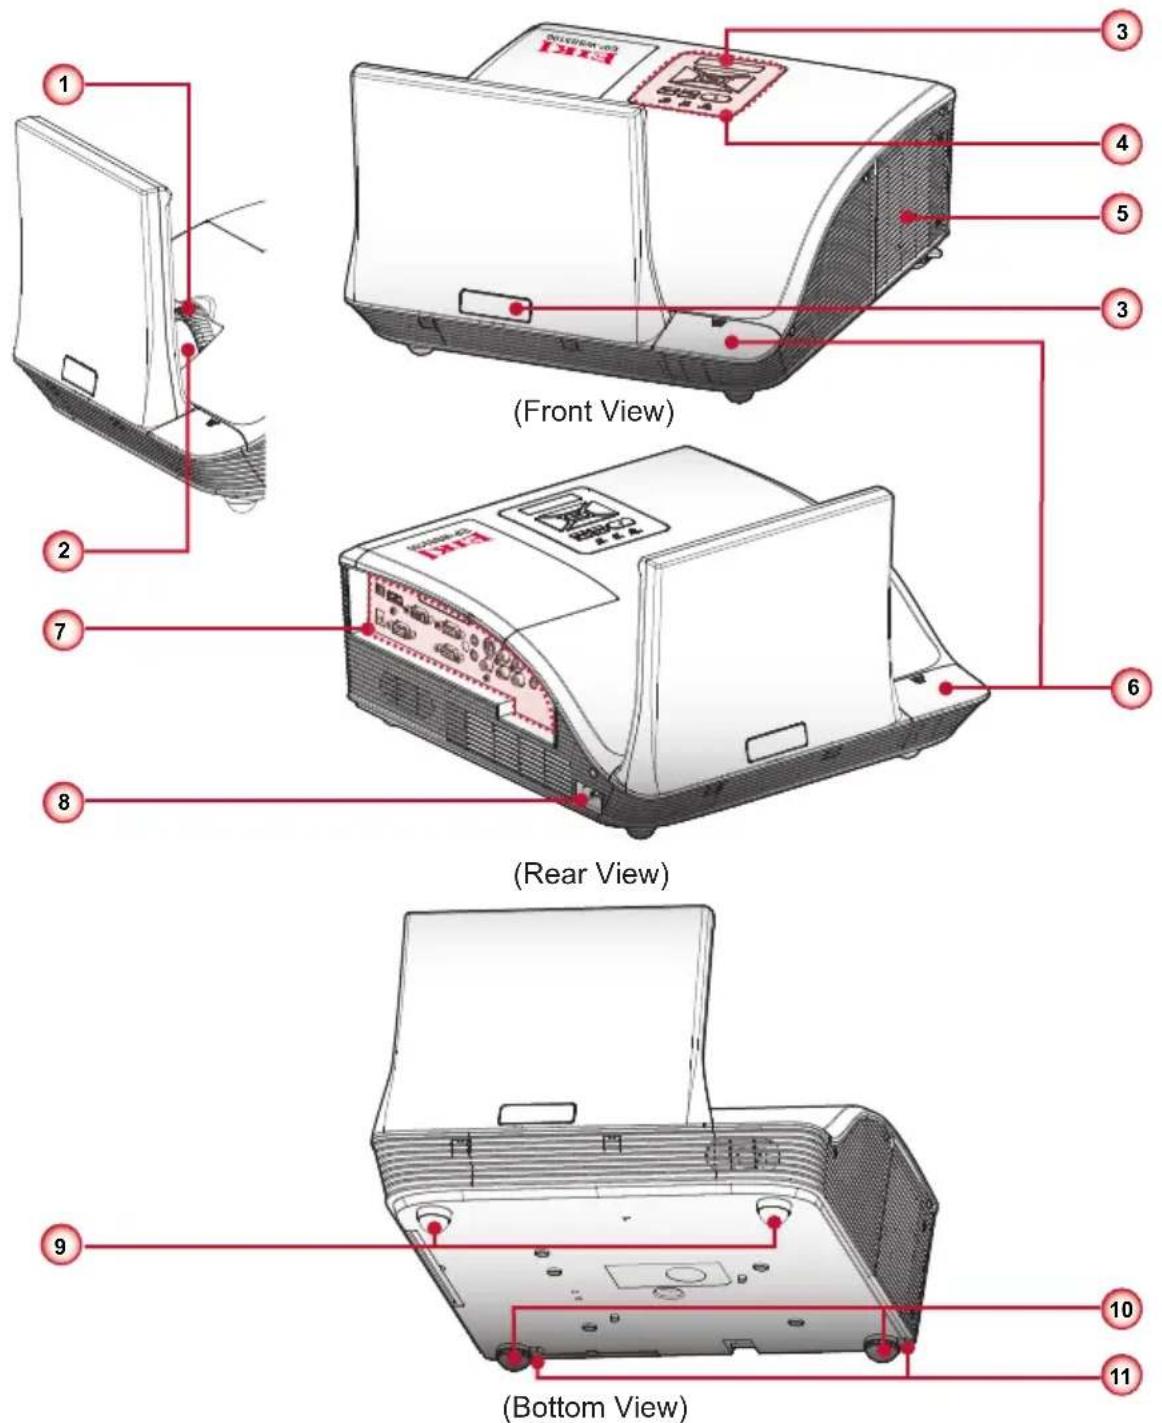
Focus Ring1.
Input / Output Connection Ports7.
Lens2.
Power Socket8.
IR Receiver3.
Elevator Feet9.
Control Panel4.
Elevator Feet10.
Lamp Cover5.
Elevator Feet Spacer11.
External Terminal Cover (Interactive 6. * Option Kit IK-US10)*
Control Panel
flowchart
graph TD
    A["POWERTEMPLAMP"] --> B["RESYNC"]
    A --> C["SOURCE"]
    B --> D["MENU"]
    C --> D
    D --> E["1"]
    D --> F["2"]
    D --> G["3"]
    D --> H["4"]
    D --> I["5"]
    D --> J["6"]
    D --> K["7"]
    D --> L["8"]
    D --> M["9"]
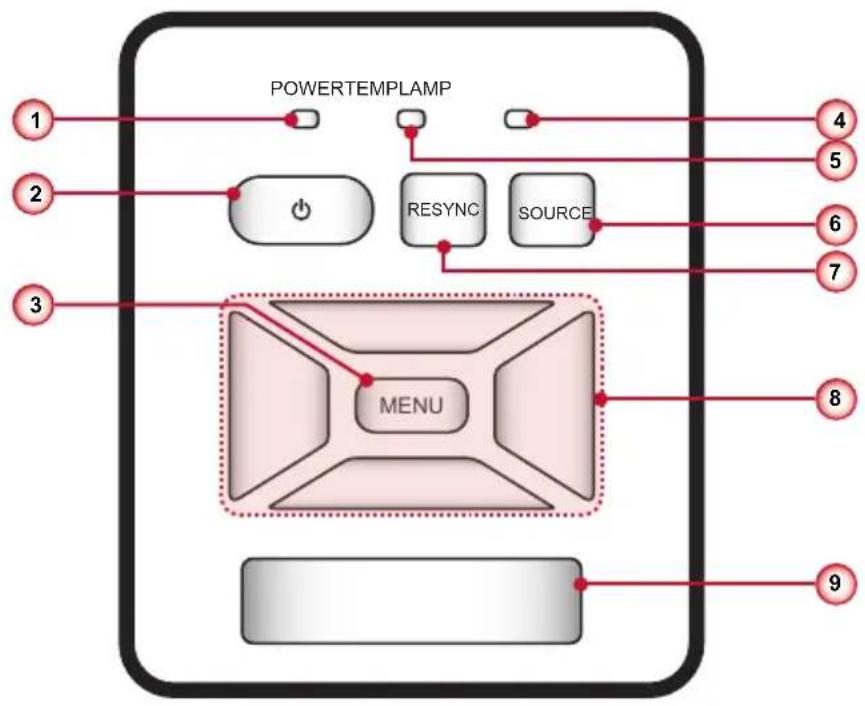
Power LED1.
Power 2
Menu / Exit3.
Lamp LED4.
Temp (Temperature) LED5.
Source6.
Resync7.
Four Directional Select Keys8.
IR Receiver9.
Connection Ports

text_image
321 5 6 8 4 7 NLY VGA 0.1 VGA 0.2 VGA 0.3 VGA 0.4 VGA 0.5 VGA 0.6 VGA 0.7 VGA 0.8 VGA 0.9 VGA 1.0 Audio 1.1 Audio 1.2 Audio 1.3 Audio 1.4 Audio 1.5 Audio 1.6 Audio 1.7 Audio 1.8 Audio 1.9 Audio 2.0 Audio 2.1 Audio 2.2 Audio 2.3 Audio 2.4 Audio 2.5 Audio 2.6 Audio 2.7 Audio 2.8 Audio 2.9 Audio 3.0 Audio 3.1 Audio 3.2 Audio 3.3 Audio 3.4 Audio 3.5 Audio 3.6 Audio 3.7 Audio 3.8 Audio 3.9 Audio 4.0 Audio 4.1 Audio 4.2 Audio 4.3 Audio 4.4 Audio 4.5 Audio 4.6 Audio 4.7 Audio 4.8 Audio 4.9 Audio 5.0 Audio 5.1 Audio 5.2 Audio 5.3 Audio 5.4 Audio 5.5 Audio 5.6 Audio 5.7 Audio 5.8 Audio 5.9 Audio 6.0 Audio 6.1 Audio 6.2 Audio 6.3 Audio 6.4 Audio 6.5 Audio 6.6 Audio 6.7 Audio 6.8 Audio 6.9 Audio 7.0Mini USB Connector1.
HDMI Connector2.
VGA Output Connector3.
LAN Connector4.
- Audio In 1 Connector (For VGA In 1 Connector)
6.S-Video Connector
7.Left/Right RCA Audio Input Connector (For S-Video Connector)
- Audio Output Connector
9.12V Trigger Relay Connector (12V, 250mA)
-
RS232 Connector
-
VGA In 1 Connector
-
VGA In 2 Connector
-
Audio In 2 Connector (For VGA In 2 Connector)
-
Composite Video Input Connector
-
Left/Right RCA Audio Input Connector (For Composite Video Input Connector)
-
3.5mm Microphone Input Connector Power Socket17.
Remote Control
flowchart
graph TD
    A["1"] --> B["ReSync"]
    C["2"] --> B
    D["3"] --> E["Video"]
    F["4"] --> E
    G["5"] --> H["3D"]
    I["6"] --> H
    J["7"] --> K["Freeze"]
    L["8"] --> K
    M["9"] --> N["Blank"]
    O["10"] --> P["Mute"]
    Q["11"] --> R["Power"]
    S["12"] --> T["HDMI"]
    U["13"] --> V["Keystone+"]
    W["14"] --> X["Aspect"]
    Y["15"] --> Z["Volume"]
    AA["Menu"] --> AB["Keystone-"]
    AC["+"] --> Z
    AD["−"] --> Z
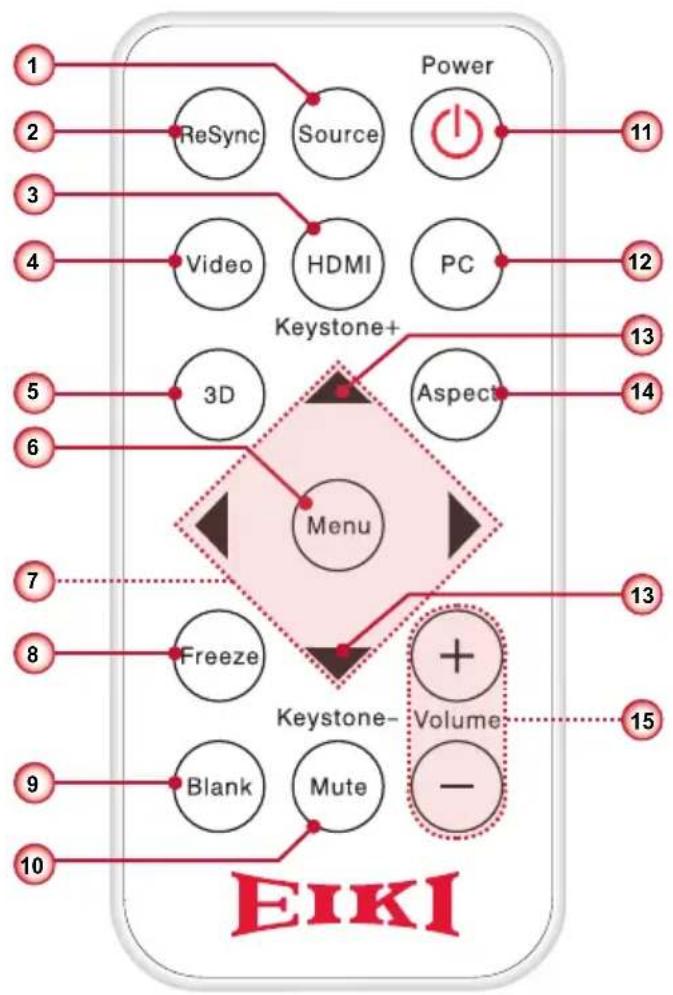
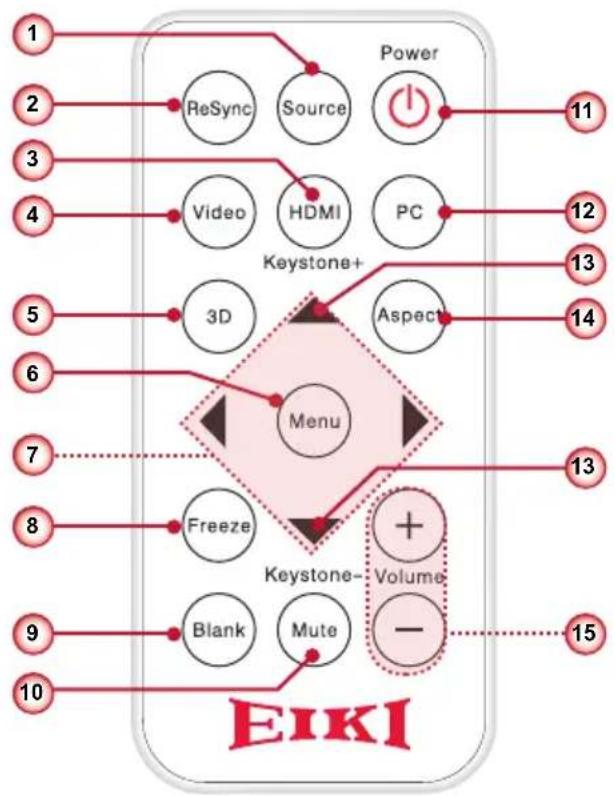
Source1.
ReSync2.
HDMI3.
Video4.
3D5.
Menu6.
Four Directional Select Keys7.
Freeze8.
Blank9.
Mute10.
Power 1.
PC12.
Keystone 13.
Aspect14.
Volume +/-15.

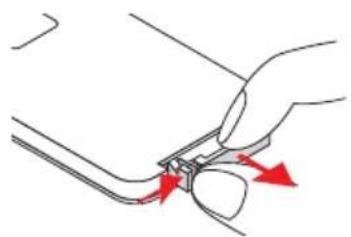
Before using the remote control for the first time, remove the transparent insulation tape. See page 19 for battery installation.
text_image
CP8025 3-2.15Installation
Connecting to Computer/Notebook
text_image
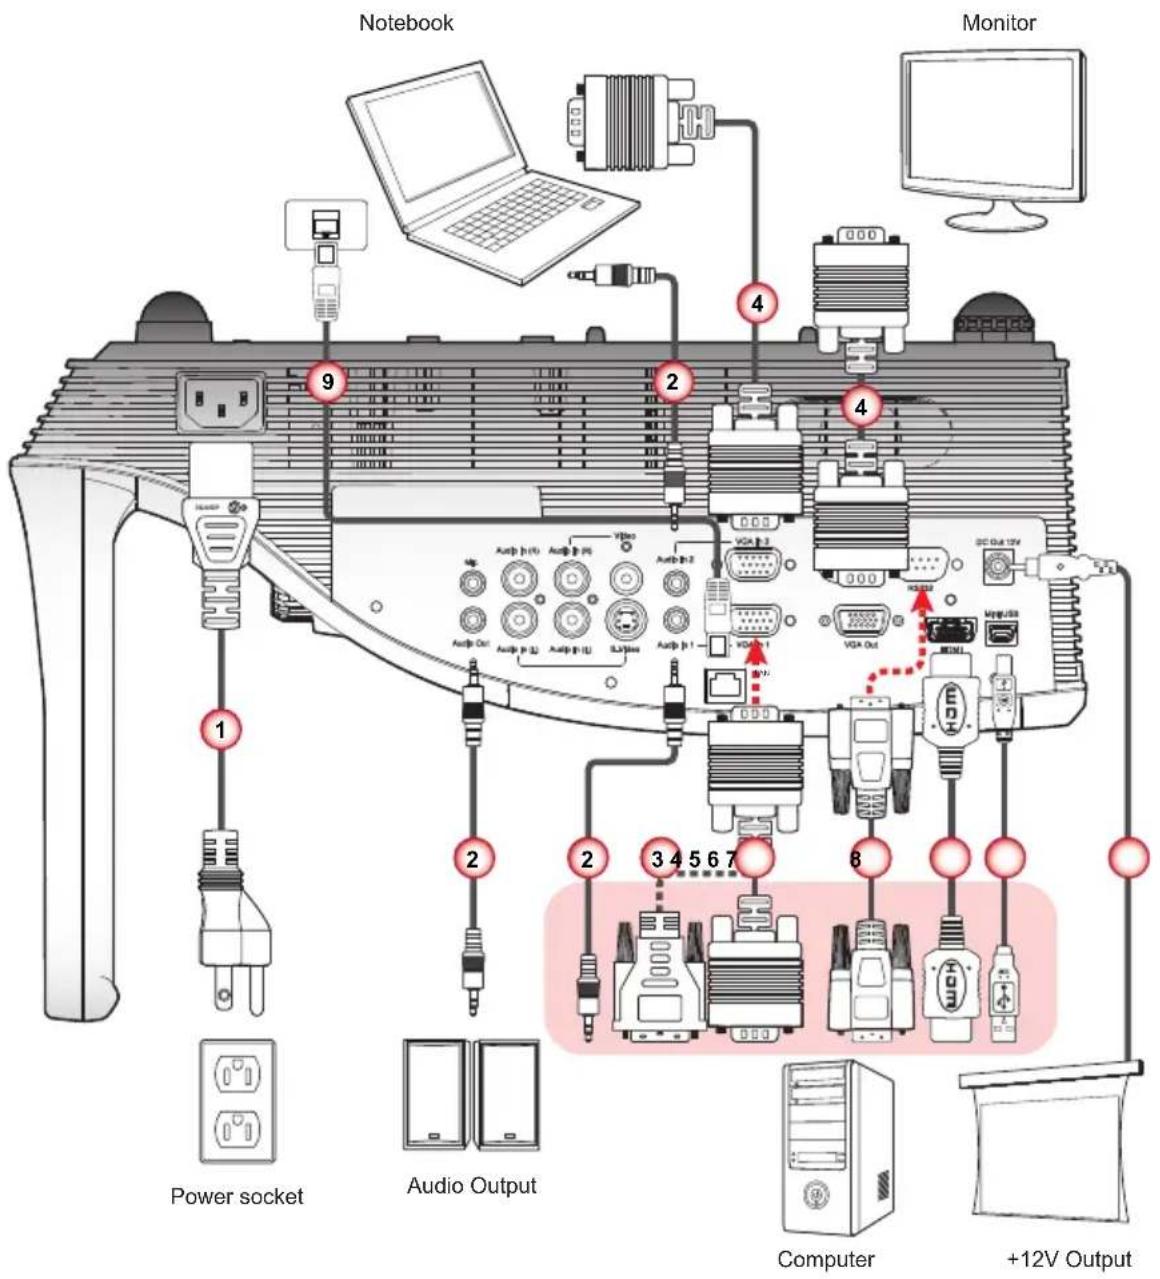
Notebook Monitor 1 2 3 4 5 6 7 Power socket Audio Output Computer +12V OutputPower Cord1.
Audio Cable 2.
VGA to DVI-A Cable 3.
VGA Cable4.
RS232 Cable 5.
HDMI Cable6.
USB Cable 7.
12V DC Jack 8.
Network Cable 9.

■ Due to the difference in applications for each country, some regions may have different accessories.
Connecting to Video Sources
text_image
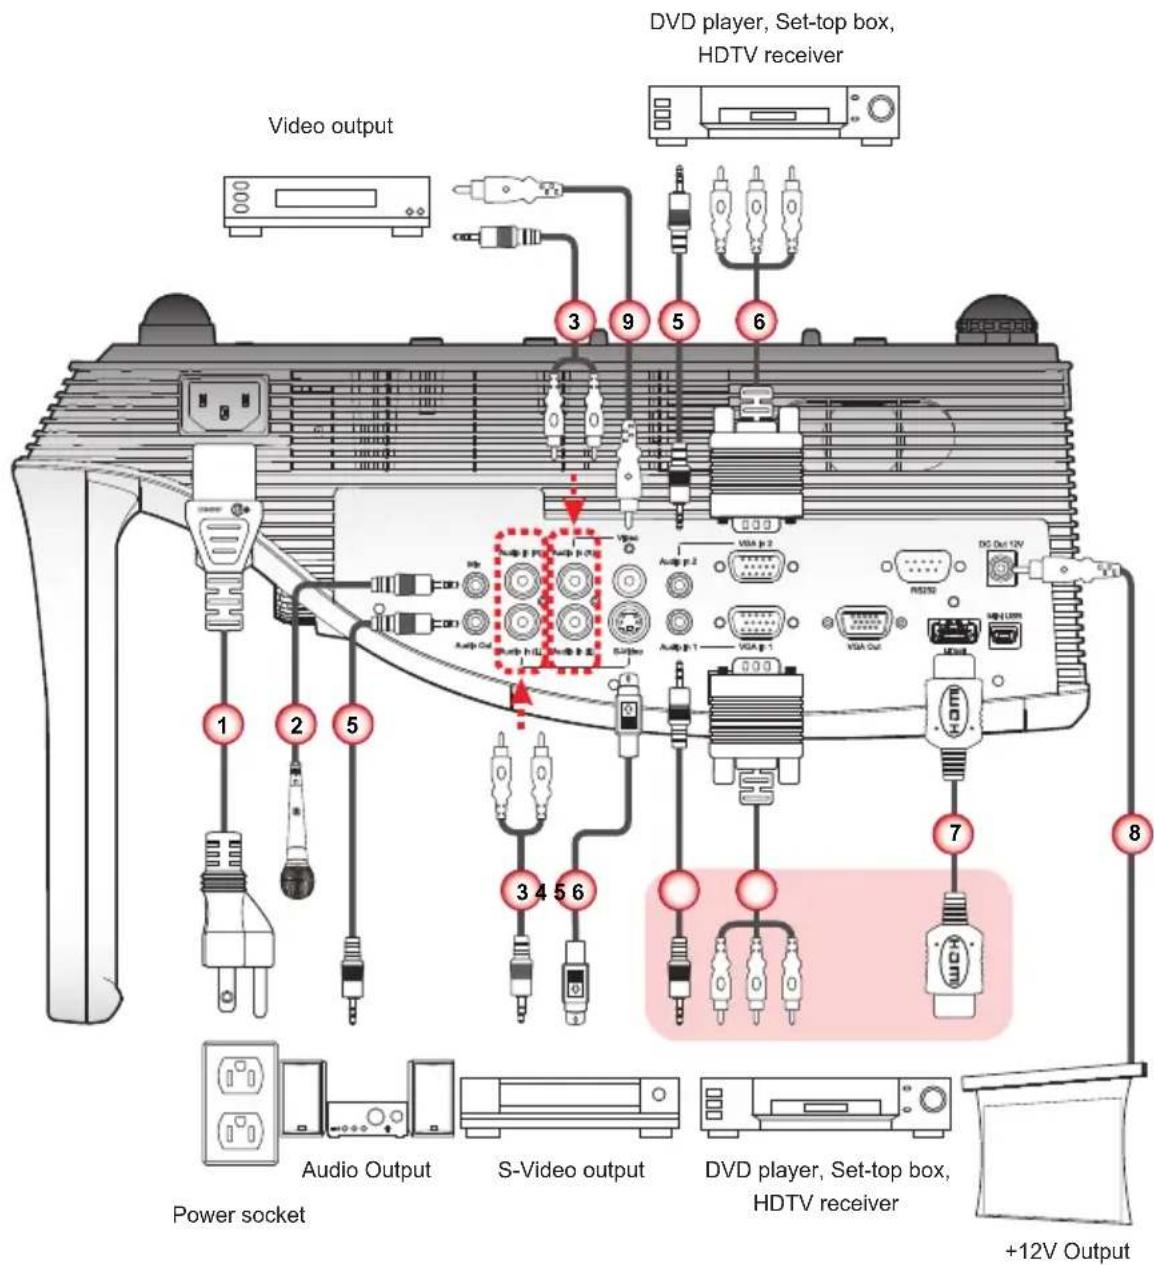
DVD player, Set-top box, HDTV receiver Video output 3 9 5 6 1 2 5 Audio Out VISA p.2 VISA p.1 VISA Out DC Out 12V 3 4 5 6 7 8 Power socket Audio Output S-Video output DVD player, Set-top box, HDTV receiver +12V OutputPower Cord1.
Microphone Cable 2.
Audio Cable Jack/RCA 3.
S-Video Cable 4.
Audio Cable 5.
VGA to HDTV (RCA) Cable 6.
HDMI Cable 7.
12V DC Jack 8.
Composite Video Cable 9.

■ Due to the difference in applications for each country, some regions may have different accessories.
Powering On/Off the Projector
Powering On the Projector
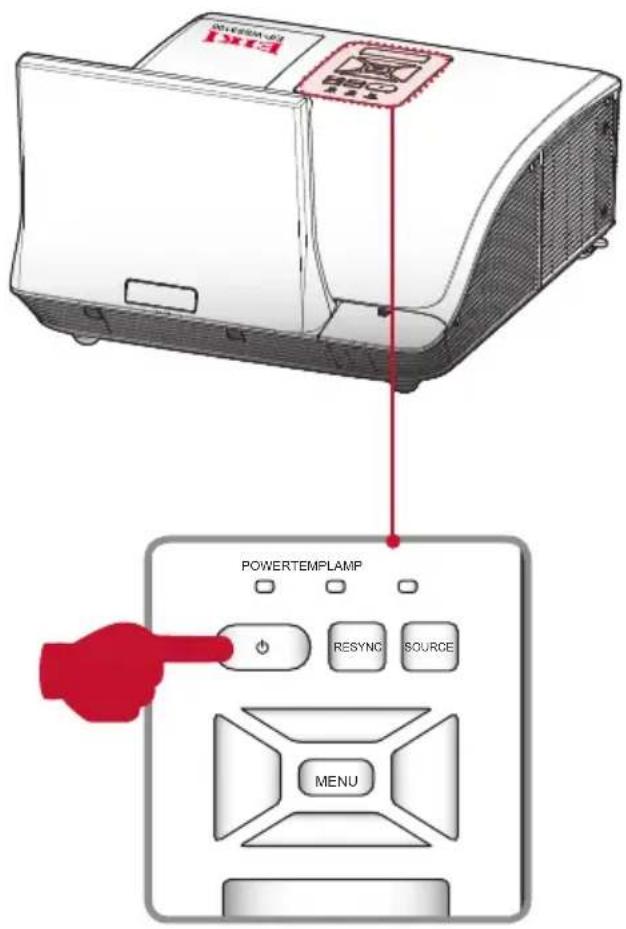
Securely connect the power cord and signal cable. When connected, the Power 1. LED will turn red.
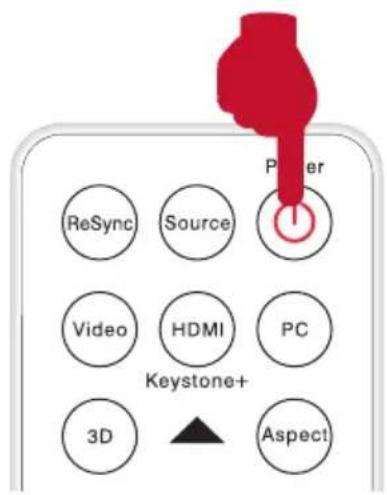
- Turn on the lamp by pressing “⏻” button on the control panel or on the remote control. The Power LED will turn blue.
Turn on your source that you want to display on the screen (computer, note-3. book, video player, etc). The projector will detect the source automatically and will display on the screen.
If you connected multiple sources at the same time, press the "Source" button 4. on the remote control to switch between inputs.
text_image
POWERTEMPLAMP RESYNC SOURCE MENUor
text_image
Power ReSync Source Video HDMI PC Keystone+ 3D AspectPowering Off the Projector
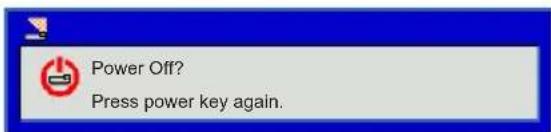
- Press the “💡” button on the control panel or on the remote control to turn off the projector. The following message will be displayed on the screen. Press the “💡” button again to confirm.
text_image
Power Off? Press power key again.- The Power LED will turn red and blink rapidly after the projector is turned off. And the fans will continue to operate for about 90 seconds to ensure that the system cools properly.
- Once the system has finished cooling, the Power LED will stop blinking and turn solid red to indicate standby mode.
- It is now safe to unplug the power cord.
LED Indicator Messages
| Message | Lamp LED(Red) | Temp LED(Red) | Power LED(Red) | Power LED(Blue) |
| Power Plug | Flash ON to OFF100ms | Flash ON to OFF100ms | Flash ON to OFF100ms | - |
| Standby - - ON - | ||||
| Power button ON - - - ON | ||||
| Cooling state - - | 0.5 second H(ON),0.5 second L(OFF)flashing | - | ||
| Power button OFF:Cooling completed; Standby Mode | - - ON - | |||
| Firmware download ON ON ON - | ||||
| Thermal sensor error, OSD showing as below:1. Make sure air in and outlets are not blocked.2. Make sure the environment temperature is under 40 degree C. | - ON - ON | |||
| Fan lock error, OSD showing as below:The projector will switch off automatically. | - | 0.5 second H(On),0.5 second L(Off)flashing | - | ON |
| Lamp error (Lamp, Lamp driver, Color wheel) | ON - - ON |
Adjusting the Projected Image
Adjusting the Projector's Height
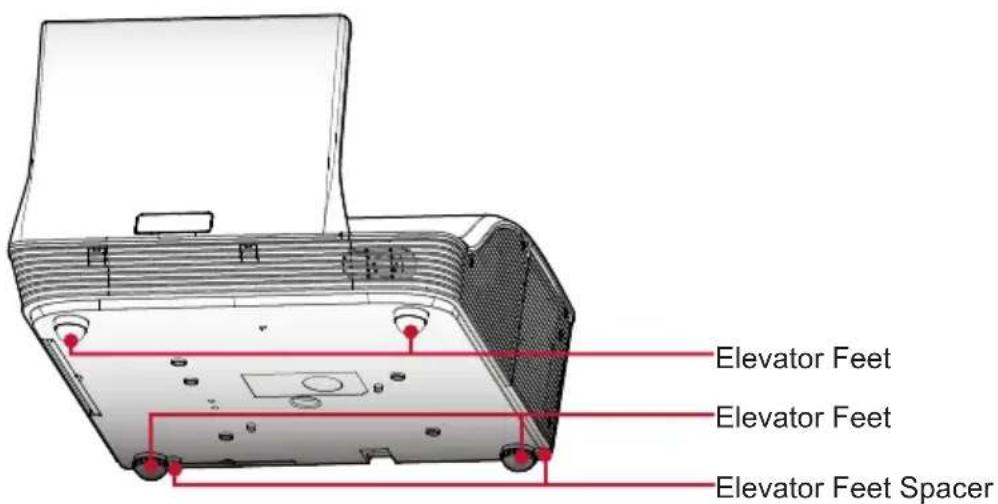
The projector is equipped with elevator feet for adjusting the image height.
To raise the image: •
Use screw in feet to raise the image to the desired height angle and fine-tune the display angle. ①
To lower the image: •
Use screw in feet to lower the image to the desired height angle and fine-tune the display angle. ②
text_image
Elevator Feet Elevator Feet Elevator Feet Spacer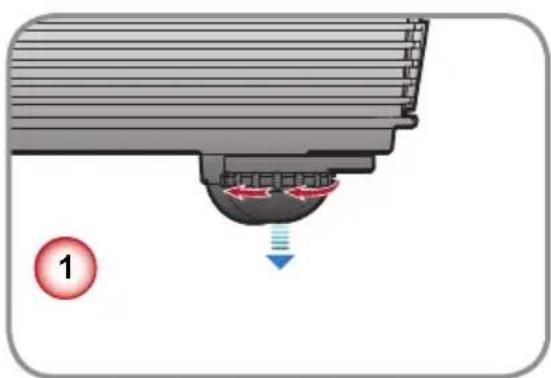
natural_image
Diagram of a mechanical component with directional arrows indicating flow or movement (no text or symbols)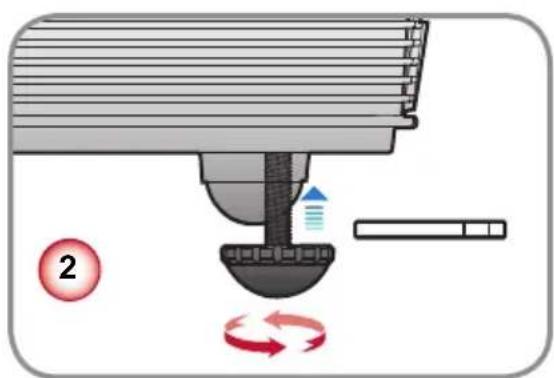
text_image
Diagram illustrating a mechanical or fluid system with labeled components and directional arrows indicating rotational flow.Adjusting the Projector's Focus
To focus the image, rotate the focus ring until the image is clear.
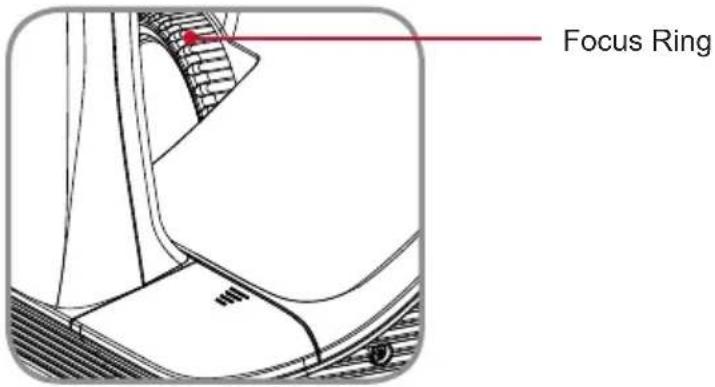
text_image
Focus RingAdjusting Projection Image Size
Refer to the graphics and table show as below to determine the screen size and projection distance.
Adjusting the vertical image position •
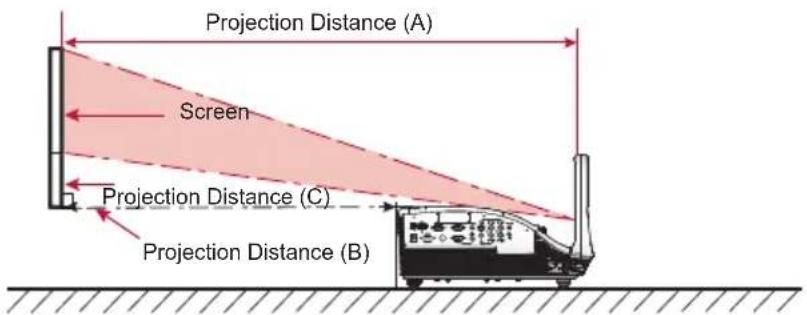
text_image
Projection Distance (A) Screen Projection Distance (C) Projection Distance (B)WXGA Series
| Screen Size (16:10) Projection Distance (A) Projection Distance (B) Projection Distance (C) | |||||||
| Diagonal (inch) mm Inch mm Inch mm Inch mm | |||||||
| 70 1778 | 20.4 517 | 7.2 | 182 6.0 153 | ||||
| 80 2032 | 23.5 | 596 | 10.3 262 | 7.4 187 | |||
| 87.2 | 2215 | 25.8 | 655 | 12.6 | 320 | 8.3 | 210 |
| 90 2286 | 26.7 677 | 13.5 343 | 8.6 219 | ||||
| 100 | 2540 | 29.9 | 759 | 16.7 | 424 | 9.9 | 252 |

■ Projection Distance A(mm)=Screen size(mm) x 0.296, Tolerance is around 3.1%
Ex: Projection Distance (655mm)=Screen size(2215mm) x 0.296
This table is for user's reference only.
User Controls
Using the Control Panel
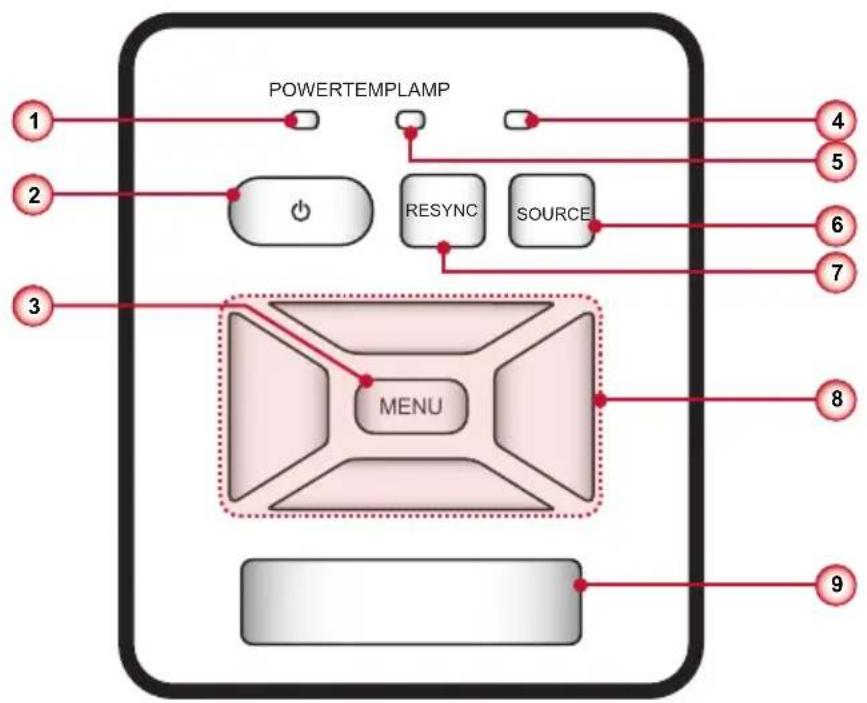
flowchart
graph TD
    A["POWERTEMPLAMP"] --> B["RESYNC"]
    A --> C["SOURCE"]
    B --> D["MENU"]
    C --> D
    D --> E["1"]
    D --> F["2"]
    D --> G["3"]
    D --> H["4"]
    D --> I["5"]
    D --> J["6"]
    D --> K["7"]
    D --> L["8"]
    D --> M["9"]
| Name | Description | |
| 1 | Power LED Indicate the projector's status | |
| 2 | Power ⏻ | Turn the projector on/off. |
| 3 | Menu Launch the on-screen display (OSD) / Exit a menu. | |
| 4 | Lamp LED Indicate the projector's lamp status. | |
| 5 | Temp LED Indicate the projector's temperature status. | |
| 6 | Source Select an input signal. | |
| 7 | Resync | Automatically synchronize the PC analog timing to its optimized condition. |
| 8 | Four Directional Select Keys | Use ▲▼◀▶ to select items or make adjustments to your selection. |
| 9 | IR Receiver | |
Using the Remote Control
flowchart
graph TD
    1 --> ReSync["ReSync"]
    2 --> ReSync
    3 --> Video["Video"]
    4 --> Video
    5 --> 3D["3D"]
    6 --> Keystone+
    Keystone+
    Keystone+
    Keystone+
    Keystone+
    Keystone+
    Keystone+
    Keystone+
    Keystone+
    Keystone-
    Keystone-
    Keystone-
    Keystone-
    Keystone-
    Keystone-
    Keystone-
    Keystone-
    Keystone-
    Keystone-
    Keystone-
    Keystone-
    Keystone-
    Keystone-
    Keystone-
    Keystone-
    Keystone-
    Keystone-
    Keystone-
    Keystone-
    Keystone-
    Keystone-
    Keystone-
    Keystone-
    Keystone-
    Keystone
| Name | Description | |
| 1 | Source Select an input signal. | |
| 2 | ReSync | Automatically synchronize the PC analog timing to its optimized condition. |
| 3 | HDMI Switch to HDMI source. | |
| 4 | Video Switch to Composite Video or S-Video source. | |
| 5 | 3D Press the “3D” to turn the 3D OSD menu on/off. | |
| 6 | Menu Launch or Exit the on-screen display(OSD). | |
| 7 | Four Directional Select Keys | Press ▲▼◄► direction buttons to select items or make adjustments. |
| 8 | Freeze | Press to freeze the image. Press it again to un-freeze the image. |
| 9 | Blank | Hide the screen picture. Press again to display screen picture. |
| 10 | Mute | Mute the volume of speakers and audio out. Press again and switch to normal volume. |
| 11 | Power ⏻ | Power on/off the projector. |
| 12 | PC Switch to VGA in 1/VGA in 2 source. | |
| 13 | Keystone / Adjust image until the sides are vertical. | |
| 14 | Aspect Use this function to choose your desired aspect ratio. | |
| 15 | Volume +/- Increase / decrease audio volume. | |
Remote Control Battery Installation
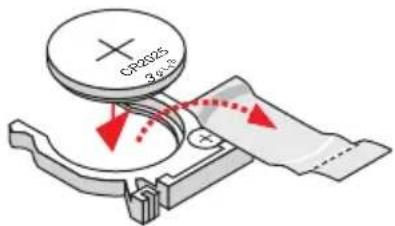
Press firmly and slide 1. the battery cover off.
Install new battery into the 2. compartment.
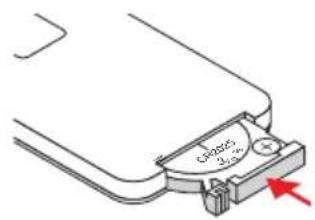
Put the cover 3. back.
natural_image
Hand holding a tool interacting with a small object, marked with red arrows indicating direction (no text or symbols present)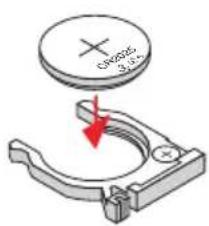
text_image
C0625 3.15Remove the old battery and install new one (CR2025). Ensure that the side with a “+” is facing up.
text_image
Capac 4.5
To ensure safe operation, please observe the following precautions:
Use CR2025 type battery.
Avoid contact with water or liquid. ■
Do not expose the remote control to moisture or heat. ■
Do not drop the remote control. ■
If the battery has leaked in the remote control, carefully wipe the case clean and install new battery.
Risk of an explosion if battery is replaced by an incorrect type.
Dispose of used battery according to the instructions. ■
On-screen Display Menus
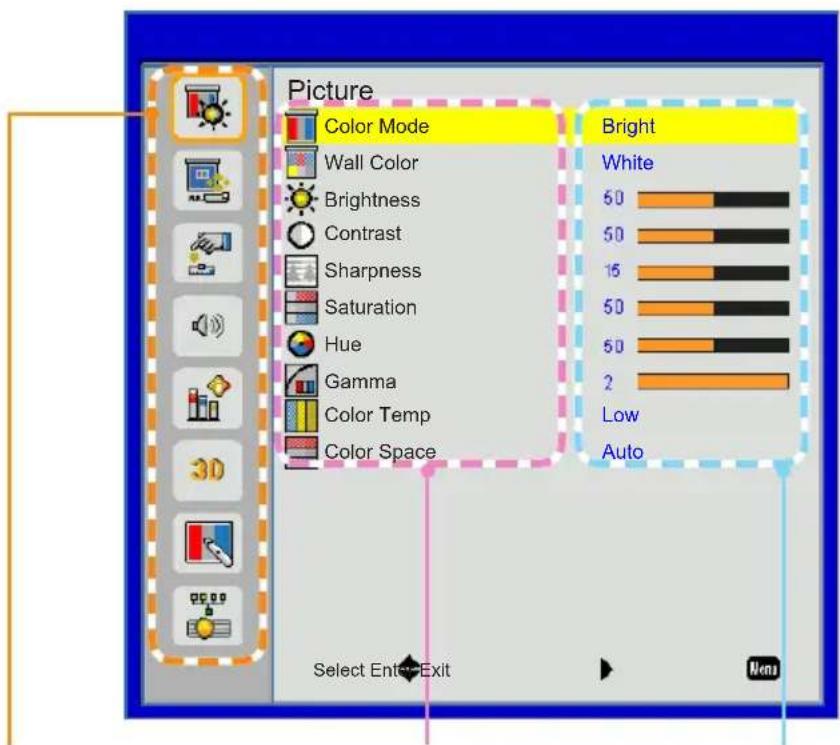
The Projector has multilingual On-screen Display menus that allow you to make image adjustments and change a variety of settings. The projector will automatically detect the source.
How to operate
To open the OSD menu, press the "Menu" button on the remote control or on the 1. control panel.
When OSD is displayed, use the ◀▶▲▼ buttons to select the desired item and 2. adjust the settings by the ◀▶ buttons.
If the setting has 3→icon, you could press the ▶ button to enter another sub menu. Press the "Menu" button to close the sub menu after adjustment.
After adjusting the settings, press the "Menu" button to go back to the main 4. menu.
To exit, press the "Menu" button again. The OSD menu will be closed and the 5. projector will automatically save the new settings.
text_image
Picture Color Mode Wall Color Brightness Contrast Sharpness Saturation Hue Gamma Color Temp Color Space Bright White 60 50 16 50 50 2 Low Auto Select Enter-Exit MenuMain Menu Sub Menu Settings
Structure
Main Menu Sub Menu Settings
| PICTURE | resU / emaG / eivoM | |
| Wall Color | White / Light Yellow / Light Blue / Pink / Dark Green | |
| Brightness | 0~100 | |
| Contrast | 0~100 | |
| Sharpness | 0~31 | |
| Saturation | 0~100 | |
| Hue | 0~100 | |
| Gamma | 0~3 | |
| Color Temp. | Low / Mid / High | |
| Color Space | AUTO / RGB / YUV | |
| SCREEN | Aspect Ratio | AUTO / 4:3 / 16:9 / 16:10 |
| Phase | 0~31 | |
| Clock | -50~50 | |
| H. Position | -10~10 | |
| V. Position | -10~10 | |
| Digital Zoom | 1~10 | |
| V Keystone | -20~20 | |
| Ceiling Mount | Front / Front Ceiling / Rear / Rear Ceiling | |
| SETTING | Language | English / Deutsch / Español /Français / Italiano / Nederlands / Português /日本語 / 簡体中文 / Polski / 한국어 / Русский / Svenska / 繁體中文 / عربي /Norsk / Türkçe |
| Menu Location | ||
| Closed Caption | Off / CC1 / CC2 / CC3 / CC4 | |
| VGA Out (Standby) | Off / On | |
| LAN(Standby) | Off / On | |
| Auto Screen(12V out) | Off / On | |
| Test Pattern | Off / On | |
| Security | Security Off / On | |
| Change Password 000000 | ||
| Reset | No / Yes | |
| Volume | Mute | Off / On |
| Volume | 0~32 | |
| Microphone Volume | 0~32 | |
| OPTIONS | Logo | Default / User |
| Logo Capture | ||
| Auto source | Off / On | |
| Input | HDMI / VGA 1 / VGA 2 / S-Video / COMPOSITE | |
| Auto Power Off (min) | 0~120 | |
| Lamp Setting | Lamp Hours Used (Normal) | |
| Lamp Hours Used (ECO) | ||
| Lamp Life Reminder Off / On | ||
| Lamp Power Mode Normal / ECO | ||
| Clear Lamp Hours No / Yes | ||
| Dynamic Black | Off / On | |
| High Altitude | Off / On | |
| Dust Filter Reminder Filters Remind(Hour) | ||
| Cleaning Up Reminder No / Yes | ||
| Information | Model Name / SNID / Source / Resolution /Software Version / Color Space / Aspect Ratio | |
Main Menu Sub Menu Settings
| 3D | nO / ffO / OTUAD3 | |||
| nO / ffOtrevnI D3 | ||||
| 3D Format | Frame Packing / Side-by-Side (Half) / Top and Bottom / Frame Sequential / Field Sequential | |||
| 1080p @ 24 96Hz / 144Hz | ||||
| Interactive | Interactive Settings | Off / IR Camera | ||
| LAN | LAN Settings | DHCP | Off / On | |
| IP Address | ||||
| Subnet mask | ||||
| Gateway | ||||
| DNS | ||||
| Store | No / Yes | |||
| teseR | Nen | |||
Picture
text_image
Picture Color Mode Bright Wall Color White Brightness 50 Contrast 50 Sharpness 15 Saturation 50 Hue 50 Gamma 2 Color Temp Low Color Space Auto Select Enter ExitColor Mode
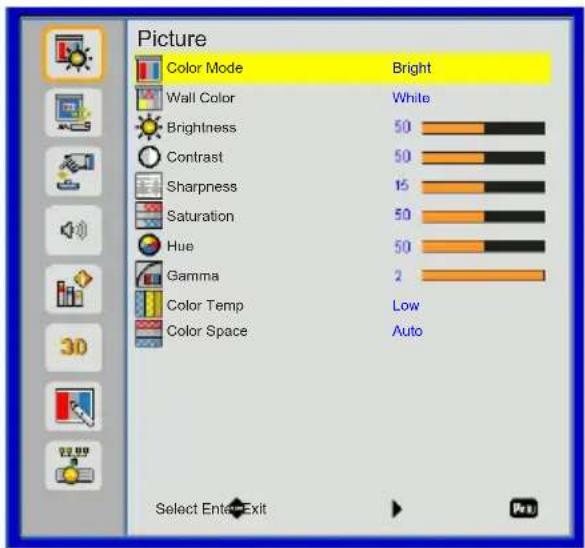
There are many factory presets optimized for various types of images. Use the ◀ or ▶ button to select the item.
Bright: For brightness optimization.
▶ PC: For meeting presentation.
▶ Movie: For playing video content.
▶ Game: For game content.
▶ User: Memorize user's settings.
Wall Color
Use this function to choose a proper color according to the wall. It will compensate the color deviation due to the wall color to show the correct image tone.
Brightness
Adjust the brightness of the image.
▶ Press the ◀ button to darken image.
▶ Press the ▶ button to lighten the image.
Contrast
The Contrast controls the difference between the lightest and darkest parts of the picture. Adjusting the contrast changes the amount of black and white in the image.
▶ Press the ◀ button to decrease the contrast.
▶ Press the ▶ button to increase the contrast.
Sharpness
Adjust the sharpness of the image.
▶ Press the ◀ button to decrease the sharpness.
▶ Press the ▶ button to increase the sharpness.
Saturation
Adjust a video image from black and white to fully saturated color.
Press the ◀ button to decrease the amount of saturation in the image.
▶ Press the ▶ button to increase the amount of saturation in the image.
Hue
Adjust the color balance of red and green.
▶ Press the ◀ button to increase the amount of green in the image.
▶ Press the ▶ button to increase the amount of red in the image.

"Sharpness", "Saturation" and "Hue" functions are only supported under video mode.
Gamma
Effects the representation of dark scenery. With greater gamma value, dark scenery will look brighter.
Color Temp.
Adjust the color temperature. At higher temperature, the screen looks colder; at lower temperature, the screen looks warmer.
Color Space
Select an appropriate color matrix type from Auto, RGB or YUV.
Screen
text_image
Screen Aspect Ratio Auto Phase 15 Clock 10 H. Position 10 V. Position 10 Digital Zoom 10 V. Keystone 10 Ceiling Mount Front Select Enter ExitAspect Ratio
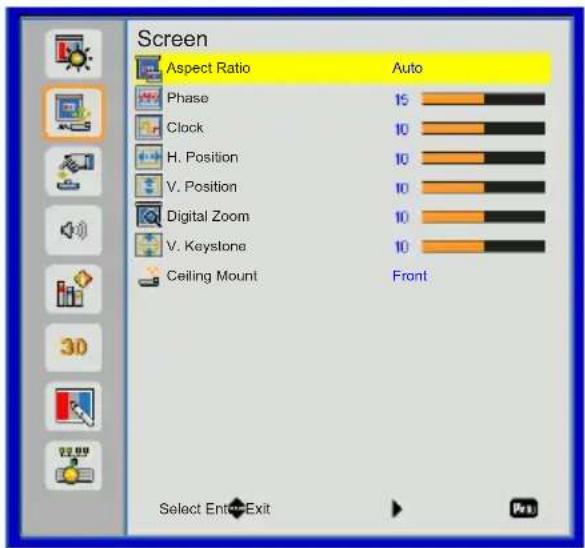
▶ Auto: Keep the image with original width-height ratio and maximize the image to fit native horizontal or vertical pixels.
4:3: The image will be scaled to fit the screen and displayed using a 4:3 ratio.
16:9: The image will be scaled to fit the width of the screen and the height adjusted to display the image using a 16:9 ratio.
16:10: The image will be scaled to fit the width of the screen and the height adjusted to display the image using a 16:10 ratio.
Phase
Synchronize the signal timing of the display with the graphic card. If the image appears to be unstable or flickers, use this function to correct it.
Clock
Change the display data frequency to match the frequency of your computer's graphic card. Use this function only if the image appears to flicker vertically.
H. Position
▶ Press the ◀ button to move the image left.
▶ Press the ▶ button to move the image right.
V. Position
Press the ◀ button to move the image down.
▶ Press the ▶ button to move the image up.

"H. Position" and "V. Position" ranges will depend on input source.
Digital Zoom
Press the ◀ button to reduce the size of an image.
Press the ▶ button to magnify an image on the projection screen.
V Keystone
Press the ◀ or ▶ button to adjust image distortion vertically. If the image looks trapezoidal, this option can help make the image rectangular.
Ceiling Mount
Front: The image is projected straight on the screen.
Front Ceiling: This is the default selection. When selected, the image will turn upside down.
▶ Rear: When selected, the image will appear reversed.
▶ Rear Ceiling: When selected, the image will appear reversed in upside down position.
Setting
text_image
Setting Language English Menu Location Closed Caption CC1 VGA OUT (Standby) Off LAN (Standby) Off Auto Screen(12V Out) Off Test Pattern Off Security Reset Select Enter ExitLanguage
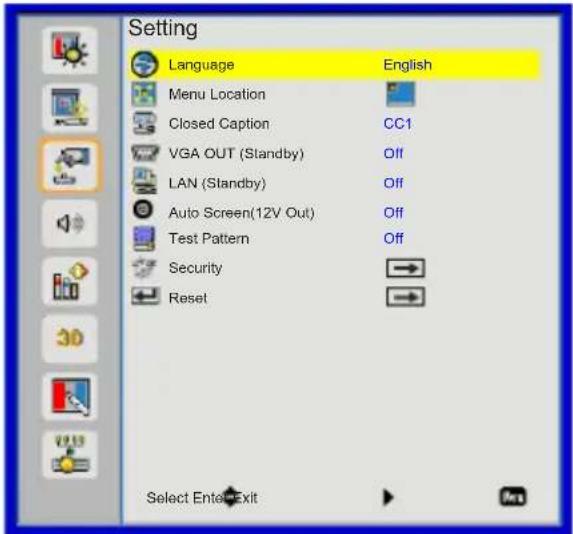
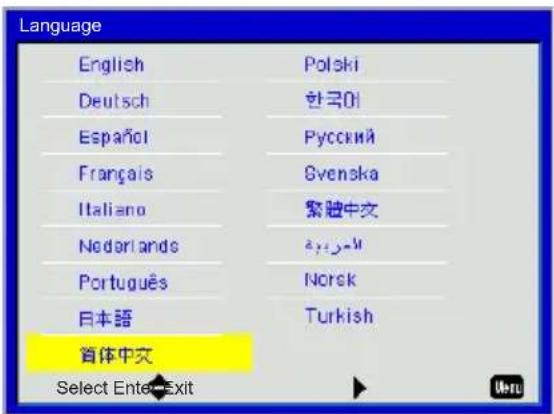
Choose the multilingual OSD menu. Press the ◀ or ▶ button into the sub menu and then use the ▲ or ▼ button to select your preferred language. Press ▶ on the remote control to finalize the selection.
text_image
Language English Deutsch Español Français Italiano Nederlands Portugues 日本語 首体中文 Select Enter-Exit Polski 한국이 Русский Svenska 繁體中文 Norsk TurkishMenu Location
Choose the menu location on the display screen.
Closed Caption
Use this function to enable closed caption menu. Select an appropriate closed captions option: Off, CC1, CC2, CC3, CC4.
LAN (Standby)
Choose "On" to enable LAN connection. Choose "Off" to disable LAN connection.
VGA OUT (Standby)
Choose "On" to enable VGA OUT connection.
Auto Screen (12V Out)
Choose "On", the down/up move of electronic screen will be related with power on/off of Projector.
Test Pattern
Display a test pattern.
Security
Refer next page.
Reset
Choose "Yes" to return the parameters on all menus to the factory default settings.
Setting | Security
text_image
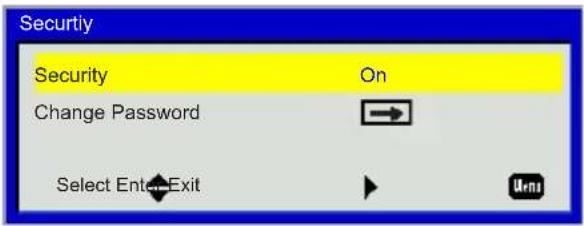
Security Security On Change Password → Select Enter Exit ↗ UmiSecurity
On: Choose "On" to use security verification when turning on the projector.
Off: Choose "Off" to be able to switch on the projector without password verification.
Change Password
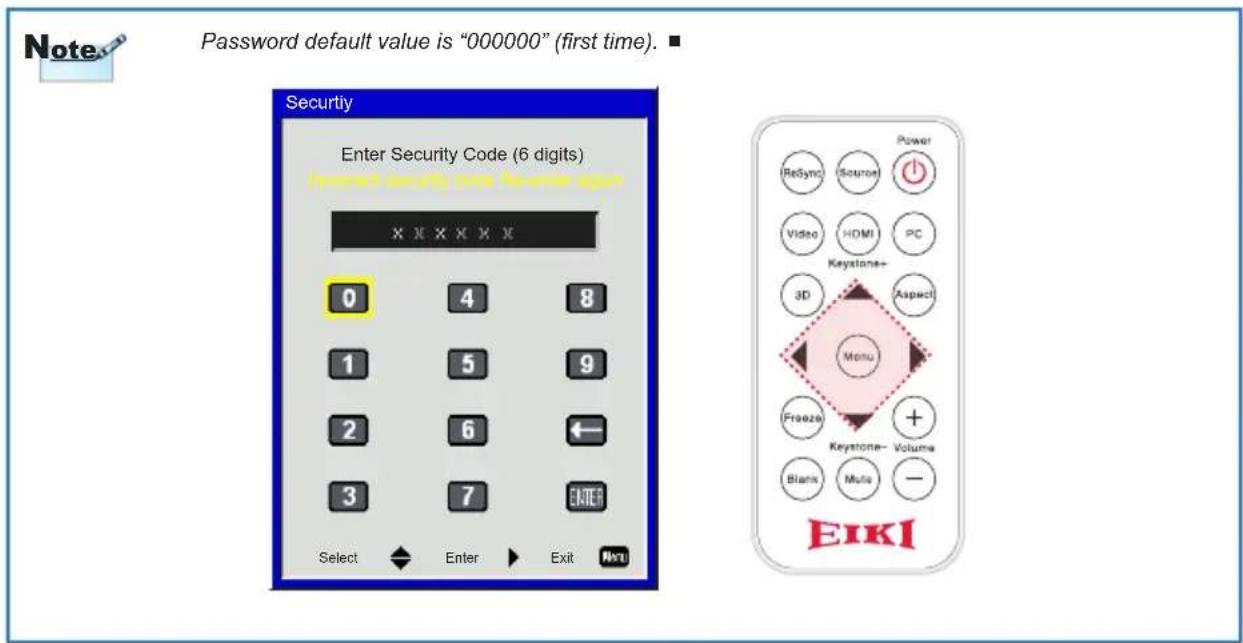
▶ First time:
- Press the ▶ button to set the password.
• The password has to be 6 digits.
- Use the ▲ or ▼ on the remote control to select your new password on the screen and then press ▶ to confirm it.
Change Password:
- Use the ▲ or ▼ on the remote control to enter your current password on the screen and then press ▶ to confirm it.
- Enter a new password (6 digits in length) then press "Enter" to confirm it.
- Enter the new password again and press "Enter" to confirm it.
If the incorrect password is entered for 3 times, the projector will automatically shut down.
If you have forgotten your password, please contact your local office for support.
text_image
Note Password default value is "000000" (first time). Security Enter Security Code (6 digits) Implied Security Code for enter digit X X X X X X 0 4 8 1 5 9 2 6 ← 3 7 ENTER Select Enter Exit EikiVolume
text_image
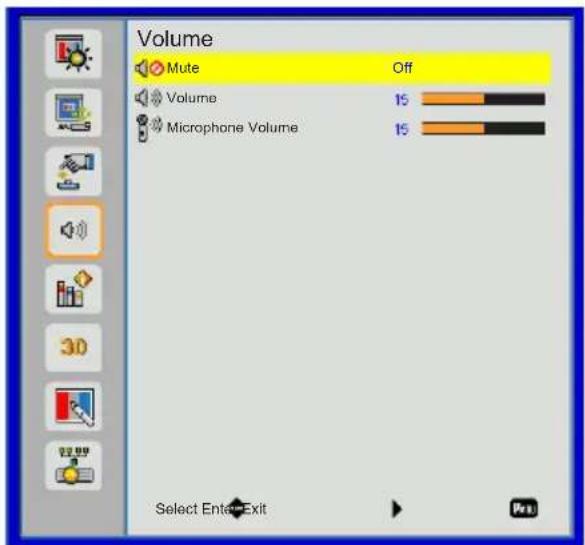
Volume Mute Off Volume 15 Microphone Volume 15 Select Enter ExitMute
Choose "On" to turn mute on.
Choose "Off" to turn mute off.
Volume
▶ Press the ◀ button to decrease the volume.
▶ Press the ▶ button to increase the volume.
Microphone Volume
Press the ◀ button to decrease the microphone Volume.
▶ Press the ▶ button to increase the microphone Volume.
Options
text_image
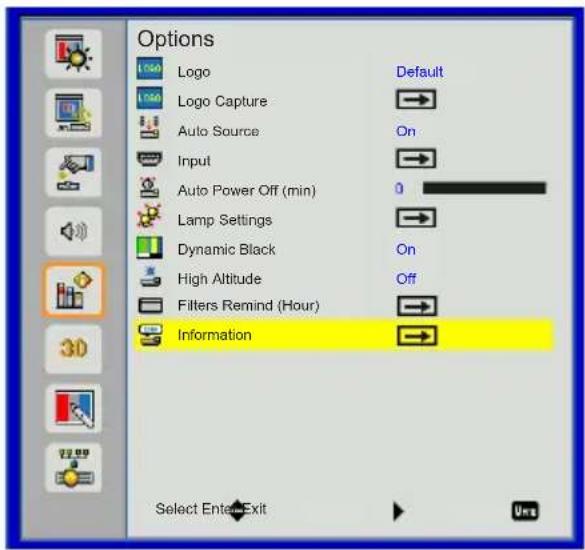
Options Logo Default Logo Capture Auto Source On Input Auto Power Off (min) 0 Lamp Settings Dynamic Black On High Altitude Off Filters Remind (Hour) Information Select Enter ExitLogo
Use this function to set the desired startup screen. If changes are made they will take effect the next time the projector is powered on.
Default: The default startup screen.
▶ User: Use stored picture from "Logo Capture" function.
Logo Capture
Press ▶ button to capture an image of the picture currently displayed on screen.
Screen capture in progress... Please wait...

For successful logo capture, please ensure that the onscreen image does not exceed the projector's native resolution. (WXGA:1280x800).
"Logo Capture" is not available when 3D is enabled.
■ Before active this function, it is recommended that "Aspect Ratio" is set to the "Auto".
Auto Source
On: The projector will search for other signals if the current input signal is lost.
Off: The projector will only search current input connection.
Input
Press ▶ button to enable/disable input sources. The projector will not search for inputs that are not selected.

text_image
Input HDMI VGA 1 VGA 2 S-Video Composite Select Enter ExitAuto Power Off (min)
Sets the countdown timer interval. The countdown timer will start, when there is no signal being sent to the projector. The projector will automatically power off when the countdown has finished (in minutes).
Lamp Setting
Refer to page 33.
Dynamic Black
On: The pictures with the optimum contrast will be displayed by automatically providing signal compensation to suit the pictures concerned.
Off: Turn off this function.

"Dynamic Black" is available when "Color Mode" is set to "Movie".
■ "Dynamic Black" is not available when "3D" or "Interactive" is enabled.
■ When "Dynamic Black" is available, "Lamp Power Mode" selection is not available.
High Altitude
On: The built-in fans run at high speed. Select this option when using the projector at altitudes above 2500 feet/762 meters or higher.
Off: The built-in fans automatically run at a variable speed according to the internal temperature.
Filters Remind (Hour)
Filters Remind (Hour): Set the filter reminder time
Cleaning Up Reminder: Select "Yes" to reset the dust filter hour counter after replacing or cleaning the dust filter.
Information
Display the projector information for model name, SNID, source, resolution, software version, color space and aspect ratio on the screen.
Options | Lamp Settings
text_image
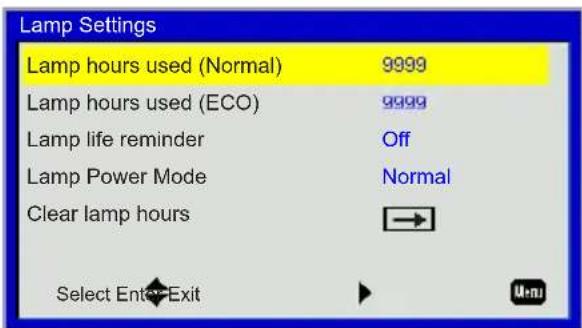
Lamp Settings Lamp hours used (Normal) 9999 Lamp hours used (ECO) 9999 Lamp life reminder Off Lamp Power Mode Normal Clear lamp hours → Select Enter→ExitLamp Hours Used (Normal)
Display the projection time of normal mode.
Lamp Hours Used (ECO)
Display the projection time of ECO mode.
Lamp Life Reminder
On: Choose "On" to show the lamp end of life warning message.
Off: Choose "Off" to hide the lamp end of life warning message.
Lamp Power Mode
▶ Normal: Normal mode.
▶ ECO: Use this function to dim the projector lamp which will lower power consumption and extend the lamp life.
Clear Lamp Hours
Choose "Yes" to reset the lamp hour counter after replacing the lamp.
3D
text_image
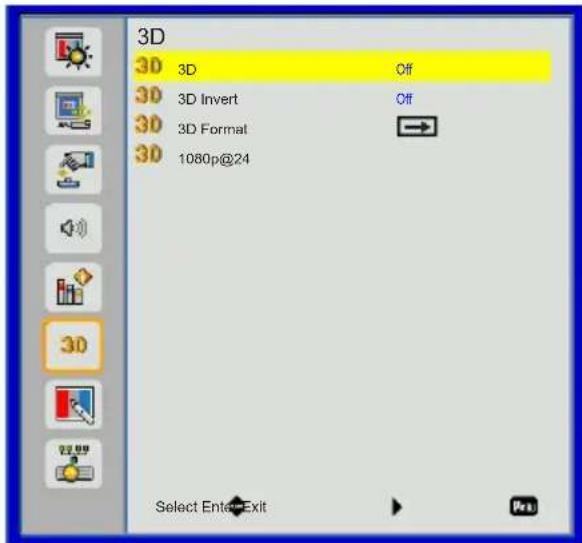
3D 3D 3D Off 3D 3D Invert Off 3D 3D Format 3D 1080p@24 Select Enter-Exit Pr3D
▶ Auto: When a HDMI1.4a 3D timing identification signal is detected, the 3D image is selected automatically.
Choose "Off" to disable 3D function.
Choose "On" to enable 3D function.
3D Invert
If you see a discrete or overlapping image while wearing DLP 3D glasses, you may need to execute "Invert" to get best match of left/right image sequence to get the correct image.
3D Format
Use this feature to select the 3D format. Options are: "Frame Packing", "Side-by-Side (Half)", "Top and Bottom", "Frame Sequential" and "Field Sequential".

■ "Frame Sequential" is supported the DLP Link 3D input signals from VGA / HDMI connector.
■ "Frame Sequential" / "Field Sequential" are supported the HQFS 3D input signals from Composite/S-video connector connector.
■ "Frame Packing" / "Side-by-Side(Half)" / "Top and Bottom" are supported from HDMI 1.4a 3D input signals.
1080p @24
Use this feature to select 96 or 144Hz refresh rate as using 3D glasses in the1080p @24 frame packing.
Interactive
text_image
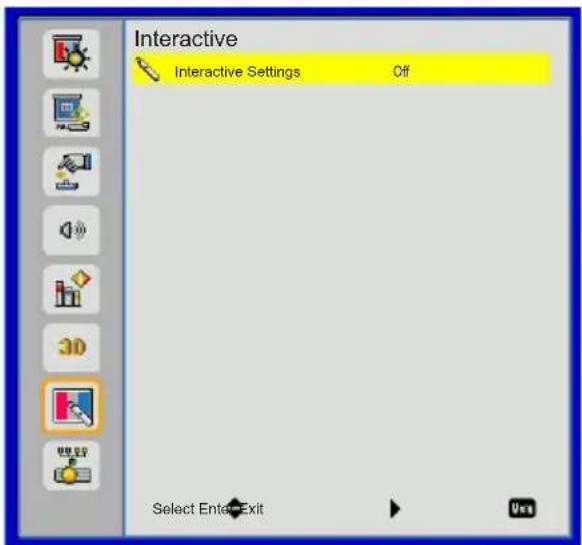
Interactive Interactive Settings Off Select Enter Exit Help
The Interactive function is available when displaying graphic source from HDMI/VGA input. Other sources are not supported.
If "3D" or "Dynamic Black" function is enabling, "Interactive" feature is disabling.
Interactive Settings
Use this feature to select the Interactive Pen function.
Choose "Off" to disable the Interactive Pen function.
Choose "IR Camera" to enable the Interactive Pen function.
You need to unplug the Mini USB cable that connects NB/desktop with the projector before using the Interactive function. After you complete the Interactive Settings in OSD, use Mini USB cable to connect NB/desktop with the projector.
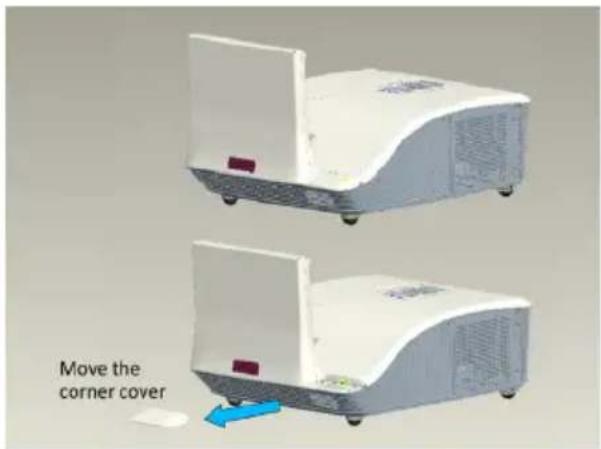
The IR camera Interactive function needs an external IR camera. Please refer to below figure and plug in IR camera to projector before projector was installed.
text_image
Move the corner cover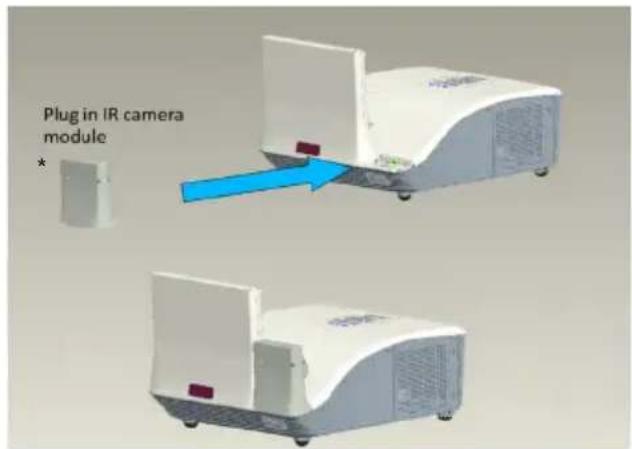
text_image
Plug in IR camera module *(*)Interactive Kit IK-US10 (Option)
LAN
text_image
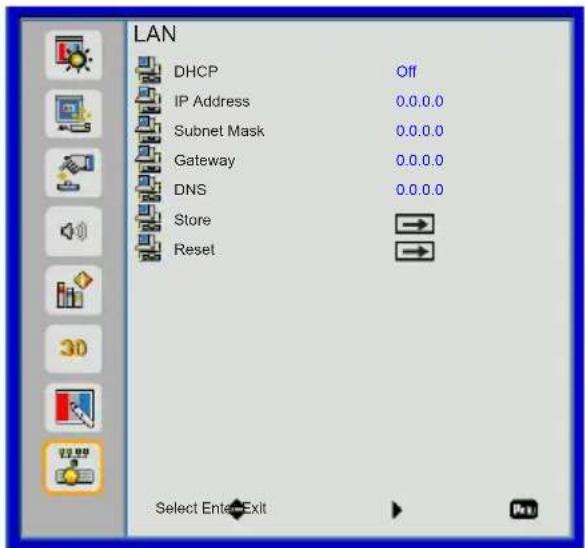
LAN DHCP Off IP Address 0.0.0.0 Subnet Mask 0.0.0.0 Gateway 0.0.0.0 DNS 0.0.0.0 Store Reset Select Enter ExitDHCP: If a DHCP server exists in the network to which the projector is connected, the IP address will automatically be acquired when you select DHCP On. If DHCP is Off, manually set the IP Address, Subnet Mask, and Gateway. Use ▲ or ▼ to select the number of IP address, Subnet Mask, and Gateway.
IP Address: Select an IP address.
Subnet Mask: Configure the Subnet Mask of the LAN connection.
Gateway: Check the Gateway address with your network/system administrator if you configure it manually.
DNS: Check the DNS Server IP address with your network/system administrator if you configure it manually.
Store: Choose "Yes" to save the changes made in network configuration settings.
Reset: Choose "Yes" to return the display parameters on all menus to the factory default settings.
Web Management
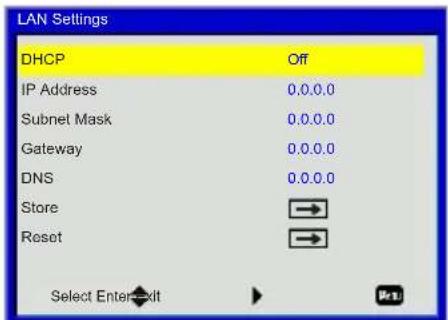
Turn on DHCP to allow a DHCP server to automatically assign an IP, or 1. manually enter the required network information.
text_image
LAN Settings DHCP Off IP Address 0.0.0.0 Subnet Mask 0.0.0.0 Gateway 0.0.0.0 DNS 0.0.0.0 Store → Reset → Select Enter—ExitOpen your web browser and type in IP Address from the OSD LAN. 2.
Based on network web-page for the input-string in [tools] tab, the limitation for 3. Input-Length is in the below list ("space" and the other punctuation key included):
| Category Item | Input-Length (characters) | |
| Projector | Projector Name 21 | |
| Location 21 | ||
| Administrator 21 | ||
| Admin Password | New Password 4 | |
| Confirm 4 | ||
Note: The characters allowed to be input are 0-9, and a-Z.

■ Use Internet Explore 7/8/9 or Safari version 5.0.3 to enter the IP address. You can now access Web Management and manage the projector from a remote location.
When making a direct connection from your computer to the projector
Step 1: Find an IP Address (192.168.10.100) from LAN function of projector.
Step 2: To open Network Connections, click Start, click Control Panel, click Network and Internet Connections, and then click Network Connections. Click the connection you want to configure, and then, under Network Tasks , click Change settings of this connection.
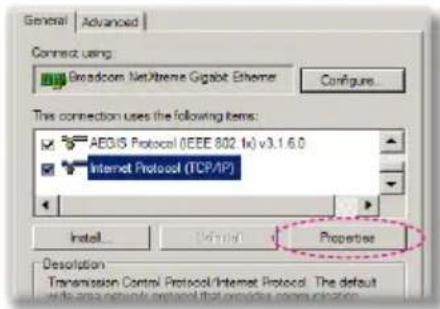
Step 3: On the General tab, under This connection uses the following items, click Internet Protocol (TCP/IP), and then click "Properties."
text_image
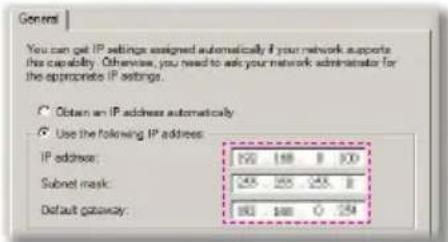
General | Advanced | Connect using Broadcom NetXtreme Gigabit Ethernet Configure... This connection uses the following items: AEGIS Protocol (IEEE 802.1x) v3.1.6.0 Internet Protocol (TCP/IP) Install... Default Properties Desolation Transmission Control Protocol/Internet Protocol The default with area network protocol that provides communicationStep 4: Click Use the following IP address, and type in as below:
IP address: 192.168.10.99
Subnet mask: 255.255.255.0
text_image
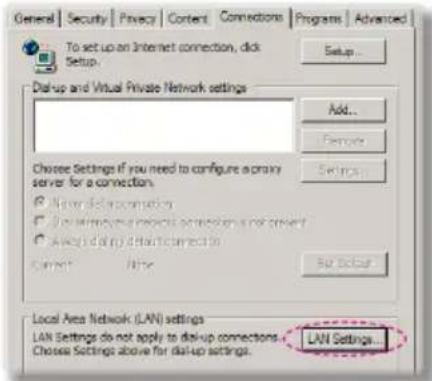
General You can get IP settings assigned automatically if your network supports this capability. Otherwise, you need to ask your network administrator for the appropriate IP settings. ○ Obtain an IP address automatically ● Use the following IP address: IP address: 100 188 8 100 Subnet mask: 245 265 245 8 Default gateway: 183 188 0 259Step 5: To open Internet Options, click IE web browser, click Internet Options, click the Connections tab and click "LAN Settings..."
text_image
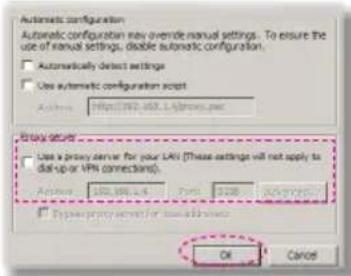
General Security Privacy Content Connections Programs Advanced To set up an Internet connection, disk Setup. Setup... Backup and Virtual Private Network settings Add... Remove Settings... Choose Settings if you need to configure a proxy server for a connection. ● New Delinquemation ○ Do not use any remote connections or other ○ Avoid data (i) default connection to Current Now Set Out Local Area Network (LAN) settings LAN Settings do not apply to disk-up connections. Choose Settings above for disk-up settings. LAN Settings...Step 6: The Local Area Network (LAN) Setting dialog box appears, In the Proxy Server area, cancel the Use a proxy server for your LAN check box., then click "OK" button twice.
text_image
Automatic configuration Automatic configuration may override manual settings. To ensure the use of manual settings, disable automatic configuration. Automatically detect settings Use automatic configuration script Actions: https://202-458-1/kg/xxx.net System server Use a proxy server for your LAF (These settings will not apply to dial-up or VPN connections). Actions: 372.196.1.4 Ports: 1238 System ports: Type proxy server or manual server OK CancelStep 7: Open your IE and type in the IP address of 192.168.10.100 in the URL then press "Enter" key.
Projector Information Page
text_image
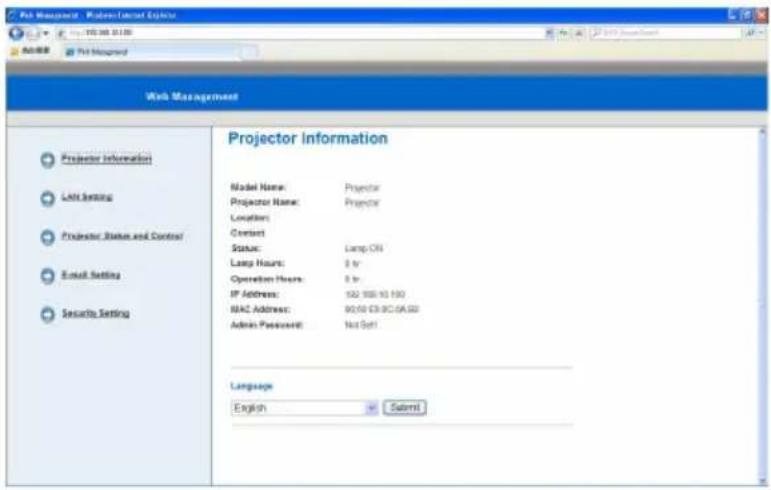
Web Management Projector Information Model Name: Projector Projector Name: Projector Location: Context Status: Lamp ON Lamp Hours: 3 fr Operation Hours: 8 fr IP Address: 102.100-10.100 MAC Address: 90.50 GB BC GA SDD Admin Password: Not Soft Language English SubmitProjector Information page by entering the projector's IP address at the web browser. See "LAN Settings" section.
Language: Allows you to set the language for web management.
LAN Settings Page
text_image
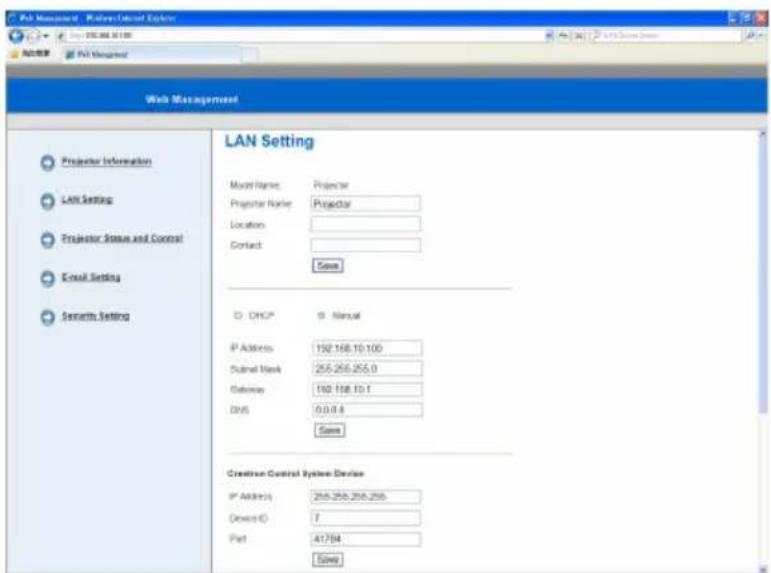
Web Management Projector Information LAN Setting Projector Status and Control Email Setting Security Setting LAN Setting Model Name Projector Projector Name Projector Location: Contact: Save CHCP 9 Normal IP Address 192.168.10.100 Submit Mask 255.255.255.0 Subway 192.168.10.1 DNS 0.0.0.0 Save Creatine Control System Device IP Address 255.255.255.255. Device ID 7 Port 41794 Save▶ Set up the Projector Name, Location and Administrator information (up to 21 characters for each field). Press Save to store the settings.
Choose DHCP to assign an IP address to the projector from a DHCP server automatically, or Manual to assign an IP address manually.
▶ Set up the IP Address, Device ID and Port information on the Crestron function.
Projector Status and Control Page
text_image
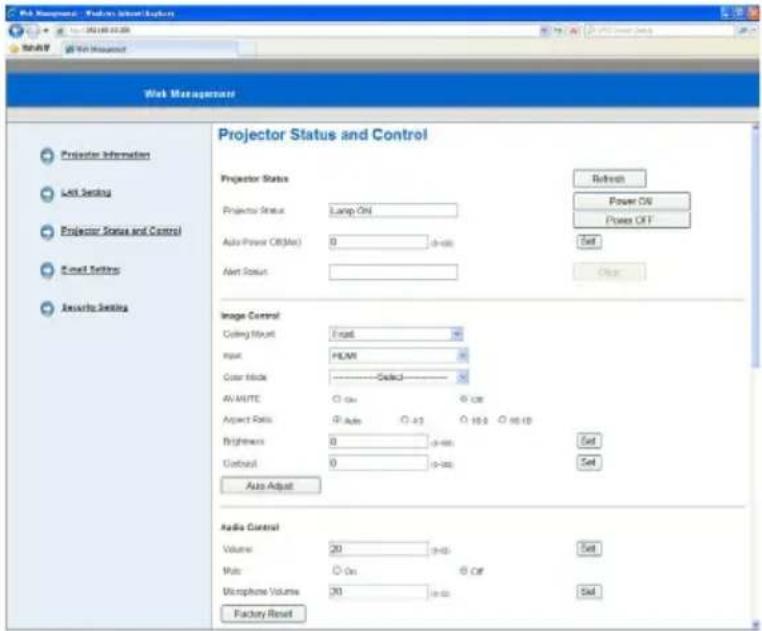
Web Management - Playbox Status/Actions Projector Information Last Setting Projector Status and Control Event Settings Projector Status and Control Projector Status Projector Status Lamp Ctrl Auto Power Off(Min) 0 (p=68) Alert Status Reference Power CW Power OFF Set Clear Image Control Coding Mount Event Input PUM Color Mode Select AV WHITE C++ C#F Aspect Ratio Auto A+2 H5.0 H5.10 Brightness 0 (p=68) Controll 0 (p=68) Auto Adjust Set Radio Control Volume 20 (p=68) Multi On Off Microphone Volume 20 (p=68) Factory Reset Set▶ Projector Status: There are 4 status: Standby, Warning up, Lamp On, Power Saving and Cooling. Click the Refresh button to refresh the status and control settings.
▶ Auto Power Off: Auto Power Off can be set to Off(0) or 1\~120 minutes. See “Auto Power Off (min)” function.
Alert Status: There are three error status: Lamp warning, Low lamp life, and Temperature warning. Your projector might lock up in protection mode if any of the alerts is activated. To exit protection mode, click the Clear to clear the Alert Status before you could Power ON your projector.
Ceiling Mount: Allows you to select the projector mode, depending on how the projector is mounted. There are four projection modes: Front, Front Ceiling, Rear and Rear Ceiling. See “Ceiling Mount” function.
Source Select: The Source Select menu allows you to select your projector's input source. You can select HDMI, VGA 1/VGA 2, S-Video and Composite Video.
Color Mode: Select a mode to optimize the display image based on how the projector is being used. See "Color Mode" function.
Blank Screen: Select On/Off to hide/unhide the screen picture.
Aspect Ratio: Allows you to select the aspect ratio to adjust how the image appears.
Brightness: Select value to adjust the brightness of the image.
Contrast: Select value to adjust the display contrast.
Volume: Select the value (0\~32) for the audio volume
Mute: Choose "On" to turn mute on. Choose "Off" to turn mute off.
Microphone Volume: Select the value (0\~32) for the Microphone Volume.

- Click the Auto Adjust button to adjust the settings automatically. - Click the Factory Reset button to restore the factory default settings.
E-mail Setting Page
text_image
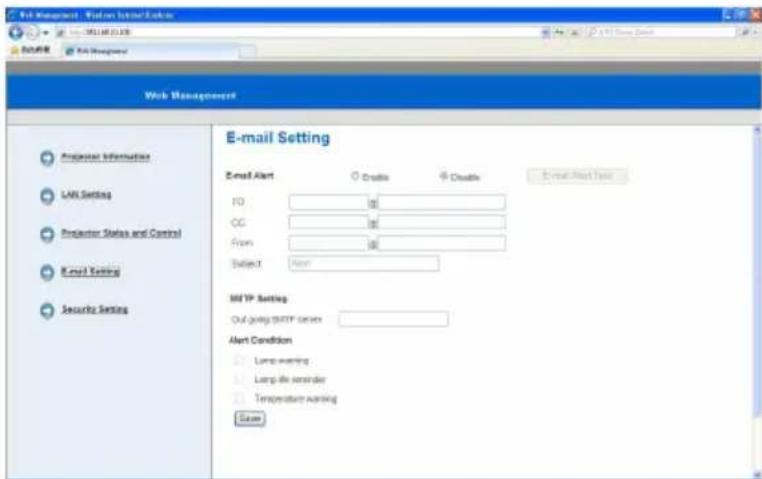
Web Management - Windows Internet Explorer File Management - Web Management Projector Information LMS Setting Projector Status and Control Email Setting Security Setting E-mail Setting Email Alert Delete Disable Email Alert Time ID GO Access Submit X Alert SMTP Setting Out Going SMTP Series Alert Condition Long warning Long file reminder Temperature warning SaveE-mail Alert: You can set whether to be notified by email (Enable) or not (Disable).
To/Cc/From: You can enter email address of sender (From) and recipients (To/Cc) to receive notification when an abnormality or warning occurs.
▶ SMTP setting: Out going SMTP server, User name, and Password should be provided by your network administrator or MIS.
▶ Alert Condition: You can select the abnormalities or warnings to be notified by email. When any of the alert conditions occur, an email will be sent to the recipients (To/Cc).

Click the Save button to save the settings.
Security Setting Page
text_image
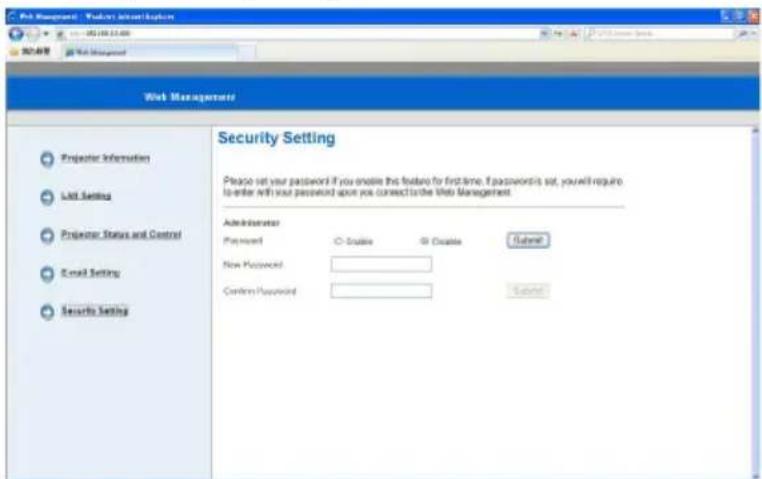
Web Management Projector Information List Setting Projector Status and Control Email Setting Security Setting Security Setting Please set your password if you enable this feature for first time. If passwords set, you will require to enter with your password upon you connect to the Web Management. Administrator Payment Cancel Cancel Subnet New Password Confirm Password Subnet▶ Set up an administrator password to access the Web Management.
Step 1. Password: Click Enable first.
Step 2. New Password: Enter the new password.
Step 3. Confirm Password: Confirm the new password then Submit
Step 4. Password: Click Enable then Submit.

Contact Service Center if you forget your administrator password.
Login Page
text_image
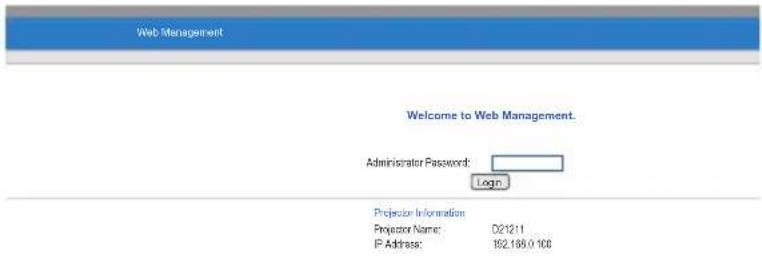
Web Management Welcome to Web Management. Administrator Password: Login Projector Information Projector Name: 021211 IP Address: 162.185.0.100▶ Administrator Password: Enter the Administrator Password and click Login button.
Crestron
For more information, please visit http://www.crestron.com & www.crestron.com/getroomview/
Appendices
Troubleshooting
If you experience a problem with your projector, please refer to the following information. If a problem persists, please contact your authorized dealer.
Image Problems
? No image appears on-screen
- Ensure all the cables and power connections are correctly and securely connected as described in the “Installation” section.
▶ Ensure the pins of connectors are not crooked or broken.
▶ Check if the projection lamp has been securely installed.
▶ Ensure that the “Blank” feature is not turned on.
? Partial, scrolling or incorrectly displayed image
▶ Press "Auto Sync" on the remote control.
• If you are using a PC:
For Windows 95, 98, 2000, XP: -
Open the "My Computer" icon, the "Control Panel" folder, and 1. then double click on the "Display" icon.
Select the "Settings" tab.2.
Verify that your display resolution setting is lower than or equal to 3.1080p.
For Windows Vista, Windows 7: -
From the "My Computer" icon, open the "Control Panel" folder, 1. and double click the "Appearance and Personalization" Select "Display".2.
- Click "Adjust resolution" to display "Screen resolution".
Verify that your display resolution setting is lower than or equal to 4.1080p.
If the projector is still not projecting the whole image, you will also - need to change the monitor display you are using. Refer to the following steps.
Select the "Change" under the "Monitor" tab.1.
Click on "Show all devices". Next, select "Standard monitor types" 2. under the SP box; choose the resolution mode you need under the "Models" box.
Verify that the resolution setting of the monitor display is lower 3. than or equal to 1080p.
• If you are using a Notebook:
First, follow the steps above to adjust resolution of the computer. -
Press the toggle output settings. example: [Fn]+[F4] -
| Notebook Brand Function Keys | |
| Acer [Fn]+[F5] | |
| Asus [Fn]+[F8] | |
| Dell [Fn]+[F8] | |
| Gateway [Fn]+[F4] | |
| IBM/Lenovo [Fn]+[F7] | |
| HP/Compaq [Fn]+[F4] | |
| NEC [Fn]+[F3] | |
| Toshiba | [Fn]+[F5] |
| Mac Apple | System Preference -> Display -> Arrangement -> Mirror display |
- If you experience difficulty changing resolutions or your monitor freezes, restart all equipment including the projector.

The screen of the Notebook or PowerBook computer is not displaying your presentation
Some Notebook PCs may deactivate their own screens when a second display device is in use. Each has a different way to be reactivated. Refer to your computer's documentation for detailed information.

Image is unstable or flickering
Adjust the "Phase" to correct it. Refer to the "Screen" section on pages 25 for more information.
▶ Change the monitor color setting from your computer.

Image has vertical flickering bar
▶ Use “Clock” to make an adjustment. Refer to the “Screen” section for more information.
▶ Check and reconfigure the display mode of your graphic card to make it compatible with the product.

Image is out of focus
Adjust the "Focus Ring" on the projector lens.
▶ Make sure the projection screen is within the required distance. Refer to Page 16.

The image is stretched when displaying 16:9 DVD title
When you play anamorphic DVD or 16:9 DVD, the projector will show the best image in 16:9 format on projector side.
If you play 4:3 format DVD title, please change the format as 4:3 in projector OSD.
If the image is still stretched, you will also need to setup the display format as 16:9 (wide) aspect ratio type on your DVD player.

Image is too small or too large
▶ Move the projector closer to or further from the screen.
Press "Menu" on the remote control or on the control panel. Go to "Screen" --> "Aspect Ratio" and try the different settings.

Image has slanted sides:
If possible, reposition the projector so that it is centered on the screen and below the bottom of the screen.
▶ Use “Screen” --> “V Keystone” from the OSD to make an adjustment.

Image is reversed
▶ Select “Screen” --> “Ceiling Mount” from the OSD and adjust the projection direction.
Projector Problems

The projector stops responding to all controls
If possible, turn off the projector, then unplug the power cord and wait at least 20 seconds before reconnecting power.

Lamp burns out or makes a popping sound
When the lamp reaches its end of life, it will burn out and may make a loud popping sound. If this happens, the projector will not turn on until the lamp module has been replaced. To replace the lamp, follow the procedures in the “Replacing the Lamp” section on pages 52.
Remote Control Problems

If the remote control does not work
Check the operating angle of the remote control is within ±30^ both horizontally and vertically of one of the IR receivers on the projector.
Make sure there are not any obstructions between the remote control and the projector. Move to within 7 m ( ±0^ ) of the projector.
Make sure the batteries are inserted correctly.
Replace batteries if they are exhausted.
Sound Problems

If no sound from the projector
If you are playing an external source, make sure you have an audio cable securely connected between the source device and the projector's audio input.
Please make sure the external speakers are not connected.
Make sure the volume is not set to minimum.
Make sure the "Volume --> Mute" function is set to "Off".
3D Problems

Blurry double image
Select "3D" --> "3D" from OSD and choose "Off" to avoid normal 2D image is blurry double image.

Two images, Side-by-Side(Half) format
Select "3D" --> "3D Format" from OSD and choose "Side-by-Side(Half)" for input signal is HDMI 1.4a 3D. 3D Format is only supported on 3D Timing on page 51.

Image does not display in 3D
Check if the battery of 3D glasses is drained.
Check if the 3D glasses is turned on.
Select "3D" --> "3D Format" from OSD and choose "Side-by-Side(Half)" for input signal is HDMI 1.4a 3D. 3D Format is only supported on 3D Timing on page 51.
On Screen Messages
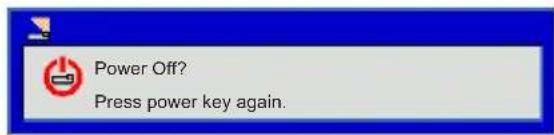
Power off confirm •
text_image
Power Off? Press power key again.Fan lock error •

text_image
Warning! FAN LOCKED The proejctor will switch off automatically.No source found •
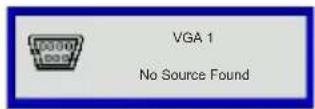
Please refer Troubleshooting on page43.
Out of display range •
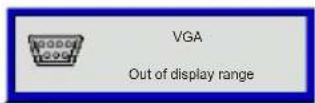
Please refer Compatibility Mode on page48.
Over temperature •

text_image
Warning! TEMPERATURE TOO HIGH Please: 1. Make sure air in and outlets are not blocked. 2. Make sure the environment temperature is under 40 degree C.Compatibility Modes
VGA Analog •
PC signal -
| Modes Resolution V. Frequency [Hz] H. Frequency [Hz] | ||
| VGA | 640x480 60 31.5 | |
| 640x480 67 35.0 | ||
| 640x480 72 37.9 | ||
| 640x480 75 37.5 | ||
| 640x480 85 43.3 | ||
| 640x480 120 61.9 | ||
| IBM 720x400 70 31.5 | ||
| SVGA | 800x600 56 35.1 | |
| 800x600 60 37.9 | ||
| 800x600 72 48.1 | ||
| 800x600 75 46.9 | ||
| 800x600 85 53.7 | ||
| 800x600 120 77.4 | ||
| Apple, MAC II 832x624 75 49.1 | ||
| XGA | 1024x768 60 48.4 | |
| 1024x768 70 56.5 | ||
| 1024x768 75 60.0 | ||
| 1024x768 85 68.7 | ||
| 1024x768 120 99.0 | ||
| Apple, MAC II 1152x870 75 68.7 | ||
| SXGA | 1280x1024 60 64.0 | |
| 1280x1024 72 77.0 | ||
| 1280x1024 75 80.0 | ||
| QuadVGA | 1280x960 60 60.0 | |
| 1280x960 75 75.2 | ||
| SXGA+ 1400x1050 60 65.3 | ||
| UXGA | 1600x1200 60 75.0 | |
Extended wide timing -
| Modes Resolution V. Frequency [Hz] H. Frequency [Hz] | ||
| WXGA | 1280x720 60 44.8 | |
| 1280x800 60 49.6 | ||
| 1366x768 60 47.7 | ||
| 1440x900 60 59.9 | ||
| WSXGA+ 1680x1050 60 65.3 | ||
Component signal -
| Modes Resolution V. Frequency [Hz] H. Frequency [Hz] | |||
| 480i 720x480(1440x480) 59.94(29.97) 15.7 | |||
| 576i 720x576(1440x576) 50(25) 15.6 | |||
| 480p 720x480 | 59.94 | 31.5 | |
| 576p 720x576 | 50 31.3 | ||
| 720p | 1280x720 60 45.0 | ||
| 720p | 1280x720 50 37.5 | ||
| 1080i | 1920x1080 | 60(30) 33.8 | |
| 1080i | 1920x1080 | 50(25) 28.1 | |
| 1080p | 1920x1080 | 23.98/24 | 27.0 |
| 1080p | 1920x1080 60 67.5 | ||
| 1080p | 1920x1080 50 56.3 | ||
HDMI Digital •
PC signal -
| Modes Resolution V. Frequency [Hz] H. Frequency [Hz] | ||
| VGA | 640x480 60 31.5 | |
| 640x480 67 35.0 | ||
| 640x480 72 37.9 | ||
| 640x480 75 37.5 | ||
| 640x480 85 43.3 | ||
| 640x480 120 61.9 | ||
| IBM 720x400 70 31.5 | ||
| SVGA | 800x600 56 35.1 | |
| 800x600 60 37.9 | ||
| 800x600 72 48.1 | ||
| 800x600 75 46.9 | ||
| 800x600 85 53.7 | ||
| 800x600 120 77.4 | ||
| Apple, MAC II | 832x624 75 49.1 | |
| XGA | 1024x768 60 48.4 | |
| 1024x768 70 56.5 | ||
| 1024x768 75 60.0 | ||
| 1024x768 85 68.7 | ||
| 1024x768 120 99.0 | ||
| Apple, MAC II | 1152x870 75 68.7 | |
| SXGA | 1280x1024 60 64.0 | |
| 1280x1024 72 77.0 | ||
| 1280x1024 75 80.0 | ||
| QuadVGA | 1280x960 60 60.0 | |
| 1280x960 75 75.2 | ||
| SXGA+ 1400x1050 60 65.3 | ||
| UXGA 1600x1200 60 75.0 | ||
Extended wide timing -
| Modes Resolution V. Frequency [Hz] H. Frequency [Hz] | ||
| WXGA | 1280x720 60 44.8 | |
| 1280x800 60 49.6 | ||
| 1366x768 60 47.7 | ||
| 1440x900 60 59.9 | ||
| WSXGA+ 1680x1050 60 65.3 | ||
Video signal -
| Modes Resolution V. Frequency [Hz] H. Frequency [Hz] | |||
| 480p 640x480 59.94/60 31.5 | |||
| 480i 720x480(1440x480) 59.94(29.97) 15.7 | |||
| 576i 720x576(1440x576) | 50(25) | 15.6 | |
| 480p 720x480 | 59.94 | 31.5 | |
| 576p 720x576 | 50 31.3 | ||
| 720p | 1280x720 60 45.0 | ||
| 720p | 1280x720 50 37.5 | ||
| 1080i | 1920x1080 | 60(30) | 33.8 |
| 1080i | 1920x1080 | 50(25) | 28.1 |
| 1080p | 1920x1080 | 23.98/24 27.0 | |
| 1080p | 1920x1080 60 67.5 | ||
| 1080p | 1920x1080 50 56.3 | ||
- HDMI 1.4a mandatory 3D timing- Video Signal
| Modes | Resolution | V. Frequency [Hz] | H. Frequency [Hz] |
| Frame Packing | 720p | 50 | 31.5 |
| 720p | 59.94/60 | 15.7 | |
| 1080p | 23.98/24 | 15.6 | |
| Side-by-Side(Half) | 1080i | 50 | 31.5 |
| 1080i 59.94/60 | 31.3 | ||
| Top and Bottom | 720p | 50 | 45.0 |
| 720p | 59.94/60 | 37.5 | |
| 1080p | 23.98/24 | 33.8 | |
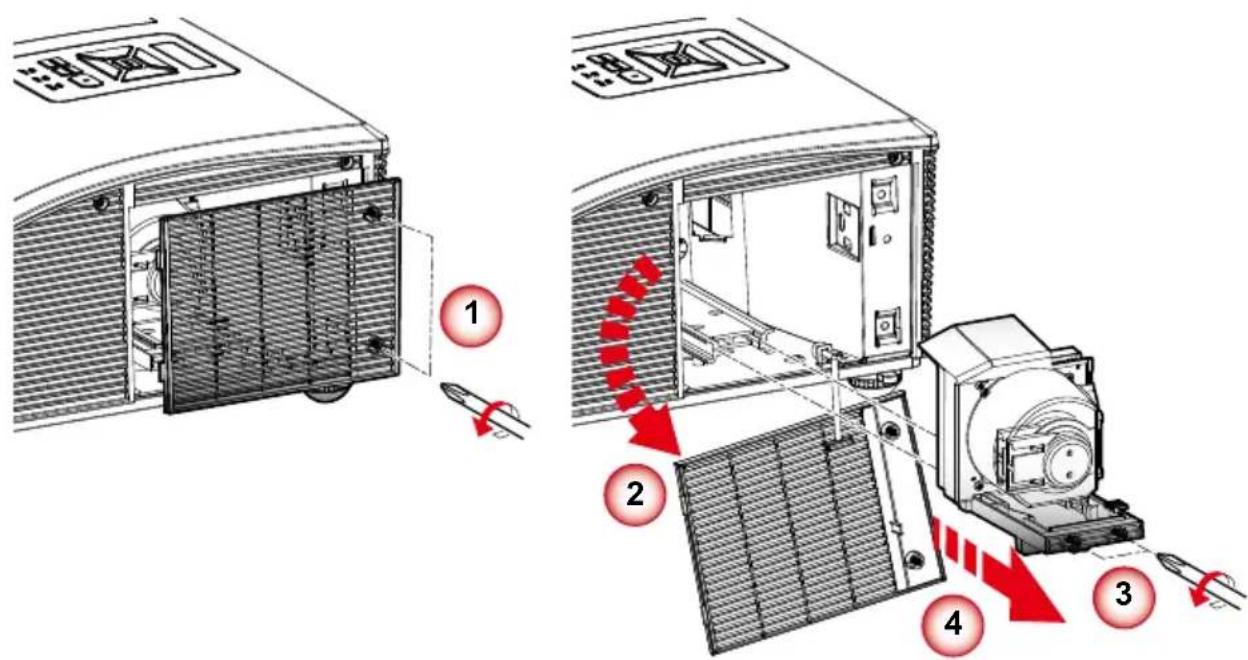
Replacing the lamp (Part Number:13080021)
The projector automatically detects the lamp life. When the lamp life is nearing the end of use, you will receive a warning message.

text_image
Warning! Lamp Lamp is approaching the end of its useful life Replacement suggested!When you see this message, please contact your local reseller or service center to change the lamp as soon as possible. Make sure the projector has been cooled down for at least 60 minutes before changing the lamp.
text_image
Diagram illustrating the installation steps of a solar panel system, showing components from air vent to fan assembly.
The screws on the lamp cover and the lamp cannot be removed. ■
■ The projector cannot be turned on if the lamp cover has not been placed back on the projector.
Do not touch the glass area of the lamp. Hand oil can cause the lamp to shatter. Use a dry cloth to clean the lamp module if it was accidentally touched.
Lamp Replacement Procedure:
-
Turn off the projector power by pressing the "button."
-
Disconnect the power cord.
-
Unscrew the two screws on the cover. ^1
-
Lift up and remove the cover. ^2
-
Unscrew the two screws on the lamp module. ^3
-
Pull up the lamp handle and remove the lamp module slowly and carefully.
-
Turn on the projector and use "Clear lamp hours" after the lamp module is replaced.

Please let the projector to cool down for at least 60 minutes. ■
Replacing and cleaning the optional dust filter
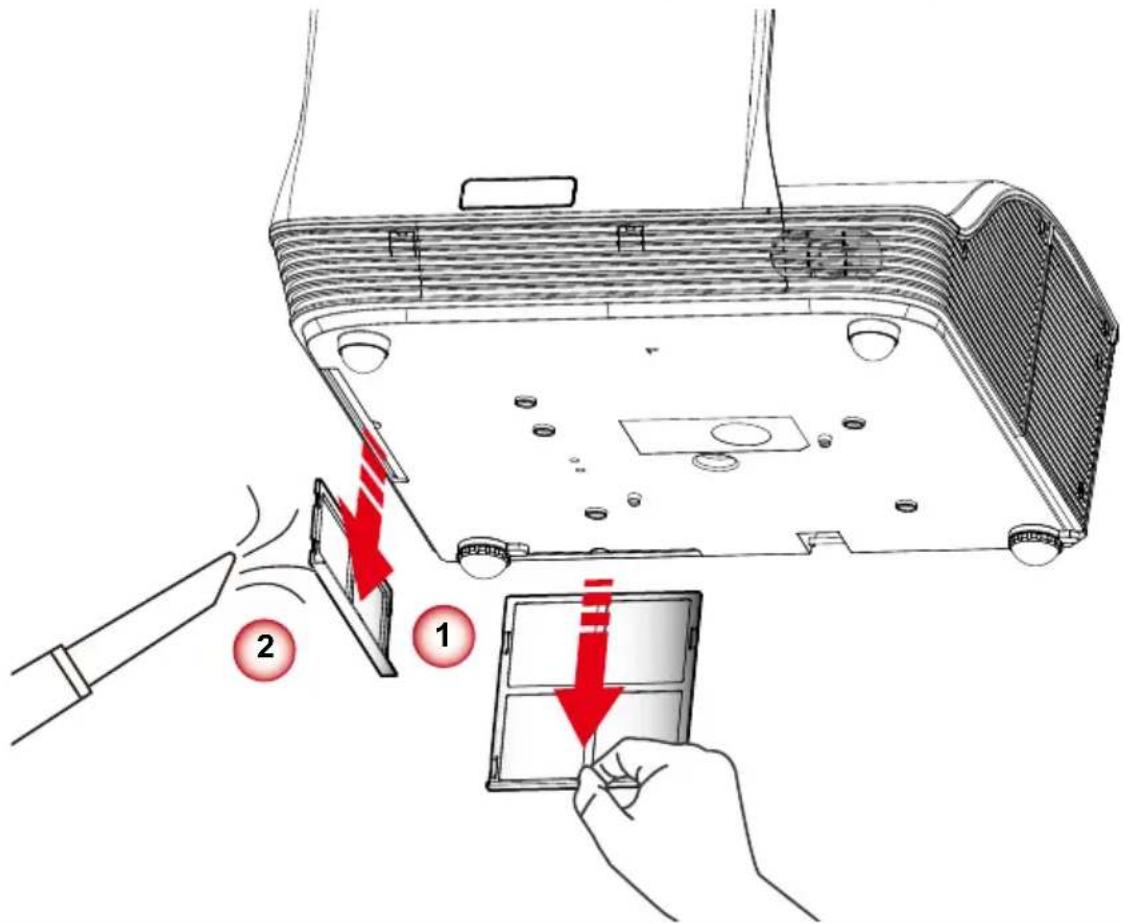
We recommend cleaning the dust filter after every 500 hours of use, clean it more often if the projector is used in a dusty environment.

text_image
Warning! Dust Filters The usage time of the dust filter is reached. Please clean the dust filters for better performance.When you see this message, please find following steps for cleaning procedure:
text_image
Diagram illustrating a device's internal components and installation steps, labeled with arrows and numbered annotations.
The optional dust filter should be used in dusty environments. ■ If the dust filter is installed, proper maintenance will prevent overheating and related damage to the projector.
Cleaning the Dust Filter Procedure:
- Turn off the projector power by pressing the "button."
- Disconnect the power cord.
- Pull the latch by the arrow direction.
- Remove the dust filter slowly and carefully.
- Clean or replace the dust filter. 2
- Turn on the projector and use "Reset Dust Filter" after the dust filter is replaced.
Ceiling Mount Installation
If you wish to use a third party ceiling mount kit, please ensure the screws which are used to attach a mount to the projector meet the following specifications:
Screw type: M4x4 •
Diameter: 4 mm -
Length: 11 mm -

Please note that damage resulting from incorrect installation will invalidate the warranty. ■

text_image
357.00 85.50160.00 74.75 151.30 112.50 367.00 137.49 Lens CenterUnit: mm
Specifications
| Projection system DLP | ® |
| Resolution | WXGA (1280x800) |
| Computer compatibility IBM PC and compatibles, Apple Macintosh, iMac and VESA standards: SXGA, XGA, SVGA, VGA, WXGA, UXGA | |
| Video compatibility NTSC (3.58/4.43), PAL (B/D/G/H/I/M/N), SECAM (B/D/G/K/K1/L), HDTV (720p, 1080i, 1080p), SDTV (480i, 480p, 576i, 576p) | |
| Aspect ratio Auto, 4:3, 16:9, 16:10 | |
| Displayable colors 1.07 billion colors | |
| Projection lens F# 2.6 | |
| Projection screen size | 80.2" - 96.6" (Diagonal) |
| Max. focus screen size | 70" - 100" (Diagonal) |
| Projection distance | 517 mm - 759 mm (±10mm) |
| Throw ratio | 0.35 |
| Horizontal scan rate 30 k - 100 kHz | |
| Vertical refresh scan rate 50 - 120 Hz | |
| Keystone correction ±15 degrees | |
| Weight 8 Kg (17.64 lbs) | |
| Dimensions (W x D x H) 357 (W) x 367 (D) x 135(H) mm (excluding foot)357 (W) x 367 (D) x 231(H) mm (including reflection mirror) | |
| Power supply AC 100 - 240 V, 50 - 60 Hz | |
| Power consumption | Normal mode: 350W ±10% @ 110VacECO mode: 290W ±10% @ 110VacStandby < 0.5 W |
| Operating temperature 5°C to 40°C / 41°F to 104°F | |
I/O connectors Power socket x
• LAN (RJ45) x 1
- RS232 x 1
- DC12V x 1
- HDMI x 1
- VGA input x 2
- VGA output x 1
- S-Video x 1
- Composite x 1
• 3.5 mm audio jack input x 2
• RCA (L/R) audio jack input x 2
• 3.5 mm audio jack input (Microphone)x 1
• 3.5 mm audio jack input x 1
- Mini USB B x 1
Standard package contents AC
power cord x 1
- VGA cable x 1
- Remote control x 1
- CR2025 x 1
• Owner's manual (CD) x 1 - Quick start Guide x 1

■ Design and specifications are subject to change without prior notice.
Configurations of Terminal
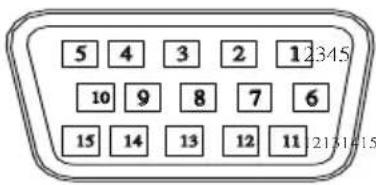
Analog RGB Input/Output
(1) Connections(15P HD-Sub)
text_image
5 4 3 2 1 10 9 8 7 6 15 14 13 12 11 21 31 41 5(2) Pin Number Define
| Pin NO. | Signal Name Connection | |
| 1 | R signal Input R | |
| 2 | G signal Input G/Sync. On G | |
| 3 | B signal Input B | |
| 4 | N.C. N.C. | |
| 5 | GND GND | |
| 6 | R return(GND) GND | |
| 7 | G return(GND) GND | |
| 8 | B return(GND) GND | |
| 9 | N.C. N.C. | |
| 10 | N.C. | GND |
| 11 | Signal return(GND) | N.C. |
(3) Connector
- 15P HD-Sub
(4) Input signal polarity
●Video signal (RGB): Positive
- Sync: Positive, Negative
(5)Input level
●Signal: 0.7V ±0.2V p-p 75Ω terminate, NRZ
- Sync: TTL
(6)Composite Sync.
- TTL:Negative
HDMI
(1) Connections
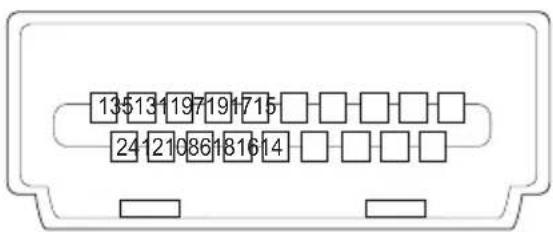
text_image
13$13 1197191715 24 121086181614(2) Pin Number Define
| Pin NO. | Signal Name Signal Name | ||||
| 1 | TMDS Data 2+ | 9 | TMDS Data 0- | 17 | Ground(DDC/CEC) |
| 2 TMDS Data 2 (Ground) | 10 TMDS Clock + 18 +5V | POWER | |||
| 3 TMDS Data 2- 11 TMDS Clock (Ground) | 19 Hot plug detect | ||||
| 4 TMDS Data 1+ 12 TMDS Clock | |||||
| 5 TMDS Data 1 (Ground) | 13 TMDS Data3+ | ||||
| 6 TMDS Data 1- 14 5V Power | |||||
| 7 TMDS Data 0+ 15 SCL | |||||
| 8 TMDS Data 0 (Ground) | 16 SDA | ||||
Composite Video Signal
(1) Connections

Video

L

R
(2) Pin Number Define
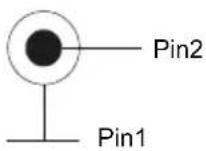
| Pin NO. | Signal Name Connection | |
| 1 Video Signal(GND) GND | ||
(3) Connector: RCA jack
(4) Input signal polarity: Composite signal, Sync:Negative
(5) Input level:Video signal: 1.0V ±0.2V p-p 75Ω terminate, NRZ
S-Video Signal
(1) S-Video Connections and Connector
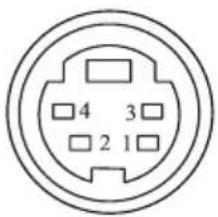
text_image
4 3 2 1(2) Pin Number Define
| Pin NO. | Signal Name Connection | |
| 1 Y | Signal(GND) GND | |
| 2 C | Signal(GND) GND | |
| 3 Y | Signal Input Y | |
| 4 C | Signal Input C |
(3) Input signal polarity
- Composite signal sync: Negative
(4)Input level
●Y Signal:1.0V ±0.2V p-p 75Ω terminate, NRZ
- Sync:0.286V ±0.1V p-p
•Chromatic:75Ω terminate, NRZ
- Burst:0.286V ±20%
RS232 Control
Communication Protocol
| Items Specification | |
| Standard Baud rate 19200 bps | |
| Data length 8 bits | |
| Parity None | |
| Stop bit 1 bit | |
| Flow Control None | |
RS232 Cable Define
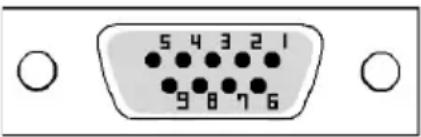
text_image
5 4 3 2 1 9 8 7 6| PC Side | Projector side with D-Sub Pin |
| RX 2 2 RX | |
| TX 3 3 TX | |
| GND 5 5 | GND |
EIKI
U.S.A.
EIKI International, Inc.
30251 Esperanza
Rancho Santa Margarita
CA 92688-2132
U.S.A.
Tel: 800-242-3454 (949)-457-0200
Fax: 800-457-3454 (949)-457-7878
E-Mail: usa@eiki.com
Canada
EIKI CANADA - Eiki International, Inc.
P.O. Box 156, 310 First St. - Unit 2,
Midland, ON, L4R 4K8, Canada
Tel: 800-563-3454 (705)-527-4084
Fax: 800-567-4069 (705)-527-4087
E-Mail: canada@eiki.com
LAKESIDE OASIS MIDDLE RING
BUSINESS CENTRE
Block 1, Room 606,
1628, Jin Sha Jiang Road
Shanghai, 200333
CHINA
Tel: 86-21-3251-3993
Service Hot line: 86-21-3251-3995
Fax: 86-21-3251-3997
E-mail: info@eiki-china.com
South East Asia
EIKI Industrial (M) Sdn Bhd
No. 11, Nouvelle Industrial Park,
Lorong Teknologi B, Taman Sains Selangor
EIKI Industrial Company Limited.
6-23 Teramoto, Itami-shi, Hyogo,
664-0026 JAPAN
Tel: +81-72-782-9492
Fax: +81-72-781-5435
WorldWide Website http://www.eiki.com