LC-WNB3000N - Video projector EIKI - Free user manual and instructions
Find the device manual for free LC-WNB3000N EIKI in PDF.


| Product Type | Normal-throw LCD Multimedia Projector |
| Model | LC-WNB3000N |
| Display System | 0.59 inch TFT LCD (3 panels) |
| Native Resolution | 1280 x 800 (WXGA) |
| Brightness | 3000 lumens |
| Contrast Ratio | Not specified (typical LCD: 2000:1 dynamic) |
| Lamp Type & Power | 240W high-pressure mercury lamp (part # 23040044) |
| Lamp Life | Approx. 3000 hours (Normal mode) / 2000 hours (Eco mode) |
| Projection Lens | F=1.6~1.9, f=18.5~22.2 mm; manual zoom/focus |
| Projection Image Size | 40" to 300" diagonal |
| Throw Distance | Wide: 1.21~9.29 m; Tele: 1.83~9.29 m |
| Keystone Correction | Vertical: -70° to +70° (manual); Auto Keystone available |
| Input Terminals | D-SUB 15pin (RGB1), HDMI, Composite Video (RCA), S-Video (Mini DIN-4), Component Video (3x RCA), Audio (2x 3.5mm, 2x RCA L/R), USB-A (for WiFi/media), Mini-USB (for PC connection) |
| Output Terminals | D-SUB 15pin (monitor out), Audio out (3.5mm) |
| Control & Network | RS-232C (DB-9), RJ45 (LAN control & browser control) |
| Built-in Speaker | 10W mono |
| Dimensions (W x H x D) | 325 x 110 x 265 mm |
| Weight | 3.4 kg (7.5 lbs) |
| Power Supply | AC 100-240V, 50/60Hz (full range) |
| Power Consumption | Approx. 320W (Normal) / 260W (Eco) / <1W standby |
| Operating Temperature | 5°C to 35°C (41°F to 95°F) |
| Storage Temperature | -20°C to 50°C (-4°F to 122°F) |
| Wireless Capability | WiFi via optional USB dongle (EZ WiFi/LAN) |
| Media Viewer Features | Photo, Video, Audio, Office Viewer (Word, Excel, PowerPoint, PDF), internal 1.5GB memory |
| Security Features | Kensington MicroSaver slot, PIN lock protection (2 modes), security anchor |
| Included Accessories | Remote control, power cord, computer cable, WiFi dongle, quick start guide, CD manual |
Frequently Asked Questions - LC-WNB3000N EIKI
User questions about LC-WNB3000N EIKI
0 question about this device. Answer the ones you know or ask your own.
Ask a new question about this device
Download the instructions for your Video projector in PDF format for free! Find your manual LC-WNB3000N - EIKI and take your electronic device back in hand. On this page are published all the documents necessary for the use of your device. LC-WNB3000N by EIKI.
USER MANUAL LC-WNB3000N EIKI
natural_image
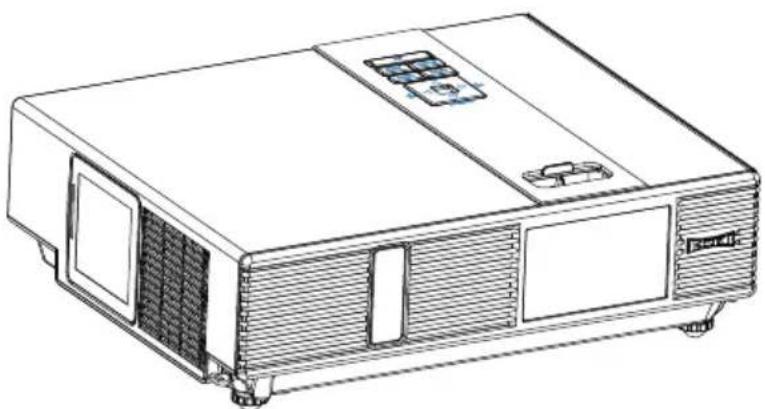
Line drawing of a rectangular electronic device with ventilation grilles and a central panel (no text or symbols)LC-XNB4000N
LC-XNB3500N
LC-WNB3000N
Projector
natural_image
Line drawing of a rectangular electronic device with ventilation grilles and control panel (no text or symbols)About the Owner's Manual
Please read the owner's manual thoroughly to ensure correct usage of the projector and its features.
After reading, store the owner's manual in a safe place for future reference.
Features
Dress up Design1.
Designed for tough environment2.
Side change lamp3.
Side change filter4.
Advanced Anti-theft features5.
Five auto features (Auto Search, Auto Sync, Auto Ceiling, Auto Keystone and Auto 6. Filter Alert)
Seven display modes (Natural, Cinema, Daylight, Green board, White Board, Black 7. Board and User)
Built-in 10W speaker8.
Logo capture9.
Image freeze function10.
Digital zoom adjustment11.
LAN Control12.
LAN Display13.
USB Display14.
-
PC-less presentation (Photo, Video, Audio and Microsoft Office Viewer)
-
1.5G bytes free internal storage for multi-media display
WiFi Display17.
The content of this manual is subject to change without previous notice.
All rights reserved.
About Owner's Manual
Contents....1
Contents of Your Box ....3
Safety Instructions ....4
Safety Labels......8
Part Names 9
Projector....9
Control Panel 10
Rear....11
Setting Up 12
Arrangement 12
Power ON / OFF 14
Setting Up The Projector ....15
Ceiling Mounted Installation Guide 16
Adjusting The Projector's Elevation 17
How To Connect....18
Remote Control 20
EZ Suit 22
Main Menu Layout and Function Definition....22
EZ Media 23
Layout and Behavior 23
EZ Display 31
Layout and Behavior 31
Setting and Configuration 47
System setting....47
Video setting....48
Photo setting 49
Audio setting....49
WiFi setting 50
Connect PC setting 58
Menu Operation ....59
How To Operate On-Screen Display ....59
MENU (PC Mode) 60
Picture Menu (PC Mode) 60
Audio Menu (PC Mode) 61
Setting Menu (PC Mode) 62
MENU (Video Mode) 63
Picture Menu (Video Mode) 63
Audio Menu (Video Mode) 64
Setting Menu (Video Mode) 65
MENU 66
Advanced Menu 66
Presentation Menu ....70
Security Menu 72
PIN Key In Operation 76
Network Control Software Application ....77
Procedure to utilize this function ....77
Browser Control 78
Maintenance Of Projector 89
Filter / How to clean or replace the filiters 89
Lamp / Replacing New Lamp 90
Troubleshooting....92
Indicator....92
Error For Machine Defects 93
List of Supported Monitor Displays ....95
Appendix
Contents of Your Box
Check-list of your accessories
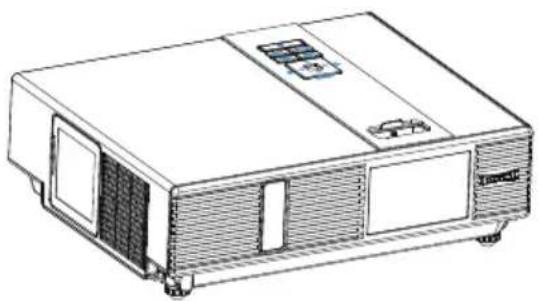
Please make sure that following items are included in the box.
If any items missing, contact your dealer please.
1. Projector
natural_image
Line drawing of a rectangular electronic device with ventilation grilles and control panel (no text or symbols)2. Quick Start Guide

natural_image
Two overlapping rectangular shapes with no text or symbols3. Owner's Manual CD
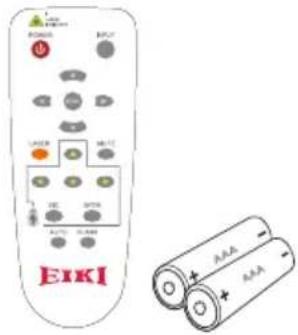
4.Remote control
text_image
EIKI 0 + - + - A B C D E F G H I J K L M N O P Q R S T U V W X Y Z A B C D E F G H I J K L M N O P Q R S T U V W X Y Z5. Power cord
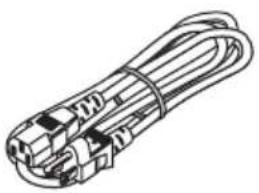
natural_image
Line drawing of a coiled network cable with multiple connectors (no text or symbols)6. Computer cable
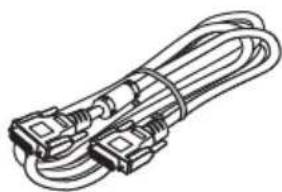
natural_image
Line drawing of a cable with connectors and connectors (no text or symbols)7. Wi-Fi Dongle
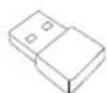
Safety Instructions
The projector is designed and tested to meet the latest standards for safety of information technology equipment. However, to ensure safe use of this product, it is important that you follow the instructions mentioned in this manual and marked on the product.

WARNING
This symbol indicates information that, if ignored, could possibly result in personal injury or even death.

CAUTION
This symbol indicates information that, if ignored, could result in personal injury or physical damage.
Typical Symbols
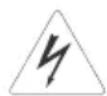
This symbol indicates an additional warning (including cautions). An illustration is provided to clarify the contents (for example: the illustration to the left indicates danger of electrical shock).

This symbol indicates a prohibited action. The contents will be clearly indicated in an illustration or description near the symbol (for example: the symbol to the left indicates that disassembly is prohibited).
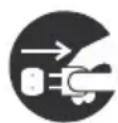
This symbol indicates a compulsory action. The contents will be clearly indicated in an illustration or description near the symbol (for example: the symbol to the left shows that the power plug should be disconnected from the power outlet).
Safety Labels

WARNING
If a problem should occur
If smoke or strange odors arise, continued use could result in fire or electrical shock. In such case, immediately turn off the power switch and then disconnect the power plug from the power outlet. After making sure that the smoke or odor has stopped, contact your dealer for repairs. Never attempt to make repairs yourself because this is dangerous.
Do not use this projector if there is no image or sound, or if the sound is distorted. Continued use could result in fire or electrical shock. In such case, immediately turn off the power switch; disconnect the power plug from the power outlet and contact your dealer.
If water would enter the inside of this projector, immediately turn off the power switch, disconnect the power plug from the power outlet and contact your dealer.
Do not install on an unstable surface.
Do not install this projector on an unstable surface such as a wobbly stand or incline because this could result in the projector falling and causing injury.


Do not open the cabinet.
Never open the cabinet. There is high voltage inside which can cause electrical shock. Contact your dealer for internal inspection, adjustment and repair.


Do not modify.
Do not modify this projector because this could result in fire or electrical shock.
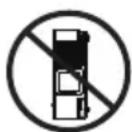
Do not place the projector upon either side to project an image.
NO SIDEWARD
Do not use in the bathroom or near water site.
Do not expose this unit to rain or use near water... for example, in the bathroom, a wet basement, near a swimming pool, etc...
Do not insert objects into the Projector.
Do not insert metal objects through the ventilation openings, etc., of this projector or drop such objects inside because this could result in fire or electrical shock.
If a foreign object should enter this projector, immediately turn off the power switch, disconnect the power plug from the power outlet and contact your dealer.
Continued use could result in fire or electrical shock. Use special caution in household and where children are present.
Safety Labels

WARNING
Do not look through the lens when the lamp is on.
Never look through the lens when the lamp is on. The powerful light could adversely affect vision. Use special caution in households where children are present.

Avoid shock or impact on the projector.
If the projector should fall, resulting in damage to the cabinet, immediately turn off the power switch, disconnect the power plug from the power outlet and contact your dealer.

Continued use could result in fire or electrical shock.
Do not place this projector in a container containing liquid. Do not place flower vases, flowerpots, cups, cosmetics, liquids such as water, etc., on top of this projector.
Do not use any power cable except those supplied with the projector.
The use of any other power cable could result in fire or electrical shock.
Do not shine the laser beam onto yourself or other.
The laser pointer function of projector remote control emits class II laser beam.
Do not look directly into the laser beam outlet or direct the laser beam at other people.
Vision can be impaired if the laser beam enters the eyes. Especially pay attention if children are present.
High temperatures are generated when the lamp is lit; so do not place objects in front of the lens.
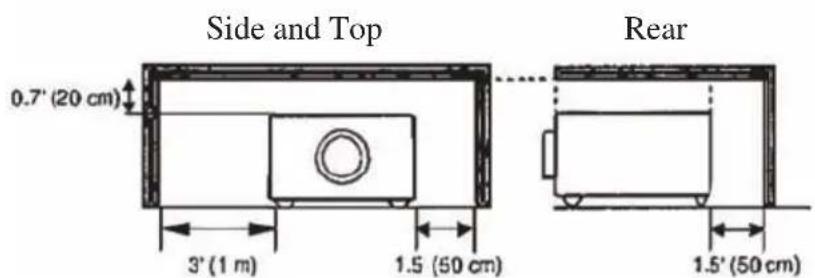
Allowing the proper amount of space on the top, sides, and rear of the projector cabinet is critical for proper air circulation and cooling of the unit.
The dimension shown here indicate the minimum space required. If the projector is to be built into a compartment or similarly enclosed, these minimum distances must be maintained.
text_image
Side and Top 0.7' (20 cm) 3' (1 m) 1.5 (50 cm) Rear 1.5' (50 cm)
Safety Labels

CAUTION
Placing heavy objects on top of this projector could result in loss of balance or falling and cause personal injury or damage the projector.

Do not block the ventilation openings of this projector.
Blocking ventilation could lead to internal overheating which could result in fire.
Do not place this projector on its side during use or push it into a small, poorly ventilated location.
Do not place this projector on a carpet or bedding or cover it with a tablecloth, etc.
Care and maintenance.
For safety purposes, disconnect the power plug from the power outlet before starting the care and maintenance of this projector.


Battery usage.
Replace the batteries with the same type only.
Do not mix old and new batteries; this could result in fire or personal injury due to battery cracking or leakage.
Make sure the plus and minus terminals are correctly aligned when loading the batteries.
Incorrect loading could result in personal injury or contamination of the surroundings due to battery cracking or leakage.

Have the projector interior cleaned regularly.
Contact your dealer to arrange for the service.
Accumulations of dust inside the projector can result in fire or malfunction if not cleaned for an extended period.
Ask your dealer for details about internal cleaning.
Safety labels are used on or within the projector to alert you to items or areas requiring your attention.
WARNING LABEL
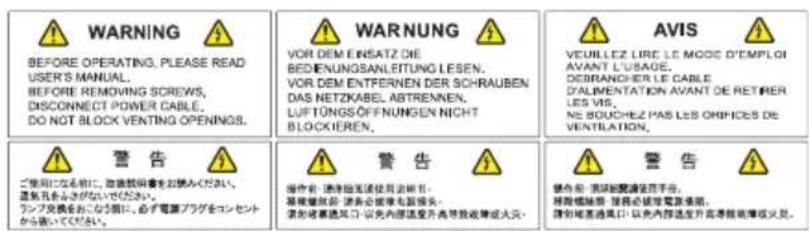
text_image
WARNING BEFORE OPERATING. PLEASE READ USER'S MANUAL. BEFORE REMOVING SCREWS, DISCONNECT POWER CABLE. DO NOT BLOCK VENTING OPENINGS. WARNING VOR DEM EINSATZ DIE BEDENUNGSANLEITUNG LESEN. VOR DEM ENTFERNEN DER SCHRAUBEN DAS NETZKABEL ABTRENNEN. LUF TONGS ÖFFNUNGEN NICHT BLOCKIEREN. AVIS VEUILLEZ LIRE. LE MODE D'EMPLOI AVANT L'USAGE. DEBRANCHER LE CABLE D'ALIMENTATION AVANT DE RETIRER LES VIS. NE BOUCHEZ PAS LES OPICES DE VENTRATION. 警告 [1] 警告 [2] 警告 [3] 警告 [4] 警告 [5] 警告[USA ONLY] This product contains mercury, Disposal of mercury may be regulated due to environmental considerations. For disposal or recycling information, please contact your local authorities or the Electronic Industries Alliance: www.siae.org.
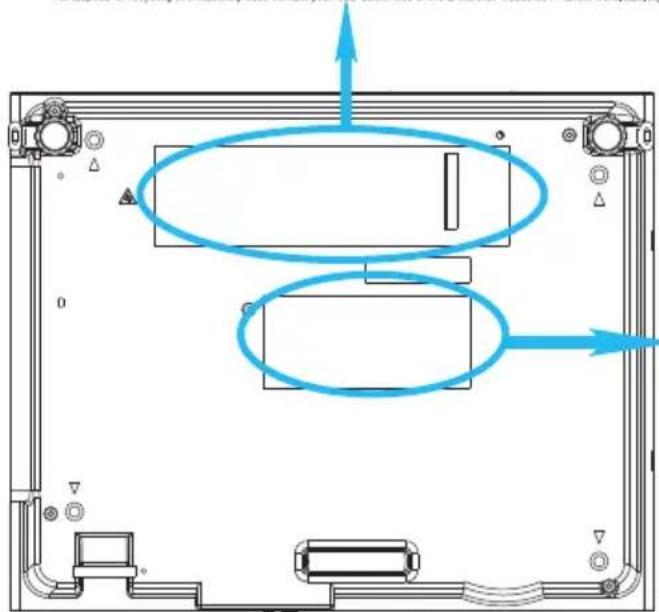
natural_image
Technical diagram of a mechanical or electronic component with no visible text, numbers, or symbols.EMI LABEL
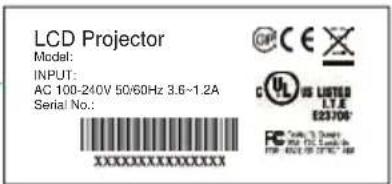
text_image
LCD Projector Model: INPUT: AC 100-240V 50/60Hz 3.6~1.2A Serial No.: XXXXXXXXXXXXXX ©CE CUL US LISTED L.T.E E23708 PC © 3.2 GB PPT: PTC Design FIR: RACE OR OFFICELAMP DOOR WARNING LABEL

CAUTION HOT
TURN THE POWER OFF AND WAIT 1 HOUR BEFORE CHANGING THE LAMP.
WARNUNG HEISS!
SCHALTEN SIE DAS GERÄT AUS UND WARTEN SIE 1 STUNDE,BIS SIE DIE LAMPE WECHSELN.
ATTENTION CHAUD
COUPER L'ALIMENTATION ET ATTENDRE 1 HEURE AVANT DE CHANGER LA LAMPE. 高涅注意
HIGH-PRESSURE LAMP MAY EXPLODE IF IMPROPERLY HANDLED.
REPLACE WITH SAME TYPE NUMBER LAMP, DO NOT CLEAN THE AIR FILTER WITH WATER OR ANY LIQUID.
DO NOT OPERATE THE PROJECTOR WITHOUT THE AIR FILTER. VORSICHT!
DIE HOCHDRUCKLAMPE KANN BEI FALSCHER HANDHABUNG EXPLODDIEREN. NUR MIT EINER LAMPE DES GLEICHEN TYPES AUSTAUSCHEN.
natural_image
Line drawing of a portable electronic device with ventilation grilles and control panel (no text or symbols)Projector
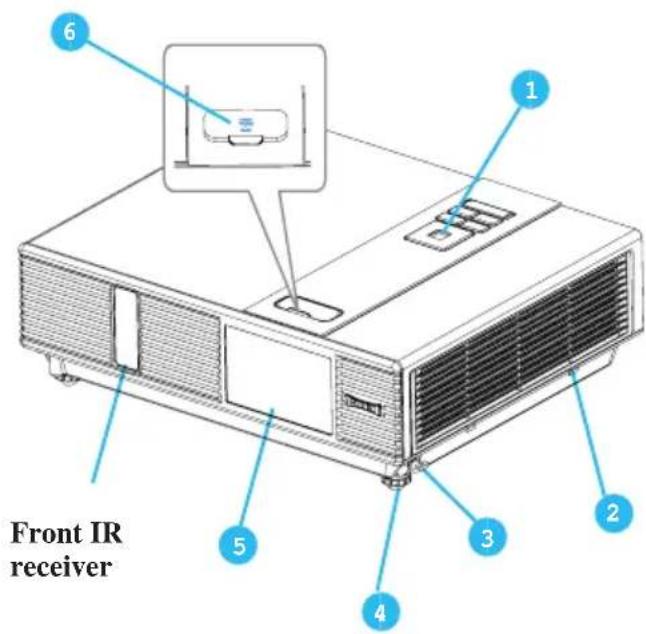
text_image
Front IR receiver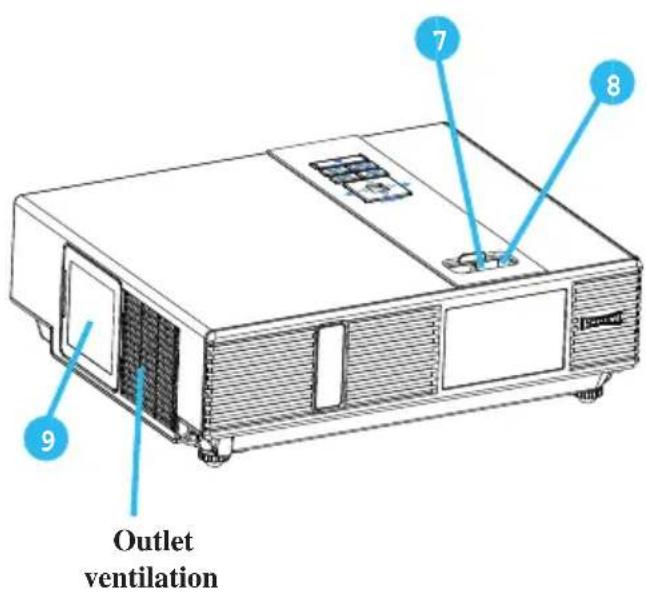
text_image
7 8 9 Outlet ventilation1 Control panel
Operating system.
2 Filter cover
Prevents dust and other foreign particles from being drawn into projector.
Remove the filter cover to clean the air filter.
Foot adjust button
Lock / unlock the adjustable foot.
Front adjustable foot
Extend and retract to adjust the projection angle.
Anti-dust glass
Dustproof function.
Gate Plate
Dustproof function.
Zoom ring
Use the zoom ring to adjust the size of the projected image.
Rotate the zoom ring until the image is the desired size.
8ocus ring
Use the focus ring to focus the projector image.
Rotate the focus ring until the image is clear.
9 Lamp door
The lamp unit is inside.
Control Panel
text_image
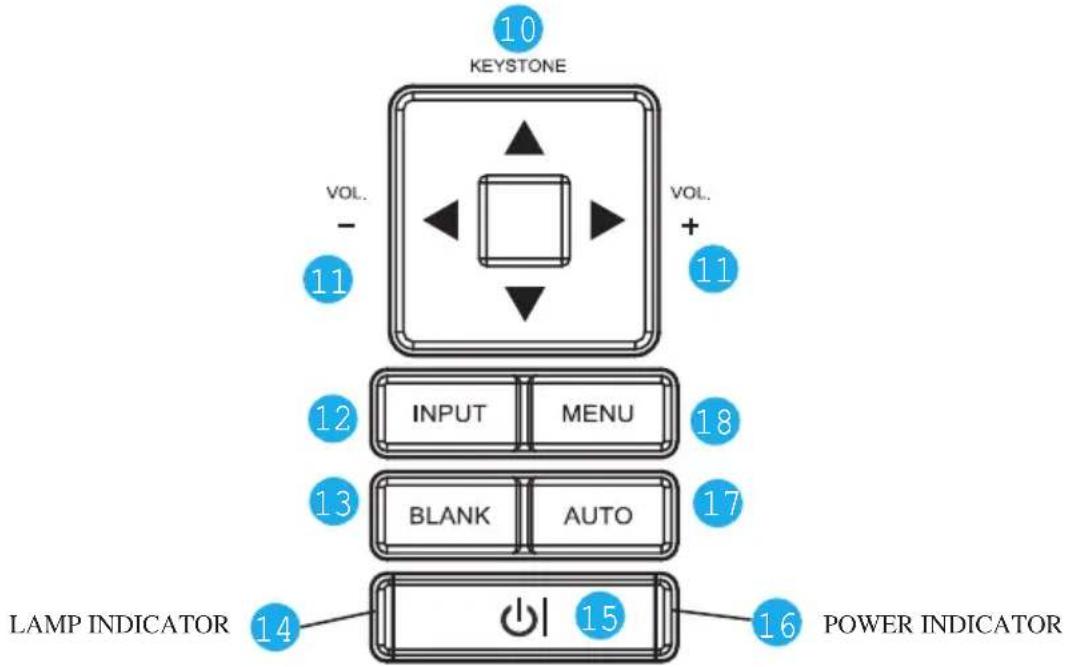
10 KEystone VOL. - 11 VOL. + 11 12 INPUT MENU 18 13 BLANK AUTO 17 LAMP INDICATOR 14 15 POWER INDICATOR 161 KEYSTONE
Adjust the vertical keystone.
11 VOLUME + / -
Sound louder or lower.
1 INPUT
Select input source:

flowchart
graph LR
    A["RGB 1 RGB 2"] --> B["HDMI"]
    C["S-Video"] <--> D["Video"] <--> E["USB"]
Note :
If the projector can not be captured the signals within 15 minutes, it will be shut down automatically.
1 BLANK
Blank the projected image. The time of Blank mode can be set in 15 minutes, 30 minutes or 60 minutes. The projector will shut down automatically after passing each set time.
14 LAMP INDICATOR
Indicates a status in the internal projector temperature, lamp door properly closed or cooling down.
1 (POWER)
Power On / Off.
1 POWER INDICATOR
Light on or flash to indicate the operating status of the projector.
17 AUTO
Automatically adjust the setting to match the current input.
18 MENU
Display or hide the OSD main menu.
Rear
text_image
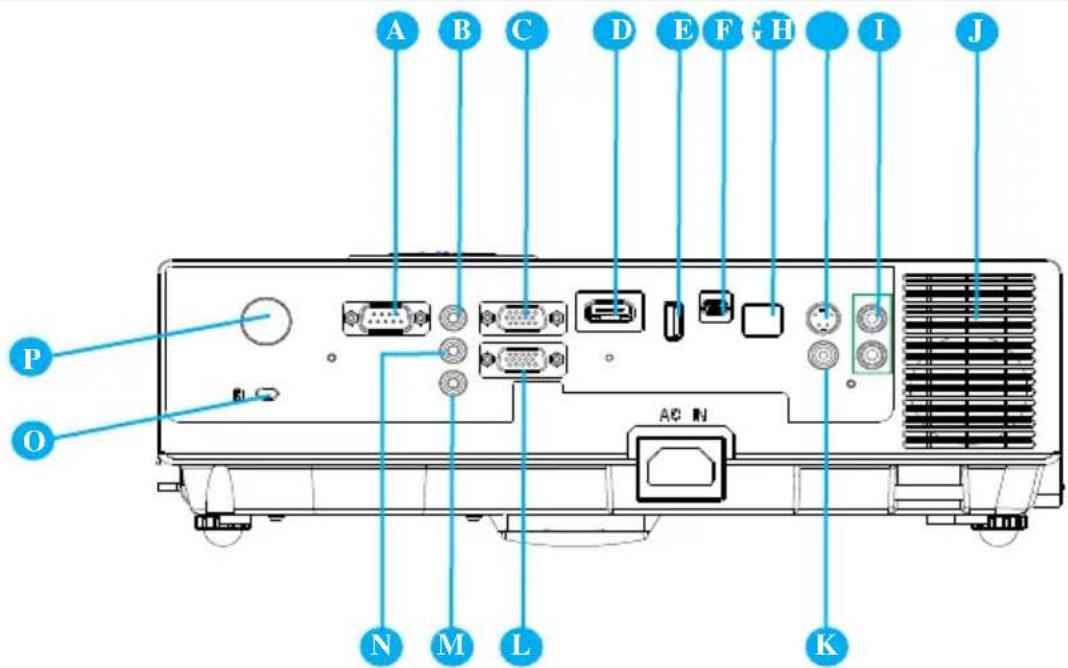
A B C D E F G H I J P O N M L KA RS-232C
Serial data port for controlling the projector with a computer or other RS-232 control device.
B AUDIO IN 1 & N AUDIO IN 2
Mini jack port corresponds to computer input. (RGB IN 1→AUDIO IN 1, RGB IN 2→AUDIO IN 2)
C RGB IN 1
Input analog RGB signal from a computer.
D HDMI
Input digital HDMI signal from a Computer & Video source.
USB Port (USB-A Type)
-
Supports USB Storage Device and USB compatible hard disks.
-
Supports wireless (WiFi) USB dongle for wirelessly projecting the computer's image.
USB Display Port (Mini-USB Type)
Support USB mini-B Connects from the computer's USB Port by using the USB mini-B type to A type cable. It also can access the internal memory from projector to perform the data.
G LAN
Please see page77 Network Control Application for details.
H S-VIDEO
Input the S-Video signal from a video source.
I AUDIO IN 3, R / L
RCA type corresponds to video input.
J SPEAKER
K VIDEO
To composite the video signal from a video source.
L RGB IN 2/OUT
Input analog RGB signal from a computer or connect an external monitor to this connection to view the "RGB IN" input. Please see P.67 for the setting.
M AUDIO OUT
This jack outputs the audio signal from computer& audio signal to external audio equipment.
Slot for Kensington Micro
SaverSecurity System
Built-in Security Slot. This security slot supports the Micro Saver® Security System. Micro Saver® is a registered trademark of Kensington Microwave Inc. The logo is trademarked and owned by Kensington Microwave Inc.
REAR IR RECEIVER
Arrangement
- Before installation, make sure that the projector is turned off and the power cord is disconnected.
- Do not set up and move the projector, while it is hot.
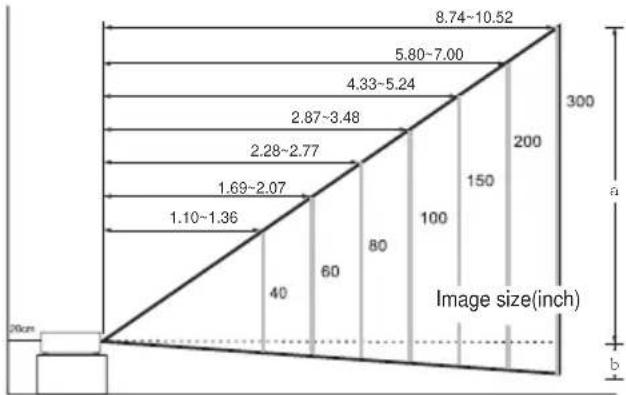
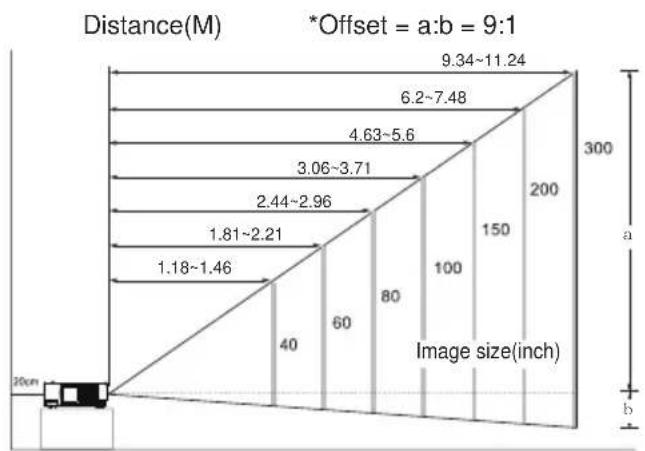
- The distance between the projector and screen determines the actual image size. Refer to the table below to determine the screen size at a given distance.
Note: The dimensions in the table below are approximate.
LC-XNB4000N / LC-XNB3500N (4:3)
| Screen size (diagonal) Distance (m) Distance (feet) | |||||
| inch m Tele Wide Tele Wide | |||||
| 40 1.0 1.36 1.10 4.47 3.62 | |||||
| 60 1.5 2.07 1.69 6.78 5.54 | |||||
| 70 1.8 2.42 1.98 7.93 6.51 | |||||
| 80 2.0 2.77 2.28 9.09 7.47 | |||||
| 100 2.5 3.48 2.87 11.40 9.40 | |||||
| 150 3.8 5.24 4.33 17.18 14.21 | |||||
| 200 5.1 7.00 5.80 22.96 19.03 | |||||
| 250 6.4 8.76 7.27 28.74 23.84 | |||||
| 300 7.6 10.52 8.74 34.52 28.66 | |||||
Distance(M) *Offset = a:b = 5:1
other
| Dimension | Value | |---|---| | Top Section | 8.74~10.52 | | Middle Section | 5.80~7.00 | | Bottom Section | 4.33~5.24 | | Left Side | 2.87~3.48 | | Right Side | 2.28~2.77 | | Center | 1.69~2.07 | | Bottom Edge | 1.10~1.36 | | Middle Edge | 40 | | Right Edge | 60 | | Bottom Edge | 80 | | Top Section (Right) | 100 | | Middle Section (Right) | 150 | | Bottom Section (Right) | 200 | | Top Section (Left) | 20cm | | Middle Section (Left) | 20cm | Image size(inch) - Top Section; Image size(inch) - Middle Section; Image size(inch) - Bottom Section; Image size(inch) - Right Section; Image size(inch) - Bottom Section.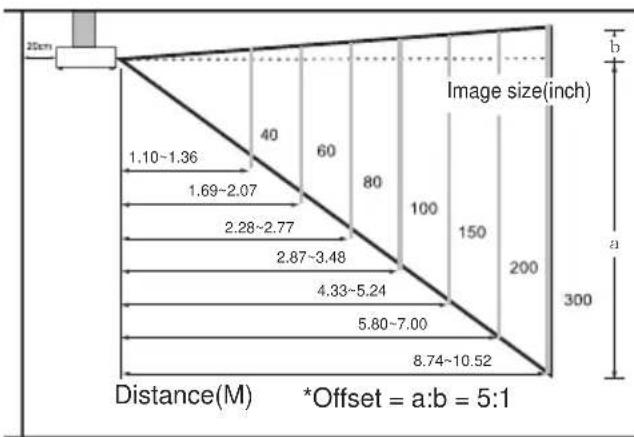
other
| Distance(M) | Image size(inch) | |-------------|------------------| | 1.10~1.36 | 40 | | 1.69~2.07 | 60 | | 2.28~2.77 | 80 | | 2.87~3.48 | 100 | | 4.33~5.24 | 150 | | 5.80~7.00 | 200 | | 8.74~10.52 | 300 |When in against at wall, leave about 20cm (7.9in.) between the projector and the wall.
LC-WNB3000 (16:10)
| Screen size (diagonal)) Distance (m) Distance (feet) | |||||
| inch m Tele Wide Tele Wide | |||||
| 40 1.0 1.46 1.18 4.78 3.88 | |||||
| 60 1.5 2.21 1.81 7.25 5.94 | |||||
| 70 1.8 2.59 2.12 8.48 6.96 | |||||
| 80 2.0 2.96 2.44 9.72 7.99 | |||||
| 100 2.5 3.71 3.06 12.18 10.05 | |||||
| 150 3.8 5.60 4.63 18.36 15.19 | |||||
| 200 5.1 7.48 6.20 24.53 20.33 | |||||
| 250 6.4 9.36 7.77 30.70 25.48 | |||||
| 300 7.6 11.24 9.34 36.87 30.62 | |||||
other
Distance(M) | Distance(M) | Image size(inch) | | :--- | :--- | | 9.34~11.24 | 300 | | 6.2~7.48 | 300 | | 4.63~5.6 | 300 | | 3.06~3.71 | 300 | | 2.44~2.96 | 300 | | 1.81~2.21 | 300 | | 1.18~1.46 | 300 | | 40 | b | | 60 | b | | 80 | b | | 100 | b | | 150 | b | *Offset = a:b = 9:1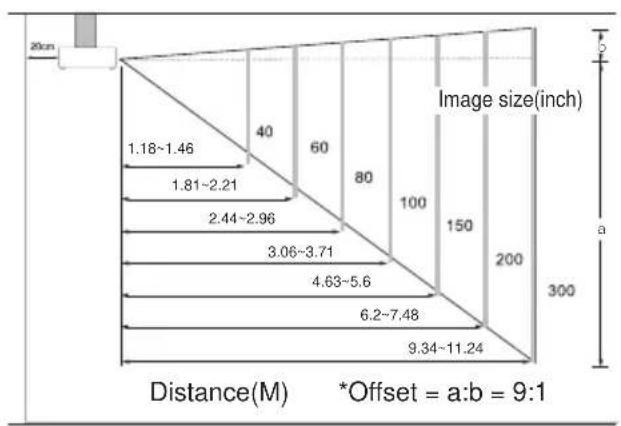
other
| Distance(M) | Image size(inch) | | :--- | :--- | | 1.18~1.46 | 40 | | 1.81~2.21 | 60 | | 2.44~2.96 | 80 | | 3.06~3.71 | 100 | | 4.63~5.6 | 150 | | 6.2~7.48 | 200 | | 9.34~11.24 | 300 | Distance(M) *Offset = a:b = 9:1When in against at wall, leave about 20cm (7.9in.) between the projector and the wall.
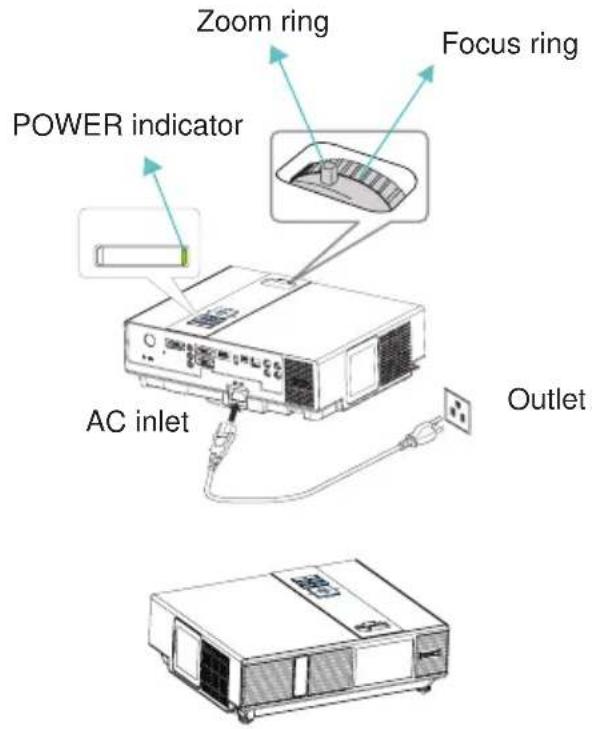
Power ON / OFF
text_image
Zoom ring Focus ring POWER indicator AC inlet OutletTurning On The Power
- Make sure that power cord is firmly and correctly connected to the projector.
- The green Power indicator blinks slowly.
- Remove the lens cover.
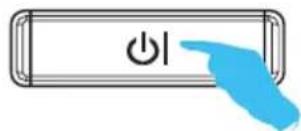
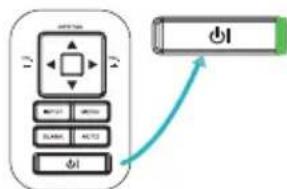
- Press POWER button on the control panel or the remote control to turn on the projector.
- Rotate the zoom ring to adjust the screen size.
- Rotate the focus ring to adjust the focus.

WARNING
A strong light is emitted when the projector's power is on. Do not look into the lens of the projector or look inside of the projector through any of the projector's openings.
1.
natural_image
Icon of a button with an 'OK' and a blue hand pointing at it (no text or symbols)2.
Power off?
Please press

POWER
key again to power off.
3.\~4.
text_image
Diagram showing a remote control interface with buttons and a play button, connected by an arrow indicating direction.5.
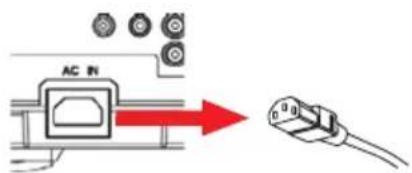
text_image
AC INTurning Off The Power
- Press the POWER button on the control panel or the remote control. The "power off" confirmation message will appear.
- Press the POWER button again while the message is shown on the screen.
- When the projector enters "Standby" mode, the green Power indicator blinks slowly.
- The projector cannot be turned on while red "Lamp indicator" is blinking slowly in cooling mode.
- If you don't use the projector for a long time, remove power cord.

WARNING
★ Do not touch around the lamp cover and the exhaust vents during use or just after use, since it is too hot.

CAUTION
Do not turn off the AC power for 120 seconds after the lamp is turned on. Doing so could cause premature lamp failure.
Setting Up
Setting Up The Projector
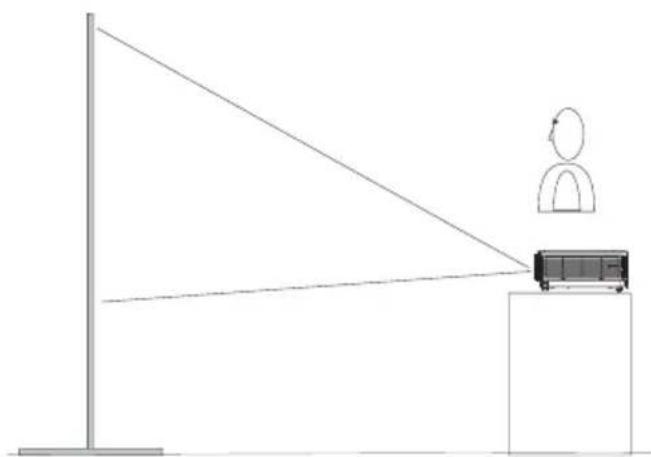
The projector supports the following four different projection methods.
- Front projection
natural_image
Simple line drawing of a person standing at a desk with a vehicle on a platform, no text or symbols present.- Rear ceiling projection
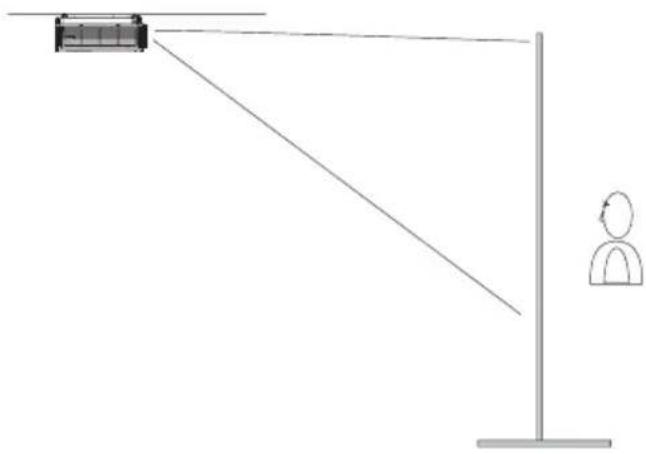
natural_image
Simple line drawing of a person standing near a pole with a car on one side, no text or symbols present.- Rear projection
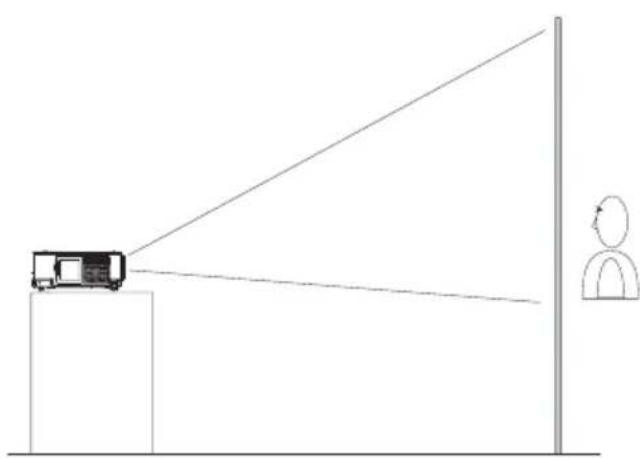
natural_image
Diagram showing a vehicle projecting a beam to a vertical pole, with a person observing nearby (no text or symbols)- Front ceiling projection
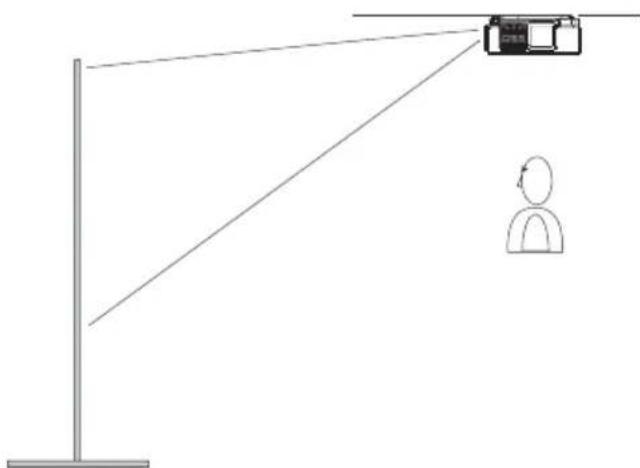
natural_image
Diagram showing a person observing a small object from a pole, with no text or symbols present.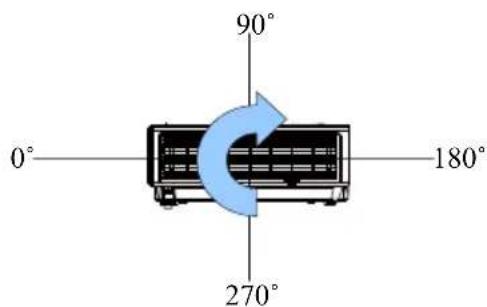
text_image
90° 0° 180° 270°The projector can be installed pitched by any angle (360 degree) without any setting in fan mode. As for rolling it must be within 10 degree.
Special installation is required in order to suspend the projector from the ceiling. Please ask your dealer for details.
Ceiling Mounted Installation Guide
Attach ceiling mount at four-suspension bracket fixing points when suspending from a ceiling. Special installation is required in order to suspend the projector from the ceiling. Please ask your dealer for details.
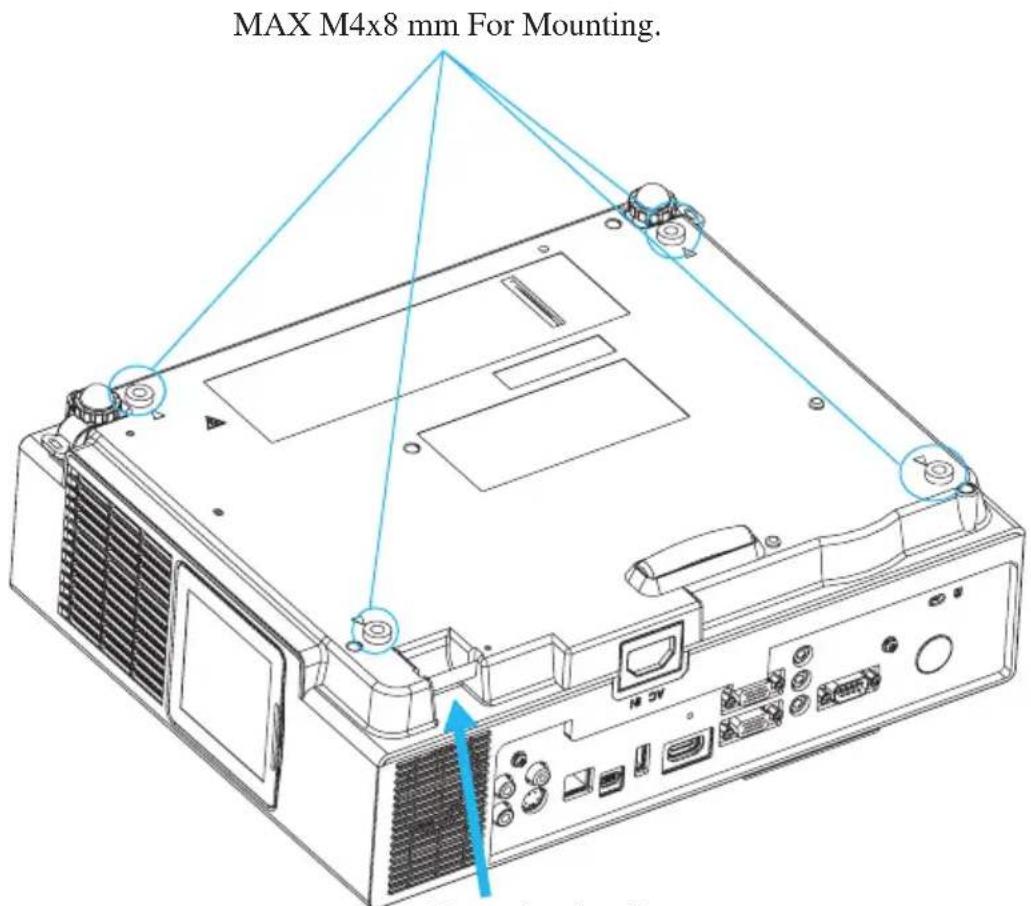
text_image
MAX M4x8 mm For Mounting.Security Anchor
The product is equipped with security anchor and PIN LOCK functions to help prevent unauthorized removal projector.

WARNING
▶ Do not grasp the security anchor to carry projector, since it is not designed for it.
The security anchor is not for comprehensive theft prevention measures. It is intended to be used as supplemental theft prevention measure.
Adjusting The Projector's Elevation
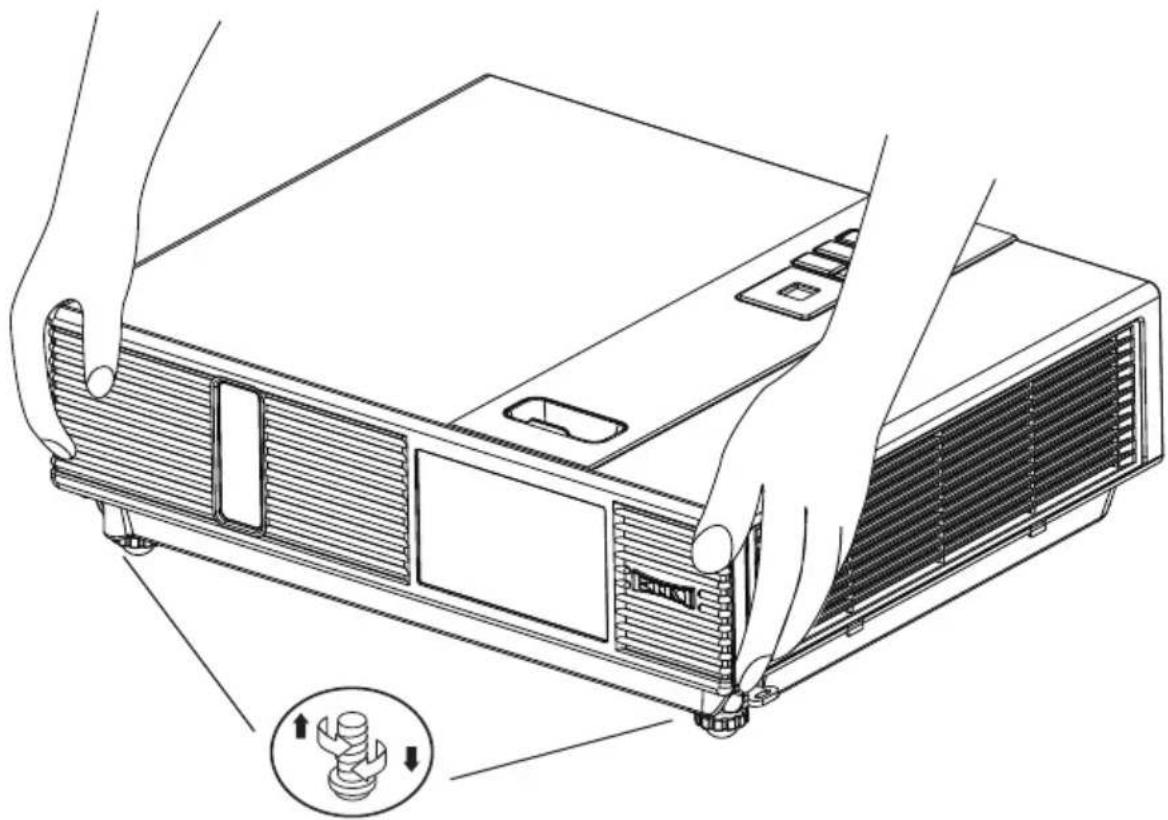
Use the adjustable foot at the front of the projector to set the image height.
1 Holding the projector, push the foot adjust buttons to loosen the front adjustable foot.
2 Position the front side of the projector to the desired height.
3 Release the foot adjust buttons in order to lock the front adjustable feet.
Please make sure that the front adjustable feet are locked.
Please rotate the adjustable feet when fine adjustment of tilt is needed.

CAUTION
* The adjustment range of front adjustable foot is 0 to 8.5 degrees.
* When the foot is adjusted, it may cause the shape of the projected image to become distorted. Use the keystone correction function to correct this distortion.
natural_image
Line drawing of a projector unit with hands and a close-up inset showing the internal components (no text or symbols)How To Connect
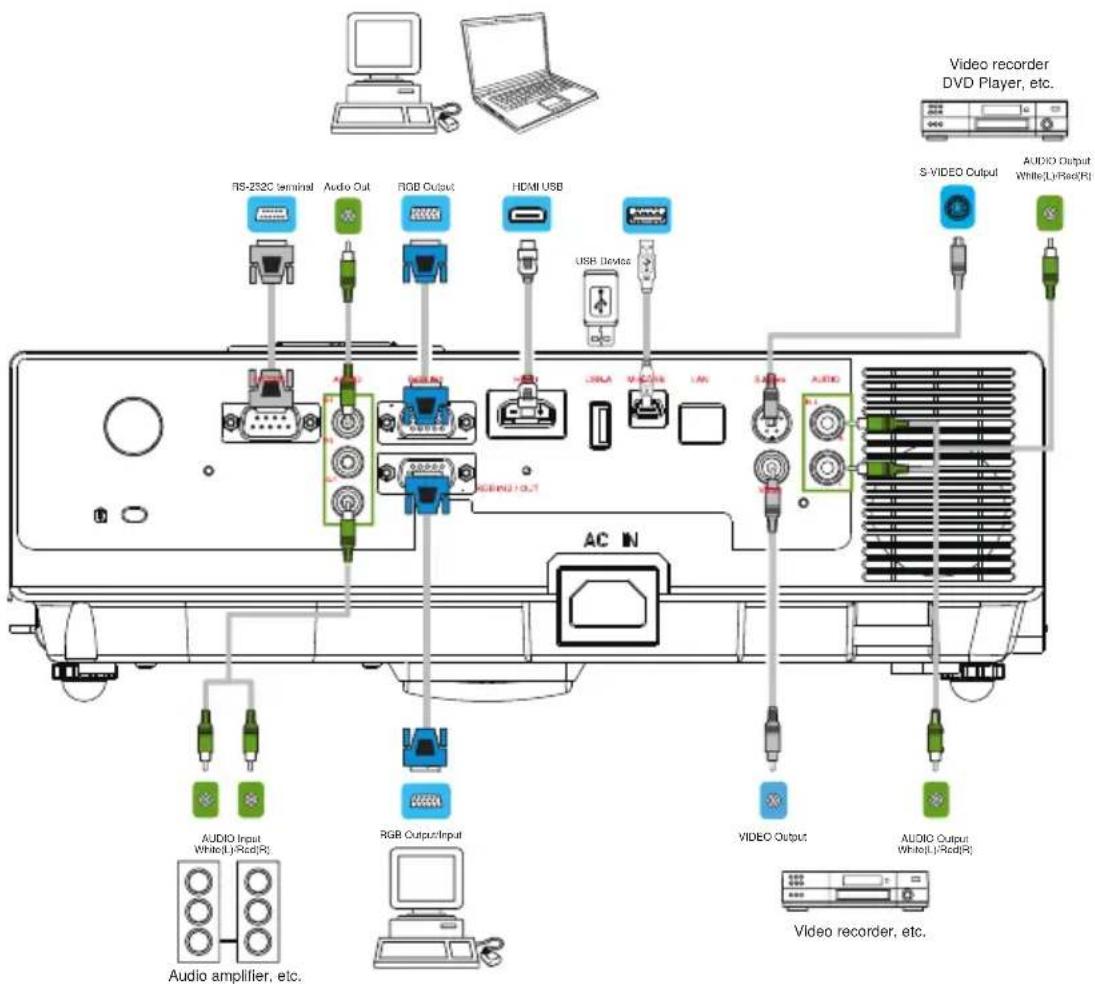
Laptop or desktop computer
text_image
RS-252C Seminal Audio Out RGB Output HDMI USB USB Devices S VIDEO Output S VIDEO Output AUDIO Input White(Ly/Red(R) RGB Output/Input VIDEO Output AUDIO Output White(Ly/Red(R) Video recorder, etc. Audio amplifier, etc. Video recorder, etc.Before starting, make sure that the projector and computer are both turned off.
Connect the computer
Connect the computer cable from the computer to the projector's RGB IN.
Connect a computer cable from the MONITOR OUT to an external monitor to view the signal on RGB IN. Tighten the screw on all connectors.
Connect the audio
-
Please connect the audio cable to the AUDIO IN 1 if the computer cable connected to the projector's RGB IN.
-
Please connect the audio cable to the AUDIO IN 2 if the computer cable connected to the projector's RGB IN 2.
-
Please connect the audio cable to the AUDIO IN 3 if the video cables are connected to the VEDIO / S-VIDEO port of the projector.
Setting Up
- If the selected video image is not displayed after the projector is turned on and the correct video source has been selected, please check that the video source device is turned on and operating correctly. Also check that the signal cables have been connected correctly.
- Many laptops do not turn on their external video ports when connected to a projector. Usually a key combination like Fn + F3 or CRT/LCD key turns the external display on / off. Locate a function key labeled CRT/LCD or a function key with a monitor symbol on the laptop. Press Fn and the labeledfunction key simultaneously. Refer to your laptop's documentation to discover your laptop's key combination.
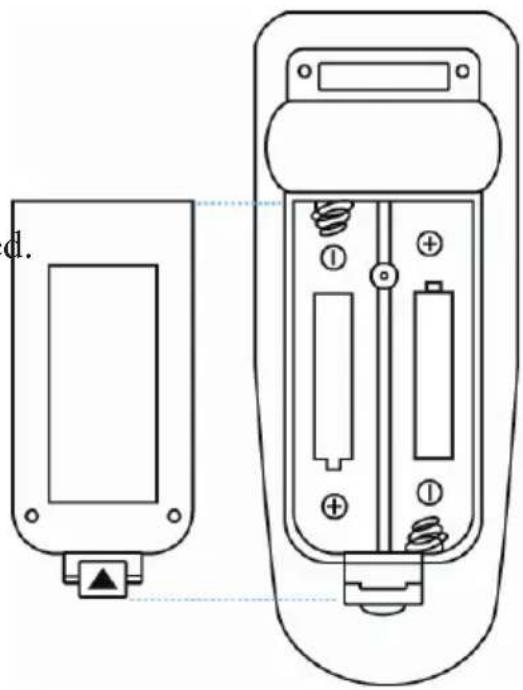
Remote Control Batteries Installation
-
Remove the battery cover.
-
Load the batteries. Make sure the poles are correctly oriented.
-
Close the battery cover.
natural_image
Diagram of a remote control device showing two components with battery and indicator lights (no text or symbols)
Caution
- Avoid excessive heat and humidity.
- Do not drop the remote control.
- If the remote control will not be used for an extended period, remove the batteries.
- Do not expose the remote control to water or moisture. This could result in malfunction.
- Replace the battery when remote control operation becomes sluggish or unresponsive.
- Do not place the remote control close to the cooling fan of the projector.
- Do not use batteries of different types at the same time.
- Do not mix a new battery with used one. Make sure the plus and terminals are correctly aligned when loading batteries.
- Dispose of batteries in accordance with environmental laws.
- Do not disassemble the remote control. If the remote control needs service, please contact your dealer.
- The batteries (battery pack or batteries installed) shall not be exposed to excessive heat such as sunshine, fire or the like.
Remote Control
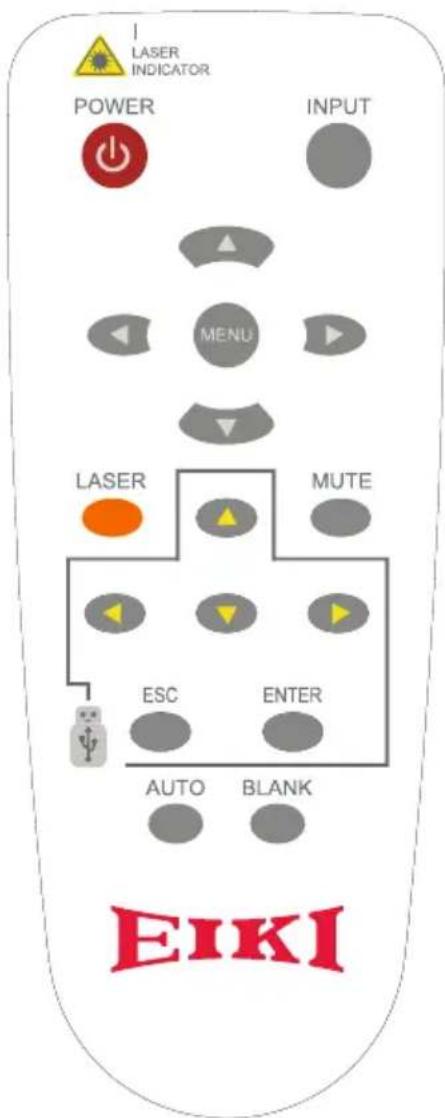
POWER
Power on / operation mode, Standby mode, Cool down mode.
INPUT
Select input source :

flowchart
graph LR
    A["RGB 1 RGB 2"] --> B["HDMI"]
    C["S-Video"] <--> D["Video"] <--> E["USB"]
MENU
Display or hide the On-Screen Display main menu page.

Press or to select On-Screen Display menu item.

Press or to select and adjust the function of On-Screen Display menu item or value.
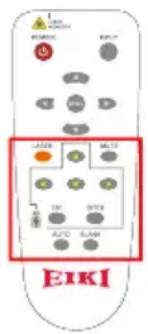
LASER
Aim the remote control at the screen, press and hold button to activate the laser pointer.
MUTE
Mute audio.
ARROW Key


Press / / / to select the EZ Suite On-Screen Display menu
ESC
Escape current status.(to set the EZ Suite On-Screen Display menu item.)
ENTER
Select current status.(to set the EZ Suite On-Screen Display menu item.)
AUTO
Refresh the current image.
BLANK
Hide the current image, become black color on the screen.
Quick Key
If it is not in the On-Screen Display main menu,
you could press the

button as the quick key.
Press or to select the item.

flowchart
graph LR
    A["V keystone"] --> B["Brightness"]
    C["Volume"] <--_D["Contrast"]
Press or to adjust the value
text_image
LASER INDICATOR POWER INPUT MENU LASER MUTE ESC ENTER AUTO BLANK EIKI◎Select the input source as the USB to get into the EZ Suite.
Main Menu Layout & Function Definition
| Main-items | Function Definition | Sub-Function Definition | Description | ||
| EZ Suite |  |  | Internal Memory | Photo Support Internal memory, USB compatible hard disks, Support Photo, Video, Audio Music and office viewer. | |
| EZ Media Function | Video | ||||
| Audio | |||||
| Office viewer | |||||
 | USB | Photo | |||
| Video | |||||
| Audio | |||||
| Office viewer | |||||
 |  | EZ USB | Support USB Display/ WiFi Display/ LAN Display | ||
| EZ Display Function |  | EZ WiFi | |||
 | EZ LAN | ||||
 |  | System | Version Function | Configuration and Setting. | |
| Setting & Configuration |  | Video | Language Update | ||
| Display Ratio | |||||
| Repeat Mode | |||||
 | Photo | Display Ratio | |||
| Slideshow | |||||
| Slideshow Duration | |||||
 | Audio | Repeat Mode | |||
 | WiFi | AP mode | |||
| Client mode | |||||
 | Connect PC | Connect PC | |||
Before to use :
- Use the ▲, ▼ or buttons on the remote control to select an item.
- Use the ENTER button on the remote control to enter item.
- Use the ESC button on the remote control to exit items.
text_image
EIKI1. EZ Media Function: Layout & Behavior
Support Internal memory and USB-disk device (Support Photo, Video, Music, office viewer)
| EZ Media | Internal Memory | Photo |
| Video | ||
| Audio | ||
| USB | Office viewer |
▶Note :
1. Internal Memory :
Internal memory, supports the memory size is 1.5GB.
2. USB :
Support USB Storage Device Type :
USB Flash Device (\~64 GB), USB compatible hard disks.
Support FAT16, FAT32, NTFS File system.
3. Limitation (each type of storage):
Support Max. to 999 directories and Max. to 9,999 Files
Support at most 10th level directory
- Even if the inserted USB Storage Device or used Internal memory contains a mix of audio music, video, and photo files, you can only browse and playback one type of file at a time. For example, if you enter the Audio music folder, only audio music files can be browsed, added to playlist and played back. To browse photo files, go back to the EZ Media screen and select Photo.
1.1 Photo Function
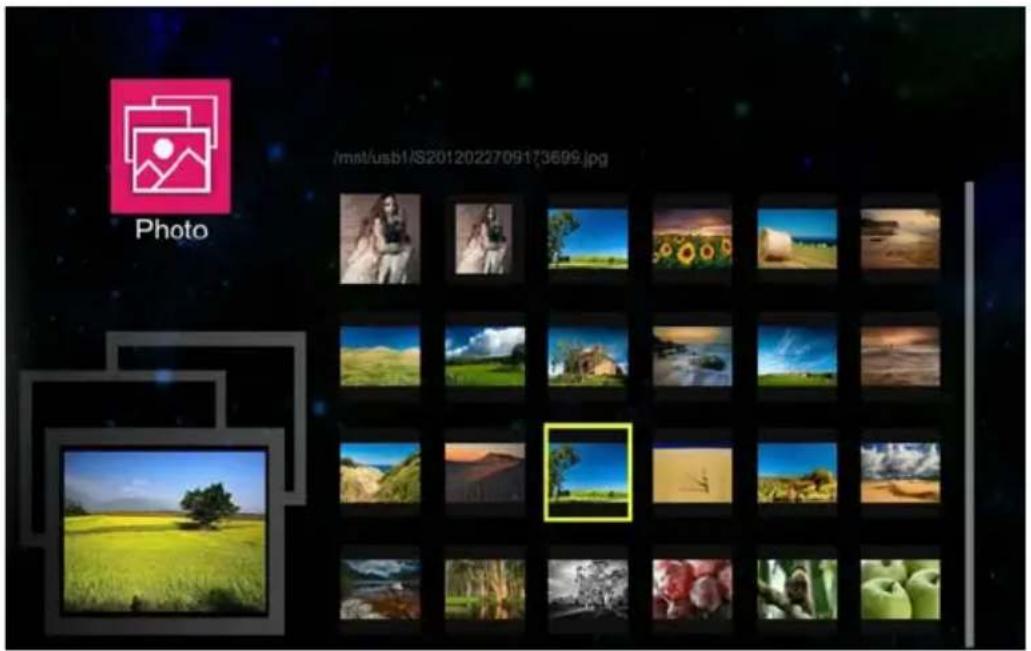
text_image
photo /met/usb1/S2012022709173699.jpgIt will show the file name / thumbnails display / file number progress bar
-
From the Photo layout. Press the 🔊, or buttons on the remote control to select the file.
-
While the highlighted photo file is selected, press the ENTER button on the remote control, the screen will display the selected file, and it will enter the Browse mode.
-
Browse mode :
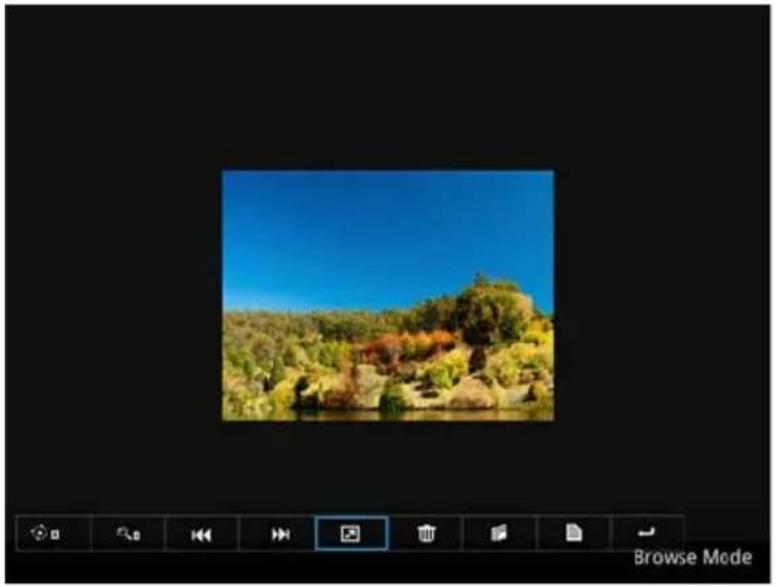
natural_image
Landscape photo of a forested hillside under a clear blue sky, with no visible text or symbols.EZ Suite(EZ Media Function)
Photo navigator toolbar :
| Rotation Zoom in Previous Next Sl de how | On/Off | Delete Copy Info Quit | ||||||
Press the , buttons on the remote control, to highlight control icon and press the ENTER button on the remote control to select.
Rotation : To rotate an image.
Using the ▶ or ● buttons on the remote control to rotate the image.
It will resume the image when press the ESC button on the remote control to exit shown image.
Zoom in : To magnify a photo.
Press the ENTER button again to expend the image. It supports x1,x2,x3 and x4 magnification.
During enlarged projection, use the ▲, ▼ or buttons on the remote control to move the image area.
It will resume the image when press ESC on the remote control to exit shown image.
Previous : Play previous photo.
Next : Play next one photo.
Slide Show On/Off : Turn On/Off the slide show function.
*The Slide show will operate after the toolbar hidden.
*There have turn on the Slide show function at the "Photo Setting" menu see page49 for more information.
Delete : To delete the photo file.
Copy : To copy the current display photo file, it will save the photo to internal memory.
Info : Showing the information of the current display photo file.
Quit : To quit browse mode and return to sub-menu.
- To return to the sub-menu, press the ESC button on the remote control.
▶Note :
-
Support *.jpg, *.jpeg, *.bmp file format.
-
Support files sorting by file name.
-
An on-screen image presented on slides automatically, when the setting of Photo Slide show is enable.
*For more information, please check the page49 for "Photo Setting"
1.2 Video Function
text_image
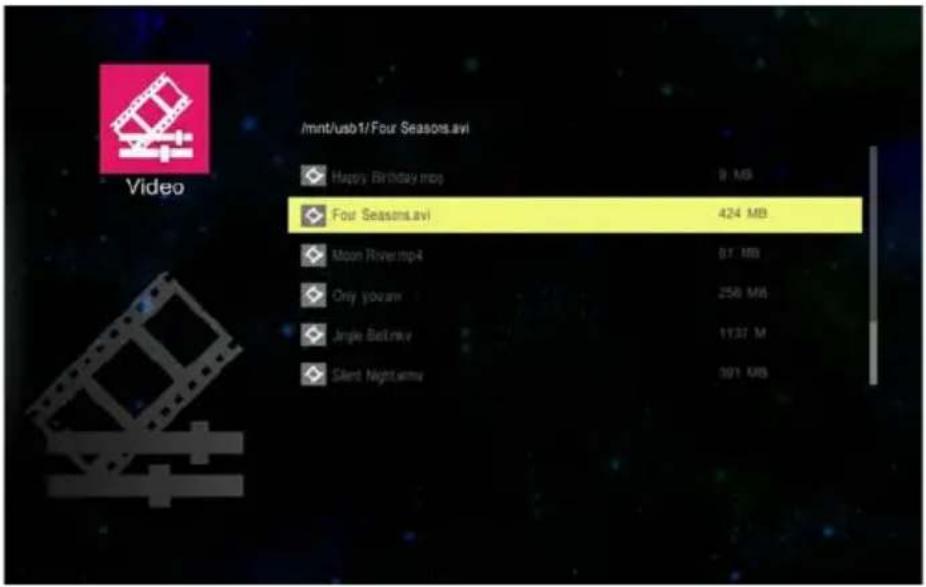
/mnt/usb1/Four Seasons.avi Happy Birthday.mps 9 MB Four Seasons.avi 424 MB Moon River.mp4 91 MB Only yobraw 258 MB Jingle Bettrev 1137 M Slend Nightarms 301 MBIt will show the file name/ file list /file size/ file number progress bar
-
From the Video layout. Press the or buttons on the remote control, to highlight the file of video playlist and press the ENTER button on the remote control to display.
-
Press the ENTER button and a pop-up video navigator toolbar will displayed when the video is performed.
Video navigator toolbar :
| ← | II | ▶ | → | 回 |
| Play fast backward | Pause | Play Play forward | Repeat mode | |
Play fast backward: To play fast backward by press the button.
Support x1, x2, x4 and x8 speeds.
Pause / Play : To pause or play the video by press the ENTER button.
Play fast forward : To play fast forward by press the ▶ button.
Support x1, x2, x4 and x8 speeds.
Repeat mode : Show the status of repeat mode.

Single display mode

Sequence repeat display mode
▶ While video navigator toolbar is disappeared, press the ◀ or ▶ on the remote control to play previous/next video file.
▶ Note :
- Support MPEG1/2/4, H264, WMV, RMVB video format, up to 1080P(20Mbps) resolution. Please refer the multimedia support list document
- Support files sorting by file name
- Video play : Support original size and full screen size display
*Fore more information, please check the page48 for Video Setting.
1.3 Audio Function
text_image
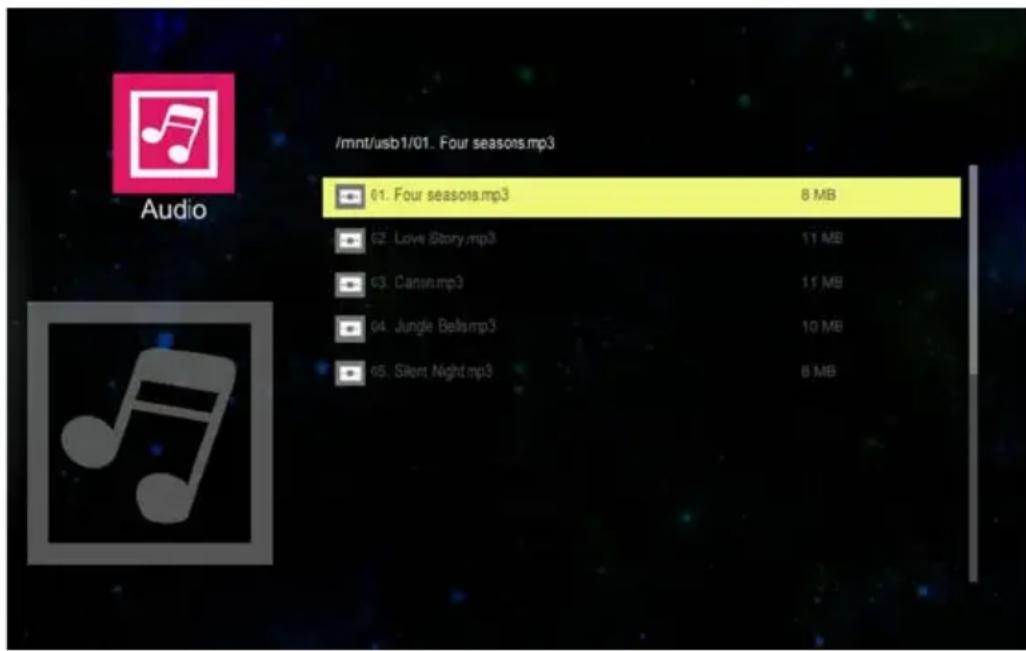
/mnt/usb1/01. Four seasons.mp3 61. Four seasons.mp3 8 MB 62. Love Story.mp3 11 MB 63. Cansn.mp3 11 MB 64. Jungle Bell.mp3 10 MB 65. Silent Night.mp3 8 MBIt will show the file name/ file list /file size/ file number progress bar.
EZ Suite(EZ Media Function)
- From the Audio layout. Press the ▲ or buttons on the remote control to highlight the file of audio playlist and press ENTER button to perform.
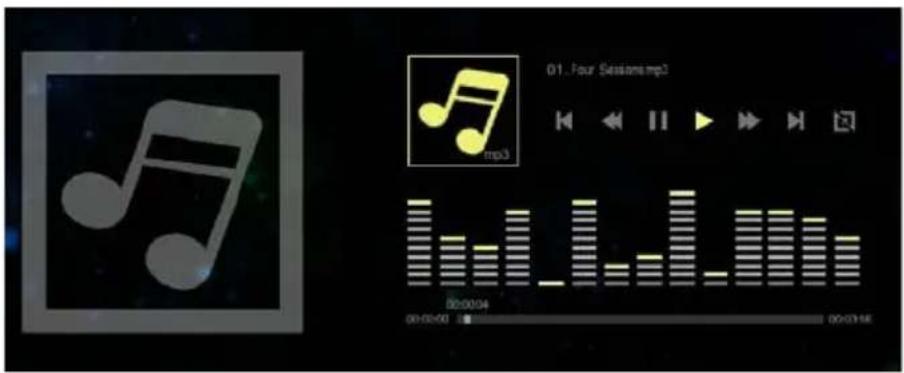
text_image
01. Four Sessions.mp3 mp3 00:00:04 00:00:00 00:07:16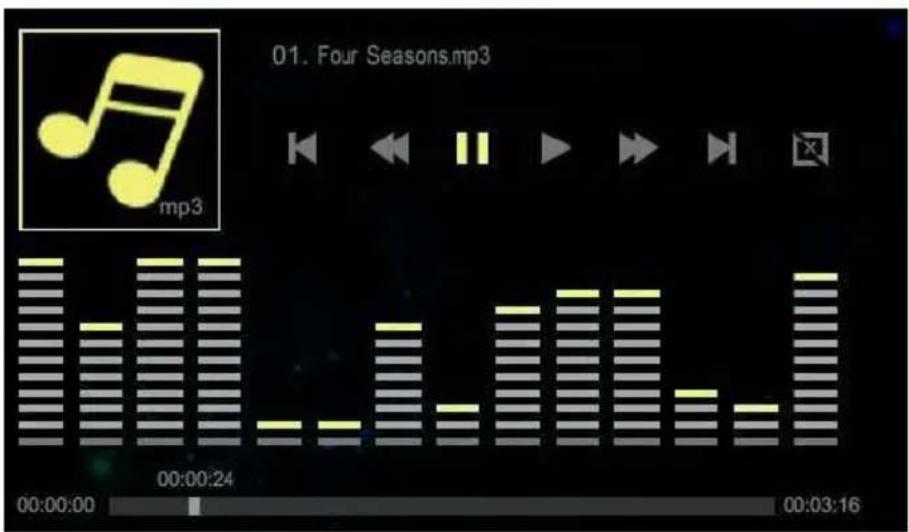
text_image
01. Four Seasons.mp3 mp3 00:00:24 00:00:00 00:03:16Audio navigator toolbar :
 |  |  |  |  |  |  |
| Previous | Play fast backward | Pause | Play Play forward | Next Repeat mode | ||
Previous : Play previous audio music file by press the button twice.
Play fast backward : To play fast backward by press the button.
Pause / Play : To pause or play the video by press the ENTER button.
Play fast forward : To play fast forward by press the ▶ button twice.
Next : Play next audio music file by press the ▶ button.
Repeat mode : Show the status of repeat mode.

Single display mode

Sequence repeat display mode
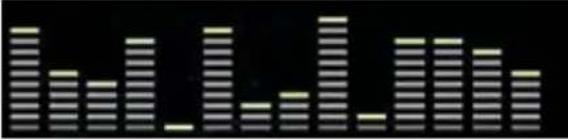 | Sound Spectrum |
 | Show the total time and indicate current playing time |
▶ Note :
- Support mp3, wma, ogg, and wav audio file format
- Support file sorting by file name and modification date same as photo function *For more information, please check the page49 for Audio Setting.
1.4 Office Viewer Function
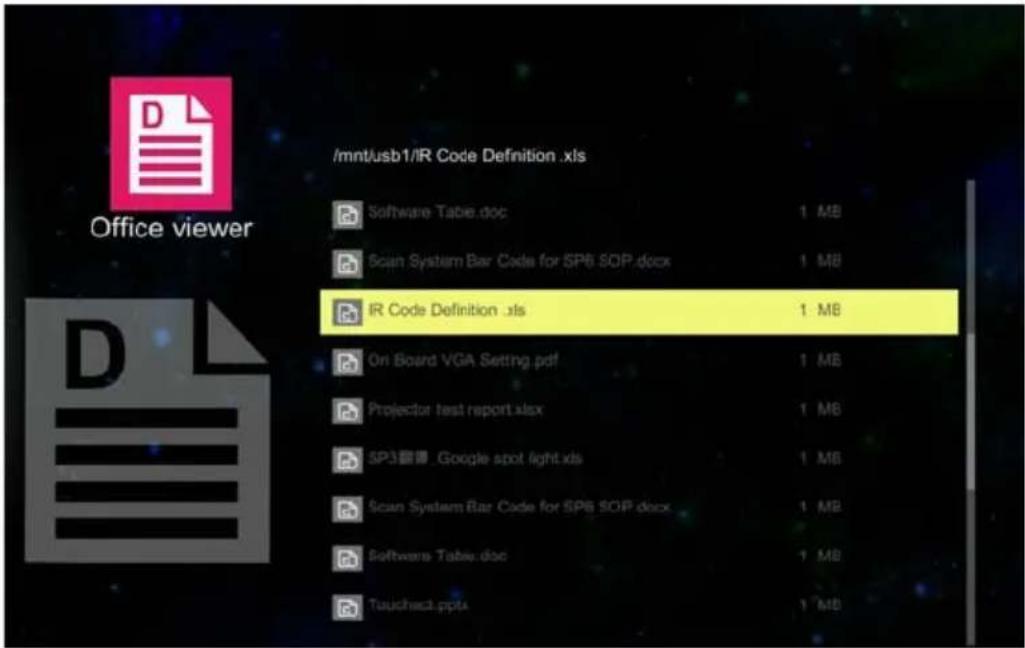
text_image
/mnt/usb1/IR Code Definition .xls Software Tabe.doc 1 MB Scan System Bar Code for 5P6 SOP.docx 1 MB IR Code Definition .xls 1 MB On Board VGA Setting.pdf 1 MB Projector test report.xlsx 1 MB 5P3 音像 Google spot light xds 1 MB Scan System Bar Code for 5P6 SOP.docx 1 MB Softwares Tabe.doc 1 MB Touchact.ppta 1 MB- Select and enter a document file that you want to browse. It will show the translucent operating menu around 5 seconds on the screen.
- The document displays on the screen.
Press EXIT button will show the translucent Tool bar on the screen. It will help you to browse the document.
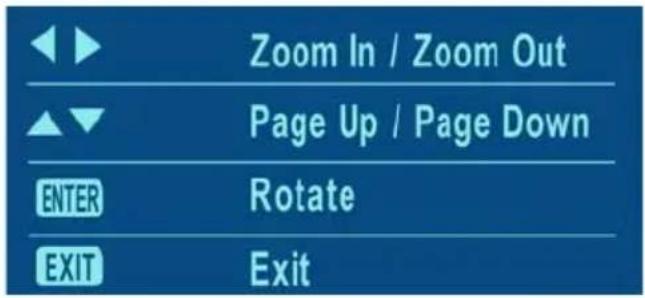
text_image
Zoom In / Zoom Out Page Up / Page Down ENTER Rotate EXIT ExitOperation info :
| ◀◀ Zoom In / Zoom out Crops the image, and magnifies or reduces the result of the cropping. | |
| ▲▼Page up/Page down | These two buttons are used to go to the previous page or the next page in documents. |
| ENTER Rotate Press “Enter” | button for movement of document around a center of rotation. |
| EXIT Exit Press “ESC” button to exit browse document. | |
▶ Note:
- Embedded Picsel Office Viewer
- Support Office 2010 (Word, Excel, PowerPoint), Adobe PDF & Plain text (TXT) format
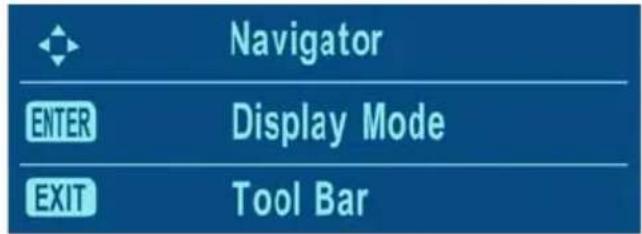
text_image
Navigator ENTER Display Mode EXIT Tool BarOperation info :
| ▲▼◀▶Navigator Use up/down/left/right keys. | |
| ENTER Display mode Press the ENTER button to set display mode. | |
| EXIT Tool bar Press the ESC button to show tool menu bar. |
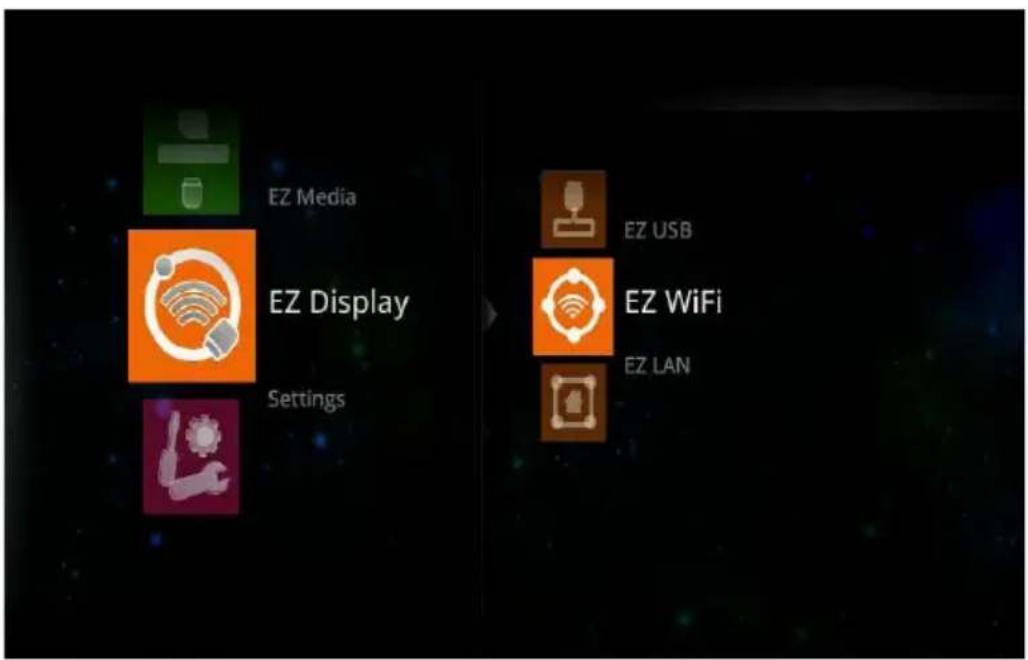
2. EZ Display Function: Layout & Behavior
Support USB Display, WiFi Display, LAN Display.
 EZ Display Function EZ Display Function |  EZ USB EZ USB |
 EZ WiFi EZ WiFi | |
 EZ LAN EZ LAN |
text_image
EZ Media EZ Display Settings EZ USB EZ WiFi EZ LAN| Function Description OS system | ||
| EZ USB | Display PC Screen with USB cableExtended Display with USB Cable | Windows OS, Mac OS |
| EZ WiFi | Wirelessly project the computer's screen | Windows OS, Mac OS, iOS, Android Device |
| EZ LAN | Display computer's screen with Ethernet Windows OS. | Mac OS |
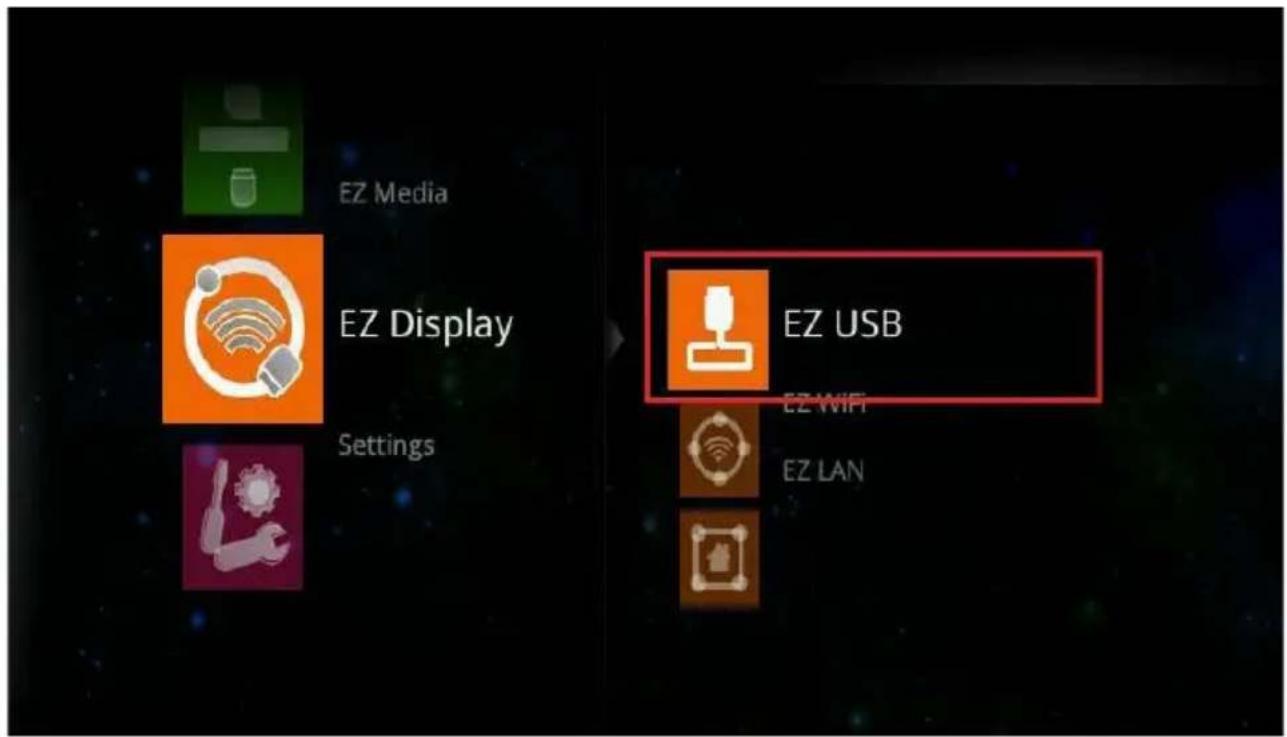
2.1 EZ USB
text_image
EZ Media EZ Display Settings EZ USB EZ WIFI EZ LAN▶Note : EZ USB support Windows OS, Mac OS
natural_image
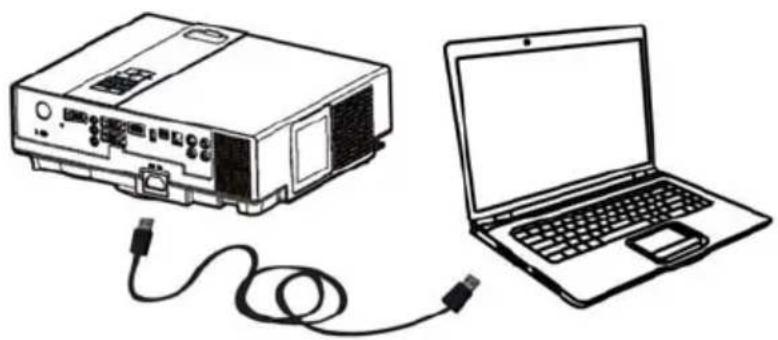
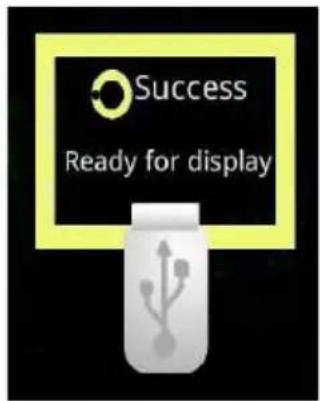
Line drawing of a projector connected to a laptop via cable (no text or symbols)- Select the EZ USB item at EZ Display interface. It will show the Ready for display image on the screen.
text_image
Success Ready for displayEZ Suite(EZ Display Function)
- Connect the computer's USB port to the projector's USB (mini-USB) port via the USB A to USB mini-B type USB Cable.
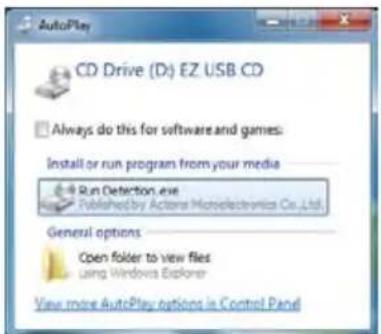
- Computer's system will examines newly discovered removable media and devices if you connect to projector via USB cable.
text_image
AutoPlay CD Drive (D:) EZ USB CD Always do this for software and games: Install or run program from your media Run Detection.exe Published by Actors Microelectronics Co., Ltd. General options Open folder to view files using Windows Explorer View more AutoPlay options in Control Panel- Click and execute "Detection.exe" program to run the USB Display adapter for projecting the images from a computer's screen.
Removing USB devices :
- Press ESC button on the remote control to exit the USB Display adapter process.
- Remove USB cable from the projector and the computer.
2.2 EZ WiFi
text_image
EZ Media EZ Display Settings EZ USB EZ WiFi EZ LAN▶ Note :
1.EZ WiFi Display support Windows OS, Mac OS, Android
2.EZ WiFi can support WiFi AP mode,Client mode.
Running under WiFi AP Mode:
natural_image
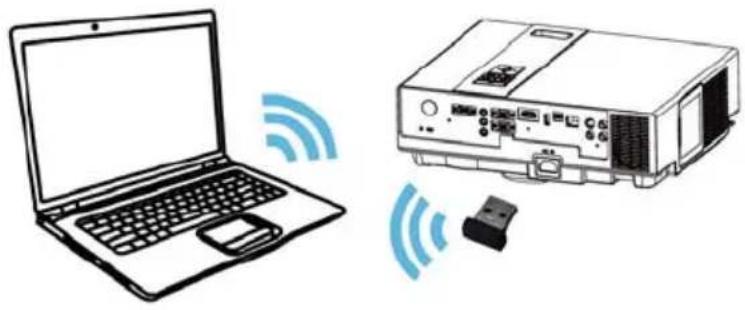
Illustration of a laptop connected to an electronic projector with wireless signal waves (no text or symbols)Projector Setup :
- Connect an Wireless USB WiFi Dongle unit to the projector's USB Port (USB -A).
- Set the AP mode parameters at \.\settings\WiFi\AP mode.
*For more information, please check the page50 for 'WiFi settings'.
text_image
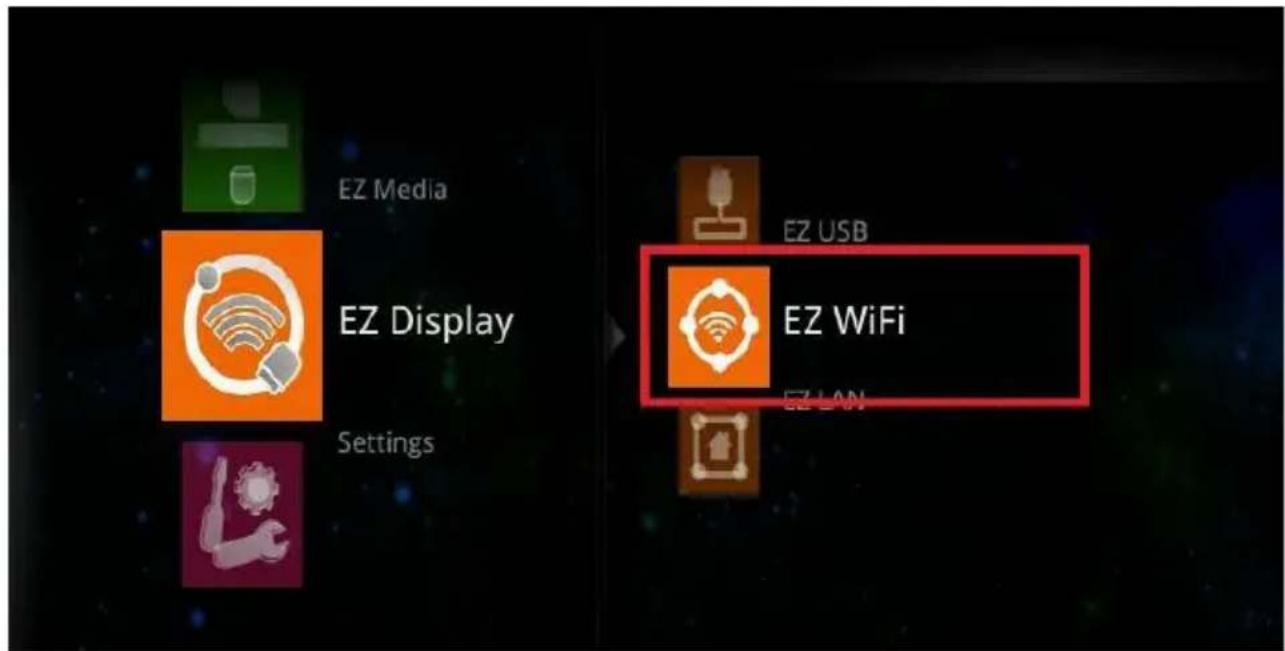
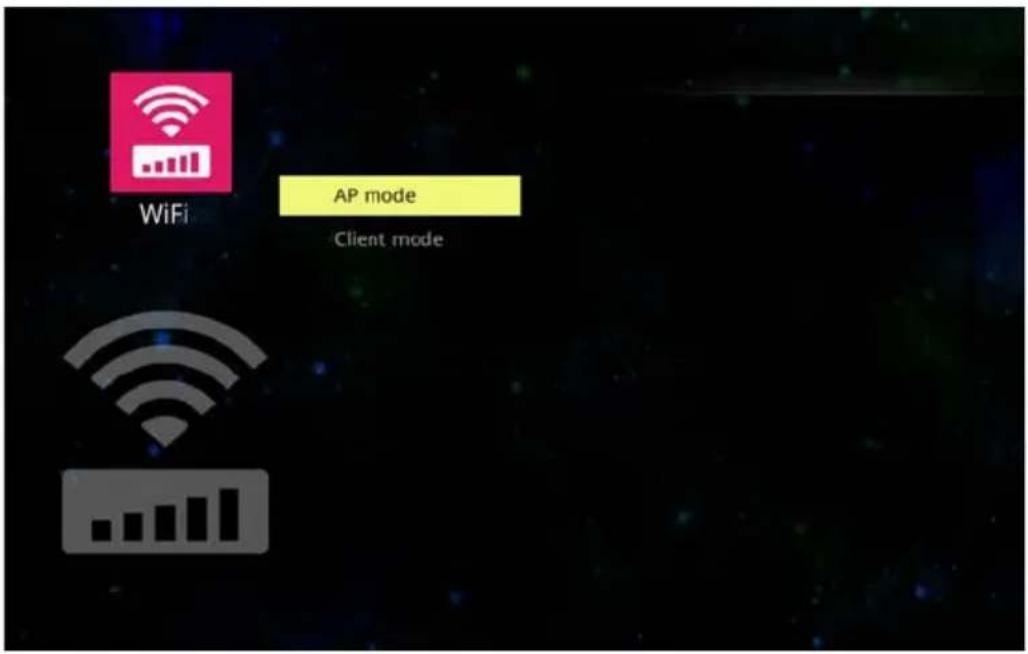
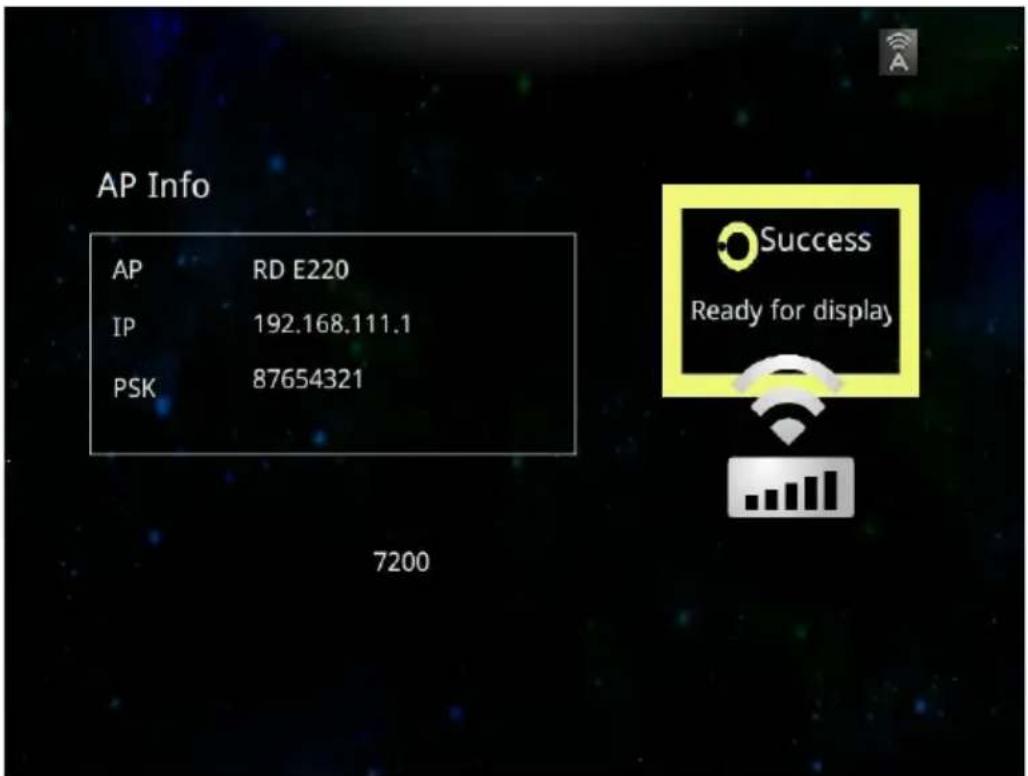
WiFi AP mode Client mode- Select the EZ WiFi item at EZ Display interface on the screen. It will show the Ready for display image on the screen. And you can find the 4-character pass code on the screen too.
text_image
AP Info AP RD E220 IP 192.168.111.1 PSK 87654321 7200 Success Ready for displayComputer Setup :
- For first time use, please install PC/Mac-tool(EZ WiFi/LAN.exe) program. After installed, new USB device “EZ USB” and new adapter “EZ Display” (Virtual .Graphics Card) will be installed.
▶ You can download the PC/Mac-tool(EZ WiFi/LAN.exe) through the intranet by web browser. Please check "Download Tool" on Page80 for more information.
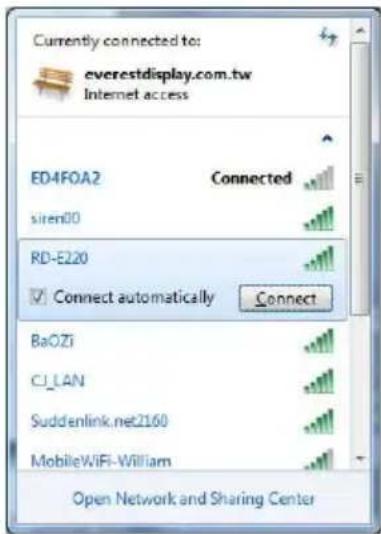
- Find the wireless local area network manager from computer that you broadcast of the SSID(for example: the name of SSID is "Optivtw_W_I"). It would need to manually enter the correct SSID to connect to the network, then execute PC/Mac-Tool(EZ WiFi/LAN.exe) program.
text_image
Currently connected to: everestdisplay.com.tw Internet access ED4FOA2 Connected siren00 RD-E220 Connect automatically Connect BaOZi CJ_LAN Suddenlink.net2160 MobileWiFi-William Open Network and Sharing Center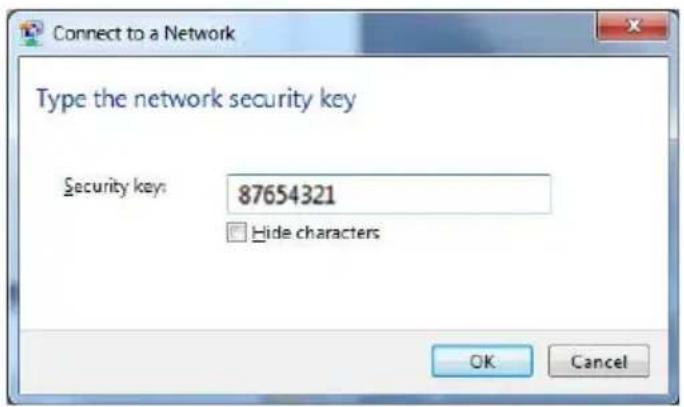
text_image
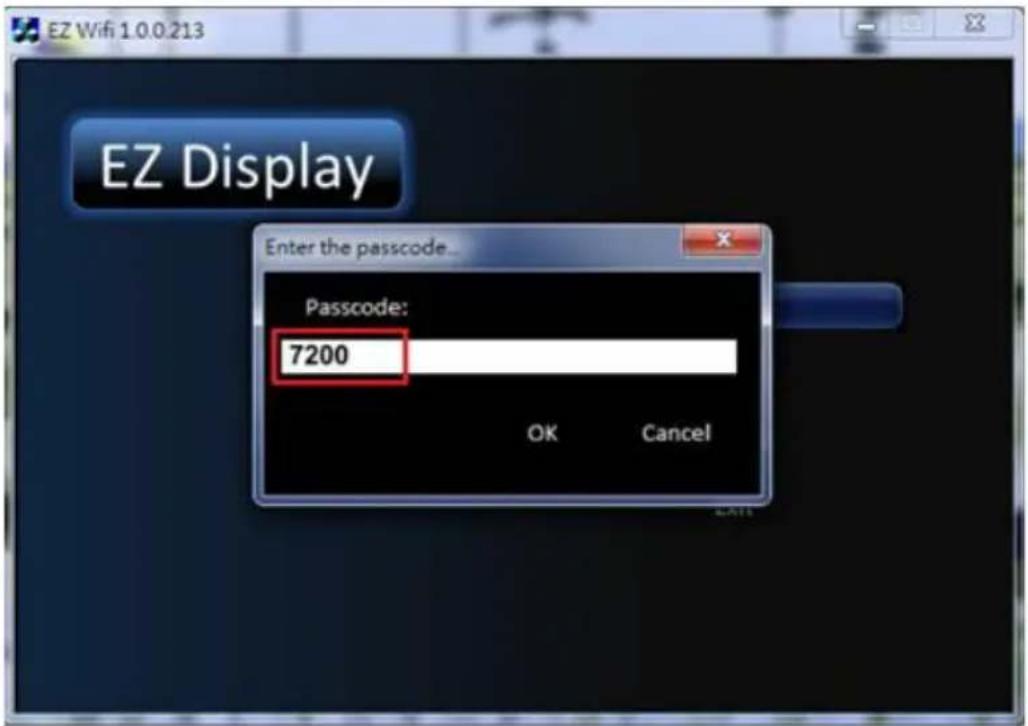
Connect to a Network Type the network security key Security key: 87654321 Hide characters OK Cancel- It will show the “Enter the passcode” dialog window on the screen, then input 4-character pass code at the dialog(for example: the PCTool Password(EZ WiFi/LAN) passcode is “7200”). After click the OK button, computer will display the EZ Display dialog, it means you can wirelessly project the computer’s screen.
▶ PCTool Password is a 4-character pass code that should be entered on PC tool EZ WiFi (EZ WiFi/LAN), for example the 4-character pass code is "7200". EZ WiFi PC tool (EZ WiFi/LAN) will check the pass code for basic protection.
text_image
EZ Display Enter the passcode... Passcode: 7200 OK Cancel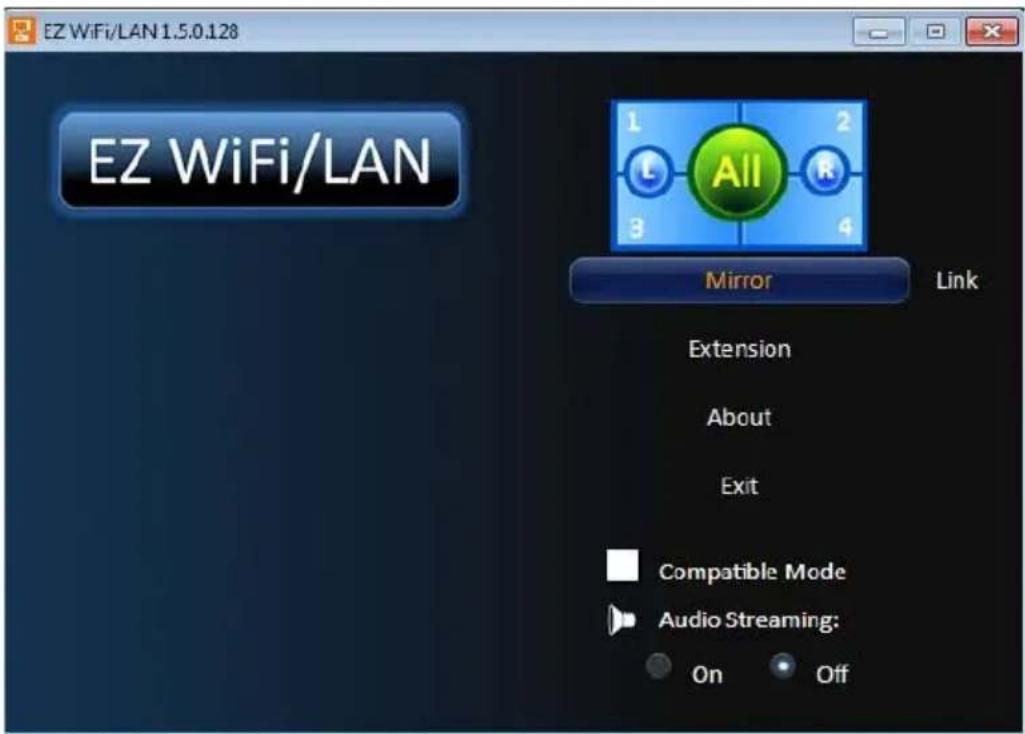
text_image
EZ WiFi/LAN 1.5.0.128 EZ WiFi/LAN 1 L 3 2 All R 4 Mirror Link Extension About Exit Compatible Mode Audio Streaming: On OffEZ Suite(EZ Display Function)
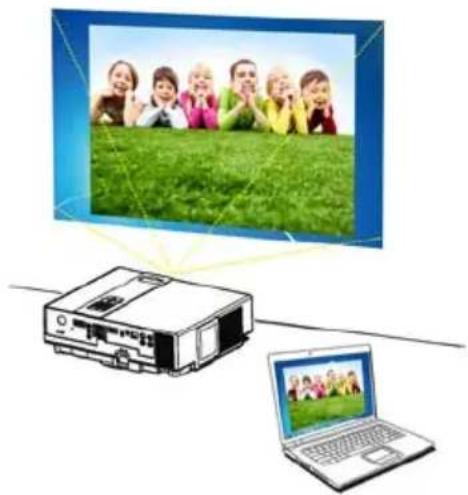
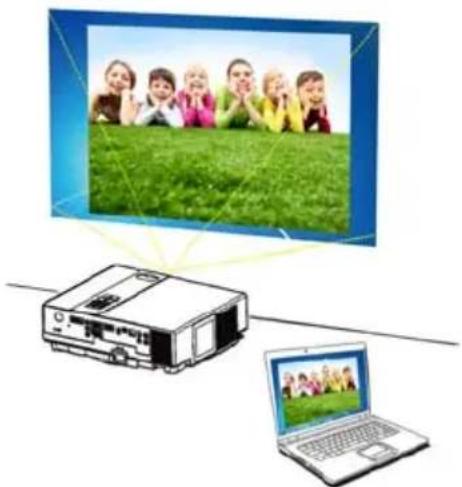
Mirror mode (default): Clone or mirror desktop mode
natural_image
Illustration of a projector and a laptop connected to a screen showing a family photo (no text or symbols present)Mirror mode
Extension mode : Span or extended desktop mode
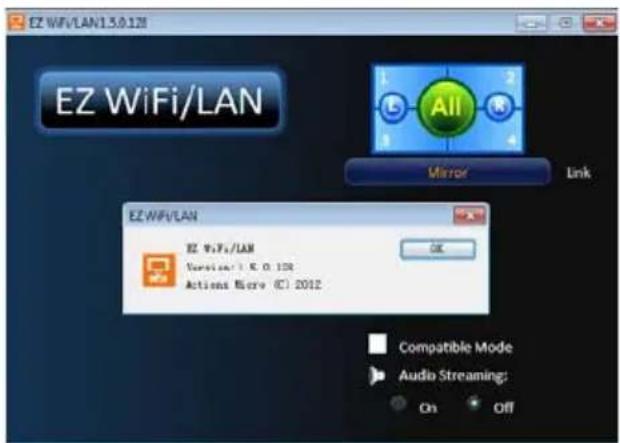
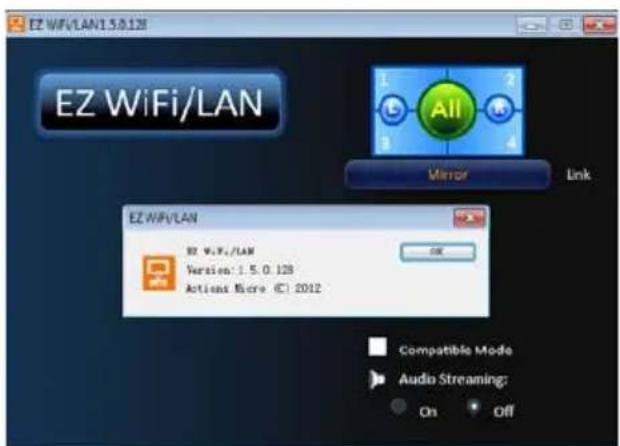
About : The information of EZ WiFi/LAN
text_image
EZ WiFi/LAN1.3.0.128 EZ WiFi/LAN E2 WiFi/LAN Version: E. O. 108 Actions Micro (C): 2012 OK Compatible Mode Audio Streaming: On OffExit : To quit the program and discontinue projecting images from the computer.
Audio Streaming : On -Projecting images from the computer with audio sound.
Off -Projecting images from the computer without audio sound.
▶Note : The frame rate of video would be decrease while the setting of Audio Streaming is ON.
Exit WIFI Display :
Click the Exit button from the EZ WiFi/LAN dialog window on the computer or press the ESC button on the remote control to quit WiFi Display.
Running under WiFi Client Mode:
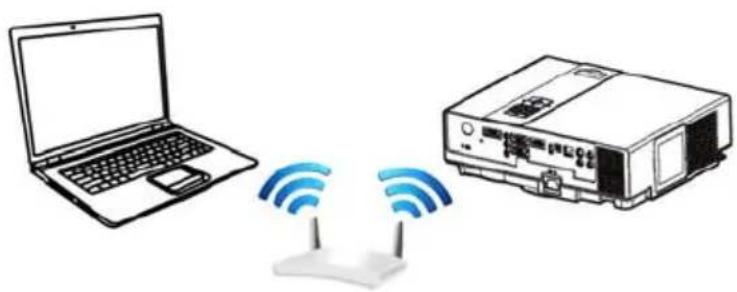
natural_image
Illustration of a laptop connected to a projector via wireless signal icons (no text or symbols)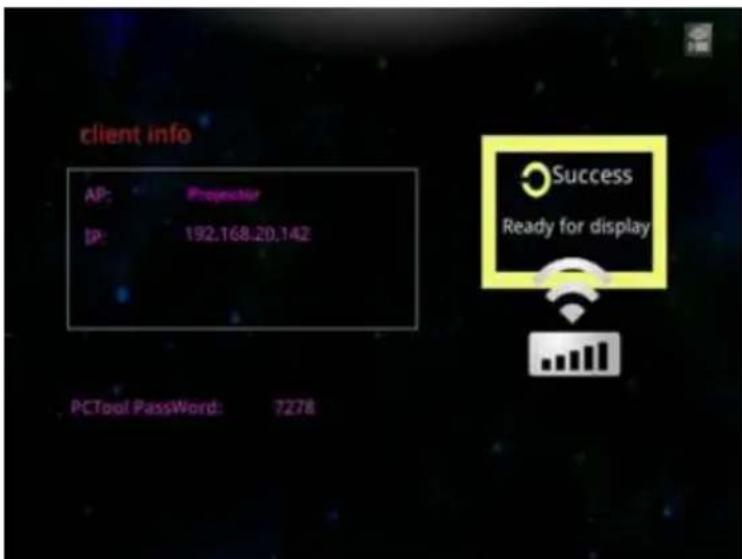
text_image
client info AP: Proprietor IP: 192.168.20.142 PCTool PassWord: 7278 Success Ready for displayProjector Setup :
- Connect an optional Wireless USB WiFi Dongle unit to the projector's USB Port (USB -A).
- Set the Client mode parameters at .\settings\WiFi\Client mode.
*For more information, please check the page53 'WiFi settings' for client mode.
- Use remove control to select the WiFi Display item at EZ Display interface on the screen. It will show the Ready for display image on the screen. And you can find the 4-character pass code on the screen too.
Computer Setup :
- We need to install PC/Mac-tool(EZ WiFi/LAN.exe) program. After installed, new USB device “EZ USB” and new adapter “EZ Display” (Virtual .Graphics Card) will be installed.
▶ You can download the PC/Mac-tool(EZ WiFi/LAN.exe) throw the internet by web browser. Please check "Download Tool"Page80 for more information.
- Find the wireless local area network manager from computer that you broadcast of the SSID(for example: the name of SSID is "Optivtw_W_I"). It would need to manually enter the correct SSID to connect to the network, then execute PC/Mac-Tool (EZ WiFi/LAN.exe) program.
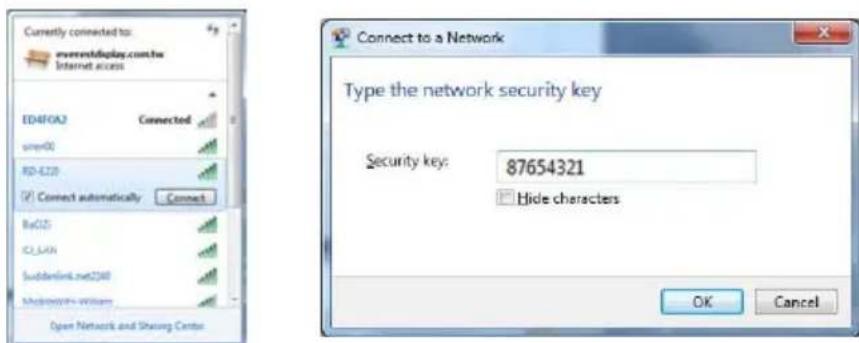
text_image
Currently connected to: www.tdiDisplay.com.ha Internet access ED40A2 Connected size(0) RD-E20 Connect automatically Connect BaO2 C2_L63 Suddenlink.net2388 Microsoft Windows Open Network and Sharing Center Connect to a Network Type the network security key Security key: 87654321 Hide characters OK Cancel- It will show the “Enter the pass code” dialog window on the screen, then input 4-character pass code at the dialog, for example: the PCTool(EZ WiFi/LAN.exe) passcode is “7278”, after click the OK button, computer will display the EZ Display dialog, it means you can wirelessly project the computer’s screen.
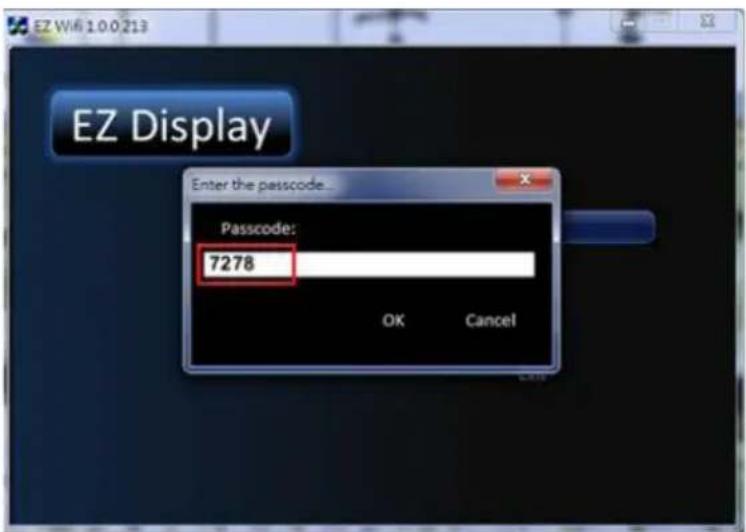
text_image
EZ W6 1.0.0 213 EZ Display Enter the passcode... Passcode: 7278 OK Cancel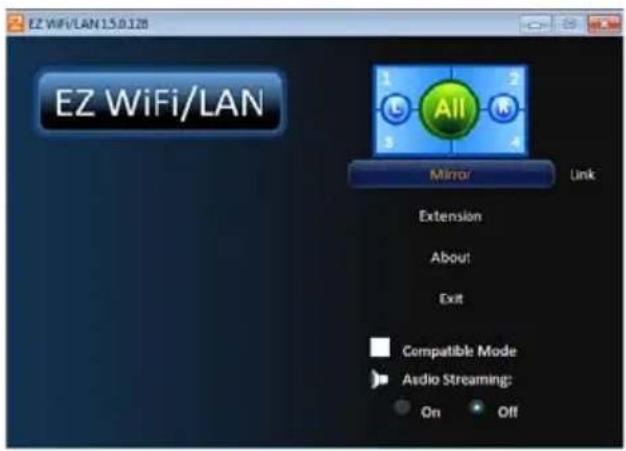
text_image
EZ WiFi/LAN 1.5.0.128 EZ WiFi/LAN 1 L All R 3 4 Mirror Link Extension About Exit Compatible Mode Audio Streaming: On OffMirror mode (default): Clone or mirror desktop mode
natural_image
Illustration of a projector and a laptop connected to a screen showing a family photo (no text or symbols present)Mirror mode
Extension mode : Span or extended desktop mode
About : The information of EZ WiFi/LAN
text_image
EZ WIFI/LAN EZ WIFI/LAN EZ WIFI/LAN Version: 1.5.0.128 Actions Micro (C): 2012 Compatible Mode Audio Streaming: On OffEZ Suite(EZ Display Function)
Exit : To quit the program and discontinue projecting images from the computer.
Audio Streaming : On -Projecting images from the computer with audio sound.
Off -Projecting images from the computer without audio sound.
▶Note : The frame rate of video would be decrease while the setting of Audio Streaming is ON.
- Exit WIFI Display : Click the Exit button from the EZ WiFi/LAN dialog window on the computer or press the ESC button on the remote control to quit WiFi Display.
2.Run in EZ WiFi
- After EZ-WiFi connection is established, you can execute EZ Display app on your iPhone/iPad or Android mobile, and you will be able to see the device's IP address now. Click it to enjoy EZ Display's complete functions. See Page56 for more information
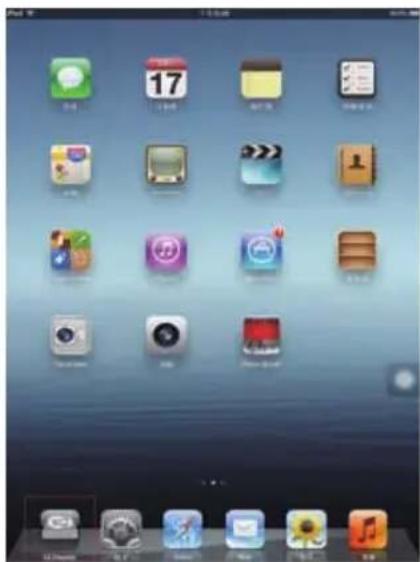
text_image
Screenshot of an iPad home screen displaying a grid of app icons with Chinese labels, including app icons like '17', music, and video.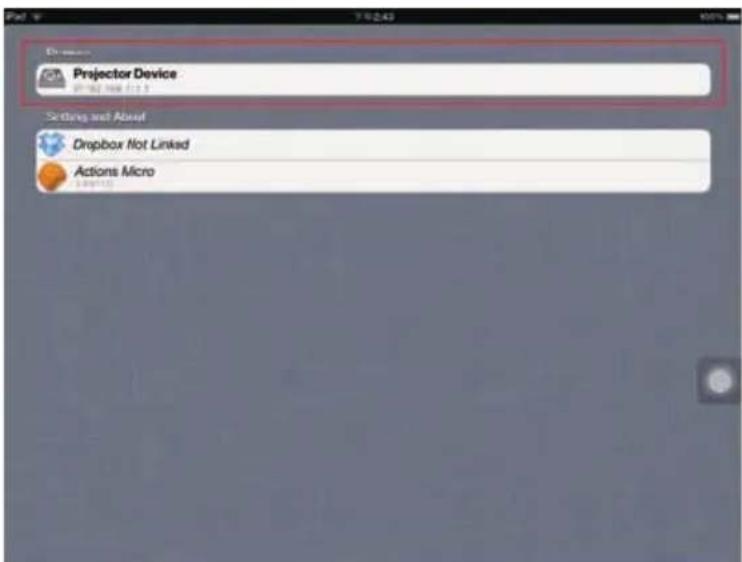
text_image
Projector Device Setting and About Dropbox Not Linked Actions Micro
text_image
EZ Display 162.1681.105.v3 (E2 Web Engine) Tap to refresh... Projector 162.1681.105.v3 (E2 Web Engine)EZ Display main functions :
- View MS-Office files(Word, Excel, PowerPoint), Adobe PDF, Apple iWorks(Pages, Numbers, Keynote), and it also supports Sketch function and save to photo roll.
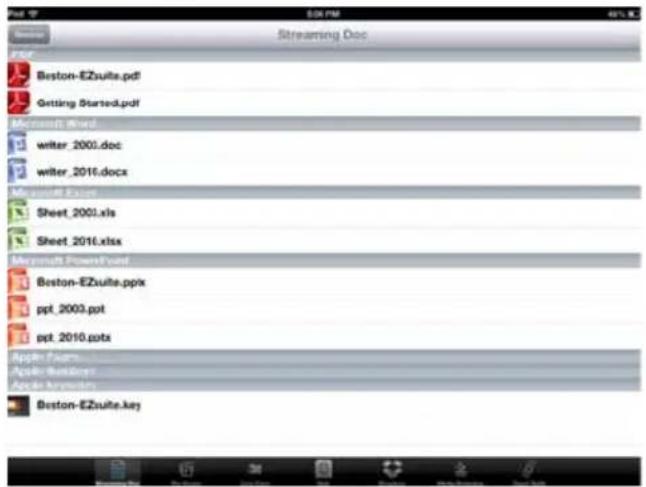
text_image
File 17 $34 PM 46.5.9 Streaming Doc Boston-EZsuite.pdf Getting Started.pdf Microsoft Word writer_2001.doc writer_2016.docx Microsoft Excel Sheet_2001.xls Sheet_2016.xlsx Microsoft PowerPoint Boston-EZsuite.pptx ppt_2003.ppt ppt_2010.potx Apple Pages Apple Builders Apple Answers Boston-EZsuite.key2.Link your Dropbox storage and view the documents stored on it.
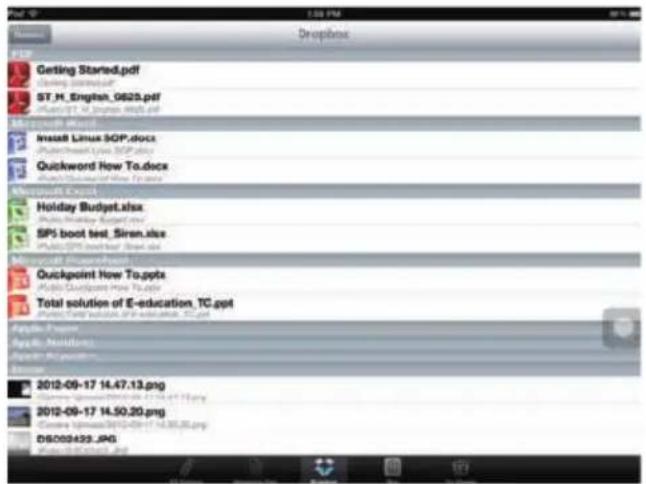
text_image
Geting Started.pdf ST_H_Engish_0625.pdf Microsoft Excel Install Linux SOP.docx Quickword How To.docx Holiday Budget.xlsx SPS boot test_Siren.xlsx Quickpoint How To.pptx Total solution of E-education_TC.ppt 2012-09-17 14:47.13.png 2012-09-17 14:50.20.png DS009433.JPG- Display Web pages and support sketch function as well.
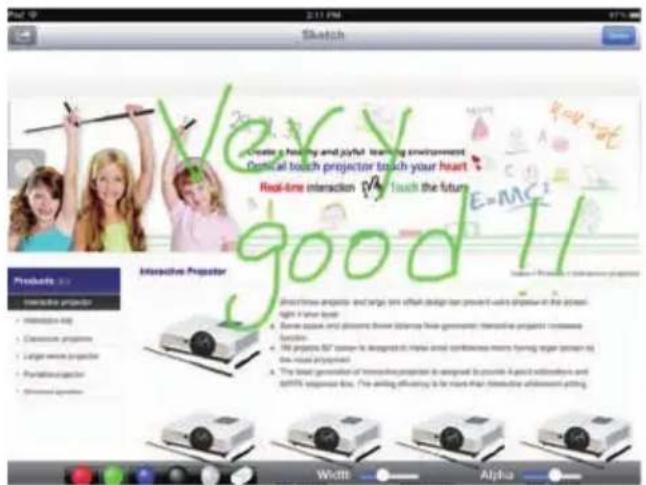
text_image
Create a healthy and joyful teaching environment Central touch projector to touch your heart Real-time interaction 7/4 touch the future good!!EZ Suite(EZ Display Function)
4.View local photo gallery and do sketch
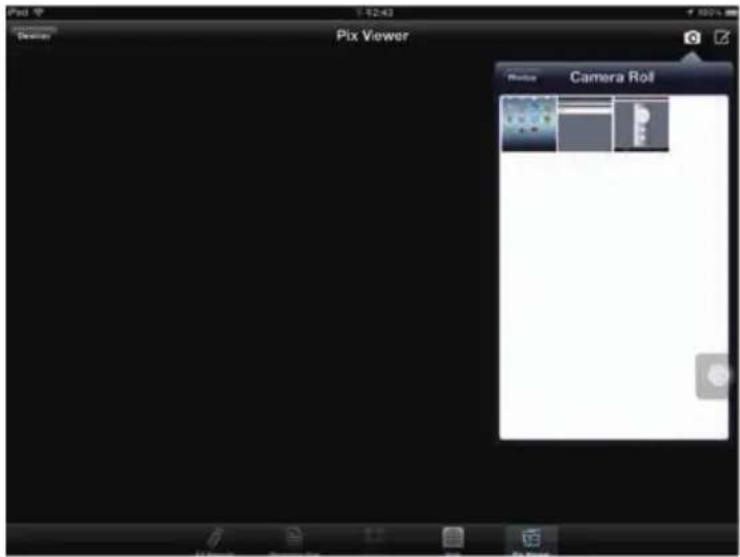
text_image
Pix Viewer Camera Roll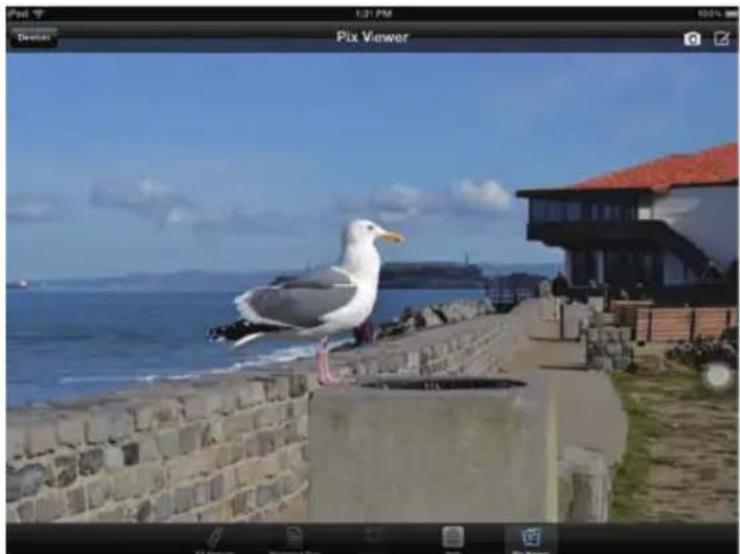
natural_image
Seagull standing on a coastal cliff with ocean and distant buildings in the background (no visible text or symbols)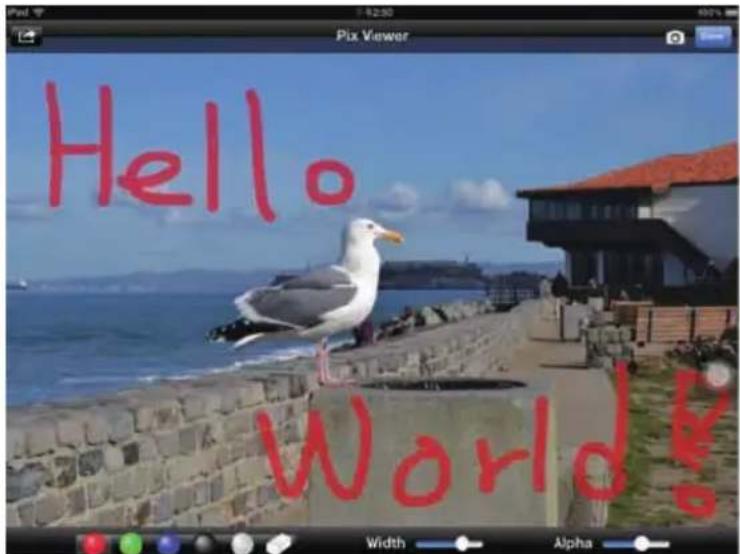
text_image
Hello World!2.3 EZ LAN
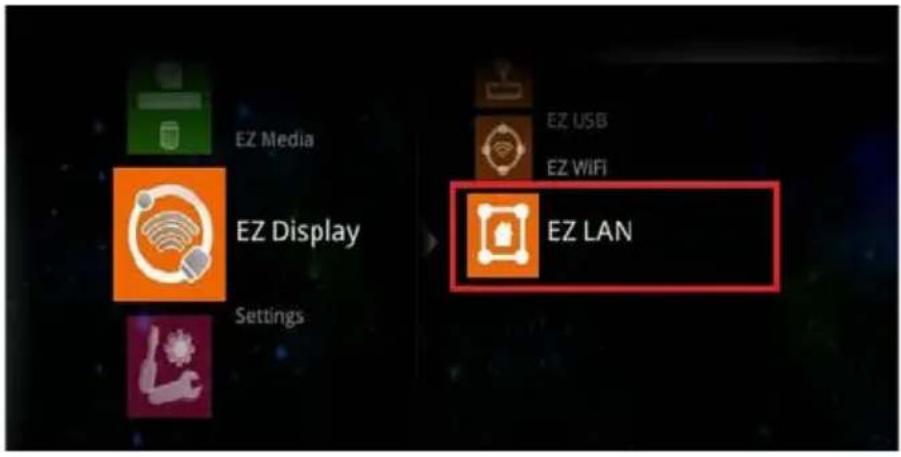
text_image
EZ Media EZ Display Settings EZ USB EZ WiFi EZ LAN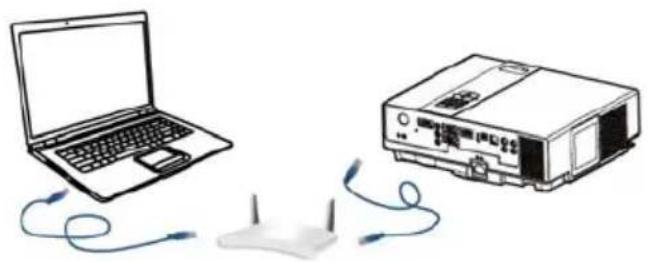
natural_image
Illustration of a laptop connected to a projector via wireless cables (no text or symbols)▶Note : EZ LAN Display supports Windows OS, Mac OS
Projector Setup :
- Connects projector's LAN port to Switch, Hub, or Local RJ45 outlet LAN port with the standard RJ45 Ethernet cable.
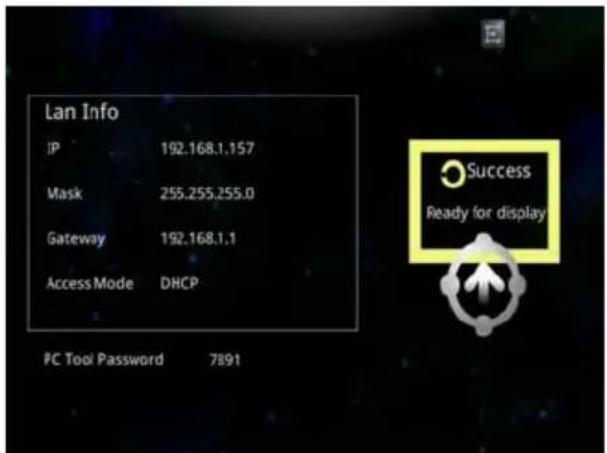
- Select the EZ LAN item at EZ Display interface on the screen. It will show the Ready for display message on the screen. And you can find the 4-character pass code on the screen too.
text_image
Lan Info IP 192.168.1.157 Mask 255.255.255.0 Gateway 192.168.1.1 Access Mode DHCP PC Tool Password 7891 Success Ready for displayComputer Setup :
- We need to install PC/Mac-tool(EZ WiFi/LAN.exe) program. After installed, new USB device “EZ USB” and new adapter “EZ Display” (Virtual .Graphics Card) will be installed.
▶ You can download the PC/Mac-tool(EZ WiFi/LAN.exe) throw the internet by web browser. Please check Page80 for more information.
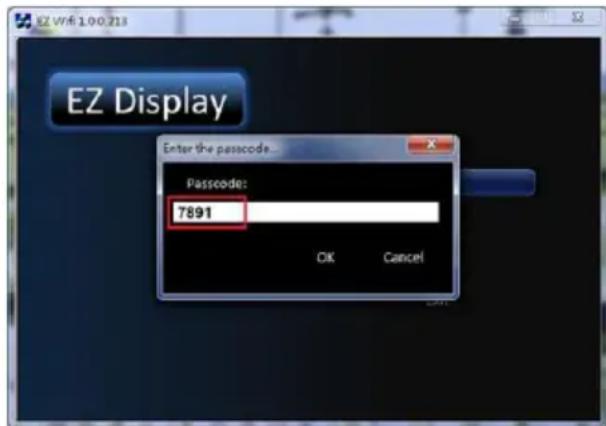
- Executing PC Tools (EZ WiFi/LAN.exe) program from PC/Notebook.
text_image
EZ Wfi 1.00.218 EZ Display Enter the passcode... Passcode: 7891 OK Cancel- It will show the "Enter the pass code" dialog window on thw screen, then input 4-character pass code at the dialog.Click the OK button, computer will display the EZ WiFi/LAN dialog, it means you can project the computer's screen via Ethernet.
▶ PC Tools Password is a 4-character pass code that should be entered on PC tool EZ WiFi (EZ WiFi/LAN), for example the 4-character pass code is "7891". EZ WiFi PC tool (EZ WiFi/LAN) will check the pass code for basic protection.
Exit EZ LAN Display :
Click the Exit button from the EZ WIFI/LAN dialog window on the computer or use remote control to press the ESC button to quit LAN Display.
3. Setting & Configuration
 Setting & Configuration Setting & Configuration |  | Version |
| Language | ||
| Update | ||
 | Display Ratio | |
| Repeat Mode | ||
 | Display Ratio | |
| Slideshow | ||
| Slideshow Duration | ||
 | Repeat Mode | |
 | AP mode | |
| Client mode | ||
 | Connect PC Setting |
3.1 System Setting
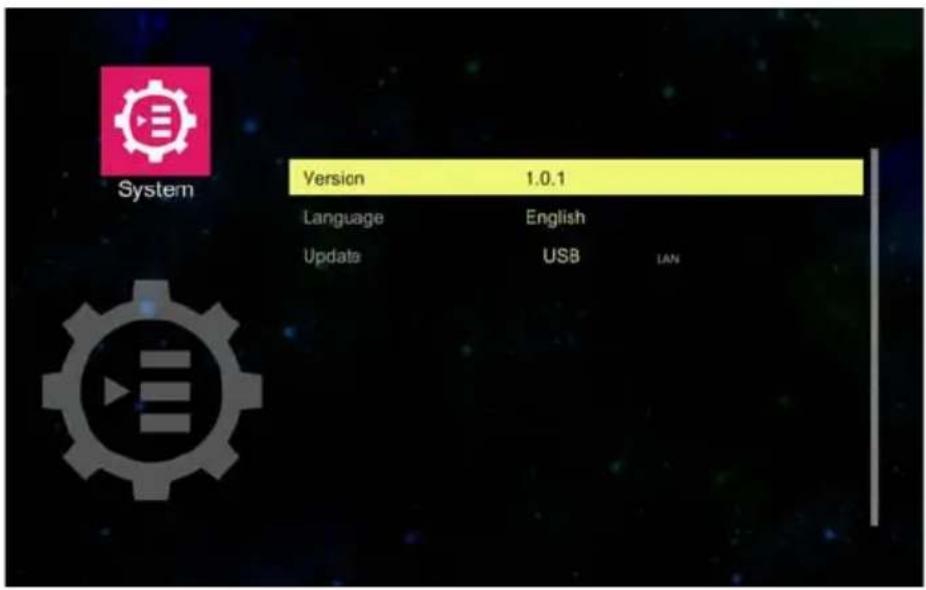
text_image
System Version 1.0.1 Language English Update USB LANVersion : Show the EZ Suite firmware version
Language: Show the current language
Update : USB (upgrade the EZ Suite firmware with mini USB cable)
3.2 Video Setting
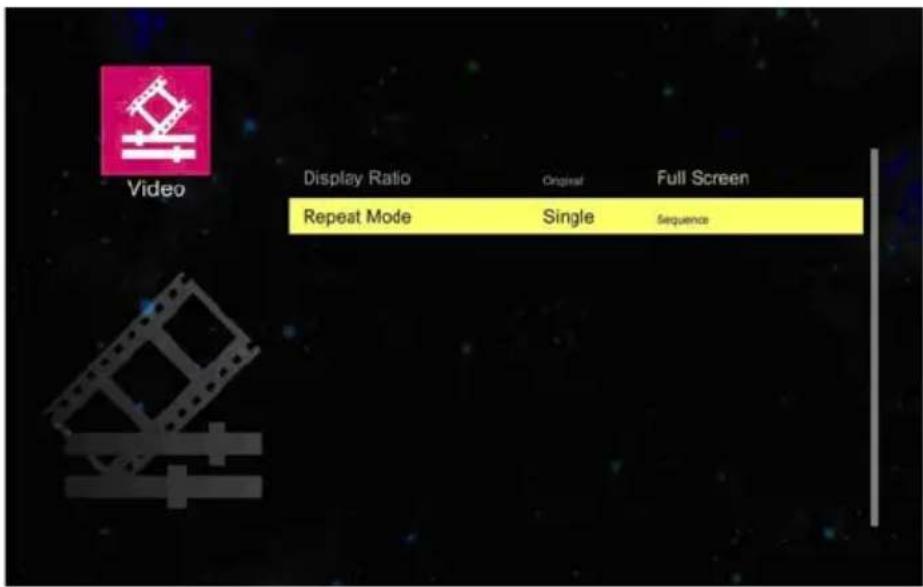
text_image
Video Display Ratio Original Full Screen Repeat Mode Single Sequence1. Display ratio
Original : The video aspect ratio changes in the order of Original setting (according to the video image resolution.)
Full Screen : Change the aspect ratio to be displayed at full screen size.
2. Repeat Mode
Signal : Play the selected video file once.
Sequence : To play the playlist in sequence.
3.3 Photo Setting
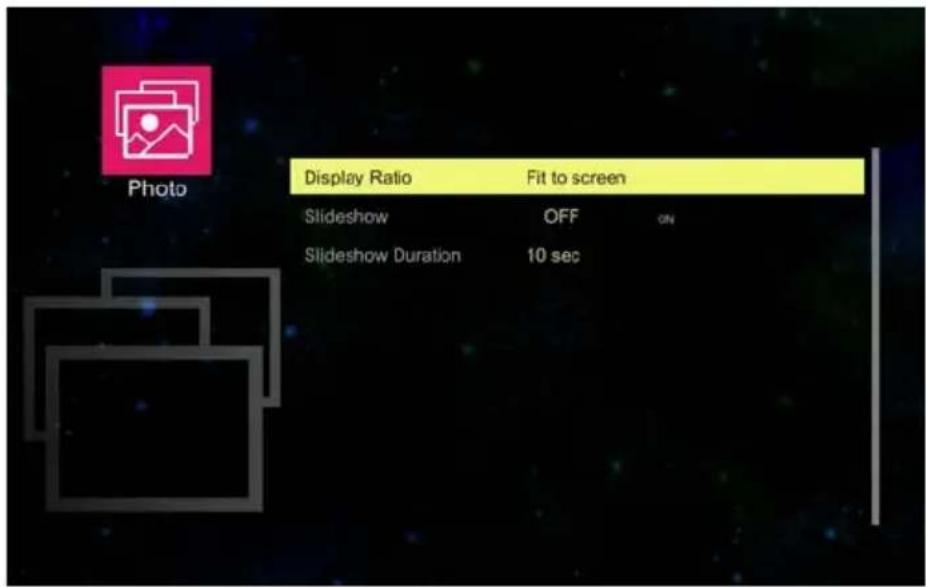
text_image
Photo Display Ratio Fit to screen Slideshow OFF ON Slideshow Duration 10 sec1. Display ratio
Original: Projected the image of original size.
Full Screen : Change the aspect ratio to be displayed at full screen size.
2. SlideShow
OFF : Turns SlideShow function off.
ON : Turns SlideShow function on.
- Slidesshow Duration: Set the Photo Slideshow duration time as 10 seconds, 30 seconds or 1 minutes.
3.4 Audio Setting
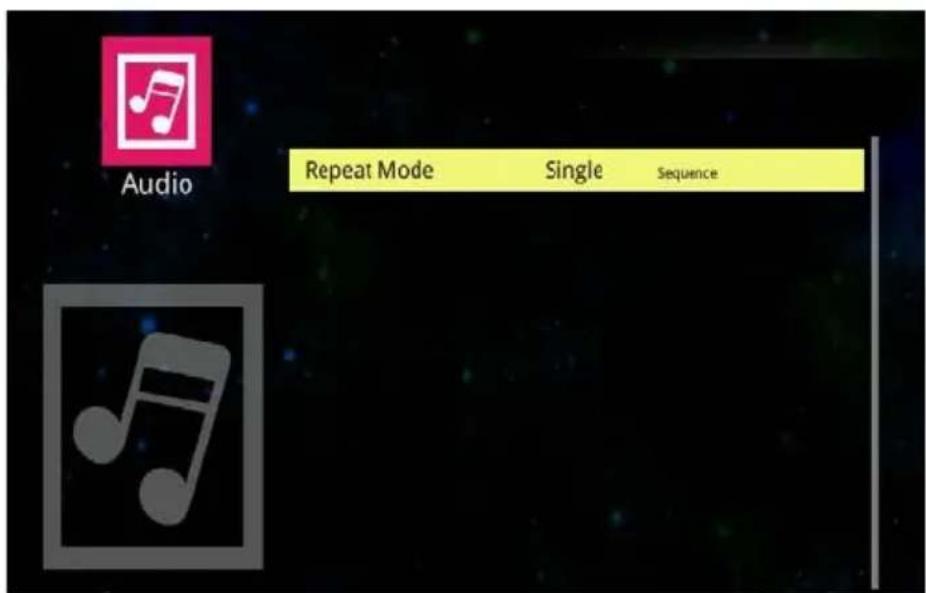
text_image
Audio Repeat Mode Single SequenceRepeat mode
Signal : Play the selected audio file once.
Sequence : To play the playlist in sequence.
3.5 WiFi Setting
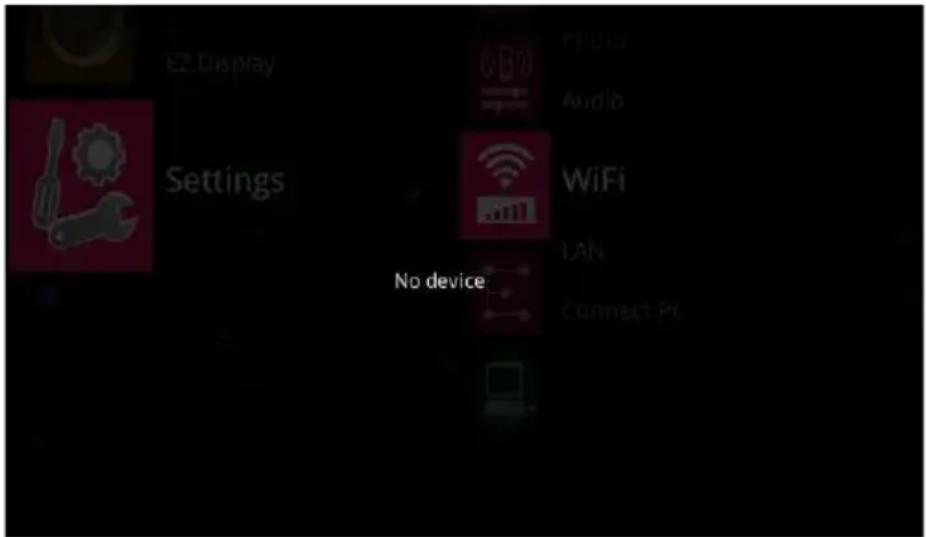
text_image
E2 Display Settings No device WiFi LAN Connect PCPlease plug in the WIFI USB Dongle first; otherwise the projector would examine and project “No device” message on the screen.
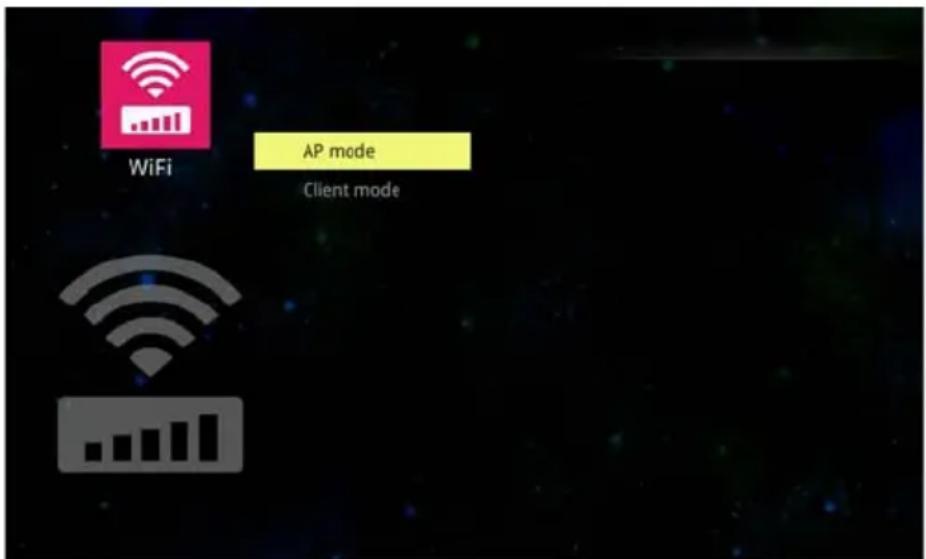
text_image
WiFi AP mode Client modeThere are AP mode, Client mode at the WiFi setting.
*For more information, please check the page51 for AP mode and page53 for Client mode.
EZ Suite(Setting&Configuration)
AP mode(Ad Hoc):
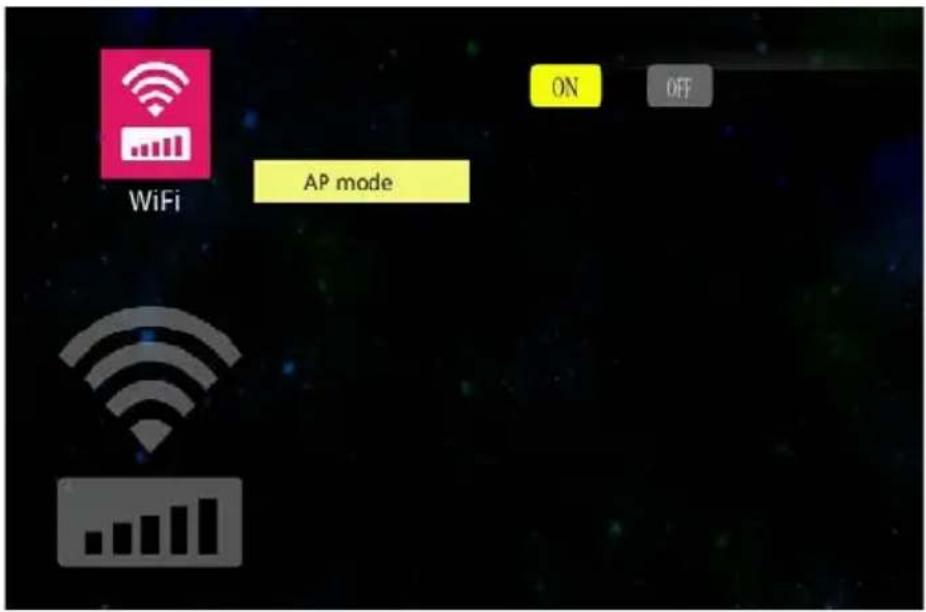
text_image
WiFi AP mode ON OFFSelect the ON button, then press the ENTER button on the remote control to go to set some parameters for being enabled under AP mode.
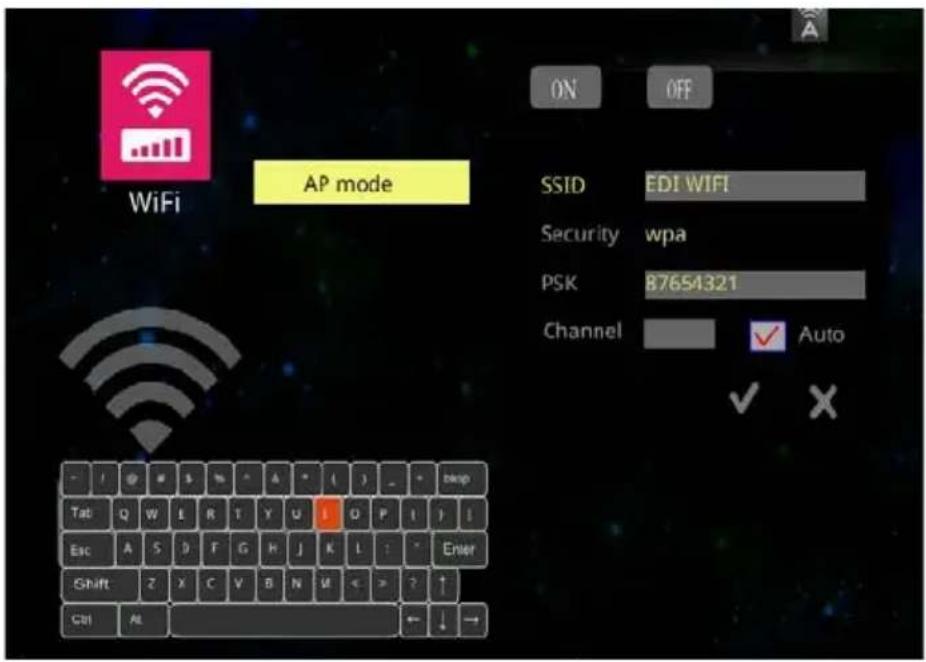
text_image
WiFi AP mode ON OFF SSID EDI WIFI Security wpa PSK 87654321 Channel Auto - / ● S ▼ A * ( ) - * blank Tat Q W L R T Y U I Q P I J I Esc A S D F G H J K L : * Enter Shift Z X C V B N M < > ? ↑ Ctrl AL ← ↓ →These settings are only for basic wireless parameters. If you are going to modify these wireless parameters, the visual keyboard will pop-up on the screen. Press the , or buttons to select a character on the visual keyboard, and press the ENTER button to keyin the character. Press ESC button to quit the setting, it can help you to configure your setting.
EZ Suite(Setting&Configuration)
SSID (Service Set Identification): The same name of SSID must be assigned to wireless devices in your network. Considering your wireless network security, the default SSID is set to be “rtwap”.
Security : you can configure the security settings of your wireless network.
There are three wireless security modes supported by the Router : Open, WPA2 and WPA.
Open - it means no security settings of this wireless network. The default setting is automatic that based on the wireless station's capability and request.
WPA(default) and WPA2 – It's the WPA/WPA2 authentication type.
PSK (Pass-Key) : You can enter a key-code.
Channel : This field determines which operating frequency will be used. It is not necessary to change the wireless channel unless you notice interference problems with another nearby access point.
Auto : The default setting is automatic, which can adjust the channel width for your clients automatically.
V : Press the ENTER button to enable AP mode, and then press the ESC button on the remote control to quit AP mode setting page.
X : Abort the setting, or you can press the ESC button on the remote control to quit setting.
EZ Suite(Setting&Configuration)
Client mode :
When wireless clients survey the local area for wireless networks to associate with, they will detect the SSID broadcast by the Router. The SSID of the AP your Router is going to connect to as a client.
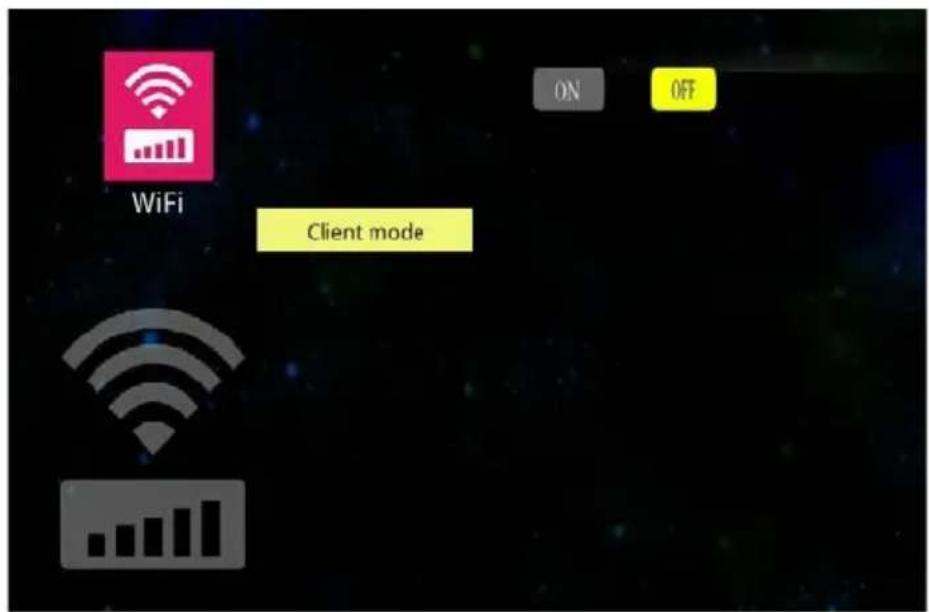
text_image
WiFi Client mode ON OFFSelect the ON button and press ENTER button on the remote control for starting Client mode.
Press the ▼ button on the remote control to go to the items of SSID. The visual keyboard will pop-up on the screen if select a SSID name and ask you PSK(pass-key) for connecting. Press the ▲, or ▶ ENTER buttons on the visual keyboard to key-in the PSK entry that should be chosen according to the AP's security configuration.
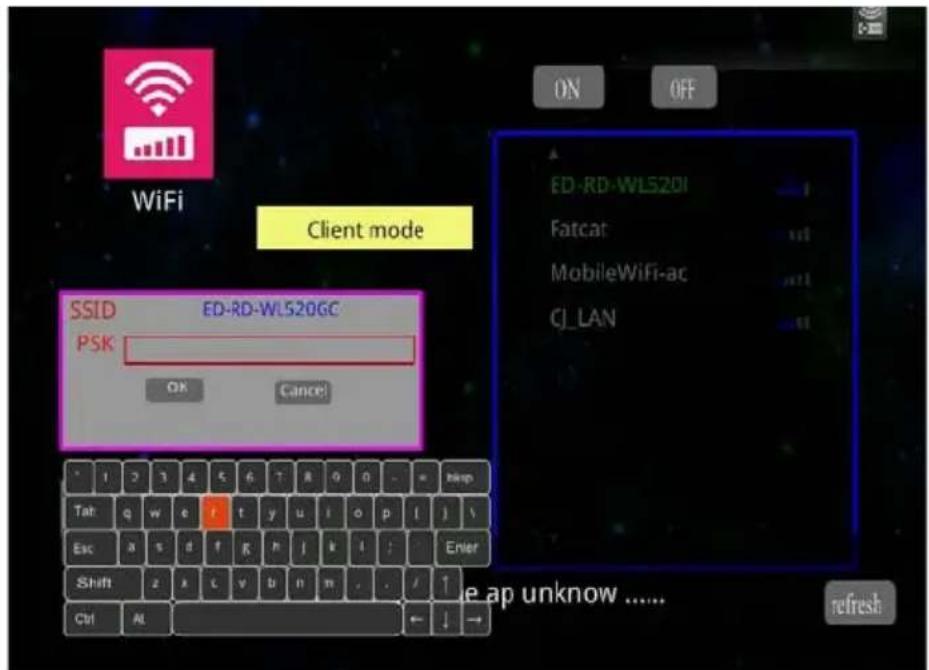
text_image
WiFi Client mode SSID ED-RD-WLS20GC PSK OK Cancel ED-RD-WLS20I Fatcat MobileWiFi-ac CJ_LAN * 1 2 3 4 5 6 T R G O - - = Help Tat q w e r t y u i o p ! j \ Esc a s d f g h j k l : - Enter Shift z x c v b n m . / ↑ Ctrl AL ← ↓ → e ap unknown ...... refresh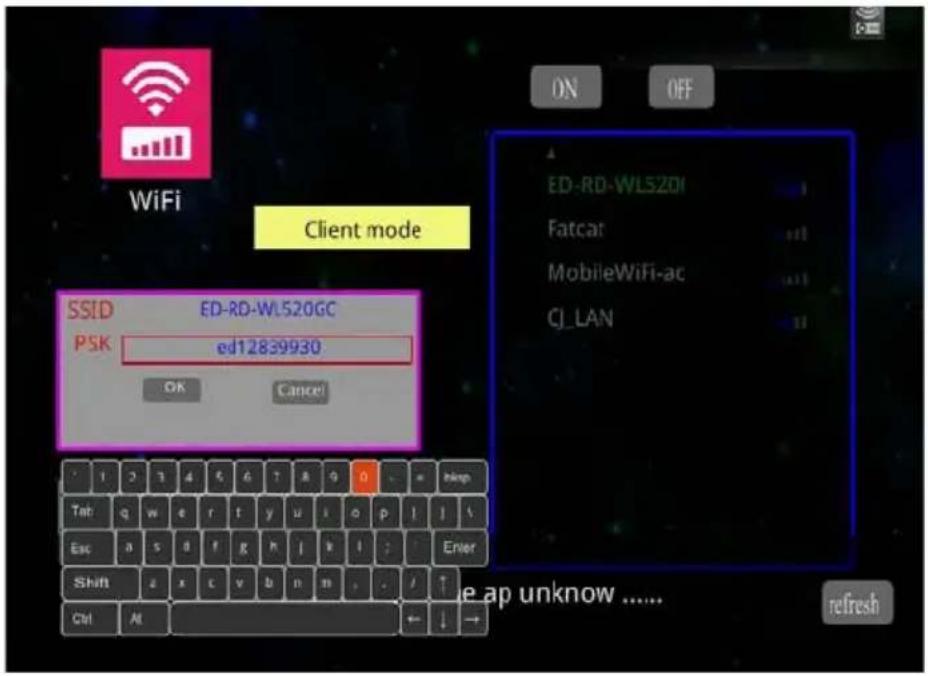
text_image
WiFi Client mode SSID ED-RD-WL520GC PSK ed12839930 OK Cancel ED-RD-WL520GI Fatcat MobileWiFi-ac CL_LAN e_ap unknown ...... refresh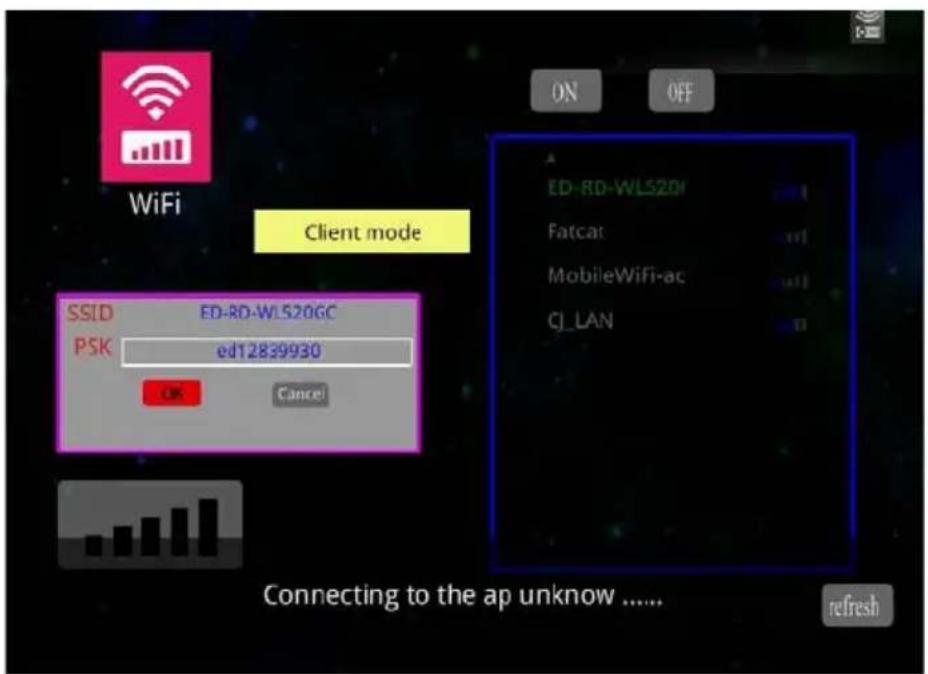
text_image
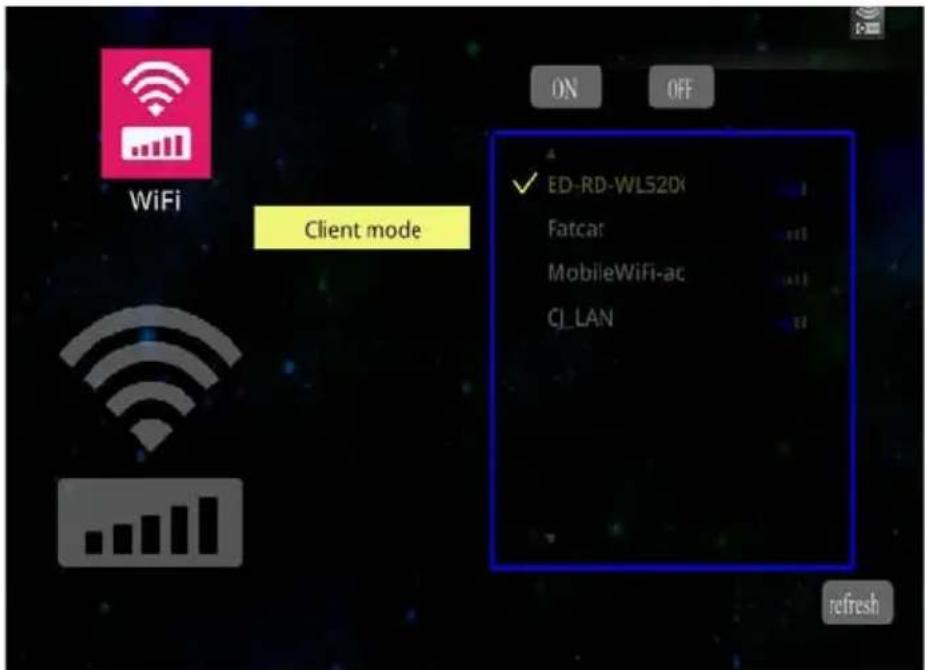
WiFi Client mode SSID ED-RD-WLS20GC PSK ed12839930 OK Cancel ON OFF ED-RD-WLS20H Fatcat MobileWiFi-ac CL_LAN Connecting to the ap unknown ...... refreshPress the to connect to as a client.
text_image
ON OFF WiFi Client mode ED-RD-WLS2DX Fatcar MobileWiFi-ac CJ_LAN refreshConnect successfully.
text_image
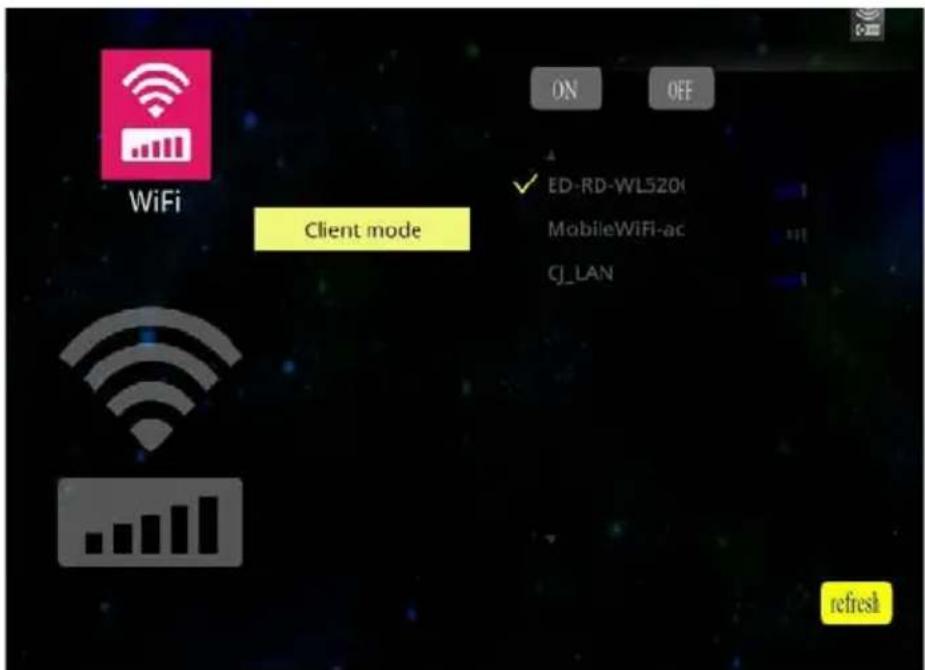
WiFi Client mode ED-RD-WL5201 MobileWiFi-ac CL_LAN refreshSelect the refresh, then press the ENTER button on the remote control to detect the SSID broadcast with the Router again.
EZ Display :
Main functions :
- View MS-Office files(Word, Excel, PowerPoint), Adobe PDF,
Apple iWorks(Pages, Numbers, Keynote), and it also supports Sketch function to save to photo roll.
- View local photo gallery and do sketch
- View the image directly from the built-in camera.
- Display Web pages and support sketch function as well
- Link your Dropbox storage and view the documents stored on it.
- for iPhone / iPad : Open App store to download the EZ display.
for Android device: Open Google Play to download the EZ display.

text_image
Power Search > FILTED BY MEDIA TYPE All Results Music Movies TV Shows Apps Books Podcasts iTunes U iPhone Apps See All > E2 Display USBes Released Sep 10, 2012 FREE iPad Apps See All > E2 Display USBes Released Sep 10, 2012 FREE Developers Actions Microelectronics ...- Configuring the Projector's Wi-Fi:
EZ Display can support AP mode and Client mode.
AP mode :
Set the AP mode parameters at .\settings\WiFi\AP mode.
See ‘WiFi settings’ (Page50) for more information to set parameters.
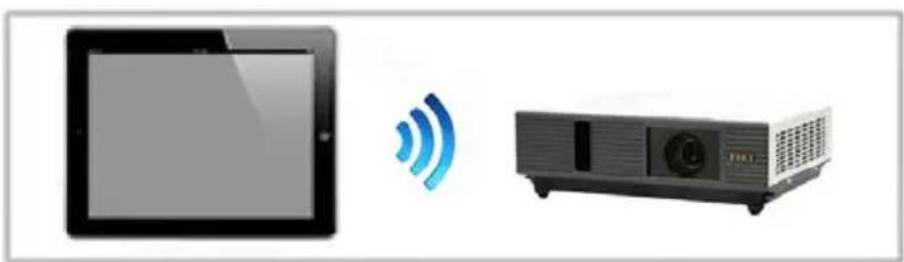
natural_image
Illustration of a tablet and a projector with wireless signal icon (no text or symbols)Connects directly to a projector
Client mode :
Set the client mode parameters at \.\settings\WiFi Client mode.
See ‘WiFi settings’ (Page52) for more information to set parameters.
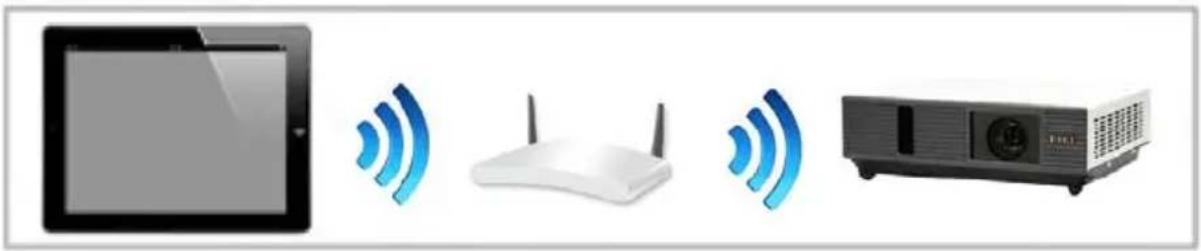
natural_image
Illustration of four electronic devices: a tablet, wireless router, and projector (no text or symbols)Connects through a wireless LAN router.
▶ Note :
Compatible Devices :
| Application Compatible OS version | |
| EZ display - iOS 5.1.1 or later- Android 4.0 or above. |
| Network Correspond |
| WiFi - 802.11n |
3.6 Connect PC Setting
Connect PC for accessing internal memory:
- Connect the computer's USB port to the projector's USB (mini-USB) port via the USB cable.
- Computer's system will examine newly discovered removable media and devices.
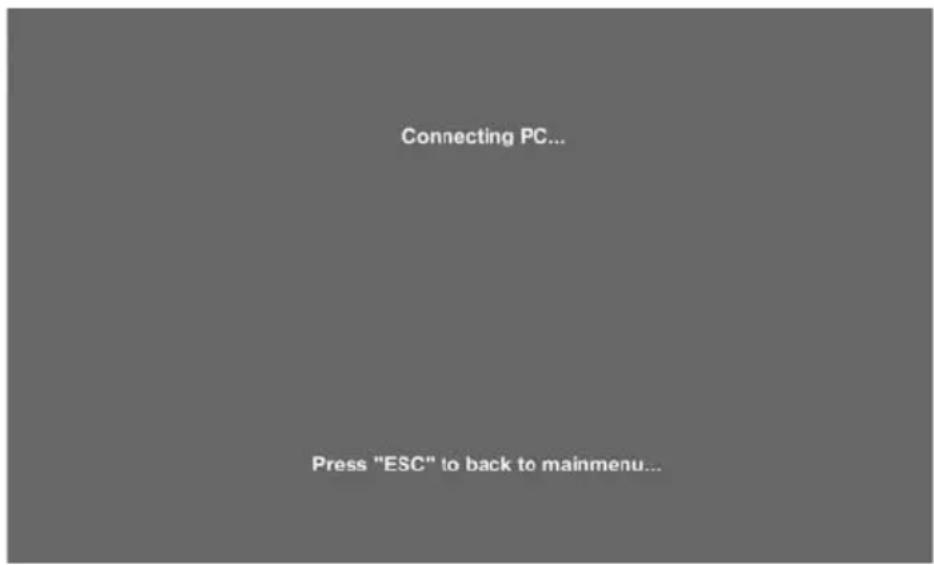
text_image
Connecting PC... Press "ESC" to back to mainmenu...- Projector will display the connecting message on the screen.
- Click and execute "Open folder to view files", it can access the internal memory from projector.
Remove connecting Internal Memory:
Press the “ESC” button on the remote control to exit communication process with computer, and then remove mini-USB cable from the projector and computer.
How To Operate On-Screen Display
-
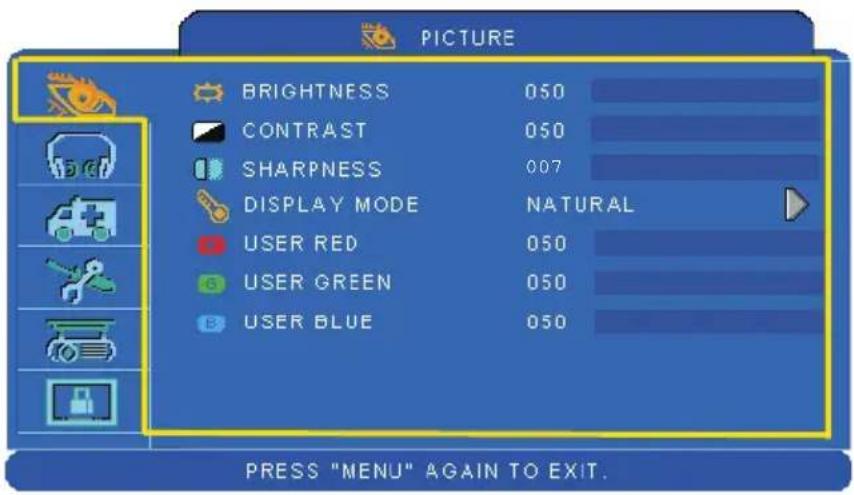
You could press "Menu" button. It will be shown blue main menu. The first main menu is "PICTURE" menu.
-
Choose which item you want to enter, you could press up / down /left/right button of control panel or remote control to adjust item or value.
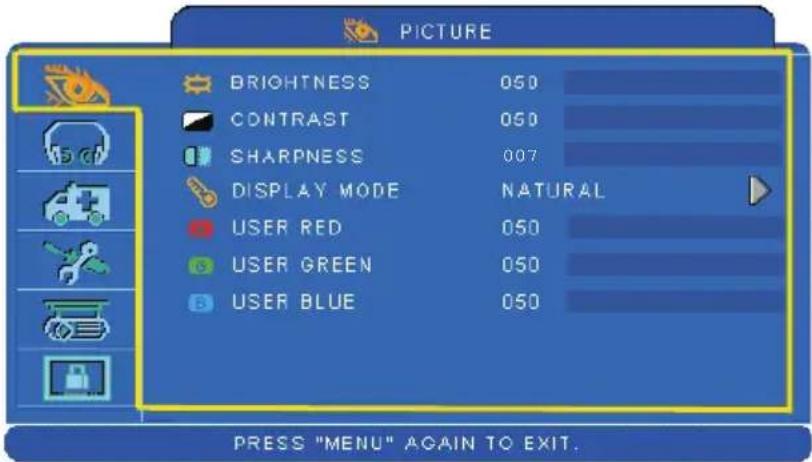
text_image
PICTURE BRIGHTNESS 050 CONTRAST 050 SHARPNESS 007 DISPLAY MODE NATURAL USER RED 050 USER GREEN 050 USER BLUE 050 PRESS "MENU" AGAIN TO EXIT.Up / Down / Right / Left button
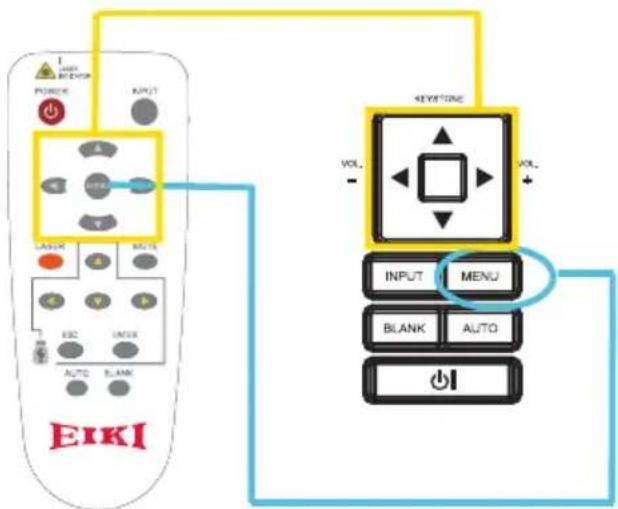
text_image
POWER INPUT LAYER MUTE ESC INSUR AUTO BLANK EIKI KEYTIME VOL. INPUT MENU BLANK AUTO OKMenu button
Picture Menu
text_image
PICTURE BRIGHTNESS 050 CONTRAST 050 SHARPNESS 007 DISPLAY MODE NATURAL USER RED 050 USER GREEN 050 USER BLUE 050 PRESS "MENU" AGAIN TO EXIT.Step:
-
Use the ▲ /▼ buttons to select an item.
-
Use the ◀ / ▶ cursor buttons to select an item or adjust the value.
| Item Selection Description | ||
| BRIGHTNESS 000/100 Adjust the image brightness level. | ||
| CONTRAST 000/100 Adjust the image contrast level. | ||
| SHARPNESS 000/015 Adjusts the image sharpness. | ||
| DISPLAY MODE | NATURAL Natural color. | |
| CINEMA Enhance contrast ratio when displaying DVD contents. | ||
| DAYLIGHT Suitable when ambient light is strong. | ||
| GREEN BOARD WHITE BOARD BLACK BOARD | Adjust the color settings to make the projected image on a (green, white, black) board more visible. | |
| USER | User Red 000/100User Green 000/100User Blue 000/100 | |
*Only USER mode in Display mode USER RED/GREEN/BLUE can be adjusted.
*The setting data in this Picture Menu is not shown correctly if no signal is fed and projected.
Audio Menu
text_image
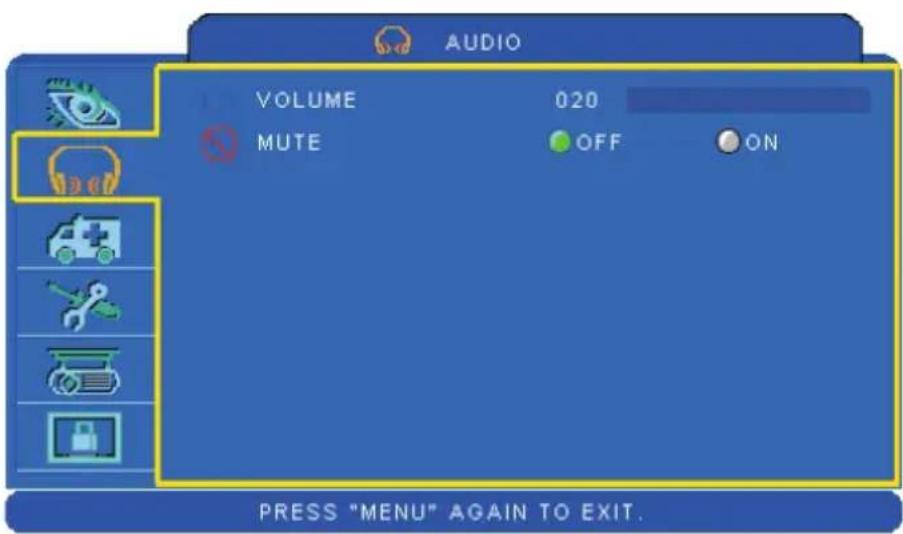
AUDIO VOLUME 020 MUTE OFF ON PRESS "MENU" AGAIN TO EXIT.Step:
-
Use the ▲ /▼ buttons to select an item.
-
Use the ◀ / ▶ buttons to select an item or adjust the value.
| Item Selection Description | ||
| VOLUME 00/40 Adjust the volume. | ||
| MUTE OFF/ON Mute the volume OFF / ON. |
Setting Menu
text_image
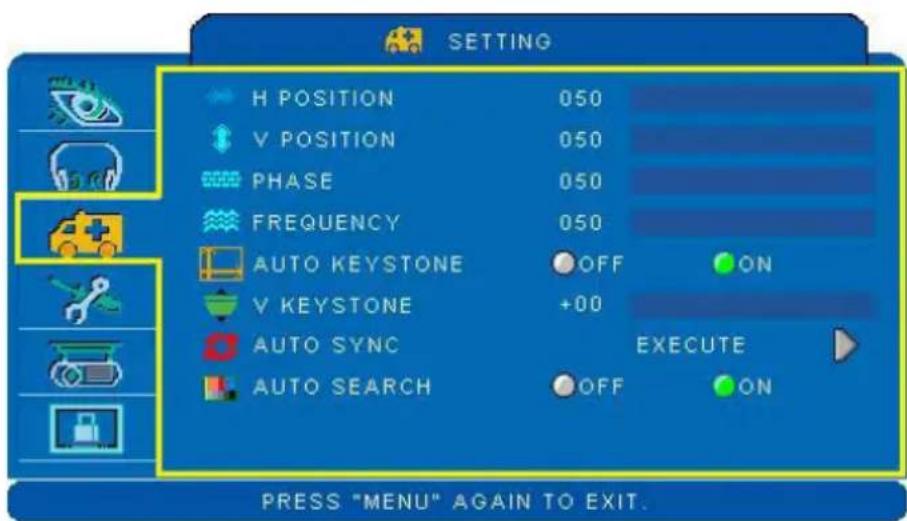
SETTING H POSITION 050 V POSITION 050 PHASE 050 FREQUENCY 050 AUTO KEYSTONE OFF ON V KEYSTONE +00 AUTO SYNC EXECUTE AUTO SEARCH OFF ON PRESS "MENU" AGAIN TO EXIT.Step:
-
Use the ▲ /▼ buttons to select an item.
-
Use the ◀ / ▶ buttons to select an item or adjust the value.
| Item Selection Description | ||
| H POSITION 000/100 | Move the image position horizontally.This function is only selected for computer signal. | |
| V POSITION 000/100 | Move the image position vertically.This function is only selected for computer signal. | |
| PHASE 000/100 Adjust the image sharpness. | ||
| FREQUENCY 000/200 Set the horizontal scanning frequency. | ||
| AUTO KEYSTONE | OFF/ON Correct keystone distortion in image automatically. | |
| V KEYSTONE -70/+70 Correct vertical keystone distortion in image manually. | ||
| AUTO SYNC EXECUTE Set all of the above setting automatically. | ||
| AUTO SEARCH OFF/ON Search signal source manually or automatically. | ||
Picture Menu
text_image
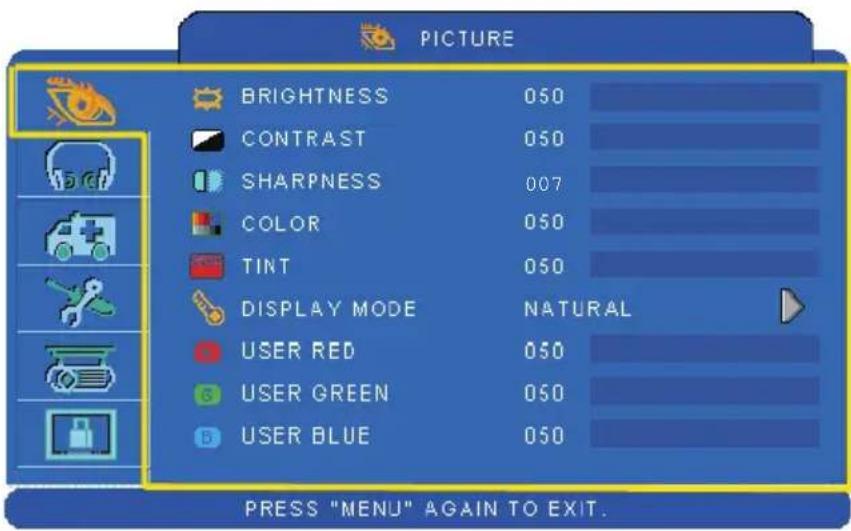
PICTURE BRIGHTNESS 050 CONTRAST 050 SHARPNESS 007 COLOR 050 TINT 050 DISPLAY MODE NATURAL USER RED 050 USER GREEN 050 USER BLUE 050 PRESS "MENU" AGAIN TO EXIT.Step:
-
Use the ▲ /▼ buttons to select an item.
-
Use the ◀ / ▶ cursor buttons to select an item or adjust the value.
| Item Selection Description | ||
| BRIGHTNESS 000/100 Adjust the image brightness level. | ||
| CONTRAST 000/100 Adjust the image contrast level. | ||
| SHARPNESS 000/015 Adjusts the image sharpness. | ||
| COLOR 000/100 | Adjust the strength of whole color.This function can be used under video signal, S-Video signal, or component video signal input only. | |
| TINT 000/100 | Adjust the image tint.This function can be used under video signal, S-Video signal, or component video signal. | |
| DISPLAY MODE | NATURAL Natural color. | |
| CINEMA Enhance contrast ratio when displaying DVD contents. | ||
| DAYLIGHT Suitable when ambient light is strong. | ||
| GREEN BOARDWHITE BOARDBLACK BOARD | Adjust the color settings to make the projected image on a (green, white, black) board more visible. | |
| USER | User Red 000/100User Green 000/100User Blue 000/100 | |
*Only USER mode in Display mode USER RED/GREEN/BLUE can be adjusted.
*The setting data in this Picture Menu is not shown correctly if no signal is fed and projected.
Audio Menu
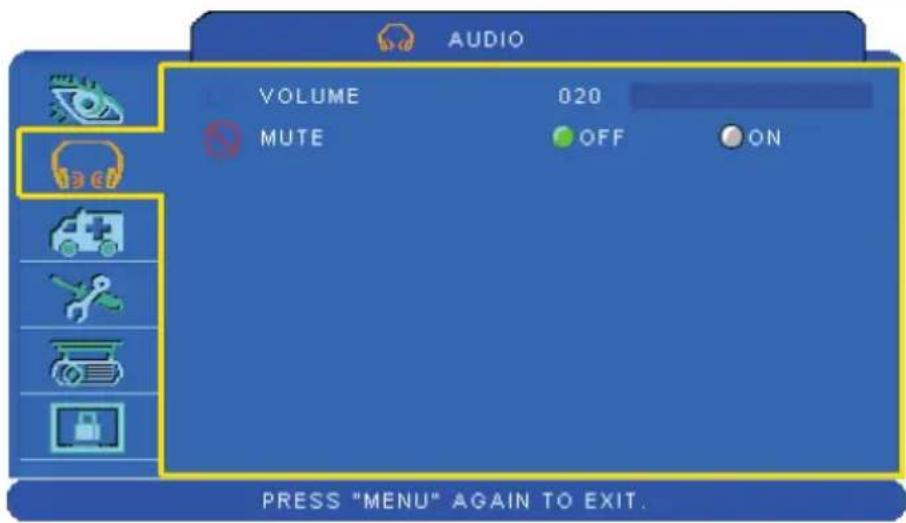
text_image
AUDIO VOLUME 020 MUTE OFF ON PRESS "MENU" AGAIN TO EXIT.Step:
-
Use the ▲ /▼ buttons to select an item.
-
Use the ◀ / ▶ buttons to select an item or adjust the value.
| Item Selection Description | ||
| VOLUME 00/40 Adjust the volume. | ||
| MUTE OFF/ON Mute the volume OFF / ON. |
Setting Menu
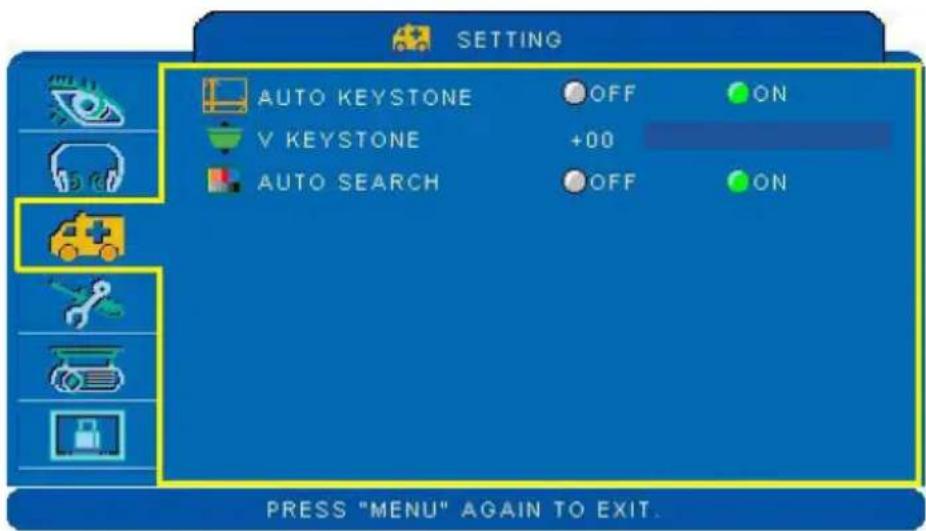
text_image
SETTING AUTO KEYSTONE OFF ON V KEYSTONE +00 AUTO SEARCH OFF ON PRESS "MENU" AGAIN TO EXIT.Step:
-
Use the ▲ /▼ buttons to select an item.
-
Use the ◀ / ▶ buttons to select an item or adjust the value.
| Item Selection Description | ||
| AUTO KEYSTONE | OFF/ON Automatically Correct keystone distortion in image. | |
| V KEYSTONE -70/+70 Correct vertical keystone distortion in image manually. | ||
| AUTO SEARCH OFF/ON Search signal source manually or automatically. | ||
Advanced Menu
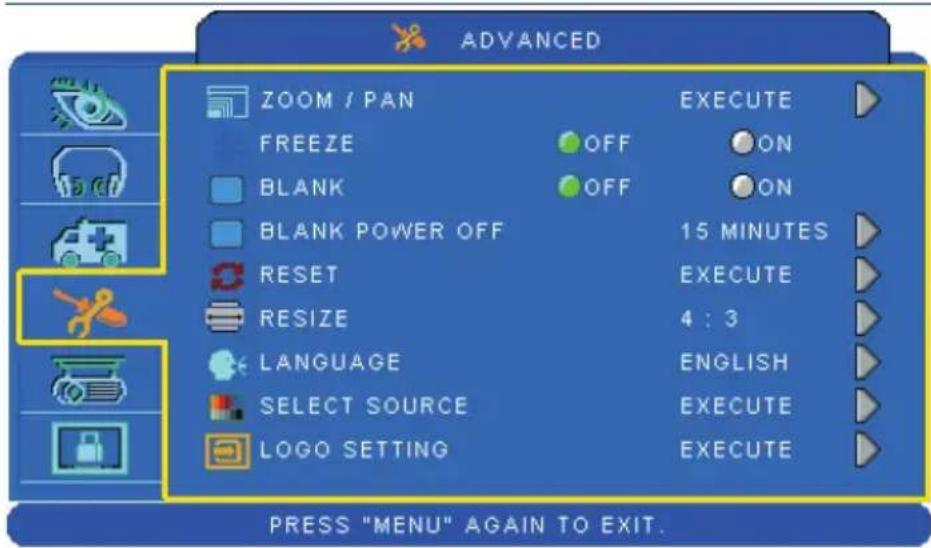
text_image
ADVANCED ZOOM / PAN EXECUTE FREEZE OFF ON BLANK OFF ON BLANK POWER OFF 15 MINUTES RESET EXECUTE RESIZE 4 : 3 LANGUAGE ENGLISH SELECT SOURCE EXECUTE LOGO SETTING EXECUTE PRESS "MENU" AGAIN TO EXIT.Step:
-
Use the ▲ /▼ buttons to select an item.
-
Use the ◀ / ▶ buttons to select an item or adjust the value.
| Item Selection Description | ||
| ZOOM / PAN EXECUTE EXECUTE | digital zoom and pan function. | |
| FREEZE OFF/ON Freeze the current image on the screen. | ||
| BLANK OFF/ON Hide the image, display a black screen. | ||
| BLANK POWER OFF | 15/30/60Minute | Set power off time after blank. |
| RESET EXECUTE Reset all menu function to their factory default values. | ||
| RESIZE 4:3,16:9 16:10,1:1 | ||
| LANGUAGE ENGLISH | Select the language that the menu and on screen massage is display inEnglish→繁體中文→简体中文→日本語→한국어Italiano←←←DutchFrançaisDePolski→Português→Русский→Español→اللهاللهاللهاللهاللهاللهاللهاللهاللهاللهاللهاللهاللهاللهاللهاللهاللهاللهاللهاللهاللهاللهاللهاللهاللهاللهاللهاللهاللهاللهاللهاللهاللهاللهاللهاللهاللهاللهاللهاللهاللهاللهاللهاللهاللهاللهاللهاللهاللهاللهالhnlllllllllllllllllllllllllllllllllllllllllllllllllllllllllllllllllllllllllllllllllllllllllllllllllllllllllllllllllllllllllllllllllllllllllllllllllllllllllllllllllllllllllllllllllllllllllllllllllllllllllllllllllllllllllllllllllllllllllllllllllllllllllllllllllllllllllllllllllllllllllllllllllllllllllllllllllllllllllllllllllllllllllllllllllllllllllllllllllllllllllllllllllllllllllllllllllllllllllllllllggllllllllllllllllllllllllllllllllllllllllllllllllllllllllllllllllllllllllllllllllllllllllllllllllllllllllllllllllllllllllllllllllllllllllllllllllllllllllllllllllllllllllllllllllllllllllllllllllllllllccccccccccccccccccccccccccccccccccccccccccccccccccccccccccccccccccccccccccccccccccccccccccccccccccccccccccccccccccccccccccccccccccccccccccccccccccccccccccccccccccccccccccccccccccccccccccccccccccccccccccccccc | |
| SELECT SOURCE EXECUTE | Select the input source item, it will show the sub-items on the screen.Use the ▲ / ▼ buttons to change input source item. And use ▶button to select input source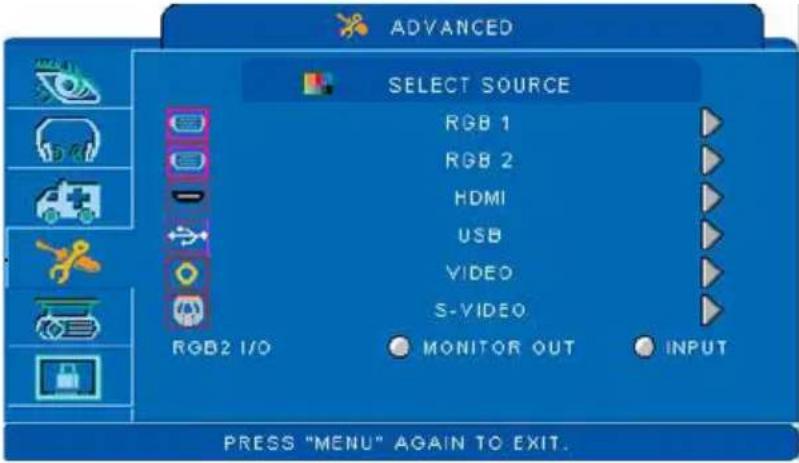 RGB2 I/O could be turned into one of analog RGB IN 2 input source or output the projected from MONITOR OUT to an external monitor by RGB 1 source. RGB2 I/O could be turned into one of analog RGB IN 2 input source or output the projected from MONITOR OUT to an external monitor by RGB 1 source. | |
| LOGO SETTING EXECUTE | Customize the start-up logo.IMPORTANT:To implement Logo setting function, please enter PIN code first. Without inputting the PIN code, you cannot modify Logo setting function. | |
Advanced Menu
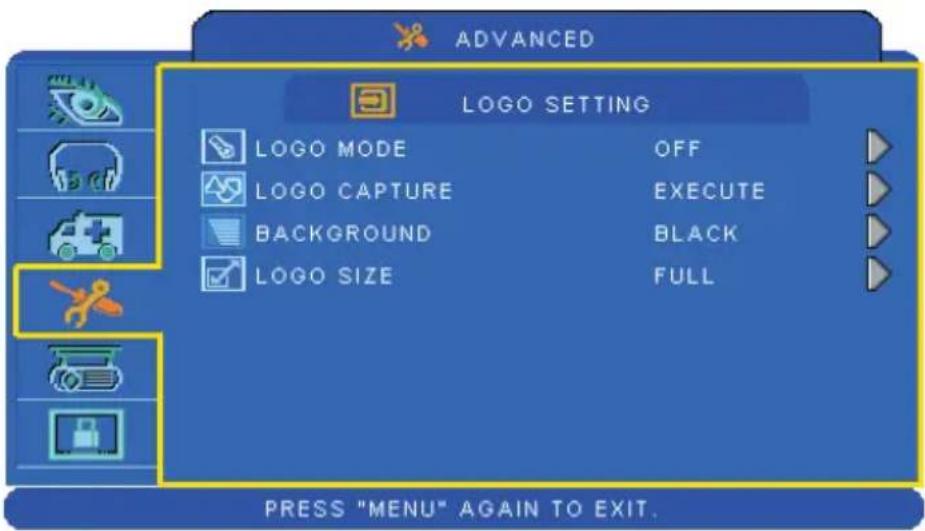
text_image
ADVANCED LOGO SETTING LOGO MODE OFF LOGO CAPTURE EXECUTE BACKGROUND BLACK LOGO SIZE FULL PRESS "MENU" AGAIN TO EXIT.LOGO SETTING
This function allows you to customize the start-up logo.
IMPORTANT:
To implement Logo setting function, please enter PIN code first. Without inputting the PIN code, you cannot modify Logo setting function.
| Item Selection Description | ||
| LOGO MODE | DEFAULT USER OFF | Select Mode( ▶ cursor button) |
| The factory logo.The image you captured.The blank image. You can select color with background function. | ||
| LOGO CAPTURE | EXECUTE Start to capture the image.(PC mode only) | |
| BACKGROUND | BLACK BLUE WHITE | Set background color. |
| LOGO SIZE | ORIGINAL FULL | Display the captured image in original size and put in the center of the screen.Expend the image to full screen. |
Advanced Menu
LOGO Capture
How to use this function?
① Select Logo Capture item in the logo setting menu, and press ▶ button.
② You can see the red frame to select captured area.
③ Use 4 direction buttons to adjust the position of the frame.
4 Press "MENU" to start capturing and display a dialog.
2
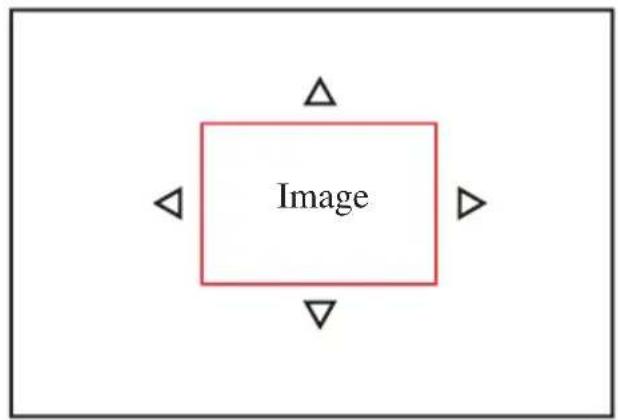
text_image
Image4
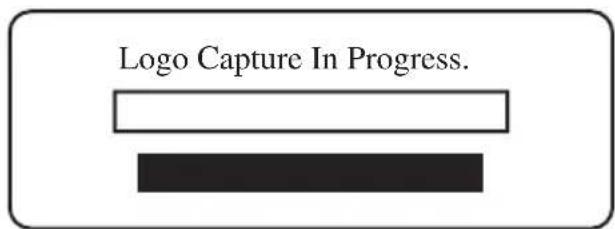
text_image
Logo Capture In Progress.NOTE
To capture an image is available only in PC mode. The area that can be captured is 512 x 384 dots.
Presentation Menu
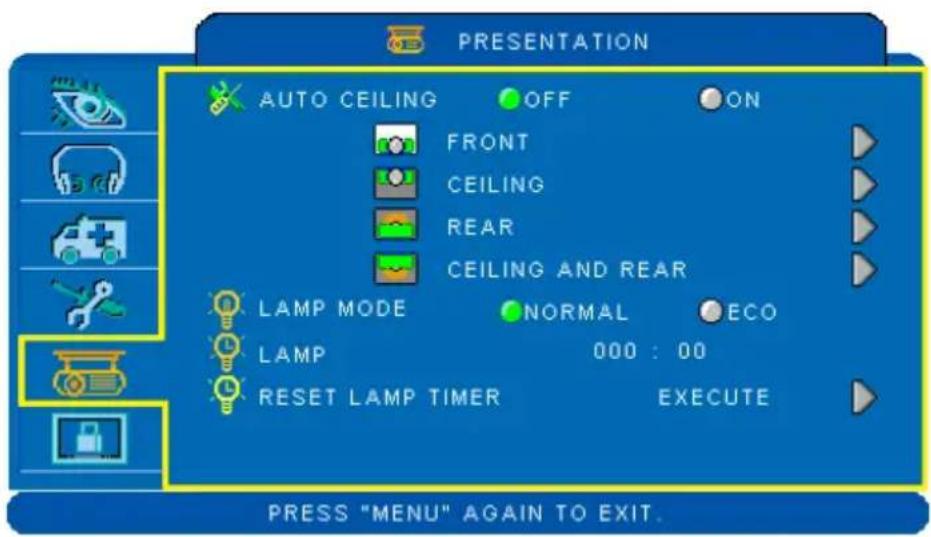
text_image
PRESENTATION AUTO CEILING OFF ON FRONT CEILING REAR CEILING AND REAR LAMP MODE NORMAL ECO LAMP 000 : 00 RESET LAMP TIMER EXECUTE PRESS "MENU" AGAIN TO EXIT.Step:
-
Use the ▲ /▼ buttons to select an item.
-
Use the ◀ / ▶ buttons to select an item or adjust the value.
| Item Selection Description | ||
| AUTO CEILING OFF / ON | Automatically invert the image when the projector is turned upside down, i.e. when the projector is mounted on the ceiling. | |
| FRONT EXECUTE | Normal projection mode. | |
| CEILING EXECUTE | Mirror the image vertically, only for the projector mounted upside down. | |
| REAR EXECUTE | Mirror the image horizontally, only for projecting onto rear projection screen. | |
| CEILING AND REAR | EXECUTE | Mirror the image horizontally and vertically. Projecting onto a rear projection screen while projector is upside down. |
| LAMP MODE | NORMAL / ECO | Switch lamp mode between Normal or ECO mode. |
| LAMP Show lamp use time. | ||
| RESET LAMP TIMER | EXECUTE | After changing a new lamp, execute this function to reset the lamp timer. |
| POWER MANAGEMENT | 15/30/60/off/ Minutes | Set power off time after detecting no signal. |
Presentation Menu
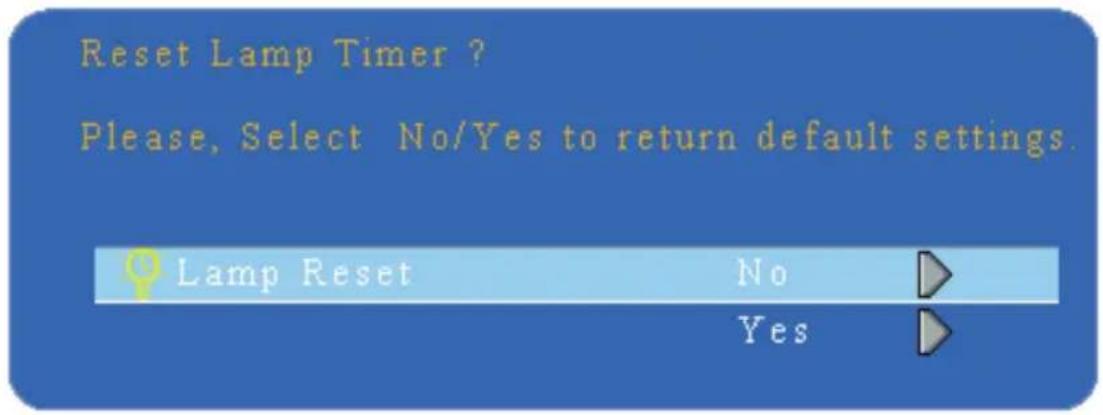
Reset Lamp Timer
The lamp timer is the time counted after the last resetting. The usage time of the lamp is shown in the PRESENTATION Menu. Pressing the RESET button or the ▶ button displays a dialog.
To reset the lamp time, select the RESET using the ▶ button.
text_image
Reset Lamp Timer ? Please, Select No/Yes to return default settings. Lamp Reset No YesNOTE
When replacement message appears, replace the lamp with a new one as soon as possible, even if the lamp is still workable.
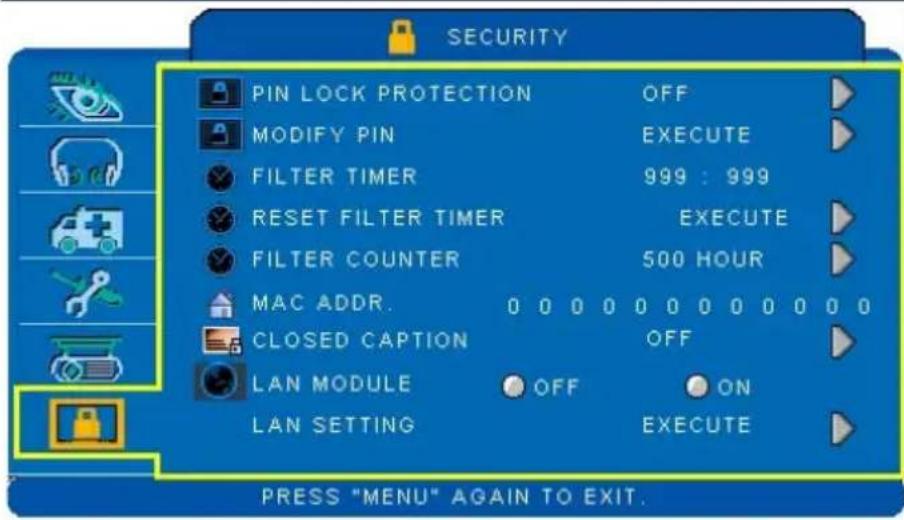
Security Menu
text_image
SECURITY PIN LOCK PROTECTION OFF MODIFY PIN EXECUTE FILTER TIMER 999 : 999 RESET FILTER TIMER EXECUTE FILTER COUNTER 500 HOUR MAC ADDR. 0 0 0 0 0 0 0 0 0 0 0 CLOSED CAPTION OFF LAN MODULE OFF ON LAN SETTING EXECUTE PRESS "MENU" AGAIN TO EXIT.Step:
-
Use the ▲ /▼ buttons to select an item.
-
Use the ◀ / ▶ buttons to select an item or adjust the value.
| Item Selection Description | ||
| PIN LOCK PROTECTION | OFFON 1ON 2 | OFF: Turn off PIN lock protection.ON 1: After plugging in AC power, you need to key in PIN code at the first time of use. If the AC power stays plugged, you do not need to key in PIN code next time when you use the projector.ON 2: You need to key in PIN code every time when you turn on the projector.CAUTION:Once the PIN code had been set, the projector cannot be used unless you enter the correct PIN code. |
| MODIFY PIN EXECUTE | 1. Press “MENU” on the projector or remote control.2. Use the ▶ button to select the MODIFY PIN item of the SECURITY category.3. Press the ▶ button to change PIN LOCK PROTECTION mode.4. Please enter the original PIN code.(a) If the PIN is correct, system will allow you to change a new PIN code.(b) If the PIN is incorrect, a “Code Error” message will appear.5. Please enter a new PIN code. And then enter again to confirm.NOTE:(1) To change the PIN lock protection state, you must enter the PIN code first.(2) Please enter: 0000 for first-time use.(3) To avoid unnecessary trouble, if you activate the [PIN Lock Protection], it is highly recommended that you write down the PIN code and store it in a safe place. | |
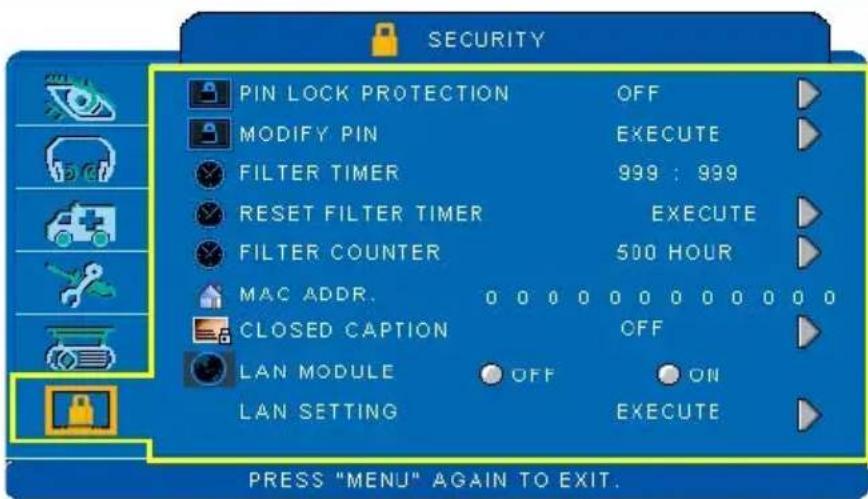
Security Menu
text_image
SECURITY PIN LOCK PROTECTION OFF MODIFY PIN EXECUTE FILTER TIMER 999 : 999 RESET FILTER TIMER EXECUTE FILTER COUNTER 500 HOUR MAC ADDR. 0 0 0 0 0 0 0 0 0 0 0 CLOSED CAPTION OFF LAN MODULE OFF ON LAN SETTING EXECUTE PRESS "MENU" AGAIN TO EXIT.Step:
- Use the ▲ /▼ buttons to select an item.
- Use the ◀ / ▶ buttons to select an item or adjust the value.
| Item Selection Description | ||
| FILTER TIMER Show the filter use hour. | ||
| RESET FILTER TIMER | EXECUTE Reset the filter timer after cleaning / changing filter. | |
| FILTER COUNTER | 500 hours800 hours1000 hours | Select (500 / 800 / 1000 hours) depending on the environment.(default : 500 hours). Please see page75. |
| MAC ADDR. | If purchasing LAN control module, "MAC ADDR." will be shown in "Security" Menu.MAC address stands for unique Media Access Control address of LAN control module and displays with six groups of two hexadecimal digits. | |
| CLOSED CAPTION | OFF(Default)C.C1C.C2C.C3C.C4T1T2T3T4 | The Closed Caption function intimates the sound effects, dialogue, and narration in the content of the television program or video source.Caption (C.C1~C.C4) : Display closed caption Text (T1~T4) : Display text data, which is for additional information such as news reports or a TV program guide.NOTE: This function is available only in video / S-Video source. |
| LAN MODULE | OFFON | If purchasing LAN control module, "LAN MODULE" will be shown in "Security" Menu.Select ON/OFF to turn on/off LAN control feature. |
| LAN SETTING EXE | CUTE | Enter LAN SETTING to set up projector network configuration. |
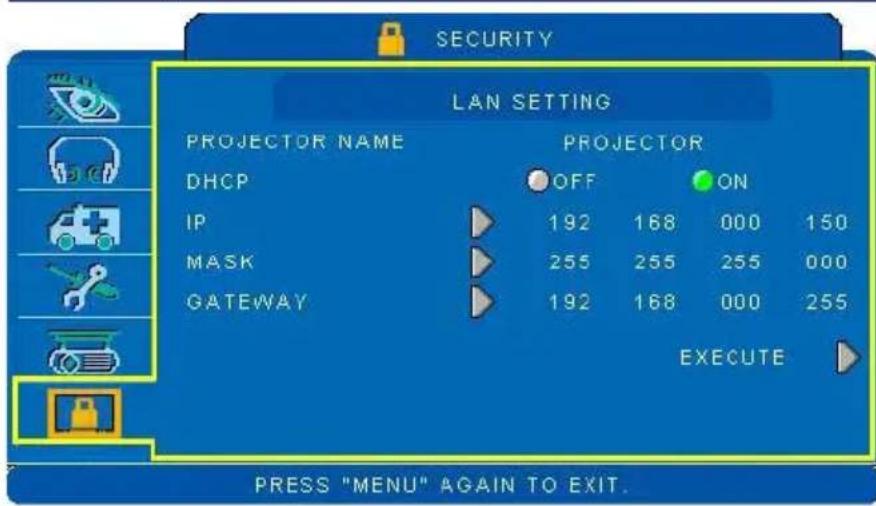
Security Menu
text_image
SECURITY LAN SETTING PROJECTOR NAME PROJECTOR DHCP OFF ON IP 192 168 000 150 MASK 255 255 255 000 GATEWAY 192 168 000 255 EXECUTE PRESS "MENU" AGAIN TO EXIT.Step:
-
Use the ▲ /▼ buttons to select an item.
-
Use the ◀ / ▶ buttons to select an item or adjust the value.
| Item Selection Description | ||
| PROJECTOR NAME | Default is Projector | Projector network setting display which shows bits that can be recognized by ASCII. |
| DHCP OFF / ON | When setting ON, projector's IP address will be assigned by DHCP server automatically. When setting OFF, you can use remote control to do setting manually. | |
| IP | Key in IP address manually. Press "ENTER" to do digit setting. When appears, press ▲ /▼ to adjust value. When finishing value adjustment, press MENU to exit. | |
| MASK | Enter MASK address manually. Press "ENTER" to do digit setting. When appears, press ▲ /▼ to adjust value. When finishing value adjustment, press MENU to exit. | |
| GATEWAY | Enter GATEWAY address manually. Press "ENTER" to do digit setting. When appears, press ▲ /▼ to adjust value. When finishing value adjustment, press MENU to exit. | |
Auto Filter Alert
Auto Filter Alert is in SECURITY category to show the air filter use time and alert user to change filter. Pressing ▶ cursor button will display a dialog. When the operating time reaches the set time, a warning message will appear on the screen to remind user of filter cleaning / replacing.
Filter Replace...
Filter has been used for more than 500 hours.
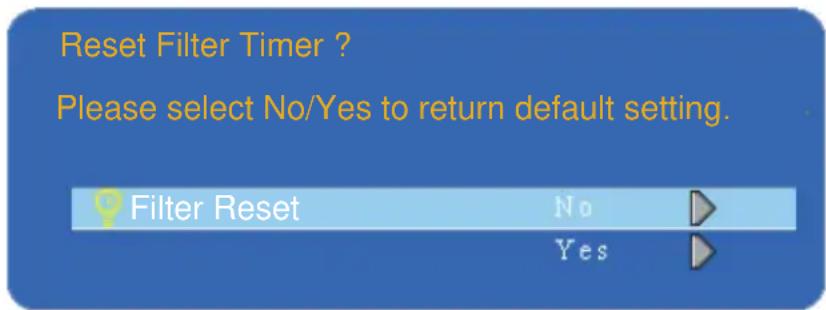
Reset Filter Timer
The filter timer is the time counted after the last resetting. The usage time of the filter is shown in the SECURITY Menu. Pressing the RESET button or the ▶ button displays a dialog.
To reset the filter time, select the RESET using the ▶ button.
text_image
Reset Filter Timer ? Please select No/Yes to return default setting. Filter Reset No Yes▶NOTE
Please reset the Filter time only when you replace the filter.
PIN Key In Operation
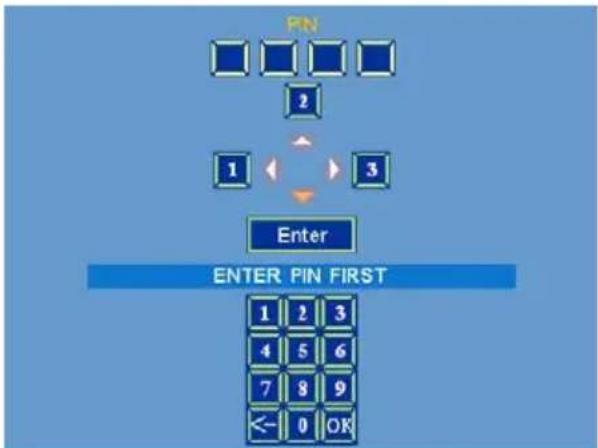
When the projector is turned on and the PIN LOCK PROTECTION is set to [ON], the image will show as on the right side.
-
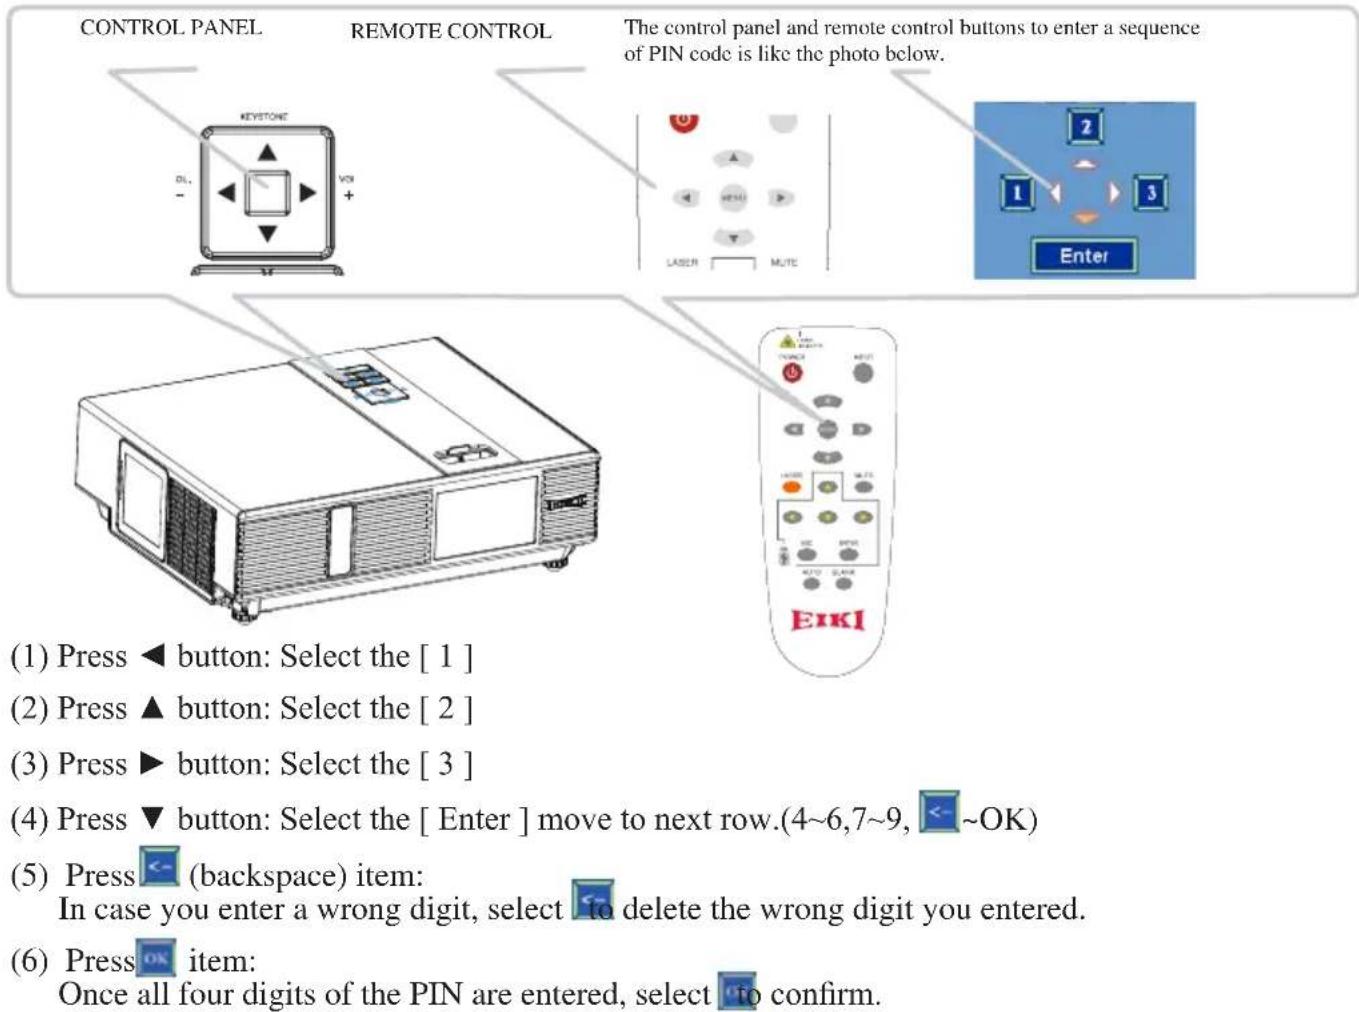
Press the MENU button on the projector or remote control. Enter PIN code by keypad or remote control.
-
How to enter a PIN code? You can use control panel or remote control.
flowchart
graph TD
    PN["PN"] --> 2["2"]
    2 --> 1["1"]
    1 --> 3["3"]
    3 --> Enter["Enter"]
    Enter --> PINFirst["ENTER PIN FIRST"]
    PINFirst --> 1["1"]
    PINFirst --> 2["2"]
    PINFirst --> 3["3"]
    1 --> 4["4"]
    2 --> 5["5"]
    3 --> 6["6"]
    4 --> 7["7"]
    5 --> 8["8"]
    6 --> 9["9"]
    7 --> <=0["<="]
    8 --> OK["OK"]
text_image
CONTROL PANEL REMOTE CONTROL The control panel and remote control buttons to enter a sequence of PIN code is like the photo below. (1) Press ◀ button: Select the [ 1 ] (2) Press ▲ button: Select the [ 2 ] (3) Press ▶ button: Select the [ 3 ] (4) Press ▼ button: Select the [ Enter ] move to next row.(4~6,7~9, ←~OK) (5) Press ← (backspace) item: In case you enter a wrong digit, select □ to delete the wrong digit you entered. (6) Press OK item: Once all four digits of the PIN are entered, select □ to confirm.NOTE
(1) Please enter: 0000 for first-time use.
(2) If the PIN is incorrect, a "Enter new code" message will be shown. Please try again. If the PIN code input is incorrect for three times, a warning message will show up and the projector will shut itself down in 30 seconds.
(3) If you have no idea about the PIN, please contact your dealer for help.
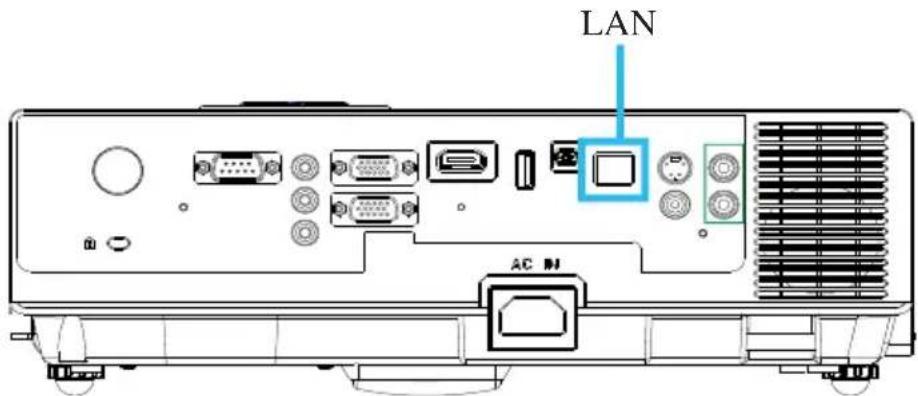
text_image
LAN AC 动Procedure to utilize this function
It can help user to monitor and manage the projector(s) status in the local area network.
1 Register the projector(s) which needs to be controlled.
" Auto search " can help you to seek the projector(s) source easily.
After registering in the work group, you can start to control the projector.
② Group the projector(s) into different sections.
You can monitor the status easily by the sort of group name function in the network.
③ Monitor the status for each projector.
a. You can manage and change the monitoring content by System Parameter Setting.
b. The Lamp timer, filter working time or system warning feedback etc. can be known by checking the status for projector(s).
4 Control the booked projector(s).
The status can be refreshed and acquired by monitoring functions; you can also operate the function easily by Network Control.
NOTE
To monitor and control the projector(including stand-by mode), the following conditions need to be ready:
(1) Projector should already be powered on.
(2) Projector is connected to network.
(3) LED light of the projector network port shows normal. (Green light on, Orange twinkle)
* Stand-by mode indicator: Green LED (Power) on the projector's control panel flashes.
Before Using Network Control Software
-
The projector should be powered on and the LAN wire is well connected to projector.
-
The LAN module ON/OFF item in SECURITY menu of OSD should be setting ON.
-
Make sure the computer and projector can connect to network. Network Control software needs to arrange in TCP/IP network communication and the network cable.
NOTE:
IE8 browser & 1024x768 viewing resolution is recommended.
Network Control Software Application
Browser Control
Auto IP address setting (while DHCP setting is "ON"):
(1) Enable DHCP from the projector on-screen-display menu, under "SECURITY \ LAN SETTING".
(2) Please wait for the PC server to release IP address to the projector.
(3) Enter "Given IP address (For example http://192.168.1.176/) into the address bar of the web browser and press "Enter" key or click "Go" button.
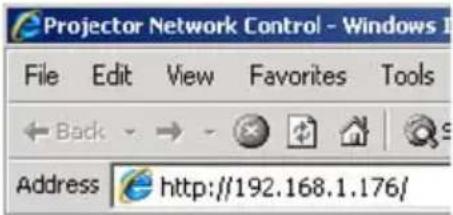
text_image
Projector Network Control - Windows 1 File Edit View Favorites Tools Back → Address http://192.168.1.176/Projector Network Control
V0.2

text_image
Home Control Panel Network Alert Setting Schedule Time Crestron LogoutStatus
IP Address: 192.168.1.200
Projector Name: Projector
System Status: Power On
Input Source: RGB1
Lamp Hours: 3
Filter Hours: 3
Projector Status: Normal
MAC Address: 00.60. E9:00:15:21
Item Setting description:
| ITEM SETTING DESCRIPTION | |
| Home (Status) Show | current projector status and network configuration settings. |
| Control Panel Select | projector's detailed setting from this page. |
| Network Set up network configuration and password from this page. | |
| Alert Setting Show | and setup Alert configurations. |
| Schedule Show and | set up Schedule, including Weekly Schedule and Specific Day. |
| Time Set up the date/time on the projector. | |
| Crestron Crestron configuration. | |
| Logout Logout information. | |
If the Administrative & User password is enabled, select your User Name and enter password to login.
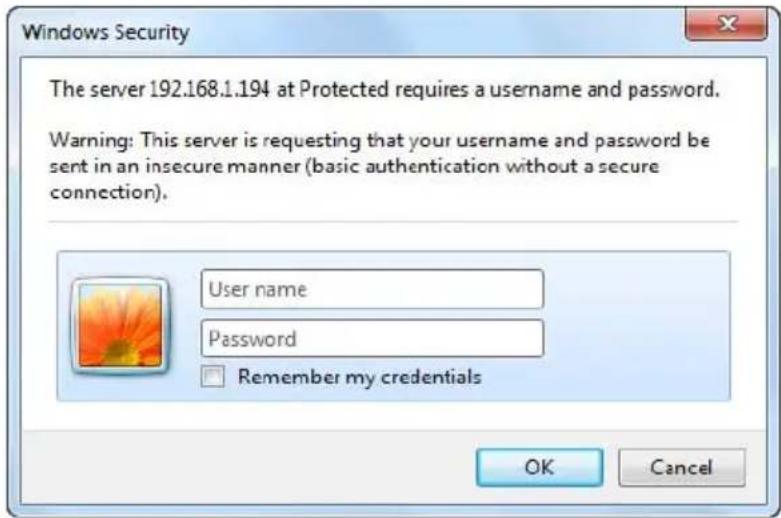
text_image
Windows Security The server 192.168.1.194 at Protected requires a username and password. Warning: This server is requesting that your username and password be sent in an insecure manner (basic authentication without a secure connection). User name Password Remember my credentials OK CancelADMINISTRATOR MODE
User name: admin
Password: (Default password setting is disabled.)
Home (Status):
Show current projector status and network configuration settings.
Projector Network Control
V0.2

text_image
Home Control Panel Network Alert Setting Schedule Time Crestron LogoutStatus
Projector Name: PROJECTOR
System Status: Inactive
Input Source:
Lamp Hours: —
Filter Hours:
Wired Lan
IP Address: 0.0.0.0
Subnet Mask: 0.0.0.0
Gateway: 0.0.0.0
MAC Address: 00.26 47.18 59 40
Wireless Lan
Mode:
SSID:
Channel:
IP Address: —
Subnet Mask: —
Gateway:
MAC Address: —
Download Tool


Network Control Software Application
| ITEM ITEM SETTING DESCRIPTION | ||
| Status Projector Name | Show projector name. | |
| System Status Show if projector is Power On or Inactive . | ||
| Input Source Show current input source. | ||
| Lamp Hours Show lamp used hours on current projector. | ||
| Filter Hours Show filter used hours on current projector. | ||
| Wired LAN IP Address | Show current IP address of wired LAN. | |
| Subnet Mask Show current Subnet Mask of wired LAN. | ||
| Gateway Show current Gateway of wired LAN. | ||
| MAC Address Show current MAC Address of wired LAN. | ||
| Wireless LAN Mode | Access Point Mode. | |
| SSID | SSID (Service Set Identification) is the wireless network name, it must be assigned to wireless devices in your network. | |
| Channel | This field determines which operating frequency will be used. The default channel is set to Auto, so the AP will choose the best channel automatically. | |
| IP Address Show current IP address of Wireless LAN. | ||
| Subnet Mask Show current Subnet Mask of Wireless LAN. | ||
| Gateway Show current Gateway of Wireless LAN. | ||
| MAC Address Show current MAC Address of Wireless LAN. | ||
| Download Tool | Windows | To download the application program of EZ WiFi_LAN.The file is Windows OS only for EZ Display used. |
| MAC | To download the application program of EZ WiFi_LAN.The file is MAC OS only for EZ Display used. | |
Control Panel:
Select projector's detailed setting from this page.
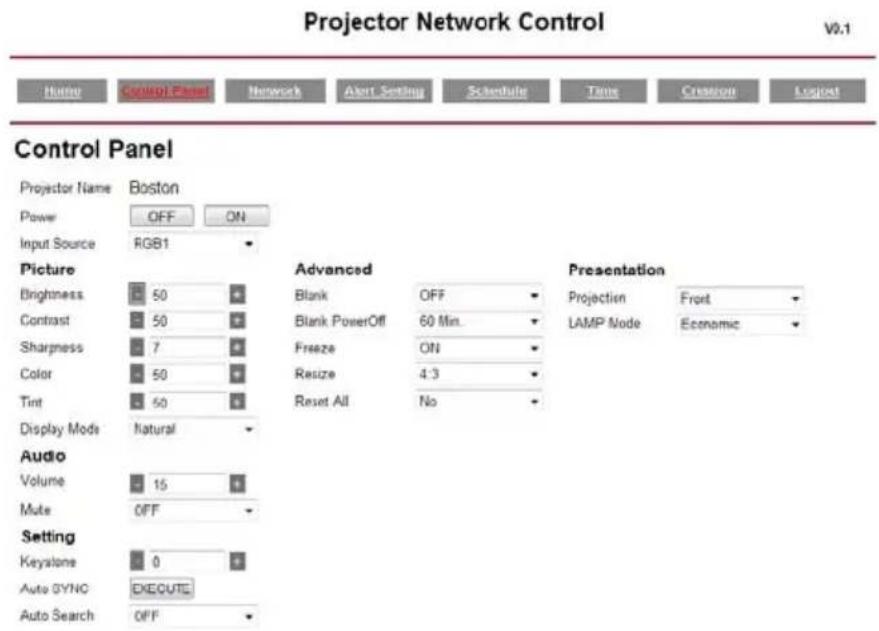
text_image
Projector Network Control V0.1 Home Control Panel Network Alert Setting Schedule Time Creation Logpost Control Panel Projector Name Boston Power OFF ON Input Source RGB1 Picture Brightness 50 Contrast 50 Sharpness 7 Color 50 Tint 50 Display Mode Natural Audio Volume 15 Mute OFF Setting Keystone 0 Auto SYNC EXECUTE Auto Search OFF Advanced Blank OFF Blank PowerOff 60 Min. Freeze ON Resize 4:3 Reset All No Presentation Projection Front LAMP Mode Economic| ITEM SETTING DESCRIPTION | |
| Basic | |
| Projector Name Show | projector name on the current projector. |
| Power Power On or | Power Off the projector via network. |
| Input Source Select input source. | |
| Picture | |
| Brightness Adjust the image brightness level. | |
| Contrast Adjust the image contrast level. | |
| Sharpness Adjust the image sharpness. | |
| Color | Adjust the strength of whole color.This function can only be used under Video signal, S-Video signal, or component video signal input. |
| Tint | Adjust the image tint.This function can be used under Video signal, S-Video signal, or component video signal. |
| Display Mode Adjust | Natural/Cinema/Daylight/Green Board/White Board/Black/User Mode. |
| Audio | |
| Volume Adjust the volume. | |
| Mute Mute the volume OFF / ON. | |
| Setting | |
| Keystone Manually correct vertical keystone distortion in image. | |
| Auto Sync | Set all of the above setting automatically. (This function can only be used under PC mode) |
| Auto Search Search signal source manually or automatically. | |
| Advanced | |
| Blank Blank the current image on the screen | |
| Blank Power Off No / 15 / 30 / 60 (minutes) | |
| Freeze Freeze the current image on the screen. | |
| Resize | 4:3,16:9, 1:1, 16:10 |
| Reset All | Reset all menu function to their factory default values. |
| Presentation | |
| Projection | Select Front/Ceiling/Rear/Celing and Rear |
| Lamp Mode | Switch lamp mode between Powerful or Normal mode. |
Network Control Software Application
Network :
Set up network configuration and password from this page.
Projector Network Control
V0.2

text_image
Home Control Panel Network Alert Setting Schedule Time Crestron LogoutNetwork Setting
Network
| DHCP | Manual | |||
| IP Address | 192.168.1.200 | Administrator | Enable | Disable |
| Subnet Mask | 255.255.0.0 | |||
| Gateway | 192.168.1.254 | New Password | ||
| DNS Server | 192.168.1.246 | |||
| Group Name | GROUP | Confirm Password | ||
| Projector Name | Projector | |||
| Submit | ||||
| Submit |
| ITEM SETTING DESCRIPTION | |
| Network | |
| DHCP Assign an IP address to the projector from the DHCP server automatically. | |
| IP Address Set up IP Address when DHCP is disabled. | |
| Subnet Mask Set up Subnet Mask when DHCP is disabled. | |
| Gateway Set up Gateway when DHCP is disabled. | |
| DNS Server Set up DNS Server address when DHCP is disabled. | |
| Group Name Create projector group. (Max length: 14 characters) | |
| Projector Name Create projector naming of the current projector. (Max length: 14 characters) | |
| Password | |
| Administrator | Turn ON/OFF administrative password function.Administrator mode can control the conditions on web. |
| New Password Enter administrative password.(Max length: 15 characters) | |
| Confirm Password Re-enter administrative password. | |
Network Control Software Application
Alert:
Show and setup Alert configurations.
Projector Network Control
V0.2

text_image
Home Control Panel Network Alert Setting Schedule Time Crestron LayoutAlert Setting
Email Setting
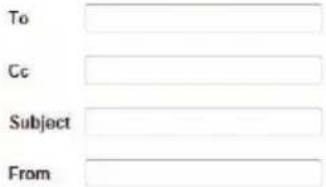
text_image
To Cc Subject FromSMTP Setting
text_image
Server User Name PasswordAlert Condition
□ Fan Lock
Over Temperature
Filter Time Alert
Lamp Fail
Lamp Time Alert
Submit Issue Test Mail
When problem occurs to the projector, it will automatically send e-mail to remind user.
How to opearte:
- Enter Email Setting columns.
- Enter SMTP Setting columns.
- Select Alert Condition. Multiple choices are fine.
-
Press Submit to confirm.
-
After completing Alert Setting for the first time, it is recommended that you press Issue Test Mail to see if the attendees can receive the e-mail. If the attendees cannot receive the e-mail, please check if the setting is correct or not. If you have questions with the Alert Setting, please contact your network service provider.
| ITEM SETTING DESCRIPTION | |
| Email Setting | |
| To Set up the mail alert attendee. (Max length: 40 characters) | |
| Cc Set up the backup mail alert attendee. (Max length: 40 characters) | |
| Subject Set up the subject of the alert e-mail. (Max length: 40 characters) | |
| From Set up the sender e-mail address. (Max length: 40 characters) | |
| SMTP Setting | |
| Server To enter the SMTP server (Mail server) name of the company or IP address.(Max length: 40 characters) | |
| User Name Enter the sender's e-mail address. (Max length: 40 characters) For example: david@xxxxx.com | |
| Password Enter password of the sender's e-mail account. (Max length: 15 characters) | |
| Alert Condition | |
| Fan Lock The cooling fan is not operating. | |
| Over Temperature The projector internal is over heated. | |
| Lamp fail The lamp does not light up. | |
| Lamp Time Alert Lamp has reached its life time. Suggest changing the lamp. | |
| Lamp Cover Opened Lamp Cover does not close well. | |
| Filter Time Alert Filter has reached its life time. Suggest cleaning the filter. | |
Network Control Software Application
Schedule :
Show and set up Schedule, including Weekly Schedule and Specific Day.
Weekly Schedule
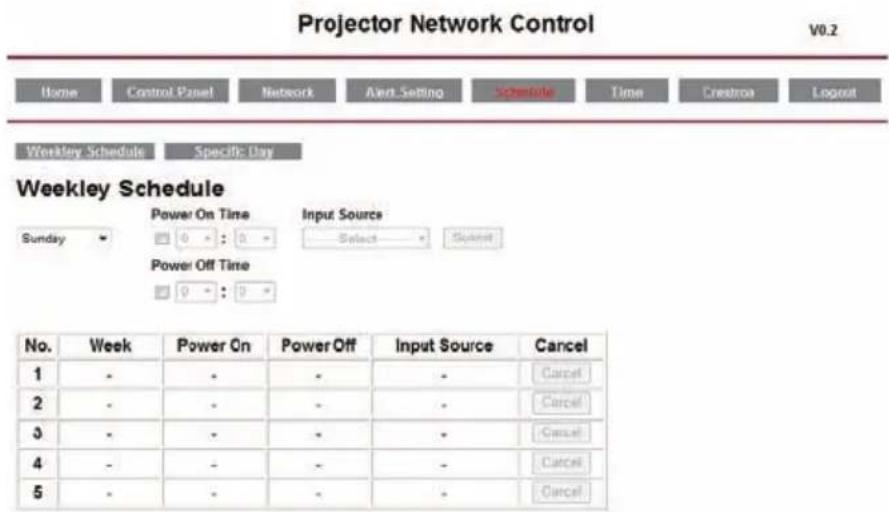
text_image
Projector Network Control V0.2 Home Control Panel Network Alert Setting Schedule Time Creation Logout Weekley Schedule Specific Day Weekley Schedule Power On Time Input Source Sunday Select Submit Power Off Time No. Week Power On Power Off Input Source Cancel 1 - - - - Cancel 2 - - - - Cancel 3 - - - - Cancel 4 - - - - Cancel 5 - - - - CancelTo power on and power off projector based on Weekly Schedule.
How to set up:
- Choose week days.
- Set up power-on or power-off time.
(Please be sure that the interval between power-on and off setting is more than 5 minutes.)
- Enter Input Source and select input source.
- After completing setting, press ADD to confirm.
- To cancel items, select the item and press "Cancel" button.
Specific Day

text_image
Projector Network Control V0.1 Home Control Panel Network Alert Setting Schedule Time Creation Logout Weekley Schedule Specific Day Specific Day Power On Time Input Source 2008 January 1 0 : 0 —— Select —— Submit Power Off Time 2008 January 1 0 : 0 No. Power On Power Off Input Source Cancel 1 - - - Cancel 2 - - - Cancel 3 - - - Cancel 4 - - - Cancel 5 - - - CancelBased on Specific Day to set up power-on and power-off time.
How to set up:
- Choose power-on days and time.
- Choose power-off days and time.
(Please be sure the setting period between power-on time and off time is greater than 5 minutes.)
- Enter Input Source and select input source.
- After completing setting, press ADD to confirm.
- To cancel items, select the item and press "Cancel" button.
Time :
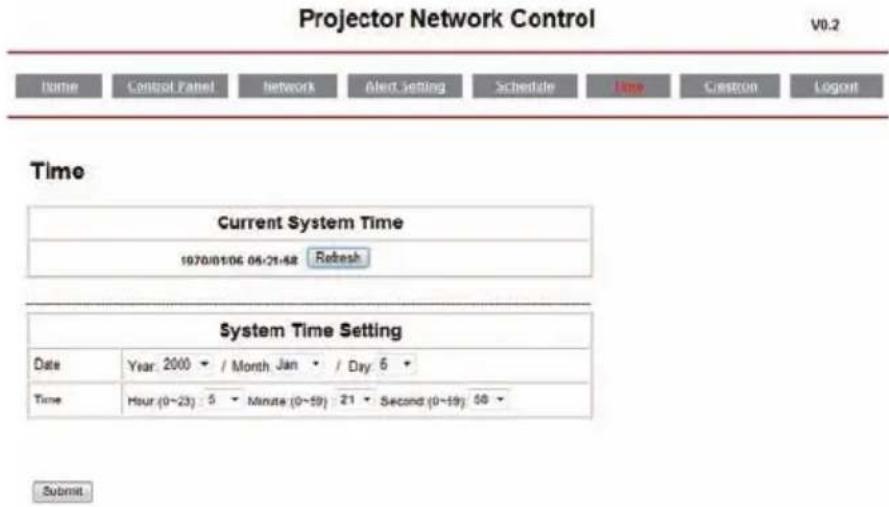
text_image
Projector Network Control V0.2 Time Control Panel Network Alert Setting Schedule Time Custom Logout Current System Time 1970/01/06 04:21:58 Refresh System Time Setting Date Year: 2000 • / Month Jan • / Day: 6 • Time Hour (0~23) 5 • Minute (0~59) 21 • Second (0~59) 58 • Submit- Current System Time Setting : Refresh the date/time on the webpage if you click "Refresh" button.
- System Time Setting : To set the date/time manually Enter the Date in Month/Day/Year format. Enter the Time in Hour/Minute/Second format.
- Click the "Submit" button to save your setting.
Crestron : Projector's detailed setting from Crestron.
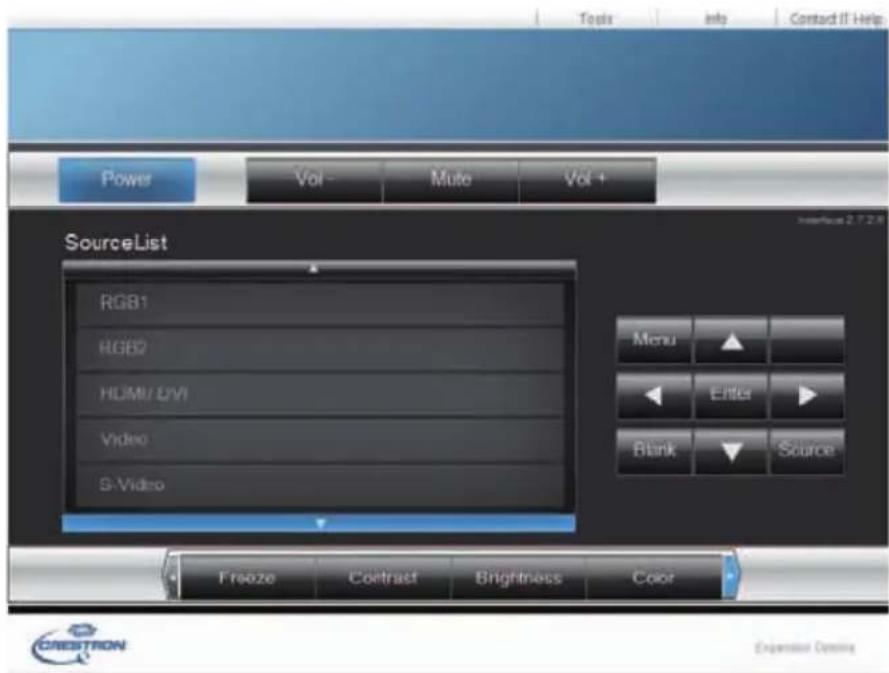
text_image
Tools Info Contact IT Help Power Vol- Muto Vol + SourceList RGB1 RGB2 HDMI/DVI Video S-Video Menu Enter Blank Source Freeze Contrast Brightness Color CREDITRON Expansion Console| ITEM SETTING DESCRIPTION | |
| Power Power On or Power Off the projector via network. | |
| Vol + (Volume +) Adjust the volume up. | |
| Vol + (Volume -) Adjust the volume down. | |
| Mute Mute the volume OFF / ON. | |
| Source List Select input source. | |
| Brightness Adjust the image brightness level. | |
| Contrast Adjust the image contrast level. | |
| Color Adjust the strength of whole color. | |
| Sharpness Adjust the image sharpness. | |
| ZOOM Zoom in/Zoom out and Pan. | |
| Menu Display or hide the OSD main menu. | |
| UP/Down buttons Use UP/Down buttons to select an items. | |
| Left/Right buttons Use left/right buttons to select an items or adjust the value. | |
| Source RGB1->RGB2->HDMI->USB->Video->S-Video->RGB1. | |
| Enter | Use Enter buttons to select an item. |
| Auto | Automatically adjust the setting to match the current input. |
| Blank | Blank the projected image. The time of Blank mode can be set in 15 minutes, 30 minutes or 60 minutes. The projector will shut down automatically after passing each set time. |
About the Tools button :
Set up network configuration, projector network web browser login password and set projector name from this page.
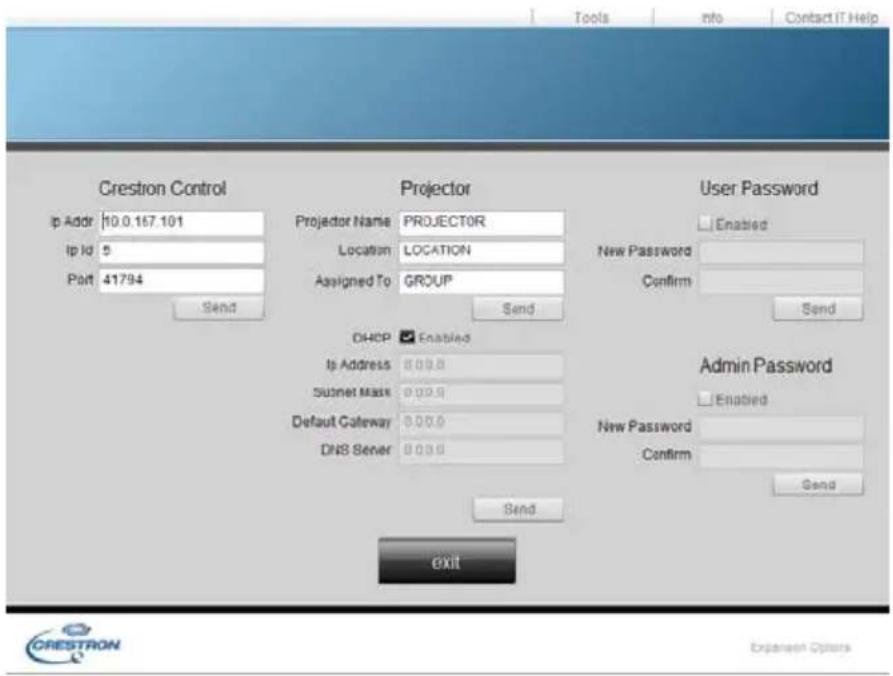
text_image
Tools Info Contact IT Help Crestron Control Ip Addr 10.0.167.101 Ip Id 5 Port 41794 Send Projector Projector Name PROJECTOR Location LOCATION Assigned To GROUP Send User Password Enabled New Password Confirm Send DHCP Enabled Ip Address 0.00.0 Subnet Mass 0.00.0 Default Gateway 0.00.0 DNS Sener 0.00.0 Send Admin Password Enabled New Password Confirm Send Exit CRESTRON Expansion OptionsNetwork Control Software Application
| Crestron Control | |
| Projector Name | Displays the projector name used to identify the projector when connected to a network.When editing, you can enter up to 14 single-byte alphanumeric characters. |
| Location | Show the location where the projector is. When editing, you can enter up to 14 single-byte alphanumeric characters. |
| Assigned To | Displays the name used to identify the projector is assigned to someone who can manage a network.When editing, you can enter up to 14 single-byte alphanumeric characters. |
Click button to send and save the setting that you modify.
| Projector's Network Configuration | |
| DHCP Enabled | Assign an IP address to the projector from the DHCP server automatically. |
| IP Address Set up | IP Address when DHCP is disabled. |
| Subnet Mask Set | up Subnet Mask when DHCP is disabled. |
| Gateway Set up | Gateway when DHCP is disabled. |
| DNS Server Set | up DNS Server address when DHCP is disabled. |
Click button to send and save the setting that you modify.
| Admin Password | |
| Enabled Turn ON | N administrative password function if selected. |
| New Password | Enter administrative password. (Max length: 15 characters). |
| ConfirmPassword | Re-enter administrative password. |
Click button to send and save the setting that you modify.
| User Password | |
| Enabled Turn ON | User password function if selected. |
| New Password Enter administrative password. (Max length: 15 characters). | |
| ConfirmPassword | Re-enter administrative password. |
Click button to send and save the setting that you modify.
Click exit button to leave this page.
About the "Info" button :
Show current projector status from this page. Press exit button to leave this page.
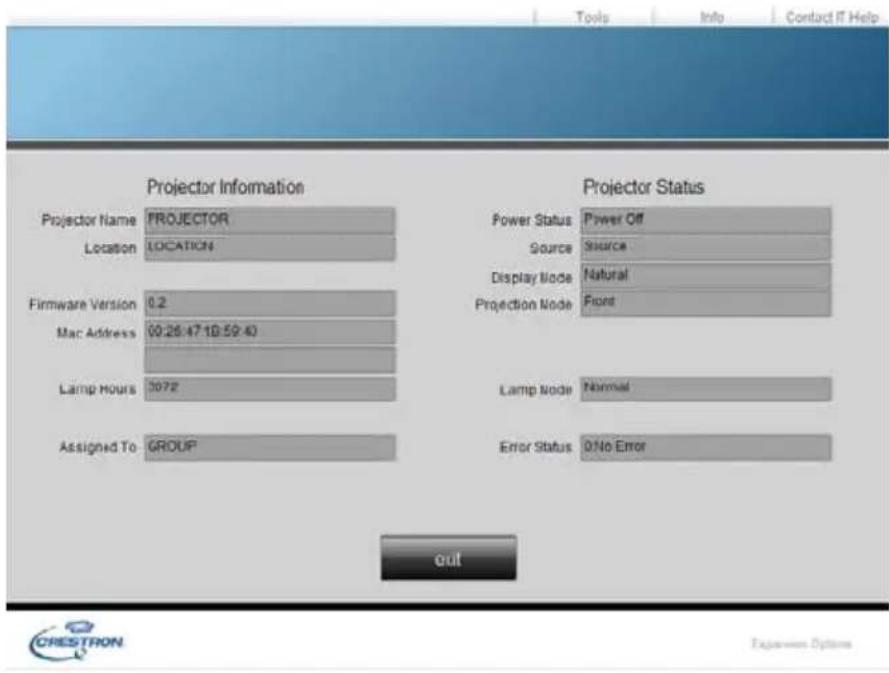
text_image
Projector Information Projector Name PROJECTOR Location LOCATION Firmware Version 0.2 Mac Address 00:28:47 10:59:40 Lamp Hours 3072 Assigned To GROUP Projector Status Power Status Power Off Source Source Display Node Natural Projection Node Front Lamp Node Normal Error Status 0/No Error outClick exit button to leave this page.
About the "Contact IT Help":
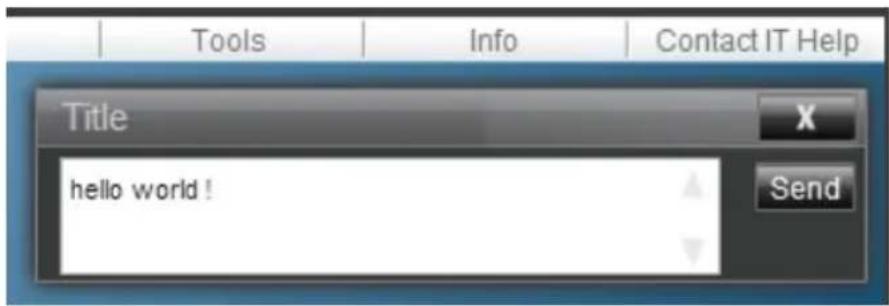
text_image
Tools Info Contact IT Help Title X hello world ! SendClick to close Contact IT Help window dialog.
Click Send to send the message to Crestron's device and projector.
Logout : logging out of the projector network control.
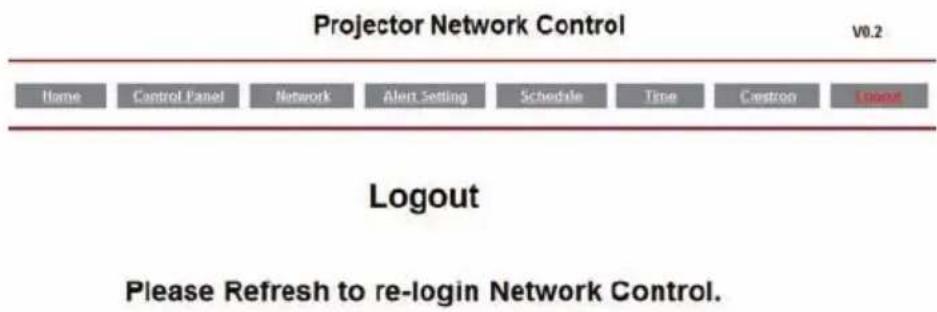
text_image
Projector Network Control V0.2 Home Control Panel Network Alert Setting Schedule Time Castron Logout Logout Please Refresh to re-login Network Control.Filter
Keep the air filters clean by cleaning them periodically.
By using Filter Counter the projector can remind you of the timing.
There is black sponge attached just back side of the filter cover consists of a black frame.
How to clean or replace the filters
Turn off the projector, and unplug the power cord. Wait to allow the projector to cool down sufficiently.
-
Push up 2 white stoppers of the Filter cover and remove it from the side of projector as shown below.
-
Remove the spong case from the projector by pull it front the right hand side.
-
Clean the filters with a vacuum cleaner except for the back side of the sponge, because the vacuum cleaner may suck it. Brush the sponge gently by a brush. (Do not clean the filters with water.)
-
Insert the filter parts to the side of the projector first and then close the Filter cover by pushing 2 white stoppers. Make sure that the Filter cover is well closed.
-
Reset the Filter Timer.(P.75)
1
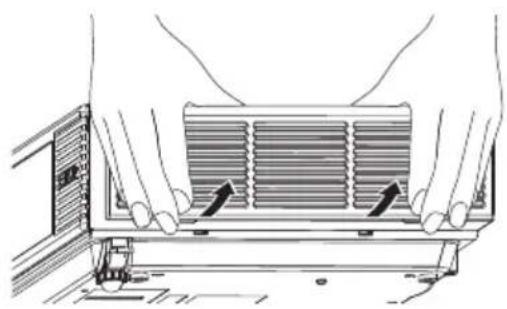
natural_image
Illustration of hands installing or adjusting a heat exchanger panel (no text or symbols visible)2
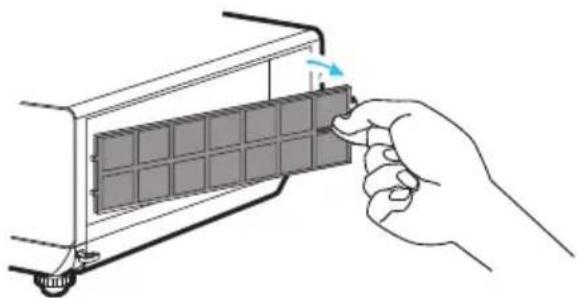
natural_image
Hand inserting a grid into a device panel (no text or symbols visible)3
Sponge filter
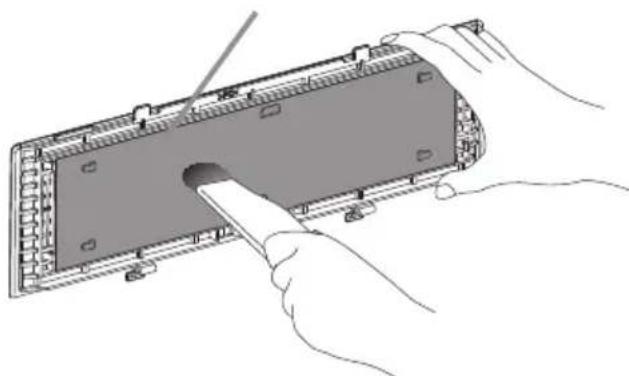
natural_image
Illustration of hands inserting a component into a device casing (no text or symbols visible)Maintenance of Projector
Lamp
Please turn off the projector and unplug the AC power cord. And then, let the projector cool down at least 60 minutes.
Replacing New Lamp
LC-XNB4000N Part Number:23040043
LC-XNB3500N Part Number:23040044
LC-WNB3000N Part Number:23040044
- Remove the lamp door.
- Loosen 2 screws of the lamp holder. Hold the handle on the top of the lamp, pull out the lamp straight off the projector.
- Insert new lamp, lock the lamp door firmly with 2 screws.
- Put the lamp door on.
- Please reset the lamp timer after replacing lamp. (P.71)
When changing lamp, it is recommended that you change the filer at the same time.
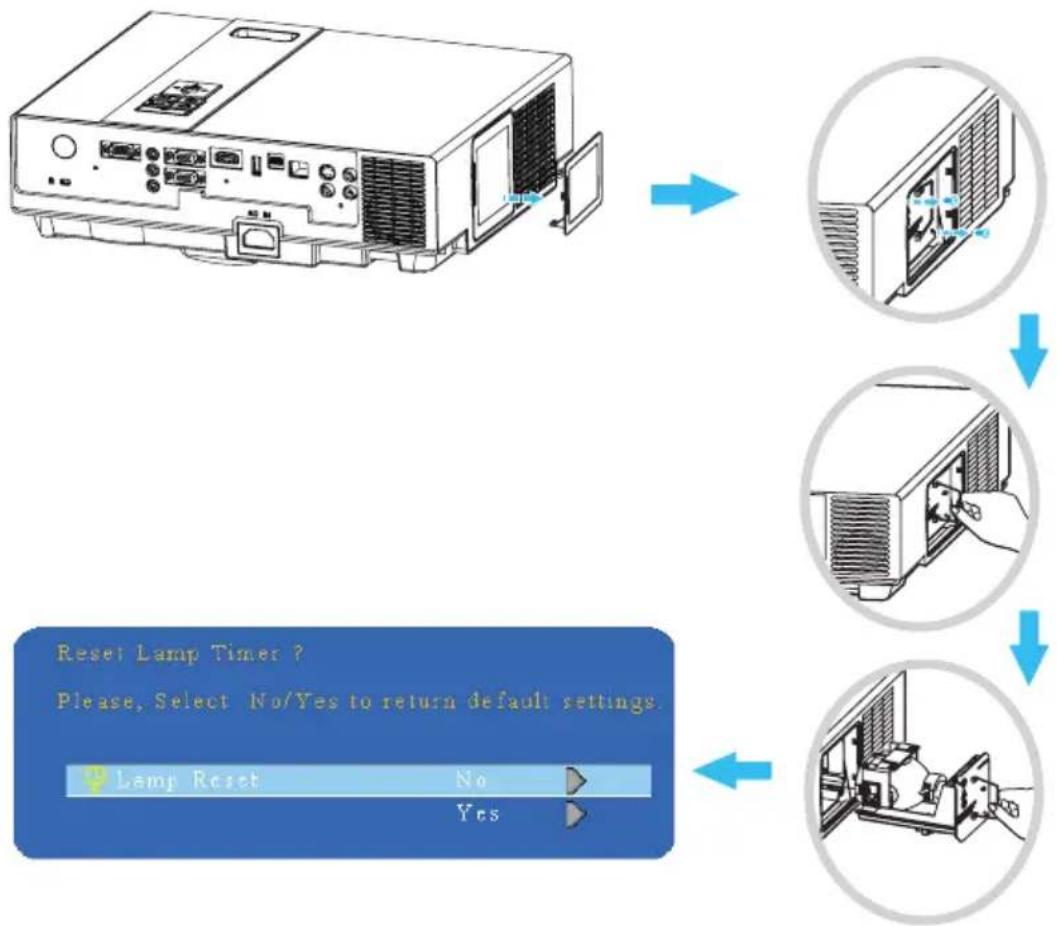
flowchart
graph TD
    A["Device"] --> B{Reset Lamp Timer ?}
    B -->|No| C["Printer 1"]
    B -->|Yes| D["Printer 2"]
    C --> E["Printer 3"]
    D --> F["Printer 4"]

WARNING
The projector uses a high-pressure mercury lamp.
The explosion of lamp with a loud bang or burn out could possibly cause injury or a fire. When the bulb burst, it is possible for shards of glass to fly into the lamp housing; and for gas containing mercury to escape from the projector's vent holes.
If the lamp has broken, do not check the inside of the projector. Please ventilate the room immediately.
Do not touch or bring your face close to the broken pieces since it might get into your eyes or mouth. In case of injury, seek medical advice immediately.
Disposal of a Lamp
Dispose of a lamp in accordance with the local recycling laws.
Do not put it to your trash.
Recycling Lamp's laws of the USA, go to www.lamprecycle.org.
Recycling Product's laws of USA, go to www.eiae.org.
Recycling Product's laws of Canada, go to www.epsc.ca.
For more information about recycling laws, please contact local government agency or dealer.

CAUTION HOT
Before replacing the Lamp part, pay attention to the following items:
- The Lamp is optional part. Contact the dealer for replacement lamp.
- The lamp becomes very hot when in use. Turn the power off and disconnect the power cord.
- Wait 1 Hour before replacing the lamp.
- Do not use old lamp part.
Additional
- In order to ensure the safe use of your projector, please contact your dealer to inspect about once a year.
- Before maintenance, make sure the power cable is unplugged, allow the projector to cool sufficiently. The high temperature state of the projector could cause a burn in and/or malfunction to the projector.
- Never try to maintain the inside of the projector by yourself.
Indicator
The power and lamp indicators show the status of the projector. Before requesting repair, check the projector status using the chart below. If the problem cannot be resolved, contact your dealer.
In normal status\~\~\~
| POWER LAMP | CONDITIONS DESCRIPTION | ||
| Blinking In Green | Off Stand by mode | Projector is ready to be turned on. | |
| Lighting In Green | Off On mode Projector is on and operating. | ||
| Lighting In Green | Blinking In Red (Slow) | Cool down mode | Projector is in cool down mode and will not respond to user input. |
| Lighting In Green | Blinking In Red (fast) | Cool down mode | When the projector is turned on in 2 minutes after it was turned off. |
In abnormal status\~\~\~
| POWER LAMP | CONDITIONS DESCRIPTION | ||
| Blinking In Green | Blinking In Red (Fast) | Fan fault mode | The projector has detected a problem of a slow internal fan speed. The lamp will shut off automatically. Contact your dealer. |
| Blinking In Green | Lighting In Red | Lamp cover open | The lamp cover is open or there is a problem with the lamp. If the lamp door is closed and replacing the lamp does not correct the issue, contact your dealer. |
| Blinking In Green (Fast) | Blinking In Red (Fast) | High temperature | The projector has overheated and shut itself down.Correct the over temperature condition immediately.1. Check that the ventilation slots are free from obstructions.2. Check the cleanliness of the air filter. |
| Blinking In Green (Slow) | Blinking In Red (Slow) | Lamp fail | The lamp does not light. Come back to " stand by mode ", and press the power button. |
Error For Machine Defects
The following problems may be confused with a machine defect. Check and follow the table. If it couldn't be improved, contact your dealer.
| Symptom Cause / Remedy | |
| Projector power does not turn on. | The power cord is disconnected.Plug the power cord into an AC outlet. |
| Intending to turn on the projector again during the cool down mode.Wait until the cool down mode has completed. | |
| There is no lamp and/or lamp cover is not firmly closed.Please turn off the power and disconnect the power plug from the power outlet. Check if the lamp is installed or the lamp cover is firmly closed and turn on the power again. | |
| Power cord has impaired.When you touch the power cord, the indicator goes on then off, please remove the power cord and connect it again. If the situation is repeated, remove the power cord and contact your dealer. | |
| No image | The input is not connected correctly.Select the appropriate input source. |
| No signal input.Connect correctly. | |
| The lens cover is attached to the lens.Remove the lens cover. | |
| Colors are pale | Color density and color matching are not adjusted correctly.Adjust the RGB setting. |
| Color lose.Caused by poor VGA cable connection. | |
| Abnormal brightness & contrast | Brightness and contrast are not adjusted correctly.Adjust the brightness and contrast setting. |
| The lamp is near the end of its service life.Replace with a new lamp. | |
| Image is blurred | The projection lens is not focused.Adjust the focus using the focus ring. |
| The lens is dirty or misty.Clean the lens. | |
Error For Machine Defects
| Symptom Cause / Remedy | |
| No audio | The projector is not connected correctly.Check audio cable if connect correctly. |
| The volume is set to minimum.Adjust the volume. | |
| Mute is turned on.Press the MUTE button. | |
| Remote control is not working. | No battery.Before using the remote control, please check the battery of remote control. |
| Remote signal is obstructed.Remove the obstacle between projector and remote control. | |
List of Supported Monitor Displays
| Computer mode / HDMI table | ||
| Signal Refresh Rate (Hz) | Resolution (dots) | |
| VGA 60 640x480 | ||
| VESA 60 / 72 / 75 / 85 640x480 | ||
| SVGA 56 / 60 / 72 / 75 /85 800x600 | ||
| XGA 60 / 70 / 75 / 85 1024x768 | ||
| SXGA 70 / 75 1152x864 | ||
| SXGA 60 / 75 1280x960 | ||
| SXGA 60 1280x1024 | ||
| WXGA 60 / 75 1280x800 | ||
| WXGA+ 60/ 75 / 85 1440x900 | ||
| SXGA + 60 / 75 1400x1050 | ||
| UXGA 60 1600x1200 | ||
| WSXGA+ 60 1680x1050 | ||
| MAC | 67 1280x1024 / 640x480 | |
| MAC | 75 832x624 | |
| MAC | 75 1024x768 | |
| MAC | 75 1152x870 | |
| Component mode | ||
| Signal Refresh Rate (Hz) | Resolution (dots) | |
| SDTV(480i / 576i) | 30 / 25 720x480 / 720x576 | |
| SDTV(480p / 576p) | 60 / 50 720x480 / 720x576 | |
| HDTV(720p) | 60 1280x720 | |
| HDTV(1080i / 1080p) | 30 / 60 1920x1080 | |
| Composite / S-Video | ||
| Signal Refresh Rate (Hz) | Resolution (dots) | |
| TV(NTSC) | 60 720x480 | |
| TV(PAL,SECAM) | 50 720x576 | |
| HDMI | ||
| Signal Refresh Rate (Hz) | Resolution (dots) | |
| SDTV(480P) | 60 720x480 | |
| HDTV(720P) | 60 1280x720 | |
| HDTV(1080i) | 60 1920x1080 | |
| HDTV(1080P) | 60 1920x1080 | |
Appendix
Menu Tree (PC Mode)
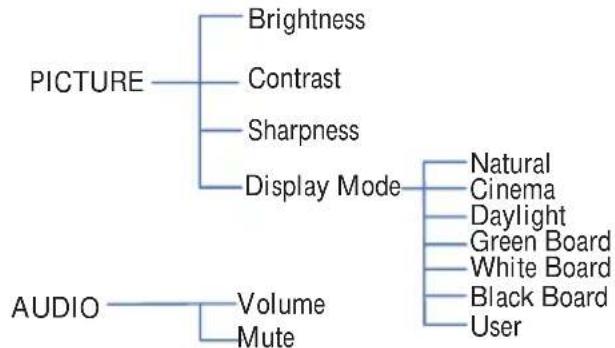
flowchart
graph TD
    A["PICTURE"] --> B["Brightness"]
    A --> C["Contrast"]
    A --> D["Sharpness"]
    A --> E["Display Mode"]
    E --> F["Natural"]
    E --> G["Cinema"]
    E --> H["Daylight"]
    E --> I["Green Board"]
    E --> J["White Board"]
    E --> K["Black Board"]
    E --> L["User"]
    M["AUDIO"] --> N["Volume"]
    M --> O["Mute"]
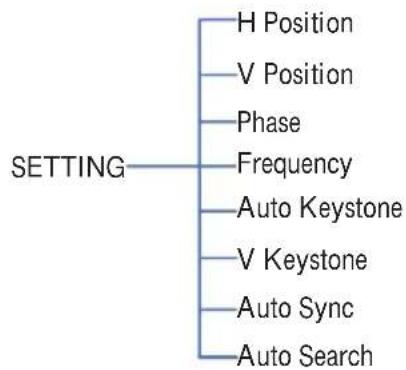
flowchart
graph TD
    A["SETTING"] --> B["H Position"]
    A --> C["V Position"]
    A --> D["Phase"]
    A --> E["Frequency"]
    A --> F["Auto Keystone"]
    A --> G["V Keystone"]
    A --> H["Auto Sync"]
    A --> I["Auto Search"]
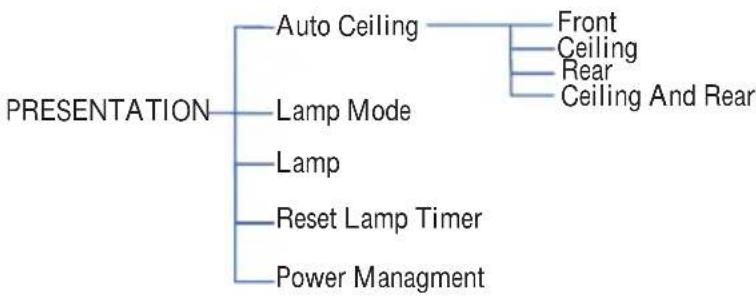
flowchart
graph TD
    A["PRESENTATION"] --> B["Auto Ceiling"]
    A --> C["Lamp Mode"]
    A --> D["Lamp"]
    A --> E["Reset Lamp Timer"]
    A --> F["Power Management"]
    B --> G["Front"]
    B --> H["Ceiling"]
    B --> I["Rear"]
    B --> J["Ceiling And Rear"]
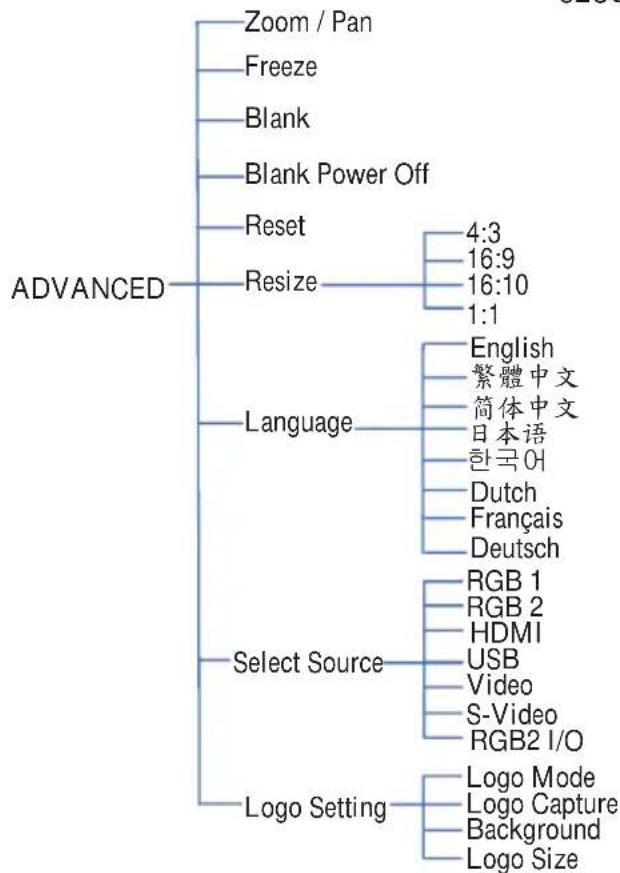
flowchart
graph TD
    A["ADVANCED"] --> B["Zoom / Pan"]
    A --> C["Freeze"]
    A --> D["Blank"]
    A --> E["Blank Power Off"]
    A --> F["Reset"]
    A --> G["Resize"]
    G --> H["4:3\n16:9\n16:10\n1:1"]
    G --> I["English\n繁體中文\n简体中文\n日本語\n한국어\nDutch\nFrançais\nDeutsch"]
    A --> J["Language"]
    J --> K["RGB 1\nRGB 2\nHDMI\nUSB\nVideo\nS-Video\nRGB2 I/O"]
    A --> L["Select Source"]
    L --> M["Logo Mode\nLogo Capture\nBackground\nLogo Size"]
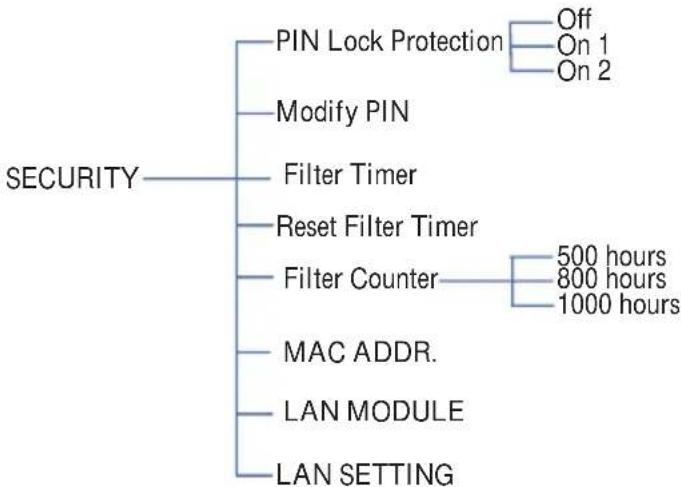
flowchart
graph TD
    A["SECURITY"] --> B["PIN Lock Protection"]
    A --> C["Modify PIN"]
    A --> D["Filter Timer"]
    A --> E["Reset Filter Timer"]
    A --> F["Filter Counter"]
    A --> G["MAC ADDR."]
    A --> H["LAN MODULE"]
    A --> I["LAN SETTING"]
    B --> J["Off"]
    B --> K["On 1"]
    B --> L["On 2"]
    F --> M["500 hours"]
    F --> N["800 hours"]
    F --> O["1000 hours"]
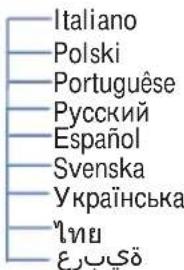
text_image
Italiano Polski Portuguêsse Русский Español Svenska Українська ไทย عَيْبِر*DVI doesn't support H / V POSITION, PHASE, FREQUENCY, AUTO SYNC function.
Menu Tree (Video Mode)
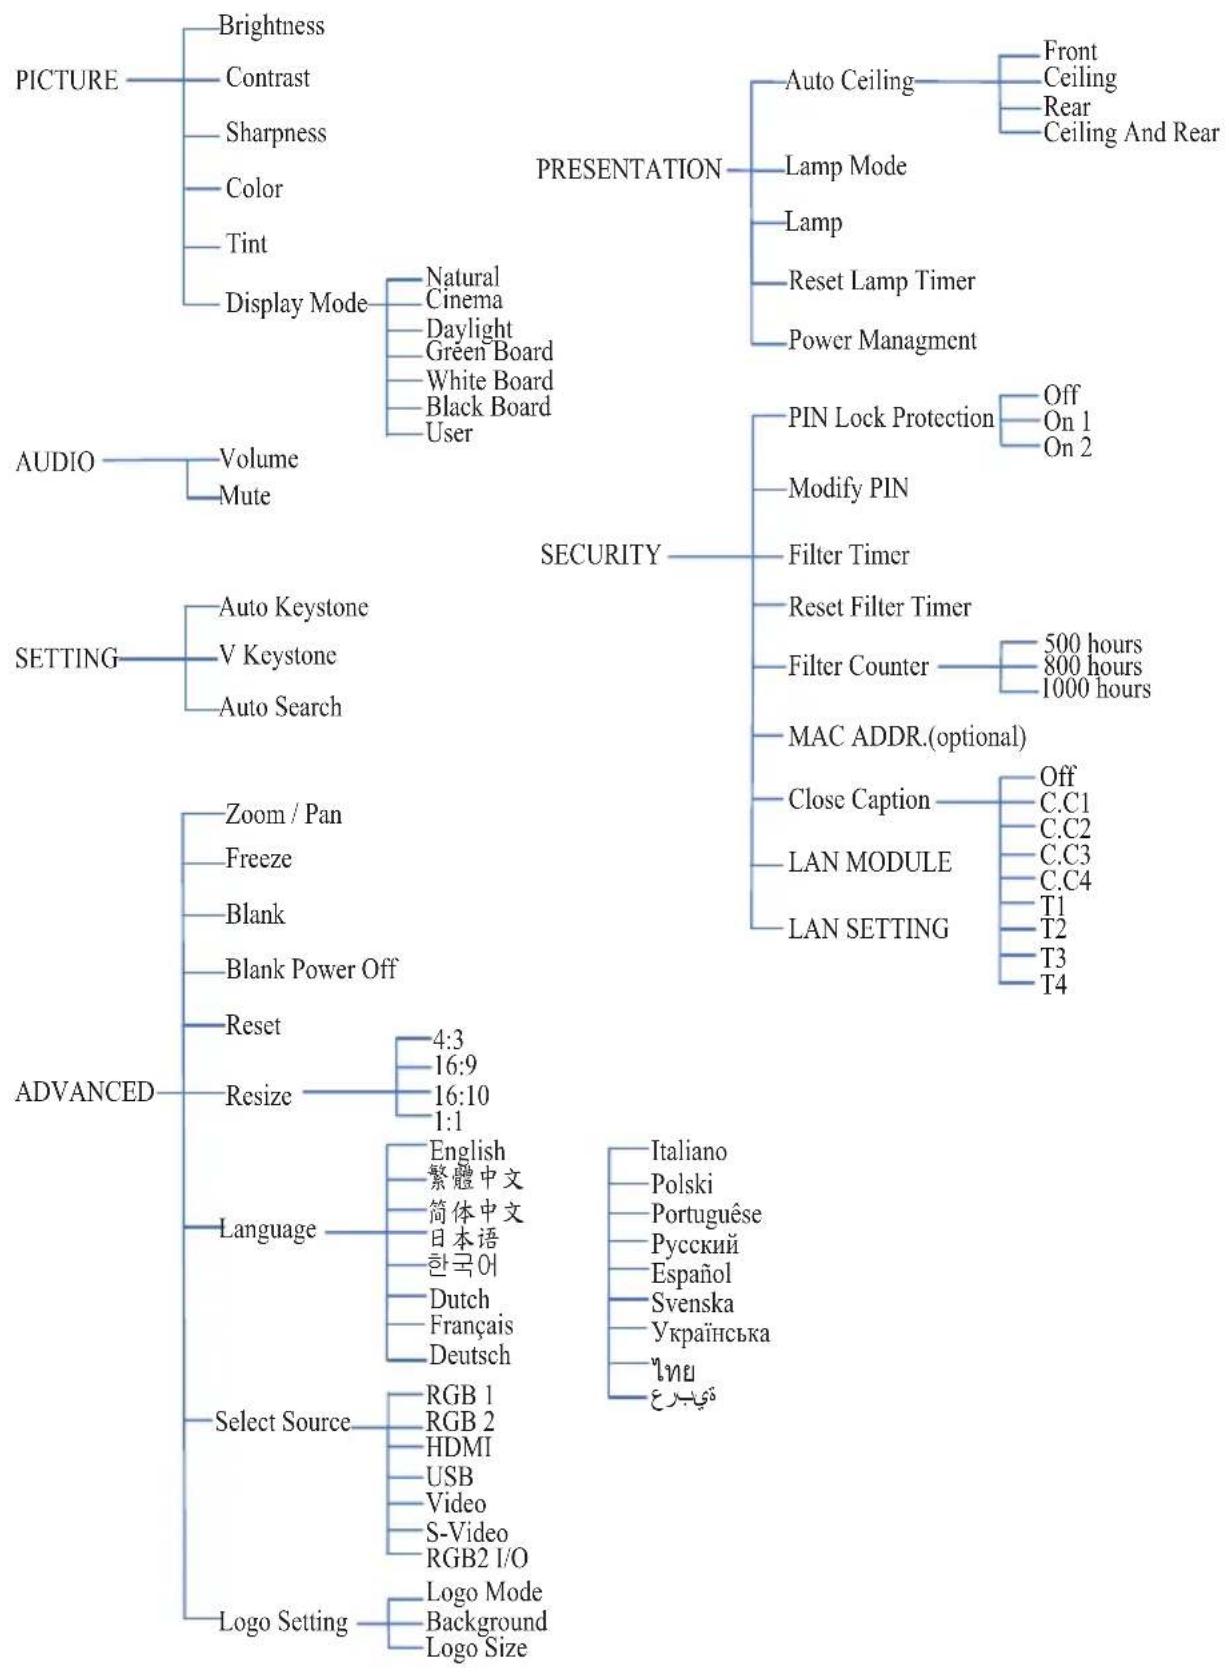
flowchart
graph TD
    A["PICTURE"] --> B["Brightness"]
    A --> C["Contrast"]
    A --> D["Sharpness"]
    A --> E["Color"]
    A --> F["Tint"]
    A --> G["Display Mode"]
    G --> H["Natural Cinema"]
    G --> I["Daylight"]
    G --> J["Green Board"]
    G --> K["White Board"]
    G --> L["Black Board"]
    G --> M["User"]

    N["AUDIO"] --> O["Volume"]
    N --> P["Mute"]

    Q["SETTING"] --> R["Auto Keystone"]
    Q --> S["V Keystone"]
    Q --> T["Auto Search"]

    U["ADVANCED"] --> V["Zoom / Pan"]
    U --> W["Freeze"]
    U --> X["Blank"]
    U --> Y["Blank Power Off"]
    U --> Z["Reset"]
    Z --> AA["4:3 16:9 16:10 1:1"]

    AB["LOGO Setting"] --> AC["Logo Mode Background Logo Size"]

    AD["PRESENTATION"] --> AE["Auto Ceiling"]
    AD --> AF["Lamp Mode"]
    AD --> AG["Lamp"]
    AD --> AH["Reset Lamp Timer"]
    AD --> AI["Power Management"]

    AJ["SECURITY"] --> AK["PIN Lock Protection"]
    AJ --> AL["Modify PIN"]
    AJ --> AM["Filter Timer"]
    AJ --> AN["Reset Filter Timer"]
    AJ --> AO["Filter Counter"]
    AJ --> AP["MAC ADDR.(optional)"]
    AJ --> AQ["Close Caption"]
    AJ --> AR["LAN MODULE"]
    AJ --> AS["LAN SETTING"]

    AT["Language"] --> AU["English 繁體中文 筒体中文 日本语 汇국어 Dutch Français Deutsch"]

    AU --> AV["Select Source RGB 1 RGB 2 HDMI USB Video S-Video RGB2 I/O"]

    AW["Italiano Polski Portuguêsé Psckii Español Svenska Українська інв гиь عівгюз"] --> AX["Типу"]
Appendix
Appearance
natural_image
Technical line drawing of a mechanical or electrical component with no visible text or symbols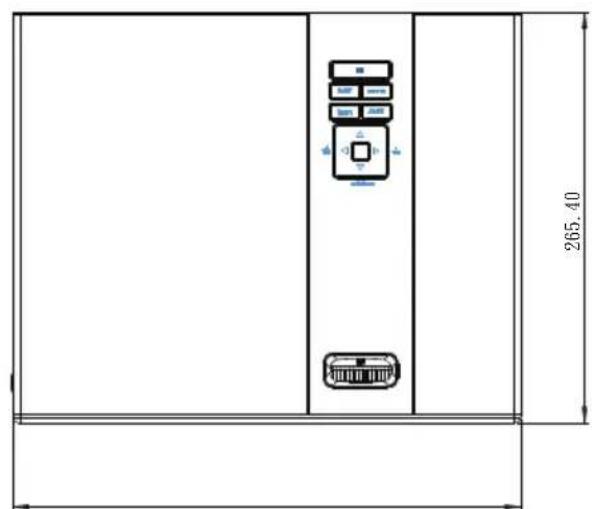
text_image
265,40325.00
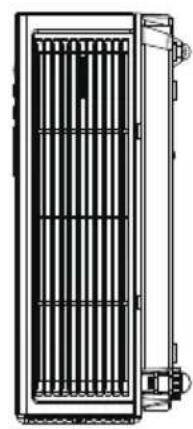
natural_image
Technical line drawing of a vertical panel or enclosure with internal grating and mounting brackets (no text or symbols)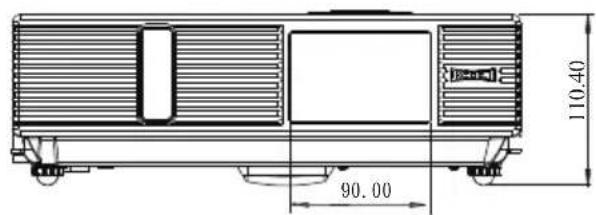
text_image
110.40 90.00
text_image
265.00 255.00 170.00 195.00Screw for Ceiling Mounted M4x8mm 4pcs
Configurations of Terminal
Analog RGB Input/Output
(1) Connections(15P HD-Sub)
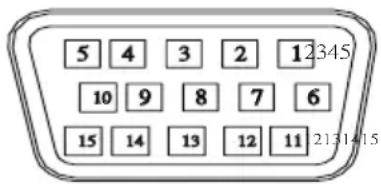
text_image
5 4 3 2 12345 10 9 8 7 6 15 14 13 12 11 2131415(2) Pin Number Define
| Pin NO. | Signal Name Connection | |
| 1 | R signal Input R | |
| 2 | G signal Input G/Sync. | On G |
| 3 | B signal Input B | |
| 4 | N.C. N.C. | |
| 5 | GND GND | |
| 6 | R return(GND) GND | |
| 7 | G return(GND) GND | |
| 8 | B return(GND) GND | |
| 9 | N.C. N.C. | |
| 10 | N.C. | GND |
| 11 | Signal return(GND) | N.C. |
| 12 | DDC data DDC/SDA | |
| 13 | HSYNC/TTL/Comp.sync | H |
| 14 | VSYNC | V |
| 15 | DDC clock | DDC/SCL |
(3) Connector
- 15P HD-Sub
(4) Input signal polarity
●Video signal (RGB): Positive
- Sync: Positive, Negative
(5)Input level
●Signal: 0.7V ±0.2V p-p 75Ω terminate, NRZ
- Sync: TTL
(6)Composite Sync.
- TTL:Negative
HDMI
(1) Connections
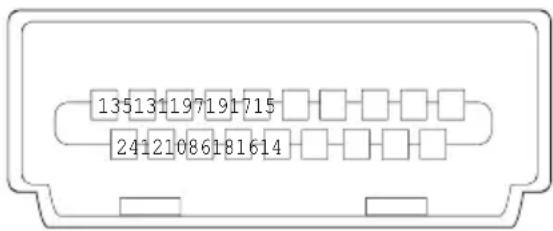
text_image
135131197191715 24121086181614(2) Pin Number Define
| Pin NO. | Signal Name Pin | NO. | Signal Name Pin | NO. | Signal Name |
| 1 TMDS Data 2+ 9 TMDS Data 0- 17 Ground(DDC/CEC) | |||||
| 2 TMDS Data 2 (Ground) | 10 TMDS Clock + 18 +5V | POWER | |||
| 3 TMDS Data 2- 11 TMDS Clock (Ground) | 19 Hot plug detect | ||||
| 4 TMDS Data 1+ 12 TMDS Clock | |||||
| 5 TMDS Data 1 (Ground) | 13 TMDS Data3+ | ||||
| 6 TMDS Data 1- 14 5V Power | |||||
| 7 TMDS Data 0+ 15 SCL | |||||
| 8 TMDS Data 0 (Ground) | 16 SDA | ||||
Appendix
Composite Video Signal
(1) Connections

Video

L

R
(2) Pin Number Define
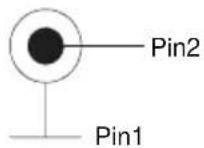
| Pin NO. Signal Name Connection | |
| 1 Video Signal(GND) GND | |
| 2 Video Input V |
(3) Connector: RCA jack
(4) Input signal polarity: Composite signal, Sync:Negative
(5) Input level: Video signal: 1.0V ±0.2V p-p 75Ω terminate, NRZ
S-Video Signal
(1) S-Video Connections and Connector
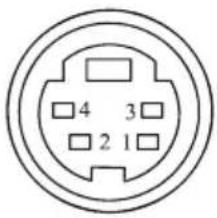
text_image
4 3 2 1(2) Pin Number Define
| Pin NO. Signal Name Connection | |
| 1 Y Signal(GND) GND | |
| 2 C Signal(GND) GND | |
| 3 Y Signal Input Y | |
| 4 C Signal Input C |
(3) Input signal polarity
●Composite signal sync: Negative
(4)Input level
●Y Signal:1.0V ±0.2V p-p 75Ω terminate, NRZ
- Sync:0.286V ±0.1V p-p
●Chromatic:75Ω terminate, NRZ
●Burst:0.286V ±20%
RS232 Control
Communication Protocol
| Items Specification | |
| Standard Baud rate 96 | 00 bps |
| Data length 8 bits | |
| Parity None | |
| Stop bit 1 bit | |
| Flow Control None |
RS232 Cable Define

text_image
5 4 3 2 1 9 8 7 6| PC Side Projector side with D-Sub Pin | |
| RX 2 2 RX | |
| TX 3 3 TX | |
| GND 5 5 GND |
LC-XNB4000N Technical Specifications
Mechanical Information
| Projector Type Normal-Throw Multimedia Projector | |
| Dimensions(WxHxD) | 325 x 110 x 265 mm |
| Net Weight 3.4 kg | |
| Feet Adjustment up to 8.5° | |
Panel Resolution
| LCD Panel System 0.63" TFT LCD Panel, 3 panels |
| Panel Resolution 1,024 x 768 dots |
| Number of Pixels 2,359,296 (1,024 x 768 x 3 panels) |
Signal Compatibility
| Color System PAL,SECAM,NTSC |
| SD/HD TV Signal 480i, 480p, 575i, 575p, 720p, 1080i and 1080p |
| Input Scanning Frequency H-sync. 31~92kHz, V-sync. 48~120Hz |
Optical Information
| Projection Image Size 40"~300" Diagonal | |
| Throw Distance Wide: 1.14 ~ 8.76M Tele: 1.73 ~ 10.53M | |
| Projection Lens F=1.6 ~ 1.9 / f=18.5 ~22.2 mm | |
| Projection Lamp 245W Lamp | |
| Brightness | 4000 lm |
Interface
| Input Terminals | D-SUB 15 pin x 1HDMI x 1Composite Video, RCA x 1S-Video, Mini Din-4 x 1Component Video, RCA x 33.5mm Mini-Stereo Audio Jack x 2Audio RCA (Right /Left) x 2USB-A x 1Mini USB x 1 |
| Output Terminals D-SUB 15 | pin x 13.5mm Mini-Stereo Audio Jack x 1 |
| Control Terminals | RS232 DB-9 x 1RJ45 x 1 |
Audio
| Speaker | 10W mono speaker built-in |
Power
| Voltage and Power Consumption | AC100~240V, 50/60Hz(full range) |
Operating Environment
| Operating Temperature | 5°C~35°C/41°F~95°F |
| Storage Temperature | -20°C~50°C/-4°F~122°F |
•The specifications are subject to change without notice.
LC-XNB3500N Technical Specifications
Mechanical Information
| Projector Type Normal-Throw Multimedia Projector Dimensions(WxHxD) | 325 x 110 x 265 mm |
| Net Weight 3.4 kg | |
| Feet Adjustment up to 8.5° |
Panel Resolution
| LCD Panel System 0.63" TFT LCD Panel, 3 panels |
| Panel Resolution 1,024 x 768 dots |
| Number of Pixels 2,359,296 (1,024 x 768 x 3 panels) |
Signal Compatibility
| Color System PAL,SECAM,NTSC |
| SD/HD TV Signal 480i, 480p, 575i, 575p, 720p, 1080i and 1080p |
| Input Scanning Frequency H-sync. 31~92kHz, V-sync. 48~120Hz |
Optical Information
| Projection Image Size 40"~300" Diagonal | |
| Throw Distance Wide: 1.14 ~ 8.76M Tele: 1.73 ~ 10.53M | |
| Projection Lens F=1.6 ~ 1.9 / f=18.5 ~22.2 mm | |
| Projection Lamp 240W Lamp | |
| Brightness | 3500 lm |
Interface
| Input Terminals | D-SUB 15 pin x 1HDMI x 1Composite Video, RCA x 1S-Video, Mini Din-4 x 1Component Video, RCA x 33.5mm Mini-Stereo Audio Jack x 2Audio RCA (Right /Left) x 2USB-A x 1Mini USB x 1 |
| Output Terminals D-SUB 15 | pin x 13.5mm Mini-Stereo Audio Jack x 1 |
| Control Terminals | RS232 DB-9 x 1RJ45 x 1 |
Audio
| Speaker | 10W mono speaker built-in |
Power
| Voltage and Power Consumption | AC100~240V, 50/60Hz(full range) |
Operating Environment
| Operating Temperature | 5^ 35^ / 41^ 95^ |
| Storage Temperature | -20^ 50^ / -4^ 122^ |
•The specifications are subject to change without notice.
LC-WNB3000N Technical Specifications
Mechanical Information
| Projector Type Normal-Throw Multimedia Projector Dimensions(WxHxD) | 325 x 110 x 265 mm |
| Net Weight 3.4 kg | |
| Feet Adjustment up to 8.5° |
Panel Resolution
| LCD Panel System 0.59" TFT LCD Panel, 3 panels |
| Panel Resolution 1,280 x 800 dots |
| Number of Pixels 3,072,000 (1,280 x 800 x 3 panels) |
Signal Compatibility
| Color System PAL,SECAM,NTSC |
| SD/HD TV Signal 480i, 480p, 575i, 575p, 720p, 1080i and 1080p |
| Input Scanning Frequency H-sync. 31~92kHz, V-sync. 48~120Hz |
Optical Information
| Projection Image Size 40"~300" Diagonal | |
| Throw Distance Wide: 1.21 ~ 9.29M Tele: 1.83 ~ 9.29M | |
| Projection Lens F=1.6 ~ 1.9 / f=18.5 ~22.2 mm | |
| Projection Lamp 240W Lamp | |
| Brightness | 3000 lm |
Interface
| Input Terminals | D-SUB 15 pin x 1HDMI x 1Composite Video, RCA x 1S-Video, Mini Din-4 x 1Component Video, RCA x 33.5mm Mini-Stereo Audio Jack x 2Audio RCA (Right /Left) x 2USB-A x 1Mini USB x 1 |
| Output Terminals D-SUB 15 | pin x 13.5mm Mini-Stereo Audio Jack x 1 |
| Control Terminals | RS232 DB-9 x 1RJ45 x 1 |
Audio
| Speaker | 10W mono speaker built-in |
Power
| Voltage and Power Consumption | AC100~240V, 50/60Hz(full range) |
Operating Environment
| Operating Temperature | 5^ 35^ / 41^ 95^ |
| Storage Temperature | -20^ 50^ / -4^ 122^ |
•The specifications are subject to change without notice.
EIKI
U.S.A.
EIKI International, Inc.
30251 Esperanza
Rancho Santa Margarita
CA 92688-2132
U.S.A.
Tel: 800-242-3454 (949)-457-0200
Fax: 800-457-3454 (949)-457-7878
E-Mail: usa@eiki.com
Canada
EIKI CANADA - Eiki International, Inc.
P.O. Box 156, 310 First St. - Unit 2,
Midland, ON, L4R 4K8, Canada
Tel: 800-563-3454 (705)-527-4084
Fax: 800-567-4069 (705)-527-4087
E-Mail: canada@eiki.com
LAKESIDE OASIS MIDDLE RING
BUSINESS CENTRE
Block 1, Room 606,
1628, Jin Sha Jiang Road
Shanghai, 200333
CHINA
Tel: 86-21-3251-3993
Service Hot line: 86-21-3251-3995
Fax: 86-21-3251-3997
E-mail: info@eiki-china.com
South East Asia
EIKI Industrial (M) Sdn Bhd
No. 11, Nouvelle Industrial Park,
Lorong Teknologi B, Taman Sains Selangor 1, Kota Damansara PJU5,
47810 Petaling Jaya, Selangor Darul Ehsan, Malaysia
Tel: +603-6157-9330
Fax: +603-6157-1320
E-Mail: sales@eiki.my
Japan & Worldwide
EIKI Industrial Company Limited.
6-23 Teramoto, Itami-shi, Hyogo,
664-0026 JAPAN
Tel: +81-72-782-9492
Fax: +81-72-781-5435
WorldWide Website http://www.eiki.com