HB302W - Cooker Freggia - Free user manual and instructions
Find the device manual for free HB302W Freggia in PDF.


| Product Type | Built-in Electric Hob |
| Brand | Freggia |
| Model | HB302W |
| Number of Burners | 4 |
| Burner 1 | Ø145 mm, 1000 W |
| Burner 2 | Ø180 mm, 1500 W |
| Burner 3 (Fast-heating) | Ø145 mm, 1500 W |
| Burner 4 (Fast-heating) | Ø180 mm, 2000 W |
| Total Power | 6000 W |
| Control Type | 7-position rotary knobs |
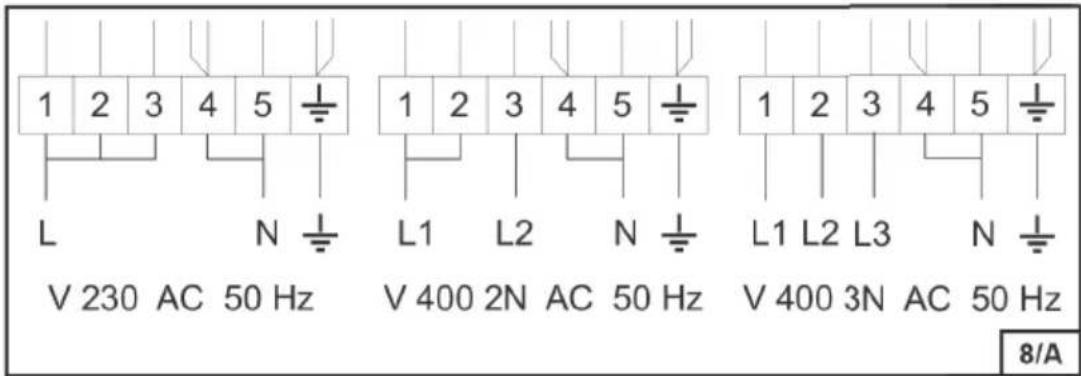
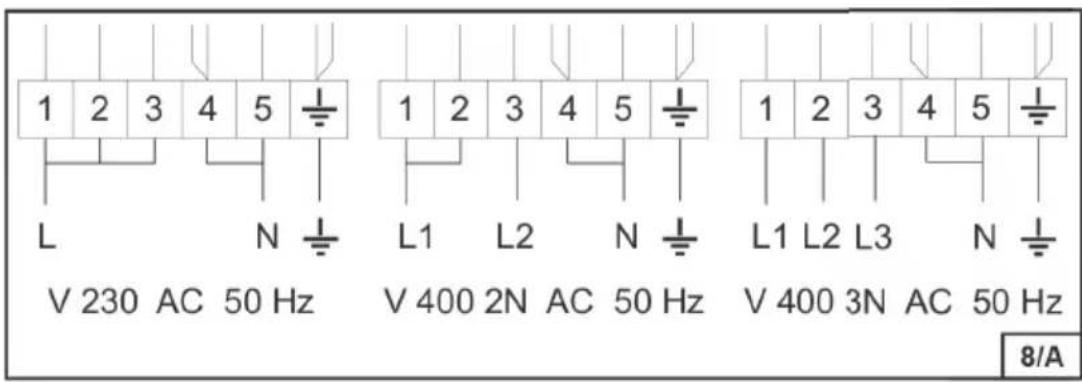
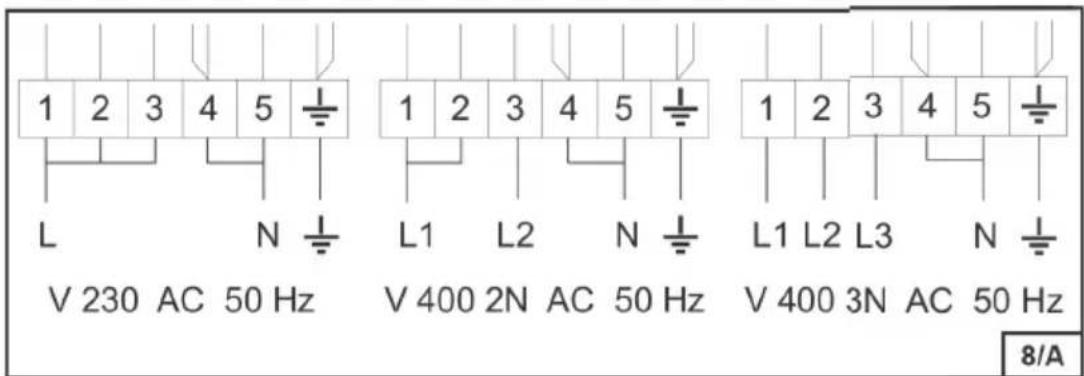
| Power Supply | 230 V AC 50 Hz (single phase) or 400 V 2N/3N (three-phase) |
| Electrical Connection | H05V2V2-F cable, 3-wire (L, N, Earth) |
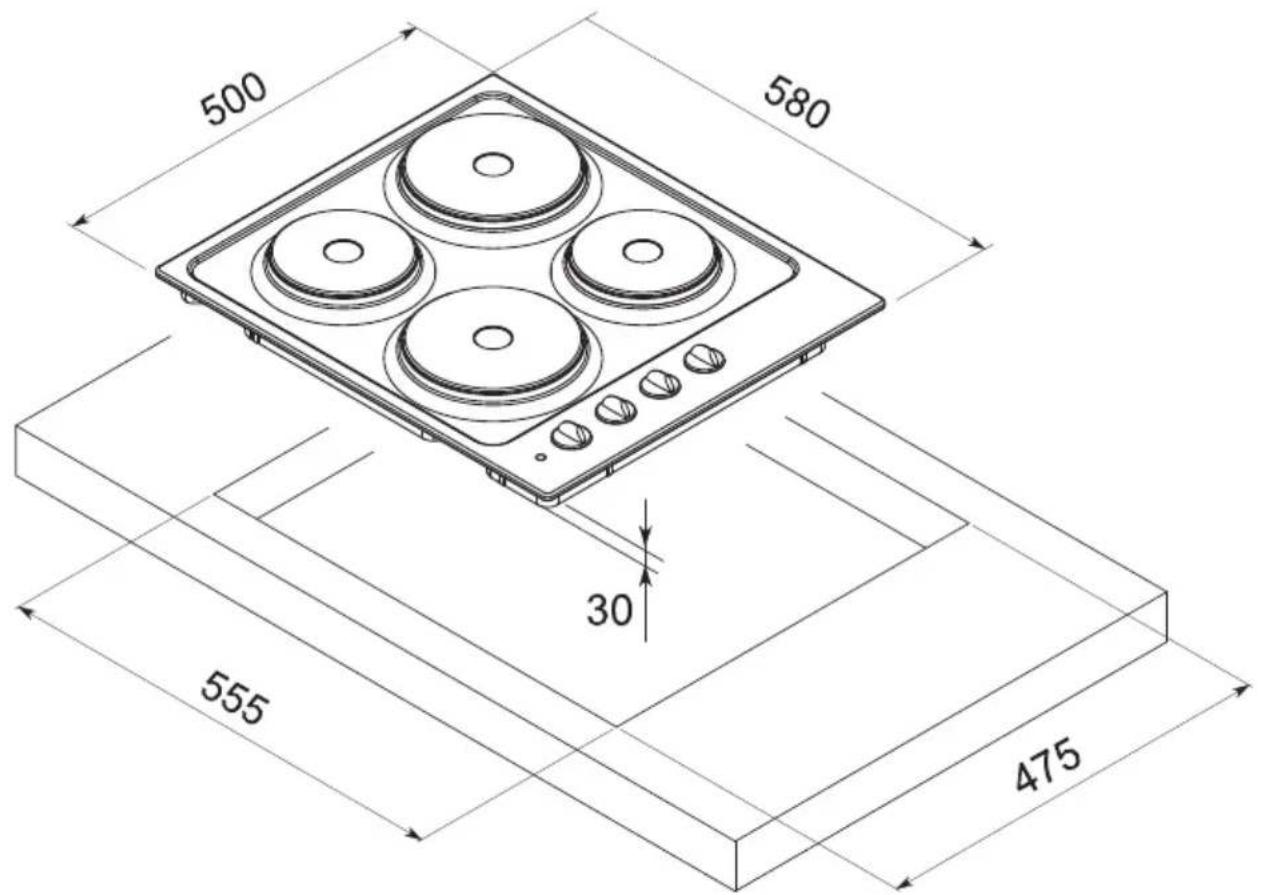
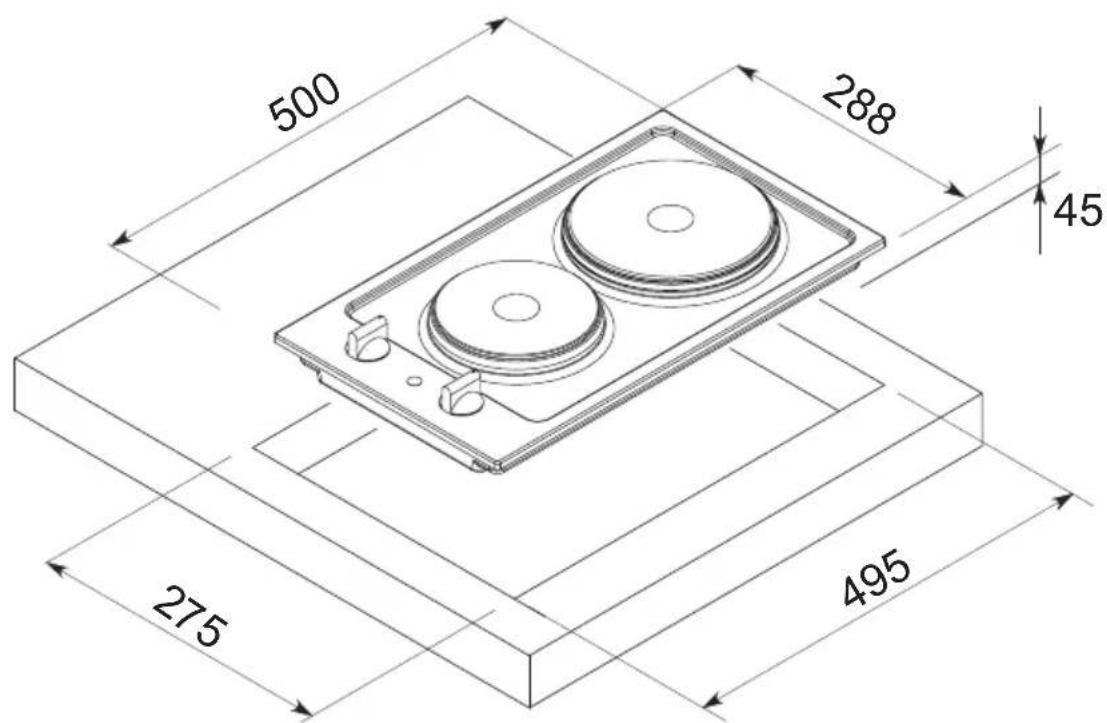
| Cut-out Dimensions | 600 x 475 mm (or 290 x 475 mm for smaller models) |
| Overall Dimensions (approx) | 600 x 555 x 30 mm (height estimated) |
| Installation | Built-in, min. 50 mm from adjacent walls, min. 10 mm clearance above oven |
| Safety Features | Requires qualified installation; children supervision advised; residual heat after use |
| Cleaning | Enameled/stainless steel parts with mild detergent; electric burners wiped with paper towel |
| Maintenance | Regular cleaning; occasional oil coating on burners to prevent rust |
| Spare Parts & Accessories | Available via authorized service centers; phone 0-800-500-514; www.freggia.com |
| Disposal | Separate collection (WEEE) in accordance with EU directive 2002/96/EC |
| Standards Compliance | EU directives 2006/95/EC, 2004/108/EC, 2004/1935/EC |
Frequently Asked Questions - HB302W Freggia
User questions about HB302W Freggia
0 question about this device. Answer the ones you know or ask your own.
Ask a new question about this device
Download the instructions for your Cooker in PDF format for free! Find your manual HB302W - Freggia and take your electronic device back in hand. On this page are published all the documents necessary for the use of your device. HB302W by Freggia.
USER MANUAL HB302W Freggia
Thank you for purchasing Freggia built-in hob.
Please carefully read the user manual, as it contains the instructions for the safe installation, operation and maintenance of the built-in hob.
Save it for future use.
RU
natural_image
Two identical line drawings of a cooking pot with handles and a base, no text or symbols present.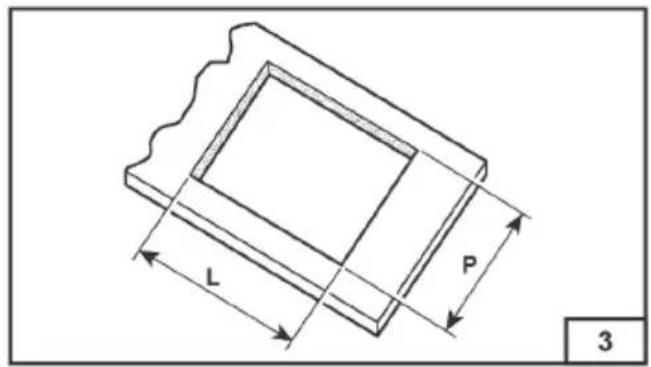
natural_image
Technical line drawing of a mechanical component with labeled part 'S' and reference number '5' (no text or symbols beyond labels)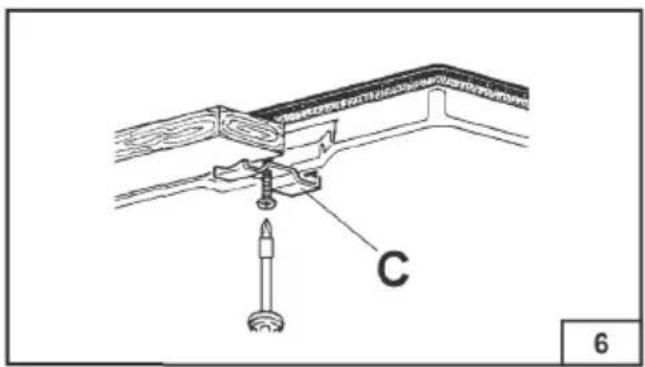
We invite you to read this instruction booklet carefully before installing and using the equipment. It is very important that you keep this booklet together with the equipment for any future consultation. If this equipment should be sold or transferred to another person, make sure that the new user receives the booklet, so that he can learn how to operate the appliance and read the corresponding notice.
THIS APPLIANCE COMPLIES WITH THE FOLLOWING DIRECTIVES:
EEC 2006/95/CE (Low Voltage)
EEC 2004/108/CE (Electromagnetic Compatibility)
EEC 2004/1935/CE (Contact with foods)
- The installation must be carried out by experienced and qualified personnel, in conformity with the regulations in force.
- This appliance is not intended for use by people (including children) with reduced physical, sensory or mental capabilities, or lack of experience and knowledge, unless they have been given supervision or instruction concerning use of the appliance by a person responsible for their safety.
- Keep this instruction with the appliances
• Children should be supervised to ensure that they do not play with the appliance. - While the appliance is running, watch the children and make sure they neither stay near the equipment, nor touch the surfaces that have not cooled down completely.
- Before carrying out maintenance or cleaning the equipment, cut the power supply and let the appliance cool down.
- In case of intense or prolonged use of the equipment, it may be necessary to improve aeration, for example by opening a window or increasing mechanical suction power, where possible.
- Combustion by-products must be discharged outside through a suction hood or an electric fan (see the "installation" paragraph).
- For any possible operation or modification, apply to an authorized Technical Assistance Centre and demand original spare parts.
- Exposed parts of this appliance heat up during cooking and remain hot for some time after the appliance is switched off. Make sure to keep children away from the appliance until after it has cooled.
- Once you have finished using the appliance, ensure that all switches and control knobs are set to the "0" or OFF position.
- If you have something plugged into a socket near the appliance, ensure that there are no cables touching any hot surfaces.
- Do not store flammable substances in the immediate vicinity of the appliance, or substances vulnerable to the effects of high temperature.
- Carry out regular maintenance of the appliance: this will increase its lifespan and will let you avoid malfunctions.
The manufacturer accepts no responsibility for possible damage to things or people resulting from incorrect installation or from improper, incorrect or unreasonable use of this equipment.
DESCRIPTION
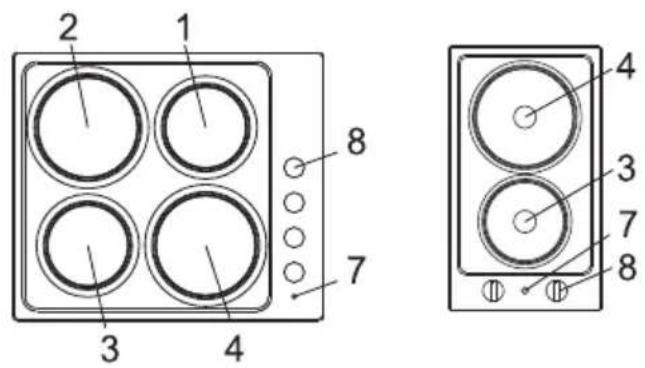
- Electric burner ∅145, 1000 W
- Electric burner ∅180, 1500 W
- Fast-heating electric burner ∅145, 1500 W
- Fast-heating electric burner ∅180, 2000 W
- Hob setting indicator
- Hob control knob
INSTRUCTIONS FOR THE USER
IT IS NECESSARY THAT ALL OPERATIONS REGARDING THE INSTALLATION ARE CARRIED OUT BY QUALIFIED PDERSONNEL, IN CONFORMITY WITH THE REGULATIONS IN FORCE. THE SPECIFIC INSTRUCTIONS ARE DESCRIBED IN THE BOOKLET SECTION INTENDED FOR THE INSTALLER.
USING THE ELECTRIC HOB
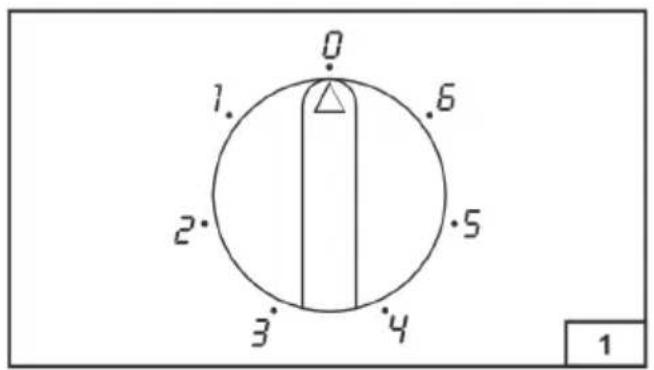
The electric plate is controlled by a rotary knob with 7 possible positions. You can set the necessary heating power by turning the knob to the relevant position.
A light indicates when then the electric plate is working.
To assist you when cooking, a table has been provided below detailing what each heating power setting can be used to make.
WARNING
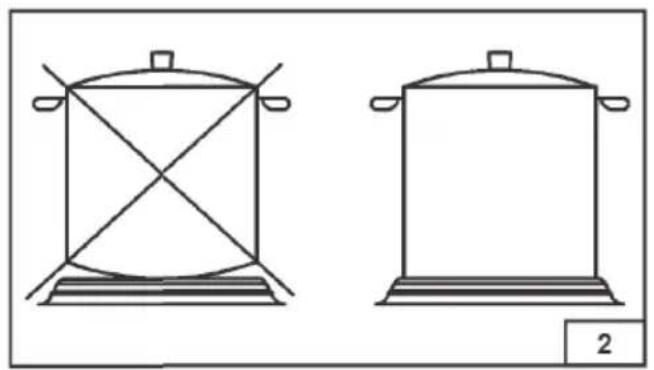
• Use flat-bottomed pans with a diameter equal to that of the electric plate, or just slightly larger than it.
- Do not place food being prepared directly onto the hob itself.
• Turn the hob off several minutes before finishing cooking, since the temperature of the electric heater is prone to lag behind the temperature you have just set.
- The electric plate remains hot for a substantial period of time after use – do not place your hands or other objects on the hob so as to avoid injury or damage.
- The electric plate may be cleaned using easily available kitchen cleaning products.
- When the equipment is not working, always check that the knobs are in the off position.
• While cooking with fat or oil, pay the utmost attention as these substances can catch fire when overheated.
- Do not use sprays near the appliance when it is in operation.
- Do not place unstable or deformed pots on the burner, so as to prevent them from overturning or overflowing.
- Since stainless steel can darken upon the application of high temperatures, we do not recommend placing food to be cooked for a long period of time in clay or cast-iron kitchenware. You should also avoid using aluminium foil to protect the hob during use.
- Do not place pans in the area where the control knobs are.
Note. When using the appliance for the first time set the rotary knob to position 1 and leave it there for around 30 minutes, so as to get rid of any residual oil or moisture.
| Control knob position | Heat intensity Uses | |
| 0 | O | ff |
| 1 Minimum For keeping food warm and heating small volumes of liquid. | ||
| 2 Slight | For heating small volumes of liquid: creams and sauces which need to be prepared for a long period of time. | |
| 3 Moderate For defrosting food, stewing, and cooking at temperatures below the boiling point. | ||
| 4 | Medium | Cooking at boiling point, roasting meat and thin fish fillets. |
| 5 | Enhanced | For roasting meat, steaks, and boiling medium volumes of liquids. |
| 6 | Maximum | For boiling large quantities of liquids, roasting, and grilling. |
| Control knob position | Heat intensity Uses | |
| 0 | O | ff |
| 1 Minimum For keeping food warm and heating small volumes of liquid. | ||
| 2 Slight | For heating small volumes of liquid: creams and sauces which need to be prepared for a long period of time. | |
| 3 Moderate For defrosting food, stewing, and cooking at temperatures below the boiling point. | ||
| 4 | Medium | Cooking at boiling point, roasting meat and thin fish fillets. |
| 5 | Enhanced | For roasting meat, steaks, and boiling medium volumes of liquids. |
| 6 | Maximum | For boiling large quantities of liquids, roasting, and grilling. |
CLEANING
Before doing any cleaning, unplug the appliance.
It is advisable to clean the appliance when it is cold.
• ENAMELED PARTS
The enameled parts must be washed with a sponge and soapy water or with a light detergent. Do not use abrasive or corrosive products.
Do not leave substances, such as lemon or tomato juice, salt water, vinegar, coffee and milk on the enameled surfaces for a long time.
• STAINLESS STEEL PARTS
Stainless steel can be stained if it remains in contact with highly calcareous water or aggressive detergents for an extended period of time.
The stainless steel parts should also be cleaned with soapy water and then dried with a soft cloth.
• ELECTRIC BURNERS
Wipe electric burners down with a paper towel every time after use. If needs be, let the element heat up first to burn off stubborn stains. From time to time, electric burners must be coated with vegetable oil whilst still warm, and then dried thoroughly with a paper towel.
Failure to clean electric burners or to carry out maintenance on them may result in rust forming on their surface.
INSTRUCTIONS FOR THE INSTALLER
IMPORTANT NOTICE: THE OPERATIONS INDICATED BELOW MUST BE FOLLOWED BY QUALIFIED PERSONNEL EXCLUSIVELY, IN CONFORMITY WITH THE REGULATIONS IN FORCE. THE MANUFACTURING FIRM ACCEPTS NO RESPONSIBILITY FOR DAMAGE TO PEOPLE, ANIMALS OR THINGS RESULTING FROM FAILURE TO COMPLY WITH SUCH PROVISIONS
INSTALLATION
• INSTALLING THE TOP
The appliance is designed to be embedded into heat-resistant pieces of furniture.
The walls of the pieces of furniture must resist temperatures of 75^ C (in accordance with European standards). Therefore, the appliance can be installed next to cabinets, provided the height of the cabinet doses not exceed that of the hob.
The equipment must not be installed near inflammable materials, such as curtains, tablecloths, etc.
Make a hole in the top of the piece of furniture, with the dimensions (see fig.3), at a distance of at least 50 mm from the appliance border to the adjacent walls.
| Dimension L (mm) | P (mm) | |
| 290 263 475 | ||
| 600 555 475 |
Any possible wall unit over the cook-top must be placed at a distance of at least 760 mm from the top.
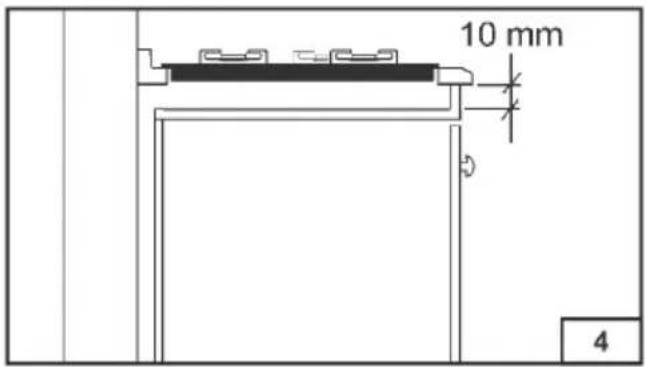
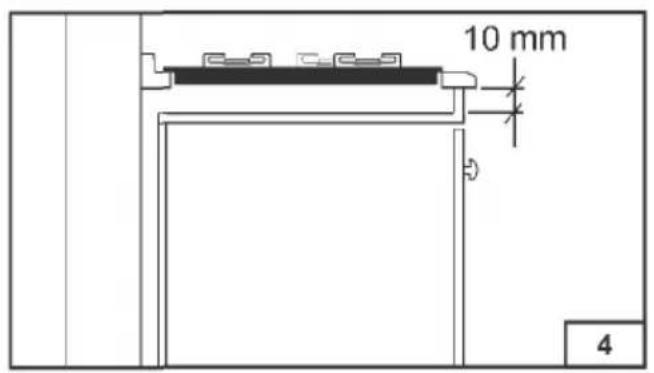
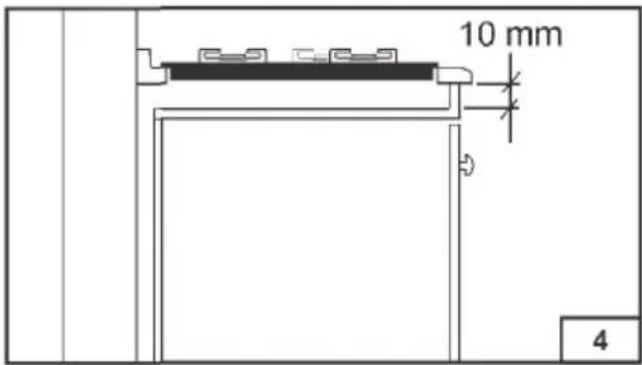
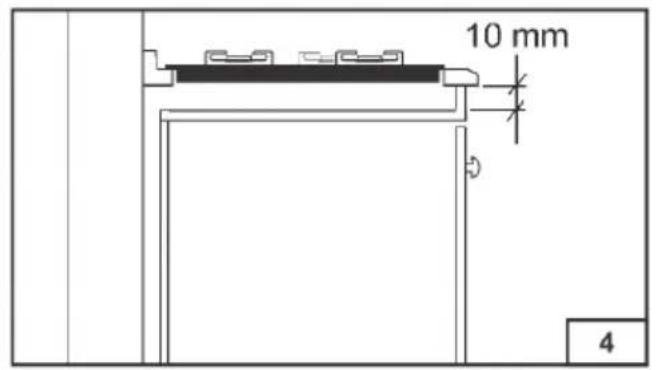
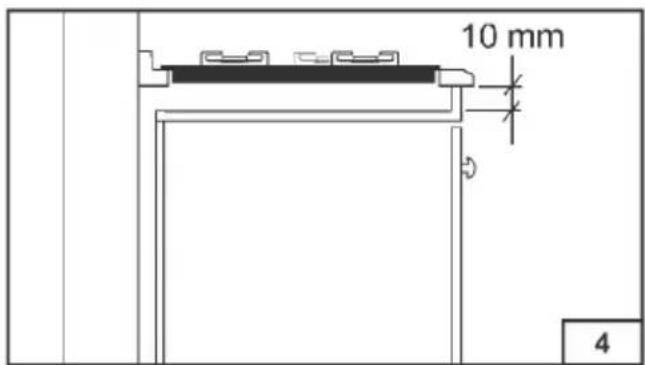
A distance of at least 10 mm (fi g. 4) is advised between the hob and the oven on which it is placed. If mounting the hob on the oven, appropriate precautions must be taken. It is essential to pay special attention to the placement of the cable – it should not be in contact with any parts of the oven that heat up. Furthermore, if the hob should be placed on top of an oven lacking forced convection, it is essential to provide the building with adequate ventilation: a ventilation pipe with a cross-section of at least 200 cm ^2 and an exhaust pipe with one of at least 60 cm ^2 .
- FASTENING THE TOP
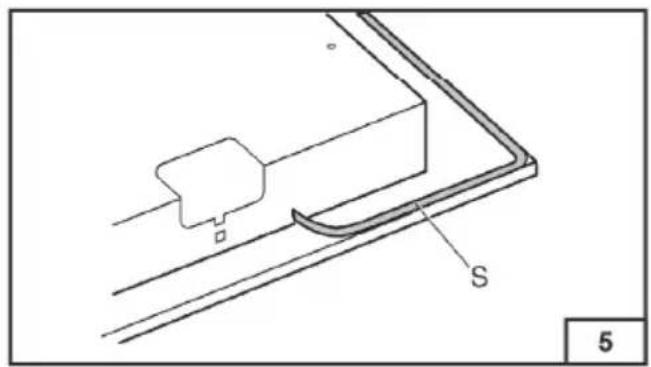
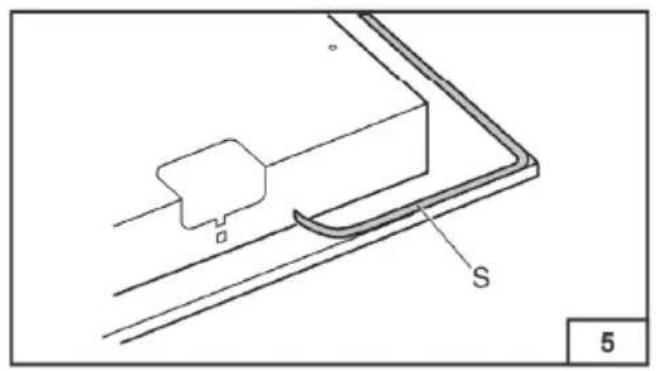
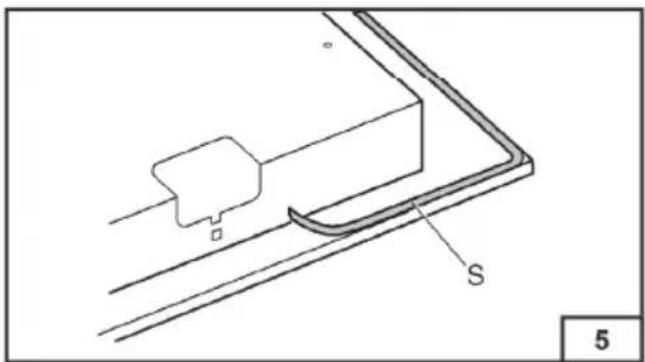
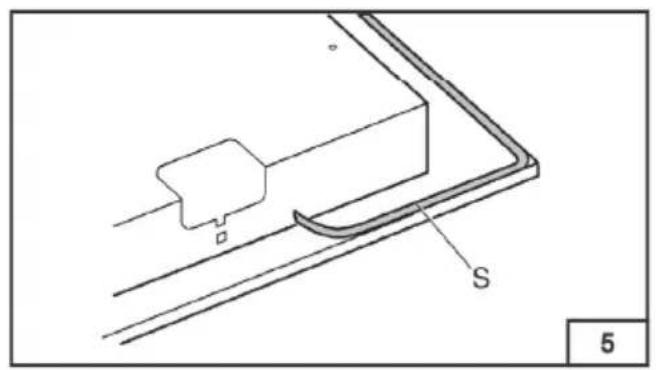
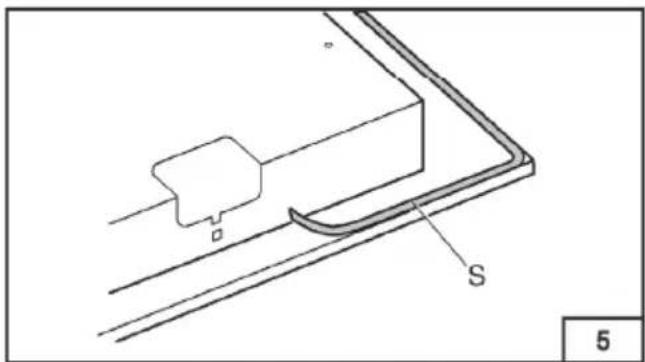
Every cook-top is equipped with a special washer having.
This must be placed under the edge of the box unit, as close as possible to the edge itself (fig.5). Introduce and place the cook-top in the hole made in the piece of furniture, then block it with the screws of fastening hooks C (fig. 6)
• ELECTRIC CONNECTION
Connection to the electric grid must be carried out by qualified personnel and in conformity with the regulations in force.
The voltage of the electric system must correspond to the value indicated in the label under the appliance. Make sure that the electric system is provided with an effective ground connection in compliance with the regulations and provisions of the law. Grounding is compulsory.
Do not use extension cords, adapters as this can lead to overheating and fire. The device must be connected directly to the network. To do this you need to use only one socket, and a socket that is exclusively used by this appliance. Furthermore, your electric board needs to have a device installed in it that can cut off power to the appliance completely according to the specifications in surge category III and in accordance with the installation regulations.
The type of cable used must have appropriate temperature-resistance characteristics. We recommend using the following type: H05V2V2-F.
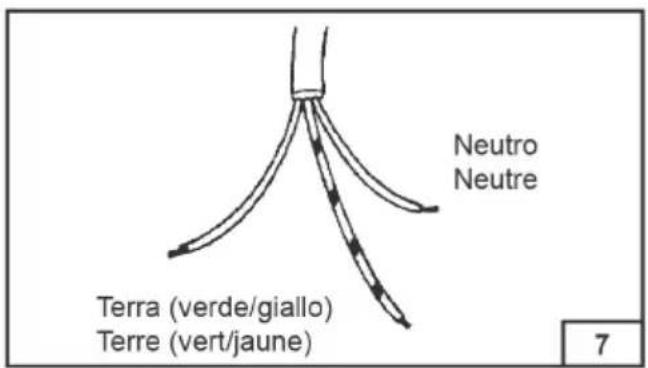
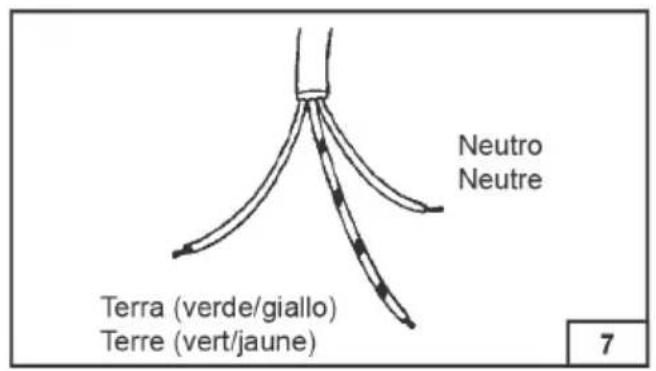
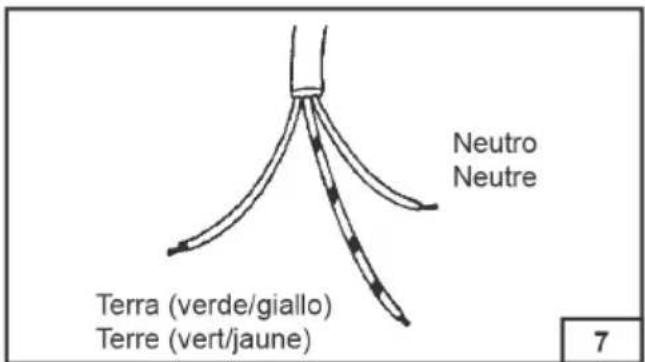
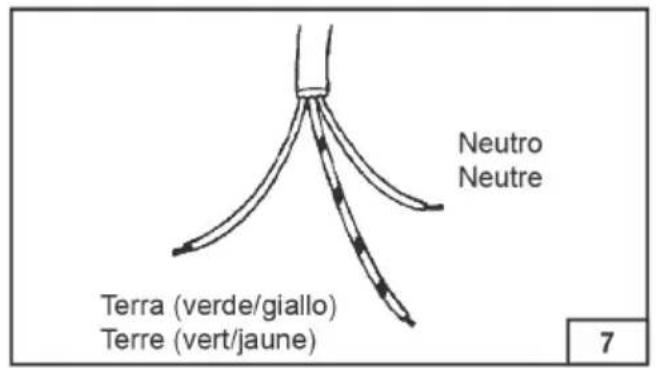
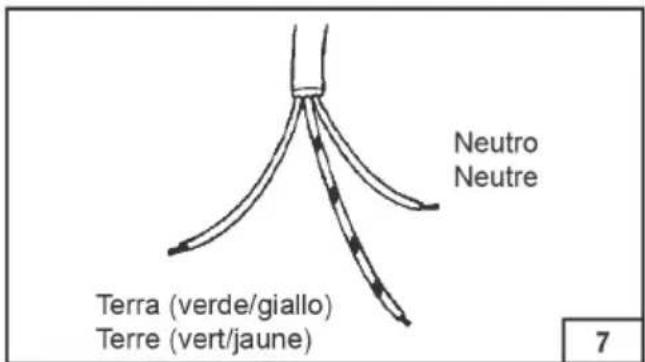
The appliance is powered by a three-wire power cable. The earth wire is yellow and green in colour. It should be longer than the other two wires by around 2 cm (fig. 7). Place a jack on the wire that will be suitable for the conditions, and connect it to the appropriate socket.
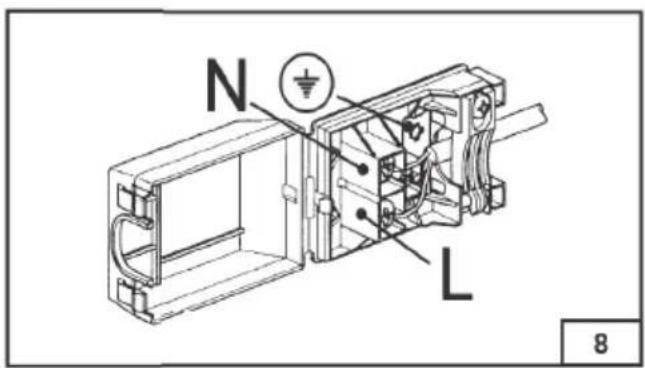
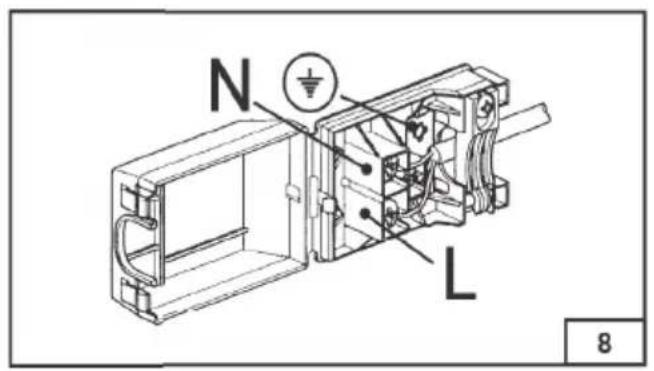
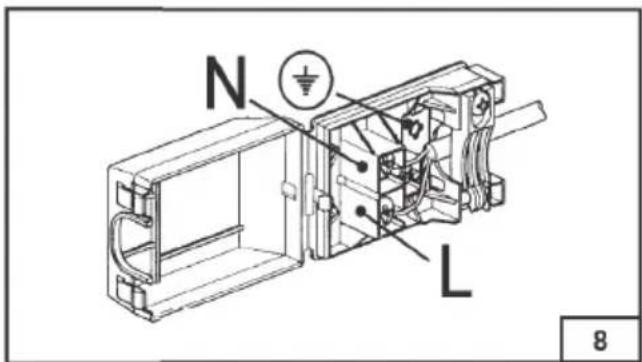
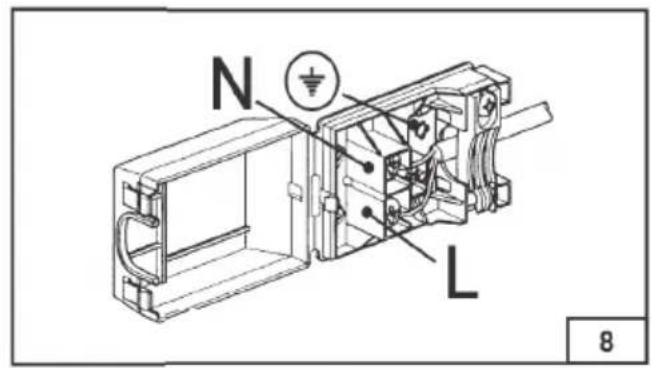
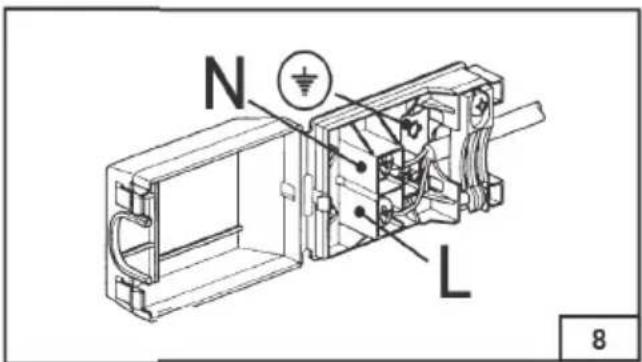
The earth wire (yellow-green) should not be interrupted by any switches. The live wire is brown in colour (it goes out from clamp L in the switchbox) should always be connected to the live wire in the mains.
The power cable should be placed so as not to exceed room temperature by 50^ C at any point along it.
A power cable for two hobs should have a cross-section of at least 3 by 1.5 mm2, and for four hobs, 3 by 2.5 mm2.
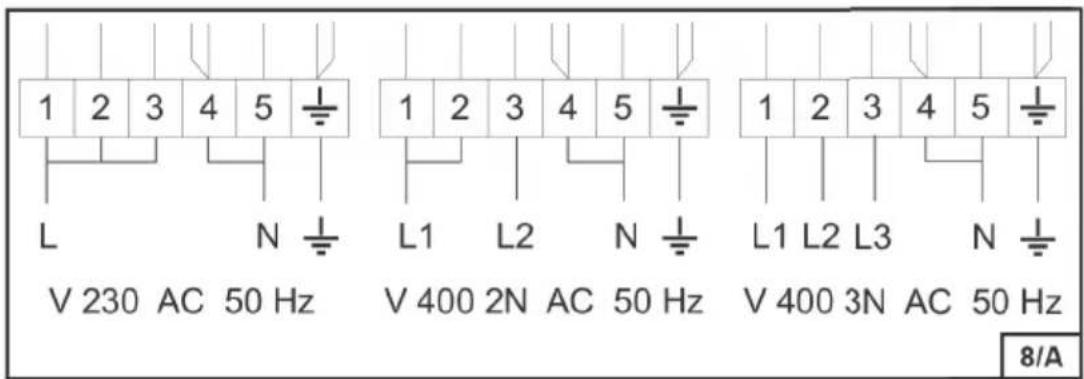
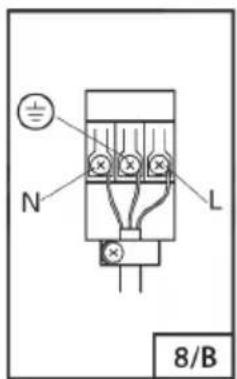
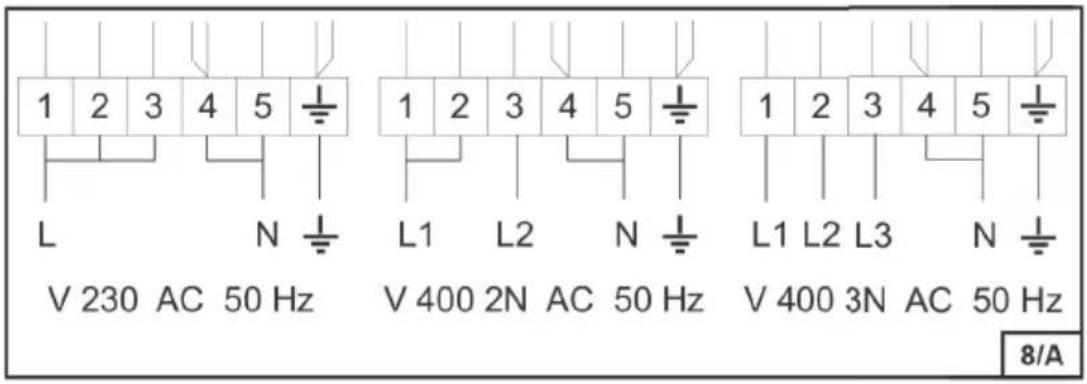
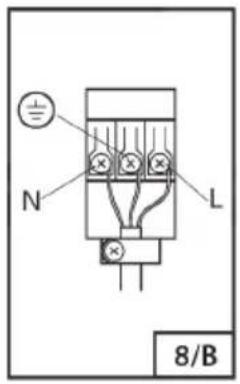
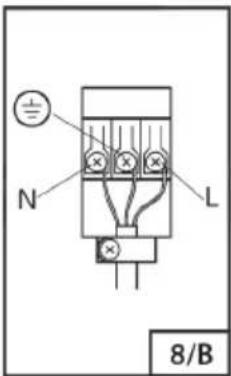
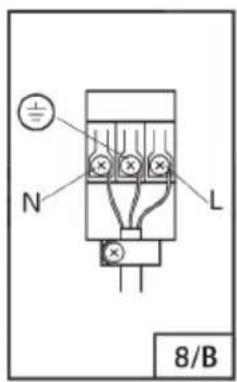
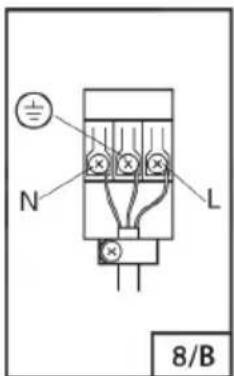
Fig.8-8 /A and fig. 8-8 /B indicate the different types of connection, varying according to model and mains voltage.
This product complies with EU directive 2002/96/EC.
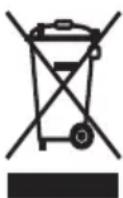
The crossed-out dustbin symbol on the appliance indicates that the appliance must be disposed of separately from other domestic refuse at the end of its useful life. It must therefore be delivered to a waste recycling center specifically for electric and electronic equipment or returned to the retailer at the moment of purchase of a new equivalent appliance.
The user is responsible for delivering the appliance to the appropriate collection center at the end of its useful life. Failure to do so may result in a fine, as provided for by laws governing waste disposal.
Differential collection of waste products for eventual recycling, treatment and environmentally friendly disposal helps reduce possible negative effects on the environment and health, and also enables the materials making up the product to be recycled.
For more detailed information on the available refuse collection systems, refer to the local Municipal Solid Waste disposal centre or the shop where the product was purchased.
Producers and importers are responsible for fulfilling their obligations as regards recycling, treatment and environmentally friendly disposal by directly or indirectly participating in the collection system.
• TECHNICAL MAINTENANCE AND SPARE PARTS
Before leaving the factory, all our products are configured and tested by a qualified, experienced professional with the aim of ensuring optimal working conditions for them.
Original spare parts and accessories may be bought or ordered via a trade network or from authorised service centres. Your may make an order using our information line at 0-800-500-514, or on the relevant section or our site, www.freggia.com.
All repair and tuning must be carried out by a qualified professional in accordance with Freggia's requirements. Given the above, we recommend always using authorised service centres (by phoning the support line on 0-800-500-514, free to call from landlines within Ukraine), telling them your make, model and factory number.
All this information may be found on the factory information label, located on the back of the device, and on its packaging.
The information in question will enable the service centre agent to authorise calling out a repairman and to choose necessary spare parts and accessories, and it guarantees timely and effective service. We recommend writing down these details here, so as to always have them to hand, or else to affix the sticker with your appliance's details on it to the frame on the instruction booklet cover.
The manufacturing firm accepts no responsibility for any possible imprecision in this booklet due to misprints or clerical errors. It reserves the right to make any changes that it considers necessary to its own products, without affecting the essential characteristics of functionality and safety.
natural_image
Two identical line drawings of a cooking pot with handles and cross-bracing, no text or symbols present.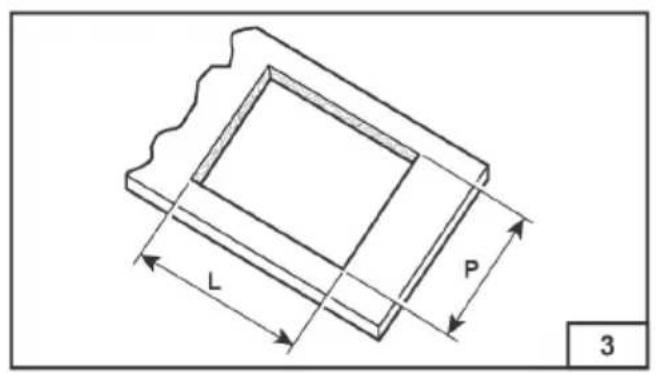
natural_image
Technical line drawing of a mechanical component with labeled parts S and a small block, no readable text or symbols beyond labels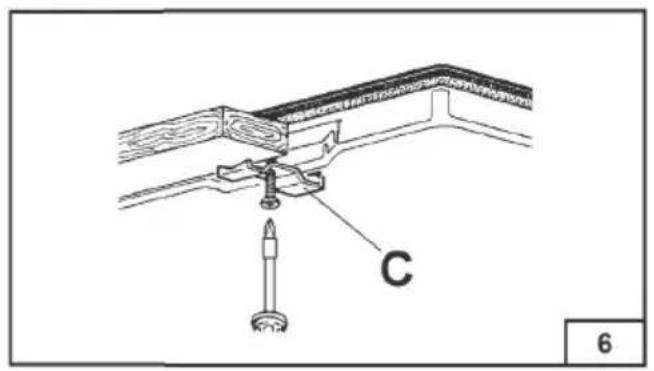
natural_image
Two identical line drawings of a cooking pot with handles and a cross-shaped lid, no text or symbols present.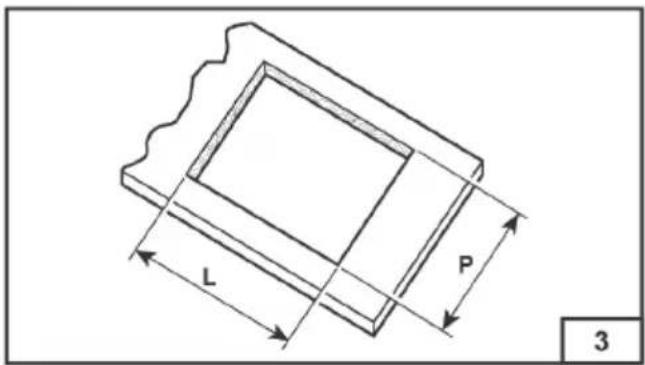
natural_image
Technical line drawing of a mechanical component with labeled part 'S' and reference number '5' (no text or symbols beyond labels)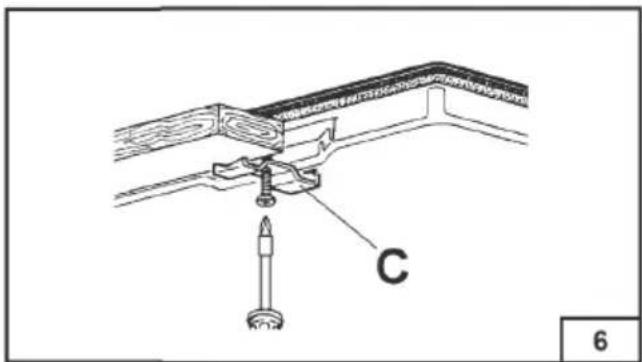
natural_image
Two simple line drawings of cooking pots with cross-bracing, no text or symbols present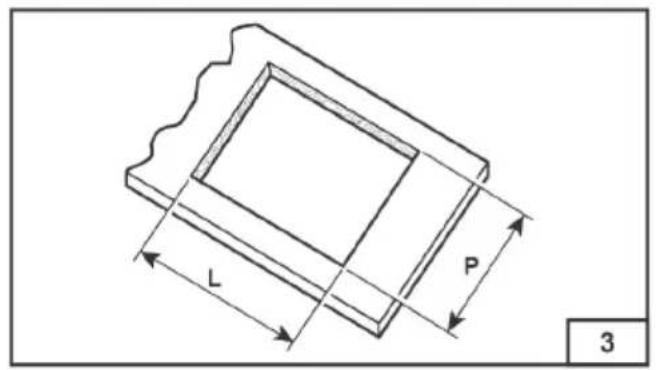
natural_image
Technical line drawing of a mechanical component with labeled part 'S' and reference number '5' (no text or symbols beyond labels)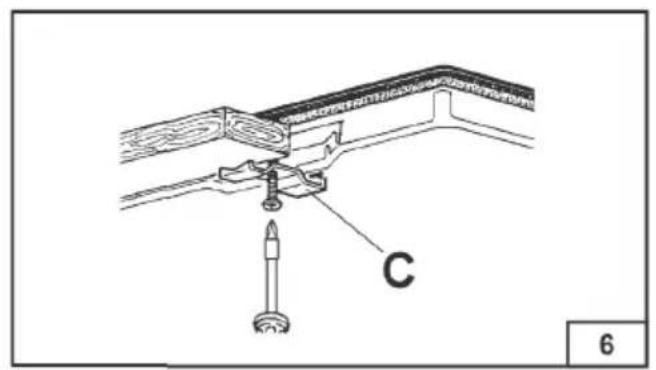
natural_image
Two identical line drawings of a cooking pot with handles and cross-bracing, no text or symbols present.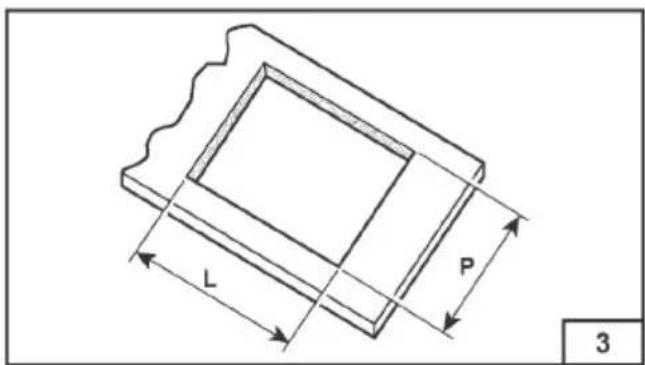
natural_image
Technical line drawing of a mechanical component with labeled part 'S' and reference number '5' (no text or symbols beyond labels)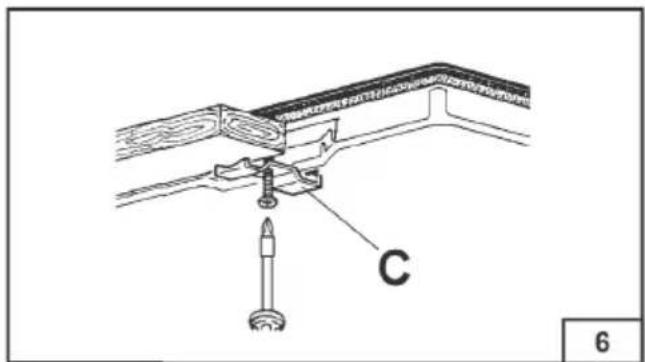
FOR YEARS TO COME freggia

This manual can be downloaded at www.freggia.com
- RU
- DESCRIPTION
- INSTRUCTIONS FOR THE USER
- IT IS NECESSARY THAT ALL OPERATIONS REGARDING THE INSTALLATION ARE CARRIED OUT BY QUALIFIED PDERSONNEL, IN CONFORMITY WITH THE REGULATIONS IN FORCE. THE SPECIFIC INSTRUCTIONS ARE DESCRIBED IN THE BOOKLET SECTION INTENDED FOR THE INSTALLER.
- USING THE ELECTRIC HOB
- WARNING
- CLEANING
- • ENAMELED PARTS
- • STAINLESS STEEL PARTS
- • ELECTRIC BURNERS
- INSTRUCTIONS FOR THE INSTALLER
- INSTALLATION
- • INSTALLING THE TOP
- - FASTENING THE TOP
- • ELECTRIC CONNECTION
- This product complies with EU directive 2002/96/EC.
- • TECHNICAL MAINTENANCE AND SPARE PARTS
- FOR YEARS TO COME freggia
Brand : Freggia
Model : HB302W
Category : Cooker