
DVD 4539 HDMI - DVD player AEG - Free user manual and instructions
Find the device manual for free DVD 4539 HDMI AEG in PDF.


| Product Type | DVD Player |
| Model | DVD 4539 HDMI |
| Dimensions (W x H x D) | 430 x 44 x 250 mm |
| Weight | 2.0 kg |
| Power Supply | 100–240 V, 50/60 Hz |
| Power Output | 15 W |
| Laser Type | Semiconductor laser |
| Signal Format | PAL / NTSC |
| Video Outputs | HDMI, SCART, Component Video, S-Video, Composite Video |
| Audio Outputs | Stereo (2.0 V rms), 5.1CH, Digital Coaxial, Optical |
| Compatible Media | DVD-Video, DVD±R/RW, CD, CD-R/RW, MPEG-4, MP3, Video CD |
| Regional Code | 2 (Europe, Middle East, Japan, etc.) |
| USB Input | Yes (front) |
| Memory Card Slot | SD / MMC / Memory Stick |
| Playback Functions | Repeat, A-B Repeat, Zoom, Slow Motion, Angle, Subtitle, Language, GOTO, Playlist |
| Ripping Function | CD to MP3 (selectable quality up to 320 kbps) |
| Parental Control | Yes (password-protected, multiple rating levels) |
| Screen Saver | Yes (can be enabled/disabled) |
| Remote Control | Included (infrared, range up to 5 m) |
| Operating Temperature | 0°C to 40°C |
| Weight | 2.0 kg |
Frequently Asked Questions - DVD 4539 HDMI AEG
User questions about DVD 4539 HDMI AEG
0 question about this device. Answer the ones you know or ask your own.
Ask a new question about this device
Download the instructions for your DVD player in PDF format for free! Find your manual DVD 4539 HDMI - AEG and take your electronic device back in hand. On this page are published all the documents necessary for the use of your device. DVD 4539 HDMI by AEG.
USER MANUAL DVD 4539 HDMI AEG
Overview of the Components ......Page 3
Instruction Manual Page 34
Technical Data Page 35
Overview of the Components
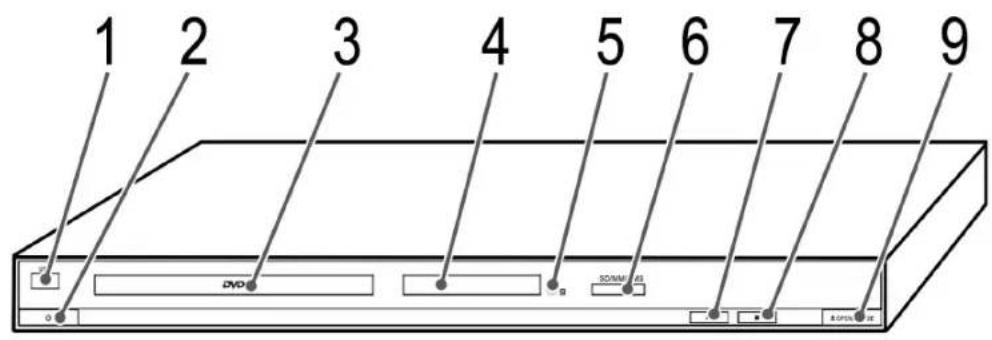
Abb./Fig. 1
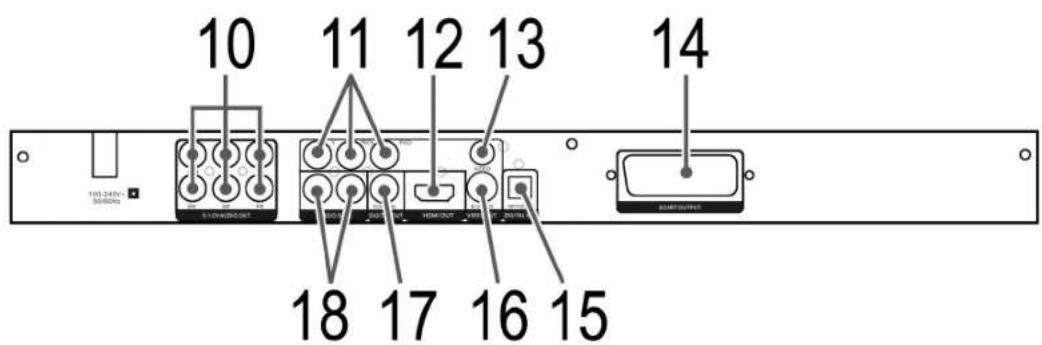
Abb./Fig. 2
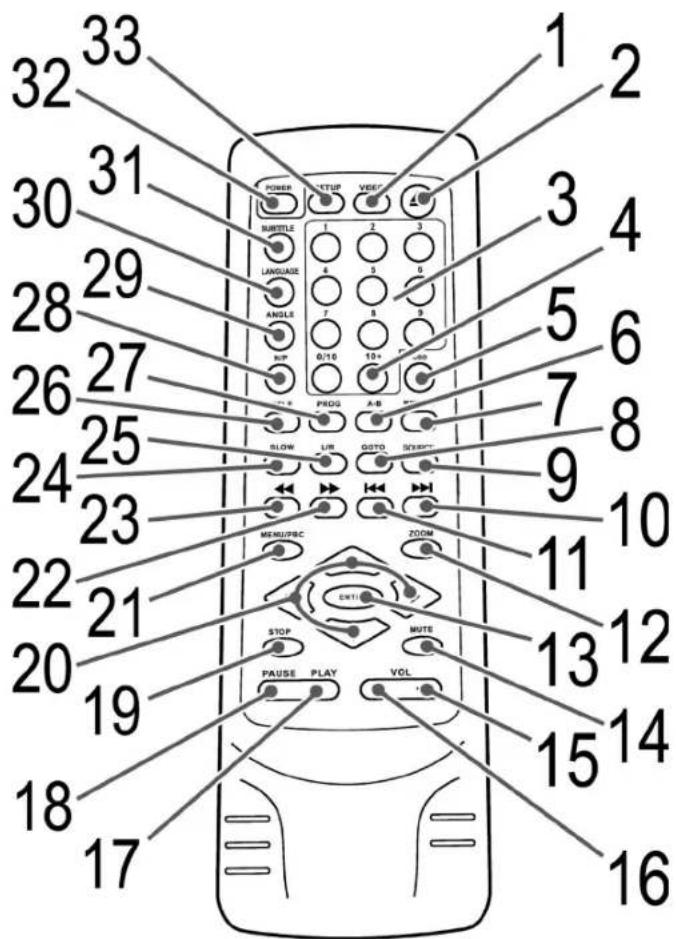
Abb./Fig. 3
4 Deutsch
natural_image
Front view of a rectangular electronic device with ports and buttons (no visible text or symbols)Abb. 2/12
SD-Card
Multi Media Card
Memory-Stick
D-47906 Kempen/Germany
1 VIDEO: Progressive scan/interlace/S-Video switching.
2 ▲: To open or close the CD/DVD tray
3 Numerical buttons: For direct selection of chapter or song number.
4 10+: For selecting the chapters/tracks above 9. Pressing again increases by a further 10.
5 OSD: To display the play status on screen.
6 A-B: To select the section to be repeated.
7 REPEAT: To repeat title, chapters, etc.
8 GOTO: For direct accessing of a section on the CD/DVD.
9 SOURCE: USB/CARD/DVD switching
10 ▶▶I: To jump to the next chapter or song.
11 I: To return to the previous chapter or song.
12 ZOOM: To zoom in or out.
13 ENTER: Confirm the input.
14 MUTE: To switch of the sound.
15 VOL +: To increase the volume.
16 VOL-: To reduce the volume.
17 PLAY ▶: Start playback.
18 PAUSE II: To freeze the picture. Press the „PLAY▶“ button to continue the film
19 STOP: Stop play.
20 Cursor buttons: Navigation in screen menu.
21 MENU/PBC: To display the main menu of the DVD/VCD/To show the Playback-Control for VCD.
22▶: Fast forward.
23 ◀: Fast reverse.
24 SLOW: Slow motion. Press the "PLAY ►" button to continue the film.
25 L/R: Switches between the right-hand and left-hand channel.
26 TITLE: To show the Playback-Control for VCD.
27 PROG: Call up DVD play list.
28 N/P: AUTO/NTSC/PAL colour norm switching.
29 ANGLE: To select the viewing angle.
30 LANGUAGE: To change the Audio settings.
31 SUBTITLE: To show/hide subtitles.
32 POWER: To activate standby mode.
33 SETUP: To start the setup menu.
English
Technical data
| Type of equipment DVD-Player | |
| Model DVD 4539 HDMI | |
| Voltage 100–240 V, 50/60 Hz | |
| Output | 15 W |
| Dimensions (W x H x D) 430 x 44 x 250 mm | |
| Weight | 2,0 kg |
| Laser | Semiconductor laser |
| Signal format PAL/NTSC | |
| Signal noise distance >= 92 dB | |
| Video output 1,0 V (P-P) 75 Ω | |
| Analogue Audio output 2,0 V (rms) | |
| S-Video output | (Y) 1,0 V (P-P), 75 Ω(C) 286 mV (P-P), 75 Ω |
| Operating environment 0°C bis 40°C, level base | |
| Compatible media | DVD-Video (DVD Disc, DVD ±R/RW)MPEG-4 Video (from CD/DVD Disc, DVD±R/RW, CD-R/RW)Audio CD (from CD Disc, CD-R/RW)Video CD (from CD Disc, CD-R/RW)MP3 fi les (from CD/DVD Disc, DVD±R/RW, CD-R/RW) |
| Regional | 2 (= Europe, Greenland, South Africa, Egypt and Middle East, Japan) |
Table of Contents
Device parts 34
Remote control 34
Technical data 35
Safety instructions 36
Setting up and connecting 39
Starting up 39
About the DVD-Player 43
Playing media 44
Working in file mode 47
Changing the default settings 52
Troubleshooting 58
Disposal 59
OSD Menu overview 60
36 English
Many thanks!
We are glad that you have made a decision in favour of the DVD-Player DVD 4539 HDMI!
We would like to wish you much joy with your machine and thank you for your purchase!
natural_image
Front view of a rectangular electronic device with ports and buttons (no visible text or symbols)Symbols in this operating manual
Important instructions for your safety are especially marked. You must follow these instructions to avoid accidents and damage to the machine:
WARNING:
Warns against dangers to your health and indicates potential risks of injury.
ATTENTION:
Indicates potential hazards for the player or other objects.
i NOTE: Highlights tips and information for you.
Manufacturer address
ETV
We reserve the right to make technical and design-related changes in the course of ongoing product improvements.

Operating manual
Safety instructions
Read the complete operating manual before using the player.
Keep the manual in a safe place. If you pass the player on to a third party, pass on the operating manual as well.
Non-compliance with this manual can lead to severe injuries or damage to the machine.
We assume no liability for damage caused as a result of non-compliance with this operating manual.
The player may only be used in households for private use. It is not suitable for commercial use.
English
Children and Frail Individuals
Do not leave the machine unattended, and do not use it if children or persons who cannot assess the risk are nearby.
Children or persons who cannot assess the risks are not allowed to use the player. Keep the player out of reach.
Packaging material must not be used to play with. There is a risk of suffocation.
Power supply
The machine is operated with electrical current, which means there is in principle a risk of electric shock. For this reason, pay particular attention to the following:
- Never touch the plug with wet hands.
If you want to pull the plug out of the plug socket, always pull directly on the plug. Never pull on the cable as it could tear.
Make sure that the power cable is not bent, caught or run over and that it does not come into contact with heat sources.
Please ensure that during operation the electric lead is not wound around the device.
Never place the machine on the power cable while it is being operated.
Only use extension cables that are designed for the power consumption level of the machine. - Keep the appliance away from rain and any moisture.
You should only operate this device if the electric voltage stated on the type plate of the device is the same as that supplied by your power socket. The wrong voltage can destroy the machine.
Do not stand vases etc. on the appliance. Water could seep into the appliance.
Do not open the appliance.
Pull out the mains plug if the appliance is not to be used over a longer period of time.
Take care that nobody can trip over the power supply cable.
Laser
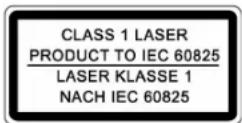
This appliance is classified as laser appliance of class 1 (CLASS 1 LASER). The associated label is attached to the outside of the appliance.
Laser beams can damage the eyes. Therefore observe the following:
Do not open the appliance. Do not attempt to dismantle the appliance.
In order to avoid any danger: Have service work only carried out by the manufacturer or an authorized service workshop.
Transport
In order to avoid damage to the DVD, you should remove it before transporting the appliance.
- Never move the machine when it is in operation.
38 English
Where to position the appliance
Safe operation of the appliance presupposes that it is positioned in an appropriate place. Therefore observe the following:
- Protect the appliance against the influence of weather. Never use it in the open-air.
- Protect the appliance against moisture.
Do not place any vessels filled with liquids, e.g. vases, on the device.
Never place the appliance on or in direct vicinity of heat sources, such as e.g. hobs, ovens, etc.
Do not expose the appliance to direct sunlight.
Place the appliance so that a sufficient air supply is assured. This is to avoid a build up of heat inside the appliance. Make sure that the ventilation slots are not blocked. - Protect the appliance against the mechanical vibrations.
Always place the device on a firm and fl at surface. - Protect the remote control against weather influences, moisture and high temperatures (e.g. by direct sunlight).
Operation
The player is able to show a still image on the TV-screen/monitor over an unlimited period of time. This can cause damage to the screen. It is therefore advisable to activate the screen saver Page 57, "Various Settings".
Do not increase the volume when the player is just playing very quiet sections. This could damage the speaker if very loud passages start all of a sudden after the quiet section.
Do not move the player with a DVD inserted. This could damage the DVD.
Do not put your hands into the DVD-slot. You could be injured.
Place only DVDs or CDs on the DVD-tray, as otherwise the player may be damaged.
Switch the player off by the On/Off -switch if it is not going to be used for a longer period of time.
Please disconnect the mains plug during thunderstorms.
Intended use
The DVD-Player is solely intended for the following tasks:
Playing of Video DVD/Video CD.
Playing of Audio-CD,
Any other use is considered non-intended use and is prohibited.
Defect
If the machine should become defective at some point:
If the power supply cable for this appliance is damaged, it must be replaced by the manufacturer or his customer services, in order to avoid hazards.
Should fluid have seeped into the player or if the player has been dropped down or damaged in any other way, the player must be examined by an authorized dealer. Disconnect the player from the power supply and consult an authorized dealer.
Setting up and connecting
Unpacking
Unpack the appliance and all accessories and check that the contents are complete.
ATTENTION:
Always transport/send the player in its original packaging to prevent it from being damaged. Keep the packaging for this purpose. Dispose of unnecessary packaging material in accordance with the regulations applicable in your country.
i NOTE:
Get in touch with your dealer immediately if you notice damage caused by transport.
Setting up
- Place the player on a stable, heat resistant, horizontal and level surface. Keep a distance of at least 10 cm from walls and objects.
- Connect the device to a properly installed power socket.
Starting up
Remote control battery installation
WARNING:
Leaking out battery acid can damage your health. Remove the battery from the battery compartment as soon as it is exhausted or if the remote control is not going to be used for a longer period of time. Wipe up leaked out battery acid with a cloth. In case of skin contact immediately wash the affected area. Seek medical advice if battery acid has been swallowed. In case of contact with your eyes wash out the eyes and seek medical advice.
ATTENTION:
Mismatching battery types or new and used batteries must never be used together. Different battery types have different properties. Do not use old and new batteries together. The mutual use of old and new batteries can shorten the lifetime of the new batteries and possibly result in leakage of the old batteries. When disposing of old batteries you should strictly comply with the legal and environmental regulations applicable in your country. Do not throw batteries into fire!
i NOTE:
The lifetime of the enclosed batteries may be shortened because of storage.
- Open and remove the battery compartment cover.
- Insert two batteries of type AAA/R03 (1.5 V), ensure correct polarity (+ and -). Start with the negative pole (-).
- Attach and close the battery compartment cover.
i NOTE:
The signals from the remote control are transmitted to the DVD-Player by infrared light. You should therefore take care that the DVD-Player is not exposed to the direct sunlight. This could make the transmission of signals from the remote control to the DVD-Player impossible.
English
Connecting the Video cable
Effective range of the remote control
If you want to use the remote control it has to be pointed at the remote control sensor on the front of the device. The distance between remote control and sensor should not exceed 5m. The angle of the remote control to the remote control sensor to right, left, top and bottom should not exceed 30°.
The video cable transmits the video data from your DVD-Player to the TV or the Video-Projector.
There are five different ways of connecting the DVD-Player with your TV/Video-Projector. Select one of these possibilities to suit your replay unit.
i HINWEIS:
If you are not using a SCART or HDMI connection you must always establish an additional audio connection for transmitting the audio data (i.e. the sound).
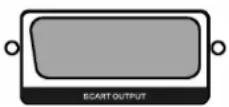
Fig. 2/14
SCART
SCART is used to transmit both Video and Audio data.
- Plug the SCART jack firmly into the socket on the back of the player.
- Plug the SCART jack into the corresponding socket on your playback device.
- Press the VIDEO button (Fig. 3/1) repeatedly to select the „RGB" setting.
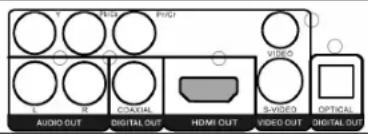
Fig. 2/12
HDMI
Connection using a HDMI cable ensures a very high replay quality. HDMI is used to transmit both Video and Audio data.
- Plug the HDMI jack into the socket on the back of the player.
- Plug the HDMI jack into the corresponding socket on your playback device.
Select the „HD“ setting by repeatedly pressing the VIDEO button (Fig. 3/1) in stop mode.
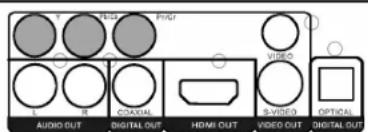
Fig. 2/11
Component Video
Connection using a Component Video cable ensures a very high replay quality.
Component Video transmits only Video signals.
- Plug each of the three jacks into the corresponding sockets on the DVD-Player.
- Plug the jacks into the corresponding socket on your playback device.
You can select between the settings „P-Scan“, „RGB“, „S-Video“ and „YUV“ for your connected playback device by repeatedly pressing the VIDEO (Fig. 3/1) button in stop mode. Please see the operating instructions of the connected device for the correct setting.
English
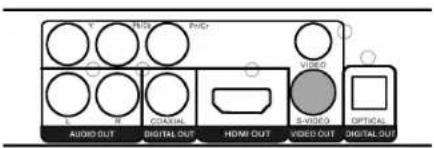
Fig. 2/16
S-Video
Connection using a S-Video cable ensures a very high replay quality.
Component Video transmits only Video signals.
- Plug the S-Video jack into the socket on the back of the player.
- Plug the S-Video jack into the corresponding socket on your play-back device.
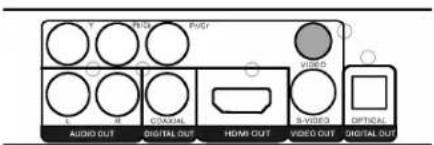
Fig. 2/13
Composite-Video
Composite-Video is used to transmit both Video data.
- Plug the Composite-Video jack into the socket on the back of the player.
- Plug the Composite-Video jack into the corresponding socket on your playback device.
Connecting the Audio cable
You can choose from four transmission methods for audio signals.
You must generally choose first whether you would like to have the sound coming from your TV, or through a Stereo or 5.1-Amplifi er. The Audio cable must then be connected to the TV or an amplifi er accordingly.
i NOTE:
If your amplifi er is equipped with a digital output, you should use the amplifi er. You will experience a much better audio quality, and the installation is much easier.
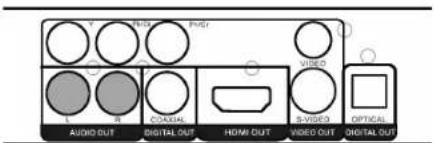
Fig. 2/18
Stereo
Connect both Audio cables for the right and the left speakers to your playback device or your amplifier.
- Plug the Audio jacks into the sockets on the back of the player.
- Plug the Audio jacks into the corresponding sockets on your play-back device or your amplifier.
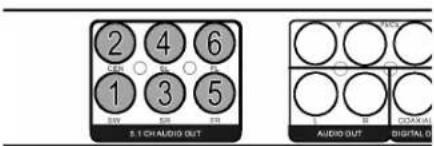
It is possible to obtain a particularly natural surround sound effect by means of audio output through a 5.1 audio signal.
This method uses 6 speakers. Four of these speakers are placed in the four corners of the room. One speaker is positioned close to the playback device. The sixth speaker serves the output of very low tones. With this arrangement of speakers a very natural stereophonic sound is achieved.
Connect the 5.1CH AUDIO OUT sockets on the back of the DVD player to the corresponding connections on the back of the subwoofer.
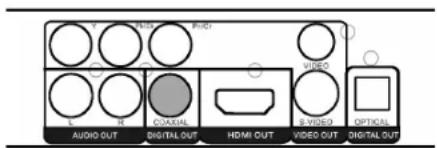
Fig. 2/17
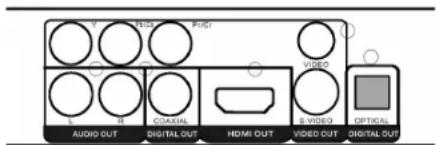
Fig. 2/15
Inputs on the Front
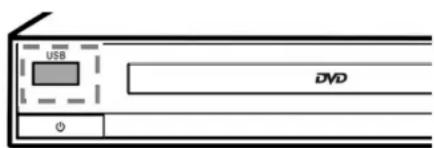
Fig. 1/1
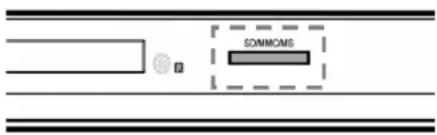
Fig. 1/6
Switching on the player
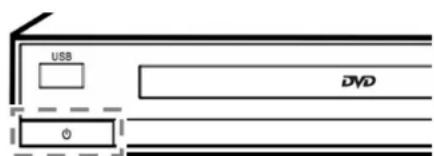
Fig. 1/2
Proceed as follows:
-
Plug the Audio jacks into the sockets on the back of the player. Make sure that the jacks are correctly arranged:
-
(1) Connection for Subwoofer: Bass
- (2) Connection for Center speaker
- (3) Speaker rear right
- (4) Speaker rear left
- (5) Speaker front right
-
(6) Speaker front left
-
Plug the Audio jacks into the corresponding sockets on your play-back device or your amplifier.
Digital
Connect the Coaxial cable for transmission of digital Audio signals to your playback device or your amplifier.
- Plug the Audio jack into the socket on the back of the player.
- Plug the Audio jack into the corresponding socket on your playback device or your amplifier.
Optical
Connect an optical cable for transmitting the digital audio signal with your playback device or amplifier.
- Insert the optical plug into the socket on the rear of the device.
- Insert the optical plug into the corresponding socket of your play-back device or amplifier.
USB Input (on the Front)
Connect your output device directly to the socket on the front of the device.
Memory Card Slot (on the Front)
Insert an SD/MMC or MS memory card into the card slot on the front of the device.
Turn on the main switch of the DVD player by pressing the "○" on/off switch on the front of the machine.
About the DVD-Player
With this DVD-Player you can play a vast variety of DVD-formats Page 35, "Technical data".
However, you must be aware that in many cases DVDs are encrypted with a so-called "Regional Code". This specifies for which region in the world the DVD is intended. As an example, the DVDs marked with regional code "1" are intended for the USA and Canada. DVDs with regional code "2" are for use in Europe.
i NOTE:
With your DVD-Player you can only play DVDs with regional code "2". There are both lots of burning and compressing methods as well as high quality differences in (burned) CDs/DVDs. Moreover, the music industry has not yet agreed on a fixed standard for copy protection. This may, in very isolated cases, result in problems when relaying CDs, DVDs and MP3 CDs. This is no malfunction of the player.
Furthermore, there may be isolated problems when playing CDs or DVDs which were created on a PC (e.g. holiday photographs). In case of problems check the settings of the DVD writing program on your computer. You should in particular make sure that the DVD has been finalized. For further information on this matter please refer to the operating manual of your recorder.

Terminology
Input Not Possible
If a function or input selected by you is not possible, the adjacent symbol is shown on the screen.
Track: "Track" is the designation for sections on an Audio-CD. This may be a song, the set of a symphony, etc.
Title/Chapter: Video-DVDs are divided into "Title" and „Chapters". A „Title" may be e.g. a particular fi Im, the „Chapters" may be subse°50ctions of this fi Im.
HDMI: High Definition Multimedia Interface is an interface for transmitting high-resolution digital video data and digital audio data.
MPEG4: Your DVD player is also suitable for playing back files that have been compressed using the MPEG-4 system (short for Moving Picture Experts Group-4). MPEG-4 is a compression method by means of which large quantities of data can be reduced without any noticeable loss of picture and sound quality.
i NOTE:
It is not possible to guarantee full compatibility with all of the compression methods used worldwide, particularly when more than one soundtrack or subtitles are involved. Also MPEG 4 fi les with integrated special functions such as a menu, subtitles etc. are not always supported. This is no malfunction of the player.
English
Using the remote control
Loading a CD/DVD
Understanding the onscreen DVD-menu
Starting the replay
Interrupting the replay
Changing Audio-Language/Audio-Mode
Showing subtitles
Playing media
You transmit commands to the DVD-Player via remote control. It is thus important to point the end of the remote control towards the DVD-Player.
-
Press the remote control button ▲ (Fig. 3/2). The CD/DVD tray opens.
-
Place the CD/DVD on the tray.
-
Press the remote control button ▲ (Fig. 3/2) again. The CD/DVD tray closes. The display (Fig. 1/4) first shows „LOAd“. After a short while the type of the loaded medium is displayed (e.g. „DVD“).
If you use DVDs you can call up the on-screen menu by repeatedly pressing the OSD button (Fig. 3/5).
DVD-menu
Current medium.
Current playback time / Total playback time.
Current title / total number of titles.
Current chapter / total number of chapters.
Current audio language / total number of audio languages.
Current subtitle status.
Current camera angle/total number of camera angles.
Current bit rate (megabits per second).
-
Place the CD/DVD on the CD/DVD-tray Page 44, "Loading a CD/DVD".
-
Press the „PLAY ▶“ button (Fig. 3/17) on the remote control.
i NOTE:
If the replay does not start or the replay is of poor quality, you should check the default settings of the DVD-Player.
-
Press the „PAUSE II“ button (Fig. 3/18) on the remote control. The replay is interrupted, the currently visible image is „frozen".
-
Press the „PLAY▶“ button (Fig. 3/17) on the remote control to restart the „normal“ replay.
Press the LANGUAGE button (Fig. 3/30) several times to change the Audio language. The available audio languages depend on the DVD.
Press the SUBTITLE button (Fig. 3/31) to display the current subtitle status. Press the button several times if you would like to activate or deactivate the subtitle function or if you want to choose a different subtitle language. The available subtitle languages depend on the DVD.
English
Stopping the replay
Press the STOP button (Fig. 3/19) during replay. The replay stops.
Press the "PLAY ►" button (Fig. 3/17) again, to continue the replay from the last position.
Press the STOP button (Fig. 3/19) twice to stop the replay completely. Press the „PLAY“ button (Fig. 3/17) again, to replay the CD/DVD from the beginning.
Selecting previous chapter/track
Press the „I◀◀” button (Fig 3/11) to jump to the start of the previous chapter or track.
Selecting next chapter/track
Press the "▶▶I" button (Fig 3/10) to jump to the start of the next chapter or track.
Selecting track directly
Enter the number of the desired chapter/track with the Numerical Buttons on the remote control (Fig. 3/3).
Replay of the chapter/track starts after a short while.
Accessing a section via menu
The on-screen menu enables comfortable access to any sections of a medium. To do this, proceed as follows:
- Press the GOTO button (Fig. 3/8). The menu appears on the screen.
- Use the Cursor Buttons (fig. 3/20) to select the desired option.
- Now move to the point from which the replay should start. Depending on the type of medium this may be a track number, a chapter or even a point in time. The input must be made with the Numerical Buttons (Fig. 3/3). Then press the ENTER button (Fig. 3/13).
Repeating DVD-title/chapter
- Choose the chapter or title to be repeated.
- Press the REPEAT button (Fig. 3/7). The message "Repeat Chapter" appears on the screen.
- Press the REPEAT button again until the word „Repeat Title“ appears on the screen.
Stopping repeat
Press the REPEAT button (Fig. 3/7) repeatedly until the words „Repeat Off “ appear.
Selecting a section to be repeated
You can define a freely selected section to be automatically repeated.
To do this, proceed as follows:
- Mark the beginning of the section to be repeated. During repetition press the button A-B (Fig. 3/6) on the remote control once. The message „Rep A-“ appears on the screen.
- Mark the end of the section to be repeated by pressing the A-B-button on the remote control once again. The message „Rep A-B“ appears on the screen. The previously marked section is now repeated.
Press the A-B-button again to stop the repetition.
i NOTE:
On CDs/MP3 CDs the section to be repeated must be within a track.
46 English
Using the DVD-menu
Normally each DVD has its own menu. Here you can choose chapters, make settings, etc. This menu is specific for the DVD and can thus not be explained in detail.
Press the MENU/PBC button (Fig. 3/21) to access the DVD-menu. Use the Cursor Buttons (Fig. 3/20) to navigate in the Menu. Press the ENTER button (Fig. 3/13) to confirm.
If you are in a menu area for direct chapter selection, you can enter the number of this chapter with the Numerical Buttons (Fig. 3/3) on the remote control.
Using fast forward or reverse
The DVD-Player has a fast forward and a fast reverse feature.
-
Press the ▶▶ (Fig. 3/22) or ◀◀ button (Fig. 3/23) to start fast forward or fast reverse. The current replay direction and the speed, e.g. „▶▶ x2“ is now displayed on screen.
-
Press the ▶ or ◀ button several times in order to change the speed. The speed can be accelerated by factor 2, 4, 8 or 16.
-
Press the „PLAY▶“ button (Fig. 3/17) to restart the "normal" replay when the desired section is reached.
Enlarging a screen section
You can change the screen section when viewing DVDs, VCDs or images.
Press the ZOOM button (Fig. 3/12) to change the screen section. Press the button several times to select the suitable zoom factor or to return to the original zoom factor.
i NOTE:
With the cursor buttons (Fig. 3/20) you can move through the zoomed image.
Changing the viewing angle
Some DVDs offer the possibility to select the viewing angle.
Press the ANGLE button (Fig. 3/29) to change the viewing angle.
i NOTE:
If changing the Viewing Angle is not possible, the message „Not allowed at the moment“ will be displayed.
Repeat pressing the button to choose a different viewing angle, or to return to the original viewing angle.
Adjusting the volume
Press the VOL + button (Fig. 3/15) to increase the volume.
Press the VOL - button (Fig. 3/16) to reduce the volume.
i NOTE:
Please remember, that this will only change the output volume of the DVD-Player. In order to adjust the volume to your requirements you may also have to change the volume of the playback device.
Creating a playlist (DVD)
It is possible that you may not wish to play the titles in the same order that they are to be found on the DVD. The function „Create Playlist“ you can create your own playing order.
To do this, proceed as follows:
- Press the PROG button (Fig. 3/27). A table is displayed. Here you can enter the desired order of the chapters/titles.
i NOTE:
However, your playlist will be lost when switching off the DVD-Players or when inserting a new DVD.
- Use the Cursor Buttons (Fig. 3/20) to navigate in the table.
- Enter the desired title and chapter at the relevant position in the table. Use the Numerical Buttons (Fig. 3/3) for this purpose.
- Store your entry by selecting the "Play" command with the Cursor Buttons (Fig. 3/20) at the edge of the table.
- Press the ENTER button (Fig. 3/13) on the remote control to confirm this command.
Deleting a playlist (DVD)
- Press the PROG button. You will now see a table.
- Use the Cursor Buttons (Fig. 3/20) to go to the "Clear program" command at the edge of the table.
- Press the ENTER button (Fig. 3/13) on the remote control to confirm this command.
- Press the PROG button to terminate this procedure.
Working in fi le mode
As well as being able to play back „normal" fi lms or music from CDs/DVDs, this DVD player is also able to play back video or audio fi les from CDs or DVDs which are stored in the fi le system. Such media are frequently available if you create CDs of digital photographs or MP3 music on your computer.
Using CD/DVD
- Place the CD or DVD on the tray Page 44, „Loading a CD/DVD”.
- Select the desired file(s) and start the replay Page 49, "Selecting file/directory and starting replay".
Using a memory card
The following memory cards can be used:
SD-Card
Multi Media Card
Memory-Stick
- Insert the memory card into the card reader (Fig. 1/8).
- Press the STOP button (Fig. 3/19)
- Press the SOURCE button (Fig. 3/9) on the remote control in order to turn the DVD player to the fi le mode.
i NOTE:
The SOURCE menu can only be called up in stop mode.
- Use the Cursor Buttons (Fig. 3/20) to select the „CARD“ mode. Confirm with the ENTER (Fig. 3/13) button.
Using a USB medium
i NOTE:
In order to find out which files can be played back the DVD player now reads the contents of the storage medium. In the case of large storage media this procedure may take a long time.
- Select the desired file(s) und start playback Page 49, "Selecting file/directory and starting playback".
- If you would like to change back to DVD mode, press the SOURCE button (Fig. 3/9) again. Use the Cursor Buttons (Fig. 3/20) to select the „DISC“ mode. Confirm with the ENTER (Fig. 3/13) button.
By means of the USB connection you can connect numerous devices to the DVD Player.
This device has been developed in accordance with the latest technical developments in the USB fi eld. Unfortunately the large number of different types of USB storage media on off er today makes it impossible to guarantee full compatibility with all USB storage media. For this reason there may be problems in rare cases with playing back from USB storage media. This is not a malfunction of the device.
- Insert a USB storage medium directly into the corresponding connection of the DVD player (Fig. 1/2).
- Press the STOP (Fig. 3/19) button.
- Press the SOURCE button (Fig. 3/9) on the remote control in order to turn the DVD player to the fi le mode.
i NOTE:
The SOURCE menu can only be called up in stop mode.
- Use the Cursor Buttons (Fig. 3/20) to select "USB" mode. Confirm with the ENTER (Fig. 3/13) button.
i NOTE:
In order to find out which files can be played back the DVD player now reads the contents of the storage medium. In the case of large storage media this procedure may take a long time.
- Select the desired file(s) und start playback → Page 49, "Selecting file/directory and starting playback".
- If you would like to change back to DVD mode, press the SOURCE button (Fig. 3/9) again. Use the Cursor Buttons (Fig. 3/20) to select the „DISC“ mode. Confirm with the ENTER (Fig. 3/13) button.
Selecting fi le/directory and starting replay
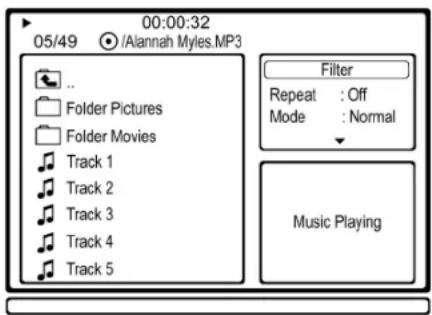
Media may contain numerous data/fi les and directories. You must therefore fi rst determine the data to be played.
- Place the CD or DVD in the drive if you have not already done so.
- A two-column menu window appears in which the directories (if there are any directories present) or the files are listed on the left.
- Use the Cursor buttons (Fig. 3/20) to select the desired directory of file in the left-hand list.
- Select this by pressing the „ENTER“ button (Fig. 3/13).
File: Once you have selected a file, this is now displayed directly or played back.
Directory: If you have called up a directory, a list of files now opens.
Here too you can select the desired fi le with the Cursor buttons and the ENTER button (Fig. 3/13). If you have selected a fi le, this is now displayed or played back.
Please note:
There are both lots of burning and compressing methods as well as high quality differences in CDs/DVDs and burned CDs/DVDs.
For this reason there may occasionally be problems when fi les are played back (for example fi les are displayed but cannot be played back). This is no malfunction of the player.

NOTE:
In order to return from the fi les to the folders, select the 🔔." symbol (higher-level folder) and press the ENTER key (Fig. 3/13).
In the upper right-hand list the following options are available:
Filter: Allows the selection of the fi le types shown in the left-hand list. Select between the fi le types „Audio“, „Photo“ and „Video“. Only the selected fi le types are displayed. To leave the fi Iter menu press the cursor button „⇔“ (Fig. 3/20).
Repeat: By repeatedly pressing the ENTER key (Fig. 3/13) you can select between the options „single“ (the current track is played back repeatedly), „folder“ (the current folder is played back repeatedly) and „off“.
Mode: By repeatedly pressing the ENTER key (Fig. 3/13) you can change the type of playback.
Normal = Random playback is deactivated.
Shuffle = The tracks on the CD are played back in random order.
Music Intro = Each track is played for 10 seconds.
Edit mode: In edit mode you can programme the tracks you would like to hear (see "Creating a Play List")
Creating a playlist
You may want to replay the titles, e.g. on a CD, in a different order to the order determined by the producer. The function „Edit mode“ you can create your own playing order.
To do this, proceed as follows:
- In the upper right-hand list select the option „Edit mode“ and confirm with the ENTER key (Fig. 3/13).
- Now use the ENTER key to select the tracks in the left-hand list.
English
- Then change back to the upper right-hand list and use the "↓" cursor button to select the option "Add to Program" and confirm with the ENTER key.
- Now call up the program list by selecting the option „Program view“ and confirming with ENTER. The screen display changes to the browser view.
- Deactivate the edit mode by selecting „Edit Mode“ again and confirming with ENTER. Change to the left-hand list and start playback with the ENTER key.
i NOTES:
However, your playlist will be lost when switching off the DVD-Players or when inserting a new CD/DVD.
If you would like to compose the order of playback from several folders it is first necessary to add the tracks from one folder to the play list before you can change to another folder. To do so, deactivate the edit mode each time in order to show the contents of the other folder.
Deleting a Playlist
- In the upper right-hand list select the option „Edit mode" and confirm with the ENTER key (Fig. 3/13).
- Now call up the program list by selecting the option „Program view“ and confirming with ENTER. The screen display changes to the browser view.
- Select the titles/tracks to be deleted in the list on the left with the ENTER button.
- Then select the option "Clear program" in the upper right-hand list and confirm with the ENTER key.
NOTE: It is only possible to delete individual tracks in the stop mode.
Stopping the replay
Press the STOP button (Fig. 3/19) on the remote control to stop the replay.
Viewing pictures
The DVD player is suitable for displaying your digital photographs. These photos may be stored only any medium (DVD, CD, etc.) supported by the DVD player.
i NOTE:
Please ensure a suitable size of the photos. Large size photos may take some time to be displayed or may not be displayed at all. It is of advantage if the size of the photo corresponds with the screen size of the playback device. For TVs this is normally 1024x576 pixel (TV-aspect 16:9) or 768x576 (TV-aspect 4:3).
Start the replay of photos by selecting the file from which the replay shall start Page 49, "Selecting file/directory and starting replay".
Scrolling
Manual: Press the „I◀◀” (Fig. 3/11) or „▶▶I“ button (Fig. 3/10) on the remote control to scroll forward or back.
Automatic: Press the „PLAY ▶“ button (Fig. 3/17). The pictures change automatically.
Rotating a photo
You can use the Cursor buttons to rotate a photo during replay:
Rotate for 180°: Cursor Button „↓“, „↑“
Rotate clockwise for 90°: Cursor Button „→”
Rotate counter-clockwise for 90°: Cursor Button „←”
Ripping (CD-MP3 Conversion)
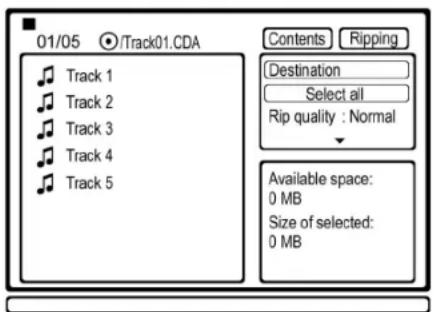
If an audio CD is inserted you can activate the ripping function. This function allows you to convert the data on the audio CD in real time to the MP3 format and then store them on a connected MP3 player.
- Use the cursor buttons (Fig. 3/20) to select the "Ripping" field and confirm with the ENTER key (Fig. 3/13).
- In order to select the target memory (USB) use of the cursor buttons to select the "Destination" fi eld and confi rm with the ENTER key. The selection window opens. Make your selection with the cursor buttons and ENTER.
- Now select the tracks to be converted in the left-hand column with the cursor buttons and the ENTER key.
i NOTE:
- If you would like to convert all the tracks, select the fi eld „Select All“.
- For each conversion the device creates a new folder.
-
The respective storage destination can only be selected if an appropriate medium has been inserted.
-
By repeatedly pressing the ENTER key (Fig. 3/13) you can choose between the storage qualities „Low“, „Medium“, „High“ and „Best“ in the „Rip Quality“ line.
i NOTE:
- The memory capacity is shown in the lower right-hand column. Please ensure that the memory capacity (size of selected) does not exceed the available memory capacity (available space).
-
The bit rates of the settings are as follows: Low = 128 kBit/s, Medium = 160 kBit/s, High = 192 kBit/s, Best = 320 kBit/s
-
Now use the „↓” cursor button to select the „Ripping Start“ field below the „Rip Quality“ fi eld and press the ENTER key (Fig. 3/13).
-
The conversion begins. Progress is shown on the screen.
i NOTES:
- You can stop the conversion process by pressing „Cancel“. Press the ENTER key to do so. In the confirmation prompt select the „Yes" fi eld and confirm with the ENTER key. The tracks already converted are nevertheless stored.
- Interrupted tracks and those already present can only be deleted on the PC.
Changing the default settings
A large number of default settings can be comfortably changed via the screen menu.
Press the SETUP button (Fig. 3/33) on the remote control to start the menu for changing the default settings.

NOTE:
Many of these default settings can be changed via both the remote control and the menu. The difference is: If you change the default settings via the remote control, these changes will only be valid until the DVD-Player is switched off or the DVD is changed. However, any changes made in the menu are permanent.
Understanding the menu structure
Using the menu
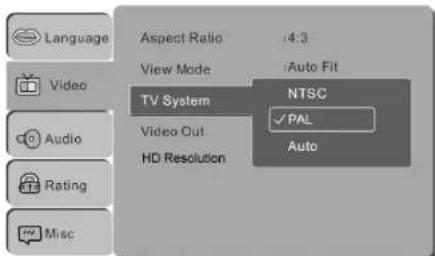
The Setup menu has two menu levels:
Main menu: The main level is represented by graphical symbols.
Sub-menu: The corresponding sub-menu options can be found under each of the main menu options.
Navigation and selection
Use the Cursor Buttons (Fig. 3/20) (↓/↑) on the remote control to browse through the main menu.
In order to change from the main menu to the submenu, press the cursor button ( ).
You can also move through the submenu with the cursor buttons (↓/↑).
Select a menu option with the ENTER button (Fig. 3/13).
Use the ENTER button also to select an option (e.g. "PAL" in the illustration on the left). The selected option (in the example „PAL") is now highlighted.
To change back from the submenu to the main menu, press the cursor button (⇐).
Overview of the main menu
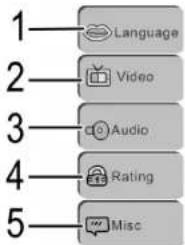
Language Settings (1)
Video Setup Page (2)
Audio Setup Page (3)
Password Setup Page (4)
Various Settings (5)
i NOTE:
Some of the menu settings are only available in stop mode (depending on the DVD).
English
Language Settings
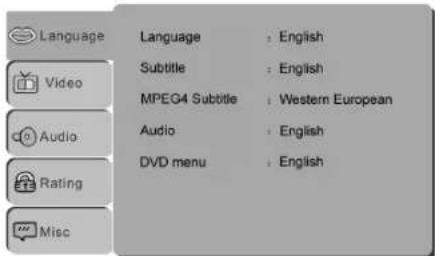
Language; Subtitle; MPEG4 Subtitle; Audio; DVD menu
Language: Here you can select the language of the on-screen display.
Subtitle: Here you can select the preferred language for the subtitles of the film.
MPEG4 subtitle: Here you can select the preferred subtitle language for playing back MPEG4 fi les.
Audio: Here you can select the preferred language for the audio output.
DVD menu: Here you can select the preferred language for the DVD menus.
Video Settings
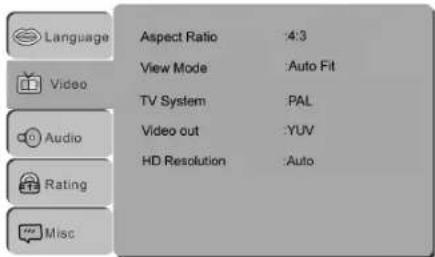
Aspect Ratio
Here you can adapt the output of the DVD-Player to the TV-aspect.
Concerning the background: If you do not have a wide screen TV the TV-aspect will be 4:3. However, most feature films have an aspect of 16:9, the image is therefore too wide for the TV-screen.
Here you can specify how the replay of the film is to be adapted to the playback device:
4:3: You will see the complete width of the film. The film is thus reduced in size, whereby black bars appear below and above the film
16:9: Select this option if you use a wide screen TV for replay. Please note that fi lms, that have been recorded with TV-aspect 4:3 can still be replayed using aspect 4:3. This means, that replaying this fi lm will not require the complete wide screen area of the television.
View Mode
Here you can set various display options for the playback device that is connected.
i NOTE:
The setting „Panscan" is not supported by all DVDs.
TV-System
Match the output of the DVD-Player to the colour transfer system of your replay device. The following options are available:
NTSC: A system primarily used in North America.
PAL: A system commonly used in Europe.
AUTO: Select this setting if your replay device is a multi-system unit.
Video Output
Select the video output option for the playback device that is connected and which you wish to use. Choosing the right signal format depends on the type of connection and the playback device (see also the operating manual of the replay unit).
English
Audio Setup
S-VIDEO: Choose this option if your replay device supports progressive signals and is connected to the DVD-Player by means of an S-Video cable.
YUV: Choose this option if your replay device supports progressive signals and is connected to the DVD-Player by means of a Component-Video cable.
RGB: Select this option if your playback device is connected to the DVD player via the SCART connection.
P-Scan: Choose this option if your playback device supports progressive signals and is connected to the DVD-Player by means of a Component-Video cable.
HD: Select this option if your playback device is connected via the HDMI connection to the DVD player.

NOTE:
If you would like to select the „RGB" setting, please ensure that your playback device supports this setting.
If the "S-VIDEO" or "P-Scan" option is activated but your playback device does not support Progressive Scan signals, no picture is displayed.
By pressing the VIDEO button (Fig. 3/1) you can also switch between the video output options. (Only in Stop Mode possible.)
HD Resolution
Here you can select the resolution supported by your playback device.
In order to achieve the best possible picture quality, we recommend the AUTO setting.
Auto: The maximum possible/supported resolution is set automatically.
480p / 576p; 720p; 1080i; 1080p: The picture is displayed with the selected resolution.

NOTE:
The „HD“ menu can only be selected if in the „Video Output“ menu the „HD“ option is activated.
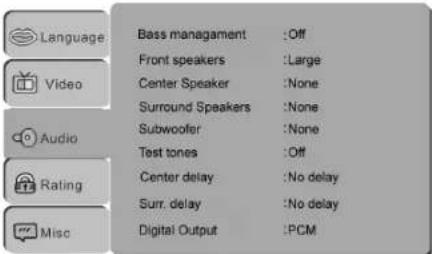
Bass Management
For activating or deactivating the Best, Audio, Surround, Sound (Bass) Management function.
On: The Bass Management function is activated.
Off: The Bass Management function is deactivated.

NOTE:
When the Bass Management function is deactivated it is not possible to turn the individual loudspeakers to "small".
Front speakers; Center speaker; Surround speakers
Here it is possible to set the characteristics of the loudspeakers.
English
Large: The loudspeaker supports a frequency band below 200 Hz.
Small: The loudspeaker supports a frequency band above 200 Hz.
Off: The loudspeaker does not produce any audio signals.
Example:
a) The correct setting for DVDs with AC3 sound using a Scart cable for the picture and sound data (Fig. 2/14).
Front speakers = large
Centre speaker = none
Surround speakers = none
b) The correct setting for DVDs with AC3 sound using the 5.1 audio output (Fig. 2/13).
Front speakers = small
Centre speaker = small
Surround speakers = small
Subwoofer:
Off: The loudspeaker does not produce any audio signals.
On: The loudspeaker produces audio signals.
Test Tones
A full surround sound is produced for the test tone. The individual loudspeakers are activated one after the other. It is therefore possible for you to check the connection and settings of your multichannel loudspeakers.
Center/Surround Delay
If you use a 5.1-Audio system, you may experience a distortion of the sound impression caused by the distance differences between speaker groups and listener. Sounds that should be heard by the listener at the same time arrive successively.
Here you can delay the sounds from the central and rear loudspeakers in order to produce a balanced sound for the listener.
Digital Output
Here you specify the settings for the digital Audio output.
Off: No digital audio signal is produced.
PCM: Output of a digital Audio signal that is converted to a 2-channel signal. Use this setting if your amplifi er is a two-channel stereo amplifi er.
All: Output of a digital Audio signal. Use this setting if your amplifier is no two-channel stereo amplifier.
i NOTE:
If there is no Audio output, even though you connected the DVD-Player to an amplifier, you will most likely have chosen an incorrect setting for the Audio output.
56 English
Password Setup Page
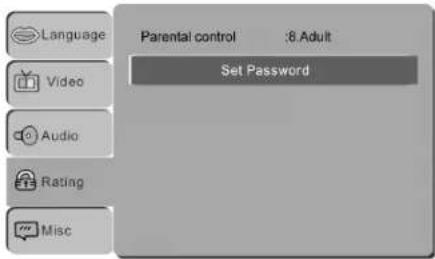
Parental Control
Some DVD contain information concerning the target group. This method is comparable with the rating of cinema films („Suitable only for persons of 12 years and over“ e.g.).
If you have the child lock option activated a probably existing corresponding information is read from the DVD and compared with the value pre-set by you. If a DVD is intended for an older age group than the one pre-set by you, the DVD cannot be played.
The following child lock options are available:
Kid Safe: Suitable for children.
G: Suitable for all age groups.
PG: The presence of parents is recommended. Some scenes may be unsuitable for children.
PG 13: The presence of parents is strictly recommended. Some scenes may be unsuitable for children under the age of 13.
PGR: The presence of parents is strictly necessary.
R: Young persons under the age of 17 may only view this film in the presence of an adult.
NC17: Children and juveniles under the age of 17 are not allowed to watch this fi Im.
Adult: The film must only be watched by adults.
In order to activate the individual parental control options, please proceed as follows:
- In the "Parental Control" line press the ENTER key (Fig. 3/13). A window appears for entering the current password.
- Enter the current password with the Numeric buttons and confirm with the ENTER key. The master password is „8888“.
- Press the ENTER key again (Fig. 3/13).
- Now select the desired option and confirm with the ENTER key (Fig. 3/13).
Setting a Password
If you want to operate the DVD-Player with a child lock system, you must first enter a password. This password safeguards the settings for the child lock system, so that it can only be changed by yourself.
In this menu you can change the password for the child lock system.
In order to change the password, you must first enter the current password. The master password is „8888“.
i HINWEIS:
If you forgot your password, you can deactivate the child lock system with this Master password.
English
Proceed as follows to change the password:
- In the "Set Password" line press the ENTER key (Fig. 3/13). A window appears for entering the current password.
- Enter the current password in the "Enter Password" line with the Numeric buttons (Fig. 3/3) on the remote control. In order to prevent unauthorised individuals from reading the password, only the symbols „****“ are shown on the screen. Confirm your entry with the ENTER key (Fig. 3/13).
- In order to set the new password, press the ENTER key in the "Set Password" line.
- Enter the new password in the "New Password" line with the Numeric buttons on the remote control.
- Confir rm the new password by entering it again and then pressing the ENTER button. This is then briefly confirmed by the words "Set Password Successful" on the screen.
Various Settings
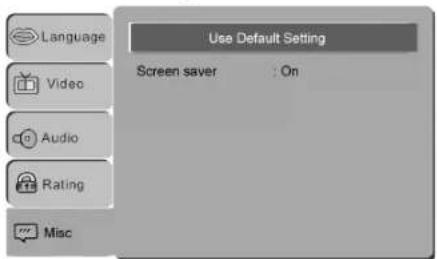
Using Default Settings
Select the command „Use Default Settings/Yes“ if you would like to return the device to the factory presets.
All settings that you have made are lost.
Screen saver
The player is able to display a still image for any time on the screen. This can cause damage to the screen. It is therefore recommended to activate the screen saver.
The following options are available:
On: The screen saver is activated (default setting).
Off: The screen saver is deactivated.
58 English
Troubleshooting
Before sending the machine to the Customer Services, use the following table to check whether you can rectify the fault yourself.
| Fault | Possible cause | Solution |
| The power supply light does not light | No power supply | ⚠ WARNING:Before troubleshooting, switch the player off. |
| Put the mains plug in correctly, if necessary, check the socket is working with another appliance. | ||
| no power supply/ mains switch switched off | Switch the player on by the mains switch (Fig. 1/2). | |
| No image displayed on screen | Video cable not correctly connected | ⚠ WARNING:Before troubleshooting, switch the player off. Check the correct fi t of the Video cable ⇒ „Connecting the Video cable“. Make sure that the jacks are tightly in the sockets. |
| no DVD/CD inserted Insert a CD/DVD. | ||
| DVD/CD not compatible | Use only compatible media (see ⇒ „Technical data“). | |
| DVD/CD incorrectly placed in CD/DVD-tray | Turn the CD/DVD around. | |
| CD/DVD is dirty Clean the CD/DVD around. | ||
| CD/DVD is damaged Use a diff erent CD/DVD. | ||
| Incorrect settings Check the settings of your DVD-Player. | ||
| The child lock system is activated | Deactivate the child lock ⇒ „Parental control”. | |
| The wrong TV mode has been selected (no P-SCAN-capable playback device). | Press the VIDEO (Fig. 3/1) button in stop mode in order to change to TV mode. | |
| No response when pressing button | Power supply problem or static charging of appliance | Switch off the main switch and pull out the mains plug. Insert the mains plug into the socket and switch the player on again. |
| No sound Audio cable | not connected | ⚠ WARNING:Before troubleshooting, switch the player off. |
| Video plug for transmission of the Video signal, you must use and Audio cable in addition to the Video cable ⇒ „Connecting the Audio cable“. | ||
| Amplifi er switched off If you | use an amplifi er for Audio output: check whether the amplifi er is switched on. | |
| Incorrect settings Check the settings of your DVD-Player. | ||
| The remote control does not work | wrong direction The remote control is not pointed towards the DVD-Player. | |
| too far away Make sure that the remote control is not further than 5 m away from the player. | ||
| Batteries empty | Replace the batteries in the remote control ⇒ „Remote control battery installation“. | |
| DVD cannot be played | DVD has not been fi nalized | Use a fi nalized DVD. |
Disposal
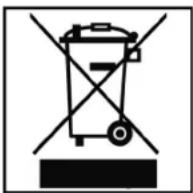
At the end of the service life of the appliance, in particular if it is malfunctioning, make the appliance unusable by pulling the mains plug out of the socket and separating the power cable. Dispose of the appliance according to the environmental regulations applicable in your country. Electrical waste may not be disposed of together with household waste. For any advice regarding recycling, contact your local municipal authorities or your dealer.
Batteries
Notes on Handling Batteries:
- Keep batteries away from children. They are not a toy!
Never throw batteries into a fire or immerse in water.
When inserting a battery, ensure the correct polarity.
Do not open the batteries by force.
Avoid contact with metallic objects (rings, nails, screws et cetera). There is a danger of short-circuiting!
As a result of a short-circuit batteries may heat up considerably or even catch fi re. This may result in burns.
If a battery leaks do not rub the liquid into your eyes or mucous membranes. If hands come into contact with the liquid they should be washed thoroughly and eyes rinsed out with clear water; if symptoms persist please consult a doctor.
Used batteries should not be disposed of in the normal domestic waste. Please return old batteries to an appropriate connection point.
The following symbols are to be found on (rechargeable) batteries containing harmful substances:

Pb = contains lead Cd = contains cadmium Hg = contains mercury Li = contains lithium
Declaration of conformity
ETV Elektro-Technische Vertriebsgesellschaft mbH hereby declares that the device DVD 4539 is in conformity with the basic requirements of the European guideline for electromagnetic compatibility (2004/108/EG) and the low voltage guideline (2006/95/EG).
| Language | Language |
| Subtitle | |
| MPEG 4 subtitle | |
| Audio | |
| DVD menu |
| Video | Aspect Ratio 4:3 | 16:9 |
| View Mode Fill | OriginalAuto FitPan Scan | |
| TV System NTSC | PALAUTO | |
| Video out S-Video | YUVRGBP-ScanHD | |
| HD Resolution Auto | 480p / 576p720p1080i1080p |
| Rating | Parental Control 1. Kid Safe | 2. G3. PG4. PG-135. PG-R6. R7. NC-178. Adult |
| Set Password |
| Misc | Use Default Setting | |
| Screen saver | OffOn |
| Audio | Bass management Off | On |
| Front Speakers Large | Small | |
| Center Speaker Large | SmallNone | |
| Surround Speakers Large | SmallNone | |
| Subwoofer None | Present | |
| Test tones Off | LeftRightCenterLeft surr.Right surr.Subwoofer | |
| Center delay No Delay | 0.3m0.6m1m1.4m1.7m | |
| Surr. delay No Delay | 1m2m3m4m5.1m | |
| Digital Output Off | PCMAll |
GARANTIE-KARTE
The following technical changes addicted to DVD 4539 HDMI. Please keep this supplement with your operating manual.
Overview of the components

Device parts (Fig. 2)
19 POWER ON/OFF switch
Switching on the player
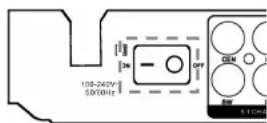
Turn on the main switch of the DVD player by moving the „POWER“ on/off switch on the back of the device to „ON“. If the device is then in standby mode, press the button STANDBY on the device (Fig. 1/2) or on the
remote control (Fig. 3/32) in order to switch the device on.


- Deutsch
- English
- English
- WARNING:
- ATTENTION:
- ETV
- Safety instructions
- Children and Frail Individuals
- Power supply
- Laser
- Transport
- English
- Where to position the appliance
- Operation
- Intended use
- Defect
- Setting up and connecting
- Unpacking
- i NOTE:
- Setting up
- Starting up
- Remote control battery installation
- Effective range of the remote control
- i HINWEIS:
- SCART
- HDMI
- Component Video
- S-Video
- Composite-Video
- Connecting the Audio cable
- Stereo
- Inputs on the Front
- Switching on the player
- Proceed as follows:
- Digital
- Optical
- USB Input (on the Front)
- Memory Card Slot (on the Front)
- About the DVD-Player
- Terminology
- Input Not Possible
- Playing media
- DVD-menu
- Stopping the replay
- Selecting previous chapter/track
- Selecting next chapter/track
- Selecting track directly
- Accessing a section via menu
- Repeating DVD-title/chapter
- Stopping repeat
- Selecting a section to be repeated
- English
- Working in fi le mode
- Selecting fi le/directory and starting replay
- Please note:
- NOTE:
- Creating a playlist
- i NOTES:
- Deleting a Playlist
- Viewing pictures
- Scrolling
- Rotating a photo
- Changing the default settings
- Navigation and selection
- Language Settings
- Video Settings
- Aspect Ratio
- View Mode
- TV-System
- Video Output
- Audio Setup
- HD Resolution
- Bass Management
- Front speakers; Center speaker; Surround speakers
- Example:
- Subwoofer:
- Test Tones
- Center/Surround Delay
- Digital Output
- English
- Parental Control
- Setting a Password
- Using Default Settings
- Screen saver
- English
- Troubleshooting
- Disposal
- Batteries
- Notes on Handling Batteries:
- Declaration of conformity
- GARANTIE-KARTE
Brand : AEG
Model : DVD 4539 HDMI
Category : DVD player