
DVD 4552 - DVD player AEG - Free user manual and instructions
Find the device manual for free DVD 4552 AEG in PDF.


| Product Type | DVD Player |
| Brand | AEG |
| Model | DVD 4552 |
| Dimensions (W x D x H) | 430 x 260 x 45 mm |
| Weight | 2.5 kg |
| Power Supply | AC 220-240 V, 50/60 Hz |
| Power Consumption | 15 W (max) |
| Disc Compatibility | DVD, DVD±R/RW, CD, CD-R/RW, VCD, MP3, JPEG, DivX |
| Video Output | Composite, Component, S-Video (via SCART) |
| Audio Output | Stereo RCA, Coaxial Digital, Optical Digital |
| Video System | PAL / NTSC (auto switch) |
| Progressive Scan | Yes (480p/576p) |
| Audio Decoding | Dolby Digital, MPEG-1/2 |
| Region Code | Region 2 (Europe) |
| Remote Control | Included (batteries not included) |
| Additional Ports | Front USB (for MP3/JPEG), Headphone jack |
| Playback Features | Zoom, Slow Motion, Repeat A-B, Parental Control |
| Cleaning Instructions | Wipe with dry soft cloth; do not use solvents. |
| Safety Precautions | Keep away from moisture, do not block ventilation slots. |
| Spare Parts / Accessories | Remote control, power cord, user manual |
| Repairability | Laser lens replacement; consult qualified service center. |
Frequently Asked Questions - DVD 4552 AEG
User questions about DVD 4552 AEG
0 question about this device. Answer the ones you know or ask your own.
Ask a new question about this device
Download the instructions for your DVD player in PDF format for free! Find your manual DVD 4552 - AEG and take your electronic device back in hand. On this page are published all the documents necessary for the use of your device. DVD 4552 by AEG.
USER MANUAL DVD 4552 AEG
natural_image
Two AEG televisions displaying cars with a back light and whiteboard, alongside a remote control panel (no visible text or symbols on main devices)Deutsch
Inhalt
Overview of the components ......Page 3/4
Instruction Manual Page 36
Technical Specifications Page 37
Disposal Page 60
Overview of the Components
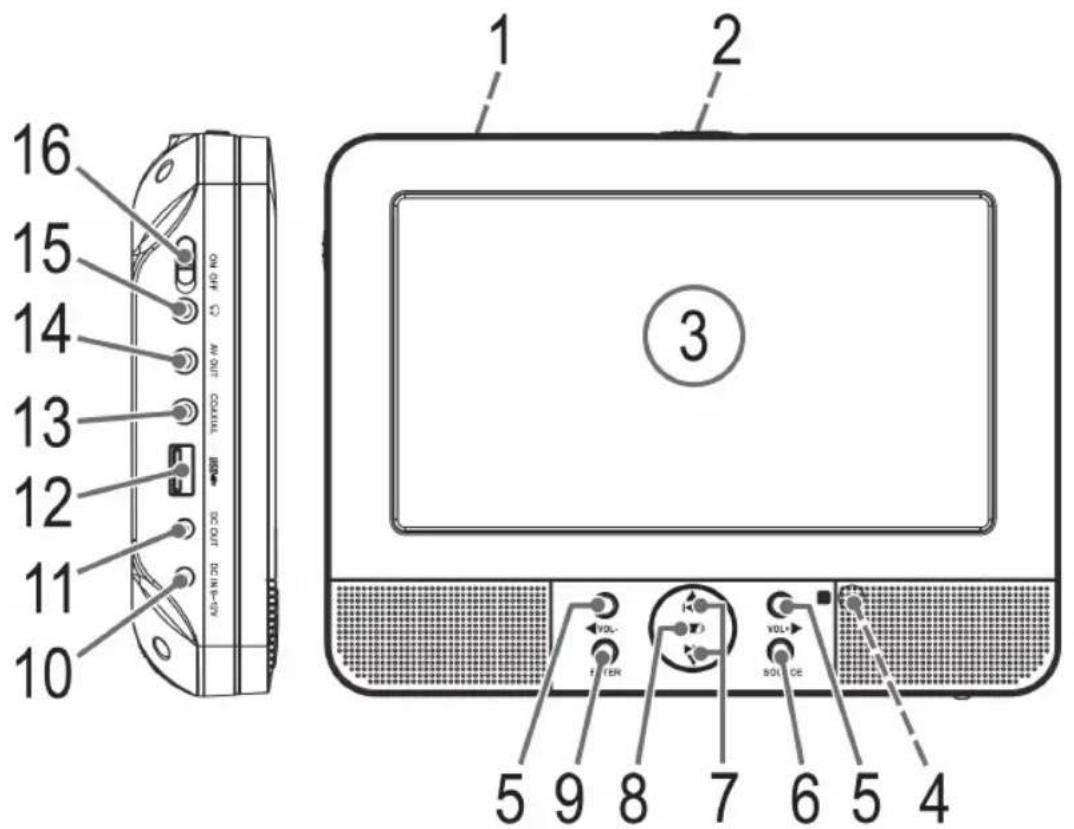
Abb./Fig. 1 (DVD Monitor)
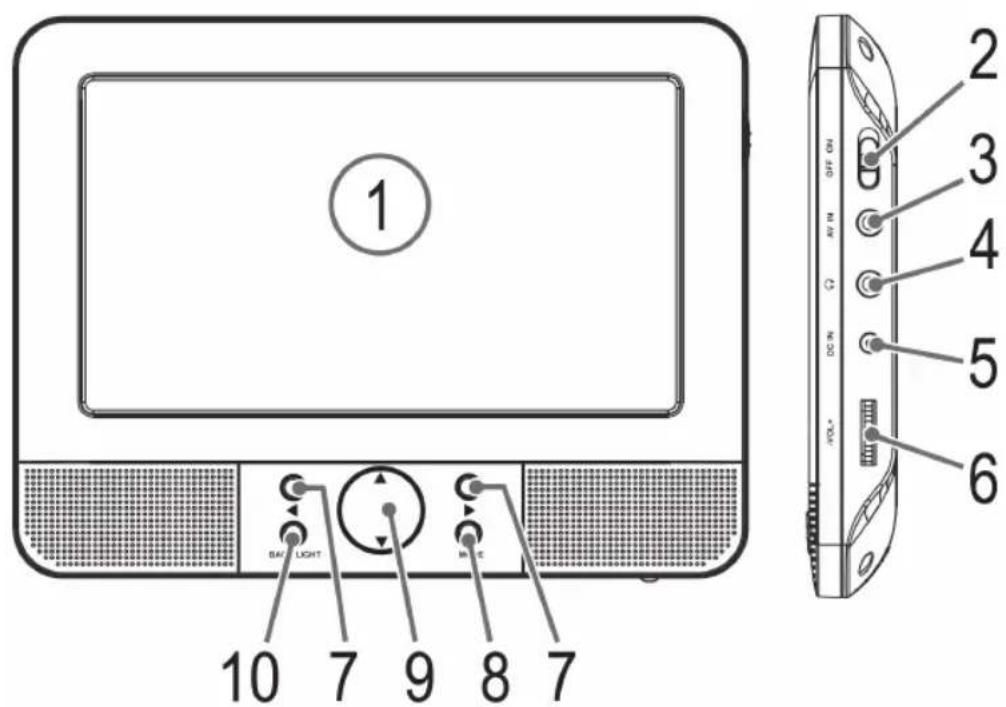
Abb./Fig. 2 (LCD Monitor)
Overview of the Components
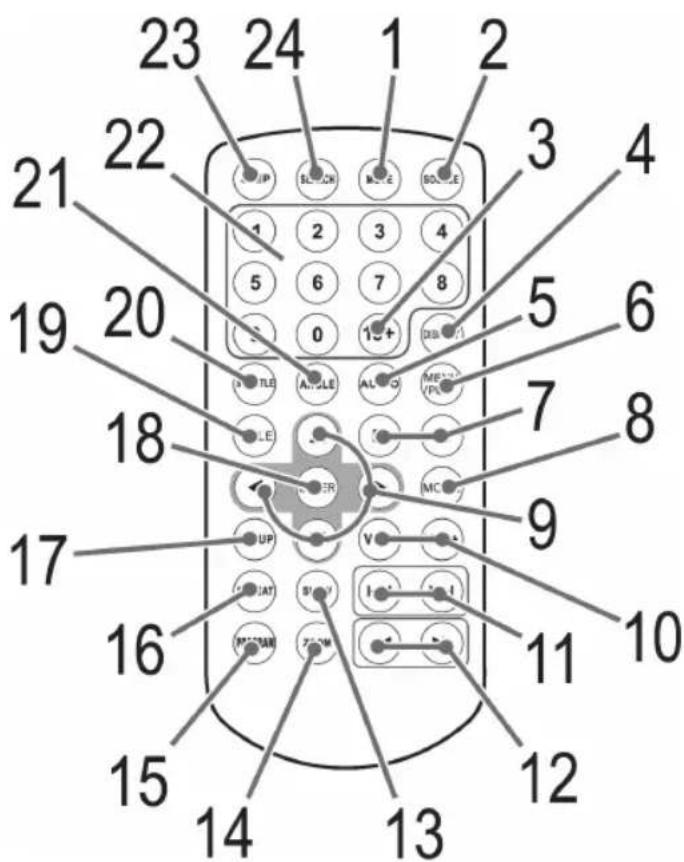
Abb./Fig. 3
Deutsch
natural_image
Line drawing of two rectangular TV monitors with control knobs and buttons (no text or symbols)natural_image
Illustration of hands using a ruler to measure a rectangular object (no text or symbols present)
natural_image
Line drawing of a hand holding a tablet device (no text or symbols)SR = Silberoxid-Batterie
CR = Lithium-Batterie
Garantiebedingungen
Location of Controls (DVD Monitor) (Fig. 1)
1 SD/MS/MMC card slot
2 "Open" button (OPEN)
3 LCD display
4 IR Sensor for remote control
5 "Right/Increase volume" button (▶/VOL+) "Left/Decrease volume" button (◀/VOL-)
6 Function selector (SOURCE)
7 "Up/Previous" button (▲/◄◄)
"Down/Next" button (▼)►►
8 Battery charge indicator ( ■ )
9 "Confirm" button (ENTER)
10 DC IN 9-12V connector
11 DC OUT socket
12 USB port
13 COAXIAL socket
14 AV OUT connector
15 📊 Earphones jack
16 ON/OFF switch
Location of Controls (LCD Monitor) (Fig. 2)
1 LCD display
2 ON/OFF switch
3 AV IN connector
4 Earphones jack
5 DC IN connector
6 Volume control
7 "Left/Right" button ( ◀/▶)
8 "Screen setup" button MODE
9 "Up/Down" button ( ▲▼)
10 "Screen off" button (BACK LIGHT)
Remote Control (Fig. 3)
1 MUTE: Mute the sound.
2 SOURCE: Select among DVD, USB and CARD.
3 10+: For selecting the chapter/tracks above 9. Pressing the button again increases the figure by 10 each time.
4 DISPLAY: Display playback mode.
5 AUDIO: Change audio settings.
6 MENU/PBC: Access DVD/VCD main menu. Show playback control in VCD.
7 ▶It: Start playback. Freeze image. Press "→" to continue.
■: Stop playback.
8 MODE: Show the video setup menu.
9 Navigation buttons: Navigate OSD menu.
10 VOL+/VOL-: Increase/decrease volume.
11: Skip to previous chapter or song.
▶: Skip to next chapter or song.
12 ▶: Fast forward.
◀◀: Rewind.
13 SLOW: Slow motion. Use the ▶ II button to continue playing the film.
14 ZOOM: Zoom in/out.
15 PROGRAM: Access playlist.
16 REPEAT: Repeat title, chapter, etc.
17 SETUP: Access setup menu.
18 ENTER: Confirm input.
19 TITLE: Display DVD title menu.
20 SUBTITLE: Show/hide sub-titles.
21 ANGLE: Select camera angle.
22 Numeric buttons: Select chapter or track number directly.
23 STEP: Pauses the display. Press again to show the next picture. Use the ▶ II button to continue playing the film.
24 SEARCH: Select CD/DVD section directly.
Technical Specifications
| Type of Unit DVD Car Cinema | |
| Model DVD 4552 LCD | |
| Power Supply AC 100-240 V, 50/60 HzDC 9 V, 1.5 A | |
| Output <15 W | |
| Dimension (L x H x W) DVD | Monitor: 226 mm x 173 mm x 38 mmLCD Monitor: 226 mm x 169 mm x 21 mm |
| Weight DVD Monitor: 0.79 kgLCD Monitor: 0.45 kg | |
| Laser Semi-conductor-laser | |
| Signal PAL/NTSC | |
| SNR >=80 dB | |
| Video-output 1.0 V (P-P) 75 Ω | |
| Analog audio-output 1.0 V (rms) | |
| Operating conditions 0°C to 40°C, level surface | |
| Compatible media DVD-Vi | Video (DVD Disc, DVD±R/RW)MPEG-4 Video (of CD/DVD Disc,DVD±R/RW, CD-R/RWAudio CD (of CD Disc, CD-R/RW)Video CD (of CD Disc, CD-R/RWMP3 files (of CD/DVD Disc, DVD±R/RW,CD-R/RW) |
| Regional code | 2 (= Europe, Greenland, South Africa, Egyptand Middle East, Japan) |
| Accessories | AC/DC Adapter, Mains/AV cable, remotecontrol (incl. battery), car adaptor cable,4x straps, 2x stereo headphones |
Table of Contents
Location of Controls....36
Remote Control 36
Technical Specifications ....37
Safety Instructions 39
Assembly and Connection 41
Operation 42
Power Supply 42
Change Fuse for 12 V adaptor....45
Connections 45
Turn Unit On....45
Connect to Other Devices 46
LCD Monitor - Change Display Settings....46
About the DVD-Player 47
Play Media 48
Work in Data Mode 51
Change Default Setting 53
Troubleshooting 59
Disposal 60
Conformity Declaration 61
OSD Menu Overview 62
38 English
Thank you!
Thank you for selecting DVD Car Cinema DVD 4552 LCD.
Enjoy this unit and thanks again for the purchase!

natural_image
Line drawing of two rectangular TV screens with control knobs and buttons (no text or symbols)Symbols featured in the Operation Manual
To ensure your safety, important Tips are specifically labeled. To avoid accidents and damage to the unit, it is imperative to comply with these guidelines:
WARNING:
Warns against danger to your health and illustrates possible injury risks.
CAUTION:
Outlines possible hazards for unit and other items.
i NOTE:
Provides notes and information for your convenience.
Manufacturer's Contact Information
ETV
We reserve the right to perform technical and visual changes to ensure the continuous improvement of our unit.

Safety Instructions
User Manual
Prior to using the unit please read the entire user manual.
Keep the manual in a safe place. If you pass the unit on to a third part please include the user manual.
Disregarding these instructions may lead to severe injury or damage to the unit.
We do not accept liability for damages sustained due to disregarding of the user manual.
The unit may be utilized for personal use within a household only. It is not suitable for commercial use.
Children and Handicapped Persons
Do not leave the unit unattended and do not use if children or other individuals who are unable to assess the possible endangerment are in the vicinity.
Children or other individuals who are unable to assess the possible endangerment should not use the unit. Please store it in a manner that does not allow access.
- Packing materials should not be used for play, due to danger of sufocation.
Power Supply
The unit is powered electrically and therefore may lead to electric shock. Please pay attention to the following:
- Do not touch the plug with wet hands.
If you remove the plug from the outlet, always remove by pulling the plug directly. To avoid possible breakage, never pull the cable.
■ Ensure that the mains cable is not bent, jammed, run over or is subjected to heat sources.
■ Ensure that the cable is not wrapped around unit during use. - Do not place unit on top of the mains cable during use.
■ Use only extension cords that are compatible with the power input of the unit. - Do not expose the unit to rain and moisture of any kind.
- Operate the unit only if the electrical voltage indicated on the identification label is compatible with the voltage of your power outlet. Incorrect voltage may destroy the unit.
■ To avoid water penetration, never place a lower vase etc., on the unit. - Do not open the unit.
- Pull the mains plug if the unit is not in use for an extended period of time.
■ Ensure that the mains cable does not project a tripping hazard.
English
Laser

This unit is classified as a category 1 laser unit. The corresponding tag may be found on the outside surface of the unit. Laser rays may cause damage to eyes. Please pay caution to the following:
Do not open the unit under any circumstances. Do not attempt to disassemble the unit.
To avoid endangerment: Maintenance should be performed by the manufacturer or their customer service only.
Location
Select a safe location to ensure safe operation of the unit. Please pay caution to the following:
■ Protect the unit against environmental forces.
■ Protect the unit from moisture.
- Do not place any container illed with liquid substances i.e. vases, on top of the unit.
■ Never place the unit on top of or in the close vicinity of heating sources such as i.e. heaters, ovens, etc.
- Do not expose the unit to direct sunlight.
When placing the unit ensure the location provides adequate ventilation to avoid heat accumulation inside of the unit. Ensure that ventilation slots are not blocked.
■ Protect the unit from mechanical percussions.
■ Always place the unit on a sturdy lat surface.
- Protect the remote control against environmental forces, moisture and extreme temperatures (i.e. direct sun light).
- Do not use the unit while driving a vehicle.
Operation
The unit can display a freeze frame for unlimited time on screen. This can cause damage to the screen. Activate the screen saver Page 55, "General Setup" menu.
Do not adjust the volume in the event a low volume segment is rendered. This may cause damage to the speaker if suddenly followed by a high volume rendition of a following segment.
To avoid damage to the unit place only CD's or DVD's into the designated slot.
■ During longer periods of non-use turn the unit of (main switch).
■ Disconnect the network plug during a thunderstorm
Intended Utilization
Utilization of this unit is limited to the following:
■ Play-back of video-DVD/video CD's
■ Play-back of audio-CD.
Any other utilization not for intended use is prohibited.
English
Damage
If the unit is damaged:
To avoid endangerment in the event the network connector is damaged only the manufacturer or their customer service may replace the part.
If moisture penetrated the unit or the unit has been dropped or has been damaged otherwise, an authorized specialized dealer must evaluate the damage. Disconnect the unit and contact an authorized dealer.
Assembly and Connection
Unpacking
Please unpack the unit and all accessories and check the contents for completeness.
CAUTION:
Always transport/ship the unit in the original packing to avoid damages. Retain the original packing materials for this purpose. Recycle useless packing material in accordance with your countries regulations.
i NOTE:
Damages due to transport must be reported to the supplier immediately.
Assembly
- Fold out the stand at the rear of the DVD Monitor.
- Place the unit on a stable, level and lat surface. Maintain a distance of a minimum of 10 cm from walls and other objects.
- Connect the unit to an outlet installed according to regulations.
- Remove protective cover from device /LCD Screen if applicable.
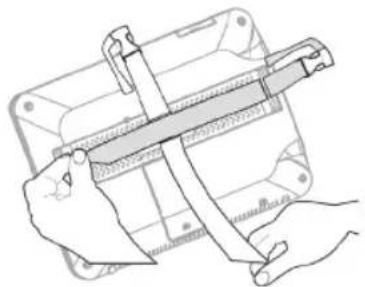
Head-rest mounting
You will need two fastening strips to fit each device.
WARNING:
The fixing belts are not suitable for use while driving. Risk of injuries!
i NOTE:
The supplied fixing belts are only intended for use while the vehicle is parked.
- Thread a strap through the clamps on the back of the unit.
- Fix the device now horizontally to the back of the head-rest.
- Fasten the horizontal strap to the other strap. Run it vertically around the headrest.
natural_image
Illustration of hands using a ruler to measure a rectangular object (no text or symbols visible)
natural_image
Line drawing of a hand holding a digital tablet device (no text or symbols visible)English
Insert Batteries into the Remote Control/replace
Operation

WARNING:
Leaking battery acid may cause a health hazard. Remove batteries from the remote control when depleted or the unit is not in use for an extended period of time. Clean up any leakage with a cloth immediately. In the event of skin contact, rinse the affected area immediately. In case of ingestion consult a physician immediately. In the event of eye contact, rinse eyes and consult a physician immediately.

CAUTION:
Upon disposal, adhere to the recycle and environmental regulations of your respective country. Never throw batteries into open fire.

NOTE:
The lithium cell in the battery compartment of the remote has been protected with plastic foil for transport. This extends the lifetime of the battery. Before initial use, please remove this foil to prepare the remote control for use.
The life span of enclosed batteries may be reduced due to storage.
- Open the battery compartment on the bottom of the remote control.
- Replace the cell with a battery of the same type (CR 2025). Pay attention to the polarity.
- Close the battery compartment again.

NOTE:
The signals of the remote control are transmitted to the DVD-Player by infrared light. Ensure that the DVD-Player is not exposed to direct sunlight. This may render the signal transmittal from the remote control to the DVD-Player impossible.
Remote Control Range
To use the remote control point it toward the remote control sensor located at the front of the unit. The distance between remote control and sensor should not exceed 5 meters. The angle of the remote control to the sensor should not exceed 30 degrees within right, left, above and below.
Power Supply
A. Alternating Current Adapter
The alternating current adapter is functional with an alternating current of 100 V and 240 V but:
The enclosed mains cable may only be connected to a power source of 230-240 V alternating current within Europe.
To connect to an alternating current source outside of Europe a plug adapter compatible with the respective outlet must be used.
-
Connect the AC adapter cable to the DC IN 9\~12 V connector (Fig. 1/10) of the device.
-
To operate both devices:
-
Connect the AC adapter plug to the DC IN 9\~12 V connector (Fig. 1/10).
-
Connect the mains/AV connector cable to the DC OUT/AV OUT connector on the DVD MONITOR (Fig. 1/11, 14) and the DC IN/AV IN connector on the LCD MONITOR (Fig. 2/5, 3).
-
Connect the AC adapter to a properly installed Schuko socket. The charge indicator turns on red (Fig. 1/8).

CAUTION:
The enclosed alternate current adapter is intended for use with this unit only. Do not use with other unit.
If the unit is not in use for an extended period of time the alternate current adapter must be disconnected from the power outlet.
B. With Car Adaptor
Use the 12 V car adaptor for vehicles with 12 V power supply, negative ground.
■ Connect the cigarette lighter adapter to the DC IN 9\~12 V connector (Fig. 1/10).
Using both units:
- Connect the cigarette lighter adapter plug to the DC IN 9\~12 V connector (Fig. 1/10).
- Connect the mains/AV cable to DC OUT/AV OUT connector from DVD MONITOR (Fig. 1/11, 14) and DC IN/AV IN connector from LCD MONITOR (Fig. 2/5, 3).
Now connect the plug to the cigarette lighter of your vehicle.
Safety Precautions:
■ Only use this unit with the genuine car adaptor, other adaptors can damage the unit.
■ Only use the genuine car adaptor for this unit. Do not use for other units.
- Do not use the unit while driving. Ensure that the unit is fastened and/or stored properly to avoid injuries in case of accident.
i NOTE:
The supplied straps are only intended for use when the vehicle is parked.
WARNING:
The straps are not suitable for use when driving. Risk of injuries!
■ Handling the unit and watching videos/DVDs while driving is prohibited.
A dirty cigarette lighter can get hot. Ensure that the car adaptor is only connected to a clean cigarette lighter.
■ Disconnect the 12 V adaptor after use from unit and cigarette lighter.
- Charge the battery indoors before use.
■ Use the battery for watching DVDs outdoors.
Charge Battery
△ CAUTION:
Do not charge the battery right after use. Let the battery cool down for approx. 10 minutes to avoid damage.
- Connect the charger to the unit's DC IN 9\~12 V connector (Fig. 1/10).
- Connect the charger to a properly installed wall outlet. The charge indicator turns red (Fig. 1/8).

NOTE:
A dual operation is not possible with a battery.
CAUTION:
The enclosed alternate current adapter is intended for use with this unit only. Do not use with other unit.
If the unit is not in use for an extended period of time the alternate current adapter must be disconnected from the power outlet.
- Disconnect the unit in case of problems with the battery (such as overheating, swelling or odors) and contact the Service Center.
Do not charge the battery if not properly ventilated (such as on a mattress, sofa, cushion, soft surface, etc.).
Do not replace the battery with a different type, do not throw into ire or water; danger of explosion.
- Avoid direct sunlight or high temperatures (above 40°C [104°F]), like on the dashboard.
- Avoid shocks and pressure to the battery.
Avoid overcharging, deep discharge, too high current, operation in too high temperatures (above 40^ C) or too low temperatures (below 0^ C) and long storage when empty. This can damage the battery.
The rechargeable battery is fully charged when the charge indicator (Fig. 1/8) turns green.

NOTE:
■ Playback stops if the charge of the battery is too low.
The charge is low if "Low Battery" is displayed. Charge the battery now.
- Charge the battery directly before use.
- You can also charge the battery via the car adaptor.
CAUTION:
Do not short-circuit the terminals.
■ Only use the genuine charger to charge the battery.
Private Listening with Earphones/Headphones (Fig. 1/15; Fig. 2/4)
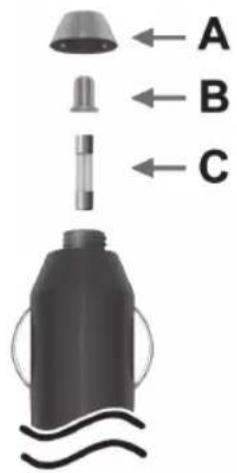
Change Fuse for 12 V adaptor
i NOTE:
Make sure that no hardware is lost when removing the fuse. Also ensure that hardware is fitted back into the correct place.
If the device does not work when using the 12 V cigarette lighter adapter, change the fuse. This can be found in the top of the 12 V adapter.
■ Unscrew the round, silver endpiece (A).
■ Remove the fuse (C) and replace it with a 2 A new time delay fuse.
■ Ensure that the silver tip (B) is fitted into the silver endpiece. Screw the endpiece back on.
Connections
- For private listening use headphones with 3.5 mm stereo jack and connect to earphones jack (P)
- Press VOL+ ▶/◄VOL- to increase or decrease the volume.
WARNING:
Do not adjust the headphone volume to loud. This may be hazardous to your hearing and you may endanger others and yourself.
Adjust to a low volume to avoid disrupting your surroundings.
If you suffer from tinnitus, keep volume to a minimum or refrain from use of this unit.
- Otologists advise a against long term use of headphones over an extended period of time.
Side Panel Inputs
USB port (Fig. 1/12)
Plug a USB storage device directly into the correct port of the device.
Card slot (Fig. 1/1)
Insert an MMC/SD or MS card with the label facing back in the card slot of the unit.
For further use with a USB storage device or memory card, please refer to section ➔ Page 51 "Work in Data Mode".
Turn Unit On (Fig. 1/16; Fig. 2/2)
Turn the unit on by sliding the "ON/OFF" main switch on the side of the unit to "ON". The buttons ▲/▼/▼/▼ (Fig. 1/7) and ▲/▼ (Fig. 2/9) light up red.
i NOTE:
In Dual mode, the DVD MONITOR must be switched on so that the power supply is fed to the second monitor.
English
Connect Other Playback Devices
Connect to Other Devices
■ Connect an AV cable to AV IN (Fig. 2/3) and to the playback device to view images of another playback device (such as digital camera).
■ Connect the AC adapter cable to the DC IN connector (Fig. 2/5).
■ Connect the AC adapter to a properly installed plug socket.

NOTE:
Other devices can only be connected to the LCD Monitor (slave monitor).
Digital Audio Transmission
Connect a coaxial cable (not included) to transmit the digital audit signal to your playback unit or your amplifier.
- Plug the Audio plug into the COAXIAL socket of the DVD monitor (Fig. 1/13).
- Insert the audio plug into the corresponding socket of your playback unit or your amplifier.
Connect TV Set
Connect an A/V cable to AV OUT (Fig. 1/14) and to the TV set to view images on the TV set.
Switch the TV set to AV IN. Observe the TV's user manual.

NOTE:
You need an audio cable with a 4-pin 3.5 mm jack plug to cinch socket, with a pin length of 15 mm.
LCD Monitor - Change Display Settings
■ Press the MODE button (Fig. 2/8), to display the Setup menu.
Use the ▲ and ▼(Fig. 2/9) buttons to select the option. Use the ▲ and ▶(Fig. 2/7) buttons to change the setting.

NOTE:
The menu hides itself automatically after a short time if no setting has been changed.
PICTURE

BRIGHT
CONTRAST
COLOR
LANG
ZOOM

50
50
ENGLISH
Picture
In the "Picture" menu, you can adjust brightness, contrast, colour, OSD language and the aspect ratio (ZOOM).
About the DVD-Player
You may play back a multitude of data formats with the Page 37, "Technical Specifications".
However, please note that most DVDs are furnished with a so called "regional code". It determines for which world region the DVD is designed. For example, DVDs with regional code "1" are designate for the USA and Canada. DVDs marked with the regional code "2" are designated for Europe.
i NOTE:
You may only play back DVDs marked with regional code "2" on the DVD-Player. A multitude of burn and duplication procedures as well as different levels of quality of (duplicated) CDs/DVDs are available. Additionally the music industry does not adhere to a set duplication copyright. This is the reason playback problems of CDs, DVDs and MP3 CDs may be experienced in isolated cases. It is not a malfunction of the unit.
Further, in isolated cases problems in playing computer reproduced CDs or DVDs. (i.e. vacation pictures). In the event of problems examine the setting of the DVD-reproduction program on your computer. Ensure that the DVD was inalized. Further information regarding this subject is available in the operation manual of your recording device.
Input not possible
This icon will be displayed if you select or enter an invalid function.
Track: "Track" is the sections of an Audio-CD. This may pertain to a song, a set of a symphony, etc.
■ Title/chapter: Video-DVDs are compartmentalized into "title" and "chapters". A "title", for example may be a specific movie and "chapters" may be sections of the movie.
■ MPEG4: Your DVD-Player is also equipped to play data compressed for MPEG-4 (short for Moving Picture Experts Group-4) MPEG-4 compression method that allows large amount of data to be compressed without significantly compromising the quality of picture and sound.
i NOTE:
A full global compatibility of compression procedures is not guaranteed, especially if multiple soundtracks and subtitles are involved. Even MPEG 4 files with integrated special menu functions are not always supported. This is not a malfunction of the unit.
English
Use Remote Control
Load CD/DVD
Screen Display of DVD-Menu
Start Playback
Play Media
You transmit commands to the DVD-Player using the remote control. It is important that the end of the remote control is pointed toward the DVD-Player.
- Slide the OPEN button on the device (Fig. 1/2) in the direction of the arrow. The CD/DVD compartment opens.
- Insert the CD/DVD.
- Close the CD/DVD compartment again. A moment later the loaded media type is displayed (e.g. "DVD-VIDEO").
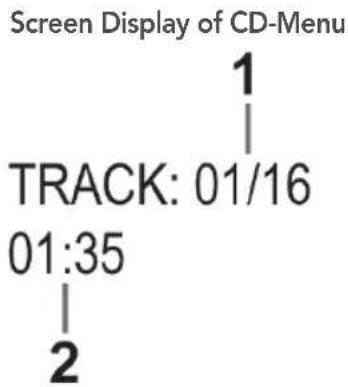
For CDs the following status information is displayed:
■ Current track/total number of tracks (1).
Time (2): Here you find information about playing time and remaining time. By default the elapsed playing time of the current track is displayed in minutes and seconds. Repeatedly press the DISPLAY button (Fig. 3/4) on the remote control for further time displays.
You have the following options
- remaining time until the end of the track,
- elapsed playing time CD,
- remaining time until the end of the CD.
You may display the screen menu for DVD use by pressing the DISPLAY button (Fig. 3/4).
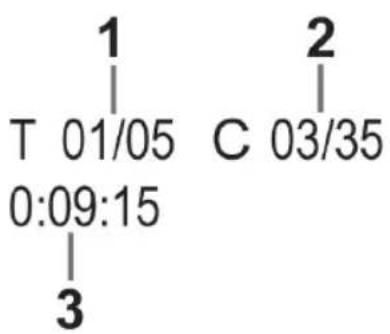
DVD-menu
■ Current title/total number of titles (1).
■ Current chapter/total number of chapters (2).
■ Time (3): Here you find information about playing time and remaining time.
By default the elapsed playing time of the current track is displayed. The time is displayed in hours, minutes and seconds. Repeatedly press the DISPLAY button (Fig. 3/4) on the remote control for further time displays.
You have the following options
- remaining time until the end of the title,
- elapsed playing time chapter,
- remaining time until the end of the chapter,
-
display off.
-
Insert CD/DVD into CD/DVD-compartment Page 48, "Load CD/DVD".
- Press the "▶II" button (Fig. 3/7) on the remote control.
i NOTE:
If the play does not start up or the play quality is poor, check the default settings on the DVD-Players.
English
Pause Playback
- Press the "button (Fig. 3/7) on the remote control. The playback is interrupted and the current image is frozen.
- Press the "▶II" button (Fig. 3/7) on the remote control, to restart "normal" play.
Change Audio-Language/Audio-Mode
Press the AUDIO button (Fig. 3/5), repeatedly to change the audio-language. The available languages are dependent on the DVD.
i NOTE:
If the medium does not support this function, (e.g. on a CD), you can change the audio mode with this button, e.g. set it to "mono" or "stereo".
Show Sub-Titles
Press the SUBTITLE button (Fig. 3/20) repeatedly if you want to activate, deactivate or select a different subtitle language. The available subtitle languages are dependent on the DVD.
Stop Playback
During playback press "■" button (Fig. 3/7). This will stop play.
Press the "▶II" button again (Fig. 3/7) to continue the playback from the last position.
Press the "■" button twice (Fig. 3/7) to stop reply entirely. If you press the "▶" button (Fig. 3/7) again, the CD/DVD will start from the beginning.
Select previous Chapter/ Track
Press "button (Fig. 3/11) to return to the beginning of the previous chapter or track.
Select next Chapter/Track
Press "▶▶(Fig. 3/11) to forward to the next chapter or track."
Direct Track Selection
Enter the number of the desired chapter/track using the numeric buttons on your remote control (Fig. 3/22).
Playback will start shortly.
Select a Passage using the Menu
For your convenience, you may select respective media passages directly from you screen menu as follows:
- Select the desired category by repeatedly pressing the SEARCH button (Fig. 3/24).
- Use the navigation buttons (Fig. 3/9) to select the category.
- Enter the moment in time for playback to start. Depending on the media type this can be a track number, a chapter or a time. Enter the values with the numeric buttons (Fig. 3/22). Playback starts after a short moment.
Repeat DVD-Title/Chapter
- Select chapter or title to be repeated.
- Press the REPEAT button (Fig. 3/16). "Chapter" is displayed.
- Press the REPEAT, button again until "Title" or "All" is displayed.
Repeat CD-Track
- Select the track to be repeated.
- Press the REPEAT button (Fig. 3/16). "Track" is displayed.
50 English
Repeat CD Press the REPEAT (Fig. 3/16) button again until "All" is displayed.
End Repeat Repeatedly press the REPEAT button (Fig. 3/16), until the message disappears from the screen.
DVD-Menu Ordinarily each DVD features an individual menu. Here you may select chapters, change settings, etc. This menu is CD specific, therefore no additional information is available.
Press the MENU/PBC button (Fig. 3/6), to start the DVD-menu. Navigate the menu using the navigation buttons (Fig. 3/9). Confirm the entry by pressing the ENTER button (Fig. 3/18).
Fast Forward or Rewind The DVD-Player features a fast forward and rewind option.
-
Press ▶ or◀(Fig. 3/12) to start fast forward or rewind. The current direction and speed are displayed, e.g. “▶2x”.
-
Press the ▶ or ◀ button repeatedly to change the speed. The speed may be accelerated by factor 2, 4, 8, 16 or 32.
-
Press the "▶II" button (Fig. 3/7) to continue normal play upon reaching the desired passage.
Enlarge Picture Upon viewing DVDs, VCDs or pictures you may modify the picture appearance.
Press ZOOM button (Fig. 3/14), to modify the picture segment. Press the button repeatedly to select the applicable zoom-factor or to return to the default zoom-factor.
i NOTE:
You may navigate within the zoomed picture using the navigation buttons (Fig. 3/9).
Change Picture Angle Some DVDs offer the option to select the picture angle independently.
Press ANGLE (Fig. 3/21), to modify the picture angle.
i NOTE:
If modification of the picture angle is not possible the screen will display an error message "∅".
Press the button repeatedly to select another picture angle or return to the default picture angle.
Adjust Volume Use the VOL+ and VOL- buttons (Fig. 3/10) to set the desired volume.
i NOTE:
If the volume is set to low on the DVD monitor, there will be no sound output from the AV OUT socket (Fig. 1/14).
English
51
Create Playlist (CD/DVD)
CD:
Program
DVD:
Program
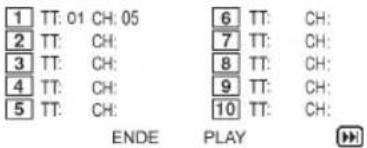
Delete Playlist (CD/DVD)
Use CD/DVD
Use Memory Card
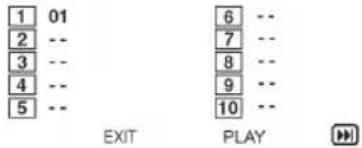
You may not want to listen to titles of e.g. a CD in the order designated by the manufacturer. The function "create playlist" enables you to create you own play sequence as follows:
- Press the PROGRAM button (Fig. 3/15). You will see a table. Enter the desired track sequence (CDs) or chapter/title (of DVDs) here.
i NOTE:
Your playlist will be lost upon turning of the DVD-player as well as when inserting a new CD/DVD.
- Navigate within the table by using the navigation buttons (Fig. 3/9).
- Enter the desired track (on CDs) or the chapter/title (on DVDs at the respective table position. Use numeric buttons for entries (Fig. 3/22).
- Use navigation buttons (Fig. 3/9) to save your entries by selecting "Start" at the bottom edge of the table.
-
Confirm your entry by pressing the ENTER button (Fig. 3/18) on the remote control.
-
Press the PROGRAM button. A table is displayed (Fig. CD or Fig. DVD).
- Use the navigation buttons (Fig. 3/9) to manoeuvre to the command "Stop" at the bottom of the table.
- Press ENTER (Fig. 3/18) on the remote control to confirm.
- Press the PROGRAM button to finish.
Work in Data Mode
In addition to play "regular" movies or music with CDs/DVDs, with this DVD-Player you have the option to display video- or audio files of CDs or DVDs, if stored in file systems. Such media is available if you create CDs containing digital photos or MP3-music on your computer.
- Insert a CD or DVD into the drive Page 48, "Load CD/DVD".
- Select the desired and start play Page 52, "Select File/Index and Start Playback".
You may use the following memory cards:
SD-Card
■ Multi Media Card
■ Memory Stick
- Insert the memory card into the card reader with the label facing back (Fig. 1/1).
- Press the SOURCE button (Fig. 3/2) on the remote control to access the file menu.
- Use the navigation buttons (Fig. 3/9) to select MEDIA/SD mode. Press ENTER (Fig. 3/18) to confirm.
-
Select the desired file(s) and start playback Page 52, "Select File/ Index and Start Playback".
-
Press the SOURCE button (Fig. 3/2) again and use the navigation buttons and ENTER to return to DVD mode.

NOTE:
The DVD player scans the media contents to determine, which files can be played. This process can take some time for large storage media.
Use USB Device
A variety of USB devices can be connected to the DVD player, such as USB sticks or digital cameras.
This unit is designed according to the latest USB developments. Due to the large number of different USB devices on the market we cannot guarantee total compatibility with all USB devices. In some cases playback problems from USB devices can occur. This is no malfunction of this device.
- Connect the USB device directly to the DVD player's port (Fig. 1/12).
- Press the SOURCE button (Fig. 3/2) on the remote control to access the ile menu.
- Use the navigation buttons (Fig. 3/9) to select MEDIA/USB mode. Press ENTER (Fig. 3/18) to confirm.

NOTE:
The DVD-Player will search storage media to determine which playable data is available. This may take a long time if a large storage media is searched.
- Select the desired file(s) and star Page 52, "Select File/Index and start playback".
- Press the SOURCE button (Fig. 3/2) again and use the navigation buttons and ENTER to return to DVD mode.
Select File/Index and Start Playback
Communication media may contain numerous data/files and indexes. Therefore you must specify which files should be played.
- If not yet done, now insert the CD or DVD into the drive or connect a device.
- A menu window listing the directories (if directories exist) or the files appears.
- Use the navigation buttons (Fig. 3/9) in the list to select the desired directory or the file.
- Press ENTER (Fig. 3/18) to confirm.
File: The file content is displayed or played if a file is selected.
Directory: If a directory is selected the file list opens.
Select the desired file with the navigation buttons and ENTER (Fig. 3/18). The file content is displayed or played if a file is selected.
Note:
Numerous reproduction and compression procedures as well as differences in quality of CDs/DVDs and burned CDs and DVDs are available. Because of this reason problems with the play of files, (i.e. files may be displayed but cannot be played), may occur in isolated cases. This is not a malfunction of the unit.
i NOTE:
Press “◀ (Fig. 3/9) to return from the file list to the directories.
Exit Play
Display Photos
Press the "■" button (Fig. 3/7) on the remote control to exit playback.
The DVD-Player is equipped to display your digital photos. These photos may be stored on any media supported by your DVD-player (DVD, CD, etc.).
i NOTE:
■ Ensure an acceptable photo size. Very large photos may be displayed at a very slow speed or not at all. Ideally the photo size corresponds with the picture format of the play. In TVs this is normally 1024x576 Pixel (size 16:9) or 768x576 (Size 4:3).
Please be aware that any conversion may lead to loss of information regarding the original format.
Start the photo display by selecting the file you would like to start the display with ➔ Page 52, "Select File/Index and start playback".
i NOTE:
After a few seconds, a preview appears in the menu window on the right hand side.
Turn Pages
■ Manual: Press buttons◀◀ or ▶◀(Fig. 3/11) on the remote control to scroll forwards or back.
■ Pause paging: Press▶ II (Fig. 3/7) to pause the automatic slideshow. Press▶ again to continue slideshow mode.
Rotate Pictures
You may rotate the picture during display by using the navigation buttons:
■ Rotate vertically: Navigation button "▼"
■ Rotate horizontally: Navigation button "▲"
■ 90° clockwise: navigation button "▶"
■ 90° counter clockwise: navigation button "◀"
Cross fade
When playing back pictures you can select between various cross fade effects.
Press the PROGRAM button repeatedly (Fig. 3/15).
Change Default Setting
A larger number of default settings can be comfortably changed via the screen menu.
Press the SETUP button (Fig. 3/17) on the remote control to start the menu for changing the default settings.
English
Understand Menu Structure
Using the Menu
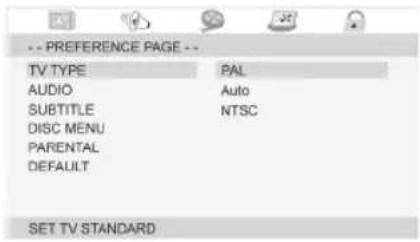

Main Menu Overview
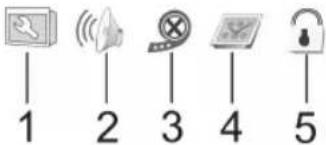
i NOTE:
Many of this default settings can be changed using the remote control as well as the menu. The difference is: If you change the default settings with the remote control, the changes will reset upon turning off the DVD Player or removal of the DVD. Changes made using the menu are permanent.
Within the menu setup you will find two menu levels:
■ Main menu: The main menu is displayed by graphic symbols.
Sub-menu: Within every main menu entry you will ind the corresponding sub-menu entries.
Navigation and Selection
■ Within the main menu you will navigate using the navigation buttons (Fig. 3/9) of remote control ▶/▶
■ You can navigate the sub-menu using the navigation buttons (▲/▼).
■ Select a specific menu section by pressing the ENTER button (Fig. 3/18).
Select an option (e.g. "PAL" in the Figure on the left) also with ENTER. The selected option (PAL in this example) is highlighted.
■ Press the navigation button (◀) to toggle between submenu and main menu.
Slide Control
Please use the control as follows:
- Select it with the ENTER button.
- Navigate the control with the navigation buttons (▲/▼).
- Confirm with the ENTER button.
■ General Setup (1)
■ Audio Setup Page (2)
■ Video Setup Page (3)
■ Preference Page (4)
■ Password Setup Page (5)
i NOTE:
Some menu settings are available in stop mode only (contingent on DVD).
General Setup Page
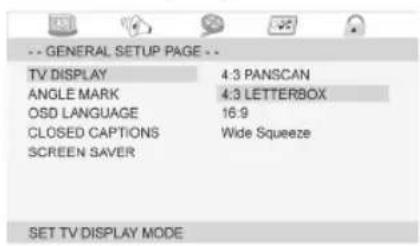

TV Monitor
Here you may adjust the output of the DVD-Player to match the aspect ration of your display unit.
Background: Unless you have a wide-screen TV, the aspect ratio of your image display is 4:3. Most movies however, have an aspect ratio of 16:9, therefore the picture is to wide for TV playback.
You may select here how the playback of the movie will appear on your output device:
4:3 Panscan: You may only view the center area of the movie. The edges are cut off.
4:3 Letterbox: You may view the entire range of the movie in a reduced version; therefore a black bar appears on the top and bottom of the screen.
16:9: Choose this option if you have a wide-screen TV. Keep in mind that movies recorded in an aspect ratio of 4:3 will display in the same 4:3 ratio. Therefore it will not populate the entire screen of the wide-screen TV.
■ Wide Squeeze: Select this option, if you are using a wide screen TV for playback. This setting adjusts films in 4:3 format to the aspect ratio of the wide screen TV.

NOTE:
The setting "4:3 PANSCAN" is not supported by all DVDs.
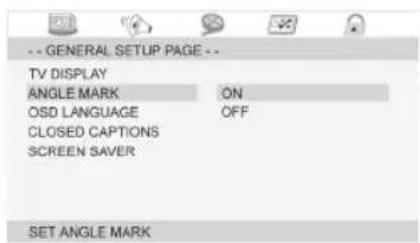
Angle Mark (Camera Angle)
If the DVD contains scenes shot from different angles press the ANGLE button (Fig. 3/21) to select one of the different camera angles. This function is only available if the DVD contains scenes shot from different camera angles.
Activate the function as follows:
■ On: The angle mark is displayed.
■ Off: The angle mark is not displayed.
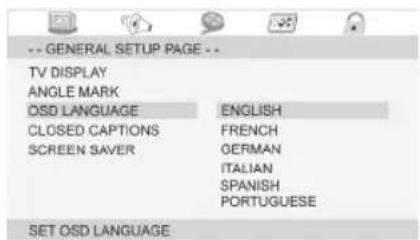
OSD Language
Here you select the OSD language.
Closed captions (comments)
Some DVDs contain closed captions, such as for hearing impaired persons.
■ On: Closed captions are displayed.
■ Off: Closed captions are not displayed.
English
Audio Setup Page


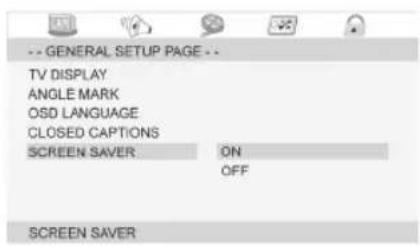
Screen Saver
The unit can display a freeze frame without a time limit. This can cause damage to the screen. Activate the screen saver to protect the screen.
Select between the following options:
■ On: Screen saver is activated (default).
■ Off: Screen saver is deactivated.
Downmix (Downmix)
Modifies the characteristic of the speaker output:
L/R: Select this setting to play the DVD in Pro Logic Dolby Stereo Effect. Plays a realistic 2-channel stereo effect.
■ Stereo: Select this setting if you wish to play a DVD recorded in 5.1-audio-format in 2-channell-stereo sound.
Digital Output
The settings for the digital audio output are defined here.
■ SPDIF Off: An analogue and not a digital audio signal is transmitted.
■ SPDIF/RAW: A digital audio signal is transmitted. Use this setting if the amplifier is not a stereo two channel amplifier.
■ SPDIF/PCM: A digital audio signal is transmitted, which is converted into a 2-channel signal. Use this setting if the amplifier is a stereo two channel amplifier.
i NOTE:
If there is no audio output, although you have connected the DVD player to an amplifier, you may have selected an incorrect setting for the audio output.
Dolby Digital Setup
Dual Mono
The sound output usually takes place stereo. You may choose a mono output instead of a stereo output
■ Stereo: The output is in stereo (default setting).
L-Mono: The output is in mono. On all speakers the signal is emitted from the "left" stereo channel.
■ R-Mono: The output is in mono. On all speakers the signal is emitted from the "right" stereo channel.
- Mix Mono: The output is in mono. On all speakers the signal is emitted from the "both" stereo channel.

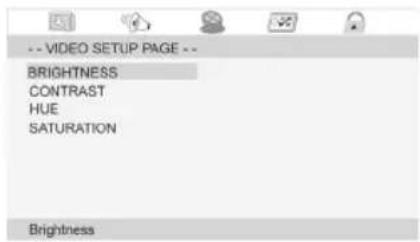
Video Setup
Preference Page

Dynamic
This concept "Dynamic Range" describes the ratio from the lowest to the loudest sound. With a high dynamic range very low, as well as very loud sounds are emitted.
This may cause playback issues. In the event you view a DVD within a relatively noisy you may adjust the volume to hear low volume passages, however, it bears the disadvantage that louder passages are unacceptably loud. Suggestively you may compromise (reduce) the dynamic range and increase the output volume.
■ FULL -1/8: The dynamic ratio is compromised from 1/8 to maximum (FULL).
■ OFF: The dynamic ratio is not compromised (default setting).
Video Output Settings
In this menu you can change various settings to adjust the video output signal.

NOTE:
You can also use the MODE button (Fig. 3/8) to open this menu.
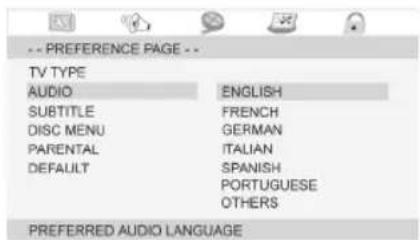
TV Type
Adjust the DVD player's output to the color system of your TV set. The following options are available:
■ PAL: Primarily European system.
■ AUTO: Select this setting if your TV set is a multi system device.
■ NTSC: Primarily North American system.
Audio; Subtitle; Disc Menu
■ Audio: Select your preferred audio language.
■ Subtitle: Select your preferred subtitle language.
■ Disc Menu: Select your preferred disc menu language.
English
Password Setup Page
Parental lock (Child-Welfare)
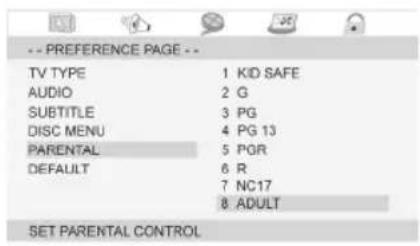
Some DVDs provide ratings for target groups. Applicable is the same standard used for movie ratings. (i.e. "Rated 12 years of age and above").
If you activated the child protection, if available, the information is read by the DVD and compared to your selected setting. If the DVD is authorized for and older age group as indicated in your settings the DVD will not play. You may choose from following options. Select between the following parental options:
■ Kid Safe: Safe for all children.
■ G: Suitable for all age groups.
■ PG: Parental guidance is recommended. Some scenes may be unsuitable for children.
■ PG 13: Parental guidance is strictly recommended. Some scenes may be unsuitable for children under 12 years of age.
■ PGR: Parental guidance is necessary.
■ R: Parental guidance for juveniles under the age of 16 years.
■ NC17: Not suitable for children and juveniles under the age of 18 years.
■ Adult: Adults only.
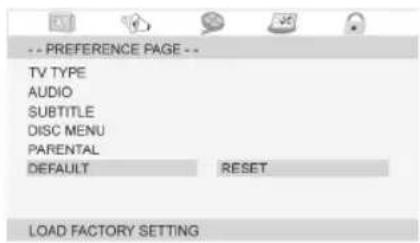
Default
Select "Reset" to reset the unit to the default settings.
All personalized settings are deleted.
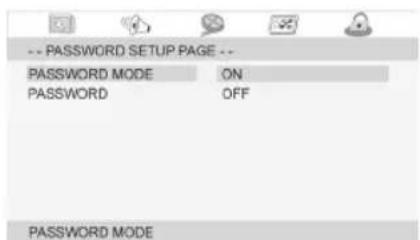
Enter a password first to lock your DVD player with the parental lock. The password protects the parental settings, and can only be changed after entering the correct password.
Password mode
■ ON: The password must be entered to change the parental settings.
■ OFF: The parental settings can be changed without entering the password.
Password
This menu allows you to change the password for the parental lock.
To change the password first enter the old password. The master password is "1369".
NOTE: In case you forget your password you can deactivate the parental lock with the master password.

Follow these steps to change the password:
- Enter the current password with the numeric buttons (Fig. 3/22) on the remote control in the field "Old Password". The screen shows "XXXX" to avoid that unauthorized person can read the password.
- Enter the new password with the numeric buttons on the remote control in the field "New password".
- Enter the new password again in the filed "Confirm Password". Press ENTER (Fig. 3/18) to confirm.
Troubleshooting
Consult the following table to troubleshoot errors prior to sending the device to customer service.
| Errors Cause Solution | ||
| Network display light not on | Lack of power supply | ⚠ WARNING:Turn off the device prior to troubleshooting. |
| Check if the mains plug is connected correctly. If necessary, test the outlet with another device for functionality. | ||
| No power supply/ main switch turned off | Turn the unit back on again with the main switch (Fig. 1/16; 2/2). | |
| No screen display TV | operation:Video cable incorrectly connected. | ⚠ WARNING:Turn of the device prior to troubleshooting. |
| Check the proper position of the video cable. Check if the plug is plugged tightly into the out let. | ||
| No DVD/CD inserted Insert CD/DVD. | ||
| DVD/CD incompatible Use compatible media only. | ||
| DVD/CD placed upside down into CD/DVD-compartment | Turn CD/DVD around. | |
| CD/DVD is soiled Clean CD/DVD. | ||
| CD/DVD is damaged Use another | CD/DVD. | |
| Default settings incorrect Check the default settings of the DVD-Players. | ||
| Child safety is activated Deactivate child safety. | ||
| No reaction upon pressing | Power supply issues or static charge of the device. | Turn off the main switch and disconnect the mains plug. Re-connect mains plug and turn device on. |
60
English
Errors Cause Solution
| No sound TV operation: | Audio cable not connected | ⚠ WARNING:Turn off the device prior to troubleshooting. |
| Ensure correct connection of the audio cable. Check if the plug is plugged tightly into the out let. | ||
| Volume set too low. Press (VOL+) to increase the volume (Fig. 1/5; Fig. 3/10). | ||
| Headphones plugged in incor-rectly | Check for correct fit of the headphone plug. | |
| Default settings incorrect Check the default settings of the DVD-Player. | ||
| Remote does not function | Incorrect position The remote control does not point toward the DVD-Player. | |
| Distance too far Ensure that the distance between remote control and device does not exceed 5 meters. | ||
| Empty battery Change battery in the remote control. | ||
| Titles are played in wrong order | Playlist is used Delete playlist. | |
| DVD does not play DVD not finalized Use a finalized DVD. | ||
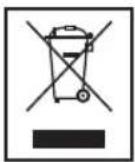
Battery Disposal

Batteries / Rechargeable Batteries
Disposal
When the unit is exhausted, especially when malfunctions occur, deactivate the unit by removing the mains plug from the outlet and sever the electric cable. Dispose of the device in accordance with the environmental regulations applicable to your country. Electric waste may not be disposed of together with household cable. For recycling instructions consult your community authorities or your dealer.
The unit (DVD Monitor) features a rechargeable battery. Do not dispose of exhausted batteries with the household waste.
■ Remove the batteries before disposing of the unit. If necessary, ask a qualified person or our service centre.
Instructions for Handling Batteries / Rechargeable Batteries:
- Keep Batteries/rechargeable batteries out of reach of children. They are not toys!
■ Never throw batteries/rechargeable batteries into open fire or submerge in water.
Upon inserting the battery, pay attention to the polarity. - Do not use force to open the batteries/rechargeable batteries.
■ Prevent contact with metallic items such as (rings, nails, screws etc.) This may cause short circuit endangerment. - Shorted batteries may heat up significantly or may even combust, which can lead to burns.
If a battery/rechargeable battery leaks, avoid contact of the liquid with eyes or membranes. Upon contact wash hands and rinse eyes with clear water and consult a physician in the even of persisting problems. - Do not place used batteries in household garbage. Take old batteries to a designated collection site.
These symbols are displayed on pollutant containing Batteries/rechargeable batteries:

PR = Zinc-air battery
LR = Alkaline battery
SR = Silver oxide battery
CR = Lithium battery
Conformity Declaration
The company hereby declares ETV – Elektro-technische Vertriebsg-sellschaft mbH, that the following device, DVD 4552 LCD is in compliance with the essential requirements of European regulations for electro-magnetic compatibility (2004/108/EG) and low voltage regulations (2006/95/EG).
You may request a copy of the conformity declaration by contacting the enclosed address.
English
OSD Menu Overview
| -- GENERAL SETUP PAGE - - - - VIDEO SETUP PAGE -- | |
| TV DISPLAY 4:3 PANSCAN | BRIGHTNESS4:3 LETTERBOX CONTRAST16:9 HUEWIDE SQUEEZE SATURATION |
| ANGLE MARK ON | OFF - - PREFERENCE PAGE -- |
| OSD LANGUAGE TV TYPE | PAL |
| CLOSED CAPTIONS ON | AutoOFF NTSC |
| SCREEN SAVER ON | OFF |
| --AUDIO SETUP PAGE -- | ||
| DOWNMIX | LT/RTSTEREO | |
| DIGITAL OUTPUT | SPDIF/OFFSPDIF/RAWSPDIF/PCM | |
| DOLBY DIGITAL | DOLBY DIGITAL SETUP | |
| DUAL MONO | STEREOL-MONOR-MONOMIX-MONO | |
| DYNAMIC | ||
| SUBTITLE | |
| DISC MENU | |
| PARENTAL | 1 KID SAFE2 G3 PG4 PG 135 PGR6 R7 NC 178 ADULT |
| DEFAULT | RESET |
| -- PASSWORT SETUP PAGE -- | |
| RASSWORD MODE | ONOFF |
| PASSWORD | CHANGE |


GARANTIE-KARTE
Garantiebewijs • Carte de garantie Certificato di garanzia • Tarjeta de garantia Cartão de garantia • Guarantee card Garantikort • Karta gwarancyjna • Záruční list Garancia lap • Гарантийная карточка
DVD 4552 LCD
24 Monate Garantie gemäß Garantie-Erklärung • 24 maanden garantie overeenkomstig schriftelijke garantie • 24 mois de garantie conformément à la déclaration de garantie • 24 meses de garantie según la déclaration de garantía • 24 meses de garantia, conforme a declaração de garantía • 24 mesi di garanzia a seconda della spiegazione della garanzia • 24 months guarantee according to guarantee declaration 24 mäneders garanti i henhold til garantierklæring 24 miesiące gwarancji na podstawie karty gwarancyjnej • Záruka 24 mésicü podle prohlåšení o záruce • A garanciát lásd a használati utasításban Garantийные обязательства – смотри руководство пользователя
Kaufdatum, Händlerstempel, Unterschrift • Koopdatum, Stempel van de leverancier. Handlekening Firma • Data de compra, Canimbo do vendedor, Assinatura • Data dell'acquisto, timbro del commerciante, Firma • Purchase date, Dealer stamp, Signature • Kjapsdato, stempel fra forhandler, underskrift • Data kupna, Pleczatka skiepu, Podpis • Datum koupé, Razitko prodejce, Podpis • A väsärlasi datum, a väsärlasi hely belyegzője, alairás Data lokuynki, печать торговca, подпись



- Deutsch
- Inhalt
- Garantiebedingungen
- Technical Specifications
- Table of Contents
- English
- WARNING:
- CAUTION:
- i NOTE:
- ETV
- Safety Instructions
- User Manual
- Children and Handicapped Persons
- Power Supply
- English
- Laser
- Location
- Operation
- Intended Utilization
- Damage
- Assembly and Connection
- Unpacking
- Assembly
- NOTE:
- Remote Control Range
- With Car Adaptor
- Using both units:
- Safety Precautions:
- Charge Battery
- △ CAUTION:
- Change Fuse for 12 V adaptor
- Connections
- Side Panel Inputs
- USB port (Fig. 1/12)
- Card slot (Fig. 1/1)
- Turn Unit On (Fig. 1/16; Fig. 2/2)
- Connect Other Playback Devices
- Connect to Other Devices
- Digital Audio Transmission
- Connect TV Set
- LCD Monitor - Change Display Settings
- PICTURE
- About the DVD-Player
- Input not possible
- Play Media
- DVD-menu
- Pause Playback
- Change Audio-Language/Audio-Mode
- Show Sub-Titles
- Stop Playback
- Select previous Chapter/ Track
- Select next Chapter/Track
- Direct Track Selection
- Select a Passage using the Menu
- Repeat DVD-Title/Chapter
- Repeat CD-Track
- English
- Create Playlist (CD/DVD)
- Delete Playlist (CD/DVD)
- Use CD/DVD
- Use Memory Card
- Work in Data Mode
- Use USB Device
- Select File/Index and Start Playback
- Exit Play
- Display Photos
- Turn Pages
- Rotate Pictures
- Cross fade
- Change Default Setting
- Understand Menu Structure
- Navigation and Selection
- Slide Control
- TV Monitor
- Angle Mark (Camera Angle)
- OSD Language
- Closed captions (comments)
- Screen Saver
- Downmix (Downmix)
- Digital Output
- Dolby Digital Setup
- Dual Mono
- Dynamic
- Video Output Settings
- TV Type
- Audio; Subtitle; Disc Menu
- Password Setup Page
- Parental lock (Child-Welfare)
- Default
- Password mode
- Password
- Troubleshooting
- Disposal
- Instructions for Handling Batteries / Rechargeable Batteries:
- Conformity Declaration
- OSD Menu Overview
- GARANTIE-KARTE
- DVD 4552 LCD
Brand : AEG
Model : DVD 4552
Category : DVD player