
46WM48 - Television TOSHIBA - Free user manual and instructions
Find the device manual for free 46WM48 TOSHIBA in PDF.



| Product type | Rear projection television |
| Brand | TOSHIBA |
| Model | 46WM48 |
| Screen size | 46 inches (approx. 117 cm) |
| Aspect ratio | 16:9 |
| Maximum resolution | 1080i (via HDMI) |
| Broadcast systems | PAL I, PAL B/G, SECAM L, SECAM D/K |
| Number of programs | 100 |
| Input connectors | 3 SCART (EXT1, EXT2, EXT3), 1 HDMI, 1 VGA (PC), 1 component (Y Pb Pr), 1 S-Video + audio |
| Audio outputs | 1 fixed/variable stereo, 1 subwoofer output |
| Audio power | 20 W + 20 W (10% distortion) |
| Power consumption | 195 W (standby 2 W) |
| Power supply | 230 V AC, 50 Hz |
| Dimensions (W x H x D) | 135 x 81 x 39 cm |
| Net weight | 35 kg |
| Accessories | Remote control, 2 AAA batteries, mounting clip |
| Special features | SRS WOW 3D, Teletext, Timer, Keyboard lock, Quick restart |
| Lamp | Replaceable mercury lamp (limited lifespan, eco mode) |
| Maintenance | Clean with a dry, soft cloth. Avoid chemical products. |
| Safety | Ventilation required (10 cm around). Do not block openings. |
Frequently Asked Questions - 46WM48 TOSHIBA
User questions about 46WM48 TOSHIBA
0 question about this device. Answer the ones you know or ask your own.
Ask a new question about this device
Download the instructions for your Television in PDF format for free! Find your manual 46WM48 - TOSHIBA and take your electronic device back in hand. On this page are published all the documents necessary for the use of your device. 46WM48 by TOSHIBA.
USER MANUAL 46WM48 TOSHIBA
Safety precautions – Some do's and don'ts for you to be aware of 3
Installation and important information 4
The remote control – an at-a-glance guide 5
Connecting external equipment – a guide to connecting equipment to the back of the television 6
Connecting a computer – connecting a computer to the back of the television 7
Connections and controls – switching on the television, standby, using the controls, headphone socket, connecting equipment to the side of the television 8
Tuning the television using Quick setup – language, country, broadcast system 9
Programme sorting 9
Manual tune – an alternative to Quick setup, direct entry of channels, tuning a programme position for a VCR 10
Programme skip 11
Auto tune 12
CONTROLS AND FEATURES
General controls – changing programme position, time display 12
Stereo and bilingual transmissions – stereo/mono or dual language broadcasts 12
Sound controls – volume, sound mute, bass boost, super woofer, bass/treble/balance, stable sound 13
WOW™ sound effect – SRS WOW, SRS 3D and SRS Trubass 13
Widescreen viewing 14
Picture controls – picture position, picture preferences (brightness, colour, contrast, tint, sharpness), digital noise reduction (DNR), black stretch 15
Picture controls – colour temperature, lamp mode, automatic format (widescreen), blue screen 16
PC Settings – picture position, clock phase, sampling clock, reset 17
Quick restart 18
Panel lock – disabling the buttons on the television 18
The timer – setting the television to turn on and off 18
Input selection and AV connections – input and output sockets for connected equipment 19
TELETEXT
Setting up, general information, Auto and LIST modes 20
Control buttons 21
PROBLEM SOLVING
Lamp Unit replacement – important information, when to replace the lamp unit 22
Lamp Unit replacement – replacing the lamp unit 23
LED indications 24
Questions and Answers – answers to some of the more common queries including manual fine tuning and colour system 25
INFORMATION
Specifications and Accessories – technical information about the television, supplied accessories 27
Safety Precautions
This equipment has been designed and manufactured to meet international safety standards but, like any electrical equipment, care must be taken to obtain the best results and for safety to be assured. Please read the points below for your own safety. They are of a general nature, intended to help with all electronic consumer products and some points may not apply to the goods you have just purchased.
Air Circulation
Leave at least 10cm clearance around the television to allow adequate ventilation. This will prevent overheating and possible damage to the television. Dusty places should also be avoided.
Heat Damage
Damage may occur if the television is left in direct sunlight or near a heater. Avoid places subject to extremely high temperatures or humidity, or locations where the temperature is likely to fall below 5° C ( 41° F).
Mains Supply
The mains supply required for this equipment is 230v AC 50Hz. Never connect to a DC supply or any other power source. DO ensure that the television is not standing on the mains lead. DO NOT cut off the mains plug from this equipment, this incorporates a special Radio Interference Filter, the removal of which will impair its performance.
IF IN DOUBT PLEASE CONSULT A COMPETENT ELECTRICIAN.
Do
DO read the operating instructions before you attempt to use the equipment.
DO ensure that all electrical connections (including the mains plug, extension leads and interconnections between pieces of equipment) are properly made and in accordance with the manufacturers' instructions. Switch off and withdraw the mains plug before making or changing connections.
DO consult your dealer if you are ever in doubt about the installation, operation or safety of your equipment.
DO be careful with glass panels or doors on equipment.
Do not
DON'T remove any fixed cover as this may expose dangerous voltages.
DONT obstruct the ventilation openings of the equipment with items such as newspapers, tablecloths, curtains, etc. Overheating will cause damage and shorten the life of the equipment.
DON'T allow electrical equipment to be exposed to dripping or splashing or objects filled with liquids, such as vases, to be placed on the equipment.
DON'T place hot objects or naked flame sources, such as lighted candles or nightlights on, or close to equipment. High temperatures can melt plastic and lead to fires.
DON'T use makeshift stands and NEVER fix legs with wood screws. To ensure complete safety, always fit the manufacturers' approved stand, bracket or legs with the fixings provided according to the instructions.
DON'T listen to headphones at high volume, as such use can permanently damage your hearing.
DON'T leave equipment switched on when it is unattended, unless it is specifically stated that it is designed for unattended operation or has a standby mode. Switch off by withdrawing the plug, make sure your family know how to do this. Special arrangements may need to be made for infirm or handicapped people.
DONT continue to operate the equipment if you are in any doubt about it working normally, or it is damaged in any way – switch off, withdraw the mains plug and consult your dealer.
ABOVE ALL – NEVER let anyone, especially children, push or hit the screen, push anything into holes, slots or any other openings in the case.
NEVER guess or take chances with electrical equipment of any kind – it is better to be safe than sorry.
THE MAINS PLUG IS USED TO COMPLETELY DISCONNECT THE TELEVISION AND THEREFORE SHOULD BE EASILY ACCESSIBLE.
Installation and important information
Where to install
Locate the television away from direct sunlight and strong lights, soft, indirect lighting is recommended for comfortable viewing. Use curtains or blinds to prevent direct sunlight falling on the screen.
Place on a sturdy platform, the mounting surface should be flat and steady. It should then be secured to the wall with a sturdy tie using the clip on the back of the television this will prevent it from falling over.
A floor stand is available for this television.
The display panels are manufactured using an extremely high level of precision technology, however sometimes some parts of the screen may be missing picture elements or have luminous spots. This is not a sign of a malfunction.
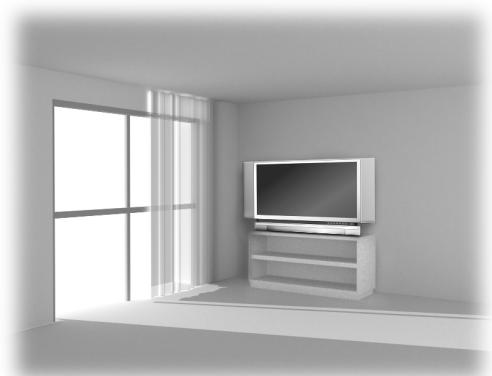
Make sure the television is located in a position where it cannot be pushed or hit by objects and that small items cannot be inserted into slots or openings in the case.
CAUTION: Avoid moving the television whilst the lamp unit is still warm, allow the lamp to cool for at least 1 hour.
Please take note
EXCLUSION CLAUSE
Toshiba shall under no circumstances be liable for loss and/or damage to the product caused by:
i) fire;
ii) earthquake;
iii) accidental damage;
iv) intentional misuse of the product;
v) use of the product in improper conditions;
vi) loss and/or damage caused to the product whilst in the possession of a third party;
vii) any damage or loss caused as a result of the owner's failure and/or neglect to follow the instructions set out in the owner's manual;
viii) any loss or damage caused directly as a result of misuse or malfunction of the product when used simultaneously with associated equipment;
Furthermore, under no circumstances shall Toshiba be liable for any consequential loss and/or damage including but not limited to the following, loss of profit, interruption of business, the loss of recorded data whether caused during normal operation or misuse of the product.
If stationary images generated by teletext, channel identification logos, computer displays, video games, on screen menus, etc. are left on the television screen for any length of time they could become conspicuous, it is always advisable to reduce both the brightness and contrast settings.
The remote control
Simple at-a-glance reference of your remote control.

Inserting batteries and effective range of the remote

Remove the back cover to reveal the battery compartment and make sure the batteries are inserted the right way round. Suitable battery types for this remote are UM-4, AAA, IEC R03 1.5V.
Do not combine a used, old battery with a new one or mix battery types. Remove dead batteries immediately to prevent acid from leaking into the battery compartment. Dispose of them in a designated disposal area.
The performance of the remote control will deteriorate beyond a distance of five metres or outside an angle of 30 degrees from the centre of the television. If the operating range becomes reduced the batteries may need replacing.
Connecting external equipment
Before connecting any external equipment, turn off all main power switches. If there is no switch remove the mains plug from the wall socket.
![graph TD A["decoder"] --> B["TV"] A --> C["VCR"] D["video recorder"] --> E["IN/OUT"] D --> F["SAT"] G["SCART 1 (EXT 1)"] --> H["3S (S=VIDEO)"] I["SCART 2 (EXT 2)"] --> H J["SCART 3 (EXT 3)"] --> K["3S (S=VIDEO)"] L["COMPONENT VIDEO INPUT (EXT 4)"] --> M["RGB/PC"] N["HDMI™ INPUT"] --> O["AUDIO"] O --…](/content/2019/11/77766/images/850d8fd8c01e7aa012e87d66ac34896c5d33d0f796a599d1c2ce8448e41a0f0d.jpg)
WE RECOMMEND THAT YOU USE SCART LEADS IN ADDITION TO AERIAL CABLES WHEREVER POSSIBLE
Aerial cables:

Connect the aerial to the socket on the rear of the television. If you use a decoder* and/or a video recorder it is essential that the aerial cable is connected through the decoder and/or through the video recorder to the television.
SCART leads:

Connect the video recorder IN/OUT socket to the television. Connect the decoder TV socket to the television. Connect the video recorder SAT socket to the decoder VCR socket.
Before running Auto tuning put your decoder and video recorder to Standby.
The phono sockets alongside the COMPONENT VIDEO INPUT sockets will accept L and R audio signals.
In addition there is a fixed/variable external audio output which enables the connection to a suitable Hi-Fi unit, make sure the Speaker option in the Sound menu is set to Off.
HDMI™ (High-Definition Multimedia Interface) is for use with a DVD, decoder or electrical equipment with digital audio and video output. It is designed for best performance with 1080i high-definition video signals but will also accept and display 480i, 480p and 720p signals.
A wide variety of external equipment can be connected to the back of the television, therefore the relevant owners manuals for all additional equipment must be referred to.
We recommend SCART 1 for a decoder, SCART 2 for additional equipment and SCART 3 for a VCR.
If connecting S-VIDEO equipment, set the INPUT for EXT3. See page 19.
If the television automatically switches over to monitor external equipment, return to normal television by pressing the desired programme position button.
To recall external equipment, press ⬤ to select between EXT1, EXT2, EXT3, EXT4C, EXT5, HDMI or PC.
HDMI, the HDMI logo, and High-Definition Multimedia Interface are trademarks or registered trademarks of HDMI Licensing, LLC.
Connecting a computer
Before connecting any external equipment, turn off all main power switches. If there is no switch remove the mains plug from the wall socket.

Connect the PC cable from the computer to the PC terminal on the back of the television.
Press the ➕ to select PC mode.
The following signals can be displayed:
VGA: 640 x 480/60 Hz (VESA 480-60)
SVGA: 800 x 600/60 Hz (VESA 600-60)
XGA: 1024 x 768/60 Hz (VESA 768-60)
PLEASE NOTE:
Some PC models cannot be connected to this television.
An adaptor is not needed for computers with a DOS/V compatible mini D-sub 15p terminal.
A band may appear at the edges of the screen or parts of the picture may be obscured. This is due to the strength of the signal, it is not a malfunction.
When PC input mode is selected some of the television's features will be unavailable e.g Manual setting in the SET UP menu, Colour, Tint, DNR and Black Stretch in the PICTURE menu.
Signal information for Mini D-sub 15p connector
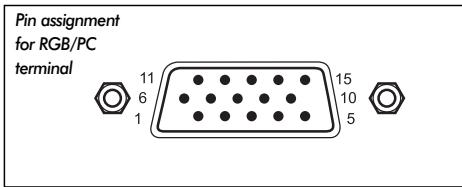
| Pin. No. | Signal name | Pin No. | Signal name |
| 1 | R | 9 | NC |
| 2 | G | 10 | Ground |
| 3 | B | 11 | NC |
| 4 | NC (not connected) | 12 | NC |
| 5 | NC | 13 | H-sync |
| 6 | Ground | 14 | V-sync |
| 7 | Ground | 15 | NC |
| 8 | Ground |
Connections and controls
A wide variety of external equipment can be connected via the sockets located behind the door on the right side of the television.
Whilst all the necessary adjustments and controls for the television are made using the remote control, the touch controls on the front of the television may be used for some functions.

Switching on
If the red LED is unlit check that the mains plug is connected to the power supply. If the picture does not appear press a number button on the remote control, it may take a few seconds.
To put the television into Standby press ⏻ on the remote control. To view the television press ⏻ again or any of the number buttons. The picture may take a few seconds to appear.
To set up the television you will now need to use the on-screen menus. Press the MENU button on the remote control to see the menus.
The menu bar at the top of the screens will show five different topics shown in symbols. As each symbol is selected by pressing the < or > button on the remote control, its respective options will appear below.
To use the options press the √ button on the remote control to move down through them and OK, ⟨ or⟩ to select the required choice. Follow the on screen instructions. The functions of each menu are described in detail throughout the manual.
Using the controls and connections
To alter the volume press - ∆ +.
To alter the programme position press ▼ Ⓟ ▲.
Press MENU and ⟨,⟩, √ or ∧ to control the sound and picture options.
Press EXIT to finish.
When connecting mono sound equipment to EXT5, connect the audio output of the equipment to the L/Mono socket on the television.
To select the Input, press ⬤ until the display shows EXT5 as described on page 19. The television will automatically sense the type of signal.
Please always refer to the owner's manual of the equipment to be connected for full details.
Please note: Inserting the headphone jack will mute the sound from all speakers.
Tuning the television using Quick setup, Programme sorting
Before switching on the television put your decoder and video recorder (VCR) to Standby if they are connected. To set up the television use the buttons on the remote control as detailed on page 5.
1 Connect the television to the mains power. The Quick setup screen will appear.

2 Using < or > select your Language, then press OK.
3 Then press < or > to select your Country and press OK.
4 Your System will have been selected, if there is a choice, press > to select from the systems displayed.
B/G – Continental Europe, I – UK D/K – Eastern Europe, L1, L2 – France
5 To start Auto tuning press OK.

6 The search will begin for all available stations. The slide bar will move along the line as the search progresses.
You must allow the television to complete the search.
When the search is complete the television will automatically select programme position 1. This may not be a clear picture or the signal may be weak, so the station order can be changed using Programme sorting which will appear on the screen.
7 With the list of stations now showing use √ or ∧ to highlight the station you want to move and press >.
The selected station will be moved to the right of the screen.

8 Use √ or ∧ to move through the list to your preferred position. As you do so the other stations will move to make room.
9 Press < to store your move.
Repeat as necessary, then press EXIT.
If the television cannot be connected to a VCR/decoder with a SCART lead or if a station on another system is required, use Manual tuning to allocate a programme position, see page 10.
Manual tune
The television can be tuned-in manually using Manual tuning. For example: if the television cannot be connected to a VCR/decoder with a SCART lead or to tune-in a station on another System (see page 9).
Use and to move across the screen and select any of these Manual Tune options.

Programme: The number to be pressed on the remote control.
System: Specific to certain areas. See page 9.
Colour system: Factory set to Auto, should only be changed if problems are experienced, i.e. NTSC input from external source.
Programme skip: → means nothing has been stored or the facility to skip the channel is ON. See page 11.
Channel: The channel number on which a station is being broadcast.
Search: Search up and down for a signal.
Manual fine tuning: Only used if interference/weak signal is experienced. See page 25.
Station: Station identification. Use the ∧ or √ and ⟨ or ⟩ buttons to enter up to seven characters.
To allocate a programme position on the television for a decoder and VCR: turn the decoder on, insert a pre-recorded tape in the VCR and press PLAY, then manually tune.
1 Press MENU and using < or > select the SET UP menu, with ▼ highlight Manual tuning, press OK to select.

2 Use ∧ or √ to highlight the programme position required e.g. we suggest Prog. 0 for a VCR.
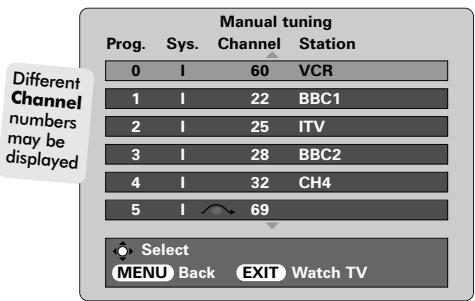
3 Press OK to select. If the programme is skipped, Programme skip must be removed before storing.

4 Press > to select System and use ∧ or ∨ to change (if required, see page 9).
5 Then press > to select Search.
6 Press ∧ or ∨ to begin the search, the television will show the channel numbers.
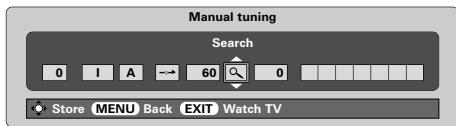
7 Each signal will show on the television, if it is not your VCR, press ∧ or ∨ again to restart the search.
Manual tune continued Programme skip
8 When your VCR signal is found, press > to move along to Station. With ∧, ∨, < and > put in the required characters, e.g. VCR.
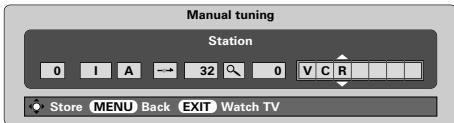
9 Press OK to store.
10 Repeat for each programme position you want to tune or, press MENU to return to the list of channels and select the next number to tune.
11 Press EXIT when you have finished.
12 To name external equipment, e.g. DVD on EXT2, press ➕ to select EXT2, then select Manual setting from the SET UP menu. Press OK.
13 Press > to select Label then using ↗, √, < and > put in the required characters.

14 Press OK and then EXIT. When EXT2 is next selected it will show on the screen as EXT2 DVD. At any time by pressing OK a list will appear on screen showing all stored programmes and external equipment. Use ∧ and √ to highlight and OK to select.
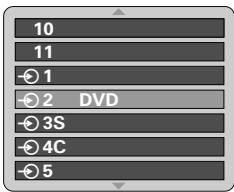
PLEASE NOTE This television has direct channel entry if the channel numbers are known.
Select the Manual tuning screen in Step 3. Enter the Programme number, the System, then the Channel number. Press OK to store.
Programme skip
To prevent certain programmes from being viewed, the programme position can be skipped. The remote control must be removed as the channels will still be available using and . The television can then be watched as normal using the controls on the front, but the television will not show the skipped programme position.
1 Select Manual tuning from the SET UP menu.

2 Use ∧ or ∨ to highlight the programme position to be skipped and press OK to select.
3 Press > to select Programme skip.
4 Use ∧ or ∨ to turn Programme skip on. Press OK.
on the screen indicates a skipped programme position.

5 Press MENU and repeat from Step 2 or press EXIT.
Each programme position has to be individually selected. To turn Programme skip off, repeat the procedure for each position.
Skipped programme positions cannot be selected by P▲(∧) and P▼(∨) or by the controls on the front of the television, but can still be accessed by the number buttons on the remote control.
Auto tune, general controls, time display, stereo/bilingual transmissions
Using Auto tuning
To set up the television using Auto tuning, press MENU and use < or > to select the SET UP menu.

2 Press √ to highlight Language and < or > to select.
3 Using ▼ highlight Country, then ⟨ or 〉 to select. The television will now tune the stations for your country.
4 Press √ to highlight Auto tuning, then press OK.
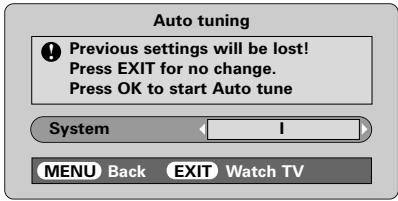
5 Your System will have been selected, if there is a choice, press < or > to select from the systems displayed, then press OK.
B/G – Continental Europe, I – UK D/K – Eastern Europe, L1, L2 – France
You must allow the television to complete the search.
When the search is complete the television will automatically select programme position 1. This may not be a clear picture, so the station order can be changed using Programme sorting, see page 9.
Selecting programme positions
To select a programme position use the numbered buttons on the remote control.
For programme positions below 10 use 0 and the required number e.g. 01 for programme position 1.
Programme positions can also be selected using P▲ (∧) and P▼(∨).
To revert to the previous programme position press ↩.
To display on-screen information i.e. programme position, input mode or stereo/mono signal, press CALL.
The Time Display
The time display facility allows the current (teletext) time to be seen on the television screen.
Press 📷/✉ whilst watching a normal television broadcast to see a time display from the broadcaster. It will remain on screen for about 5 seconds.
Stereo and Bilingual transmissions
If stereo or dual language broadcasts are transmitted the word Stereo or Dual will appear on the screen each time programme positions are changed, disappearing after a few seconds. If the broadcast is not in stereo the word Mono will appear.
Stereo... Press I/II to select Stereo or Mono.
Bilingual... Bilingual transmissions are rare. If they are transmitted the word Dual will display. Choose the required programme number and if the word Dual appears press ∞I/II to select Dual 1, Dual 2 or Mono.
Sound controls, WOW™ sound effect
Sound controls
Volume
Press - () or + () to adjust the volume.
Sound Mute
Press ☒ once to turn the sound off and again to cancel.
Bass Boost – to enhance the depth of sound
Press ◀: then < or > to adjust the effect. The difference will only be noticeable on sound with a strong bass. Press ◀: again to turn Bass Boost off.
Super Woofer
When an active Super Woofer is connected (to the Woofer Out connection on the back of the television) pressing ◄: will control it only if Woofer External is chosen. Select AV connection in the SET UP menu, press √ until Woofer is highlighted then press < or > to choose External.
Bass, Treble and Balance

1 Press MENU and < or > to select SOUND.
2 Press √ to highlight Bass, Treble or Balance and < or > to change the setting.
When connecting to a Hi-fi unit, set the Speaker option to Off. Then select Fixed or Variable for the Audio output in the AV connection menu.
WOW™ sound effect
WOW™ gives a rich, virtual surround sound experience from your televisions speakers using the stereo signals being broadcast. If mono sound is broadcast or SRS WOW is not selected these features will be unavailable.
SRS WOW turns the virtual surround sound effect on. When On is selected SRS 3D gives a softer effect to the sound and SRS Trubass alters the depth of sound.
1 Press MENU and select the SOUND menu.
Use ∧ or ∨ to highlight SRS WOW then press ⟨ or 〉to select On or Off.

2 Then press √ to highlight SRS 3D and press ⟨ or⟩ to select between Normal or Soft.
Highlight SRS Trubass and use < or > to select Normal or Soft to suit your preference.
Stable sound®
The Stable Sound feature limits high volume levels and prevents the extreme changes in volume that can occur when channels are changed or a programme switches to a commercial.
1 Press MENU and select the SOUND menu.
Use ∧ or ∨ to highlight Stable Sound then press ⟨ or⟩ to select On or Off.
WOW, SRS and (●) symbol are trademarks of SRS Labs, Inc.
WOW technology is incorporated under license from SRS Labs. Inc.
Widescreen viewing
Depending on the type of broadcast being transmitted, programmes can be viewed in a number of formats. Press the ⏻ button repeatedly to select between Super live, Cinema, Subtitle, 14:9, Wide and 4:3.
Please note: Whenever the MENU button is pressed the picture size setting will change while the menus are ON the screen. This is to ensure that the menus do not overlap the edges of the viewable area.
![graph LR A["SUPER LIVE"] --> B["This setting will enlarge the image to fit the screen by stretching the image horizontally, holding the correct proportions at the centre of the image. Some distortion may occur."] C["CINEMA"] --> D["When watching 'letterbox format' films/video tapes, this setting wil…](/content/2019/11/77766/images/b87c0993ee36cac241e68121c00452c67ec7fb03116e00c0a132d0cd260d16db.jpg)
Using the special functions to change the size of the displayed image (i.e. changing the height/width ratio) for the purposes of public display or commercial gain may infringe on copyright laws.
Picture controls
Picture position
The picture position may be adjusted to suit personal preference and can be particularly useful for external inputs.
1 In the SET UP menu press √ until Picture size/position is highlighted.
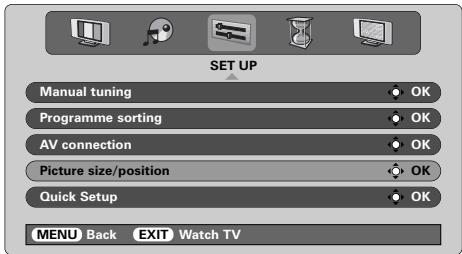
2 Press OK to view the options available for the picture format that has been selected.
3 Press ∧ and √ to select an option, then ⟨ or 〉 to adjust the settings.
The options alter depending on the widescreen format chosen and when viewing connected equipment.
In Cinema:

To return to the original factory settings select Reset in the Picture size/position menu and press OK.
Picture preferences
This television offers the choice of personalising the picture style. Press →|→|← to view the different styles available:
Picture mode-1 to 3 are preset options and Picture mode-M stores your own settings:
1 Select the PICTURE menu.

2 Use or to adjust the Contrast, Brightness, Colour, Tint and Sharpness.
The Tint can only be adjusted on an NTSC signal from an NTSC video recorder or DVD player when the television is in AUTO or NTSC colour mode.
DNR – Digital Noise Reduction
DNR enables you to 'soften' the screen representation of a weak signal to reduce the noise effect.
1 Select DNR from the PICTURE menu. Use < or > to adjust. The differences may not always be noticeable (for the best result use lower settings as picture quality can be lost if the setting is too high).
Black Stretch
Black Stretch increases the strength of dark areas of the picture which improves the definition.

1 In the PICTURE menu press √ until Black Stretch is highlighted.
2 Press < or > to select between On and Off. The effect depends on the broadcast and is most noticeable on dark colours.
Picture controls continued
Colour Temperature
Colour Temperature increases the 'warmth' or 'coolness' of a picture by increasing the red or blue tint.
1 In the PICTURE menu press √ until Colour Temperature is highlighted.
2 Press < or > to select between Normal, Warm and Cool to suit your preference.

Lamp mode
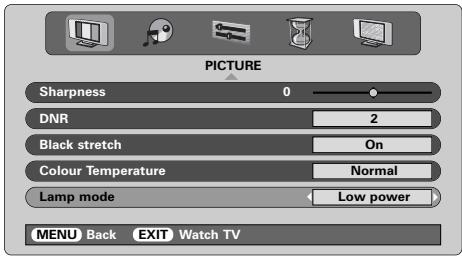
The Lamp mode has two options. The High bright mode is for use where additional screen brightness is required such as in a room where the lighting is bright. The Low power mode reduces wear on the projection lamp. This will prolong the life of the lamp and it is recommended that the lamp stays in this mode as much as possible.
1 In the PICTURE menu press √ until Lamp mode is highlighted.
2 Press < or > to select between High bright and Low power to suit your preference.
Automatic format (Widescreen)
When this television receives a true Widescreen picture and Auto format is On, it will automatically be displayed in Widescreen format, irrespective of the television's previous setting.
1 Select Auto format from the FUNCTION menu, then select On or Off.

Blue screen
When Blue screen is selected the screen will turn blue and the sound will be muted when no signal is received.
1 In the FUNCTION menu press ↗ or ↙ to highlight Blue screen.
2 Press < or > to select On or Off.

PC settings – picture position, clock phase, sampling clock, reset
Picture position
The picture position may be adjusted to suit personal preference.
1 Press ⬤ to select PC, then select PC Setting from the SET UP menu.
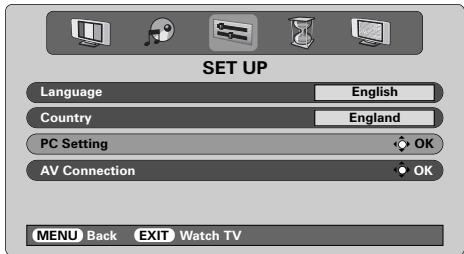
2 Press OK. Press ∧ and √ to select an option, then ⟨ or 〉 to adjust the settings.

Clock phase
The Clock phase matches the PC signal with the television display. Adjusting this can clear horizontal stripes and picture blur.
1 In the SET UP menu press √ until PC Setting is highlighted.
2 Press OK to select, then √ to highlight Clock phase.

3 Use < or > to adjust until the picture clears.
Sampling clock
Adjusting the Sampling clock alters the number of pulses per scan, this will clear vertical lines on the screen.
1 In the SET UP menu press √ until PC Setting is highlighted.
2 Press OK to select, then √ to highlight Sampling clock.

3 Use < or > to adjust until the picture clears.
Reset
To return to the original factory settings.
1 In the SET UP menu press √ until PC Setting is highlighted.
2 Press OK to select, then √ to highlight Reset.
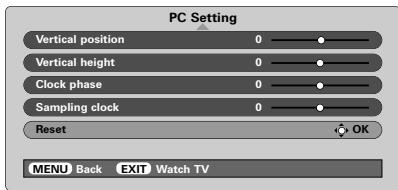
3 Press OK.
Quick restart, panel lock, the timer
Quick restart
When Quick restart is set to On the lamp will stay in low power mode for several minutes after the television is turned off, if it is then turned on from standby the picture will appear immediately. If the Off setting is selected it may take a few minutes for the picture to appear, during this time clicking noises will be heard as the lamp resets, this is not a malfunction.
1 In the FUNCTION menu press ↗ or ↙ to highlight Quick restart.
2 Press < or > to select On or Off.

When On is selected and the television is turned off the screen will be dimly lit and the fans will continue to run, this is a feature of Quick restart, not a malfunction.
If the television is put into standby whilst in this mode the standby wattage is high, this will be dramatically reduced if Off is selected.
Panel lock
Panel lock disables the controls on the front of the television. All buttons on the remote control can still be used.
1 From the FUNCTION menu select Panel lock and choose On or Off using < or >.
When Panel lock is On, a reminder will appear when any of the front panel controls are pressed. Once the television has been switched off it can ONLY be brought out of standby using the remote control.
The Timer
The television can be set to turn itself On or Off after a certain time.
1 Press MENU and < or > to select the TIMER menu.
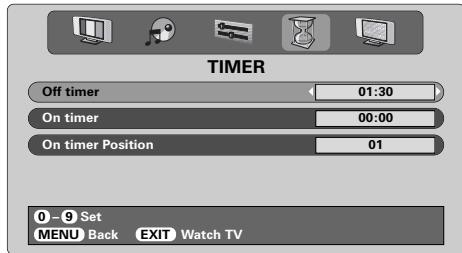
2 Press √ to select On or Off timer. Use the number buttons to set the required time. For example, to switch the television off in one and a half hours enter 01:30, or press > to increase/decrease in steps of 1 minute.
3 If setting the Off timer, press EXIT to finish. If setting the On timer, press √ to select On timer Position, enter the programme position number required, then press ⏻ to put the television into Standby. The GREEN On timer indicator on the front of the television will now be lit.
Any equipment connected with SCART leads must also be put into Standby to prevent them from being displayed when the timer switches on.
Once the On timer has been set the television can be switched on at any time by pressing ⏻. The Green On timer indicator will remain on until the set time period has passed, the television will then go to the chosen channel. This feature can help to avoid missing favourite programmes.
4 To cancel the On timer, enter zero in each position including the programme position.
Input selection and AV connections
Defining the INPUT and OUTPUT sockets so that the television recognises connected equipment. See page 6 for a clear view of the back connection recommendations.
Most VCRs and decoders send a signal through the SCART lead to switch the television to the correct Input socket. Alternatively press the external source selection button ⬤ until the picture from connected equipment is shown. This button must be used to view equipment connected using the COMPONENT VIDEO INPUT (EXT4).
An S in the display e.g. → 3S (EXT 3S), indicates the input is set for an S-Video signal.
Input selection
Use the Input Selection if the television does not switch over automatically.
1 Press → to select →1, →2, →3, →4C, →5 (EXT1-5), HDMI or PC.
HDMI™ displays equipment connected to Input HDMI on the back of the television. It is designed for best performance with 1080i high definition signals.
PC displays a computer connected to Input RGB/PC on the back of the television.
2 To return to television mode press → again or one of the numbered buttons.
To bring up the EXT menu, press and hold ⬤.
INPUT signal selection
This specifies the type of signal going into SCART 3 (EXT3) on the back of the television. Please refer to the manufacturers instructions for the connected equipment.
1 In the SET UP menu press √ until AV connection is highlighted, then press OK. With < or > select either AV or S-VIDEO as the required input for EXT3.
If the colour is missing try the alternative setting.
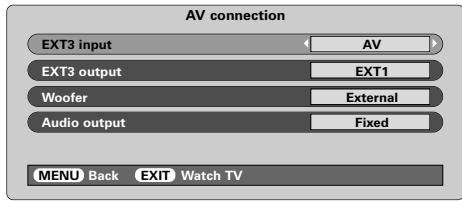
OUTPUT signal selection for SCART 3
This enables selection of the source to output from SCART 3. For example, to record transmissions in stereo from a stereo decoder – connect a stereo decoder to SCART 1 and stereo VCR to SCART 3, then select EXT1 as the EXT3 output. The signal received through SCART 1 will output directly through SCART 3.
1 Select AV connection.

2 Use < or > to change the EXT3 output option to:
TV = The last television programme selection.
Monitor = The picture on screen.
EXT1 = The picture from equipment connected to SCART 1.
EXT2 = The picture from equipment connected to SCART 2.
EXT5 = The picture from equipment connected to the side input sockets.
HDMI, the HDMI logo, and High-Definition Multimedia Interface are trademarks or registered trademarks of HDMI Licensing, LLC.
Teletext – setting up, general information, Auto and LIST modes
This television has a multi-page teletext memory, which takes a few moments to load. It offers two Modes of viewing text – Auto will display Fastext, if available. LIST will store your four favourite pages.
Selecting Modes
The teletext character set will be automatically chosen by the language setting in the SET UP menu.
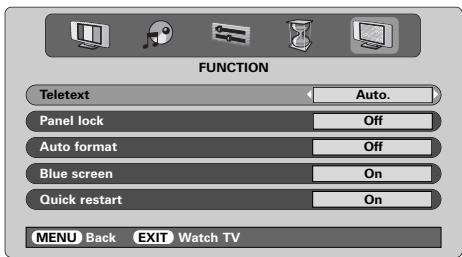
1 Select Teletext from the FUNCTION menu.
2 With < or > choose Auto. or LIST then press EXIT.
Teletext information
The ☐/☐ button:
To view teletext press ☐/☐. Press again to superimpose the teletext over a normal broadcast picture and again to return to normal viewing. Programmes cannot be changed until teletext is cancelled.
The first text page shown will be the initial page.
In Auto. mode this displays the main subjects available and their relevant page numbers.
In LIST mode this displays whichever page number is currently stored on the RED button.
In either mode any teletext page can be accessed by entering the 3 digit page number using the numbered buttons, pressing the coloured buttons or pressing P▲(∧) to advance to the next page and P▼(∨) to go back to the previous page.
Sub-pages
If there are sub-pages they will automatically load into memory without changing the page on screen.
To access the sub-pages press Ⓞ(→) then use ∧ and ∨ to view them. A bar with numbers will appear on the side of the screen.
The sub-page you are viewing will be highlighted and, as the television loads any additional sub-pages the colour of the numbers will change, indicating that these pages have been loaded.
These sub-pages will remain available to view until another page is chosen or, in normal TV mode, the channel is changed.
Navigating pages using Auto.
If Fastext is available four coloured titles will appear at the base of the screen.
To access one of the four given subjects, press the relevant coloured button on the remote control.
For further information on your particular text system(s), see the broadcast teletext index page or, consult your local Toshiba dealer.
Navigating pages using LIST
The four coloured choices at the bottom of the screen are numbers – 100, 200, 300 and 400, which have been programmed into the television's memory. To view these pages press the relevant coloured buttons.
To change these stored pages press the relevant coloured button and enter the 3 digit number. This number will change in the top left of the screen and in the coloured highlight.
Press OK to store. The bars at the bottom of the screen will flash white. Whenever OK is pressed all four page numbers showing at the bottom will be stored and the previous ones will be lost.
If OK is not pressed the selection will be forgotten when teletext is cancelled.
Other pages may be viewed by entering the 3 digit page number – but DO NOT press OK or these pages will be stored.
Teletext continued – control buttons
Below is a guide to the functions of the remote control teletext buttons.

To display an index/initial page:
Auto.
Press ☐i to access index pages. The one displayed is dependant on the broadcaster.
LIST
Press ☐i to return to the page currently stored on the RED button.

To display a page of teletext:
Press ☐/☐ to display teletext. Press again to superimpose teletext over a normal broadcast picture. Press again to return to normal television viewing. Programmes cannot be changed until you return to normal television.

To access sub-pages:
For use with ∧ and ∨ to view sub-pages when available.

To reveal concealed text:
To discover the solutions on quiz and joke pages press the ☐? button.

To hold a wanted page:
At times it is convenient to hold a page of text. Press 📊 and 📌 will appear in the top left of the screen. The page will be held on screen until the button is pressed again.

To enlarge the teletext display size:
Press ☐ once to enlarge the top half of the page, press again to enlarge the bottom half of the page. Press again to revert to normal size.

To select a page whilst viewing a normal page:
Enter the page number then press Ⓗ/Ex, a normal picture will be displayed. The television will indicate when the page is present by displaying the page number at the top of the screen. Press ≡/□ to view the page.
To display news flashes:
Select the news flash page for the chosen teletext service (see the index page of teletext service). Press 📋/EX. The news flashes will be displayed as and when they are broadcast. Press 📋/EX again to cancel the display.
The news flash page must be cancelled before changing programmes.

Remember to cancel teletext before changing channels - press the ≡/□ button twice.
Lamp unit replacement
The light source in this television is a mercury lamp which has internal atmospheric pressure that increases during use. The lamp has a limited service life which depends on the the amount of use and the settings used, so it has been designed for safe replacement by the consumer. The average service life can be extended by using Low power mode.
The brightness of the lamp will vary during use and over time will gradually decrease, some lamps may require earlier replacement. The strength of the quartz glass in the lamp will also reduce, this may cause the lamp to rupture, creating a loud noise and stopping the operation of the television. The lamp unit is designed so that the broken glass remains inside the replaceable unit. The lamp has reached the end of its service life when a reduction in colour and/or brightness is noticed or if the lamp ruptures.
CAUTION: Always handle the lamp unit with care, keep away from children and pets. The unit has been designed so that the consumer can replace it but any misuse could result in the unit breaking exposing sharp edges and pinch points.
IMPORTANT INFORMATION
NEVER look directly at the lamp when lit as eye damage could result. ALWAYS turn off the television by unplugging the mains lead before opening the lamp unit door and DO NOT remove the back cover of the television.
The temperature of the lamp immediately after use exceeds 392° F/200°C. Allow the lamp to cool for at least 1 hour before replacing it, touching it before it has cooled will result in severe burns.
When replacing the lamp unit ALWAYS wear gloves to reduce the risk of burns.
The lamp unit door is provided with an interlock to reduce the risk of electric shock and excessive ultraviolet radiation. DO NOT attempt to replace the lamp unit without removing the lamp unit door completely, failure to do so could result in serious injury or death.
If the lamp unit glass is accidentally touched or gets dirt on it, it can be gently wiped clean with a lint-free cleaning cloth such as a camera lens cloth or spectacles cloth. NEVER clean the lamp with any type of flammable or aerosol cleaning liquid. Most household cleaning agents contain chemicals that are flammable at high temperatures.
When to replace the Lamp unit
The lamp unit needs to be replaced when:
The picture darkens and/or the colours fade, If the screen does not light (see LED Indication 3), If a loud noise is heard and the picture goes black (see LED Indication 3).
To obtain a replacement lamp contact your local Toshiba authorised dealer.
Lamp unit replacement continued
Replacing the Lamp unit
1 Turn off the television and remove the mains plug from the wall socket.
Allow the lamp to cool for at least 1 hour before replacing it.
Remember to wear gloves when replacing the lamp unit.
2 Undo the lamp unit door by loosening the thumb screw, then remove it by pulling the door outwards.
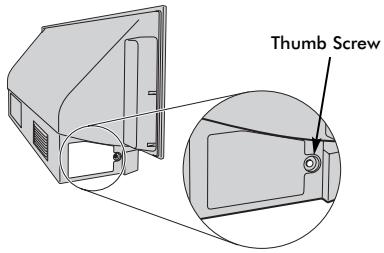
3 Using a Phillips hand screwdriver of suitable size, loosen the two screws on the bottom left and right of the lamp unit.

4 Using the lamp unit handle, gently pull the unit out of the television and put to one side.

5 Carefully insert the new lamp unit into the television until it is fully seated.
NOTE:
Make sure that the lamp unit it not subjected to any knocks or bumps.
Never touch the lamp unit glass or allow it to get dirty. This may affect the picture quality and shorten the service life of the lamp.
6 Using the Phillips screwdriver tighten the two screws. Make sure that the screws are hand-tight only, do not use an electric screwdriver to avoid over-tightening.
7 Replace the lamp unit door by inserting the hooks on the left side of the door into the openings in the televisions cabinet.

8 Replace the thumb screw and hand-tighten.
9 Plug in the mains lead and take the television out of standby, the television may take a moment to come up to full brightness. The television should now operate normally.
If there is no picture, the picture is very dark or the television does not turn on, turn it back off and remove the plug from the mains power. Repeat steps 1 to 7 to ensure that the lamp unit has been installed correctly.
If the television still does not operate, make sure the television is unplugged and contact your Toshiba dealer.
Put the old lamp into the now empty lamp unit box and dispose of it according to local Government guidelines. Make sure it is out of reach of children and animals.
LED indications
The green and red LED lights on the television's front control panel show the current status of the television. The green LED comes on when a control touchpad is pressed and the red LED comes on when the television is connected to the power supply. If the green LED is flashing see the guide below, these are the most common issues. If in any doubt contact your Toshiba dealer.
Current limiter operation
Turn off the television and remove the mains plug from the wall socket, wait for a short while, replace the plug and turn the television back on again. If the problem still persists, contact your Toshiba dealer.
IICBUS error
Turn off the television and remove the mains plug from the wall socket. Contact your Toshiba dealer.
Low Power standby
The television is in Quick Restart On mode, the lamp will remain on for 6 minutes. After this time the flashing green LED will go off.
Lamp re-try
The television is turned on and will automatically try to restart up to eight times.
Lamp door open
Turn off the television and remove the mains plug from the wall socket. Check the lamp cover is secure or repeat the lamp unit installation procedure. If the problem still persists contact your Toshiba dealer.
Lamp error
Turn off the television and remove the mains plug from the wall socket, replace the plug and turn the television back on again. If the problem persists replace the lamp unit.
If after replacing the lamp unit the problem still persists, contact your Toshiba dealer.
Colour wheel error
Turn off the television and remove the mains plug from the wall socket. Contact your Toshiba dealer.
Temperature problem
Turn off the television and remove the mains plug from the wall socket. Make sure that none of the slots and openings in the television's cabinet have been covered or blocked. Allow the lamp unit to cool for at least 1 hour before turning the television back on.
If the problem persists contact your Toshiba dealer.
| Problem | Green LED Operation |
| Current limiter operation (OCP, OVP, Fan Stop) | 500ms ON, 500ms OFF |
| IICBUS error | 1sec ON, 1sec OFF |
| Low Power standby | (200ms ON, 200ms OFF) x 1 time, 2sec OFF |
| Lamp re-try | (200ms ON, 200ms OFF) x 2 times, 2sec OFF |
| Lamp door open | (200ms ON, 200ms OFF) x 3 times, 2sec OFF |
| Lamp error | (200ms ON, 200ms OFF) x 4 times, 2sec OFF |
| Colour wheel error | (200ms ON, 200ms OFF) x 5 times, 2sec OFF |
| Temperature problem | (200ms ON, 200ms OFF) x 6 times, 2sec OFF |
Questions and Answers
Below are the answers to some of the most common queries.
For more information got to www.toshiba.co.uk

Why is there no sound or picture?
A Check the mains switch is on and check all connections.
Check the television is not in standby mode. If the lamp unit has recently been replaced, make sure that it has been installed properly and that the unit door has been replaced correctly.

Why is the picture very dark?
A The lamp unit may need to be replaced.

There is a picture, but why is there little or no colour?
A When using an external source, for instance, a poor quality video tape, if there is little or no colour, improvements may sometimes be achieved. The colour is factory set to Auto. to automatically display the best colour system.
To check that you have the best colour:
1 With the external source playing, select Manual setting from the SET UP menu.
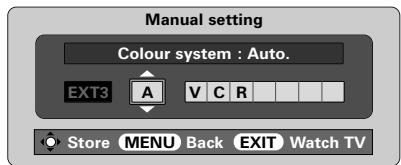
2 With ∧ or √ choose between Auto., PAL, SECAM, NTSC 4. 43 or 3. 58.
Q Why doesn't the video/DVD being played show on screen?
A Make sure the VCR or DVD player is connected to the television as shown on page 6, then select the correct input by pressing ⬤.
Q Why is there a picture but no sound?
A Check the volume has not been turned down or that sound mute has not been selected.
Q Why is the VCR/DVD picture in black and white?
A Check the correct input has been chosen, S-VIDEO or AV. See AV connections.
Q Why is there a good video picture but no sound?
A Check the SCART lead connection.
Q What else can cause a poor picture?
A Interference or a weak signal. Try a different television station. Manual fine tuning may help.
1 Select the Manual tuning menu. Highlight the station and press OK, then press > to select Manual fine tuning.
2 Using ∧ or ∨ adjust to get the best picture and sound. Press OK and then EXIT.

Q Why is the screen dimly lit and fan still running when the television is off?
A The Quick restart mode is set to On. To stop this set the mode to Off.
Q Why don't the controls on the front of the television work?
A Check that Panel lock is not On.
Q Why doesn't the remote control work?
A Check the side switch on the remote control is in TV mode.
Check the batteries aren't dead or inserted incorrectly.
Questions and Answers continued

Why are there vertical stripes on the screen?
A The Sampling clock may need adjustment. Select PC Setting from the SET UP menu, highlight Sampling Clock and adjust until the lines clear.

Why are there horizontal stripes and/or blurred images on the screen?
A The Clock phase may need adjustment. Select PC Setting from the SET UP menu, highlight Clock phase and adjust until the picture clears.

Why is there a message permanently on the screen?

Remove it by pressing CALL.

Why is there no sound from my connected sound equipment?
A Check the Speaker option in the Sound menu is set to Off.

Why are there noises from the fan?
A The cooling fans and colour wheel will change speed during normal operations, for example, when changing channels, this is not a malfunction.

Why are there noises from the fan when the channel is in blue screen mode?
A If the signal is lost and the channel being watched goes into blue screen mode, the cooling fans and colour wheel still operate. This is not a malfunction.

Why are there problems with teletext?
A Good performance of text depends on a good strong broadcast signal. This normally requires a roof or loft aerial. If the Text is unreadable or garbled, check the aerial. Go to the main index page of the teletext service and look for the User Guide. This will explain the basic operation of teletext in some detail. If further information is needed on how to use text see the teletext section.

Why are there no teletext sub-pages?
A There are none broadcast or they have not yet loaded. Press the Ⓐ(-▶) button to access. (See teletext section).

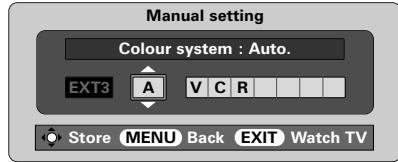
Why are the colours wrong when an NTSC source is played?
A Connect the source via a SCART lead and play. Select Manual setting from the SET UP menu.
1
Set the Colour to Auto. and exit.
2
Go to the PICTURE menu and adjust the tint.
Cleaning the screen and cabinet...
Turn off the power, clean the screen and cabinet with a soft, dry cloth. We recommend that you do not use any proprietary polishes or solvents on the screen or cabinet as this may cause damage.
Disposal...
The lamp in this television contains mercury, when the lamp unit and the television reaches the end of its useful life please dispose of it in accordance with Local Government Regulations or at a recycling centre.
Specifications and accessories
Broadcast systems/channels
| PAL-I | UHF | UK21-UK69 |
| PAL-B/G | UHF E21-E69 |
| VHF E2-E12, S1-S41 |
| SECAM-L | UHF F21-F69 |
| VHF F1-F10, B-Q |
| SECAM-D/K | UHF | R21-R69 |
| VHF | R1-R12 |
Video Input PAL, SECAM, NTSC 3.58/4.43
External connections
| EXT1 | Input | 21-pin SCART | RGB, A/V |
| EXT2 | Input | 21-pin SCART | RGB, A/V |
| EXT3 | Input/Output | 21-pin SCART | A/V, S-video |
| Selectable output |
| EXT4 | Input | Phono jacks | Y, PB/CB , PR/CR High definition 1080iProgressive scan |
| Phono jacks | A/V |
| EXT5 | Input (Side) | 4 pin | S-video |
| Phono jack | Video | ||
| Phono jacks | Audio L + R |
| HDMI TM | Input | HDMI connector | Digital television signal |
| PC | Input | Mini D-sub 15-pin | Analog RGB signal |
| Input | 3.5mm stereo jack | Audio |
| Audio Output Fixed/Variable | Phono jacks | Audio L + R |
| Output to Active Super Woofer | Phono socket |
Programme Positions 100
| Stereo | Nicam |
| 2 carrier system |
| Visible Screen Size(approx.) | 46WM | 46ins |
| 52WM | 52ins |
| Display | 16:9 |
| Sound output (at 10% distortion) | Main | 20W + 20W |
| Power consumption | 46WM | 195W |
| as specified in EN60107-1 : 1997 | 52WM | 195W |
| Weight (approx.) | 46WM | 35kg |
| 52WM | 38kg |
| Headphone socket | 3.5mm stereo |
| Accessories | Remote control |
| 2 batteries |
| (UM-4, AAA, IEC R03 1.5V) |
| Clip |

Printed on recycled paper. 100% Chlorine free.
© Toshiba Information Systems (U.K.) Limited
All rights reserved.
Reproduction in whole or part without written permission is strictly prohibited.
Toshiba Information Systems (U.K.) Limited
Consumer Products Division,
European Service Centre,
Admiralty Way, Camberley,
Specification is subject to change without notice.
Originated by Kensa Creative Solutions, Saltash, Cornwall.
Sommaire
MISE EN ROUTE
B/G – Europe continentale, I – R.-U. D/K – Europe de l'Est, L1, L2 – France
© Toshiba Information Systems (U.K.) Limited
Toshiba Information Systems (U.K.) Limited
Consumer Products Division,
European Service Centre,
Admiralty Way, Camberley,
© Toshiba Information Systems (U.K.) Limited
Toshiba Information Systems (U.K.) Limited
Consumer Products Division,
European Service Centre,
Admiralty Way, Camberley,
ADVERTENCIA
Consumer Products Division, European Service Centre, Admiralty Way, Camberley, Surrey,
GU15 3DT England (Razón social)
© Toshiba Information Systems (U.K.) Limited
Toshiba Information Systems (U.K.) Limited
Consumer Products Division,
European Service Centre,
Admiralty Way, Camberley,
Ingresso video PAL, SECAM, NTSC 3.58/4.43
Connessioni esterne
Consumer Products Division,
European Service Centre,
Admiralty Way, Camberley, Surrey GU15 3DT.
© Toshiba Information Systems (U.K.) Limited
© Toshiba Information Systems (U.K.) Limited
Toshiba Information Systems (U.K.) Limited
Consumer Products Division,
European Service Centre,
Admiralty Way, Camberley,
Handvat van de lampunit
© Toshiba Information Systems (U.K.) Limited
Toshiba Information Systems (U.K.) Limited
Consumer Products Division,
European Service Centre,
Admiralty Way, Camberley,
- CONTROLS AND FEATURES
- TELETEXT
- PROBLEM SOLVING
- INFORMATION
- SAFETY PRECAUTIONS
- AIR CIRCULATION
- HEAT DAMAGE
- MAINS SUPPLY
- DO
- DO NOT
- INSTALLATION AND IMPORTANT INFORMATION
- WHERE TO INSTALL
- PLEASE TAKE NOTE
- EXCLUSION CLAUSE
- THE REMOTE CONTROL
- INSERTING BATTERIES AND EFFECTIVE RANGE OF THE REMOTE
- CONNECTING EXTERNAL EQUIPMENT
- WE RECOMMEND THAT YOU USE SCART LEADS IN ADDITION TO AERIAL CABLES WHEREVER POSSIBLE
- AERIAL CABLES
- SCART LEADS
- CONNECTING A COMPUTER
- PLEASE NOTE
- CONNECTIONS AND CONTROLS
- SWITCHING ON
- USING THE CONTROLS AND CONNECTIONS
- TUNING THE TELEVISION USING QUICK SETUP, PROGRAMME SORTING
- MANUAL TUNE
- MANUAL TUNE CONTINUED PROGRAMME SKIP
- PROGRAMME SKIP
- AUTO TUNE, GENERAL CONTROLS, TIME DISPLAY, STEREO/BILINGUAL TRANSMISSIONS
- USING AUTO TUNING
- SELECTING PROGRAMME POSITIONS
- THE TIME DISPLAY
- STEREO AND BILINGUAL TRANSMISSIONS
- SOUND CONTROLS, WOW™ SOUND EFFECT
- SOUND CONTROLS
- VOLUME
- SOUND MUTE
- BASS BOOST – TO ENHANCE THE DEPTH OF SOUND
- SUPER WOOFER
- BASS, TREBLE AND BALANCE
- WOW™ SOUND EFFECT
- STABLE SOUND®
- WIDESCREEN VIEWING
- PICTURE CONTROLS
- PICTURE POSITION
- PICTURE PREFERENCES
- DNR – DIGITAL NOISE REDUCTION
- BLACK STRETCH
- PICTURE CONTROLS CONTINUED
- COLOUR TEMPERATURE
- LAMP MODE
- AUTOMATIC FORMAT (WIDESCREEN)
- BLUE SCREEN
- PC SETTINGS – PICTURE POSITION, CLOCK PHASE, SAMPLING CLOCK, RESET
- CLOCK PHASE
- SAMPLING CLOCK
- RESET
- QUICK RESTART, PANEL LOCK, THE TIMER
- QUICK RESTART
- PANEL LOCK
- THE TIMER
- INPUT SELECTION AND AV CONNECTIONS
- INPUT SELECTION
- INPUT SIGNAL SELECTION
- OUTPUT SIGNAL SELECTION FOR SCART 3
- TELETEXT – SETTING UP, GENERAL INFORMATION, AUTO AND LIST MODES
- SELECTING MODES
- TELETEXT INFORMATION
- SUB-PAGES
- NAVIGATING PAGES USING AUTO
- NAVIGATING PAGES USING LIST
- TELETEXT CONTINUED – CONTROL BUTTONS
- AUTO
- LIST
- LAMP UNIT REPLACEMENT
- IMPORTANT INFORMATION
- WHEN TO REPLACE THE LAMP UNIT
- LAMP UNIT REPLACEMENT CONTINUED
- REPLACING THE LAMP UNIT
- NOTE
- LED INDICATIONS
- CURRENT LIMITER OPERATION
- IICBUS ERROR
- LOW POWER STANDBY
- LAMP RE-TRY
- LAMP DOOR OPEN
- LAMP ERROR
- COLOUR WHEEL ERROR
- TEMPERATURE PROBLEM
- QUESTIONS AND ANSWERS
- QUESTIONS AND ANSWERS CONTINUED
- CLEANING THE SCREEN AND CABINET
- DISPOSAL
- SPECIFICATIONS AND ACCESSORIES
- SOMMAIRE
- MISE EN ROUTE
- ADVERTENCIA
Brand : TOSHIBA
Model : 46WM48
Category : Television