AB838 - Answering machine AUDIOLINE - Free user manual and instructions
Find the device manual for free AB838 AUDIOLINE in PDF.


User questions about AB838 AUDIOLINE
0 question about this device. Answer the ones you know or ask your own.
Ask a new question about this device
Download the instructions for your Answering machine in PDF format for free! Find your manual AB838 - AUDIOLINE and take your electronic device back in hand. On this page are published all the documents necessary for the use of your device. AB838 by AUDIOLINE.
USER MANUAL AB838 AUDIOLINE
DIGITAL ANSWERING MACHINE
Name: MANFRED ZINNOW
1.1 Fitting Batteries (not included) ---- 23
1.2 Connecting the Answering Machine ---- 23
1.3 Setting the Day and Time Announcement -- 24
- OPERATION 25
2.1 Recording a Greeting 25
2.2 Checking your greeting 26
2.3 Setting up the Answering Machine ---- 26
2.4 Switching the Answering Machine On and Off 26
2.5 Limiting the recording time for incoming messages 26
2.6 Listening in 27
2.7 Interrupting the answering machine 27
2.8 Recording Notes 27
2.9 Recording Telephone Calls 28
2.10 Listening to Messages 28
2.11 Deleting Messages 29
- REMOTE ACCESS .... 31
3.1 Authorisation Code 31
3.2 Remote Access by Telephone 31
3.3 Remote Access using Remote Access Transmitter 31
3.4 Toll-free Remote Pre-access 32
3.5 Remote Access Facilities 32
3.5.1 Listening to and deleting messages .... 33
3.5.2 Re-recording a greeting ....34
3.5.3 Recording a memo 34
3.5.4 Room monitoring ....34
3.5.5 Switching off the answering machine .. 34
3.6 Switching on remotely 34
3.7 Remote Access with insufficient Memory Capacity 35
- IMPORTANT INFORMATION ...... 35
4.1 AUDIOLINE Power Supply 35
4.2 Carrying out a Reset 35
4.3 Care 36
4.4 Fault Finding 36
4.5 Guarantee 37
4.6 Safety Information 37
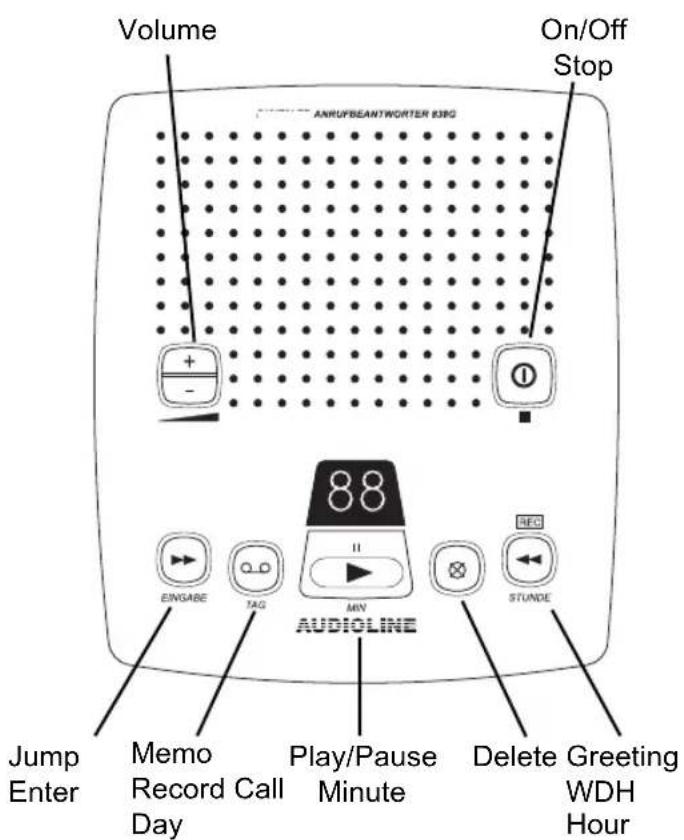
OPERATIONAL ELEMENTS
text_image
Volume AnruFBEANTWORTER 83PG On/Off Stop Audioline EINGABE TAG MIN STUNDE Jump Enter Memo Record Call Day Play/Pause Minute Delete Greeting WDH HourBack view
text_image
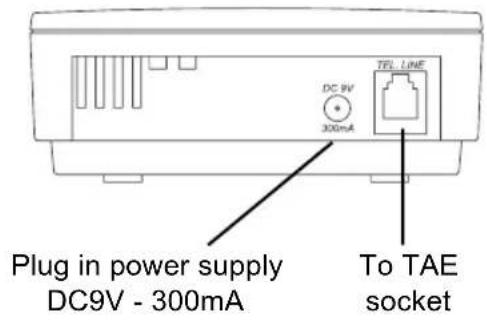
Plug in power supply DC9V - 300mA To TAE socket DC PV 300mA TEL LINERight hand side
text_image
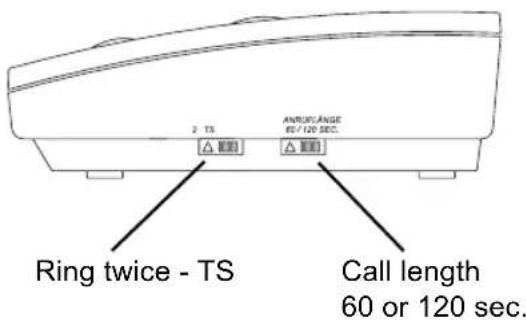
2 TS ANRURLANGE 60 / 120 SEC. △ △ △ Ring twice - TS Call length 60 or 120 sec.1. PREPARATION
1.1 FITTING BATTERIES (not included)
As your AUDIOLINE 838G stores all information digitally, such as your greeting message, all incoming messages and the day and time announcement, a battery is required to safeguard the data during a power cut (or if the mains power supply should be accidentally unplugged from the socket). You will need a 9 V alkaline block battery.
- The battery compartment can be found on the underside of your answering machine. Remove the screw and open the battery compartment.
- Now connect the adapter to the battery. In doing so, ensure that the polarity is correct.
- Place the battery in the battery compartment and close the compartment with the screw.
When the battery is discharged or no battery is fitted, "bL" is shown in the display. No battery power is required as long as the answering machine is connected to the mains power supply.
1.2 CONNECTING THE ANSWERING MACHINE
Set up your answering machine near to the telephone and to a mains socket. Connect the small plug on the telephone cable provided to the telephone jack on the rear of your AUDIOLINE 838G and connect the other end to your TAE socket (coding N = for accessories such as answering machine / telefax). Plug the power supply into a properly installed mains socket and the other end into the socket on the rear of your AUDIOLINE 838G. If you do not have the right connections, please refer to your telephone network provider.
When switching on for the first time, your new answering machine needs a few seconds to initialise all the functions. The display shows “CL” during this time.
After several signal tones, the display alternates between the following settings:
| bl = Battery flat or no battery installed. |
| — = The time and/or the greeting messages have not been set up. |
| 00 = No messages have been recorded. |
1.3 SETTING THE DAY AND TIME ANNOUNCEMENT
The day and the exact time are saved with each incoming message so that you always know when callers left their messages. To set the day and time announcement, please proceed as follows:
- Press and hold the EINGABE button.
- After the signal tone, press and hold the TAG button.
You will now hear all the days of the week, one after the other. In addition, the weekdays will be shown in the display as follows:
$$ \begin{array}{l} 0 0 = \text {Sunday,} 0 1 = \text {Monday,} 0 2 = \text {Tuesday,} \ 0 3 = \text {Wednesday,} 0 4 = \text {Thursday,} 0 5 = \text {Friday,} \ 0 6 = \text {Saturday} \end{array} $$
When you hear the correct day:
-
Release the TAG button and continue to hold the EINGABE button pressed.
-
Press and hold the STD button (hour). You will now hear the hours, one after the other: "one, two ...". The hours will also be shown on the display. When you hear the correct hour announced:
- Release the STD button and continue to hold the EINGABE button pressed.
- Press the MIN button several times. You will see the minutes in the display and you will hear the minutes announced, one after the other: one, two, three ... “.
If the MIN button is kept pressed, the minutes change in steps of 10.
- After you have heard the correct minute announced, release the EINGABE button.
The voice will now repeat the complete day and time announcement once more.
The current day and time announcement can be interrogated at any time by pressing the EINGABE button.
2. OPERATION
2.1 RECORDING A GREETING
You can choose between two different greetings with your AUDIOLINE 838G.
=> Your own greeting
=> If you do not want to record your own greeting, a fixed pre-recorded greeting in a masculine voice will be used. In this way, your answering machine replies anonymously and, if required, you can remain unidentified.
Before recording your greeting, you should write down the text that you want to record. The maximum length is 30 seconds. The longer your greetings last, the less recording time will be available for incoming messages.
The maximum recording time is ca. 40 minutes. If your greeting lasts for 18 seconds, for example, then 39 minutes and 42 seconds remain for incoming messages.
- Press and hold the REC button. The display shows "A1".
- Start recording your greeting after hearing a signal tone (max. 30 seconds). While recording, keep at a distance of ca. 20 cm from the AUDIOLINE 838G so that you can speak easily into the microphone at the front.
Example: "Hallo, this is 05432/1234. I am sorry but we are not available to take your call at the moment. However, you can leave a message if you wish. Please speak after the tone. If you hear a second tone, the recording will stop automatically".

Note: If your greeting lasts longer than 30 seconds, a signal tone will sound and the recording will be stopped.
- Release the REC button after you have finished your greeting message.

The greeting will now be repeated automatically. The volume can be adjusted with the volume button.
If you are not happy with your greeting message or if your first greeting was too long, you can record a new greeting at any time. To do this, simply repeat the steps in the foregoing chapter 2.1.
2.2 CHECKING YOUR GREETING
If your 838G is ready to use, you can check your greeting at any time. To do this, simply press the button.
2.3 SETTING UP THE ANSWERING MACHINE

A slide switch can be found on the right-hand side of the AUDIOLINE 838G. With this you can set up how incoming calls are to be accepted.
2 = The call will be answered after 2 rings.
TS = In the “TS” position, the first call will be answered after 6 rings and all further calls will be answered after 2 rings. Furthermore, with the switch in this position, you can make use of the toll-free remote access facility. Details will be found in Chapter 3.4.
2.4 SWITCHING THE ANSWERING MACHINE ON AND OFF

Your AUDIOLINE 838G can be switched off or on using the On/Off button. When the 838G is switched off, the display goes dark and no calls will be accepted.
2.5 LIMITING THE RECORDING TIME FOR INCOMING MESSAGES
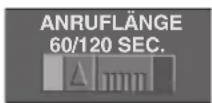
On the right-hand side, you will find a slide switch, which you can use to determine the maximum length of incoming messages. Settings for 60 seconds
and 120 seconds are available. If the caller speaks for longer, a signal tone will sound and the call will be disconnected.
If a pause of longer than 7 seconds occurs during the recording, the call will automatically be disconnected with a signal tone.
When the recording time for incoming messages has been used up, the display shows the message "FL". If you are not at home, you can erase the recorded messages via the remote access facility in order to create more memory space (see Chapter 3.7).
2.6 LISTENING IN
The integral loudspeaker makes it possible to listen in to incoming calls without accepting the call.

If you do not want to listen in to the incoming calls, set the volume to zero.
2.7 INTERRUPTING THE ANSWERING MACHINE
You can personally intervene at any time while the answering machine is playing back your greeting or the caller is dictating his message. Simply lift the receiver. The answering machine will stop and you can speak directly to the caller.
The message recorded up until the receiver was lifted will remain stored and can be played back later as normal.
2.8 RECORDING NOTES
The AUDIOLINE 838G can also be used like a notepad for yourself or members of your family. You can leave messages or record your own messages so that you can listen to these again later.
The length of a note is restricted to 60 seconds. If this time is exceeded, the recording stops and no more calls or notes can be recorded. Please keep a distance of ca. 15 cm from the microphone in the front of the answering machine.

-
Press and hold the "Record" button. The display flashes "r1" during the recording.
-
Start recording the note after the signal tone. E.g. "Hallo Thomas, you will find your meal in the fridge. I will be back at 10 o'clock".
- When you have finished your message, simply release the "Record" button.
Your answering machine is ready for use again and the message display shows an additional message.

Note: It is not possible to record notes while a call is being taken from outside. In the same way, calls will not be recorded when a note is being dictated.
2.9 RECORDING TELEPHONE CALLS
With this function, you can record a telephone call that you are in the process of making. In this way, you can listen to details of the call again later in order to note down a telephone number for instance.

-
Simply press the "Record" button during a call. The message "r2" will appear in the display. You will hear a signal tone every 15 seconds to remind you that recording is taking place.
-
Press the "Record" button once more to finish recording. Your answering machine is ready for use again and the message display shows an additional message.
2.10 LISTENING TO MESSAGES
The display shows the total number of messages recorded including notes (MEMO) and recorded telephone calls.
On playback, ensure that the volume is set to the middle position. If messages are played back too loudly or too quietly, you can adjust the volume during playback.
To listen to messages, proceed as follows:
Listening to messages
Press the "Play" button once. If there are still messages on the answering machine that you have already listened to earlier, the newly recorded messages will always be played back first.
If you also want to listen to the old messages again, press the "Play" button once more after the last message. At the end of each message the day and time announcement tells you when the message was recorded.
After the last message has been played, the unit gives two signal tones to indicate that no further messages have been recorded.

Play back of messages can be stopped by using the "Stop" button.

Note: If the "Play" button is pressed and no messages have been recorded, you will hear two signal tones.

Pause
If you want to break off listening to the messages, press the "Play" button. By pressing the "Play" button again, you can resume listening.

Repeating current message
Press the "Rewind" button once to repeat the message currently playing.

Repeating previous message
Press the "Rewind" button for one second to repeat the previous message.

Skipping one message
Press the "Forward" button once to skip the message currently playing. The 838G now starts directly with the next message.

Fast forward
Press the "Forward" button several times in succession. In this way, you can rapidly skip several messages.
2.11 DELETING MESSAGES

Deleting a single message
Press the "Delete" button during or immediately on completion of the message to be deleted. The message will be deleted and playback will continue with the next message.

Deleting all messages
The recorded messages can all be deleted at once. To do this, press and hold the "Delete" button for 3 seconds. Deletion will be confirmed with several signal tones and the message display will be reset.

Note: Only messages that have already been listened to will be deleted. Messages not listened to will be retained.
3. REMOTE ACCESS
3.1 AUTHORISATION CODE
Your AUDIOLINE 838G has personal access authorisation so that only you can listen to incoming messages using the remote access facility. The authorisation code is a three-digit number and can be found on a sticker on the underside of the answering machine.
3.2 REMOTE ACCESS BY TELEPHONE
If you call from a telephone that has Touch-Tone Dial-ling (TTD), you can easily control your answering machine remotely using the telephone keypad.

NOTE: A basic distinction is made between two dialling processes when telephoning. Touch-Tone Dialling is the fast modern process, which is used in digital telephone networks.
These digital telephone networks are already extremely widespread so that most telephones work using the Touch-Tone Dialling process.
You can tell by listening which process is used. Simply dial the number "9" on your telephone. If you hear several pulses (chattering) the Pulse Dialling process is used. If a single tone sounds, then Touch-Tone Dialling is used.
3.3 REMOTE ACCESS USING REMOTE ACCESS TRANSMITTER
If the telephone from which you want to remotely control your answering machine works using Pulse Dialling, you will need a remote access transmitter. As transmission is internationally standardised, you can use any commercially available remote access transmitter.
If you should require such a remote access transmitter, please refer to your dealer or contact AUDIOLINE directly.
To use the remote access transmitter, hold the loudspeaker on the rear of the transmitter directly in contact with the mouthpiece of the telephone receiver. If you now press the appropriate numbers on the numerical keypad of the remote access transmitter, these will be transmitted to the AUDIOLINE 838G, which then interprets them as commands.
3.4 TOLL-FREE REMOTE PRE-ACCESS
Using the toll-free remote pre-access facility, you can find out whether there are any messages on your answering machine without incurring any charges.
Set the slide control to the "TS" position.

If you now call your 838G when you are away, the answering machine answers as follows:
A. If your call is answered after 2 rings, there are messages on your 838G.
B. If no messages have been recorded, your call will not be answered after 2 rings. Put the receiver down directly as your call will now only be answered after the sixth ring. In this way, you can save call charges.
A. If your call is answered after 2 rings, there are messages on your 838G.
B. If no messages have been recorded, your call will not be answered after 2 rings. Put the receiver down directly as your call will now only be answered after the sixth ring. In this way, you can save call charges.
3.5 REMOTE ACCESS FACILITIES
- Call your own telephone number and allow the greeting message to run through to the end. Wait until your answering machine is ready to record a message.
- After the signal tone, enter your personal authorisation code by pressing the appropriate numbers on the number pad of the remote control or of a telephone. The numbers must be pressed for a minimum of one second.
Two signal tones confirm that the right code has been entered. Now select the required function by pressing the appropriate combination of keys.
For more information see:
3.5.1 Listening to and deleting messages
3.5.2 Re-recording a greeting
3.5.3 Recording a memo
3.5.4 Room monitoring
3.5.5 Switching off the answering machine

Note: The line will be disconnected if you do not call up one of the remote access functions within 7 seconds.
3.5.1 Listening to and deleting messages
Play back all messages Press "2 and#" If no messages have been recorded, you will hear three signal tones.
Play back new messages Press "1 and#" Only new incoming messages will be played back.

Note: While you are listening to messages, the unit asks approximately every 2 minutes whether you want to continue listening.
The answering machine stops and you will hear a signal tone.
Press any button and the message playback will be continued.
Repeat previous message Press "4 and #" The previous message will be automatically repeated.
Delete current message Press "3 and #" The message will be deleted and playback will continue with the next message.
At the end of the messages you will hear three signal tones. Within the next 7 seconds you can either repeat all messages or delete all messages. If no input is made within these 7 seconds, the line will be automatically disconnected.
Play all messages again Press "2 and#"
Delete all messages Press "3 and #"
Skip message Press "6 and #" The message currently playing will be skipped. The 838G now starts directly with the next message.
3.5.2 Re-recording a greeting
Press "8 and " #
Dictate your new greeting message after the signal tone. End the recording by pressing the "5 and #" buttons.
3.5.3 Recording a memo Press "9 and " #
Dictate your memo after the signal tone. End the recording by pressing the "8 and #" buttons.
3.5.4 Room monitoring Press "0 and "#
You can also listen in to your home using your answering machine. The integral microphone in your answering machine is switched on and you can listen in to the room. Every 30 seconds you will hear a signal tone. If you want to continue listening, press the "0 and #" buttons again within 7 seconds.
To end room monitoring simply replace the receiver.
3.5.5 Switching off the Press "7 and " # answering machine
The answering machine is switched off by pressing the "7 and #" buttons and you can replace the telephone receiver.
3.6 SWITCHING ON REMOTELY
Imagine that you have left your office or your house and have forgotten to switch on your answering machine. With the AUDIOLINE 838G, you have the facility to switch on the answering machine from another telephone.
- Call your number and let it ring 9 times.
- When your answering machine replies with a long signal tone, enter your authorisation code. Two signal tones confirm that the right code has been entered
- Now enter the key combination "7 and #" to switch the answering machine on.
- Replace the receiver.
3.7 REMOTE ACCESS WITH INSUFFICIENT MEMORY CAPACITY
You can control your answering machine at any time using the remote access facility. If, however, there is no memory left for new messages, the 838G will no longer accept calls. In this case, please proceed as follows
- Call your number. If there is not sufficient memory capacity your call will not be answered after 2 or 6 rings.
- Let it ring 9 times and your answering machine will respond with three signal tones.
- Now enter your authorisation code.
You will hear a signal tone in confirmation and you now have the possibility of recreating more memory space by deleting messages. For more information, refer to Chapter 3.5.1.
4. IMPORTANT INFORMATION
4.1 AUDIOLINE POWER SUPPLY
The AUDIOLINE 838G may only be used with the original power supply. Do not connect your answering machine to the sockets of other equipment as otherwise you could ruin your answering machine and cause damage to the telephone network.
Warning: Use only an AUDIOLINE power supply! The use of other power supplies will invalidate any claims under the guarantee. If faults should occur even though you are using the AUDIOLINE power supply, please consult your dealer.
4.2 CARRYING OUT A RESET
If, for any reason, your answering machine is no longer working correctly, you should carry out a reset. To do this, please proceed as follows:
- Unplug the mains adapter and the telephone cable from their respective sockets.
- Remove the old battery.
-
Now plug the power supply into the socket.
-
Next please connect a new 9V battery and close the battery compartment.
- Plug the telephone cable back into the telephone socket.
- Now re-record your greeting message.
4.3 CARE
The case of your AUDIOLINE 838G can be cleaned with a damp cloth. Do not use spray polish or cleaning cream with abrasive particles, which could damage the loudspeaker or the case. Do not expose the unit to direct sunlight and avoid extreme humidity.
4.4 FAULT FINDING
If a fault should occur, please first check whether the fault is in the unit or in the telephone line. Remove all other telephone equipment and connect only the AUDIOLINE 838G directly to the telephone socket. If the fault is still there, connect just your telephone to the telephone socket. The results will show you where the fault lies.
Message display does not come on
Check whether the mains adapter is correctly seated in the mains socket and whether the mains adapter cable is properly seated in the rear of the AUDIOLINE 838G. Check whether there is power at the socket.
Message display shows BL
The battery is discharged and must be replaced. If the power fails, your greeting, all recorded messages and the day and time announcement will be deleted.
Message display shows FL (FULL)
The memory capacity is exhausted.
Message display shows —
Either the greeting message or the day and time announcement has not yet been set up.
4.5 GUARANTEE
AUDIOLINE equipment is manufactured and tested in accordance with the most up to date productio methods. Selected materials and highly developed technology ensure trouble-free operation and long life. If your unit should develop a fault within the guarantee period, however, please contact the shop where you bought your AUDIOLINE equipment exclusively and have your purchase receipt available for inspection. The guarantee period is 24 months from the day of purchase under the following conditions: within the guarantee period, all defects due to material or manufacturing faults will be repaired free of charge. The guarantee is invalidated if the equipment has been tampered with by the purchaser or third parties. Any damage caused by improper handling or operation, by incorrect positioning or storage, by improper connection or installation or by excessive force or other external influences is not covered by the guarantee. In the case of complaint, we reserve the right to repair or replace defective parts or to exchange the equipment. Exchanged parts or exchanged equipment become our property. Claims for compensation are excluded insofar as they do not relate to criminal intent or gross negligence on the part of the manufacturer. All guarantee claims according to these conditions must be raised exclusively with your dealer. Rights under the guarantee can no longer be enforced after the expiry of one year from purchase and delivery of our products. In the case of unnecessary or unjustified demands on the customer service department, we will levy our usual service charges for materials, time, postage and packing. Any complaints must be reported as soon as a problem is found. The guarantee is valid within the German Federal Republic.
4.6 SAFETY INFORMATION
Battery information
Please use only 9V alkaline block batteries. Before changing or fitting the battery for the first time, the TAE plug must be disconnected from the telecommunication network. High voltages from the telephone network could be present on the battery contacts. Avoid inserting the battery with the wrong polarity.
Disposal
If the useful life of the batteries or the complete equipment has expired, please dispose of these carefully in accordance with the statutory requirements and in a manner friendly to the environment.
Temperature and Ambient Conditions
The AUDIOLINE 838G is designed for use in protected rooms with a temperature range of +5 °C to 45 °C. The unit must not be installed in damp rooms such as a bathroom or laundry room. Avoid proximity to sources of heat such as radiators and do not expose the unit to direct sunlight. Adequate ventilation must be provided for the plug-in mains power supply and the answering machine in order to prevent overheating.
European Approval and CE Marking
Your AUDIOLINE 838G is approved for use on the German telephone network. The approval mark is on the underside of your telephone. The telephone is approved in accordance with EU Directive 91/263/EEC for telecommunications equipment. Accordingly, anybody can connect the unit to a telephone socket and put it to use. This telephone fulfils the requirements of the EU Directives:
89/336/EEC "Electromagnetic Compatibility"
73/23/EEC "Electrical Equipment for use within certain voltage limits".
DECLARATION OF CONFORMITY
WE AUDIOLINE GmbH
OF PROMENADENSTR. 1
41460 NEUSS
GERMANY
DECLARE UNDER OUR SOLE RESPONSIBILITY AS EU DISTRIBUTOR THAT THE PRODUCT
MODEL: 838G
DESCRIPTION: DIGITAL ANSWERING MACHINE
IS IN CONFORMITY WITH THE BASIC REQUIREMENTS OF DIRECTIVE: 1999/5/EC
AUTHORISED SIGNATORY:
Signature:
MANFRED ZINNOW
Position in the company: MANAGING DIRECTOR
Date of issue: 16.05.2000

A copy of this declaration will be retained for 10 years after cessation of production.

SUPPLIER: AUDIOLINE GmbH, PROMENADENSTR. 1, D-41460 NEUSS
PRODUCT: 838 G
This product has been developed for use with an analogue telephone line (PSTN) within Germany. However, no guarantee can be accepted for trouble-free operation on all telecommunications terminal equipment connections due to the differences between the different telecommunications network operators.
AUDIOLINE
AUDIOLINE GmbH
Promenadenstrasse 1
41460 Neuss
Service Hotline 0180 5 00 13 88
Internet: www.audioline.de - E-mail: info@audioline.de