TAB968 Polyphonic - Answering machine AUDIOLINE - Free user manual and instructions
Find the device manual for free TAB968 Polyphonic AUDIOLINE in PDF.


User questions about TAB968 Polyphonic AUDIOLINE
0 question about this device. Answer the ones you know or ask your own.
Ask a new question about this device
Download the instructions for your Answering machine in PDF format for free! Find your manual TAB968 Polyphonic - AUDIOLINE and take your electronic device back in hand. On this page are published all the documents necessary for the use of your device. TAB968 Polyphonic by AUDIOLINE.
USER MANUAL TAB968 Polyphonic AUDIOLINE
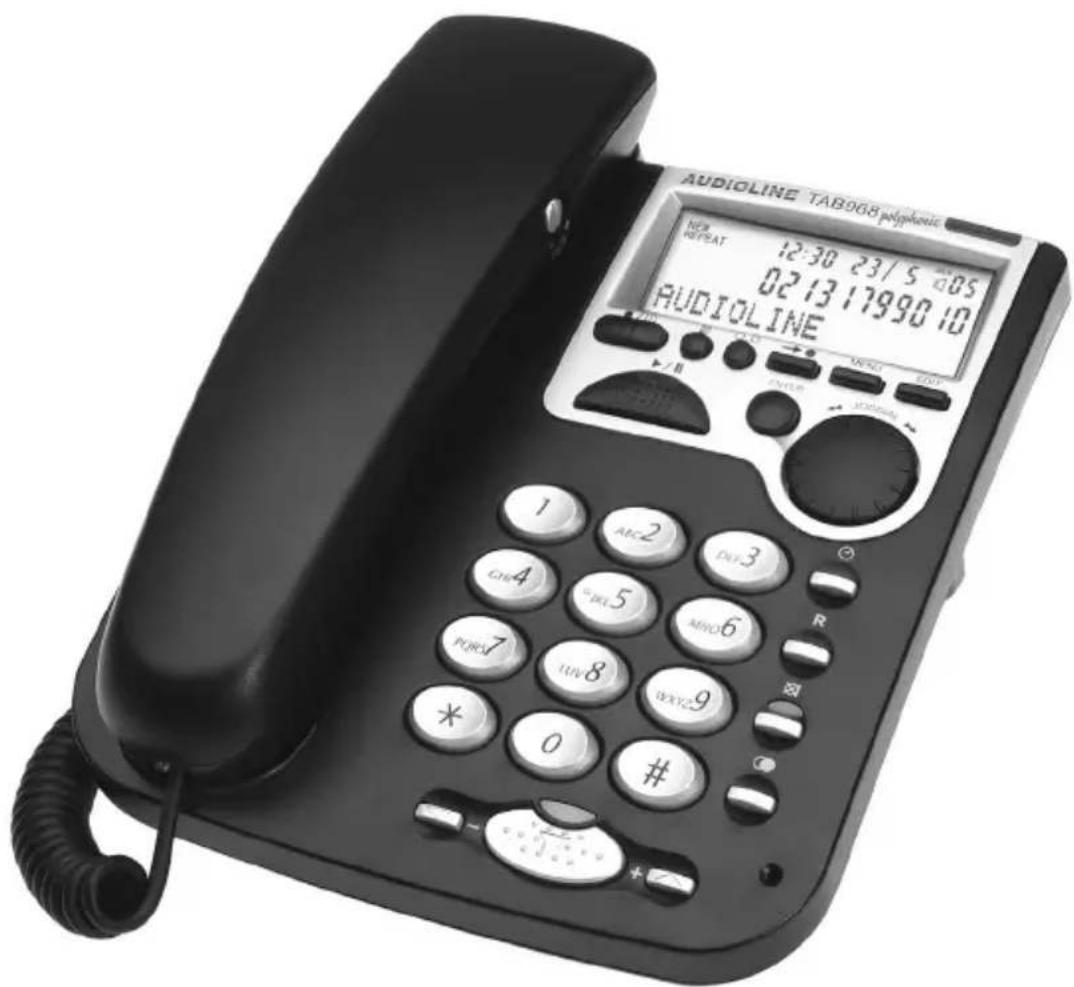
Handsfree-telephone with digital answering machine
text_image
AUDIOLINE TAB968 polyphonic NEW REPEAT 12:30 23/5 05 02:13 17990 10 AUDIOLINEOperating Instructions 31
natural_image
Simple line drawing of a curved object with a small inset detail (no text or symbols)4.8 Einstellbare Klingelmelodien
1 General Information.... 33
2 Operational Elements 35
3 Commissioning.... 36
3.1 General Information 36
3.2 Check contents of pack.... 36
3.3 Fitting the batteries.... 36
3.4 Connecting the receiver.... 36
3.5 Connecting the telephone 36
3.6 Connecting the plug-in mains power supply 37
3.7 Private exchanges - Setting up for T-NET 37
3.8 Fitting the desk support 37
3.9 Wall mounting 38
3.10 Basic settings 38
3.10.1 Setting the contrast.... 38
3.10.2 Setting the time, date and day of the week 38
3.10.3 Entering the local dialling code and the country code ..... 39
4 Operation 40
4.1 Making a call using the receiver or handsfree feature .... 40
4.2 Entering numbers before dialling 41
4.3 Receiving calls.... 41
4.4 Call duration display.... 41
4.5 Redial.... 41
4.6 Muting the microphone.... 42
4.7 Adjusting the receiver volume 42
4.8 Selectable ring tones 42
4.9 Polyphonic ring tone volume 43
5 The phone book.... 44
5.1 Storing numbers in the phone book.... 44
5.2 Making calls using the phone book 45
5.3 Changing numbers in the phone book.... 45
5.4 Deleting individual numbers from the phone book...... 46
5.5 Deleting the entire phone book.... 46
6 Caller display (CLID) 47
6.1 Viewing the caller list 48
6.2 Dialling a telephone number directly from the caller list.... 48
6.3 Storing telephone numbers from the caller list in the phone book 49
6.4 Deleting telephone numbers from the caller list 49
6.5 Deleting the entire caller list.... 49
7 T-NET mode / Private exchanges.... 50
7.1 "R" Button on private exchanges.... 50
7.2 "R" Button and the DEUTSCHE TELEKOM T-NET functions ..... 50
7.3 Dialling and storing telephone numbers when using on private exchanges 50
- Contents -
8 The answering machine....51
8.1 Selecting a male or female voice for the standard greeting ..... 51
8.2 Recording, changing and deleting a greeting message.... 51
8.3 Deleting your own greeting and reverting to the pre-recorded greeting.... 52
8.4 Setting up the answering machine 52
8.5 General operation 52
8.6 Listening, repeating, skipping and deleting messages 53
8.7 Recording notes.... 54
8.8 Recording telephone calls 54
8.9 Remote access 54
8.9.1 Remote access authorisation code 54
8.9.2 Toll-free remote pre-access 55
8.9.3 Remote access facilities 55
8.9.4 Switching on remotely 56
8.9.5 Remote access with insufficient memory capacity...... 56
9 Important information....57
9.1 Hearing aid compatibility 57
9.2 Fault finding....57
9.2.1 Telephone 57
9.2.2 Answering machine 57
9.2.3 AUDIOLINE Hotline....57
9.3 Changing the telephone cable.... 57
9.4 Guarantee....58
9.5 Declaration of Conformity/CE mark 58
1 General Information
Please read these operating instructions carefully. If you should have any questions, please contact our Service Department on the Hotline number 0180 500 13 88 (costs Telekom by printing: 12ct/min). Under no circumstances open the unit yourself and do not try to carry out your own repairs. For any claims under the warranty, please refer to your dealer.
Intended use
This telephone is designed for use connected to an analogue telephone line (PSTN) in Germany. However, due to differences in the services provided by the various telecommunications providers, we cannot guarantee that the telephone will work properly when connected to all telecommunications terminal lines. The telephone is prepared for connection to a TAE phone jack with F/N coding and can be used together with other equipment such as a fax, answering machine, or a modem. Plug the connecting phone cable only into the telephone plug socket provided for this purpose. Do not replace the plug of the connecting phone cable.
Batteries
Do not use any other kind of rechargeable batteries, as these could possibly lead to a short circuit. When changing the batteries, always use four new batteries, type AAA 1.5V. Do not throw batteries into the fire or immerse in water. Do not dispose of old or faulty batteries with the normal household waste.
Private exchanges
The telephone can also be connected to a private exchange. You can find out from the dealer from whom the equipment was purchased whether your telephone will work on your private exchange without any problems. Due to the large number of different private exchanges, it is not possible to guarantee this function.
Disposal
If the useful life of the complete equipment has expired, please dispose of it carefully in accordance with the statutory requirements and in a manner friendly to the environment.
Temperature and ambient conditions
The telephone is designed for use in protected rooms with a temperature range of 10 °C to 30 °C . The telephone must not be installed in damp rooms such as a bathroom or laundry room. Avoid proximity to sources of heat such as radiators and do not expose the unit to direct sunlight.
- General Information -
Location
Do not set up the telephone in the immediate vicinity of other electrical equipment such as microwaves or hi-fi systems, as this may result in mutual interference.
The location has a decisive influence on the trouble-free operation of the telephone.
Place the telephone on a flat and non-slip surface. The feet do not normally leave any marks on the surface. However, due to the large number of varnishes and surfaces in use, it may not be possible to prevent marks occurring on the surface due to the feet of the unit.
Do not use the telephone in areas where there is a risk of an explosion.
Excessive exposure to smoke, dust, vibrations, chemicals, moisture, heat or the direct rays of the sun must be avoided.
Cleaning and care
The surface of the case can be cleaned with a soft, dry, lint-free cloth. Never use cleaning agents, particularly aggressive solvents. No attention is necessary apart from cleaning the housing occasionally. The rubber feet of the telephone are not resistant to all cleaning agents. The manufacturer can therefore not accept any liability for possible damage to furniture or the like.
CE mark
The telephone complies with the basic requirements of the R&TTE Directive This is confirmed by the CE mark.
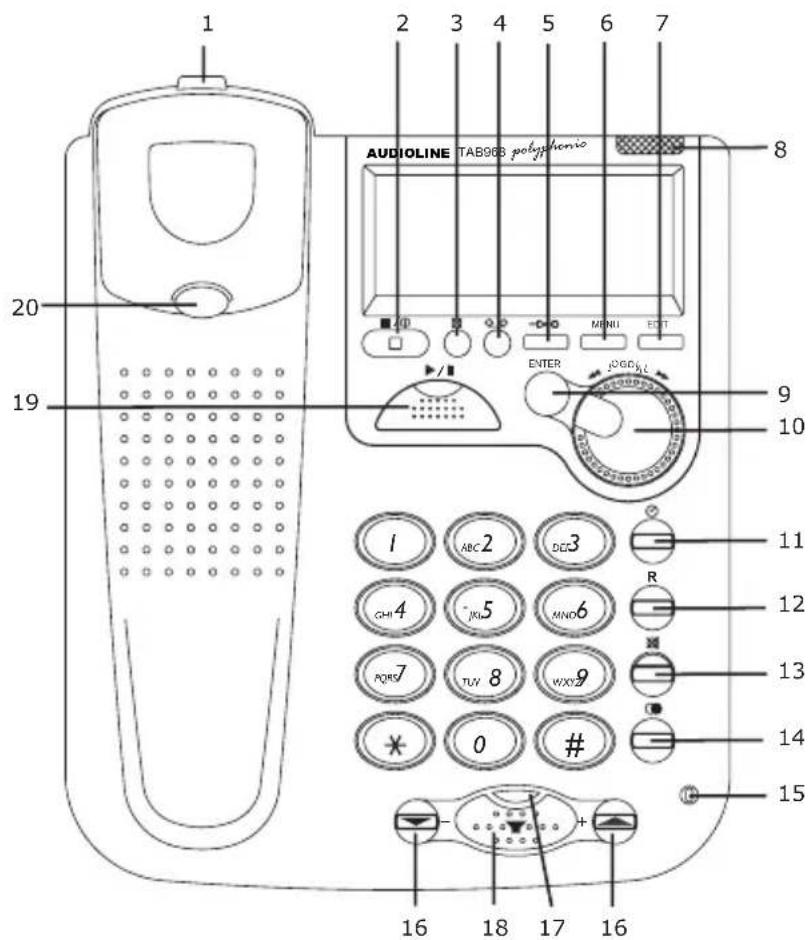
2 Operational Elements
1 Receiver hanging hook
2 Stop/Answering machine on-off
3 Delete button
4 Recording memos and telephone calls
5 Opening the phone book
6 MENU button
7 EDIT button
8 Indicator light for new calls (CLID)
9 DIAL/ENTER button
10 Jogdial
11 Reset call timer
12 R signal button
13 Mute button with indicator light
14 Redial
15 Microphone for handsfree facility
16 Volume adjustment
17 Handsfree indicator light
18 Handsfree button
19 Play-back/Pause with message LED
20 Receiver rest for wall mounting
1 Connection for spiral receiver cable
2 Telephone cable connection
3 Battery compartment
4 Ring tone switch
5 Answering machine switch
6 Fixing for desk support
7 Wall mounting
8 Power supply connection
9 Select ring melodies
10 Volume ring melodies
11 FLASH switch
text_image
1 2 3 4 5 6 7 AUDIOLINE TAB968 polyphonio MENU EDIT ENTER JOGDKL 1 20 19 9 10 11 12 13 14 15 16 18 17 16 I ABC2 DE3 R CHI 4 JCU 5 MNO 6 PORT TUY 8 WXY 9 * 0 # +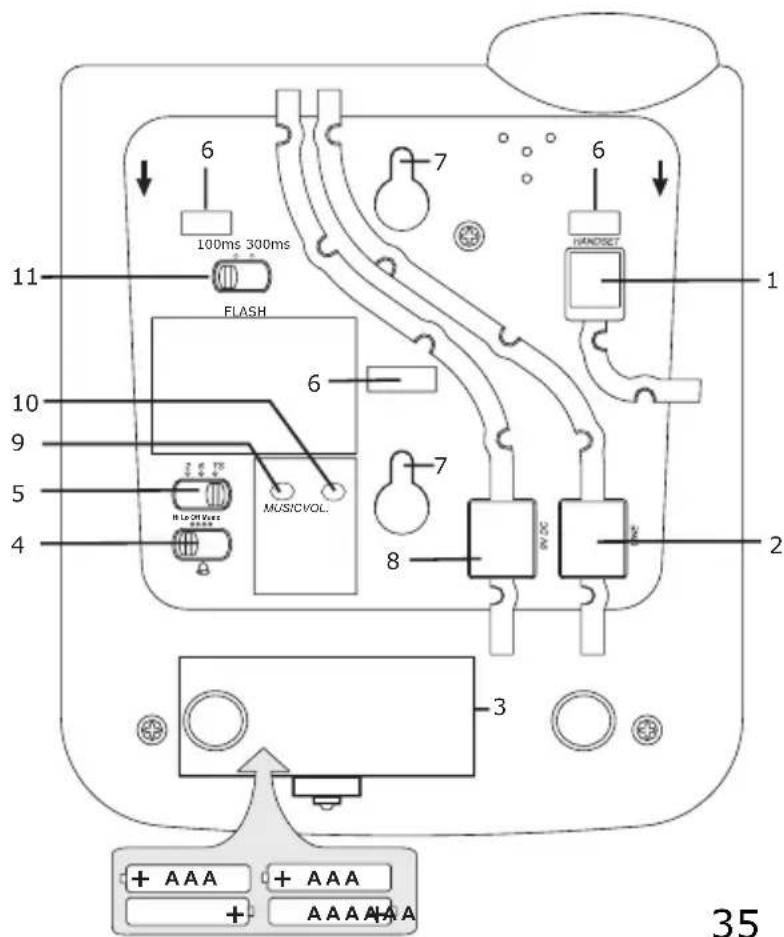
text_image
1 6 100ms 300ms FLASH 11 10 9 5 4 MUSICVOL. 6 7 8 HANDSET 2 3 + AAA + AAA + A A A A A A 35- Commissioning -
3 Commissioning
3.1 General Information
NOTE! Before commissioning, it is essential that you read the General Information at the beginning of this manual.
3.2 Check contents of pack
The following items are supplied
| one telephone base one telephone receiver |
| one telephone connecting cable one spiral cable |
| one desk support one instruction manual |
| one mains power supply |
3.3 Fitting the batteries
Before connecting your new telephone to the telephone network, the batteries should be installed. Please always use four new alkaline batteries, type AAA/LR03 1.5 V only. The batteries are used for preventing loss of data if there should be a mains power failure. Before installing or changing the batteries make sure that the telephone is not connected to the telephone network.
- The battery compartment is to be found on the underside of your telephone.
- Open the battery compartment with a small screwdriver or a pointed object.
- Insert the batteries. In doing so, ensure that the polarity is correct.
- Close the battery compartment.
The batteries should be changed when this symbol display. All four batteries must then be replaced

appears in the
3.4 Connecting the receiver
After unpacking your telephone, you must first connect the telephone receiver to the base unit. First take the short end of the spiral cable and plug it into the socket at the bottom of the receiver. Turn the telephone over and plug the long end into the socket marked HANDSET. Feed the cable through the cable channel to the outside.
3.5 Connecting the telephone
Connect the telephone cable supplied to the telephone socket and the telephone jack LINE on the underside of the telephone. Then feed the cable out of the telephone housing either upwards or downwards through the cable guide. Clip the cable firmly in the cable channel.
The telephone works using the tone dialling system.
- Commissioning -
3.6 Connecting the plug-in mains power supply
Insert the plug of the power supply into the 9V DC socket on the underside of the telephone and plug the power supply into a properly installed 230 V mains socket. For safety reasons, use only the plug-in mains power supply provided. Feed the cable through the cable channel to the outside.
3.7 Private exchanges - Setting up for T-NET
You can use the "R" signal button on your telephone on private exchanges and when using DEUTSCHE TELEKOM's T-Net functions.
Private exchanges
If you have connected your telephone to a private exchange, you can use all the facilities such as call transfer, automatic recall, etc. The "R" signal button gives you access to these facilities. The FLASH time "100ms" will be required on a private exchange. To make this setting, move the slide switch on the underside to the "100ms" position. You can find out from the dealer from whom the equipment was purchased whether your telephone will work on your private exchange without any problems and which other facilities you will have access to.
T-NET functions
Your telephone supports the most important DEUTSCHE TELEKOM added value services (e.g. brokering, call waiting, three-way conferencing, etc.). Please contact DEUTSCHE TELEKOM to gain access to these functions (some of which are subject to charge). When using T-NET functions, move the slide switch on the underside to the "300ms" position.
3.8 Fitting the desk support
If you intend to use your telephone on a desk, then the desk support supplied must be fitted. To do this, turn the telephone over. Now insert the two upper hooks into the openings provided and push the desk support firmly home.
If you ever need to remove the support, press gently on the middle clips on the upper edge and then pull the desk support off.
In the receiver rest there is a small hanging device, which is used when the telephone is wall mounted. This hanging device is not required when the telephone is used on a desk, as it impedes the lifting of the receiver. Using a small screwdriver, turn this hanging device until the screw is completely flush and its upper end does not protrude at all.
- Commissioning -
3.9 Wall mounting
Your telephone is also suitable for wall mounting. Use two flat head screws for fixing. Drill two holes horizontally side by side, 67 mm apart, and leave the screws protruding from the wall by 5mm. Now place the telephone over the screws and push it slightly downwards.
There is a small hanging device in the receiver rest to prevent the receiver from falling when it is placed on the rest with the telephone mounted on the wall. Using a small screwdriver, turn this hanging device until a small hook appears at the upper end.
If you are using the telephone fitted to the wall, you can hang the receiver on the telephone without hanging up. You will find a small hook for this purpose at the upper end of the receiver rest.
3.10 Basic settings
3.10.1 Setting the contrast
- Press the MENU button. The display shows the message LCD KONTRAST.
- Confirm with the ENTER button. The display shows the current contrast setting with values between 1 and 5.
- Now select the required contrast using the Jogdial and confirm with ENTER. The display now shows the message TAG EINSTELLEN.
- Exit the set-up mode using the ☐/① button.
3.10.2 Setting the time, date and day of the week
- Press the MENU button. The display shows the message LCD KONTRAST.
- Select the TAG EINSTELLEN message using the Jogdial.
- Confirm with the ENTER button. The display will show the day of the week that is currently set.
- Now select the required day of the week using the Jogdial and confirm with ENTER. The display now shows the message ZEIT EINSTELLEN.
- Confirm with the ENTER button. The hours will now flash in the display.
- Now select the current hour using the Jogdial and confirm with ENTER. The minutes will now flash in the display.
- Now select the required minutes using the Jogdial and confirm with ENTER. The display now shows the message DATUM EINSTELLEN.
- Confirm with the ENTER button and the day will flash in the display.
- Now select the current day using the Jogdial and confirm with ENTER. The month will now flash in the display.
- Now select the current month using the Jogdial and confirm with ENTER. The display shows the message ORTSVORWAHL.
- Exit the set-up mode using the ☐/☐ button.
- Commissioning -
3.10.3 Entering the local dialling code and the country code
Telephone numbers are always shown in the display with the local dialling code or, in the case of international calls, also with the appropriate country code. If these numbers are dialled directly from the caller list, the dialling code can of course be omitted with local calls. Therefore, you should enter your local dialling code (always starting with the 0) and the country code for Germany (0049).
- Press the MENU button. The display shows the message LCD KONTRAST.
- Select the ORTSVORWAHL message using the Jogdial.
- Confirm with the ENTER button. The display shows the message - - - - - and the dashes will flash.
- Now enter your dialling code using the number pad and and confirm with ENTER. The display shows the message LANDESVORWAHL.
- Confirm with the ENTER button. The display shows the message - - - - - and the dashes will flash.
- Now enter the country code for Germany "0049" using the number pad and confirm with ENTER.
- Exit the set-up mode using the ☐/① button.
Incorrect entries can be deleted with the ☑ button. To do this, move the cursor to the correct point using the Jogdial and then press the ☑ button.
4 Operation
4.1 Making a call using the receiver or handsfree feature
The telephone can be used like any conventional telephone and, in addition, has some useful special features, which make phoning considerably easier for you. You have two ways of making a call:
A: Using the receiver
- Lift the receiver and wait until you hear the dialling tone.
- Now dial the required telephone number. The number dialled will be shown in the display. The display shows a telephone number with a maximum of 16 digits. If the number dialled is longer, only the last 16 digits will be displayed.
- To end the call simply replace the receiver.
If you want to change from the receiver to the handsfree feature during a call, press the handsfree button and replace the receiver.
B: Making a call using the handsfree feature
- Press the handsfree button
. The LED above the button comes on
and the display shows the the in-built loudspeaker.
symbol. You will hear the dialling tone over


- Dial the required telephone number. The number dialled will be shown in the display. The display shows a telephone number with a maximum of 16 digits. If the number dialled is longer than 16 digits, only the last 16 digits will be displayed.
If the other party accepts the call, his voice will be heard over the in-built loudspeaker. When using the handsfree facility always speak loudly and clearly towards the telephone.
The volume can be adjusted using the + ▲ and - ▼ buttons next to the handsfree button.
If you want to change from the handsfree facility to the receiver, simply lift the receiver.
- To end the call, press the handsfree button

or replace the receiver.
4.2 Entering numbers before dialling
You can also enter the required telephone number while the receiver is on the hook and before the handsfree button has been pressed without this being dialled directly. When doing so, you have the option to correct the number entered.
- Enter the required telephone number while the receiver is on the hook and before the handsfree button has been pressed.
- If you have entered a number incorrectly, move the cursor to the required position using the Jogdial.
- Replace the incorrect number simply by entering the correct number or delete the number with the ☑ button.
- To dial the number, press the ENTER button. The handsfree facility will be switched on automatically and the number will be dialled directly.
- If you want to change to using the receiver, simply lift the receiver.
4.3 Receiving calls
The call can be accepted using the receiver or the handsfree facility. Lift the receiver or use the handsfree facility by pressing the handsfree button

To end the call, replace the receiver or press the handsfree button

4.4 Call duration display
The call duration in minutes and seconds is shown in the display during a call. This will appear in the display automatically. The call duration will still be retained in the display for a few seconds after the call has been ended.
If you want to reset the display during a call, simply press the ⏻ button. The display will jump back to 00:00.
4.5 Redial
If a connection that you have dialled is engaged or you were unable to get through to anybody, simply replace the receiver. The last number dialled with a maximum of 32 digits remains stored in the telephone automatically. To use the redial facility, proceed as follows:
- Lift the receiver or press the handsfree button
- Press the redial button Ⓞ. The stored redial number will now be dialled.
4.6 Muting the microphone
The microphone can be turned off during a call by using the secrecy button ☒It is thus possible to speak without the other person hearing you. The loudspeaker in the handset remains switched on and you can continue to hear the other person.
21 Press the mute button ✉ once during a call to mute the microphone. The indicator light in the button will come on.
22 To switch the microphone on again, press the mute button ✗ once more. The indicator light will go out and you can continue the call as normal.
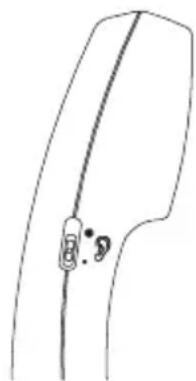
4.7 Adjusting the receiver volume
If the receiver volume is too quiet or too loud for you, you can change this to suit your requirements.
Using the slide switch 📋 on the receiver, you can adjust the volume from soft ● to loud ●
natural_image
Simple line drawing of a curved object with a small inset detail (no text or symbols)4.8 Selectable ring tones
Your telephone has 12 polyphonic ring tones and one standard ring signal. When you receive a call, the pre-selected tone or the standard ring signal will be played.
Polyphonic ring tones
If you want to use the polyphonic ring tones, set the slide switch 🔒 to the Music position.
You can choose the ring tone you require by repeatedly pressing the MUSIC button on the underside of the telephone. A new tone will be played each time the button is pressed. When the last tone is reached (Tone 12), Tone 1 will be played on the next press of the button. A new tone will be played each time the button is pressed again. When you have found the right tone, you do not have to do anything else, as the tone that was selected last will be stored automatically.
Standard ring signal
By means of the slide switch 🔒 on the underside you can choose the settings HI (loud) or LO (soft) to switch on the standard ring and, at the same time, match the volume to your requirements. Remember that the settings HI (loud) and LO (soft) only apply to the standard ring signal.
If at any time you do not want to be disturbed, use the OFF setting.
- Operation -
4.9 Polyphonic ring tone volume
You can adjust the required volume in eight steps by pressing the VOL. button (underside) repeatedly. A new volume will be set each time the button is pressed. When you have found the right volume, you do not have to do anything else, as the volume that was selected last will be stored automatically.
Note:
A. When the phone is used for the first time or in the event of a power failure, the maximum volume (Step 8) will always be set.
B. When the lowest volume (Step 1) has been reached, Step 1 and then Step 2 etc will be set the next time the button is pressed. After Step 8, the volume will then be reduced by one step on each press of the button.
5 The phone book
Your telephone allows you to store 99 telephone numbers with an associated name in the phone book.
If the capacity of 99 numbers has been reached, the next time you try to store a number the display will show the message TELEFONBUCH VOLL. In this case, other numbers must be deleted first.
5.1 Storing numbers in the phone book
- Press the MENU button.
- Select the TELEFONBUCH message using the Jogdial and confirm with ENTER. The display shows NUMMER EINGEBEN.
- Enter the required telephone number with a maximum of 24 digits using the number pad.
- Confirm with the ENTER button. The display shows NAME EINGEBEN.
- Now enter the required name with a maximum of 16 letters and confirm with ENTER.
- The number has now been saved with the associated name and the display will show the message NUMMER EINGEBEN.
- If you want to enter more numbers proceed as under 3 or exit the storage mode with the ☐/☐ button.
How to enter names
The number keys are also printed with letters for entering names. By repeatedly pressing the appropriate button, upper case letters as well as numbers and special characters can be entered.
Incorrect entries can be deleted with the ☑ button. To do this, move the cursor to the correct point using the Jogdial and then press the ☑ button.
Overview
| Button 1 Space, +, &, -, /, 1 | |
| Button 2 A, B, C,2 | |
| Button 3 D, E, F, 3 | |
| Button 4 G, H, I, 4 | |
| Button 5 J, K, L, 5 | |
| Button 6 M, N, O, 6 | |
| Button 7 P, Q, R, S, | 7 |
| Button 8 T, U, V, 8 | |
| Button 9 W, X, Y, Z, | 9 |
| Button 0 ,, , : , ; , ?, | 0 |
| * button ',@,(,),* | |
| # button $,_,%,!,# | |
| Delete | |
- The phone book -
5.2 Making calls using the phone book
If you have stored numbers in the phone book, you can dial these numbers directly.
- To choose a number from the phone book, first press the →→ button.
- Now enter the first letter of the name of the person you want to call using the number pad. After a short time the display will show the first number stored with this initial letter. You can now search for more numbers with this letter by turning the Jogdial to the right.
- To dial the number, press the ENTER button. The handsfree facility will be switched on automatically and the number will be dialled directly.
- If you want to change to using the receiver, simply lift the receiver.
Note: You can also search for a number directly using the Jogdial without entering an initial letter. To do this, simply turn the Jogdial after pressing the button and you will be able to look through the whole list.
When you reach the end of the list the message ENDE DER LISTE will appear.
5.3 Changing numbers in the phone book
- To choose a number from the phone book, first press the →○ button.
- Now enter the first letter of the name of the required party using the number pad. After a short time the display will show the first number stored with this initial letter. You can now search for more numbers with this letter by turning the Jogdial to the right.
- Now press the EDIT button. The first digit of the number will flash in the display.
- Move the cursor to the required position using the Jogdial and re-enter the number or delete the number with the ☑ button.
- Confirm with the ENTER button and the first letter of the name will flash.
- Move the cursor to the required position using the Jogdial and re-enter the letter or delete the letter with the ☑ button.
- Confirm your entry with the ENTER button and the display will show the message GESPEICHERT.
- The phone book -
5.4 Deleting individual numbers from the phone book
- To choose a number from the phone book, first press the →○ button.
- Now enter the first letter of the name of the required party using the number pad. After a short time the display will show the first number stored with this initial letter. You can now search for more numbers with this letter by turning the Jogdial to the right.
- Now press the ☒ button once. The display shows the message LOESCHEN?.
- Now press directly the ☒ button for 2 seconds. The number will be deleted and the display will now show another number from the phone book.
- The display will revert to the normal display after 30 seconds.
5.5 Deleting the entire phone book
- To choose a number from the phone book, first press the →0 button.
- Now press and hold the ☒ button until the message ALLES LOESCHEN? appears in the display.
- Now press and hold the ☒ button again for 2 seconds until the message ALLE GELOESCHT appears in the display.
- The display will show the message TELEFONBUCH LEER for 30 seconds.
6 Caller display (CLID)
Using caller display, you can see in the case of incoming calls who is calling you. If this function is available on your line, the display shows you the caller's telephone number while the telephone is ringing. The display reports the following information when there is no telephone number available.
If the message KEINE NUMMER appears in the display, the number has only been partially or incorrectly received.
If the message NICHT VERFUEGBAR or FERNGESPRAECH appears in the display, the particulars of the number are not available. This could have been an international call.
If the message PRIVAT appears in the display, the caller has suppressed the transmission of his telephone number or it was not possible to transmit the number.
NOTE!
Caller display is an optional service from your telephone provider. Your telephone will show the number in the display if your telephone provider offers this service. Please ask your telephone provider for further information. If this service is not available, incoming calls will not be shown in the display.
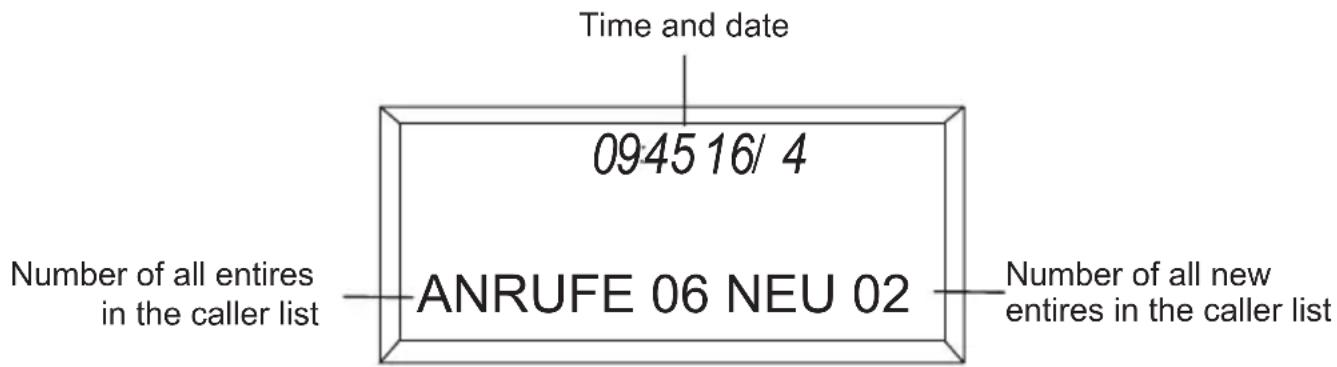
In your absence, all calls will be saved in a caller list with date and time. Up to 99 numbers are saved in the caller list. When the list is full, the oldest number is always deleted from the list.
If calls are registered during your absence, this will be indicated in the display by the message NEU and the indicator light for new calls will flash.
Note: The new calls display is not dependent on the calls recorded on the answering machine. Calls will also be stored in the caller list even where no message has been left on the answering machine.
text_image
Time and date 09:45 16/ 4 Number of all entries in the caller list ANRUFE 06 NEU 02 Number of all new entires in the caller list- Caller display (CLID) -
6.1 Viewing the caller list
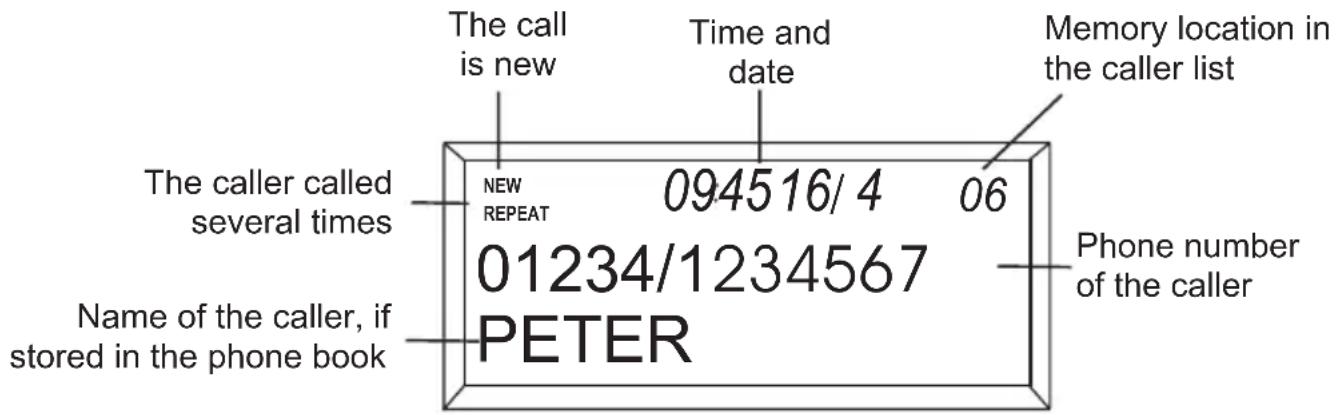
You can page through the caller list using the Jogdial. All calls registered will be shown as follows:
text_image
The call is new Time and date Memory location in the caller list The caller called several times NEW 094516/ 4 06 01234/1234567 Phone number of the caller Name of the caller, if stored in the phone book PETERWhen you reach the last storage location in the list, the display will show the message ENDE DER LISTE.
Note!
When all newly recorded numbers have been checked, the new call indicator light goes off and the NEW indicator in the display shows "0".
If no button is pressed within 30 seconds, the caller list is no longer displayed and the display shows the current time and date once more along with the number of telephone numbers stored in the caller list and the number of newly stored telephone numbers.
6.2 Dialling a telephone number directly from the caller list
You can dial telephone numbers directly from the caller list.
- Select the required telephone number using the Jogdial.
- To dial the number, press the ENTER button. The handsfree facility will be switched on automatically and the number will be dialled.
- If you want to change to using the receiver, simply lift the receiver.
Note!
Before dialling, your telephone compares the country and local dialling codes of the number selected with your location (country + local dialling code). If you have entered your country and local dialling code during installation, the appropriate numbers will not be dialled if this is a number from within your country or local network.
6.3 Storing telephone numbers from the caller list in the phone book
- Select the telephone number from the caller list that you want to put into the phone book by using the Jogdial.
- Press the EDIT button. The display shows the message NAME EINGEBEN.
- Now enter the required name with a maximum of 16 letters and confirm with ENTER. The number will now be stored in the phone book.
6.4 Deleting telephone numbers from the caller list
- Select the telephone number from the caller list that you want to delete by using the Jogdial.
- Now press the ☒ button once. The display shows the message LOESCHEN?.
- Now press directly the ☒ button for 2 seconds. The number will be deleted and the display will now show another number from the caller list.
6.5 Deleting the entire caller list
When the entire caller list is deleted, only those entries, which you have already checked in the list, will be deleted.
- Select any telephone number from the caller list by using the Jogdial.
- Now press and hold the ☒ button until the message ALLES LOESCHEN? appears in the display.
- Now press and hold the ☒ button again for 2 seconds until the message ALLES GELOESCHT appears in the display.
7 T-NET mode / Private exchanges
You can use the "R" signal button on your telephone on private exchanges and when using DEUTSCHE TELEKOM's T-Net functions.
7.1 "R" Button on private exchanges
If you have connected your telephone to a private exchange, you can use all the facilities such as call transfer, automatic recall, etc. The "R" signal button gives you access to these facilities. The FLASH time "100ms" will be required on a private exchange. For this purpose, set the "FLASH" switch to the "100ms" setting. You will find more information in Chapter 3.5. You can find out from the dealer from whom the equipment was purchased whether your telephone will work on your private exchange without any problems and what further facilities you will receive from this.
7.2 "R" Button and the DEUTSCHE TELEKOM T-NET functions
Your telephone supports the most important DEUTSCHE TELEKOM added value functions (e.g. brokering, call waiting, three-way conference, etc.). The T-NET works using the "FLASH 300ms" setting. For this purpose, set the "FLASH" switch to the "300ms" setting. You will find more information in Chapter 3.4. Please contact DEUTSCHE TELEKOM to gain access to the T-NET functions (some of which are subject to charge).
7.3 Dialling and storing telephone numbers when using on private exchanges
Note! The pause function between the code for the outside line (usually 0 or 9) and the dialling tone described in this chapter is only necessary on older private exchanges.
With some private exchanges, there is a short pause between the code for the outside line (usually 0 or 9) and the dialling tone. This pause can be entered when dialling manually and when dialling from the phone book so that the following numbers are not dialled too quickly.
Entering the pause when dialling manually
Press the redial button Ⓞ once between the code for the outside line and the actual telephone number. After an outside line has been obtained, you telephone will wait for 3 seconds before dialling the actual telephone number.
Storing the pause with the number
Simply press the redial button Ⓞ after the code for the outside line and before the actual telephone number when storing the number. When dialling from the phone book, a pause of three seconds will then be automatically inserted after the code for the outside line.
8 The answering machine
For your greeting message you can either use the standard greeting delivered by a professional male or female radio speaker or you can record your own greeting with a length of up to 60 seconds. If you have not recorded your own greeting, the answering machine will reply with the standard greeting.
8.1 Selecting a male or female voice for the standard greeting
- Press the MENU button and select the STANDARD ANSAGE setting using the Jogdial.
- Then press the ENTER button.
- Use the Jogdial to select the required setting MAENNERSTIMME FRAUENSTIMME.
- Confirm with ENTER and you will hear the standard greeting with the selected voice.
8.2 Recording, changing and deleting a greeting message
Example of your own greeting: "Hallo, this is 05432/1234. I am sorry but we are not available to take your call at the moment. However, you can leave a message if you wish. Please speak after the tone."
Before recording your greeting, you should write down the text that you want to record. The length of your own greeting must be at least 3 seconds and may not exceed 60 seconds. The longer your greeting lasts, the less recording time will be available for incoming messages. The maximum recording time is ca. 28 minutes. If your greeting lasts 20 seconds for example, there will be 27 minutes and 40 seconds remaining for incoming calls.
Recording your own greeting
- Press the MENU button. The display shows the message LCD KONTRAST.
- Use the Jogdial to select the setting ANSAGE AUFNEHMEN and press and hold the ENTER button.
- Start your greeting directly after the signal tone. While recording, keep at a distance of ca. 15 cm from the answering machine so that you can speak easily into the microphone on the upper side.
- Release the ENTER button after you have finished your greeting message.
The greeting will now be repeated automatically. The volume can be adjusted by repeatedly pressing the two arrow keys ▲ and ▼
- The answering machine -
Checking your own greeting
- You can check your own greeting at any time.
- Press the MENU button and select the ANSAGE ABSPIELEN setting using the Jogdial.
- Then press the ENTER button to play back the greeting.
8.3 Deleting your own greeting and reverting to the pre-recorded greeting
If you have recorded your own greeting you can delete this and by doing so revert to the pre-recorded greeting.
Press the MENU button and select the ANSAGE ABSPIELEN setting using the Jogdial. Then press the ENTER button to play back the greeting.
Then press the ☒ button. Your own greeting will be deleted and you will be using the pre-recorded greeting once more.
8.4 Setting up the answering machine
On the underside of the telephone you will find a slide switch with which you can set how many times the phone rings before the incoming calls are answered.
2 The call will be answered after 2 rings.
6 The call will be answered after 6 rings.
TS In the "TS" position, the first call will be answered after 6 rings and all further calls will be answered after 2 rings. Furthermore, with the switch in this position, you can make use of the toll-free remote access facility. Details will be found in Chapter 8.9.2.
8.5 General operation
The answering machine can be switched off or on using the ☐/① button. If the answering machine is switched off, the message LED in the ▶/Ⅱ button will go off and no messages will be recorded.
The maximum length for incoming messages is 60 seconds. If the caller speaks for longer, a signal tone sounds and the call will be cut off. If there is a pause of more than 7 seconds during recording, the call will automatically be terminated with a signal tone.
No more calls will be answered if the memory capacity for new messages is exhausted. After 10 rings, the caller will hear a message informing him that his call cannot be taken. If you try to record a call or to dictate a memo, the display will show SPEICHER VOLL.
- The answering machine -
The in-built loudspeaker makes it possible to listen to incoming calls without speaking to the caller. If you do not want to listen to the incoming calls, set the volume right down by repeatedly pressing the ▼ arrow key. You can of course personally intervene at any time while the caller is dictating his message by lifting the receiver. The answering machine will stop and you will be able to speak to the caller directly.
8.6 Listening, repeating, skipping and deleting messages
If the message LED in the ▶/II button is flashing, this means that new calls have been recorded during your absence.
Note: The CALLS and NEW displays refer exclusively to those numbers that have been stored by means of the CLID function.
LISTENING TO MESSAGES
Press the ▶/|| button once. If the message LED is flashing, your answering machine will now first play back the newly recorded messages. At the same time, the display will show NEUE NACHRICHT.
If the LED is not flashing, all recorded messages that you have not yet deleted will be played back. At the same time, the display will show NACHRICHT.
With each message you will hear the day of the week and the time at which it was recorded.
If no messages have been saved, you will hear an appropriate message and two signal tones.
If you want to break off listening to the messages, press the ▶/□ button. By pressing the ▶/□ button again, you can resume listening to the messages. You can stop listening to the messages by pressing the ■/○ button.
The volume can be adjusted using the ▲ and ▼ buttons next to the handsfree button.
REPEATING CURRENT MESSAGE
Turn the Jogdial one notch to the left to repeat the message currently playing.
REPEATING PREVIOUS MESSAGE
Turn the Jogdial two notches to the left to repeat the previous message.
SKIPPING ONE MESSAGE
Turn the Jogdial one notch to the right to skip the message currently playing. The answering machine now starts directly with the next message.
- The answering machine -
DELETING A SINGLE MESSAGE
Press the ☒ button while the message is being played back.
DELETING ALL MESSAGES
In standby mode, press the ☑ button for 2 seconds.
8.7 Recording notes
With your answering machine you can leave messages for other people who use your answering machine, e.g. your family. These notes can be heard or deleted later like all other messages. See chapter 8.6.
Press and hold the button.
After a signal tone, the display will show the message AUFNAHME MEMO and you can start recording your note. Example: "Hallo Thomas, you will find your meal in the fridge. I will be back at 10 o'clock".
Simply release the button when you have finished your message. The message LED will flash, if the answering machine is on and the display shows MEMO.
8.8 Recording telephone calls
You can record a telephone call that you are in the process of making. In this way you can listen to details of the call again later. These recorded calls can be heard or deleted later like all other messages. See chapter 8.6.
Press the 📄 button during a call. The display will show MITSCHNEIDEN and your answering machine will start recording the call.
To stop recording, terminate the call or press the 📄 button. The message LED will flash, if the answering machine is on.
Note: No telephone calls can be recorded during the handsfree feature.
8.9 Remote access
8.9.1 Remote access authorisation code
Your answering machine has personal access authorisation (Remote Code) so that only you can listen to incoming messages using the remote access facility.
The authorisation code is a three-digit number and can be found on the underside of your unit (Remote Code).
- The answering machine -
8.9.2 Toll-free remote pre-access
Using the toll-free remote pre-access facility, you can find out whether there are any messages on your answering machine without incurring any charges.
Set the slide control to the "TS" position. If you now call your machine when you are away, the answering machine answers as follows:
A. If your call is answered after 2 rings, there are new messages on your answering machine and you can continue as described under 8.9.3.
B. If no messages have been recorded, your call will not be answered after 2 rings. Put the receiver down directly after the third ring as your answering machine will switch on as normal after the sixth ring. In this way, you can save call charges.
8.9.3 Remote access facilities
Call your own telephone number and enter your personal authorisation code while your greeting is playing by pressing the appropriate numbers on the number pad of a telephone.
A signal tone confirm that the right code has been entered. Now select one of the functions listed below by pressing the appropriate combination of keys. The pause between entering the individual remote access functions must not exceed 10 seconds, as otherwise the connection will be cut off automatically.
| Play back newly recorded messages Press 1 and # | |||
| Play back all recorded messages Press 2 and # | |||
| Delete current message Press | |||
| Repeat previous message Press | |||
| S t o p | |||
| Skip current message Press | |||
| Turn the answering machine on or off. Press 7 and #After this input, the answering machine is no longer ready for operation. | |||
| Re-record your own greeting Press 8 and #Finish recording with 5 and #. | |||
| Record memo Press 9 and #Finish recording with 5 and #. | |||
| Switch on room monitoring Press 10 and #Finish monitoring with 5 and #. |
Note: While you are listening to messages, the unit asks every 2 minutes and 40 seconds whether you want to continue listening. The answering machine stops and you will hear signal tones. Enter any number to continue playing back the messages.
- The answering machine -
8.9.4 Switching on remotely
Imagine that you have left your office or your house and have forgotten to switch on your answering machine. Using the remote access facility, you can switch on the answering machine from another telephone.
Call your number and let it ring until your call is answered by your answering machine (ca. 10 times).
After the signal tone, enter your personal authorisation code. A signal tone confirms that the right code has been entered.
Note: The monitoring function is active in this moment, so that the inputs or also speaking are heard over the loudspeaker of the answering machine.
Press ⑦ and # and your answering machine will be switched on.
Now replace the receiver or make use of the other remote access functions.
8.9.5 Remote access with insufficient memory capacity
You can control your answering machine at any time using the remote access facility. If, however, there is no memory left for new messages, the answering machine will no longer be able to accept calls. In this case, please proceed as follows:
Call your number.
Let this ring for about 10 times and your answering machine will reply with the message that the call cannot be answered.
Now enter your authorisation code. You will hear two signal tones in confirmation and you now have the possibility of recreating more memory space by deleting messages. To do this, first listen to the messages and then delete individual messages. For more information see Chapter 8.9.3.
9 Important information
9.1 Hearing aid compatibility
The telephone has a special circuit working on the basis of induction for transmitting speech to hearing aids. Please set your hearing aid to "T".
9.2 Fault finding
9.2.1 Telephone
Remove all extra telephone equipment and connect only the telephone directly to the telephone socket. If the fault is still present, connect another telephone (if available) to the telephone socket. The results will show you whether the fault lies with the unit or with the telephone line. Of course, you can always ring your network operator's service department, which will give you more advice on checking your installation.
9.2.2 Answering machine
The answering machine cannot be switched on
Check whether the mains adapter has been properly plugged into the mains socket and that the mains adapter cable is properly seated at the rear of the telephone. Check whether there is power at the mains socket.
Battery monitoring light flashes
The batteries are flat and must be changed. If the mains should fail, your greeting, all recorded messages and the day and time announcement will be deleted.
No messages are recorded
Delete messages in order to create more memory space.
9.2.3 AUDIOLINE Hotline
In the case of technical problems you can also contact our Service Department on the Hotline number 0180 5 00 13 88 (costs Telekom by printing: 12ct/min).
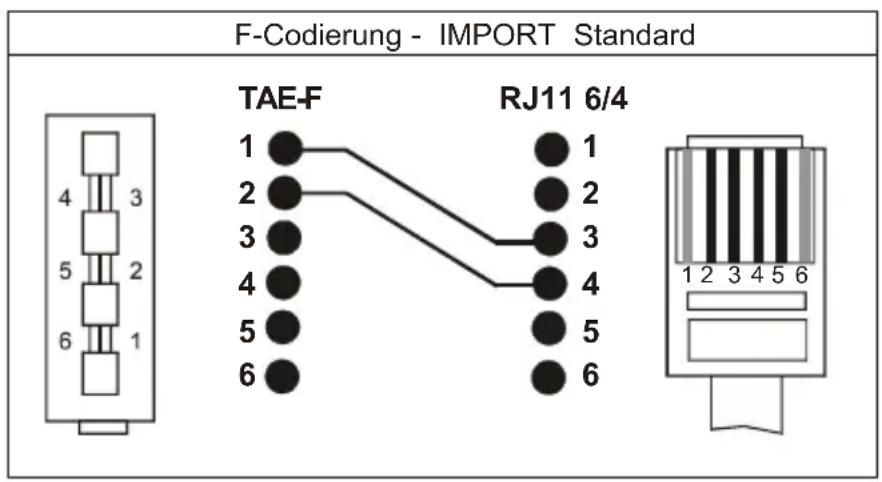
9.3 Changing the telephone cable
If you have to replace your telephone cable, you can locate the appropriate cable at your dealer's with the help of the following diagram.
text_image
F-Codierung - IMPORT Standard TAE-F RJ11 6/4- Important information -
9.4 Guarantee
AUDIOLINE units are manufactured and tested in accordance with the most up-to-date manufacturing procedures. Selected materials and highly developed technologies ensure trouble-free operation and long life. If, however, your unit should develop a fault within the warranty period, please contact the shop where you bought your AUDIOLINE unit, taking with you your purchase receipt. The warranty period is 24 months calculated from the day of purchase. This warranty is not applicable to the batteries or battery packs used in the various products.
Warranty conditions:
All defects, which are the result of material or manufacturing faults, will be rectified free of charge within the warranty period. Claims under the warranty shall not be considered if the equipment has been tampered with by the purchaser or third parties. Damage, which results from improper handling or use, incorrect positioning or storage, inappropriate connection or Installation and through Act of God or other external influences are not covered by the warranty. In the case of complaints, we reserve the right to repair or to replace the defective parts or to exchange the unit. Parts or units that have been exchanged shall become our property. Claims for damages shall not be entertained unless they relate to intention or gross negligence on the part of the manufacturer. In accordance with these conditions, all claims under the warranty shall be made exclusively to your dealer. Rights under the warranty can no longer be enforced after the expiry of two years from the purchase and handing over of our products.
9.5 Declaration of Conformity/CE mark
The telephone complies with the basic requirements of the R&TTE Directive "1999/5/EEC". This is confirmed by the CE mark.
For the complete Declaration of Conformity, please use the free download from our web site www.audioline.de.