
TV1329 - Television ORION - Free user manual and instructions
Find the device manual for free TV1329 ORION in PDF.


| Type | Color Television |
| Model | TV1329 |
| Brand | ORION |
| Screen Size | 13 inches (measured diagonally) |
| Dimensions (W x D x H) | 14-1/4 x 14-3/16 x 12-5/8 inches |
| Weight | 20.9 lbs |
| Power Source | AC 120V, 60Hz |
| Power Consumption | 65 Watts |
| Tuner Type | 181 Channel, Quartz PLL Frequency Synthesized |
| Receiving Channels | VHF 2-13, UHF 14-69, CATV 01-125 |
| Antenna Input Impedance | 75 Ohm coaxial |
| Audio Output Power | 1.5 Watts |
| Speaker | 3" Full Range, 8 ohm |
| Remote Control | Infrared, direct access, 2 x AAA batteries |
| On-Screen Display Languages | English, Spanish, French |
| Closed Caption | Decoder with Caption and Text modes |
| V-Chip | Program and movie rating control |
| Sleep Timer | Programmable up to 120 minutes |
| Memory Backup | Retains channel settings during power interruption |
| Picture Adjustments | Brightness, Contrast, Color, Tint, Sharpness |
| Warranty | 12 months parts and labor (picture tube: 2 years parts only) |
| Accessories | Remote control, telescopic antenna (TV1329 only) |
| Cleaning | Unplug, use a damp cloth; do not use liquid cleaners |
Frequently Asked Questions - TV1329 ORION
User questions about TV1329 ORION
0 question about this device. Answer the ones you know or ask your own.
Ask a new question about this device
Download the instructions for your Television in PDF format for free! Find your manual TV1329 - ORION and take your electronic device back in hand. On this page are published all the documents necessary for the use of your device. TV1329 by ORION.
USER MANUAL TV1329 ORION
ORION warrants this product to be free from manufacturing defects in material and workmanship under normal use and conditions for a period of twelve (12) months from date of original purchase in the United States only.
Should service be necessary under this warranty for any reason due to manufacturing defect or malfunction during the first twelve (12) months from date of original purchase. ORION will provide carry-in repair service at an ORION authorized Independent Service Center at no charge. Also, if an original part fails due to manufacturing defect in material and workmanship within one year from date of original purchase (two years from date of original purchase for picture tube) we will replace the defective part only (LABOR NOT INCLUDED AFTER THE INITIAL ONE YEAR WARRANTY PERIOD) provided the defect or malfunction is verified along with dated proof of purchase.
There are Independent Service Centers located throughout the country. For the one nearest you, DIAL TOLL FREE: 1-800-289-0980.
In the event there is no such local Independent Service Center, the product may be returned to the ORION Factory Service Center* listed below.
- Pack the unit in a well-padded heavy corrugated box.
- Enclose your check or money order payable to ORION in the amount of \$19.00 to cover shipping and handling costs.
- Enclose proof of purchase (warranty service will not be performed without dated proof of purchase). - Ship the unit prepaid via UPS or parcel post (insured).
Note: This warranty is void if the product is:
(a) Damaged through negligence, misuse, abuse, or accident.
(b) Used in a commercial application or rentals.
(c) Modified or repaired by anyone other than an Independent Service Center authorized by ORION to
effect warranty repairs to the class of product or by the ORION Factory Service Center (d) Damaged because it is improperly connected to the equipment of other manufacturers.
This warranty does not cover:
(a) Damage to equipment not properly connected to the product.
(b) Costs incurred in the shipping of the product to an authorized Independent Service Center or ORION Factory Service Center.
(c) Damage or improper operation of unit caused by customer abuse, misuse, negligence, or failure to follow operating instructions provided with the product.
(d) Ordinary adjustments to the product which can be performed by customer as outlined in the owner's manual
(e) Signal reception problems caused by external antenna or cable systems.
THIS WARRANTY IS NON-TRANSFERABLE AND APPLIES ONLY TO THE ORIGINAL PURCHASER AND DOES NOT EXTEND TO SUBSEQUENT OWNERS OF THE PRODUCT. ANY APPLICABLE IMPLIED WARRANTIES, INCLUDING THE WARRANTY OF MERCHANTABILITY, ARE LIMITED IN DURATION TO A PERIOD OF THE EXPRESS WARRANTY AS PROVIDED HEREIN BEGINNING WITH THE DATE OF ORIGINAL PURCHASE AT RETAIL AND NO WARRANTIES. WHETHER EXPRESS OR IMPLIED SHALL APPLY TO THIS PRODUCT THEREAFTER. ORION MAKES NO WARRANTY AS TO THE FITNESS OF THE PRODUCT FOR ANY PARTICULAR PURPOSE AND USE.
UNDER NO CIRCUMSTANCES SHALL ORION BE LIABLE FOR ANY LOSS, DIRECT, INDIRECT, INCIDENTAL, SPECIAL, OR CONSEQUENTIAL DAMAGE ARISING OUT OF OR IN CONNECTION WITH THE USE OF THIS PRODUCT.
THIS WARRANTY IS VALID ONLY IN THE UNITED STATES OF AMERICA. THIS WARRANTY GIVES YOU SPECIFIC LEGAL RIGHTS, HOWEVER. YOU MAY HAVE OTHER RIGHTS WHICH MAY VARY FROM STATE TO STATE. SOME STATES DO NOT ALLOW LIMITATION ON IMPLIED WARRANTIES OR EXCLUSION OF CONSEQUENTIAL DAMAGE, THEREFORE, THESE RESTRICTIONS MAY NOT APPLY TO YOU.
*ORION SALES, INC.
HIGHWAY 41
ORION PLACE PRINCETON, INDIANA 47670
3H40101D K 99/09
Printed in Thailand
ANTENNA/CATV CONNECTIONS
ENGLISH
OWNER'S MANUAL
ORION®
COLOR TELEVISION
TV1329
TV1929
CAUTION
Changes or modifications not expressly approved by the party responsible for compliance with the FCC Rules could void the user's authority to operate this equipment.
ATTENTION
If you purchase a universal remote control from your local retailer, please contact the remote manufacturer for the required programming code.
TV/CATV MODE SELECTION
When shipped from the factory, the TV/CATV menu option is set to the "CATV" (Cable Television) mode. If not using CATV, set this menu option to "TV" mode.
FEATURES
Quartz PLL Frequency Synthesized Tuning System - Electronically locks in and memorizes available channels for perfect reception.
181 Channel Tuner - The tuning system is capable of receiving all 68 VHF/UHF standard broadcast channels that are available in your area. When operating on a cable system, it can tune to the standard VHF channel frequencies plus up to 113 cable channel frequencies. The actual number of channels received depends upon channel reception in your area or your cable system.
On-Screen 3 Language Display - Consists of channel, sleep timer, volume level, muting, text/caption indicators and picture control adjustments. These can be displayed in English, Spanish or French.
Picture Adjustments Using The Remote Control - The On-Screen display allows precise remote control adjustment of BRIGHTNESS, COLOR, CONTRAST, SHARPNESS and TINT.
Sleep Timer - Operable from the remote control, this TV can be programmed up to 120 minutes to turn off automatically.
Memory Back Up - This system prevents loss of memorized channel selections in case a power interruption to the TV should occur.
V-Chip - The V-Chip function can rate a TV program or movie content. It allows you to set a restriction level.
Closed Captioned Decoder - Displays text captions or 1/3 of full screen text on the screen for hearing impaired viewers.
Indoor Antenna
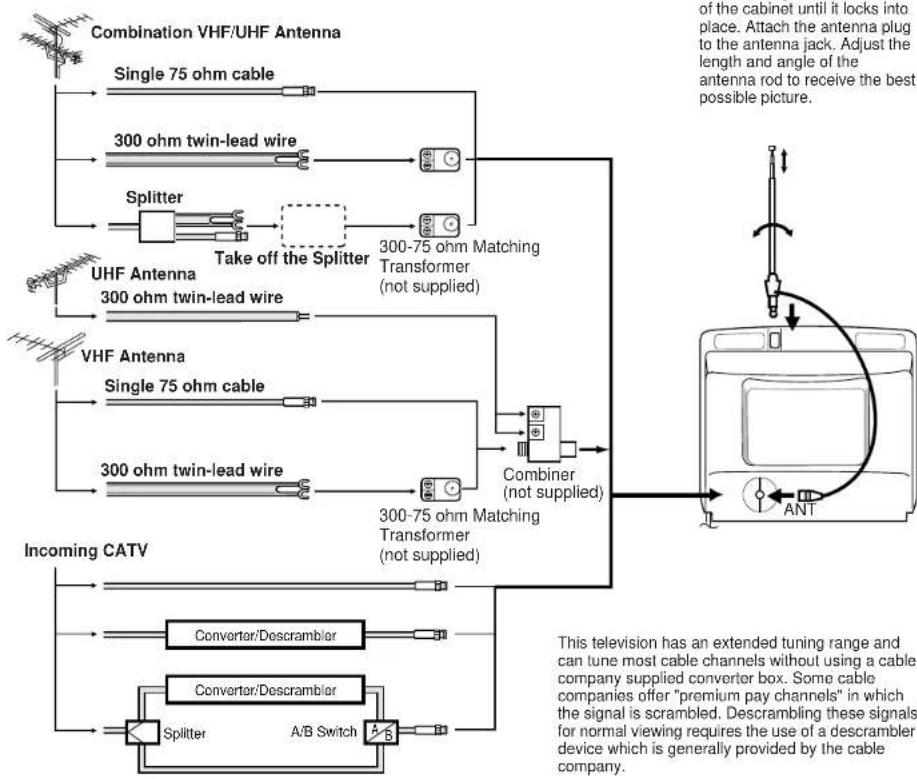
A single pole antenna is supplied with the unit (TV1329 only). insert the antenna holder into the mounting hole on the back of the cabinet until it locks into place. Attach the antenna plug to the antenna jack. Adjust the length and angle of the antenna rod to receive the best possible picture.
Combination VHF/UHF Antenna (Single 75 ohm cable or 300 ohm twin-lead wire)
Connect the 75 ohm cable from a combination VHF/UHF antenna to the antenna jack.
If your combination antenna has a 300 ohm twin-lead wire, use the 300-75 ohm matching transformer (not supplied).
Combination VHF/UHF Antenna (Separate VHF and UHF 300 ohm twin-leads)
Connect the UHF twin-lead wire to a combiner (not supplied). Connect the VHF twin-lead to the 300-75 ohm matching transformer (not supplied). Attach the transformer to the combiner. Attach the combiner to the antenna jack.
Separate VHF/UHF Antennas
Connect the 75 ohm cable from the VHF antenna and the UHF antenna twin-lead to a combiner (not supplied). Attach the combiner to the antenna jack.
NOTE: If your VHF antenna has a twin-lead wire, use the 300-75 ohm matching transformer (not supplied), then connect the transformer to the combiner.
For Subscribers to Basic Cable TV Service
For basic cable service not requiring a converter/ descrambler box, connect the CATV 75 ohm coaxial cable directly to the antenna jack on the back of the television.
For Subscribers to Scrambled Cable TV Service
If you subscribe to a cable service which requires the use of a converter/descrambler box, connect the incoming cable to the converter/descrambler box and connect the output of the box to the antenna jack on the back of the television. Follow the connections shown left. Set the television to the output of the converter/descrambler box (usually channel 3 or 4) and use the converter/descrambler box to select channels.
For Subscribers to Unscrambled Basic Cable with Scrambled Premium Channels
If you subscribe to a cable service in which basic cable channels are unscrambled and premium channels require the use of a converter/descrambler box, you may wish to use a two-set signal splitter (sometimes called a "two-set coupler") and an A/B switch box from the cable installer or an electronics supply store. Follow the connections shown left. With the switch in the "B" position, you can directly tune any nonscrambled channels on your TV. With the switch in the "A" position, tune your TV to the output of the converter/descrambler box (usually channel 3 or 4) and use the box to tune scrambled channels.
flowchart
graph TD
    A["Combination VHF/UHF Antenna"] --> B["Single 75 ohm cable"]
    A --> C["300 ohm twin-lead wire"]
    A --> D["Splitter"]
    D --> E["Take off the Splitter"]
    E --> F["300-75 ohm Matching Transformer (not supplied)"]
    G["UHF Antenna"] --> H["300 ohm twin-lead wire"]
    I["VHF Antenna"] --> J["Single 75 ohm cable"]
    I --> K["300 ohm twin-lead wire"]
    L["Incoming CATV"] --> M["Converter/Descrambler"]
    L --> N["Converter/Descrambler"]
    L --> O["Splitter"]
    O --> P["A/B Switch"]
    P --> Q["300-75 ohm Matching Transformer (not supplied)"]
    R["Combiner (not supplied)"] --> S["300-75 ohm Matching Transformer (not supplied)"]
    T["ANT"] --> U["Analog Cable Interface"]
    U --> V["Display Panel"]
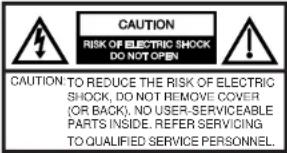

The lightning flash with arrowhead symbol, within an equilateral triangle is intended to alert the user to the presence of uninsulated dangerous voltage within the product's enclosure that may be of sufficient magnitude to constitute a risk of electric shock to persons.

The exclamation point within an equilateral triangle is intended to alert the user to the presence of important operating and maintenance (servicing) instructions in the literature accompanying the appliance.
WARNING: TO REDUCE THE RISK OF ELECTRIC SHOCK, DO NOT EXPOSE THIS APPLIANCE TO RAIN OR MOISTURE.
IMPORTANT SAFEGUARDS
- READ INSTRUCTIONS- All the safety and operating instructions should be read before the unit is operated.
- RETAIN INSTRUCTIONS- The safety and operating instructions should be retained for future reference.
- HEED WARNINGS-All warnings on the unit and in the operating instructions should be adhered to.
- FOLLOW INSTRUCTIONS- All operating and use instructions should be followed.
- CLEANING- Unplug this unit from the wall outlet before cleaning. Do not use liquid cleaners or aerosol cleaners. Use a damp cloth for cleaning.
- ATTACHMENTS- Do not use attachments not recommended by the unit's manufacturer as they may cause hazards.
- WATER AND MOISTURE- Do not use this unit near water. For example, near a bathtub, washbowl, kitchen sink, or laundry tub, in a wet basement, or near a swimming pool.
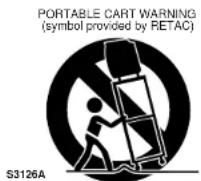
- ACCESSORIES- Do not place this unit on an unstable cart, stand, tripod, bracket, or table. The unit may fall, causing serious injury, and serious damage to the unit. Use only with a cart, stand, tripod, bracket, or table recommended by the manufacturer.
REMOTE CONTROL
8A. An appliance and cart combination should be moved with care. Quick stops, excessive force, and uneven surfaces may cause the appliance and cart combination to overturn.
9. VENTILATION- Slots and openings in the cabinet and in the back or bottom are provided for ventilation, to ensure reliable operation of the unit and to protect it from overheating. These openings must not be blocked or covered. The openings should never be blocked by placing the unit on a bed, sofa, rug, or other similar surface. This unit should never be placed near or over a radiator or heat source. This unit should not be placed in a built-in installation, such as a bookcase, or rack unless proper ventilation is provided or the manufacturer's instructions have been adhered to.
10. POWER SOURCE- This unit should be operated only from the type of power source indicated on the rating plate. If you are not sure of the type of power supply to your home, consult your appliance dealer or local power company. For units intended to operate from battery power, or other sources, refer to the operating instructions.
11. GROUNDING OR POLARIZATION- This unit is equipped with a polarized alternating current line plug (a plug having one blade wider than the other). This plug will fit into the power outlet only one way. This is a safety feature. If you are unable to insert the plug fully into the outlet, try reversing the plug. If the plug should still fail to fit, contact your electrician to replace your obsolete outlet. Do not defeat the safety purpose of the polarized plug. If your unit is equipped with a 3-wire grounding-type plug, a plug having a third (grounding) pin, this plug will only fit into a grounding-type power outlet. This too, is a safety feature. If you are unable to insert the plug into the outlet, contact your electrician to replace your obsolete outlet. Do not defeat the safety purpose of the grounding-type plug.
-
POWER-CORD PROTECTION- Power-supply cords should be routed so that they are not likely to be walked on or pinched by items placed upon or against them, paying particular attention to cords at plugs, convenience receptacles, and the point where they exit from the appliance.
-
LIGHTNING- To protect your unit during a lightning storm, or when it is left unattended and unused for long periods of time, unplug it from the wall outlet and disconnect the antenna or cable system. This will prevent damage to the unit due to lightning and power line surges.
- POWER LINES- An outside antenna system should not be located in the vicinity of overhead power lines, or other electric light or power circuits, or where it can fall into such power lines or circuits. When installing an outside antenna system, extreme care should be taken to keep from touching such power lines or circuits as contact with them might be fatal.
15.OVERLOADING- Do not overload wall outlets and extension cords as this can result in a risk of fire or electric shock.
16.OBJECT AND LIQUID ENTRY- Do not push objects through any openings in this unit as they may touch dangerous voltage points or short out parts that could result in fire or electric shock. Never spill or spray any type of liquid into the unit. - OUTDOOR ANTENNA GROUNDING- If an outside antenna or cable system is connected to the unit, be sure the antenna or cable system is grounded so as to provide some protection against voltage surges and built-up static charges. Section 810 of the National Electrical Code, ANSI/NFPA 70. provides information with respect to proper grounding of the mast and supporting structure, grounding of the lead-in wire to an antenna discharge unit, size of grounding conductors, location of antenna discharge unit, connection to grounding electrodes, and requirements for the grounding electrode.
18.SERVICING- Do not attempt to service this unit yourself as opening or removing covers may expose you to dangerous voltage or other hazards. Refer all servicing to qualified service personnel. - DAMAGE REQUIRING SERVICE- Unplug this unit from the wall outlet and refer servicing to qualified service personnel under the following conditions:
a. When the power-supply cord or plug is damaged.
b. If liquid has been spilled, or objects have fallen into the unit.
c. If the unit has been exposed to rain or water.
d. If the unit does not operate normally by following the operating instructions. Adjust only those controls that are covered by the operating in structions, as an improper adjustment of other controls may result in damage and will often require extensive work by a qualified technician to restore the unit to its normal operation.
e. If the unit has been dropped or the cabinet has been damaged.
f. When the unit exhibits a distinct change in performance, this indicates a need for service.
-
REPLACEMENT PARTS- When replacement parts are required, be sure the service technician uses replacement parts specified by the manufacturer or those that have the same characteristics as the original part. Unauthorized substitutions may result in fire, electric shock or other hazards.
-
SAFETY CHECK- Upon completion of any service or repairs to this unit, ask the service technician to perform safety checks to determine that the unit is in proper operating condition.
- WALL OR CEILING MOUNTING- The product should be mounted to a wall or ceiling only as recommended by the manufacturer.
- HEAT- The product should be situated away from heat sources such as radiators, heat registers, stoves, or other products
(including amplifiers) that produce heat. - NOTE TO CATV SYSTEM INSTALLER This reminder is provided to call the CATV system installer's attention to Article 820-40 of the NEC that provides guidelines for proper grounding and, in particular, specifies that the cable ground shall be connected to the grounding system of the building, as close to the point of cable entry as practical.
EXAMPLE OF ANTENNA GROUNDING AS PER NATIONAL ELECTRICAL CODE
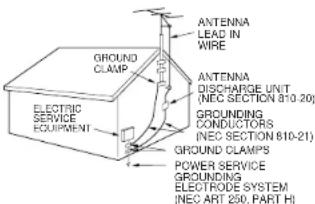
NEC-NATIONAL ELECTRICAL CODE S2898A
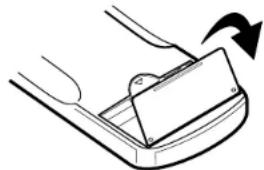
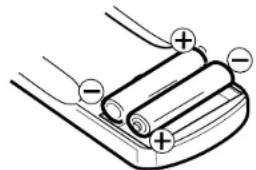
Before using the remote control transmitter, batteries must first be installed into it.
HOW TO INSTALL BATTERIES
- Open the battery compartment cover.
natural_image
Diagram of a car seatbelt mechanism with an arrow indicating rotation (no text or symbols present)- Install two "AAA" (penlight size) batteries.
natural_image
Diagram of two batteries with positive and negative charges, no text or symbols present- Replace the battery compartment cover.
Use two "AAA" size penlight batteries (not supplied) for the transmitter. The batteries may last approximately one year depending on how much the remote control is used. For best performance, it is recommended that batteries should be replaced on a yearly basis, or when the remote operation becomes erratic. Do not mix old and new batteries or different types.
BATTERY PRECAUTIONS
These precautions should be followed when using batteries in this device:
1. Use only the size and type of batteries specified.
2. Be sure to follow the correct polarity when installing the batteries as indicated in the battery compartment. Reversed batteries may cause damage to the device.
3. Do not mix different types of batteries together (e.g. Alkaline and Carbon-zinc) or old batteries with fresh ones.
4. If the device is not to be used for a long period of time, remove the batteries to prevent damage or injury from possible battery leakage.
5. Do not try to recharge batteries not intended to be recharged; they can overheat and rupture.
(Follow battery manufacturer's directions.)
POWER SOURCE
TO USE AC POWER SOURCE
Use the AC polarized line cord provided for operation on AC. Insert the AC cord plug into a standard 120V 60Hz polarized AC outlet.
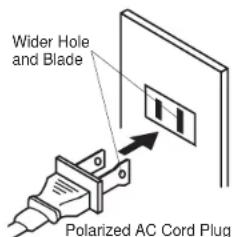
Polarized AC Cord Plug (One blade is wider than the other.)
NOTE:
- Never connect the AC line cord plug to other than the specified voltage (120V 60Hz). Use the attached power cord only.
- If the polarized AC cord does not fit into a non-polarized AC outlet, do not attempt to file or cut the blade. It is the user's responsibility to have an electrician replace the obsolete outlet.
-
If you cause a static discharge when touching the unit, and the unit fails to function, simply unplug the unit from the AC outlet, wait a few minutes, and plug it back in. The unit should return to normal operation.
-
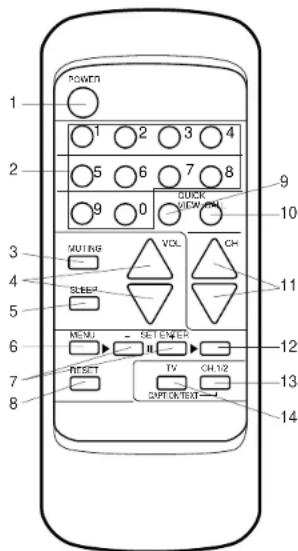
POWER Button - Press to turn the TV on. Press again to turn the TV off.
- Direct Channel Selection Buttons (0-9) - Allows direct access to any channel.
- MUTING Button - To turn off the sound, press this button once. The TV will be silenced and the symbol "MUTING" will appear on the screen. The muting feature can be released by pressing the MUTING button again or one of the VOL ▲ or ▼ button.
-
VOL (VOLUME) ▲ / ▼ Buttons - Press the ▲ button to increase, or the ▼ button to decrease the volume level.
-
SLEEP Button - To set the TV to turn off after a preset amount of time, press the SLEEP button on the remote control. The clock will count down 10 minutes each time the button is pressed in the order of 120, 110, 100, …… 20, 10, 0. After the sleep time is programmed, the display will disappear then reappear momentarily every ten minutes to remind you the sleep timer function is operating. To confirm the sleep time setting, press the SLEEP button once and the remaining time will be momentarily displayed. To cancel sleep time, press the SLEEP button repeatedly until the display turns to 0.
- MENU Button - Press to display the On-Screen menu function.
- SET + / - Buttons - Press to select the desired setting during On-Screen operations.
- RESET Button - Press to reset the On-Screen picture adjustments to their factory preset positions.
- QUICK VIEW Button - This button allows you to go back to the previous channel selected by just pressing the QUICK VIEW button. Press this button again to return to the channel you were watching.
- CALL Button - When you press this button, the channel number tuned will appear on the upper right corner of the screen. Press the button again to remove display from the screen.
- CH (CHANNEL) ▲ / ▼ Buttons - Press the ▲ button to change to a higher numbered channel set into memory. Press the ▼ button to change to a lower numbered channel set into memory.
- ENTER Button - Press to enter or select information for On-Screen operations.
- CH.1/2 Button - Switches between Channel 1 and Channel 2 in the Closed Caption mode.
- TV/CAPTION/TEXT Button - Press this button to switch between normal TV and the two Closed Caption modes (captions and 1/3 of full screen text). Closed Captioning will display text on screen for hearing impaired viewers.
LOCATION OF CONTROLS
TV1329
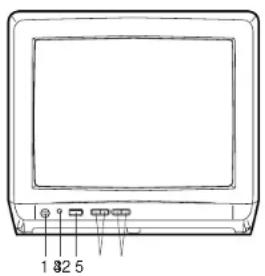
TV1929
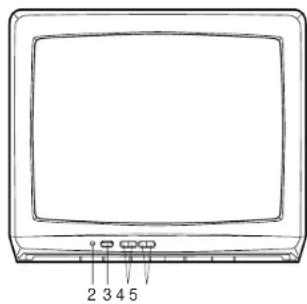
natural_image
Line drawing of a flat-screen monitor with labeled buttons (no text or symbols on the screen)- EAR (Earphone) Jack - Plug an earphone or monaural headphones with an 1/8 miniplug into this jack for private listening.
- Remote Sensor - Signals from the Remote Control unit are received here.
- POWER Button - Press to turn the TV on or off.
- VOLUME ▲ / ▼ Buttons - Press to raise or lower the volume of the sound.
- CHANNEL ▲ / ▼ Buttons - Press to select a higher or lower numbered channel set into memory.
SETTING LANGUAGE
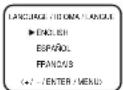
This TV can display the channel number, on screen displays and picture adjustments on the screen in English, Spanish or French.
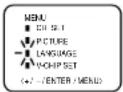
On-screen language selection (step 3) will automatically appear on the screen when you press the MENU button initially. Select language to use the other menu options.
1 Press the MENU button.
2 Press the SET + or - button to select the LANGUAGE mode, then press the ENTER button.
3 Press the SET + or - button until the *▶* indicator points to the desired language: English (ENGLISH), Spanish (ESPAÑOL) or French (FRANCAIS), then press the ENTER button.
4 Press the MENU button again.
NOTE:
If Spanish or French is chosen, the Closed Caption indicators will be in the selected language, but the Closed Caption text will not be affected by the language selection.
TV OPERATION
1 To turn on the TV, press the POWER button.
2 The VOLUME can be adjusted to a desired level by pressing the VOL (VOLUME) ▲ or ▼ button.
The sound level will be indicated on the TV screen by GREEN BARS AND A NUMBER. As the sound level increases, so do the number of BARS AND THE NUMBER on the screen. The same is true for decreasing the level.
3 Set the TV/CATV menu option to the appropriate position. When shipped from the factory, this menu option is in the CATV setting. See "To Memorize Channels".
TV - VHF/UHF channels CATV - CABLE TV channels
4 CH (CHANNEL) ▲ and ▼ buttons
Press and release the CH (CHANNEL) ▲ or ▼ button. The channel automatically stops at the next channel set into memory. Press and hold the button down to change channels more quickly.
For proper operation, before selecting channels, they should be set into the TV's memory. See "To Memorize Channels".
DIRECT CHANNEL SELECTION buttons (0-9) - Press these buttons to select a channel. The channel number will appear on the upper right corner of the TV screen. If an invalid channel number is selected, the display will revert to the original channel. TV MODE DIRECT CHANNEL SELECTION - When the TV/CATV menu option is in the TV position, all channels can be instantly selected by using two buttons. (For example, to select channel 2, press "0", then "2". If you press only "2", channel selection will be delayed for a few seconds). For channels 10 and above, press the 2 digits in order.
CATV mode direct channel selection
When the TV/CATV menu option is in the CATV position, channels can be selected as follows:
1-9 Press "0" twice, then 1-9 as needed. Example, to select channel 2, press "002". 10-19 Press "0", then remaining 2 digits. Example, to select channel 13, press "013". 20-99 Press the 2 digits in order. Example, to select channel 36, press "36". 100-125 Press the 3 digits in order. Example, to select channel 120, press "120"
NOTE: If the station being viewed stops broadcasting, the TV will automatically shut off after 15 minutes.
CLOSED CAPTION
WHAT IS CLOSED CAPTIONING?
This television has the capability to decode and display Closed Captioned television programs. Closed Captioning will display text on the screen for hearing impaired viewers or it will translate and display text in another language.
TO VIEW CLOSED CAPTIONS
Press the TV/CAP/TEXT button on the remote control to switch between normal TV and the two Closed Caption Modes (Captions and Full Screen Text).
Captions: This Closed Caption Mode will display text on the screen in English or another language (depending on the setting of the Closed Captions CH. 1/2 button). Generally, Closed Captions in English are transmitted on Captions Channel 1 and Closed Captions in other languages are transmitted on Captions Channel 2.
Text: The Text Closed Caption Mode will usually fill 1/3 of full screen with a programming schedule or other information. After selecting a Closed Caption Mode, it will stay in effect until it is changed, even if the channel is changed. If the Captions signal is lost due to a commercial or a break in the signal, the Captions will reappear when the signal is received again. If the channels are changed, the Captions will be delayed approximately 10 seconds. The Captions will appear in places on the screen where they will least interfere with the picture, usually on the bottom of the screen. News programs will usually show three-line Closed Captions which scroll onto the screen. Most other shows provide two or three lined Captions placed near the character who is speaking so the viewer can follow the dialogue. Words in italics or underlined describe titles, words in foreign languages or words requiring emphasis. Words that are sung usually appear enclosed by musical notes. For television programs broadcasting with Closed Captions, look in your TV guide for the Closed Captions symbol (CC).
- When activating the Closed Captioned Decoder, there will be a short delay before the Closed Captioned text appears on the screen.
- Closed Captioned text is only displayed in locations where it is available.
- If no caption signal is received, no captions will appear, but the television will remain in the Caption Mode.
- Misspellings or unusual characters may occasionally appear during Closed Captioning. This is normal with Closed Captioning, especially with live programs. This is because during live programs, captions are also entered live. These transmissions do not allow time for editing.
- When Captions are being displayed, on-screen displays, such as volume and mute may not be seen or may interfere with Closed Captions.
- Some cable systems and copy protection systems may interfere with the Closed Captioned signal.
- If using an indoor antenna or if TV reception is very poor, the Closed Caption Decoder may not appear or may appear with strange characters or misspelled words. In this case, adjust the antenna for better reception or use an outdoor antenna.
SETTING V-CHIP
This TV is fitted with a V-CHIP controller which provides you with channel viewing access controls and restrictions.
1 Press the SET + or - button to select the V-CHIP SET option, then press the ENTER button.
2 Enter your password using the Direct channel selection buttons. In the event of entering incorrect password press the RESET button. Then press the ENTER button.
3 Enter the same password for confirmation, then press the ENTER button.
4 Press the SET + or - button to select the V-CHIP option. Press the ENTER button to select the ON.
5 Press the SET + or – button to select the TV RATING or MOVIE RATING option. Press the ENTER button.
6 Press the SET + or – button to select the desired rating for the applicable video or TV channel. Press the ENTER button.
TV RATING

TV-Y : all children
TV-Y7:7 years old and above
TV-G : childrens program
When you select TV-Y7, TV-PG, TV-14 or TV-MA, press the CALL button to show the
contained rating
Press the SET + or – button to select the desired item you want. Press the ENTER button to select the OFF.
MOVIE RATING
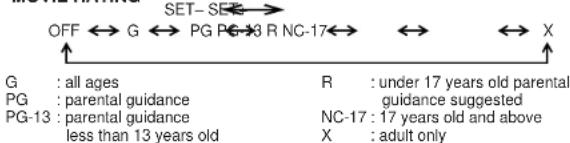
flowchart
graph LR
    A["SET- SET"] --> B["OFF ↔ G ↔ PG PG-13 R NC-17 ↔ ↔ X"]
    C["G : all ages"] --> D["PG : parental guidance"]
    E["PG-13 : parental guidance"] --> F["less than 13 years old"]
    G["R : under 17 years old parental guidance suggested"] --> H["NC-17: 17 years old and above"]
    I["X : adult only"] --> J["End"]
7 Press the MENU button three times to return to normal TV viewing.
NOTES:
• The V-Chip function is activated only on programs and tapes that have the rating signal.
- Once you block a program using the V-Chip function, the blocked program cannot be watched based on the content of the show. When the program starts, the "ENTER PASSWORD" will appear on the screen. When you want to release the V-Chip temporarily, enter the password.
If you change the channel or turn off and on the TV while releasing the V-Chip temporarily, the V-Chip setting will be resumed.
- When you watch the TV from the cable box or the VCR with the RF Modulator, then you release the V-Chip temporarily, the V-Chip setting will not be resumed until you turn off the TV. The TV channel is not used in this case.
- When changing the channel with the cable box or the VCR, approximately 10 seconds will pass until the program appears.
TO MEMORIZE CHANNELS TROUBLESHOOTING GUIDE
This TV is equipped with a channel memory feature which allows channels to skip up or down to the next channel set into memory, skipping over unwanted channels.
Before selecting channels, they must be programmed into the TV's memory. In addition to normal VHF and UHF channels, this TV can receive up to 113 Cable TV channels. To use this TV with an antenna, set the TV/CATV menu option to the TV setting. When shipped from the factory, this menu option is in the CATV setting.
TV/CATV SELECTION
1 Press the MENU button.
2 Press the SET + or - button until the indicator next to "CH SET" begins to flash, then press the ENTER button.
3 Press the SET + or – button until the indicator next to "TV/CATV" begins to flash.
4 Press the ENTER button to select the TV or CATV mode. The arrow indicates the selected mode.
5 Press the MENU button twice to return to normal TV viewing.
The chart below is typical of many cable system channel allocations.
CATV CHART
| Number on this TVCorresponding CATV channel | 14A | 15B | 16C | 17D | 18E | 19F | 20G | 21H | 22I | ||||||||
| 23J | 24K | 25L | 26M | 27N | 28O | 29P | 30Q | 31R | 32S | 33T | 34U | 35V | 36W | 37AA | 38BB | 39CC | 40DD |
| 41EE | 42FF | 43GG | 44HH | 45II | 46JJ | 47KK | 48LL | 49MM | 50NN | 51QQ | 52PP | 53QQ | 54RR | 55SS | 56TT | 57UU | 58VV |
| 59WW | 60AAA | 61BBB | 62CCC | 63DDD | 64EEE | 65FFF | 66GG | 67HH | 68III | 69JJ | 70KKK | 71LLL | 72MMM | 73NNN | 74OOO | 75PPP | 76QQQ |
| 77RR | 78SSS | 79TTT | 80UU | 81VV | 82WWW | 83XXX | 84YYY | 85ZZZ | 8686 | 8787 | 8888 | 8989 | 9090 | 9191 | 9292 | 9393 | 9494 |
| 95A-5 | 96A-4 | 97A-3 | 98A-2 | 99A-1 | 100100 | 101101 | 102102 | 103103 | 104104 | 105105 | 106106 | 107107 | 108108 | 109109 | 110110 | 111111 | 112112 |
| 113113 | 114114 | 115115 | 116116 | 117117 | 118118 | 119119 | 120120 | 121121 | 122122 | 123123 | 124124 | 125125 | 011226 | 123127 | 124128 | 125129 | 126130 |
NOTE:
Contact your cable company to determine the type of cable system used in your area.
AUTOMATIC CHANNEL MEMORY
1 Press the MENU button.
2 Press the SET + or - button until the indicator next to "CH SET" begins to flash, then press the ENTER button.
3 Press the SET + or - button until the indicator next to "AUTO CH MEMORY" begins to flash, then press the ENTER button. The TV will begin memorizing all the channels available in your area.
4 Press the MENU button twice to return to normal TV viewing.
TO ADD/DELETE CHANNELS
1 Press the MENU button.
2 Press the SET + or – button until the indicator next to "CH SET" begins to flash, then press the ENTER button.
3 Press the SET + or - button until the indicator next to "ADD/DELETE" begins to flash, then press the ENTER button.
4 Select the desired channels to be memorized or deleted using the Direct Channel Selection buttons (10 keys. 0-9), the CH ▲ or ▼ button or the SET + or - button.
5 Press the ENTER button to select ADD or DELETE. If an unmemorized channel was selected (step 4), the channel indication will be red. Press the ENTER button if you wish to ADD the unmemorized channel. The channel indicator will change from red to green when a channel is added and the channel will be memorized. If a memorized channel was selected (step 4), the channel indication will be green. Press the ENTER button if you wish to DELETE the channel from memory. The channel indicator will change from green to red when a channel is deleted. Repeat Steps 4 and 5 for each channel to be added or deleted.
6 Press the MENU button three times after adding or deleting all of the desired channels, to return to normal TV viewing.
ADJUSTING PICTURE
You can adjust the settings for color, sharpness, contrast, brightness and tint.
1 Press the MENU button.
2 Press the SET + or - button until the indicator next to "PICTURE" begins to flash, then press the ENTER button.
3 Press the ENTER button repeatedly to select the item you want to adjust.
→ CONTRAST COLORBRIGHTNESS TINT SHARPNESS
4 Press the SET + or - button to adjust the setting.
| + | - | |
| BRIGHTNESS | increase brightness | decrease brightness |
| CONTRAST | increase contrast | decrease contrast |
| COLOR | be brilliant color | be pale color |
| TINT | be greenish color | be reddish color |
| SHARPNESS | makes picture clearer | makes picture softer |
TO RETURN TO INITIAL SETTING
Press the RESET button while the picture adjusting mode appears on-screen.
Before requesting service, please refer to the following chart for the symptom and possible solution.
| SYMPTOMS | POSSIBLE SOLUTIONS |
| TV does not operate | Make sure the power cord is plugged in.Try another AC outlet.Power is off, check fuse or circuit breaker.Unplug unit for an hour, then plug it back in. |
| Poor sound or No sound | Station or CATV experiencing problems, tune to another station.Check sound adjustments (Volume and Muting).Check for sources of possible interference. |
| Poor picture or No picture | Station or CATV experiencing problems, tune to another station.Check antenna or CATV connections, reorient antenna.Check for sources of possible interference.Check picture control adjustments. |
| Poor reception on some channels | Station or CATV experiencing problems, tune to another station.Station signal is weak, reorient antenna to receive weaker station.Check for sources of possible interference. |
| Poor color or no color | Station or CATV experiencing problems, tune to another station.Make sure channels are set into memory.Check picture control adjustments.Check antenna or CATV connections, reorient antenna.Check for sources of possible interference. |
| Picture wobbles or drifts | Station or CATV experiencing problems, tune to another station.Make sure channels are set into memory.CATV company is scrambling signal.Check antenna orientation. |
| No CATV reception | Check all CATV connections.Set TV/CATV menu option to the CATV mode.Station or CATV system problems, try another station. |
| Horizontal or diagonal bars on screen | Check antenna connections, reorient antenna.Check for sources of possible interference. |
| No reception above channel 13 | Make sure TV/CATV menu option is in the appropriate mode.If using antenna, check UHF antenna connections. |
| No Remote operation | Batteries are weak, dead or inserted incorrectly.Remote is out of range, move closer to TV within 15 feet.Make sure Remote is aimed at sensor.Confirm there are no obstructions between the Remote and the TV.Make sure the power cord is plugged in. |
| TV shuts off | No broadcast on station tuned.Sleep Timer is set.Power interrupted. |
| Closed - Caption Is not activated. | TV station experiencing problems or program tuned is not closed captioned. Try another channel.Check CATV connection or VHF/UHF antenna, reposition or rotate antenna.Press TV/CAPTION/TEXT button to turn on the closed caption decoder. |
| Display is not shown in your language. | Select proper language in the menu options. |
SPECIFICATIONS
| Model | TV1329 TV1929 | |
| AC Power Input: | 120V, 60Hz | |
| AC Power Consumption: | 65 Watts | 80 Watts |
| Chassis Construction: | IC Solid state | |
| Picture Tube: | 13" (measured diagonally) | 19" (measured diagonally) |
| Audio Power Output Rating: | 1.5 Watts | |
| Speaker: | 3" Full Range, 8 ohm | |
| Tuner Type: | 181 Channel, Quartz PLLFrequency Synthesized | |
| Remote Control: | Infrared, Direct Access,2 x AAA batteries | |
| Receiving Channels: | VHF 2-13UHF 14-69CATV 01-97 (5A)-(A-3)98-99 (A-2)-(A-1)14-22 (A)-(I)23-36 (J)-(W)37-65 (AA)-(FFF)66-125 (GGG)-(125) | |
| Antenna Input Impedance: | 75 Ohm (VHF/UHF/CATV)Coaxial Input | |
| Dimensions: | 14-1/4" (W) x 14-3/16" (D) x12-5/8" (H) | 19-1/8" (W) x 18-5/16" (D) x16-5/16" (H) |
| Weight: | 20.9 lbs | 38.6 lbs |
ACCESSORIES
Remote Control
Telescopic Antenna (TV1329 only)
ORION®
FOR ADDITIONAL SET-UP OR OPERATING ASSISTANCE
PLEASE CALL:
1-800-289-0980
FOR CUSTOMER SERVICE, PLEASE CALL OR WRITE TO:
ORION SALES, INC.
HIGHWAY 41
ORION PLACE
PRINCETON, INDIANA 47670
GARANTIA LIMITADA
Antena combinada de VHF/UHF (Cable solo de 75 ohmios o de conductores gemelos de 300 ohmios)
natural_image
Diagram of a car seatbelt mechanism with an arrow indicating clockwise motion (no text or symbols)natural_image
Diagram of two batteries with positive and negative charges, no text or symbols presentnatural_image
Line drawing of a flat-screen monitor with labeled buttons (no text or symbols on the screen)


- ANTENNA/CATV CONNECTIONS
- ENGLISH
- OWNER'S MANUAL
- ORION®
- COLOR TELEVISION
- CAUTION
- ATTENTION
- TV/CATV MODE SELECTION
- FEATURES
- Indoor Antenna
- Combination VHF/UHF Antenna (Single 75 ohm cable or 300 ohm twin-lead wire)
- Combination VHF/UHF Antenna (Separate VHF and UHF 300 ohm twin-leads)
- Separate VHF/UHF Antennas
- For Subscribers to Basic Cable TV Service
- For Subscribers to Scrambled Cable TV Service
- For Subscribers to Unscrambled Basic Cable with Scrambled Premium Channels
- IMPORTANT SAFEGUARDS
- REMOTE CONTROL
- HOW TO INSTALL BATTERIES
- BATTERY PRECAUTIONS
- POWER SOURCE
- TO USE AC POWER SOURCE
- NOTE:
- LOCATION OF CONTROLS
- SETTING LANGUAGE
- TV OPERATION
- CATV mode direct channel selection
- CLOSED CAPTION
- WHAT IS CLOSED CAPTIONING?
- TO VIEW CLOSED CAPTIONS
- SETTING V-CHIP
- NOTES:
- TO MEMORIZE CHANNELS TROUBLESHOOTING GUIDE
- TV/CATV SELECTION
- AUTOMATIC CHANNEL MEMORY
- TO ADD/DELETE CHANNELS
- ADJUSTING PICTURE
- TO RETURN TO INITIAL SETTING
- SPECIFICATIONS
- ACCESSORIES
- GARANTIA LIMITADA
Brand : ORION
Model : TV1329
Category : Television