TV40FBT167D - Television ORION - Free user manual and instructions
Find the device manual for free TV40FBT167D ORION in PDF.


| Product Type | LED TV |
| Model | TV40FBT167D |
| Brand | Orion |
| Screen Size (Diagonal) | 40 inches |
| Resolution | 1920 x 1080 pixels (Full HD) |
| Aspect Ratio | 16:9 |
| Refresh Rate | 60 Hz |
| Connectivity | HDMI (2), USB (1), VGA, AV, RF Antenna, Ethernet, Composite |
| Audio Output | 2 x 8W |
| Power Supply | AC 100-240V, 50/60Hz |
| Power Consumption (Typical) | 65W |
| Standby Power Consumption | <0.5W |
| Dimensions with Stand (W x H x D) | 900 x 560 x 200 mm (estimated) |
| Weight with Stand | 7 kg (estimated) |
| VESA Mount Standard | 200 x 200 mm |
| Tuner | DVB-T/T2/C |
| Operating Temperature | 0°C to 40°C |
| Remote Control | Included |
| Warranty | 2 years (standard) |
| Energy Efficiency Class | A+ |
| Cleaning Instructions | Use a soft, dry cloth. Avoid liquid cleaners. |
| Safety Precautions | Place on a stable surface. Do not block ventilation openings. |
| Spare Parts and Repairability | Spare parts available through authorized service centers. |
| User Manual | Available for download at notice-facile.com |
Frequently Asked Questions - TV40FBT167D ORION
User questions about TV40FBT167D ORION
0 question about this device. Answer the ones you know or ask your own.
Ask a new question about this device
Download the instructions for your Television in PDF format for free! Find your manual TV40FBT167D - ORION and take your electronic device back in hand. On this page are published all the documents necessary for the use of your device. TV40FBT167D by ORION.
USER MANUAL TV40FBT167D ORION
natural_image
Front view of a blank flat-screen monitor with no visible text or symbols on the screen.natural_image
Three-step illustration of a black plastic container with internal components, showing step 1, step 2, and step 3 (no text or symbols)Notifications & Features & Accessories .....18
Features 18
Control Buttons on the TV....18
Connect Power 19
Remote Control 20
Connections....21
Media Browser Menu....24
TV Menu Features and Functions .....25
General TV Operation 27
Using the Channel List ....27
Configuring Parental Settings 27
Electronic Programme Guide (EPG) ......27
Software Upgrade....28
Troubleshooting & Tips 28
PC Input Typical Display Modes 30
Supported File Formats for USB Mode ....30
AV and HDMI Signal Compatibility ....30
Safety Information

CAUTION
RISK OF ELECTRIC SHOCK
DO NOT OPEN

CAUTION: TO REDUCE THE RISK OF ELECTRIC SHOCK DO NOT REMOVE COVER (OR BACK). NO USER-SERVICEABLE PARTS INSIDE. REFER SERVICING TO QUALIFIED SERVICE PERSONNEL
To operate your TV in extreme ambient conditions may cause the damage of the device.

If there is lightning or storms, or if the TV is not going to be used for a while (e.g. if going away on holiday), disconnect the TV set from the mains. The mains plug is used to disconnect TV set from the mains and therefore it must remain readily operable.

The exclamation point within an equilateral triangle is intended to alert the user to the presence of important operating and maintenance (servicing) instructions in the literature accompanying the appliance.
Note : Follow the on screen instructions for operating the related features.

IMPORTANT - Please read these ructions fully before installing or rating

WARNING: Never let people (including dren) with reduced physical, sensory or
mental capabilities or lack of experience and / or knowledge use electrical devices unsupervised.
- For ventilation purposes, leave a free space of at least 10 cm all around the set.
- Do not block ventilation holes.
- Do not place the TV on sloping or unstable surfaces, the TV may tip over.
- Use this device in moderate climates.
- The power cord plug should be easily accessible. Do not place the TV, furniture, etc. on the power cord. A damaged power cord/plug can cause fire or give you an electric shock. Handle the power cord by the plug, do not unplug the TV by pulling the power cord. Never touch the power cord/plug with wet hands as this could cause a short circuit or electric shock. Never make a knot in the power cord or tie it with other cords. When damaged it must be replaced, this should only be done by qualified personnel.
- Do not use this TV in a humid or damp place. Do not expose the TV to liquids. If any liquid falls into the cabinet unplug the TV and have it checked by qualified personnel before operating it any further.
- Do not expose the TV to direct sunlight or other heat sources.
- The TV should not be placed near to open flames or sources of intense heat such as an electric heater.
- Excessive sound pressure from earphones and headphones can cause hearing loss.
- Ensure that no open flame sources, such as lit candles, are placed on top of the TV.
- To prevent injury, this TV must be securely attached to the wall in accordance with the installation instructions (if the option is available).
- Occasionally, a few non-active pixels may appear on the screen as a fixed blue, green or red point. Please note that this does not affect the performance of your product. Take care not to scratch the screen with fingernails or other hard objects.
- Before cleaning, unplug the TV from the wall socket. Only use a soft, dry cloth while cleaning.
| Warning | Serious injury or death risk |
| Risk of electric shock | Dangerous voltage risk |
| Caution | Injury or property damage risk |
| Important | Correctly the system operate |
| Notice | Additional notes marked |
Getting Started
Notifications & Features & Accessories
Environmental Information
This television is designed to consume less energy to help save the environment. To reduce energy consumption, you should take the following steps:
If you set the Power Save Mode as Eco, the TV will switch to energy-saving mode. The Power Save Mode settings can be found In the 'Picture' section of the Main Menu. Note that some picture settings will be unavailable to be changed.
If Picture Off is selected, "Screen will be off in 3 seconds." message will be displayed. Select PROCEED and press OK to continue. The screen will be off immediately.
When the TV is not in use, please switch off or disconnect the TV from the mains plug. This will also reduce energy consumption.
Standby Notifications
- If the TV does not receive any input signal (e.g. from an aerial or HDMI source) for 5 minutes, the TV will go into standby. When you next switch-on, the following message will be displayed: "Standby Cause No Signal" Press OK to continue.
- If the TV has been left on and not been operated for a while, the TV will go into standby. When you next switch-on, the following message will be displayed. "Standby Cause No Operation" Press OK to continue.
Features
- Remote controlled colour TV.
• Fully integrated digital/cable TV (DVB-T/C) - HDMI inputs are for connecting a device that has a HDMI socket.
- USB input.
- OSD menu system.
- Scart socket for external devices (such as DVD Players, PVR, video games, etc.)
- Stereo sound system.
- Teletext.
• Headphone connection.
• Automatic programming system. - Manual tuning.
• Automatic power down after up to six hours. - Sleep timer.
- Child lock.
• Automatic sound mute when no transmission. - NTSC playback.
• AVL (Automatic Volume Limiting).
- PLL (Frequency Search).
- PC input.
- Plug&Play for Windows 98, ME, 2000, XP, Vist Windows 7.
• Game Mode (Optional).
Accessories Included
- Remote Control
- Batteries: 2 × AAA
- Instruction Book
Control Buttons on the TV
natural_image
Front view of a blank flat-screen computer monitor (no text or symbols visible)TV Control Switch & Operation
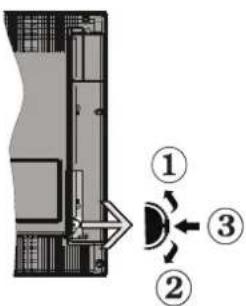
- Up direction
- Down direction
- Programme/Volume / AV / Standby-On selection switch
The Control button allows you to control the Volume/Programme/ Source and Standby-On functions of the TV.
To change volume: Increase the volume by pushing the button up. Decrease the volume by pushing the button down.
To change channel: Press the middle of the button, the channel information banner will appear on screen. Scroll through the stored channels by pushing the button up or down
To change source: Press the middle of the button twice, the source list will appear on screen. Scroll
through the available sources by pushing the button up or down.
To turn the TV off: Press the middle of the button down and hold it down for a few seconds, the TV will turn into standby mode.
Inserting the Batteries into the Remote
Lift the cover on the back of the remote upward gently. Install two AAA batteries. Make sure to match the + and - ends of the batteries in the battery compartment (observe the correct polarity) Replace the cover.

natural_image
Close-up of a black handheld device with a pencil inserted, showing two views (1 and 2) with arrows indicating direction (no text or symbols)Connect Power
IMPORTANT: The TV set is designed to operate on 220-240V AC, 50 Hz socket. After unpacking, allow the TV set to reach the ambient room temperature before you connect the set to the mains. Plug the power cable to the mains socket outlet.
Antenna/Cable Connection
Connect the "aerial" or "cable TV" plug to the AERIAL INPUT (ANT) socket located on the back of the TV.

Notification
Manufactured under license from Dolby Laboratories.
TRADEMARK ACKNOWLEDGMENT
"Dolby" and the double-D symbol are trademarks of Dolby Laboratories. DOLBY DIGITAL PLUS
"HDMI, the HDMI logo and High-Definition Multimedia Interface are trademarks or registered trademarks of HDMI Licensing LLC."
Information for Users on Disposal of Old Equipment and Batteries
[European Union only]
These symbols indicate that equipment with these symbols should not be disposed of as general household waste. If you want to dispose of the product or battery, please consider the collection systems or facilities for appropriate recycling.
Notice: The sign Pb below the symbol for batteries indicates that this battery contains lead.
![ORION TV40FBT167D - [European Union only] - 1](/content/2026/05/1025963/images/53277f822b7804cf863ae4f4156f6730bb09785f524e6ec51bf7835a3d35bcab.jpg)
Specification
| TV Broadcasting PAL B/G D/K K | |
| Receiving Channels | VHF (BAND I/III) - UHF (BAND U) - HYPERBAND |
| Number of Preset Channels | 1000 |
| Channel Indicator On Screen Display | |
| RF Aerial Input 75 Ohm (unbalanced) | |
| Operating Voltage 220-240V AC, 50Hz. | |
| Audio German+Nicam Stereo | |
| Audio Output Power (WRMS.) (10% THD) | 2 x 6 |
| Power Consumption | 95 W |
| Weight | 11,00 |
| TV Dimensions DxLxH (with foot) | 220 x 933 x 592 |
| TV Dimensions DxLxH (without foot) | 70 x 933 x 559 |
| Operation temperature and operation humidity: | 0°C up to 40°C, 85% humidity max |
Getting Started
Remote Control

Teletext
Press "☐" button to enter. Press again to activate mix mode. Press once more to exit. Follow the instructions displayed on digital teletext screen.
Digital Teletext (for UK only)
Press " 🔊" button to view digital teletext information. Operate it with the coloured buttons, cursor buttons and the OK button. The operation method may differ depending on the contents of the digital teletext. Follow the instructions displayed on the digital teletext screen. When the " 🔊" button is pressed again, the TV returns to television broadcast.
-
Standby
-
My button 1
-
No Function
-
Changes equalizer modes
-
Picture mode selection
-
Numeric buttons
-
TV Button
-
Electronic programme guide
-
Menu
-
Navigation buttons (Up/Down/Left/ (Right-TXT Subpage)
-
Back
-
Favourites
-
Volume Up / Down
-
Info
-
Record programme
-
Play
-
Current language
-
Rapid reverse
-
Red button / IDTV Page up
-
Green button / IDTV Page down
-
My button 2
-
Source selection
-
Sleep timer
-
Media browser
-
Channel swap
-
Teletext
-
Q. Menu
-
OK / Select / Hold (in TXT mode) / Channel List (DTV mode)
-
Exit / Return / Index page (in TXT mode)
-
Image size
-
Mute
-
Program Up / Down
-
Pause
-
Stop
-
Subtitles
-
Rapid advance
-
Blue button
-
Yellow button
Using My button 1 (\*\*)
Press MY BUTTON 1 for five seconds when on a desired source, channel or link, until the "MY BUTTON IS SET" message is displayed on the screen. This confirms that the selected MY BUTTON is now associated with the selected function.
Using My Button 2 (\*\*\* )
Press MY BUTTON 2 for five seconds when on desired source, channel or link, until the "MY BUTTON IS SET" message is displayed on the screen. This confirms that the selected MY BUTTON is now associated with the selected function.
Getting Started
Connections
| Connector Type | Cables Device | ||
 | Scart Connection (back) |  |  |
 | VGA Connection (back) |  |  |
SIDE AV | PC/YPbPr Audio Connection (side) |  Side AudioYPbPr or PC Connection Cable(Not supplied) Side AudioYPbPr or PC Connection Cable(Not supplied) |  |
 | HDMI Connection (back) | 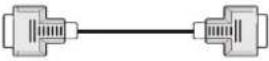 |  |
 SPDIF SPDIF | SPDIFF Connection (back) |  |  |
SIDE AV | Side AV (Audio/Video) Connection (side) | [6AHS](Not supplied) |  |
HEADPHONE | Headphone Connection (side) |  | |
 | YPbPr Video Connection (back) |  PC to YPbPr Connection Cable (Not supplied) PC to YPbPr Connection Cable (Not supplied) | [HEAY] |
| [ST3W] | USB Connection (side) |  |  |
| [02X7] | CI Connection (side) |  |  |

NOTE: When connecting a device via the YPbPr or Side AV input, you must use the supplied connection cables to enable connection. See the illustrations above. | You can use YPbPr to VGA cable (not supplied) to enable YPbPr signal via VGA input. | You cannot use VGA and YPbPr at the same time. | To enable PC audio, you will need to use the SIDE AV CONNECTION cable's WHITE & RED inputs. | If an external device is connected via the SCART socket, the TV will automatically switch to AV mode. | When receiving DTV channels (Mpeg4 H.264) or while in Media Browser mode, output will not be available via the scart socket. | When using the wall mounting kit (optional), we recommend that you plug all your cables into the back of the TV before mounting on the wall. | Insert or remove the CI module only when the TV is SWITCHED OFF. You should refer to the module instruction manual for details of the settings.
Getting Started
First Time Installation - USB Connections
Switching On/Off
To Switch the TV On
Connect the power cord to the 220-240V AC, 50 Hz.
To switch on the TV from standby mode either:
Press the "☐" button, P+ / P- or a numeric button on the remote control.
Press the side function switch until the TV comes on from standby.
To Switch the TV Off
Press the "☐" button on the remote control or press the side function switch until the TV switches into standby mode.
To power down the TV completely, unplug the power cord from the mains socket.
Note: When the TV is switched to standby mode, the standby LED can blink to indicate that features such as Standby Search, Over Air Download or Timer is active. The LED can also blink when you switch on the TV from standby mode.
First Time Installation
When turned on for the first time, the language selection screen is displayed. Select the desired language and press OK.
The First Time Installation (FTI) screen will be displayed next. Set your preferences using the navigation buttons and when finished, press OK to continue.
You can activate Store mode option to be available in "Other settings" menu and your TV's features will be illustrated on the top of the screen. A confirmation screen will be displayed. Select YES to proceed.
If Home Mode is selected, Store mode will not be available after the First Time Installation. Press OK button to continue.
Default PIN code can change depending on the selected country.
If you are asked to enter a PIN code for viewing a menu option, use one of the following codes: 4725, 0000 or 1234.
Aerial Installation
If you select AERIAL option from the Search Type screen, the television will search for digital terrestrial TV broadcasts.

NOTE: You can press MENU button to cancel.
After all the available stations are stored, the Channel List will be displayed on the screen. If you like how the channels are sorted according to the LCN (*), please select "Yes" and then press OK.
Press MENU button to quit channel list and watch TV. (*) LCN is the Logical Channel Number system that organizes available broadcasts in accordance with a recognizable channel sequence (if available).
Cable Installation
If you select CABLE option and press OK button on the remote control. To continue, please select YES and press OK. To cancel operation, select NO and press OK. You can select frequency ranges from this screen.
Enter the frequency range manually by using the numeric button.
Note: Searching duration will change depending on the selected search step.
Media Playback via USB Input
You can connect a 2.5" and 3.5" inch (hdd with external power supply) external hard disk drives or USB memory stick to your TV by using the USB inputs of the TV.
IMPORTANT! Back up your files before making any connections to the TV. Manufacturer will not be responsible for any file damage or data loss. Certain types of USB devices (e.g. MP3 Players) or USB hard disk drives/memory sticks may not be compatible with this TV. The TV supports FAT32 and NTFS disk formatting but recording will not be available with NTFS formatted disks.
While formatting a USB hard disk that has 1TB (Tera Byte) or more file capacity, you can experience problems with the formatting process. Do not repeatedly quickly plug and unplug the drive. This may cause physical damage to the USB player and USB device itself. Do not pull out USB module while playing a file.
Recording a Programme
IMPORTANT: When using a new USB hard disk drive, it is recommended that you first format the disk using your TV's "Format Disk" option.
Note : To record a programme, you should first connect a USB disk to your TV while the TV is switched off. You should then switch on the TV to enable the recording feature.
To use the recording function, you need to connect a USB disk or an external hard disk drive to the TV and the connected USB disk should have at least 1 GB capacity and should have 2.0 speed compatibility. If the connected USB device does not support 2.0 speed, an error message will be displayed.
Note: Recorded programmes are saved into the connected USB disk. If desired, you can store/copy recordings onto a computer; however, these files will
not be available to be played on a computer. You can play the recordings only via your TV.
Note: Lip Sync delay may occur during the timeshifting Radio record is supported. The TV can record programmes up to ten hours.
Recorded programmes are split into 4GB partitions.
If the writing speed of the connected USB disk is not sufficient, the recording may fail and the timeshifting feature may not be available.
It is recommended to use USB hard disk drives for recording HD programmes.
Do not plug out the USB/HDD during a recording. This may harm the connected USB/HDD.
Multipartition support is available. The maximum of two different partitions are supported. The first partition of the USB disk is used for PVR ready features. It also must be formatted as the primary partition to be used for the PVR ready features.
Some stream packets may not be recorded because of signal problems, so sometimes video may freezes during playback.
Record, Play, Pause, Display (for PlayListDialog) keys can not be used when teletext is ON. If a recording starts from timer when teletext is ON, teletext is automatically turned off. Also teletext usage is disabled when there is an ongoing recording of playback.
Timeshift Recording
Press Ⅲ (PAUSE) button while watching a broadcast to activate timeshifting mode. In timeshifting mode, the programme is paused and simultaneously recorded to the connected USB disk.
Press ▶ (PLAY) button again to resume the paused programme from where you stopped. Press the STOP button to stop timeshift recording and return to the live broadcast.
Note: Timeshift cannot be used while in radio mode.
Note: You cannot use the timeshift fast reverse feature before advancing the playback with the fast forward option.
Instant Recording
Press (RECORD) button to start recording an event instantly while watching a programme. You can press (RECORD) button on the remote control again to record the next event on the EPG. In this case, an OSD will be displayed, indicating the programmed events for recording. Press (STOP) button to cancel instant recording.
Note: You can not switch broadcasts or view the Media Browser during the recording mode. While recording a programme or during the timeshifting, a warning message appears on the screen if your USB device speed is not sufficient.
Watching Recorded Programmes
Select the Recordings Library from the Media Browser menu. Select a recorded item from the list (if previously recorded). Press the OK button to view the Play Options. Select an option then press OK button.
Note: Viewing main menu and menu items will not be available during the playback.
Press the ■ (STOP) button to stop a playback and return to the Recordings Library.
Slow Forward
If you press || (PAUSE) button while watching recorded programmes, the slow forward feature will be available. You can use▶ button to slow forward. Pressing ▶ button consecutively will change slow forwarding speed.
Recording Configuration
Select the Recording Configuration item in the Settings menu to configure the recording settings.
Format Disk: You can use Format Disk feature for formatting the connected USB disk. Your pin is required to use the Format Disk feature (default pin is 0000).
Default PIN code can change depending on the selected country.
If you are asked to enter a PIN code for viewing a menu option, use one of the following codes: 4725.0000 or 1234.
IMPORTANT: Note that ALL the data stored on the USB disk will be lost and the disk format will be converted to FAT32 if you activate this feature. If your USB disk malfunctions, you can try formatting the USB disk. In most cases formatting the USB disk will restore normal operation; however, ALL the data stored on the USB disk will be lost in such a case.
Note: If "USB is too slow" message is displayed on the screen while starting a recording, try restarting the recording. If you still get the same error, it is possible that your USB disk does not meet the speed requirements. Try connecting another USB disk.
Media Browser Menu
You can play photo, music, and movie files stored on a USB disk by connecting it to your TV. Connect a USB disk to one of the USB inputs located on the side of the TV. Pressing the MENU button while in the Media Browser mode will access the Picture, Sound and Settings menu options. Pressing the MENU button again will exit from this screen. You can set your Media Browser preferences by using the Settings Menu.
| Loop/Shuffle Mode Operation | |
| Start playback with ▶ and activate 📄 | TV plays next file and loop the list. |
| Start playback with OK and activate 📄 | the same file will be played in a loop (repeat). |
| Start playback with OK▶ and activate 📄 | the file will be played in a shuffle. |
Quick Menu
Quick Settings menu allows you to access some options quickly. This menu includes Power Save Mode, Picture Mode, Equalizer Settings, Favourites and Sleep Timer options. Press Q.MENU button on the remote control to view quick menu. See the following chapters for the details of the listed features.
TV Menu Features and Functions
| Picture Menu Contents | |
| Mode | You can change the picture mode to suit your preference or requirements. Picture mode can be set to one of these options: Cinema, Game, Dynamic and Natural. |
| Contrast | Sets the lightness and darkness values of the screen. |
| Brightness | Sets the brightness value for the screen. |
| Sharpness | Sets the sharpness value for the objects displayed on the screen. |
| Colour | Sets the colour value, adjusting the colors. |
| Power Save Mode | To set the Power Save Mode as Eco, Picture Off and Disabled.(When the Mode is Dynamic, Power Save mode is automatically set as disabled.) |
| Backlight(Optional) | This setting controls the backlight level. The backlight function will be inactive if the Power Save Mode is set to Eco. The backlight cannot be activated in VGA, Media Browser mode or while the picture mode is set to Game. |
| Noise Reduction | If the broadcast signal is weak and the picture is noisy, use the Noise Reduction setting to reduce the amount of noise. |
| Advanced Settings | |
| Dynamic Contrast | You can change the Dynamic Contrast ratio to desired value. |
| Colour Temp | Sets the desired colour tone. |
| Picture Zoom | Sets the desired picture size from picture zoom menu.Note: Auto (Only available in Scart mode with SCART PIN8 high voltage/low voltage switching) |
| Film Mode | Films are recorded at a different number of frames per second to normal television programmes. Turn this feature on when you are watching films to see the fast motion scenes clearly. |
| Skin Tone | Skin tone can be changed between -5 and 5. |
| Colour Shift | Adjust the desired colour tone. |
| RGB Gain | You can configure the colour temperature values using the RGB Gain feature. |
| Reset | Resets the picture settings to factory default settings.(Except Game Mode) |
| Autoposition (in PC mode) | Automatically optimizes the display. Press OK to optimize. |
| H Position (in PC mode) | This item shifts the image horizontally to the right hand side or left hand side of the screen. |
| V Position (in PC mode) | This item shifts the image vertically towards the top or bottom of the screen. |
| Dot Clock (in PC mode) | Dot Clock adjustments correct the interference that appear as vertical banding in dot intensive presentations like spreadsheets or paragraphs or text in smaller fonts. |
| Phase (in PC mode) | Depending on the resolution and scan frequency that you input to the TV set, you may see a hazy or noisy picture on the screen. In such a case you can use this item to get a clear picture by trial and error method. |
| While in VGA (PC) mode, some items in Picture menu will be unavailable. Instead, VGA mode settings will be added to the Picture Settings while in PC mode. | |
TV Menu Features and Functions
| Sound Menu Contents | |
| Volume | Adjusts the volume level. |
| Equalizer | Selects the equalizer mode. Custom settings can be made only when in user mode. |
| Balance | This setting is used for emphasizing left or right speaker balance. |
| Headphone | Sets headphone volume. |
| Sound Mode | You can select a sound mode. (If the selected channel supports). |
| AVL (Automatic Volume Limiting) | Function sets the sound to obtain fixed output level between programmes. |
| Digital Out | Sets digital out audio type. |
| Settings Menu Contents | |
| Conditional Access | Controls conditional access modules when available. |
| Language | Configures language settings (may change depending on the country selected) Preferred and current settings will be available. Current settings can be changed only if the broadcaster supports. |
| Parental | Enter correct password to change parental settings. You can easily adjust menu lock, maturity lock (may change depending on the country selected) and child lock in this menu. You can also set new pin number. |
| Timers | Sets sleep timer to turn off the TV after a certain time. Sets timers for selected programmes. (USB Record) |
| Recording Configuration | Displays the recording configuration menu (Usb connection required) |
| Date/Time | Sets date and time. |
| Sources | Enables or disables selected source options. |
| Other Settings: Displays other setting options of the TV set: | |
| Menu Timeout | Changes timeout duration for menu screens. |
| Scan Encrypted Channels | When this setting is on, the search process will locate the encrypted channels as well. |
| Blue Background | Activates or deactivates the blue background system when the signal is weak or absent. |
| Software Upgrade | To ensure that your TV always has the most up to date firmware. |
| Application Version | Displays application version. |
| Hard of Hearing | Enables any special feature sent from the broadcaster. |
| Audio Description | Audio description refers to an additional narration track for blind and visually impaired viewers of visual media, including television and movies. You can use this feature, only if the broadcaster supports that additional narration track.Note: Audio description sound feature cannot be available in recording or time shifting mode. |
| Auto TV Off | You can set the timeout value of auto off feature. When the timeout value is reached and the TV has not been operated for a selected time, the TV will go into standby mode. |
TV Menu Features and Functions
| Standby Search (Optional) | If the Standby Search is set to On, when the TV is in standby mode, available broadcasts will be searched. If the TV locates any new or missing broadcasts, a menu screen will be displayed, asking you whether or not to execute these changes. Channel list will be updated and changed after this process. |
| Store Mode | While Store Mode is enabled, some items in the TV menu may not be available. |
| Power Up Mode | This setting configures the power up mode preference. |
| Install and Retune Menu Contents | |
| Automatic Channel Scan (Retune) (If available) | Displays automatic tuning options. Digital Aerial: Searches and stores aerial DVB stations. Digital Cable: Searches and stores cable DVB stations. Analogue: Searches and stores analogue stations. Digital Aerial & Analogue: Searches and stores aerial DVB and analogue stations. Digital Cable & Analogue: Searches and stores cable DVB and analogue stations. |
| Manual Channel Scan | This feature can be used for direct broadcast entry. |
| Network Channel Scan | Searches for the linked channels in the broadcast system. |
| Analogue Fine Tune | You can use this setting for fine tuning analogue channels. This feature is not available if no analogue channels are stored. |
| First Time Installation | Deletes all stored channels and settings, resets TV to factory settings. |
General TV Operation
Using the Channel List
The TV sorts all stored stations in the Channel List. You can edit this channel list, set favourites or set active stations to be listed by using the Channel List options.
Configuring Parental Settings
To prohibit viewing of certain programmes, channels and menus can be locked by using the parental control system.
To display parental lock menu options, the PIN number should be entered. The factory default PIN number is 0000. After coding the correct PIN number, parental settings menu will be displayed.
Menu Lock: Menu lock setting enables or disables the menu access.
Maturity Lock: When set, this option gets the maturity information from the broadcast and if this maturity level is disabled, disables access to the broadcast.
Child Lock: When Child Lock is set, the TV can only be controlled by the remote control. In this case the control panel buttons will not work.
Set PIN: Defines a new PIN number.
Default PIN code can change depending on the selected country.
If you are asked to enter a PIN code for viewing a menu option, use one of the following codes: 4725, 0000 or 1234.
Electronic Programme Guide (EPG)
Some, but not all channels send information about the current and next programmes. Press the ⚙ button to view the EPG menu.
Red button (Prev Day): Displays the programmes of previous day.
Green button (Next day): Displays the programmes of the next day.
Yellow button (Zoom): Expands programme information.
Blue button (Filter): Views filtering options.
SUBTTL: Press 📋 button to view Select Genre menu. Using this feature, you can search the programme guide database in accordance with the genre. Info available in the programme guide will be searched and results matching your criteria will be listed.
INFO: Displays, in detailed, information on the programme selected.
Numeric buttons (Jump): Jumps to the preferred channel directly via numeric buttons.
OK: Displays programme options.
Text (Search): Displays "Guide Search" menu.

(Now) : Shows the current programme.
(RECORD): The TV will start to record the selected programme. You can press again to stop the recording.
P+P- : More event info
IMPORTANT: Connect a USB disk to your TV while the TV is switched off. You should then switch on the TV to enable the recording feature.
Note: Switching to a different broadcast or source is not available during a recording.
Programme Options
In EPG menu, press the OK button to enter the Event Options menu.
Select Channel
In EPG menu, using this option, you can switch to the selected channel.
Record / Delete Record Timer
After you have selected a programme in the EPG menu, press the OK button. Select the Record option and press the OK button. After this operation, a recording will be scheduled for the selected programme.
To cancel an already set recording, highlight that programme and press the OK button and select the option Delete Rec. Timer. The recording will be cancelled.
Set Timer / Delete Timer
After you have selected a programme in the EPG menu, press the OK button. Select the Set Timer on Event option and press the OK button. You can set a timer for future programmes. To cancel an already set timer, highlight that programme and press the OK button. Then select "Delete Timer" option. The timer will be cancelled.
Note: It is not possible to record two channels at the same time.
Software Upgrade
Your TV is capable of finding and updating automatically via the Aerial/Cable signal.
Software upgrade search via user interface
Simply navigate on your main menu. Choose Settings and select Other Settings menu. In Other Settings menu navigate on to the Software for Upgrade item and press OK button to check for a new software upgrade.
3 AM search and upgrade mode
While the TV is connected to an aerial signal. If Automatic scanning in the Upgrade Options menu is enabled, the TV wakes up at 03:00 and searches broadcast channels for new software upgrades. If new software is found and downloaded successfully, the next time the TV powers up, it will have the new software version.
Note: If the TV fails to come on after the upgrade unplug the TV for 2 minutes and plug in again.
Troubleshooting & Tips
Tv will not turn on
Make sure the power cord is plugged in securely to wall outlet. The batteries in the remote control may be exhausted. Press the Power button on the TV.
Poor picture
- Have you selected the correct TV system?
- Low signal level can cause picture distortion. Please check antenna access.
- Check if you have entered the correct channel frequency if you have done manual tuning.
- The picture quality may degrade when two devices are connected to the TV at the same time. In such a case, disconnect one of the devices.
No picture
- No Picture means that your TV is not receiving a transmission. Have you selected the correct button on the remote control? Try once more. Also make sure the correct input source has been selected.
• Is the antenna connected properly?
• Is the antenna cable damaged? - Are suitable plugs used to connect the antenna?
- If you are in doubt, consult your dealer.
No sound
- Has the TV been set to mute? To cancel mute, press the "X" button, or increase the volume level.
- Sound is coming from only one speaker. Is the balance set to one extreme? See Sound Menu section.
Remote control - does not operate
- The batteries may be exhausted. Replace the batteries.
Input sources - can not be selected
- If you cannot select an input source, it is possible that no device is connected. if not
- Check the AV cables and connections if you have tried to connect a device.
Recording unavailable
To record a programme, you should first connect a USB disk to your TV while the TV is switched off. You should then switch on the TV to enable recording feature. If you cannot record, try switching off the TV and then re-inserting the USB device.
USB is too slow
If a “USB is too slow” message is displayed on the screen while starting a recording, try restarting the recording. If you still get the same error, it is possible that your USB disk does not meet the speed requirements. Try connecting another USB disk.
PC Input Typical Display Modes
The following table is an illustration of some of the typical video display modes. Your TV may not support all resolutions. Your TV supports up to 1920x1080.
| Index | Resolution | Frequency |
| 1 | 800x600 | 56 Hz |
| 2 | 800x600 | 60 Hz |
| 3 | 1024x768 | 60 Hz |
| 4 | 1024x768 | 66 Hz |
| 5 | 1280x768 | 60 Hz |
| 6 | 1360x768 | 60 Hz |
| 7 | 1280x960 | 60 Hz |
| 8 | 1280x1024 | 60 Hz |
| 9 | 1400x1050 | 60 Hz |
| 10 | 1600x1200 | 60 Hz |
| 11 | 1920x1080 | 60 Hz |
AV and HDMI Signal Compatibility
| Source Supported Signals | Available | ||
| EXT(SCART) | PAL 50/60 O | ||
| NTSC 60 O | |||
| RGB 50 O | |||
| RGB 60 O | |||
| Side AV | PAL 50/60 O | ||
| NTSC 60 O | |||
| PC/YPbPr | 480I, 480P 60Hz O | ||
| 576I, 576P 50Hz O | |||
| 720P 50Hz,60Hz O | |||
| 1080I 50Hz,60Hz O | |||
| 1080P 50Hz,60Hz O | |||
| HDMI1HDMI2 | 480I 60Hz O | ||
| 480P 60Hz O | |||
| 576I, 576P 50Hz O | |||
| 720P 50Hz,60Hz O | |||
| 1080I 50Hz,60Hz O | |||
| 1080P | 24Hz, 25Hz30Hz, 50Hz,60Hz | O | |
(X: Not Available, O: Available)
In some cases a signal on the TV may not be displayed properly. The problem may be an inconsistency with standards from the source equipment (DVD, Set-top box, etc.). If you do experience such a problem please contact your dealer and also the manufacturer of the source equipment.
Supported File Formats for USB Mode
| Media File Extension | Format | Remarks | ||
| Video | Audio | (Maximum resolution/Bit rate etc.) | ||
| Movie | mpg, mpeg | MPEG1, MPEG2 | MPEG1: 768x576 @30PMPEG2:1920x1080 @ 30P | |
| vob | MPEG2 | 1920x1080 @ 30P | ||
| mp4 | MPEG4, Xvid , H.264 | |||
| mkv | H.264, MPEG4,VC-1 | |||
| avi MPEG2, | MPEG4, Xvid , H.264 | |||
| flv | H.264/VP6/Sorenson | H.264/VP6:1920x1080 @ 30PSorenson: 352x288 @30P | ||
| 3gp | MPEG4 , H.264 | 1920x1080 @ 30P | ||
| Music | .mp3 | - | MPEG 1 Layer 1 / 2 (MP3) | 32Kbps ~ 320Kbps(Bit rate)32K, 44.1k, 48k Hz,16K, 22.05K, 24KHz,8K, 11.025K, 12K Hz(Sampling rate) |
| Photo | .jpg .jpeg | Baseline JPEG | - | max WxH = 17000x10000 4147200bytes |
| . | Progressive JPEG | - | max WxH = 4000x4000 3840000bytes | |
| .bmp | - | - | max WxH = 5760x4096 3840000bytes | |
| Subtitle | .sub .srt | - | - | - |
Turinys
Saugos informacija....31
Darbo pradžia....33
natural_image
Front view of a blank flat-screen computer monitor (no text or symbols visible)natural_image
Close-up of a black electronic device with a USB cable inserted, showing internal components and an arrow indicating direction (no text or symbols)Prijunkite maitinima
Teletekstas
| A | Product Fiche | ||
| B | Commercial Brand: ORION | ||
| C | Product No. 10087199 | ||
| D | Model No. 40FBT167D | ||
| E | Energy efficiency class A | ||
| F | Visible screen size (diagonal, approx.) (inch/cm) | 40 inches 102 cm | |
| G | On mode average power consumption (Watt) | 63 | |
| H | Annual energy consumption (kWh/annum) | 91 | |
| I | Standby power consumption (Watt) | 0,5 | |
| J | Off mode power consumption (Watt) | 0 | |
| K | Display resolution (px) 1920 x 1080 | ||
| A B C D E F | ||||||
| English | Product Fiche Commercial Brand Product No. | Model No. Energy efficiency class | Visible screen size (diagonal, approx.) (inch/cm) | |||
| Deutsch | Produkt Datenblatt | Markenzokhen | Produkt Nr. | Modell Nr. | Energieeffizienzklasse | Sichtbare slideschimgrose (diagonal,ca.) (Zoll./cm) |
| عربية | الابس المتح | العملة الجيرية تيفرانك | فر الم pdج | فر الم ووديل | كلة مغملةoplackة | الحجم للكثة الموزعة (مартала,م outdoors) |
| Български | Справочен пист с техническите данни | Търговска марка | Продукт Ne | Модел Ne | Клас на енергийна эффективност | Видим размер на екрана (диагонал,приб.) (инна/юм) |
| čeština | Informačni list | Značka výrobce | Číslo produktu | Модел č. | Energetlicka třida | Vidilelna velikos obrazovky (uhlopríčka,pól,parců/cm) |
| Dansk | Produktoplysningskema | Varemaerke | Produktnr. | Model nr. | Energiefektivitresklasse | Synlig skermeterrese (diagonair,ca.) (HK/cm) |
| Suomi | Tuote fiche | Kaupallinen merkki | Tuote no. | Mali no. | Virran tehokuusluokka | Nákyván kuvaruudun koko (diagonaalinen,n.) (tuumaa/cm) |
| Français | Fiche du produit | Marque commerciale | Produit N° | Modèle N° | Classe d'elficacité énergétique | Taille d'écran visibile (diagonale,approx.) (pouces/cm) |
| Hrvatski | SAŽETAK PROIZVODA | Trgovačka marka | Br. proizvoda | Br. modela | Klasa energetske učinkovilosti | Vidljva velična ekranа (diagonalna,privilžno) (inča/cm) |
| Nederlands | Productfiche | Commeroisel merk. | Productnr. | Modelnr. | Energie eficiëntie klasse | Zichibare schemngroite (diagonaal,ca.) (inches/cm) |
| Español | Ficha del Producto | Marca Comercial | No de Producto | No de Modelo | Clasificacion Energética | Tamato de pantalla visible (diagonal,aprox.) (pulgadas/cm) |
| Svenska | Produktspecifikation | Varumárke | Produktnr. | Modelnr. | Energiklass | Synlig skärmetorick (diagonal.ungetarlig) (turn/cm) |
| Italiano | Scheda prodotto | Marchio commerciale | Numero prodotto | Numero modello | Classe di eficienza energetica | Dimensoni visibili dello schermo (diagonale,crica)(pollicik/cm) |
| Polski | KARTA PRODUKTU | Marka produktu | Nr produktu | Nr modelu | Klasa efektywności energetycznej | Vidoczny obraz ekranu (przekątna,okolo)(cal/cm) |
| Magyar | Termékarmertelő adallap | Kereskodelmi marka | Termékszám | Modelészám | Energiahalékonysági osztály | Léható képlantomány (diagonális,kb.) (inches/cm) |
| Norsk | Produktinformason | Kommersiell merkevare | Produkt nr. | Modell nr. | Energiefektivitet klasse | Synlig skjormstarrelse (diagonal,ca.) (tommer/cm) |
| Português | Ficha do produto | Marca Comercial | Produto No | Modelo No | Classificação eficiência energetica | Tamanno eca visivel (diagonal,aprox.) (polegadas/cm) |
| Română | Fişă produs | Marcă comercială | Nr. Produs | Nr. Model | Clasa de eficiența energetica | Dimensunea ecranului vizibi (diagonala,aprox.) (inch/cm) |
| Русский | Справочный листок технических данных изделия | Торговая марка | Номер изделия | Номер модели | Класс энергопотребления | Видимый размер экрана (по диагонали,Окопо) (дюйкоа/см) |
| беларуская | Справочный листок технических данных изделия | Торговая марка | Номер изделия | Номер модели | Класс энергопотребления | Видимый размер экрана (по диагонали,Окопо)(дюйкоа/см) |
| македонски | Технички податоци | Комерцијална марка | Производ бр. | Модел бр. | Класа на енергетока ефикасност | Голевина на видлина екран (дијагонала,окопу) (иникам) |
| український | Техичнідані | Коривеційна марка | Артикул | Модель | Клас анерросложивання | Видими розмір екрана (диагональ. Приблиэно (дюйкоа/см) |
| Srpski | Tehnicke odike | Komercijalna marka | Proizvod br. | Model br. | Klasa energetske etikasnosti | Velicina vidljyog ekranа (diagonala,tokom) (inča/cm) |
| Slovenčina | Informačný list | Značka výrobcu | Číso produktu | Model č. | Energetická trieda | Vidlarna velikost obrazovky (uhlopríčka,zhruba) (palcov/cm) |
| Slovenčina | Opis izdelka | Komercialna znamka | Št. Izdelka | Št. Modela | Razred energetske učinkovikosti | Vidna velikos:zaslona (diagonala,privl.) (palcevm) |
| Еллянук | Делію тродо́вто́с | Ерторіко о́йвоо | Ap. Проло́вто́с | Ap. Movrlălou | Katnyopia everyzuokćs ото́боо́нг | Ората руєвьос звів’юн (бідуынуіо́с,тер.) (прот.) (прот.) |
| Bosanski | Tehnički podaci | Komercijalna marka | Produkt br. | Model br. | Klasa energetske etikasnosti | Vidljva velicina ekranа (diagonala,privilžno.) (inča/cm) |
| тынай | тынай о́йло́ю́ю́ю́ю́ю́ю́ю́ю́ю́ю́ю́ю́ю́ю́ю́ю́ю́ю́ю́ю́ю́ю́ю́ю́ю́ю́ю́ю́ю́ю́ю́ю́ю́ю́ю́ю́ю́ю́ю́ю́ю́ю́ю́ю́ю́ю́ю́ю́ю́ю́я́ю́ю́ю́ю́ю́ю́ю́ю́ю́ю́ю́ю́ю́ю́ю́ю́ю́ю́ю́ю́ю́ю́ю́ю́ю́ю́ю́ю́ю́ю́ю́ю́ю́ю́ю́ю́ю́ю́ю́ю́ю́ю́ю́ю́ю́ю́ю́ю́ю́ую́ю́ю́ю́ю́ю́ю́ю́ю́ю́ю́ю́ю́ю́ю́ю́ю́ю́ю́ю́ю́ю́ю́ю́ю́ю́ю́ю́ю́ю́ю́ю́ю́ю́ю́ю́ю́ю́ю́ю́ю́ю́ю́ю́ю́ю́ю́ю́ю́ю́ью́ю́ю́ю́ю́ю́ю́ю́ю́ю́ю́ю́ю́ю́ю́ю́ю́ю́ю́ю́ю́ю́ю́ю́ю́ю́ю́ю́ю́ю́ю́ю́ю́ю́ю́ю́ю́ю́ю́ю́ю́ю́ю́ю́ю́ю́ю́ю́ю́ю́ Euróю́ю́ю́ю́ю́ю́ю́ю́ю́ю́ю́ю́ю́ю́ю́ю́ю́ю́ю́ю́ю́ю́ю́ю́ю́ю́ю́ю́ю́ю́ю́ю́ю́ю́ю́ю́ю́ю́ю́ю́ю́ю́ю́ю́ю́ю́ю́ю́ю́у́ю́ю́ю́ю́ю́ю́ю́ю́ю́ю́ю́ю́ю́ю́ю́ю́ю́ю́ю́ю́ю́ю́ю́ю́ю́ю́ю́ю́ю́ю́ю́ю́ю́ю́ю́ю́ю́ю́ю́ю́ю́ю́ю́ю́ю́ю́ю́ю́ю́� уініні зім. | Уніні зім. | Уніні зім. | Уніні зім. | Уніні зім. | Уніні зім. |
| Türkçe | Ürün řişi | Ticari Marka | Ürün No. | Model No. | Enerji verimiliği smĩ | Görülen ekran boyutu (zapraz,yakisk.) (inch/cm) |
| Shqip | Tě chēnat e produktit | Marks tregtare | Nr. I produktit. | Nr. Imocelt. | Klasa e eficiencès sè energijsè | Madhěsla e ekranit té dukením (diagonal, stérstent) (inch/cm) |
| Lietuvlių | Gamino etiketė | Gamintojas | Gamino Nr. | Modello Nr. | Energetinio efektyvumo klase | Matomas ekranо дүсіз (jerizainė,approx.) (colly/cm) |
| Latviešu | Produkta apraksı | Marka | Produkta nr. | Modelja nr. | Energoefektivitätes klase | Ekraña izměs (pa diogrāš), aprçram (collas/cm) |
| Eestl | TOOTEKIRJELDUS | Tootja firma | Toote nr. | Mudeli nr. | Energiaklass | Vasatava ekraani suurus (diagonal,umbes) (tolli/cm) |
| فر Aerospace | ملاحظات محصزن | مازک نгаJPRI | تاماره محصزن | تاماره من | کروگ کارлыی ارززی | ۱۳اناء صنده خلي طاشاد (العستبر Vienna) |



- Safety Information
- IMPORTANT - Please read these ructions fully before installing or rating
- Getting Started
- Notifications & Features & Accessories
- Environmental Information
- Standby Notifications
- Features
- Accessories Included
- Control Buttons on the TV
- TV Control Switch & Operation
- Inserting the Batteries into the Remote
- Connect Power
- Antenna/Cable Connection
- Notification
- TRADEMARK ACKNOWLEDGMENT
- Information for Users on Disposal of Old Equipment and Batteries
- [European Union only]
- Remote Control
- Teletext
- Digital Teletext (for UK only)
- Using My button 1 (\*\*)
- Using My Button 2 (\*\*\* )
- First Time Installation - USB Connections
- Switching On/Off
- To Switch the TV On
- To Switch the TV Off
- First Time Installation
- Aerial Installation
- Cable Installation
- Media Playback via USB Input
- Recording a Programme
- Timeshift Recording
- Instant Recording
- Watching Recorded Programmes
- Slow Forward
- Recording Configuration
- Media Browser Menu
- Quick Menu
- General TV Operation
- Using the Channel List
- Configuring Parental Settings
- Electronic Programme Guide (EPG)
- Programme Options
- Select Channel
- Record / Delete Record Timer
- Set Timer / Delete Timer
- Software Upgrade
- Software upgrade search via user interface
- AM search and upgrade mode
- Troubleshooting & Tips
- Tv will not turn on
- Poor picture
- No picture
- No sound
- Remote control - does not operate
- Input sources - can not be selected
- Recording unavailable
- USB is too slow
- PC Input Typical Display Modes
- Turinys
- Prijunkite maitinima
- Teletekstas
Brand : ORION
Model : TV40FBT167D
Category : Television