
BTST 9300 - Headphones SILVERCREST - Free user manual and instructions
Find the device manual for free BTST 9300 SILVERCREST in PDF.

Pick your language and provide your email: we'll send you a specifically translated version.
| Product Type | Wireless Bluetooth Headphones |
| Model | BTST 9300 |
| Brand | SilverCrest |
| Form Factor | Over-ear |
| Connectivity | Bluetooth 5.0 |
| Wireless Range | Up to 10 meters |
| Battery Type | Rechargeable lithium-ion |
| Battery Life | Up to 20 hours (playback) |
| Charging Time | Approx. 2 hours |
| Charging Port | USB-C |
| Driver Size | 40 mm |
| Frequency Response | 20 Hz - 20 kHz |
| Impedance | 32 Ω |
| Controls | Buttons for power, volume, playback, and calls |
| Microphone | Built-in |
| Weight | Approx. 250 g |
| Dimensions (unfolded) | 195 x 165 x 85 mm |
| Foldable | Yes |
| Cleaning | Wipe with a soft, dry cloth |
| Safety | Do not use at high volume for long periods; avoid moisture |
| Spare Parts | Replacement ear cushions (available from SilverCrest) |
| Warranty | 2 years |
Frequently Asked Questions - BTST 9300 SILVERCREST
How do I pair the BTST 9300 with my phone?
Turn on the headphones, press and hold the power button until the LED flashes blue and red. On your phone, enable Bluetooth and select 'BTST 9300' from the list.
What should I do if the headphones don't charge?
Ensure the USB-C cable is fully inserted and connected to a working power source. Try a different cable if possible. If issue persists, reset the headphones by holding the power button for 10 seconds.
How long does the battery last?
The battery lasts up to 20 hours of continuous playback at moderate volume. Charging takes about 2 hours.
Can I use the headphones while charging?
It is not recommended to use the headphones while charging to avoid potential damage to the battery.
How do I reset the headphones?
Hold the power button for 10 seconds while the headphones are on. The LED will flash quickly, then turn off. Release and turn on again to complete reset.
Are the ear cushions replaceable?
Yes, the ear cushions are replaceable. You can purchase spare cushions from SilverCrest customer support or authorized dealers.
What is the wireless range?
The wireless range is up to 10 meters (33 feet) in open space. Walls and obstacles may reduce range.
Does the headphones have a built-in microphone?
Yes, the BTST 9300 has a built-in microphone for hands-free calls and voice commands.
How do I clean the headphones?
Wipe the exterior with a soft, dry cloth. For the ear cushions, gently wipe with a slightly damp cloth and allow to air dry. Do not use harsh chemicals.
Can I connect to multiple devices at once?
No, the BTST 9300 connects to one device at a time. To switch, disconnect from the current device and pair with the new one.
User questions about BTST 9300 SILVERCREST
0 question about this device. Answer the ones you know or ask your own.
Ask a new question about this device
No questions yet. Be the first to ask one.
Download the instructions for your Headphones in PDF format for free! Find your manual BTST 9300 - SILVERCREST and take your electronic device back in hand. On this page are published all the documents necessary for the use of your device. BTST 9300 by SILVERCREST.
USER MANUAL BTST 9300 SILVERCREST
Owner's Manual & Service Information

natural_image
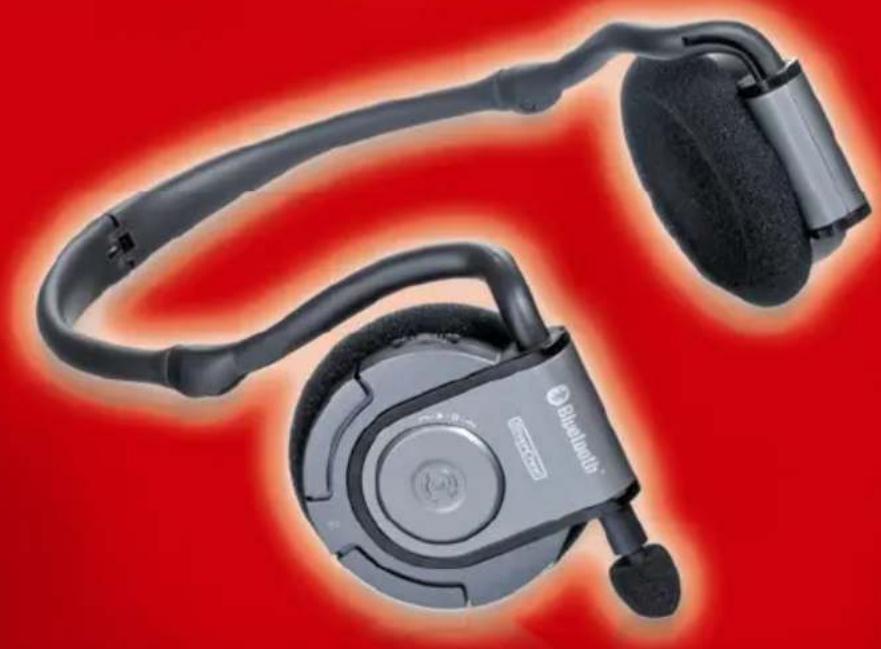
Black Bluetooth headset with earbuds and headband against red background (no text or symbols visible)Overzicht
natural_image
Product catalog image showing seven different electronic devices and accessories, including audio, USB, and cable bundles (no text or labels visible)Blauw led
natural_image
Close-up of a Bluetooth headset with earbuds and headband (no visible text or symbols)Koppelingsknop
natural_image
Close-up of a Bluetooth headset with earbuds and headband (no visible text or symbols)Koppelingsknop
Het hoofdscherm met de Bluetooth-instellingen verschijnt weer. De eenmalige koppeling voor de service "Headset" is gelukt. Nu kunt u op een van deze pictogrammen klikken om de betreffende verbinding te starten. Zie voor meer informatie de tekst vanaf pagina 32 - De verbinding tot stand brengen en verbreken.De verbinding tot stand brengen en verbreken
In het hoofdvenster van de Bluetooth-instellingen ziet u een lijst met alle gekoppelde apparaten. Voor de audioverbinding van de Bluetooth-hoofdtelefoon wordt bijvoorbeeld het volgende pictogram weergegeven: BTST-9300 (1) niet verbonden
Het pictogram (1) geeft aan dat de gekoppelde hoofdtelefoon nog geen verbinding heeft gemaakt. Als u wel een verbinding tot stand wilt brengen, dubbelklikt u op het pictogram of klikt u met de rechtermuisknop op het pictogram en selecteert u "Verbinden" in het contextmenu. De verbinding wordt tot stand gebracht en het pictogram wijzigt in: BTST-9300 (2) verbonden
Als u de verbinding met de hoofdtelefoon wilt verbreken, klikt u met de rechtermuisknop op het pictogram (2) en selecteert u "Verbinding verbreken". De verbinding wordt verbroken en het pictogram wijzigt navenant. Herhaal dit proces voor de overige verbindingen. U kunt slechts één verbinding tegelijk gebruiken. Als u probeert een verbinding te openen terwijl een andere verbinding nog actief is, verschijnt een waarschuwing met de melding dat u de bestaande verbinding eerst moet verbreken.Verbinden met een mobiele telefoon
Als u de Bluetooth-hoofdtelefoon met een mobiele telefoon wilt verbinden, moet u ook eerst een koppeling uitvoeren. Opmerking
Raadpleeg de handleiding van uw mobiele telefoon om te weten te komen hoe u de mobiele telefoon in de koppelingsmodus zet.  Rood led Hoofdschakelaar in de stand "On" (Aan) zetten Zet de hoofdschakelaar (6) eerst op "On" om de Bluetooth-stereohoofdtelefoon aan te zetten. Deze schakelaar bevindt zich op het rechteroorgedeelte dat tevens de microfoon bevat. Zet de schakelaar in de stand "On" om de voeding in te schakelen. De blauwe led op het rechteroorgedeelte begint te knipperen ten teken dat het apparaat klaar voor gebruik is.Verbinden met een mobiele telefoon
natural_image
Close-up of a Bluetooth headset with attached microphone and ear (no visible text or symbols)Gesprekken accepteren en ophangen
 Zodra op de mobiele telefoon of computer een verbinding tot stand is gebracht met de Bluetooth-hoofdtelefoon hoort u de telefoon automatisch overgaan op de hoofdtelefoon. Druk nogmaals op de belknop als u het gesprek wilt aannemen. U hoort uw gesprekspartner in de hoofdtelefoon. Druk nogmaals op de belknop als u het gesprek wilt beëindigen. Opmerking
U kunt ook spraakgestuurde nummerkeuze gebruiken als deze functionaliteit op uw mobiele telefoon wordt ondersteund. Druk hiervoor eenmaal op de knop Vol+. Zie de gebruikershandleiding van uw mobiele telefoon voor meer informatie.Gelijktijdig gebruik
Bij de Bluetooth-hoofdtelefoon kunt u zowel een audioverbinding als een telefoonverbinding op uw mobiele telefoon gebruiken. Sluit hiervoor de hoofdtelefoon aan op de gewenste audiobron (zie pagina 9 - Koppelen aan de stereoadapter) en vervolgens op de mobiele telefoon (zie pagina 33 - Verbinden met een mobiele telefoon).Gesprekken aannemen
Als de telefoon overgaat, wordt de audioverbinding met de stereoadapter automatisch uitgeschakeld zodat u op de belknop kunt drukken om het gesprek aan te nemen (zie pagina 35 - Gesprekken aannemen en ophangen).Ophangen
Druk nogmaals op de belknop als u het gesprek wilt beëindigen. De Bluetooth-hoofdtelefoon schakelt terug naar de audioafspeelbron.Het besturingswieltje
Het besturingswieltje is een speciale functie die is ontworpen voor Windows Media Player. Hiermee kunt u functies bedienen als Stoppen, Volgende nummer en Vorige nummer. Druk op het besturingswieltje om te stoppen met afspelen. Draai aan het besturingswieltje om te bladeren tussen de nummers in uw afspeellijst. natural_image
Close-up of a mechanical component with directional arrows and symbols (no readable text or labels)Het besturingswieltje
 Schakel in het volgende scherm het selectievakje "AV-afstandsbedieningsservice" onder "Services inschakelen" in. Opmerkin
Nadat u de AVRCP-service (Audio/video-afstandsbedieningsprofiel) kunt u op de belknop (2) op de hoofdtelefoon drukken om de muziek te pauzeren. Druk nogmaals op de belknop om het afspelen te hervatten. natural_image
Close-up of a modern robotic vacuum cleaner with a circular head and attached sensor (no visible text or symbols)Bijlage
Veelgestelde vragenWat is de pincode van de hoofdtelefoon?
De pincode is "1234". Dit wordt ook wel de Bluetooth-wachtcode, -code of -wachtwoord genoemd.Kan ik de pincode wijzigen?
Nee. De pincode is vooraf ingesteld voor de Bluetooth-hoofdtelefoon.Wat is koppeling?
De eerste verbinding tussen twee Bluetooth-apparaten waarmee een permanente veilige verbinding tot stand wordt gebracht. Op een apparaat wordt een veilige pincode ingevoerd die het andere apparaat moet bevestigen.Hoeveel bedraagt het draadloze bereik van de hoofdtelefoon?
Bluetooth is ontworpen voor communicatie over korte afstand. Het bereik is afhankelijk van het externe apparaat en bedraagt ongeveer 10 m bij de stereoadapter en bij gebruik van de USB-adapter maximaal 25 m. Het bereik kan minder zijn vanwege van de omgevingsomstandigheden.Is het nodig om de Bluetooth-hoofdtelefoon en het andere Bluetooth-apparaat voor elk gebruik te koppelen?
Nee, dat hoeft maar één keer te gebeuren. Na een geslaagde koppeling hoeft de hoofdtelefoon alleen verbinding te maken met het externe apparaat.Ondersteunt de Bluetooth verschillende gelijktijdige verbindingen?
Ja. U kunt de hoofdtelefoon gelijktijdig gebruiken met de stereoadapter of USB-adapter en een mobiele telefoon. Sommige merken zijn echter mogelijk niet compatibel. Het is niet mogelijk om twee audioverbindingen via de stereoadapter en USB-adapter tegelijk tot stand te brengen.Ondersteunt het besturingswieltje alle MP3-spelers?
Nee. Het besturingswieltje is een speciale functie die is ontworpen voor Windows Media Player.Bijlage
Waarom wordt de muziek niet gedempt/hervat bij het koppelen van een audioafspeelapparaat en een mobiele telefoon? Sommige merken mobiele telefoons zijn mogelijk niet compatibel. Als u de Bluetooth-hoofdtelefoon met slechts één apparaat gebruikt, doet deze incompabiliteit zich niet voor. Bij het gebruik van de stereoadapter in combinatie met een MP3-speler is het volume te zacht. Het uitvoervermogen van audioafspeelapparatuur varieert. De stereoadapter kent twee versterkingsmodi. Als u tweemaal (in plaats van eenmaal) op de regelknop op de stereoadapter klikt terwijl u verbinding maakt met de hoofdtelefoon, wordt het uitvoervolume hoger. Wat is een A2DP-profiel? Dit is een nieuwe Bluetooth-standaard voor de stereokwaliteit van het verzonden signaal. De Bluetooth-hoofdtelefoon en stereoadapter en de USB-adapter ondersteunen deze standaard. Wat is AVRCP? AVRCP staat voor "Audio/Video Remote Control Profile" en is een Bluetooth-service die afstandsbedieningsfuncties zoals Afspelen en Stoppen biedt.Bijlage
De knipperfrequentie van de leds op de stereoadapter en de hoofdtelefoon. line
| Time | Blauw led (Square Wave) | Rood led (Square Wave) | |------|--------------------------|-------------------------| | 1 | High | High | | 2 | Low | Low | | 3 | High | High | | 4 | Low | Low |Opmerkingen
Garantie 36 maanden vanaf koopdatum
Belangrijke informatie met betrekking tot de garantie
SilverCrest
Geachte klant, Hartelijk dank voor uw beslissing om een SILVERCREST-product te kopen. U wordt verzocht, voor ingebruikneming van uw SILVERCREST-product de bijgevoegde documentatie of onlinehulp zorgvuldig door te lezen. Mocht er een keer een probleem ontstaan dat op deze wijze niet opgelost kan worden, adviseren wij u contact op te nemen met onze hotline. Als er geen telefonische oplossing mogelijk is, krijgt u een behandelingsnummer (RMA) dat u samen met een kopie van het koopbewijs bij het apparaat dient te voegen. Nadat u het apparaat transportveilig en neutraal heeft verpakt, stuurt u het voor de afwikkeling van de garantie onder vermelding van het RMA-nummer aan de buitenkant van het pakje naar het adres dat onze hotlinemedewerker u noemt. Na ontvangst van het apparaat worden aanwezige productie- en materiaalfouten gratis door ons verholpen. Actuele informaties en antwoorden op veelgestelde vragen krijgt u in het internet onder: www.silvercrest.cc Deze garantie is geldig in Nederland Uw wettelijke garanties jegens de verkoper bestaan naast deze garantie en worden hierdoor niet beperkt.  Hotlinenummer: 020-2013989 (Houduw serienummer gereed!) Fabrikant: TARGA GmbH, Postfach 2244, D-59482 Soest www.silvercrest.ccOverview
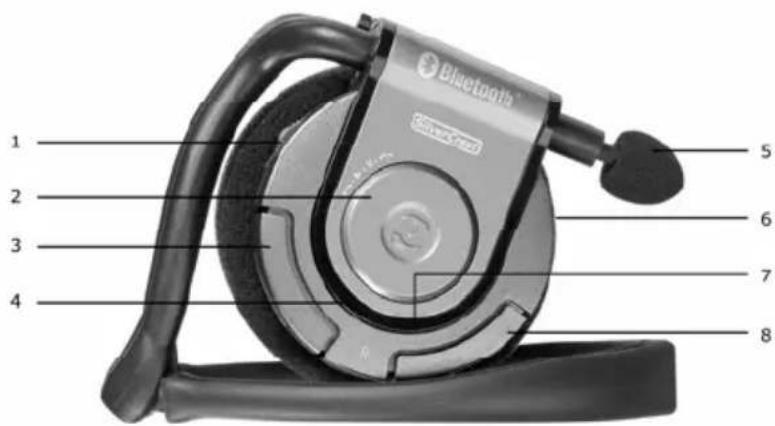
 1 – Pairing button and control wheel 2 - Accept call/hang-up button 3 - Vol+ to raise the volume 4 - Red indicator 5 - Microphone 6 - Power on/off button 7 - Blue indicator 8 - Vol- to lower the volumePackage contents
natural_image
Product catalog image showing seven different electronic devices and accessories, including audio, USB, and power plug (no text or labels visible)Table of Contents
Important Notice 4 Introduction and Getting Started .... 7 Charging the Batteries....8Pairing
Pairing with the Stereo Adapter 9 Using the Stereo Adapter 12 Adjusting the Volume.... 13 The Bluetooth 2.0 EDR USB Adapter .... 14 System Requirements for Installing the USB Adapter.... 14 Installing the USB Adapter.... 15 Pairing with the USB Adapter.... 20 Establishing the Audio Connection.... 25 Establishing the Headphones Connection 28 Starting and Stopping the Connection 32 Connecting with a Mobile Phone.... 33 Accepting and Hanging Up Calls 35Special Features
Simultaneous Use 36 The Control Wheel.... 37Appendix
FAQs 39 The Indicators.... 41 Your Annotations 42 Details of Guarantee 43Important Notice
Before you use this device for the first time, please read the following notes in this manual and heed all warnings, even if you are familiar with handling electronic devices. Keep this manual in a safe place for future reference. If you sell or pass this device on to another person, it is imperative that you also hand over this manual.OPERATING ENVIRONMENT
The device is not for use in rooms with a high temperature or humidity (e.g. bathrooms), and must be kept free of dust.Always make sure that:
- no direct heat sources (e.g. heating) can affect the device - no direct sunlight or bright artificial light reaches the device - the device is not exposed to spray and dripping water and abrasive liquids - the device must not be subject to any great temperature changes as this may cause moisture through condensation - the device should not be subject to excessive knocks and vibrationsPOWER ADAPTER AND BATTERIES
Use only the supplied power adapter model KSAFB0500085W1EU to avoid overheating, deformation of housing, fire, electric shock, explosions and other dangers. Never connect this power adapter to other devices. The power adapter consumes current as soon as plugged into a wall outlet. In order to completely disconnect the device from the mains, the power adapter must be pulled out from the wall outlet. For this reason, the device should be positioned in a way that assures a direct and unobstructed access to the wall outlet so that the power adapter can be immediately pulled out in an emergency situation. To reduce the risk of fire, do not leave the power adapter connected to the mains when not using it. Only connect it when charging the batteries of the devices. Warning! The supplied power adapter has not been designed for outdoor use. Only use the power adapter indoors. Always hold all cables by the plug and never pull on the cable itself. Never hold the power adapter with wet hands as this may cause a short circuit or electric shock.Important Notice
The Bluetooth headphones and the stereo adapter contain rechargeable batteries. These batteries shall only be removed or replaced by an authorized service center. Warning: Replacing or removing the batteries must be performed by an authorized service technician.MAINTENANCE AND CARE
Only use a clean, dry cloth for cleaning. Do not open the case of the headphones, the power adapter, the stereo adapter or the Bluetooth USB adapter. If the casing of the power adapter is opened, your life is in danger due to electric shock.RF INTERFACE
- Turn the device off when located onboard of an aircraft, in an hospital, a surgery area or nearby medical electronic equipment. The RF signals may interfere with the functionality of sensitive devices. - Place the device at least 20cm (8 inch) away from pacemakers, as the RF signals may interfere with the functionality of the pacemaker. - The transmitted RF signals can cause interference to hearing aids. - Do not place the device with the wireless adapter turned on near flammable gas or in an explosion-sensitive area (e.g. a paint shop), as the transmitted RF signals can cause explosions or fire. - When transmitting wireless data it is possible that unauthorized parties may receive data. TARGA GmbH is not liable for any interference caused to RF or TV signals caused by unauthorized modification to this device. Furthermore, TARGA does not assume any liability for replacing any cables or devices that have not been specifically approved by TARGA GmbH. The user is solely responsible and liable for troubleshooting any interference caused by unauthorized modification of this device and for replacing any appliances. - It is not allowed to use the stereo headphones while driving a vehicle as it covers both ears.Important Notice
CHILDREN
Do not allow children to play with the headphones as swallowing small pieces can lead to suffocation.DISPOSAL OF OLD DEVICES
 If the product is labeled with a stroke-out waste bin, it is subject to the European Guideline 2002/96/EC. All electric and electronic devices must be disposed of separately from household waste at established bodies. Avoid damaging the environment and danger to your personal health by disposing of the device properly.CE DECLARATION OF CONFORMITY
CE This device has been tested and approved for compliance with the basic and other relevant requirements of the EMC Directive 89/336/EEC, the Low-voltage Directive 73/23/EEC and the R&TTE Directive 99/5/EC.TRADEMARKS
 This icon is a trademark of Bluetooth SIG, Inc., USA and used by Targa GmbH under license. All other names and product names or registered trademarks are the property of their respective owners.NOISE ABATEMENT
Do not use the headphones at high volume levels. Otherwise you will damage your ears and possibly disturb other people. Under dangerous circumstances, e.g. on the road or when operating machines, do not use the headphones. Despite the headphones are designed in a way that they allow to perceive external noise, never adjust the volume at such a high level that you are not capable to hear any more what's happening around you.RISK OF FIRE
During a thunderstorm, unplug the power adapter from the mains. There is a risk of fire.Introduction and Getting Started
Thank you for purchasing these Bluetooth stereo headphones. These headphones have been designed for receiving wireless high-quality stereo sound from audio playback devices. The range with stereo adapter is approx. 10 m, and when using the USB adapter up to 25 m. The different accessories allow a flexible use of your headphones. Just connect the supplied stereo adapter to any audio playback device (e.g. MP3 player, Hifi equipment, TV) to listen to the radio or watch TV wireless. The system also includes a Bluetooth USB adapter that can be connected to a computer. Please read this User's Manual carefully in order to take advantage of the full functionality of the headphones.Charging the Batteries
To charge the batteries connect the stereo headphones and the stereo adapter to the Y cable (see figure). Next connect the power adapter to the Y cable and connect the power adapter to  a wall outlet. A red indicator will illuminate on both device to indicate the charging in progress. As soon as the indicator stops lighting, the charging cycle is completed. Then you may disconnect all the cables and pull the power adapter out from the mains socket. Note
The first-time charging of the batteries requires approx. four hours, any future charging cycles will require approx. two hours. A fully charged battery allows approx. eight hours of operation and approx. 165 hours of standby. Optionally, instead of the power adapter (6) you may also use the USB charger cable (4). Notice to notebook computer users: Charging via the USB charger cable will discharge the notebook battery faster.Pairing with the Stereo Adapter
After you have charged the batteries of the Bluetooth stereo headphones and the Bluetooth stereo adapter (see page 8 – Charging the Batteries), you are ready to use both devices to wireless listen to the stereo music from a MP3 player. To do so, first you have to synchronize both the headphones and the stereo adapter. This process is more commonly known as "pairing". During the pairing process, both device shouldn't be separated more than 3 m (10 feet) in order to guarantee a hassle-free functionality. For any future usage, once the pairing is completed, you will only have to connect or disconnect both devices. The pairing is only required before the first-time use.  Moving the main switch into "On" position First toggle the main switch (6) to turn the Bluetooth stereo headphones on. You will find it on the right-hand earpiece that also contains the microphone. Move the switch to the "On" position to turn the power on. The blue indicator on the right earpiece starts blinking to indicate that the device is ready.Pairing with the Stereo Adapter
 Plugging the audio connector into the audio playback device Next plug the stereo adapter connector into your audio playback device (e.g. an MP3 player). You may use any audio playback device with a 3.5mm audio plug. Starting the pairing on the stereo adapter Press and hold the control button on the stereo adapter for at least six seconds until the red and blue control indicators flash alternating. The stereo adapter is now ready to connect to a remote device. Note
If the stereo adapter was already powered on, it is not possible to start the pairing mode. In this case, you must turn it off first by keeping the control button pressed until it powers off.Pairing with the Stereo Adapter
natural_image
Close-up of a Bluetooth headset with earbuds and headband (no visible text or symbols)Note
The pairing between two Bluetooth devices is required only once. After the devices "know each other", you only need to connect or disconnect them when you want to use them (see page 12 – Using the Stereo Adapter).Using the Stereo Adapter
Once you have successfully paired the headphones and the stereo adapter, you only need to connect or disconnect them when you want to use them. Disconnecting the stereo adapter from the headphones To disconnect the Bluetooth connection between both devices, press and hold the control button on the stereo adapter for approx. one or two seconds. The audio connection gets lost and the blinking frequency of the blue indicator will change from 3 short to 1 short light. The device is now in idle mode. Powering the stereo adapter off In order to power the stereo adapter off after it has been disconnected, press and hold the control button for approx. four to five seconds. The red indicator on the stereo adapter will blink 4 times shortly to confirm and the device powers off. Powering the stereo adapter on Press and hold the control button for approx. four to five seconds until the blue indicator lights up to indicate idle mode. Establishing a connection to the headphones After the blue indicator on the stereo adapter indicates idle mode, you can establish a connection with the paired headphones by pressing the control button once. This process may take a few seconds.Adjusting the Volume
To adjust the volume, press the volume buttons on the right earpiece. Vol – lowers the volume.  Note
The stereo adapter also offers the possibility to adjust the volume for devices that have a low-power output. When establishing a connection to the paired headphones (see page 12 - Establishing a connection to the headphones) press the control button on the stereo adapter once to use the default volume. You can optionally raise the volume by pressing the control button twice.The Bluetooth 2.0 EDR USB Adapter
The Bluetooth adapter enhances your desktop or notebook PC with Bluetooth functionality. It allows you to connect your computer to the Bluetooth headphones.  Do not connect the Bluetooth USB adapter to your computer's USB port before the setup program prompts you to do so.System Requirements for Installing the USB Adapter:
- CPU: Intel Pentium III 500MHz or higher - RAM: minimum 256 MB - Available hard disk space: minimum 50MB - Operating system: Windows 2000/XP - One free USB port, USB 1.1 or 2.0 compatible - CD-ROM drive Insert the supplied CD-ROM into your CD or DVD drive (depending on the computer). The "Install Shield Wizard" should launch automatically. In case that the autorun function is disabled on your computer, you may launch the setup manually by running the file "setup.exe" from the CD.Installing the USB Adapter
 In the welcome screen, click on Install Note: If this window does not show up, the "Install Shield Wizard" has already started automatically (see the figure below).  The "Install Shield Wizard" appears that will guide you through the setup process. Click on NextInstalling the USB Adapter
 Select "I accept the terms in the license agreement" and click Next  The Install Shield Wizard is now ready to copy the required files. Click InstallInstalling the USB Adapter
 Install Shield is processing the setup Please wait...  Select "I accept" and click OK to process without any warning messages. Note: Unfortunately, Microsoft does not offer any signature for this software. Therefore some warning messages may appear when selecting "I do not accept". However, this has no influence on the functionality.Installing the USB Adapter
 The setup process begins, Please wait...  As soon as all the necessary files have been copied, the following message will appear. Now you may connect the USB adapter to any free USB port of your computer and click OKInstalling the USB Adapter
The computer detects the plugged USB adapter and starts installing all necessary drivers. This process executes automatically and is accompanied by several messages popping up in different windows.  As soon as this message appears, the setup is completed. Click on Finish  In order for the computer to apply the changes, you have to restart it. To restart it automatically at this point, click on YesPairing with the USB Adapter
In the same way than for the stereo adapter and the headphones, the USB adapter and the headphones have to be paired the first time you want to establish a connection. When pairing with the USB adapter, two connections can be established: an audio connection to listen to the music played back on the computer and a headset connection to use the VoIP functions on the computer (Internet phone). You may setup both connections, but you can only use one connection at a time. The installed software gives you a comfortable access to both connections. On the headphones you can adjust the already explained settings. Moving the main switch into "On" position
First toggle the main switch (6) to turn the Bluetooth stereo headphones on. You will find it on the right-hand earpiece that also contains the microphone. Move the switch to the "On" position to turn the power on. The blue indicator on the right earpiece starts blinking to indicate that the device is ready.Pairing with the USB Adapter
natural_image
Close-up of a Bluetooth headset with earbuds and headband (no visible text or symbols)Pairing with the USB Adapter
 This is the Bluetooth settings main window. Normally, this window lists all paired devices. In this example, there is no entry yet. In order to add your Bluetooth headphones (that is already in pairing mode) click New Connection  Select "Custom Mode" in order to be able to choose between the connection options "Audio Sink" and "Headset". Then click on NextPairing with the USB Adapter
 Now the software starts searching for Bluetooth devices that have been put into pairing mode. Please wait...  If you see this message after the search, please check if the Bluetooth headphones are still in pairing mode. You can recognize it by the red and blue indicators blinking alternately. If necessary, re-activate the pairing mode on the headphones, confirm this message and try re-establishing the connection.Pairing with the USB Adapter
 Once the search has been successful, a list with all found devices is displayed. In this case, the Bluetooth headphones will be listed as BTST-9300. To establish a connection with it, click Next  The software will try to establish a connection. If you are prompted for a PIN, enter: 1234 This is the preset PIN of the headphones. It that cannot be changed. Please read on the next page how to setup the audio connection. In order to setup a headset connection, please read the section starting on page 28 (Establishing the Headset Connection).Establishing the Audio Connection
Please read below how to setup an audio connection.  While establishing the connection to the Bluetooth headphones, the software has detected two services to choose from. To establish the audio connection, choose "Audio Sink" and click Next  The audio device will be setup. Please wait...Establishing the Audio Connection
The audio device has been setup properly and allows it to be configured in this step. You can edit the default connection name "BTST-9300" by overwriting it. Click the "Change Icon" button to open a new window. Select the desired icon and click "OK" to use it for the audio connection. The "Create a shortcut on the desktop" radio button allows you to create a shortcut to the connection. It will allow you to launch the "Audio Sink" service directly from your Windows desktop. Establishing the Audio Connection
 To complete the setup, click Finish  The Bluetooth settings main window displays again. You have successfully completed the one-time pairing for the "Audio Sink" service. Please read the next page how to setup the headset service.Establishing the Headset Connection
In order to perform a new pairing, first put the Bluetooth headphones in pairing mode and launch the pairing software (see pages 20-24 - Pairing with the USB Adapter).  While establishing the connection to the Bluetooth headphones, the software as detected two services to choose from. To establish the headset connection, choose "Headset" and clickNext
 The connection to the remote device (headset) will be established. Please wait...Establishing the Headset Connection
 Now press the Call button (2) on the Bluetooth headphones to confirm the connection. natural_image
Close-up of a QF5688 Bluetooth headset with attached microphone and ear (no visible text or symbols)Establishing the Headset Connection
You have successfully setup the headset. Like after the pairing for the audio connection, you can also customize the settings for this connection. The default connection name is "BTST-9300(2)", as the name "BTST-9300" is already in use for the audio connection. The connection name must be unique and cannot be assigned twice. For example, you can name the connection as "Headset". To change the icon used for this connection, click the "Change Icon" button and choose a new icon from the window that appears. Confirm your selection by clicking "OK" in order to enable the new icon. The "Create a shortcut on the desktop" radio button allows you to create a shortcut to the connection. It will allow you to launch the "Headset" service directly from your Windows desktop.  Perform any changes as required and click NextEstablishing the Headset Connection
 To complete the setup, click Finish  The Bluetooth settings main window displays again. You have successfully completed the one-time pairing for the "Headset" service. Now you can double-click on any of these icons to start the corresponding connection. For more information, see the section starting on page 32 - Starting and Stopping the Connection.Starting and Stopping the Connection
In the Bluetooth settings main window you can see a list of all linked devices. For instance, the Bluetooth headphones shows the following icon for the audio connection:  BTST-9300 (1) not connected The icon (1) shows the linked headphones that hasn't established any connection yet. In order to connect it, double-click on the icon or right-click on the icon and select "Connect" from the context menu. The connection will be established and the icon changes:  BTST-9300 (2) connected In order to disconnect the headphones, right-click on the icon (2) and select "Disconnect". The headphones will be disconnected and the icon changes accordingly. Repeat this process for the other connections. It is only possible to use one connection at a time. When attempting to open a connection while another connection is still active, a message will prompt you to disconnect the existing connection first.Connecting with a Mobile Phone
To establish a connection from the Bluetooth headphones to a mobile phone, it is also necessary to perform a pairing first. Note
Please consult the User's Manual of your mobile phone to find out how to enable the pairing mode of your mobile phone.  Moving the main switch into "On" position First toggle the main switch (6) to turn the Bluetooth stereo headset on. You will find it on the right-hand earpiece that also contains the microphone. Move the switch to the "On" position to turn the power on. The blue indicator on the right earpiece starts blinking to indicate that the device is ready.Connecting with a Mobile Phone
natural_image
Close-up of a Bluetooth headset with attached microphone and ear (no visible text or symbols)Accepting and Hanging Up Calls
 Once your mobile phone or computer has established a successful connection to the Bluetooth headphones, incoming calls will be heard automatically through the headphones. To accept the call, press the Call button once. You can hear the conversation over the headphones. To finish the call, press the Call button again. Note
You can also use voice-dialing, as long as your mobile phone supports this feature. To use it, press the Vol+ button once. For more information, consult the User's Manual of your mobile phone.Simultaneous Use
You can use both an audio connection and a telephone connection to your mobile phone for your Bluetooth headphones. To do so, first connect the headphones to the desired audio source (see page 9 - Pairing with the Stereo Adapter) and then to the mobile phone (see page 33 - Connecting with a Mobile Phone).Accepting calls
During an incoming call, the audio connection to the stereo adapter automatically mutes so that you can press the Call button to accept it (see page 35 - Accepting and Hanging Up Calls).Hanging up calls
To finish the call, press the Call button again. The Bluetooth headset toggles back to the audio playback source.The Control Wheel
The control wheel is a special feature designed for Windows Media Player. It allows you to control functions like Stop, Next track and Previous track. Press the control wheel to stop the playback. Turn the control wheel to navigate between the songs in your playlist. natural_image
Close-up of a mechanical component with directional arrows indicating motion or movement (no readable text or symbols)The Control Wheel
 In the following menu "General" enable the "AV Remote Control Service" checkbox. Note
After enabling the AVRCP (Audio/Video Remote Control Profile) service you can press the Call button (2) on the headphones to pause the music playback. Press the Call button again to resume playback. natural_image
Close-up of a black and silver robotic device with a circular head and earpiece, no visible text or symbols.Appendix
FAQsWhat is the PIN of the headphones?
The PIN is "1234". It is also known as Bluetooth passkey, code or password.Can I change the PIN?
No. The PIN is preset for the Bluetooth headphones.What is pairing?
The first-time linking between two Bluetooth device allowing to establish a permanent secure connection. One device will provide a security PIN that the other device has to acknowledge.What's the wireless range of the headphones?
Bluetooth has been designed for short-distance communications. The range depends on the remote device and is approx. 10 m with the stereo adapter, and when using the USB adapter up to 25 m. The range may deteriorate depending on the environmental conditions.Is it necessary to pair the Bluetooth headphones and the other Bluetooth device prior to using them every time?
No. The pairing must only be performed once. After a successful pairing the headphones only needs to be connected to the remote device.Does the Bluetooth support several simultaneous connections?
Yes. You can use the headphones simultaneously with the stereo adapter or USB adapter and a mobile phone. However, some brand models may be incompatible. It is not possible to establish two audio connections via the stereo adapter and the USB adapter at the same time.Does the control wheel support all MP3 players?
No. The control wheel is a special feature designed for Windows Media Player.Appendix
Why is the music muted/resumed when pairing with an audio playback device and a mobile phone? Some mobile phone brands and models may not be compatible. When using the Bluetooth headphones with only one device, these incompatibilities should not appear. When using the stereo adapter with an MP3 player, the volume is too low. The output power of the audio playback devices may vary. The stereo adapter offers two amplification modes. When pressing the control button on the stereo adapter twice (instead of once) while connecting it to the headphones, the output volume will be higher. What is an A2DP profile? This is a new Bluetooth standard for stereo quality signal transmitting. The Bluetooth headset, the stereo adapter and the USB adapter support this standard. What is AVRCP? AVRCP means „Audio/Video Remote Control Profile“ and is a Bluetooth service offering remote control functions like Play and Stop.Appendix
The blinking frequency of the stereo adapter and headphones indicators  5 Idle mode (no active Bluetooth connection) 6 An active Bluetooth connection to a remote device has been established 7 The device is in pairing mode (searching a remote device) 8 The stereo adapter is powering offYour Annotations
36 month warranty from date of purchase
 United Kingdom 3Important warranty information
SilverCrest Dear Customer, Thank you for purchasing a SILVERCREST product. Please carefully read through the enclosed documentation or online help before putting your SILVERCREST product into service. If you have a problem, which can't be solved in this way, please contact our hotline. If the problem cannot be solved over the phone, you will be given a reference number (RMA), which you should enclose together with a copy of the proof of purchase. After you have packaged the unit safe for transport and in plain packaging, please send it for warranty processing, with the RMA noted on the outside of the package, to the address given to you by our hotline employee. After receiving the unit we will correct the manufacturing and material defect free of charge. Up-to-date information and answers to the most frequently asked questions are available on the internet from: www.silvercrest.cc This guarantee is valid in the UK. Your statutory guarantees from the seller are in addition to this warranty and are not limited by it.  MONTH WARRANTY Hotline number: 0207-3650744 (Please have your serial number to hand!) Manufacturer: TARGA GmbH, Postfach 2244 D-59482 Soest www.silvercrest.cc  www.silvercrest.cc   CE declaration of conformity: www.silvercrest.cc Targa GmbH Lange Wende 41 D-59494 Soest Germany  
Table of contents
Click a title to access it
- Owner's Manual & Service Information
- Overzicht
- De verbinding tot stand brengen en verbreken
- BTST-9300 (1) niet verbonden
- BTST-9300 (2) verbonden
- Verbinden met een mobiele telefoon
- Opmerking
- Gesprekken accepteren en ophangen
- Gelijktijdig gebruik
- Gesprekken aannemen
- Ophangen
- Het besturingswieltje
- Opmerkin
- Bijlage
- Wat is de pincode van de hoofdtelefoon?
- Kan ik de pincode wijzigen?
- Wat is koppeling?
- Hoeveel bedraagt het draadloze bereik van de hoofdtelefoon?
- Is het nodig om de Bluetooth-hoofdtelefoon en het andere Bluetooth-apparaat voor elk gebruik te koppelen?
- Ondersteunt de Bluetooth verschillende gelijktijdige verbindingen?
- Ondersteunt het besturingswieltje alle MP3-spelers?
- Opmerkingen
- Garantie 36 maanden vanaf koopdatum
- Belangrijke informatie met betrekking tot de garantie
- SilverCrest
- Overview
- Package contents
- Table of Contents
- Pairing
- Special Features
- Appendix
- Important Notice
- OPERATING ENVIRONMENT
- Always make sure that:
- POWER ADAPTER AND BATTERIES
- MAINTENANCE AND CARE
- RF INTERFACE
- CHILDREN
- DISPOSAL OF OLD DEVICES
- CE DECLARATION OF CONFORMITY
- TRADEMARKS
- NOISE ABATEMENT
- RISK OF FIRE
- Introduction and Getting Started
- Charging the Batteries
- Note
- Pairing with the Stereo Adapter
- Using the Stereo Adapter
- Adjusting the Volume
- The Bluetooth 2.0 EDR USB Adapter
- System Requirements for Installing the USB Adapter:
- Installing the USB Adapter
- Pairing with the USB Adapter
- Moving the main switch into "On" position
- Establishing the Audio Connection
- Establishing the Headset Connection
- Next
- Starting and Stopping the Connection
- Connecting with a Mobile Phone
- Accepting and Hanging Up Calls
- Simultaneous Use
- Accepting calls
- Hanging up calls
- The Control Wheel
- What is the PIN of the headphones?
- Can I change the PIN?
- What is pairing?
- What's the wireless range of the headphones?
- Is it necessary to pair the Bluetooth headphones and the other Bluetooth device prior to using them every time?
- Does the Bluetooth support several simultaneous connections?
- Does the control wheel support all MP3 players?
- Your Annotations
- month warranty from date of purchase
- Important warranty information
Manual assistant
Powered by Anthropic
Waiting for your message
Product information
Brand : SILVERCREST
Model : BTST 9300
Category : Headphones