
CB 2001 - Coffee maker BOMANN - Free user manual and instructions
Find the device manual for free CB 2001 BOMANN in PDF.


| Product Type | Fully automatic coffee machine |
| Brand | Bomann |
| Model | CB 2001 |
| Dimensions (W x H x D) | Approx. 34.2 x 26.6 x 36.7 cm |
| Weight | Approx. 9 kg |
| Power Consumption | 1300 W |
| Rated Voltage/Frequency | 230 V ~ 50 Hz |
| Water Tank Capacity | 1.4 L |
| Coffee Bean Container Capacity | Approx. 250 g |
| Coffee Grounds Container Capacity | 0.6 L |
| Grinder Adjustment | 8 levels (1 very fine to 8 very coarse) |
| Pre-Injection | Adjustable (small, normal, large) |
| Percolation Temperature | Adjustable (low, normal, high) |
| Percolation Time | Adjustable (short, normal, long) |
| Cup Sizes | Normal cup (max 100 ml), Large cup (max 200 ml) |
| Hot Water Function | Yes, via steam switch |
| Steam Function | Yes, for milk frothing |
| Cup Warmer | Integrated cup shelf with heating |
| Energy-Saving Mode | Adjustable from 15 min to 11 h 45 min (preset 1 h) |
| Water Hardness Setting | 3 levels (soft, normal, hard) |
| Self-Test | Automatic on startup |
| Automatic Rinsing | After 10 cups prepared |
| Cleaning Brew Group | Removable, rinse with warm water (weekly) |
| Descaling | Programmable with automatic monitoring |
| Warranty | 24 months from date of purchase |
Frequently Asked Questions - CB 2001 BOMANN
User questions about CB 2001 BOMANN
0 question about this device. Answer the ones you know or ask your own.
Ask a new question about this device
Download the instructions for your Coffee maker in PDF format for free! Find your manual CB 2001 - BOMANN and take your electronic device back in hand. On this page are published all the documents necessary for the use of your device. CB 2001 by BOMANN.
USER MANUAL CB 2001 BOMANN
natural_image
Exterior view of two BOMANN ESPUCCINO coffee machines with glass cups and control knobs (no visible text or symbols on main devices)CB 2001 / CB 2002
CE
DEUTSCH
Inhalt
natural_image
Simple line drawing of a coffee cup and a circle with letter M (no text or symbols)natural_image
Simple line drawing of a coffee cup and a circle with letter M (no text or symbols)natural_image
Simple line drawing of a coffee cup and a circle with letter M (no text or symbols)natural_image
Simple diagram with three symbols: a dot pattern, an arrow pointing right, and a circle labeled M (no text or labels)natural_image
Simple diagram with three symbols: a north arrow, a curved line with a circle, and a musical note (no text or labels)natural_image
Simple line icons including a bowl, spoon, and megaphone with directional arrows (no text or symbols)natural_image
Simple diagram with two icons: a steaming cup and an arrow pointing right, no text or symbols present.natural_image
Line drawing of a hand inserting a device into a container with arrows indicating direction (no text or symbols)B
natural_image
Illustration of a hand holding a device with a downward arrow indicating force or motion (no text or symbols)natural_image
Cross-sectional diagram of a mechanical device showing internal components and a close-up view (no text or labels)natural_image
Mechanical component diagram showing internal structure and close-up view (no text or symbols)natural_image
Technical diagram of a mechanical device with a top component and a vertical shaft, showing internal components without any text or symbols.12
D-47906 Kempen/Germany
Overview of the Controls.... 17
Controls and Display.... 17
Control Panel 17
Display 17
Hot Water/Steam Switch.... 18
Installation.... 18
Unpacking and Setting up the Device.... 18
Mains Connection 18
Cup Warmer/Cup Shelf.... 18
Initial Use 18
Preparing the Device.... 18
Filling in the Coffee Beans 18
Filling in the Coffee Powder.... 18
Filling with Water 18
Protection against Impurities 18
Setting the Degree of Grinding 18
Self-Test 19
Preparing Coffee 19
Preparing Hot Water.... 19
Producing Steam and Foaming Milk 19
Programming Presets 20
Filling Quantity - Normal Cup.... 20
Filling Quantity - Large Cup 20
Coffee quantity....21
Pre-Injection.... 21
Percolation Time 21
Percolation Temperature 21
Energy-Saving Mode.... 21
Entering the Water Hardness 22
Total Number of Prepared Cups 22
Cleaning and Maintenance.... 22
Cleaning the Outside of the Device 22
Cleaning the Water Tank 22
Cleaning the Coffee Grinding Gear.... 22
Cleaning the Hot Water/Steam Nozzle 22
Cleaning the Coffee Spout.... 22
Cleaning the Brew Group.... 23
Removing/Inserting the Brew Group.... 23
Cleaning the Filter Screens.... 23
Adjusting the Position of the Drive Shaft.... 23
Cleaning the Coffee Powder Container 24
Cleaning the Coffee Grounds Collector 24
Emptying and Cleaning the Drip Collector.... 24
Descaling.... 24
Troubleshooting.... 25
Technical Data 26
Guarantee.... 27
General Safety Instructions
- Read the operating instructions carefully before putting the appliance into operation and keep the instructions including the warranty, the receipt and, if possible, the box with the internal packing.
- The appliance is designed exclusively for private use and for the envisaged purpose. This appliance is not fi t for commercial use. Do not use it outdoors (except if it is designed to be used outdoors). Keep it away from sources of heat, direct sunlight, humidity (never dip it into any liquid) and sharp edges. Do not use the appliance with wet hands. If the appliance is humid or wet, unplug it immediately. Do not put it in water.
- When cleaning or putting it away, switch off the appliance and always pull out the plug from the socket (pull on the plug, not the cable) if the appliance is not being used and remove the attached accessories.
- Do not operate the machine without supervision. If you should leave the workplace, always switch the machine off or remove the plug from the socket (pull the plug itself, not the lead).
- To protect children from the dangers posed by electrical appliances, make sure that the cable is hanging low and that children do not have access to the appliance.
- Check the appliance and the cable for damage on a regular basis. Do not use the appliance if it is damaged.
- Do not try to repair the appliance on your own. Always contact an authorized technician. To avoid the exposure to danger, always have a faulty cable be replaced only by the manufacturer, by our customer service or by a qualified person and with a cable of the same type.
- Use only original spare parts.
- Pay careful attention to the following "Special Safety Instructions".
Special Safety Information
- Place the device on a solid, fl at surface. Position it such that it cannot tilt over.
- The fully automatic coffee machine must be positioned at least 10 cm from the wall (at the back and sides).
- Do not place the device immediately next to a gas or electric cooker or any other source of heat.
- Never place the coffee machine in rooms where the temperature is below 0^ C. The residual water in the kettle could freeze and cause damage.
- Before the machine is connected to the mains it must be ensured that the polystyrene protection behind the service door (6) has been removed.
- When the machine is lifted you should always hold the housing and never the water tank.
- The machine must not be used outside.
- During operation the mains lead must not be wound round the machine. The mains lead must not come into contact with hot surfaces.
- The machine, mains lead and mains plug (19) must never be touched with wet/damp hands, as there is a danger of an electric shock.
- The parts of the machine which are live must not come into contact with water as there is a danger of short-circuiting!
- Do not move the machine when it is in operation.
• Coffee beans should only be filled into the container
provided (2). Otherwise the machine might suffer severe damage.
- Any water leaking from the bottom of the machine does not represent a fault. The water given off is residual water which is drained into the drip collector (10) whenever percolation is carried out.
- Also small amounts of water collecting in the area of the brew group and the floor of the machine are caused by residual water and are not a sign of leakage.
- Danger of Burns: Never point the hot water or steam jet at yourself or others. A vessel should be placed under the hot water/steam nozzle (14).
- Never switch on the machine if it does not contain water and coffee beans. Never fill the water tank (4) with too much water or water that is too hot or boiling.
- The water tank (4) should only be filled with cold drinking water. By no means must water containing carbon dioxide be used (sparkling water).
Safety Symbols on the Device and in the Operating Instructions

Caution! Hot surface! Danger of scalding!
Overview of the Controls
Diagram A / Machine
1 Lid of the coffee bean container
2 Coffee bean container
3 Water tank fl ap
4 Water tank
5 I/O mains switch
6 Service door
7 Recessed grip
8 Coffee grounds collector
9 Hot water/steam switch
10 Drip collector
11 Drip collector cover with fi lling level indicator
12 Float
13 Coffee spout
14 Hot water/steam nozzle
15 Control panel
16 Display
17 Cup warmer/cup shelf
18 Filling hole for coffee powder
19 Mains plug
Accessories not shown
Coffee measuring spoon/brush, adjustment tool
Diagram B / Brew Group
A Lower half of the housing
B Upper half of the housing
C Brew chamber (lower screen)
D Drive shaft
E Brew group coffee outlet
F Handle
G Upper screen
H Spindle coupling
Controls and Display
Control Panel (15)
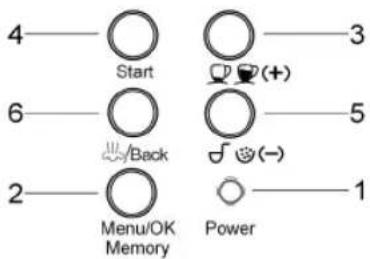
1 POWER control lamp: shows standby operation
2 „MENU/OK/MEMORY“
button:
changes from steam to normal mode; switches to programming mode
3 „☐☐(+) (normal/large cup)" button:
4 „START button“:
,+“ function in programming mode, selection of normal/large cup press once – makes 1 cup of coffee; press twice – makes 2 cups of coffee
5 „♂(−) (beans/powder)" button:
changes between coffee preparation from freshly ground coffee beans and coffee powder function; "-" in programming mode
6 „/ BACK (steam/back)" button:
changes to steam mode
Display (16)
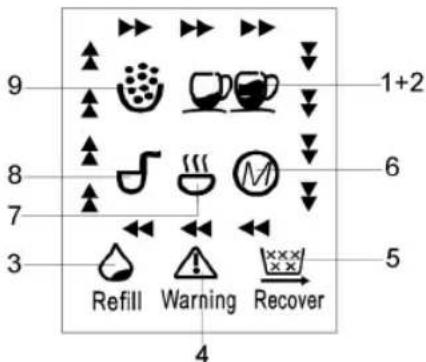
1 „normal/large cup“:
2 „second cup“:
3 Warning message "Refill":
4 Warning message "Warning":
5 Warning message "Recover":
6 „M“:
7 „Steam“:
8 Selection:
9 Selection:
shows the current
selection
two cups of coffee are made
(fill up with water)
(warning message)
(parts of the machine not inserted properly) coffee is made with stored settings.
machine is in steam mode
„coffee powder“
„coffee beans“
Further information on the meanings of the warning messages is to be found in the section on „Troubleshooting”.
Hot Water/Steam Switch (9)
flowchart
graph TD
    A["ON"] --> B["OFF"]
    B --> C["Steam"]
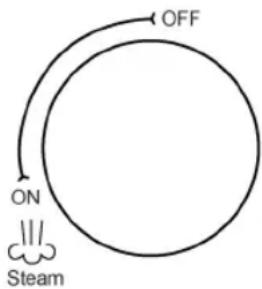
Hot water preparation in normal mode (the „MENU/OK/MEMORY” button lights up).
Steam production in steam mode (the "BACK" button lights up).
The hot water or steam quantity is increased by turning the switch in an anticlockwise direction.
Installation
We recommend that you keep the original packaging for transporting the machine at a later date as this will protect the machine during transport against accidental damage.
Before initial use of the machine please note all the information contained in the section "Special Safety Information".
Unpacking and Setting up the Machine
- Remove the packaging material completely. Caution! Do not allow small children to play with the foil as there is a danger of suffocation!
- Place the fully automatic coffee machine on a heat-resistant, fi rm and fl at surface.
- Ensure that:
- the device is not standing on the mains lead;
- the distance to the wall at the side and behind the coffee machine is at least 10 cm;
- the machine is not standing next to sources of heat or in direct sunlight;
- the device is not exposed to any moisture.
Mains Connection
Insert the mains plug into a correctly installed 230 V \~, 50 Hz socket with earthing contact. Turn the machine on with the I/O switch (5). The mains control lamp (POWER) lights up and shows that the machine is on standby.
Cup Warmer/Cup Shelf
Insert the cup shelf (17) into the retaining mechanism.
Initial Use
Before using the device for the first time rinse the water tank (4) with clear water.
Preparing the Machine
Caution! Never point the steam or hot water jet at yourself or others! There is a danger of scalding from steam and hot water!
Filling in the coffee beans
Only coffee beans may be filled into the coffee bean container (2) in order to avoid damage to the device!
- Remove the lid of the coffee bean container (1).
- Fill in coffee beans (up to approximately 250 g).
- Please use fresh coffee beans. The most suitable type are espresso roasted beans.
- Close the lid of the coffee bean container.
Filling in the Coffee Powder
Note: Filling of the container is only intended for the preparation of one cup. Therefore only one level measuring spoon should be fi lled in.
- Open the lid of the coffee powder container (18).
- Fill in a small or large quantity of coffee powder to taste (max. one measuring spoon). Please do not use any soluble (instant) coffee powder.
- Close the lid of the coffee powder container.
Filling with Water
The decisive factor in the preparation of a good espresso coffee is not only the coffee mixture, the degree of grinding and the right water temperature, but also the quality of the water. We therefore advise you to use water that is deficient in lime, which will not only ensure that the coffee tastes good, but will also prevent scaling of the interior of the machine. The water tank (4) should be emptied daily and fi lled up with fresh water. Water which contains carbon dioxide (sparkling water) must not be used.
- Open the flap of the water container (3).
- Fill the container 3/4 full with cold drinking water (maximum 1.4 litres).
Note: If the water tank is overfi led the excess water comes out of the overflow and drains into the drip collector.
• Alternatively, you can also remove the water tank (4).
The machine does not work if the level in the water tank falls below the minimum. The word "Refill" appears in the display. First fi ll the tank with water.
Protection against Impurities of the Coffee Beans
Even the most carefully selected coffee beans may contain impurities such as small stones or dirt. If these reach the coffee grinding mechanism the mechanism is automatically blocked. Should this be the case, turn the device off using the I/O switch (5) and remove the mains plug.
Setting the Degree of Grinding
When it leaves the factory the machine has a preset degree of grinding which is suitable for the average properties of the most widely used coffee mixtures. If the coffee passes too quickly (too coarse) or too slowly (ground too finely) through the grinding mechanism, the degree of grinding can be adjusted.
In the case of coffee mixtures with special properties the degree of grinding can be corrected as follows:
- If the coffee comes out of the machine too slowly (in drips), a coarser degree of grinding must be set.
- Otherwise, if the coffee comes out too quickly and without the formation of any foam, a finer degree of grinding must be set.
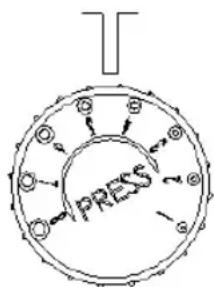
Using the rotating dial you can adjust the degree of grinding to eight different levels from 1 (very fine) to 8 (very coarse). The factory setting is suitable for most cases.
The fi ner the coffee is ground, the more intense is its taste. However, percolation then takes longer.
How to alter the setting:
- Remove the lid from the coffee bean container (1).
- The rotating dial for adjusting the degree of grinding is located on the left-hand front side of the coffee bean container.
• Make a cup of coffee using coffee beans. - With the coffee meal running, press the rotating head downwards and carry out the required adjustment.
The changed settings only become noticeable after the preparation of two to 3 cups of coffee.
Self-Test
flowchart
graph TD
    A["Start"] --> B["Arrow Up"]
    B --> C["Arrow Down"]
    C --> D["Arrow Left"]
    D --> E["Arrow Up"]
    E --> F["Arrow Up"]
    F --> G["Arrow Down"]
    G --> H["Arrow Left"]
    H --> I["Arrow Up"]
    I --> J["Arrow Down"]
    J --> K["Arrow Left"]
    K --> L["Arrow Up"]
    L --> M["Arrow Down"]
    M --> N["Arrow Left"]
    N --> O["Arrow Up"]
    O --> P["Arrow Down"]
    P --> Q["Arrow Left"]
    Q --> R["Arrow Up"]
    R --> S["Arrow Down"]
    S --> T["Arrow Left"]
    T --> U["Arrow Up"]
    U --> V["Arrow Down"]
    V --> W["Arrow Left"]
    W --> X["Arrow Up"]
    X --> Y["Arrow Down"]
    Y --> Z["Arrow Left"]
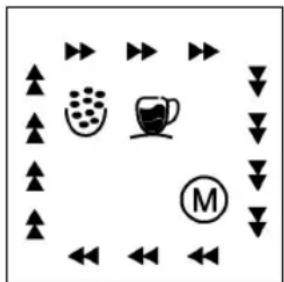
When the machine is switched on it automatically carries out a self-test. The MENU/OK/MEMORY button fl ashes. At the same time a cleaning cycle is performed, with the residual water (approx. 20-50ml) being rinsed out of the machine. When the MENU/OK/
MEMORY button lights up, the machine is ready for use. The adjacent symbols then appear in the display (16).
Preparing Coffee
- Position the coffee spout (13) at the right height.
- Place a coffee cup under the coffee spout. The machine must be in normal mode, as shown by the MENU/OK/MEMORY button lighting up. If the machine is in steam mode it has to be switched back to normal mode.
- Press the MENU/OK/MEMORY button, or the BACK button. You can then take over or change the following presets:
Coffee Beans/Coffee Powder
Press the ♂(←) button if you would like to switch between the “coffee beans” and “coffee powder” settings. If the “coffee powder” setting is selected the ♂(←) button lights up.
Normal Cup/Large Cup
Press this button ☐☒(+) if you would like to switch between the normal cup and large cup settings. The cup symbol in the display (16) changes.
Stored Aroma Setting/New Selection
- Press the MENU/OK/MEMORY button if you do not want to use the factory settings.
If the „M” symbol is not shown you can change the settings without storing them. For further information please see the section on “Programming Presets”.
One Cup/Two Cups
- Place one coffee cup under each of the two openings of the coffee spout (13). Select the filling quantity with the 📋 (+) button.
- Press the START button twice.
- Now 2 cup symbols are shown in the display, either “two normal cups” or “large cups”, depending on the pre-selection.
Stopping Percolation
In order to stop percolation, press the ☐ (+) button.
Automatic Rinsing
After 10 cups have been prepared the machine is automatically rinsed. This is shown by the buttons MENU/OK/MEMORY and START lighting up simultaneously. Please empty the drip collector (10) regularly.
Preparing Hot Water
Caution! Danger of scalding from steam and hot water! Never point the steam or hot water jet at yourself or others!
flowchart
graph TD
    A["Start"] --> B["Process Step 1"]
    B --> C["Process Step 2"]
    C --> D["Process Step 3"]
    D --> E["End"]
    style A fill:#f9f,stroke:#333
    style B fill:#ccf,stroke:#333
    style C fill:#cfc,stroke:#333
    style D fill:#fcc,stroke:#333
    style E fill:#ffc,stroke:#333
The device must be set to normal mode.
- Place a heat-resistant vessel under the hot water/steam nozzle (14).
- Turn the hot water/steam switch (9) carefully in an anticlockwise direction.
Hot water flows out of the hot water/steam nozzle. The further you turn the switch away from the OFF position in an anticlockwise direction, the greater the quantity of water that flows out.
- When the vessel is full, turn the hot water/steam switch (9) back to the OFF position.
Producing Steam and Foaming Milk
Caution! Never point the steam or hot water jet at yourself or others! There is a danger of scalding from steam and hot water!
Use the steam nozzle (14) to foam milk for cappuccino or heat up other drinks. If you would like to foam milk, fi ll a vessel one third full with cold milk. If you use low fat milk the foam you obtain will be more stable.
flowchart
graph TD
    A["↑"] --> B["→"]
    C["↑"] --> D["→"]
    E["↑"] --> F["→"]
    G["↓"] --> H["→"]
    I["↓"] --> J["→"]
    K["↓"] --> L["→"]
    M["←"] --> N["←"]
    O["←"] --> P["←"]
    Q["←"] --> R["←"]
    S["←"] --> T["←"]
    U["←"] --> V["←"]
    W["←"] --> X["←"]
    Y["←"] --> Z["←"]
-
Press the / BACK button. The device changes to the "steam" mode. Caution: Hot steam may be expelled from the machine.
• After a few seconds the water is heated up. The 🎨 / BACK button lights up. -
Place the cup or a heat-resistant glass under the hot water/steam nozzle (14).
- Turn the hot water/steam switch (9) carefully in an anticlockwise direction.
The further you turn the switch away from the OFF position in an anticlockwise direction, the greater the quantity of steam that is expelled.
- After the heating process turn the hot water/steam switch back to the OFF position.
In order to be able to make coffee again you must turn the machine back to the normal mode.
- Press the MENU/OK/MEMORY button or the BACK button.
The MENU/OK/MEMORY and 🎨 / BACK buttons flash of the same time. When the MENU/OK/MEMORY button is flashing you can make some coffee.
Programming Presets
If you would like to program presets you must change to the programming mode. You can set the following presets, fi lling quantity, pre-injection, percolation time and percolation temperature.
There are two ways to select the following menu item and change the presets:
One-Time Preset:
If you want to change the presets only for the next percolation process, but do not wish to store them, please proceed as follows:
natural_image
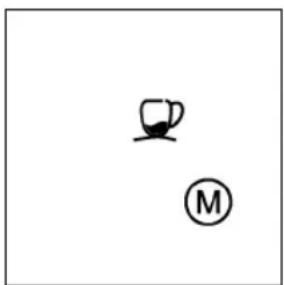
Simple line drawing of a coffee cup and a circle with letter M (no text or symbols)- Keep the MENU/OK/MEMORY button pressed down for fi ve seconds. In the display the "normal cup" and "M" fl ash. The arrowheads are no longer visible.
Note: By pressing the 📄 / BACK button once you reach the programming mode of the presets for the "large cup" (the symbols "large cup" and "M" flash in the display). Leave the menu by pressing the MENU/OK/MEMORY button repeatedly.
The machine switches back automatically to normal mode if no button is pressed for 10 seconds. Any changes you have made will not be stored.
- Now press the MENU/OK/MEMORY button for five seconds to reach the programming mode. Repeated pressing of the MENU/OK/MEMORY button will take to the individual presets. After you have made your adjustments you can leave the menu by pressing the / BACK button twice. The individual menu items for the one-time and for the programmed preset are explained in the section below.
Programming Presets:
If you want to store the changed presets please use the MENU/OK/MEMORY button. Repeated pressing of the MENU/OK/MEMORY button will take to the next setting option. Store the changes with the MENU/OK/MEMORY button.
Filling Quantity - Normal Cup
natural_image
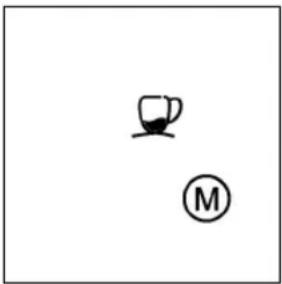
Simple line drawing of a coffee cup and a circle with letter M (no text or symbols)- Start the percolation process with the 📋(+) button when you have reached the desired fi lling quantity. Store the changes with the MENU/OK/MEMORY below.
The maximum fi lling quantity for the normal cup is 100 ml. The preset is a fi lling quantity of 40 ml when the stored or one-time selected setting is used.
Filling Quantity - Large Cup
natural_image
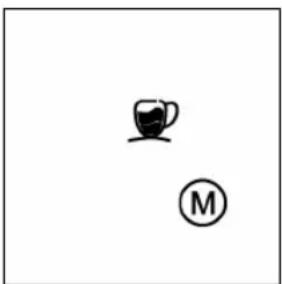
Simple line drawing of a glass mug and a circle with letter M (no text or symbols)- Stop the percolation process with the ☐ (+) button when the desired fi lling quantity has been reached. Store the changes with the MENU/OK/MEMORY button.
The maximum fi lling quantity for the large cup is 200 ml. The preset fi lling quantity is 100 ml when the saved or the one-time selected setting is used.
Coffee Quantity
natural_image
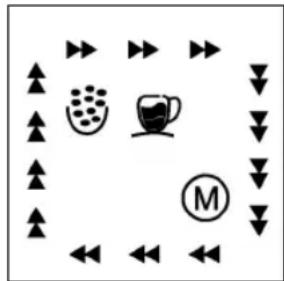
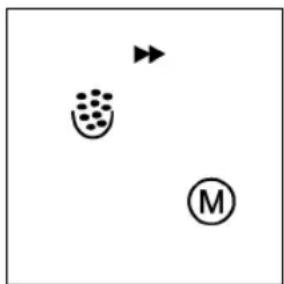
Simple diagram with two circular symbols: a dot pattern inside and a circle labeled M, with an arrow pointing to the dot (no text or labels)You can make your coffee with a small, normal or large quantity of coffee. The “normal” setting is shown in the display by 2 arrowheads in the middle. If the small quantity of coffee has been set the arrowheads are on the left, while in the large quantity coffee setting they are on the right.
- Call up the menu item „coffee quantity“. The coffee bean symbol fl ashes.
- Change the coffee quantity with the ∅ ⊕(−) or □ ⊕(+) button.
- Save the changes with the MENU/OK/MEMORY button.
Pre-Injection
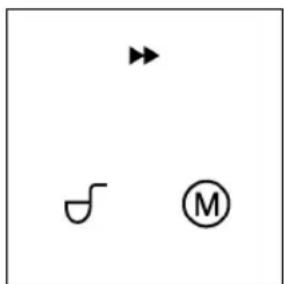
natural_image
Simple diagram with three symbols: a north arrow, a curved line with a circle, and a circled 'M' (no text or labels)Before percolation the coffee powder is moistened slightly and swells up. This allows the aroma to unfold better. You can select between a normal, small and large pre-injection quantity. The best setting depends on the sort of coffee being used, the degree of grinding and your personal taste. A larger pre-injection quantity should be selected for a fine degree of grinding. The “normal pre-injection quantity” setting is shown in the display by 2 arrowheads in the middle. In the “small pre-injection quantity” setting the arrowheads are on the left, while in the “large pre-injection quantity” setting they are on the right.
- Call up the menu item „pre-injection quantity“. The coffee powder symbol fl ashes.
- Change the pre-injection quantity with the ∅ ⊕(−) or □ ⊕(+) buttons.
- Save the changes with the MENU/OK/MEMORY button.
Percolation Time
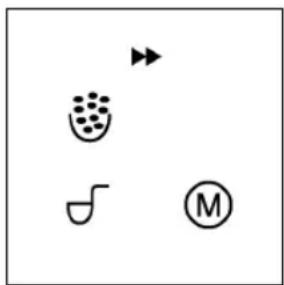
natural_image
Simple diagram with three symbols: a bowl with dots, a spoon, and a circle labeled M (no text or labels)You can choose between a normal, short or long percolation time. The “normal” setting is shown in the display by 2 arrowheads in the middle. In the “short percolation time” setting the arrowheads are on the left, while in the “long percolation time” setting they are on the right.
- Go to the „percolation time“ menu item. The coffee bean and the coffee powder symbols flash simultaneously.
- Change the percolation time with the ∅ ⊕(−) or □ ⊕(+) buttons.
- Save the changes with the MENU/OK/MEMORY button.
Percolation Temperature
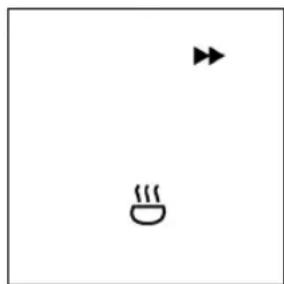
natural_image
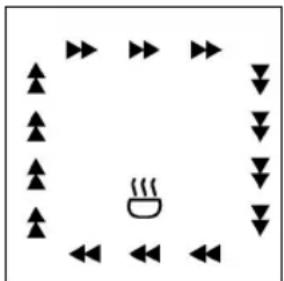
Simple diagram with two icons: a speedometer and an arrow, no text or symbols presentYou can choose between a normal, low and high percolation temperature. The “normal” setting is shown in the display by 2 arrowheads in the middle. In the “low percolation temperature” setting the arrowheads are on the left, while in the “high percolation temperature” setting they are on the right. The preset is “high”.
- Call up the „percolation temperature“ menu item. The steam symbol fl ashes.
- Change the percolation temperature with the ∫ ⊕(−) or □▽(+) buttons.
- Store the changes with the MENU/OK/MEMORY button.
Energy-Saving Mode
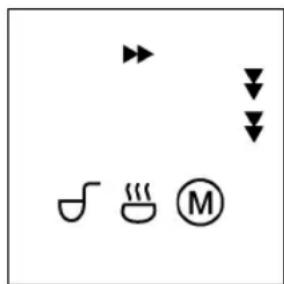
If the machine is not used for a certain period it switches to the energy-saving mode. This is shown by the "coffee powder" and the "steam" symbols fl ashing. In the energy-saving mode the cup shelf heating is switched off. The energy-saving mode is interrupted by pressing
any button. The fl ashing symbols go off. As soon as the MENU/OK/MEMORY button stops fl ashing the machine can be used again.
A period of between 15 minutes and 11 hours and 45 minutes can be set. The preset is 1 hour.
- Go to the „energy-saving mode“ menu item. The coffee powder and steam symbols flash.
- Press the ☑(+) button to increase the set time by 15 minutes in each case.
- Press the ⚙(→) button to reduce the set time by 15 minutes in each case. The set time is displayed by arrowhead pairs.
The horizontal arrows show the minutes. Press as follows:
pressing once = 15 minutes,
pressing twice = 30 minutes,
pressing three times = 45 minutes.
If you press a fourth time a vertical arrow appears in the display. The full hour has been reached. If you press the button again the „15 minute arrow“ reappears in the horizontal position, then the „30 minute arrow“ etc. in the example shown at the side a period of 2 1/2 hours would be set.
- Save the changes with the MENU/OK/MEMORY button.
Entering the Water Hardness
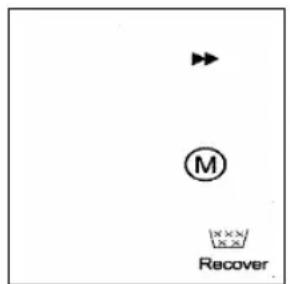
The time of descaling the machine is determined automatically from the water consumption and can be adapted to the water hardness in 3 steps. Please ask your local drinking water supplier about the degree of hardness of the water in your area.
- Go to the „setting the water hardness“ menu item.
• The „Recover“ symbol fl ashes.
- Press the 😊(-) button to reduce the degree of hardness.
- Press the ▼(+) button to increase the degree of hardness. The “normal” setting is shown in the display by two arrowheads in the middle. In the soft water setting the arrowheads are on the left, while in the hard water setting they are on the right. The preset is “high”.
- Save the changes with the MENU/OK/MEMORY button.
Total Number of Prepared Cups
You can call up the total number of prepared cups. To do so you have to change to the programming mode.
- Keep the MENU/OK/MEMORY button pressed down for fi ve seconds. In the display the symbols for "normal cup" and "M" fl ash. The arrowheads go off.
- Press the MENU/OK/MEMORY button until two coffee cup symbols flash simultaneously in the display.
The total number of prepared cups is shown by arrowhead pairs. Each of the arrowhead pairs on the edge of the display stands for 500 prepared cups.
Cleaning and Maintenance
Dismantling of the machine or working inside it is strictly forbidden.
If the machine is kept clean and well looked after it will produce coffee of an optimum quality and will have a long service life.
Caution! Do not allow any moisture to penetrate the housing. Otherwise there is a danger of an electric shock.
The fully automatic coffee machine should never be cleaned with aggressive, abrasive or caustic detergents which might attack the surface of the machine.
Before the machine is cleaned it must be switched off by the I/O mains switch (5) and the mains plug removed from the socket.
- Before cleaning the machine please wait until it has cooled down.
- Never immerse the machine in water or other liquids.
- Do not clean any of the machine parts in the dishwasher.
- The machine parts should always be dried by hand and never placed in a cooker or microwave oven to dry.
Cleaning the Exterior of the Machine
- Clean the exterior of the machine and the accessories with a damp soft cloth.
- The machine has an integrated rotating plate for easier handling and cleaning.
Cleaning the Water Tank
- Remove the water tank (4).
- Rinse out the water tank with fresh water.
- Reinstall the water tank.
Cleaning the Coffee Grinding Mechanism
Never fill the coffee bean container (2) with water. This may damage the machine!
Only the supplied brush should be used to clean the container. Water or other liquids must never be used. The coffee grinding mechanism does not require any servicing.
Hot Water/Steam Nozzle
The steam pipe and the Maxi cappuccino device should be cleaned after every use. In order to ensure that the Maxi cappuccino device is cleaned thoroughly it can be removed (pull downwards out of the steam pipe).
Rinse the Maxi cappuccino device thoroughly with warm water. Wipe the steam pipe off with a damp cloth.
Cleaning the Coffee Spout
The coffee spout (13) can be removed for cleaning. Press the coffee spout into the top position beforehand.
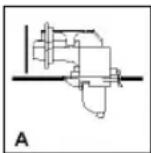
- Press on the clip to release the locking mechanism (A).
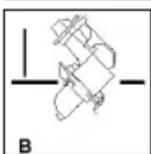
- Tilt the coffee spout towards the machine (B).
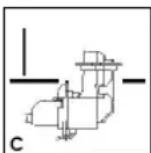
- Then remove the coffee spout by pulling it downwards (C).
- Rinse out the coffee spout with
hot water.
- Reinstall the coffee spout. Ensure that the seal is correctly positioned and that it is not damaged. Proceed according to steps A to C in the reverse order.
- Ensure that the clip locks into place. Otherwise the coffee spout is not correctly attached.
Cleaning the Brew Group
Before cleaning the device switch it to the „O“ position and then remove the mains plug (19) from the socket.
If the machine is used daily the brew group must be cleaned regularly, i.e. at least once a week. Only warm water should be used for cleaning.
- Allow the machine to cool down.
- Open the service door (6).
- Lift the brew group slightly and then carefully pull it out horizontally.
- Rinse the brew group thoroughly with warm water.
- Allow the brew group to dry.
- Clean the service chamber with a damp cloth.
- Reinstall the brew group horizontally until it locks in place.
- Close the service door.
Note: Only if the service door can be closed easily is the brew group correctly in position.
Removing/Inserting the Brew Group
A
natural_image
Line drawing of a hand inserting a device into a lock (no text or symbols)B
natural_image
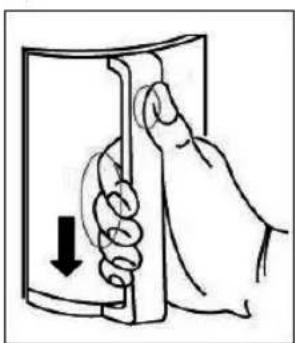
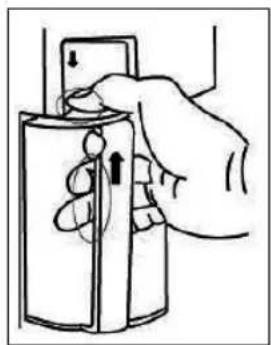
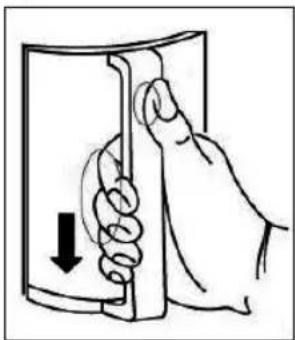
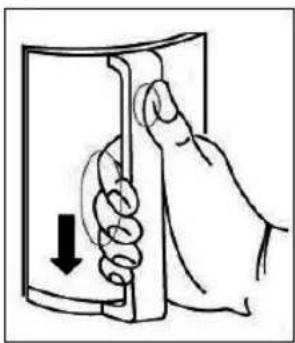
Illustration of a hand holding a device with a downward arrow indicating force or motion (no text or symbols)In order to remove the brew group please switch the machine off and open the service door (6). Grip the brew group by the handle (diagram A). Lift the brew group slightly and then remove it from the housing. To reinsert the brew group proceed in the reverse order (diagram B).
Cleaning the Filter Screens
Cleaning the Lower Filter Screen
A
natural_image
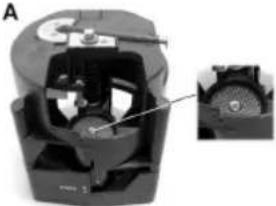
Cross-sectional view of a mechanical device showing internal components and a close-up inset (no text or symbols visible)If after a certain time the coffee comes out of the machine too slowly, or if no coffee comes out, this may be due to the fact that the coffee that has been used is too rich. In this case you should open the service door (6) and
remove the brew group. In diagram A the lower screen is clearly visible. The brush of the measuring spoon can be used to clean the screen. Any residues adhering to the screen can be removed by gently moving the brush. If the openings in the screen are still blocked you can remove the screen from its retaining device. In order to remove the screen please proceed as follows:
- Release the screw of the screen with an appropriate cool.
-
Remove the screen from its retaining mechanism.
-
Hold the fi Iter up to the light and check which fi Iter openings are blocked. Clean the openings with the point of a needle if necessary.
- Now replace the cleaned screen in its retaining mechanism.
- Reposition the screw and gently tighten it.
Cleaning the Upper Filter Screen
B
natural_image
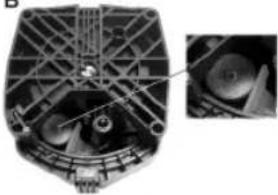
Technical illustration of a mechanical component with internal structure and close-up inset (no visible text or symbols)The upper screen becomes visible when the brew group is rotated - see diagram B. In order to clean the screen please proceed as described above. Please note that the upper screen is slightly offset and its removal requires a little dexterity.
Adjusting the Position of the Drive Shaft
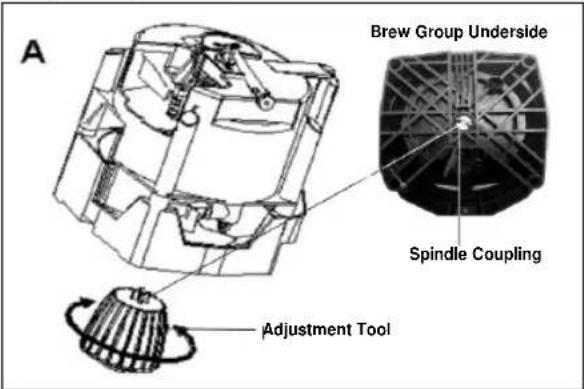
B
If it is not possible to close the service door (6), check whether the brew group has been correctly reinstalled.
Note: the drive shaft of the brew group must fit onto the drive shaft of the motor. Should this not be the case, please proceed as follows:
- Turn the machine off by the I/O switch (5). Open the service door (6).
- Remove the brew group from the service chamber and close the service door. Turn the machine on with the I/O switch.
- The drive shaft is now readjusted. This procedure lasts approximately 20 seconds.
-
Then open the service door and try to insert the brew group again.
-
When the brew group is correctly inserted, close the service door. Note: Only if the service door can be closed easily is the brew group correctly in position. Should this not be the case please proceed as described under points 7 to 11.
- Turn the machine off by the I/O switch (5) and then back on again. The machine is ready to use.
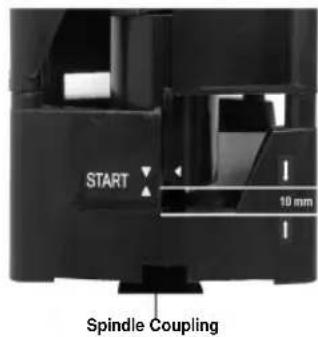
- If it is still not possible to insert the brew group, check whether it is in the correct starting position. This is the case if the distance of 10 mm (see diagram B) is maintained.
- Turn the brew group until you can see the coupling of the spindle (diagram A).
- Attach the upper section of the adjustment tool to the coupling of the spindle on the floor of the brew group.
- Twist the spindle until the distance of 10 mm (diagram B) is reached. Correct the direction of rotation if necessary. Ensure that the arrow of the brew group is located within the start marking.
- In order to turn the drive shaft on the floor of the service chamber, place the underside of the adjustment tool (socket wrench) on the drive shaft and turn it either slowly to the left or to the right.
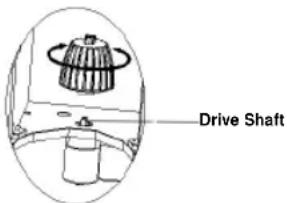
Note: It is essential that the coupling of the brew group meshes with the drive shaft on the floor of the service chamber.
Cleaning the Coffee Powder Container
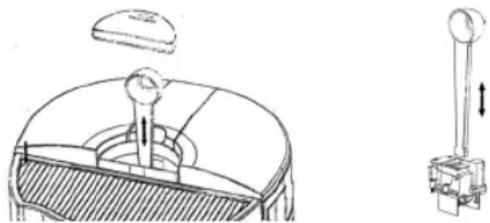
Open the service door (6) and remove the brew group. Then open the fllling hole (18). Please use the brush to clean the chamber (see diagram). Then remove the coffee residues from the service chamber.
Cleaning the Coffee Grounds Collector
- Remove the coffee grounds collector (8).
- Remove the coffee grounds.
- Clean the coffee grounds collector under running water.
- Reinstall the container.
natural_image
Technical line drawing of a mechanical component with no visible text or symbolsThe machine only works when the coffee grounds collector is correctly installed.
Emptying and Cleaning the Drip Collector
Empty and clean the drip collector (10) regularly, especially when it is full. This is shown by the red fllling level indicator (11) in the middle of the drip collector protruding upwards.
- Pull out the drip collector.
- Remove the drip collector cover (11).
- Clean the collector and the collector cover under running water.
- Reinstall the drip collector cover on the collector.
- Replace the drip collector.
Descaling
Important: Regular descaling protects the machine from expensive repairs. Damage resulting from a lack of regular cleaning, incorrect use or non-compliance with the instructions is not covered by the guarantee.
Descaling serves the purpose of removing all lime deposits from the surfaces and all openings through which water flows. This ensures that the valves, heating elements and other important components will work correctly.
In order to ensure that it functions correctly the machine must be descaled regularly.
Note: Please use a descaling agent for household equipment.
Please do not use any vinegar, but rather a commercially available descaling agent on a citric acid base. For the correct quantities please see the instructions.
It is possible to read off how much water has flowed through the machine before descaling. To this purpose it is necessary to switch to the programming mode.
- Keep the MENU/OK/MEMORY button pressed down for five seconds.
- Press the MENU/OK/MEMORY button repeatedly until the word "Refill" appears in the display.
- Count the arrowhead pairs. Each pair signifies 1/14 of the permitted water flow.
Note: If the hot water/steam switch (9) is opened under this menu item the descaling programme starts.
The device is equipped with an internal monitoring system which shows when the machine is switched on that the descaling procedure should be started. In this case the "Refill" and "Recover" symbols flash alternately in the display. The machine is still on standby.
In order to descale the machine, please proceed as follows:
- Place a vessel with a capacity of more than 1 l under the hot water/steam nozzle (14) (the drip collector (10) must be inserted).
- Fill the water tank (4) with the prepared descaling agent. Keep the MENU/OK/MEMORY button pressed for five seconds.
- Press the MENU/OK/MEMORY button repeatedly until the word "Refill" appears in the display.
- Start the descaling process by opening the hot water/steam switch (9).
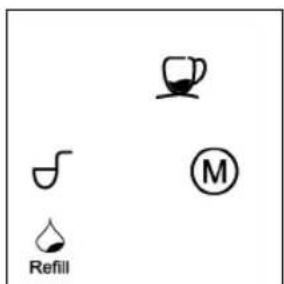
The adjacent symbols fl ash alternately in the display while the descaling programme runs at intervals.
While this programme is running the machine does not react when the buttons are pressed.
When the descaling process is finished the word "Refill" appears in the display.
- Empty the vessel with the used descaling solution - and also the drip collector if necessary - and replace it under the hot water/steam nozzle.
- Rinse out the water tank (4) thoroughly and fi ll it with fresh water.
The „Refill“ symbol flashes. A waiting period of 12 minutes follows. After the waiting time has expired the “Refill” and “Recover” symbols fl ash alternately. The water is expelled from the hot water/steam nozzle.
- Turn the hot water/steam switch to OFF when the water tank is empty.
The descaling process is fi nished. The machine is preheated and changes to the normal mode. Fill the water tank again with fresh tap water.
Troubleshooting
When one of the warning messages described above is displayed, the arrowheads in the display move in an anticlockwise direction.
| Warning Message | Cause | Remedy |
| Refillsymbol lights up | Too little water in the water tank (4). | Fill up with water. |
| Refillsymbol fl ashes | A problem with the water flow. | Switch off the machine for 30 minutes and then back on. |
| Check that the coffee outlet of the brew group is correctly in place (diagram B). | ||
| Warningsymbol lights up | You have pressed the hot water/steam switch (9) while the machine is making coffee or performing the self-test. | Turn the hot water/ steam switch back to the OFF position. |
| Warningsymbol lights up while “M” fl ashes | Loss of electro- nic data in the machine, but this does not cause any fault. | Press the START button. “Warning” goes off and “M” stops fl ashing. |
| Warningsymbol fl ashes | The brew group is not correctly inserted. | Check the correct position (see section on „Cleaning the Brew Group“) and restart the machine. |
| Recoversymbol lights up | The drip collector or coffee grounds collector is not correctly installed. | Ensure it is correctly positioned. |
| Recoversymbol fl ashes | You have prepared 10 cups. | Empty the coffee grounds container. |
ENGLISH
| Fault | Possible Causes | Remedy |
| When the main switch is pressed the machine does not turn on. | The machine has no power supply. | Check the socket with another device and insert the mains plug correctly. |
| The service door is open. | Please close the door. | |
| Percolation does not start. | Coffee grounds collector (8) is not correctly inserted. | Insert the coffee grounds collector correctly. |
| The water tank is empty. | Fill the water tank. | |
| The device is in steam extraction mode. | Turn the machine back to normal mode. | |
| The brew group is not correctly inserted. | Insert the brew group correctly (see section „Position of the Drive Shaft“). | |
| In the coffee preparation cycle the noise of the grinding mechanism becomes louder. | The coffee beans are used up. | Switch off the device and fi ll up the container (2). |
| No hot water/no steam | Hot water/steam nozzle (14) is blocked. | Unblock the opening with a thin needle. |
| No coffee comes out, but there is no error message in the display. | The water system has not been fi lled with the water from the tank. | Follow the instructions in the section on „Initial Use“ carefully. |
| No coffee comes out / the coffee only comes out slowly. | The coffee spout (13) is blocked. | Switch off the machine. Clean the coffee spout and the fi lter (diagram B) in accordance with the instructions in the section “Cleaning and Maintenance”. |
| The water sys-tem is blocked by lime. | Carry out descaling and cleaning. | |
| Degree of grin-ding too fi ne. | If the problem persists, set a coarser degree of grinding (see section „Set-ting the Degree of Grinding”). | |
| The heating time becomes longer, the warm water quantity smal-ler. | The device is furred up. | Start the descaling programme. |
| Fault | Possible Causes | Remedy |
| The coffee is not creamy enough. | The coffee mix-ture used is not suitable. | Try different coffee mixtures. |
| Degree of grin-ding too coarse. | Set to a fi ner de-gree of grinding. | |
| The milk is not foamed. | The milk is not suitable. | Check the fat content. Use low fat milk. |
| The brew group becomes stuck in the service chamber. | The start and end position of the brew group do not corres-pond to the start position of the drive shaft. | Switch the machine on and off at least fi ve times in a row.Before switching off each time allow the adjustment procedure of the machine to fi nish - loud clicking noises are normal. Before switching on again each time please check whether the brew group has come loose. |
Technical Data
Model: CB 2001 / CB 2002
Rated voltage/frequency: 230 V \~ 50 Hz
Power consumption: 1300 W
Protection class: I
Water tank: 1,4 l
Coffee bean container: 250 g
Coffee grounds container: 0,6 l
Dimensions
(W x H x D): approx. . 34,2 x 26,6 x 36,7 cm
Weight: approx. 9 kg
This device has been tested according to all relevant current CE guidelines, such as electromagnetic compatibility and low voltage directives, and has been constructed in accordance with the latest safety regulations.
Subject to technical changes without prior notice!
Guarantee
The device supplied by our Company is covered by a 24 month guarantee starting on the date of purchase (receipt).
During the life of the guarantee any fault of the device or its accessories *) ascribable to material or manufacturing defects will be eliminated free of charge by repairing or, at our discretion, by replacing it. The guarantee services do not entail an extension of the life of the guarantee nor do they give rise to any right to a new guarantee!
Proof of the guarantee is provided by the proof of purchase. Without proof of purchase no free replacement or repair will be carried out.
If you wish to make a claim under the guarantee please return the entire machine in the original packaging to your dealer together with the receipt.
*) Damage to accessories does not mean automatic free replacement of the whole machine. In such cases please contact our hotline. Broken glass or breakage of plastic parts are always subject to a charge.
Defects to consumables or parts subject to wearing (e.g. motor pistons, kneading blades, drive shafts, spare remote control, spare toothbrushes, saw blades, etc.) as well as cleaning, maintenance or the replacement of said parts are not covered by the guarantee and hence are to be paid!
The guarantee lapses in case of unauthorized tampering.
After the expiry of the guarantee
After the expiry of the guarantee repairs can be carried by the competent dealer or repair service against the payment of the ensuing costs.
natural_image
Simple line drawing of a coffee cup and a circle with letter M (no text or symbols)natural_image
Simple line drawing of a coffee cup and a circle with letter M (no text or symbols)natural_image
Simple line drawing of a glass mug and a circle with letter M (no text or symbols)natural_image
Simple diagram with three symbols: a dot pattern, an arrow pointing right, and a circle labeled M (no text or labels)natural_image
Simple diagram with three symbols: a curved line, a circle labeled 'M', and an arrow pointing upward (no text or labels)natural_image
Simple line icons including a smiley face, a drink with a leaf, and a megaphone (no text or symbols)natural_image
Simple diagram with two icons: a steaming cup and an arrow pointing right, no text or symbols present.natural_image
Hand holding a device with directional arrows indicating movement (no text or symbols)B
natural_image
Illustration of a hand holding a door handle with a downward arrow indicating force or movement (no text or symbols)natural_image
Cross-sectional diagram of a mechanical device showing internal components and a close-up view (no text or labels)natural_image
Mechanical component diagram showing internal structure and close-up view (no text or symbols)natural_image
Simple line drawing of a coffee cup and a circle with letter M (no text or symbols)natural_image
Simple line drawing of a coffee cup and a circle with letter M (no text or symbols)natural_image
Simple line drawing of a glass cup and a circle with letter M (no text or symbols)natural_image
Simple diagram with two circular symbols and an arrow, no text or labels presentnatural_image
Simple diagram with three symbols: a north arrow, a curved line with a circle labeled 'M', and a small figure (no text or labels)natural_image
Simple diagram with three icons: a bowl with dots, a spoon, and a circle labeled M (no text or symbols)natural_image
Simple diagram with a steaming cup and an arrow pointing right, no text or symbols presentnatural_image
Cross-sectional view of a mechanical device with internal components and a close-up inset showing a detail (no visible text or symbols)natural_image
Mechanical component diagram showing internal structure and a close-up inset (no text or symbols)natural_image
Technical diagram of a mechanical device with a cylindrical component and a vertical shaft, showing internal components without any text or symbols.- DEUTSCH
- Inhalt
- General Safety Instructions
- Special Safety Information
- Safety Symbols on the Device and in the Operating Instructions
- Overview of the Controls
- Diagram A / Machine
- Accessories not shown
- Diagram B / Brew Group
- Controls and Display
- Hot Water/Steam Switch (9)
- Installation
- Unpacking and Setting up the Machine
- Mains Connection
- Cup Warmer/Cup Shelf
- Initial Use
- Preparing the Machine
- Filling in the coffee beans
- Filling in the Coffee Powder
- Filling with Water
- Protection against Impurities of the Coffee Beans
- Setting the Degree of Grinding
- Preparing Coffee
- Coffee Beans/Coffee Powder
- Normal Cup/Large Cup
- Stored Aroma Setting/New Selection
- One Cup/Two Cups
- Stopping Percolation
- Automatic Rinsing
- Preparing Hot Water
- Producing Steam and Foaming Milk
- Programming Presets
- One-Time Preset:
- Programming Presets:
- Filling Quantity - Normal Cup
- Filling Quantity - Large Cup
- Entering the Water Hardness
- Total Number of Prepared Cups
- Cleaning and Maintenance
- Dismantling of the machine or working inside it is strictly forbidden.
- Caution! Do not allow any moisture to penetrate the housing. Otherwise there is a danger of an electric shock.
- Before the machine is cleaned it must be switched off by the I/O mains switch (5) and the mains plug removed from the socket.
- Cleaning the Exterior of the Machine
- Cleaning the Water Tank
- Cleaning the Coffee Grinding Mechanism
- Never fill the coffee bean container (2) with water. This may damage the machine!
- Hot Water/Steam Nozzle
- Cleaning the Coffee Spout
- Cleaning the Brew Group
- Cleaning the Filter Screens
- Cleaning the Coffee Powder Container
- Cleaning the Coffee Grounds Collector
- Emptying and Cleaning the Drip Collector
- Descaling
- Note: Please use a descaling agent for household equipment.
- Note: If the hot water/steam switch (9) is opened under this menu item the descaling programme starts.
- Troubleshooting
- Technical Data
- Guarantee
- After the expiry of the guarantee
Brand : BOMANN
Model : CB 2001
Category : Coffee maker