
CB 171 - Coffee maker BOMANN - Free user manual and instructions
Find the device manual for free CB 171 BOMANN in PDF.


| Brand | Bomann |
| Model | CB 171 |
| Product Type | Espresso and Cappuccino Maker |
| Capacity | 2 or 4 cups |
| Power Supply | 230 V, 50 Hz |
| Power Consumption | Approx. 850 W |
| Pressure System | Steam pressure boiler |
| Functions | Espresso brewing, steam frothing for cappuccino |
| Control | Rotary control knob (Off, Brew, Steam Release) |
| Filter Holder | Removable with filter basket and retainer |
| Carafe | Glass carafe with lid, marked levels (2-cup, 4-cup, steam) |
| Steam Nozzle | Metal, for milk frothing |
| Safety Features | Polarized plug, short cord, pressure release valve, automatic shut-off when turned off |
| Material | Plastic housing, metal boiler and brew head |
| Cleaning | Hand wash removable parts; wipe base with damp cloth; descale with vinegar periodically |
| Use | Household only, not for outdoor use |
| Includes | Espresso maker, carafe, filter basket, filter holder, drip tray, drip mat |
Frequently Asked Questions - CB 171 BOMANN
User questions about CB 171 BOMANN
0 question about this device. Answer the ones you know or ask your own.
Ask a new question about this device
Download the instructions for your Coffee maker in PDF format for free! Find your manual CB 171 - BOMANN and take your electronic device back in hand. On this page are published all the documents necessary for the use of your device. CB 171 by BOMANN.
USER MANUAL CB 171 BOMANN
ESPRESSOMASCHINE GB21243
BEDIENUNGSANLEITUNG OPERATING INSTRUCTIONS INSTRUCCIONES DE MANEJO
natural_image
Black-and-white illustration of a vintage scientific instrument resembling a spectrometer or optical instrument, with no visible text or symbols.CE
Delife Latino logo
natural_image
Black-and-white illustration of a vintage scientific instrument resembling a spectrometer or optical instrument, with no visible text or symbols.CE
Delife Latino logo
.IMPORTANT SAFEGUARDS
When using electrical appliances, basic safety precautions should always be followed, including the followings :
- Read all instructions carefully.
- When in use, this appliance is under pressure and should never be left unattended.
- Do not place on or near hot gas or electrical burners, or in a heated/microwave oven.
- To protect against risk of electrical shock, do not immerse the appliance, cord, or plug in water or other liquid.
- Do not touch hot surfaces. Use handles or knobs.
- Close supervision is necessary when any appliance is used by or near children.
- Turn the appliance OFF and unplug from outlet when not in use, before putting on or taking off parts and before cleaning. To disconnect, turn the appliance off, grasp plug, and pull it out from wall. Never yank on cord.
- Do not operate any appliance with a damaged cord or plug or after the appliance malfunctions or is dropped or damaged in any manner. Return the appliance to an authorized service facility for examination, repair, or electrical or mechanical adjustment.
- The use of attachments not recommended or provided by the appliance manufacturer may result in fire, electric shock or other personal injury.
10.Do not use outdoors. - Do not let cord hang over edge of table or counter or touch hot surfaces, including the stove.
- Never use this appliance without water.
- Never use warm or hot water to fill the water chamber. Use cold water only.
- Do not use the carafe on a range top. Do not set a hot carafe down on a wet or cold surface.
- Do not use a cracked or damaged carafe, or a carafe with a loose or weakened handle.
16.Do not use this appliance for other than intended use. - Please check the power cord for malfunction/damages.
SAVE THESE INSTRUCTIONS
NO USER MAINTENANCE
RETURN TO SERVICE STATION
HOUSEHOLD USE ONLY
SHORT CORD INSTRUCTIONS
A short power cord is provided to reduce the hazards resulting from entanglement or tripping over a longer cord. An extension cord may be used with care; however, be sure the marked electrical rating is at least as great as the rating of this appliance. The extension cord should be positioned such that it does not drape over the counter or tabletop where it can be pulled on by children or tripped over. The electrical rating of this appliance is listed on the bottom panel of the appliance.
This appliance has a polarized plug( one blade wider than the other). As a safety feature, this plug will fit in a polarized outlet only one way. If the plug does not fit fully in the outlet, reverse the plug. If it still does not fit, contact a qualified electrician. Do not attempt to defeat this safety feature.
Before Your First Use
Carefully unpack the Espresso/Cappuccino Maker. Remove all accessories and packaging materials. To remove any dust that may have accumulated during packaging, wash the carafe, carafe lid, filter basket, filter holder and drip tray with warm, soapy water. Do not use harsh or abrasive cleansers. You may wipe the base with a clean, damp cloth.
Caution : Do not immerse the base, cord or plug in water or other liquid.
Brewing espresso and cappuccino is different from brewing regular coffee. Both espresso and cappuccino are brewed by forcing boiling water through finely ground coffee; using pressure. Special attention is required, and we recommended that you read through all of the instructions included in this manual before brewing.
Note : We recommend that before you brew your first pot of espresso or cappuccino, you run a complete brewing cycle with cold water only, without any ground coffee. This will remove any dust that may have settled inside the espresso maker.
Important : Use only cold water for brewing-this brewing system has been designed to work only with cold water.
Caution : During and after use, the Boiler is under pressure.
Never unscrew/open the Boiler Cap or remove the Filter Holder while the espresso/cappuccino maker is in operation. Be sure to release all steam pressure from the Boiler before removing the Boiler Cap or Filter Holder( see step 13 in Making Espresso).
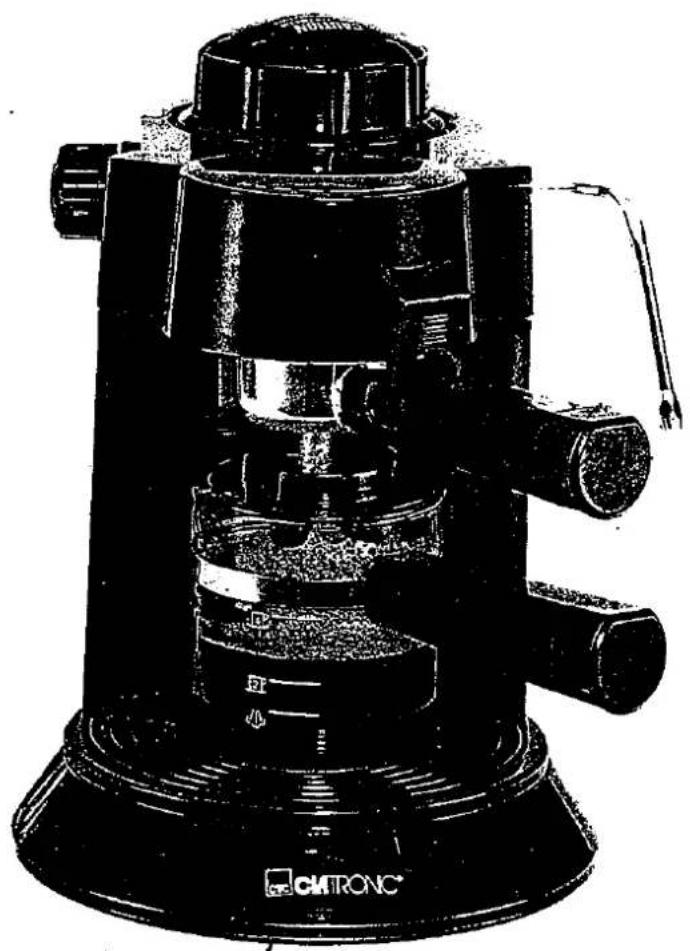
Knowing Your Espresso/Cappuccino Maker
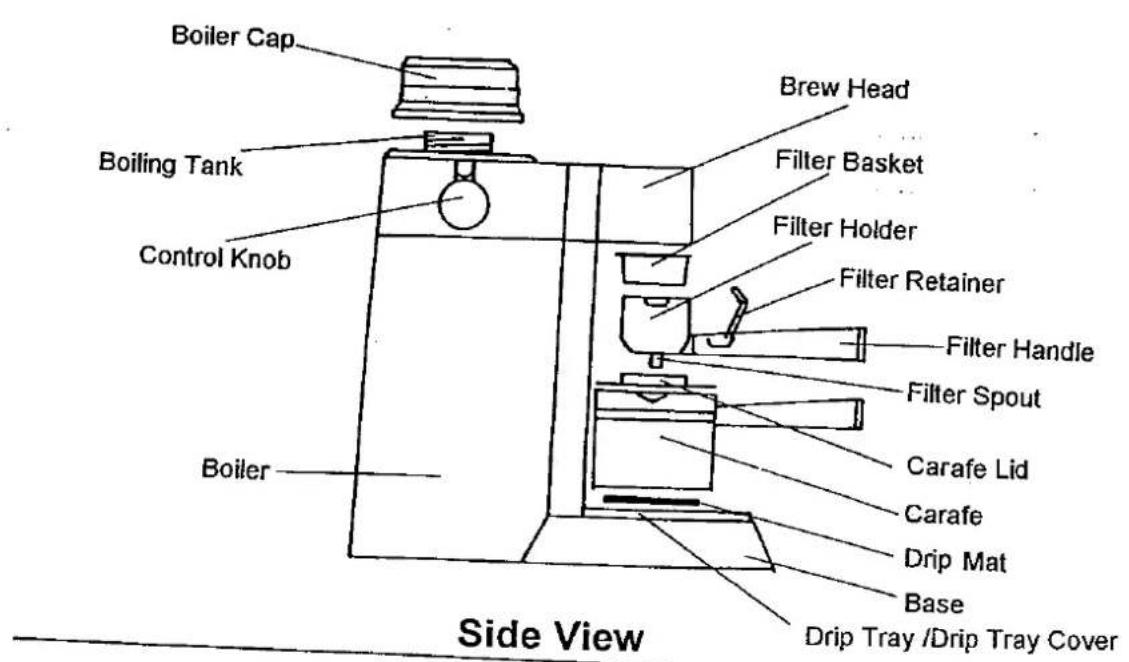
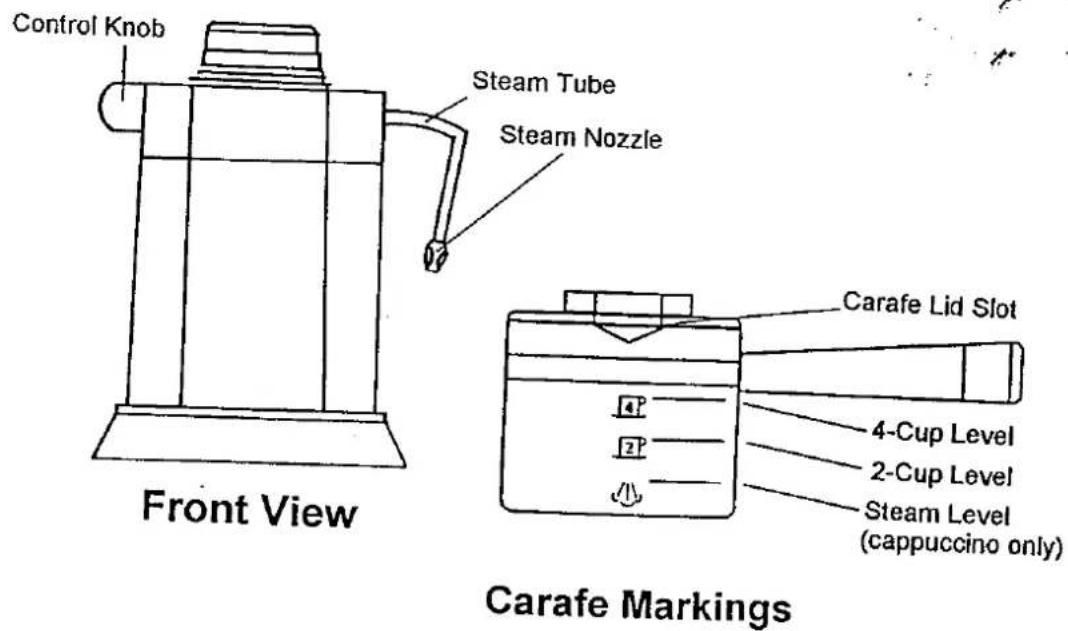
Makir
Espres pressu the he extract espres taste n
For best To do s Insert the preheat water r
Becaus (1/4-1/3 To prep
-
Place count cover
-
Be su unplu
-
To make brew in immer Release end of Import
Once I contro 4. Remov boiler, 5. Insert t backwa 6. Fill the filter ba cups of measur
Making Espresso
Espresso is a method of quickly extracting the heart of the coffee flavor under pressure in single servings. The secret of cafe-quality espresso is CREMA, the heart and soul of true espresso flavor. Crema is the foamy golden brown extraction that develops in the filter holder and encrusts the top of your espresso serving. It is visible, smooth and creamy, with a fresh, bittersweet taste not found in other types of coffee.
For best results, it is recommended to preheat the appliance and serving cup. To do so, insert the filter basket into the filter holder without adding any coffee. Insert the filter holder into the brew head. The espresso cup may also be preheated by placing the cup beneath the brew head. Let two or three cups of water run through( see the brewing procedures disclosed below).
Because espresso is so strong, a typical serving is only about 2-3 ounces (1/4-1/3 cup), the amount that a porcelain espresso cup generally holds. To prepare espresso :
- Place the espresso/cappuccino maker on a flat, level surface, such as countertop. Place the drip mat onto the round recess on the drip tray cover. Always use the appliance with the non-skid drip mat in place.
- Be sure the appliance is not plugged in at this time. If it is plugged in, unplug the appliance. Set the control knob to the OFF position.
- To make sure that there is no retaining steam pressure from previous brewings, place a container of cold water under the steam nozzle and immerse the steam nozzle in the water. Turn the control knob to the Steam Release position. The retaining steam will be released as bubbles at the end of the steam nozzle.
Important: Be sure to depressurize the appliance before proceeding with each brewing cycle.
Once the bubbling stops, the pressure has been fully released. Turn the control knob to the OFF position.
-
Remove the boiler cap and the filter holder. If there is any water in the boiler, invert the appliance and pour the water out.
-
Insert the filter basket into the filter holder. Swing the filter retainer backward so that it is away from the filter basket.
-
Fill the filter basket to the desired level( level indicator marked inside the filter basket) with ground espresso coffee. You may make either 2 or 4 cups of espresso. Spread the coffee evenly and press down lightly with a measuring/pressing spoon.
Important: The purpose of tamping is to level the grounds in the filter basket rather than pack the grounds, and a flat surface tamper is recommended. Overpacking will block the flow of water and may damage the appliance or cause injury. Carefully remove any coffee residue from the brim of the filter.
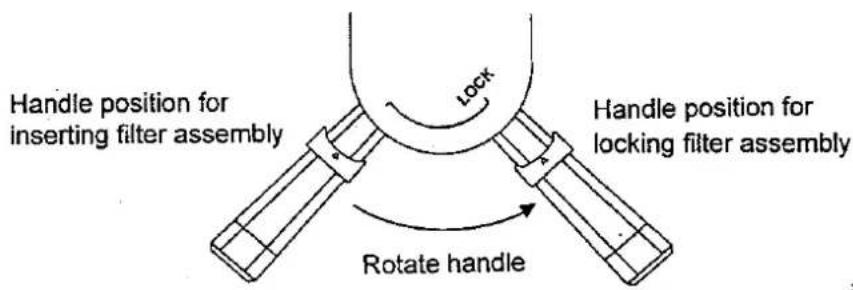
- Line up the filter holder's handle with the left end of the locking arc printed on the top of the espresso/cappuccino maker(see figure below). Insert the filter holder into the brew head and turn the handle to the right to lock it in place. Until the handle has reached the LOCK position, visually inspect the filter holder to be sure that it is seated properly in the brew head to avoid splattering hot coffee.
- Fill the carafe with cold water to the desired cup level. Pour this water into the boiler.
Important: Always use cold water only—the brewing system has been designed to work only with cold water.
- Replace the boiler cap on the appliance and close it securely.
Important: This appliance is operated under pressure--so before proceeding, make sure that the boiler cap and filter holder are both properly and securely closed or locked in place.
-
Put the carafe lid on the carafe and place the carafe under the filter spout, position the carafe such that the filter spout slides into the carafe lid's slot.
-
Plug the appliance into a 230V, 50Hz AC outlet only. Turn the control knob to the Brew position. The pilot light will illuminate to indicate that the machine is in operation. After about 3 minutes, espresso will start flowing into the carafe.
12 When brewing is completed, turn the control knob to the OFF position. Remove the carafe and empty the freshly brewed espresso into an espresso cup.
13: Be sure to release any retaining steam pressure from the boiler before starting another brewing cycle or before cleaning. Place a container of cold water under the steam nozzle and immerse the steam nozzle into the water. Turn the control knob to the Steam Release position. The retaining steam will be released as bubbles at the end of the steam nozzle. Once the bubbling stops, the pressure has been fully released. Turn the control knob to the OFF position.
Caution: Be sure to release steam from the boiler before proceeding with each brewing cycle.
- After brewing, wait a few seconds before detaching the filter holder by turning the handle from right to left. To remove the used coffee grounds, swing the filter retainer forward to hold the filter basket in position, then turn the filter holder upside down and tap out the used coffee grounds. Remove the filter holder after making espresso in order to prolong the service life of the rubber seal in the brew head. Be carefully not to touch any exposed metal part as the metal parts are extremely hot and may cause injury.
Making Cappuccino
Cappuccino is a mixture of equal parts of espresso coffee, steamed milk, and frothed milk. For best results, use only fresh, cold milk( the colder the better) with a small, deep, narrow pitcher( about 1 cup capacity) for frothing. A steel pitcher is best because it allows you to feel the temperature of the milk as it is heated.
During the frothing process, the milk should double in volume, so do not overfill the pitcher with milk. After frothing, the top half of the pitcher will contain frothed milk, while the bottom half will contain warmed milk. Do not overheat the milk because this can break down the froth.
To prepare cappuccino, follow steps 1-7 for making espresso, then continue as directed below. Important: Be sure to release steam pressure from the boiler before proceeding with any brewing cycle.
-
Fill the carafe with cold water to the desired cup level. Pour the water into the boiler. Fill the carafe with cold water again to the steam level. Pour this additional water into the boiler. This additional water is for producing the steam needed for milk frothing. Important: Always use cold water only:
-
Replace the boiler cap on the appliance and close it securely.
Important: This appliance is operated under pressure--so before proceeding, make sure that the boiler cap and filter holder are both properly and securely closed or locked in place.
-
Put the carafe lid on the carafe, then place the carafe under the filter spout, position the carafe such that the filter spout slides into the carafe lid's slot.
-
Fill a deep, narrow, heat-resistant 1-cup pitcher half full with fresh, cold milk. If you do not have such a pitcher, use other heat-resistant receptacle. A chilled receptacle will help the frothing process.
-
Plug the appliance into a 230V, 50Hz AC-only outlet. Turn the control knob to the Brew position. The pilot light will illuminate to indicate that the machine is in operation. After about 3 minutes, boiling water will begin passing through the ground coffee and flow into the carafe.
-
When the coffee in the carafe has reached the steam level, turn the control knob to the OFF position. This will stop the brewing process temporarily.
-
Position the milk pitcher beneath the steam nozzle. Raise the pitcher until the steam nozzle is dipped about 1/4 inch into the milk. Turn the control knob slowly to the Steam Release position. As you are turning the control knob, steam will begin to escape through the steam nozzle to froth the milk. By keeping the tip of the steam nozzle just below the surface of the milk, move the pitcher in a circular motion. As the milk increases in volume, lower the tip of the steam nozzle so that it is in the milk instead of in the froth.
Continue the frothing process for about 45 to 90 seconds, depending on personal taste or until the milk doubles in volume. Be careful not to overheat or scald the milk which will ruin the froth.
Do not immerse the steam nozzle more than 1/2 inch into the milk. For proper frothing, a hissing sound should be produced, not a bubbling sound.
After completing the frothing, turn the control knob back to the Brew position. This will restart the brewing cycle.
- When the brewing is completed, turn the control knob to the OFF position. Remove the carafe. Pour about 2 ounces of espresso into each cappuccino cup or standard coffee mug. Spoon the foam into the cup containing the espresso coffee. Add the liquid milk. A cappuccino is 1/3 coffee, 1/3 hot milk and 1/3 foamed milk.
1€
17
18
Mi
- Be sure to release the steam pressure from the boiler before starting another brewing cycle or before cleaning. Place a container of cold water under the steam nozzle and immerse the steam nozzle in the water. Turn the control knob to the Steam Release position. The retaining steam will be released as bubbles at the end of the steam nozzle.
Important: Be sure to release steam from the boiler before proceeding with each brewing cycle.
Once the bubbling stops, the pressure has been fully released. Turn the control knob to the OFF position.
-
After brewing, wait a few seconds before detaching the filter holder by turning the handle from right to left. To remove the used coffee grounds, swing the filter retainer forward to hold the filter basket in position, then turn the filter holder upside down and tap out the used coffee grounds. Remove the filter holder after making espresso in order to prolong the service life of the rubber seal in the brew head. Be carefully not to touch any exposed metal part as the metal parts are extremely hot and may cause injury.
-
Wipe off the accumulated milk from the steam nozzle with a clean, damp cloth after each use. Once the milk hardens it becomes difficult to remove. Soak the steam nozzle in a pitcher of water overnight to remove hardened milk, or "froth" hot water to soften the milk coating. If this doesn't work, insert a needle into the hole to clear any blockage. And if this still does not improve the performance or if the appliance begins to sputter, may be there are mineral deposits buildup in the appliance. Follow the methods disclosed below to remove the mineral deposits from the appliance.
Mineral Deposits
Calcium and other minerals buildup can occur in espresso/cappuccino makers. This buildup is caused by minerals normally found in almost all water. Periodically, you will need to remove any deposits that may form in the appliance. You will know when the espresso/cappuccino maker requires decalcifying when you notice an obvious increase in brewing time and/or frequent clogging of the steam nozzle.
To correct this, mix 2 tablespoons of white vinegar in a full carafe of water. Pour the mixture into the boiler. Place the empty carafe and filter holder in place. Screw the boiler cap back into place. Make sure that both the boiler cap and filter holder are properly and securely closed or locked in place. Plug the appliance into a 230V 50Hz AC only outlet and turn the control knob to the Brew position. Allow the appliance to run a complete brewing cycle. Empty the carafe and rinse it out in clean, warm water. Refill the boiler with
cold water( make sure to release steam pressure from the boiler before unscrewing the boiler cap or removing the filter holder) and run 1 or 2 brewing cycles, or until there is no more smell of vinegar.
Helpful Hints
• The use of filtered or bottled water is strongly recommended to improve the taste of your espresso and reduce calcification in your machine. Distilled water should not be used because it is flat and tasteless.
- Since retention of heat preserves flavor, serving espresso and cappuccino in pre-heated cups is strongly recommended.
- Remember that when making cappuccino, some of the water will be used for producing steam. Take the following as a guideline for filling the boiler with proper amount of water: For 2 cups of cappuccino, use 6 ounces of water; for 4 cups, use 12 ounces of water. As a useful measuring guide, the carafe will hold 12 ounces of water when filled to the bottom of its spout.
• One of the secrets for frothing milk is proper technique, which can be acquired only through practice. The other is to have enough steam to finish the frothing. It is better to add a little more water than necessary to ensure that you will have enough steam.
- If the time required to make the coffee is longer (i.e. if the coffee flows slowly from the brew head), the coffee may be ground too finely; alternatively, too much coffee has been used, or the coffee has been pressed down too hard.
- If the time required to make the coffee is shorter(i.e. If the coffee flows quickly from the brew head), the coffee may be ground too coarse or an insufficient quantity of coffee has been used or the coffee has not been firmly pressed.
- If you prefer in a thicker" foam " to your milk, let the frothed milk stand for 30 to 60 seconds before adding it to the coffee.
- If you would like to add a liqueur to the espresso, do so before adding any milk.
- If the boiler cap is difficult to remove, there may be some residual steam pressure in the appliance. Release the steam by the afore-mentioned procedure.
- Lubricate the gasket in the boiler opening and filter holder periodically with vegetable oil.
• To maintain the seal between the filter holder and brew head, do not store the filter holder in the brew head when the machine is not in use. This may deform the brew head gasket.
Care and cleaning
Be sure the appliance is unplugged and has cooled before any cleaning. Wipe the appliance with a clean, damp cloth. Do not immerse the appliance, cord or plug in water or other liquid. Wash the filter basket, filter holder, carafe, carafe lid, boiler cap and drip tray/mat in warm, soapy water. Do not put any part or parts into the dishwasher. It is very important to keep the steam nozzle clear and clean. After removing the steam nozzle from the milk, allow steam to escape for an additional 2 to 3 seconds, then turn the control knob to OFF and wipe the steam nozzle with a clean, damp cloth.
Caution : Metal Steam Nozzle will be hot.
Brand : BOMANN
Model : CB 171
Category : Coffee maker