
CTV 792 - Portable DVD Player CLATRONIC - Free user manual and instructions
Find the device manual for free CTV 792 CLATRONIC in PDF.

| Product Type | Portable DVD Player |
| Brand | Clatronic |
| Model | CTV 792 |
| Screen Size | 7 inches (estimated) |
| Dimensions (L x W x H) | 20 x 15 x 3 cm (estimated) |
| Weight | Approximately 1.2 kg |
| Power Supply | AC adapter (100-240V) and rechargeable battery |
| Battery Type | Lithium-ion (built-in) |
| Playable Discs | DVD, DVD±R/RW, CD, CD-R/RW, MP3, JPEG |
| Video Output | Composite AV out (RCA) |
| Audio Output | Headphone jack, built-in speakers |
| Region Code | Region 2 (estimated, check device) |
| Remote Control | Included (infrared) |
| Supported Languages | English, German (estimated) |
| Care Instructions | Wipe with a dry soft cloth; avoid liquids and direct sunlight |
| Safety Features | Overcharge protection; auto power-off when idle |
| Spare Parts Availability | Contact Clatronic service center for battery and adapter |
| Warranty | 2 years (estimated) |
Frequently Asked Questions - CTV 792 CLATRONIC
User questions about CTV 792 CLATRONIC
0 question about this device. Answer the ones you know or ask your own.
Ask a new question about this device
Download the instructions for your Portable DVD Player in PDF format for free! Find your manual CTV 792 - CLATRONIC and take your electronic device back in hand. On this page are published all the documents necessary for the use of your device. CTV 792 by CLATRONIC.
USER MANUAL CTV 792 CLATRONIC
1 GOTO: For direct accessing of a section on the CD/DVD.
2 POWER: To activate standby mode.
3 Numerical buttons: For direct selection of chapter or song number. For selecting the channel numbers directly in DVB-T mode.
4 ANGLE/TTX: To select the viewing angle. For switching on/off teletext in DVB-T mode.
5 SUBTITLE: To show/hide subtitles.
6 TITLE: Display the title menu of the DVD.
7 ENTER: Confir rm the input.
8 Cursor buttons: Navigation in screen menu. For switching through the stored channels in DVB-T mode.
9 SETUP: To start the setup menu.
10 TV/RADIO: For switching between TV and radio mode (if available) in DVB-T mode.
11 REPEAT/DEL: To repeat title, chapters, etc. For deleting channels in DVB-T mode.
12 PRO/EPG: Calling up the play list. For calling up the EPG function in DVB-T mode.
13 DISPLAY: To display the play status on screen. For displaying the current channel slot, as well as the date, time and audio in DVB-T mode. Press the button again to display the signal strength
and signal quality. Pressing again hides the information.
14 MUTE: To switch of the sound.
15 SOURCE: For selecting between DVD/USB/CARD and DVB-T.
16 10+: For selecting the chapters/tracks above 9. Pressing again increases by a further 10.
17 STEP: To freeze the picture. Press the „ II“ button to continue the fi lm.
18 AUDIO: To change the Audio settings.
19 PBC/SCAN: To show the Playback-Control for VCD. For activating the channel search in DVB-T mode.
20 , “: Stop play.
21 „ II“: Start playback. To freeze the picture. Press the „ II“ button to continue the film.
22 MODE: For setting the picture parameters of the LCD display.
23 ZOOM: To zoom in or out.
24 MENU: To display the main menu of the DVD/VCD.
25 I : To return to the previous chapter or song.
26 I: To jump to the next chapter or song.
27 /PROT: Fast forward. For protecting channels in DVB-T mode.
28 /FAV: Fast reverse. For administering the favourites in DVB-T mode.
Technical Data
Type of equipment LCD Television Set/
DVD Player with DVB-T Receiver
ModelCTV 792 DVB-T/DVD
Voltage DC 9V, 2A
Output 15 W
Dimensions (W x H x D) 260 x 29.6 x 182 mm
Weight 1.43 kg
Laser Semiconductor laser
Signal format PAL/NTSC
Signal noise distance >= 80 dB
Video output 1.0 V (P-P) 75 Ω
Analogue Audio output 1.4 V (rms)
Operating environment 0°C bis 40°C, level base
Compatible media ■ DVD-Video (DVD Disc, DVD ±R/RW)
MPEG-4 Video (von CD/DVD Disc, DVD±R/RW, CD-R/RW)
Audio CD (von CD Disc, CD-R/RW)
Video CD (von CD Disc, CD-R/RW)
MP3 files (von CD/DVD Disc, DVD±R/RW, CD-R/RW)
Regional 2 (= Europe, Greenland, South Africa, Egypt and Middle East, Japan)
©
Many thanks!
We are pleased that you have decided to purchase the CTV 792 DVB-T/DVD LCD television set/DVD player with DVB-T receiver! We would like to wish you much joy with your machine and thank you for your purchase!
Symbols in this operating manual
Important instructions for your safety are especially marked. You must follow these instructions to avoid accidents and damage to the machine:
WARNING:
Warns against dangers to your health and indicates potential risks of injury.
ATTENTION:
Indicates potential hazards for the player or other objects.
NOTE: Highlights tips and information for you.
Manufacturer address
Clatronic International GmbH
Industriering Ost 40
D-47906 Kempen
We reserve the right to make technical and design-related changes in the course of ongoing product improvements.
Operating manual
Children
Power supply
Laser
Safety instructions
Read the complete operating manual before using the player.
Keep the manual in a safe place. If you pass the player on to a third party, pass on the operating manual as well.
Non-compliance with this manual can lead to severe injuries or damage to the machine.
We assume no liability for damage caused as a result of non-compliance with this operating manual.
The player may only be used in households for private use. It is not suitable for commercial use.
Do not leave the machine unattended, and do not use it if children or persons who cannot assess the risk are nearby.
Children or persons who cannot assess the risks are not allowed to use the player. Keep the player out of reach.
Packaging material must not be used to play with. There is a risk of suffocation.
The machine is operated with electrical current, which means there is in principle a risk of electric shock. For this reason, pay particular attention to the following:
- Never touch the plug with wet hands.
If you want to pull the plug out of the plug socket, always pull directly on the plug. Never pull on the cable as it could tear.
Make sure that the power cable is not bent, caught or run over and that it does not come into contact with heat sources.
Make sure that the power cable is not wound around the device while in operation.
- Never place the machine on the power cable while it is being operated.
Only use extension cables that are designed for the power consumption level of the machine.
- Keep the appliance away from rain and any moisture.
Only operate the machine if the electrical voltage stated on the type plate beneath the machine agrees with the voltage on your plug socket. The wrong voltage can destroy the machine.
Do not stand vases etc. on the appliance. Water could seep into the appliance.
Do not open the appliance.
Pull out the mains plug if the appliance is not to be used over a longer period of time.
Take care that nobody can trip over the power supply cable.
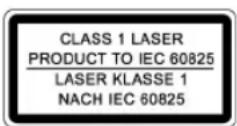
This appliance is classified as laser appliance of class 1 (CLASS 1 LASER). The associated label is attached to the outside of the appliance.
Laser beams can damage the eyes. Therefore observe the following:
Do not open the appliance. Do not attempt to dismantle the appliance.
In order to avoid any danger: Have service work only carried out by the manufacturer or an authorized service workshop.
Where to position the appliance
Safe operation of the appliance presupposes that it is positioned in an appropriate place. Therefore observe the following:
- Protect the appliance against the influence of weather. Never use it in the open-air.
- Protect the appliance against moisture.
Do not place liquid filled vessels, e.g. vases, on the device.
Never place the appliance on or in direct vicinity of heat sources, such as e.g. hobs, ovens, etc.
Do not expose the appliance to direct sunlight.
Place the appliance so that a sufficient air supply is assured. This is to avoid a build up of heat inside the appliance. Make sure that the ventilation slots are not blocked. - Protect the appliance against the mechanical vibrations.
Always place the device on a firm, even base. - Protect the remote control against weather influences, moisture and high temperatures (e.g. by direct sunlight).
Operation
The player is able to show a still image on the TV-screen/monitor over an unlimited period of time. This can cause damage to the screen. It is therefore advisable to activate the screen saver
⇒ Page 57, „System settings“.
Do not increase the volume when the player is just playing very quiet sections. This could damage the speaker if very loud passages start all of a sudden after the quiet section.
Do not move the player with a DVD inserted. This could damage the DVD.
Do not put your hands into the DVD-slot. You could be injured.
Place only DVDs or CDs on the DVD-tray, as otherwise the player may be damaged.
Switch the player off by the On/Off-switch if it is not going to be used for a longer period of time.
Please disconnect the mains plug during thunderstorms.
Intended use
The device is intended exclusively for the following tasks:
Playing of Video DVD/Video CD.
Playing of Audio-CD,
■ Reception of digital terrestrial channels (DVB-T).
Any other use is considered non-intended use and is prohibited.
Defect
If the machine should become defective at some point:
If the power supply cable for this appliance is damaged, it must be replaced by the manufacturer or his customer services, in order to avoid hazards.
Should fluid have seeped into the player or if the player has been dropped down or damaged in any other way, the player must be examined by an authorized dealer. Disconnect the player from the power supply and consult an authorized dealer.
©
Effective range of the remote control
If you want to use the remote control it has to be pointed at the remote control sensor on the front of the device. The distance between remote control and sensor should not exceed 5m. The angle of the remote control to the remote control sensor to right, left, top and bottom should not exceed 30°.
Power Supply
A. With the alternating current adapter
The alternating current adapter works with alternating current of between 100 V and 240 V, but
In Europe the mains lead (supplied) may only be connected to an alternating current power source of 230-240 V.
When connecting to an alternating current source outside Europe a plug adapter must be used that conforms to the socket.
ATTENTION:
The supplied mains lead and alternating current adapter should only be used for this device. Do not use it with other equipment.
If the device is not going to be used for a prolonged period the mains lead must be removed from the power socket.
B. With the adapter for the cigarette lighter
The cigarette lighter adapter is used in vehicles that have a 12 V power supply with negative earth.
Precautionary Measures:
This device may only be used with the original vehicle adapter, as a different adapter can damage the device.
The original vehicle adapter may only be used for this device. Do not use it for other equipment.
While you are driving the vehicle it is forbidden to adjust the device or watch videos and CDs.
Please ensure that the device is firmly installed and cannot fall inside the vehicle in the case of an accident.
If the cigarette lighter is dirty, poor conductivity will make the connection hot. Please ensure that the adapter is only inserted into a clean cigarette lighter connection.
After use the adapter should be removed from the device and from the cigarette lighter socket.
C. With the rechargeable battery
Charge up the battery before initial use.
The rechargeable battery is intended for portable use and for the viewing of DVDs out of doors.
Recharging the Battery
- Remove the rechargeable battery from the device (if it is currently being used).
- Insert the cable of the alternating current adapter into the DC IN 9V socket on the right-hand side of the battery.
©
Connection to Other Equipment
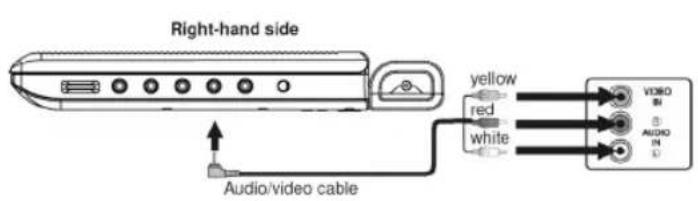
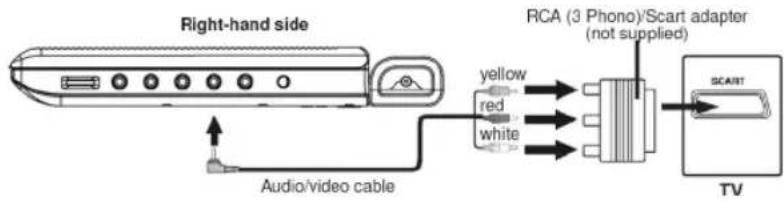
Connection to a television set (AV OUT Fig. 1/4)
If the television set has audio/video inputs.
ENSOLID
If the television set has a Scart connection.
Playback of a DVD on the Television Set
- Turn on the DVD player by the POWER ON/OFF switch.
- Turn on the television set and follow the instructions supplied with the television set.
i NOTE:
Please ensure that the correct audio/video cable is used as the wrong cable will produce a weak signal.
DVDs are copy-protected and cannot be copied. If a DVD is copied onto a video cassette you will see a blurred picture with poor sound quality. This is NOT the fault of the device!
-
If you use a set of headphones you should use one with a 3.5 mm stereo jack, which should be inserted into headphone socket (1 or 2).
-
With the VOL volume control (Fig. 1/7) you can set the desired volume.
WARNING:
Make sure that the volume of your headphones or earphones is not too high, as otherwise this may damage your ears and you may endanger yourself or others.
In order not to disturb those around you the volume should be set to a low level.
If you suffer from tinnitus you should turn the volume down low or refrain from using this device.
Ear doctors recommend that earphones should not be used continuously over a prolonged period.
Use of ear/headphones (Fig. 1/6)
©
Inputs on the side of the device
USB Input (on the left-hand side of the device) (Fig. 1/23)
Insert a USB storage medium into the corresponding socket on the left-hand side of the device.
Memory Card Slot (on the left-hand side of the device) (Fig. 1/24)
Insert an MMC/SD or MS storage card into the card slot on the left-hand side of the device.
Switching on the player (Abb. 1/22)
Turn on the main switch of the DVD player by moving the „POWER ON/OFF“ switch on the left-hand side of the device to the „ON“ position.
About the DVD-Player
With this DVD-Player you can play a vast variety of DVD-formats Page 39, "Technical data".
However, you must be aware that in many cases DVDs are encrypted with a so-called “Regional Code”. This specifies for which region in the world the DVD is intended. As an example, the DVDs marked with regional code “1” are intended for the USA and Canada. DVDs with regional code “2” are for use in Europe.
i NOTE:
With your DVD-Player you can only play DVDs with regional code "2". There are both lots of burning and compressing methods as well as high quality differences in (burned) CDs/DVDs. Moreover, the music industry has not yet agreed on a fixed standard for copy protection. This may, in very isolated cases, result in problems when relaying CDs, DVDs and MP3 CDs. This is no malfunction of the player.
Furthermore, there may be isolated problems when playing CDs or DVDs which were created on a PC (e.g. holiday photographs). In case of problems check the settings of the DVD writing program on your computer. You should in particular make sure that the DVD has been finalized. For further information on this matter please refer to the operating manual of your recorder.

Terminology
Input Not Possible
If a function or input selected by you is not possible, the adjacent symbol is shown on the screen.
Track: "Track" is the designation for sections on an Audio-CD. This may be a song, the set of a symphony, etc.
Title/Chapter: Video-DVDs are divided into "Title" and „Chapters". A „Title" may be e.g. a particular fi Im, the „Chapters" may be subsections of this fi Im.
MPEG4: Your DVD player is also suitable for playing back files that have been compressed using the MPEG-4 system (short for Moving Picture Experts Group-4). MPEG-4 is a compression method by means of which large quantities of data can be reduced without any noticeable loss of picture and sound quality.
Changing the Screen Settings
By repeatedly pressing the MODE (Fig. 1/8; Fig. 2/22) button you can select brightness, contrast, colour hue and the screen mode (16:9 or 4:3). Adjust the settings with the cursor buttons (▶/◀).
ENGLISH
Using the remote control
Loading a CD/DVD
Playing media
You transmit commands to the DVD-Player via remote control. It is thus important to point the end of the remote control towards the DVD-Player.
- Press the ▲ OPEN (Fig. 1/21) button on the device. The CD/DVD tray opens.
- Place the CD/DVD on the tray.
- Close the CD compartment (Fig. 1/20) again. After a short while the type of the loaded medium is displayed (e.g. „DVD“).
Understanding the onscreen CD-menu
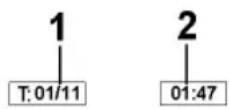
When playing CDs the following status information is displayed on screen:
Current track/total number of tracks (1).
Time (2): This provides information about the duration and the remaining play time. By standard the play time expired of the current track is displayed. The display is in hours, minutes and seconds. Press the DISPLAY-button (Fig. 2/13) once or several times to have further times displayed.
The following possibilities are available for selection
- time remaining to the end of the track,
- playback time of the CD so far,
- time remaining to the end of the CD.
Understanding the onscreen DVD-menu

When playing DVDs you can view the on-screen menu by pressing the DISPLAY-button (Fig. 2/13).
DVD-menu
Current title/total number of titles (1).
Current chapter/total number of chapters (2).
Time (3): This provides information about the duration and the remaining play time. By standard the play time expired of the current title is displayed. The display is in hours, minutes and seconds. Press the DISPLAY-button (Fig. 2/13) once or several times to have further times displayed. The following possibilities are available for selection
- time remaining to the end of the title,
- expired playing time of the chapter,
- time remaining to the end of the chapter.
Starting the replay
- Place the CD/DVD on the CD/DVD-tray ⇒ Page 50, „Loading a CD/DVD“.
- Press the „▶II“-button (Fig. 2/21) on the remote control.
i NOTE:
If the replay does not start or the replay is of poor quality, you should check the default settings of the DVD-Player.
©
©
Changing the viewing angle
Some DVDs offer the possibility to select the viewing angle.
Press the ANGLE /TTX-button (Fig. 2/4) to change the viewing angle.
NOTE:
If changing the Viewing Angle is not possible, the message „ “ will be displayed.
Repeat pressing the button to choose a different viewing angle, or to return to the original viewing angle.
Adjusting the volume
Creating a playlist (CD/DVD)
CD:
Program
DVD:
Program
Deleting a playlist (CD/DVD)
The desired volume can be set with the volume control (Fig. 1/7) on the device.
You may want to replay the titles, e.g. on a CD, in a different order to the order determined by the producer. The function „Create Playlist“ you can create your own playing order.
To do this, proceed as follows:
- Press the PRO/EPG-button (Fig. 2/12). A table is displayed. Here you can enter the desired order of the tracks (in the case of CDs) or chapters/titles (for DVDs).
NOTE:
However, your playlist will be lost when switching off the DVD-Players or when inserting a new CD/DVD.
- Use the Cursor Buttons (Fig. 2/8) to navigate in the table.
- Enter the desired track (in the case of CDs) or the desired title and chapter (for DVDs) at the appropriate position in the table. Use the Numerical Buttons (Fig. 2/3) for this purpose.
- Use the Cursor Buttons (Fig. 2/8) to select the command "Start" at the bottom of the screen to save the input.
-
Press the ENTER-button (Fig. 2/7) on the remote control to confirm this command.
-
Press the PRO/EPG-button. You will now see a table (Fig. CD or Fig. DVD).
- Use the Cursor Buttons (Fig. 2/8) to manoeuvre to the command "Stop" at the bottom of the table.
- Press the ENTER-button (Fig. 2/7) on the remote control to confirm this command.
- Press the PRO/EPG button to terminate this procedure.
Working in fi le mode
As well as being able to play back „normal“ fi lms or music from CDs/DVDs, this DVD player is also able to play back video or audio fi les from CDs or DVDs which are stored in the fi le system. Such media are frequently available if you create CDs of digital photographs or MP3 music on your computer.
Using CD/DVD
Using a memory card
- Place the CD or DVD on the tray Page 50, „Loading a CD/DVD“.
- Select the desired file(s) and start the replay Page 55, „Selecting file/ directory and starting replay“.
The following memory cards can be used:
SD-Card
Multi Media Card
Memory-Stick
- Insert the memory card into the card reader (Fig. 1/24).
- Press the SOURCE button (Fig. 2/15) on the remote control in order to turn the DVD player to the file mode.
- Select the desired file(s) und start playback → Page 55, „Selecting a file/ directory and starting playback“.
- If you would like to change back to DVD mode, press the SOURCE button (Fig. 2/15) repeatedly.
i NOTE:
In order to find out which fi les can be played back the DVD player now reads the contents of the storage medium. In the case of large storage media this procedure may take a long time. During this time you will see the words „WAITING“ on the screen.
If you have connected an output device to the USB socket its content is displayed first. Press the SOURCE (Fig. 2/15) button a second time to display the contents of the memory card.
Using a USB medium
By means of the USB connection it is possible to connect various USB storage media to the DVD player. Examples of such devices are USB memory sticks or digital cameras.
This device has been developed in accordance with the latest technical developments in the USB fi eld. Unfortunately the large number of different types of USB storage media on offer today makes it impossible to guarantee full compatibility with all USB storage media. For this reason there may be problems in rare cases with playing back from USB storage media. This is not a malfunction of the device.
- Insert a USB storage medium into the corresponding connection of the DVD player (Fig. 1/23).
- Press the SOURCE button (Fig. 2/15) on the remote control in order to switch the DVD player to the file mode.
i NOTE:
In order to find out which files can be played back the DVD player now reads the contents of the storage medium. In the case of large storage media this procedure may take a long time. During this time you will see the words „WAITING“ on the screen.
- Select the desired file(s) and start playback Page 55, "Selecting a file/ directory and starting playback".
- If you would like to change back to DVD mode, press the SOURCE button (Fig. 2/15) repeatedly.
Selecting fi le/directory and starting replay
Media may contain numerous data/files and directories. You must therefore first determine the data to be played.
- If necessary, insert the CD or DVD into the drive or connect a USB storage medium.
- A two-column menu window appears in which the directories (if there are any directories present) or the files are listed on the left.
- Use the Cursor buttons (Fig. 2/8) to select the desired directory of file in the left-hand list.
- Select this by pressing the ENTER button (Fig. 2/7).
File: Once you have selected a file, this is now displayed directly or played back.
Directory: If you have called up a directory, a list of files now opens.
Here too you can select the desired file with the Cursor buttons and the ENTER button (Fig. 2/7). If you have selected a file, this is now displayed or played back.
Please note:
There are both lots of burning and compressing methods as well as high quality differences in CDs/DVDs and burned CDs/DVDs.
For this reason there may occasionally be problems when fi les are played back (for example files are displayed but cannot be played back). This is no malfunction of the player.
i NOTE:
With the „◀” button (Fig. 2/8) you can return from the files to the directories.
Stopping the replay
Press the „■“-button (Fig. 2/20) on the remote control to stop the replay.
Viewing pictures
The DVD player is excellently suitable for viewing digital photographs. These photos may be stored only any medium (DVD, CD, etc.) supported by the DVD player.
i NOTE:
- Please ensure a suitable size of the photos. Large size photos may take some time to be displayed or may not be displayed at all. It is of advantage if the size of the photo corresponds with the screen size of the playback device. For TVs this is normally 1024x576 pixel (TV-aspect 16:9) or 768x576 (TV-aspect 4:3).
- Please note that any conversion generally involves a loss of data with respect to the original format.
Start the replay of photos by selecting the file from which the replay shall start Page 55, "Selecting fi le/directory and starting replay".
i NOTE:
After a few seconds a preview picture appears on the right-hand side in the two-column menu window.
©
Overview of the main menu

System settings
Slide control
In many menus you will find slide controls to adjust e.g. the volume or the brightness of the screen. The slide control is used as follows:
- Select with the ENTER-button.
- Move the control with the Cursor Buttons (▼/▲).
- Confirm the entry with the ENTER-button.
General Setup (1)
Audio Setup Page (2)
Dolby Digital Settings (3)
Preference Page (4)
Password Setup Page (5)
DVB-T Settings (6)
i NOTE:
Some of the menu settings are only available in stop mode (depending on the DVD).
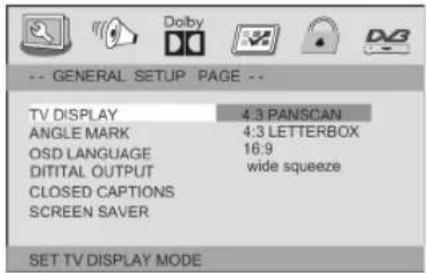
TV Display
Here you can adapt the output of the DVD-Player to the TV-aspect.
Concerning the background: If you do not have a wide screen TV the TV-aspect will be 4:3. However, most feature fi lms have an aspect of 16:9, the image is therefore too wide for the TV-screen.
Here you can specify how the replay of the film is to be adapted to the playback device:
4:3 Panscan: You will only see the middle section of the film. The borders will be cut off.
4:3 Letterbox: You will see the complete width of the film. The film is thus reduced in size, whereby black bars appear below and above the film
16:9 Wide: Select this option if you use a wide screen TV for replay. Please note that fi lms, that have been recorded with TV-aspect 4:3 can still be replayed using aspect 4:3. This means, that replaying this fi Im will not require the complete wide screen area of the television.
Wide Squeeze: Select this option if you use a wide screen TV for replay. This setting is used to adapt fi lms in 4:3 format to the aspect ratio of the widescreen television set.
NOTE: The setting "4:3 Panscan" is not supported by all DVDs.
©
Analogue Output Setup

Dolby Digital Setup
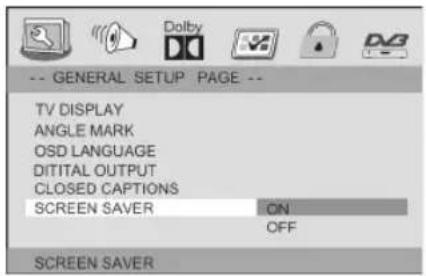
Screen saver
The player is able to display a still image for any time on the screen. This can cause damage to the screen. It is therefore recommended to activate the screen saver.
The following options are available:
On: The screen saver is activated (default setting).
Off: The screen saver is deactivated.
Downmix
Change the characteristics of the speaker output:
LT/RT: Choose this setting if you want to play the DVD with the Pro Logic Dolby stereo effect. This produces a almost real 2-channel replay effect.
Stereo: Choose this setting if you want to play a DVD, that has been produced in the 5.1-Audio format, as 2-channel stereo sound.
3D SURROUND: You may probably not have a 5.1-Audio system. In this case you can use the „3D SURROUND“-setting to simulate a similar sound effect.
Off: Select this setting to transmit the Audio signal to the output device without changes.
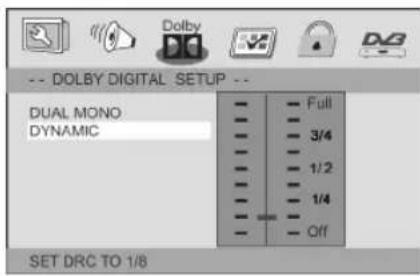
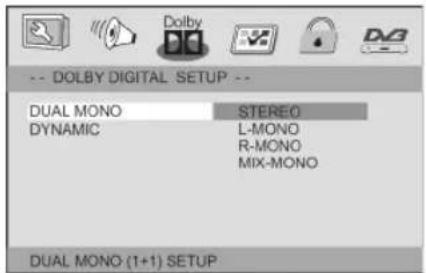
Dual Mono
The Audio output is normally in stereo. Here you have the possibility to choose Mono-output instead of Stereo-output.
Stereo: The Audio output is in Stereo (default).
L-Mono: The Audio output is in Mono. In this case the signal of the „left" stereo channel is transmitted to all speakers.
R-Mono: The Audio output is in Mono. In this case the signal of the „right“ stereo channel is transmitted to all speakers.
Mix Mono: The Audio output is in Mono. In this case the signal of the „both“ stereo channel is transmitted to all speakers.
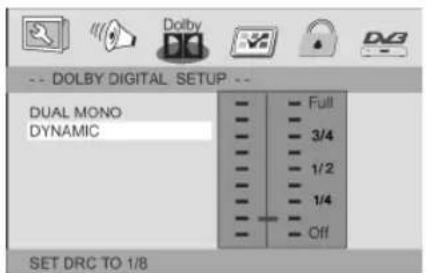
Dynamic
The term „Dynamic“ (Dynamic Range) describes the ratio of quietest and loudest sound. If the dynamic range is very large, you will experience very quiet and very loud sounds.
This may cause replay problems. Let us assume that you are watching a DVD in a relatively loud environment. You can now increase the volume to be able to hear also the very quiet passages, however with the disadvantage that loud passages will be unacceptably loud. In this case it would make sense to compress the dynamic range (i.e. reduce) and increase the output volume at the same time.
FULL -1/8: The dynamic range is compressed slightly (1/8) to full (FULL).
OFF: The dynamic range is not compressed at all (default).
©
©
Zone (location)
Here you can select the region where you are located.
Time zone
Here you can select the time zone corresponding to your location. This is synchronised by the reception signal to Greenwich Mean Time (GMT). The automatic setting of the time is carried out in accordance with your selection.
In the majority of Europe:
Normal time = GMT +1
Summer time = GMT +2
Age lock
Here you can select the age of the child lock or deactivate the setting.
If you have activated the child lock option, the corresponding information is compared with the age set by you (if such information is transmitted by the respective station). If a programme is intended for an older age group than the age you have set, the programme cannot be shown.
i NOTE:
You are asked to put in the password. This is identical to the one you entered in the menu „Password Setup Page/Password“.
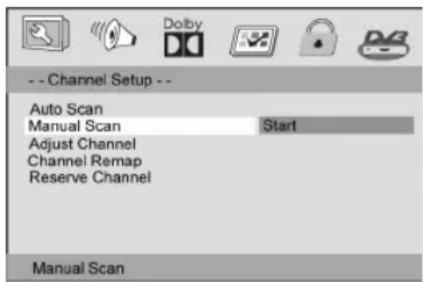
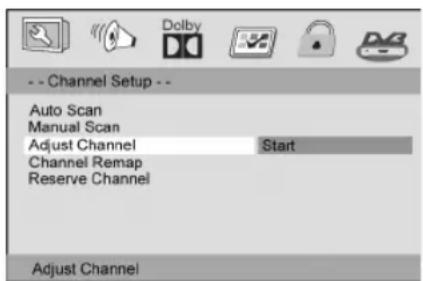
Channel Setting
Automatic Scan
Select this type of scan to search for channels through the entire reception frequency range of the receiver.
- Select the „Start“ command.
- Confirm the confirmation prompt shown with the ENTER button (Fig.2/7).
The channel search is now performed automatically and may take several minutes.
i NOTE:
- If you would like to interrupt the procedure, press the PBC/SCAN (Fig. 2/19) button and acknowledge the confirmation prompt with the ENTER button (Fig. 2/7).
- By pressing the PBC/SCAN button (Fig. 2/19) you can also activate the automatic channel search.
Manual Scan
i NOTE:
In this type of search it is necessary to know the frequency of the channel you are searching for. This can be obtained either on the Internet or directly from the respective channel provider.
Select this type of scan in order to specifically search a certain channel or a certain frequency for programmes.
- Select the „Start“ command.
- Confirm the confirmation prompt shown with the ENTER button (Fig.2/7).
- The manual search window opens. Use the numerical buttons (Fig. 2/3) to enter the desired frequency and select the "SCAN" command. In the frequency range that has been entered a search is carried out for channels that can be received.
i NOTE:
If you would like to interrupt the procedure, press the PBC/SCAN button (Fig. 2/19).
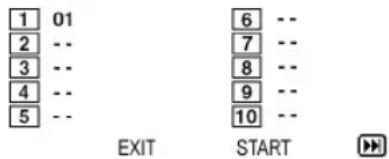
Setting the Channel
Select the „Start“ command. The channel setting menu appears. Use the cursor buttons (Fig. 2/8) to select the channel that you would like to modify.
- Favourite: Press the ◀◀/FAV button (Fig. 2/28) to include the currently selected channel in the favourites list.
- Delete: Press the REPEAT/DEL button (Fig. 2/11) to jump over the currently selected channel when switching over.
- Protected: Press the ▶▶/PROT button (Fig. 2/27) to protect the currently selected channel. You will then be asked to enter the password. If you now want to select the channel, you will be asked once more to enter the password.
To leave the channel setting menu, select the „EXIT“ command and confirm with the ENTER button (Fig. 2/7).
i NOTE:
The password is identical to the one you entered in the menu „Password Setup Page/Password“.
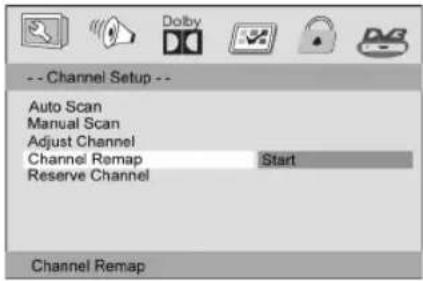
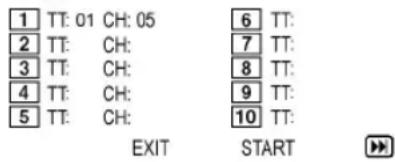
Sorting the Channels
- Select the „Start“ command. The channel sorting menu appears.
- Use the cursor buttons (Fig. 2/8) to select the channel you would like to move.
- Press the ENTER button (Fig. 2/7) and use the cursor buttons to select the new channel slot.
- Press the ENTER button again.
In order to leave the channel sorting menu, select the „EXIT“ command and confirm with the ENTER button (Fig. 2/7).
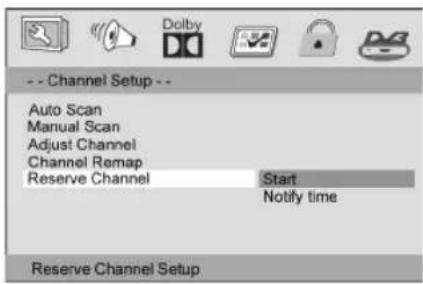
Reserved Channels
Start: The programmes that you have reserved are shown.
Notify time: Here you can set the desired reminder time for the reserved programmes.
The DVB-T Receiver
The signals received from the aerial cannot be processed by a television set. They are processed in the built-in DVB receiver in such a way that audio and video signals (AV) are available at its outputs, which are then passed on to the television set.
DVB-T stands for:
Digital Video Broadcasting Terrestrial: a digital, universal transmission technology for pictures, graphics, sound and text, i.e. for data in every conceivable form and in every possible appropriate quality.
EPG (Electronic Programme Guide)
i NOTE:
This function can only be used if it is supported by the selected station.
The built-in DVB-T receiver has an electronic programme magazine. This makes it possible to depict the information of the individual channels on the screen. You can acquire an overview of the programmes that are currently being transmitted or the programmes of the day.
The EPG Function allows you:
• to show information on programme content on the screen.
• to highlight programmes for which a reminder window is automatically shown at the beginning of the programme.
©
©
| Fault | Possible cause | Solution |
| No sound | During operation with a television set:Audio cable not connected | WARNING:Before searching for the fault, please turn the device off.Check the correct fi t of the Audio cable. Make sure that the jacks are tightly in the sockets. |
| Volume turned to low | Increase the volume by turning the VOL volume control (Fig. 1/7) on the device. | |
| Headphones not correctly inserted | Check that the headphones are correctly positioned. | |
| Amplifier switched off | If you use an amplifier for Audio output: check whether the amplifier is switched on. | |
| Incorrect settings Check the settings | of your DVD-Player. | |
| The remote control does not work | Wrong direction The remote control is not pointed towards the DVD-Player. | |
| Too far away | Make sure that the remote control is not further than 5 m away from the player. | |
| Batterie empty Replace the batteries in the remote control. | ||
| Titles are played in wrong order | Playlist is used Delete the playlist. | |
| DVD cannot be played DVD has not been finalized Use a finalized DVD. | ||
| No DVB-T reception The station being received is too weak for reception via the telescopic aerial. | Realign the aerial or connect your house or room aerial. | |
| Mosaic similar picture | The station being received is too weak. | Realign the aerial. |
©
OSD Menu overview
| **GENERAL SETUP PAGE ** -- DVB-T SETUP PAGE -- | |||
| TV DISPLAY 4:3 PANSCAN AREA GERMANY4:3 LETTERBOX SPAIN16:9 UKWide Squeeze FRANCE | |||
| ANGLE MARK ON ITALY | OFF NETHERLANDS | ||
| OSD LANGUAGE TIME ZONE CHANGE | |||
| DIGITAL OUTPUT SPDIF/OFF | PARENTAL AGE | 4 | 5611121314151718DISABLE |
| SPDIF/RAW | |||
| SPDIF/PCM | |||
| CLOSED CAPTIONS | ON 7 | ||
| OFF 8 | |||
| SCREEN SAVER | ON 9 | ||
| OFF 10 | |||
| **ANALOG AUDIO SETUP PAGE ** | |||
| DOWNMIX | LT/RT | ||
| STEREO | |||
| 3D SURROUND | |||
| OFF 16 | |||
| **DOLBY DIGITAL SETUP ** | |||
| DUAL MONO | STEREO | CHANNEL SETUP | |
| L-MONO | |||
| R-MONO | |||
| MIX-MONO | |||
| DYNAMIC | -- CHANNEL SETUP -- | ||
| AUTO SCAN START | |||
| MANUAL SCAN START | |||
| ADJUST CHANNEL START | |||
| CHANNEL REMAP START | |||
| RESERVE CHANNEL STARTNOTIFY TIME | |||
| **PREFERENCE PAGE ** | |||
| TV TYPE | PAL | ||
| NTSC | |||
| PBC | ON | ||
| OFF | |||
| AUDIO | |||
| SUBTITLE | |||
| DISC MENU | |||
| PARENTAL | 1 KID SAFE | ||
| 2 G | |||
| 3 PG | |||
| 4 PG 13 | |||
| 5 PGR | |||
| 6 R | |||
| 7 NC17 | |||
| 8 ADULT | |||
| DEFAULT | RESET | ||
| **PASSWORD SETUP PAGE ** | |||
| PASSWORD MODE | ON | ||
| OFF | |||
| PASSWORD | CHANGE | ||
HSI70NE
©
- Technical Data
- Operating manual
- Children
- Power supply
- Laser
- Safety instructions
- Where to position the appliance
- Operation
- Intended use
- Defect
- Effective range of the remote control
- With the alternating current adapter
- ATTENTION:
- With the adapter for the cigarette lighter
- Precautionary Measures:
- With the rechargeable battery
- Recharging the Battery
- Connection to Other Equipment
- Playback of a DVD on the Television Set
- i NOTE:
- WARNING:
- Inputs on the side of the device
- Switching on the player (Abb. 1/22)
- About the DVD-Player
- Terminology
- Input Not Possible
- Changing the Screen Settings
- ENGLISH
- Using the remote control
- Loading a CD/DVD
- Playing media
- Understanding the onscreen CD-menu
- Understanding the onscreen DVD-menu
- DVD-menu
- Starting the replay
- Changing the viewing angle
- NOTE:
- Adjusting the volume
- Creating a playlist (CD/DVD)
- Deleting a playlist (CD/DVD)
- Working in fi le mode
- Using CD/DVD
- Using a memory card
- Using a USB medium
- Selecting fi le/directory and starting replay
- Please note:
- Stopping the replay
- Viewing pictures
- Slide control
- TV Display
- Screen saver
- Downmix
- Dual Mono
- Dynamic
- Zone (location)
- Time zone
- Age lock
- Channel Setting
- Automatic Scan
- Manual Scan
- Setting the Channel
- Sorting the Channels
- Reserved Channels
- The DVB-T Receiver
- EPG (Electronic Programme Guide)
- OSD Menu overview
Brand : CLATRONIC
Model : CTV 792
Category : Portable DVD Player