
CTV 758 - Portable DVD Player CLATRONIC - Free user manual and instructions
Find the device manual for free CTV 758 CLATRONIC in PDF.

| Product Type | Portable DVD Player with DVB-T |
| Brand | Clatronic |
| Model | CTV 758 |
| Power Supply | AC 100-240 V (50/60 Hz) via adapter; DC 12 V car adapter (9 V output) |
| Disc Playback | DVD, Video CD, Audio CD |
| DVB-T Receiver | Built-in, supports digital terrestrial channels |
| Video Output | AV (RCA) and SCART (via adapter) |
| Audio Output | Analog stereo (RCA); Digital coaxial (SPDIF) |
| AV Input | Yes (for connecting external devices) |
| Headphone Jack | 3.5 mm stereo |
| Remote Control | Infrared, range up to 5 m, angle 30° |
| Display | Built-in LCD color display (aspect ratio adjustable) |
| Aspect Ratio Settings | 4:3 Panscan, 4:3 Letterbox, 16:9 Wide, Wide Squeeze |
| On-Screen Display Languages | Selectable |
| Parental Control | Password-protected (default password: 1369) |
| Zoom Function | 2x, 4x, 8x, 16x, 32x (with cursor navigation) |
| Repeat Modes | Chapter, Title, Track, All |
| Teletext | Yes (via DVB-T) |
| EPG (Electronic Program Guide) | Yes, with program reservation |
| Cleaning | Use a soft, dry cloth. Avoid liquid cleaners. |
| Safety | Keep away from moisture, heat sources, and direct sunlight. Use only supplied adapters. |
| Repairs | Contact authorized dealer; do not open device. |
Frequently Asked Questions - CTV 758 CLATRONIC
User questions about CTV 758 CLATRONIC
0 question about this device. Answer the ones you know or ask your own.
Ask a new question about this device
Download the instructions for your Portable DVD Player in PDF format for free! Find your manual CTV 758 - CLATRONIC and take your electronic device back in hand. On this page are published all the documents necessary for the use of your device. CTV 758 by CLATRONIC.
USER MANUAL CTV 758 CLATRONIC
natural_image
Exterior view of a CMTRONC TV portable box with an antenna and CD/DVD-T disc (no visible text or symbols on the device body)©
©
©
Technische Daten
natural_image
Line drawing of a laptop and its rear panel with labeled parts (no text or symbols present)natural_image
Technical line drawing of a mechanical bracket with internal force arrows (no text or symbols)2
Where to position the appliance
Safe operation of the appliance presupposes that it is positioned in an appropriate place. Therefore observe the following:
- Protect the appliance against the influence of weather. Never use it in the open-air.
- Protect the appliance against moisture.
Do not place liquid filled vessels, e.g. vases, on the device.
Never place the appliance on or in direct vicinity of heat sources, such as e.g. hobs, ovens, etc.
Do not expose the appliance to direct sunlight.
Place the appliance so that a sufficient air supply is assured. This is to avoid a build up of heat inside the appliance. Make sure that the ventilation slots are not blocked. - Protect the appliance against the mechanical vibrations.
■ Always place the device on a firm, even base. - Protect the remote control against weather influences, moisture and high temperatures (e.g. by direct sunlight).
Operation
The player is able to show a still image on the TV-screen/monitor over an unlimited period of time. This can cause damage to the screen. It is therefore advisable to activate the screen saver Page 58, „System settings“.
Do not increase the volume when the player is just playing very quiet sections. This could damage the speaker if very loud passages start all of a sudden after the quiet section.
Do not move the player with a DVD inserted. This could damage the DVD.
Do not put your hands into the DVD-slot. You could be injured.
Place only DVDs or CDs on the DVD-tray, as otherwise the player may be damaged.
Switch the player off by the On/Off-switch if it is not going to be used for a longer period of time.
Please disconnect the mains plug during thunderstorms.
Intended use
The device is intended exclusively for the following tasks:
Playing of Video DVD/Video CD.
Playing of Audio-CD,
■ Reception of digital terrestrial channels (DVB-T).
Any other use is considered non-intended use and is prohibited.
Defect
If the machine should become defective at some point:
If the power supply cable for this appliance is damaged, it must be replaced by the manufacturer or his customer services, in order to avoid hazards.
Should fluid have seeped into the player or if the player has been dropped down or damaged in any other way, the player must be examined by an authorized dealer. Disconnect the player from the power supply and consult an authorized dealer.
©
Effective range of the remote control
If you want to use the remote control it has to be pointed at the remote control sensor on the front of the device. The distance between remote control and sensor should not exceed 5 m. The angle of the remote control to the remote control sensor to right, left, top and bottom should not exceed 30°.
Power Supply
A. With the alternating current adapter
The alternating current adapter works with alternating current of between 100 V and 240 V, but
In Europe the mains lead (supplied) may only be connected to an alternating current power source of 230-240 V.
When connecting to an alternating current source outside Europe a plug adapter must be used that conforms to the socket.
ATTENTION:
The alternating current adapter is only intended for use with this device. Do not use with other devices.
If the device is not going to be used for a prolonged period, the adapter must be disconnected from the power socket.
B. With the adapter for the cigarette lighter
The 9 V cigarette lighter adapter is used in vehicles that have a 12 V power supply with negative earth.
Precautionary Measures:
This device may only be used with the original vehicle adapter, as a different adapter can damage the device.
The original vehicle adapter may only be used for this device. Do not use it for other equipment.
While you are driving the vehicle it is forbidden to adjust the device or watch videos and CDs.
Please ensure that the device is firmly installed and cannot fall inside the vehicle in the case of an accident.
If the cigarette lighter is dirty, poor conductivity will make the connection hot. Please ensure that the adapter is only inserted into a clean cigarette lighter connection.
After use the 9 V adapter should be removed from the device and from the cigarette lighter socket.
©
Connection to Other Equipment
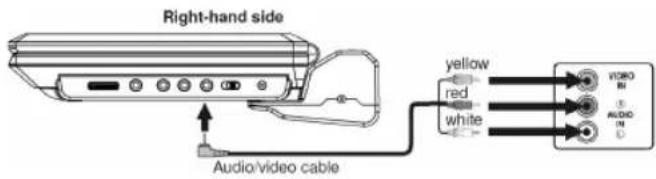
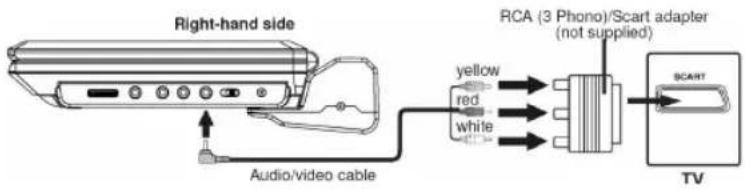
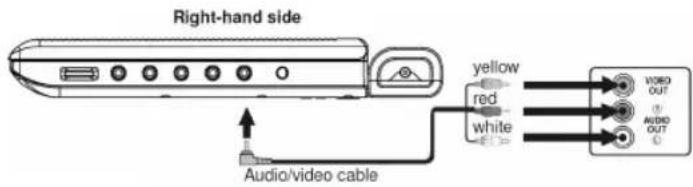
Connection to a television set (AV OUT Fig. 1/18)
If the television set has audio/video inputs.
ENGLISH
If the television set has a Scart connection.
Playback of a DVD on the Television Set
-
Turn on the DVD player by the POWER ON/OFF switch.
-
Turn the AV IN/OUT switch (Fig. 1/21) on the device to OUT in order to turn the device to AV OUT operation.
-
Turn on the television set and follow the instructions supplied with the television set.
NOTE:
Please ensure that the correct audio/video cable is used as the wrong cable will produce a weak signal.
DVDs are copy-protected and cannot be copied. If a DVD is copied onto a video cassette you will see a blurred picture with poor sound quality. This is NOT the fault of the device!
Use of ear/headphones (Fig. 1/17)
- If you use a set of headphones you should use one with a 3.5 mm stereo jack, which should be inserted into headphone socket (☐ or ☐)
- With the VOL volume control (Fig. 1/6) you can set the desired volume.
WARNING:
Make sure that the volume of your headphones or earphones is not too high, as otherwise this may damage your ears and you may endanger yourself or others.
In order not to disturb those around you the volume should be set to a low level.
If you suffer from tinnitus you should turn the volume down low or refrain from using this device.
Ear doctors recommend that earphones should not be used continuously over a prolonged period.
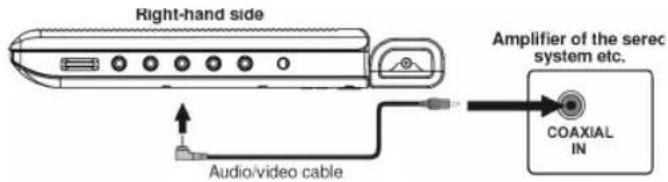
Digital
Connect the Coaxial cable for transmission of digital Audio signals to your play-back device or your amplifier.
- Insert the audio plug into the socket on the right-hand side of the device (Fig. 1/7).
- Plug the Audio jack into the corresponding socket on your playback device or your amplifier.
Connecting other Playback Devices
In order to play back the picture from another playback device (e.g. digital camera) on the LCD screen, connect the audio/video cable to the AV socket (Fig. 1/18) and the other end to the playback device. Turn the AV OUT switch (Fig. 1/21) on the device to IN in order to turn the device to AV IN operation.
Antenna connections
Antenna Input (Fig. 1/16)
NOTE:
Please ensure that it is possible to receive DVB-T signals in your area. Information on the transmission area is available on the Internet under: http://www.ueberallfernsehen.de, or from your specialist dealer.
This device has a built-in DVB-T receiver.
In order to be able to receive digital terrestrial channels with the built-in DVB-T receiver it is necessary to connect your permanently installed house aerial. If you are located in the central section of the transmission area you can also use an optional passive or active DVB-T aerial.
- Connect the cable from your DVB-T aerial system or your DVB-T room aerial to the ANT. Socket on the left-hand side of the device.
Switching on the player (Fig. 1/1)
Turn on the main switch of the DVD player by moving the „POWER ON/OFF“ switch on the left-hand side of the device to the „ON“ position.
©
Using the remote control
Loading a CD/DVD
Understanding the onscreen CD-menu

Understanding the onscreen DVD-menu
Starting the replay
Playing media
You transmit commands to the DVD-Player via remote control. It is thus important to point the end of the remote control towards the DVD-Player.
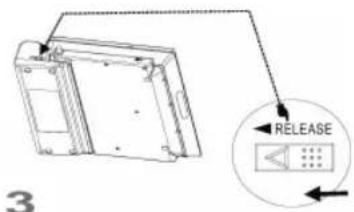
- Press the OPEN (Fig. 1/4) button on the device. The CD/DVD tray opens.
- Place the CD/DVD on the tray.
- Close the CD compartment (Fig. 1/3) again. After a short while the type of the loaded medium is displayed (e.g. „DVD“).
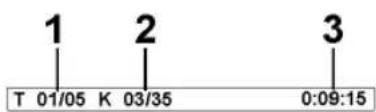
When playing CDs the following status information is displayed on screen:
Current track/total number of tracks (1).
Time (2): This provides information about the duration and the remaining play time. By standard the play time expired of the current track is displayed. The display is in hours, minutes and seconds. Press the DISPLAY-button (Fig. 2/13) once or several times to have further times displayed.
The following possibilities are available for selection
- time remaining to the end of the track,
- playback time of the CD so far,
- time remaining to the end of the CD.
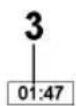
When playing DVDs you can view the on-screen menu by pressing the DISPLAY-button (Fig. 2/13).
DVD-menu
Current title/total number of titles (1).
Current chapter/total number of chapters (2).
Time (3): This provides information about the duration and the remaining play time. By standard the play time expired of the current title is displayed. The display is in hours, minutes and seconds. Press the DISPLAY-button (Fig. 2/13) once or several times to have further times displayed.
The following possibilities are available, e.g. for CDs
- Single Elapsed – elapsed playing time
- Single Remain - time remaining to the end of the track
-
Total Elapsed – elapsed total playing time of the CD
• Total Remain – remaining total playing time
• Chapter Elapsed - elapsed playback time of the chapter,
• Chapter Remain - time remaining to the end of the chapter. -
Place the CD/DVD on the CD/DVD-tray → Page 50, "Loading a CD/DVD".
-
Press the ▶II"-button (Fig. 2/21) on the remote control.
i NOTE:
If the replay does not start or the replay is of poor quality, you should check the default settings of the DVD-Player.
Interrupting the replay
- Press the „II“-button (Fig. 2/21) on the remote control. The replay is interrupted, the currently visible image is „frozen“.
- Press the „■“-button (Fig. 2/21) on the remote control to restart the „normal“ replay.
Changing Audio-Language/Audio-Mode
Press the AUDIO-button (Fig. 2/18) several times to change the Audio language. The available audio languages depend on the DVD.
i NOTE:
If the medium does not support this function (e.g. a CD), you can use this button to change the Audio mode and set it e.g. to „Mono“ or „Stereo“.
Showing subtitles
Press the SUBTITLE-button (Fig. 2/5) to display the current subtitle status. Press the button several times if you would like to activate or deactivate the subtitle function or if you want to choose a different subtitle language. The available subtitle languages depend on the DVD.
Stopping the replay
Press the „[-”-button (Fig. 2/20) during replay. The replay stops.
Press the „III“-button (Fig. 2/21) again, to continue the replay from the last position.
Press the „I“-button (Fig. 2/20) twice to stop the replay completely. Press the „II“-button (Fig. 2/21) again, to replay the CD/DVD from the beginning.
Selecting previous chapter/track
Press the I- button (Fig 2/25) to jump to the start of the previous chapter or track.
Selecting next chapter/track
Press the □□I-button (Fig 2/26) to jump to the start of the next chapter or track.
Selecting track directly
Enter the number of the desired chapter/track with the Numerical Buttons on the remote control (Fig. 2/3).
Replay of the chapter/track starts after a short while.
Accessing a section via menu
The on-screen menu enables comfortable access to any sections of a medium. To do this, proceed as follows:
- Select the desired category by repeatedly pressing the button GOTO-button (Fig. 2/1).
- Now move to the point from which the replay should start. Depending on the type of medium this may be a track number, a chapter or even a point in time. The input must be made with the Numerical Buttons (Fig. 2/3). Playback begins after a short time.
| Repeating DVD-title/chapter | 1. Choose the chapter or title to be repeated.2. Press the REPEAT/DEL-button (Fig. 2/11). The message “Chapter” appears on the screen.3. Press the REPEAT/DEL-button again, until the message “Title” or “All” is displayed. |
| Repeating track on CD | 1. Select the track to be repeated.2. Press the REPEAT/DEL-button (Fig. 2/11). The message „Track“ appears on the screen. |
| Repeating CD | Keep pressing the REPEAT/DEL-button (Fig. 2/11), until the message „All“ is displayed on screen. |
| Stopping repeat | Press the REPEAT/DEL (Fig. 2/11) repeatedly until the message disappears from the screen. |
| Using the DVD-menu | Normally each DVD has its own menu. Here you can choose chapters, make settings, etc. This menu is specific for the DVD and can thus not be explained in detail.Press the MENU-button (Fig. 2/24) to access the DVD-menu. Use the Cursor Buttons (Fig. 2/8) to navigate in the Menu. Press the ENTER-button (Fig. 2/7) to confirm.If you are in a menu area for direct chapter selection, you can enter the number of this chapter with the Numerical Buttons (Fig. 2/3) on the remote control. |
| Using fast forward or reverse | The DVD-Player has a fast forward and a fast reverse feature.1. Press the ▶▶/PROT (Fig. 2/27) or ◀◀/FAV-button (Fig. 2/28) to start fast forward or fast reverse. The current replay direction and the speed, e.g.,Forward x [2]“ is now displayed on screen.2. Press the ▶▶/PROT or ◀◀/FAV-button several times in order to change the speed. The speed can be accelerated by factor 2, 4, 8, 16 or 32.3. Press the „▶II“-button (Fig. 2/21) to restart the “normal” replay when the desired section is reached. |
| Enlarging a screen section | You can change the screen section when viewing DVDs, VCDs or images.Press the ZOOM-button (Fig. 2/23) to change the screen section. Press the button several times to select the suitable zoom factor or to return to the original zoom factor. |
| NOTE:With the cursor buttons (Fig. 2/8) you can move through the zoomed image. |
©
©

Understanding the menu structure
Using the menu
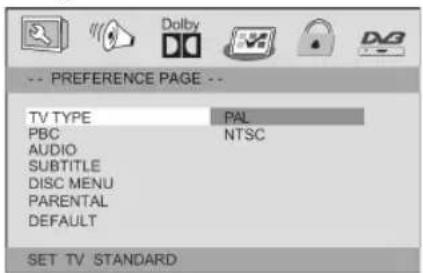
The Setup menu has two menu levels:
Main menu: The main level is represented by graphical symbols.
Sub-menu: The corresponding sub-menu options can be found under each of the main menu options.
Navigation and selection
Use the Cursor Buttons (Fig. 2/8) (▶/◀) on the remote control to browse through the main menu.
In contrast to this, you must use the Cursor Buttons (▼/▲) to move in the sub-menu.
Select a menu option with the ENTER-button (Fig. 2/7).
Use the ENTER-button also to select an option (e.g. "PAL" in the illustration on the left). The selected option (in the example „PAL") is now highlighted.
Slide control
In many menus you will find slide controls to adjust e.g. the volume or the brightness of the screen. The slide control is used as follows:
- Select with the ENTER-button.
- Move the control with the Cursor Buttons (▼/▲).
- Confirm the entry with the ENTER-button.
Overview of the main menu
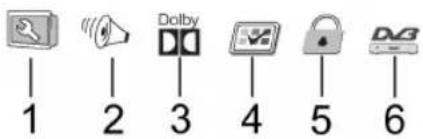
General Setup (1)
Audio Setup Page (2)
Dolby Digital Settings (3)
Preference Page (4)
Password Setup Page (5)
DVB-T Settings (6)
NOTE: Some of the menu settings are only available in stop mode (depending on the DVD).
System settings
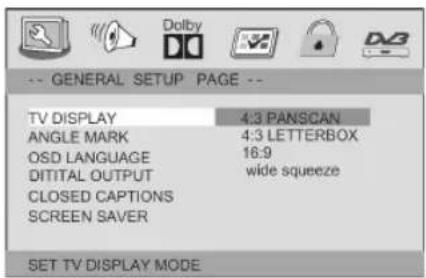
TV Display
Here you can adapt the output of the DVD-Player to the TV-aspect.
Concerning the background: If you do not have a wide screen TV the TV-aspect will be 4:3. However, most feature films have an aspect of 16:9, the image is therefore too wide for the TV-screen.
Here you can specify how the replay of the film is to be adapted to the playback device:
4:3 Panscan: You will only see the middle section of the film. The borders will be cut off.
4:3 Letterbox: You will see the complete width of the film. The film is thus reduced in size, whereby black bars appear below and above the film.
16:9 Wide: Select this option if you use a wide screen TV for replay. Please note that fi lms, that have been recorded with TV-aspect 4:3 can still be replayed using aspect 4:3. This means, that replaying this fi lm will not require the complete wide screen area of the television.
Wide Squeeze: Select this option if you use a wide screen TV for replay. This setting is used to adapt fi lms in 4:3 format to the aspect ratio of the widescreen television set. (Preferred setting for the built-in screen.)
NOTE: The setting „4:3 Panscan“ is not supported by all DVDs.
Angle Mark (Camera Angle)
If the DVD contains sequences recorded from different camera angles you can use the ANGLE/TTX button (Fig. 2/4) to select the various camera angles. This function is only available if the DVD contains scenes with various camera angles.
Before you can use this function it has to be activated.
On: The angle symbol is shown on the screen.
☐ Off: No angle symbol is shown on the screen.
OSD Language
Here you can select the language of the on-screen displays.
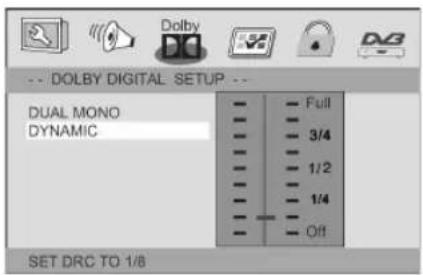
Digital Output
Here you specify the settings for the digital Audio output.
SPDIF/Off: Output of an analogue Audio signal, but no digital signal.
SPDIF/RAW: Output of a digital Audio signal. Use this setting if your amplifier is no two-channel stereo amplifier.
☐ SPDIF/PCM: Output of a digital Audio signal that is converted to a 2-channel signal. Use this setting if your amplifier is a two-channel stereo amplifier.
i NOTE:
If there is no Audio output, even though you connected the DVD-Player to an amplifier, you will most likely have chosen an incorrect setting for the Audio output.
©


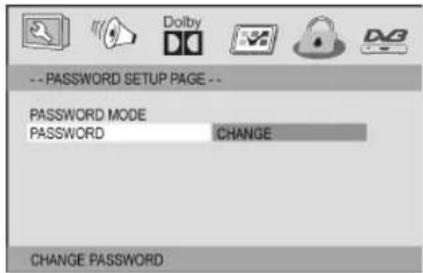
Password
In this menu you can change the password for the child lock system.
In order to change the password, you must first enter the current password. The master password is „1369“.
i NOTE:
If you forgot your password, you can deactivate the child lock system with this password.
DVB-T Setup
Proceed as follows to change the password:
- Enter the present password in the „Old Password“ line with the Numerical buttons (Fig. 2/3) of the remote control. To prevent the password from being read by unauthorized persons only the characters “XXXX” will appear on the screen.
- Enter the new password in the „New Password“ line with the Numerical buttons of the remote control.
- Confirm the new password by entering it again in the „Confirm“ line. Confirm your entry with the ENTER-button (Fig. 2/7).
i NOTE:
The DVB-T settings menu can only be selected during DVB-T operation.
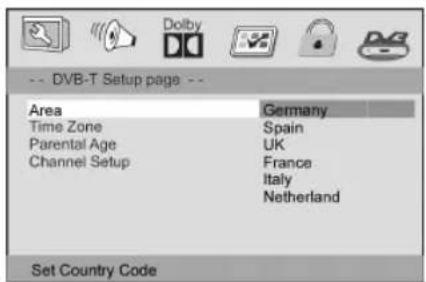
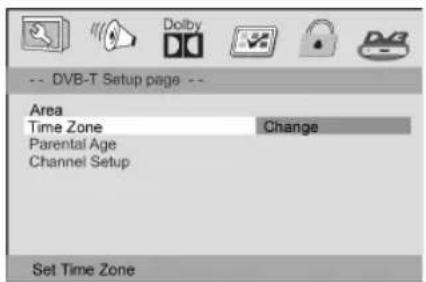
Zone (location)
Here you can select the region where you are located.
Time zone
Here you can select the time zone corresponding to your location. This is synchronised by the reception signal to Greenwich Mean Time (GMT). The automatic setting of the time is carried out in accordance with your selection.
In the majority of Europe:
Normal time = GMT + 1
Summer time = GMT +2

©

Reserving Programmes
From the EPG menu it is possible to reserve programmes.
- Use the cursor buttons (Fig. 2/8) to select the desired programme and press the ENTER-button (Fig. 2/7) to confirm.
- An information window appears. Select „OK“ to reserve the programme or „Cancel“ to cancel the procedure. Confirm your selection with the ENTER-button.
The reserved programme is now listed in the DVB-T menu (reserved programmes).
Deleting reserved programmes
- If you would like to delete the reserved programme again, select „channel setup/reserved channel/start“ in the DVB-T settings menu.
- Use the cursor buttons (Fig. 2/8) to select the corresponding programme and confirm with the ENTER-button (Fig. 2/7).
- Confirm the confirmation prompt with the ENTER-button.
Teletext
Press the ANGLE/TTX-button (Fig. 2/4) to call up the teletext function. Enter the desired teletext page with the help of the numerical buttons (Fig. 2/3). The number you have entered is shown in the top left-hand corner of the screen. After you have entered the desired teletext page number your television set searches for the page. As the teletext pages cannot all be transmitted at the same time it may take a few seconds until your set has found the page.
For all teletext operators page 100 shows the list of contents.
- Use the „I◀◀” or MENU-button (Fig. 2/25, 24) to scroll one page forwards or backwards.
- By pressing the ZOOM-button (Fig. 2/23) the teletext group shown in the yellow fi eld is called up.
- By pressing the „▶▶I“-button (Fig. 2/26) the teletext block shown in the blue fi eld is called up.
In order to turn off the teletext, press the ANGLE/TTX-button (Fig. 2/4) again.
Selecting favourites
By repeatedly pressing the „◀/FAV“-button (Fig. 2/28) you can switch through the previously selected favourite channels. (For selecting favourites see the DVB-T menu „Setting the channel“).
©
©
Disposal
At the end of the service life of the appliance, in particular if it is malfunctioning, make the appliance unusable by pulling the mains plug out of the socket and separating the power cable. Dispose of the appliance according to the environmental regulations applicable in your country. Electrical waste may not be disposed of together with household waste. For any advice regarding recycling, contact your local municipal authorities or your dealer.
Guarantee
The device supplied by our Company is covered by a 24 month guarantee starting on the date of purchase (receipt).
During the life of the guarantee any fault of the device or its accessories ascribable to material or manufacturing defects will be eliminated free of charge by repairing or, at our discretion, by replacing it. The guarantee services do not entail an extension of the life of the guarantee nor do they give rise to any right to a new guarantee!
Proof of the guarantee is provided by the proof of purchase. Without proof of purchase no free replacement or repair will be carried out.
If you wish to make a claim under the guarantee please return the entire machine in the original packaging to your dealer together with the receipt.
Defects to consumables or parts subject to wearing as well as cleaning, maintenance or the replacement of said parts are not covered by the guarantee and hence are to be paid!
The guarantee lapses in case of unauthorized tampering.
After the expiry of the guarantee
After the expiry of the guarantee repairs can be carried by the competent dealer or repair service against the payment of the ensuing costs.
Declaration of conformity
Clatronic International GmbH hereby declares that the device CTV 758 DVB-T/DVD is in conformity with the basic requirements of the European guideline for electromagnetic compatibility (89/336/ EWG) and the low voltage guideline (93/68/EWG and 2006/95/EG).
©
©