
MOD-60 - Vacuum Cleaner MPM - Free user manual and instructions
Find the device manual for free MOD-60 MPM in PDF.


| Product Type | Canister Vacuum Cleaner |
| Brand | MPM |
| Model | MOD-60 |
| Power Consumption | 600 W |
| Voltage | 220-240 V, 50/60 Hz |
| Dust Capacity | 1.5 L |
| Filtration System | HEPA filter |
| Noise Level | ≤ 78 dB(A) |
| Cord Length | 5 m |
| Dimensions (L x W x H) | 38 x 25 x 28 cm |
| Weight | 4.5 kg |
| Suction Power Control | Electronic slider |
| Floor Nozzle | Combination carpet/hard floor |
| Crevice Tool | Yes |
| Dusting Brush | Yes |
| Upholstery Nozzle | Yes |
| Filter Cleaning | Washable HEPA filter |
| Dust Bag Type | Reusable cloth bag |
| Overheat Protection | Yes |
| Parking Position | Yes |
| Accessories Storage | On-board storage |
Frequently Asked Questions - MOD-60 MPM
User questions about MOD-60 MPM
0 question about this device. Answer the ones you know or ask your own.
Ask a new question about this device
Download the instructions for your Vacuum Cleaner in PDF format for free! Find your manual MOD-60 - MPM and take your electronic device back in hand. On this page are published all the documents necessary for the use of your device. MOD-60 by MPM.
USER MANUAL MOD-60 MPM
natural_image
Black and red compact vacuum cleaner with coiled hose and handle (no visible text or symbols)natural_image
Technical line drawing of a mechanical component with an arrow indicating direction (no text or symbols)CZYSZCZENIE I WYMIANA FILTRÓW POWIETRZA
natural_image
Technical line drawing of a vertical warning light fixture with directional arrows indicating motion (no text or symbols)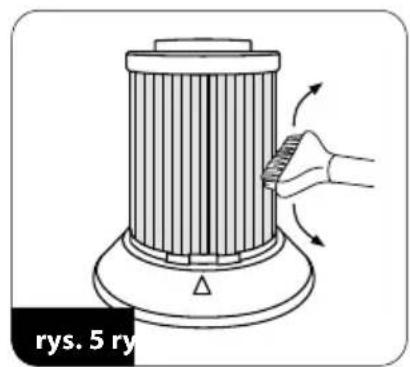
natural_image
Diagram of a mechanical device with a hand operating it, showing rotational motion (no text or symbols)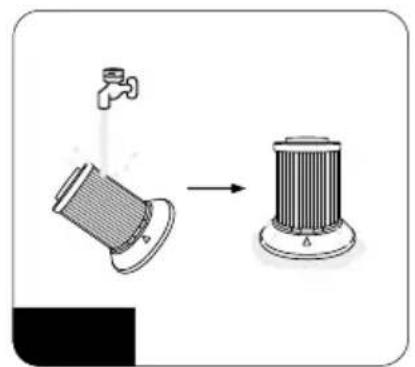
natural_image
Diagram showing a faucet opening a cylindrical component into a base, illustrating the process of cleaning or assembly (no text or symbols present)natural_image
Line drawing of a vacuum cleaner with a lid, emitting exhaust smoke (no text or symbols)Read carefully this manual before using the appliance.
Always remove the plug from the power outlet when not used, or before cleaning the appliance.
Before the first use check if mains voltage conform with vacuum cleaner.
Do not hang the power cord over sharp edges and do not allow the power cord to touch hot surfaces.
Do not pull the cord to unplug the appliance.
Do not leave the operating vacuum cleaner unattended.
- Close supervision is necessary when using the appliance near children.
Do not allow the vacuum cleaner to go over the power cord in case it can damage its insulation.
Do not try to use the vacuum cleaner if you suspect any technical damage.
Do not use the appliance, also if the power cord or plug is damaged - return the appliance for repair to an authorized service centre.
To avoid the risk of damage, fire or injury, always use the attachments recommended by the manufacturer.
Take extreme caution when cleaning the stairs.
Do not immerse the appliance, its cord and plug in water or any other liquids, keep it dry at all times.
Do not use the vacuum cleaner to collect flammable and corrosive liquids, solvents, matches, ash, cigarette ends, oil, sharp items etc. It can cause damage or even fire! Do not vacuum-clean near flammable liquids and substances!
Because of the vacuum cleaner plastic housing keep the appliance away from any heat sources (heaters, stoves etc.)
Do not cover the vacuum cleaner outlet and inlet!
This vacuum cleaner is designed for domestic use only.
This appliance is not intended for use by children under 8 years of age and individuals with reduced physical, sensory or mental capabilities, or lack of experience and knowledge, unless they have been given supervision or instruction concerning use of the appliance in a safe way and if they understand the hazards involved. Cleaning and user maintenance shall not be carried out by children without supervision.
Children should be supervised to ensure that they do not play with the appliance.
- Store the appliance and its cord out of reach of children under 8 years of age.
Do not vacuum-clean people or animals, take special care not to move suction nozzles near eyes and ears.
Turn off and disconnect the appliance from supply circuit before replacing accessories.
Do not vacuum without bag, filters and in case of damage.
Check the hose, wand and suction nozzles and remove any litter from them.
Use the vacuum cleaner only indoors and on dry surfaces. Dry the washed carpets before vacuum-cleaning.
Keep your children safe: do not leave any parts of the packaging readily accessible (i.e. plastic bags, cardboard boxes, polystyrene inserts, etc.).
WARNING! Never let children play with plastic film or bags. Choking/asphyxiation hazard!
APPLIANCE OVERVIEW
Unlike traditional vacuum cleaners, this bagless cyclone vacuum cleaner feature no bag for collecting dust and debris. Instead, the appliance has a purpose-designed cyclone chamber, in which air is forced to rotate in a vortex at an extreme speed. This creates a centrifugal force which expels all dust and debris collected by the vacuum cleaner to a dust canister. The dust canister is cleaned with ease. Using the cyclone vacuum cleaner saves time and reduces operating costs of the appliance
- Vacuum Cleaner housing
- Power cord retractor button
- Vacuum cleaner on/off switch
- Dust container release button
- Dust container
- Dust container lid
- Container lid release button.
- Hinged bottom
- Main filter housing
- Suction hose socket
- Vacuum Cleaner wheels
- Exhaust filter
- Power cable
- Telescopic tube
- Suction hose
- Carpet and floor brush
- Crevice nozzle
- Small brush
- Equipment parking space
STATIC ELECTRICITY
Vacuum cleaning certain surfaces at a low air humidity may cause slight electrification of the appliance. This is natural, does not damage the appliance and does not constitute its defect. To minimise this phenomenon, it is recommended to:
- frequently discharge the appliance by touching items in the room with the metal pipe,
▶ increase air humidity in the room,
use generally available anti-electrostatic products.
APPLIANCE ASSEMBLY
- Remove the vacuum cleaner from the box and discard all bags, stickers and fillers.
- Check that the dust canister and all filters are properly installed in place. See the installation and removal instructions in Sections: "EMPTYING THE DUST CONTAINER" and "AIR FILTER CLEANING AND REPLACEMENT".
- Attach suction hose ⑩ to the socket ⑮ - lock it by slightly rotating the hose end until the locking mechanism engages. Mount the appropriate equipment on the other end of the suction hose, as required - telescopic tube ⑭ and/or appropriate brush ⑯, ⑰, ⑱. The length
of the telescopic tube can be adjusted by pressing the button on the tube and extending/retracting the tube according to the user's needs.
USING THE APPLIANCE
- Before turning on the vacuum cleaner, unwind the power cord ⑬ to a suitable length and plug it into a mains outlet. The yellow mark on the power cord indicates the optimum length limit. Do not pull out the power cord beyond the red mark! Do not press the vacuum cleaner power cord winder button.
- Press the power switch ③ to turn on the vacuum cleaner.
- Monitor the dust canister level. Do not overfill the dust canister. Otherwise the suction power will be reduced and the filters will become dirty prematurely.
CAUTION! If you feel a rapid drop of the suction power, empty the dust canister and/or unclog the suction hose.
- To optimally position the appliance after use, place the parking guide in the horizontal position located between the protective grille buttons ② and ③. Place the rail at the back of the floor-carpet head with the connected suction hose and telescopic tube on the rail.
- To retract the power cord, press the button ② with one hand and hold the cord with the other hand to prevent sudden shuffling that could damage the cord.
ACCESSORIES OVERVIEW
FLOOR-CARPET ATTACHMENT
Designed for cleaning large flat surfaces. It is equipped with castors that facilitate movement in difficult to access places and a flexible joint, connecting it with the suction hose, which allows directing at various angles. When you press the button on the upper attachment housing (switch it to the brush mode), a row of rigid bristles will appear on the bottom to facilitate cleaning hard floors.
SMALL BRUSH
Intended for cleaning flat surfaces, furniture, upholstery, and mattresses. The compact sizes make it perfect for cleaning hard to reach places and whenever the floor and carpet tool is too big.
CREVICE TOOL
Used for cleaning difficult to access areas, such as in room corners, by and below pieces of furniture and in bends and slits. It is also perfect for cleaning computer keyboards, drawers, radiators or window frames.
EMPTYING THE DUST CANISTER
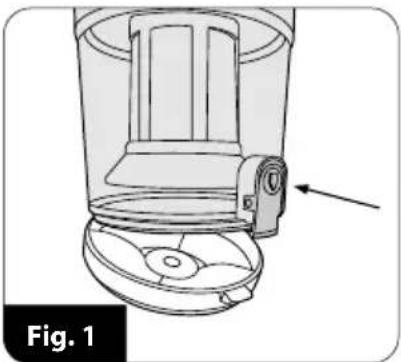
To empty the dust container ⑤, switch off the vacuum cleaner, disconnect it from the power supply, unhook the suction hose ⑮ by making half a turn and finally press the button ④ and pull out the dust container from the appliance. Place the bin over the rubbish dumpster, release the lid button ⑦ as shown in Fig.1 and dump the dust into the bin. After emptying the bin, close the bottom lid and put the container back into its place in the vacuum cleaner - a characteristic click can be heard when the container locks into the appliance.
natural_image
Technical line drawing of a mechanical device with an arrow indicating a component (no text or symbols present)AIR FILTER CLEANING AND REPLACEMENT
Normal operation of the vacuum cleaner requires cleaning the main filter ⑨ each time after it is emptied. Clean the exhaust filter ⑫ at least every few times the dust container is emptied. Replace filters with new ones on regular manner. Unplug the vacuum cleaner from the power supply and disconnect the suction hose before cleaning.
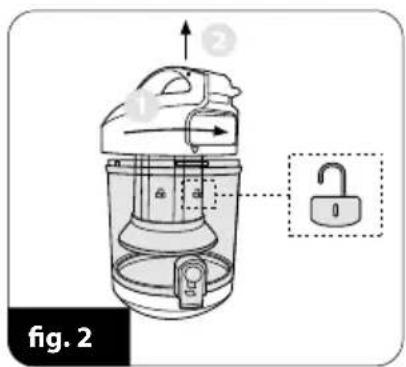
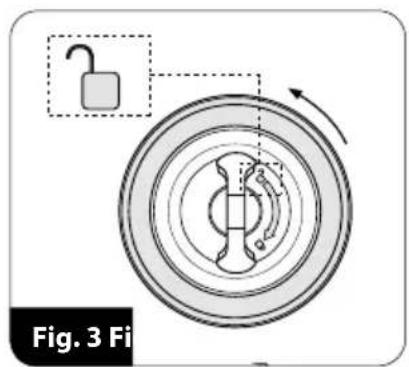
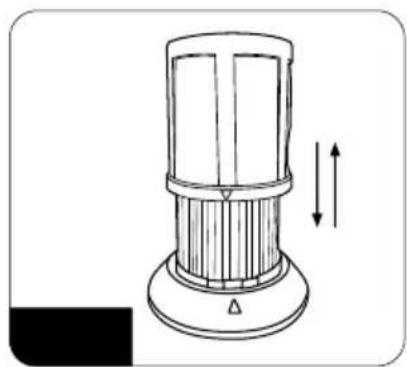
- The main filter ⑨ is located in the dust container and consists of a protective grid and a basic filter. Remove the dust container from the vacuum cleaner, take off the lid of the container (Fig.2), take out the main filter (Fig.3) and the protective grid (Fig.4). The filter and the grid can be gently cleaned with a soft brush (Fig.5) and rinsed under running water (Fig.6). Remember to let the filter and protective grid dry completely before putting all parts back together. Follow the markings on the individual components when dismantling and assembling any parts of the appliance.
natural_image
Technical line drawing of a vertical warning light fixture with directional arrows indicating motion (no text or symbols)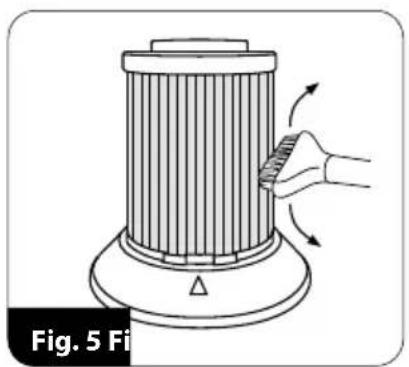
natural_image
Diagram of a mechanical device with a handle and rotating arm, labeled 'Fig. 5 Fi' (no text or symbols on the device itself)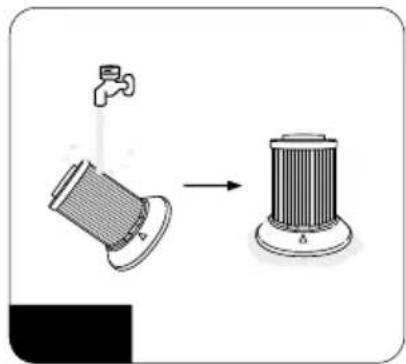
natural_image
Diagram showing a water tap opening a cylindrical device into a base with a flanged top (no text or symbols)The exhaust filter ⑫ is located in a flap on the back of the vacuum cleaner and is protected with
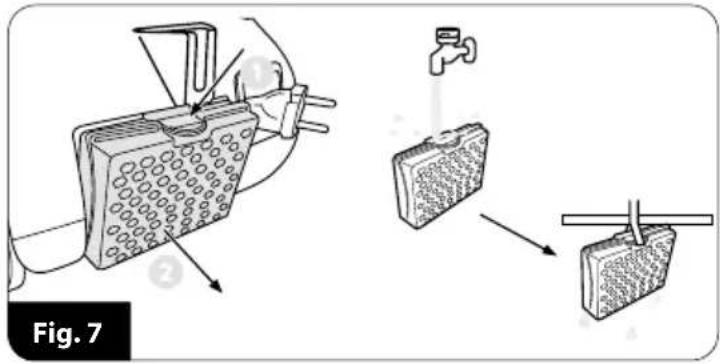
a latch (Fig. 7). After removing the filter flap, remove the protective sponge from the filter as well. Rinse both the filter and the sponge under running water and dry thoroughly. Put the protective sponge back in place before fitting the filter. CAUTION! The filter must be completely dry before installation. Installation of a wet filter may cause an electric shock.
CLEANING AND MAINTENANCE
- Periodically wipe clean the vacuum cleaner canister and the dust canister with a damp cloth. This will keep a neat appearance for a long time.
- Do not clean with sharp objects or strong detergents (e.g. solvents), as they will cause permanent damage to the vacuum cleaner canister.
- Maintain the air filters as explained above.
TROUBLESHOOTING
| Problem: Possible causes: Solution: | ||
| Dust canister cannot be placed in their seat. | The filters were not properly installed. Install the filters properly. | |
| Vacuum cleaner canister overheating. | A slight increase in the temperature of the vacuum cleaner canister is normal. If the temperature is rising considerably, immediately turn off the vacuum cleaner and wait until cools. | |
| The air filters are very dirty. Clean or replace the filters. | ||
| Low suction power. | The dust canister is full. Empty the dust canister. | |
| The suction hose and/or the telescopic wand is clogged. | Unclog the suction hose and/or the telescopic wand. | |
Technical parameters are indicated on the product rating label.
Length of power cord: 4,5 m
Reach of vacuum cleaner: 7,5m

Note! MPM agd S.A. reserves its right to modify the technical data.
PROPER DISPOSAL OF THE PRODUCT (waste electrical and electronic equipment)
Marking on the product indicates that after the service–life of the product expires, it should not be disposed with other type of municipal waste. Used equipment may have a negative impact on the environment and health of people due to potentially containing hazardous substances, mixtures and components. Mixing electric waste with other types of waste or disassembling those in an unprofessional manner may cause
a release of substances that are hazardous to the environment and health. Used equipment should be handed-over to a point for collection of electric waste. In order to obtain detailed information regarding the electric waste collection points, the user should contact the municipal point of electric waste collection or used equipment processing department.
natural_image
Technical line drawing of a mechanical component with an arrow indicating direction (no text or symbols)natural_image
Technical line drawing of a vertical warning light fixture with directional arrows indicating motion (no text or symbols)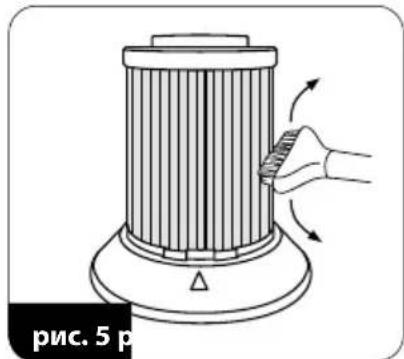
natural_image
Illustration of a mechanical device with a hand holding a tool, showing rotational motion arrows (no text or symbols)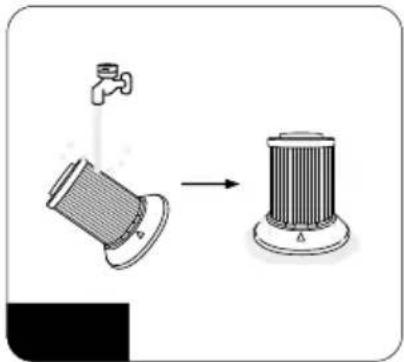
natural_image
Diagram showing a faucet opening a cylindrical component and a base-mounted fan blade, both without any text or symbols.natural_image
Technical line drawing of a mechanical component with an arrow indicating direction (no text or symbols)natural_image
Technical line drawing of a vertical warning light fixture with directional arrows indicating motion (no text or symbols)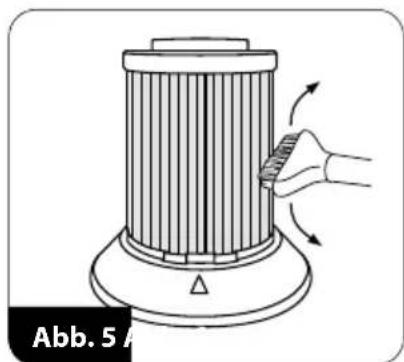
natural_image
Diagram of a mechanical device with a hand operating it, showing rotational motion arrows (no text or symbols)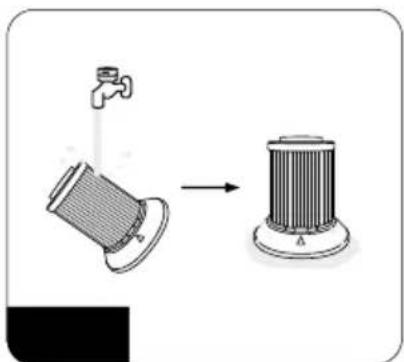
natural_image
Diagram showing a faucet opening a cylindrical component and its side view with a base (no text or symbols)natural_image
Technical line drawing of a mechanical component with an arrow indicating a feature, labeled 'obr. 1' (no other text or symbols)ČIŠTĚNÍ A VÝMĚNA VZDUCHOVÝCH FILTRŮ
natural_image
Technical line drawing of a vertical warning light fixture with two vertical arrows indicating upward motion (no text or symbols)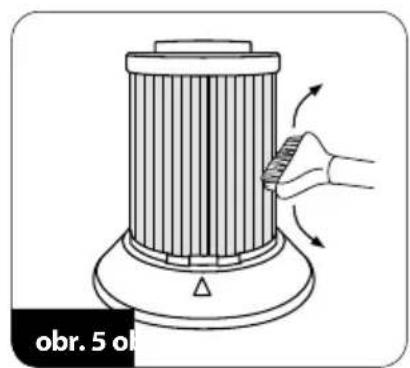
natural_image
Diagram of a mechanical device with a handle and rotating arrow, labeled 'obr. 5 ol' (no other text or symbols)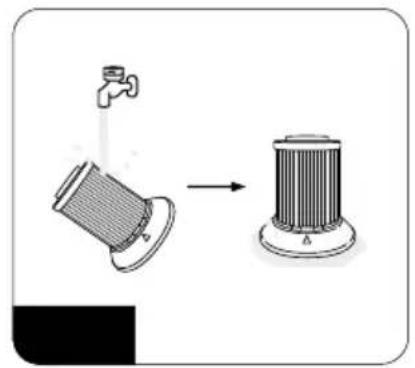
natural_image
Diagram showing a faucet opening a cylindrical component and its side view with a base (no text or symbols)natural_image
Technical line drawing of a mechanical component with an arrow indicating direction (no text or symbols)ČISTENIE A VÝMENA VZDUCHOVÝCH FILTROV
natural_image
Technical line drawing of a vertical warning light fixture with directional arrows indicating motion (no text or symbols)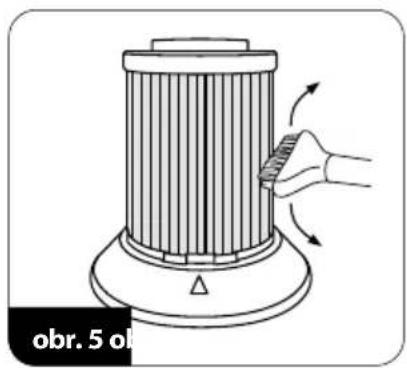
natural_image
Diagram of a vertical cylindrical device with a handle and arrow indicating rotation, labeled 'obr. 5 ol' (no other text or symbols)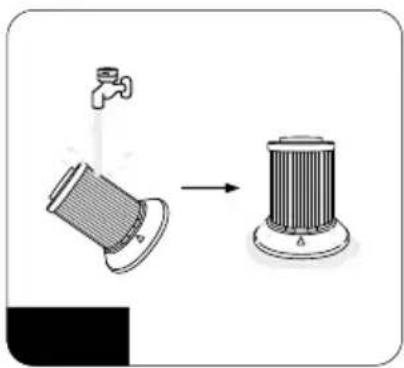
natural_image
Diagram showing a faucet opening a cylindrical component and a base-mounted fan or filter device (no text or symbols present)We wish you satisfaction from using the product and invite you to check a wide range of other MPM appliances
- CZYSZCZENIE I WYMIANA FILTRÓW POWIETRZA
- APPLIANCE OVERVIEW
- STATIC ELECTRICITY
- APPLIANCE ASSEMBLY
- USING THE APPLIANCE
- ACCESSORIES OVERVIEW
- FLOOR-CARPET ATTACHMENT
- SMALL BRUSH
- CREVICE TOOL
- EMPTYING THE DUST CANISTER
- AIR FILTER CLEANING AND REPLACEMENT
- CLEANING AND MAINTENANCE
- PROPER DISPOSAL OF THE PRODUCT (waste electrical and electronic equipment)
- ČIŠTĚNÍ A VÝMĚNA VZDUCHOVÝCH FILTRŮ
- ČISTENIE A VÝMENA VZDUCHOVÝCH FILTROV
Brand : MPM
Model : MOD-60
Category : Vacuum Cleaner