
TE‒343 - Digital decoder TESLA - Free user manual and instructions
Find the device manual for free TE‒343 TESLA in PDF.


| Product Type | Digital Terrestrial Receiver (DVB-T2) |
| Model | Tesla TE-343 |
| Dimensions | Approx. 115 x 75 x 28 mm |
| Weight | Approx. 180 g |
| Power Supply | 5V DC, 1.5A (via external adapter) |
| Standby Power Consumption | < 1 W |
| Tuner | DVB-T2/T, MPEG-2/4, H.264/H.265 |
| Channel Memory | Up to 800 stations |
| Video Outputs | HDMI (1080p/1080i/720p/576p/576i), SCART (CVBS/RGB) |
| Audio Output | HDMI, Digital Audio (SPDIF) via SCART? (Not specified) |
| USB Port | USB 2.0 Host (max 500 mA) for media playback and recording |
| Network | Ethernet RJ-45 (10/100 Mbps), optional Wi-Fi via external adapter |
| Media Support | Video, Music, Pictures via USB; DLNA |
| Recording | PVR to USB drive (Timeshift and scheduled recording) |
| Electronic Program Guide | 7-day EPG |
| Parental Control | Yes (password protected) |
| Languages | Multilingual OSD, audio, subtitle |
| Accessories | Remote control, HDMI cable, 2x AAA batteries, manual |
| Maintenance | Clean with a soft dry cloth; do not use liquids |
| Safety | Do not open device; no user-serviceable parts; keep away from moisture |
| Spare Parts / Repair | Contact dealer or authorized service center |
Frequently Asked Questions - TE‒343 TESLA
User questions about TE‒343 TESLA
0 question about this device. Answer the ones you know or ask your own.
Ask a new question about this device
Download the instructions for your Digital decoder in PDF format for free! Find your manual TE‒343 - TESLA and take your electronic device back in hand. On this page are published all the documents necessary for the use of your device. TE‒343 by TESLA.
USER MANUAL TE‒343 TESLA
1
3

MANUAL
OBSAH
BEZPEČNOSTNÉ POKYNY A PARAMETRE

1

TE-343
TESLA
MANUAL
OBSAH
1 Všeobecné vlastnosti 22
2. Prehl'ad 23
2.1 Predná strana prijimača 23
2.2 Zadná strana prijímača 23
2.3 Dial'kový ovládač 24
3. Menu prijímača 25
4. Program 26
4.1 Editácia zoznamu staníc 26
4.2 Ovládanie hlasitosti 26
5. Obraz 27
5.1 Pomer strán obrazu 27
5.2 Rozlíšenie obrazu na HDMI konektore 27
5.3 Formát TV obrazu 27
5.4 TV-SCART 27
5.5 Nastavenie OSD 27
6. Vyhl'adávanie staníc 28
6.1 Iba vol'né FTA-Free to air
6.2 Automatické vyhl'adávanie 28
6.3 Ručné vyhlřadávanie 28
6.4 Krajina 28
6.5 Napájanie anténneho zosilňovača 5V 28
6.6 Automatická aktualizácia staníc 28
7. Čas 29
7.1 Región a čas 29
7.2 Režim spánku (Hod.) 29
7.3 Nastavenje časovača 29
7.4 Zapnutie/vypnutie napájania 29
8. Nastavenie OSD 30
8.1 Jazyk OSD 30
8.2 Jazyk EPG 30
8.3 Jazyk titulkov 30
8.4. Jazyk TTX 30
8.5 Prvy jazyk zvuku 30
8.6 Drubý jazyk zvuku 30
8.7 Zvukoví opis AD 30
8.8 Digital Audio 30
0.3 Digital Audio 56
0. Nostavenia systémy 31
9. Nastavenie systemu 31
0.1. Podlěovský zámok 31
9.1 Rodicovsky Zámok 31
8.2 Nostevania zámkov 32
9.2 Nastavenie zamkov 31
9.3 Výrobné nastavenie 21
9.3 vyrobne nastavenia 31
9.4 Informacle o systeme 31
9.5 Aktualizacia softveru 31
9.6 Nastavenie internetovej siete 31
10. USB-Mediálne centrum 32
10.1 Mediálne centrum 32
10.2 Nahrávky 32
10.3 Možnosti rekordéra 32
10.4 Internet 32
10.5 DLNA 32
1. VŠEOBECNÉ VLASTNOSTI
Terrestrial Broadcast Digital Receiver | DVB-T2
User manual EN
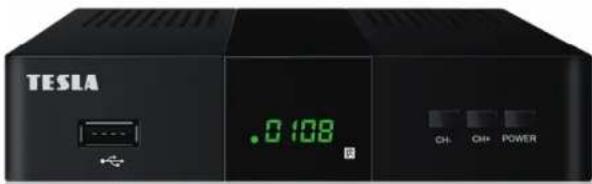
SAFETY INSTRUCTIONS AND PARAMETERS

Read this manual carefully before use.
Technical specifications and operating procedures in this guide are subject to change without notice. If you have any questions during the period of use, please contact the manufacturer.

Dear customer,
Thank you for purchasing a product of the proven TESLA brand.
Please read this manual carefully before first use. He will be a good guide for you
when you get acquainted with your new device.
We want STB TESLA to be a pleasant companion for you.
the data and advice that is used in this walkthrough may be subject to future changes
and improvements and are effective for the release of its current version, in February 2022.
Thank you for your understanding.


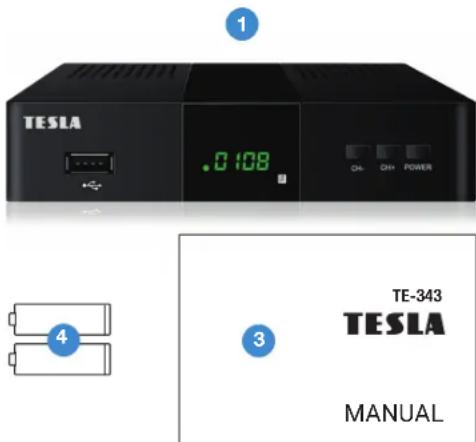
PACKAGE CONTENTS
- Receiver
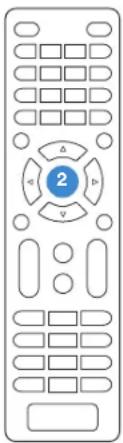
- Remote control
- Operating Instructions
- HDMI cable
- 2x AAA batteries
CONTENT
1 General features 38
2. Overview 39
2.1 Receiver front 39
2.2 Receiver back 39
2.3 Remote control 40
3. Receiver menu 41
4. Program 42
4.1 Editing the list of stations 42
4.2 Volume control 42
5. Image 43
5.1 Image aspect ratio 43
5.2 Image resolution on hdmi connector 43
5.3 TV picture format 43
5.4 TV-SCART 43
5.5 OSD settings 43
6. Station search 44
6.1 Free FTA-Free to air only 44
6.2 Automatic search 44
6.3 Manual search 44
6.4 Country 44
6.5 Antenna amplifier power supply 5V 44
6.6 Automatic station updates 44
7. Time 45
7.1 Region and time 45
7.2 Sleep Mode Falling Asleep (Hours) 45
7.3 Setting the timer 45
7.4 Power on/off 45
8. OSD settings
8.1 OSD language 46
8.2 EPG language 46
8.3 Subtitle language 46
8.4 TTX language
8.5 First sound language 46
8.6 Second sound language 46
8.7 Audio description of AD 46
8.8 Digital Audio 46
9. System Settings 47
9.1 Parental control 47
9.2 Setting up locks 47
9.3 Factory settings 47
9.4 System Information 47
9.5 Software Updates 47
9.6 Setting up the Internet network 47
10. USB-Media Center 48
10.1 Media Centre 48
10.2 Recordings 48
10.2 Recordings 48
10.3 Recorded Options 48
10.4 Internet 48
10.4 Internet 48
10.3 DLNA 48
1. GENERAL CHARACTERISTICS
• DVB-T2 compatible (MPEG-II / MPEG-IV / H.264/H.265)
• PAL/NTSC conversion
• Memory for 800 stations
• Support 8 favorite groups and parental control
• Multilingual offer support
• Multi-language audio support
• DVB Subtitle Support
• 7-day Electronic Programme Guide (EPG)
- Teletext
- USB 2.0 interface
2. OVERVIEW
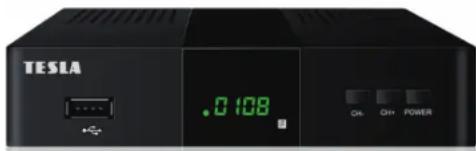
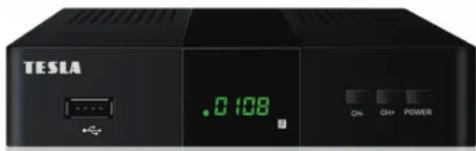
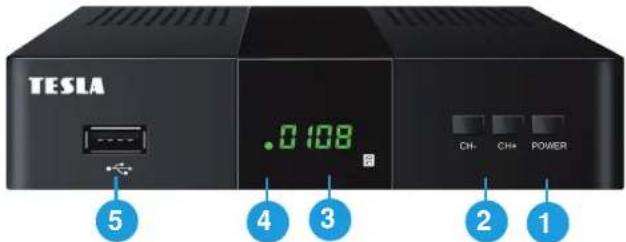
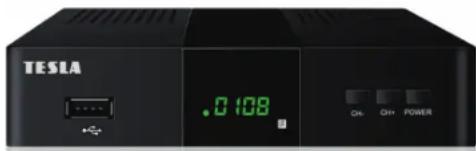
2.1 RECEIVER FRONT
- POWER: Switch the receiver between operation and standby mode.
- CH+/CH-: Change the station or change the item in the receiver menu menu.
- DISPLAY: Displays the number of the selected station. In standby mode displays the local time.
- SIGNAL LED: Signal presence indicator.
- USB 2.0 host port: USB 2.0 port for storage connection. Power supply max. 500mA.
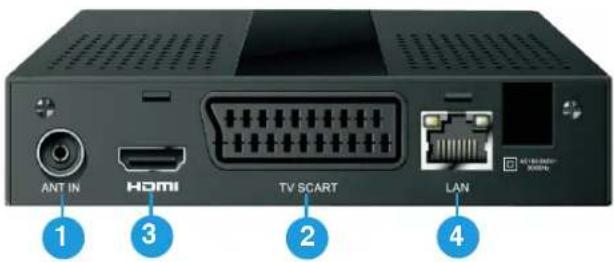
2.2 BACK OF RECEIVER
- RF IN: Antenna connection connector.
- TV SCART: Analog way to connect to TV via SCART cable.
- HDMI: Connect to the TV with an HDMI cable.
- LAN: Used to connect to the Internet via Ethernet-LAN cable.
2. OVERVIEW
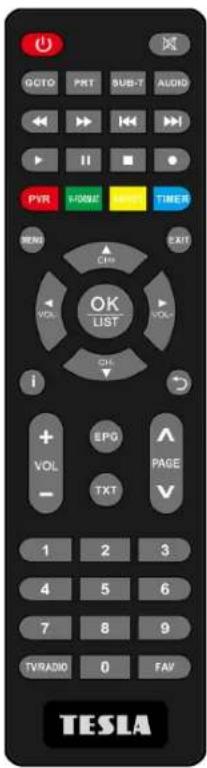
2.3 REMOTE CONTROL
-
⏻ Switches the receiver between the operating and standby mode.
-
Mutes the sound.
-
GOTO: Go to the selected recording time.
4: PRT: Set the repeat recording option.
-
SUB-T: Displays a list of available subtitle languages.
-
AUDIO: Displays a list of available sounds.
-
◀◀/▶▶ Fast backwards / Fast forward.
-
|◀◀ / ▶▶| Skip to the next recording.
-
▶ Play.
-
IIPause/Jumps to the time shift function.
-
■ Stops recording and playback.
-
● Recording of the show.
-
PVR: Direct access to the playlist.
-
V-FORMAT: Used to change the image resolution on the HDMI connector.
-
ASPECT: Used to change the image format.
-
TIMER: Set up an event timer.
-
MENU: Activates the main menu of the receiver.
-
EXIT: Ends the current menu step by step.
-
VOL◄ / VOL►: Change the volume in watch mode, in the menu, move left and right.
-
CH▲ / CH▼: Change station, move up/down in the menu.
-
OK: Activates the highlighted submenu in menu mode to see a list of stations in viewing mode.
-
INFO: Displays information about the program.
-
←: Switches to the previous watched station.
-
VOL+ - : Increase / decrease volume.
-
EPG: Electronic Program Guide
-
TXT: Displays teletext if available.
-
PAGE ▲ / ▼: Paging in the menu.
-
NUMERIC BUTTONS (0 \~ 9): Enter TV number / radio station, or menu option number.
-
TV/RADIO: Change the list of TV/Radio stations.
-
FAV: Displays a list of favorite stations, that you set up earlier.
3. RECEIVER MENU
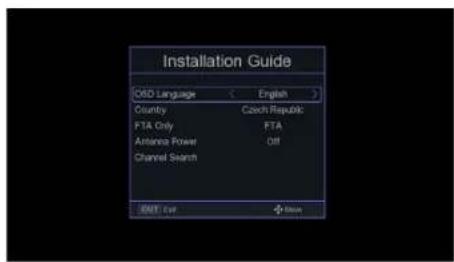
After the first time you turn on the receiver, you will be greeted by the installation wizard. Connect the antenna cable using the antenna connector (fig. 2.2/1). Select the OSD language one by one, country of use, whether to search for uncoded stations (FTAs), whether you want to activate 5V on the antenna connector for the antenna amplifier. On the last line "Station search" press tl. OK on the remote control to start the search.
Note: The default receiver password is 000000.
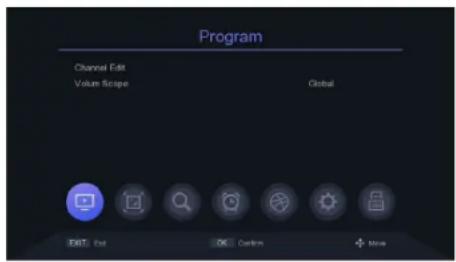
Main menu: Press the MENU button to open the receiver's main menu.
4. PROGRAMME
4.1 EDITING THE STATION LIST
First, on the remote control, use the TV/R button to select in which list stations you want to make adjustments. Using the numeric buttons 1 to 5 on the controller select an option:
- DEL - Deleting stations from the list.
- MOVE - Move stations in the list. Select a station in the list and press tl. OK. Subsequently, a symbol of two red arrows will appear in the row. Using navigation keys to move the station to a new position and press tl again. OK to save.
- SKIP - Mark stations that will not be displayed when you switch stations using navigation keys. They will be skipped.
- LOCK - Here you can lock stations. To view them, it will be required enter the receiver password.
- FAV - Here you can create your own popular lists of stations.
4.2 VOLUME CONTROL
When choosing "Uniform", the volume control will be uniform for all stations. When "Station" is selected, the volume will be adjusted to each station individually.
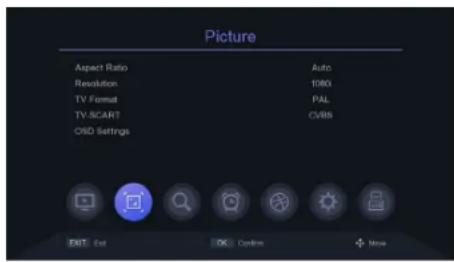
5. IMAGE
5.1 IMAGE ASPECT RATIO
Set the display format according to the aspect ratio of the screen. Select 4:3 or 16:9 mode, depending on the type of TV.
5.2 IMAGE RESOLUTION ON HDMI CONNECTOR
Set the image resolution on the HDMI connector in the range of 1080p, 1080i, 720p, 576i or 576p.
5.3 TV PICTURE FORMAT
The default value is PAL.
5.4 TV-SCART
Here you can set the video output type of the SCART connector. CVBS-RGB.
5.5 OSD SETTINGS
You can set OSD Transparency, Brightness, Color, Image Contrast, and Timeout OSD view.
6. STATIONS SEARCH
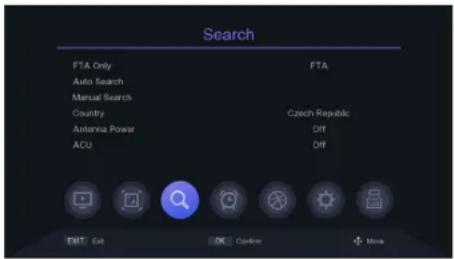
6.1 FREE-FTA-FREE TO AIR ONLY
Choose whether the receiver should search only for uncoded stations.
Use the buttons ◀/▶.
6.2 AUTOMATIC SEARCH
Automatically searches for and saves available stations.
The new search deletes the existing list of stations.
6.3 MANUAL SEARCH
In this menu, you can manually search for stations from the selected channel.
6.4 COUNTRIES
Select the country in which the receiver will be used.
6.5 POWER SUPPLY OF ANTENNA AMPLIFIER 5V
In this menu, you can turn on or off the 5V power supply for the antenna amplifier. The 5V voltage will be available on the antenna connector. Do not turn on this power supply in case you are not using any amplifier!
6.5 AUTOMATIC CHANNELS UPDATES
7. TIME
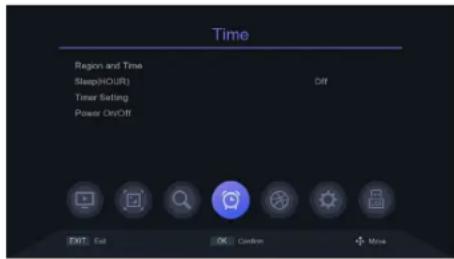
7.1 REGION AND TIME
Choose whether the receiver time will be set automatically from the broadcast or set it manually. Next, you have the option to set "Daylight Saving Time".
7.2 FALLING ASLEEP
In this menu you can set the time for which the receiver will go automatically to standby mode.
7.3 SETTING THE TIMER
Automatically records on the connected USB drive, or plays the program according to the list of timer events that you set here.
-
Press the green button to set the timer. Choose "Record-PVR" mode or just "Play". Enter the necessary parameters and press the OK button to save the timer.
-
Modify or delete the timer. In the Event Timer menu, highlight one event, press the red or blue button to cancel one or all of the timers. With the yellow button press, you can adjust the timer.
7.4 POWER ON/OFF
In this menu you can set the time of automatic switching on or off of the receiver.
8. OSD ADJUSTMENT
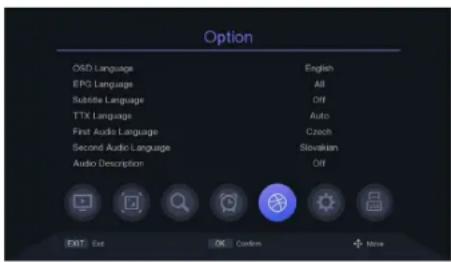
Tip: Here you can set all settings by pressing the ◀/▶.
8.1 OSD LANGUAGE
Set the menu language.
8.2 EPG LANGUAGE
Set the EPG-program guide language.
8.3 SUBTITLE LANGUAGE
Set the subtitle language.
8.4 TXT LANGUAGE
Set TXT
8.5 FIRST AUDIO LANGUAGE
Set your preferred sound language.
8.6 SECOND AUDIO LANGUAGE
Set the language that will be preferred second in order.
8.7 AUDIO (ACCOMPANYING) DESCRIPTION OF THE SCENE FOR THE BLIND
Here you can activate the additional audio description. The sound will only be available as long as the selected station is broadcast.
8.8 DIGITAL AUDIO
Here you can set the format of digital audio data according to the needs of the home audio system.
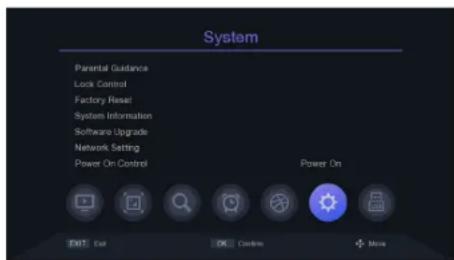
9. SYSTEM SETTINGS
9.1 PARENTAL CONTROL
In this menu, you can set parental controls. The default receiver password is 000000. If the evaluated order exceeds the age set here, then the receiver will be require a password. Otherwise, you won't be able to watch the show.
9.2 LOCK SETTINGS
In this menu you can activate the option to lock the menu, the need to enter or do not enter the password for previously locked stations, or change the password of the receiver.
9.3 FACTORY RESET
After selecting the receiver password, all stations and receiver settings are erased to factory values.
9.4 SYSTEM INFORMATION
Here is available information about the receiver model, software version and firmware assembly data.
9.5 SOFTWARE UPDATES
You can choose a USB update to update the software, or you can back up setting the box to USB for later use. During the update process do not turn off the power. To update the SW from the Internet, first connect the receiver to the Internet.
9.6 INTERNET NETWORK SETTINGS
The Internet can be connected via LAN cable or external Wi-Fi module (not included). Connect the Wi-Fi adapter. Press the green button to search available Wi-Fi networks, select a network and enter the network password, if required.
10. USB-MEDIA CENTER
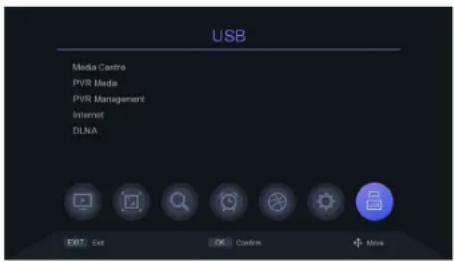
The menu will only be available if you connect a USB drive. You can play a video, music, pictures, or recordings.
10.1 MEDIA CENTRE
Connect a USB drive with multimedia content. Subsequently, you can select what type of file you want to play (Video, Music, Pictures).
10.2 PVR MEDIA
A list of previously created custom recordings will be displayed here.
10.3 PVR MANAGEMENT
You can activate the timeshift function and set the amount of disk space. For this function, a USB connection of the recording device - disk is required. You can set the default recording length for recording. It also displays properties connected USB recording device or perform formatting.
Warning - when pressing the red button, the disk will be formatted and delete all user data!
10.4 INTERNET
Weather: after a successful connection to the Internet network, this application can display weather forecast. RSS reader - Information websites.
10.5 DLNA
DLNA allows you to share photos, music, and videos on your network to devices that support this standard.
WARRANTY CONDITIONS
1. WARRANTY PERIOD
The manufacturer provides a warranty for this product for a period of 24 months from the date of purchase of the product Consumer. The warranty period is extended by the period during which the product was under warranty repair. The warranty applies only to defects caused by a manufacturing error or material defect!
2. WARRANTY CARD
Free warranty service is provided only if proof of purchase of the product is presented (receipts) and correctly completed warranty card - must contain the serial number, date of sale and the stamp of the store (assembly firm). Copies and incorrectly completed warranty certificates will not be taken into account!
3. REPAIRS DURING THE WARRANTY AND POST-WARRANTY PERIOD
Warranty service must be applied to the organization where the product was purchased or to the assembly company, that performed the installation.
4. SCOPE OF WARRANTY
The warranty is invalid if the defect is caused by mechanical damage, improper use, inattention, an unavoidable event (natural disaster), if the product was connected to another supply voltage as specified in the technical specification, and also in the case of modifications or repairs made outside the distributor's service. Nor can the guarantee be invoked where the consumer requires modification or adaptation to extend the functionality of the product (or a system composed of several to opponents) as opposed to the standard version.
Inter-sat LTD, as the manufacturer of this device, declares that the type of radio equipment Tesla TE-343 complies with Directive 2014/53/EU. The full text of the EU declaration of conformity is available on the https://www.tesla-electronics.eu/
Serial number
Date of sale Seller's stamp and signature
Date of notification
Date of implementation
Mounting no. letter/comment
Signature
Registration of warranty repairs:
TESLA
TESLA TE-343
INSTRUKCJE BEZPIECZEŃSTWA I PARAMETRY

natural_image
Front view of a classic television remote control with no visible text or symbols on the device itself.1

TE-343
TESLA
MANUAL
SPIS TREŚCI
3. NAPRAWY W OKRESIE GWARANCYJNYM I POGWARANCYJNYM


- OBSAH
- BEZPEČNOSTNÉ POKYNY A PARAMETRE
- VŠEOBECNÉ VLASTNOSTI
- SAFETY INSTRUCTIONS AND PARAMETERS
- PACKAGE CONTENTS
- CONTENT
- GENERAL CHARACTERISTICS
- OVERVIEW
- RECEIVER FRONT
- BACK OF RECEIVER
- REMOTE CONTROL
- RECEIVER MENU
- PROGRAMME
- EDITING THE STATION LIST
- VOLUME CONTROL
- IMAGE
- IMAGE ASPECT RATIO
- IMAGE RESOLUTION ON HDMI CONNECTOR
- TV PICTURE FORMAT
- TV-SCART
- OSD SETTINGS
- STATIONS SEARCH
- FREE-FTA-FREE TO AIR ONLY
- AUTOMATIC SEARCH
- MANUAL SEARCH
- COUNTRIES
- POWER SUPPLY OF ANTENNA AMPLIFIER 5V
- AUTOMATIC CHANNELS UPDATES
- TIME
- REGION AND TIME
- FALLING ASLEEP
- SETTING THE TIMER
- POWER ON/OFF
- OSD ADJUSTMENT
- SYSTEM SETTINGS
- USB-MEDIA CENTER
- MEDIA CENTRE
- PVR MEDIA
- PVR MANAGEMENT
- INTERNET
- DLNA
- WARRANTY CONDITIONS
- WARRANTY PERIOD
- WARRANTY CARD
- REPAIRS DURING THE WARRANTY AND POST-WARRANTY PERIOD
- SCOPE OF WARRANTY
- TESLA
- TESLA TE-343
- INSTRUKCJE BEZPIECZEŃSTWA I PARAMETRY
- SPIS TREŚCI
- NAPRAWY W OKRESIE GWARANCYJNYM I POGWARANCYJNYM
Brand : TESLA
Model : TE‒343
Category : Digital decoder