
TE‒222 - Digital decoder TESLA - Free user manual and instructions
Find the device manual for free TE‒222 TESLA in PDF.


| Product Type | Digital terrestrial receiver (DVB-T2) |
| Brand | Tesla |
| Model | TE-222 |
| Video Decoding | MPEG-2/4, H.264/H.265 (HEVC) |
| Maximum Resolution | Full HD 1080p |
| Tuner | DVB-T2 |
| Station Memory | 800 stations |
| Favorite Groups | 4 groups |
| Parental Control | Yes (password protected) |
| Electronic Program Guide (EPG) | 7-day |
| Teletext | Yes |
| USB Port | USB 2.0 host for media playback and PVR |
| HDMI Output | Yes, with CEC support |
| Power Supply | MicroUSB 5V (adapter not included) |
| Remote Control | Included (with IR sensor) |
| Warranty | 24 months |
| Package Contents | Receiver, remote control, 2x AAA batteries, IR sensor, microUSB cable, HDMI extension cable, IEC antenna connector, user manual |
| Time Shift | Yes |
| PVR Recording | Yes (via USB storage) |
| Multilingual Support | OSD, subtitle, and audio language selection |
| Audio Description | AD for visually impaired |
| Safety Instructions | Read manual before use; do not expose to moisture |
Frequently Asked Questions - TE‒222 TESLA
User questions about TE‒222 TESLA
0 question about this device. Answer the ones you know or ask your own.
Ask a new question about this device
Download the instructions for your Digital decoder in PDF format for free! Find your manual TE‒222 - TESLA and take your electronic device back in hand. On this page are published all the documents necessary for the use of your device. TE‒222 by TESLA.
USER MANUAL TE‒222 TESLA
natural_image
Exterior view of a Tesla brand electronic device with a gold connector and dot pattern (no text or symbols on body)BEZPEČNOSTNÍ POKYNY A PARAMETRY

natural_image
Front view of a classic remote control with a square button and grid of buttons (no text or symbols)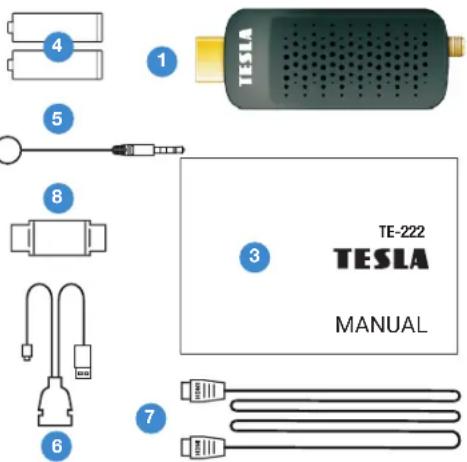
OBSAH
natural_image
Close-up of a Tesla brand electronic device with a perforated grille and connector (no visible text or symbols)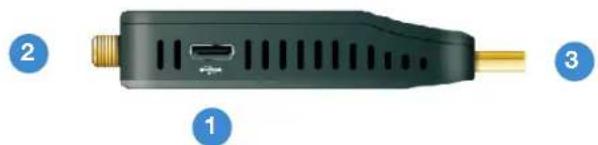
natural_image
Close-up of a black electronic device with ports and a metallic connector, labeled 1, 2, and 3 (no text or symbols on the device itself)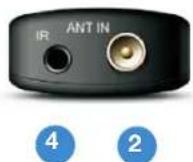
2. PŘEHLED
2.2 DÁLKOVÝ OVLADAČ
natural_image
Exterior view of a Tesla brand electronic device with a gold connector and perforated grille (no text or symbols on body)BEZPEČNOSTNÉ POKYNY A PARAMETRE
natural_image
Front view of a classic remote control with square buttons and a central diamond-shaped button (no text or symbols)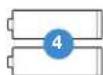
1
5
OBSAH
natural_image
Close-up of a Tesla brand electronic device with a perforated grille and connector (no visible text or symbols)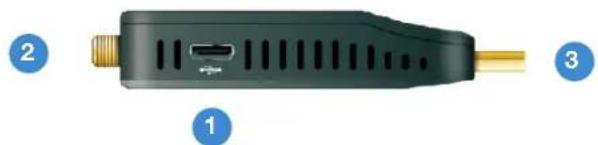
natural_image
Close-up of a black electronic device with ports and a metallic connector, labeled 1, 2, and 3 (no text or symbols on the device itself)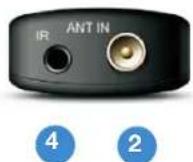
2. PREHL'AD
2.2 DIALKOVÉ OVLÁDANIE
6.2 MANUÁLNE VYHL'ADÁVANIE
Terrestrial Broadcast Receiver | DVB-T2
User manual EN
natural_image
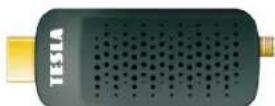
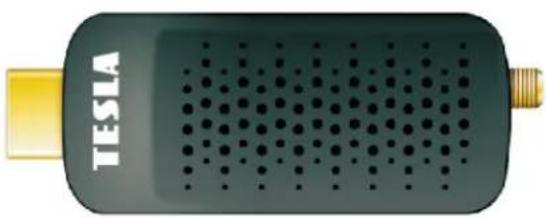
Black Tesla brand electronic device with dotted grille and gold connector (no visible text or symbols beyond branding)SAFETY INSTRUCTIONS AND PARAMETERS

Read this manual carefully before use.
Technical specifications and operating procedures in this guide are subject to change without notice. If you have any questions during the period of use, please contact the manufacturer.

Dear customer,
Thank you for purchasing a product of the proven TESLA brand.
Please read this manual carefully before first use. He will be a good guide for you
when you get acquainted with your new device.
We want STB TESLA to be a pleasant companion for you.
the data and advice that is used in this walkthrough may be subject to future changes
and improvements and are effective for the release of its current version, in February 2022.
Thank you for your understanding.
Full HD
1080
H.265
HEVC


TIME SHIFT
HDMI

USB PVR

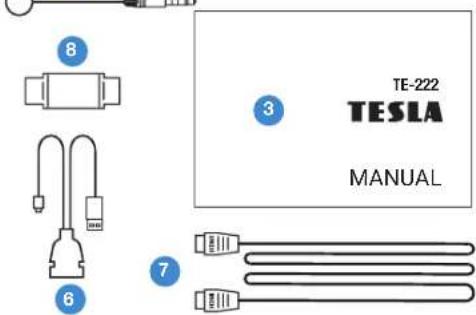
PACKAGE CONTENTS
- reciever
- Remote control
- Operating Instructions
- 2x AAA batteries
- External IR sensor
- MicroUSB power cable
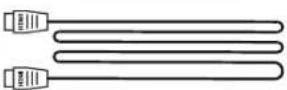
- HDMI extension cable
- IEC antenna connector
natural_image
Front view of a classic remote control with square buttons and a central diamond-shaped button (no text or symbols)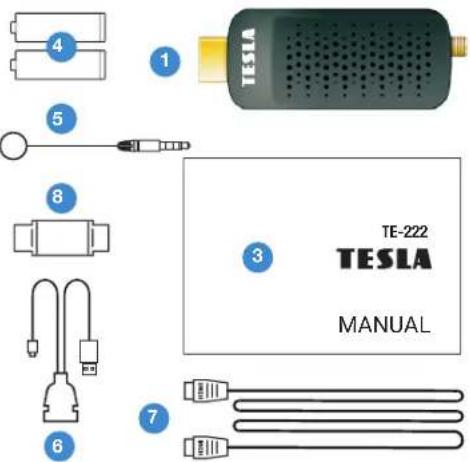
CONTENT
1 General features 38
- Overview 39
2.1 Overview of receiver connectors 39
2.2 Remote control 40
-
Receiver menu 41
-
List Of Stations 42
4.1 Editing the list of stations 42
- Image 43
5.1 Image aspect ratio 43
5.2 Image resolution on HDMI connector 43
5.3 TV picture standard 43
5.4 OSD menu transparency 43
5.5 HDMI-CEC 43
- Station search 44
6.1 Free FTA-Free to air only 44
6.2 Automatic search 44
6.3 Manual search 44
6.4 Country 44
6.5 Power supply of antenna amplifier 5V 44
- Time 45
7.1 Time settings 45
7.2 Time zone 45
7.3 Turn off after: 45
- Options 46
8.1 OSD language 46
8.2 Subtitle language 46
8.3 Sound language 46
8.4 Digital Audio 46
8.5 Audio AD description of the action 46
- System Settings
9.1 Parental Controls 47
9.2 Setting a password 47
9.3 Factory settings 47
9.4 System Information 47
9.5 Firmware Update 47
10. USB-Medial Center 48
10.1 Multimedia
10.2 Photo Settings 48
10.3 Movie Options 48
10.4 PVR Settings 48
1. GENERAL CHARACTERISTICS
• DVB-T2 compatible (MPEG-II / MPEG-IV / H.264/H.265)
• PAL/NTSC conversion
• Memory for 800 stations
• Support 4 favorite groups and parental control
• Multilingual offer support
• Multi-language audio support
• DVB Subtitle Support
• 7-day Electronic Programme Guide (EPG)
- Teletext
- USB 2.0 interface
2. OVERVIEW
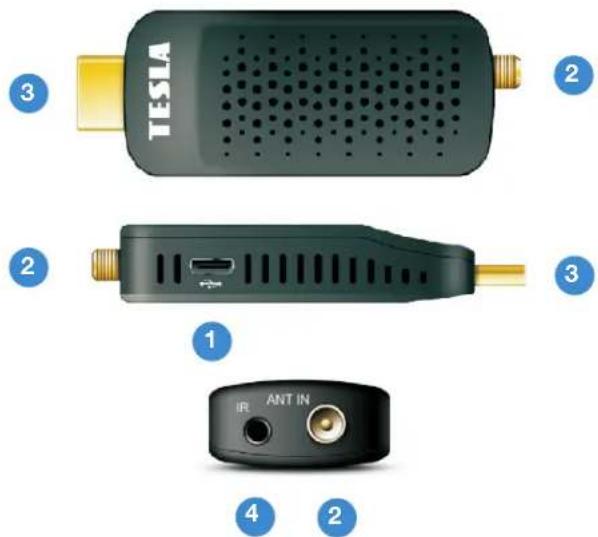
2.1 OVERVIEW OF RECEIVER CONNECTORS
- MICROUSB 2.0 HOST PORT: Port to connect memory storage and power the receiver. The 5V power adapter is not included. You can also use the USB input on your TV for power.
- RF IN: Antenna connection connector.
- HDMI: Connect to your TV using this HDMI connector.
- IR: 2.5mm JACK connector to connect the included IR remote control sensor. HDMI extension: You can use this cable to extend or improve the availability of the HDMI input in your TV in case this one is hard to access (for example, when mounting the TV on the wall).
- HDMI extension: You can use this cable to extend or improve the availability of the HDMI input in your TV in case this one is hard to access (for example, when mounting the TV on the wall)
2. OVERVIEW
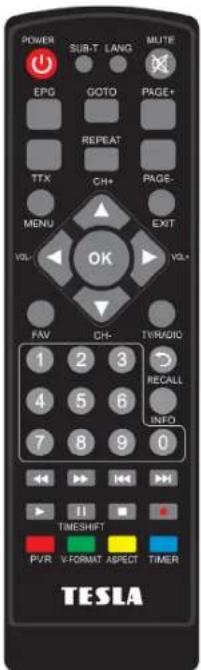
2.2 REMOTE CONTROL
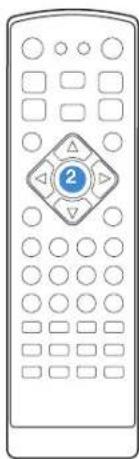
- ⏻ Switches the receiver between the operating and standby mode.
- Mutes the sound.
- SUB-T: Displays a list of available subtitle languages.
- LANG: For sound selection.
- EPG: Electronic Program Guide.
- GOTO: Go to the selected recording time.
- PAGE+ a PAGE- : Paging in the menu.
- REPEAT: Repeat in multimedia mode.
- TTX: Displays teletext if available.
- MENU: Activates the main menu of the receiver.
- EXIT: Ends the current menu step by step.
- ▲ / ▼: Change station, move up/down in the menu.
- ◀ / ▶: Change the volume in watch mode, in the menu, move left and right.
- OK: Activates the highlighted submenu in menu mode to see a list of stations in viewing mode.
- FAV: Displays a list of favorite stations, that you set up earlier.
- TV/RADIO: Change the list of TV/Radio stations.
- NUMERIC BUTTONS (0 \~ 9): Enter TV number / radio station, or menu option number.
- RECALL: Switches to the previous monitored station.
- INFO: Displays information about the program.
- ◀◀/▶▶ Shift backward / Shift forward.
- |◀◀ / ▶▶ | Skip recording or station.
- ▶ Play.
- II Pause / Goes to the time shift funkci.
- ■ Stops recording and playback.
- • Recording of the show.
- PVR: Direct access to the playlist.
- V-FORMAT: Here you can set the output resolution of the Image on the HDMI connector.
- ASPECT: Used to change the image format.
- TIMER: Direct access to the timer list.
3. RECEIVER MENU
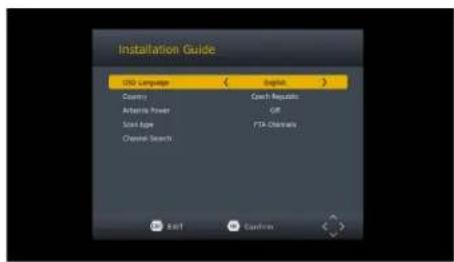
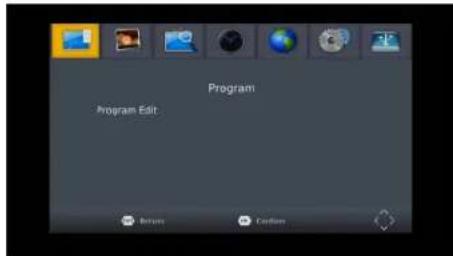
After the first time you turn on the receiver, you will be greeted by the installation wizard. Connect the antenna cable using the antenna connector. Select the OSD language one by one, country of use, whether to search for uncoded stations (FTAs), whether you want to activate 5V on the antenna connector for powering the antenna amplifier. On the last line "Station search" press button OK on the remote control to start the search.
Note: The default receiver password is 000000.
Main menu: Press the MENU button to open the receiver's main menu.
4. LIST OF STATIONS
4.1 EDITING THE STATION LIST
To enter this menu, first enter the receiver password.
Use the color buttons on your controller select an option:
-
DELETE - Delete stations from the list.
-
MOVE - Move stations in the list. Press the red button. Subsequently, a symbol of two red arrows will appear in the row. Using navigation keys to move the station to a new position and press again button OK to save.
-
SKIP - Mark the stations that will not be displayed when you switch stations using navigation keys. They will be skipped.
-
LOCK - Here you can lock stations. To view them, it will be required enter the receiver password.
-
FAV - Here you can create your own favorite lists of stations. Select one of the FAV categories from the FILM / NEWS / SPORTS / ENTERTAINMENT list and press button EXIT. A star symbol appears next to the station in the list.
To stop editing and save it, press button EXIT.
5. IMAGE
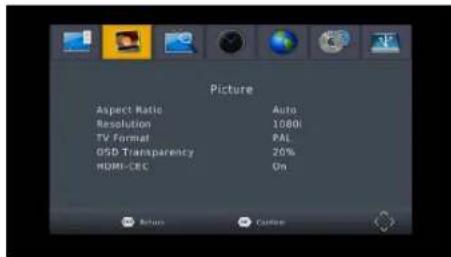
5.1 IMAGE ASPECT RATIO
Set the display format according to the aspect ratio of the screen. Select a 4:3 or 16:9 mode, depending on the type of TV.
5.2 IMAGE RESOLUTION ON HDMI CONNECTOR
Set the image resolution on the HDMI connector in the range of 1080p, 1080l, 720p, 576i or 576p.
5.3 TV PICTURE STANDARD
The default value is PAL.
5.4 OSD MENU TRANSPARENCY
Setting the menu transparency in percent.
5.5 HDMI-CEC
Function for switching on the receiver and TV simultaneously with one controller. It is also necessary that the TV supports the CEC function. The CEC function is not guaranteed due to inconsistencies between manufacturers.
6. STATIONS SEARCH
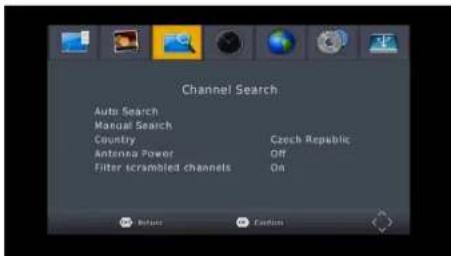
6.1 AUTOMATIC SEARCH
Automatically searches for and saves available stations. The new search deletes the existing list of stations.
6.2 MANUAL SEARCH
In this menu, you can manually search for stations from the selected channel.
6.3 COUNTRY
Select the country in which the receiver will be used.
6.4 POWER SUPPLY OF ANTENNA AMPLIFIER 5V
In this menu, you can turn on or off the 5V power supply for the antenna amplifier. The 5V voltage will be available on the antenna connector. Do not turn on this power if no antenna amplifiers Use!
6.5 FTA-FREE TO AIR ONLY
Select whether the receiver should search only for uncoded stations. Use the ◀/▶ buttons.
7. TIME
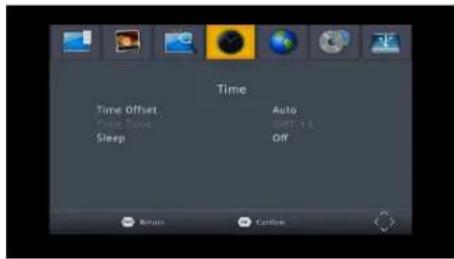
7.1 TIME SETTING
Choose whether the receiver time will be set automatically from the broadcast or set it manually.
7.2 TIME ZONE:
7.3 TURN OFF AFTER:
In this menu you can set the time for which the receiver will go automatically to standby mode.
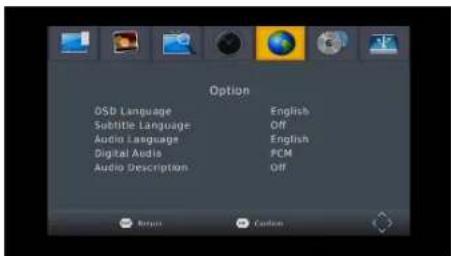
8. OPTIONS
Tip: Here you can set all settings by pressing the button ◀/▶.
8.1 OSD LANGUAGE
Set the menu language.
8.2 SUBTITLE LANGUAGE
Set the subtitle language.
8.3 AUDIO LANGUAGE
Set your preferred audio language.
8.4 DIGITAL AUDIO
Here you can set the format of digital audio data according to the needs of the home audio system.
8.5 AUDIO (ACCOMPANIMENT) AD SCENE DESCRIPTION FOR THE BLIND:
Here you can activate the additional audio description. The sound will only be broadcast by the selected station.
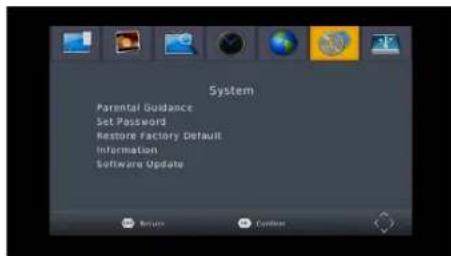
9. SYSTEM SETTINGS
9.1 PARENTAL CONTROL
In this menu, you can set parental controls. The default receiver password is 000000. If the rated show exceeds the age it was set here, then the receiver will be Require a password. Otherwise, you won't be able to watch the show.
9.2 SETTING A PASSWORD
In this menu, you can change the password of the receiver.
9.3 FACTORY RESET
After selecting the receiver password, all stations and receiver settings are erased to factory hodnot.
9.4 SYSTEM INFORMATION
Here is available information about the receiver model, software version and firmware build dates.
9.5 FIRMWARE UPDATES
You can choose a USB update to update the software.
Do not turn off the power during the update process.
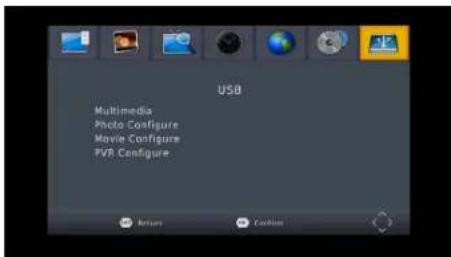
10. USB-MEDIA CENTER
The menu will only be available if you connect a USB drive. You can play a video, music, pictures, or recordings.
10.1 MULTIMEDIA
Connect a USB drive with multimedia content. You can then select what type of file you want to play (Music, Photos, Movie, and PVR files).
10.2 PHOTO SETTINGS
Here it is possible to adjust the parameters of the photo viewer.
10.3 MOVIE SETTINGS
Here it is possible to set the subtitle playback parameters for AVI files.
10.4 PVR SETTINGS
You can activate the timeshift function and set the Timeshift memory allocation. Format: Used to completely erase the contents of the USB drive!
WARRANTY CONDITIONS
1. WARRANTY PERIOD
The manufacturer provides a warranty for this product for a period of 24 months from the date of purchase of the product Consumer. The warranty period is extended by the period during which the product was under warranty repair. The warranty applies only to defects caused by a manufacturing error or material defect!
2. WARRANTY CARD
Free warranty service is provided only if proof of purchase of the product is presented (receipts) and correctly completed warranty card - must contain the serial number, date of sale and the stamp of the store (assembly firm). Copies and incorrectly completed warranty certificates will not be taken into account!
3. REPAIRS DURING THE WARRANTY AND POST-WARRANTY PERIOD
Warranty service must be applied to the organization where the product was purchased or to the assembly company, that performed the installation.
4. SCOPE OF WARRANTY
The warranty is invalid if the defect is caused by mechanical damage, improper use, inattention, an unavoidable event (natural disaster), if the product was connected to another supply voltage as specified in the technical specification, and also in the case of modifications or repairs made outside the distributor's service. Nor can the guarantee be invoked where the consumer requires modification or adaptation to extend the functionality of the product (or a system composed of several to components) as opposed to the standard version.
Inter-sat LTD, as the manufacturer of this device, declares that the type of radio equipment Tesla TE-222 complies with Directive 2014/53/EU. The full text of the EU declaration of conformity is available on the https://www.tesla-electronics.eu/
Serial number
Date of sale Seller's stamp and signature
Date of notification
Date of implementation
Mounting no. letter/comment
Signature
Registration of warranty repairs:
TESLA
TESLA TE-222 Dongle
natural_image
Exterior view of a Tesla brand electronic device with a perforated grille and gold connector (no text or symbols on body)INSTRUKCJE BEZPIECZEŃSTWA I PARAMETRY

HDMI USB PVR MEV USD
ZAWARTOŚĆ PACZKI
natural_image
Front view of a white remote control with square buttons and a central triangular button (no text or symbols)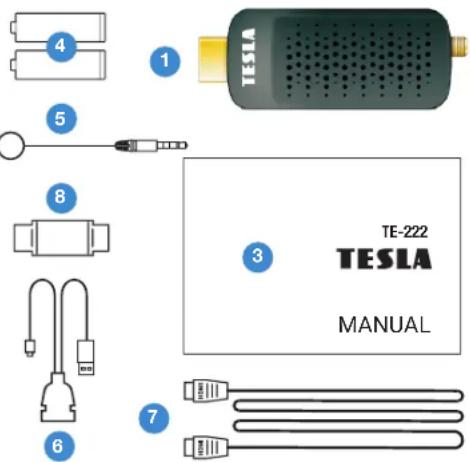
SPIS TREŚCI
1 Funkcje ogólne 54
- Przegład 55
3. NAPRAWY W OKRESIE GWARANCYJNYM I POGWARANCYJNYM


- BEZPEČNOSTNÍ POKYNY A PARAMETRY
- OBSAH
- PŘEHLED
- DÁLKOVÝ OVLADAČ
- BEZPEČNOSTNÉ POKYNY A PARAMETRE
- PREHL'AD
- DIALKOVÉ OVLÁDANIE
- MANUÁLNE VYHL'ADÁVANIE
- SAFETY INSTRUCTIONS AND PARAMETERS
- PACKAGE CONTENTS
- CONTENT
- GENERAL CHARACTERISTICS
- OVERVIEW
- OVERVIEW OF RECEIVER CONNECTORS
- REMOTE CONTROL
- RECEIVER MENU
- LIST OF STATIONS
- EDITING THE STATION LIST
- IMAGE
- IMAGE ASPECT RATIO
- IMAGE RESOLUTION ON HDMI CONNECTOR
- TV PICTURE STANDARD
- OSD MENU TRANSPARENCY
- HDMI-CEC
- STATIONS SEARCH
- AUTOMATIC SEARCH
- MANUAL SEARCH
- COUNTRY
- POWER SUPPLY OF ANTENNA AMPLIFIER 5V
- FTA-FREE TO AIR ONLY
- TIME
- TIME SETTING
- TIME ZONE:
- TURN OFF AFTER:
- OPTIONS
- OSD LANGUAGE
- SUBTITLE LANGUAGE
- AUDIO LANGUAGE
- DIGITAL AUDIO
- AUDIO (ACCOMPANIMENT) AD SCENE DESCRIPTION FOR THE BLIND:
- SYSTEM SETTINGS
- PARENTAL CONTROL
- SETTING A PASSWORD
- FACTORY RESET
- SYSTEM INFORMATION
- FIRMWARE UPDATES
- USB-MEDIA CENTER
- MULTIMEDIA
- PHOTO SETTINGS
- MOVIE SETTINGS
- PVR SETTINGS
- WARRANTY CONDITIONS
- WARRANTY PERIOD
- WARRANTY CARD
- REPAIRS DURING THE WARRANTY AND POST-WARRANTY PERIOD
- SCOPE OF WARRANTY
- TESLA TE-222 Dongle
- INSTRUKCJE BEZPIECZEŃSTWA I PARAMETRY
- ZAWARTOŚĆ PACZKI
- SPIS TREŚCI
- NAPRAWY W OKRESIE GWARANCYJNYM I POGWARANCYJNYM
Brand : TESLA
Model : TE‒222
Category : Digital decoder