
SKZ 65 BW - Range hood AMICA - Free user manual and instructions
Find the device manual for free SKZ 65 BW AMICA in PDF.

| Product Type | Range Hood |
| Brand | Amica |
| Model | SKZ 65 BW |
| Width | 65 cm |
| Installation Type | Wall-mounted chimney hood |
| Control Type | Touch control panel |
| Fan Speeds | 3 (Low, Medium, High) |
| Off-Timer | Yes, 15 minutes delay |
| Lighting | Replaceable incandescent/halogen/LED modules |
| Grease Filter | Aluminum (washable, clean monthly) |
| Charcoal Filter | Activated charcoal (replace every 2 months for recirculation mode) |
| Operation Modes | Extraction (duct to outside) or Recirculation (with charcoal filter) |
| Voltage | 220-240 V |
| Frequency | 50/60 Hz |
| Safety Features | Automatic shut-off via off-timer, safety distance instructions (minimum 65-75 cm above gas hob) |
| Maintenance | Grease filter cleaning monthly; charcoal filter replacement every 2 months |
| Manufacturer | Amica S.A., ul. Mickiewicza 52, 64-510 Wronki, Poland |
Frequently Asked Questions - SKZ 65 BW AMICA
User questions about SKZ 65 BW AMICA
0 question about this device. Answer the ones you know or ask your own.
Ask a new question about this device
Download the instructions for your Range hood in PDF format for free! Find your manual SKZ 65 BW - AMICA and take your electronic device back in hand. On this page are published all the documents necessary for the use of your device. SKZ 65 BW by AMICA.
USER MANUAL SKZ 65 BW AMICA
natural_image
Simple line drawing of a kitchen chimney with steam rising (no text or symbols)OKP6547S / OKP6547SW /
SKZ 65 BW / SKZ 65 BB
EN- Table of contents
NOTES ON SAFETY 7
UNPACKING 10
DISPOSAL OF OLD APPLIANCE 10
OPERATION 11
KITCHEN HOOD CONTROLS 11
OFF-TIMER 11
OTHER IMPORTANT INFORMATION CONCERNING THE OPERATION OF THE HOOD 12
CLEANING AND MAINTENANCE 13
MAINTENANCE 13
GREASE FILTER 13
ACTIVATED CHARCOAL FILTER 13
LIGHT 13
WARRANTY AND AFTER SALES SERVICE 14
WARRANTY 14
GARANTIE, NACHVERKAUF-SERVICE 24
GARANTIE 24
PL- Spis treści
WSKAZÓWKI DOTYCZĄCE BEZPIECZEŃSTWA 26
ROZPAKOWANIE 30
USUWANIE ZUŻYTYCH URZĄDZEŃ 30
OBSŁUGA 31
STEROWANIE OKAPEM 31
TIMER (OPÓŻNIONE WYŁĄCZENIE OKAPU) 31
INNE WAŻNE INFORMACJE DOTYCZĄCE OBSŁUGI OKAPU 32
CZYSZCZENIE I KONSERWACJA 33
KONSERWACJA 33
From now on, your daily housework will be easier than ever before. Your appliance Air exceptionally easy to use and extremely efficient. After reading these Operating Instructions, operating the appliance will be easy.
Before being packaged and leaving the manufacturer, the appliance was thoroughly checked with regard to safety and functionality.
Before using the appliance, please carefully read these Operating Instructions. By following these instructions carefully you will be able to avoid any problems in using the appliance. It is important to keep these Operating Instructions and store them in a safe place so that they can be consulted at any time.
Follow these instructions carefully in order to avoid possible accidents.
Sincerely,
Amica
NOTES ON SAFETY
- Before using the appliance, please carefully read this manual!
- The appliance is designed for household use only.
- The manufacturer reserves the right to introduce changes, which do not affect operation of the appliance.
- The manufacturer shall not be liable for any damage or fire caused by the appliance resulting from failure to follow instructions in this manual.
- Cooker hood is designed to remove cooking odours. Do not use cooker hood for other purposes.
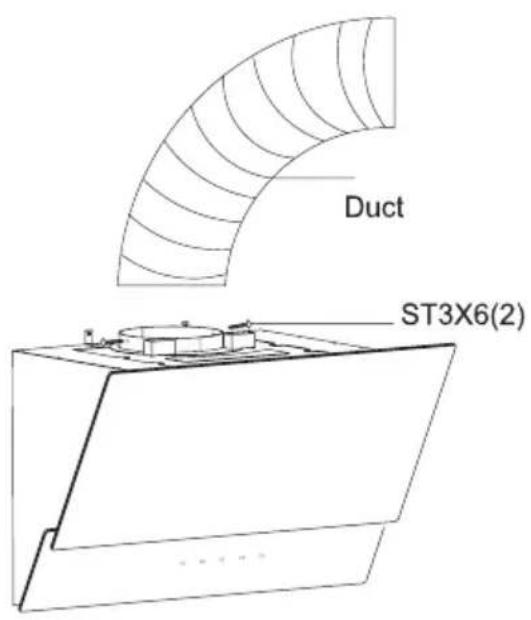
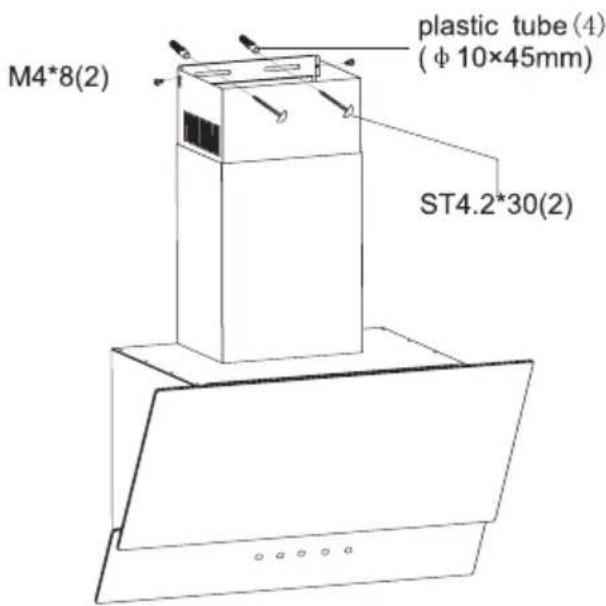
- Connect the cooker hood operating in extraction mode to a suitable ventilation duct (do NOT connect the cooker to smoke or flue gas ducts, which are in use). It requires installation of the air extraction duct to the outside. The length of the duct (usually a pipe of ∅ 120 or 150 mm) should not be longer than 4-5 m. An air extraction duct is also required for telescopic and furniture hoods in absorption mode.
- Cooker hood operating in air recirculation mode requires the installation of an activated charcoal filter. In this case, installing an extractor duct is not required, however it is recommended to install an air guide vane (Mainly in chimney cooker hoods).
- The cooker hood features independent lighting and exhaust fan that can be operated at one of several speeds.
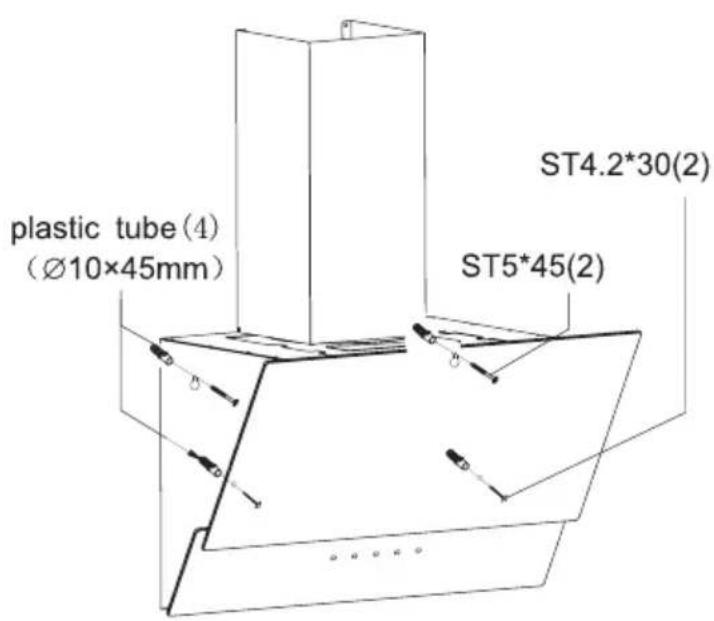
- Depending on the type, the hood is designed to be permanently attached to a vertical wall over a gas or electric stove (chimney and universal hoods); on the ceiling over a gas or electric stove (island hoods); on the vertical built in furniture over a gas or electric stove (telescopic and built-in hoods). Before installing, make sure that the
wall/ceiling structure is strong enough to suspend the hood. Some hoods are very heavy.
- For details of the installation distance above an electric hob please refer to product technical sheet. If the installation instructions of the gas cooker specify a greater distance, this must be taken into account (Fig. 1).
- Do not leave an open flame under the hood. When the pots are removed from the burner, set the minimum flame. Always make sure that the flame does not extend outside the pot, because it causes unwanted loss of energy and a dangerous concentration of heat.
- When cooking on fat, supervise the pans constantly, because overheated fat can ignite.
- Unplug the appliance before any cleaning, replacing the filter or repair work.
- Cooker hood grease filter should be cleaned at least once a month, because the filter saturated with fat is flammable.
- Ensure adequate ventilation (air flow) if other equipment such as liquid fuel stoves or heaters are operated in the room in addition the cooker hood. When the cooker hood is simultaneously operated with burning appliances requiring adequate fresh air from the room to work properly, their safe operation is possible if under pressure around these appliances is a maximum of 0.004 mbar (this does not apply when the cooker hood is used as an odour filter)
- Do not lean on the hood.
- The hood should be cleaned regularly both inside and out (AT LEAST ONCE A MONTH, following the indications concerning maintenance provided in this manual)..Failure to adhere to the rules concerning cleaning the hood and replacing filters results in a fire risk.
- If the power cord is damaged it should be replaced by a specialised service centre.
- Ensure that it is possible to disconnect the ap-
pliance from the mains by removing the plug or switching off the bi-polar switch.
- This appliance is not intended for use by persons (including children) with physical, mental or sensory handicaps, or by persons inexperienced or unfamiliar with the appliance, unless under supervision or in accordance with the instructions as communicated to them by persons responsible for their safety.
- Particular attention should be paid not to allow unaccompanied children to use the appliance.
- Make sure voltage indicated on the nameplate corresponds to the local mains supply voltage.
- Before use, extend and straighten the power cord.
- Packaging materials (bags, polyethylene, polystyrene, etc.) should be kept away from children during unpacking.
- Before connecting the hood to the mains power supply always check that the power cord is properly installed and is not trapped by the appliance. Do not connect the appliance to the mains until assembly is complete.
- Do not operate your kitchen hood without the aluminium grease filters.
- It is strictly forbidden to cook dishes under on an open flame (flambé) under your kitchen hood.
- Always strictly adhere to regulations issued by the competent local authorities regarding the technical and safety requirements for fume extraction.
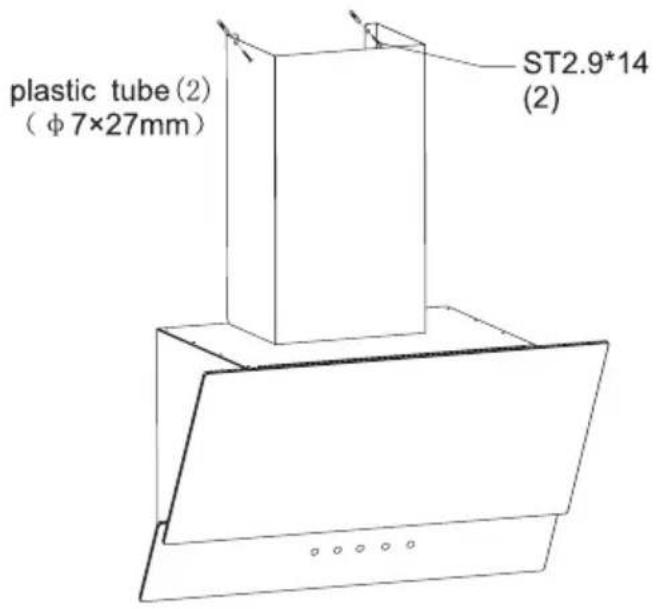
- Failing to tighten bolts and fasteners in accordance with these instructions may endanger life and health.
- Hanging kitchen hoods operate only in air circulation / odour absorber mode
- WARNING! Failure to install the screws or fixing device in accordance with these instructions may result in electrical hazards.
UNPACKING
natural_image
Recycling symbol composed of three chasing arrows forming a triangle (no text or labels)During transportation, protective packaging was used to protect the appliance against any damage. After unpacking, please dispose of all elements of packaging in a way that will not cause damage to the environment.
All materials used for packaging the appliance are environmentally friendly; they are 100% recyclable and are marked with the appropriate symbol.
Important! Packaging materials (bags, polyethylene, polystyrene, etc.) should be kept away from children during unpacking.
DISPOSAL OF OLD APPLIANCE

natural_image
Symbol of a trash bin crossed with a diagonal line, representing waste or discharge (no text or labels)In accordance with European Directive 2012/19/EU and Polish legislation regarding used electrical and electronic goods, this appliance is marked with the symbol of the crossed-out waste container. This marking indicates that the appliance must not be disposed of together with other household waste after it has been used.
The user is obliged to hand it over to waste collection centre collecting used electrical and electronic goods. The collectors, including local collection points, shops and local authority departments provide recycling schemes.
Proper handling of used electrical and electronic goods helps avoid environmental and health hazards resulting from the presence of dangerous components and the inappropriate storage and processing of such goods.
OPERATION
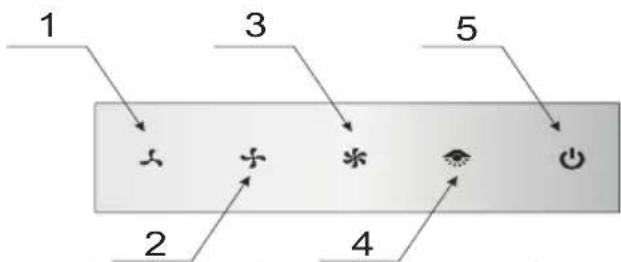
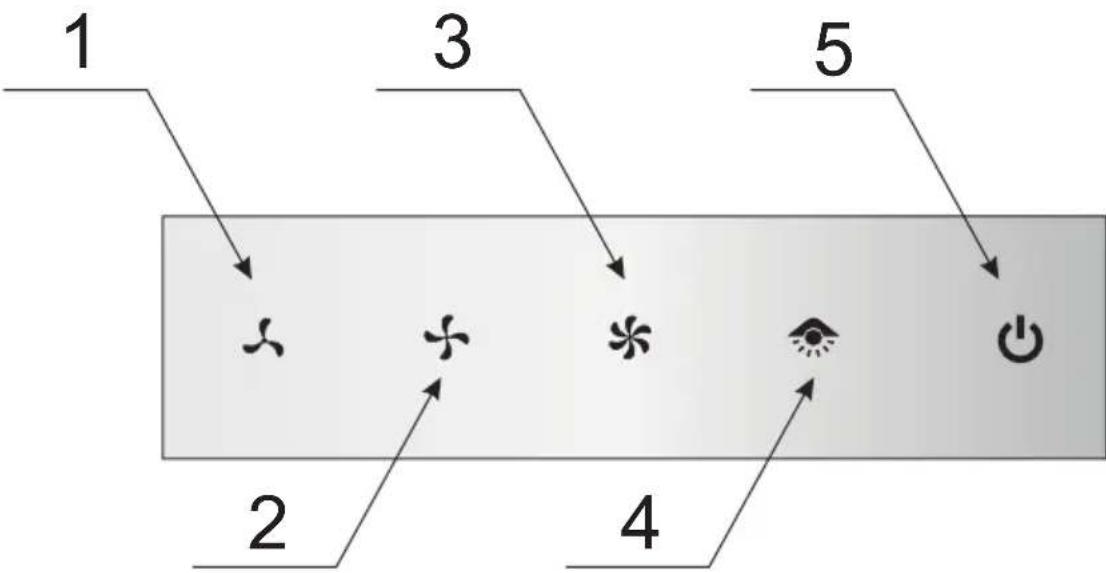
Kitchen hood controls
Control Panel is shown in Figure 4, for reference it is also shown below:
flowchart
graph TD
    1 --> A["×"]
    2 --> B["÷"]
    3 --> C["*"]
    4 --> D["○"]
    5 --> E["○"]
The control panel is equipped with touch controls: To turn on the kitchen hood, touch one of the sensors to select the desired speed:
1- Low speed. Use this speed when cooking a little food with hardly any fumes.
2- Medium speed. Use this speed when cooking multiple dishes at the same time with moderate amount of fumes.
3- High speed. Use this speed when frying or grilling, with large amount of fumes.
4- Turn Standby mode on/off
5- Turn light on/off
Note:
- To use one of the three speeds, first touch the ⓣ to turn on the Standby mode and then select the desired speed. To turn off the active speed, touch the backlit sensor again.
• To turn on the light, first activate the Standby mode. - When you turn off the Standby mode, the appliance fan and light will turn off.
- Touch twice to turn off the hood when fan is operating.
Off-Timer
Use Off-Timer to turn off the hood after a specified time. Use Off-Timer to filter the fumes out of the air after cooking. The delay time is about 15 minutes. Touch ⏻to activate the Off-Timer at any time. Sensor flashes. Flashing indicates that Off-Timer has been enabled. Touch ⏻ again to cancel the Off-Timer. The appliance will turn off. To turn on the appliance, touch the sensor corresponding to the desired fan speed.
Other important information concerning the operation of the hood
Operation in air circulation / odour filter mode. In this mode, the filtered air returns to the room through the outlets. Install activated charcoal filter in this setting. It is recommended to install the air guide (available depending on the model, mainly in chimney cooker hoods).
Air extraction operation: When cooker hood operates in extraction mode, air is discharged outside through an extraction duct. Remove activated charcoal filter in this setting. The cooker hood is connected to the air outlet opening using a rigid or flexible extraction duct with a diameter of 150 or 120 mm, and the appropriate clamps, which must be purchased at a hardware store. The appliance should be installed by a qualified installer.
Fan speed: Lowest and medium fan speed is used in normal conditions and less intense odours, while the highest speed is used only when cooking odours are very intense, such as during frying or grilling.
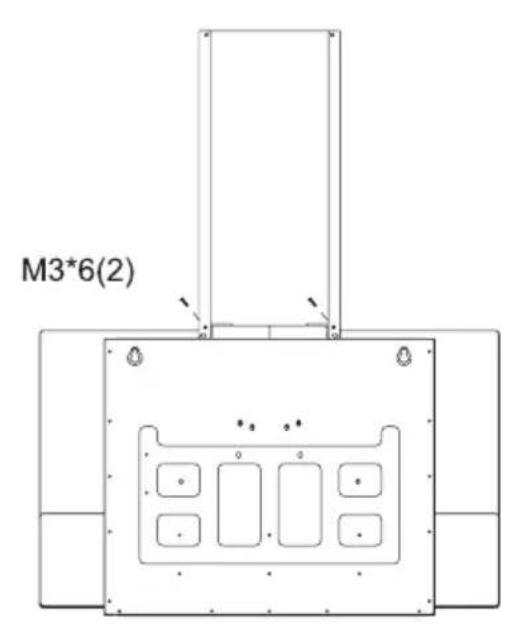
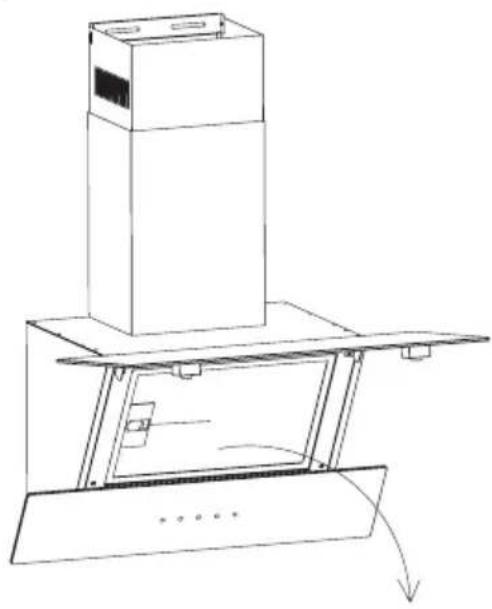
Note (applies to universal hoods only): Due to the design of universal hoods you need to manually change the mode of operation. See Figure 8 for instructions on how to change the mode.
Note (only applies to telescopic and in-built kitchen hoods): Furniture and telescopic cooker hoods operating in air recirculation mode require installation of the exhaust duct. The other end of the duct should be directed to the room as it will discharge filtered air.
Note: Hanging kitchen hoods operate only in air circulation / odour absorber mode
CLEANING AND MAINTENANCE
Maintenance
Regular maintenance and cleaning of the appliance will ensure trouble-free operation of the cooker hood and extend its life. Especially make sure that the grease filter and activated charcoal filter are replaced according to manufacturer's recommendations.
- Do not use a soaked cloth, sponge, or water jet.
- Do not use solvents or alcohol, as they may tarnish lacquered surfaces.
- Do not use caustic substances, especially for cleaning stainless steel.
- Do not use a rough or abrasive cloth.
- It is recommend to use a damp cloth and a neutral detergent.
Note: After several washes in the dishwasher, the colour of the aluminium filter may change. The change of colour does not indicate improprieties or the necessity to change it.
Grease filter
For normal hood operation, aluminium grease filter should be cleaned every month in the dishwasher or by hand using a mild detergent or liquid soap.
Dismantling of aluminium grease filter is shown on Figure 5.
Acrylic filter is used in some models. This filter should be replaced at least once every two months or more frequently if the appliance is used intensively.
Activated charcoal filter
Charcoal filter is used only when the cooker hood is not connected to the ventilation duct. Activated charcoal filter can absorb odours until saturated. Charcoal filter is not suitable for washing or regeneration and should be replaced at least once every two months or more frequently if the appliance is used intensively.
Dismantling of charcoal filter is shown on Figure 6.
Light
Use incandescent / halogen / LED modules of the same specification as those factory-installed in the appliance. See Figure 7 for details how to replace lights. If there is no such figure in this manual, please contact authorised service to replace the lighting module.
WARRANTY AND AFTER SALES SERVICE
Warranty
Warranty service as stated on the warranty card. The manufacturer shall not be held liable for any damage caused by improper use of the product.

The manufacturer recommends that all repairs and adjustments be carried out by the Factory Service Technician or the Manufacturer's Authorized Service Point. Repairs should be carried out by a qualified technician only.
Manufacturer's Declaration
The manufacturer hereby declares that this product meets the requirements of the following European directives:
• Low Voltage Directive 2014/35/EC
• Electromagnetic Compatibility (EMC) Directive 2014/30/EC
• ErP Directive 2009/125/EC
• Directive RoHS 2011/65/EC
and has thus been marked with the symbol and been issued with a declaration of compliance made available to market regulators.
natural_image
Recycling symbol composed of three chasing arrows forming a triangle (no text or labels)natural_image
Symbol of a trash bin crossed with two crossed lines, representing waste sorting or disposal (no text or labels)GARANTIE, NACHVERKAUFSERVICE
Garantie
natural_image
Recycling symbol composed of three chasing arrows forming a triangle (no text or labels)natural_image
Simple line drawing of a trash bin with crossed lines indicating no waste or prohibition (no text or symbols)natural_image
Recycling symbol composed of three chasing arrows forming a triangle (no text or labels)natural_image
Symbol of a trash bin crossed with a diagonal line, representing waste sorting or disposal (no text or labels)natural_image
Recycling symbol composed of three chasing arrows forming a triangle (no text or labels)natural_image
Simple line drawing of a trash bin with crossed lines indicating no waste or discharge (no text or symbols)natural_image
Recycling symbol composed of three chasing arrows forming a triangle (no text or labels)natural_image
Simple line drawing of a trash bin with two crossed lines indicating no waste or prohibition (no text or symbols)natural_image
Recycling symbol composed of three chasing arrows forming a triangle (no text or labels)natural_image
Symbol of a trash bin crossed with diagonal lines, representing waste sorting or disposal (no text or labels)natural_image
Recycling symbol composed of three chasing arrows forming a triangle (no text or labels)natural_image
Simple line drawing of a trash bin with crossed lines indicating no waste or discharge (no text or symbols)natural_image
Recycling symbol composed of three chasing arrows forming a triangle (no text or labels)natural_image
Symbol of a trash bin crossed with a diagonal line and a horizontal bar below (no text or labels)natural_image
Recycling symbol composed of three chasing arrows forming a triangle (no text or labels)natural_image
Simple line drawing of a trash bin with crossed lines indicating no waste or discharge (no text or symbols)natural_image
Simple line drawing of a three chasing recycling symbol (no text or labels)natural_image
Simple line drawing of a trash bin with crossed lines indicating no waste or discharge (no text or symbols)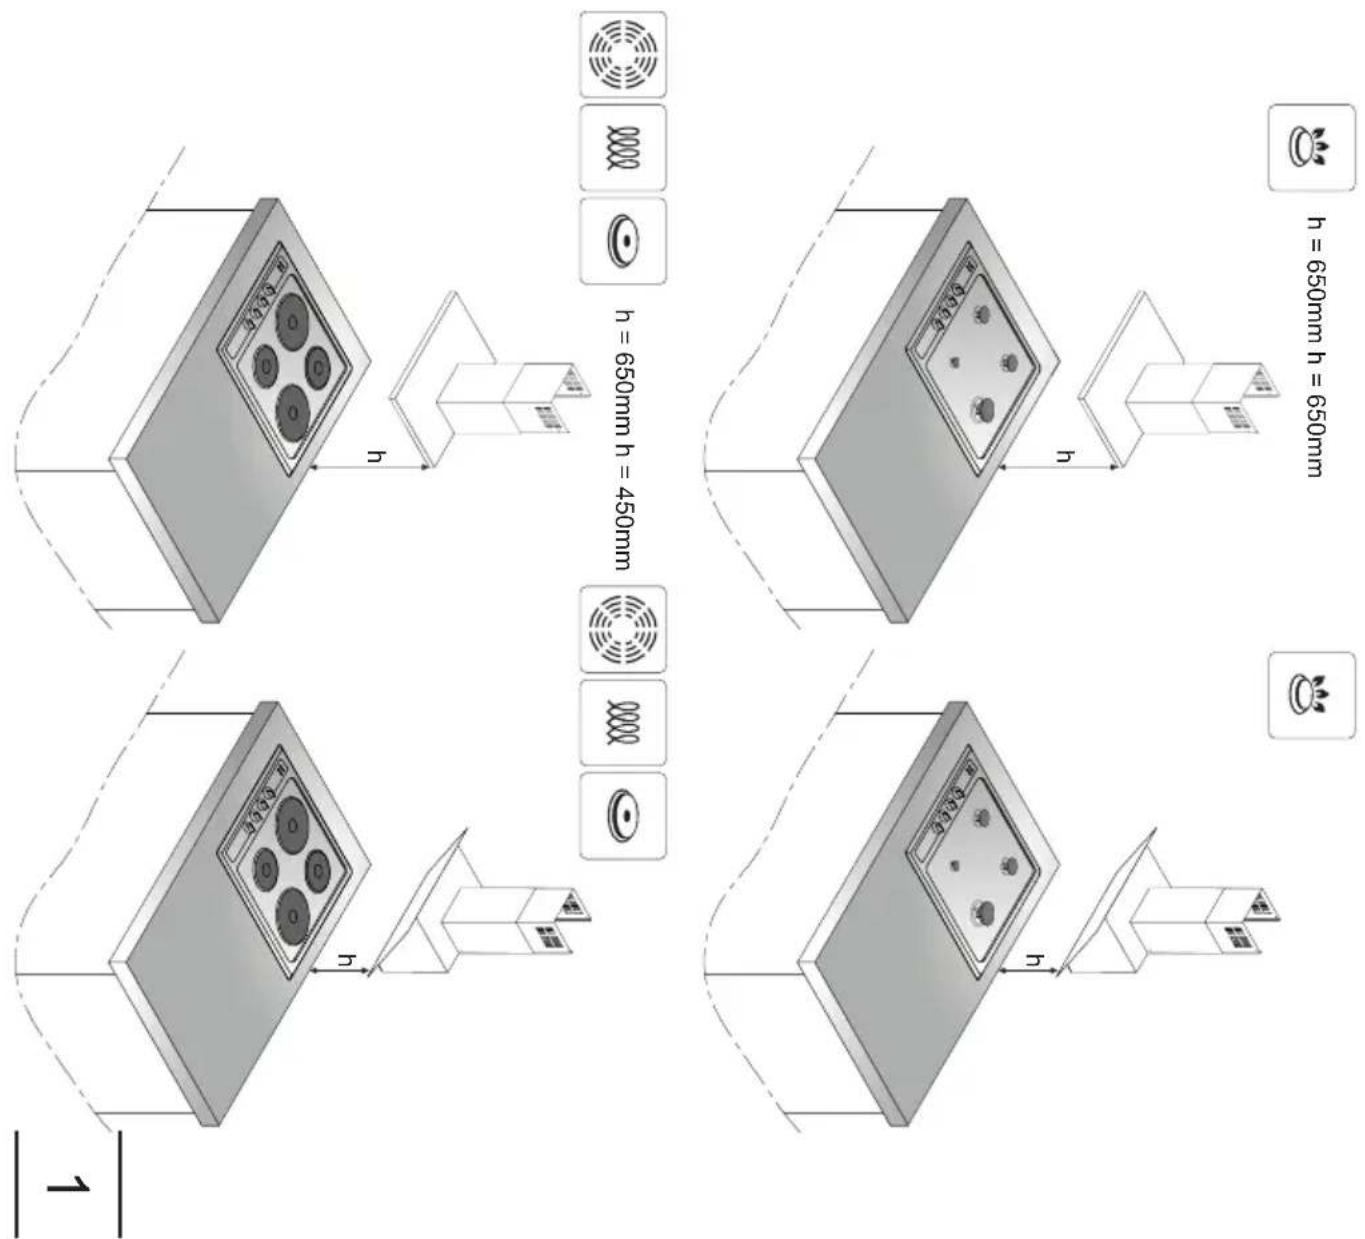
| EN DE PL CS | SK RO HU BG | ES PT | SL | ||||||||
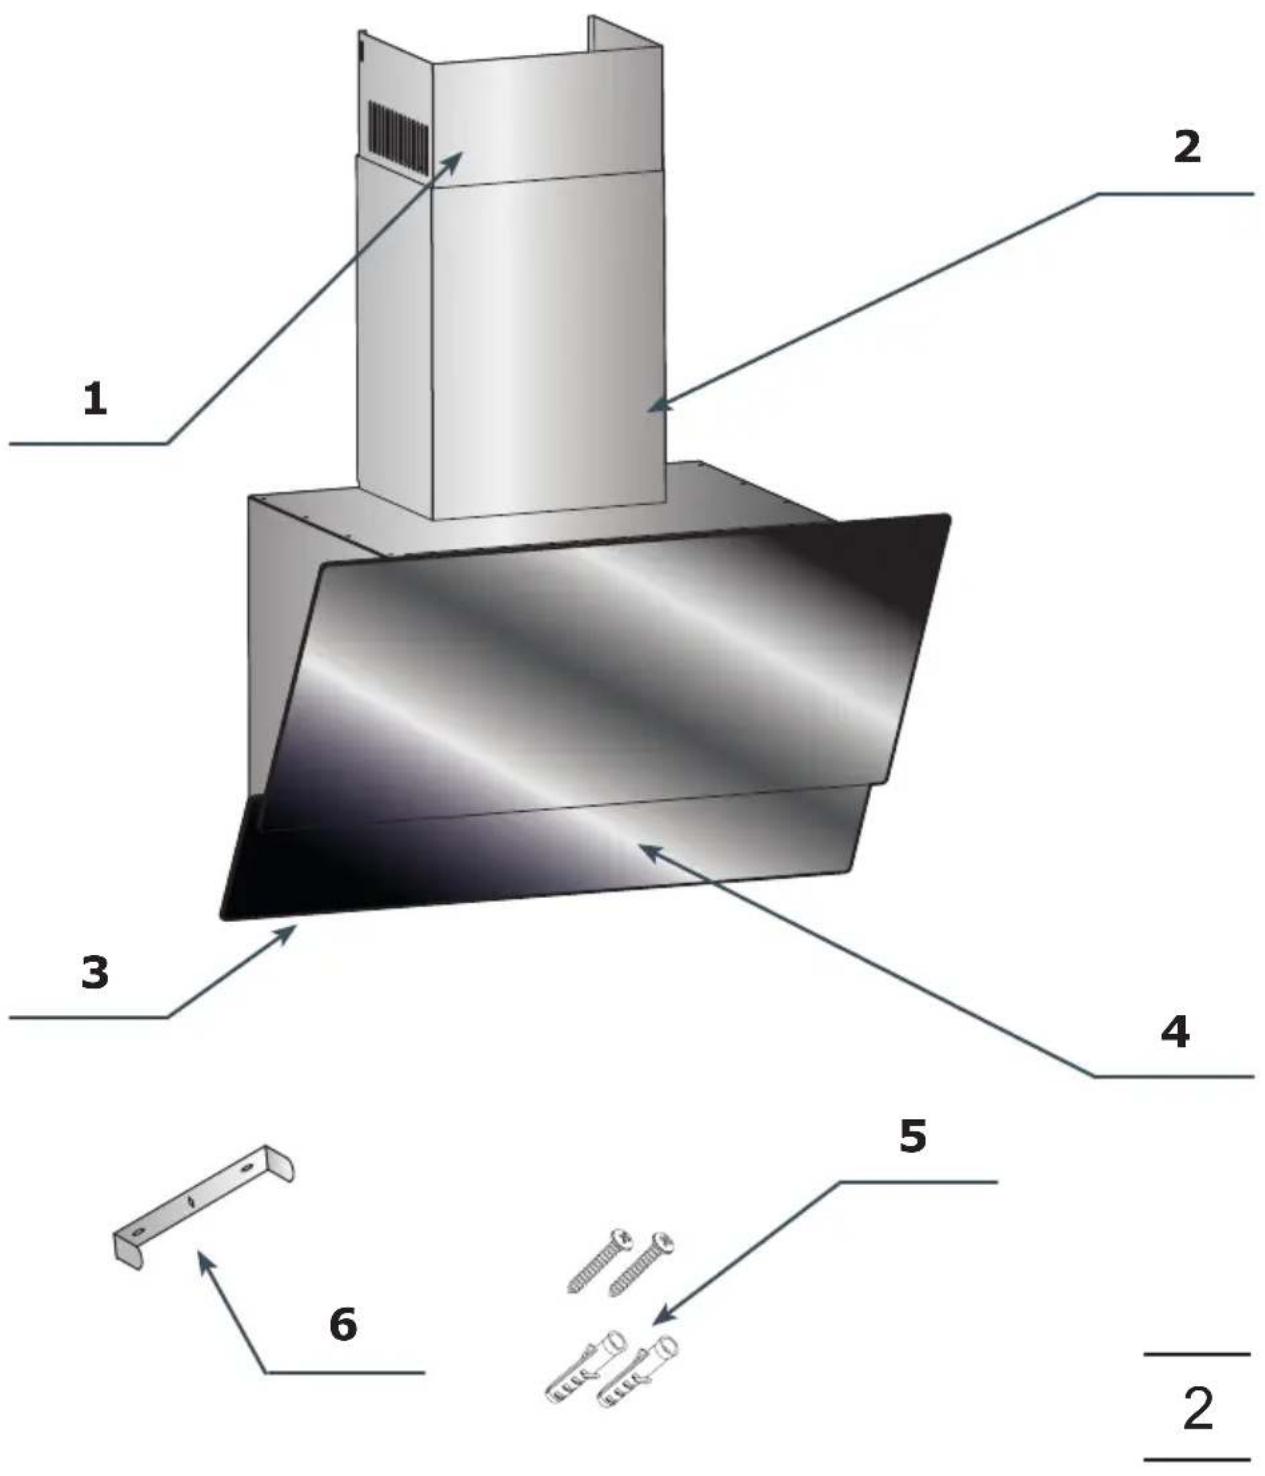
| 1 | Upper chim-ney cover | obere Abdeckung | Mąskownica górna | Horní krycí lista | Horná krycia lista | Element de mascare superior | Felső díszítő-elem | Горен маскиращ елемент | Panel supe-rior | Chaminé superior | Zgornje ohišje |
| 2 | Lower chim-ney cover | untere Abdeckung | Maskownica dolna | Spodní krycí lista | Dolná krycia lista | Element de mascare inferior | Alsó díszítő-elem | Долен маскиращ елемент | Panel inferior | Chaminé inferior | Spodnje ohišje |
| 3 | Lighting Beleuchtung | Oświetlenie | Osvětlení | Osvetlenie | Sistem de iluminare | Világítás Ocветление Iluminación Iluminação Osvetlitev | |||||
| 4 | Control Panel Bedienfeld | Panel sterowania | Ovládací panel | Ovládací panel | Panou de comanda | Irányítópanel | Панел за управление | Panel de control | Painel de comando | Panel za upravljanje | |
| 5 | Screws and wall plugs | Schrauben und Spreiz-dübel | Wkręty i kolki rozporowe | Vruty a hmożdinky | Skrutky, a rozperné koliky | Śruburi și dibluri | Csavarok és tiplik | Дюбели и винтове | Tornillos y tacos | Parafusos e buchas de fixação | Vijaki in vložki za vijake |
| 6 | Upper chim-ney cover holder | Halterung der oberen Abdeckung | Uchwyt maskownicy górnej | Úchyt horní krycí listy | Držiak hornej krycej listy | Suportul capacului superior | Felső fedél fogantyúja | Държач на горния маскиращ елемент | Mango de pa-nel superior | Fixação da chaminé superior | Ročaj zgor-njega ohisja |
3a
3b
3c
3d
3e
flowchart
graph TD
    1 --> A["•"]
    2 --> B["•"]
    3 --> C["•"]
    4 --> D["•"]
    5 --> E["○"]
4
natural_image
Line drawing of a kitchen air conditioner unit with a chimney and ventilation system (no text or symbols)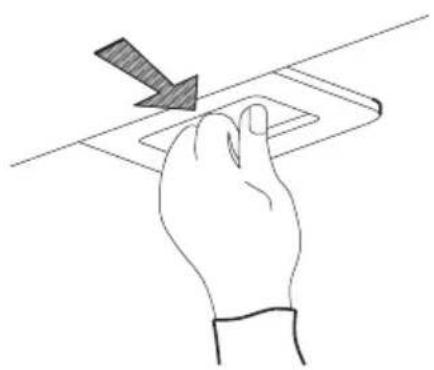
natural_image
Hand holding a rectangular object with a diagonal arrow pointing downward (no text or symbols)
5
6
Amica S.A.
ul . Mickiewicza 52 / 64-510 Wronki tel. 67 25 46 100 / fax 67 25 40 320
www.amica.pl
Amica International GmbH
Lüdinghauser Str. 52
D-59387 Ascheberg
Tel: 0 25 93 - 95 67-0
www.amica-group.de

- EN- Table of contents
- PL- Spis treści
- Amica
- NOTES ON SAFETY
- UNPACKING
- DISPOSAL OF OLD APPLIANCE
- OPERATION
- Kitchen hood controls
- Note:
- Off-Timer
- Other important information concerning the operation of the hood
- CLEANING AND MAINTENANCE
- Maintenance
- Grease filter
- Activated charcoal filter
- Light
- WARRANTY AND AFTER SALES SERVICE
- Warranty
- Manufacturer's Declaration
- GARANTIE, NACHVERKAUFSERVICE
- Garantie
Brand : AMICA
Model : SKZ 65 BW
Category : Range hood