
ZKT623LN - Cooker ZANUSSI - Free user manual and instructions
Find the device manual for free ZKT623LN ZANUSSI in PDF.
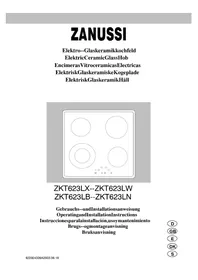


| Product Type | Electric Ceramic Glass Hob |
| Brand | Zanussi |
| Model | ZKT623LN |
| Dimensions (W x D x H) | 570 x 500 x 47 mm |
| Cut-out Dimensions (W x D) | 560 x 490 mm |
| Total Connected Load | 6.4 kW |
| Voltage / Frequency | 230 V ~ 50 Hz |
| Number of Cooking Zones | 4 |
| Cooking Zone Front Left (dual) | 750 / 2200 W |
| Cooking Zone Rear Left | 1200 W |
| Cooking Zone Front Right | 1200 W |
| Cooking Zone Rear Right | 1800 W |
| Controls | Touch control (TOUCH-CONTROL) |
| Residual Heat Indicator | Yes, displays "H" when hot |
| Child Safety Device | Yes, electronic lock |
| Safety Cut-off | Automatic after defined time or spillage |
| Dual Cooking Zone | Yes, front left zone with two sizes |
| Cleaning Method | Ceramic glass cleaner, scraper for stubborn soil |
| Spare Parts Availability | Via local Service Force Centre |
| Country of Origin | Germany |
Frequently Asked Questions - ZKT623LN ZANUSSI
User questions about ZKT623LN ZANUSSI
0 question about this device. Answer the ones you know or ask your own.
Ask a new question about this device
Download the instructions for your Cooker in PDF format for free! Find your manual ZKT623LN - ZANUSSI and take your electronic device back in hand. On this page are published all the documents necessary for the use of your device. ZKT623LN by ZANUSSI.
USER MANUAL ZKT623LN ZANUSSI
ZKT623LX--ZKT623LW
ZKT623LB--ZKT623LN
Appliance description



Operating the hob
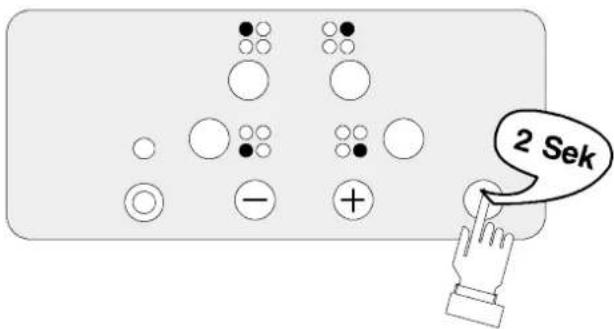
Selecting the cooking zone
Residual heat indicator
Child safety lock
What to do if...
ZKT623LX--ZKT623LW
ZKT623LB--ZKT623LN
The warning triangle and/or specific words (warning, caution, important) are used to highlight information that is important for your safety or the functioning of the appliance.

After this symbol you will find supplementary information on operating and practical use of the appliance.

Tips and instructions for the economical and environmentally sound use of the appliance are marked with this symbol.
These instructions contain information on how to rectify faults yourself. See the section "What to do if..."
Should you require further assistance, please contact your local Service Force Centre.
Content
For the user
Dear Customer! 26
Safety information 28
Disposal 29
Of packaging material 29
Hints of disposal 29
Before the first use 29
Cleaning for the first time 29
Description of the hob 30
Digital indicators 30
Special features of the appliance 31
Operating instructions 32
General information 32
TOUCH-CONTROL sensor fields 32
Switching on the appliance 32
Switching off the appliance 32
Cooking zone selection 33
Setting selection 33
Cooking zone switch-off 33
Residual heat indicator 34
Child safety device 34
Safety cut-off after time 35
Safety cut-off due to a spillage 35
Application, charts, tips 36
Cooking and frying utensils 36
General hints 36
Energy consumption 36
Chart: boiling and frying 37
Cleaning and care 38
Ceramic glass surface 38
Light soiling 38
Stubborn soiling 38
Special soiling 39
Sugar 39
Dark spots and decor damages 39
Scratches in the ceramic glass surface 39
The hob frame 39
What to do... 40
Guarantee conditions, Customer care 41
For the installer
Installation instructions 42
Hints on safety 42
Built-in in the kitchen worktop 42
Electrical connection 44
Technical data, rating plate 45
Important Safety Information
The safety of this appliance corresponds to the acknowledged rules of technique and to the law on appliance safety. The safety measures existing as a matter of self-understanding would, however, not cover all of possible risks of accidents.
Moreover, we feel compelled as the manufacturer to make you familiar with the following safety hints.
Electrical safety
- This appliance must be installed by qualified personnel.
- Repairs to the appliance should only be carried out by authorised service engineers. Improper repairs can lead to injury or serious malfunction. If your appliance needs repairing, please contact your local Service Force Centre.
Please observe this instruction, otherwise the guarantee will not cover any damage that may occur.
- Built-in appliances must be installed in built-in cupboards and worktops. The cupboards have to be located and fastened in a way that they are stable. The protection against accidental contact required by the VDE will then be ensured.
- Damaged appliances must not be installed.
- Do not use the hob if the ceramic glass is damaged:
- switch off the cooking zones, - disconnect from the electricity supply.
- A special electronically controlled safety switch-off makes sure that all cooking zones are switched off automatically after a defined time, in case there will be no variation of settings.
Safety for children
- This appliance is designed to be operated by adults only. Do not allow children to play with the product or tamper with the controls.
- This hob is fitted with a safety device of the electronic control which prevents playing children from turning the hob.
Safety during use
- This hob is intended for domestic cooking only. It is not designed for commercial or industrial purposes.
- The appliance gets hot when in use. In case of careless handling there is danger of burning oneself at the heating zones.
- Do not use the cooking zones to heat the room.
- Take care when plugging electrical items into mains sockets near the hob. Connecting leads must not come into connection with the hot surface or vessels.
- Hot oils can ignite very quickly. Do not leave the hob unattended when preparing foods in pans of oil, i.e. frying chips.
- The sensor technique provides best-possible safety with the manipulation of the appliance, but to the same extent it needs care when setting cooking zones, output or period so time.
- After use make sure that the appliance is switched off.
Safety when cleaning
- Ensure that all heating zones are switched off while cleaning the hob.
- For safety reasons do not clean the appliance with a steam jet or high pressure cleaner.
How to avoid damaging your appliance
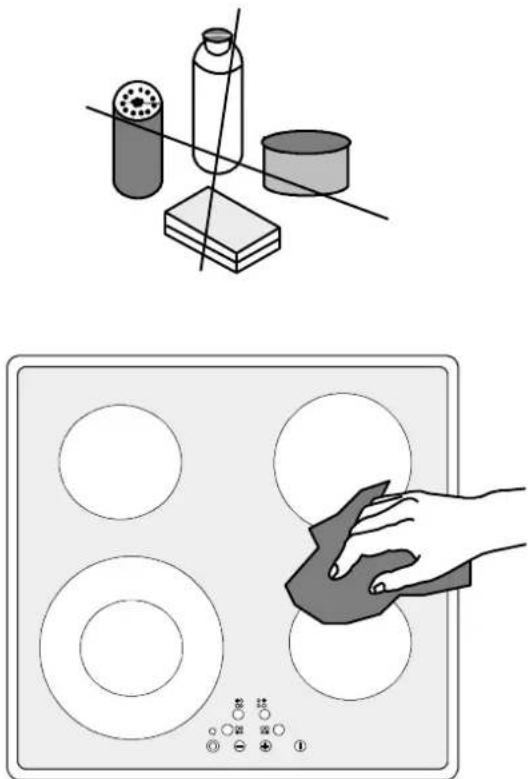
- Do not use the hob surface as a working surface or for storage.
- Do not use the cooking zones with empty pans or without pans. This could cause damage to the pans or the hob.
- Ceramic glass is insensitive to temperature shock and very robust, however, it is not unbreakable. Hard and sharp objects, in particular, can damage the cooking surface if they fall on it.
- Do not use cast iron pots or pans with damaged bases that are rough or burred. Scratching may occur when the lids are slid.
- Do not place any pans on the hob frame. Scratching may occur or the paint damaged.
- Ensure that liquids containing acids, e.g. vinegar, lemon, limescale removing agents, do not come into contact with the hob frame, otherwise matt spots will appear.
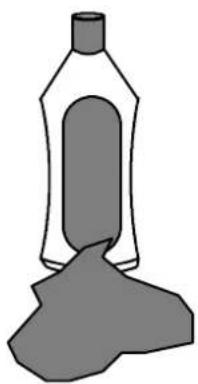
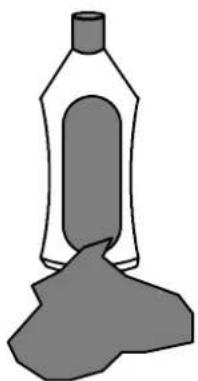
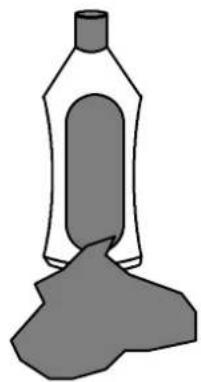
- If sugar or a dish containing sugar comes into contact with a hot cooking zone and then melts, remove the soiling immediately whilst still warm, using a glass scraper. If it cools, damage to the surface may occur.
- Keep all items and materials that melt away from the ceramic glass surface, e.g. plastics, aluminium foil or oven foils. If something of this nature should melt onto the ceramic glass surface, it must be removed immediately using a glass scraper.
Disposal
Disposal of packaging material

All parts of the packaging can be recycled and hard foam parts are appropriately marked.
PE = Polyethylene
(outer wrapping and the bag inside)
PS = Polystyrene foam (e.g. packing pieces)
Please dispose of all packaging and old appliances with due regard for safety and the environment.

Please observe the national and regional regulations on appliances and packing material as well as the material marking (material separation, refuse collection, waste disposal sites).
Hints on disposal

The appliance must not be disposed of with the household rubbish.
Please contact your local council or Environmental Health Officer to see if there are facilities in your area to recycle the appliance.
Before the first use
Cleaning for the first time
The hob has to be cleaned thoroughly before it is first used.
Wash the ceramic glass surface and the frame with warm water with a little washing up liquid added and wipe dry.

Never use aggressive or abrasive cleaning agents, they may damage the ceramic glass and hob frame.
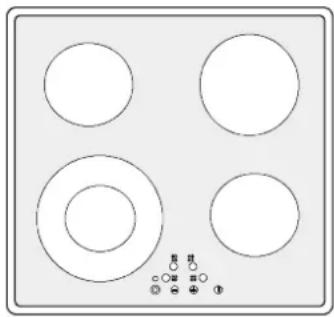
Description of the hob
Cooking and control section features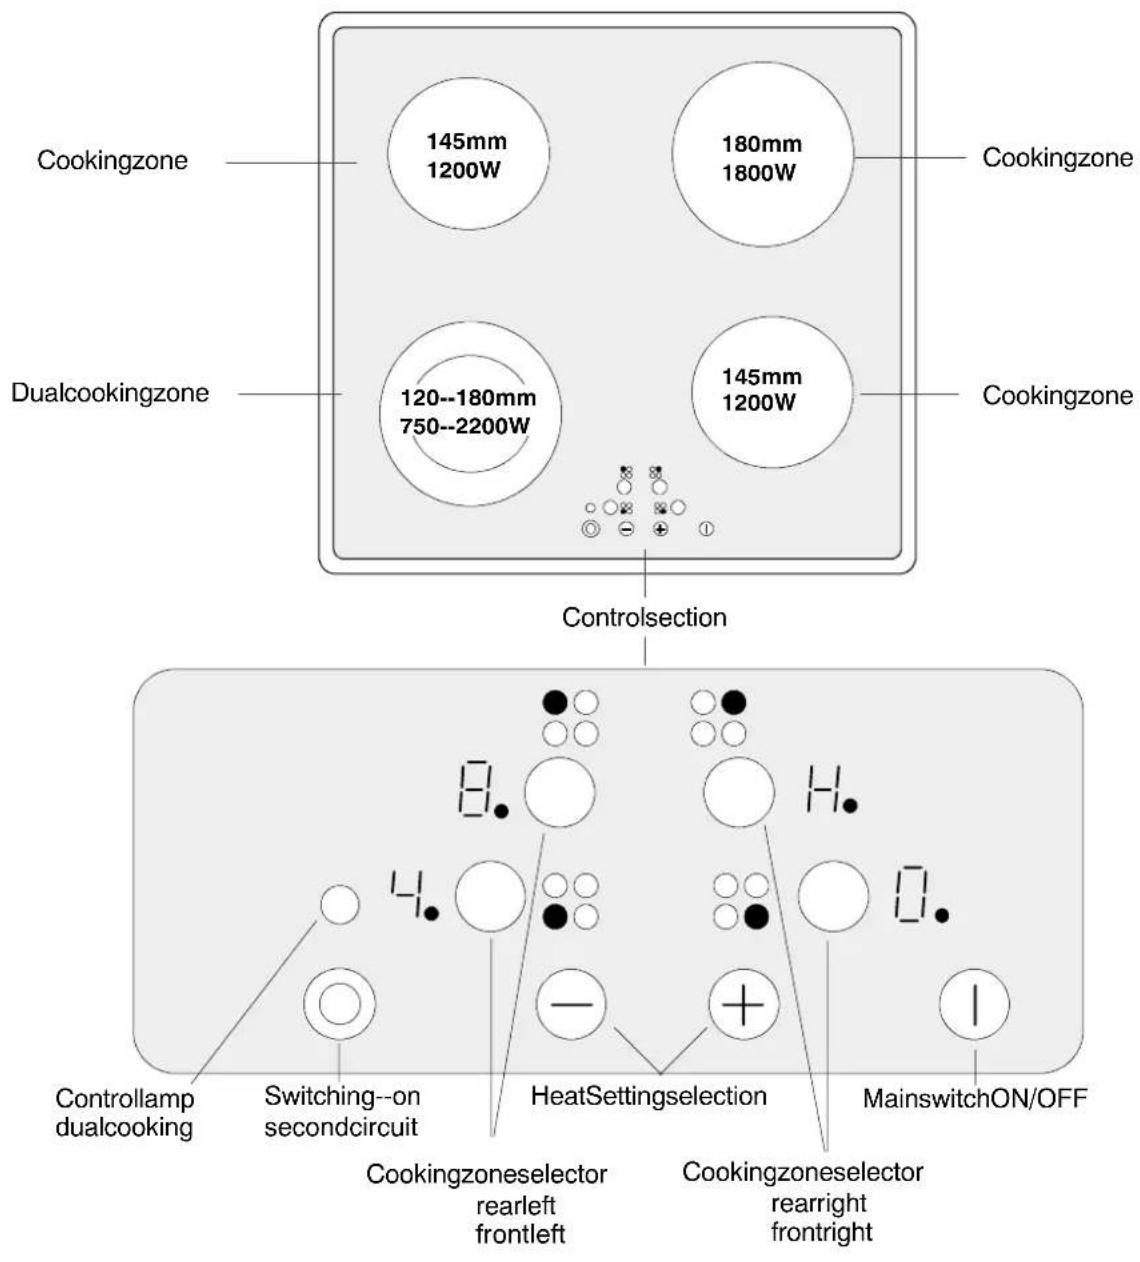
Digital indicators
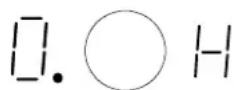
Four display fields, one for each cooking zone, show up as follows:
After switch-on and with automatic switch-off by the safety function, when selecting a cooking zone, 1. depending on heat setting selected, with residual heat, with malfunction, with child safety device switched on.
Special features of the appliance
● Ceramic glass cooking area:
The appliance is comprised of a ceramic glass cooking surface and 4 quick-heating cooking zones. Due to especially efficient radiant heating elements, the cooking zones will heat up very quickly.
- Touch controls:
The appliance is controlled by TOUCH-CONTROL.
- Touch control ON/OFF:
With use of the ON/OFF touch controls, the power supply to the appliance can be switched on and off.
● Control and function indicators:
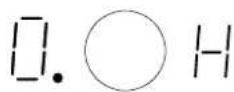
Digital indicators or control lamps provide information about settings made (1./9), functions activated (0./-) as well as any residual heat (H) of the corresponding cooking zone.
• Dual cooking zone:
The appliance is fitted with a dual cooking zone. This means you may use this cooking zone in two sizes, for smaller and larger pots. A chance for saving energy.
● Warm-keeping setting:
☐ = this setting allows you to keep dishes warm.
● Residual heat indicator:
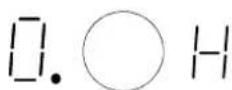
A H. ("hot") for residual heat indication will come on in the display in case of a cooking zone temperature that implies the danger of burning.
● Safety lock/children safety device:
With this function, the cooking area can be secured against unintended switching on.
Safety cut-off:
A safety cut-off makes sure that all cooking zones will be switched off automatically after some time if there is no variation of settings.
Cleaning:
Due to the ceramic glass cooking area and the touch controls being a single unit, it is very easy to keep the hob clean.



Operating instructions
General information
The cooking surface is made of proven ceramic glass and consists of 4 cooking zones. The rapid glowing cooking zones with the especially efficient radiant heating elements will considerably reduce the duration of heating up.
The cooking surface is pore-free and also insensitive to rapid changes in temperature. Pots can therefore be moved from a hot to a cold zone. When switching on a cooking zone you may hear a short buzz. That is a characteristic of all ceramic glass cooking zones and does not impair the function or the lifetime of the appliance. Always put pots and pans onto the cooking zone before switching on.
TOUCH-CONTROL sensor fields
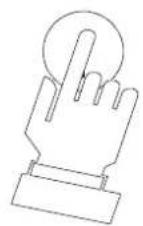
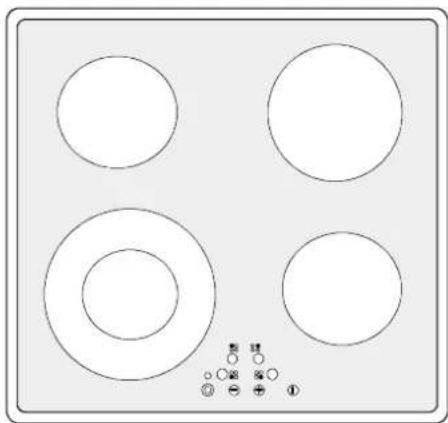
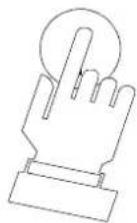
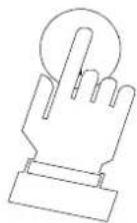
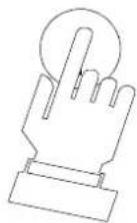
To operate the TOUCH-CONTROL sensor fields, put your finger flat from top onto the desired field, until corresponding indicators will come on or go out, respectively until the desired function will be carried out.
Switching on the appliance
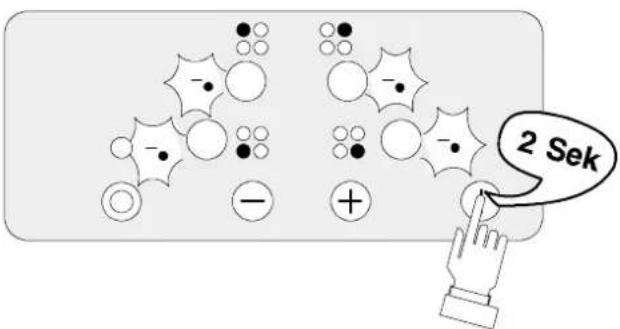
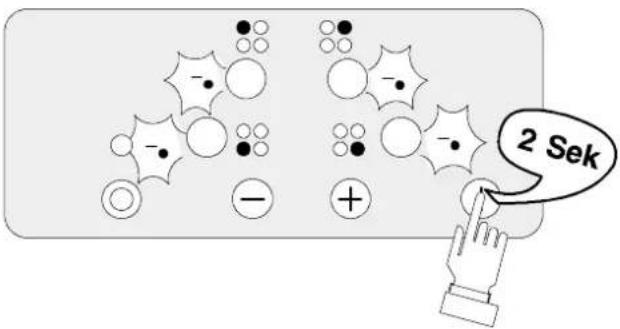
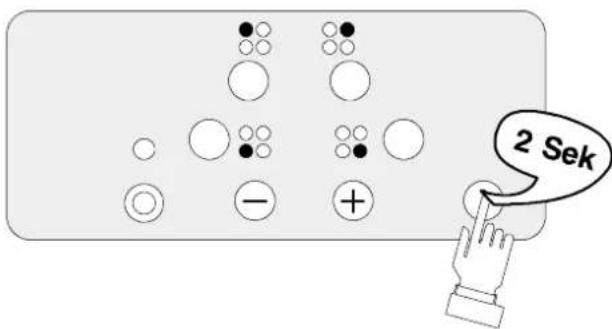
The entire appliance is switched on by means of the touch control ① ON/OFF.
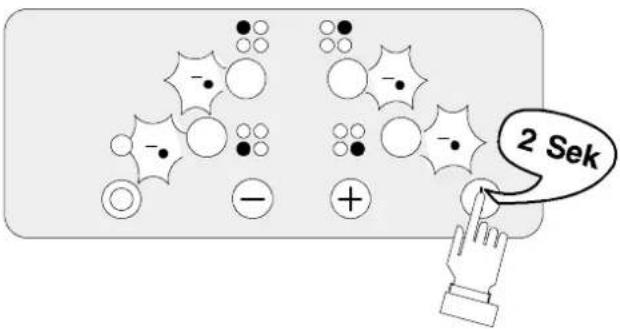
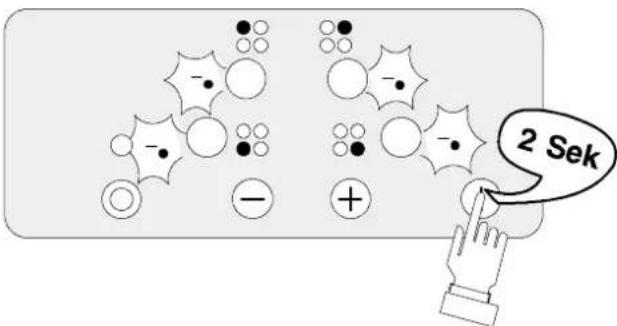
Keep the control ON/OFF touched for about two seconds. The digital indicators show - and the digital point flashes.
Once the appliance has been switched on, a cooking zone must be selected within 10 seconds with use of the cooking zone selector. If a cooking zone is not selected, the appliance will switch off for safety reasons.
Switching off the appliance
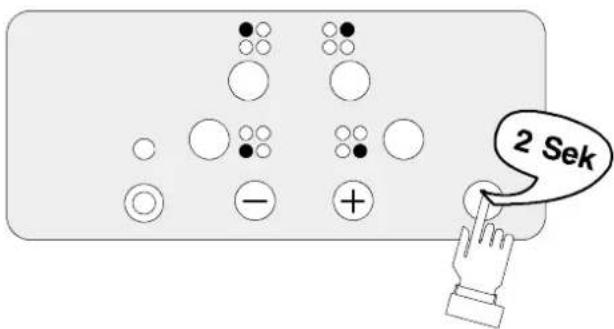
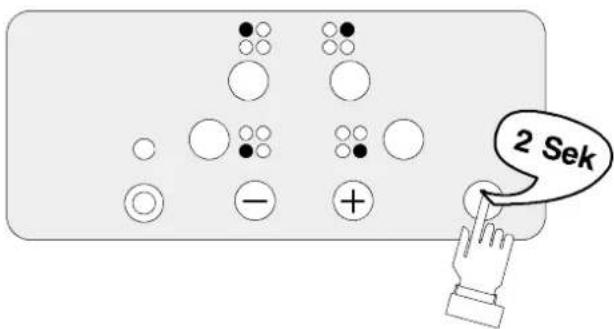
To fully switch off the appliance, use the touch control ① ON/OFF.
- Keep the sensor field ON/OFF touched for about two seconds. After switching off one individual cooking zone or the entire cooking area, the residual heat is indicated with (“hot”) in the digital indicators of the corresponding cooking zones.
Cooking zone selection
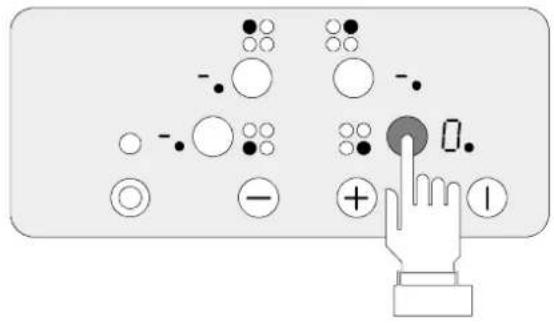
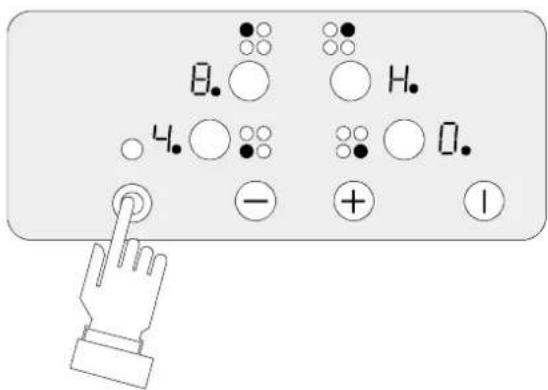
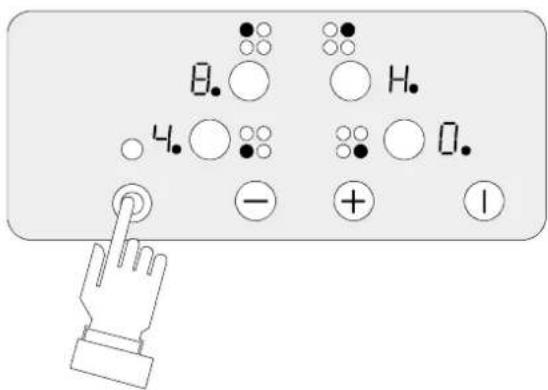
- To activate a cooking zone, keep the corresponding control touched for about one second. A zero with digital point comes on in the corresponding cooking zone display.
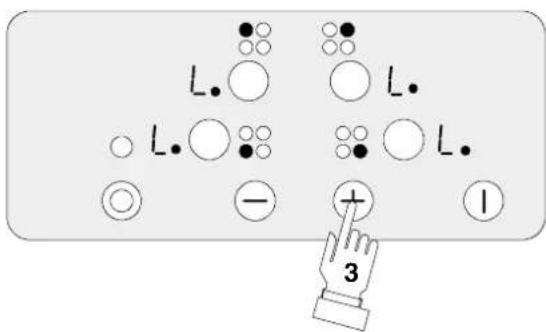
Setting selection - + -
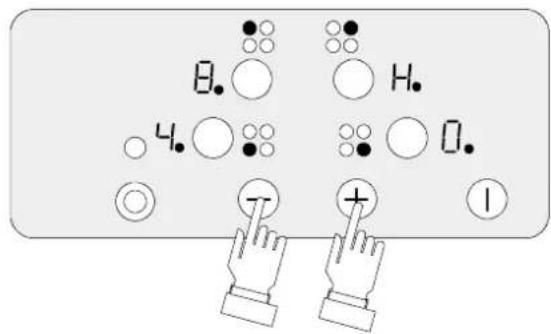
- For selecting or changing the setting for the cooking zone from ☐ to ☐, use the + touch control to increase the setting. Use the - touch control to reduce the setting.
Dual cooking zones switch on and off
When using the dual cooking zones, the larger heating circuit can be switched on in addition to the smaller zone by using the corresponding touch control ☐ on the ceramic glass cooking area.
The outer zone can be switched on at any time during the use of the inner zone. The control lamp illuminates after the outer zone has been switched on.
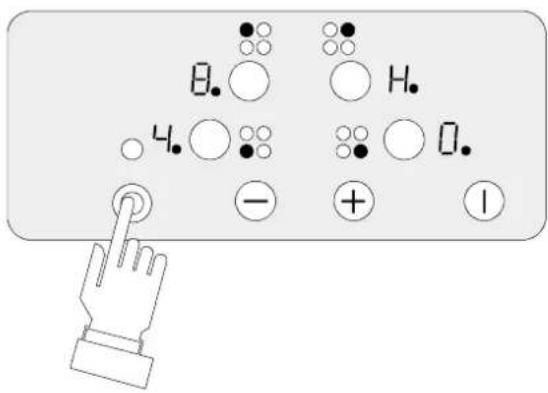
- 1. Touch the control for the dual cooking zone. The outer heating circuit is switched on, the control lamp beside the contact with a control for the dual cooking zone lights up.
- 2. For switching off the outer heating circuit, touch the control for the dual cooking zone Ⓞ, the outer heating circuit is switched off.
Cooking zone switch off
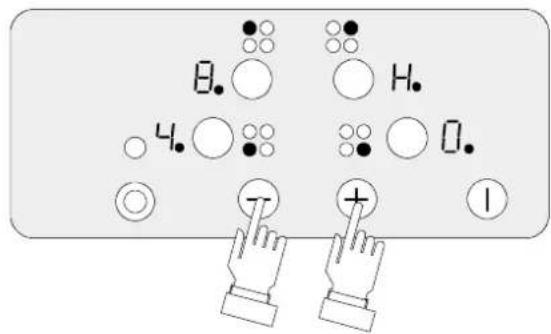
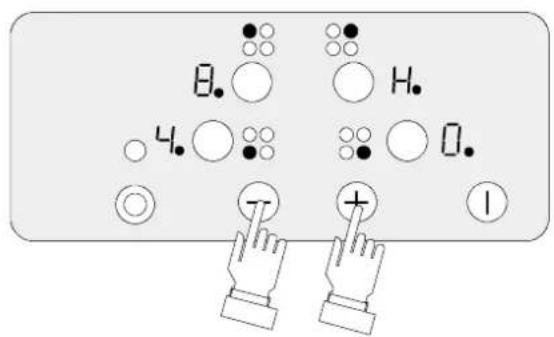
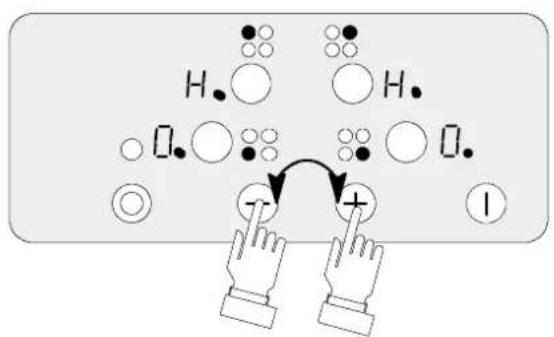
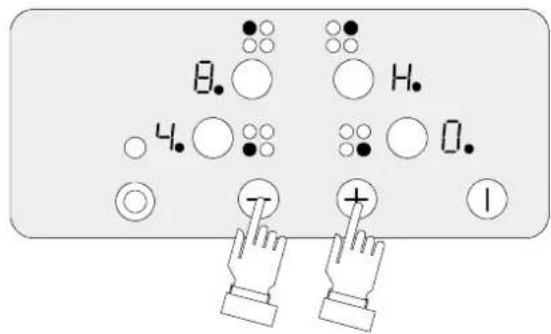
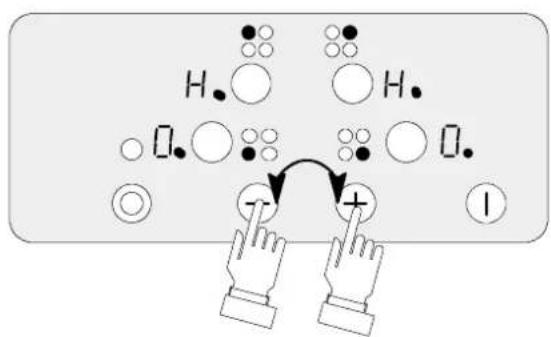
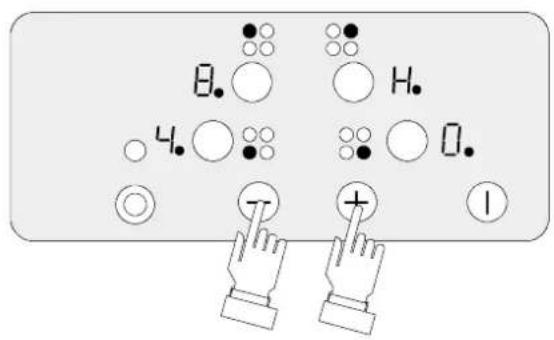
- 1. Select the desired cooking zone by means of the cooking zone touch control. - 2. For switching off, push the + and - touch controls at the same time or return to zero with the - touch control.
Residual heat indicator
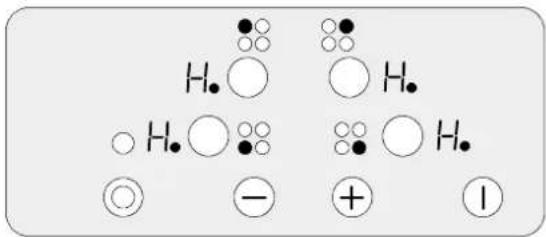
After switching off a single cooking zone or the entire hob, any residual heat is indicated by ☐ (“hot”) showing in the display of the corresponding cooking zone.
Even after switching off a cooking zone, the residual heat indicator will go out only after sufficient cooling down of the cooking zone.

The residual heat can be used for melting and keeping dishes warm.

Caution! While the H. is illuminated, the hob is hot and there is a risk of burning.
Caution! If there is a power failure, the H. will go out even if there is residual heat in the hob. Care will have to be taken until there is no longer a risk of burning.
Child safety device
Activating the child safety device
The child safety device prevents the cooking zones being switched on accidentally.

The child safety device can only be activated when the hob is switched on.
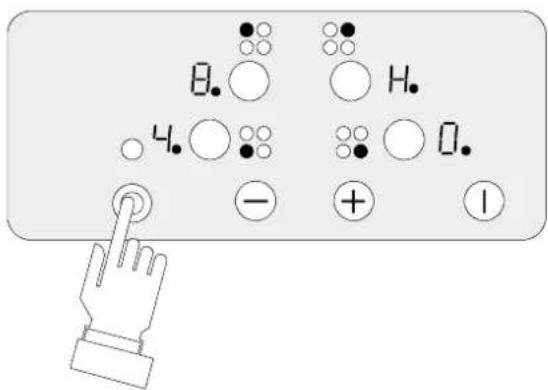
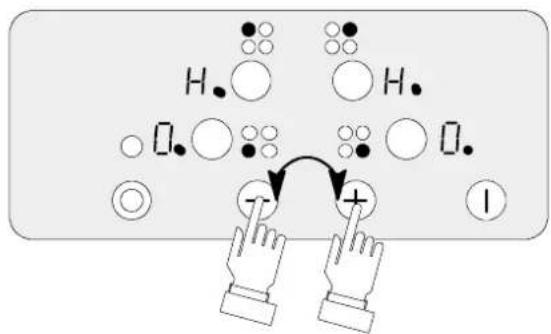
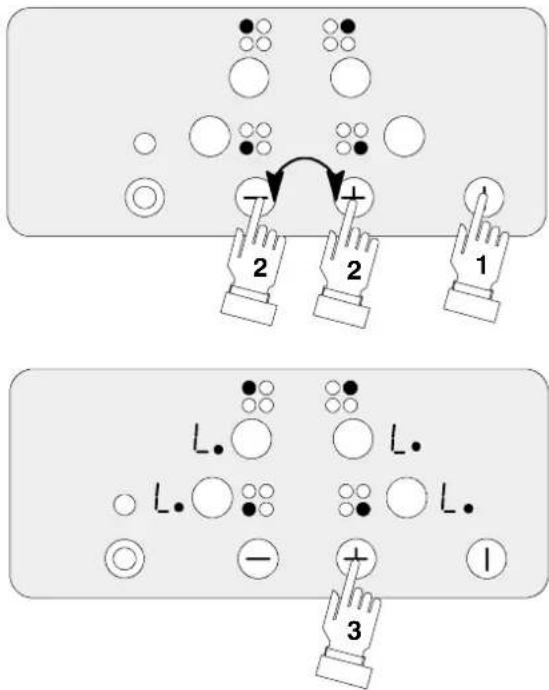
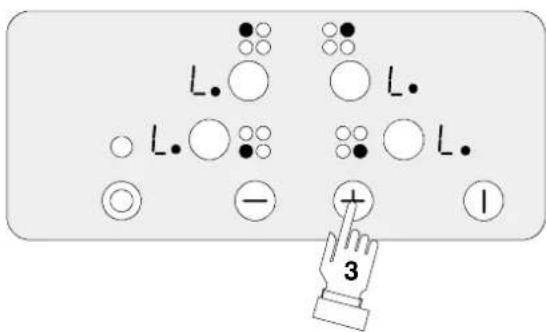
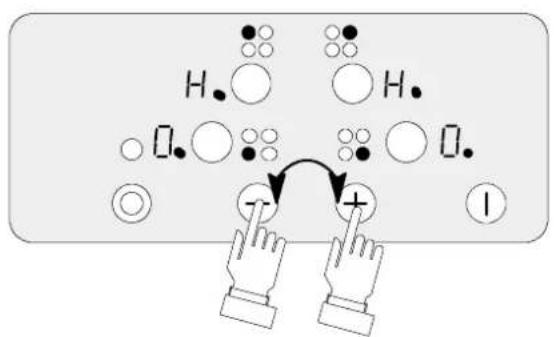
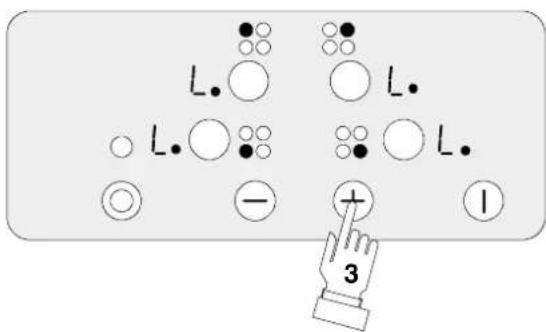
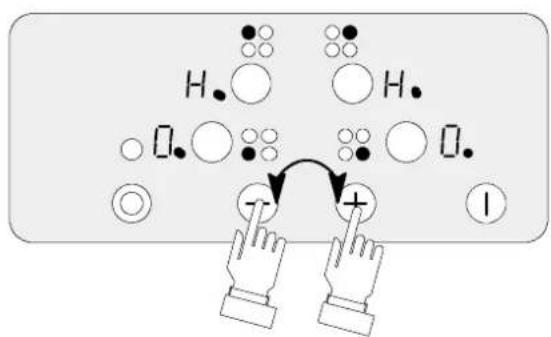
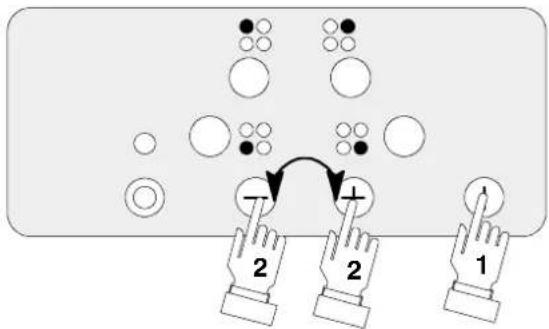
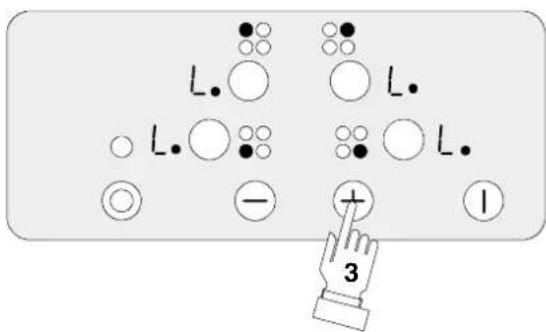
• 1. Touch the ① ON/OFF control. - 2. Immediately after (within 10 seconds) touch the + and - controls at the same time for about two seconds and then release. - 3. Touch the + control again. 📁 will be indicated in the digital displays for about 10 seconds. The child safety device is now activated.
Use of the cooking area with the child safety device activated
• 1. Touch the ① ON/OFF control. - 2. Within 10 seconds touch the + and - controls at the same time for about two seconds. The digital displays show ☐ and the digital point flashes. - 3. Select the cooking zone and set the heat setting as desired.

The child safety device remains deactivated until you next switch off the appliance. All cooking zones and settings can be used as normal.
Deactivating the child safety device
The child safety device can only be deactivated when the hob is switched off.
- Touch ① ON/OFF control, is indicated in the digital displays.
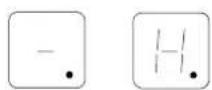
- Touch + and - controls at the same time for about 2 seconds and then release. 3. Touch - control again. Symbol will go out in the digital displays and - will be indicated. The child-safety device is now deactivated.
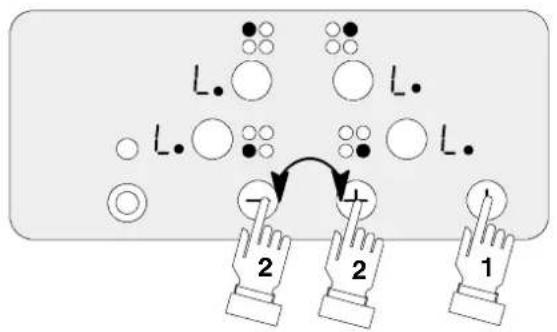
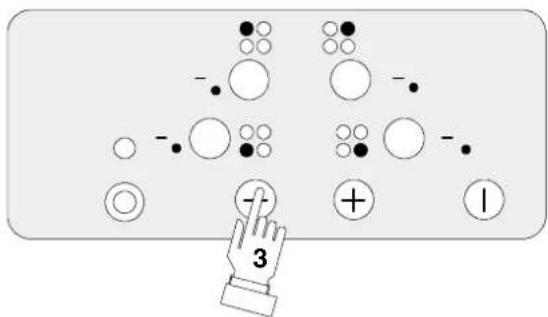
Safety cut off after a time
If a cooking zone is not switched off or if a setting is not varied after a defined time, the corresponding cooking zone will switch off automatically.
H. appears in the cooking zone display and - after cooling down.
● The cooking zones switch off as follows:
- setting 1 – 2 after 6 hours
- setting 3 – 4 after 5 hours
- setting 5 after 4 hours
- setting 6 – 9 after 1.5 hours
To re-set the cooking zones, if required, the appliance must be switched back on using the main switch ① ON/OFF.
Safety cut off due to a spillage
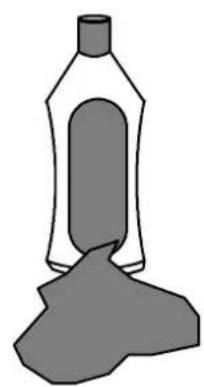
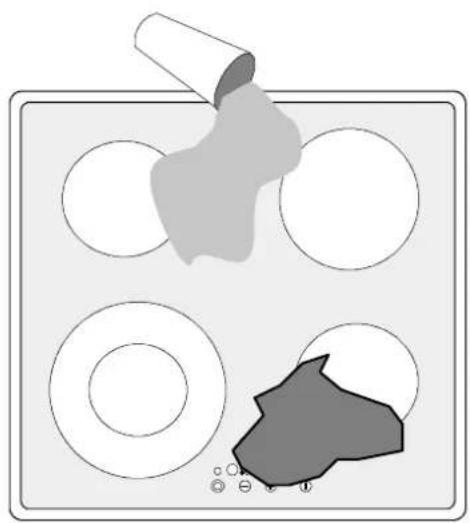
Liquids that boil over and spill onto the surface will cause the cooking zones to switch off.
The hob will also switch itself off if a wet cloth is placed on the control panel.
In either case the appliance must be switched back on, once the liquid or cloth has been removed, with the main switch ① ON/OFF for further use.
Application, Charts, Tips
Cooking and frying utensils
The better the pot or the pan, the better the boiling or frying result.
- You can recognize good quality pans by their base. The base should be as thick and as flat as possible.
- Rough bases (i.e. burrs and sharp edges) will scratch the ceramic glass surface.
- Utensils with aluminium and copper bases can leave behind metallic discolorations which can only be removed with difficulty or sometimes not at all. ● Saucepans and frying pans should not be smaller than the cooking zone, and preferably not more than 10–15 mm larger than the diameter of the cooking zone.
- When cold, pan bases normally curve slightly inwards (are concave). In no case should they curve outwards (be convex).
- When buying new pots or pans pay attention to the base diameter. Manufacturers often state the upper diameter of the edge of a dish.
- If you are using special cooking utensils like pressure cookers or a WOK, follow the manufacturer's instructions.
- Follow any guidelines provided by the saucepan manufacturer. Ensure they are recommended for use on ceramic hobs.
General hints
● The bases should always be clean and dry. - To avoid scratching or damaging the ceramic glass surface, pots and pans should be moved on the hob by lifting them, and not by sliding. - Scratches can also be caused by grains of sand (e.g. originating from the previous washing of vegetables), drawn over the cooking surface with the pan, or by burrs and the rims of pan bases. - Use high sided pans for dishes with a lot of liquid, so that nothing boils over.

Energy consumption
To save energy, you should:
- Place pots and pans in position before switching on the cooking zone.
- Use only cooking and frying utensils with smooth, flat bases.
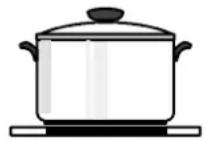
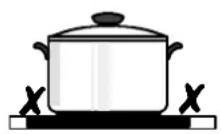
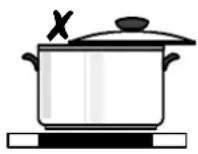
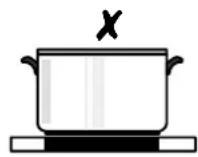
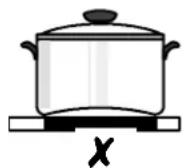
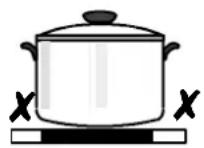
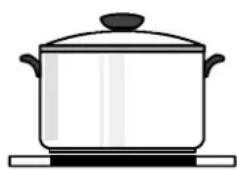
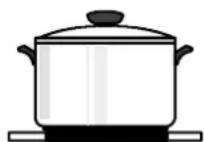
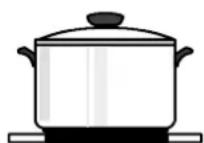
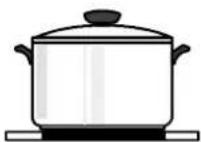
- Wherever possible, cover pots and pans with a lid.
- Never place pots or pans on cooking zones with a higher diameter.
- Because of wet or dirty cooking zones and pots, energy will be wasted.
- Switch off the cooking zone a few minutes before the end of the cooking time, in order to make use of the residual heat.
- When using pressure cookers, you can reduce the cooking time by up to 50%. As well as saving energy, more vitamins and minerals are retained in the food.
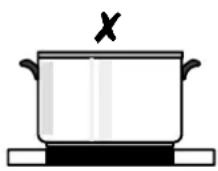
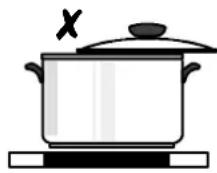
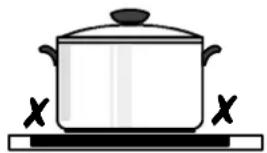
Chart: Boiling and frying
The setting position required for cooking processes is dependent on the quality of the pots and on the type and amount of the food.
| SwitchpositionCookingmethodExamples | ||
| 9 | ParboilingQuickfrying | Startingofcookingandroasting,cookingoflargequantitiesofliquid,thenswitch--backtoappropriatesetting |
| 7 - 9 | FryingDeepfatfrying | Frenchfries,pan--cakesFilletofporkandbeef,steaksgoulash |
| 6 - 7 | RoastingFryingwithoutcrust | Fryingofmeat,schnitzel,cutlets,meat--balls,sausages,liver,fish--filletindeepfat,Fryingeggsorchops |
| 4 - 5 | BoilingBraising | Boiledpotatoes,stews,soups,hot--pot,saucesinlargequantities |
| 3 - 4 | SimmeringStewing | Simmeringofvegetables,braisingofmeat,lightlycookingsmallamountoffruitwithlittleliquid |
| 2 - 3 | Gentlesimmering | Simmeringofriceandfoodwithmilk(sometimesstirring),Stewingofsmalleramountofpotatoesorvegetables,Warmingupofpreparedmeal |
| 1-2 | KeepingwarmMelting | Omelette,friedeggs,Hollandaisesauce,Keepingwarmamealorsmallamountofhot--potMeltingofbutter,chocolate,gelatine. |
| 0 | Residual heat | Residual heat, OFF-position |
When heating up or frying, we recommend heat setting "9", and then continue cooking foods at an appropriate lower heat setting.
Cleaning and care
Attention! Cleaners must not get onto the hot ceramic glass surface! After cleaning, all residues of cleaners must be removed with sufficient clean water, as they may be caustic when being reheated.
Never use aggressive or abrasive agents, such as oven sprays, stain or rust removers, scouring powder, or sponges with an abrasive effect.
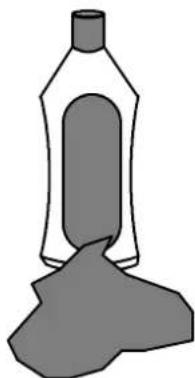
Suitable cleaning materials are: clean cloth or household paper, hot water with detergent, suitable commercial cleaners and cleaning scrapers. Cleaning scrapers and ceramic glass cleaners are available from the expert trade and in markets for building material.
Ceramic glass surface
- Clean the ceramic glass surface after every use when it is hand warm or cold. This will avoid spills becoming burnt on.
- Remove scale and water marks, fat spots and metallic shimmering discoloration with a commercial ceramic glass cleaner such as Vitroclen.
Light soilage
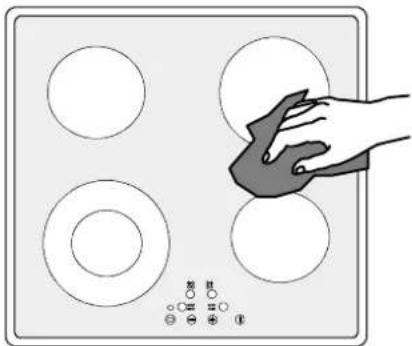
● Wipe the ceramic glass surface with a damp cloth, and a little washing up liquid. - Then rub dry with a clean cloth. No residues of cleaner must be left on the surface. - Once a week, thoroughly clean the entire ceramic glass surface with a commercial ceramic glass cleaner such as "Vitroclen". Always ensure that the hob is dry after cleaning.
Stubborn soilage
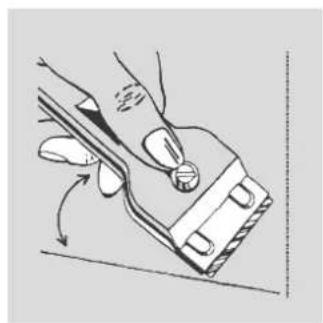
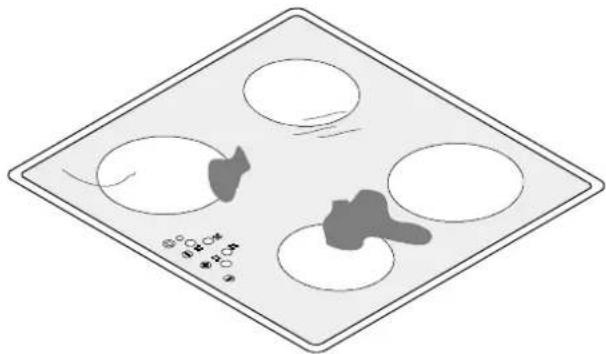
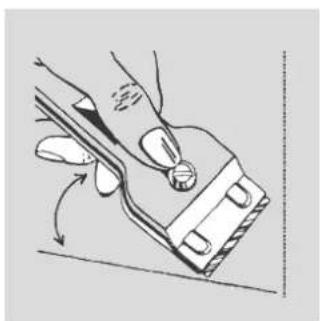
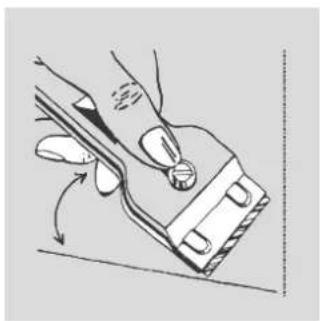
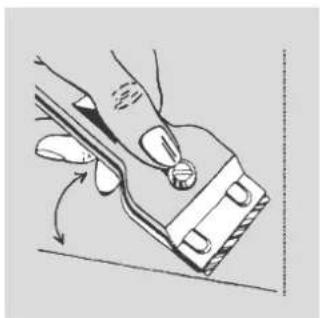
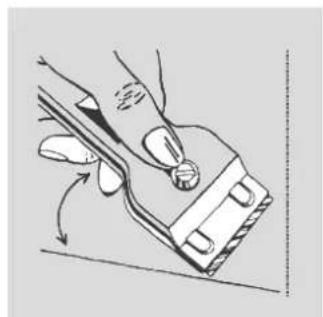
● To remove food that has boiled over or burnt on spots, use a glass scraper. - Place the glass scraper at an angle to the ceramic glass surface. Remove soiling by sliding the scraper.
Special soilage
Sugar
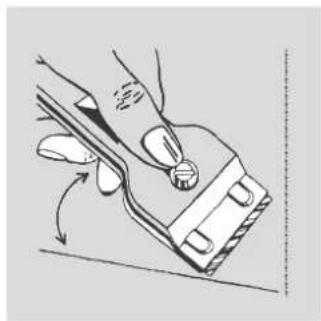
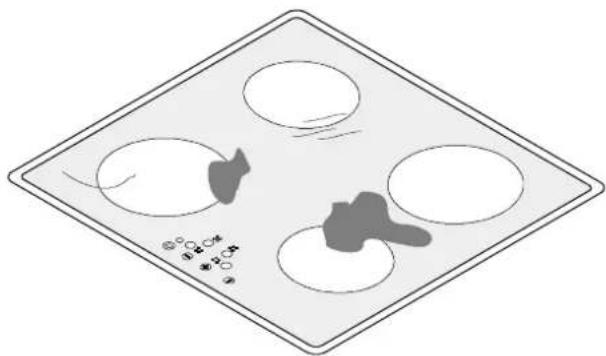
- Remove burnt-on sugar, melted plastics, aluminum foil immediately -- when they are still warm -- using a glass scraper, otherwise damage may occur. Warning! When using the cleaning scraper on the warm cooking zone, care should be taken. ● Afterwards clean the cooking surface normally. If the cooking zone and melted material has cooled down, reheat the cooking zone gently to aid the cleaning process.
Dark spots, decor damages
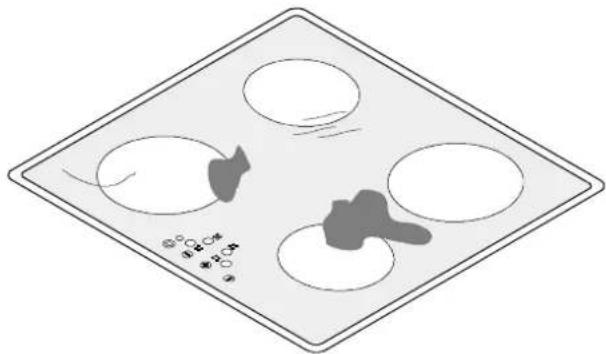
If aggressive cleaners or pans with abrasive bases are used, then the decor will take on an abraded appearance and dark spots will appear over time. These marks cannot be removed. However, they do not impair the functionality of the hob.
Scratches in the ceramic glass surface
Scratches in the ceramic glass surface resulting from burrs on a pan base or sand grains cannot be removed. However, they do not impair the function of the hob.
The hob frame
Do not allow vinegar, lemons or scale removers to come into contact with the hob frame, matt spots will appear.
- Clean the hob frame with water and a little washing-up liquid.
- Soften dried dirt with a wet cloth. Then wipe off and rub dry.
What to do...
If the hob does not function correctly, please carry out the following checks, as it may be something you can remedy yourself.
...if the cooking zones will not function?
Check, whether
- the main fuse has failed. ●the appliance is correctly switched on.
- the safety cutoff has operated. ●the control lamps of the control panel are lighting. ● the corresponding cooking zone is switched on.
- the cooking zones are set for cooking as desired.
...if cooking zones cannot be switched on/off?
Check, whether
●the control panel is locked. - a period of more than 10 seconds has elapsed between pressing the on/off switch and selecting a cooking zone. - the touch controls are entirely or partly covered by liquid or by a wet cloth.
...if the whole indicator section for residual heat, except, will fail all of a sudden?
Check, whether
● The ON/OFF touch control was accidentally touched. - The touch controls are entirely or partly covered by liquid or by a wet cloth. - The safety cutoff has operated. ● There was a power cut for a short while.
...if the displays suddenly go out?
Check whether
● the fuse has failed. ● there has been a power cut. - The setting operation was correctly made.
...if after cooking zone switch-off the display will not show - or H. for residual heat?
Check whether
- The cooking zone has only been in operation for a short while, and is therefore not hot enough.
...if a cooking zone cannot be switched on?
Check whether
● the child-safety is switched on.
...if all displays (inclusive of residual heat indicator H) go out during cooking?
- The overheating protection of the electronic controls has blocked the use of the hob. Once the cooking zone has cooled down it can be operated again.
...if the display flashes?
If the hob has been used at high setting for a long period of time, the overheating protection of the electronic control will become active and the front left cooking zone will become inoperable. This occurs to prevent damage to the electronic controls. The front left cooking zone will operate again once the appliance has cooled down and is no longer in the display. The front right and rear cooking zones can still be operated during this time.
...if the display lights up?
Check whether
the touch controls are entirely or partly covered or contaminated by liquid or by a wet cloth.
Clean the ceramic glass surface and wipe it dry.
If after switching the appliance back on, the display still shows F. Contact your local Service Force Centre.
If after carrying out the above checks your appliance is still faulty, disconnect from the mains supply and contact your local Service Force Centre.
In guarantee customers should ensure that the above checks have been made as the engineer will make a charge if the fault is not a mechanical or electrical breakdown. Please note that proof of purchase is required for any in-guarantee service calls.
...the cooking zone automatically switches back to setting 7 during cooking?
Because the temperature is too high, the electronic control thermal cutoff has triggered an automatic reduction of the cooking setting. You can increase the cooking setting again, after the cooking zone has cooled down. If you try to increase the setting again and display flashes, this means that it is not yet possible to carry out the desired increase, because the appliance is still too hot.
Service and Spare Parts
If you require an engineer or you wish to purchase spare parts contact your local Service Force Centre by telephoning:
0990-929929
Your call will be routed to the Service Centre covering your postcode area.
When you contact the Service Centre you will need to give the following details:
1 Your name, address and postcode. 2 Your telephone number. 3 Clear and concise details of the fault. 4 Model and serial number of the appliance (rating plate) 5 The purchase date.
In guarantee customer should ensure that the checks listed in "What to do" have been made as the engineer will make a charge if the fault is not a mechanical or electrical breakdown.
Guarantee Conditions
Standard Guarantee Conditions
We undertake that if within 12 months of the date of the purchase this appliance or any part thereof is proved to be defective by reason only of faulty workmanship or materials, we will, at our option, repair or replace the same FREE OF CHARGE for labour, materials or carriage on condition that:
- The appliance has been correctly installed and used only on the electricity supply stated on the rating plate.
- The appliance has been used for normal domestic purposes only, and in accordance with the manufacturer's instructions.
- The appliance has not been serviced, maintained, repaired, taken apart, or tampered with by any person not authorized by us.
- All service work under this guarantee must be undertaken by a Service Force Centre.
- Any appliance or defective part replaced shall become the Company's property.
- This guarantee is in addition to your statutory and other legal rights.
Home visits are made between 8.30am and 5.30pm Monday to Friday. Visits may be available outside these hours in which case a premium will be charged.
Exclusions
This guarantee does not cover:
- Damage or calls resulting from transportation, improper use or neglect, the replacement of any light bulbs or removable parts of glass or plastic.
- Costs incurred for calls to put right an appliance which is improperly installed or calls to appliances outside the United Kingdom.
- Appliances found to be in use within a commercial environment, plus those which are subjected to rental agreements.
- Products of Electrolux manufacture which are not marketed by Electrolux.
European Guarantee
If you should move to another country within Europe then your guarantee moves with you to your new home subject to the following qualifications:
- The guarantee starts from the date you first purchased your product.
- The guarantee is for the same period and to the same extent for labour and parts as exists in the new country of use for this brand or range of products.
- This guarantee relates to you and cannot be transferred to another user.
- Your new home is within the European Community (EC) or European Free Trade Area.
- The product is installed and used in accordance with our instructions and is only used domestically, i.e. a normal household.
- The product is installed taking into account regulations in your new country.
Before you move please contact your nearest Customer Care Department, listed below, to give them details of your new home. They will then ensure that the local Service Organisation is aware of your move and able to look after your appliances.
France Senlis +33 (0)3 44 62 22 22 Germany Nürnberg +49 (0)911 32322600 Italy Pordenone +39 (0)167 847053 Sweden Stockholm +46 (0)207 87750 UK Slough +44 (0)1753 219897
Customer Care
For general enquiries or for further information on Electrolux products, please contact our Customer Care Department.
Electrolux
55-77 High Street
Slough
Berkshire
SL1 1DZ
Tel: 0870 595 0950
European:
+44 (0)1753 219898
Installation instructions
Hints on safety

This appliance must be installed and connected by qualified personnel. Please observe this instruction, otherwise the warranty will not cover any damage which may occur.
During the installation and in case of a service failure the appliance must not be connected to the mains.
The general rules for the operation of electric appliances, the provisions by the competent electricity supply board and the specifications of these instructions for installation have to be strictly adhered to.
Built-in in the kitchen worktop

Electrical safety is to be ensured by professional installation.
Protection against accidental contact according to the regulations set by VDE or other local authorities must be ensured by correct installation of the appliances. The same refers to the back of the appliance which, even in case of built-in solutions away from the wall, must not be freely accessible.
Built-in cupboards have to be located and fastened in a way that they are stable.
Note down the data from the rating plate of your appliance in the printed rating plate form in this manual. These numbers are needed in case of service calls.
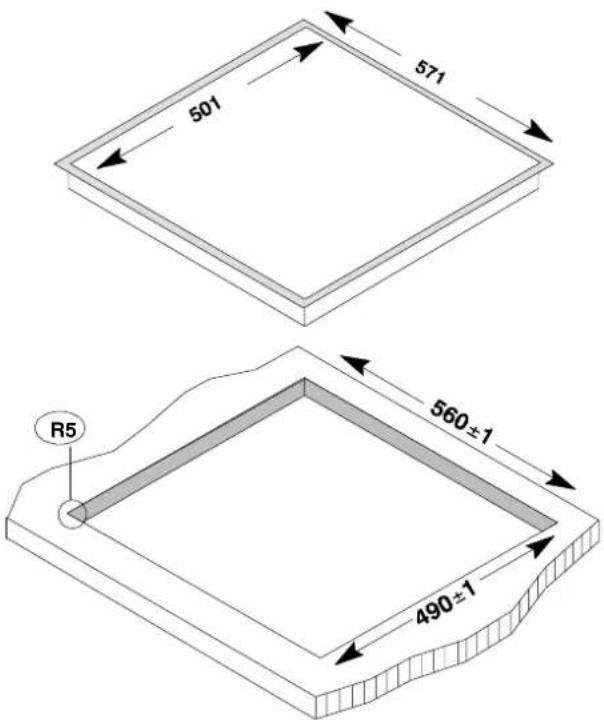
Installation dimensions
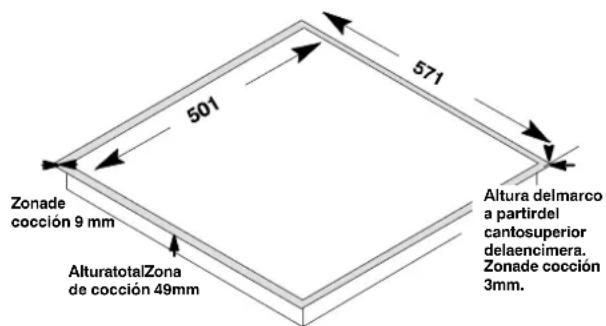
The opening in the cabinet must correspond to the standard dimensions. Then necessary information can be found in the dimensional sketch.
The separation between the lower surface of the hob and the part of the furniture below it must be at least 20 mm.
The lateral separation between the sides of the hob and the cabinet must be at least 55 mm, and must be at least 55 mm from the rear panel.
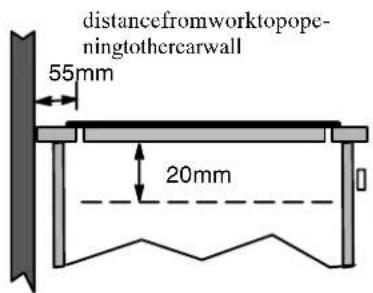
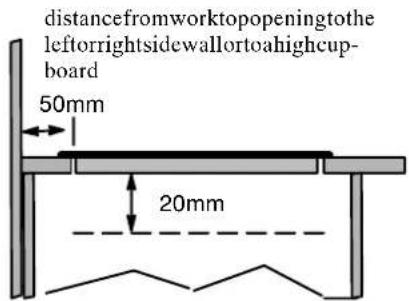
With regard to the protection against overheating of surrounding furniture surfaces, this appliance corresponds to type Y. This appliance or the built-in cupboard for the appliance respectively may be located with the rear wall and one side wall to whatever high walls or furniture respectively, and with the other side to another appliance or furniture of the same height as this appliance.
Hob installation
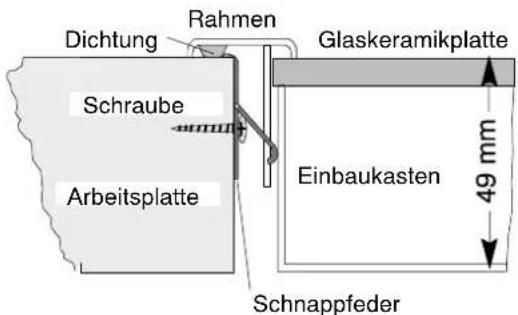
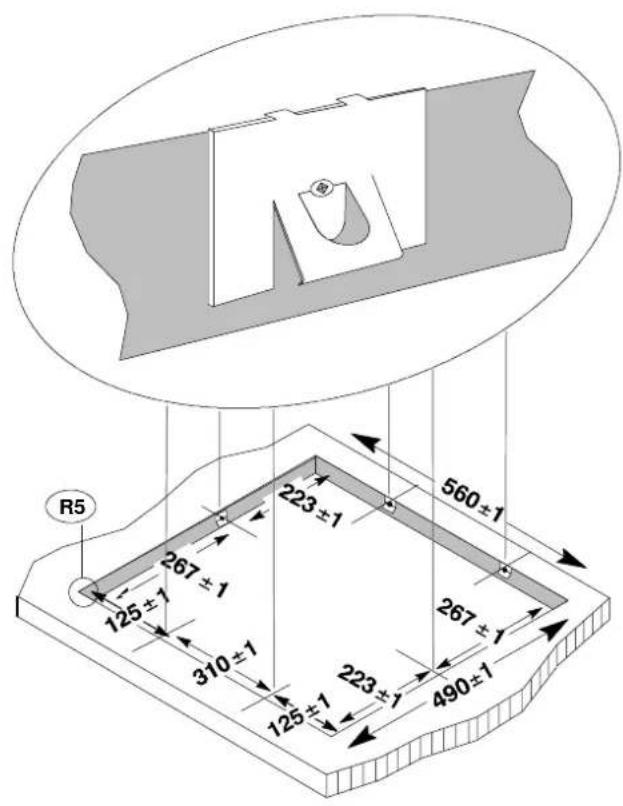
- Cut out the worktop with the cut-out size as stated. The tolerance sizes must not be exceeded. Saw exactly at the marking line. Recommendation: Mark the cut-out with a steel needle. Cover-glue the line in order to avoid splintering of the coating when cutting. Clean the worktop in the cut-out section. With tiled worktops, the grooves within the contact area of the cooking area must completely be filled up with groove material.
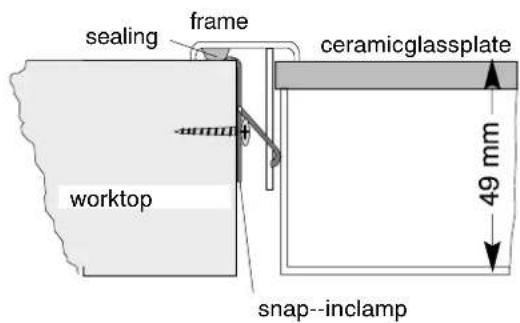
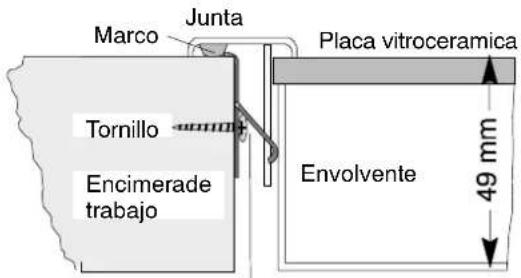
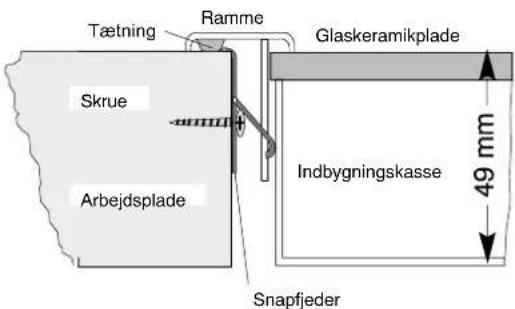
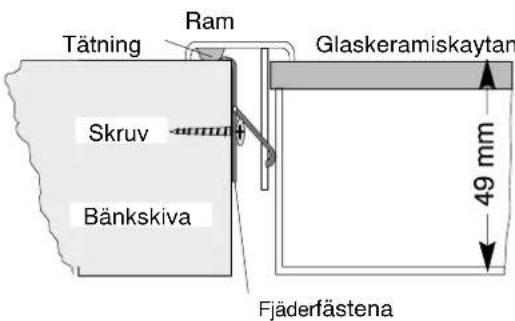
- Then fasten the catch springs with screws in the cut-out at the marked position. The distortion of the springs serves as a stop on the worktop.
- With natural, artificial stone, or ceramic plate, the springs can be glued in with special adhesive (synthetic resin, two-component adhesive, etc.).
- The cooking area is lowered from the top into the cut-out section, centered and firmly pressed on until the springs will catch.
- Check the seal in the supporting frame for perfect seating and gapless support. Please do not apply further silicone sealing matter as this will complicate the removal of the hob if servicing is necessary.
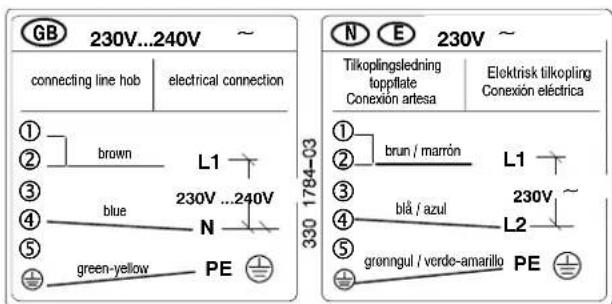
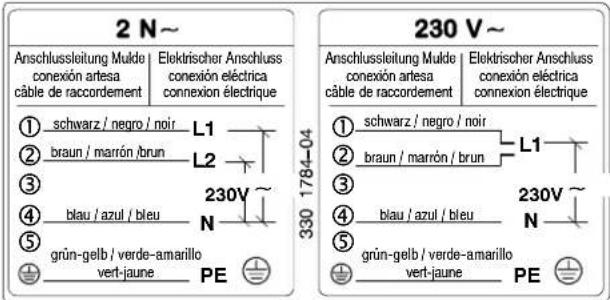
Electrical connections
Before connecting the appliance, check that the voltage quoted on the rating plate - that is, the nominal voltage of the appliance - corresponds to the available mains voltage. The rating plate can be found on the lower housing of the ceramic glass hob.
The mains connection must be carried out by an expert electrician. The VDE regulations and the valid prescriptions by the local power supply boards have to be complied with.
- Prior to connection, it should be checked whether the voltage stated on the rating plate—i.e., the nominal voltage of the appliance and of the oven/control box—is identical with the prevailing mains voltage. The rating plate is located on the lower housing of the hob.
- The heating element voltage amounts to 230V~. The appliance will also perfectly perform with the former mains voltage of 220V~.
- The mains connection must be carried out in a way that an all-pole insulating device is existing with a contact opening of at least 3mm, e.g., LS-automatism, earth-leakage circuit-breaker or fuse.
- A wire of type H05VV-F or of higher rating is to be used as supply cable.
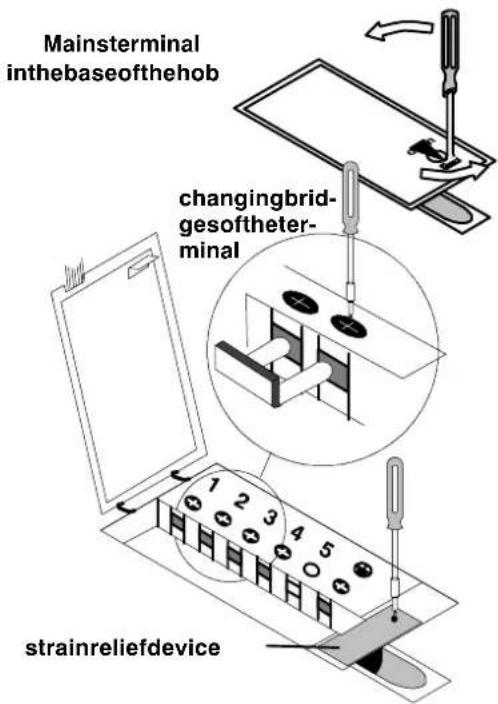
- The mains terminal is located in the bottom of the appliance behind a covering slide. It can be opened with a screwdriver (pict.).
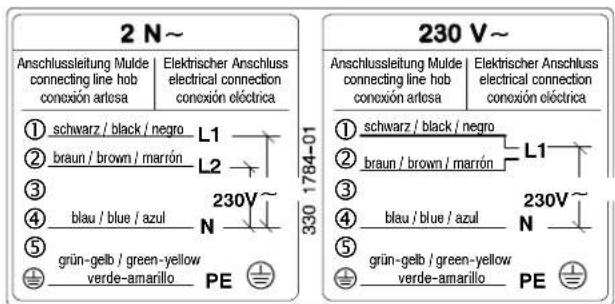
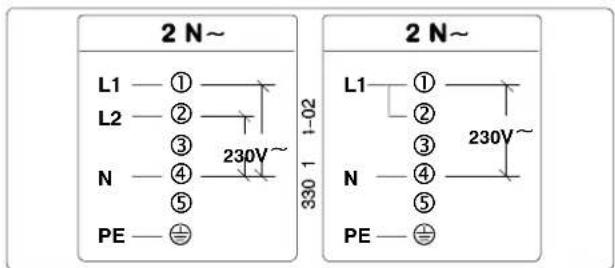
- According to existing mains voltage, the appliance has to be connected in correspondence with the diagram of connecting possibilities. The bridges of the terminal board are to be changed accordingly, if need be.
- The protective conductor is to be connected to terminal ⏻. The protective conductor must be longer than live leads.
- The cable connections have to be connected as shown and the terminal screws be firmly tightened.
- Afterwards, the supply cable has to be secured by strain relief device and the covering slide must be closed by firmly pressing down until it engages.
Priorities first: user should remove any existing labels and protective film from the ceramic glass plate or the frame of the hole.
After connecting the electrical supply, all cooking zones should be briefly switched on one after the other at their maximum power, in order to test whether they are operational.
Technical data
Dimensions of the appliance:
Length: 570 mm.
Depth: 500 mm.
Height 47 mm.
Volume 49 L.
Cut-out dimensions
Length 560 mm.
Depth 490 mm.
Radius R5
Power of cooking zones:
Dual cooking zone front left ..... 750/2200 W
Cooking zone rear left 1200 W
Cooking zone rear right 1800 W
Cooking zone front right 1200 W
Total connected load max. 6.4 kW
Voltage 230 V~50 Hz
Specifications, Standards, Guidelines
This appliance corresponds to the following standards:
- EN 60 335-1 and EN 60 335-2-6 with regard to the safety of electric appliances for domestic use and similar purposes
- DIN 44546 / 44547 / 44548 with regard to the criteria for electric cookers for domestic use. EN 55014-2 / VDE 0875 part 14-2, EN 55014 / VDE 0875 part 14 / 12.93, EN 61000-3-2 / VDE 0838 part 2
- EN 61000-3-3 / VDE 0838 part 3 with regard to the basic protection demands for electromagnetic compatibility (EMC).

This appliance corresponds to EC guidelines
- 73/23/EC dt. 19.02.1973 (low-voltage guideline)
- 89/336/EC dt. 03.05.1989 (EMC guideline inclusive of amendment guideline 92/31/EC)
Rating plate
Note down here the data from the rating plate of your appliance. The rating plate is on the base of the hob. The rating plate is not visible after the hob has been built-in.
This information will be required:
- when requesting a service call
- when ordering spare parts or accessories -- with technical queries.
ZANUSSI MADE IN GERMANY
TYP: PEE2 019 PNC: 949 590 890 MODELL: ZKT 623 LX
230 V ~
Total max. 6.4 kW
ZANUSSI
MADE IN GERMANY
TYP: PEE2 019 PNC: 949 590 794 MODELL: ZKT 623 LX
230 V ~
Total max. 6.4 kW

CE

ZANUSSI MADE IN GERMANY
TYP: PEE2 019 PNC: 949 590 802 MODELL: ZKT 623 LN
230 V ~
Total max. 6.4 kW

ZANUSSI
Electric glass ceramic hob
Electric ceramic glass hobs
ZKT623LX--ZKT623LW
ZKT623LB--ZKT623LN
Main switch



Child safety lock

What to do when,...
Flange
Electrical connection
ZKT623LX--ZKT623LW
ZKT623LB--ZKT623LN
Description of the appliance
Design of the cooking and control panel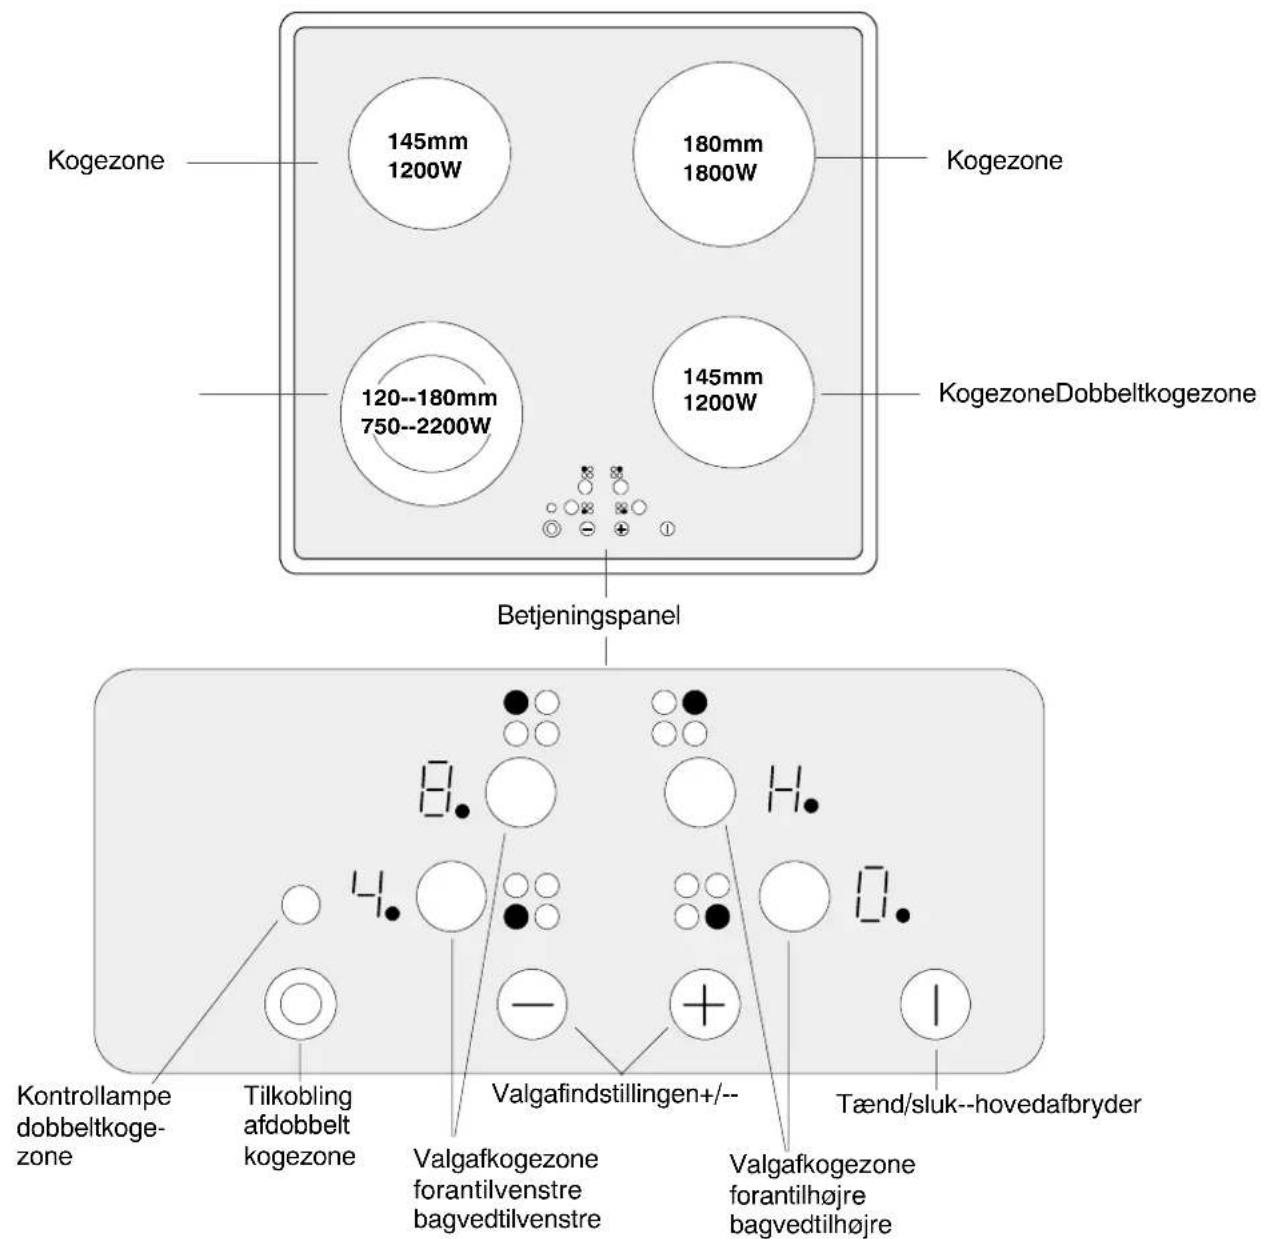
Digital indicators
The four display fields assigned to the four cooking zones show:

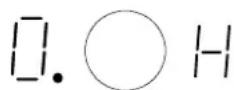


Operating the cooking field
General information
Selecting a cooking zone
Residual heat indicator
Child safety
Use, tables, tips
Pots and pans

The better the pot, the better the result.
Cooking and frying table
Special units
Sugar
Burnt-on sugar, melted plastic, aluminum foil or other materials that can melt must be removed immediately - while still warm - with the cleaning scraper.

Dark spots, decorative damage

Cooking zone frame

ZKT623LX--ZKT623LW
ZKT623LB--ZKT623LN
Description of the hob
Cooking zones and touch panel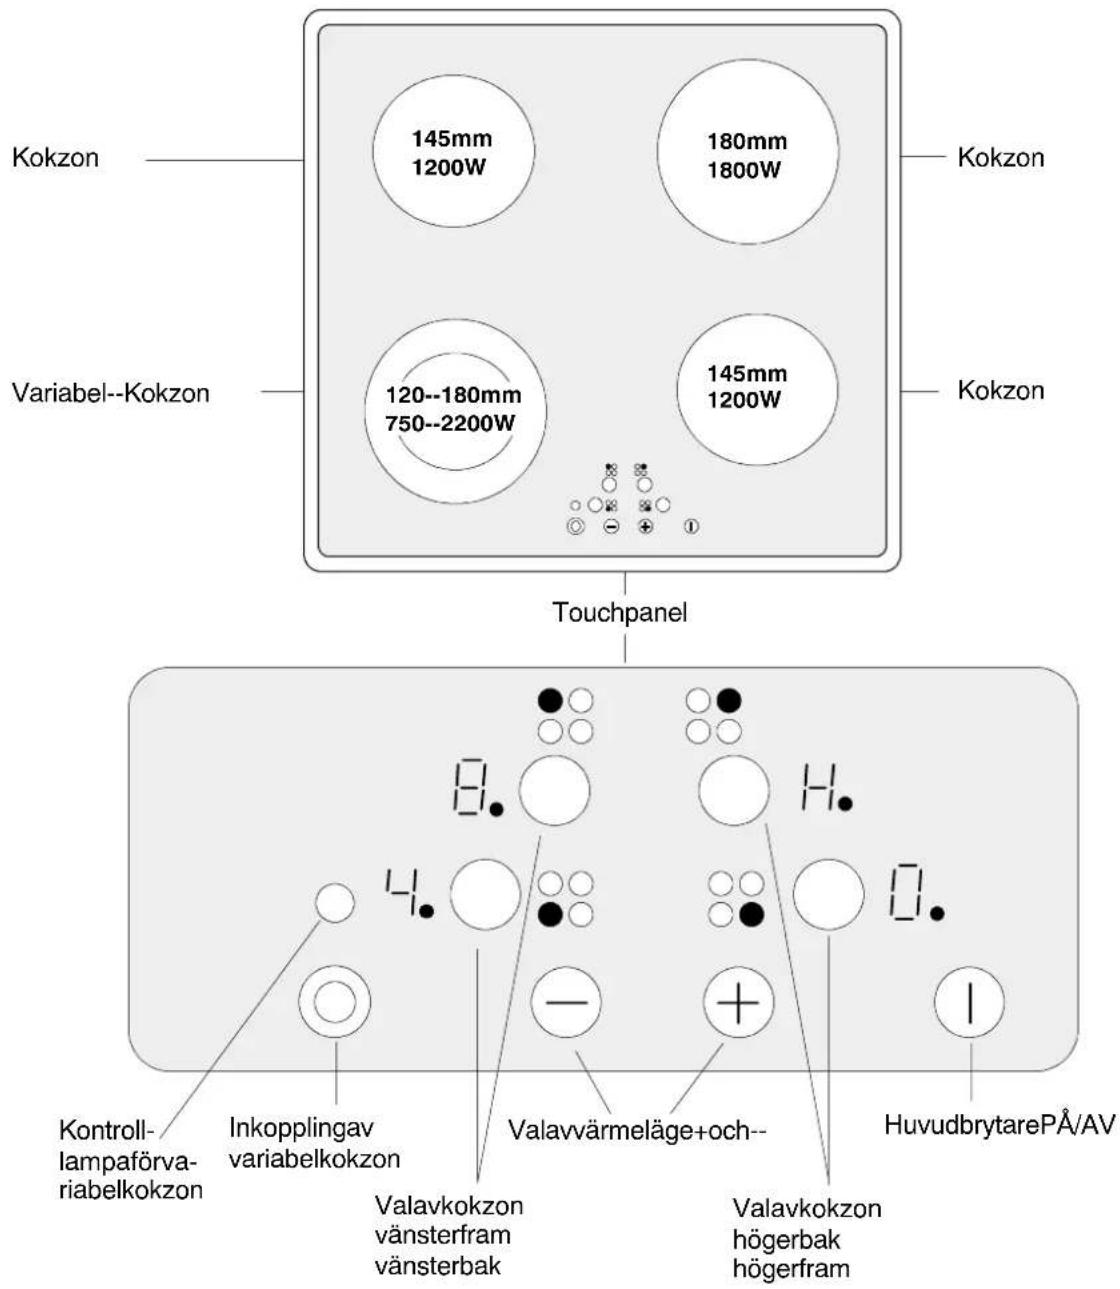



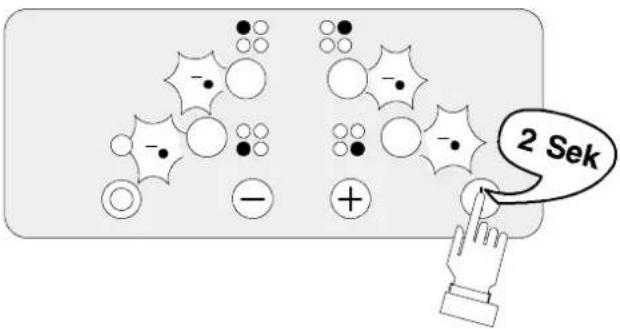
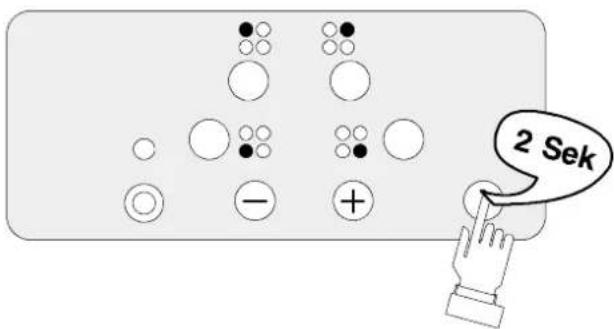
Selection of cooking zone
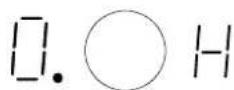
Press the desired cooking zone field (marking) for a second. The cooking zone activates and the display lights up and shows zero with a decimal point.
Selection of heat setting - + -
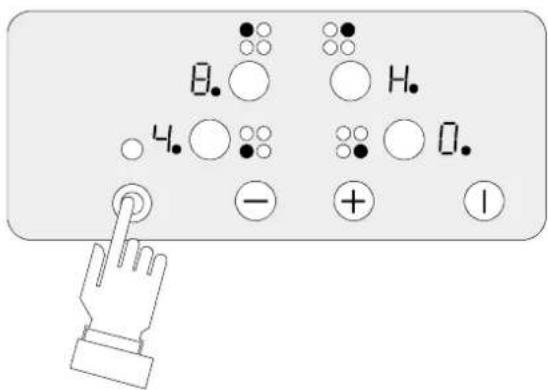
Residual heat indicator
Tips, tables and advice
Pans
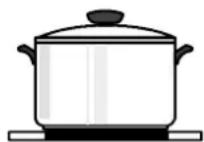
Table: boiling and frying at different heat settings
Special soiling
Sugar
What do I do when,...
- APPLIANCE DESCRIPTION
- OPERATING THE HOB
- SELECTING THE COOKING ZONE
- RESIDUAL HEAT INDICATOR
- CHILD SAFETY LOCK
- WHAT TO DO IF
- CONTENT
- FOR THE USER
- DEAR CUSTOMER
- SAFETY INFORMATION
- DISPOSAL
- BEFORE THE FIRST USE
- SPECIAL FEATURES OF THE APPLIANCE
- OPERATING INSTRUCTIONS
- APPLICATION, CHARTS, TIPS
- CLEANING AND CARE
- WHAT TO DO
- FOR THE INSTALLER
- INSTALLATION INSTRUCTIONS
- IMPORTANT SAFETY INFORMATION
- ELECTRICAL SAFETY
- SAFETY FOR CHILDREN
- SAFETY DURING USE
- SAFETY WHEN CLEANING
- HOW TO AVOID DAMAGING YOUR APPLIANCE
- DISPOSAL OF PACKAGING MATERIAL
- HINTS ON DISPOSAL
- CLEANING FOR THE FIRST TIME
- DESCRIPTION OF THE HOB
- DIGITAL INDICATORS
- ● CERAMIC GLASS COOKING AREA
- TOUCH CONTROLS
- TOUCH CONTROL ON/OFF
- ● CONTROL AND FUNCTION INDICATORS
- DUAL COOKING ZONE
- ● WARM-KEEPING SETTING
- ● RESIDUAL HEAT INDICATOR
- ● SAFETY LOCK/CHILDREN SAFETY DEVICE
- SAFETY CUT-OFF
- CLEANING
- GENERAL INFORMATION
- TOUCH-CONTROL SENSOR FIELDS
- SWITCHING ON THE APPLIANCE
- SWITCHING OFF THE APPLIANCE
- COOKING ZONE SELECTION
- SETTING SELECTION
- DUAL COOKING ZONES SWITCH ON AND OFF
- COOKING ZONE SWITCH OFF
- CHILD SAFETY DEVICE
- ACTIVATING THE CHILD SAFETY DEVICE
- USE OF THE COOKING AREA WITH THE CHILD SAFETY DEVICE ACTIVATED
- DEACTIVATING THE CHILD SAFETY DEVICE
- SAFETY CUT OFF AFTER A TIME
- SAFETY CUT OFF DUE TO A SPILLAGE
- COOKING AND FRYING UTENSILS
- GENERAL HINTS
- ENERGY CONSUMPTION
- CHART: BOILING AND FRYING
- CERAMIC GLASS SURFACE
- LIGHT SOILAGE
- STUBBORN SOILAGE
- SPECIAL SOILAGE
- SUGAR
- DARK SPOTS, DECOR DAMAGES
- SCRATCHES IN THE CERAMIC GLASS SURFACE
- THE HOB FRAME
- IF THE COOKING ZONES WILL NOT FUNCTION
- IF COOKING ZONES CANNOT BE SWITCHED ON/OFF
- IF THE WHOLE INDICATOR SECTION FOR RESIDUAL HEAT, EXCEPT, WILL FAIL ALL OF A SUDDEN
- IF THE DISPLAYS SUDDENLY GO OUT
- IF AFTER COOKING ZONE SWITCH-OFF THE DISPLAY WILL NOT SHOW - OR H. FOR RESIDUAL HEAT
- IF A COOKING ZONE CANNOT BE SWITCHED ON
- IF ALL DISPLAYS (INCLUSIVE OF RESIDUAL HEAT INDICATOR H) GO OUT DURING COOKING
- IF THE DISPLAY FLASHES
- IF THE DISPLAY LIGHTS UP
- IN GUARANTEE CUSTOMERS SHOULD ENSURE THAT THE ABOVE CHECKS HAVE BEEN MADE AS THE ENGINEER WILL MAKE A CHARGE IF THE FAULT IS NOT A MECHANICAL OR ELECTRICAL BREAKDOWN. PLEASE NOTE THAT PROOF OF PURCHASE IS REQUIRED FOR ANY IN-GUARANTEE SERVICE CALLS
- THE COOKING ZONE AUTOMATICALLY SWITCHES BACK TO SETTING 7 DURING COOKING
- SERVICE AND SPARE PARTS
- GUARANTEE CONDITIONS
- STANDARD GUARANTEE CONDITIONS
- EXCLUSIONS
- THIS GUARANTEE DOES NOT COVER
- EUROPEAN GUARANTEE
- CUSTOMER CARE
- HINTS ON SAFETY
- BUILT-IN IN THE KITCHEN WORKTOP
- INSTALLATION DIMENSIONS
- HOB INSTALLATION
- ELECTRICAL CONNECTIONS
- TECHNICAL DATA
- DIMENSIONS OF THE APPLIANCE
- CUT-OUT DIMENSIONS
- POWER OF COOKING ZONES
- SPECIFICATIONS, STANDARDS, GUIDELINES
- RATING PLATE
- ZANUSSI
- WHAT TO DO WHEN
- ELECTRICAL CONNECTION
- DESCRIPTION OF THE APPLIANCE
- OPERATING THE COOKING FIELD
- SELECTING A COOKING ZONE
- CHILD SAFETY
- USE, TABLES, TIPS
- POTS AND PANS
- COOKING AND FRYING TABLE
- SPECIAL UNITS
- DARK SPOTS, DECORATIVE DAMAGE
- COOKING ZONE FRAME
- SELECTION OF COOKING ZONE
- SELECTION OF HEAT SETTING
- TIPS, TABLES AND ADVICE
- PANS
- TABLE: BOILING AND FRYING AT DIFFERENT HEAT SETTINGS
- SPECIAL SOILING
- WHAT DO I DO WHEN
Brand : ZANUSSI
Model : ZKT623LN
Category : Cooker