
BM1200BK - Toaster GORENJE - Free user manual and instructions
Find the device manual for free BM1200BK GORENJE in PDF.

| Product Type | Toaster |
| Brand | Gorenje |
| Model | BM1200BK |
| Color | Black |
| Number of Slots | 2 |
| Power Consumption | 800 W |
| Voltage | 220-240 V |
| Frequency | 50-60 Hz |
| Dimensions (W x D x H) | 28 x 18 x 20 cm |
| Weight | 1.2 kg |
| Cord Length | 0.8 m |
| Browning Control | 7 levels |
| Functions | Toast, Defrost, Reheat, Cancel |
| Automatic Shut-off | Yes |
| Cool-Touch Housing | Yes |
| Removable Crumb Tray | Yes |
| Self-Centering Racks | Yes |
| High-Lift Lever | Yes |
| Warranty | 2 years |
Frequently Asked Questions - BM1200BK GORENJE
User questions about BM1200BK GORENJE
0 question about this device. Answer the ones you know or ask your own.
Ask a new question about this device
Download the instructions for your Toaster in PDF format for free! Find your manual BM1200BK - GORENJE and take your electronic device back in hand. On this page are published all the documents necessary for the use of your device. BM1200BK by GORENJE.
USER MANUAL BM1200BK GORENJE
natural_image
Black and white photo of a black industrial bread maker with control panel and digital display (no visible text or symbols)BM 1200 BK
Pokrov
Ročaj
Kontrolno okence
Posoda za kruh
Lopatke za mešanje
Nadzorna plošča
Ohišje
Merilna skodelica
Merilna žlička
Kavelj
OPIS NADZORNE PLOŠČE
natural_image
Simple line drawing of a container with liquid and a small object inside, no text or symbols presentKvas ali pecilni prašek
Suhe sestavine (moka, sladkor...)
Voda ali druga tekočina
natural_image
Simple line drawing of a container with liquid inside, no text or symbols presentkvasac ili prašak za pecivo
suhi sastojci
- Poklopac
- Ručica
- Kontrolni prozorčić
- Posuda za hleb
- Lopatice za mešanje
- Kontrolna tabla
- Kućište
- Šoljica za merenje
- Kašičica za merenje
- Kuka
OPIS KONTROLNE TABLE
natural_image
Simple line drawing of a container with liquid inside, no text or symbols presentkvasac ili prašak za pecivo
suvi sastojci
voda ili tečnost
Napomena: Maksimalna količina brašna ili kvasca napisana je u receptu.
- Na vrhu brašna prstom napravite manju rupicu, u nju stavite kvasac i pazite da ne dođe u dodir s tečnošću ili sa soli.
- Lagano spustite poklopac i priključni kabel umetnite u utičnicu.
- Pritisnite na dugme „MENU“ i odaberite željeni program pečenja.
- Pritisnite dugme „COLOR“ i odaberite željenu boju korice.
- Pritisnite dugme „LOAF“ (vekna) i odaberite željenu veličinu vekne.
- Pritisnite dugme „TIME+“ ili „TIME-“ da podesite vremensku odgodu. Ukoliko želite da aparat odmah započne sa radom, taj korak preskočite.
- Pritisnite dugme „START/STOP“ da aparat odmah započne sa radom.
- Posle završetka pečenja čućete 10 zvučnih signala. Tada pritisnite dugme „START/STOP“ (3 sekunde) da zaustavite program i iz aparata izvadite pečeni hleb. Otvorite poklopac i sa kuhinjskim rukavicama okrenite posudu za hleb u suprotnom pravcu od kazaljke na satu. Izvadite posudu za hleb iz aparata.
Upozorenje: posuda za hleb može da bude vrlo vruća! Postupajte pažljivo i zaštitite se od opekotina.
- Ostavite posudu za hleb da se hladi pre nego što izvadite hleb. Sa lopaticama pažljivo odvojite veknu od ivica posude.
- Obrnite posudu za hleb nadole i postavite je na metalni žičani podmetač ili očistite radnu površinu i lagano potresite posudu da hleb sam ispadne napolje.
- Pre nego što započnete da sečete hleb, ostavite ga da se hladi oko 20 minuta. Za sečenje hleba preporučujemo električni nož ili nazubljeni nož za hleb. Korišćenjem noža za voće ili kuhinjskog noža možda ćete naseći neravnomerne i natrgane komade.
- Ukoliko Vas slučajno nema u blizini ili ako niste pritisnuli dugme „START/STOP“ da isključite aparat, hleb će automatski ostati topao još otprilike jedan sat. Kada se funkcija održavanja temperature završi, čućete 10 zvučnih signala.
- Posle završetka upotrebe odnosno kada aparat za pečenje hleba više ne koristite, isključite ga iz električne instalacije.
Important safeguards:
Before first use, please read the instruction manual carefully.
- Before using the electrical machine, always follow basic precautions.
- Please keep these instructions, the guaranty certificate, the sales receipt and, if possible, the carton with the inner packaging!
- The machine is intended for commercial use!
- Before use, check if the voltage of wall outlet corresponds to the one on the rating plate.
- Always switch off the machine and remove the plug from the socket whenever the machine is not in use, when attaching accessory parts, cleaning the machine or whenever a disturbance occurs.
- In order to protect children from the dangers of electrical machines, never leave them unsupervised with the machine. Be sure that children do not have access to the machine and ensure that the cable does not hang down.
- Check the machine and the cable regularly for damage. If there is damage of any kind, do not use the machine.
- Do not repair the machine by yourself, rather consult an authorized expert.
- Do not use the machine with a damaged outlet. Replaced it with equivalent plug from the manufacturer, our customer service department or a similar qualified person.
- Keep the machine and the cable away from heat, direct sunlight, moisture, sharp edges, etc...
- Never leave the machine unsupervised! When you do not use it, even if this is only for a moment, switch the machine off.
- Use only original accessories.
- Do not use the machine outdoors.
- Do not place the machine in water or other liquid. Do not use the machine with wet or moist hands.
- Should the machine become moist or wet, remove the plug off the socket immediately. Do not reach into the water.
- Use the machine only for the intended purpose on the rating label of the machine.
- Do not touch any of the moving or spinning parts of the machine.
- Do not touch hot surfaces. Use handles or knobs.
- Persons (including children) with reduced physical, sensory or mental capabilities, or lack of experience and knowledge, should not use this machine, unless they are supervised or get instructions how to use it, by a person responsible for their safety.
- When you remove the pan, be careful that you do not damage it.
- Do not insert metal foils or other materials into the machine. This can provide a higher risk for a fire or short circuit.
- To avoid fire, never cover the maschine with a towel or any other material, because heat and steam must be able to come out. Prevent contact with combustible material.
- Never connect the maschine to an external timer switch or remote control system.
- Noise level: Lc < 68 dB(A).
This appliance is marked according to the European directive 2002/96/EC on Waste Electrical and Electronic Equipment (WEEE). This guideline is the frame of a European-wide validity of return and recycling on Waste Electrical and Electronic Equipment.
Using the machine for the first time:
Check the baking pan and clean the rest of the baking chamber. Pan is non-stick coated. Do not use sharp objects and do not rub! Grease it and bake empty for about 10 minutes. Clean it again. Place the kneading bar on the axle in the baking area. Air the room if any unwanted smell appears.
Electrical connection:
The machine must only be connected to a correctly installed 220-240V, 50Hz safety socket. As soon as you plug the bread maker into the socket, you will hear a beep and "1 3:00, 1200g, MEDIUM" will appear in the display screen. The two dots between the "2" and "55" won't flash constantly. The "1" indicates the default program. The "1200g" and "MEDIUM" are the default settings.
FUNCTIONS & OPERATION
Know your bread maker
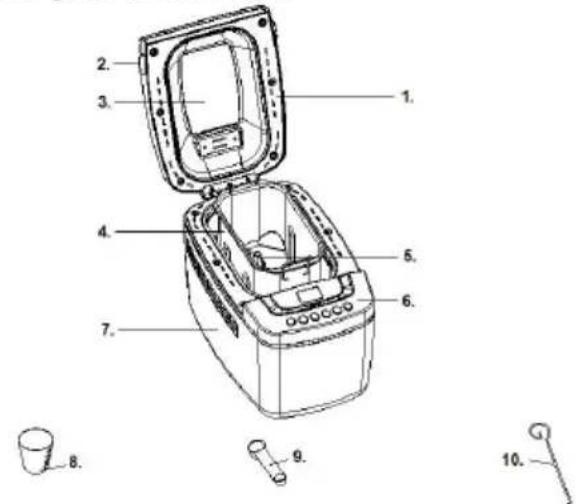
- Lid
- Lid Lug
- Viewing Winow
- Baking Pan
- Kneading Blade
- Control Planel
- Housing
- Measuring Cup
- Measuring Spoon
- Hook
INTRODUCTION OF CONTROL PANEL
(The silkscreen is subject to change without prior notice.)
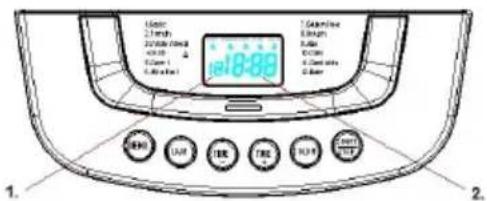
- The program you have chosen.
- The operation time for each program.
Start/stop
Use the button for starting or stopping the selected baking program.
To start a program, press the "START/STOP" button once. You will hear a short beep and the two dots in the time display will begin to flash and as the program starts. Any other button is inactivated except the START/STOP after a program has begun.
To stop the program, press the "START/STOP" button and hold for approx. 3 seconds, then you will hear a beep, that means that the program has been switched off.
Menu
It is used to set different programs. Every time you press "MENU" button, the program will change (followed by a short beep). Press the button continuously and the 12 menus appear on the LCD display. Select your desired program. The functions of 12 menus are explained below.
-
Basic: For white and mixed breads, it mainly consists of wheat flour or rye flour. The bread has a compact consistency. You can adjust the bread brown by setting the COLOR button.
-
French: For light breads made from fine flour. French bread requires special timing and temperatures to achieve that wonderful crispy, nicely browned crust. This is not suitable for baking recipes requiring butter, margarine or milk.
- Whole wheat: Whole wheat bread is a yeast bread that is made with a significant portion of whole wheat flour (50% or more), rather than with all white bread flour. Breads made from whole wheat flour are more nutritious because the flour is milled from the entire wheat berry (including the bran and the germ). Using whole wheat flour produces a bread that is brown to dark brown in color (when all whole wheat flour is used), and the breads are more flavorful and healthful than breads made with refined white flours (even though “lost” nutrients are added back into white flours).
- Quick (the loaf size and delay time are not applicable):
Kneading, rise and baking loaf within the time less than Basic bread. But the bread baked on this setting is usually smaller with a dense texture.
- Sweet: The Sweet Breads settings are for baking breads with high amounts of sugar, fats and proteins, all of which tend to increase browning. Due to a longer phase of rising the bread will be light and airy.
- Ultra fast (the delay time is not applicable):
Kneading, rise and baking loaf in a shortest time. Usually the bread made is smaller and rougher than that made with QUICK program.
- Gluten free: The ingredients to create gluten-free breads are unique. While they are “yeast breads,” the dough is generally wetter and more like a batter. It is also important not to over-mix or over-knead gluten-free dough. There is only one rise, and due to the high moisture content, baking time is increased. Mix-ins must be added at the very beginning of the cycle with other basic ingredients.
- Dough (the color and loaf size are not applicable):
Kneading and rise, but without baking, remove the dough and use for making bread rolls, pizza, steamed bread, etc.
- Jam (the color, loaf size and delay time are not applicable. Directly press START/STOP button once to begin working):
The bread maker is a great cooking environment for homemade jams and chutneys. The paddle automatically keeps the ingredients stirring through the process, they make a wonderful complement to freshly baked bread!
- Cake: Kneading, rise and baking, but rise with soda or baking powder.
- Sandwich: Kneading, rise and baking bread for making sandwich, for baking light texture bread with a thinner crust.
- Bake: (the loaf size and delay time are not applicable, but the operation time can be adjusted by pressing "TIME+" or "TIME—" button, press the "TIME+" or "TIME—" button once, the time will increase or decrease 1 minute. The adjusted time range is 10-60 minutes):
For additional baking of breads that are too light or not baked through, in this program there is no kneading or rising.
Colour
With the button you can select LIGHT, MEDIUM or DARK colour of the crust. You will hear a short beep after each press.
This button is used only for the programs BASIC, FRENCH, WHOLE-WHEAT, QUICK, SWEET, ULTRA FAST, GLUTEN FREE, CAKE, SANDWICH and BAKE.
Loaf
Press this button to select the size of the bread: 900g, 1200g when you select the desired size, the LCD will display the corresponding size. Please note the total operation time may vary with the different loaf size. This button is not applicable for the some programs, the details refer to the corresponding program described in above section "MENU".
Time
If you do not strat baking immediately, you can use the button to set the delay time. Set the delay function:
1) Select your menu, colour, loaf size.
2) Set the delay time by pressing "TIME+" or "TIME—" button. The delay time should include the baking time of chosen menu. Suppose it is 8:30PM and you want the bread to be baked at 7:00Am the next day. The delay time is so 10 hours and 30 minutes. Press "TIME+" or "TIME—" button continuously until 10:30 appears on the display. The leap of each press is 10 minutes.
3) Press the "START/STOP" button to activate delay program. You will see the dots flashing and LCD will start to count down the remaining time.
Note: the maximum delay time is 13 hours. Do not use any perishable ingredients such as eggs, fresh milk, fruits, and onions in the delay menu.
KEEP WARM
Bread is automatically kept warm for 1 hour after baking. If you would like to take the bread out during keep warm, cancel the program by pressing "START/STOP" button.
NOTE: The programs of DOUGH and JAM do not have the function of keep warm.
MEMORY
If the power supply is interrupted during the course of making bread, the process of making bread will continue automatically within 10 minutes, even without pressing "START/STOP" button. If the interruption time takes longer than 10 minutes, baking process must be restarted. Put new ingredients into the bread maker. If the interruption happened before dough rising, press "START/STOP" button for new beginning.
ENVIRONMENT
The machine works well in a wide range of temperature change, but there might be a difference in loaf size. The loaf will be bigger in a very warm and smaller in a very cold room. The room temperature should be from 15 °C to 34 °C.
WARNING DISPLAY:
- If the display shows "H HH" after pressing "START/STOP" button, the temperature inside is too high. Stop the program. Open the lid and let the machine cool down for 10 to 20 minutes.
- If the display shows "L LL" after pressing "START/STOP" button, the temperature inside is too low. Stop the program. Open the lid and let the machine cool down for 10 to 20 minutes.
- If the display shows "E E0" or "E E1" after pressing "START/STOP" button, the temperature sensor does not work. Please go to the nearest authorized service.
HOW TO MAKE BREAD
- Place the baking pan in position, and then turn it clockwise until it clicks in correct position. Fix the kneading blades. For easier removal of blades at the end, oil them with butter.
- Place ingredients into the baking pan. It is recommended first to put water or other liquid in the pan, then sugar, salt and flour. As the last ingredient always add baking powder or yeast.
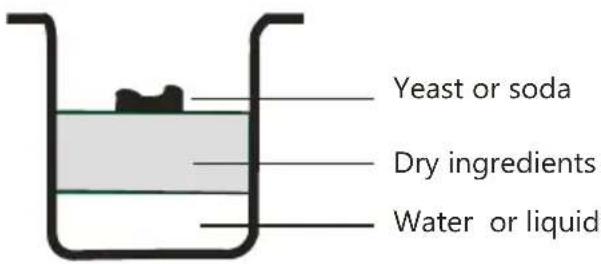
Note: the maximum allowed quantities of the flour and yeast are noted in the book enclosed.
- Make a small hole into the flour with a finger, put in yeast and make sure it does not come in contact with liquid or salt.
- Close the lid gently and plug the power cord into a wall outlet.
- Press the "MENU" button until your desired program is selected.
- Press the "COLOR" button to select the desired crust colour.
- Press the "LOAF" button to select the desired size (900g, or 1,2kg).
- Set the delay time by pressing "TIME+" or "TIME—" button. If you want the bread maker to start working immediately, skip this step.
- Press the "START/STOP" button to start working.
- Once the process is completed, you will hear 10 beeps. Press "START/STOP" button and hold it for approx. 3 seconds to stop the process. Open the lid, put on kitchen gloves, turn the baking pan clockwise and take the bread out.
Note: The baking pan and bread may be very hot! Always handle with care. - Let the baking pan cool down before removing the bread. Then use non-stick spoon and gently loose the sides of the bread from the pan.
- Turn the baking pan upside down onto a wire cooling rack or clean cooking surface and gently shake until bread falls out.
- Let the bread cool down for about 20 minutes before slicing it. It is recommended to slice bread with electric cutter. Do not use fruit or kitchen knife, otherwise the bread will fall to pieces.
- If you are out of the room or did not press "START/STOP" button at the end of program, the bread will be kept warm automatically for 1 hour. When keep warm function is finished, you will hear 10 beeps.
- When the bread maker is no longer in use, unplug the power cord.
Note: Before slicing the loaf, use the hook to remove kneading blades, hidden on the bottom of the loaf. The loaf is hot, so never use your hands to remove the kneading blades.
Note: If you did not eat the whole bread, we advise you to store the rest in plastic bag or bread basket. Bread can be stored for about 3 days on room temperature. For longer storage, pack it in sealed plastic bag and then place it into the refrigerator. Bread is consumable max 10 days. Storage time for home made bread is shorter than time for bread in market.
CLEANING AND MAINTENNANCE
Disconnect the machine from the power and let it cool down before you start to clean it.
- Baking pan: Rub inside and outside with a wet cloth. Do not use any sharp or abrasive cleaners.
NOTE: Insert the bread pan in correct position, then press it down. If it cannot be inserted, adjust the pan lightly to make it is on the correct position, then press it down.
- Kneading blade: If the kneading bar is difficult to remove from the axle, soak the baking pan in water.
- Housing: Gently wipe the outer surface of housing with a wet cloth. Do not use any abrasive cleaner for cleaning, as this would degrade the high polish of the surface. Never immerse the housing into water for cleaning.
NOTE: It is suggested not to disassembe the lid for cleaning.
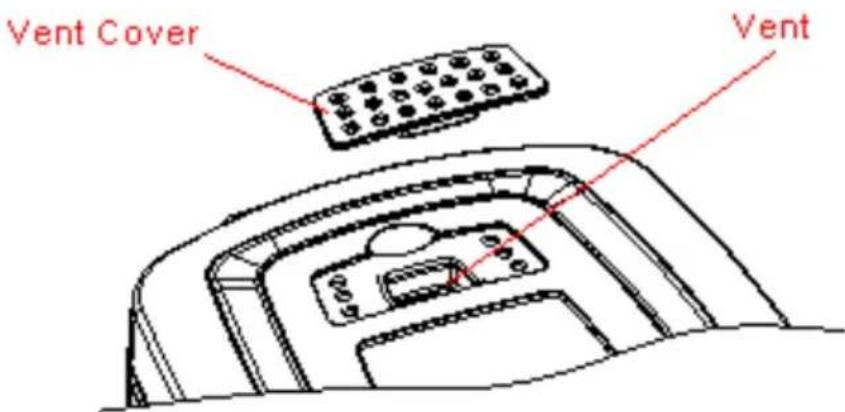
- Vent: To keep the effect of ventilating, the vent cover shall be detached to clean periodically.
- Before the bread maker is packed for storage, ensure that it has completely cooled down, clean and dry, and the lid is closed.
This machine conforms the CE directives for radio interference suppression and low-voltage safety and has been built to meet current safety requirements.
Environment
Do not throw away the machine with the normal household waste at the end of its life. Hand it in at an official collection point for recycling. By doing this, you help to preserve the environment.
Guarantee & service
If you need information or if you have a problem, please contact the Gorenje Customer Care Centre in your country (you find its phone number in the worldwide guarantee leaflet). If there is no Customer Care Centre in your country, go to your local Gorenje dealer or contact the Service department of Gorenje domestic machines.
For personal use only!
GORENJE WISHES YOU A LOT OF PLEASURE WHEN USING YOUR APPLIANCE
We reserve the right to any modifications!
natural_image
Simple line drawing of a U-shaped container with liquid inside, no text or symbols presentДріжджі або сода
Сухі інгредієнти
With the button you can select LIGHT, MEDIUM or DARK colour of the crust. You will hear a short beep after each press.
This button is used only for the programs BASIC, FRENCH, WHOLE-WHEAT, QUICK, SWEET, ULTRA FAST, GLUTEN FREE, CAKE, SANDWICH and BAKE.
Vel'kost' (Loaf)
GWARANCJA I SERWIS NAPRAWCZY
natural_image
Simple line drawing of a container with liquid and a small object inside, no text or symbols presentДрожжи или сода
Сухие ингредиенты
KEEP WARM: 0-60 мин.