
DEH-150MP - Car stereo PIONEER - Free user manual and instructions
Find the device manual for free DEH-150MP PIONEER in PDF.
| Product type | Car stereo with CD player |
| Brand | PIONEER |
| Model | DEH-150MP |
| Dimensions (W × H × D) | 178 × 50 × 160 mm (standard DIN) |
| Weight | Approximately 1.5 kg |
| Power supply | 14.4 V DC (10.8 to 15.1 V), negative ground |
| Maximum current consumption | 10.0 A |
| Maximum output power | 50 W × 4 (channels), 70 W × 1 (subwoofer) |
| Continuous output power | 22 W × 4 (50 Hz - 15,000 Hz, 5% THD, 4 Ω) |
| Load impedance | 4 Ω (4 to 8 Ω acceptable) |
| Preamp output level | 2.0 V (max) |
| Display | Monochrome display with backlight |
| FM tuner | 87.5 - 108.0 MHz (50/100 kHz step) |
| MW tuner | 531 - 1,602 kHz |
| LW tuner | 153 - 281 kHz |
| Disc player | CD, CD-R, CD-RW (audio and compressed files) |
| Compatible audio formats | MP3, WMA, WAV (PCM and MS ADPCM) |
| Auxiliary input (AUX) | Front stereo 3.5 mm jack |
| Integrated equalizer | 5 bands (80 Hz/250 Hz/800 Hz/2.5 kHz/8 kHz), ±12 dB |
| RDS functions | AF, TA, NEWS, PTY, REGION |
| Detachable front panel | Yes, with protective cover |
| Laser class | Class 1 (IEC 60825-1:2007) |
| Maintenance | Clean with a soft, dry cloth; avoid liquids |
| Repairability | Contact an authorized PIONEER service center |
Frequently Asked Questions - DEH-150MP PIONEER
User questions about DEH-150MP PIONEER
0 question about this device. Answer the ones you know or ask your own.
Ask a new question about this device
Download the instructions for your Car stereo in PDF format for free! Find your manual DEH-150MP - PIONEER and take your electronic device back in hand. On this page are published all the documents necessary for the use of your device. DEH-150MP by PIONEER.
USER MANUAL DEH-150MP PIONEER
REPRODUCTOR DE CD CON RECEPTOR RDS
CD RDS-EMPFÄNGER
CD RDS-ONTVANGER
CD RDS ПРИЕМНИК
DEH-150MP
DEH-150MPG
Pioneer
Owner's Manual
Mode d'emploi
Thank you for purchasing this PIONEER product
To ensure proper use, please read through this manual before using this product. It is especially important that you read and observe WARNINGS and CAUTIONS in this manual. Please keep the manual in a safe and accessible place for future reference.

If you want to dispose this product, do not mix it with general household waste. There is a separate collection system for used electronic products in accordance with legislation that requires proper treatment, recovery and recycling.
Private households in the member states of the EU, in Switzerland and Norway may return their used electronic products free of charge to designated collection facilities or to a retailer (if you purchase a similar new one).
For countries not mentioned above, please contact your local authorities for the correct method of disposal.
By doing so you will ensure that your disposed product undergoes the necessary treatment, recovery and recycling and thus prevent potential negative effects on the environment and human health.
About this unit
The tuner frequencies on this unit are allocated for use in Western Europe, Asia, the Middle East, Africa and Oceania. Use in other areas may result in poor reception. The RDS (radio data system) function only operates in areas with broadcasting RDS signals for FM stations.
CAUTION
This product is a class 1 laser product classified under the Safety of laser products, IEC 60825-1:2007.
CLASS 1 LASER PRODUCT
CAUTION
- Do not allow this unit to come into contact with liquids. Electrical shock could result. Also, damage to this unit, smoke, and overheating could result from contact with liquids.
- The Pioneer CarStereo-Pass is for use only in Germany.
- Always keep the volume low enough to hear outside sounds.
- Avoid exposure to moisture.
- If the battery is disconnected or discharged, any preset memory will be erased.
Note
Function setting operations are completed even if the menu is canceled before the operations are confirmed.
In case of trouble
Should this unit fail to operate properly, please contact your dealer or nearest authorized PIONEER Service Station.
Operating this unit
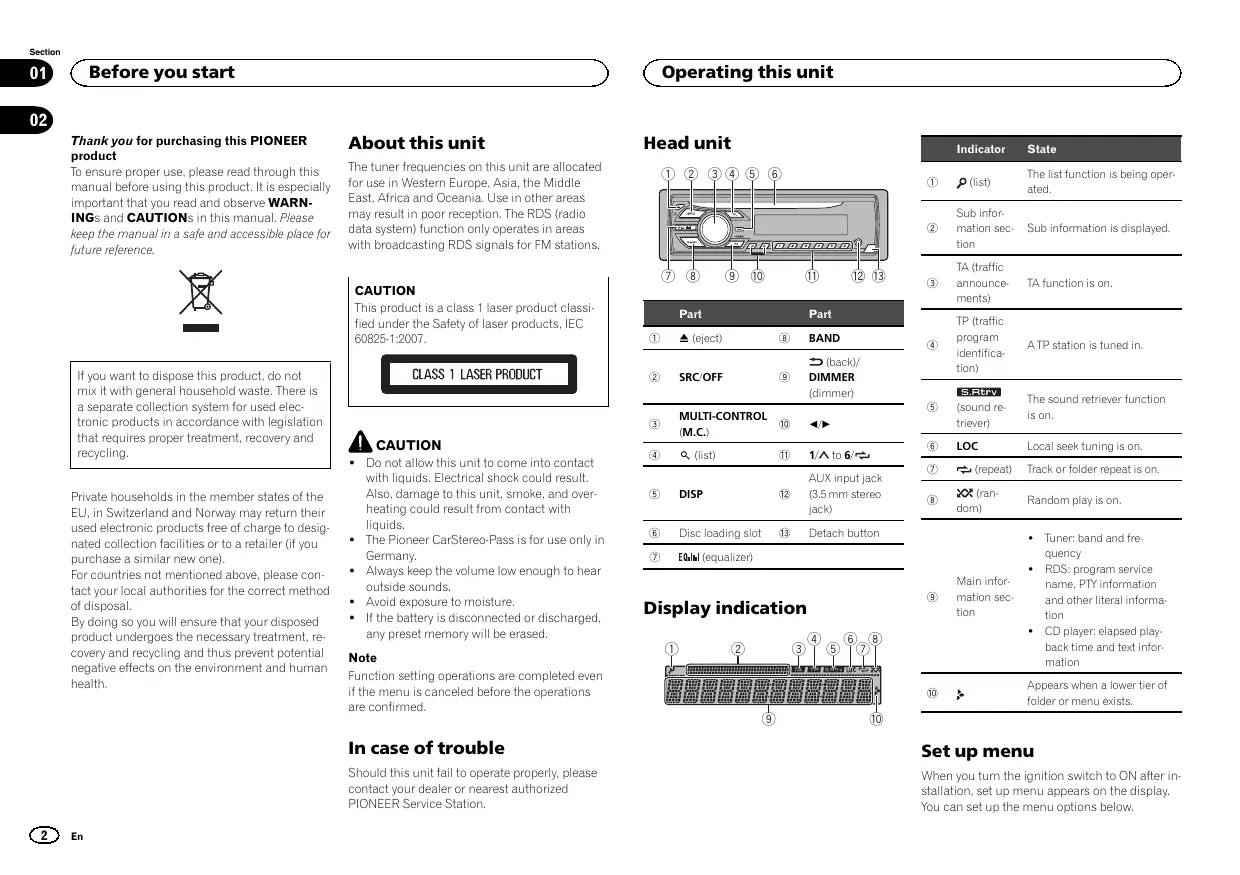
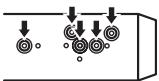
Head unit
text_image
Diagram of a device rear panel with numbered labels pointing to key components| Part | Part | ||
| 1 | ▲ (eject) | 8 | BAND |
| 2 | SRC/OFF | 9 | (back)/DIMMER (dimmer) |
| 3 | MULTI-CONTROL (M.C.) | 10 | ◀/▶ |
| 4 | Q (list) | 11 | 1/ to 6/↔ |
| 5 | DISP | 12 | AUX input jack (3.5 mm stereo jack) |
| 6 | Disc loading slot | 13 | Detach button |
| 7 | EQ (equalizer) | ||
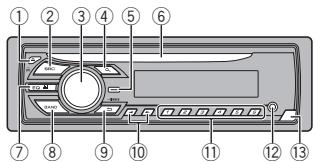
Display indication

text_image
Diagram of a network device rear panel with numbered labels pointing to different ports or connectors.| Indicator | State | |
| 1 | (list) | The list function is being operated. |
| 2 | Sub information section | Sub information is displayed. |
| 3 | TA (traffic announcements) | TA function is on. |
| 4 | TP (traffic program identification) | ATP station is tuned in. |
| 5 | S.Rtrv(sound retriever) | The sound retriever function is on. |
| 6 | LOC | Local seek tuning is on. |
| 7 | (repeat) | Track or folder repeat is on. |
| 8 | (random) | Random play is on. |
| 9 | Main information section | Tuner: band and frequencyRDS: program service name, PTY information and other literal informationCD player: elapsed playback time and text information |
| 10 | Appears when a lower tier of folder or menu exists. |
Set up menu
When you turn the ignition switch to ON after installation, set up menu appears on the display. You can set up the menu options below.
Operating this unit
1 After installation of this unit, turn the ignition switch to ON.
SET UP appears.
2 Turn M.C. to switch to YES.
■ If you do not operate for 30 seconds, the set up menu will not be displayed.
■ If you prefer not to set up at this time, turn M.C. to switch to NO. Press to select.
If you select NO, you cannot set up in the set up menu.
3 Press M.C. to select.
4 Perform the following procedures to set the menu.
To proceed to the next menu option, you need to confirm your selection.
LANGUAGE (multi-language)
This unit can display the text information from a compressed audio file even for information embedded in English or Russian.
- If the embedded language and the selected language setting are not the same, text information may not display properly.
- Some characters may not be displayed properly.
1 Turn M.C. to select the desired setting. ENG (English)—PYC (Russian)
2 Press M.C. to confirm the selection.
CLOCK SET (setting the clock)
1 Turn M.C. to adjust hour.
2 Press M.C. to select minute.
3 Turn M.C. to adjust minute.
4 Press M.C. to confirm the selection.
FM STEP (FM tuning step)
Normally, the FM tuning step employed by seek tuning is 50 kHz. When AF or TA is on, the tuning step automatically changes to 100 kHz. It may be preferable to set the tuning step to 50 kHz when AF is on.
- The tuning step remains at 50 kHz during manual tuning.
1 Turn M.C. to select the FM tuning step. 50 (50 kHz)—100 (100 kHz)
2 Press M.C. to confirm the selection. QUIT appears.
5 To finish your settings, turn M.C. to select YES.
■ If you prefer to change your setting again, turn M.C. to switch to NO. Press to select.
6 Press M.C. to select.
Notes
- You can set up the menu options from the system menu. For details about the settings, refer to System menu on page 6.
- You can cancel set up menu by pressing SRC/OFF.
Basic operations
Important
- Handle gently when removing or attaching the front panel.
- Avoid subjecting the front panel to excessive shock.
- Keep the front panel out of direct sunlight and high temperatures.
- To avoid damaging the device or vehicle interior, remove any cables and devices attached to the front panel before detaching it.
Operating this unit
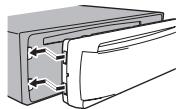
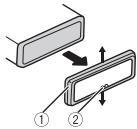
Removing the front panel to protect your unit from theft
1 Press the detach button to release the front panel.
② Push the front panel upward (I) and then pull it toward (II) you.

natural_image
Diagram of a device with two labeled arrows (I and II) indicating directional movement, no text or symbols present.3 Always keep the detached front panel in a protection device such as a protection case.
Re-attaching the front panel
① Slide the front panel to the left. Make sure to insert the tabs on the left side of the head unit into the slots on the front panel.
[2] Press the right side of the front panel until it is firmly seated. If you cannot attach the front panel to the head unit successfully, make sure that you are placing the front panel onto the head unit correctly. Forcing the front panel into place may result in damage to the front panel or head unit.
Turning the unit on
1 Press SRC/OFF to turn the unit on.
Turning the unit off
1 Press and hold SRC/OFF until the unit turns off.
Selecting a source
1 Press SRC/OFF to cycle between: TUNER (tuner)—CD (CD player)—AUX (AUX)
Adjusting the volume ☐ Turn M.C. to adjust the volume.

CAUTION
For safety reasons, park your vehicle when removing the front panel.
Note
When this unit's blue/white lead is connected to the vehicle's auto-antenna relay control terminal, the vehicle's antenna extends when this unit's source is turned on. To retract the antenna, turn the source off.
Frequently used menu operations
Returning to the previous display
Returning to the previous list (the folder one level higher)
1 Press ⇌/DIMMER.
Returning to the ordinary display
Canceling the main menu
1 Press BAND.
Returning to the ordinary display from the list
1 Press BAND.
Tuner
Basic operations
Selecting a band
1 Press BAND until the desired band (FM1, FM2, FM3 for FM or MW/LW) is displayed.
Switching preset stations
1 Press ◀ or ▶
- Select PCH (preset channel) under SEEK to use this function. For details about the settings, refer to SEEK (left/right key setting) on the next page.
Manual tuning (step by step)
1 Press ◀ or ▶.
- Select MAN (manual tuning) under SEEK to use this function. For details about the settings, refer to SEEK (left/right key setting) on the next page.
Seeking
1 Press and hold ◀ or ▶, and then release. You can cancel seek tuning by briefly pressing ◀ or ▶. While pressing and holding ◀ or ▶, you can skip stations. Seek tuning starts as soon as you release ◀ or ▶.
Note
This unit's AF (alternative frequencies search) function can be turned on and off. AF should be off for normal tuning operation (refer to AF (alternative frequencies search) on the next page).
Storing and recalling stations for each band
Using preset tuning buttons
1 When you find a station that you want to store in memory, press one of the preset tuning buttons (1/^ to 6/⇐) and hold until the preset number stops flashing.
2 Press one of the preset tuning buttons (1/∧ to 6/⇐) to select the desired station.
Switching the display
Selecting the desired text information
1 Press DISP to cycle between the following:
- FREQUENCY (program service name or frequency)
• BRDCST INFO (program service name/PTY information)
• CLOCK (source name and clock)
Notes
- If the program service name cannot be acquired in FREQUENCY, the broadcast frequency is displayed instead. If the program service name is detected, the program service name will be displayed.
- BRDCST INFO text information will change automatically.
- Depending on the band, text information can be changed.
- Text information items that can be changed depend on the area.
Using PTY functions
You can tune in to a station using PTY (program type) information.
Operating this unit
Searching for an RDS station by PTY information You can search for general types of broadcasting programs, such as those listed in the following section. Refer to this page.
1 Press Q (list).
2 Turn M.C. to select a program type.
NEWS/INFO—POPULAR—CLASSICS—OTHERS
3 Press M.C. to begin the search.
The unit searches for a station broadcasting that type of program. When a station is found, its program service name is displayed.
• To cancel the search, press M.C. again.
- The program of some stations may differ from that indicated by the transmitted PTY.
- If no station is broadcasting the type of program you searched for, NOT FOUND is displayed for about two seconds and then the tuner returns to the original station.
PTY list
NEWS/INFO (news and information)
NEWS (News), AFFAIRS (Current affairs), INFO (Information), SPORT (Sports), WEATHER (Weather), FINANCE (Finance)
POPULAR (popular)
POP MUS (Popular music), ROCK MUS (Rock music), EASY MUS (Easy listening), OTH MUS (Other music), JAZZ (Jazz), COUNTRY (Country music), NAT MUS (National music), OLDIES (Oldies music), FOLK MUS (Folk music)
CLASSICS (classics)
L. CLASS (Light classical), CLASSIC (Classical)
OTHERS (others)
EDUCATE (Education), DRAMA (Drama), CULTURE (Culture), SCIENCE (Science), VARIED (Varied), CHILDREN (Children's), SOCIAL (Social affairs), RELIGION (Religion), PHONE IN (Phone in), TOURING (Travel), LEISURE (Leisure), DOCUMENT (Documentaries)
Function settings
1 Press M.C. to display the main menu.
2 Turn M.C. to change the menu option and press to select FUNCTION.
3 Turn M.C. to select the function.
Once selected, the following functions can be adjusted.
■ If MW/LW band is selected, only BSM, LOCAL and SEEK are available.
BSM (best stations memory)
BSM (best stations memory) automatically stores the six strongest stations in the order of their signal strength.
1 Press M.C. to turn BSM on. To cancel, press M.C. again
REGION (regional)
When AF is used, the regional function limits the selection of stations to those broadcasting regional programs.
1 Press M.C. to turn the regional function on or off.
LOCAL (local seek tuning)
Operating this unit
Local seek tuning lets you tune in to only those radio stations with sufficiently strong signals for good reception.
1 Press M.C. to select the desired setting.
FM: OFF—LV1—LV2—LV3—LV4
MW/LW: OFF—LV1—LV2
The highest level setting allows reception of only the strongest stations, while lower levels allow the reception of weaker stations.
TA (traffic announcement standby)
1 Press M.C. to turn traffic announcement standby on or off.
AF (alternative frequencies search)
1 Press M.C. to turn AF on or off.
NEWS (news program interruption)
1 Press M.C. to turn the NEWS function on or off.
SEEK (left/right key setting)
You can assign a function to the left and right keys of the unit.
Select MAN (manual tuning) to tune up or down manually or select PCH (preset channel) to switch between preset channels.
1 Press M.C. to select MAN or PCH.
CD/CD-R/CD-RW
Basic operations
Playing a CD/CD-R/CD-RW
1 Insert the disc into the disc loading slot with the label side up.
Ejecting a CD/CD-R/CD-RW
1 Press ▲.
Selecting a folder
1 Press 1/∧ or 2/∨.
Selecting a track
1 Press ◀ or ▶.
Fast forwarding or reversing
1 Press and hold ◀ or ▶.
- When playing compressed audio, there is no sound during fast forward or reverse.
Returning to root folder
1 Press and hold BAND.
Switching between compressed audio and CD-DA
1 Press BAND.
Switching the display
Selecting the desired text information
1 Press DISP to cycle between the following: CD-DA
- ELAPSED TIME (track number and play-back time)
• CLOCK (source name and clock)
• SPEANA (spectrum analyzer)
CD-TEXT
- TRACK INFO (track title/track artist/disc title)
- ELAPSED TIME (track number and play-back time)
• CLOCK (source name and clock)
• SPEANA (spectrum analyzer)
MP3/WMA/WAV
- TRACK INFO (track title/artist name/album title)
- FILE INFO (file name/folder name)
- ELAPSED TIME (track number and play-back time)
• CLOCK (source name and clock)
• SPEANA (spectrum analyzer)
Notes
- TRACK INFO and FILE INFO text information will change automatically.
Operating this unit
- Depending on the version of iTunes used to write MP3 files to a disc or media file types, incompatible text stored within an audio file may be displayed incorrectly.
- Text information items that can be changed depend on the media.
Selecting and playing files/tracks from the name list
1 Press 🔒 to switch to the file/track name list mode.
2 Use M.C. to select the desired file name (or folder name).
Selecting a file or folder
1 Turn M.C.
Playing
1 When a file or track is selected, press M.C.
Viewing a list of the files (or folders) in the selected folder
1 When a folder is selected, press M.C.
Playing a song in the selected folder
1 When a folder is selected, press and hold M.C.
Operations using special buttons
Selecting a repeat play range
1 Press 6/↔ to cycle between the following:
- ALL – Repeat all tracks
• ONE – Repeat the current track - FLD – Repeat the current folder
Playing tracks in random order
1 Press 5/XX to turn random play on or off.
Tracks in a selected repeat range are played in random order.
- To change songs during random play, press ▶ to switch to the next track. Pressing ◀ restarts playback of the current track from the beginning of the song.
Pausing playback
1 Press 4/PAUSE to pause or resume.
Enhancing compressed audio and restoring rich sound (sound retriever)
1 Press 3/S.Rtrv to cycle between: 1—2—OFF (off)
1 is effective for low compression rates, and 2 is effective for high compression rates.
Function settings
1 Press M.C. to display the main menu.
2 Turn M.C. to change the menu option and press to select FUNCTION.
Once selected, the function below can be adjusted.
S.RTRV (sound retriever)
Automatically enhances compressed audio and restores rich sound.
① Press M.C. to select the desired setting. For details, refer to Enhancing compressed audio and restoring rich sound (sound retriever) on this page.
Audio adjustments
1 Press M.C. to display the main menu.
2 Turn M.C. to change the menu option and press to select AUDIO.
3 Turn M.C. to select the audio function.
Once selected, the following audio functions can be adjusted.
- FADER is not available when SUB.W/SUB.W is selected in SP-P/O MODE. For details, refer to SP-P/O MODE (rear output and preout setting) on page 7.
Operating this unit
- SUB.W, SUB.W CTRL and HPF SETTING are not available when REAR/REAR is selected in SP-P/O MODE. For details, refer to SP-P/O MODE (rear output and preout setting) on the next page.
- SUB.W CTRL and HPF SETTING are not available when SUB.W is selected in OFF. For details, refer to SUB.W (subwoofer on/off setting) on this page.
FADER (fader adjustment)
1 Press M.C. to display the setting mode.
② Turn M.C. to adjust the front/rear speaker balance.
BALANCE (balance adjustment)
1 Press M.C. to display the setting mode.
② Turn M.C. to adjust the left/right speaker balance.
EQ SETTING (equalizer recall)
1 Press M.C. to display the setting mode.
2 Turn M.C. to select the equalizer.
POWERFUL—NATURAL—VOCAL—CUSTOM1—CUSTOM2—FLAT—SUPER BASS
The equalizer band and equalizer level can be customized when CUSTOM1 or CUSTOM2 is selected.
If selecting CUSTOM1 or CUSTOM2, complete the procedures outlined below. If selecting other options, press M.C. to return to the previous display.
- CUSTOM1 can be set separately for each source.
- CUSTOM2 is a shared setting used in common for all sources.
3 Press M.C. to display the setting mode.
4 Press M.C. to cycle between the following: Equalizer band—Equalizer level
5 Turn M.C. to select the desired setting. Equalizer band: 80HZ—250HZ—800HZ—2.5KHZ—8KHZ
Equalizer level: +6 to -6
- You can also switch the equalizer by pressing EQ repeatedly.
LOUDNESS (loudness)
Loudness compensates for deficiencies in the low-frequency and high-frequency ranges at low volume.
1 Press M.C. to select the desired setting. OFF (off)—LOW (low)—MID (mid)—HI (high)
SUB.W (subwoofer on/off setting)
This unit is equipped with a subwoofer output which can be turned on or off.
1 Press M.C. to select the desired setting. NOR (normal phase)—REV (reverse phase)—OFF (subwoofer off)
SUB.W CTRL (subwoofer adjustment)
Operating this unit
Only frequencies lower than those in the selected range are outputted from the subwoofer.
1 Press M.C. to display the setting mode.
2 Press M.C. to cycle between the following: Cut-off frequency—Output level—Slope level Rates that can be adjusted will flash.
3 Turn M.C. to select the desired setting.
Cut-off frequency: 50HZ—63HZ—80HZ—100HZ—125HZ—160HZ—200HZ
Output level: -24 to +6
Slope level: -6—-12
BASS BOOST (bass boost)
1 Press M.C. to display the setting mode.
2 Turn M.C. to select a desired level.
0 to +6 is displayed as the level is increased or decreased.
HPF SETTING (high pass filter adjustment)
When you do not want low sounds from the subwoofer output frequency range to play from the front or rear speakers, turn on the HPF (high pass filter). Only frequencies higher than those in the selected range are output from the front or rear speakers.
1 Press M.C. to display the setting mode.
2 Press M.C. to cycle between the following: Cut-off frequency—Slope level
3 Turn M.C. to select the desired setting.
Cut-off frequency: OFF—50HZ—63HZ—80HZ—100HZ—125HZ—160HZ—200HZ
Slope level: -6—-12
SLA (source level adjustment)
SLA (Source level adjustment) lets you adjust the volume level of each source to prevent radical changes in volume when switching between sources.
- Settings are based on the FM volume level, which remains unchanged.
- The MW/LW volume level can also be adjusted with this function.
- When selecting FM as the source, you cannot switch to SLA.
1 Press M.C. to display the setting mode.
2 Turn M.C. to adjust the source volume.
Adjustment range: +4 to -4
System menu
Important
PW SAVE (power saving) is canceled if the vehicle battery is disconnected and will need to be turned back on once the battery is reconnected. When PW SAVE (power saving) is off, depending on connection methods, the unit may continue to draw power from the battery if your vehicle's ignition doesn't have an ACC (accessory) position.
1 Press M.C. to display the main menu.
2 Turn M.C. to change the menu option and press to select SYSTEM.
3 Turn M.C. to select the system menu function.
Once selected, the following system menu functions can be adjusted.
Operating this unit
LANGUAGE (multi-language)
This unit can display the text information from a compressed audio file even for information embedded in English or Russian.
- If the embedded language and the selected language setting are not the same, text information may not display properly.
- Some characters may not be displayed properly.
1 Turn M.C. to select the desired setting. ENG (English)—PYC (Russian)
CLOCK SET (setting the clock)
1 Press M.C. to display the setting mode.
2 Press M.C. to select the segment of the clock display you wish to set.
Hour—Minute
3 Turn M.C. to adjust the clock.
12H/24H (time notation)
1 Press M.C. to select the desired setting. 12H (12-hour clock)—24H (24-hour clock)
AUTO PI (auto PI seek)
The unit can automatically search for a different station with the same programming, even during preset recall.
1 Press M.C. to turn Auto PI seek on or off.
AUX (auxiliary input)
Activate this setting when using an auxiliary device connected to this unit.
1 Press M.C. to turn AUX on or off.
MUTE MODE (mute mode)
Sound from this system is automatically muted or attenuated when a signal from equipment with a mute function is received.
1 Press M.C. to display the setting mode.
2 Turn M.C. to select the desired setting.
You can select any one of the options in the following list:
- MUTE – Muting
- 20dB ATT – Attenuation (20dB ATT has a stronger effect than 10dB ATT)
• 10dB ATT – Attenuation
PW SAVE (power saving)
Switching this function on enables you to reduce the consumption of battery power.
- Turning on the source is the only operation allowed when this function is on.
1 Press M.C. to turn the power save on or off.
Switching the dimmer setting
You can adjust the brightness of illumination.
1 Press M.C. to display the main menu.
2 Turn M.C. to display ILLUMI and press to select.
3 Press M.C. to select the desired setting.
OFF (off)—ON (on)
- You can also change the dimmer setting by pressing and holding ↩/DIMMER.
Initial menu
1 Press and hold SRC/OFF until the unit turns off.
2 Press and hold SRC/OFF until the main menu appears in the display.
Operating this unit
3 Turn M.C. to change the menu option and press to select INITIAL.
4 Turn M.C. to select the initial menu function.
Once selected, the following initial menu functions can be adjusted.
FM STEP (FM tuning step)
Normally, the FM tuning step employed by seek tuning is 50 kHz. When AF or TA is on, the tuning step automatically changes to 100 kHz. It may be preferable to set the tuning step to 50 kHz when AF is on.
- The tuning step remains at 50 kHz during manual tuning.
1 Press M.C. to select the FM tuning step. 50 (50 kHz)—100 (100 kHz)
SP-P/O MODE (rear output and preout setting)
The rear speaker leads output and the RCA output of this unit can be used to connect a full-range speaker or subwoofer. Select a suitable option for your connection.
1 Press M.C. to display the setting mode.
2 Turn M.C. to select the desired setting.
You can select any one of the options in the following list:
- REAR/SUB.W – Select when there is a full-range speaker connected to the rear speaker leads output and there is a subwoofer connected to the RCA output.
- SUB.W/SUB.W – Select when there is a subwoofer connected directly to the rear speaker leads output without any auxiliary amp and there is a subwoofer connected to the RCA output.
- REAR/REAR – Select when there is a full-range speaker connected to the rear speaker leads output and the RCA output. If there is a full-range speaker connected to the rear speaker leads output and the RCA output is not used, you may select either REAR/SUB.W or REAR/REAR.
System menu
1 Press and hold SRC/OFF until the unit turns off.
2 Press and hold SRC/OFF until the main menu appears in the display.
3 Turn M.C. to change the menu option and press to select SYSTEM.
4 Turn M.C. to select the system menu function.
Once selected, the following system menu functions can be adjusted.
Operating this unit
For details, refer to System menu on page 6.
Using an AUX source
1 Insert the stereo mini plug into the AUX input jack.
2 Press SRC/OFF to select AUX as the source.
Note
AUX cannot be selected unless the auxiliary setting is turned on. For more details, refer to AUX (auxiliary input) on the previous page.
Switching the display
Selecting the desired text information
1 Press DISP to cycle between the following:
- Source name
• Source name and clock
If an unwanted display appears
Turn off the unwanted display using the procedures listed below.
1 Press M.C. to display the main menu.
2 Turn M.C. to change the menu option and press to select SYSTEM.
3 Turn M.C. to display DEMO OFF and press to select.
4 Turn M.C. to switch to YES.
5 Press M.C. to select.
Installation
Connections

Important
- When installing this unit in a vehicle without an ACC (accessory) position on the ignition switch, failure to connect the red cable to the terminal that detects operation of the ignition key may result in battery drain.

ACC position

No ACC position
- Use of this unit in conditions other than the following could result in fire or malfunction.
— Vehicles with a 12-volt battery and negative grounding.
— Speakers with 50 W (output value) and 4Ω to 8Ω (impedance value). - To prevent a short-circuit, overheating or malfunction, be sure to follow the directions below.
— Disconnect the negative terminal of the battery before installation.
— Secure the wiring with cable clamps or adhesive tape. Wrap adhesive tape around wiring that comes into contact with metal parts to protect the wiring.
— Place all cables away from moving parts, such as the shift lever and seat rails.
— Place all cables away from hot places, such as near the heater outlet.
— Do not connect the yellow cable to the battery by passing it through the hole to the engine compartment.
— Cover any disconnected cable connectors with insulating tape.
— Do not shorten any cables.
— Never cut the insulation of the power cable of this unit in order to share the power with other devices. The current capacity of the cable is limited.
— Use a fuse of the rating prescribed.
— Never wire the negative speaker cable directly to ground.
— Never band together negative cables of multiple speakers.
- When this unit is on, control signals are sent through the blue/white cable. Connect this cable to the system remote control of an external power amp or the vehicle's auto-antenna relay control terminal (max. 300 mA 12 V DC). If the vehicle is equipped with a glass antenna, connect it to the antenna booster power supply terminal.
- Never connect the blue/white cable to the power terminal of an external power amp. Also, never connect it to the power terminal of the auto antenna. Doing so may result in battery drain or a malfunction.
- The black cable is ground. Ground cables for this unit and other equipment (especially, high-current products such as power amps) must be wired separately. If they are not, an accidental detachment may result in a fire or malfunction.
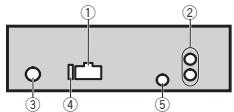
This unit
text_image
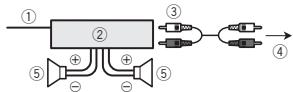
Diagram of a device panel with labeled ports and indicators, including a traffic light indicator.① Power cord input
② Rear output or subwoofer output
③ Antenna input
④ Fuse (10 A)
⑤ Wired remote input
Hard-wired remote control adapter can be connected (sold separately).
Installation
Power cord

flowchart
graph TD
    A["①"] --> B["②"]
    B --> C["③"]
    C --> D["④"]
    D --> E["⑤"]
    E --> F["⑥"]
    F --> G["⑦"]
    G --> H["⑧"]
    H --> I["⑨"]
    I --> J["⑩"]
    J --> K["⑪"]
    K --> L["⑫"]
    L --> M["⑬"]
    M --> N["⑭"]
    N --> O["⑮"]
    O --> P["⑯"]
    P --> Q["⑰"]
    Q --> R["⑱"]
    R --> S["⑲"]
    S --> T["⑳"]
    T --> U["㉑"]
    U --> V["㉒"]
    V --> W["㉓"]
    W --> X["㉔"]
    X --> Y["㉕"]
    Y --> Z["㉖"]
① To power cord input
② Depending on the kind of vehicle, the function of ③ and ⑤ may be different. In this case, be sure to connect ④ to ⑤ and ⑥ to ③.
③ Yellow
Back-up (or accessory)
④ Yellow
Connect to the constant 12 V supply terminal.
⑤ Red
Accessory (or back-up)
⑥ Red
Connect to terminal controlled by ignition switch (12 V DC).
⑦ Connect leads of the same color to each other.
⑧ Black (chassis ground)
⑨ Blue/white
The pin position of the ISO connector will differ depending on the type of vehicle. Connect ⑨ and ⑪ when Pin 5 is an antenna control type. In another type of vehicle, never connect ⑨ and ⑪.
⑩ Blue/white
Connect to system control terminal of the power amp (max. 300 mA 12 V DC).
⑪ Blue/white
Connect to auto-antenna relay control terminal (max. 300 mA 12 V DC).
⑫ Yellow/black
If you use an equipment with Mute function, wire this lead to the Audio Mute lead on that equipment. If not, keep the Audio Mute lead free of any connections.
⑬ Speaker leads
White: Front left ⊕
White/black: Front left ⊖
Gray: Front right ⊕
Gray/black: Front right ⊖
Green: Rear left ⊕ or subwoofer ⊕
Green/black: Rear left ⊖ or subwoofer ⊖
Violet: Rear right ⊕ or subwoofer ⊕
Violet/black: Rear right ⊖ or subwoofer ⊖
⑭ ISO connector
In some vehicles, the ISO connector may be divided into two. In this case, be sure to connect to both connectors.
Notes
- Change the initial menu of this unit. Refer to SP-P/O MODE (rear output and preout setting) on page 7.
The subwoofer output of this unit is monaural. - When using a subwoofer of 70 W (2Ω), be sure to connect the subwoofer to the violet and violet/black leads of this unit. Do not connect anything to the green and green/black leads.
Installation
Power amp (sold separately)
Perform these connections when using the optional amplifier.
flowchart
graph LR
    ① --> ②
    ② --> ③
    ② --> ④
    ⑤ --> ⑥
    ⑥ --> ⑤
    ③ --> ④
    ④ --> ③
    ③ --> ④
① System remote control
Connect to Blue/white cable.
② Power amp (sold separately)
③ Connect with RCA cables (sold separately)
④ To Rear output or subwoofer output
⑤ Rear speaker or subwoofer
Installation
Important
- Check all connections and systems before final installation.
- Do not use unauthorized parts as this may cause malfunctions.
- Consult your dealer if installation requires drilling of holes or other modifications to the vehicle.
- Do not install this unit where:
— it may interfere with operation of the vehicle.
— it may cause injury to a passenger as a result of a sudden stop. - The semiconductor laser will be damaged if it overheats. Install this unit away from hot places such as near the heater outlet.
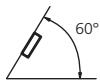
- Optimum performance is obtained when the unit is installed at an angle of less than 60°.
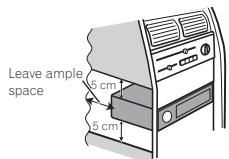
- When installing, to ensure proper heat dispersal when using this unit, make sure you leave ample space behind the rear panel and wrap any loose cables so they are not blocking the vents.
text_image
Leave ample space 5 cm 5 cmDIN front/rear mount
This unit can be properly installed using either front-mount or rear-mount installation.
Use commercially available parts when installing.
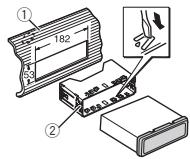
DIN Front-mount
1 Insert the mounting sleeve into the dashboard.
For installation in shallow spaces, use the supplied mounting sleeve. If there is enough space, use the mounting sleeve that came with the vehicle.
2 Secure the mounting sleeve by using a screwdriver to bend the metal tabs (90°) into place.
text_image
Technical diagram showing assembly steps of a mechanical component with labeled parts and dimensions① Dashboard
Installation
② Mounting sleeve
■ Make sure that the unit is installed securely in place. An unstable installation may cause skipping or other malfunctions.
DIN Rear-mount
1 Determine the appropriate position where the holes on the bracket and the side of the unit match.
2 Tighten two screws on each side.

text_image
Technical diagram of a device with labeled components and numbered parts① Tapping screw (5 mm × 8 mm)
② Mounting bracket
③ Dashboard or console
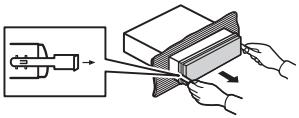
Removing the unit
1 Remove the trim ring.
① Trim ring
② Notched tab
- Releasing the front panel allows easier access to the trim ring.
- When reattaching the trim ring, point the side with the notched tab down.
2 Insert the supplied extraction keys into both sides of the unit until they click into place.
3 Pull the unit out of the dashboard.
natural_image
Diagram showing a mechanical device being processed into a rectangular block, with hands holding the component (no text or symbols present)Removing and re-attaching the front panel
You can remove the front panel to protect your unit from theft.
Press the detach button and push the front panel upward and pull it toward you.
For details, refer to Removing the front panel to protect your unit from theft and Re-attaching the front panel on page 3.
Additional information
Troubleshooting
| Symptom | Cause | Action |
| The display automatically returns to the ordinary display. | You did not perform any operation within about 30 seconds. | Perform operation again. |
| The repeat play range changes unexpectedly. | Depending on the repeat play range, the selected range may change when another folder or track is being selected or during fast forwarding/reversing. | Select the repeat play range again. |
| A subfolder is not played back. | Subfolders cannot be played when FLD (folder repeat) is selected. | Select another repeat play range. |
| NO XXXX appears when a display is changed (NOTITLE, for example). | There is no embedded text information. | Switch the display or play another track/file. |
| The unit is malfunctioning.There is interference. | You are using a device, such as a cellular phone, that transmits electric waves near the unit. | Move electrical devices that may be causing the interference away from the unit. |
Error messages
When you contact your dealer or your nearest Pioneer Service Center, be sure to note the error message.
Common
| Message | Cause | Action |
| AMP ERROR | Unit fails to operate or speaker connection is incorrect; protective circuit is activated. | Check the speaker connection. If the message fails to disappear even after the engine is switched off/on, contact your dealer or an authorized Pioneer Service Station for assistance. |
CD player
| Message | Cause | Action |
| ERROR-07, 11, 12, 17, 30 | The disc is dirty. | Clean the disc. |
| The disc is scratched. | Replace the disc. | |
| ERROR-07, 10, 11, 12, 15, 17, 30, A0 | There is an electrical or mechanical error. | Turn the ignition switch OFF and back ON, or switch to a different source, then back to the CD player. |
| ERROR-15 | The inserted disc is blank. | Replace the disc. |
| ERROR-23 | Unsupported CD format. | Replace the disc. |
Additional information
| Message | Cause | Action |
| FORMAT READ | Sometimes there is a delay between the start of playback and when you start to hear any sound. | Wait until the message disappears and you hear sound. |
| NO AUDIO | The inserted disc does not contain any playable files. | Replace the disc. |
| SKIPPED | The inserted disc contains DRM protected files. | Replace the disc. |
| PROTECT | All the files on the inserted disc are embedded with DRM. | Replace the disc. |
Handling guidelines
Discs and player
Use only discs that feature either of the following two logos.


Use 12-cm discs. Do not use 8-cm discs or an adapter for 8-cm discs.
Use only conventional, fully circular discs. Do not use shaped discs.

Do not insert anything other than a CD into the CD loading slot.
Do not use cracked, chipped, warped, or otherwise damaged discs as they may damage the player.
Unfinalized CD-R/RW discs cannot be played back.
Do not touch the recorded surface of the discs.
Store discs in their cases when not in use.
Do not attach labels, write on or apply chemicals to the surface of the discs.
To clean a CD, wipe the disc with a soft cloth outward from the center.
Condensation may temporarily impair the player's performance. Let it rest for about one hour to adjust to a warmer temperature. Also, wipe any damp discs off with a soft cloth.
Playback of discs may not be possible because of disc characteristics, disc format, recorded application, playback environment, storage conditions, and so on.
Road shocks may interrupt disc playback.
Read the precautions for discs before using them.
Additional information
When using discs that can be printed on label surfaces, check the instructions and the warnings of the discs. Depending on the discs, inserting and ejecting may not be possible. Using such discs may result in damage to this equipment.
Do not attach commercially available labels or other materials to the discs.
- The discs may warp making the disc unplayable.
- The labels may come off during playback and prevent ejection of the discs, which may result in damage to the equipment.
DualDiscs
DualDiscs are two-sided discs that have a recordable CD for audio on one side and a recordable DVD for video on the other.
Since the CD side of DualDiscs is not physically compatible with the general CD standard, it may not be possible to play the CD side with this unit. Frequent loading and ejecting of a DualDisc may result in scratches on the disc. Serious scratches can lead to playback problems on this unit. In some cases, a DualDisc may become stuck in the disc loading slot and will not eject. To prevent this, we recommend you refrain from using DualDisc with this unit.
Please refer to the information from the disc manufacturer for more detailed information about DualDiscs.
Compressed audio compatibility
WMA
File extension: .wma
Bit rate: 48 kbps to 320 kbps (CBR), 48 kbps to 384 kbps (VBR)
Sampling frequency: 32 kHz, 44.1 kHz, 48 kHz
Windows Media Audio Professional, Lossless, Voice/DRM Stream/Stream with video: Not compatible
MP3
File extension: .mp3
Bit rate: 8 kbps to 320 kbps (CBR), VBR
Sampling frequency: 8 kHz to 48 kHz (32 kHz, 44.1 kHz, 48 kHz for emphasis)
Compatible ID3 tag version: 1.0, 1.1, 2.2, 2.3, 2.4 (ID3 tag Version 2.x is given priority over Version 1.x.)
M3u playlist: Not compatible
MP3i (MP3 interactive), mp3 PRO: Not compatible
WAV
File extension: .wav
Quantization bits: 8 and 16 (LPCM), 4 (MS ADPCM)
Sampling frequency: 16 kHz to 48 kHz (LPCM), 22.05 kHz and 44.1 kHz (MS ADPCM)
Additional information
Supplemental information
Only the first 32 characters can be displayed as a file name (including the file extension) or a folder name.
Russian text to be displayed on this unit should be encoded in one of the following character sets:
- Unicode (UTF-8, UTF-16)
- A character set other than Unicode that is used in a Windows environment and is set to Russian in the multi-language setting
This unit may not operate correctly depending on the application used to encode WMA files.
Disc
| Playable folder hierarchy: up to eight tiers (A practical hierarchy is less than two tiers.) |
| Playable folders: up to 99 |
| Playable files: up to 999 |
| File system: ISO 9660 Level 1 and 2, Romeo, Joliet |
| Multi-session playback: Compatible |
| Packet write data transfer: Not compatible |
| Regardless of the length of blank sections between the songs from the original recording, compressed audio discs play with a short pause between songs. |

CAUTION
Do not leave discs in any place that is subject to high temperatures.
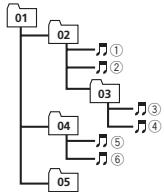
Sequence of audio files
The user cannot assign folder numbers and specify playback sequences with this unit.
Example of a hierarchy
flowchart
graph TD
    A["01"] --> B["02"]
    B --> C["①"]
    B --> D["②"]
    B --> E["03"]
    E --> F["③"]
    E --> G["④"]
    A --> H["04"]
    H --> I["⑤"]
    H --> J["⑥"]
Level 1 Level 2 Level 3 Level 4
Folder
Compressed
audio file
01 to 05: Folder
number
① to ⑥: Playback
sequence
Disc
Folder selection sequence or other operation may differ depending on the encoding or writing software.
Russian character chart
D: Display C: Character
Copyright and trademark
iTunes
Apple and iTunes are trademarks of Apple Inc., registered in the U.S. and other countries.
Additional information
MP3
Supply of this product only conveys a license for private, non-commercial use and does not convey a license nor imply any right to use this product in any commercial (i.e. revenue-generating) real time broadcasting (terrestrial, satellite, cable and/or any other media), broadcasting/streaming via internet, intranets and/or other networks or in other electronic content distribution systems, such as pay-audio or audio-on-demand applications. An independent license for such use is required. For details, please visit http://www.mp3licensing.com.
WMA
Windows Media is either a registered trademark or trademark of Microsoft Corporation in the United States and/or other countries.
This product includes technology owned by Microsoft Corporation and cannot be used or distributed without a license from Microsoft Licensing, Inc.
Specifications
General
Power source .... 14.4 V DC (10.8 V to 15.1 V allowable)
Grounding system ...... Negative type
Maximum current consumption 10.0 A
Dimensions (W × H × D):
DIN
Chassis .... 178 mm × 50 mm × 165 mm
Nose .... 188 mm × 58 mm × 16 mm
D
Chassis .... 178 mm × 50 mm × 165 mm
Nose .... 170 mm × 46 mm × 16 mm
Weight 1 kg
Audio
Maximum power output ... 50 W × 4 70 W × 1/2 Ω (for subwoofer)
Continuous power output .... 22 W × 4 (50 Hz to 15 000 Hz, 5 % THD, 4 Ω load, both channels driven)
Load impedance .... 4Ω (4Ω to 8Ω allowable)
Preout maximum output level 2.0
Loudness contour ....+10 dB (100 Hz), +6.5 dB (10 kHz) (volume: -30 dB)
Equalizer (5-Band Graphic Equalizer):
Frequency 80 Hz/250 Hz/800 Hz/2.5 kHz/8 kHz
Equalization range .... ±12 dB (2 dB step)
Subwoofer (mono):
Frequency 50 Hz/63 Hz/80 Hz/100 Hz/125 Hz/160 Hz/200 Hz
Slope ...... -6 dB/oct, -12 dB/oct
Gain ....+6dB to -24dB
Phase ...... Normal/Reverse
CD player
System .... Compact disc audio system
Usable discs .... Compact disc
Signal-to-noise ratio ..... 94 dB (1 kHz) (IEC-A network)
Additional information
Number of channels ..... 2 (stereo)
MP3 decoding format ..... MPEG-1 & 2 Audio Layer 3
WMA decoding format ..... Ver. 7, 7.1, 8, 9, 10, 11, 12 (2 ch
audio)
(Windows Media Player)
WAV signal format .... Linear PCM & MS ADPCM
(Non-compressed)
FM tuner
Frequency range 87.5 MHz to 108.0 MHz
Usable sensitivity ...... 9 dBf (0.8μV/75Ω, mono, S/N:
30 dB)
Signal-to-noise ratio ..... 72 dB (IEC-A network)
MW tuner
Frequency range .... 531 kHz to 1 602 kHz
Usable sensitivity 25μV (S/N: 20 dB)
Signal-to-noise ratio ...... 62 dB (IEC-A network)
LW tuner
Frequency range 153 kHz to 281 kHz
Usable sensitivity 28μV (S/N: 20 dB)
Signal-to-noise ratio ...... 62 dB (IEC-A network)
Note
Specifications and the design are subject to modifications without notice.
text_image
Diagram of a device rear panel with numbered components for identificationtext_image
Diagram of a rack-mounted electronic device with numbered components for identificationIndicateur État
natural_image
Diagram of a device with two labeled arrows (I and II) indicating directional movement or flow, no text or symbols present.NEWS/INFO—POPULAR—CLASSICS—OTHERS
MW/LW (PO/GO): OFF—LV1—LV2
S.RTRV (sound retriever)
BASS BOOST (accentuation des graves)
MUTE MODE (mode sourdine)
text_image
Diagram of a device panel with labeled ports and indicators, including a traffic light indicator.Installation
text_image
at 5 cm 5 cmtext_image
Technical diagram showing labeled components of a device with numbered parts and a magnified inset viewtext_image
Technical diagram of an electronic component with numbered parts and labeled partsnatural_image
Diagram showing hands operating a mechanical device to cut a rectangular block (no text or symbols present)Installation
Dimensions (L × H × P):
DIN
Châssis .... 178 mm × 50 mm × 165 mm
Panneau avant ... 188 mm × 58 mm × 16 mm
D
Châssis .... 178 mm × 50 mm × 165 mm
Panneau avant ... 170 mm × 46 mm × 16 mm
Poids 1 kg
Audio
Pente ...... -6 dB/oct, -12 dB/oct
Phase ...... Normale/Inverse
Lecteur de CD
Système .... Compact Disc Digital Audio
text_image
Diagram of a device rear panel with numbered labels pointing to key componentstext_image
Diagram of a rack-mounted server with numbered components for identificationIndicatore
natural_image
Diagram of a device with two labeled arrows (I and II) indicating directional flow or movement, no text or symbols present.NEWS/INFO—POPULAR—CLASSICS—OTHERS
text_image
Diagram of a device panel with labeled ports and indicators, including a traffic light indicator.Installazione
text_image
Technical diagram showing assembly steps of a device with labeled components and dimensions① Cruscotto
text_image
Technical diagram of a mechanical assembly with numbered components, likely a device or component layout.① Vite autofilettante (5 mm × 8 mm)
natural_image
Diagram showing a mechanical assembly being handled by hands, with no visible text or symbols.Estensione file: .wma
Velocità in bit: da 48 kbps a 320 kbps (CBR), da 48 kbps a 384 kbps (VBR)
Consumo massimo ..... 10,0 A
Dimensioni (L × A × P):
DIN
Unità principale
178 mm × 50 mm × 165 mm
Pannello anteriore
188 mm × 58 mm × 16 mm
D
Unità principale
178 mm × 50 mm × 165 mm
Pannello anteriore
170 mm × 46 mm × 16 mm
Peso 1 kg
Audio
Ver. 7, 7.1, 8, 9, 10, 11, 12 (2 canali audio) (Windows Media Player)
text_image
Diagram of a device rear panel with numbered labels pointing to specific componentstext_image
Diagram of a server rack with numbered components for identificationnatural_image
Diagram of a device with two labeled arrows (I and II) indicating directional movement, no text or symbols present.natural_image
Technical line drawing of a mechanical component with internal channels and fasteners (no text or symbols)NEWS/INFO—POPULAR—CLASSICS—OTHERS
text_image
Diagram of a device panel with labeled ports and indicators, including a traffic light indicator.text_image
Technical diagram showing assembly steps of a device with labeled components and dimensions① Salpicadero
text_image
Technical diagram of an electronic component with labeled parts and directional arrows indicating assembly or movement.① Tornillo con rosca cortante (5 mm × 8 mm)
② Carcasa
natural_image
Illustration of hands using a tool to interact with a mechanical component (no text or symbols present)text_image
Diagram of a device rear panel with numbered labels pointing to specific componentstext_image
Diagram of a network device rear panel with numbered labels pointing to different ports or connectors.natural_image
Diagram of a device with two labeled arrows (I and II) indicating directional movement, no text or symbols present.NEWS/INFO—POPULAR—CLASSICS—OTHERS
text_image
Diagram of a device panel with labeled ports and indicatorstext_image
Technical diagram showing assembly steps of an electronic component with labeled parts and dimensions① Armaturenbrett
② Montagerahmen
text_image
Technical diagram of an electronic component with numbered parts and labeled partstext_image
Diagram illustrating a mechanical or electrical process with hands operating a device and interacting with a block, showing directional arrows.KLASSE 1 LASERPRODUCT
LET OP
text_image
Diagram of a device rear panel with numbered components for identificationtext_image
Diagram of a multi-chamber electronic component with numbered parts labeled 1 through 10Indicator
natural_image
Diagram of a printer or printer with two labeled arrows (I and II) indicating orientation, no text or symbols present.NEWS/INFO—POPULAR—CLASSICS—OTHERS
S.RTRV (sound retriever)
BASS BOOST (bass boost)
HPF SETTING (high pass filter aanpassen)
text_image
Diagram of a device panel with labeled ports and indicators, including a traffic light indicator.text_image
Technical diagram of a mechanical assembly with numbered components and labeled parts① Zelftappende schroef (5 mm × 8 mm)
② Bevestigingsklem
③ Dashboard of console
natural_image
Illustration of a mechanical device being processed into a layered block, with hands adding material (no text or symbols)Helling ...... -6 dB/oct, -12 dB/oct
Gain ....+6 dB tot -24 dB
Fase ...... Normaal/tegengesteld
(Windows Media Player)
text_image
Diagram of a device rear panel with numbered components for identificationtext_image
Diagram of a network device rear panel with numbered labels pointing to different ports or connectors.Индика- тор
Состояние
natural_image
Diagram of a device with two labeled arrows (I and II) indicating directional flow or movement, no text or symbols present.text_image
Diagram of a device panel with labeled ports and indicators, including ports 1 through 5 and a traffic light indicator.text_image
Technical diagram showing assembly steps of a device with labeled components and dimensionstext_image
Technical diagram of a mechanical assembly with labeled components and directional arrowsnatural_image
Diagram showing hands operating a mechanical device with a close-up view of the component (no text or symbols present)(Windows Media Player)
Формат сигнала WAV ..... Linear PCM и MS ADPCM
(без компрессии)
FM-тюнер
Pioneer CarStereo-Pass
Please fill out immediately after purchase.
PIONEER ELECTRONICS (USA) INC.
P.O. Box 1540, Long Beach, California 90801-1540, U.S.A.
TEL: (800) 421-1404
PIONEER ELECTRONICS OF CANADA, INC.
340 Ferrier Street, Unit 2, Markham, Ontario L3R 2Z5, Canada
TEL: 1-877-283-5901
TEL: 905-479-4411
PIONEER ELECTRONICS ASIACENTRE PTE. LTD.
253 Alexandra Road, #04-01, Singapore 159936
TEL: 65-6472-7555
PIONEER ELECTRONICS AUSTRALIA PTY. LTD.
5 Arco Lane, Heatherton, Victoria, 3202 Australia
TEL: (03) 9586-6300
PIONEER ELECTRONICS DE MEXICO, S.A. de C.V.
Blvd.Manuel Avila Camacho 138 10 piso
Col.Lomas de Chapultepec, Mexico, D.F. 11000
TEL: 55-9178-4270
先鋒股份有限公司
台北市內湖區瑞光路407號8樓
電話:886-(0)2-2657-3588
先鋒電子(香港)有限公司
香港九龍長沙灣道909號5樓
電話:852-2848-6488