
CR85 Charge - Alarm clock radio BLAUPUNKT - Free user manual and instructions
Find the device manual for free CR85 Charge BLAUPUNKT in PDF.

| Product Type | Alarm clock radio with USB and wireless charging |
| Brand | Blaupunkt |
| Model | CR85 Charge |
| Power Supply | DC 5V 2.5A adapter (included) |
| Backup Battery | CR2032 lithium cell (not included) |
| Wireless Charging | Qi-compatible; works with mobile devices supporting Qi technology |
| USB Charging | USB-A port, 5V output (use original cable) |
| Radio | FM (assumed); auto scan and up to 20 preset stations |
| Outdoor Temperature Sensor | Wireless, 60m open air range; uses 2 x AAA batteries (not included) |
| Indoor Temperature Display | Yes, on main unit |
| Alarm | Dual alarms with weekday/weekend/once/daily options; buzzer or radio source |
| Snooze Duration | Adjustable from 5 to 60 minutes (default 5 min) |
| Sleep Timer | 5, 10, 15, 30, 45, 60, 75, 90 minutes or off |
| Display Dimmer | High/Low/Off modes; auto-dimmer with programmable schedule |
| Operating Temperature | Maximum 35°C |
| Safety | Complies with EU directives; do not expose to water or moisture |
| Accessories | AC/DC adapter, wireless outdoor transmitter, user manual |
Frequently Asked Questions - CR85 Charge BLAUPUNKT
User questions about CR85 Charge BLAUPUNKT
0 question about this device. Answer the ones you know or ask your own.
Ask a new question about this device
Download the instructions for your Alarm clock radio in PDF format for free! Find your manual CR85 Charge - BLAUPUNKT and take your electronic device back in hand. On this page are published all the documents necessary for the use of your device. CR85 Charge by BLAUPUNKT.
USER MANUAL CR85 Charge BLAUPUNKT
Alarm clock radio with USB and wireless charging/ in-out temperature
Important Notes
- safety and operating instruction should be retained for future reference.
- The apparatus should not be exposed to dripping or splashing or placed in a humid atmosphere such as a bathroom.
- Do not install the product in the following areas:
- Places exposed to direct sunlight or close to radiators.
- On top of other stereo equipment that radiate too much heat.
- Blocking ventilation or in a dusty area.
- Areas where there is constant vibration.
• Humid or moist places. - Do not place near candles or other naked flames.
- Operate the product only as instructed in this manual.
- Before turning on the power for the first time, make sure the power adaptor is properly connected.
For safety reasons, do not remove any covers or attempt to gain access to the inside of the product. Refer any servicing to qualified personnel.
Do not attempt to remove any screws, or open the casing of the unit; there are no user serviceable parts inside. Refer all servicing to qualified service personnel.
SAFETY INSTRUCTIONS
- Read Instructions - All the safety and operating instructions must be read before the product is operated.
- Retain Instructions - The safety and operating instructions should be kept with the product for future reference.
- Heed warnings - All warnings on the product and in the operating instructions should be adhered to.
- Follow instructions - All operating and users' instructions should be followed.
- Installation - Install in accordance with the manufacturer's instructions.
- Power sources - This product should be operated only from the type of power source indicated by the marking adjacent to the power cord entry. If you are not sure of the type of power supply to your home, consult your product dealer or local power company.
- Water and moisture - To reduce the risk of fire or electric shock, do not expose the product to train, dripping, splashing or excessive moisture such as in a sauna or bathroom. Do not use this product near water, for example, near a bathtub, washbowl, kitchen sink, laundry tub, in a wet basement or near a swimming pool (or similar).
- Object and Liquid Entry - Never push objects of any kind into this product through openings, as they may touch dangerous voltage points or short-circuit parts that could result in a fire or electric shock. Never spill liquid of any kind on the product. Do not place any object containing liquid on top of the product.
- Servicing - Do not attempt to service this product yourself, as opening or removing covers may expose you to dangerous voltage or other hazards. Refer all servicing to qualified service personnel.
- Replacement parts - When replacement parts are required, ensure that the service technician has used replacement parts specified by the manufacturer or have the same characteristics as the original part. Unauthorized substitutions may result in fire, electric shock or other hazards.
- The highest environmental temperature suitable for this product is 35°C.
- ESD hints - If the product maybe reset or not reset to operation of control due to electrostatic discharge, just switch off and reconnect again, or move the product to another location.
- Battery
a. The batteries must not be exposed to excessive heat such as sunshine, fire or the like.
b. The batteries should be drawn to the environmental aspects of battery disposal.
c. Battery usage CAUTION-to prevent battery leakage which may result in body injuries, property damage, or damage to the apparatus:
. Install all batteries correctly, + and - as marked on the apparatus.
. Do not mix batteries (old and new or carbon and alkaline, etc.)
. Remove batteries when the unit is not used for a long time.
ERP2 (Energy Related Products) note
This product with ecodesign complies with the stage 2 requirements of Commission Regulation (EC) NO. 1275/2008 implementing Directive 2009/125/EC regard to standby and off mode electric power consumption of electronic household and office equipment.
WARNING
This appliance is not intended for use by persons (including children) with reduced physical sensory or mental capabilities, or lack of experience and knowledge, unless they have been given supervision or instruction concerning use of the appliance by a person responsible for their safety. Children should be supervised to ensure that they do not play with the appliance.
-
Never use the device unsupervised! Switch off the device whenever you are not using it, even if this only for a short while.
-
The appliance is not intended to be operated by means of an external timer or separate remote control system.
-
If the supply cord is damaged, it must be replaced by the manufacturer, its service agent or similarly qualified persons in order to avoid a hazard.
-
Before operating this system, check the voltage of this system to see if it is identical to the voltage of your local power supply.
-
To prevent fire or shock hazard, do not expose this equipment to hot places, rain, moisture or dust.
-
Do not place this unit close to a strong magnetic field.
-
Do not place the unit on a amplifier or receiver.
-
Do not place this unit in a damp area as the moisture will affect the life of electric components.
-
If the system is brought directly from a cold to a warm location, or is placed in a very damp room, moisture may condense on the lens inside the player. If this occurs, the system will not operate properly. Please leave the system turned on for about an hour until the moisture evaporates.
-
Do not attempt to clean the unit with chemical solvents as this might damage the finish. Wipe with a clean, dry or slightly damp cloth.
NOTICE

Conformity
Hereby, Blaupunkt Competence Center 2N-Everpol Sp. z o.o., declares that this equipment is in compliance with the essential requirement and other relevant provisions of Directive 2014/53/EU. Declaration of conformity can be obtained from the product page at www.blaupunkt.com.
Responsible party: 2N-Everpol Sp. z o.o, Puławska 403A, 02-801 Warsaw, Poland, Phone: +48 22 331 99 59, E-mail: info@everpol.pl

Your products is designed a manufactured with high quality materials and components, which can be recycled and reused.
When this crossed-out wheeled bin symbol is attached to a product it means that the product is covered by the European Directive 2012/19/EU. Please inform yourself about the local separate collection system for electrical and electronic products. Please cat according to your local rules and do not dispose of your old products with your normal household waste. Correct disposal of your old product helps to prevent potential negative consequences for the environment and human health.
Your product contains batteries covered by the European Directive 2006/66/EC, which cannot be dispose with normal household waste. Please inform yourself about the local rules on separate collection of batteries because correct disposal helps to prevent negative consequences for the environmental and human health.
Environmental information
All unnecessary packaging has been omitted. We have tried to make the packaging easy to separate into three materials: cardboard (box), polystyrene foam(buffer) and poly ethylene (bags, protective foam sheet). Your system consists of material which can be recycled and reused if disassembled by a specialized company. Please observe the local regulations regarding the disposal of packaging materials, exhausted batteries and old equipment. Recording and playback of material might require consent. See Copyright Act 1956 and The Performer's Protection Acts 1958 to 1972.
Many thanks to purchase our model, please read and reference this manual carefully before operate the unit. Please keep the manual for future operation reference.
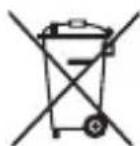
Control locations
1-Auto dim icon; 2-Alarm 1 icon; 3-Alarm 2 icon;
4-Low battery icon for outdoor temperature transmitter;
5-Outdoor temperature; 6-Indoor temperature; 7-Radio/sleep button;
8-Wireless charging indicator; 9-Snooze/dim/auto scan button;
10-Wireless charging center; 11-Up/outdoor temperature button;
12-Down/out-in temperature/month-date button;
13-Set/memory button; 14-Alarm 1-2/on-off button;
15-Volume set button; 16-Heat release vents;
17-Speaker driver; 18-USB charging port;
19-DC IN jack; 20-Backup battery compartment (not include battery)
Install backup battery power: Place your clock radio face down on a flat and soft surface; use a coin to turn the battery cover anti-clockwise at the back of your unit; insert one new lithium cell "CR2032" battery(not included) into the battery compartment by observing the "+" polarity facing upward; replace the battery cover and turn clockwise to lock it. The time and all setting will be kept in case of AC power interrupted, but the backup battery is available.
Remark: Do not use old or used battery; do not use rechargeable battery; new battery is recommended for optimal usage of this clock.
If AC power is interrupted, and backup batteries are using, the time and all settings of your unit will be kept. The alarm, radio, and wireless charging do not function and the time display does not light up.
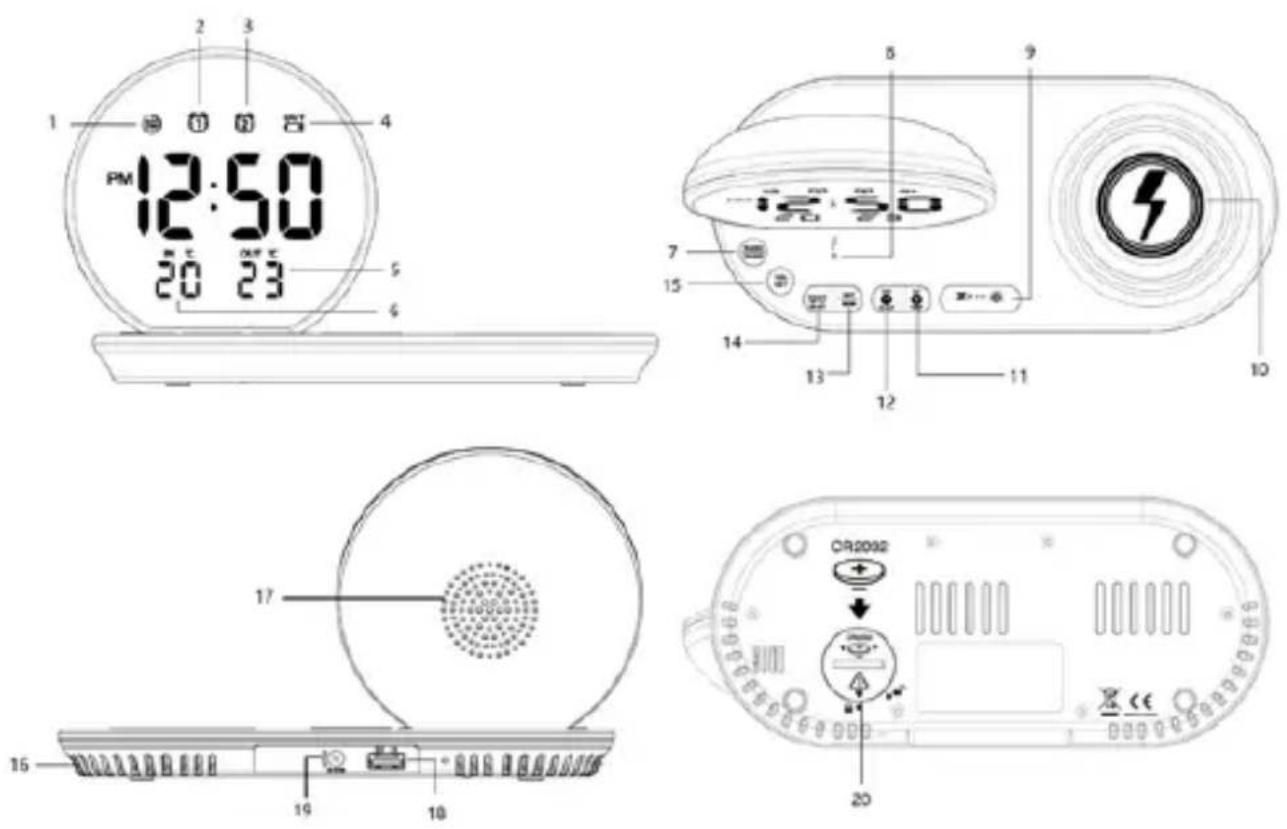
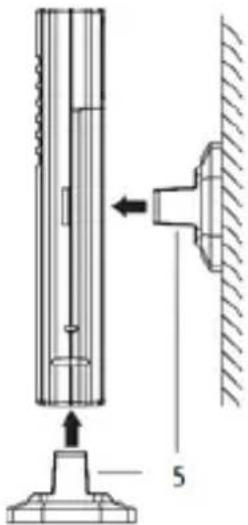
Wireless outdoor temperature transmitter installment
After you install batteries to the wireless outdoor transmitter, your clock radio will receive outdoor temperature from it in few seconds. Then place your outdoor transmitter in a dry and shaded outdoor area.
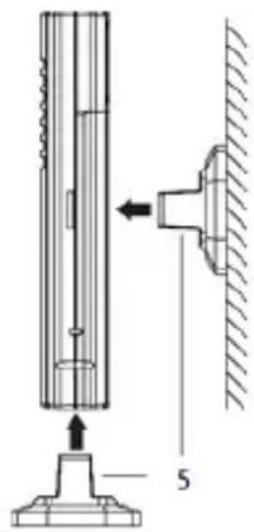
1-RF signal LED; 2- battery door; 3- Channel and selector; 4- battery compartment (2 x AAA, not include); 5-holder;
Remark:
a. The enclosed outdoor transmitter only works when Channel 1 is selected.
b. Insert the holder to the bottom of the outdoor transmitter for desktop or insert it to the back of the transmitter for wall mount purpose.
c. The temperature's readings will get stable and become more accurate after the unit powered up for around 30 minutes.
d. Keep in mind that your outdoor sensor has a 60-meter open-air transmission with no obstructions. Actual transmission range will vary depending on what is in the path of the signal. Each obstruction (roof, walls, floors, ceilings, thick trees, etc.) will effectively cut signal range in half.
e. Press the in-out temperature button to switch the in-out temperature and month/day information on display.
f. When the outdoor temperature loss, press and hold the out-temperature button (2 seconds), can auto search and receive the wireless signal from outdoor temperature transmitter. If you continue to lose the outdoor temperature, bring back the outdoor transmitter next to your clock radio and reinstall the batteries of the transmitter again (replace with new alkaline batteries if need). Try placing the transmitter in a different location until you have smooth transmission of temperature data if need. Extreme cold weather (or low battery of the outdoor transmitter) could result in intermittent or loss of transmission.
g. When OUT appears on the upper right display, replace the batteries of your outdoor transmitter with new ones.
Unit power on: insert the power connector into the DC jack of the unit, and plug in the AC/DC adaptor to an AC household outlet in order to get the power.
Clock time setting: long press (2 seconds) the set/memory button, the hour digit will flicker on the display, press the +/- button to adjust the desired hour, press and hold the +/- button to accelerate setting at high speed; Short press the set/memory button again skip to the minute setting. Using the same method like the hour setting to operate the rest setting for
minute/time format(12 or 24 hours)/calendar(year/month/day)snooze time(5 min to 60 min). Short press the set/memory button to finish the setting, and clock time will become stable on display.
Alarm setting: press and hold the alarm1-2 on/off button until the hour digits flare on display; and the alarm 1 icon LED will light on at same time. Press the +/- button to adjust the desired hour; press and hold +/- button to accelerate setting at high speed. Short press the alarm1-2 on/off button again skip to the minute setting; press the +/- button to adjust the desired minute. Short press the alarm1-2 on/off button again skip to the alarm source selection, press the +/- button to select alarm source between buzz or radio (in case of you selected radio as alarm source, press +/- button can select alarm volume between high and low level); press the alarm1-2 on/off button skip to wake up time selection between 1-5/6-7/1-1/1-7 ("1-5" = wake up by working day; "6-7" = wake up by weekend; "1-1" = wake up once; "1-7" = wake up by daily). Press the alarm 1-2 on/off button again skip to alarm 2 setting which is same operation as alarm 1.
Alarm on/off: you need turn on the alarm after finished above alarm setting; press the alarm 1-2 on/off button repeatedly can turn on or off alarm 1 and alarm 2. Please make sure the relative alarm icon LED will light on after you selected which means the alarm is working now.
Alarming and snooze: when unit is sounding due to the alarm time is being, press the alarm 1-2 on/off button to cancel the voice, and will wake up again at the same time of next day; if you press the snooze button, the alarm will be silenced temporarily and come on again after the set snooze duration.
Note:
- The unit will exist the clock or alarm setting mode when no key pressed in approximate 10 seconds.
- If your second alarm activate while the first alarm is sounding or it is in the snooze mode, the second alarm overrides the first alarm (the first alarm will reset to come on the next day).
- The alarm only works when the DC/AC power adaptor is connected. Please double check the alarm setting in case of power interrupted.
- The alarm voice duration time is 5 minutes in buzz source, 1 hour in radio source.
Radio
Before listen to the radio, please extend the wire antenna and move the unit next to the window as you can in order to get better reception. Short press the radio button to turn on or off the radio mode; press the volume button first, then continue to press the +/- button immediately for the output volume adjustment.
Tuning and auto scan: short press the +/- button to tune the radio frequency per 0.1MHz; press and hold the +/- button to scan and play the available station.
All-in-one scan(auto scan and save as preset station): long press the auto scan button(2 seconds) to scan and save the available station automatically, max supported up to 20 preset stations.
Manual memory station: When you tuned a favorite station, press and hold the memory button until the "PXX" flare on display, press the +/- button to select the preset station number you desire to save, press the set button again to confirm. Then the radio station will be saved.
Pick up preset station: short press the memory button first, press the +/- button to select the preset station number for listening.
Sleep: in radio listening mode, press and hold the sleep button first, and short press the sleep button immediately to select the sleep time (05, 10, 15, 30, 45, 60, 75, 90 or OFF); the unit will revert to clock interface after few seconds, press and hold the sleep button again can check the remaining sleep time. And the radio listening will auto off when the sleep time is being.
Note: the radio station will have few impacts due to signal interference create by USB or wireless charging output. You can turn down the volume, or switch to strong signal station for listening.
Display dimmer: short press the dimmer button to adjust the brightness in high/low/off level. Dimmer time (auto dim) setting: In standby mode (radio off), press and hold the dim button (2 seconds) till auto-dim icon light up, and "off" flashing on display. Press +/- button to select "on" to activate the function, press dim button skip to daily auto-dim start time selection, press +/- button to choose the time; press dim button again skip to auto-dim lasting time setting between 1\~12 hours, press +/- button to adjust it; press dimmer button again to finish the setting.
Wireless charging
Center your mobile device (keep 3-5 mm away from the right edge) with the backside down on the marked charging target circle. Please observe that the wireless charging indicator is staying on (not flashing or off)
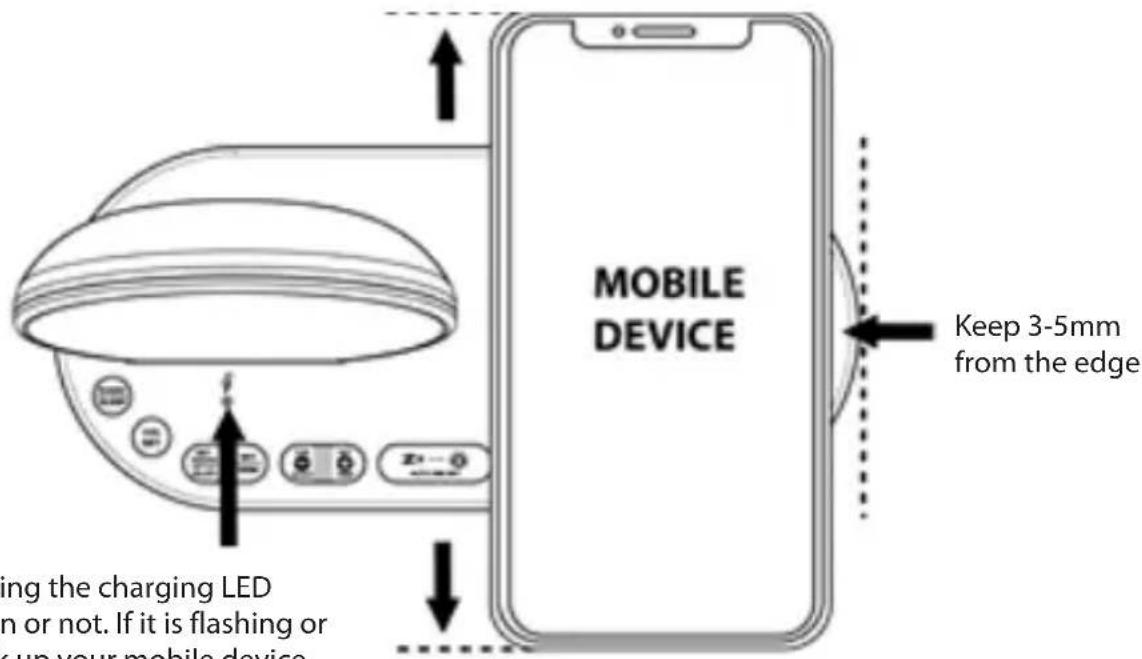
Observing the charging LED static on or not. If it is flashing or off, pick up your mobile device and position it again
Wireless charging operation and correction table
| Charging indicator | Status | Mobile device position | Top view |
 LED is on and static LED is on and static | Light on, mobile device is charging properly.Make sure your mobile device is aligned to this units's charging area. Center your mobile device with backside down on the marked charging center.Tip: keep your mobile device 3-5mm away from the right edge. |  | 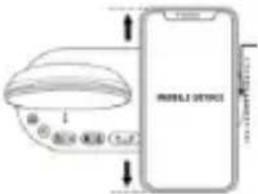 Keep 3-5mm away from the right edge. Keep 3-5mm away from the right edge. |
 LED is off LED is off | Light is off, your mobile device is:1.Removed from charging surface.2.Not placed on the charging surface properly.3.When the clock radio is not connected to a power outlet.Please verify your mobile device is not shifted too far off center.Lift up the mobile device from the charging surface and put it back on properly, |  | 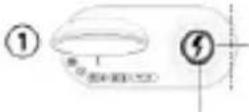 Wireless charging center Wireless charging center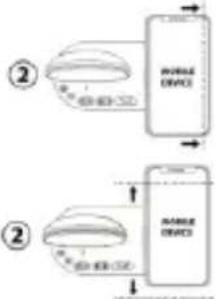 |
 LED is flashing LED is flashing | 1.Your mobile device is not being charged properly.2.Do not place foreign materials, such as metal objects, and magnetic stripe cards between the mobile device and wireless charger under charging. | X | 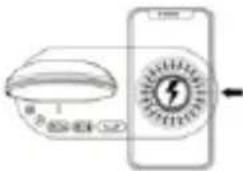 Do not place any foreign objects(metal) on the charging center or under mobile device during charging. Do not place any foreign objects(metal) on the charging center or under mobile device during charging. |
Note:
- This function only works with mobile devices that support Qi technology. Please make sure your mobile device has included such feature.
- Make sure your clock radio is connected with the adaptor (5V-2.5A) supplied with this clock radio. Unauthorized chargers or adaptors may cause damage or the wireless charger may malfunction.
- If your mobile device is not charging, the charging indicator is off. Please verify that your mobile device is not shifted too far off center.
- Using the external wireless charging receiver connected to non-Qi compatible mobile device may result in unstable charging.
- Do not put any foreign object (metal) on the charging area any time or under the mobile device during charging. The wireless charging indicator flashes and charging will stop.
6.Do not place a wireless charging receiver solely on the wireless charging surface. Doing so may overheat the wireless charger and cause a fire. It may also result in serious burn or device malfunction. - If you place a mobile device on the wireless charging surface for an extended period, the wireless charger may overheat and stop charging.
8.Do not cover or block the heat release vent at the back of the clock radio. - When the mobile device is fully charged, remove it from the wireless charging surface.
- Do not place foreign materials, such as metal objects, magnets, magnetic stripe cards, paper clips etc. between the mobile device and the wireless charging surface. The mobile device may not charge properly or may be damaged due to overheating.
- Wireless charging may not work properly if you attach a thick case to your mobile device. If your case is thick, remove it before placing your mobile device on the wireless charging surface.
- If you connect a charger to the mobile device during wireless charging, the wireless charging feature will be unavailable.
USB charging: Connect the charging cable of your mobile phone to the A-type USB port at the back of the unit, then connect the other end to your mobile phone. The clock radio will charge the mobile phone automatically.
Note :
- Make sure the original cable of your mobile phone's original charging cable for charging
- Make sure the original adaptor (5V-2.5A) enclosed with your clock radio is being used to power your clock radio. Using other adaptors may not charge your phone.
3.iPad and Notepad charging is not applicable. - Charging one mobile device by the USB port and another mobile device by the wireless charger at the same time will reduce the charging efficiency and extend the charging time.
Trouble shooting
If your clock displays irrelevant time or does not function properly, which maybe caused by electro-static discharge or other interference. Unplug the DC jack at the back of the unit, slide open the battery cover and take out the batteries. Then re-plug the DC jack and reinstall batteries by observing the correct +/- polarity. Your unit will be reset to default settings and you need to set it again.
Specification
Alarm duration Buzzer 5 minutes/ Radio 1 hour Snooze duration 5 to 60 minutes
Default settings:-
Time 24HR format
Alarm 1 and 2 6:00am (OFF)
Snooze duration 05 (5 minutes)
Ważne informacje
natural_image
Technical line drawing of a vertical cylindrical device with a side-mounted ventilation grille (no text or symbols)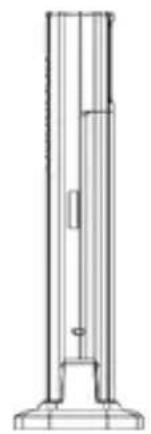
natural_image
Technical line drawing of a vertical cylindrical structure with internal components (no text or symbols)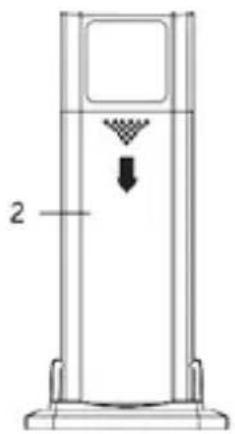
natural_image
Diagram of a vertical cylindrical device with a downward arrow and checkered pattern, labeled '2' (no text or symbols on the device itself)
1 - RF jeldióda;
2 - elemtartó ajtó;
natural_image
Technical line drawing of a vertical cylindrical device with internal spring-like structure and base (no text or symbols)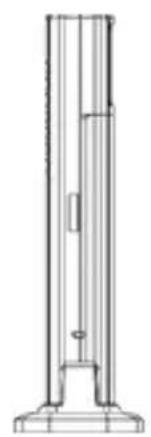
natural_image
Technical line drawing of a vertical cylindrical structure with internal components (no text or symbols)
natural_image
Diagram of a vertical cylindrical device with a downward arrow and checkered pattern, labeled '2' (no text or symbols on the device itself)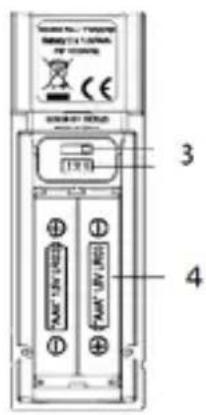

1-dioda signala RF;
2 vrata baterije;
3- prekidač kanala;
4- pretinac za baterije (2 x AAA, nisu uključene);
5-držač;
Napomena:
natural_image
Technical line drawing of a vertical cylindrical device with internal ventilation slots and a base (no text or symbols)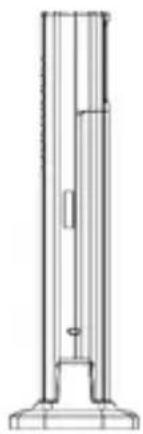
natural_image
Technical line drawing of a vertical cylindrical structure with internal components (no text or symbols)
natural_image
Technical line drawing of a vertical cylindrical device with a downward arrow and checkered pattern, labeled '2' (no text or symbols beyond label)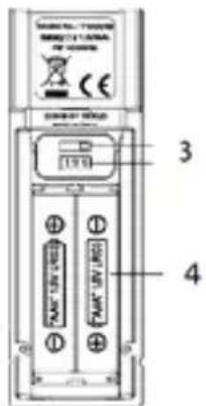
1-dioda semnal RF;
2 uşita baterii;
natural_image
Technical line drawing of a vertical cylindrical device with internal ventilation slots and a base (no text or symbols)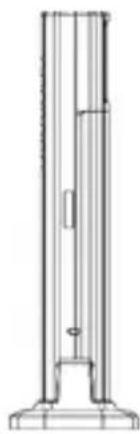
natural_image
Technical line drawing of a vertical cylindrical structure with internal components (no text or symbols)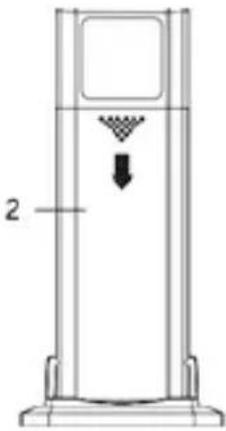
natural_image
Technical line drawing of a vertical cylindrical device with a checkered pattern and downward arrow, labeled '2' (no text or symbols beyond basic diagram)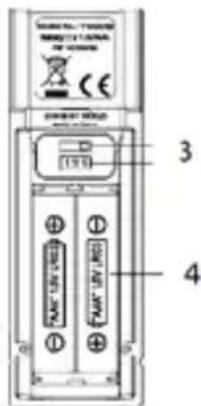

1- RF signaali diood ;
2 batarei luugikesed ;
3- kanalite lülitus;
4- batarei kamber (2 x AAA, puudub komplektis);
5- kinnitus;
Tähelepanu:
1-dioda signala RF; 2- baterijska vratica; 3- stikalo za preklapljanje kanalov; 4- prostor za baterije (2 x AAA, jih ni v kompletu); 5-nosilec;
Opozorila:
02-801 Warsaw, Poland
phone:+48 22 331 99 59
e-mail: info@everpol.pl
www.blaupunkt.com
In case of questions or problems
please contact our service.
Tel. 00 48 22 331 99 53
E-mail: info@blaupunkt-audio.pl
Enjoy it.
All rights reserved. All brand names are registered trademarks of their respective owners. Specifications are subject to change without prior notice.