
BXEFD40E - Ventilateur domestique BLACK & DECKER - Free user manual and instructions
Find the device manual for free BXEFD40E BLACK & DECKER in PDF.

| Product type | Domestic fan |
| Brand | Black & Decker |
| Model | BXEFD40E |
| Power supply | Mains (230 V ~ 50 Hz) |
| Maximum power | 36 W |
| Maximum airflow | 22.92 m³/min |
| Sound power level | 57.52 dB(A) |
| Maximum air velocity | 2.88 m/s |
| Service value (SV) | 0.63 (m³/min)/W |
| Oscillation angle | 75° |
| Tilt | Manually adjustable |
| Number of speeds | 3 |
| Carrying handle | Yes, integrated |
| Mounting type | On base (table/pedestal fan) |
| Special functions | Oscillation, tilt |
| Safety | Front and rear protective grilles |
| Cleaning | Damp cloth, do not immerse |
| Spare parts | Front grille, rear grille, fan blade, lock nuts, tubes |
| Warranty | Complies with applicable legislation, support via 2helpu.com |
| Standby consumption | 0 W |
| Certifications | Directive 2014/35/EU, 2014/30/EU, 2011/65/EU, 2009/125/EC |
Frequently Asked Questions - BXEFD40E BLACK & DECKER
User questions about BXEFD40E BLACK & DECKER
0 question about this device. Answer the ones you know or ask your own.
Ask a new question about this device
Download the instructions for your Ventilateur domestique in PDF format for free! Find your manual BXEFD40E - BLACK & DECKER and take your electronic device back in hand. On this page are published all the documents necessary for the use of your device. BXEFD40E by BLACK & DECKER.
USER MANUAL BXEFD40E BLACK & DECKER
natural_image
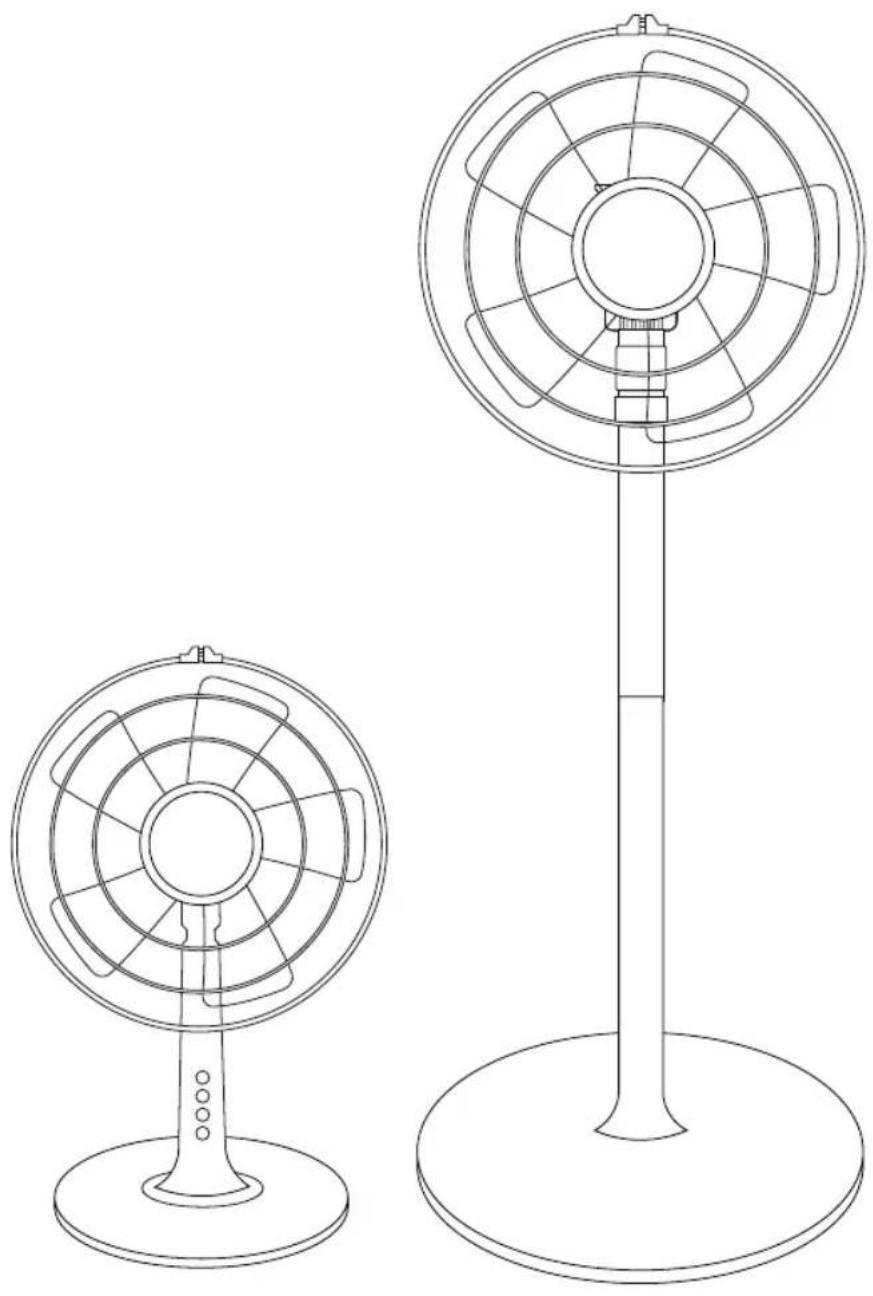
Line drawing of two different outdoor fan-shaped devices, one with a base and the other with a top, shown without any text or symbols.
natural_image
Illustration of hands performing a mechanical maneuver with a spring and rope, showing motion arrows (no text or symbols)
ENGLISH
(Original instructions)
FAN
BXEFD40E
BXEFP60E
Dear customer,
Many thanks for choosing to purchase a BLACK+DECKER brand product.
Thanks to its technology, design and operation and the fact that it exceeds the strictest quality standards, a fully satisfactory use and long product life can be assured.
- Read these instructions carefully before switching on the appliance and keep them for future reference. Failure to follow and observe these instructions could lead to an accident.
SAFETY ADVICE AND WAR- NINGS
- This appliance can be used by children aged from 8 years and above and persons with reduced physical, sensory or mental capabilities or lack of experience and knowledge if they have been given supervision or instruction concerning use of the appliance in a safe way and understand the hazards involved.
- Cleaning and user maintenance shall not be made by children unless they are supervised.
- This appliance is not a toy. Children should be supervised to ensure that they do not play with the appliance.
- Ensure that the fan is switched off from the supply mains before start any installation or assembly operation.
◆ Disconnect the appliance from the mains before undertaking any
cleaning task. Ensure that the fan is switched off from the supply mains before removing the guard.
If the connection to the mains has been damaged, it must be replaced, take the appliance to an authorised technical support service. Do not attempt to disassemble or repair the appliance by yourself in order to avoid a hazard.
- This appliance is for household use only, not professional, industrial use.
- Ensure that the voltage indicated on the rating label matches the mains voltage before plugging in the appliance.
- Connect the appliance to a socket that can supply a minimum of 10 amperes.
- The appliance's plug must fit into the mains socket properly. Do not alter the plug. Do not use plug adaptors.
- The appliance must be used and placed on a flat, stable surface.
- Do not use the appliance if the cable or plug is damaged.
If any of the appliance casings breaks, immediately disconnect the appliance from the mains to prevent the possibility of an electric shock.
Do not use the appliance if it has fallen on the floor, if there are visible signs of damage or if it has a leak.
- Do not force the power cord. Never use the power cord to lift up, carry or unplug the appliance.
Do not wrap the power cord around the appliance.
Do not clip or crease the power cord.
- Check the state of the power cord. Damaged or tangled cables increase the risk of electric shock.
- The appliance is not suitable for outdoor use.
Supply cord should be regularly examined for signs of damage, and if the cord is damaged, the appliance must not be used.
- Do not use or store the appliance outdoors.
Do not leave the appliance out in the rain or exposed to moisture. If water gets into the appliance, this will increase the risk of electric shock.
Do not touch the plug with wet hands.
- Do not touch any of the appliance's moving parts while it is operating.
Use and care:
- Fully unroll the appliance's power cable before each use. If the model of your appliance does not have the
Do not use the appliance if the on/off switch does not work. accessories described above, they can also be bought separately from the Technical Assistance Service.
◆ Use the appliance handle/s, to catch it or move it.
- Do not use the appliance if it is tipped up and do not turn it over.
- Do not turn the appliance over while it is in use or connected to the mains.
- Disconnect the appliance from the mains when not in use and before undertaking any cleaning task.
- Store this appliance out of reach of children and/or persons with physical, sensory or reduced mental or lack of experience and knowledge.
- Make sure that dust, dirt or other foreign objects do not block the fan grill on the appliance.
- Keep the appliance in good condition. Check that the moving parts are not misaligned or jammed and make sure there are no broken parts or anomalies that may prevent the appliance from operating correctly.
- Never leave the appliance connected and unattended if is not in use. This saves energy and prolongs the life of the appliance.
Service:
- Any misuse or failure to follow the instructions for use renders the guarantee and the manufacturer's liability null and void.
DESCRIPTION
A Front grill
B Guard securing
C Front cover
D Spinner lock nut
E Propeller
F Guard lock nut
G Rear grill
H Motor shaft
I Shaft pin
J Oscillation control knob
K Handle
L Motor cover
M Foot base
N Upper stand tube *
O Lower stand tube *
P Stand tube
Q Speed button
R Screw *
S Base plate
(*) Only available on BXEFP60E
INSTALLATION
- Be sure to remove all packaging material from inside the appliance.
- Ensure that the fan is switched off from the supply mains before start any installation or assembly operation.
- The appliance should be used with its base fitted.
Assembling the base (ONLY FOR THE DESK FAN):
Put the power cord into the base hole and set the bulge of stand tube alignment with space of base hole, and turn the stand tube by clockwise direction.
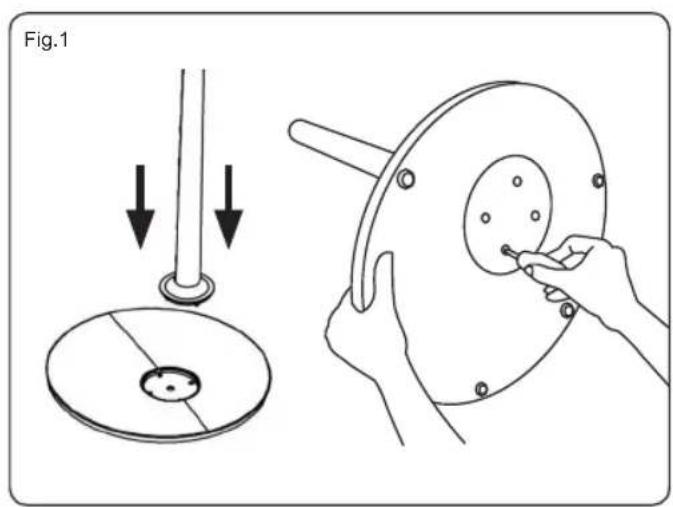
ASSEMBLING THE BASE (ONLY FOR THE STAND FAN):
- Insert the lower stand tube (O) into the base hole (S) and keep the foot (M) of the stand tube alignment with space of the base hole.
- Then use four screws (R) tighten (Fig.1).
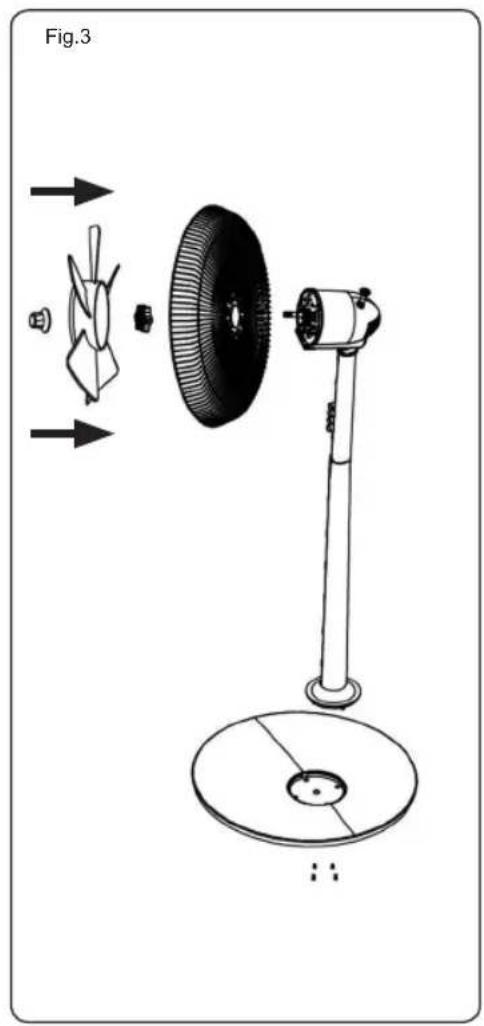
- Insert the upper stand tube (N) into the lower stand tube (O) by hand near the thread zone and turning it in a clockwise direction (Fig.2).
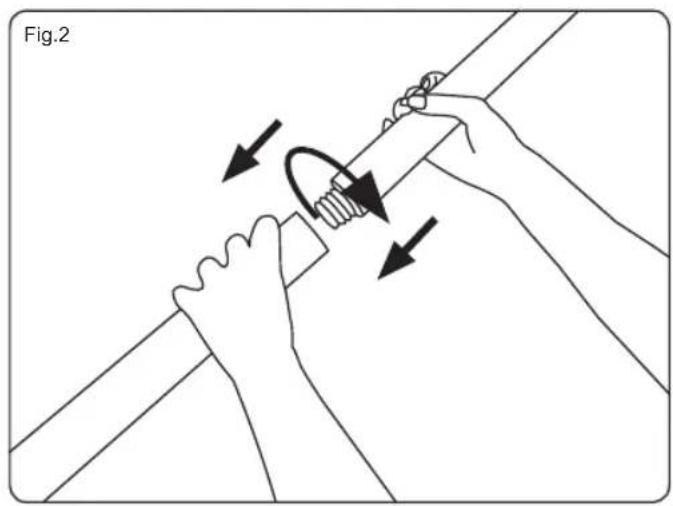
Assembling the grill and the propeller:
- Remove the spinner lock nut and guard lock nut from the motor shaft spindle.
◆ Fit the rear guard, by positioning on the location pins - Secure the guard to the motor body with the guard lock nut (Fig. 3).
- Push the fan blade onto the motor shaft by matching the slots on the base of the blade with the shaft pin.
- Secure the blade with the spinner lock nut. The spinner lock nut must be tightened by turning it in a counter-clockwise direction. Check that the fan blades rotate freely by turning with your hand.
- Open the securing clip of the front guard.
- Fit together the rear guard with the front guard and press the securing clip.
INSTRUCTIONS FOR USE
Before use:
- Make sure that all products' packaging has been removed.
Use:
◆ Unroll the cable completely before plugging it in.
- Connect the appliance to the mains.
- Turn the appliance on, by using one of the speed

ENGLISH
(Original instructions)
selection buttons.
- Select the desired ventilation speed.
Oscillation function:
The oscillation function makes it possible to direct the flow from the apparatus so that it automatically alternates over a range of 75^ .
◆ To activate this function, press the (J) switch.
- To deactivate this function, follow the procedure for switching it on in reverse.
TILTING:
- The appliance can be adjusted for a desired tilt with your hand.
Once you have finished using the appliance:
- Stop the appliance, selecting position 0 on the selector control.
◆ Unplug the appliance from the mains. - Clean the appliance.
Carry handle/s:
- This appliance has a handle on the upper part of the body, which facilitates comfortable transportation.
CLEANING
- Disconnect the appliance from the mains and allow it to cool before undertaking any cleaning task.
- Clean the equipment with a damp cloth with a few drops of washing-up liquid and then dry.
Do not use solvents, or products with an acid or base pH such as bleach, or abrasive products, for cleaning the appliance. - Do not let water or any other liquid get into the air vents to avoid damage to the inner parts of the appliance.
- Never submerge the appliance in water or any other liquid or place it under running water.
If the appliance is not in good condition of cleanliness, its surface may degrade and inexorably affect the duration of the appliance's useful life and could become unsafe to use.
ANOMALIES AND REPAIR
Take the appliance to an authorised technical support service if product is damaged or other problems arise. Do not attempt to disassemble or repair the appliance yourself as this may be dangerous.
For EU product versions and/or in case that it is requested in your country: Ecology and recyclability of the product
- The materials of which the packaging of this appliance consists are included in a collection, classification and recycling system. Should you wish to dispose of them, use the appropriate public recycling bins for each type of material.
- The product does not contain concentrations of substances that could be considered harmful to the environment.
This symbol means that in case you wish to dispose of the product once its working life has ended; take it to an authorised waste agent for the selective collection of Waste from Electric and Electronic Equipment (WEEE).
- The following information details the features related to ecodesign.
| BXEFP60E | |
| Maximum fan flow rate (F) 40,67 m ^3 /min | |
| Fan power input(P) 56,40W | |
| Service value (SV) (according to IEC 60879) | 0,72 (m ^3 /min)/W |
| Standby power consumption (PSB) | 0,00 W |
| Fan sound power level (LWA) | 59,24 dB(A) |
| Maximum air velocity( c ) 3,49 metres/sec | |
| BXEFD40E | |
| Maximum fan flow rate (F) 2 | 2,92 m ^3 /min |
| Fan power input(P) 36,40 W | |
| Service value (SV) (according to IEC 60879) | 0,63 (m ^3 /min)/W |
| Standby power consumption (PSB) | 0,00 W |
| Fan sound power level (LWA) | 57,52 dB(A) |
| Maximum air velocity (c) 2 | 88 metres/sec |
This appliance complies with Directive 2014/35/EU on Low Voltage, Directive 2014/30/EU on Electromagnetic Compatibility, Directive 2011/65/EU on the restrictions of the use of certain hazardous substances in electrical and electronic equipment and Directive 2009/125/EC on the ecodesign requirements for energy-related products.
WARRANTY AND TECHNICAL ASSISTANCE
This product enjoys the recognition and protection of the
legal guarantee in accordance with current legislation. To enforce your rights or interests you must go to any of our official technical assistance services.
You can find the closest one by accessing the following web link: http://www.2helpu.com/
You can also request related information, by contacting us (see the last page of the manual).
You can download this instruction manual and its updates at http://www.2helpu.com/
FRANÇAIS
VENTILATEUR
BXEFD40E
BXEFP60E
Cher Client,
- Insert the lower stand tube (O) into the base hole (S) and keep the foot (M) of the stand tube alignment with space of the base hole.
- Then use four screws (R) tighten (Fig.1).
РУССКИЙ
- Insert the upper stand tube (N) into the lower stand tube (O) by hand near the thread zone and turning it in a clockwise direction (Fig.2).