001-180 - Lawn mower Meec Tools - Free user manual and instructions
Find the device manual for free 001-180 Meec Tools in PDF.


| Product Type | Petrol Lawn Mower |
| Brand | Meec Tools |
| Model | 001-180 |
| Engine Displacement | 159 cm³ |
| Engine Power Output | 2.1 kW |
| Engine Speed | 2900 min⁻¹ |
| Fuel Type | Unleaded Petrol |
| Fuel Tank Capacity | 1 L |
| Oil Type | SAE 30 |
| Oil Volume | 0.55 L |
| Ignition System | TCI |
| Spark Plug Type | QJ19LM (Champion) |
| Mowing Width | 51 cm |
| Mowing Height Range | 25 – 75 mm |
| Grass Catcher Capacity | 60 L |
| Net Weight | 33.4 kg |
| Sound Pressure Level | 84 dB(A) (K=3 dB) |
| Guaranteed Sound Power Level | 98 dB(A) |
| Vibration Level | 6.1 m/s² (K=1.5 m/s²) |
| Safety Features | Engine control lever, blade brake, safety guards, spark plug cap removal before maintenance |
| Maintenance Requirements | Regular air filter cleaning, spark plug cleaning/gapping (0.7-0.8 mm), oil change after first 5 hours then every season, blade replacement every 50 hours / 2 years |
Frequently Asked Questions - 001-180 Meec Tools
User questions about 001-180 Meec Tools
0 question about this device. Answer the ones you know or ask your own.
Ask a new question about this device
Download the instructions for your Lawn mower in PDF format for free! Find your manual 001-180 - Meec Tools and take your electronic device back in hand. On this page are published all the documents necessary for the use of your device. 001-180 by Meec Tools.
USER MANUAL 001-180 Meec Tools
001-180
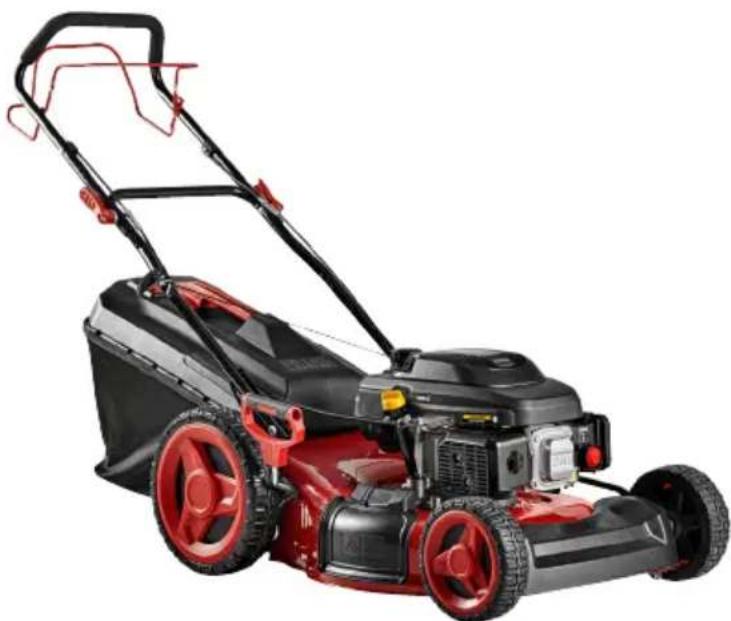
natural_image
Black and red lawn mower with blue blades and black handle, no visible text or symbols
SE GRÄSKLIPPARE
Operating instructions (Translation of the original instructions) Important! Read the user instructions carefully before use. Save them for future reference.
Värna om miljön!
Care for the environment!
Must not be discarded with household waste! This product contains electrical or electronic components that should be recycled. Leave the product for recycling at the designated station e.g. the local authority's recycling station.
Jula reserves the right to make changes. In the event of problems, please contact our service department.
www.jula.com
Tillverkare/ Produsent/ Produenci/ Manufacturer
Jula AB, Box 363, 532 24 SKARA
Distributör/ Distributør/ Dystrybutor/ Distributor
Jula Poland Sp. z o.o., ul.
2
natural_image
Technical line drawing of a vehicle chassis frame with attached sensors and wheels (no text or symbols)4
natural_image
Technical line drawing of a mechanical device casing with internal components and an arrow indicating direction (no text or symbols)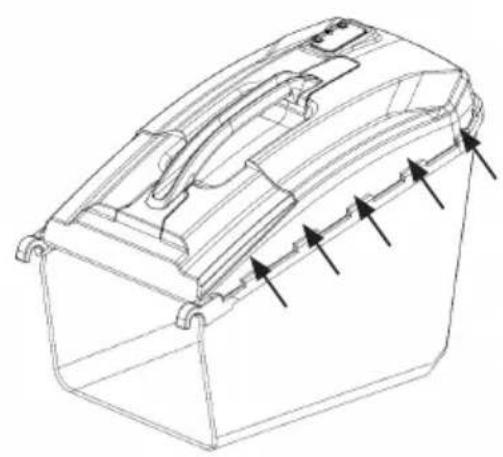
natural_image
Technical line drawing of a mechanical component with directional arrows indicating assembly or movement (no text or symbols present)5
natural_image
Technical line drawing of a lawn mower with attached equipment (no text or symbols)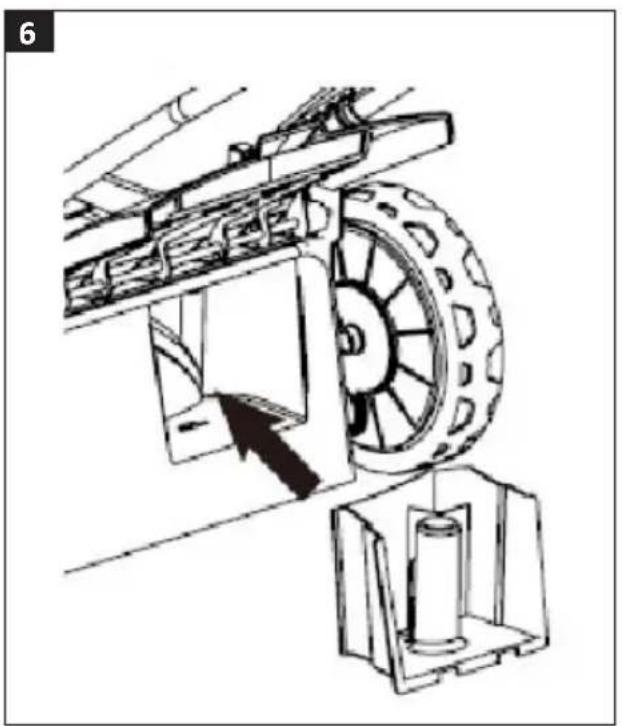
natural_image
Technical line drawing of a mechanical assembly with a wheel and housing (no text or symbols)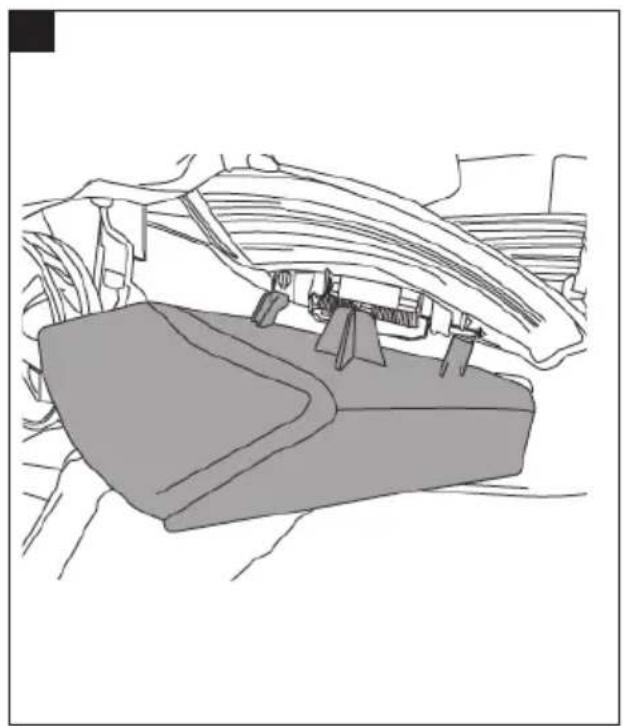
natural_image
Technical line drawing of a mechanical component with no visible text or symbols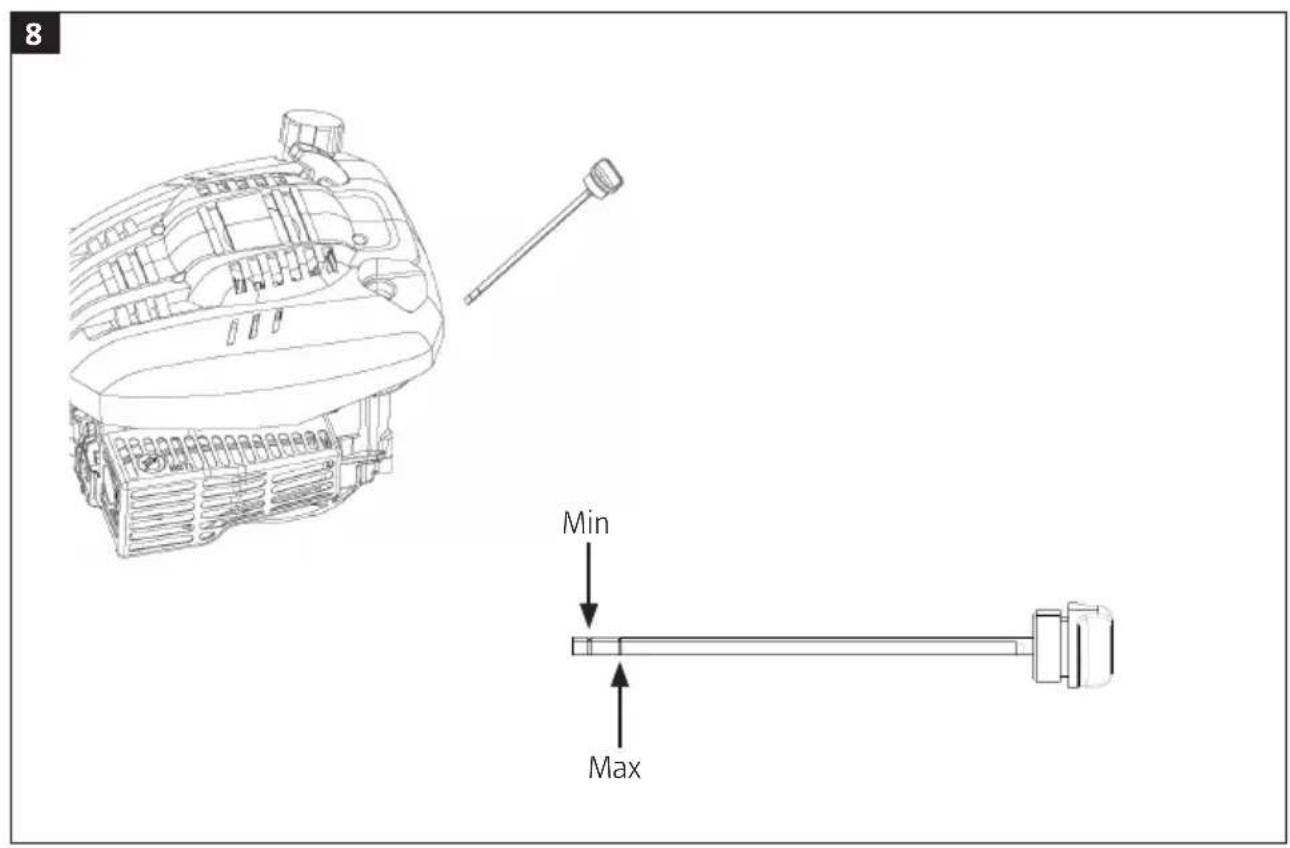
natural_image
Technical line drawing of a vehicle tire assembly with visible components and wiring (no text or symbols)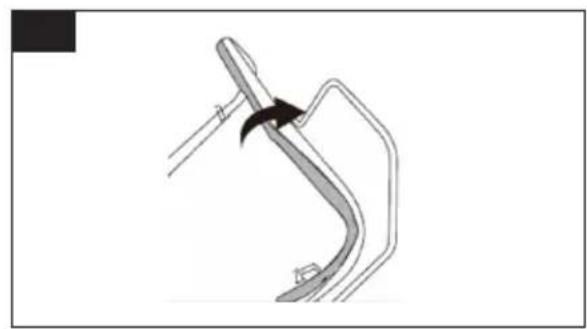
natural_image
Diagram of a mechanical clamp or bracket with a black arrow indicating direction (no text or symbols)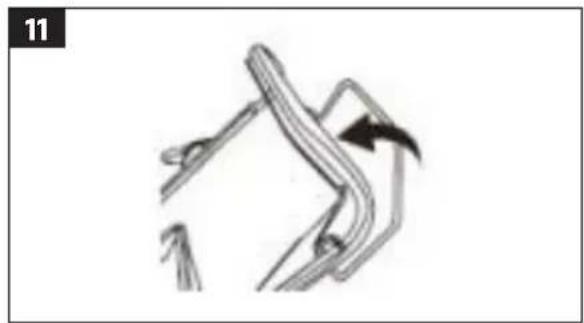
natural_image
Diagram of a rope knot with a hook, showing folding and dissection (no text or symbols)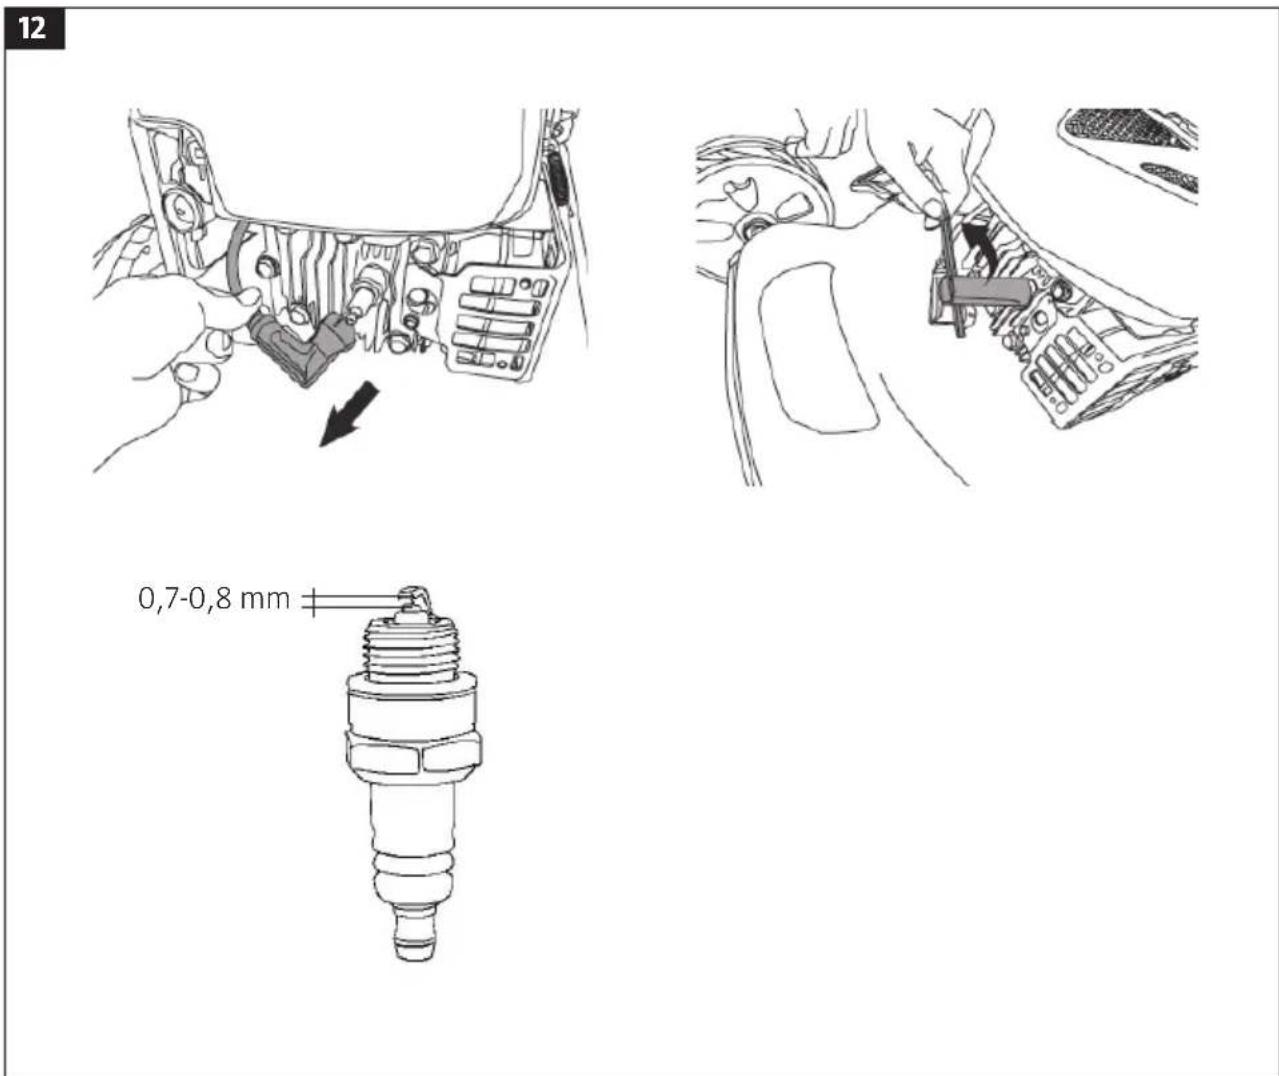
13
natural_image
Technical line drawing of a mechanical device with internal components and housing (no text or symbols)14
natural_image
Technical line drawing of a mechanical assembly with no visible text or symbolsSÄKERHETSANVISNINGAR
T∅MMING AV GRESSOPPSAMLEREN
- Read these instructions carefully and familiarise yourself with the controls on the lawn mower before use.
- Never allow children, or anyone who is unfamiliar with the lawn mower and these instructions, to use it. There may be local regulations for the minimum age of persons allowed to use the machine.
- Do not use the lawn mower when other persons, especially children, or pets are in the vicinity.
- The user is responsible for any accidents or risks to other persons or property.
- Do not use the lawn mower if you are tired, ill, upset, or under the influence of drugs, alcohol or medication.
• Do not modify the lawn mower. - Risk of hearing impairment. Wear ear protection. The user must wear ear protection, which others in the vicinity may also need to wear.
- Noisy work should be limited to specific periods.
- Rest at regular intervals. Failure to take sufficiently long and frequent breaks can result in vibration injuries.
- Exposure to vibrations from the prolonged use of petrol-powered hand tools can result in circulation injuries.
- Do not use the lawn mower in bad weather.
- Prolonged use in cold weather has been linked to blood vessel injuries in otherwise healthy people. If symptoms such as numbness, pain, weakness, swelling, changes in skin colour or loss of feeling in fingers, hands and joints should occur, stop using the machine and seek medical attention.
Before use
• Always wear heavy-duty shoes and long trousers when using the lawn mower. Do
not use the lawn mower if you are barefoot or wearing open shoes.
- Carefully inspect the area where the lawn mower is to be used and remove any objects that can be thrown up.
- The engine is supplied without oil and petrol. Always fill up with fuel and engine oil before using for the first time. Do not run the engine without enough oil – risk of serious engine damage.
• Always use clean, fresh unleaded petrol. - Always be careful when handling fuel – it is highly flammable. Store out of the reach of children.
- Only refuel in a well-ventilated area with the engine switched off. Keep petrol away from sparks and naked flames, and do not smoke where petrol is stored or when filling petrol. Avoid repeated or prolonged skin contact with fuel and/or inhalation of fuel fumes.
• Petrol is highly flammable and can in some circumstances be explosive.
• Only store fuel in an approved container.
• Fill up with fuel outdoors. Smoking prohibited! - Fill up with fuel before starting the engine. Never remove the fuel cap or add fuel while the engine is running. Allow the engine to cool before filling with fuel.
- Do not start the lawn mower if fuel has been spilled. Move the lawn mower away from any spilt fuel before starting. Be careful not to ignite spilled petrol. Replace the fuel cap and fuel tank cover properly.
• Repair/replace the muffler if it gets damaged.
• Always check the lawn mower before use to make sure that the blades, blade screws and mower deck are not worn or damaged. - On lawn mowers with multiple blades, all the blades can move when just one blade is turned – risk of personal injury.
Use
- Do not use the lawn mower if parts are missing or damaged – risk of serious personal injury.
- Do not run the engine in confined spaces where noxious carbon monoxide can accumulate.
- Only use the lawn mower in daylight, or in good artificial lighting.
• Make sure you always have a good footing on sloping ground. - Use the machine carefully. Never run with the lawn mower. Be very careful on uneven surfaces.
- Mow across slopes, never up and down. Be very careful when changing direction and on slopes. Do not use the lawn mower on slopes with a gradient of more than 15°.
- Do not mow high or wet grass. Wet grass can block the blades and the catcher system.
- Be very careful when going backwards or pulling the lawn mower towards you.
- Switch off the lawn mower if it has to be tilted when moving it over an ungrassed surface, or when moving to and from the area to be mowed.
- Never use the lawn mower if the guards or covers are dismantled or damaged.
- Never use the lawn mower without the safety devices fitted, e.g. ejector guide and/or catcher.
- Do not change the speed governor setting and do not over rev the engine.
• Disengage and put all the controls in neutral mode before starting the engine. - Start the engine carefully according to the instructions. Keep your feet away from the blades.
- Do not tilt the lawn mower when starting the engine, unless this is necessary to start it. If the lawn mower must be tilted, do not tilt it more than is absolutely
necessary. Lift up the end furthest away from the user.
• Do not stand in front of the ejector opening when starting the engine.
- Never put your hands or feet near, or under, rotating parts. Always keep at a safe distance from the ejector opening.
- Never lift or carry the lawn mower when the engine is running.
- Switch off the engine, release the cap from the spark plug, and wait until all moving parts have completely stopped in the following situations.
— Before clearing blockages or cleaning the ejector.
— Before checking, cleaning or doing any other work on the lawn mower.
- If the blade strikes an object. Check the lawn mower and repair any damage before using it again.
- If the lawn mower starts vibrating abnormally (check immediately).
— Before leaving the lawn mower.
— Before filling up with fuel.
- Before transport.
- Reduce the throttle and close the fuel cock (if there is one) before stopping the engine.
- Do not carry out any adjustments while the lawn mower is running.
- Never open the ejector flap if the engine is running and the grass catcher is not fitted. Lawn mower blades can cause serious personal injury.
- During the mowing, switch off the lawn mower at regular intervals to clear the blades and mower deck.
- Do not use your hands or feet to clear the blades and deck. Use a brush, broom or other suitable tool.
• Never start the engine indoors or in an enclosed area. Exhaust fumes from the
engine contain carbon monoxide, an odourless and highly dangerous gas – risk of serious personal injury and/or death. Keep your hands, feet, hair, and loose-fitting clothes away from moving parts. The engine and exhaust pipe get very hot when in use – risk of burn injuries.
- Do not start the engine without an air filter.
• Always check the blades after use.
• A damaged or blunt blade affects the functionality of the lawn mower.
Maintenance and storage
- Failure to follow the maintenance instructions can result in the risk of personal injury.
• Make sure that all the screw unions are properly tightened to keep the lawn mower in safe condition.
• Never store the lawn mower with fuel in the tank in areas with sources of heat. - Dispose of old fuel in accordance with local regulations.
- Allow the engine to cool before putting the lawn mower away.
- Keep the engine, muffler, battery compartment and area where fuel is stored free from grease, grass, moss, and leaves, etc. – fire risk.
• Regularly check the grass catcher, the mulch plug and side ejector, for wear and damage. - Replace damaged or worn parts.
• If the tank needs emptying, do this outside. - Do not empty the fuel tank in an enclosed area, or near naked flame or other source of heat. Do not smoke.
- Petrol and petrol fumes are highly flammable and can in some situations be explosive.
• Repairs that are not carried out correctly can result in the risk of fatal or serious
personal injury and/or damage to the environment.
• Never use petrol or flammable solvents to clean the filter.
- If blades or screws are worn or damaged, always replace the complete set to avoid imbalance.
• Always use original spare parts when replacing blades, fasteners and bolts. For reasons of safety blades should only be sharpened and fitted by an authorised service representative or other qualified personnel.
• Wear safety gloves when handling blades.
Intended use
• The lawn mower is intended for mowing lawns.
- The lawn mower must only be used as it is intended to be used and in accordance with these instructions. The manufacturer is not liable for any personal injury or damage to equipment resulting from incorrect use. The full responsibility for any such personal injury or material damage rests on the user.
• Recycle the packaging in accordance with local regulations.
- Two persons are needed to lift the lawn mower out of the packaging. Make sure there is enough space to put down the lawn mower. Stand firmly with your feet apart, bend your knees and keep your back straight when lifting.
SYMBOLS
| WARNING: Read all the instructions carefully before use, to minimise the risk of personal injury. | |
| Risk of personal injury as a result of ejected parts. Keep at a safe distance. | |
| Blades are sharp. Release the spark plug lead before maintenance/cleaning. | |
| Never refuel when the engine is running. | |
| Risk of personal injury. Never open or remove safety devices when the engine is running. | |
| Wear safety glasses and ear protection. | |
| Hot surfaces – risk of burn injuries. | |
| WARNING: Exhaust fumes from the engine contain carbon monoxide, an odourless and highly dangerous gas – risk of serious personal injury and/or death.Never start or run the engine indoors or in an enclosed area. | |
| Guaranteed sound power level |
TECHNICAL DATA
| Displacement 159 cm3 | |
| Output 2.1 kW | |
| Engine speed 2900 min-1 | |
| Catcher 60 l | |
| Mowing width 51 cm | |
| Mowing height 25-75 mm | |
| Ignition | TCI |
| Fuel tank 1 l | |
| Fuel unleaded petrol | |
| Oil volume 0.55 l | |
| Engine oil SAE30 | |
| Spark plug type QJ19LM (Champion) | |
| Net weight 33.4 kg | |
| Sound pressure level, LpA | |
| 84 dB(A), K=3 dB | |
| Measured sound power level, LwA | |
| 97 dB(A), K=3 dB | |
| Guaranteed sound power level, LwA | |
| 98 dB(A), K=3 dB | |
| Vibration level | |
| 6.1 m/s2, K=1.5 m/s2 | |
Always wear ear protection.
DESCRIPTION
- Engine control lever
- Drive lever
- Top handle
- Ejector opening
- Eccentric latch
- Bottomhandle
- Fuel cap
- Spark plug cap
- Air filter cover
- Primer bulb
- Front wheel
- Oil filler plug
- Chassis
- Lever to adjust mowing height
- Back wheel
- Grass catcher
- Wire clamp
- Guide for starter cord
- Starter handle
FIG. 1
ASSEMBLY
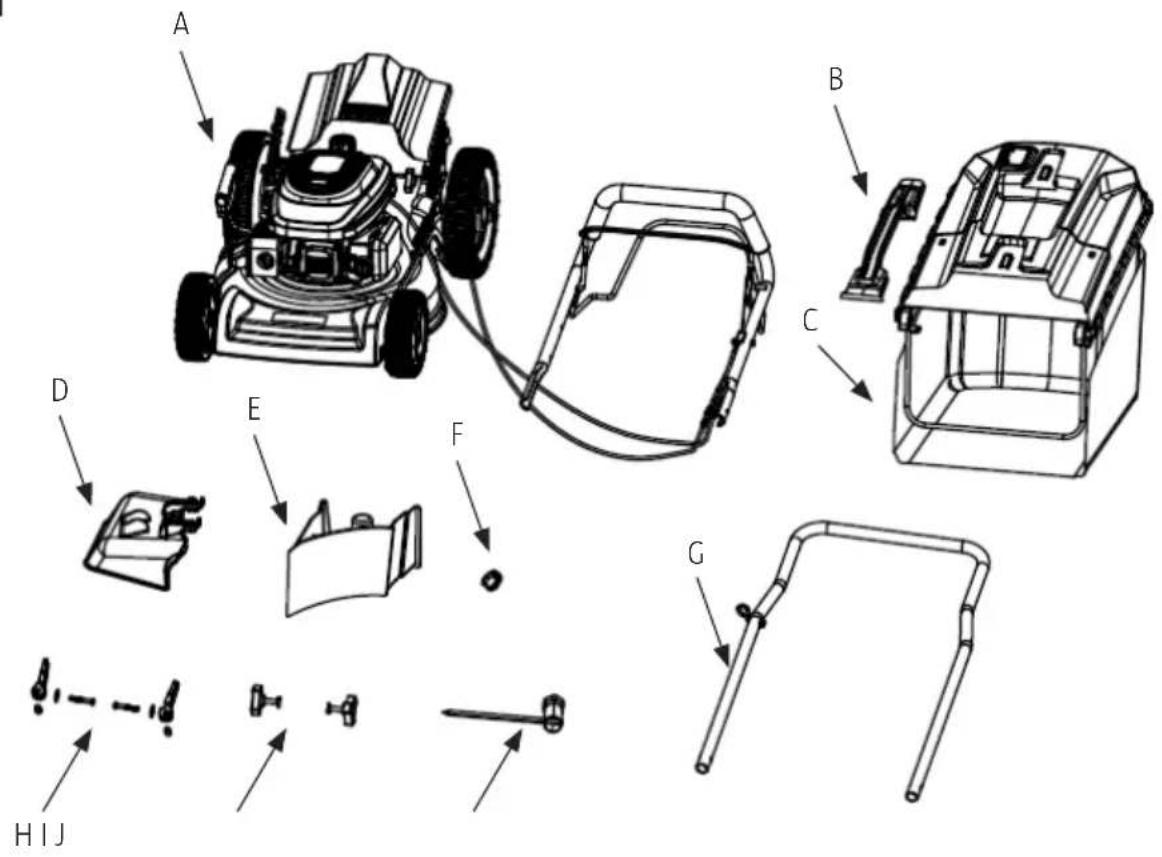
PARTS
A. Deck with top handle
B. Handle for catcher
C. Grass catcher
D. Side ejector
E. Mulch plug
F. Wire clamp x 2
G. Bottom handle
H. Eccentric latch x 2
1. Wing nuts M8 x 2 and screws x 2
J. Spark plug spanner
FIG. 2
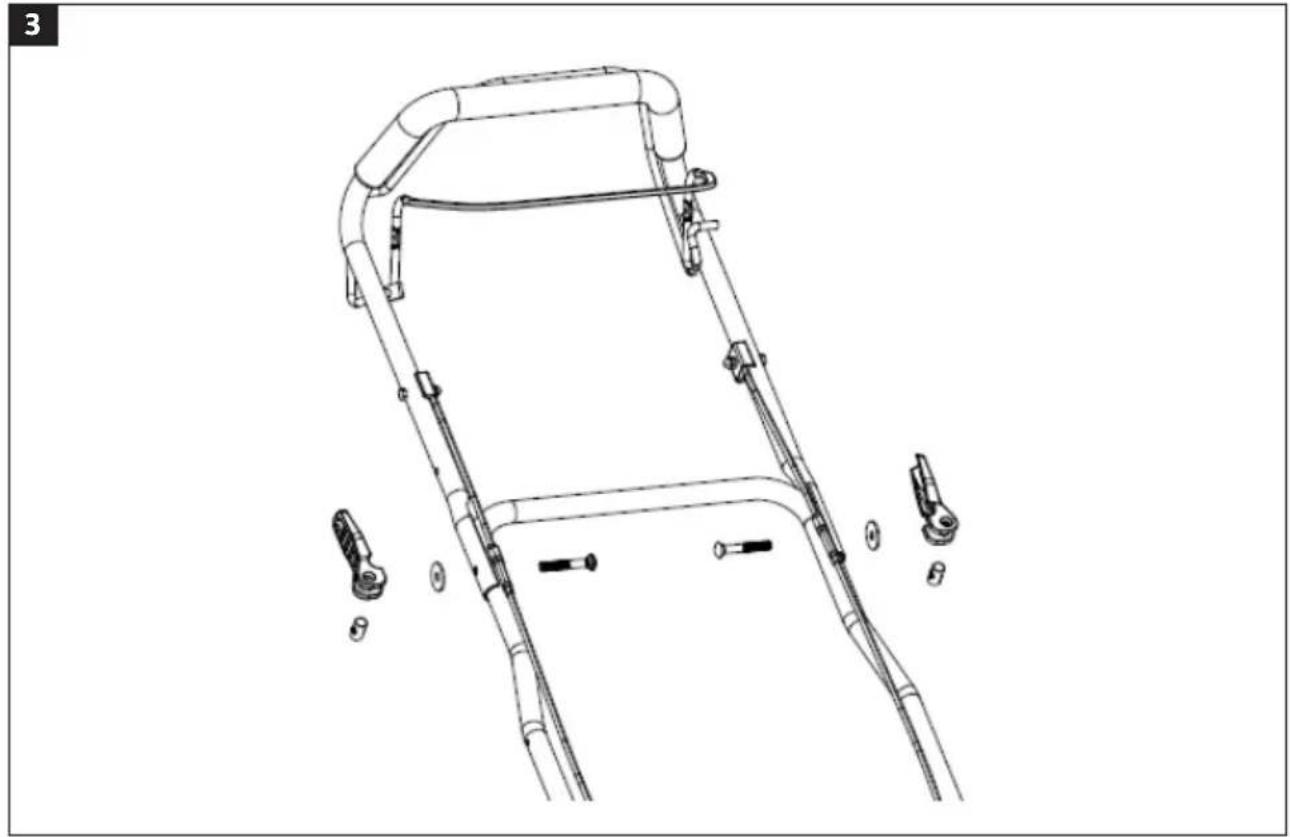
HANDLE
- Set the lever to adjust the mowing height in the lowest position and fit the bottom handle firmly on the mower deck with the M8 wing nuts and screws. Check that the guide for the starter cord is on the right side of the handle, seen from behind the lawn mower.
- Fold out the top handle and lock in place by tightening the eccentric latch.
- Check that the top and bottom handle fit firmly together.
FIG. 3
-
Fasten the wire to the engine lever in the wire clamp.
-
Hold the starter handle and carefully pull out the starter cord so that the handle just goes past the guide. Hook the starter handle in the guide.
GRASS CATCHER
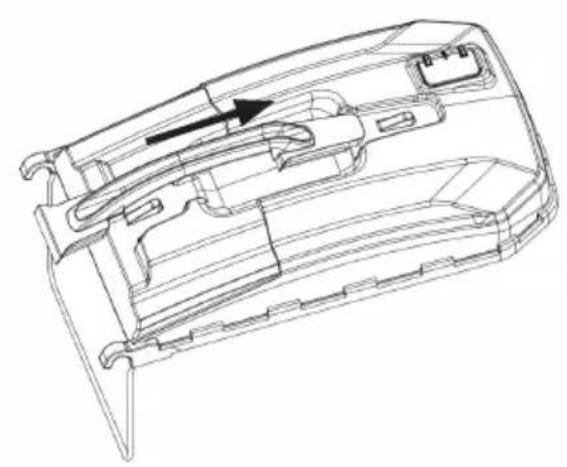
- Put the top handle through the slot in the top part of the grass catcher
- Fasten the catcher net's rubber mouldings in the top part.
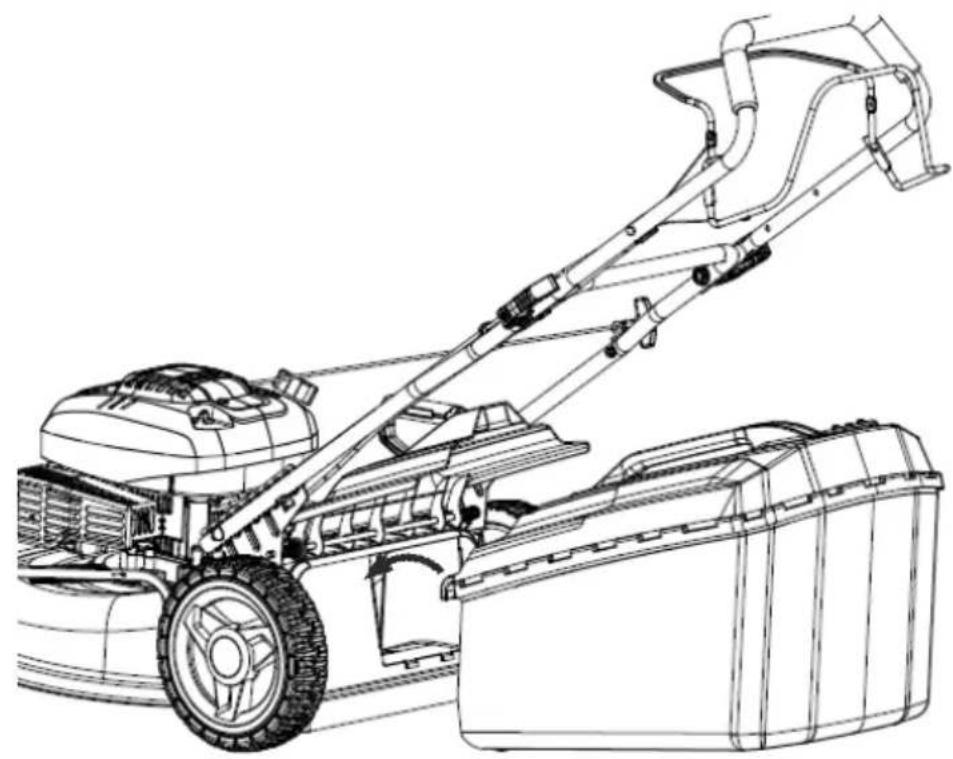
FIG. 4
- Lift up the guard, take out the mulch plug and hook the grass catcher on the lawn mower. The side ejector is not fitted when using the grass catcher.
FIG. 5
- Release the guard.
MULCH PLUG
- Lift up the guard.
- Press both pins in the holes so that the mulch plug snaps in place.
FIG. 6
- Release the guard so that it drops down and covers the mulch plug.
SIDE EJECTOR
- Lift up the side guard with one hand and hook the side ejector on the grass catcher with the other. Check that both the hooks have hooked on properly.
FIG. 7
- Release the side guard.
USE
ENGINE OIL
NOTE:
Do not screw in the dipstick when checking the level – just insert it up to the thread.
Check the oil level
-
Place the lawn mower on a level surface with the engine switched off.
-
Unscrew the oil filler plug and wipe the dipstick.
FIG. 8
-
Replace the filler plug with the dipstick, without screwing it in.
-
Remove the dipstick again and check the oil level. The oil level should be between the Max and Min marks.
Fill up with oil
-
Top up with oil if the oil level is near or below the Min mark on the dipstick.
-
Top up to the Max mark on the dipstick. Do not overfill. Wipe off any spilled oil.
-
Replace the oil filler plug.
FUEL
NOTE:
- Petrol is a perishable product. Do not buy more petrol than you can use in 30 days. Do not mix oil in the petrol.
-
Do not fill more than to the bottom edge of the filler pipe, so that the fuel can expand. Do not overfill the tank.
-
Clean the area around the fuel filler cap before opening.
- Open the fuel filler cap and check the fuel level.
- Fill up with fuel if the level is too low. Avoid spilling fuel when filling. Do not overfill. The fuel must not come up the filler tube.
- Wipe up any spilled fuel before starting the engine.
- Replace and tighten the cap on the tank by hand.
ADJUSTING THE MOWING HEIGHT
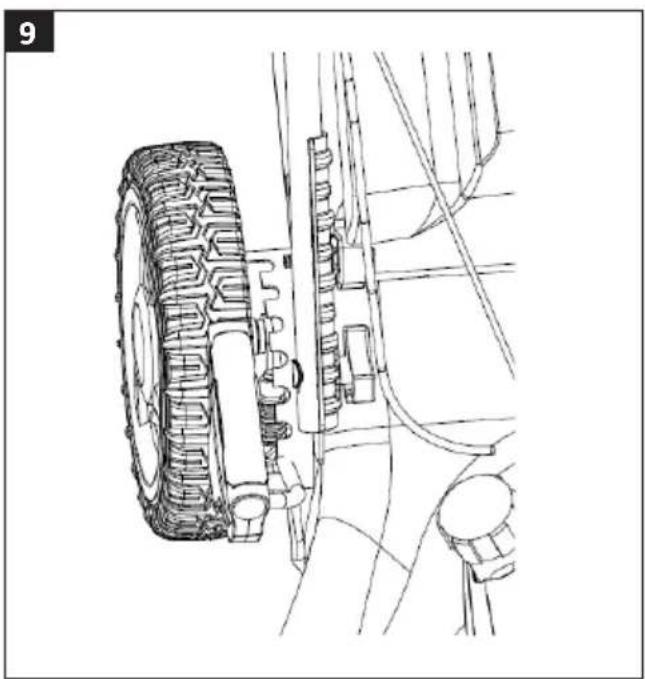
- Pull the lever towards the wheel and move it backwards or forwards to set the required mowing height.
- Release the lever to hook it in the required position.
FIG. 9
LAWN MOWING
NOTE:
- Always use the lowest mowing height setting when mowing for the first time at the start of the season, or when the grass is very dry. Do not mow more than 1/3 of the height of the grass.
- If cuttings come onto the lawn behind the lawn mower the side ejector may be blocked, the grass catcher could be full, or the underside of the mower deck could be blocked.
Starting
NOTE:
- Before starting the engine, manoeuvre the engine lever several times to check the wire moves easily.
- Check before starting that the blade is correctly and securely fitted.
- Check that the spark plug lead is connected to the spark plug, that the oil level is correct, and that there is petrol in the fuel tank.
- Set the required mowing height.
- When starting a cold engine or if the engine stops due to lack of fuel, press the primer bulb 3-5 times. It is not necessary to use the primer bulb if the engine is warm.
- Press the engine control lever towards the top handle.
FIG. 10
- Stand behind lawn mower. To start the engine, pull the starter cord slowly until it catches (about 10–15 cm) and then pull quickly. If the engine has not started after three attempts, repeat the process from the beginning.
- Let the starter handle return to its original position slowly when the engine has started.
- Press the drive lever against the handle to start mowing.
FIG. 11
- Hold the top handle, the engine control lever and the drive lever in a firm grip and follow after the lawn mower when it starts to move forward.
Stopping
- Release the engine control lever. Check that the engine stops when the lever is released.
EMPTYING THE GRASS CATCHER
- Lift up the ejector flap with one hand, grip the grass catcher handle with the other, and lift out the grass catcher. When the grass catcher is removed the ejector flap falls down and covers the mulch plug.
- Empty the grass catcher and replace.
MAINTENANCE
- Clean the lawn mower after use, especially the underside of the mower deck and blade mounting.
- Clean the ejector to remove any residual grass.
- Clean the engine's cooling fins and the casing.
- Clean under the drive mechanism cover at least twice per season. Scrape off accumulated grass and scrape under the cover with a spatula or the equivalent. Before cleaning the drive mechanism cover, empty the fuel tank and lay the lawn mower on the opposite side from the oil filler plug. Do not tilt the lawn mower more than 90°.
CHANGING THE ENGINE OIL
NOTE:
- Change the engine oil after the first 5 working hours.
- The oil should be at room temperature when changing.
-
Change the oil when the engine is warm.
-
Undo the oil filler plug.
- Use an oil change pump and suck up the old oil from the oil tank.
- Refill with new oil with the help of a funnel to the Max mark on the dipstick. Do not overfill. Wipe off any spilled oil.
- Screw in the oil filler plug.
REPLACING/CLEANING THE SPARK PLUG
- Remove the spark plug cap.
- Undo the spark plug with a spark plug spanner.
- Screw it out by hand.
- Clean the spark plug electrode with a
brass brush, or replace.
- Adjust electrode gap to 0.7-0.8 mm by using a feeler gauge.
- Carefully screw back the spark plug by hand. When it seats, tighten with the spark plug spanner.
FIG. 12
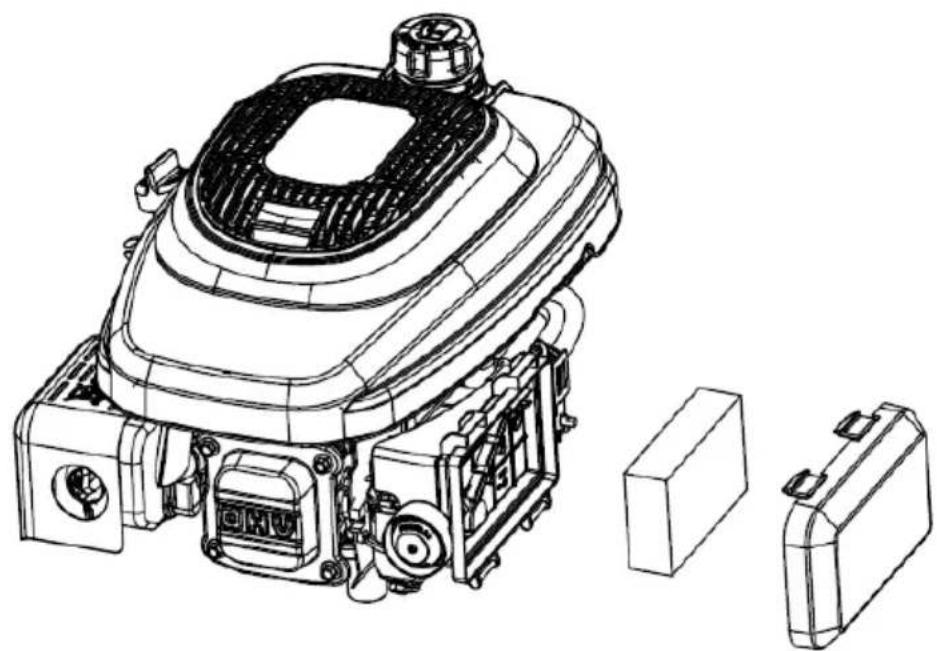
REPLACING/CLEANING THE AIR FILTER
- The engine will not work properly if the air filter is blocked because of the reduction in the supply of air.
- Clean the air filter more often if there is a lot of dust in the air.
-
Replace the filter if it is very dirty.
-
Remove the air filter cover and take out the air filter.
- Wash the air filter carefully with hot water and a mild detergent. Rinse the air filter with clean water and allow to dry.
- Refit the clean air filter, or a new one.
- Refit the air filter cover.
FIG. 13
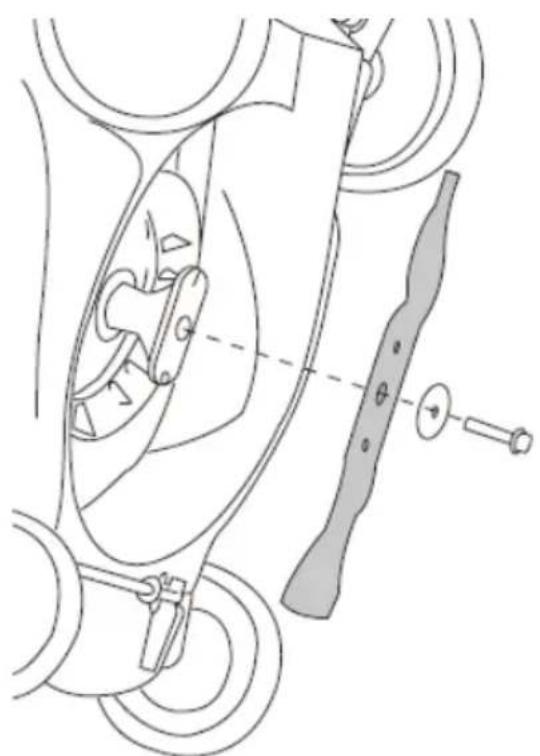
REPLACING THE BLADE
NOTE:
- Replace the blade after 50 working hours or 2 years (which ever comes first) regardless of its condition.
-
Tilt the lawn mower on its side towards the oil filler. Do not turn the lawn mower upside down.
-
Hold the blade and undo the hex screw anticlockwise with a 16 mm spanner. Remove the washer and blade.
-
Fit a new or sharpened blade on the two taps on the mounting flange, and lock in place with the washer and screw. The curvature on the blade should face the engine.
-
Check that the blade is correctly positioned and tighten the screw to 45–50 Nm. Do not overtighten.
FIG. 14
MAINTENANCE SCHEDULE
| Working hours | Air filter Spark plug Engine oil | ||
| 12 Clean Check Check | |||
| 24 Clean Clean Replace | |||
| 36 Replace Replace check | |||
STORAGE
SHORT-TERM STORAGE
No special preparations are required for storage less than 2 weeks.
- Allow the engine to completely cool.
- Empty the grass catcher.
- Clean the lawn mower in accordance with the instructions.
- Store the lawn mower upright on a level surface.
- Store the lawn mower out of the reach of children and unauthorised persons in a well ventilated area.
LONG-TERM STORAGE
- The following preparations are required for storage more than 2 weeks.
-
Failure to follow these instructions can make it difficult to start the lawn mower after storage and may result in extra service.
-
Empty the tank with a fuel pump, if possible.
- Run the engine until the fuel tank is empty and the engine stops due to lack of fuel.
- Change the oil at the end of every season
(see section Changing the engine oil).
-
Remove the spark plug. Pour 20 ml of clean engine oil into the cylinder through the spark plug hole. Pull the starter cord slowly several times to distribute the oil in the engine. Replace the spark plug.
-
Clean the lawn mower in accordance with the instructions.
-
Store the lawn mower out of the reach of children and unauthorised persons in a well ventilated area.
TRANSPORT
- Empty the tank with a fuel pump, if possible, or run the engine until the fuel tank is empty and the engine stops due to lack of fuel.
- Remove the cap from the spark plug.
- Empty the oil tank when the engine is warm (see section Changing the engine oil).
- If possible, transport the lawn mower in its original pack.
TROUBLESHOOTING
| Problem Cause Action | ||
| The lawn mower is noisy and vibrates excessively. | Loose screw unions. Check screw unions and tighten if necessary. | |
| The blade retainer screws are loose. Check blade retainer screws and tighten if necessary. | ||
| The blades are unbalanced. Allow an authorised service centre to replace blade set. | ||
| The engine will not start. | Defective spark plug. Replace spark plug. | |
| The engine control lever is not pressed against the handle. | Press the engine control lever against the handle. | |
| The primer bulb is empty. Press the primer pump 3–5 times. | ||
| The blades are worn or damaged. Allow an authorised service centre to replace blade set. | ||
| Fuel tank is empty. Fill up with fuel. | ||
| Engine is flooded. Remove, wipe and replace the spark plug. | ||
| The engine does not run smoothly. | The air filter is dirty. Clean the air filter. | |
| The spark plug is dirty. Clean the spark plug. | ||
| Uneven mowing. The blades are blunt. Sharpen all the blades. | ||
| Mowing height too low. | Set a suitable mowing height. | |
| Not all the grass goes into the catcher. | The blades are worn. | Allow an authorised service centre to replace blade set. |
| The grass catcher is full. | Empty the catcher. | |
| Unsuitable mowing height. | Set a suitable mowing height. | |
| The grass is wet. | Wait until the lawn dries. | |
| The ejector opening or flap is blocked. | Clean the ejector opening/flap. | |
| The underside of the mower deck is clogged up. | Clean the underside of the mower deck. | |
CE
EC DECLARATION OF CONFORMITY
EG FÖRSÄKRAN OM ÖVERENSSTÄMMELSE
EF SAMSVARSERKLÆRING
DEKLARACJA ZGODNOŚCI WE

Jula AB, Box 363, SE-532 24 SKARA, SWEDEN
certify that the design and manufacturing of this product
Machinery Directive 2006/42/EC
EN ISO 5395-1:2013, EN 5395-2:2013
Electromagnetic Compatibility Directive 2014/30/EU
EN ISO 14982:2009
Outdoor Noise Directive 2000/14/EC, amended by 2005/88/EC
Intertek Testing & Certification Ltd.
Davy Avenue, Knowlhill, Milton Keynes. MKB 8NL
NB0359
This product was CE marked in year -16
Name and address of the person authorised to compile the technical file:
- SE GRÄSKLIPPARE
- SÄKERHETSANVISNINGAR
- T∅MMING AV GRESSOPPSAMLEREN
- Before use
- Use
- Maintenance and storage
- Intended use
- DESCRIPTION
- ASSEMBLY
- PARTS
- HANDLE
- 3
- GRASS CATCHER
- 4
- 5
- MULCH PLUG
- 6
- SIDE EJECTOR
- 7
- ENGINE OIL
- NOTE:
- Check the oil level
- 8
- Fill up with oil
- FUEL
- ADJUSTING THE MOWING HEIGHT
- 9
- LAWN MOWING
- Starting
- 10
- 11
- Stopping
- EMPTYING THE GRASS CATCHER
- MAINTENANCE
- CHANGING THE ENGINE OIL
- REPLACING/CLEANING THE SPARK PLUG
- 12
- REPLACING/CLEANING THE AIR FILTER
- 13
- REPLACING THE BLADE
- 14
- STORAGE
- SHORT-TERM STORAGE
- LONG-TERM STORAGE
- TRANSPORT
- CE
- EC DECLARATION OF CONFORMITY
- EG FÖRSÄKRAN OM ÖVERENSSTÄMMELSE
- EF SAMSVARSERKLÆRING
- DEKLARACJA ZGODNOŚCI WE
Brand : Meec Tools
Model : 001-180
Category : Lawn mower