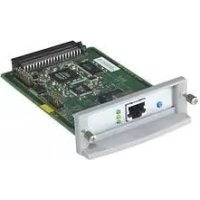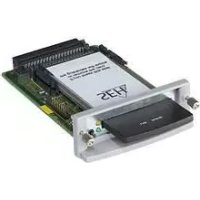
myUTN-130 - Print Server SEH - Free user manual and instructions
Find the device manual for free myUTN-130 SEH in PDF.


| Product Type | Print Server |
| Brand | SEH |
| Model | myUTN-130 |
| Dimensions (approx) | 100 x 60 x 25 mm |
| Weight (approx) | 100 g |
| Power Supply | USB bus-powered or 5V DC adapter |
| Network Interface | Ethernet 10/100 Mbps |
| Printer Interface | USB 2.0 Type B |
| Supported Protocols | TCP/IP, IPP, LPR, SMB |
| Supported OS | Windows, macOS, Linux |
| Functions | Network print sharing, printer sharing |
| Management | Web-based interface, SNMP |
| Security | IP filtering, password protection |
| Maintenance | Keep in dry place, clean with soft cloth |
| Spare Parts | Power adapter available separately |
| Repairability | No user-serviceable parts |
| Certifications | CE, FCC |
Frequently Asked Questions - myUTN-130 SEH
User questions about myUTN-130 SEH
0 question about this device. Answer the ones you know or ask your own.
Ask a new question about this device
Download the instructions for your Print Server in PDF format for free! Find your manual myUTN-130 - SEH and take your electronic device back in hand. On this page are published all the documents necessary for the use of your device. myUTN-130 by SEH.
USER MANUAL myUTN-130 SEH
natural_image
Blue industrial device labeled 'SEH 130' with no visible text or symbols beyond brandingUTN Scannerserver
myUTN-130
Quick Installation Guide
Overview [en]
This Quick Installation Guide provides a description of the installation of the myUTN-130. It contains the following information:
![SEH myUTN-130 - Overview [en] - 1](/content/2026/05/758976/images/5a98744de953e957e01cba6d9fcf6a9636baf35a89c643e74b74ee2e7a19f3bf.jpg)
General Information
![SEH myUTN-130 - Overview [en] - 2](/content/2026/05/758976/images/0953cbcac8e668ad0de68374beb6cb402e4f2e373b83e288f511a9a5b8c0e9a9.jpg)
Safety Regulations
![SEH myUTN-130 - Overview [en] - 3](/content/2026/05/758976/images/e1a02694fa74fb84be88f7e200e3b2f884c9e360dccfe992d2e92d3afd1dc658.jpg)
Hardware Installation
![SEH myUTN-130 - Overview [en] - 4](/content/2026/05/758976/images/6509d2364ad7d279c468c30dda3ffc8abf5ada0bc2138f1a55e52961e4335ba3.jpg)
Software Installation
![SEH myUTN-130 - Overview [en] - 5](/content/2026/05/758976/images/9e911ec921c7b5f3db87b87b4cfb727bad0bdb68db7256d74bb25437d18ab344.jpg)
Getting Started
![SEH myUTN-130 - Overview [en] - 6](/content/2026/05/758976/images/825883c42b759d2ee0170b5f4f9f914833a359c0c45ee6fb54e61df119d9cc12.jpg)
Configuring the UTN server
Please note the table of contents on page 3. Should you have any further questions, please contact our support hotline.
Überblick [de]
8:00 a.m. to 4:45 p.m. and
Friday
The serial number includes the date of manufacture. The serial number can be found on the type plate.
![SEH myUTN-130 - Überblick [de] - 1](/content/2026/05/758976/images/f0106c7b2a044f49a28447d559f996c9986fb3989bc2d6a3bcdde0dd7e9080f5.jpg)
text_image
Product with type plate Serial number Year MonthGeneral Information 4
Purpose....4
Scope of Supply 4
Technical Data ....5
LED Display 6
Safety Regulations 7
Hardware Installation.... 8
Software Installation 9
Getting Started: SEH UTN Manager.... 10
Starting the SEH UTN Manager 11
Assigning an IP Address to the UTN Server 12
Adding the UTN Server to the Selection List.... 13
Connecting the USB Scanner to the Client 14
Configuring the UTN server 15
Purpose
The UTN server 'myUTN-130' allows you to access a non-network-ready USB scanner in the network. The USB scanner will be connected to the USB port of the myUTN-130. The access is controlled via the software tool 'SEH UTN Manager'.
The SEH UTN Manager is installed on all clients that are intended to access USB scanners in the network. The SEH UTN Manager shows the availability of all USB scanners in the network and establishes a connection between the client and the USB scanner.
The administration of the myUTN-130 is done via the 'myUTN Control Center'.
Scope of Supply
Please check the package content before getting started:
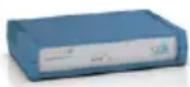
UTN server myUTN-130 (Scannerserver)
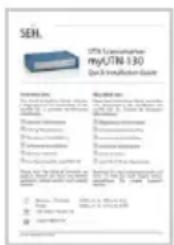
text_image
Product specification label for a SEHL 130 TPA capacitor, showing installation details and model information.Quick Installation Guide The Quick Installation Guide provides a brief description of the installation of the myUTN-130. (This document)
Power pack External power pack
Technical Data
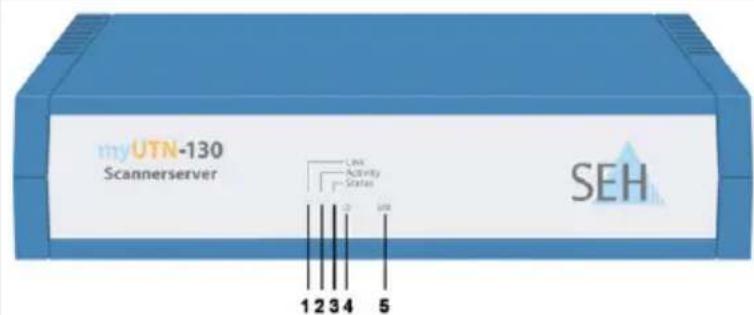
text_image
myUTN-130 Scannerserver Last Activity Status SEH 1 2 3 4 5Front view
1) Link LED (green)
2) Activity LED (yellow)
3) Status LED (green)
4) Power LED (yellow)
5) LED for the USB port (green/orange)
6) Network connector (RJ-45) for 1000BaseT, 100BaseTX and 10BaseT
7) USB port for the connection of a USB scanner
8) Status/reset button
9) Connector for the included power pack
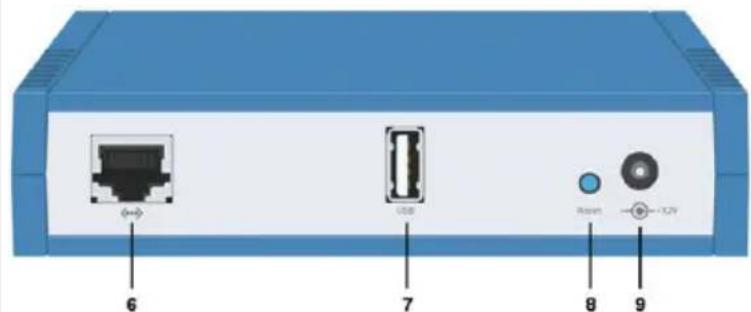
text_image
6 7 8 9 USB Reset -12VRear view
Properties Values
Network connection
logical: - 10BaseT/100BaseTX/1000BaseT (IEEE 802.3)
physical: - RJ-45 (S/UTP Cat. 5)
Device connection - 1 x USB scanner (via USB 2.0 HS)
Current input
- 300 mA @ 12 VDC (without load)
- 600 mA @ 12 VDC (with full load on the USB port)
Operating environment - Ambient temperature: 5 - 40 °C
- Relative humidity: 20 - 80 %
Dimensions - Width: 140 mm
- Height: 32 mm
- Depth: 99 mm
- Weight: 140 g
LED Display
The LEDs of the UTN server provide information about its status.
LED Action Color Description
| Link permanently on | green | Indicates an existing connection to the network. |
| permanently off | - | Indicates that there is no connection to the network. |
| Activity blinks at irregular intervals | yellow | Indicates the receipt of data packets. |
| Status permanently off | - | If the activity LED blinks periodically at the same time, the BIOS mode is signalized. |
| blinks 3 times | green | Indicates the assignment of a ZeroConfig IP address. |
| blinks 2 times | green | Indicates the assignment of an IP address that does not correspond to 0.0.0.0 or that comes from outside the ZeroConf range. |
| Power permanently on | yellow | Indicates that the device is powered. |
| permanently off | - | Indicates that the device is not powered. |
| USB port permanently off | - | No USB scanner is connected to the USB port. |
| permanently on | green | A USB scanner is connected to the USB port. |
| permanently on | orange | The USB scanner is connected to the USB port. |

Safety Regulations
UTN server are network devices for use in office environments. The myUTN-130 is designed for the integration of USB scanners into TCP/IP networks.

Before starting the initial setup procedure and during the operation of the UTN server, please note the following safety regulations. Their purpose is to protect yourself and others from personal injuries, and avoid damage to the equipment.
- Read the documentation and make sure that your system meets the requirements listed therein.
- Avoid contact with humidity or liquids.
- The device must only be connected and operated if it is in perfect condition.
◆ Make sure that no-one steps on or stumbles over the cables. - Do not connect a telephone cable to the RJ-45 connector. The RJ-45 connector may only be connected to SELV voltages. For the connection to the RJ-45 connector only S/UTP cabling (category 5 or better) may be used. The shielding must fit flushly to the connector.
- The device must only be operated using the power pack included in the package.
- Only use a certified USB cable (< 3 m) listed at www.usb.org.
- Do not open the housing. Do not put objects on top of the housing. The device must be placed on a solid surface with no vibration.

Hardware Installation
A USB scanner can be connected directly to the UTN server (myUTN-130).
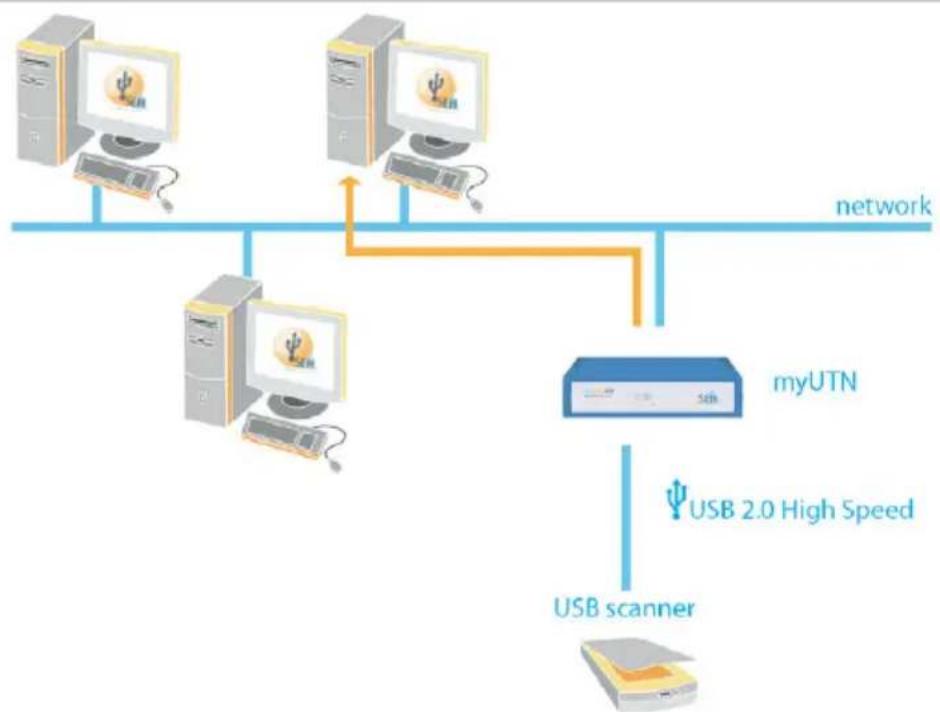
flowchart
graph TD
    A["Desktop Computer"] -->|USB 2.0 High Speed| B["USB scanner"]
    C["Desktop Computer"] -->|USB 2.0 High Speed| B
    D["Desktop Computer"] -->|USB 2.0 High Speed| B
    E["Desktop Computer"] -->|USB 2.0 High Speed| B
    B --> F["Network"]
    style A fill:#f9f,stroke:#333
    style C fill:#f9f,stroke:#333
    style D fill:#f9f,stroke:#333
    style E fill:#f9f,stroke:#333
    style F fill:#ccf,stroke:#333
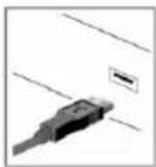

Proceed as follows:
- Connect the UTN server and the USB scanner with the USB data cable.
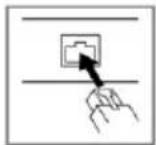
- Connect the network cable (RJ-45) to the UTN server.
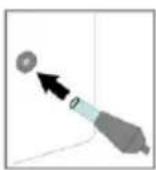
- Connect the power cord to the UTN server.
The software tool SEH UTN Manager organizes the access of the USB scanner. The SEH UTN Manager is installed on all clients that are intended to access USB scanners in the network.
The SEH UTN Manager is available in two versions:
◆ Single-User Version (SEH UTN Manager)
◆ Multi-User Version (SEH UTN Manager + SEH UTN Service)
A major difference between the single-user version and the multi-user version is the Windows service 'SEH UTN Service'. A detailed description can be found in the myUTN User Manual.

Make sure that:
- The installation of the SEH UTN Manager is suitable for Windows XP and later.
- The installation can only be carried out by Windows users with administrative rights.
First, you have to download the installation file for the SEH UTN Manager from the homepage of SEH Computertechnik GmbH:
http://www.seh-technology.com/products/usb-device-servers/products/myutn-130-downloads.html
text_image
QR code image containing encoded data, no visible human-readable textScan this QR code using your smart phone to get direct access to the homepage.

Proceed as follows:
- Start the installation file.
- Follow the installation routine.
The SEH UTN Manager is installed on your client.

Getting Started: SEH UTN Manager
After the SEH UTN Manager is started, the network will be scanned for connected UTN servers. The network range to be scanned is freely definable.
After the network scan all UTN servers found – together with the connected devices – will be shown in the 'network list'. The preferred devices will be selected and added to the 'selection list'. The devices in the selection list can be connected to the client.
This chapter describes the first steps with the program.
♦ 'Starting the SEH UTN Manager' → 11
♦ 'Assigning an IP Address to the UTN Server' → 12
♦ 'Adding the UTN Server to the Selection List' → 13
♦ 'Connecting the USB Scanner to the Client' → 14

Detailed information on how to use the SEH UTN Manager can be found in the Online Help. To start the Online Help, select Help – Online Help from the menu bar.
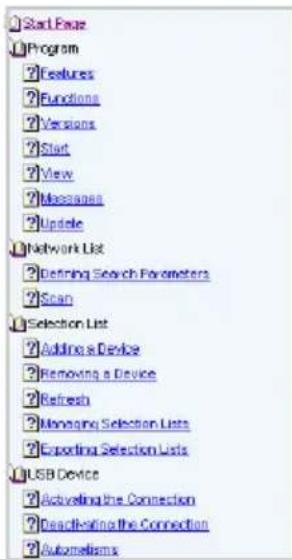
text_image
Start Frame Program Features Functions Versions Start View Messages Update Network List Defining Search Parameters Scan Selection List Adding a Device Removing a Device Refresh Managing Selection Lists Exporting Selection Lists USB Device Activating the Connection Deadleveling the Connection Automations
text_image
SEH UTN Manager SEH Online Help Version 1.6
Client and UTN server communicate via the UTN port 9200. This port must not be blocked by a firewall. If necessary, you can change the port number and/or use a secure UTN SSL port. A detailed description can be found in the myUTN User Manual.
Starting the SEH UTN Manager
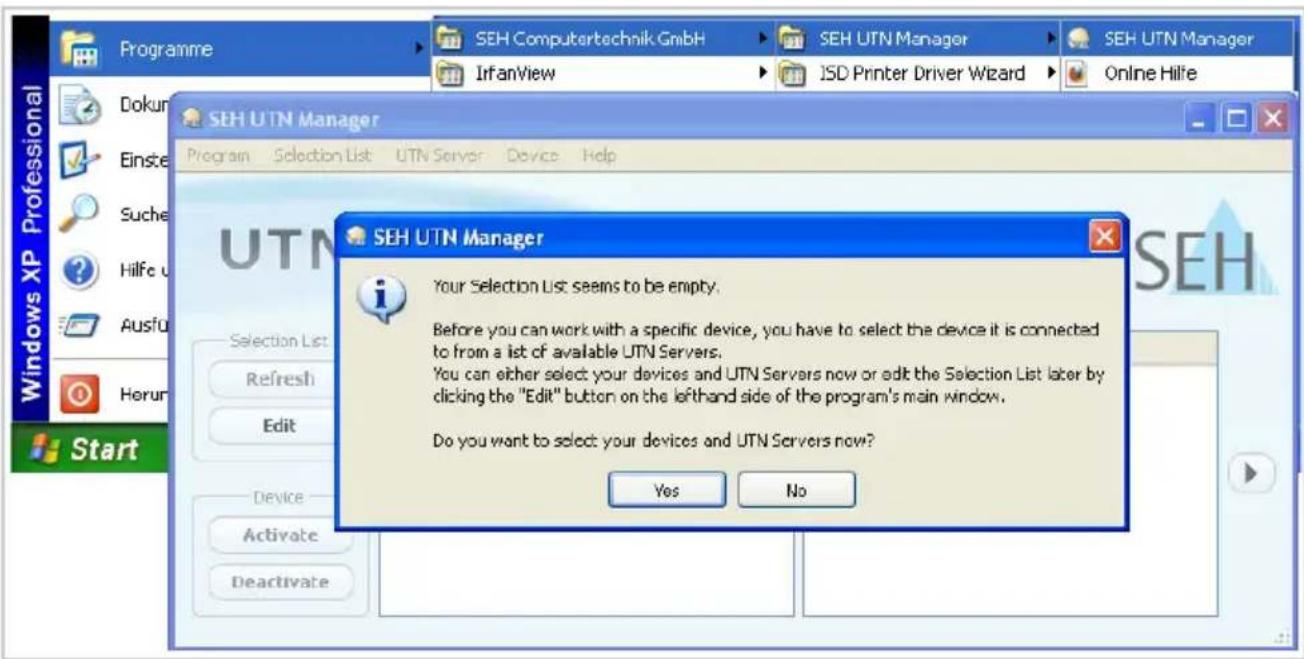
Start the SEH UTN Manager on your client via the Windows start menu. (Start --> Programs --> SEH Computertechnik GmbH --> SEH UTN Manager)
text_image
SEH UTN Manager Your Selection List seems to be empty. Before you can work with a specific device, you have to select the device it is connected to from a list of available UTN Servers. You can either select your devices and UTN Servers now or edit the Selection List later by clicking the "Edit" button on the lefthand side of the program's main window. Do you want to select your devices and UTN Servers now? Yes No
During the initial configuration, client and UTN server must be assigned to the same local network segment.
Assigning an IP Address to the UTN Server
Once the UTN server is connected to the network, it checks whether an IP address can be obtained from the boot protocols BOOTP or DHCP. If this is not the case, the UTN server assigns itself an IP address via ZeroConf from the address range (169.254.0.0/16) which is reserved for ZeroConf.
The UTN servers found by the program will be displayed in the network list. You can change the TCP/IP parameters of the UTN server.

Proceed as follows:
- Confirm the note dialog 'Your Selection List seems to be empty' by clicking Yes.
If no note dialog is available and the main dialog appears, select Selection List – Edit from the menu bar.
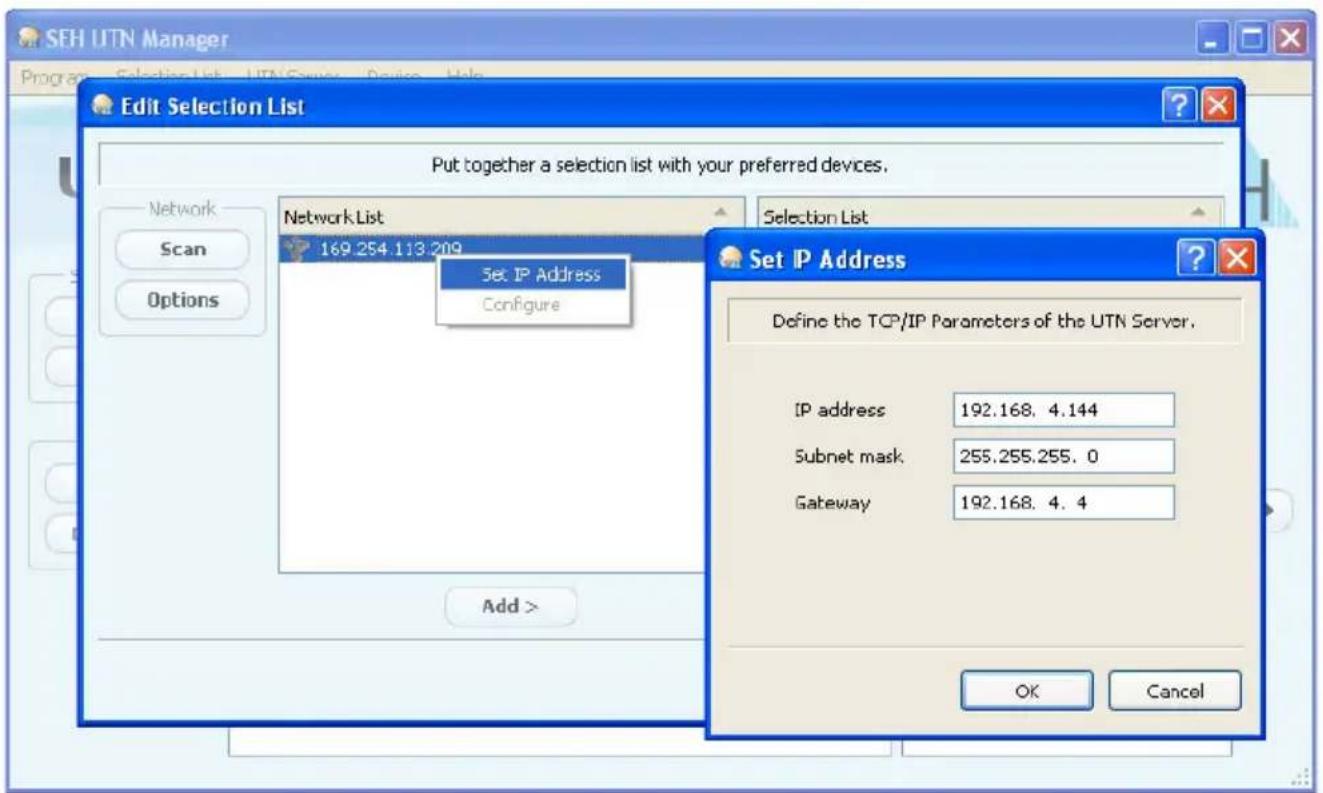
The Edit Selection List dialog appears.
- Select the UTN server from the network list.
- Select Set IP Address from the shortcut menu.
The Set IP Address dialog appears.
- Enter the relevant TCP/IP parameters.
- Click OK.
The settings are saved.
text_image
SEH UTN Manager Edit Selection List Put together a selection list with your preferred devices. Network List 169.254.113.209 Set IP Address Configure Network Scan Options Add > Selection List Set IP Address Define the TCP/IP Parameters of the UTN Server. IP address 192.168, 4.144 Subnet mask 255.255.255, 0 Gateway 192.168, 4, 4 OK CancelAdding the UTN Server to the Selection List
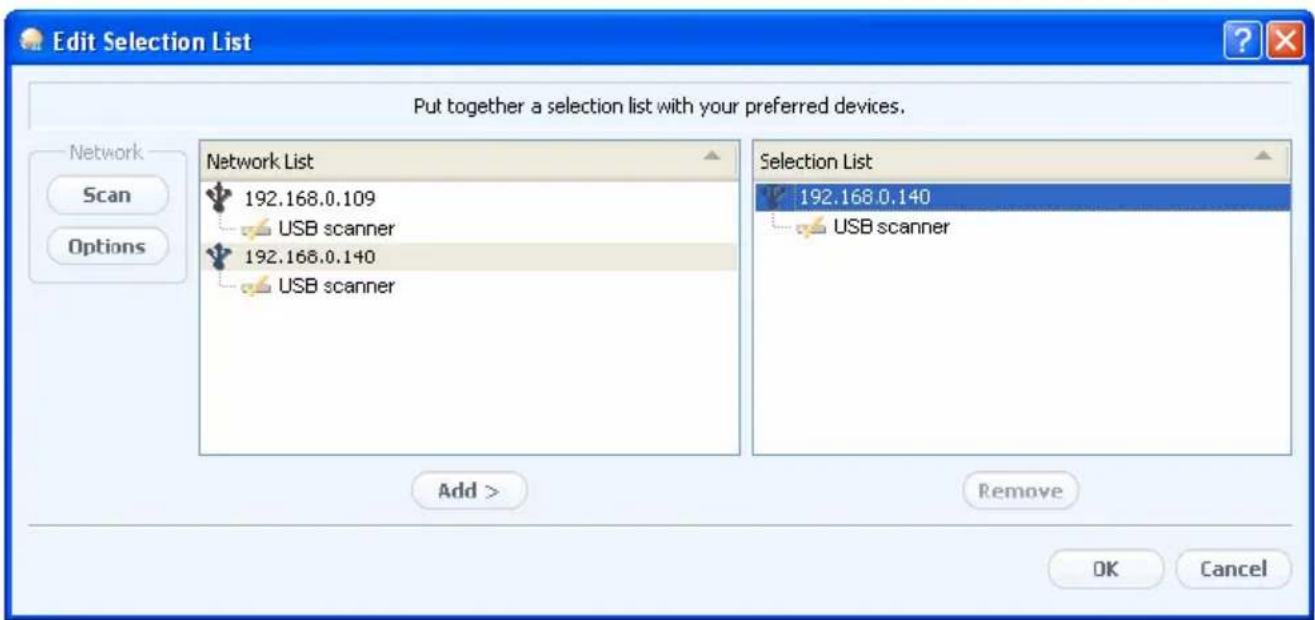
In order to connect a UTN server to a client, you must assign the UTN server to the selection list. Put together a selection list with your preferred UTN servers.

Proceed as follows:
- Select Selection List – Edit from the menu bar. The Edit Selection List dialog appears.
- Select the UTN server from the network list.
- Click Add.
- Click OK.
The UTN servers are shown in the selection list.
text_image
Edit Selection List Put together a selection list with your preferred devices. Network List 192.168.0.109 USB scanner 192.168.0.140 USB scanner Selection List 192.168.0.140 USB scanner Add > Remove OK Cancel
You can extend the search for UTN servers to any network range. To do this, change the search parameters for the network scan via the Options dialog in the Program menu.
Connecting the USB Scanner to the Client
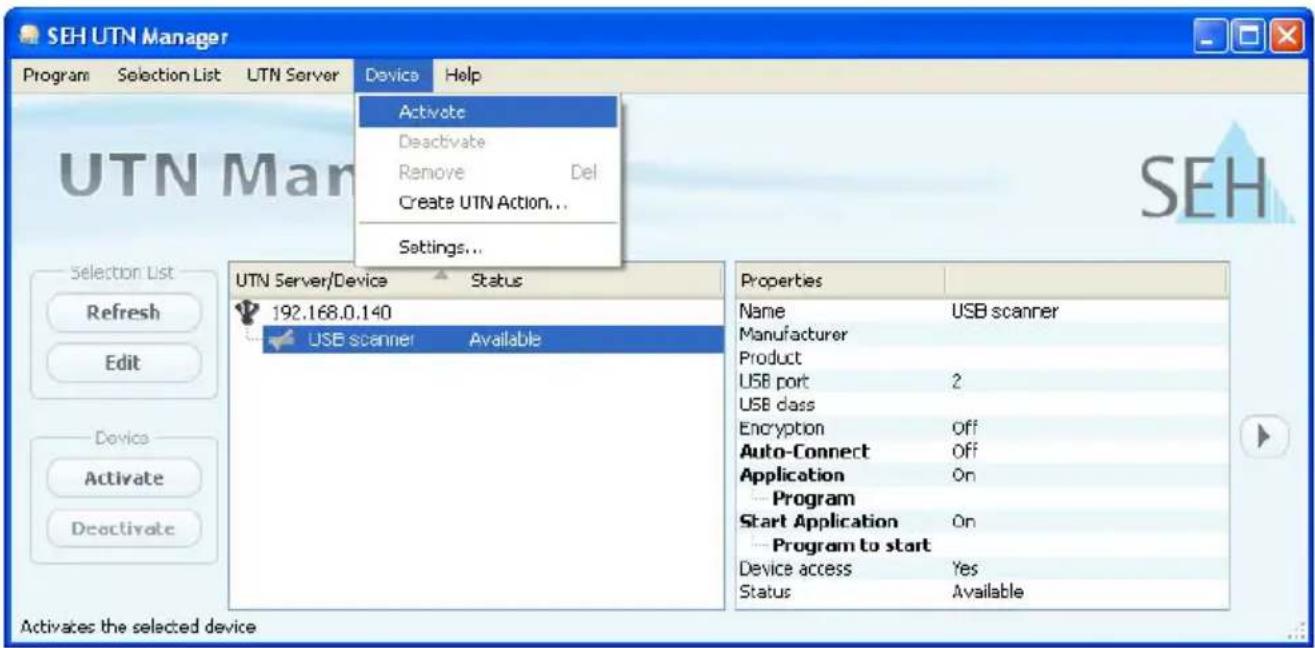
The USB scanners in the selection list can be connected to the client.

Make sure that:
- All provisions (driver installation, etc.) necessary to operate the device locally (i.e. connected directly to the client) have been met on the client. Ideally, the device has been connected and operated on the client locally according to the instructions of the manufacturer.
- The device is not connected to another client. A device that was made available by the UTN server can only be used by one network participant at a time.

Proceed as follows:
- Highlight the device in the selection list.
- Select Device - Activate from the menu bar.

The connection will be established.
text_image
SEH UTN Manager Program Selection List UTN Server Device Help Activate Deactivate Remove Del Create UTN Action... Settings... UTN Server/Device Status 192.168.0.140 USB scanner Available Properties Name USB scanner Manufacturer Product USB port 2 USB class Encryption Off Auto-Connect Off Application On Program Start Application On Program to start Device access Yes Status Available Selectn List Refresh Edit Device Activate Deactivate Activates the selected device
Close the connection to the device when the device is no longer needed. Select Device – Deactivate from the menu bar.
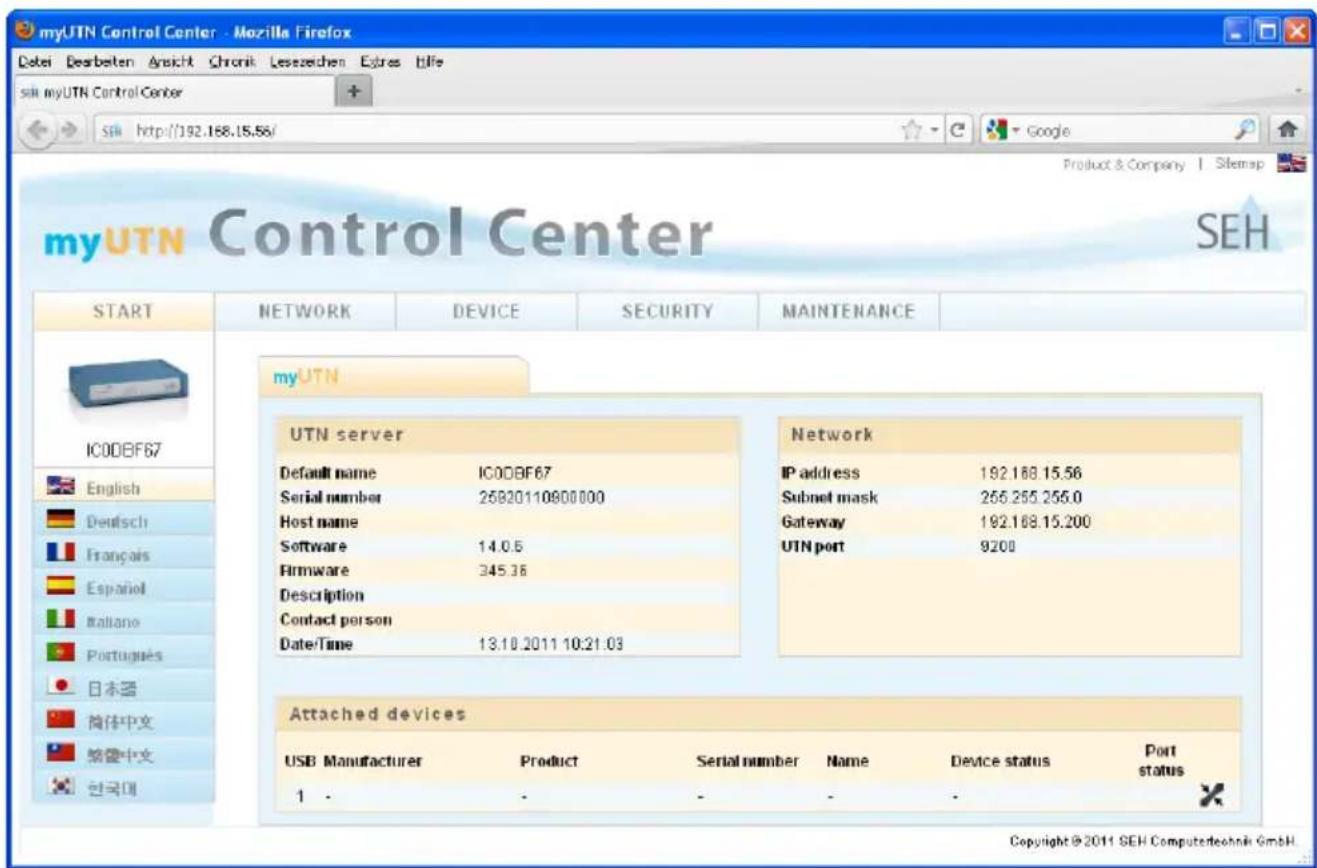
The UTN server can be configured and monitored via the myUTN Control Center. The myUTN Control Center is stored in the UTN server and can be launched by means of an Internet browser (Internet Explorer, Firefox, Safari).

Proceed as follows:
- Open your browser.
- Enter the IP address of the UTN server as the URL.

The myUTN Control Center will be displayed in the browser.
If the myUTN Control Center is not displayed, check the proxy settings of your browser.
text_image
myUTN Control Center - Mozilla Firefox Datei Desarbeiten Ansicht Chronik Leszeichen Extras Title Ssh myUTN Control Center http://192.168.15.56/ Product & Company | Slemap myUTN Control Center SEH START NETWORK DEVICE SECURITY MAINTENANCE myUTN Default name IC00BF67 Serial number 25820110800000 Host name Software 14.0.6 Firmware 345.36 Description Contact person Date/Time 13.10.2011 10:21:03 Network IP address 192.168.15.56 Subnet mask 255.255.255.0 Gateway 192.168.15.200 UTN port 9200 Attached devices USB Manufacturer Product Serial number Name Device status Port status 1 - - - - X Copyright © 2011 SEH Computedechnik GmbH.
Detailed information about the configuration of the UTN server can be found in the Online Help of the myUTN Control Center. To start the Online Help, click the '?' icon.
Allgemeine Information 18
Verwendungszweck 18
Lieferumfang.... 18
Technische Daten 19
LED-Anzeige 20
UTN-Server myUTN-130 (Scannerserver)
text_image
UTN Consumer myUTN 130 Durch Installation Guide SUPPORT SUPPORT Product Name: UTN 130 Product Type: PC/PC/PC Product Category: PC/PC/PC Product Support: PC/PC/PC Product Security: PC/PC/PC Product Protection: PC/PC/PC Product Quality: PC/PC/PC Product Quality: PC/PC/PC Product Quality: PC/PC/PC Product Quality: PC/PC/PC Product Quality: PC/PC/PC Product Quality: PC/PC/PC Product Quality: PC/PC/PC Product Quality: PC/PC/PC Product Quality: PC/PC/PC Product Quality: PC/PC/PC Product Quality: PC/PC/PC Product Quality: Product Quality: Product Quality: Product Quality: Product Quality: Product Quality: Product Quality: Product Quality: Product Quality: Product Quality: Product Quality: Product Quality: Product Quality: Product Quality: Product Quality: Product Quality: Product Quality: Product Quality: Product Quality: Product Quality: Product Quality: Product Quality: Product Quality: Product Quality: Product Quality: Product Quality: Product Quality: Product Quality: Product Quality: Product Quality: Product Quality: Product Quality: Product Quality: Product Quality: Product Quality: Product Quality: Product Quality: Product Quality: Product Quality: Product Quality: Product Quality: Product Quality: Product Quality: Product Quality: Product Quality: Product Quality: Product Quality: Product Quality: Product Quality: Product Quality: Product Quality: Product Quality: Product Quality: Product Quality: Product Quality: Product Quality: Product Quality: Product Quality: Product Quality: Product Quality: Product Quality: Product Quality: Product Quality: Product Quality: Product Quality: Product Quality: Product Quality: ProductQuality:◆ Single-User-Variante (SEH UTN Manager)
♦ Multi-User-Variante (SEH UTN Manager + SEH UTN Service)
text_image
QR code image containing encoded data, no visible human-readable textManufacturer's Addrees
Suedring 11
33647 Bielefeld
Germany
Phone ++49 (0) 521 - 94226-0

text_image
SEHEC – Declaration of Conformity
Herewith SEH Computertechnik GmbH declares that
Product:
Scannerserver
Type designation:
myUTN-130
Serial No.:
259 yyyy mm nnnnn (yyyy = year, mm = month, nnnnn = seq. no.)
is in conformity with the provisions of the
DIRECTIVE 2004/108/EC OF THE EUROPEAN PARLIAMENT AND OF THE COUNCIL OF DEC. 15, 2004
DIRECTIVE 2005/32/EC OF THE EUROPEAN PARLIAMENT AND OF THE COUNCIL of July 6, 2005
COMMISSION REGULATION (EC) No 278/2009 of April 6, 2009
Standards applied:
EN 55024:1998 +A1:2001 +A2:2003 and
EN 55022:2006 +A1:2007 Class A
EN 62301 First Edition
The named device is not intended primarily for use in domestic environments.
To meet the above specifications, the user has to comply with all instructions defined in the enclosed manual Quick Installation Guide.
Bielefeld, September 1, 2011
Dipl.-Ing. Rainer Ellerbrake, General Manager
Federal Communication Commission (FCC) Notice
The user has to comply with all instructions defined in this manual. It is not allowed to do product modifications not expressly approved by SEH.
Note:
This equipment has been tested and found to comply with the limits for a Class A digital device, pursuant to part 15 of the FCC Rules. These limits are designed to provide reasonable protection against harmful interference in a commercial environment.
This equipment generates, uses, and can radiate radio frequency energy and, if not installed and used in accordance with the instruction manual, may cause harmful interference to radio communications.
Operation of this equipment in a residential area is likely to cause harmful interference in which case the user will be required to correct the interference at his own expense.
Manufactured by:
text_image
QR code image containing encoded data, no visible human-readable textScan this QR code (meCard) using your smart phone.
Document:
Type: Quick Installation Guide
Title: myUTN-130
Version: 1.0
Order number: MHAB-QI-myUTN130
Online Links to important Internet Resources:
Support Contacts and Information:
Sales Contacts and Information:
Downloads:
http://www.seh-technology.com/support
http://www.seh-technology.com/sales
http://www.seh-technology.com/services/
downloads.html

All trademarks, registered trademarks, logos and product names are property of their respective owners.
This product uses 'Open Source Software'. For further information, please contact http://www.seh.de.
The product documentation gives you valuable information about your product.
Keep the documentation for further reference during the life cycle of the product.