
Gustito - Bread maker Eta - Free user manual and instructions
Find the device manual for free Gustito Eta in PDF.


| Brand | Eta |
| Model | Gustito |
| Product Type | Bread Maker |
| Weight | Approx. 6.5 kg |
| Number of Programs | 12 (Classic, Toast, Whole-Wheat, Quick, Sweet, Gluten-Free, Super Fast, Dough, Jam, Cake, Sandwich, Baking) |
| Loaf Sizes | 0.75 kg (1.5 lb) / 0.9 kg (2.0 lb) |
| Crust Color Settings | Light, Medium, Dark |
| Delayed Start Timer | Up to 13 hours (not available for program 6,7,9,12) |
| Keep Warm Function | 1 hour automatic after baking |
| Control Panel | Digital display with buttons: Menu, Color, Size, Time (+/-), Start/Stop |
| Display | Shows program number, remaining time, selected settings |
| Accessories Included | Baking pan, kneading blade, measuring spoon (5/15 ml), measuring cup (200 ml), hook remover |
| Safety Features | Overheat protection (shows HHH if too hot), automatic shut-off, pause function (10 min max) |
| Power Failure Memory | Retains settings for up to 10 minutes |
| Cleaning | Wipe exterior with damp cloth; wash pan and blade with mild detergent; do not immerse main unit |
| Material | Plastic housing, non-stick coated baking pan |
| Voltage & Power | As per product label (not specified in manual) |
Frequently Asked Questions - Gustito Eta
User questions about Gustito Eta
0 question about this device. Answer the ones you know or ask your own.
Ask a new question about this device
Download the instructions for your Bread maker in PDF format for free! Find your manual Gustito - Eta and take your electronic device back in hand. On this page are published all the documents necessary for the use of your device. Gustito by Eta.
USER MANUAL Gustito Eta
Electric bread maker • USER MANUAL

41-59
natural_image
White industrial air fryer with control panel and side buttons (no visible text or symbols)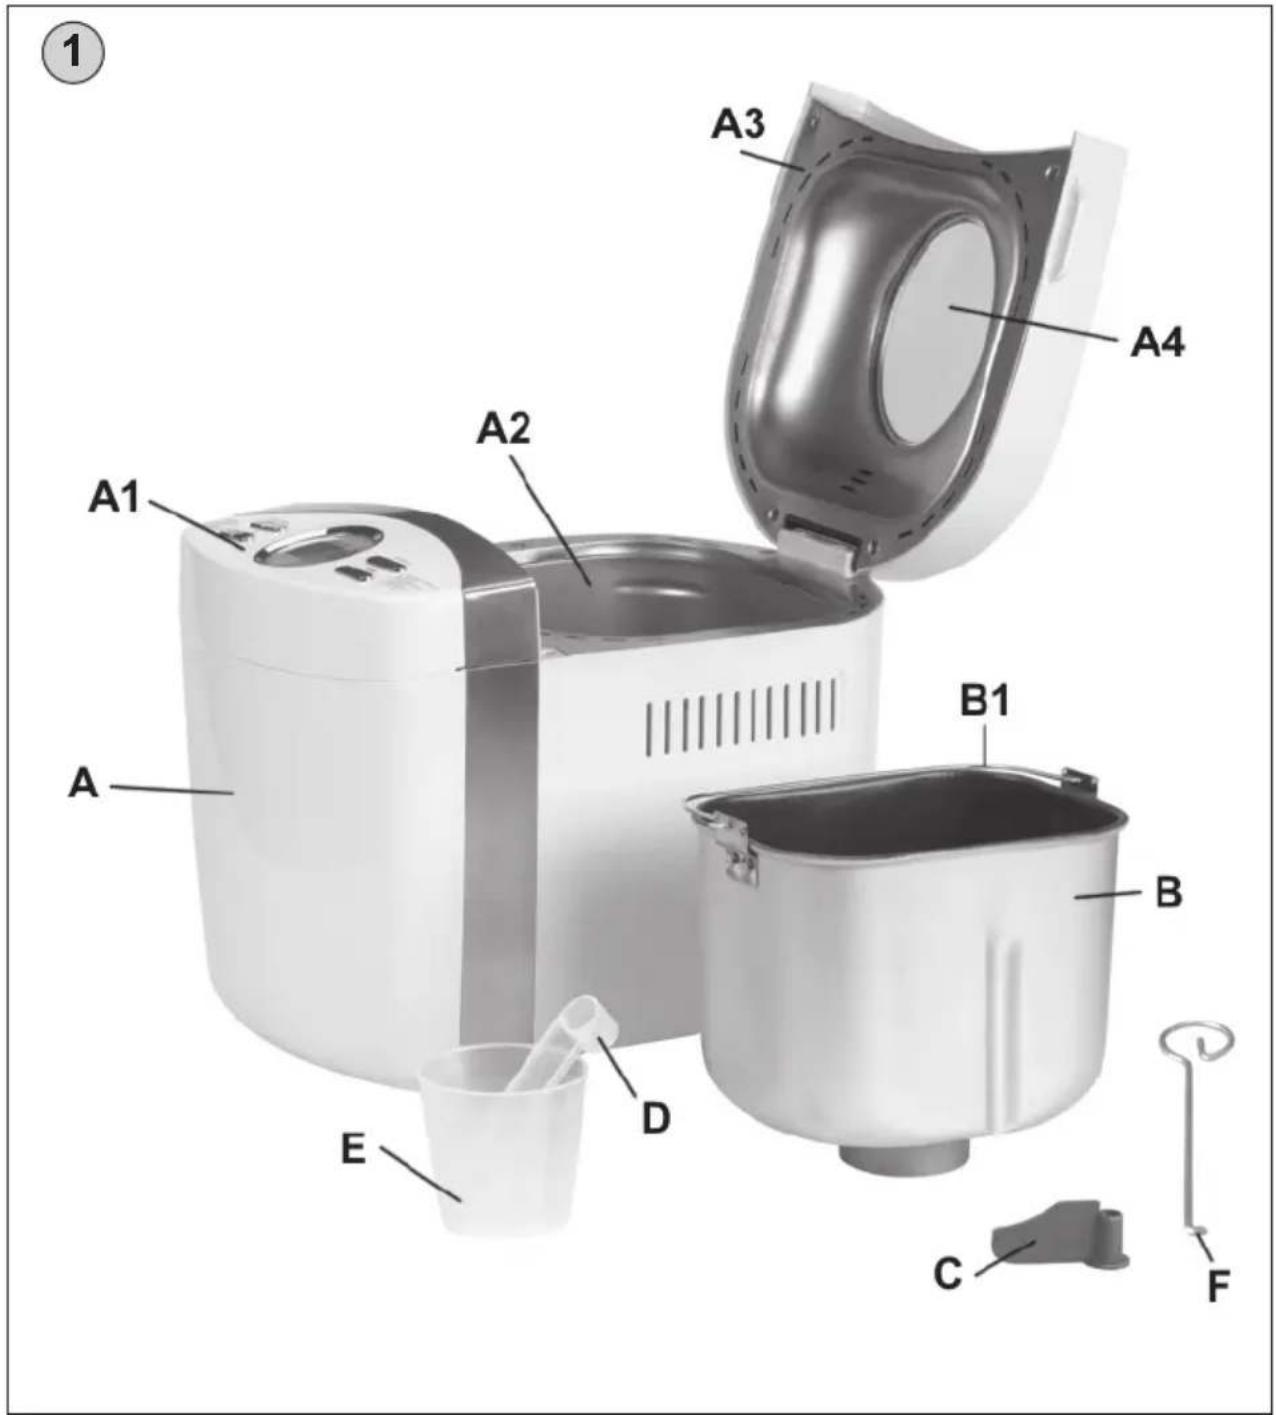
NÁVOD K OBSLUZE
CUKR A SLADIDLA (NAPŘ. MED, MELASA)
4. HMOTNOSTI A OBJEMY CHLEBA
KOL'KO JE DRUHOV MÚKY A AKO SA POUŽÍVAJÚ?
CUKOR A SLADIDLÁ (NAPR. MED, MELASA)
Dear customer, thank you for purchasing our product. Please read the operating instructions carefully before putting the appliance into operation and keep these instructions including the warranty, the receipt and, if possible, the box with the internal packing.
I. SAFETY PRECAUTIONS
- Before first use, please read this manual, look at the figures and keep it for further reference.
- Please check if product label data conforms to voltage of your plug socket.
- Do not operate any appliance with a damaged cord or plug or after the appliance malfunctions, or is dropped or damaged in any manner. Return appliance to manufacturer or the nearest authorized service agent for examination, repair or electrical or mechanical adjustment.
- Do not plug and unplug the electric socket plug with wet hands and do not pull the plug with the power cord!
- The appliance is intended for household and similar use only (production of food)! Not for commercial use!
- Do not use the bread maker outside!
- The appliance is not intended for individuals (including children) of which physical, sensory or mental disability or lack of experience and knowledge disallows safe use of the appliance if not under supervision or if not instructed on the use of the appliance by a person in charge of their safety. Children should be under supervision to avoid playing with the appliance.
- Do not use the appliance for heating of rooms!
- Do not place any objects onto the bread maker.
- Do not use the appliance with a program, timer or any other component which switches the appliance automatically as there is a risk of fire if the appliance is covered or incorrectly placed.
- We recommend checking the appliance when making a new recipe!
- Do not immerse the appliance fully or partially to water! Do not wash under running water!
- Do not turn the appliance on without the pan inserted.
- Suitable baking ingredients must be inside the appliance before connecting it to electric power socket. Heating of the appliance when dry may result in potential damage.
- Remove packaging from ingredients before use (e.g. paper, PE sack etc.).
- Use the appliance in a manner preventing any injury (e.g. burning, scalding). During use, hot steam escapes the ventilation slots and the appliance surface is hot.
– During use, avoid splashing water or any other liquid on the hot glass lid.
- Do not move the appliance when hot; potential tipping over may result in burning injury.
– If smoke generated by burning of ingredients escapes from the appliance, do not open the lid, turn the appliance off immediately and disconnect from power source.
- Do not use the appliance for purposes other than indented (e.g. drying of animals, fabric products, shoes etc.) by the manufacturer.
- Do not heat water in the appliance; calcic deposits and non-removable stains may occur on the pan. However, these stains are not dangerous and influence normal function of the appliance.
- Do not place the appliance onto unstable, fragile or flammable surfaces (e.g. glass, paper, plastic, wooden painted boards and various fabrics/tablecloths).
- Use the bread maker only on places without the risk of tipping over and at sufficient distance from flammable materials (e.g. curtains, drapes, wood etc.) and hot sources (e.g. oven, electric or gas stove) and moist surfaces (sinks, wash basins).
- It is not permissible to adjust the surface of the appliance in any way (e.g. by means of self-adhesive wall-paper, foil, etc.)!
- Use only original accessories made by the producer. Use of any other accessories may pose a danger to the operator.
- Never cover the space between the housing and the baking pan and do not insert any objects here (e.g. fingers, spoons etc.). The space between the housing and the baking pan must be free.
– Never cover the appliance in order to prevent internal fire hazard.
- When in use, do not touch edges of the pan and places with escaping steam; danger of burning and scalding.
– The bread maker conforms to fire safety requirements according to EN 60 335-2-6.
Pursuant to this standard, this is an appliance that may be operated on a table or similar surface provided that: Safe distance from surfaces of flammable materials at least 500 mm in the direction of main heat radiation and 100 mm for other directions.
- Disconnect the appliance from electric socket after use.
- Do not reel the power cord around the appliance to increase product lifecycle.
- The power cord must not be damaged by sharp or hot objects, open flame and must neither be submerged into water nor bent over sharp edges.
- Avoid free hanging of the power cord over edge of a worktop so that the power cord is accessible to children.
- The appliance is portable and is fitted with a movable power cord with the plug providing bi-polar disconnection from the electric power grid.
- If use of an extension cable is needed, please make sure the cable is in perfect condition and conforming to applicable standards.
- Disconnect the appliance from power source immediately if the power cord is damaged. The power cord must be replaced by the manufacturer or by a service technician or a qualified electrician to avoid electric shock or fire hazard.
– Use the appliance only with genuine accessories from the manufacturer.
- Do not use the appliance for purposes other than defined and described in this manual!
- The manufacturer will not be liable for defects caused by improper use of the appliance and accessories (e.g. degraded foods, injury, damage, fire etc.) and the warranty provisions will void in case of non-adherence to safety measures.
II. DESCRIPTION OF THE APPLIANCE AND ACCESSORIES (Fig. 1)
A – bread maker
A1 – control panel A4 – view window
A2 – baking area
A3 – lid
B – baking pan
B1 - holder
C - kneading blade
D - measuring spoon small/large (5/15 ml)
E - measuring cup (200 ml)
F - hook remover
III. CONTROL PANEL
1) DISPLAY – BASIC SETTINGS
After turning the appliance on, the display will show basic settings (i.e. BASIC-KLASIK program), the display will be lit and a beep sound will be heard. The colon between the numbers does not flicker.
– Number 1 shows what program was selected.
– Numbers 3:00 show completion time for the program selected.
Note
During use, the display can be used to monitor the progress of the program selected. As the program progresses, the numbers of time shown are decreasing. For one-hour heating, 0:00 is displayed on the display and the colon between the number flickers. Following heating the programmed time is displayed on the display.
2) START/STOP BUTTON
The button is used for turning the program on and off and for activation of the “pause” function.
- A beep signal will be heard after pressing the START/STOP button (short beep) and mixing/kneading will activate within three seconds (does not apply to the program 9 and 12)
- A beep signal (2 x short beeps) will be heard after the START/STOP button is pressed repeatedly and the “pause” function of the bread maker will be activated. The “pause” function is used to suspend the operation of the bread maker (e.g. to add ingredients easily). The operation of the bread maker will be suspended (the remaining time till the end of the program will be shown on the display), but the settings will be stored in the memory. Repeated pressing of the button will renew the operation of the program. The “pause” function will be automatically deactivated after 10 minutes.
Warning:
We recommend the program to be suspended for a short period of time only, max. 5 minutes. If the program were suspended for a longer time it could hamper the rising of dough and thus the baking result. For the time when the “pause” function is activated (and the display flashes).
- A beep signal for about 3 seconds (long beep) will be heard after pressing and holding the START/STOP button for 3 seconds and the program will end. The same procedure applies for termination of 60 minutes keeping warm of the bread maker.
3) BARVA (COLOR) BUTTON
The button is used for setting of requested browning colour of your bread (SVĚTLÝ-LIGHT, STŘEDNÍ-MEDIUM, TMAVÝ-DARK). The (▲) on the display shows selected bread color. Does not apply to programs 8-TĚSTO (DOUGH), 9-MARMELÁDA (JAM),
4) VELIKOST (SIZE) BUTTON
This button is used for setting required bread weight for individual programs, i.e. 0.75 kg, 0.9 kg (see the recipes table). The (▲) on the display shows selected bread size. Does not apply to programs 4-SUPER RYCHLÝ (SUPER FAST), 8-TĚSTO (DOUGH), 9-MARMELÁDA (JAM), 10-DORT (CAKE), 12-PEČENÍ (BAKING).
- 0.75 kg size (1.5 LB) = for small bread - 0.9 kg size (2.0 LB) = for large-sized bread
The content of the pan enables preparation of food (bread, cake, dough, meat loaf) up to the maximum weight of 1.0 kg.
5) MENU BUTTON
The button is used for selection of the program required. Numbers of the display show the program selected and its pre-set baking time. You can also use the COLOR (BARVA) button to define crust colour and the VELIKOST (SIZE) button to set the bread weight. Modification of these parameters will automatically change baking times (more time or less time required).
6) - + (TIME) BUTTON
The buttons are used for setting the time required for bread baking and preparation time and other foods for program 6-BEZLEPKOVÝ (GLUTEN-FREE), 7-SUPER RYCHLÝ (SUPER FAST), 9-MARMELÁDA (JAM), 12-PEČENÍ (BAKING) cannot be set for delayed start. For remaining programs it is used for setting of delayed start. The delayed start can be set from 10 minutes up to 13 hours. The setup time will be added to the preparation time, i.e. the display will show time required for the program to run.
Example:
It is 20:30 and the bread has to be finished at 7:00 in the morning, i.e. in 10 hours and 30 minutes. Press and hold the + (TIME) button until 10:30 is shown on the display (i.e. time between now (20:30) and the bread finish time). Confirm setting with the START/STOP button. The time can be set in 10-minute increments.
Attention
- The timer function (i.e. the delayed start) should be used only for recipes already successfully tried; do not change the recipes for future breads.
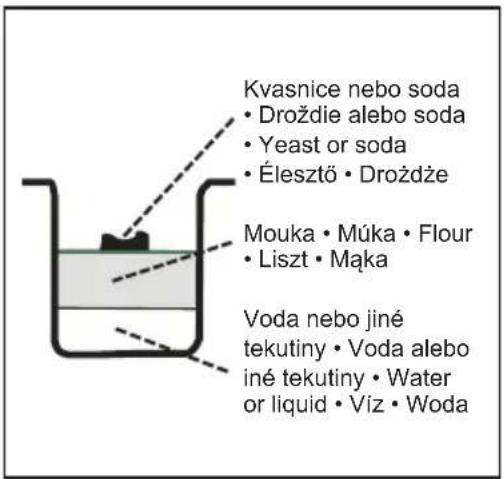
– Excessive amount of dough may overflow and bake on heating element. - When adding the ingredients in the pan, first pour liquids, then add flour and finally add dried yeast. Before turning the program on, the yeast may not contact the liquid, otherwise rising would start prematurely and the dough or bread would collapse later during baking.
- When working with the time function, do not use perishable ingredients such as milk, eggs, fruits, yoghurt, cheese, onion etc. as they could be spoiled!
- Use the bread maker in rooms heated to more than 18^ . Yeast is effective at about 17^ and more only. If you place the appliance to a cooler room, good dough rising would not be guaranteed.
- The acoustic signal (beeping) signalling the completion of the program may not be turned off; it will sound at night as well.
LIST OF PROGRAMS
1. KLASIK (CLASSIC)
The program intended for white wheat and brown rye bread; also for breads flavoured by herbs and raisins. This is the most often used program.
2. TOASTOVÝ (TOAST)
The program is intended for light bread, French bread with crispy crust and light crumb. This setup allows more time for kneading/mixing and rising required for „fluffy“ structure of French bread. Note: A baguette is not the final form.
3. CELOZRNNÝ (WHOLE-WHEAT)
The program indented for baking of whole wheat bread from flour with low gluten content. This setup allows longer time for kneading/mixing, rising (i.e. swelling up the grains) and pre-heating.
4. RYCHLÝ (QUICK)
The program is intended for baking of white, wheat and rye bread. This bread is smaller with denser crumb.
5. SLADKÝ (SWEET)
For baking of sweet breads with crust crispier than with KLASIK (CLASSIC) program.
6. BEZLEPKOVÝ (GLUTEN-FREE)
The program is intended for baking of gluten-free bread.
7. SUPER RYCHLY (SUPER FAST)
The program is intended for baking of white, wheat and rye bread. This setup shortens time required for kneading/mixing, rising and subsequent baking to minimum. This bread is smaller with denser crumb. Water (or other liquid ingredients) of temperature 48 – 50 °C must be used for this program.
8. TĚSTO (DOUGH)
The program is intended for kneading/mixing and rising of dough without baking. Various ingredients for various types of bakery products may be used (e.g. bread croissants, pizza etc.). If subsequent baking is required, set crust colour and program type. Cake size and colour may not be set in this program.
9. MARMELÁDA (JAM)
The program is intended for jam or marmalade production from fresh fruits. Cake size and colour may not be set in this program. For frequent preparation of jam we recommend obtaining another pan used exclusively for this purposes. Acids released during cooking of fruits may cause that bread prepared in the same pan will not release easily.
10. DORT (CAKE)
The program is intended for kneading/mixing of ingredients (e.g. for cake) then baked for a set time. We recommend first mixing the ingredients into two portions and pouring them to the baking pan. Cake size may not be set in this program.
11. SENDVIČ (SANDWICH)
This program is intended for baking of light bread with soft and rough crust.
12. PEČENÍ (BAKING)
The program is intended for baking of brown bread, cakes or mincemeat. The program is preset to 10 minutes. However, baking time may be adjusted by the - + (TIME) button if needed. Max baking time is one hour. Cake size may not be set in this program.
IV. BREAD MAKER FUNCTIONS
THE BEEP SOUND WILL ACTIVATE:
- if you press any of the program buttons (one short or long beep or two short beeps) and the display will illuminate for about 20 seconds;
- during the second kneading cycle of programs 1-KLASIK (CLASSIC), 2-TOASTOVÝ (TOAST), 3-CELOZRNNÝ (WHOLE WHEAT), 4-RYCHLÝ (QUICK), 5-SLADKÝ (SWEET), 6-BEZLEPKOVÝ (GLUTEN-FREE), 7-SUPER RYCHLÝ (SUPER FAST), 10-DORT (CAKE) signalling that cereals, fruits, nuts or other ingredients may be added (10 beeps):
- when the program set is completed (10 beeps),
- when the one-hour keeping warm set is completed (1 beep),
- when the safety function activates (continuous beeping).
SAFETY FUNCTION
- If you want to use the bread baker immediately after previous baking and if the appliance baking space temperature is too high (over 45 °C), pressing the START/STOP button will show HHH on the display and continuous beeping will be heard. The appliance may not be operated. Therefore, open the lid or remove the baking pan and wait for cooling the appliance down.
- If EEO appears on the display following the START/STOP button is pressed, bring the appliance to a service centre.
- If LLL appears on the display and a beep signal (5 beeps) is heard following the START/STOP button is pressed, the temperature of the baking pan is too low. The bread maker must be put into a warmer place and must be left there to acclimatize (does not apply to program 12).
- In case of power failure during operation, the appliance remembers the program setup for about ten minutes. In case of power failure for more than 10 minutes (the display shows basic settings), the process will not recover and the bread baker must be turned on again. This is possible only when the program was not interrupted later than during the kneading phase. Then, you can continue by setting your own program (delete already finished working cycles). However, if the dough was in the last rising phase and the power failure lasts for longer time, the dough may not be used again and restart with new ingredients is required.
- Please note that for safety reasons the bread maker does not have upper heating and therefore, upper bread crust is not as dark as from the bottom and all sides.
V. PREPARATION FOR USE AND PROGRESS OF BAKING
Unpack the bread baker and accessories. Remove all adhesive foils, stickers or paper from the appliance. Before first use, wash the parts in contact with foods in hot water with a detergent, rinse properly with fresh water and wipe or let it dry. Put all dried parts back to the bread baker and let the lid open. Then, set the program 12-PEČENÍ (BAKING)
and turn it on for 10 minutes without ingredients inserted and then let the appliance cold. Potential short and mild smoking is not a defect and a reason for complaint.
Place the bread baker on a flat and dry surface (e.g. a table) at height min 85 cm, out of reach of children. Plug the power cord to an electric socket. Hold the pan B with both hands, slide it to the appliance and rotate it flat out in the direction of arrow ▶ towards the text LOCK and push to lock it in the centre of the baking space A2. Tilt the handle. We recommend greasing the shaft and blade with suitable heat-resistant fat/margarine for easier removal of the blade from the bread. Then, insert the kneading blade C on the shaft in the baking pan. Slide the blade on the shaft with the flat area down. Use the spoon and cup D, E to insert ingredients in order specified in your recipe. Please always adhere to the basic rule – first all liquid ingredients followed by loose ingredients. Close the lid A3. Using suitable buttons MENU, BARVA (COLOUR), VELIKOST (SIZE), - + (TIME), set the required program on the control panel A1. Then, press the START/STOP button. The appliance automatically mixes and kneads the dough until proper consistence is reached. When the last kneading cycle is completed, the bread maker heats to an optimum temperature to rise the dough. Then, the appliance automatically sets temperature and time for bread baking. After baking, the sound signal (ten beeps) will be heard and the bread or speciality may be removed from the appliance. Then the appliance turns one hour keeping warm program; if you require no keeping warm program, press the START/STOP button for about 3 seconds to finish the program.
Note
- For heavy type dough, e.g. those of high content of rye flour, we recommend changing of addition of the ingredients – first dried yeast, then flour and add water as the last ingredient to ensure proper kneading. If you use delayed start function, the yeast must not come in premature contact with water.
- If you are adding ingredients after the beep signal is heard, we recommend:
1) dried fruit, cheese, chocolate = cut into ca. 5 mm cubes,
2) nuts = chop finely (do not use too many of them, they degrade the performance of gluten),
3) herbs = follow the recipe, max. 1 - 2 teaspoons,
4) oily ingredients, smoked meat and bacon = cut into ca. 5 mm cubes and sprinkle them lightly with flour, it will work better,
5) olives, fresh fruit, fruit preserved in alcohol = follow the recipe, the water contents in these ingredients could influence the final quality of bread.
6) seeds = the use of big and hard seeds may damage (scratch) the surface finish of the baking pan and kneading blade. This change however does in no way impact on the quality of the surface and is not a reason for the appliance to be replaced for this purpose under warranty.
- If the bread is too light at the end of the baking program, use the PEČENÍ (BAKING) program for further browning. To do this, press the START/STOP button, then select 12-PEČENÍ (BAKING) and press the START/STOP button again.
- When using the appliance, you will hear an inherent clicking sound (while kneading = clicking, while baking or heating up = cracking). This is normal and the appliance will not be replaced for this purpose under warranty.
- Pets (e.g. exotic birds) may be responsive to the smell/odour, vapours and smoke arising during the preparation of food. Therefore it is recommended that the food should be prepared in another room.
END OF PROGRAMMED PHASES
Open the lid after program end. Using oven gloves, hold the baking pan firmly and rotate it in the direction of arrow ◀ towards the text UNLOCK and remove baking pan B from the bread maker. Put it upside down on a heat-resistant solid surface (e.g. cutting board). If the bread will not go out to the board, move the kneading blade backward and forward until the bread is released. If the kneading blade is stuck in the bread, use F to remove it easily. Then, let the bread cold down. Use electric slicer or a special toothed blade knife for slicing the bread. Store remaining bread in a plastic bag or a utensil. You can store the bread for up to three days at room temperature. If longer storage of the bread is needed, wrap it in the plastic bag or utensil and store it in a freezer. Store for max 10 days. Whereas the home-made bread does not contain any preservatives, its shelf life is not generally longer than the same of shop-purchased bread.
Note
Use suitable personal protective equipment (e.g. kitchen gloves) for handling the hot baking pan, holder, blade etc. Do not use gross force on walls of the baking pan to release finished bread!
VI. FREQUENTLY ASKED QUESTIONS RELATED TO BAKING
BREAD STUCK ON THE PAN AFTER BAKING
Let the bread cool down for about 10 minutes after baking and then turn the pan upside down. If needed, move the kneading blade shaft forward and backward. Grease the pan including the kneading blade for the next baking.
HOW TO AVOID HOLES IN THE BREAD DUE TO THE KNEADING BLADE?
You can remove the kneading blade with flour coated fingers before the last dough rising phase. (See timing of the program phases)
DOUGH RISES OVER THE PAN EDGE
It happens especially when wheat flour with higher gluten content is used.
- Reduce amount of flour and adapt other ingredients. Finished bread will be of sufficient volume.
- Spread a tablespoon of dissolved margarine on the dough.
BREAD IS NOT RISEN SUFFICIENTLY
a) If a V-shaped groove appears in the centre of the bread, the flour does not contain sufficient amount of gluten. It means the flour contains a few protein (it happens during rainy summer) or because of moist flour. Measures: add a tablespoon of wheat gluten to each 500 ~g of flour.
b) If the bread is constricted in the centre, the reasons may be:
- too high temperature of water;
- too much water used;
- gluten-low flour used.
WHEN IT IS POSSIBLE TO OPEN THE LID DURING OPERATION?
Generally, the lid can be opened at any time during the kneading phase. Small amounts of flour or liquids can be added during this phase. Proceed as follows if you require the bread has to have some aspects: Open the lid before the last kneading phase and make a cut on newly forming crust using a pre-heated knife, distribute cereals or mixture of potato flour
and water in order to achieve shiny crust. However, this is the last chance for opening the lid, otherwise the crumb will collapse.
FLOUR
The most important flour element in baking of the bread is gluten. This is a natural agent thanks to which dough has its shape and allows keeping carbon dioxide produced by yeast. „Strong/solid“ flour is flour with high gluten content.
WHAT IS WHEAT WHOLE GRAIN FLOUR?
The whole grain flour is produced from all types of cereals, including wheat. The term „whole grain“ means the flour was ground from whole grains and therefore, it has higher proportion of non-digestible particles and darker colour. However, darker colour of the bread is not caused by the use of the whole grain flour.
WHAT NEEDS TO BE DONE WHEN USING RYE FLOUR?
The rye flour contains certain gluten level; this level is, however, lower than for other flours. To produce easily digestible bread, the whole grain rye bread has to be produced with higher yeast content.
HOW MANY DIFFERENT FLOURS EXIST AND HOW ARE THEY USED?
a) Corn, rice and potato flour is suitable for people allergic to gluten or for those suffering from low-absorption syndrome or stomach diseases.
b) Flour from spelt is expensive but without any chemical substances because this wheat grows on poor soil and requires no fertilizers. The spelt flour is especially suitable for allergic people. It can be used for all recipes described in the recipe book and replaces flour 405, 550 and 1050.
c) Millet flour is particularly suitable for persons suffering from many allergies. It can be used for all recipes described in the recipe book and replaces flour 405, 550 and 1050. Durum flour is suitable for baguettes thanks to its consistency and it may be replaced by durum semolina.
NUMBER CODES OF FLOUR TYPES
00 Wheat fine-ground flour, light
T 400 Wheat semi-coarsely ground flour, selection
T 405 Wheat semi-coarsely ground flour made from grains with sprouts and bran removed; it is the „lightest“ and „the least“ whole grained.
T 450 Coarse ground flour
T 512 Bakery special wheat flour
T 530 Light fine-ground wheat flour – bakery special
T 550 Semi-coarsely ground light wheat flour
T 650 Semi-light fine-ground wheat flour
T 700 Consumer ground light wheat flour
T 1000 Fine-ground dark wheat flour (bread)
T 1050 Bread wheat flour
T 1150 Bread flour
T 1800 Coarsely-ground whole grained wheat flour; fine-ground whole grained
RYE FLOURS
T 500 Rye light
T 930 Rye dark (bread)
T 960 Rye bread
T 1150 Rye fine-ground bread flour
T 1700 Rye whole grained
YEAST
Yeast is a live organism. It reproduces in dough and produces carbon dioxide bubbles causing rising of dough. Dried yeast is the most suitable for baking of home-made bread. They are available in a sack and fermentation of yeast is not linked to sugar. They have lower sugar content and they are healthier. Store unused dried yeast at low temperature in dry place in air-proof packaging. Of course, you can also use fresh yeast; however it is necessary to accept potentially different rising intensity depending on freshness of the yeast. In principle, fresh yeast must be first let rising in a liquid specified in the recipe. Roughly 10 – 13 g of fresh yeast is required per 500 g of flour if you bake your bread in the bread maker because due to moisture and hot environment created by the bread maker the yeast rises more intensively than in a classic oven. If you prepare dough only in the bread maker and bake the bread in an oven, 20 g of yeast is recommended.
SALT
Of course, salt gives the right taste to bread. It may, however, decelerate fermentation process. Thanks to salt dough is solid, compact and does not rise so quickly. Salt also improves structure of dough. Use standard table salt. Do not use large grained salt or alternatives.
BUTTER/FATS
Improves taste and softens; you can also use margarine or olive oil. If you use butter, cut it into small pieces to disperse butter evenly in dough or let it soften. You can replace 15 g of butter with one tablespoon of oil. Do not add hot butter. Fat must not contact yeast because it may prevent rehydratation. Too much fat decelerates rising. Do not use low-fat creams or butter alternatives.
SUGAR
Sugar improves taste of bread and it is partially the reason of browning crust. To have crust lighter and thinner, you can reduce sugar content up to 20 % without changing taste of the bread. If you prefer softer and lighter crust, use honey instead of sugar. Sugar may not be replaced by artificial sweeteners because yeast do not react with them.
Note: some types of dried yeast may not ferment if you add sugar. Do not use sugar cubes or coarse sugar.
WATER
Always use water of room temperature, best at 22 °C. Water can be fully or partially replaced by milk or other liquids.
OTHER INGREDIENTS
They may include everything from dried fruits, cheeses, eggs, nuts, brown flour, condiments, herbs etc. It's on you. Don't forget that ingredients such as cheese, milk and fresh fruit have higher water content that influences final loaf appearance. You should
rather use dried alternatives such as dried cheese, milk etc. After gaining some experience in using the bread baker, you will recognize where it is necessary to add water or flour.
Do not forget amount of salt because it decelerates fermentation. Some ingredients may be mixed at the beginning, e.g. dried milk and yoghurt; some add after the sound signal, e.g. nuts, dried fruit. If you monitor the baking process, you will know where the signal will sound.
CONDITIONS
Work conditions are very important; the difference in the bread size is 15 % if prepared in warm or cold environment.
STORING OF BREAD
Home-made bread contains no preservatives. However, if you put bread to a clean and air-tight utensil and then to your fridge, you can keep it for 5 – 7 days. Moreover, you can freeze the bread.
HOW TO BAKE FRESH BREAD FOR GOOD DIGESTION?
Addition of mashed cooked potato to flour followed by dough kneading will make the fresh bread more digestible.
WHAT TO DO IF YEAST IS FELT IN THE BREAD?
a) This taste is usually removed by addition of sugar.
b) Add one tablespoon of vinegar to water for small loafs and 2 tablespoons for big loafs.
c) Use buttermilk or kefir instead of water. It applies to all recipes and it is recommended for bread freshness improvement.
WHY THE BREAD BAKED IN A CLASSIC OVEN TASTES DIFFERENTLY FROM THE BREAD BAKER?
It depends on different moisture content: Bread baked in the classic oven is drier because of larger baking space whereas the bread made in the bread baker has higher moisture content.
WHY IS MARMALADE TOO LIQUID?
Home-made marmalade is usually more liquid than purchased one. Keep the marmalade in your fridge for 24 hours to stiffen. If it remains slightly liquid it will be better to spread it. Home-made marmalades are great as topcoats for ice-creams. Do not re-boil already made marmalade. For the next baking try the following:
1) check whether fruit is not overripe
2) dry fruits after washing
3) use pectin for better results.
HOW TO AVOID SPLASHING THE MARMALADE OUT OF THE PAN DURING AGITATING?
Cut fruits into small pieces and do not use more fruits than specified in the recipe. Use aluminium foil to create a protective strip around the upper edge of the baking pan (about 5 cm). Do not cover the whole form, otherwise no steam can escape.
VII. CLEANING AND MAINTENANCE
Turn off and disconnect the appliance from power supply by unplugging the plug from electric socket before maintenance! Clean cooled down appliance only and after every use! Before the first use, we recommend coating the baking pan and the kneading blade with heat resistant fat and warm them in the baker for about 10 minutes. Clean (polish) the baking pan from the fat using a paper napkin after cooling down. This is to protect the non-adhesive surface. Repeat the procedure after some time, if required. Use a mild detergent for cleaning. Do not use chemicals, gasoline, oven cleaners or abrasive or otherwise damaging detergents. Use a dampen rag to remove all the ingredients and crumbs from the lid, housing and baking space. Never soak the bread baker in water or fill the baking space with water! Wipe the outer areas of the baking pan with a dampen rag. Use a detergent to clean inner areas of the pan. Clean the blade and shaft immediately after use. If the blade is retained in the pan, it will be harder to remove it out. In this case, fill the pan with hot water and let it standing for about 30 minutes. Then, remove the kneading blade. Do not soak the baking pan in water for too long; rotation of shaft would be impaired. The baking pan is coated by a non-adhesive coating. Do not use metal tools with potential to scratch the surface. It is normal when the surface colour changes over time. However, this change has no effect on the surface properties.
Storage
Ensure the bread maker is cold before storage. Store the bread maker in a safe and dry place, out of the reach of children and incapacitated people.
VIII. FREQUENTLY ASKED QUESTIONS RELATED TO THE BREAD BAKER
| Problem Cause Solution | ||
| Smoke from baking space or ventilation slots. | The ingredients stick to the baking area or outer side of the baking pan. | Disconnect power supply and clean the baking pan or the baking space. |
| Crumb collapses and bottom of the loaf is moist. | The bread was left too long in the pan after baking and keeping warm. | Remove the bread from the pan before end of the keeping warm phase. |
| The bread is hard to remove from the baking pan. | Bottom side of the loaf is stuck on the kneading blade. | Move with the shaft backwards and forwards until the bread comes out. Clean the kneading blade and shaft after baking.If necessary, fill the baking pan with warm water for 30 minutes. Then, the kneading blade can be easily removed and cleaned. |
| The ingredients are not mixed correctly and the bread is not baked correctly. | Improper program setting.During operation of the baker, the lid was opened several times.Long-term power failure during bread baker operation.Rotating of the kneading blade is blocked. | Check the program selected and other settings.Do not open the lid after the last rising.See Chapter IV. Functions of the bread baker.Check whether the kneading blade is blocked by grains etc. Remove the baking pan and check whether the shaft rotates freely. If not, please contact the customer service. |
| The baking pan lifts up during kneading. | Too thick dough.The kneading blade is blocked and the baking pan is lifted up. | Open the lid and add some liquids. Then, close the lid again. |
| The bread baker can not be turned on. Display shows HHH. | The bread baker is still hot from previous baking cycle. | Press the START/STOP button to cancel audio signal. Remove the baking pan and let the baker cool down. Then, return the baking pan back to its place, set the program again and turn the baker on. |
IX. ENVIRONMENT
If the size of the appliance allows, all the parts contain marking of the materials used for production packaging, components and accessories as well as for recycling. The symbols on the product or in the accompanying documentation mean that the electrical or electronic product used must not be liquidated together with communal waste. To ensure the appropriate liquidation take the used appliance to a collection point where it will be accepted free of charge. Correct liquidation of the product helps to protect valuable natural resources and helps to prevent a potential negative impact on the environment and human health which can be the outcome of inappropriate liquidation of waste. More details can be obtained from your local authorities or the closest collection point. Inappropriate manipulation of such waste can result in a fine according to the national legislation.
Maintenance of a serious nature or maintenance which requires interference with the internal parts of the appliance must be carried out by a professional service centre! By failing to follow the instructions issued by the manufacturer, the right to the warranty service will be invalidated!
X. TECHNICAL DATA
Voltage (V) Stated on the product label Wattage (W) Stated on the product label Weight approx (kg) 6.5
The product has received ES declaration of conformity according to Act as amended. The product matches the requirements of the below statutory order as amended.
– Committee Regulation No. 2006/95/ES as amended, setting the technical requirements of the electrical appliance as low.
– Committee Regulation No. 2004/108/ES as amended, setting the technical requirements of products in terms of their electromagnetic compatibility
The product is in conformity with the European Parliament and European Committee Regulation No. 1935/2004/ES re. Materials and objects designed for contact with food.
The manufacturer reserves the right for any insignificant deviations from the standard finished product which do not have any effect on the functioning of the product.
HOT. DO NOT COVER. HOUSEHOLD USE ONLY. DO NOT IMMERSE IN WATER OR OTHER LIQUIDS. TO AVOID DANGER OF SUFFOCATION, KEEP THIS PLASTIC BAG AWAY FROM BABIES AND CHILDREN. DO NOT USE THIS BAG IN CRIBS, BEDS, CARRIAGES OR PLAYPENS. THIS BAG IS NOT A TOY.
XI. FREQUENTLY ASKED QUESTIONS RELATED TO RECIPES
| Problem Cause Solution | ||
| Bread rises too quickly – | Too much yeast, too much flour, lack of salt– Or combination of these causes | a/ba/b |
| Bread did not rise at all or partially only | – No or a few of yeast only– Old or expired yeast– Too hot liquid– Yeast in contact with liquid– Improper floor type or expired floor– Too much or no liquid– Low sugar | a/becdea/b/ga/b |
| Bread rises extremely and spills over the baking pan | – If water is soft, yeast ferments more intensively– Too much milk will influence fermentation of yeast | f/kc |
| Crumb collapses, there is a hollow in the bread after baking. | – Dough volume exceeds the pan and the bread lowers.– Too much liquid.– Too short or long fermentation due to increased water temperature or baking space or excessive moisture level– Too much yeast | a/fa/b/hc/h/ik |
| Heavy and clumpy bread structure | – Too much or no flour– Low yeast or sugar– Too much of fruits, coarsely-ground floor or one of the other ingredients– Old or expired flour | a/b/ga/bb e |
| Bread crumb not baked | – Too much or no liquid– High air humidity– Recipe contains wet ingredients | a/b/ghg |
| Open or coarse bread structure or too much hollows | – Too much water– No salt– High moisture, too hot water | gbh/i |
| Bread is not baked properly inside and outside | –Too much volume for the baking pan– Excessive amount of flour, particularly for white bread– Too much yeast and low salt– Too much sugar– Sweet ingredients in addition to sugar | a/ffa/ba/bb |
| Uneven or clumpy slices | – Bread not cooled down sufficiently (steam did not escape) j | |
| Flour deposits on the crust | – Flour not processed well during kneading on sides g | |
TROUBLESHOOTING:
a) Measure the ingredients properly.
b) Modify dosing of ingredients and check if you added all ingredients to dough.
c) Use other liquid or let it cool to room temperature.
d) Add the ingredients required by recipe in correct order. Create a shallow hole in the centre of flour and put yeast or dried yeast to it. Avoid direct contact of yeast with liquid.
e) Use fresh and properly stored ingredients.
f) Reduce total quantity of ingredients; in no case use more flour than specified. Alternatively, reduce quantity of all ingredients by 1/3.
g) Modify amount of liquid. If ingredients used contain water, water added must be decreased appropriately.
h) In case of humid weather, reduce water content by 1 – 2 tablespoons.
i) When hot, do not use the delayed start function. Use cold liquids. To shorten rising time, select the 4-RYCHLY (QUICK) or program 7-SUPER RYCHLY (SUPER FAST).
j) Remove bread from the pan immediately after baking and let it cool down before slicing for at least 15 minutes on a suitable pad (e.g. cutting board).
k) Use less yeast or reduce quantity of all ingredients by 1/4 of amount specified.
Measuring as well as the order in which the ingredients are added are similarly important because each ingredient plays a specific role for successful baking of bread.
- The most important ingredients such as liquids, flour, salt, sugar and yeast (either standard or dried) influence successful result of dough and bread result. Always use the right quantity at proper ratio.
- Use warm ingredients if dough has to be prepared immediately. If you wish to use the delayed start function, we recommend using of cold ingredients to prevent premature rising of yeast.
– Margarine, butter and milk influence taste and smell of the bread.
- To have crust lighter and thinner, you can reduce sugar content by 20% without effect of successful baking result. Replace sugar with honey if you prefer softer and lighter crust.
- If you want to add cereals, let them soak over night. Reduce flour and liquid content (up to 1/5). Yeast is absolutely necessary for rye flour.
- If you want to have especially light bread, rich to ingredients supporting bowel activity, add wheat bran to dough. Dosing is one tablespoon per 500 g of flour and increase liquid amount by one tablespoon.
- Fermentation is necessary for rye flour. It contains bacteria of lactic acid and acetic acid and they cause the bread is light and finely acid. You can produce the ferment, however you must take into account time required for its production. Therefore, our recipes use powdered ferment, a concentrate that can be purchased in a 15 g sack (per one kg of flour). Keep proportions in the recipe to avoid splitting of the bread. If you use powdered ferment in a different concentration (a 100 g sack per 1 kg of flour), you must reduce amount of flour: 1 kg by about 80 g or adjust the recipe accordingly.
2. ADJUSTMENT OF DOSES
If you want to increase or decrease the doses, please ensure proportional adjustment of original recipes. To achieve perfect result, follow the following basic rules for adjustments of the ingredient doses:
- Liquids / flour
Dough should be soft (not too much) and easy to knead without being fibrous. Knead lightly to create a sphere. However, this is not the case of heavy dough such as from whole grain rye or cereal bread. Check the dough after five minutes after the first kneading. If too moist, add flour in small doses to reach proper dough consistency. If too dry, add water by tablespoons during kneading. These adjustments should be carried out successively (not more than 1 tablespoon at once) and wait whether the adjustment is effected in any way. You can assess dough right before baking by touching by fingertips. Dough should slightly resist and fingerprints should disappear in a while.
• Replacement of liquids
When using ingredients with liquid content as prescribed in recipe (e.g. cottage cheese, yoghurt etc.), reduce liquid content to forecasted total quantity. When using eggs, whip them in the measurement cup and top up the cup with liquid to required liquid level.
- If you live at higher altitude (over 750 metres above sea level), the dough will rise quicker. In this case, you can reduce yeast amount by 1/4 to 1/2 of teaspoon for proportional reduction of rising. The same applies to soft water.
- Bread baking supporting products
For baking, you can add supporting products to the mixture (e.g. chlebostar, chlebovit, topmix, essirol, vital, falco, emulger etc.).
3. ADDING AND MEASURING OF INGREDIENTS AND QUANTITIES
- Admeasure the liquids by the measuring cup provided. To admeasure teaspoons or tablespoons, use the double-sided measuring spoon. Quantity admeasured by the cup must be levelled not heaped. Incorrect quantities result in poor outcomes.
- Pour liquid first but the yeast as the last ingredient. To avoid premature activation of yeast (particularly when using delayed start function), yeast must not contact the liquid.
- Use identical measurement units for measurement. Weights in grams must be measured precisely.
- For specifications in millilitres, you can use the measurement cup with the scale steps from 50 to 200 ml.
- Fruit, nut or cereal ingredients: If you want to add some other ingredients, you can do it using special programs after the beep sound. If you add the ingredients too early, they will be crushed during kneading.
4. WEIGHTS AND VOLUMES OF BREAD
- The recipes below include approximate data related to weights of bread. You will see that weight of pure white bread is lower than of the whole grain bread. This is due to the fact the white flour rises more intensively.
- Despite approximate weight data there may be minor differences. The real bread weight depends much on moisture level of the room during preparation.
- All breads of the highest weight level with substantial portion of wheat are larger and they exceed the baking pan after the last rising. However, the bread will not spill. That part exceeding the pan will brown easily when compared to the bread inside the pan.
- Where the 5-SLADKÝ (SWEET) program is proposed for sweet breads, you can use ingredients of lower volume also for the 10-DORT (CAKE) program to bake a lighter bread.
5. BAKING RESULTS
- The baking result depends on local conditions (soft water, high air relative humidity, high altitude, consistency of ingredients etc.). Therefore, data in the recipes consist of reference points that may be suitably modified. If one or other recipe fails, don't let it discourage you. Try to find reason and try it again with modified proportions.
- If the bread is too light after baking, you can brown it in 12-PEČENÍ (BAKING) program.
- We recommend baking test bread before real over night bread baking setting to make potential changes, if necessary.
• We can not be liable for perfect results of bread baked according to our recipes because we can not control quality of the ingredients used as well as other factors such as local temperature, air moisture etc.
| STAGE OFPEPARATION | PROGRAM | ||||||||||
| 1.CLASSIC | 2.TOAST | 3. WHOLE-GRAIN | 4. QUICK | 5.SWEET | 6. GLUTEN-FREE | ||||||
| 2.0LB | 1.5LB | 2.0LB | 1.5LB | 2.0LB | 1.5LB | 2.0LB | 2.0LB | 1.5LB | 2.0LB | 1.5LB | |
| 3:00hour | 2:55hour | 3:50hour | 3:40hour | 3:40hour | 3:32hour | 2:10hour | 2:55hour | 2:50hour | 2:55hour | 2:50hour | |
| H1kneading | 10 9 | 18 16 10 | 9 10 10 | 10 10 10 | 10 | ||||||
| K1 rising 2 | 20 20 40 | 40 25 25 | 10 5 5 | 10 5 | |||||||
| H2kneading | 15 A 1 | 4 A 22 A | 19 A 20 | A 18 A | 10 A 20 | A 20 A | 10 A 10 A | ||||
| K2 rising 2 | 5 25 30 | 30 35 35 | - 30 30 | 30 30 30 | |||||||
| K3 rising 4 | 5 45 50 | 50 65 65 | 30 45 | 45 45 45 | |||||||
| BAKING 6 | 5 60 70 | 65 65 60 | 70 65 | 60 70 70 | |||||||
| HEATING | 60 60 60 | 60 60 | 60 60 60 | 60 60 60 | |||||||
| STAGE OF PEPARATION | PROGRAM | |||||||
| 7. SUPER FAST | 8. DOUGH | 9. JAM | 10. CAKE | 11. SANDWICH | 12. BAKING | |||
| 2.0 LB | 1.5 LB | 2.0 LB | 1.5 LB | |||||
| 1:38 hour | 1:28 hour | 1:30 hour | 1:20 hour 1:50 hour | 2:55 hour | 2:50 hour | 0:10 – 1:00 hour | ||
| H1 kneading | 10 A | 10 A | 20 | - | 6 | 15 | 15 | - |
| K1 rising | -- | - | time 15 minutes. Temperature 106 °C, heating in cycles on/off 15 s/15 s if the temperature is < 105 °C | 5 | 40 | 40 | - | |
| H2 kneading | 5 | 5 | - | - | 10 | 5 A | 5 A | - |
| K2 rising | - | - | 30 | - | 9 | 20 | 20 | - |
| K3 rising | 33 | 28 | 40 | time 45 minutes, temperature 106 °C, kneading in cycles on/off 0.5 s/4.5 s, heating in cycles on/off 15 s/15 s if the temperature is < 105 °C | 30 | 40 | 40 | - |
| BAKING | 50 | 45 | - | 20 | 50 | 55 | 50 | 10–60 |
| HEATING | 60 | 60 | - | - | 60 | 60 | 60 | 60 |
After time period, there's "A", signalling that cereals, fruits, nuts or other ingredients may be added (10 beeps):
A KENYÉR NEM KELT MEG MEGFELELŐEN
KONIEC ZAPROGRAMOWANYCH FAZY
TO AVOID DANGER OF SUFFOCATION, KEEP THIS PLASTIC BAG AWAY FROM
BABIES AND CHILDREN. DO NOT USE THIS BAG IN CRIBS, BEDS, CARRIAGES OR PLAYPENS. THIS BAG IS NOT A TOY.
ROZWIĄZYWANIE PROBLEMÓW:
Guarantee certificate is valid only for Czech Republic and Slovak Republic.
- NÁVOD K OBSLUZE
- CUKR A SLADIDLA (NAPŘ. MED, MELASA)
- HMOTNOSTI A OBJEMY CHLEBA
- KOL'KO JE DRUHOV MÚKY A AKO SA POUŽÍVAJÚ?
- CUKOR A SLADIDLÁ (NAPR. MED, MELASA)
- SAFETY PRECAUTIONS
- DESCRIPTION OF THE APPLIANCE AND ACCESSORIES (Fig. 1)
- A – bread maker
- B – baking pan
- C - kneading blade
- CONTROL PANEL
- 1) DISPLAY – BASIC SETTINGS
- Note
- 2) START/STOP BUTTON
- Warning:
- 3) BARVA (COLOR) BUTTON
- 4) VELIKOST (SIZE) BUTTON
- 5) MENU BUTTON
- 6) - + (TIME) BUTTON
- Example:
- Attention
- LIST OF PROGRAMS
- KLASIK (CLASSIC)
- TOASTOVÝ (TOAST)
- CELOZRNNÝ (WHOLE-WHEAT)
- RYCHLÝ (QUICK)
- SLADKÝ (SWEET)
- BEZLEPKOVÝ (GLUTEN-FREE)
- SUPER RYCHLY (SUPER FAST)
- TĚSTO (DOUGH)
- MARMELÁDA (JAM)
- DORT (CAKE)
- SENDVIČ (SANDWICH)
- PEČENÍ (BAKING)
- BREAD MAKER FUNCTIONS
- THE BEEP SOUND WILL ACTIVATE:
- SAFETY FUNCTION
- PREPARATION FOR USE AND PROGRESS OF BAKING
- END OF PROGRAMMED PHASES
- FREQUENTLY ASKED QUESTIONS RELATED TO BAKING
- BREAD STUCK ON THE PAN AFTER BAKING
- HOW TO AVOID HOLES IN THE BREAD DUE TO THE KNEADING BLADE?
- DOUGH RISES OVER THE PAN EDGE
- BREAD IS NOT RISEN SUFFICIENTLY
- WHEN IT IS POSSIBLE TO OPEN THE LID DURING OPERATION?
- FLOUR
- WHAT IS WHEAT WHOLE GRAIN FLOUR?
- WHAT NEEDS TO BE DONE WHEN USING RYE FLOUR?
- HOW MANY DIFFERENT FLOURS EXIST AND HOW ARE THEY USED?
- NUMBER CODES OF FLOUR TYPES
- RYE FLOURS
- YEAST
- SALT
- BUTTER/FATS
- SUGAR
- WATER
- OTHER INGREDIENTS
- CONDITIONS
- STORING OF BREAD
- HOW TO BAKE FRESH BREAD FOR GOOD DIGESTION?
- WHAT TO DO IF YEAST IS FELT IN THE BREAD?
- WHY THE BREAD BAKED IN A CLASSIC OVEN TASTES DIFFERENTLY FROM THE BREAD BAKER?
- WHY IS MARMALADE TOO LIQUID?
- HOW TO AVOID SPLASHING THE MARMALADE OUT OF THE PAN DURING AGITATING?
- CLEANING AND MAINTENANCE
- Storage
- ENVIRONMENT
- TECHNICAL DATA
- TROUBLESHOOTING:
- ADJUSTMENT OF DOSES
- - Liquids / flour
- • Replacement of liquids
- - Bread baking supporting products
- ADDING AND MEASURING OF INGREDIENTS AND QUANTITIES
- WEIGHTS AND VOLUMES OF BREAD
- BAKING RESULTS
- A KENYÉR NEM KELT MEG MEGFELELŐEN
- KONIEC ZAPROGRAMOWANYCH FAZY
- ROZWIĄZYWANIE PROBLEMÓW:
Brand : Eta
Model : Gustito
Category : Bread maker