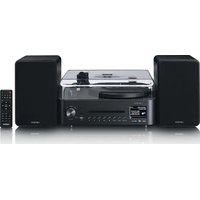
KDV-309 - DVD player LENCO - Free user manual and instructions
Find the device manual for free KDV-309 LENCO in PDF.


| Product Type | DVD Player |
| Model | KDV-309 |
| Brand | Lenco |
| Disc Compatibility | DVD, CD, CD-R/RW, MP3, JPEG |
| Video Output | Composite (CVBS), S-Video, Component (YUV) |
| Audio Output | Stereo RCA, Digital Coaxial |
| Playback Features | Multi-language, Parental Control, Zoom, Repeat, A-B Repeat |
| Power Supply | AC 110-240V, 50/60Hz |
| Power Consumption | < 10W (operating), < 1W (standby) |
| Dimensions (W x D x H) | Approx. 260 x 220 x 40 mm |
| Weight | Approx. 1.2 kg |
| Remote Control | Included, with battery |
| Display | Front panel LED display |
| Connections | Composite Video, S-Video, Component Video, Stereo Audio (L/R), Coaxial Digital Audio |
| Supported Regions | Region 2 (Europe) or multi-region (check label) |
| Maintenance | Clean lens with recommended disc cleaner; wipe exterior with dry cloth |
| Safety Features | CE certified; automatic shutdown after inactivity |
| Spare Parts & Repairability | Contact Lenco support for spare parts; repair by qualified technician |
| Warranty | 2 years (standard) |
| Package Contents | DVD player, remote control, batteries, AV cable, user manual |
Frequently Asked Questions - KDV-309 LENCO
User questions about KDV-309 LENCO
0 question about this device. Answer the ones you know or ask your own.
Ask a new question about this device
Download the instructions for your DVD player in PDF format for free! Find your manual KDV-309 - LENCO and take your electronic device back in hand. On this page are published all the documents necessary for the use of your device. KDV-309 by LENCO.
USER MANUAL KDV-309 LENCO
natural_image
Line drawing of a TV or audio equipment device with monitor, tower, and remote control (no text or symbols)SAFETY INFORMATION
CAUTION:
THIS PLAYER IS A CLASS 1 LASER PRODUCT THAT USES A VISIBLE LASER BEAM THAT COULD CAUSE HAZARDOUS RADIATION EXPOSURE IF DIRECTED. BE SURE TO OPERATE THE PLAYER CORRECTLY AS INSTRUCTED.
WHEN THIS PLAYER IS PLUGGED TO THE WALL OUTLET, DO NOT PLACE YOUR EYES CLOSE TO THE OPENING OF THE DISC TRAY AND OTHER OPENINGS TO LOOK INTO THE INSIDE OF THIS PLAYER.
USE OF CONTROLS OR ADJUSTMENTS OR PERFORMANCE OF PROCEDURES OTHER THAN THOSE SPECIFIED HEREIN MAY RESULT IN HAZARDOUS RADIATION EXPOSURE.
DO NOT OPEN UP THE PRODUCT CASING AND DO NOT REPAIR YOURSELF. REFER SERVICING TO QUALIFIED PERSONNEL.
TO REDUCE THE RISK OF FIRE OR ELECTRIC SHOCK, AND ANNOYING INTERFERENCE, USE THE RECOMMENDED ACCESSORIES ONLY.
WARNING:
- TO PREVENT FIRE OR SHOCK HAZARD. DO NOT USE THIS PLUG WITH AN EXTENSION CORD. RECEPTACLE OR OTHER OUTLET UNLESS THE BLADES CAN BE FULLY INSERTED TO PREVENT BLADE EXPOSURE.
- TO PREVENT FIRE OR SHOCK HAZARD. DO NOT EXPOSE THIS APPLIANCE TO RAIN OR MOISTURE.
CAUTION: LASER RADIATION WHEN OPEN. DO NOT STARE INTO BEAM.
VENTILATION WARNING: THE NORMAL VENTILATION OF THE PRODUCT SHALL NOT BE IMPEDED FOR INTENDED USE.
text_image
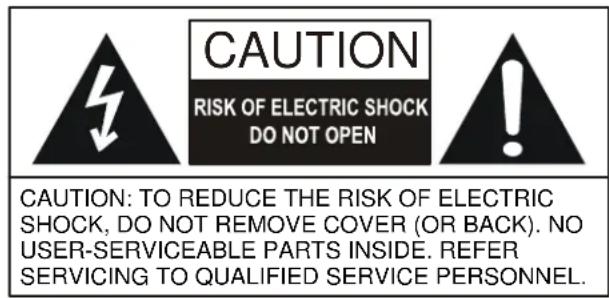
CAUTION RISK OF ELECTRIC SHOCK DO NOT OPEN CAUTION: TO REDUCE THE RISK OF ELECTRIC SHOCK, DO NOT REMOVE COVER (OR BACK). NO USER-SERVICEABLE PARTS INSIDE. REFER SERVICING TO QUALIFIED SERVICE PERSONNEL.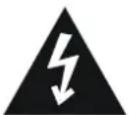
The lightning flash with arrowhead symbol, within an equilateral triangle, is intended to alert the user to the presence of uninsulated "dangerous voltage" within the product's enclosure that may be of sufficient magnitude to constitute a risk of electric shock to persons.

The exclamation point within an equilateral triangle is intended to alert the user to the presence of important operating and maintenance (servicing) instructions in the literature accompanying the appliance.
Important Safety Instructions
1) Read these instructions.
2) Keep these instructions.
3) Heed all warnings.
4) Follow all instructions.
5) Do not use this apparatus near water.
6) Clean only with dry cloth.
7) Do not block any ventilation openings. Install in accordance with the manufacture's instructions.
8) Do not install near any heat sources such as radiators, heat registers, stoves, or other apparatus (including amplifiers) that produce heat.
9) Protect the power cord from being walked on or pinched, particularly at plugs, convenience receptacles, and the point where they exit from the unit.
10) Unplug this apparatus during lightening storms or when unused for long periods of time.
11) Refer all servicing to qualified service personnel. Servicing is required when the apparatus has been damaged in any way, such as power-supply cord or plug is damaged, liquid has been spilled or objects have fallen into the apparatus, the apparatus, has been exposed to rain or moisture, does not operate normally, or has been dropped.
Illustration of the Controls/Jacks On the Main Unit
text_image
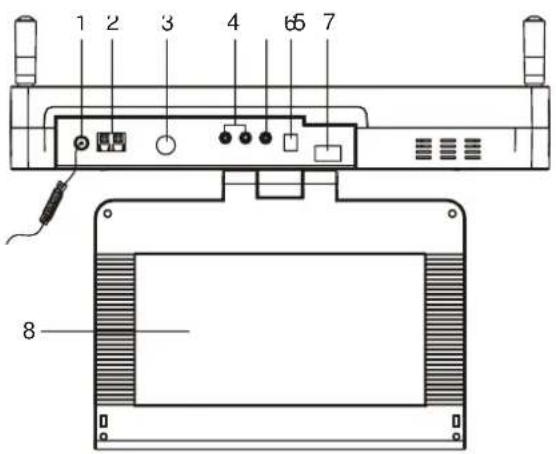
1 2 3 4 6 7 8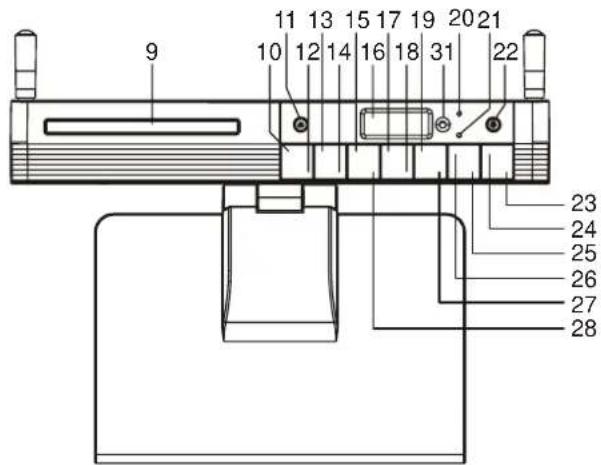
text_image
9 10 11 12 13 14 15 16 17 18 19 20 21 22 23 24 25 26 27 28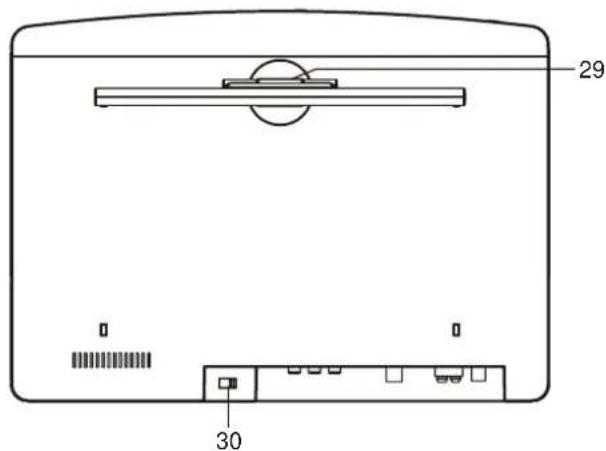
text_image
29 30- FM ANTENNA
- AM ANTENNA IN
- TV ANTENNA IN
- AUDIO IN JACKS
- VIDEO JACK
- DC IN JACK
- AC SOCKET
- TFT DISPLAY
- CD DOOR
- VOLUME + BUTTON
- CD DOOR OPEN/CLOSE BUTTON
- VOLUME - BUTTON
- TIME BUTTON
- ALARM BUTTON
- MEMORY BUTTON
- LCD DISPLAY
- MEM UP & F.FWD BUTTON
- MEM DOWN & F.BWD BUTTON
- NEXT & TUNER UP BUTTON
- DVD/DVB-T INDICATOR
- RADIO INDICATOR
- STANDBY BUTTON
- STOP/BAND BUTTON
- PLAY/PAUSE BUTTON
- MENU BUTTON
- FUNCTION BUTTON
- PREVIOUS & TUNER DOWN BUTTON
- COUNT DOWN TIMER BUTTON
- DISPLAY ROTATOR
- VOLTAGE SELECTOR (OPTIONAL)
- REMOTE SENSOR
Illustration of the Keys on the Remote Controller and Their Main Functions
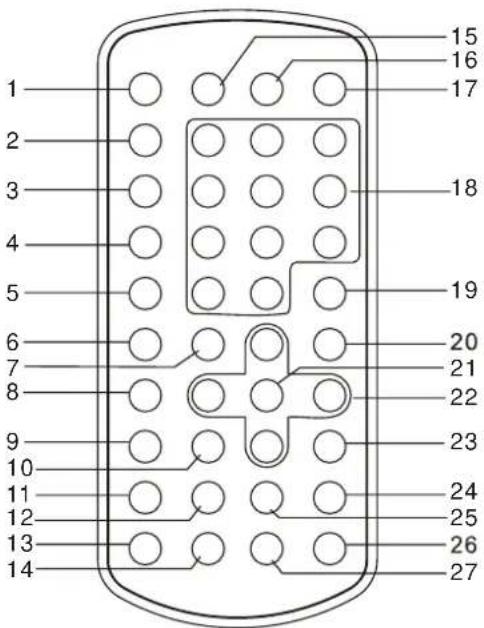
text_image
1 2 3 4 5 6 7 8 9 10 11 12 13 14 15 16 17 18 19 20 21 22 23 24 25 26 27-
FUNCTION button
-
VOL + button
-
VOL - button
-
REPEAT button
-
MENU/TITLE button
-
SUBTITLE button
-
ANGLE/ST/MONO button
-
AUDIO button
-
ZOOM button
-
TEXT/SLOW button
-
MEM DOWN & F.BWD button
-
MEM UP & F.FWD button
-
MUTE button
-
TIME button
-
DISPLAY button
-
SETUP button
-
STANDBY button
-
NUMERIC buttons
-
CLEAR button
-
STOP & BAND button
-
OK/PLAY/PAUSE button
-
NAVIGATION buttons
-
PROG/EPG button
-
TUNER UP & NEXT button
-
TUNER DOWN & PREV. button
-
SEARCH button
-
COUNT DOWN button
BASIC CONNECTION
- It is recommended to be connected to a multi-system TV.
- Ensure that this player and other equipment to be connected to the unit are in the standby or off mode and disconnect the AC power cords before commencing connection.
- Do not block ventilation holes of any piece of the equipment and arrange them so that air can circulate freely.
- Read through the instructions before connecting other equipment.
- Ensure that you observe the color coding when connecting audio, video cables.
Note:
- During DVD play, the TV volume may be at a lower level than during TV broadcasts, etc. If this is the case, adjust the volume to the desired level.
- If the DVD/CD player is connected to the TV through a video cassette recorder, the picture may not be played back normally with some DVDs. If this is the case, do not connect the player via the VCR.
CONNECTING TO A STEREO TV SET
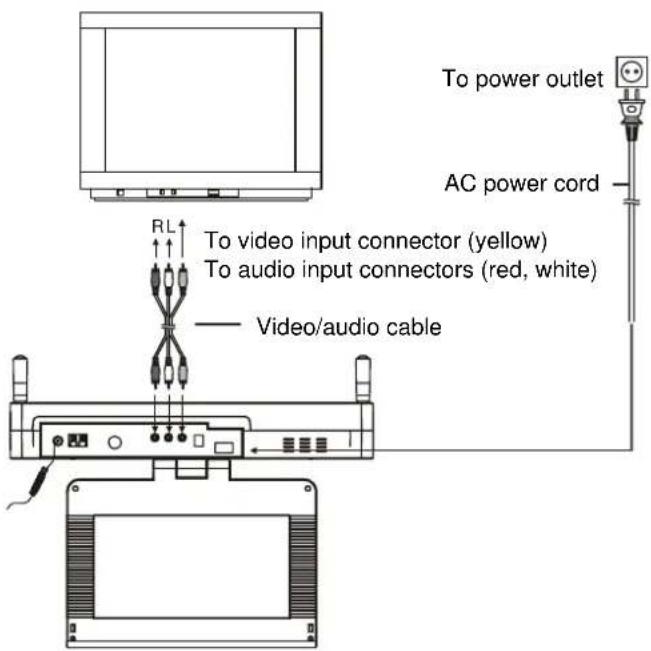
text_image
To power outlet AC power cord RL To video input connector (yellow) To audio input connectors (red, white) Video/audio cableCONNECTING TO A CAR ADAPTOR
The 12V car power adaptor is designed for use with vehicles that have a 12V/24V, negative ground electrical system. WARNING:
Disconnect the car power adaptor when not in use.
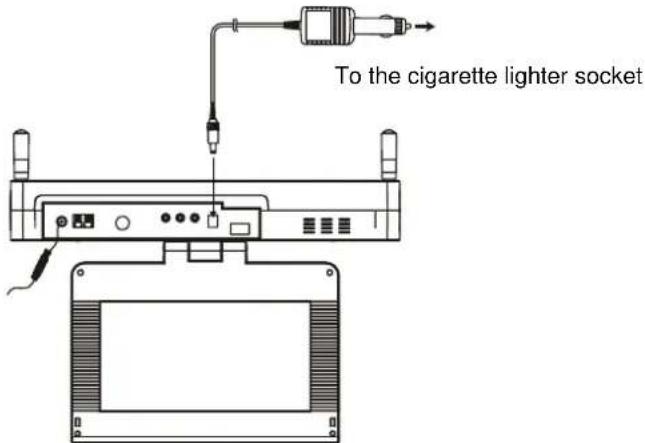
text_image
To the cigarette lighter socketCAUTIONS:
- Use the unit only with 12V car power adaptor, use with other car power adaptor could damage the unit.
- The recommended 12V car power adaptor is for use with this unit only. Do not use it with other equipment.
- In the interests of road traffic safety, do not operate the unit or view video software while driving a vehicle.
- Make sure the unit is fastened securely to prevent from moving outside of the vehicle in an accident.
- When the inside of the cigarette lighter socket is dirty with ashes or dust, the plug section may become hot due to poor contact. Be sure to clean the cigarette lighter socket before use.
- After use, disconnect the 12V car power adaptor from both the unit and cigarette lighter socket.
FUSE REPLACEMENT
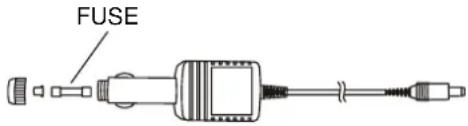
text_image
FUSEOPERATIONS
PREPARATION
Power on the TV set and select video input mode.
GET STARTED
- Turn on the player via STANDBY button and press FUNCTION button several times to switch to DVD mode. The DVD/DVB-T indicator is lit.
- Press CD door OPEN/CLOSE button on the unit to open the disc tray.
- Place a disc onto the disc tray.
- Close the disc tray via CD door OPEN/CLOSE button and the playback starts automatically.
- When a menu screen appears on the TV, move the NAVIGATION buttons or press the numeric buttons to select a preferred track number to start playback.
ADJUST THE VOLUME
Press VOLUME +/- button to adjust the volume level (The LCD shows the corresponding volume value during adjustment).
MUTE BUTTON
During playback, press MUTE button on the remote to mute the unit (the LCD shows mute icon) and press VOLUME button or MUTE button again to resume normal play.
SKIP AHEAD OR BACK
Press NEXT&TUNER UP or PREV&TUNER DOWN button once during play to skip a chapter (DVD) or a track (CD) ahead or backwards.
RAPID ADVANCE/REVERSE
During playback, press MEM UP & F.FWD button or MEM DOWN & F.BWD button several times to scan the disc forward or backward at X2, X4, X8, X20 normal speed.
Press PLAY button to resume normal play.
STOP PLAYBACK
Press STOP button during playback to stop playback; the player activates its resume function when STOP is pressed in PLAY mode; press PLAY button again, playback resumes at the point it stopped previously; open the disc tray or press the STOP button one more time to clear the resume function.
Press SLOW button on the remote control during playback, the disc will be played at 1/2 normal speed at first, each time this button is pressed, the play speed becomes slower (down to 1/7 normal speed.)
Press PLAY button, normal play will resume.
REPEAT
Press REPEAT button during play, it will repeat play one chapter/title or repeat all (DVD disc), or repeat play a track or all tracks (for CD), or repeat the specified points (A-B).
SEARCH FOR PREFERRED SCENE
- Press SEARCH button during play and highlight the item to be played (Title, Chapter, or Chapter time) by navigation buttons.
- Input the desired number or time via the numeric buttons.
- Press OK button to confirm and the playback from the located scene starts.
- To exit search menu, press SEARCH button directly. Note: during DVB play mode, press SEARCH button to auto searching the TV channels directly.
PROGRAM PLAY (UP TO 16 MEMORIES FOR DVD/CD)
- Press PROGRAM/EPG during playback to display the program menu.
- Select location(s) to be memorized via NAVIGATION buttons and then enter desired Titles/Chapters numbers via NUMERIC buttons.
Note: Inputting leading zero is not necessary. If the chapter/title/track number is behind the cardinal 10, press the +10 first and then another unit digit. Some figure inputs may be useless, because it's greater figure than total title/chapter/track number on the disc.
Example: Track 3, press "3"
Track 12, press "+10" and then "2"
Track 21, press "+10" twice, and then "1" - To start programmed playback, select PLAY on the menu and press OK button; pressing PROGRAM/EPG button again to exit programming.
- To clear all items, select the
on the menu, and then press OK button. - You can also cancel program mode by clearing all the items in the program menu by CLEAR button on the remote.
ZOOM PLAY
Press the ZOOM key continuously to zoom in the picture by 2, 3, and 4 times, zoom out by 1/2, 1/3, 1/4 normal size.
Press this key once more when the picture is at 1/4 size to return to the normal size display.
Scroll to view the enlarged picture using Navigation buttons.
ON SCREEN DISPLAY INFORMATION
When the player is in operation, press DISPLAY button continuously on the remote control, the screen will display parts of information (current disc type, title number, chapter number, playtime, audio language, audio type, subtitle language and multi angle, etc) in a sequence.
CHANGING AUDIO SOUNDTRACK LANGUAGE (DVD DISC)
It is possible to change the audio soundtrack language to a different language from the one selected at the initial settings (This operation works only with discs on which multiple audio soundtrack languages are recorded).
Press AUDIO button during DVD disc play, the sound track language changes with the current sound track number shown on the TV screen.
NOTE: When no soundtrack languages are recorded, pressing this button will not work.
MULTI-ANGLE VIEWING (DVD ONLY)
Press ANGLE/ST/MONO button during playback to display the number of angles being played and then select a desired angle to view the scene.
Note: only the DVDs shot with multi-angle scenes have this function.
CHANGING SUBTITLE LANGUAGE (DVD ONLY)
Press SUBTITLE button during playback, the subtitle language shown on the screen will change as a response to each press; When the desired language appears, release the button to view the subtitle in that language.
Note: This function only works on the DVDs recorded with multi-language.
RETURNING TO MAIN MENU AND PLAYING TITLE (DVD)
During playback, press MENU/TITLE button to return to main menu.
Press MENU/TITLE button to play title when the main menu is played.
MP3 PLAYBACK
- Load the MP3 disc onto the disc tray and the TV screen will show all its folders after a few seconds.
- Select the folder you want by the navigation buttons and then OK button to confirm.
- The files in this folder are displayed and select your favourable song via navigation buttons and press OK button to start playback.
- Press NEXT/TUNER UP button and PREV/TUNER DOWN button to select track directly.
- Press REPEAT button change play mode.
KODAK PICTURE CD / JPEG CD PLAYBACK
Slide show of Kodak Picture CD after being loaded begins automatically;
Folders of JPEG picture CD after being loaded are displayed on the TV screen; use the NAVIGATION buttons to select the desired pictures to start playback.
KODAK PICTURE CD / JPEG CD OPERATIONS
1. PLAY MODES
Press REPEAT button during play to change the play modes. During playback, press STOP to enter preview mode.
2. SKIP TO NEXT/PREVIOUS PICTURE
Press NEXT button to skip to the next picture or PREV button to the previous picture.
Press Play/Pause button to resume normal playback.
3. PICTURE ROTATIONS
Press RIGHT and LEFT NAVIGATION buttons to rotate the picture clockwise and anti-clockwise respectively.
4. PICTURE FLIPS
Press UP NAVIGATION button to flip the picture vertically. Press DOWN NAVIGATION button to flip the picture horizontally.
5. PICTURE ZOOM IN/OUT
Press ZOOM button continuously, the picture zooms in by 2, 3, 4 times or zooms out by 1/2, 1/3, 1/4 the original size.
Press this button once more when the picture getting 1/4 size to return to the normal play.
If the picture is enlarged, you may use the navigation buttons to view blocked parts of the picture.
6. SLIDE SHOW TRANSITION MODES
During slide show playback, press the PROGRAM button cyclically to select one of the slide effect to play.
INITIAL SETTINGS
Initial settings page is for you to make your preferred settings up for your player. Once the initial settings are done they are retained in the CPU of the player until otherwise modified.
COMMON PROCEDURES FOR INITIAL SETTINGS
- Press SETUP button.
- Use the navigation buttons to select the item you want to modify, setting page with further setting items displayed shows on the TV screen. Again use navigation buttons to make changes. Press OK button to confirm modifications.
- Use navigation buttons to switch to another setting on the main setting page.
- Press SETUP button to exit main setting page.
1. SYSTEM SETUP
1.1 TV SYSTEM - it is used to select the TV mode.
Please select this option as per your TV set.
1.2 LCD MODE - it is used to select the LCD display mode.
Options: 4:3
16:9
1.3 TV TYPE - it is used to select the TV scan mode, please set as per your TV set.
Options: 4:3PS : Normal Pan & scan mode
4:3LB : Normal Letter box mode
16:9 : 16:9 wide screen mode
1.4 PASSWORD - input password to unlock the system.
The steps are as follows:
1.4.1 Enter SYSTEM SETUP, select the PASSWORD item by scrolling the down navigation button, and then press the right navigation button to select the input box.
1.4.2 Input user's password "0000" to unlock it, in this case, select the input box again to change the password by inputing another new four numeric numbers and then press OK button to confirm. When the password is changed, you are needed to input the new one to unlock the system.
1.4.3 Once you forget your own password, use the supervisor's password "8200" to unlock it.
NOTE: If wrong password was input in unlock status, the system will lock.
1.5 RATING - Set the rating of this player. If you want to change the rating of parental lock, please input the password to unlock first.
Options: 1 KID SAFE / 2 G / 3 PG / 4 PG 13 / 5 PG-R / 6 R / 7 NC-17 / 8 ADULT
1.6 DEFAULT - Reset to factory settings.
Options: RESTORE
1.7 EXIT SETUP - Select it to exit the setup menu.
2. LANGUAGE SETUP
2.1 OSD LANGUAGE - It is used to select different On Screen Display language for different user.
2.2 AUDIO LANG - select preferred audio language. (DVD only, need disc software support)
2.3 SUBTITLE LANG - Select preferred subtitle language. (DVD only, need disc software support)
2.4 MENU LANG - Select preferred disc menu language. (DVD only, need disc software support)
2.5 EXIT SETUP - Select it to exit the setup menu.
3. VIDEO SETUP
3.1 BRIGHTNESS - To set the brightness for the display.
Options: 0/2/4/6/8/10/12
3.2 CONTRAST - To set the contrast effect for display.
Options: 0/2/4/6/8/10/12
3.3 HUE - To set the colour impression for display.
Options: -6/-4/-2/0/+2/+4/+6
3.4 SATURATION - to set the saturation level for display.
Options: 0/2/4/6/8/10/12
3.5 EXIT SETUP - Select it to exit the setup menu.
4. SPEAKER SETUP
4.1 DOWNMIX
Options: LT/RT - Left/Right mix mode
STEREO - Stereo mode
4.2 EXIT SETUP - Select it to exit the setup menu.
RADIO OPERATION
TO PLAY THE RADIO
- Press FUNCTION button repeatedly to switch to RADIO mode (At the moment, the TFT display will be turned off), the radio Indicator will light up and the LCD shows the current frequency and band.
- Select the desired band with STOP/BAND button until your desired band shows in the LCD.
- Tune to the desired station by pressing TUNER UP/DOWN button (Press TUNER UP/DOWN button repeatedly until you get the strongest clearest sound).
- When receiving a FM ST station, the relative icon will show in the LCD.
- The AM antenna and external FM ANTENNA are directional.
- When receiving an FM broadcast, unfold the FM antenna and place it in the best position for the best reception.
- For AM broadcasts, rotate AM antenna until the best reception is heard.
There are two clips on the AM antenna in. Press these two clips to connect the AM antenna easily as the illustration for AM reception.
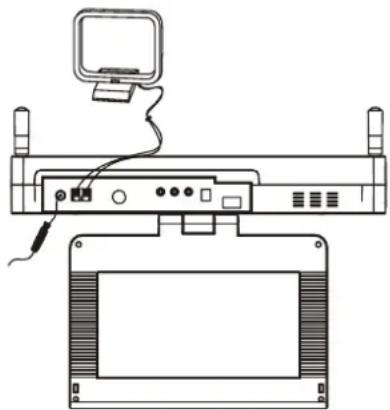
natural_image
Line drawing of a computer setup with monitor, cables, and TV (no text or symbols)-
Adjust the volume level to a comfortable listening level.
-
Press the POWER button to turn off the radio.
Note: If a particular FM (STEREO) station is weak, or you hear too much background noise, press ANGLE/ST/MONO button on the remote to switch FM (MONO). This can often result in a much clearer reception.
TO STORE THE RADIO STATION (UP TO 10 FOR AM / 30 FOR FM)
- Press BAND button to select your desired band and tune to your favorite station via TUNER UP/DOWN button.
- Press memory button and select the stored position via MEM UP/DOWN button.
- Press MEMORY button to save the radio station and exit the memory mode.
Note: The relative information will be shown in the LCD during the procedures of saving radio station.
To recall the saved station, Press MEM UP/DOWN button directly to select your desired station saved in the memory for listening.
SET TIME
Please set time as the below procedure:
-
Press standby button to switch to standby mode and press CD DOOR OPEN/CLOSE button on the unit, the hours flickers for adjusting.
-
Press NEXT/TUNER UP button or PREVIOUS/TUNER DOWN button to adjust hour.
- After adjustment, press CD DOOR OPEN/CLOSE button again to confirm and the minute flashes for adjusting.
- Use NEXT/TUNER UP button or PREVIOUS/TUNER DOWN button to adjust minute.
- Finally, press OK button to save the time.
Note: You only could set time in standby mode.
ALARM OPERATION
The unit is with alarm function, you could set alarm as below steps in standby mode:
- Press and hold ALARM button on the unit until the hour flashes in the LCD with the flickering alarm icon.
- Press NEXT/TUNER UP button or PREVIOUS/TUNER DOWN button to adjust hour.
- Press ALARM button to confirm. And the minute flashes to wait for you adjust.
- Use NEXT/TUNER UP button or PREVIOUS/TUNER DOWN button to adjust minute.
- Press ALARM button again to save.
- Use NEXT/TUNER UP button or PREVIOUS/TUNER DOWN button to select the alarm mode (b b- when the alarm comes on, the unit will sound Bi Bi... Fun- when the alarm comes on, the DVD will be turned on.)
- Finally, use ALARM button to save all settings.
Press ALARM button to enable or disable the function. The LCD show Alarm icon while the alarm is on.
Note: The alarm only could be set in standby mode.
SET TIMER
The timer function is used to time for reminding while cooking. Set the timer as below procedures:
- Press TIME button repeatedly to select the approximate time among 10, 15, 30, 45, 60, 75, 90, 180, OFF.
-
Then use TUNER UP/DOWN button to increase or decrease the minute for exact time
-
Press OK button to confirm.
When it reminds with sound, press TIME button to stop it.
After setting the timer, press count down timer button on the unit or count down button on the remote to check the remain time.
DVB OPERATIONS
GET STARTED
- Be sure the TV antenna is connected to your player properly;
- Power on the player and press FUNCTION button several times to switch to DVB-T mode and DVD/DVB-T indicator is lit.
A dialogue of first time installation shows on the screen, select YES option to perform the first time installation, then select the options as mentioned in the dialogue to finish the first time installation, select NO option to exit this interface.
LANGUAGE
Press AUDIO button on the remote repeatedly to select preferred audio language by TV programs provided during DVB mode.
DISPLAY PROGRAM DETAIL INFORMATION
Press DISPLAY button during DVB play mode to show the program detail information.
ELECTRONIC PROGRAM GUIDE
Press Program/EPG Button during DVB play mode to skim over TV Programs guide.
TELETEXT
Press TEXT button to display teletext.
SEARCH A PROGRAM
- Press NEXT&TUNER UP or PREVIOUS/TUNER DOWN button on the main unit or NAVIGATION UP/DOWN button on the remote to change the channel number. A desired channel can be reached using these two keys.
- Once the desired channel is selected, it should start broadcasting the selected channel immediately. In the event that it only shows the channel information for couple seconds and then change to black screen, this selected channel is verified as a scrambled channel. It is able to press the TUNER UP OR TUNER DOWN button on the main unit or NAVIGATION UP/DOWN buttons on the remote to skip the scrambled channel.
- During DVB play mode, press FUNCTION button to switch to RADIO play mode.
Connecting the Aerial to the player
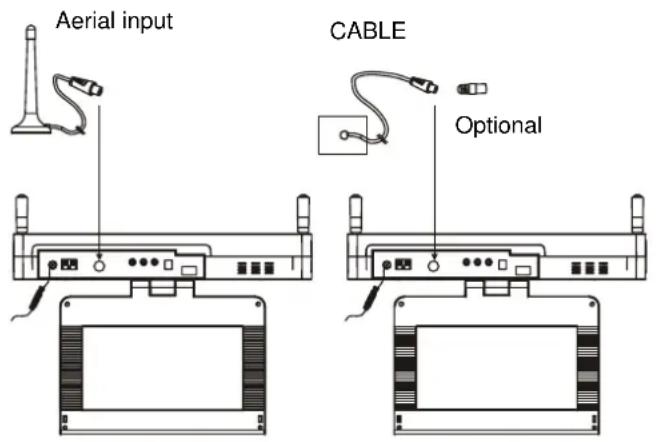
text_image
Aerial input CABLE Optional- When this player is connect to the outdoor aerial, make sure that the TV programme is available from the signal tower.
- The quality of video is depend on the signal strength.
- When this player is connect to the outdoor aerial, in avoid that the huge buildings or obstacle would block the signal.
Note: In some areas the indoor aerial terminal may differ, if the terminal is not fitted to your player, a connector is available for you to connect between Cable and player. Please refer to the above illustration.
Press SETUP Button once, a video menu will be displayed on the screen. Please set the item as your desire.
Remark: press setup button to return previous setup menu during setup.
1. Channel Guide
TV channels - It is used to enter the TV channels list for you to select or sort the TV channels as your desired.
Radio channels - It is used to enter the Radio channels list for you to select or sort the Radio channels as your desired.
Channels class - Select this option to edit the programs as your desired.
Channels edit - Select this option to edit the channels name, move or delete the channels as your desired.
2. System config
TV setting
TV system: it is used to select TV system.
TV type: it is used to select the TV scan mode, please set as per your TV set.
Options: 4:3PS : Normal Pan & scan mode
4:3LB : Normal Letter box mode
16:9 : 16:9 wide screen mode
Video setting
BRIGHTNESS - to set the brightness for the display.
CONTRAST - to set the contrast effect for display.
HUE - to set the colour impression for display.
SATURATION - to set the saturation level for display.
Language
Please select one of desired language for the system.
Parent Control
Change pin - It is used to change the password. Input user's password "0000" to unlock it. Change the password as the prompt.
Channel lock - it is used to Lock the channels.
Time setting
Time zone - it is used to select local time zone.
Sleep - it is used to select sleep time (OFF, 10, 20, 30, 40, 50, 60, 90, 120min)
System info
Select this option, the system info shows on the screen such as: Update date, Tuner info, F/w version, Model version etc. Press SETUP button to exit.
3. Installation
Auto Scan - select one of country from
Manual scan - scroll to manual scan option, a dialogue shows on the screen for you to set, after then, select
Default setup - select this option to restore the factory setting.
TROUBLESHOOTING
If your DVD player does not seem to be functioning properly, check the items below before you contact an authorized service center.
| Symptom | Check |
| Power does not turn on or suddenly turns off. | Make sure the AC cord is securely plugged into AC socket and an AC outlet.Turn the power off and then back on. |
| Remote control won't work | Check that the battery is inserted in the "+" and "-" direction properly.The battery may be flat. Replace it with a new one.Check that the signal transmission is directed at the remote control sensor on the DVD player.Remove the obstacle between the remote controller and remote control sensor. |
| No picture or sound | Check that the A/V cables are securely connected.Check that the disc is a DVD (region number 2 or all), DVD-RW or AUDIO CD.Do not use a disc that has scratches or dirt.Check that the label-side of the disc is facing up.The pick-up lens of the DVD player may be dirty. Contact the service center for lens cleaning.Check that the TV channel is set to VIDEO or AV if viewing with a TV.Check image brightness and contrast settings.Check if TV signal is strong or not. |
| No picture | Check that the LCD display is turned on. |
| No sound | Check the volume setting. If set to zero, turn up volume level.Check that the headphones are plugged into the PHONES socket.Speakers cannot be used with the headphones. |
| No picture and sound | Check that the battery is properly installed and AC cord is properly connected. |
| Distorted video or sound | Use a disc without scratches or dents. |
| Image is unclear or distorted | Check the direction, position and connection of the antenna. |
| No image or image is black and white | Adjust color settings.Check color settings. |
CAUTION
- The apparatus shall not be exposed to dripping or splashing and that no objects filled with liquids, such as vases, shall be placed on the apparatus.
- Minimum distances 2.0cm around the apparatus for sufficient ventilation.
- The ventilation should not be impeded by covering the ventilation openings with items, such as newspapers, table-cloths, curtains, etc.
- No naked flame sources, such as lighted candles, should be placed on the apparatus.
- When the mains plug or an appliance coupler is used as the disconnect device, the disconnect device shall remain readily operable.
• The use of apparatus is in tropical and/or moderate climates. - Attention should be drawn to the environmental aspects of battery disposal.
SPECIFICATIONS
Power source: AC 230V 50Hz
DC input: 12V - 2000mA
Remote control: CR 2025
Receiving bands: AM/FM
Tuning range: AM 522 - 1620 KHz
FM 87.5 -108 MHz
Power consumption: 28W
TV Output (DVD): NTSC/PAL/AUTO
Operating Temperature Range: +5°C to +35°C
LCD display: 9"
Dimensions: 375(L) x 272(W) x 58(H)mm
Operating Humidity Range: 10 % to 75 %
Disc supportable: CD, CD-R, CD-RW, DVD, DVD-R, DVD-RW,
DVD+R, DVD+RW
Support disc format: DVD/MP3/KODAK PHOTO CD/JPEG
Audio signal output:
- DVD (linear audio)
(1) Frequency response:20Hz-20KHz
(2) S/N ratio: >50dB
(3) Dynamic range: 90dB
- CD audio:
(1) Frequency response: 20Hz-20KHz
(2) S/N ratio: >50dB
(3) Dynamic range: 90dB
Specifications are subject to change without notice.
Please install the unit as the following illustration.
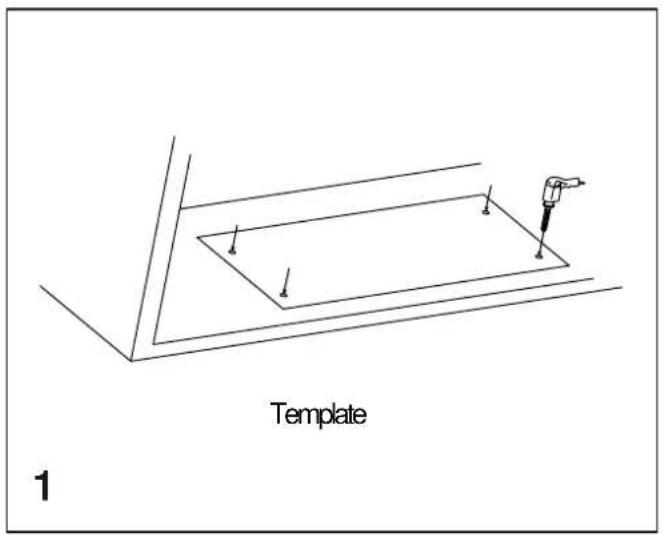
text_image
Template 1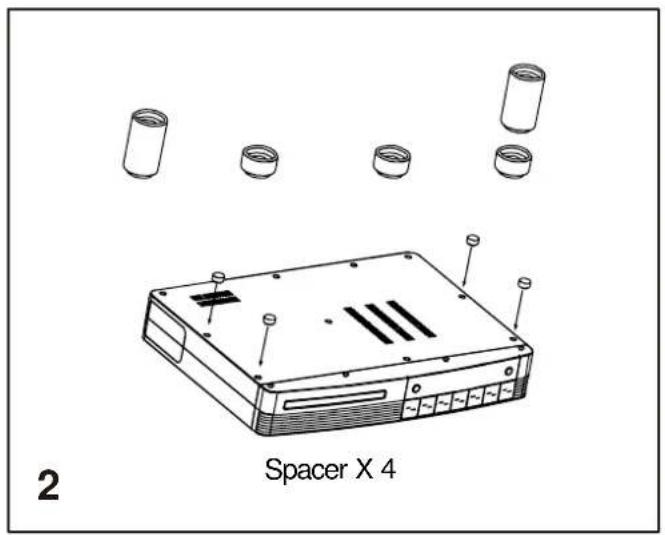
text_image
2 Spacer X 4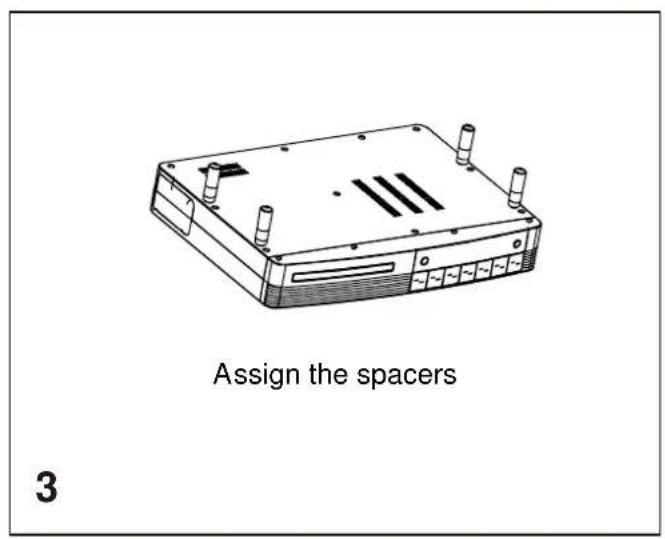
text_image
Assign the spacers 3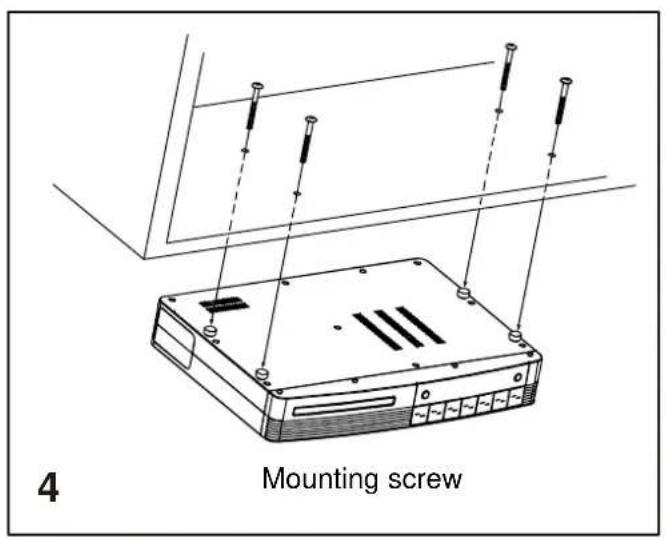
text_image
Mounting screw 4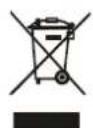
If at any time in the future you should need to dispose of this product please note that: Waste electrical products should not be disposed of with household waste. Please recycle where facilities exist. Check with your Local Authority or retailer for recycling advice. (Waste Electrical and Electronic Equipment Directive)