
DF-831 - Digital photo frame LENCO - Free user manual and instructions
Find the device manual for free DF-831 LENCO in PDF.


| Product Type | Digital Photo Frame |
| Brand | Lenco |
| Model | DF-831 |
| Screen Size (Diagonal) | 8 inches |
| Display Resolution | 800 x 600 pixels |
| Aspect Ratio | 4:3 |
| Supported Image Formats | JPEG, BMP, PNG |
| Internal Memory | 128 MB (approx.) |
| Memory Card Support | SD, SDHC, MMC (up to 32 GB) |
| USB Port | USB 2.0 (for thumb drive) |
| Power Supply | 5V DC, 1A (via AC adapter) |
| Power Consumption | 5W (typical) |
| Dimensions (W x H x D) | 228 x 178 x 28 mm (approx.) |
| Weight | 0.45 kg (approx.) |
| Slideshow Modes | Random, Sequential, with transition effects |
| Clock & Calendar | Yes, built-in |
| Auto Power On/Off | Yes, programmable timer |
| Cleaning Instructions | Wipe gently with a soft dry cloth. Do not use liquids or abrasive cleaners. |
| Safety | Use only the included adapter; keep away from moisture and heat sources. |
| Spare Parts Availability | AC adapter and stand are available separately from Lenco service centers. |
Frequently Asked Questions - DF-831 LENCO
User questions about DF-831 LENCO
0 question about this device. Answer the ones you know or ask your own.
Ask a new question about this device
Download the instructions for your Digital photo frame in PDF format for free! Find your manual DF-831 - LENCO and take your electronic device back in hand. On this page are published all the documents necessary for the use of your device. DF-831 by LENCO.
USER MANUAL DF-831 LENCO
natural_image
Simple geometric diagram with a rectangle and a dot, no text or symbols presentUser manual
- Getting started: Checking the appearance:
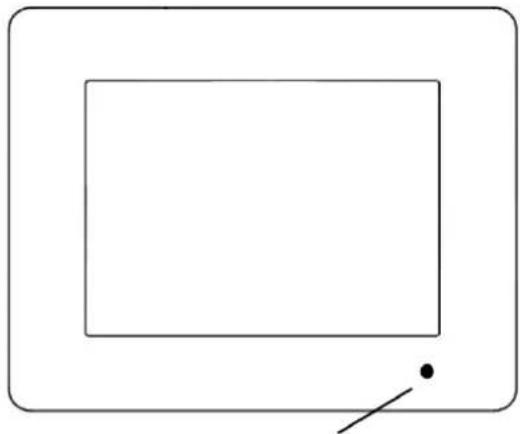
natural_image
Simple geometric diagram with a rectangle and a diagonal line, no text or symbols present.Sensor for remote control
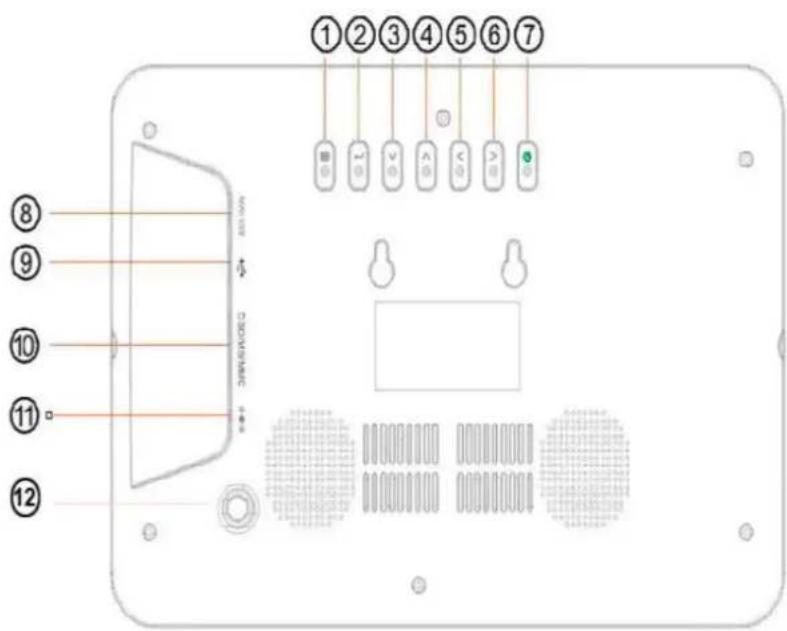
2. Understanding interface and on-board buttons:
(1). Menu / Back;
(2). Confirm
(3). Down;
(4). Up;
(5). Right.
(6). Left;
(7). On/Off;
(8). mini USB port
(9). USB port;
(10). SD/MMC reader
(11). Sockets for AC power adaptor;
(12). Frame stand port
3. Installing and recharging your unit:
Open the package and remove the protective sleeve from the unit. Screw in the stand to the stand screw hole on the back of the photo frame, Adjust the frame position for vertical or horizontal placement, Plug in the AC adapter into power outlet. Plug the other end into the unit. Insert your memory card and the unit starts the slideshow digital photos automatically.
4. Understanding the remote:
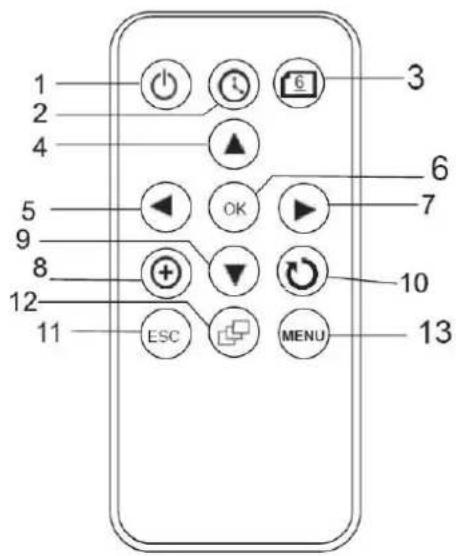
- Power On / OFF
- Clock
- Calendar
- Go up
- Go Left / Previous Picture
- Confirm
- Go Right
- Zoom in/out
- Go Down
- Rotate
- Exit / go to previous menu
- Slideshow
- Setup
Understanding the MENU:
1. Function Navigation
Power on the unit, the unit will display the following menu if there is no card inserted.
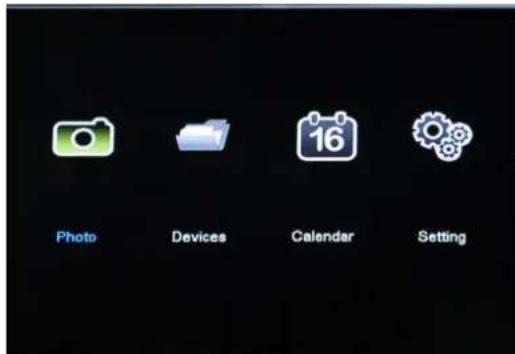
Figure 1
You can use the function navigation above to change all aspects of your photo frame from the transitions sytle of your slideshows to the colour balance of the display. To bring up the menu on screen just press the MENU button on board or the ESC button on the remote to go to the above interface.
2. Playing photos
natural_image
Three women in black dresses and boots standing on a paved path surrounded by trees, taking photos (no visible text or symbols)Figure 2
natural_image
Grid of 16 small images showing diverse scenes with natural backgrounds, displayed against a dark background (no text or symbols on the images themselves)Figure 3
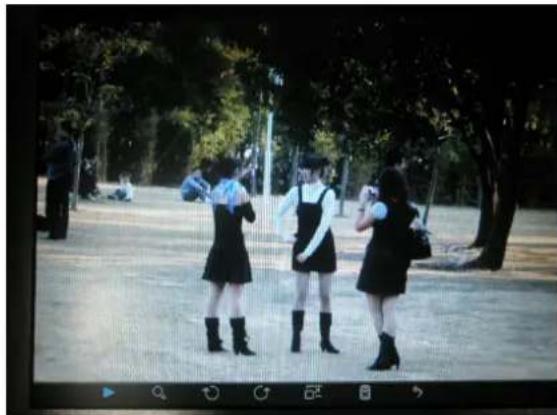
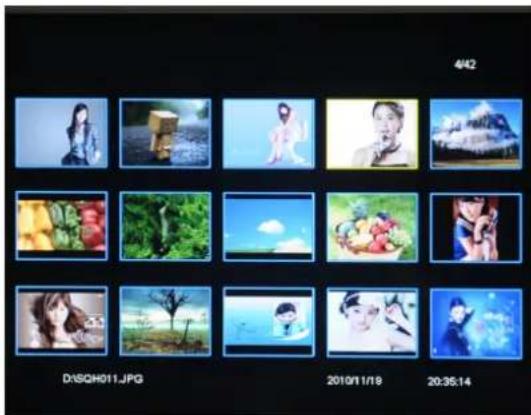
You can slideshow the photos one by one(Figure 2), or display in thumbnail mode(Figure 3)
3. Select the media source
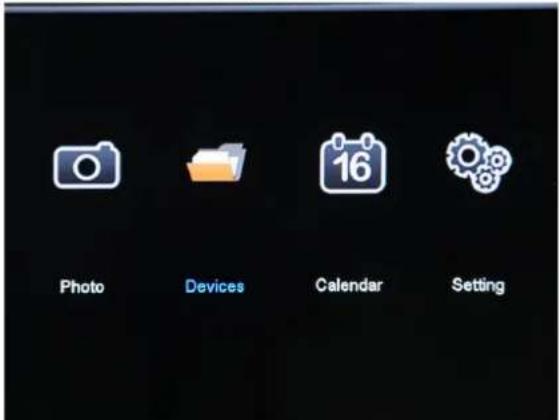
Figure 4
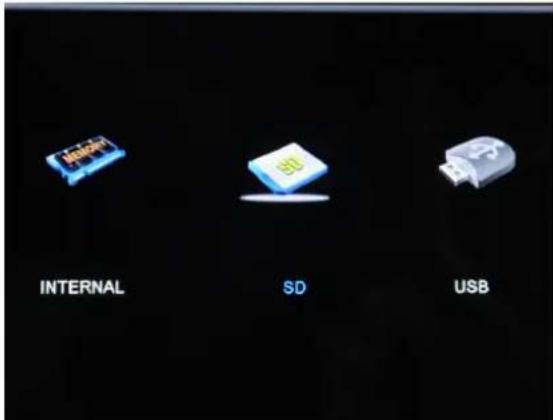
Figure 5
Select "Device" to show the media source, there are 3 media sources including internal memory, SD card and USB drive (Figure 5). If both of SD card and USB drive are inserted, please select the media source first.
4. Display Clock / Calendar
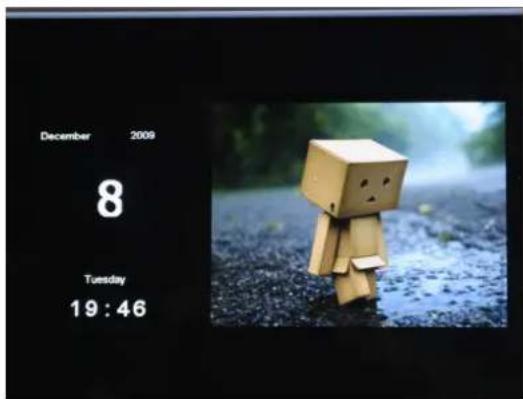
Figure 6
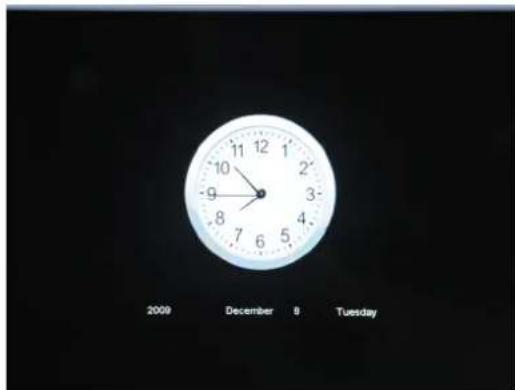
Figure 7
Select "Calendar" from the function navigation menu shown in Figure 1, the calendar & clock window will be displayed, the frame can display a sub window to slideshow photos as shown in Figure 6, or you can bring up a analogue clock to the screen as shown under Figure 7.
5. System setup
To enable some customized features, please configure the frame via system setup as below:
a. Photo Setup
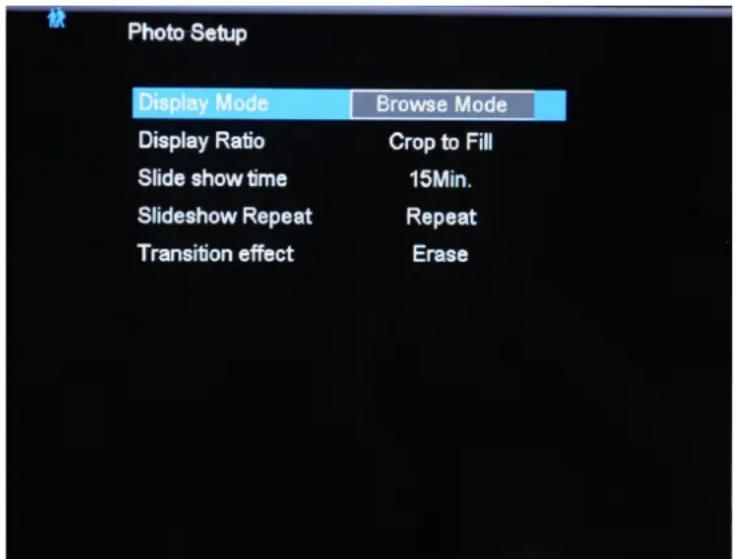
Figure 8
Under "Photo Setup", you can configure Display model, Display Ratio, Slideshow Interval, slideshow repeat as well as transition effect. Navigate with Left / Right button to change the options, use Up/Down to switch between menus.
b. Calendar Setup
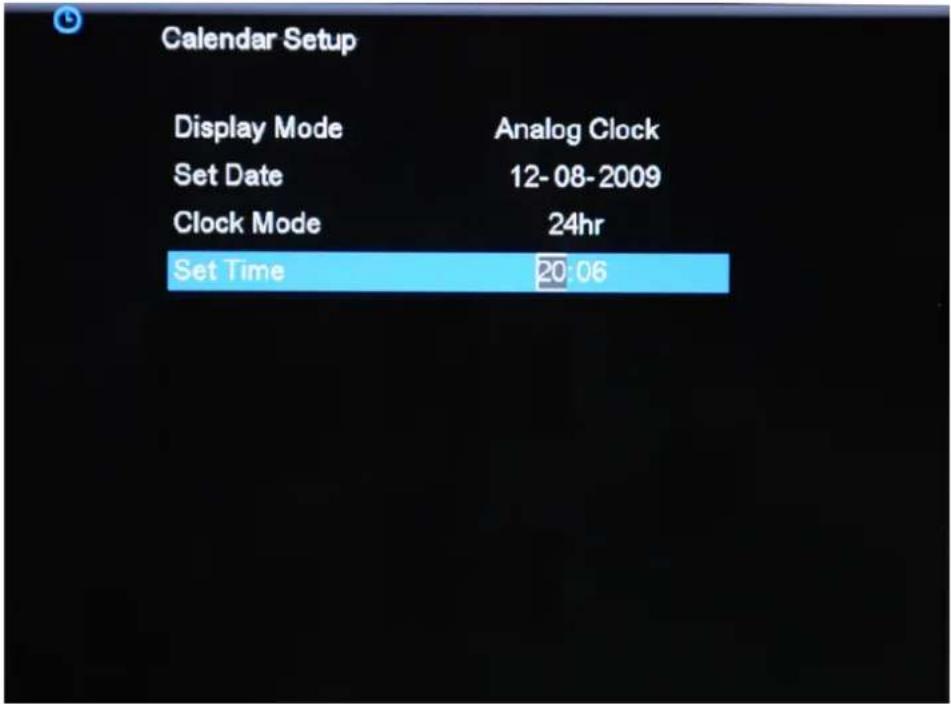
Figure 9
As shown in Figure 9, you can configure Display mode(Analog Colck, Digital Clock), set the right date,
Change the clock mode from 24hr to 12hr or vice versa, change the current time settings. Navigate with Left / Right button to change the options, use Up/Down to increase/decrease the numbers.
c. System setup
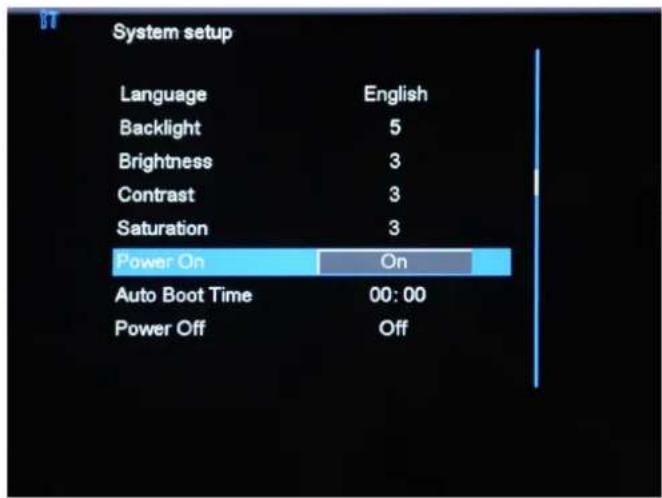
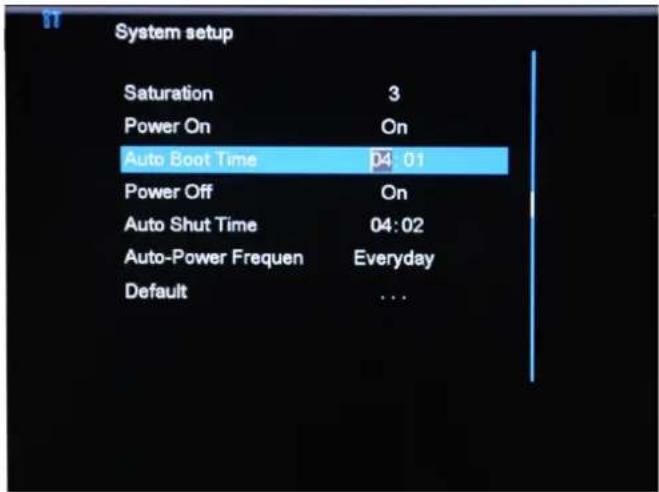
Figure 10
Figure 11
(1). Language
As show in Figure 10, select language menu, you can change the language with left/right buttons.
(2). Auto power On/Off
To enable power on/off, firstly, please select "On" to enable power On/ Power Off, as shown respectively in Figure 10 & Figure 11; then set time for auto power on/power off. Use left/right or Up/Down buttons to change the numbers and menus.
(3). Reset to factory default
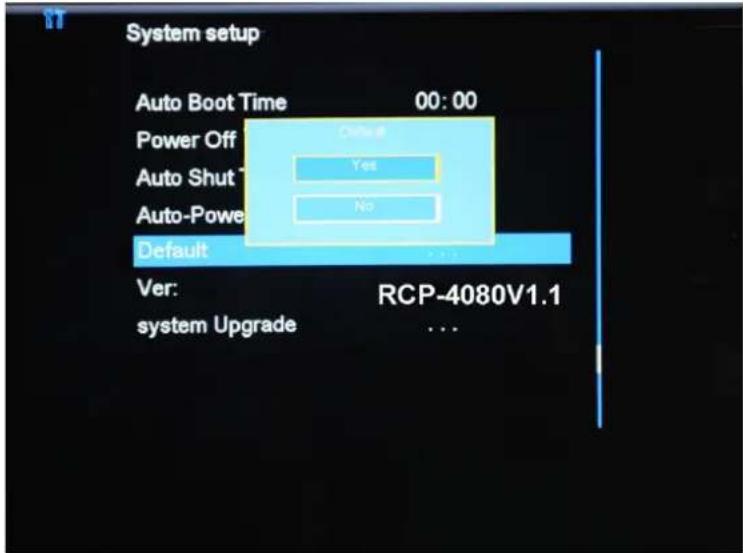
Figure 12
The factory default settings include the optimized configurations for consumers, in case that there is any malfunction or some features can not function as expected, it is highly recommended to restor to factory default (Figure 12), select “Default” then select Yes, all the changed settings will be restored to factory default.
Trouble-shooting:
| Symptom Cause Corrective Actions | |
| Digital Picture Frame doesn't power on | The POWER connector to the unit is not securely inserted. |
| No Start-up screen Memory card is not inserted correctly. | Insert a supported memory card |
| No photo on the memory card | Card is wrongly inserted Verify if the way you inserted the card is correct. Make sure the front label of the memory card is facing AWAY from you. Do not force the memory card into the slot. |
| The File doesn't play | Incompatible File Format Make sure there is at least one supported photo file on the memory card. Compatible Photo format: JPEG |
natural_image
Simple line drawing of a trash bin with crossed lines indicating no waste or plastic (no text or symbols)This symbol indicates that the relevant electrical product or battery should not be disposed of as general household waste in Europe. To ensure the correct waste treatment of the product and battery, please dispose them in accordance to any applicable local laws of requirement for disposal of electrical equipment or batteries. In so doing, you will help to conserve natural resources and improve standards of environmental protection in treatment and disposal of electrical waste (Waste Electrical and Electronic Equipment Directive).
- Understanding interface and on-board buttons:
- Installing and recharging your unit:
- Understanding the remote:
- Understanding the MENU:
- Function Navigation
- Playing photos
- Select the media source
- Display Clock / Calendar
- System setup
- a. Photo Setup
- b. Calendar Setup
- c. System setup
- (1). Language
- (2). Auto power On/Off
- (3). Reset to factory default
- Trouble-shooting:
Brand : LENCO
Model : DF-831
Category : Digital photo frame