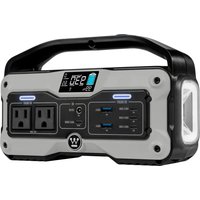
iGen400s - Portable generator WESTINGHOUSE - Free user manual and instructions
Find the device manual for free iGen400s WESTINGHOUSE in PDF.


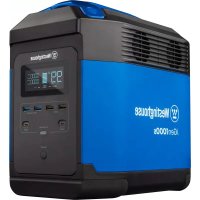
| Product type | Portable electric generator |
| Brand | Westinghouse |
| Model | iGen400s |
| Power supply | Lithium-ion battery 183.6 Wh (10.2 Ah / 18 V) |
| Rated AC power | 200 W |
| Peak AC power | 400 W |
| AC output voltage | 120 V |
| Frequency | 60 Hz |
| Wave type | Modified sine wave |
| DC output | 150 W (12 V / 3 A) |
| USB-C outputs | 3 × 30 W, 1 × 100 W |
| USB-A outputs | 2 × 18 W |
| USB-C input | 1 × 100 W |
| Solar charge input | Up to 100 W |
| Main features | Flashlight with SOS mode, LED screen, protections (overload, short circuit, low voltage, extreme temperature) |
| Maintenance | Full recharge every 3 to 6 months; store in a cool, dry place |
| Safety | Read the manual; do not expose to water; do not disassemble; keep out of reach of children |
| Included accessories | USB-C cable, cigarette lighter adapter |
| Operating temperature | ≥ -10 °C (continuous); can operate briefly at lower temperatures |
| Warranty | Product registration required at westinghouse.com/register |
Frequently Asked Questions - iGen400s WESTINGHOUSE
User questions about iGen400s WESTINGHOUSE
0 question about this device. Answer the ones you know or ask your own.
Ask a new question about this device
Download the instructions for your Portable generator in PDF format for free! Find your manual iGen400s - WESTINGHOUSE and take your electronic device back in hand. On this page are published all the documents necessary for the use of your device. iGen400s by WESTINGHOUSE.
USER MANUAL iGen400s WESTINGHOUSE
natural_image
Blue circular icon with a white crown symbol (no text or numbers)User Manual
iGen400s
Portable Power Station
natural_image
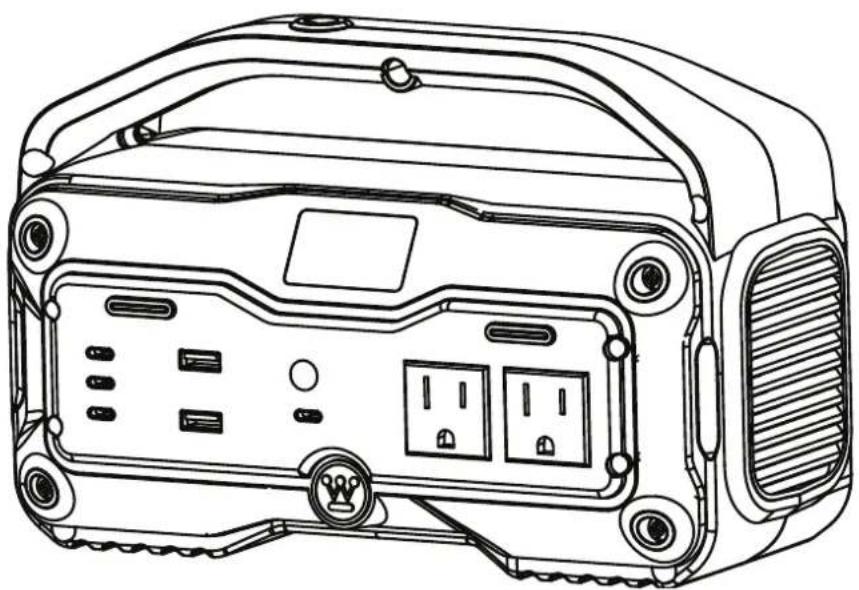
Line drawing of a portable electronic device with front panel, buttons, and ventilation slots (no text or symbols)TABLE OF CONTENTS
Introduction 2-3
Safety 4-5
Components....6-7
Assembly 8
Operation 8-10
Maintenance....11-12
Customer Service / Company Address......Back Page
INTRODUCTION
OVERVIEW AND INTENDED USE
The Westinghouse iGen400s Portable Power Station is intended to operate as a power supply for electric devices with a maximum power consumption of 300 W. This product is not intended for use with equipment related to personal safety, medical devices, nuclear equipment, or the manufacturing of air and spacecrafts. Westinghouse assumes no liability for accidents related to personal safety, fire, or equipment failure caused by using this product with the previously mentioned devices.

WARNING
Operating, servicing, and maintaining this equipment may expose you to chemicals which are known to the State of California to cause cancer and birth defects or other reproductive harm. To minimize exposure, wear gloves or wash your hands frequently when servicing this equipment. For more information go to www.P65warnings.ca.gov.
DISCLAIMERS
All information, illustrations, and specifications in this manual were in effect at the time of publishing. The illustrations used in this manual are intended as representative reference views only. We reserve the right to make any specification or design change without notice.
ALL RIGHTS RESERVED
All rights reserved. No reproduction allowed in any form without written permission from Westinghouse Outdoor Power Equipment.

DANGER
Read this manual before using or performing maintenance on this product. Failure to follow the instructions and safety precautions in this manual can result in serious injury or death.
UPDATES
The latest User Manual for Westinghouse products can be found under the support tab: westinghouse.com/pages/manuals
Or scan the following QR code with a smartphone camera to be directed to the link.
PRODUCT REGISTRATION
For trouble-free warranty coverage, it is important to register the Westinghouse product.
Register by:
- Completing and mailing the product registration card included in the carton.
- Going online to: westinghouse.com/register
- Scanning the following QR code with a smartphone camera to be directed to the mobile registration link.
For Your Records
Date of Purchase: ____
Model Number: ____
Serial Number:
Place of Purchase: ____
- Sending the following product information to:
Westinghouse Outdoor Power
Warranty registration
777 Manor Park Drive
Columbus, OH 43228
IMPORTANT: Keep the purchase receipt for trouble-free warranty coverage.
SPECIFICATIONS
Battery Cell Type ....Lithium-ion
Capacity 10.2 Ah / 18 V (183.6 Wh)
AC Rated Output 200 W
AC Peak Output 400 W
AC Output Voltage....120 V
DC Output 150 W
USB-C Output 3 x 30 W, 1 x 100 W
USB-C Input....1 x 100 W
USB-A Output 2 x 18 W
Solar Charging Input up to 100 W
Sine Wave Type......Modified
Frequency 60 Hz
NOTICE
This product is designed and rated for continuous operation at ambient temperatures above 14°F (-10°C). If
needed, this product can be operated in extremely cold temperatures for short periods. If the product is exposed to extreme temperatures during storage, it should be brought back within the optimal temperature range before operation.
NOTICE
Thank you for choosing Westinghouse! PLEASE READ BEFORE RETURNING THIS PRODUCT FOR ANY REASON.
If you have a question or experience a problem with your Westinghouse purchase, call us at 1-855-944-3571 to speak with an agent.
SAVE THIS MANUAL FOR FUTURE REFERENCE.
HAVE QUESTIONS?
Email us at service@wpowereq.com
or call 1-855-944-3571
SAFETY DEFINITIONS
The words DANGER, WARNING, CAUTION, and NOTICE are used throughout this manual to highlight important information. Be sure that the meanings of this safety information are known to all who operate, perform maintenance on, or are near the product.

This safety alert symbol appears with most safety statements. It means attention, become alert, safety is involved! Please read and abide by the message that follows the safety alerts symbol.

Indicates a hazardous situation
which, if not avoided, will result in death or serious injury.

Indicates a hazardous situation
which, if not avoided, could result in death or serious injury.

Indicates a hazardous situation
which, if not avoided, could result in minor or moderate injury.
NOTICE
Indicates a situation which can cause dam-
age to the unit, personal property, and/or the environment, or cause the equipment to operate improperly.
NOTE: Indicates a procedure, practice or condition that should be followed for the unit to function in the manner intended.
SAFETY SYMBOLS
Follow all safety information contained in this user manual as well as the information on the product labeling.
| SYMBOL | DESCRIPTION |
 | Safety Alert Symbol. Indicates a potential personal injury hazard. |
 | Read User Manual. To reduce the risk of injury, the user must read and understand user manual before using this product. |
 | WARNING! Risk of electrical shock. Never use the power station to operate power tools. Never use the power station to operate items with live, open wires. |
 | Wet Conditions Alert. Do not expose to water or rain. |
 | WARNING! Turn the machine OFF and disconnect it from the power supply before inspecting, cleaning, changing accessories, or any other maintenance task. |

WARNING
READ AND UNDERSTAND ALL INSTRUCTIONS. Failure to follow all instructions listed below and on the electric shock, fire, and/or serious personal injury.
- Read the user manual carefully. Learn the applications and limitations of the product, as well as the specific potential hazards related to its use. Following this rule will reduce the risk of electric shock, fire, or serious injury.
- DO NOT disassemble, repair, or modify the unit or the battery.
- DO NOT place the unit close to or in a fire or expose it to heat. Keep out of direct sunlight.
- DO NOT charge, use or store the unit in a bathroom or in an area exposed to rain or moisture.
- Only use the output socket to power external devices. Never connect the output to main power under any circumstances.
- DO NOT touch the unit or the plug-in points with wet hands.
- DO NOT connect any metallic objects to the AC input or output.
- DO NOT rub your eyes if fluid from inside the unit gets on your hands.
- DO NOT dispose the unit with household waste.
- DO NOT use any inappropriate or damaged power cords.
- DO NOT operate the unit above the specified input voltage.
- DO NOT use the unit if it is not functioning correctly.
- DO NOT move the unit if it is recharging or in use.
• Only use and store the unit in a clean and dry environment. DO NOT use or store the unit in dusty or wet environments. - Inspect the unit prior to every use. DO NOT use the unit if it is damaged or broken.
- Do not use the unit if the power cord is damaged or broken.
- Keep the unit away from children. DO NOT let children use the power supply unit.
- Keep this product away from pets.
- DO NOT use or store the unit in an area or environment with high temperature.
- Should fluid from inside of the unit come in contact with your skin or clothing, wash the affected areas with cold water.
- In adverse weather conditions, unplug the power cord from the socket.
- DO NOT place the unit on its side or upside down while in use or storage.
- If rust, peculiar odors, overheating or other abnormal circumstances are observed, stop using the unit immediately and contact customer service.
- The unit complies with all legal requirements for transport of dangerous goods.
- Be sure that the unit is properly secured when transporting it in a motor vehicle.
- Turn off the portable power station immediately if it has accidentally fallen, was dropped or exposed to vibrations.
- Carefully read the instructions for the electric devices that will be connected to the portable power station.
- Be sure that the device being connected is off before connecting it to the portable power station.
- Retain these instructions. Refer to them frequently and use them to instruct others who may use this product.
FIG. 1
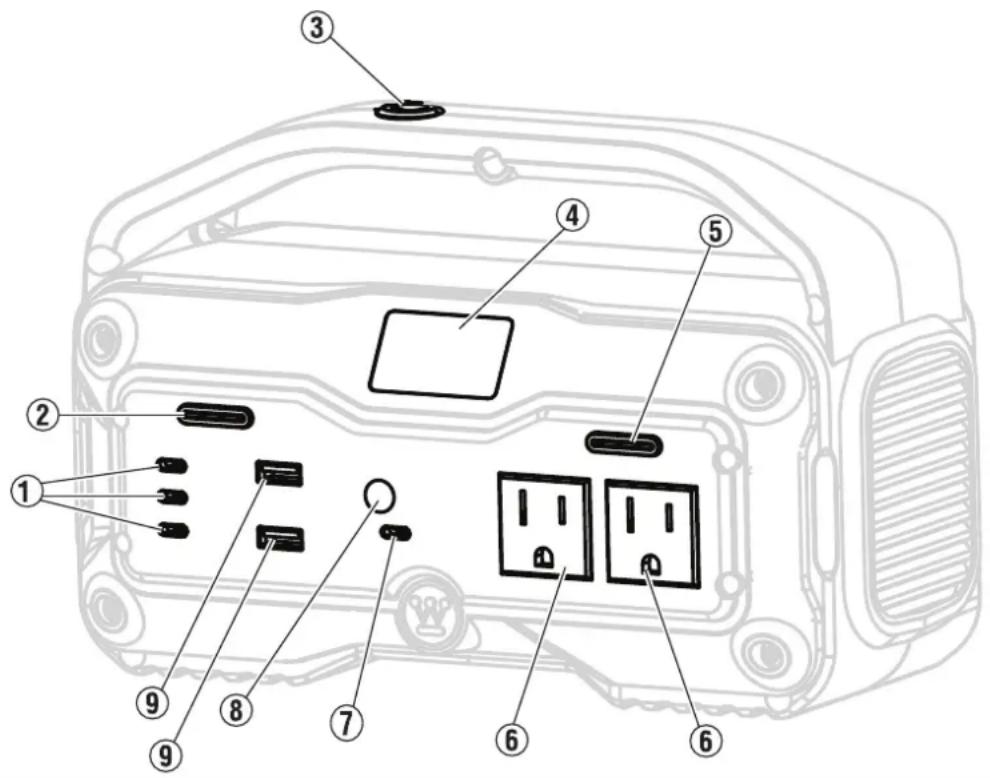
UNDERSTANDING THE UNIT
To reduce the risk of personal injury and product failure, read and understand the information in this user manual and the information on the product labeling.
See Figure 1 and the Physical Component Location table.
| Physical Component Location (See Figure 1) | ||
| Index Number | Component Description | |
| 1 USB-C | 30 W power out port Ports for providing power to USB-C, 30 watt compatible devices | |
| 2 DC power ON / OFF button Enables or disables power distribution to DC devices | ||
| 3 Flashlight ON / OFF button Enables or disables the flashlight function | ||
| 4 LED display screen Displays functional information for the performance of the power station | ||
| 5 AC power ON / OFF button Enables or disables power distribution to AC devices | ||
| 6 AC 120 V power outlet Power outlets for providing power to AC, 120 V compatible devices | ||
| 7 100 W USB-C charging and power out port A port for providing power to USB-C, 100 watt compatible devices | ||
| 8 DC 12 V 3 A power out Outlet for providing power to 12 volt, 3 amp, DC compatible devices | ||
| 9 USB-A 18 W power out port A port for providing power to USB-A, 18 watt compatible devices | ||
See Figure 2 and the Display Screen Icon table.
| Display Screen Icon (See Figure 2) | ||
| Index Number | Component Description | |
| 1 Battery | status indicator Indicates the charge level of the battery | |
| 2 | Charge time remaining / runtime remaining | Indicates how much remaining time there is to full charge or how much run time remains before the battery requires charging |
| 3 | Power in (W) | Indicates power being provided to the unit |
| 4 | Power out (W) / ERROR Codes | Indicates that power being provided from the unit and where error codes are displayed. |
FIG. 2
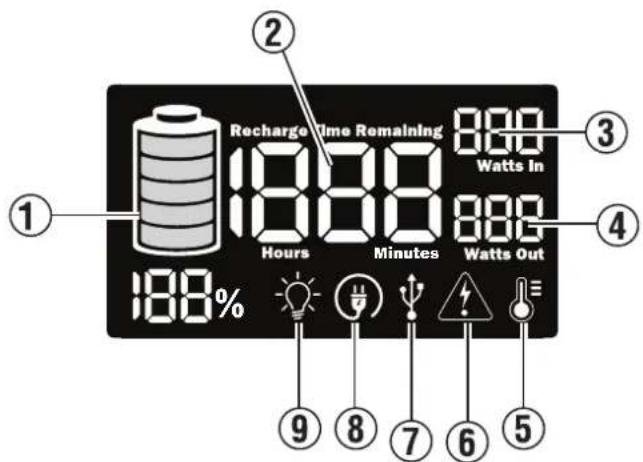
| Display Screen Icon (See Figure 2) | ||
| 5 Extreme temperature alert Indicates the power station | is operating beyond the recommended temperature range and is too hot or too cold. See below for more information. | |
| 6 Overload warning Indicates that too much power is being drawn from the power station | ||
| 7 USB output indicator Indicates that the USB output is in use | ||
| 8 AC output indicator Indicates that the AC output is in use | ||
| 9 Flashlight indicator Indicates that the flashlight is in use | ||
MODIFIED SINE WAVE
The output voltage waveform of the inverter is called “modified sine wave.” It is a step waveform similar to household alternating current. This type of waveform is applicable to most of the electrical load, including linear or switching power supply, transformer, and electric motor. The voltage in a modified sine wave rises and falls abruptly, the phase angle changes abruptly too, and it stabilizes at 0 V for a period of time before changing polarity.
NOTE: Modified sine inverters are not suitable for all electrical appliances. Unusable appliances include some air conditioning fans with capacitance voltage-reducing circuits.
PROTECTION MODE
Short-circuit / Overload Protection: If the AC or DC output short-circuits or overloads, the unit will turn off the power output. The total power output of AC and DC connections cannot exceed 300 W.
Some devices may require a surge power. The surge power could exceed 300 W. This could cause overload protection for the unit. Please remove the devices and consult with the device manufacturers for more information.
Low-voltage Protection: If the battery level of the power station is near 15% while providing power to AC connected devices that require more than 160 watts, the power station will default to low-voltage protection mode to protect the battery. The power station will stop providing power to AC connected devices and the battery status indicator will begin flashing. Disconnect AC devices and charge the power station. The power station must charge to a minimum of 30% before AC devices can be reconnected and powered.
EXTREME TEMPERATURE ALERT
High temperature / Low temperature discharge: when the temperature of internal components are 23irc F or lower, or 140irc F or higher ( ≤ -5irc C or ≥ 60irc C), the extreme temperature alert icon will begin flashing. If the temperature reaches 14irc F or lower, or 149irc F or higher ( ≤ -10irc C or ≥ 65irc C), the extreme temperature alert icon will stop flashing and remain illuminated. The unit will automatically shut down to prevent damage for the internal components. When the temperature of the internal components of the unit are within 25irc F– 126irc F ( -4irc C– 52irc C), the icon will disappear.
High temperature / Low temperature charge: when the temperature of the internal components are 41°F or lower, or 131°F or higher (≤5°C or ≥55°C), the extreme temperature alert icon will begin flashing. If the temperature reaches 32°F or lower, or 140°F or higher (≤0°C or ≥60°C)], the extreme temperature alert icon will stop flashing and remain illuminated. The unit will automatically shut down to prevent damage to the internal components. When the temperature of the internal components are within 45°F–126°F (7°C–52°C), the icon will disappear.
NOTE: When the extreme temperature alert icon appears, relocate the unit to an area within the appropriate temperature range to prevent damaging the unit.
REMOVING CARTON CONTENTS
WARNING This product does not require assembly. Do not attempt to operate this product if it is not completely assembled. Using an improperly assembled product can be hazardous and could result in serious personal injury.
- Open the carton.
- Remove and inspect the carton contents. Confirm that all the items in the INCLUDED LIST are present and undamaged.
- Recycle or dispose of the packaging materials.
If any parts are missing, contact our service team at service@wpowereq.com or call 1-855-944-3571.
WARNING Do not alter or modify this product unless instructed otherwise in this manual or by the manufacturer. Do not use attachments or accessories that are not recommended for use with this product. Making unauthorized modifications and using incompatible accessories can damage the unit and may void the warranty.
| INCLUDED LIST | |
| Item Quantity | |
| Power Station 1 | |
| USB-C Charging Cable 1 | |
| Cigarette Lighter Adapter 1 | |
WARNING Do not alter or modify this product unless instructed otherwise in this manual or by the manufacturer. Do not use attachments or accessories that are not recommended for use with this product. Making unauthorized modifications and using incompatible accessories can damage the unit and may void the warranty.
NOTICE Before using the portable power station, charge the unit by connecting the power supply cable (included). Connect the power supply cable to the unit and plug the cable into a power outlet.
OPERATION
POWERING AC APPLIANCES
NOTICE Press and hold the AC power ON / OFF button to turn on the unit and enable AC power.
- Be sure that the appliance being connected to the unit is off.
- Connect the appliance to the AC outlet on the unit.
- Press and hold the AC power ON / OFF button to turn on the unit.
NOTE: The button will illuminate when ON.
- Turn on the appliance.
NOTE: The LED Display Screen will display the active wattage being drawn from the appliance.
- When use is complete, turn off the appliance.
- Disconnect the appliance from the unit.
- Press and hold the AC power ON / OFF button to turn off the unit.
NOTE: Short press the AC power ON / OFF button to turn off the display screen in 10 seconds. This will allow 10 seconds to switch power sources while having the display screen powered on. Short press the AC power ON / OFF button to turn on the display screen and/or to enable AC power.
NOTE: The battery will drain if the unit is not off. To turn off the unit, press and hold the AC power ON / OFF button. If the unit is left on without any connected devices and the AC power is not on, the display screen will turn off after ten seconds. If the unit is left on without any connected devices, it will automatically turn off after two hours.
NOTICE If the total output exceeds 200 W, the portable power station will turn off automatically. Be sure that the power consumption is less than 200 W before using the portable power station.

WARNING
The AC outlets, AC voltage, and frequency are different according to different countries. Be sure that the portable power station are consistent with the specifications of the intended appliances.
POWERING DC APPLIANCES
NOTICE
Press and hold the DC power ON / OFF button to turn on the unit and enable DC power.
See the Incompatible Devices table for a list of devices that are, often, more than 150 W.
- Be sure that the appliance being connected to the unit is off.
- Connect the appliance to the USB outlet or the DC 12 V Power.
- Press and hold the DC Power ON / OFF button to turn on the unit.
NOTE: The button will illuminate when ON.
- Turn on the appliance.
NOTE: The LED Display Screen will display active wattage being drawn from the appliance.
-
When use is complete, turn off the appliance.
-
Disconnect the appliance from the unit.
-
Press and hold the DC power ON / OFF button to turn off the unit.
NOTE: Short press the DC power ON / OFF button to turn off the display screen in 10 seconds. This will allow 10 seconds to switch power sources while having the display screen powered on. Short press the DC power ON / OFF button to turn on the display screen and/or to enable DC power.
NOTE: The battery will drain if the unit is not off. To turn off the unit, press and hold the DC power ON / OFF button. If the unit is on without any connected devices and the DC power is not on, the display screen will turn off after ten seconds. If the unit is on without any connected devices and the DC power is not on, it will automatically turn off after two hours.
NOTICE
If the total output exceeds the wattage output of the DC outlet, the portable power station will turn off automati-
cally. Be sure that the power consumption is less than what the outlet is rated for before using the device.
| INCOMPATIBLE DEVICES* | ||||
| Hair Dryers Electric Drills | Induction Cookers Electric Kettle | Heaters Microwave Ovens | Toasters | Rice Cookers Blenders |
| * This is not an exhaustive list of incompatible devices. There may be other devices not listed that are incompatible with the unit. Please inspect the wattage of the intended devices to be used with the unit for compatibility. | ||||
USING THE FLASHLIGHT / HALO LIGHT
- Turn on the portable power station.
- Press the Flashlight ON / OFF button to turn on the flashlight.
- Press the Flashlight ON / OFF button to decrease the brightness. Press the Flashlight ON / OFF button again to decrease the brightness more.
- Press the Flashlight ON / OFF button again to turn off the flashlight.
- Press and hold the Flashlight ON / OFF button to turn on SOS Mode.

Do not look directly into the light. Looking directly into the light may cause light sensitivity or injury to the
RECHARGING THE PORTABLE POWER STATION WITH THE USB-C CABLE
- With the USB-C cable (included), connect the portable power station to a power supply.
NOTE: The unit requires up to a 10 second interval to confirm the connection to the power source before charging begins. When the unit is charging, the battery indicator light will blink on the LED Display Screen. When the unit is completely charged, the battery indicator light will stop blinking.
- When charging is complete, disconnect the unit from the power supply.
RECHARGING THE PORTABLE POWER STATION WITH THE SOLAR PANEL CABLE
- Put the solar panel where it will receive as much sunlight as possible.
- Connect the solar panel output to the input on the portable power station.
NOTE: When the unit is charging, the battery indicator light will blink on the LED Display Screen. When the unit is completely charged, the battery indicator light will stop blinking. - When charging is complete, disconnect the unit from the solar panel.
COLD WEATHER USE
Operating and charging the portable power station in temperature below the specified temperature range can affect battery capacity. It is recommended to keep the unit insulated from extremely cold temperature. If the unit is insulated from extremely cold temperatures, the capacity of the battery is more likely to be maintained. If the unit is being operated in temperatures below the specified range, it is recommended that the unit is connected to a power supply throughout operation.
MAINTENANCE TIPS
- Keep the battery level at 80% or higher. Charge the power station to full capacity every 3–6 months. Never keep the unit continuously charging for an extended period of time.
• Always be sure to store the unit in a cool, dry location.
NOTE: Failure to maintain the portable power station by adhering to these suggestions can result in battery damage, poor battery health, and damage to the unit which will void the product warranty.
RECYCLE
Always return used electronic products, batteries, and packaging materials to dedicated collection points. This will help prevent uncontrolled waste disposal and promote the recycling of materials.
FCC STATEMENT
The operation meets the following two conditions:
(1) The equipment will not cause harmful interference (2) The equipment must accept any interference received, including interference that may result in accidental operation.
NOTE: The equipment has been tested and meets the restrictions of Category B digital equipment in Part 15 of FCC Rules.
These restrictions are designed to provide reasonable protection against harmful interference in housing installation.
This equipment will generate, use and radiate radio frequency energy. If it is not installed and used according to the instructions, it may cause harmful interference to radio communication. However, there is no guarantee that interference will not occur in a particular installation.
If the device does cause harmful interference to radio or television reception (which can be determined by switching off and switching on devices), users are advised to attempt to correct the interference by one or more of the following measures:
Re-adjusting or placing the receiving antenna.
Increase the distance between the device and the receiver.
FAULT CODES
| Fault Code Fault Meaning Corrective Action | ||
| F01 / Warning Icon | Abnormal communication between the main control and the power board. The main control will turn off the AC output. | Disconnect devices to the AC output. Wait five minutes to reconnect devices. |
| F02 BMS communication error. Replace the unit. | ||
| F04 / Warning Icon | High-temperature protection. The main control will turn off the AC output. | Disconnect devices to the AC output. Press the AC power output button to clear the fault code and and turn on the AC output. Connect devices to the AC output. |
| F05 / Warning Icon | Short-circuit protection. The main control will turn off the AC output. | Disconnect devices to the AC output. Press the AC power output button to clear the fault code and turn on the AC output. Connect devices to the AC output. |
| F06 / Warning Icon | Inverter Failure. The main control will turn off the AC output. | Disconnect devices to the AC output. Press the AC power button to clear the fault code. Turn on the AC output and connect devices. |
| F07 / Warning Icon | The inverter has detected abnormal output voltage. The main control will turn off the AC output. | Disconnect devices to the AC output. Press the AC power button to clear the fault code. Turn on the AC output and connect devices. |
| F11 / Warning Icon AC output overload. | Disconnect devices to the AC output. Press the AC power button to clear the fault code. Turn on the AC output and connect devices. | |
| F15 / Overload Icon / Warning Icon | DC output overload / short circuit. The DC output will stop supplying power. | Disconnect devices to the DC output. Confirm that the connected devices comply with the maximum wattage requirements. Connect devices in accordance with the recommended maximum wattage requirements. |
| F16 / Warning Icon Temperature warning. | The power station is operating beyond the recommended operating temperatures. | |
| F18 / Warning Icon USB-C communication error. | Disconnect devices from the USB-C ports and wait five minutes before connecting devices. If the fault code persists, please contact customer service. | |
TABLA DE CONTENIDO
PRESUPUESTO
CARACTÉRISTIQUES
COMPRENDRE L'UNITÉ
natural_image
Blue circular icon with a white crown symbol (no text or numbers)www.westinghouse.com
Service Hotline (855) 944-3571
777 Manor Park Drive, Columbus, OH 43228
and Westinghouse are trademarks of Westinghouse Electric Corporation.
Used under license by Westinghouse Outdoor Power Equipment.
© 2026 Westinghouse Outdoor Power Equipment, All Rights Reserved.
- User Manual
- TABLE OF CONTENTS
- INTRODUCTION
- OVERVIEW AND INTENDED USE
- WARNING
- DISCLAIMERS
- ALL RIGHTS RESERVED
- DANGER
- UPDATES
- PRODUCT REGISTRATION
- For Your Records
- SPECIFICATIONS
- NOTICE
- HAVE QUESTIONS?
- Email us at service@wpowereq.com
- or call 1-855-944-3571
- SAFETY DEFINITIONS
- SAFETY SYMBOLS
- UNDERSTANDING THE UNIT
- MODIFIED SINE WAVE
- PROTECTION MODE
- EXTREME TEMPERATURE ALERT
- REMOVING CARTON CONTENTS
- OPERATION
- POWERING AC APPLIANCES
- POWERING DC APPLIANCES
- USING THE FLASHLIGHT / HALO LIGHT
- RECHARGING THE PORTABLE POWER STATION WITH THE USB-C CABLE
- RECHARGING THE PORTABLE POWER STATION WITH THE SOLAR PANEL CABLE
- COLD WEATHER USE
- MAINTENANCE TIPS
- RECYCLE
- FCC STATEMENT
- TABLA DE CONTENIDO
- PRESUPUESTO
- CARACTÉRISTIQUES
- COMPRENDRE L'UNITÉ
Brand : WESTINGHOUSE
Model : iGen400s
Category : Portable generator