
K55T0 413S - Fridge BAUKNECHT - Free user manual and instructions
Find the device manual for free K55T0 413S BAUKNECHT in PDF.

| Brand | Bauknecht |
| Model | K55T0 413S |
| Product type | Fridge-freezer |
| Climate class | SN (10°C to 32°C), N (16°C to 32°C), ST (16°C to 38°C), T (16°C to 43°C) |
| Refrigerant | R600a (isobutane) |
| Insulation blowing agent | c-Pentane |
| Power supply | 220-240 V ~ 50 Hz |
| Number of doors | 2 |
| Defrost type | Automatic for fridge, manual for freezer |
| Interior lighting | LED |
| Temperature adjustment | 8-position thermostat (0-7) |
| Quick freeze function | Yes (activate 4 to 6 hours before) |
| Adjustable feet | Yes (2 at front) |
| Door reversibility | Yes |
| Spare parts available | Yes (thermostats, sensors, PCBs, LED) for 7 years after last model |
| Cleaning | Warm water and mild soap, do not use steam cleaner |
| Manual freezer defrosting | Necessary when ice becomes thick |
| Use | Domestic, indoor only |
Frequently Asked Questions - K55T0 413S BAUKNECHT
User questions about K55T0 413S BAUKNECHT
0 question about this device. Answer the ones you know or ask your own.
Ask a new question about this device
Download the instructions for your Fridge in PDF format for free! Find your manual K55T0 413S - BAUKNECHT and take your electronic device back in hand. On this page are published all the documents necessary for the use of your device. K55T0 413S by BAUKNECHT.
USER MANUAL K55T0 413S BAUKNECHT
®/TM/© 2024 Whirlpool. Produced under license.
Refrigerator
User Manual
natural_image
Simple line drawing of a pear and a carrot (no text or symbols)
INFORMATION

ENERG

SUPPLIERS NAME MODEL IDENTIFIER

The model information as stored in the product data base can be reached by entering following website and searching for your model identifier (*) found on energy label.
https://eprel.ec.europa.eu
Policies, standard documentation, ordering of spare parts and additional product information can be found by:
- Visiting our website docs.whirlpool.eu/docsand parts-selfservice.europeanappliances.com
User Instruction
Refrigerator Freezer
| Content | |
| 1. Safety instructions | Page 1-6 |
| 2. Overview | Page 7 |
| 3. Reverse Door | Page 8-11 |
| 4. Installation | Page 12-13 |
| 5. Daily Use | Page 14-22 |
IMPORTANT TO BE READ AND OBSERVED
Before using the appliance, read these safety instructions. Keep them nearby for future reference.
These instructions and the appliance itself provide important safety warnings, to be observed at all times. The manufacturer declines any liability for failure to observe these safety instructions, for inappropriate use of the appliance or incorrect setting of controls.
Very young children (0-3 years) should be kept away from the appliance. Young children (3-8 years) should be kept away from the appliance unless continuously supervised. Children from 8 years old and above and persons with reduced physical, sensory or mental capabilities or lack of experience and knowledge can use this appliance only if they are supervised or have been given instructions on safe use and understand the hazards involved. Children must not play with the appliance. Cleaning and user maintenance must not be carried out by children without supervision.
Children aged from 3 to 8 years are allowed to load and unload refrigerating appliances.
PERMITTED USE
⚠️ CAUTION: The appliance is not intended to be operated by means of an external switching device, such as a timer, or separate remote controlled system.
This appliance is intended to be used in household and similar applications such as: staff kitchen areas in shops, offices and other working environments; farm houses; by clients in hotels, motels, bed & breakfast and other residential environments.
This appliance is not for professional use. Do not use the appliance outdoors.
The bulb used inside the appliance is specifically designed for domestic appliances and is not suitable for general room lighting within the home (EC Regulation 244/2009).
The appliance is designed for operation in places where the ambient temperature comes within the following ranges, according to the climatic class given on the rating plate. The appliance may not work properly if it is left for a long time at a temperature outside the specified range.
Climatic class ambient temperatures:
SN: From 10^ C to 32^ C ;
N: From 16°C to 32°C
ST: From 16°C to 38°C ;
T: From 16°C to 43°C
This appliance does not contain CFCs. The refrigerant circuit contains R600a (HC).
Appliances with Isobutane (R600a):
isobutane is a natural gas without environmental impact, but is flammable.
Therefore, make sure the refrigerant circuit pipes are not damaged, especially when emptying the refrigerant circuit.
WARNING: Do not damage the appliance refrigerant circuit pipes.
⚠ WARNING: Keep ventilation openings, in the appliance enclosure or in the built-in structure, clear of obstruction.
⚠ WARNING: Do not use mechanical, electric or chemical means other than those recommended by the Manufacturer to speed up the defrost process.
WARNING: Do not use or place electrical devices inside the appliance compartments if they are not of the type expressly authorised by the Manufacturer.
⚠ WARNING: Ice makers and/or water dispensers not directly connected to the water supply must be filled with potable water only.
WARNING: Automatic ice-makers and/or water dispensers must be connected to a water supply that delivers potable water only, with mains water pressure between 0.17 and 0.81 MPa (1.7 and 8.1 bar).
Do not store explosive substances such as aerosol cans and do not place or use gasoline or other flammable materials in or near the appliance.
Do not swallow the contents (non-toxic) of the ice packs (provided with some models). Do not eat ice cubes or ice lollies immediately after taking them out of the freezer since they may cause cold burns.
⚠ For products designed to use an air filter inside an accessible fan cover, the filter must always be in position when the refrigerator is in function.
Do not store glass containers with liquids in the freezer compartment since they may break.
Do not obstruct the fan (if included) with food items.
After placing the food check that the door of compartments closes properly, especially the freezer door.
⚠️ Damaged gaskets must be replaced as soon as possible.
⚠️ Use the refrigerator compartment only for storing fresh food and the freezer compartment only for storing frozen food, freezing fresh food and making ice cubes.
Do not store unwrapped food in the refrigerator or freezer compartments to avoid direct contact with internal surfaces.
Appliances could have special compartments (Fresh Food Compartment, Zero Degree Box,...).
Unless differently specified in the specific booklet of product, they can be removed, maintaining equivalent performances.
C-Pentane is used as blowing agent in the insulation foam and it is a flammable gas.
The most appropriate compartments of the appliance where specific types of food are to be stored, taking into account different temperature distribution in different compartments in the appliance, are as follows:
- Refrigerator compartment:
1) Upper area of the refrigerator compartment & door - temperature zone:
Store tropical fruit, cans, drinks, eggs, sauces, pickles, butter, jam
2) Middle area of the refrigerator compartment - cool zone: Store cheese, milk, dairy food, deli food, yoghurt
3) Lower area of the refrigerator compartment - coldest zone: Store cold cuts, desserts, meat and fish, cheesecake, fresh pasta, sour cream, pesto/salsa, home-cooked food, pastry cream, pudding and cream cheese
4) Fruit & vegetable drawer at the bottom of the refrigerator compartment:
Store vegetables and fruits (excluding tropical fruits)
5) Chiller compartment: Only store meat and fish in the coldest drawer
- Freezer compartment:
4 star zone (****) compartment is suitable for freezing foodstuffs from ambient temperature and for storing frozen food as the temperature is evenly distributed throughout the entire compartment.
Purchased frozen food has the storage expiration date stated on the packaging. This date takes into account the type of food being stored and therefore this date should be respected. Fresh food should be stored for the following time periods: 1-3 months for cheese, shellfish, ice cream, ham/sausage, milk, fresh liquids; 4 months for steak or chops (beef, lamb, pork); 6 months for butter or margarine, poultry (chicken, turkey);
8-12 months for fruits (except citrus), roast meat (beef, pork, lamb), vegetables. Expiration dates on the packaging of foods in the 2-star zone must be respected.
To avoid food contamination, please observe the following:
- Opening the door for long periods can cause a significant increase of the temperature in the compartments of the appliance.
- Regularly clean surfaces that may come into contact with food and accessible drainage systems.
– Clean water tanks if they have not been used for 48 h; flush the water system connected to a water supply if water has not been drawn for 5 days.
- Store raw meat and fish in suitable containers in the refrigerator, so that it does not come into contact with or drip onto other food.
- Two-star frozen food compartments are suitable for storing pre-frozen food, storing or making ice cream and ice cubes.
- Do not freeze fresh food in one, two or three-star compartments.
- If the refrigerating appliance is left empty for long periods, switch off, defrost, clean, dry, and leave the door open to prevent mould developing inside the appliance.
INSTALLATION
The appliance must be handled and installed by two or more persons - risk of injury. Use protective gloves to unpack and install - risk of cuts.
⚠️ Installation, including water supply (if any), electrical connections and repairs must be carried out by a qualified technician. Do not repair or replace any part of the appliance unless specifically stated in the user manual. Keep children away from the installation site. After unpacking the appliance, make sure that it has not been damaged during transport. In the event of problems, contact the dealer or your nearest After-sales Service. Once installed, packaging waste (plastic, styrofoam parts etc.) must be stored out of reach of children - risk of suffocation. The appliance must be disconnected from the power supply before any installation operation - risk of electrical shock.
During installation, make sure the appliance does not damage the power cable - risk of fire or electrical shock. Only activate the appliance when the installation has been completed.
⚠️ Be careful not to damage the floors (e.g. parquet) when moving the appliance. Install the appliance on a floor or support strong enough to take its weight and in a place suitable for its size and use. Make sure the appliance is not near a heat source and that the four feet are stable and resting on the floor, adjusting them as required, and check that the appliance is perfectly level using a spirit level. Wait at least two hours before switching the appliance on, to ensure that the refrigerant circuit is fully efficient.
⚠ WARNING: When positioning the appliance, ensure the supply cord is not trapped or damaged.
WARNING: To avoid a hazard due to instability, positioning or fixing of the appliance must be done in accordance with the manufacturer instructions. It's forbidden to place the refrigerator in such way that the metal hose of gas stove, metal gas or water pipes, or electrical wires are in contact with the refrigerator back wall (condenser coil).
To guarantee adequate ventilation, leave a space on both sides and above the appliance. The distance between the rear of the appliance and the wall behind the appliance should be 50 mm, to avoid access to hot surfaces. A reduction of this space will increase the Energy consumption of product. Please remove the power cord from condenser hook during installation before connecting product to power supply.
ELECTRICAL WARNINGS
⚠ It must be possible to disconnect the appliance from the power supply by unplugging it if plug is accessible, or by a multi-pole switch installed upstream of the socket in accordance with the wiring rules and the appliance must be earthed in conformity with national electrical safety standards.
Do not use extension leads, multiple sockets or adapters. The electrical components must not be accessible to the user after installation. Do not use the appliance when you are wet or barefoot.
Do not operate this appliance if it has a damaged power cable or plug, if it is not working properly, or if it has been damaged or dropped.
⚠️ If the supply cord is damaged, it must be replaced with an identical one by the manufacturer, its service agent or similarly qualified persons in order to avoid a hazard - risk of electrical shock.
WARNING: Do not locate multiple portable socket-outlets or portable power supplies at the rear of the appliance.
CLEANING AND MAINTENANCE
WARNING: Ensure that the appliance is switched off and disconnected from the power supply before performing any maintenance operation. To avoid risk of personal injury use protective gloves (risk of laceration) and safety shoes (risk of contusion); be sure to handle by two persons (reduce load); never use steam cleaning equipment (risk of electric shock).
Non-professional repairs not authorised by the manufacturer could result in a risk to health and safety, for which the manufacturer cannot be held liable. Any defect or damage caused from non-professional repairs or maintenance will not be covered by the guarantee, the terms of which are outlined in the document delivered with the unit.
Do not use abrasive or harsh cleaners such as window sprays, scouring cleansers, flammable fluids, cleaning waxes, concentrated detergents, bleaches or cleansers containing petroleum products on plastic parts, interior and door liners or gaskets. Do not use paper towels, scouring pads, or other harsh cleaning tools.
DISPOSAL OF PACKAGING MATERIALS
The packaging material is 100% recyclable and is marked with the recycle symbol 🌐The various parts of the packaging must therefore be disposed of responsibly and in full compliance with local authority regulations governing waste disposal.
DISPOSAL OF HOUSEHOLD APPLIANCES
This appliance is manufactured with recyclable or reusable materials.
Dispose of it in accordance with local waste disposal regulations.
For further information on the treatment, recovery and recycling of household electrical appliances, contact your local authority, the collection service for
household waste or the store where you purchased the appliance. This appliance is marked in compliance with European Directive 2012/19/EU, Waste Electrical and Electronic Equipment (WEEE) and with the Waste Electrical and Electronic Equipment regulations 2013 (as amended). By ensuring this product is disposed of correctly, you will help prevent negative consequences for the environment and human health.
The symbol on the product or on the accompanying documentation indicates that it should not be treated as domestic waste but must be taken to an appropriate collection center for the recycling of electrical and electronic equipment.
ENERGY SAVING TIPS
Install the appliance in a dry, well ventilated room far away from any heat source (eg. radiator, cooker, etc.) and in a place not exposed directly to the sun. If required, use an insulating plate. To guarantee adequate ventilation follow installation instructions. Insufficient ventilation at the back of the product increases energy consumption and decreases cooling efficiency. Frequent door opening might cause an increase in Energy Consumption.
The internal temperature of the appliance and the Energy Consumption may be affected also by the ambient temperature, as well as location of the appliance. Temperature setting should take into consideration these factors. Reduce door opening to minimum. When thawing frozen food, place it in the refrigerator. The low temperature of the frozen products cools the food in the refrigerator. Allow warm food and drinks to cool down before placing in the appliance. Positioning of the shelves in the refrigerator has no impact on the efficient usage of energy. Food should be placed on the shelves in such way to ensure proper air circulation (food should not touch each other and distance between food and rear wall should be kept). You can increase storage capacity of frozen food by removing baskets and, if present, Stop Frost shelf. Do not worry about noises coming from the compressor which are normal operation noises.
The Gulf Conformity Marking on the product indicates the conformity with all the requirements of the Gulf Technical Regulation for Low Voltage Electrical Equipment and Appliances BD-142004-01.

This illustration is only for hinting, the detail please check your appliance.
Tool required: Philips screwdriver, Flat bladed screwdriver, Hexagonal spanner.
- Ensure the unit is unplugged and empty.
- To take the door off, it is necessary to tilt the unit backwards. You should rest the unit on something solid so that it will not slip during the door reversing process.
- All parts removed must be saved to do the reinstallation of the door. Abstain to lay the unit flat as this may damage the coolant system.
-
It's better that 2 people handle the unit during assembly.
-
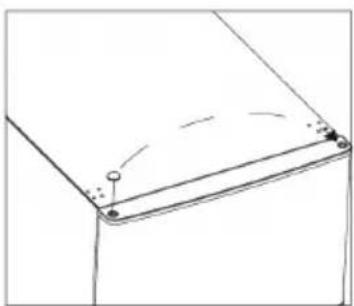
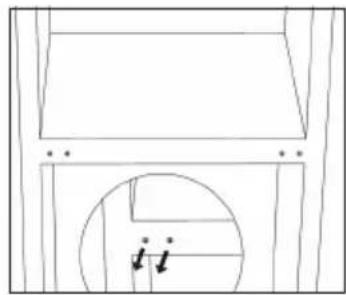
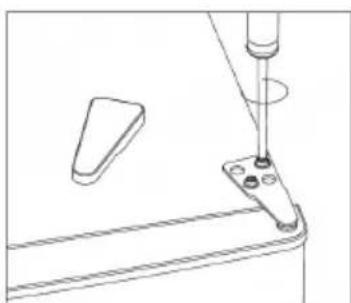
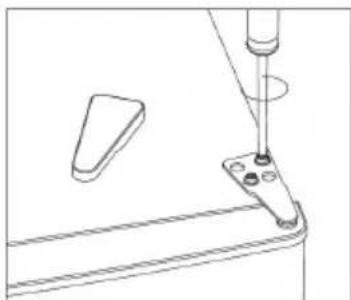
Carefully remove the top hinge cover with a flat screw driver
natural_image
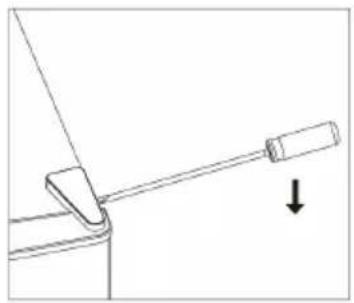
Simple line drawing of a mechanical component with a downward arrow indicating direction (no text or symbols)- Unscrew the top hinge with a philiphs screw driver.
natural_image
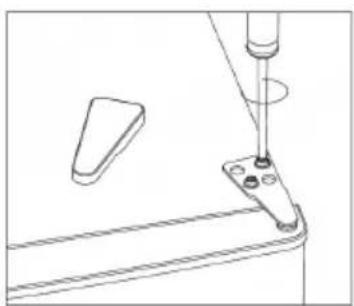
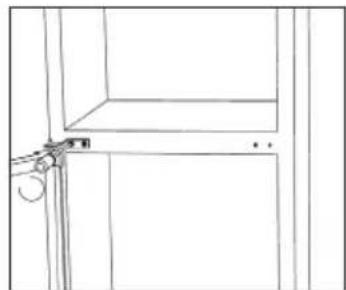
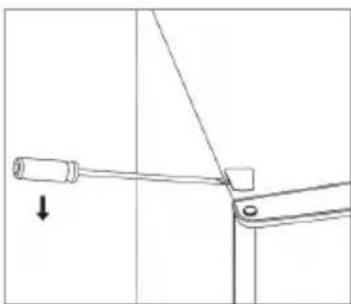
Technical line drawing of a mechanical assembly with a tool and component (no text or symbols)- Remove the hole cover with a flat screw driver.
natural_image
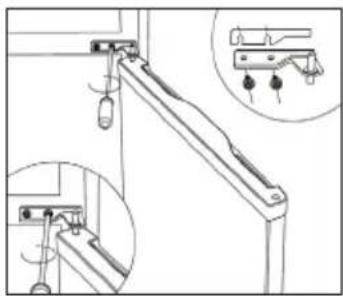
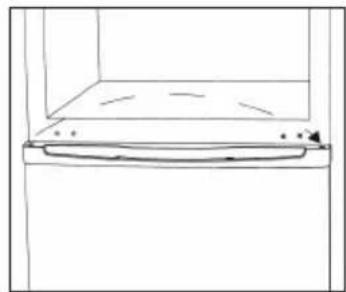
Pure mechanical diagram showing a lever mechanism with no text or symbols- Move the core cover from left side to right side. And then lift the upper door and place it on a padded surface to prevent it from scratching.
natural_image
Pure technical line drawing of a mechanical component with no text or symbols- Unscrew the middle hinge and then lift the bottom door and put it on a soft pad to avoid scratch.
natural_image
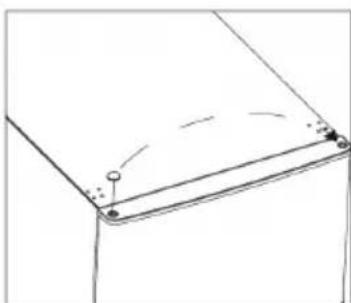
Technical line drawing of a mechanical lever system with inset detail (no text or symbols)- Move two middle hole covers from left to right.

natural_image
Simple line drawing of a basketball court with an oval opening and diagonal lines (no text or symbols)- Lie down the rear of cabinet on a soft pad And unscrew the bottom hinge and leveling foot.
natural_image
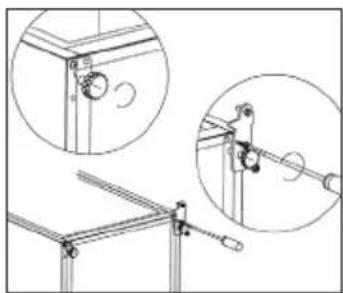
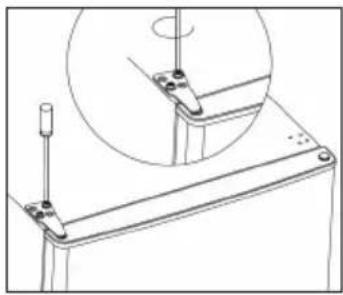
Technical line drawing of a mechanical assembly with two views of a bracket and a pulley system (no text or symbols)- Unscrew and remove the bottom hinge pin, turn the bracket over and replace it.

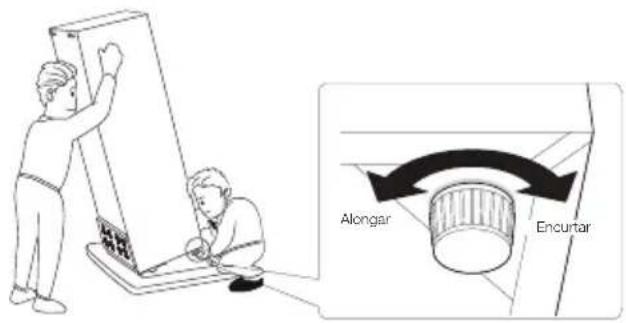
- Install the hinge at left side and foot base at right side. Then screw two leveling feet with their original parts.
natural_image
Technical line drawing of a mechanical clamp or bracket assembly with two circular insets showing close-up views (no text or symbols)- Move two middle hole covers from left to right.
natural_image
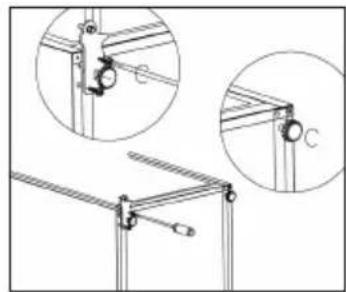
Pure technical diagram showing a rectangular block and a circular component with internal lines, no text or symbols present.- Stand up the unit and put the door on the bottom hinge. Make sure the bottom hinge core is inserted in the door hole. Then move the hinge hole cover of bottom door from left side to right side.

natural_image
Simple line drawing of a cabinet or storage unit with no text, numbers, or symbols- Install the middle hinge.
natural_image
Pure architectural line drawing of a window frame with no text, numbers, or symbols- Install the upper door with the upper hinge.
natural_image
Technical line drawing of a mechanical assembly with a circular inset showing a pin or adjustment (no text or symbols)- Clap in the hinge cover and hole cover on the top of unit.

natural_image
Simple line drawing of a folded paper or metal panel with two downward arrows indicating orientation (no text or symbols)- Detach the Fridge and the Freezer door gaskets and then attach them after rotating.

natural_image
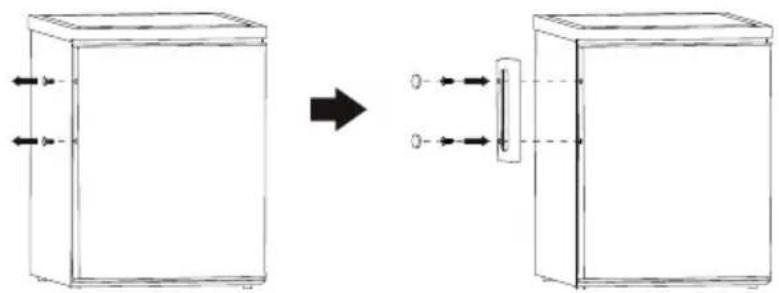
Simple line drawing of a document with arrows indicating rotation or movement (no text or symbols)Install door external handle (if external handle is present)
Space requirement
- Keep enough space of door open.
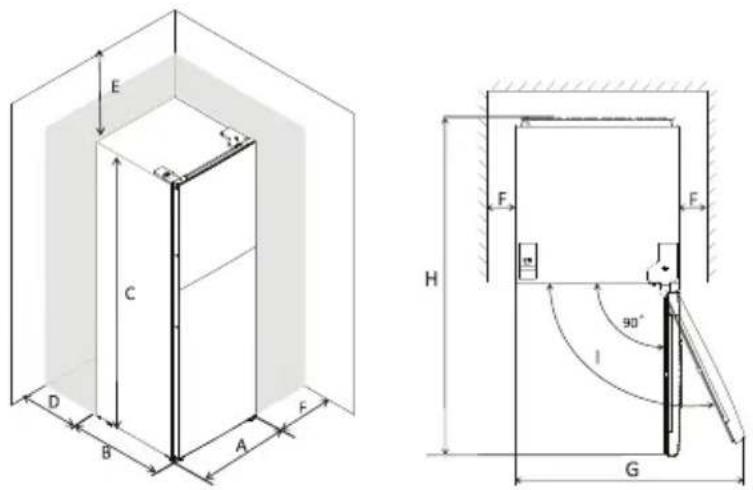
| A545 |
| B555 |
| C1426 |
| Dmin=50 |
| Emin=50 |
| Fmin=50 |
| G1090 |
| H1110 |
| I135° |
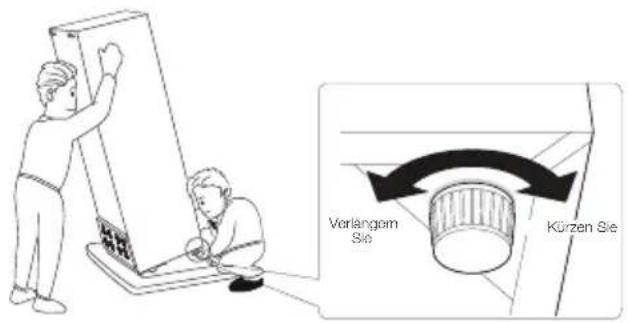
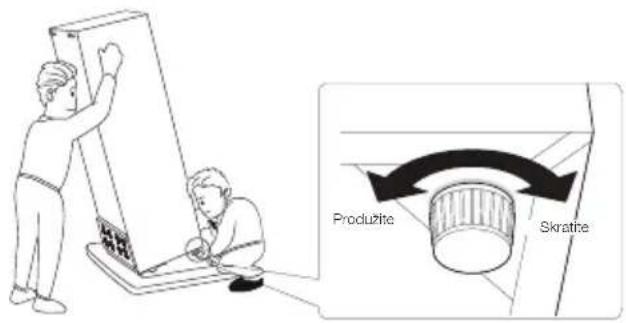
Levelling the unit
To do this adjust the two levelling feet at front of the unit.
If the unit is not level, the doors and magnetic seal alignments will net be covered properly.

Positioning
Install this appliance at a location where the ambient temperature corresponds to the climate class indicated on the rating plate of the appliance:
for refrigerating appliances with climate class:
- extended temperate: this refrigerating appliance is intended to be used at ambient temperatures ranging from 10 °C to 32 °C; (SN)
- temperate: this refrigerating appliance is intended to be used at ambient temperatures ranging from 16 °C to 32 °C; (N)
- subtropical: this refrigerating appliance is intended to be used at ambient temperatures ranging from 16 °C to 38 °C; (ST)
- tropical: this refrigerating appliance is intended to be used at ambient temperatures ranging from 16 °C to 43 °C; (T)
Location
The appliance should be installed well away from sources of heat such as radiators, boilers, direct sunlight etc. Ensure that air can circulate freely around the back of the cabinet. To ensure best performance, if the appliance is positioned below an overhanging wall unit, the minimum distance between the top of the cabi-net and the wall unit must be at least 50 mm. Ideally, however, the appliance should not be positioned below overhanging wall units. Accurate leveling is ensured by one or more adjustable feet at the base of the cabinet.
This refrigerating appliance is not intended to be used as a built-in appliance;

Warning! It must be possible to disconnect the appliance from the mains power supply; the plug must IDtherefore easily accessible after installation.
Electrical connection
Before plugging in, ensure that the voltage and frequency shown on the rating plate correspond to your domestic power supply. The appliance must be earthed. The power supply cable plug is provided with a contact for this purpose. If the domestic power supply socket is not earthed, connect the appliance to a separate earth in compliance with current regulations, consulting a qualified electrician.
The manufacturer declines all responsibility if the above safety precautions are not observed. This appliance complies with the E.E.C. Directives.
First use
Cleaning the interior
Before using the appliance for the first time, wash the interior and all internal accessories with lukewarm water and some neutral soap so as to remove the typical smell of a brand new product, then dry thoroughly.
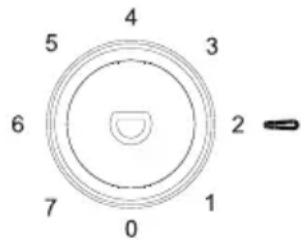
Temperature setting
- Plug on your appliance. The internal temperature is controlled by a thermostat. There are 8 settings. 1 is warmest setting and 7 is coldest when set is 0, the appliance is switched off. When set is max, compressor will not stop
- The appliance may not operate at the correct temperature if it is in a particularly hot or if you open the door often.
Daily use
| Food Location | |
| Eggs Door rack | |
| Dairy products (butter, cheese) If available, biofresh or chiller compartment Lowest shelves | |
| Fruits, vegetables and salad Fruit and vegetable box, crisper or EverFresh+ compartment (if available) | |
| Fresh meat, poultry, fresh fish, sausages, cooked foods | If available, biofresh or chiller compartment Lowest shelf |
| Ready to eat foods, packaged products, canned foods, pickled products | Upper shelves or door rack |
| Drinks, bottles, condiments, snacks Door rack | |
| Leftovers Middle shelves |
EN Guidance for storing fresh food:
Storing into the fresh food compartment:
- Keep your fridge at recommended temperature level as 4°C.
- Food to be stored should be properly sealed to avoid odour or taste alterations.
- Store only the right quantities of food inside your refrigerator. Leave spaces between foods to allow cold air flowing around them to achieve a better and more homogeneous cooling.
- To allow shorter door openings, foods eaten daily should be stored at the front of the shelf.
- Leave a gap between foods and the inner walls, allowing air to flow. If you store foods against the rear wall foods could freeze against rear wall.
- Hot, cooked food must be cooled down at room temperature before storing in the appliance. Then, warm food can be stored in the lower shelves of your fridge. Please be aware that by putting warm food nearby highly perishable foods.
- Thaw your frozen food in the fresh food compartment. This way, you can use the frozen food to cool down the fresh food compartment and save energy.
- If unripe tropical fruits (mango, melons, papaya, banana, pineapple) are stored in refrigerator, ageing process can be accelerated and it is not advisable since it causes shorter storage times. However, the ripening of strongly green fruits (apple, pear) can be promoted for a certain period in fridge compartment.
- Onions, garlic, ginger and other root vegetables should be stored at dark and cool room conditions, not in the fridge.
- When a spoiled food inside refrigerator is realized, it should be disposed. When rotten food is noticed, please clean inner liner or accessories which were in contact to prevent contamination.
-
Large pots of food, such as soups or stews can be divided into shallow containers to quickly cool in the refrigerator. Large pieces of cooked meat and whole poultry should be divided into smaller pieces for the same purpose.
-
Store only packed foods nearby eggs.
- Keep fruits and vegetables separate and store like with like: apples with apples, carrots with carrots. Fruits and vegetables give off different gases that can cause others to deteriorate.
• Take leafy greens out of plastic bags, wrap them in a paper towel or tea towel before stored in refrigerator. Take care to dry them if they are rinsed or wet before storing. - Store fruits and vegetables susceptible to drying out in perforated or unsealed plastic bags to maintain a moist environment yet still allow air to circulate.
- Different foods should be placed in different areas according to their properties:
"Please check appropriate Climate Class of your appliance rated on the rating plate. One of below information is valid for your appliance according to rated Climate Class."
- SN: Extended Temperate: This refrigerating appliance is intended to be used at ambient temperatures ranging from 10^ to 32^
- N: Temperate: This refrigerating appliance is intended to be used at ambient temperatures ranging from 16°C to 32°C
- ST: Subtropical: This refrigerating appliance is intended to be used at ambient temperatures ranging from 16°C to 38°C
- T: Tropical: This refrigerating appliance is intended to be used at ambient temperatures ranging from 16°C to 43°C
EN Storing into the freezer compartment:
- It is recommended to keep freezer setting at -20^ except extreme ambient conditions.
- 4-6 hours before freezing switch on the Fast Freeze function to provide faster freezing.
- Hot food must be cooled to room temperature before storing in the freezer compartment.
- Food cut into small portions will freeze faster and be easier to defrost and cook.
- It is better to pack food before putting it into the freezer.
- In order to avoid expiry of storage periods, please note the freezing date, time limit and name of the food on the packaging according to the storage periods of different foods.
- Under no circumstances exceed the food storage times recommended by the food manufacturers. Only take the required amount of food out of the freezer.
- Consume defrosted food quickly. Defrosted food cannot be re-frozen unless it is cooked. It is not safe to consume uncooked re-frozen fresh food.
- When freezing fresh food, avoid bringing it in contact with already frozen food. It may cause thawing of already frozen pieces.
When storing commercially frozen foods, please follow these guidelines:
Always follow manufacturers' guidelines for the length of time you should store the food for.
- Try to keep the length of time between purchase and storage as short as possible to preserve food quality.
- Buy frozen foods, which have been stored at a temperature of -18^ or below.
- Avoid buying food which has ice or frost on the packaging - This indicates that the products might have been partially defrosted and refrozen at some point - temperature rises affect the quality of food.
- We recommend a temperature setting of 4^ for fresh food compartment and -20^ for freezer compartment to achieve better food preservation.
- With the exception of extreme conditions in ambient, if temperature is set to recommended values as +4°C/-20°C, overall freshness will be prolonged within fresh food and freezer compartments. If temperature of fresh food compartment is set to cooler, fresh fruits and vegetables may be partially frozen or exposed to cold injury, while warmer temperature level may cause faster spoilage of highly perishable foods (dairy products, meat products).
Temperature setting recommendation
| Temperature setting recommendation | ||
| Environment Temperature | Freezer compartment | Fridge compartment |
| Summer (Above 38°C) | / |  |
| Set on 2-4 | ||
| Normal / | 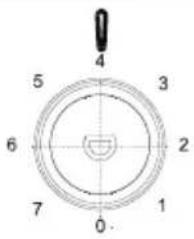 | |
| Set on 4 | ||
| Winter (Below 16°C) | / | 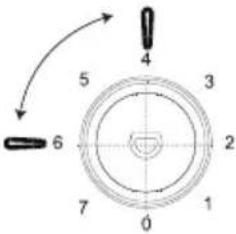 |
| Set on 4-6 | ||
• Information above give users recommendation of temperature setting.
Impact on Food Storage
• Under Recommended setting, the best storage time of fridge is no more than 3 days.
• Under Recommended setting, the best storage time of freezer is no more than 1 month.
- The best storage time may reduce under other settings.
Freezing fresh food
- The freezer compartment is suitable for freezing fresh food and storing frozen and deep-frozen food for a long time.
- Place the fresh food to be frozen in the freezer compartment.
- The maximum amount of food that can be frozen in 24 hours is specified on the rating plate. The freezing process lasts 24 hours.
Storing frozen food
When first starting-up or after a period out of use, before putting the product in the compartment let the appliance run at least 2 hours on the higher settings.
Important In the event of accidental defrosting, for example the power has been off for longer than the value shown in the technical characteristics chart under "rising time", the defrosted food must be consumed quickly or cooked immediately and then re-frozen (after cooked).
Thawing
Deep-frozen or frozen food, prior to be used, can be thawed in the fridge compartment or at room temperature, depending on the time available for this operation.
Small pieces may even be cooked still frozen, directly from the freezer. In this case, cooking will take longer.
Ice-cube
This appliance may be equipped with one or more ice-cube to produce ice.
Accessories
Movable shelves
The walls of the refrigerator are equipped with a series of runners so that the shelves can be positioned as desired.
natural_image
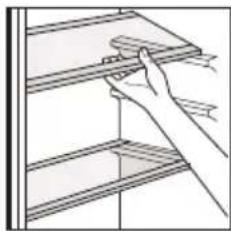
Line drawing of a hand holding a shelf with a handle, no text or symbols presentPositioning the door balconies
To permit storage of food packages of various sizes, the door balconies can be placed at different heights. To make these adjustments proceed as follows: gradually pull the balcony in the direction of the arrows until it comes free, then reposition as required.
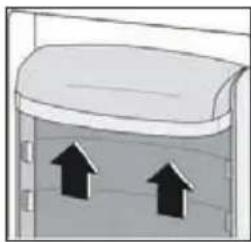
natural_image
Simple line drawing of a container with two upward arrows inside, no text or symbols present.Helpful hints and tips
To help you make the most of the freezing process, here are some important hints:
- the maximum quantity of food which can be frozen in 24 hrs. is shown on the rating plate;
- the freezing process takes 24 hours. No further food to be frozen should be added during this period; only freeze top quality, fresh and thoroughly cleaned, foodstuffs;
- prepare food in small portions to enable it to be rapidly and completely frozen and to make it possible subsequently to thaw only the quantity required;
- wrap up the food in aluminium foil or polythene and make sure that the packages are airtight; make sure that fresh, unfrozen food to touch food which is already frozen, thus avoiding a rise in temperature of the latter;
- lean foods store better and longer than fatty ones; salt reduces the storage life of food;
- water ices, if consumed immediately after removal from the freezer compartment, can possibly cause the skin to be freeze burnt;
- it is advisable to show the freezing in date on each individual pack to enable you removal from the freezer compartment, can possibly cause the skin to be freeze burnt;
- it is advisable to show the freezing in date on each individual pack to enable you to keep tab of the storage time.
Hints for storage of frozen food
To obtain the best performance from this appliance, you should:
• make sure that the commercially frozen foodstuffs were adequately stored by the retailer;
- be sure that frozen foodstuffs are transferred from the food store to the freezer in the shortest possible time;
- not open the door frequently or leave it open longer than absolutely necessary. once defrosted, food deteriorates rapidly and cannot be re-frozen;
- for no reason exceed the storage period indicated by the food manufacture.
Hints for fresh food refrigeration
To obtain the best performance:
- under no circumstances store warm food or evaporating liquids in the refrigerator Do cover or wrap the food, particularly if it has a strong flavour
- make (all types): wrap in polythene bags and place on the glass shelves above the vegetable drawer. For safety, store in this way only one or two days at the most.
- cooked foods, cold dishes, etc... : these should be covered and may be placed on any shelf.
- fruit and vegetables: these should be thoroughly cleaned and placed in the special drawer(s) provided. butter and cheese: these should be placed in special airtight containers or wrapped in aluminum foil or polythene bags to exclude as much air as possible.
- milk bottle: these should have a cap and should be stored in the balconies on the door. Bananas, potatoes, onions and garlic, if not packed, must not be kept in the fridge.
Cleaning
For hygienic reasons the appliance interior, including interior accessories, should be cleaned regularly.
The appliance may not be connected to the mains during cleaning. Danger of electrical shock! Before cleaning switch the appliance off and remove the plug from the mains, or switch off or turn out the circuit breaker or fuse. Never clean the appliance with a steam cleaner. Moisture could accumulate in electrical components, danger of electrical shock! Hot vapors can lead to the damage of plastic parts. The appliance must be dry before it is placed back into service.
Important! Ethereal oils and organic solvents can attack plastic parts, e.g. lemon juice or the juice form orange peel, butyric acid, cleanser that contain acetic acid.
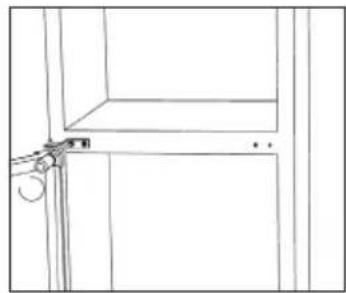
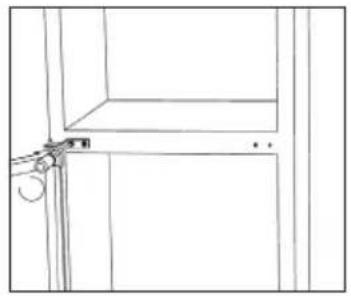
Clean drain hole
To avoid defrost water overflowing into the fridge, periodically clean the drain hole at back of fridge compartment. Use a cleaner to clean the hole as showed in right picture.
- Prevent that such substances to come into contact the appliance parts.
- Remove the food from the freezer. Store them in a cool place, well covered.
- Switch the appliance off and remove the plug from the mains, or switch off or turn out the circuit breaker of fuse.
- Clean the appliance and the interior accessories with a cloth and lukewarm water. After cleaning wipe with fresh water and rub dry.
• After everything is dry place appliance back into service.
Defrosting of the freezer
The freezer compartment, however, will become progressively covered with frost. This should be removed. Never use sharp metal tools to scrape off frost from the evaporator as you could damage it.
However, when the ice becomes very thick on the inner liner, complete defrosting should be carried out as fellows:
- pull out the plug from the socket;
- remove all stored food, wrap it in several layers of newspaper and put it in a cool place;
- keep the door open, and placing a basin underneath of the appliance to collect the defrost water; when defrosting is completed, dry the interior thoroughly
- replace the plug in the power socket to run the appliance again.
Replace the lamp
- The internal light is a LED type. To replace the lamp, please contact qualified technician.

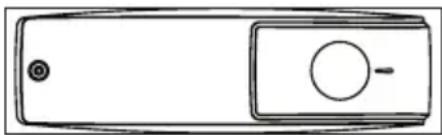
natural_image
Simple line drawing of a rectangular device with a circular button and a minus sign, no text or symbols present.Caution! Before troubleshooting, disconnect the power supply. Only a qualified electrician or a competent person must do the troubleshooting that is not in this manual.
Important! There are some sounds during normal use (compressor, refrigerant circulation).
| Problem Possible cause Solution | ||
| Appliance does not work | Temperature regulation knob is set at number "0" | Set the knob at other number to switch on the appliance |
| Mains plug is not plugged in or is loose | Insert mains plug | |
| Fuse has blown or is defective | Check fuse, replace if necessary | |
| Socket is defective | Mains malfunctions are to be corrected by an electrician | |
| The food is too warm | Temperature is not properly adjusted | Please look in the initial Temperature Setting section |
| Door was open for an extended period | Open the door only as long as necessary | |
| A large quantity of warm food was placed in the appliance within the last 24 hours | Turn the temperature regulation to a colder setting temporarily | |
| The appliance is near a heat source. | Please look in the installation location section | |
| Appliance cools too much Temperature is set too cold | Turn the temperature regulation knob to a warmer setting temporarily | |
| Unusual noises | Appliance is not level | Re-adjust the feet |
| The appliance is touching the wall or other objects | Move the appliance slightly | |
| A component, e.g. a pipe, on the rear of the appliance is touching another part of the appliance or the wall | If necessary, carefully bend the component out of the way | |
| Water on the floor Water drain hole is blocked | See the Cleaning section | |
| Side panel is hot Condenser is inside the panel | It's normal | |
If the malfunction shows again, contact the Service Center.
EN
DISCLAIMER / WARNING
Some (simple) failures can be adequately handled by the end-user without any safety issue or unsafe use arising, provided that they are carried out within the limits and in accordance with the following instructions (see the "Self-Re-pair" section).
Therefore, unless otherwise authorized in the "Self-Repair" section below, repairs shall be addressed to registered professional repairers in order to avoid safety issues. A registered professional repairer is a professional repairer that has been granted access to the instructions and spare parts list of this product by the manufacturer according to the methods described in legislative acts pursuant to Directive 2009/125/EC.
The following spare parts: thermostats, temperature sensors, printed circuit boards and light sources, will be available to professional repairers for a minimum period of seven years, after placing the last unit of the model on the market.
Ordering of spare parts can be found by visiting parts-selfservice.europeanappliances.com
Contact our After-sales Service (See phone number in the warranty booklet).
When contacting our After-sales Service, please state the codes provided on your product's identification plate.
Whirlpool
natural_image
Simple line drawing of a pear and a carrot (no text or symbols)
INFORMATIONEN

ENERG

natural_image
Simple line drawing of a mechanical component with a downward arrow indicating direction (no text or symbols)natural_image
Technical line drawing of a mechanical assembly with a tool and component (no text or symbols)natural_image
Pure mechanical diagram showing a lever and pivot mechanism without any text or symbolsnatural_image
Pure technical line drawing of a mechanical component with no text or symbolsnatural_image
Technical line drawing of a mechanical lever system with inset detail (no text or symbols)natural_image
Pure geometric diagram with concentric circles and horizontal lines, no text or symbols presentnatural_image
Technical line drawing of a mechanical assembly with two circular insets showing close-ups of components (no text or symbols)natural_image
Technical line drawing of a mechanical clamp or bracket assembly with two circular insets showing close-up views (no text or symbols)natural_image
Pure technical diagram showing a rectangular frame with internal circular cutouts and a labeled arrow (no text or symbols)natural_image
Simple line drawing of a cabinet or storage unit with no text, numbers, or symbolsnatural_image
Pure architectural line drawing of a window frame with no text, numbers, or symbolsnatural_image
Technical line drawing of a mechanical assembly with a circular inset showing a pin or adjustment (no text or symbols)natural_image
Simple line drawing of a folded paper or metal panel with two arrows indicating downward edges (no text or symbols)natural_image
Simple line drawing of a document with arrows indicating rotation or movement (no text or symbols)Platzbedarf
| A 545 |
| B 555 |
| C 1426 |
| D min=50 |
| E min=50 |
| F min=50 |
| G 1090 |
| H 1110 |
| I 135° |
natural_image
Line drawing of a hand holding a shelf with shelves (no text or symbols)natural_image
Diagram of a container with two upward arrows indicating flow or movement (no text or symbols)natural_image
Diagram showing a hand holding scissors inside a circular frame with arrows indicating rotation (no text or symbols)Täglicher Gebrauch
natural_image
Simple line drawing of a rectangular device with a circular button and a minus sign, no text or symbols present.natural_image
Simple line drawing of a pear and a carrot (no text or symbols)
INFORMACIÓN

ENERG

N: 16^ C a 32^ C
natural_image
Simple line drawing of a mechanical lever with a handle and a pull rod, no text or symbols present- Desatornille la bisagra superior con un destornillador philiphs.

natural_image
Technical line drawing of a mechanical assembly with a tool and component (no text or symbols)natural_image
Simple line drawing of a mechanical lever with a handle and pivot point, no text or symbols presentnatural_image
Pure technical line drawing of a mechanical component with no text or symbolsnatural_image
Technical line drawing of a mechanical lever system with inset detail (no text or symbols)natural_image
Simple line drawing of a basketball court with an oval opening and diagonal lines (no text or symbols)natural_image
Technical line drawing of a mechanical assembly with two circular insets showing close-ups of components (no text or symbols)natural_image
Technical line drawing of a mechanical clamp or bracket assembly with two circular insets showing close-up views (no text or symbols)natural_image
Pure technical diagram showing a rectangular structure with internal circular elements and arrows, no text or symbols present.natural_image
Simple line drawing of a cabinet or storage unit with a flat top and side panels (no text or symbols)- Instale la bisagra central.
natural_image
Pure architectural line drawing of a window frame with no text, numbers, or symbolsnatural_image
Technical line drawing of a mechanical assembly with a circular inset showing a pin or adjustment (no text or symbols)natural_image
Simple line drawing of a rectangular object with two downward arrows indicating measurement or alignment (no text or symbols)natural_image
Simple line drawing of a document with arrows indicating rotation or movement (no text or symbols)natural_image
Diagram showing a device transforming from a rectangular box to a vertical panel, with arrows indicating direction (no text or symbols present)Espacio necesario
| A545 |
| B555 |
| C1426 |
| Dmín=50 |
| Emín=50 |
| Fmín=50 |
| G1090 |
| H1110 |
| I135° |

Colocación
natural_image
Line drawing of a hand placing a rectangular object on a shelf (no text or symbols)natural_image
Diagram of a container with two upward arrows indicating flow or movement (no text or symbols)natural_image
Diagram showing a circular object with arrows indicating rotation and cutting process, no text or symbols presentnatural_image
Simple line drawing of a rectangular device with a circular button and a minus sign, no text or symbols present.natural_image
Simple line drawing of a pear and a carrot (no text or symbols)
INFORMAÇÃO

ENERG

NOME DOS FORNECEDORES IDENTIFICADOR DE MODELO


natural_image
Simple line drawing of a mechanical component with a downward arrow indicating direction (no text or symbols)natural_image
Technical line drawing of a mechanical assembly with a tool and component (no text or symbols)natural_image
Pure mechanical diagram showing a lever mechanism with no text or symbolsnatural_image
Pure technical line drawing of a mechanical component with no text or symbolsnatural_image
Technical line drawing of a mechanical lever system with inset detail (no text or symbols)natural_image
Simple line drawing of a basketball court with an oval opening and diagonal lines (no text or symbols)natural_image
Technical line drawing of a mechanical assembly with two circular insets showing close-ups of components (no text or symbols)natural_image
Technical line drawing of a mechanical assembly with two circular insets showing close-ups of components (no text or symbols)natural_image
Pure technical line drawing of a mechanical component with no text or symbolsnatural_image
Simple line drawing of a cabinet or storage unit with no text, numbers, or symbols- Instalar a dobradiça intermédia.
natural_image
Pure architectural line drawing of a cabinet or cabinet frame with no text, numbers, or symbols- Instalar a porta superior com a dobradiça superior.

natural_image
Technical line drawing of a mechanical assembly with a circular inset showing a pin or adjustment (no text or symbols)natural_image
Simple line drawing of a folded paper or metal panel with two arrows indicating direction (no text or symbols)natural_image
Simple line drawing of a document with arrows indicating rotation or movement (no text or symbols)| A545 |
| B555 |
| C1426 |
| Dmin=50 |
| Emin=50 |
| Fmin=50 |
| G1090 |
| H1110 |
| I135° |
Posicionamento
Instalar este aparelho num local onde a temperatura ambiente corresponda à classe climática indicada na placa de caraterísticas do aparelho:
natural_image
Line drawing of a hand placing a rectangular object on a shelf (no text or symbols)natural_image
Diagram of a container with two upward arrows indicating flow or movement (no text or symbols)natural_image
Diagram showing a sewing machine needle cutting fabric, with no text or symbols present.natural_image
Simple line drawing of a rectangular device with a circular button and a minus sign (no text or symbols)natural_image
Simple line drawing of a pear and a carrot (no text or symbols)
INFORMACJE

natural_image
Simple line drawing of a mechanical clamp or bracket with a downward arrow indicating force or direction (no text or symbols)natural_image
Technical line drawing of a mechanical assembly with a tool and component (no text or symbols)natural_image
Pure mechanical diagram showing a lever and pivot mechanism without any text or symbolsnatural_image
Pure technical line drawing of a mechanical part with no text, numbers, or symbolsnatural_image
Technical line drawing of a mechanical lever system with inset detail (no text or symbols)natural_image
Simple line drawing of a basketball court with an oval opening and diagonal lines (no text or symbols)natural_image
Technical line drawing of a mechanical assembly with two circular insets showing close-ups of components (no text or symbols)natural_image
Technical line drawing of a mechanical assembly with two circular insets showing close-ups of components (no text or symbols)natural_image
Simple line drawing of a basketball court with an oval opening and diagonal bars (no text or symbols)natural_image
Simple line drawing of a cabinet or storage unit with no text, numbers, or symbolsnatural_image
Line drawing of a cabinet or shelf with a handle and railings (no text or symbols)natural_image
Technical line drawing of a mechanical assembly with a circular inset showing a pin or adjustment mechanism (no text or symbols)natural_image
Simple line drawing of a folded paper or metal panel with two arrows indicating direction (no text or symbols)natural_image
Simple line drawing of a document with arrows indicating rotation or movement (no text or symbols)Wymagane miejsce
| A 545 |
| B 555 |
| C 1426 |
| D min = 50 |
| E min = 50 |
| F min = 50 |
| G 1090 |
| H 1110 |
| I 135° |

natural_image
Line drawing of a hand holding a shelf with shelves (no text or symbols)natural_image
Diagram of a container with two upward arrows indicating flow or movement (no text or symbols)natural_image
Diagram of a sewing machine needle and blade mechanism inside a circular frame (no text or symbols)natural_image
Simple line drawing of a rectangular device with a circular button and a minus sign, no text or symbols present.natural_image
Simple line drawing of a pear and a carrot (no text or symbols)
INFORMARE

ENERG

NUME FURNIZOR IDENTIFICATOR DE MODEL

natural_image
Simple line drawing of a mechanical component with a downward arrow indicating direction (no text or symbols)natural_image
Technical line drawing of a mechanical assembly with a tool and component (no text or symbols)natural_image
Pure mechanical diagram showing a lever and pivot mechanism without any text or symbolsnatural_image
Pure technical line drawing of a mechanical component with no text or symbolsnatural_image
Technical line drawing of a mechanical lever system with inset detail (no text or symbols)natural_image
Simple line drawing of a basketball court with an oval opening and diagonal lines (no text or symbols)natural_image
Technical line drawing of a mechanical assembly with two circular insets showing close-ups of components (no text or symbols)natural_image
Technical line drawing of a mechanical clamp or bracket assembly with two circular insets showing close-up views (no text or symbols)natural_image
Pure technical diagram showing a rectangular structure with internal circular elements and arrows, no text or symbols present.natural_image
Simple line drawing of a cabinet or storage unit with a flat top and side panels (no text or symbols)natural_image
Pure architectural line drawing of a window frame with no text, numbers, or symbolsnatural_image
Technical line drawing of a mechanical assembly with a circular inset showing a pin or adjustment (no text or symbols)natural_image
Simple line drawing of a folded paper or metal panel with two arrows indicating direction (no text or symbols)natural_image
Simple line drawing of a document with arrows indicating rotation or movement (no text or symbols)Spatiu necesar
| A545 |
| B555 |
| C1426 |
| Dmin=50 |
| Emin=50 |
| Fmin=50 |
| G1090 |
| H1110 |
| I135° |

Pozitionarea
natural_image
Line drawing of a hand placing a rectangular object on a shelf (no text or symbols)natural_image
Simple line drawing of a container with two upward arrows inside, no text or symbols presentnatural_image
Diagram showing a hand cutting a piece into a circular opening with arrows indicating rotation (no text or symbols)natural_image
Simple line drawing of a rectangular device with a circular button and a minus sign, no text or symbols present.natural_image
Simple line drawing of a pear and a carrot (no text or symbols)
INFORMATIE

ENERG

- Koelkastcompartiment:
natural_image
Simple line drawing of a mechanical lever with a handle and a pull rod, no text or symbols presentnatural_image
Technical line drawing of a mechanical assembly with a tool and component (no text or symbols)natural_image
Simple line drawing of a mechanical lever with a handle and pivot point, no text or symbols presentnatural_image
Pure technical line drawing of a mechanical component with no text or symbolsnatural_image
Technical line drawing of a mechanical lever system with inset detail (no text or symbols)natural_image
Simple line drawing of a basketball court with an oval opening and diagonal lines (no text or symbols)natural_image
Technical line drawing of a mechanical assembly with two circular insets showing close-ups of components (no text or symbols)natural_image
Technical line drawing of a mechanical clamp or bracket assembly with two circular insets showing close-up views (no text or symbols)natural_image
Pure technical diagram showing a rectangular block with internal circular cutouts and arrows, no text or symbols present.natural_image
Simple line drawing of a cabinet or storage unit with a flat top and side panels (no text or symbols)natural_image
Pure architectural line drawing of a window frame with no text, numbers, or symbolsnatural_image
Technical line drawing of a mechanical assembly with a circular inset showing a pin or adjustment (no text or symbols)natural_image
Simple line drawing of a folded paper or metal panel with two arrows indicating downward edges (no text or symbols)natural_image
Simple line drawing of a document with arrows indicating rotation or movement (no text or symbols)Vereiste ruimte
| A545 |
| B555 |
| C1426 |
| Dmin=50 |
| Emin=50 |
| Fmin=50 |
| G1090 |
| H1110 |
| I135° |

Positionering
natural_image
Line drawing of a hand holding a shelf with shelves (no text or symbols)natural_image
Diagram of a container with two upward arrows indicating flow or movement (no text or symbols)natural_image
Diagram showing a circular object with arrows indicating rotation and cutting process, no text or symbols presentDagelijks gebruik
natural_image
Simple line drawing of a rectangular device with a circular button and a minus sign, no text or symbols present.NL DISCLAIMER / WAARSCHUWING
natural_image
Simple line drawing of a pear and a carrot (no text or symbols)
INFORMATIONS

ENERG

NOM DES FOURNISSEURS IDENTIFIANT DU MODÈLE


natural_image
Simple line drawing of a mechanical component with a downward arrow indicating direction (no text or symbols)natural_image
Technical line drawing of a mechanical assembly with a tool and component (no text or symbols)natural_image
Pure mechanical diagram showing a lever and pivot mechanism without any text or symbolsnatural_image
Pure technical line drawing of a mechanical component with no text or symbolsnatural_image
Technical line drawing of a mechanical lever system with inset detail (no text or symbols)natural_image
Simple line drawing of a basketball court with an oval opening and diagonal lines (no text or symbols)natural_image
Technical line drawing of a mechanical assembly with two circular insets showing close-ups of components (no text or symbols)natural_image
Technical line drawing of a mechanical clamp or bracket assembly with two circular insets showing close-up views (no text or symbols)natural_image
Pure technical diagram showing a rectangular block with internal circular cutouts and arrows, no text or symbols present.natural_image
Simple line drawing of a cabinet or storage unit with a flat top and side panels (no text or symbols)natural_image
Pure architectural line drawing of a window frame with no text, numbers, or symbolsnatural_image
Technical line drawing of a mechanical assembly with a circular inset showing a pin or adjustment mechanism (no text or symbols)natural_image
Simple line drawing of a folded paper or metal sheet with two arrows indicating direction (no text or symbols)natural_image
Simple line drawing of a document with arrows indicating rotation or movement (no text or symbols)natural_image
Diagram showing a device transforming from a rectangular box to a vertical panel, with arrows indicating direction (no text or symbols present)Besoin d'espace
| A545 |
| B555 |
| C1426 |
| Dmin=50 |
| Emin=50 |
| Fmin=50 |
| G1090 |
| H1110 |
| I135° |

Positionnement
natural_image
Line drawing of a hand holding a shelf with shelves (no text or symbols)natural_image
Diagram of a container with two upward arrows indicating flow or movement (no text or symbols)natural_image
Diagram of a mechanical or electrical component with rotating arrows and a circular arrow, no visible text or symbols.natural_image
Simple line drawing of a rectangular device with a circular button and a minus sign, no text or symbols present.natural_image
Simple line drawing of a pear and a carrot (no text or symbols)
INFORMAZIONI

ENERG

NOME DEI FORNITORI
IDENTIFICATIVO DEL MODELLO


natural_image
Simple line drawing of a mechanical component with a downward arrow indicating direction (no text or symbols)natural_image
Technical line drawing of a mechanical assembly with a tool and component (no text or symbols)natural_image
Pure mechanical diagram showing a lever mechanism with no text or symbolsnatural_image
Pure technical line drawing of a mechanical component with no text or symbolsnatural_image
Technical line drawing of a mechanical lever system with inset detail (no text or symbols)natural_image
Simple line drawing of a basketball court with an oval opening and diagonal lines (no text or symbols)natural_image
Technical line drawing of a mechanical assembly with two circular insets showing close-ups of components (no text or symbols)natural_image
Technical line drawing of a mechanical clamp or bracket assembly with two circular insets showing close-up views (no text or symbols)natural_image
Pure technical diagram showing a rectangular block with internal circular cutouts and arrows, no text or symbols present.natural_image
Simple line drawing of a cabinet or storage unit with no text, numbers, or symbolsnatural_image
Pure architectural line drawing of a window frame with no text, numbers, or symbolsnatural_image
Technical line drawing of a mechanical assembly with a circular inset showing a pin or adjustment mechanism (no text or symbols)natural_image
Simple line drawing of a folded paper or metal sheet with two arrows indicating direction (no text or symbols)natural_image
Simple line drawing of a document with arrows indicating rotation or movement (no text or symbols)natural_image
Diagram showing a device transforming from a rectangular box to a vertical panel, with arrows indicating direction (no text or symbols present)Spazio necessario
| A545 |
| B555 |
| C1426 |
| Dmin=50 |
| Emin=50 |
| Fmin=50 |
| G1090 |
| H1110 |
| I135° |
Posizionamento
natural_image
Line drawing of a hand holding a shelf with shelves (no text or symbols)natural_image
Diagram of a container with two upward arrows indicating flow or movement (no text or symbols)natural_image
Diagram showing a mechanical or electrical component with arrows indicating rotation and movement (no text or symbols)Uso quotidiano
natural_image
Simple line drawing of a rectangular device with a circular button and a minus sign (no text or symbols)natural_image
Simple line drawing of a pear and a carrot (no text or symbols)
ΠΛΗΡΟΦΟΡΙΕΣ

ENERG

natural_image
Simple line drawing of a mechanical lever with a handle and a pull rod, no text or symbols presentnatural_image
Technical line drawing of a mechanical assembly with a tool and component (no text or symbols)natural_image
Simple line drawing of a mechanical lever with a handle and pivot point, no text or symbols presentnatural_image
Pure technical line drawing of a 3D object with no text, numbers, or symbolsnatural_image
Technical line drawing of a mechanical lever system with inset detail (no text or symbols)natural_image
Simple line drawing of a basketball court with an oval opening and diagonal lines (no text or symbols)natural_image
Technical line drawing of a mechanical assembly with two circular insets showing close-ups of components (no text or symbols)natural_image
Technical line drawing of a mechanical assembly with two circular insets showing close-up views of components (no text or symbols)natural_image
Pure technical diagram showing a rectangular block and a circular component with internal lines, no text or symbols present.natural_image
Simple line drawing of a cabinet or storage unit with a flat top and side panels (no text or symbols)natural_image
Pure architectural line drawing of a window frame with no text, numbers, or symbolsnatural_image
Technical line drawing of a mechanical assembly with a circular inset showing a pin or adjustment (no text or symbols)natural_image
Simple line drawing of a folded paper or metal panel with two arrows indicating downward edges (no text or symbols)natural_image
Simple line drawing of a document with arrows indicating rotation or movement (no text or symbols)Απαίτηση χώρου
| A545 |
| B555 |
| C1426 |
| Dελάχ.=50 |
| Eελάχ.=50 |
| Fελάχ.=50 |
| G1090 |
| H1110 |
| I135° |
natural_image
Line drawing of a hand placing a rectangular object on a shelf (no text or symbols)natural_image
Simple line drawing of a container with two upward arrows inside, no text or symbols present.natural_image
Diagram showing a hand cutting scissors into a circular opening with arrows indicating rotation (no text or symbols)natural_image
Simple line drawing of a rectangular device with a circular button and a minus sign, no text or symbols present.natural_image
Simple line drawing of a pear and a carrot (no text or symbols)
INFORMACIJE

ENERG

IME DOBAVITELJEV
IDENTIFIKACIJSKA OZNAKA MODELA


natural_image
Simple line drawing of a mechanical lever with a handle and a pull rod, no text or symbols presentnatural_image
Technical line drawing of a mechanical assembly with a tool and component (no text or symbols)natural_image
Simple line drawing of a mechanical lever with a handle and pivot point, no text or symbols present- Premaknite pokrov jedra z leve na desno stran. Nato dvignite zgornja vrata in jih položite na oblazinjeno površino, da se ne opraskajo.

natural_image
Pure geometric line drawing of a 3D rectangular prism with no text, numbers, or symbolsnatural_image
Technical line drawing of a mechanical lever system with inset detail (no text or symbols)- Premaknite dva pokrova srednjih lukenj z leve na desno.

natural_image
Simple line drawing of a basketball court with an oval opening and diagonal lines (no text or symbols)natural_image
Technical line drawing of a mechanical assembly with two circular insets showing close-ups of components (no text or symbols)natural_image
Technical line drawing of a mechanical clamp or bracket assembly with two circular insets showing close-up views (no text or symbols)- Premaknite dva pokrova srednjih lukenj z leve na desno.

natural_image
Pure technical diagram showing a rectangular block with internal circular cutouts and arrows, no text or symbols present.- Postavite enoto navpično in namestite vrata na spodnji tečaj. Prepričajte se, da je jedro spodnjega tečaja vstavljeno v luknjo v vratih. Nato premaknite pokrov luknje za tečaje spodnjih vrat z leve na desno stran.

natural_image
Simple line drawing of a cabinet or storage unit with a flat top and side panels (no text or symbols)- Namestite srednji tečaj.

natural_image
Pure architectural line drawing of a window frame with no text, numbers, or symbolsnatural_image
Technical line drawing of a mechanical assembly with a circular inset showing a pin or adjustment (no text or symbols)- Zataknite pokrov tečajev in pokrov lukenj na vrhu enote.
natural_image
Simple line drawing of a folded paper or metal panel with two arrows indicating downward edges (no text or symbols)- Odstranite tesnila vrat hladilnika in zamrzovalnika ter jih namestite po zamenjavi strani.
natural_image
Simple line drawing of a document with arrows indicating rotation or movement (no text or symbols)Prostorske zahteve
| A 545 |
| B 555 |
| C 1426 |
| D min=50 |
| E min=50 |
| F min=50 |
| G 1090 |
| H 1110 |
| I 135 °C |
Izravnavanje enote
natural_image
Diagram of a mechanical or electrical component with arrows indicating rotation and movement (no text or symbols)natural_image
Simple line drawing of a rectangular device with a circular button and a minus sign, no text or symbols present.natural_image
Simple line drawing of a pear and a carrot (no text or symbols)
INFORMACIJE

ENERG

IME DOBAVLJAČA IDENTIFIKACIJSKA OZNAKA MODELA


Informacijama o modelu koji su pohranjeni u bazi podataka proizvoda može se pristupiti tako da se uđe u web-mjesto navedeno u nastavku i pretražuje prema identifikacijskoj oznaci modela (*) koja se nalazi na oznaci energetske učinkovitosti.
https://eprel.ec.europa.eu
Pravila, standardne dokumente, naručivanje rezervnih dijelova i dodatne informacije o proizvodu možete pronaći tako:
- posjetite naše web-mjesto docs . whirlpool . eu / docs i parts-selfservice.europeanappliances.com
Upute za korisnike
Hladnjak zamrzivač
natural_image
Simple line drawing of a mechanical lever with a handle and a pull rod, no text or symbols present- Križnim odvijačem odvijte gornju šarku.
natural_image
Technical line drawing of a mechanical assembly with a tool and component (no text or symbols)- Plosnatim odvijačem skinite pokrov otvora.
natural_image
Simple line drawing of a mechanical lever with a handle and pivot point, no text or symbols present- Pokrov pomaknite s lijeva udesno. Zatim podignute gornja vrata i postavite na meku podlogu da biste spriječili da se ogrebu.

natural_image
Pure geometric line drawing of a 3D rectangular prism with no text, numbers, or symbols- Odvijte srednju šarku i zatim podignite donja vrata i stavite ih na meku podlogu da biste spriječili da se ogrebu.

natural_image
Technical line drawing of a mechanical lever system with inset detail (no text or symbols)natural_image
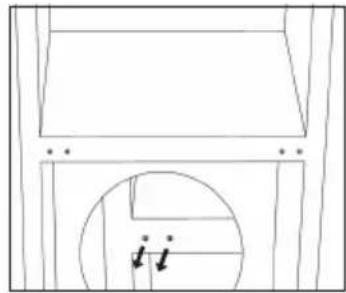
Simple line drawing of a basketball court with an oval opening and diagonal lines (no text or symbols)- Položite stražnji dio ormarića na meku podlogu i odvijte donju šarku i nožicu za poravnavanje.

natural_image
Technical line drawing of a mechanical assembly with two circular insets showing close-ups of components (no text or symbols)- Odvijte i skinite zatik donje šarke, preokrenite nosač i ponovno ga postavite.

natural_image
Technical line drawing of a mechanical clamp or bracket assembly with two circular insets showing close-up views (no text or symbols)natural_image
Pure technical diagram showing a rectangular block with internal circular cutouts and a labeled arrow (no text or symbols)- Podignite jedinicu i stavite vrata na donju šarku. Provjerite da je središte donje šarke umetnuto u otvor vrata. Zatim pomaknite pokrov otvora šarke donjih vrata s lijeva udesno.
natural_image
Simple line drawing of a cabinet or storage unit with a flat top and side panels (no text or symbols)- Postavite srednju šarku.

natural_image
Pure architectural line drawing of a window frame with no text, numbers, or symbols- Postavite gornja vrata s gornjom šarkom.

natural_image
Technical line drawing of a mechanical assembly with a circular inset showing a pin or adjustment (no text or symbols)- Spojite pokrov šarke i pokrov otvora na gornjoj jedinici.

natural_image
Simple line drawing of a folded paper or metal panel with two arrows indicating downward edges (no text or symbols)- Odspojite brtve vrata hladnjaka i zamrzivača i pričvrstite ih nakon što ih zarotirate.

natural_image
Simple line drawing of a document with arrows indicating rotation or movement (no text or symbols)Potreban prostor
| A545 |
| B555 |
| C1426 |
| Dmin=50 |
| Emin=50 |
| Fmin=50 |
| G1090 |
| H1110 |
| I135° |
Poravnavanje jedinice
Namještanje
natural_image
Line drawing of a hand placing a shelf item on top of a rack (no text or symbols)natural_image
Simple line drawing of a container with two upward arrows inside, no text or symbols present.Korisni savjeti
Ovo su neki od važnih savjeta da biste na najbolji način iskoristili postupak zamrzavanja:
- maksimalna kvaliteta namirnica koja se može zamrznuti za 24 h prikazana je na nazivnoj pločici
- zamrzavanje traje 24 sata. Tijekom tog razdoblja ne smiju se dodavati druge namirnice koje je potrebno zamrznuti: zamrzavajte isključivo namirnice vrhunske kvalitete, svježe i temeljito očišćene
- namirnice pripremajte u malim porcijama da bi se omogućilo da se brzo i potpuno zamrznu te da se potom omogući da se otopi samo potrebna količina
- namirnice zamotajte u aluminijsku ili plastični foliju i pazite da pakiranja ne propuštaju zrak pazite da svježe, nezamrznute namirnice ne dodiruju one već zamrznute kasko se potonjima ne bi podigla temperatura
- krte se namirnice brže zamrzavaju i duže traju od masnih sol smanjuje trajnost namirnica
- ledeni deserti, ako se konzumiraju odmah po vađenju iz zamrzivača, mogu prouzročiti ozebline
- preporučuje se da se na svakom pojedinačnom pakiranju nalazi datum zamrzavanja da biste mogli pratiti trajanje.
natural_image
Diagram showing a sewing machine needle cutting fabric, with no text or symbols present.- Nemojte dopustiti da takve tvari dođu u doticaj s dijelovima uređaja.
- Namirnice izvadite iz zamrzivača. Spremite ih na hladno mjesto, dobro pokrivene.
- Isključite uređaj i iskopčajte utikač iz napajanja ili iskopčajte strujni prekidač ili osigurač.
- Uređaj i opremu u unutrašnjosti očistite krpom i mlakom vodom. Nakon čišćenja obrišite čistom vodom i osušite.
- Kad se sve osuši, uređaj ponovno uključite.
Odmrzavanje zamrzivača
Zamrzivač će se ipak, postupno, prekriti ledom. To se mora ukloniti. Nikada nemojte upotrebljavati oštre metalne alate za skidanje leda s isparivača jer biste ga tako mogli oštetiti.
Ipak, kad se na unutarnjoj oblozi stvori deblji sloj leda, na sljedeći ga način potpuno otopite:
- iskopčajte utikač iz utičnice
- izvadite sve spremljene namirnice, omotajte ih u nekoliko slojeva novina i stavite na hladno mjesto
- vrata držite otvorenima, stavite posudu ispod uređaja da biste skupili vodu odmrzavanja kad odmrzavanje završi, temeljito osušite unutrašnjost
- utikač vratite u utičnicu da biste ponovno pokrenuli uređaj.
Zamjena žarulje
- Svjetlo u unutrašnjosti je LED svjetlo. Obratite se kvalificiranom serviseru radi zamjene žarulje.
natural_image
Simple line drawing of a rectangular device with a circular button and a minus sign, no text or symbols present.Oprez! Prije otklanjanja problema, odspojite napajanje. Isključivo kvalificirani električar ili stručna osoba smije otkloniti problem koji nije opisan u ovom priručniku.
Važno! Neki su zvukovi uobičajeni kod upotrebe (kompresor, kruženje rashladnog sredstva).
| Problem Mogući uzrok Rješenje | ||
| Uredaj ne radi | Gumb regulatora temperature postavljen je na „0” | Gumb okrenite na neki drugi broj da biste uključili uređaj |
| Strujni utikač nije priključen ili je labav | Ukopčajte strujni utikač | |
| Osigurač je pregorio ili nije ispravan | Provjerite osigurač, zamijenite ga prema potrebi | |
| Utičnica je neispravna | Električne nepravilnosti treba ispraviti električar | |
| Namirnice su pretople | Temperatura nije pravilno namještena | Pogledajte početni odjeljak Postavke temperature |
| Vrata su duže vrijeme bila otvorena | Vrata držite otvorenima samo koliko je potrebno | |
| Velika količina toplih namirnica stavljena je u uređaj unutar posljednja 24 sata | Regulator temperature privremeno postavite na hladniju postavku | |
| Uređaj je u blizini izvora topline | Pogledajte odjeljak o mjestu postavljanja | |
| Uređaj prejako hladi Postavljena temperatura je preniska | Regulator temperature privremeno postavite na topliju postavku | |
| Neobični zvukovi | Uređaj nije poravnat | Ponovno prilagodite nožice |
| Uređaj dodiruje zid ili druge predmete | Malo pomaknite uređaj | |
| Sastavni dio, npr. cijev na stražnjem dijelu uređaj dodiruje neki drugi dio uređaja ili zid | Prema potrebi, pažljivo savijte sastavni dio tako da ne smeta | |
| Voda na podu Otvor za odvod vode je blokiran | Pogledajte odjeljak Čišćenje | |
| Bočna ploča je vruća Kondenzator se nalazi unutar ploče | To je uobičajeno | |
Ako se neispravnost ponovno pojavi, obratite se servisnom centru.
HR ODRICANJE OD ODGOVORNOSTI/ UPOZORENJE
natural_image
Simple line drawing of a pear and a carrot (no text or symbols)
INFORMACIJE

ENERG

NAZIV DOBAVLJAČA IDENTIFIKATOR MODELA


Do informacija o modelu koje su uskladištene u bazi podataka o proizvodu može se doći tako što ćete uneti sledeći veb-sajt i potražiti identifikator vašeg modela (*) koji se nalazi na energetskoj oznaci.
https://eprel.ec.europa.eu
Smernice, standardna dokumentacija, poručivanje rezervnih delova i dodatne informacije o proizvodu se mogu naći na sledeći način:
- Na našem veb-sajtu docs . whirlpool . eu / docs i parts - selfservice . europeanappliances .com
Korisničko uputstvo
Zamrzivač frižidera
| Sadržaj | |
| 1. Bezbednosna uputstva | Stranica 1-6 |
| 2. Pregled | Stranica 7 |
| 3. Vrata s promenom smera otvaranja | Stranica 8-11 |
| 4. Instalacija | Stranica 12-13 |
| 5. Svakodnevna upotreba | Stranica 14–22 |
VAŽNO JE DA SE PROČITAJU I POŠTUJU
natural_image
Simple line drawing of a mechanical lever with a handle and a pull rod, no text or symbols present- Odvijte gornju šarku krstastim odvijačem.
natural_image
Technical line drawing of a mechanical assembly with a tool and component (no text or symbols)natural_image
Simple line drawing of a mechanical lever with a handle and pivot point, no text or symbols present- Pomerite poklopac osnove sa leve na desnu stranu. Zatim podignite gornja vrata i stavite ih na mekanu površinu da biste sprečili ogrebotine.
natural_image
Pure technical line drawing of a mechanical component with no text or symbols- Odvijte srednju šarku, a zatim podignite donja vrata i stavite ih na mekanu podlogu da biste izbegli ogrebotine.

natural_image
Technical line drawing of a mechanical lever system with inset detail (no text or symbols)- Pomerite dva poklopca srednjih otvora sa leve na desnu stranu.
natural_image
Simple line drawing of a basketball court with an oval cutout and diagonal lines (no text or symbols)- Položite zadnji deo kućišta na mekanu podlogu i odvijte donju šarku i nožicu za nivelisanje.

natural_image
Technical line drawing of a mechanical assembly with two circular insets showing close-ups of components (no text or symbols)- Odvijte i uklonite iglu donje šarke, okrenite podupirač i zamenite.
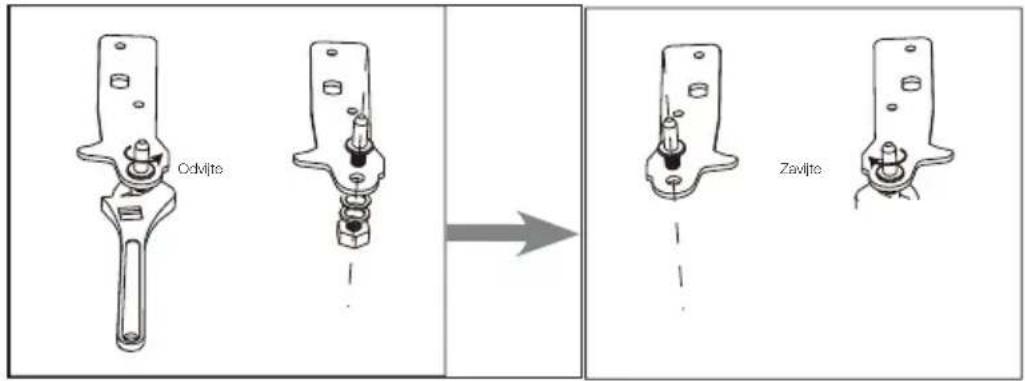
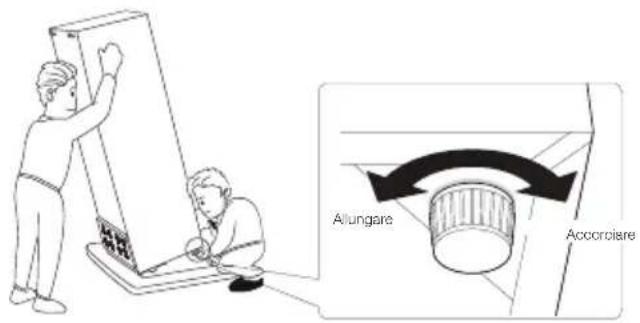
- Postavite šarku na levu stranu, a osnovu nožice na desnu stranu. Zatim zavijte dve nožice za nivelisanje sa originalnim delovima.

natural_image
Technical line drawing of a mechanical clamp or bracket assembly with two circular insets showing close-up views (no text or symbols)- Pomerite dva poklopca srednjih otvora sa leve na desnu stranu.
natural_image
Pure technical diagram showing a rectangular frame with internal circular cutouts and a labeled arrow (no text or symbols)- Podignite jedinicu i stavite vrata na donju šarku. Uverite se da je osnova donje šarke umetnuta u otvor na vratima. Zatim pomerite poklopac osnove šarke donjih vrata sa leve na desnu stranu.

natural_image
Simple line drawing of a cabinet or storage unit with a flat top and side panels (no text or symbols)- Postavite srednju šarku.

natural_image
Pure architectural line drawing of a window frame with no text, numbers, or symbols- Postavite gornja vrata sa gornjom šarkom.

natural_image
Technical line drawing of a mechanical assembly with a circular inset showing a pin or adjustment (no text or symbols)natural_image
Simple line drawing of a folded paper or metal panel with two arrows indicating direction (no text or symbols)- Odvojite zaptivke na vratima frižidera i zamrzivača, a zatim ih pričvrstite nakon rotiranja.

natural_image
Simple line drawing of a document with arrows indicating rotation or movement (no text or symbols)Postavite spoljnu ručicu vrata (ako spoljna ručica postoji)

| A 545 |
| B 555 |
| C 1426 |
| D min = 50 |
| E min = 50 |
| F min = 50 |
| G 1090 |
| H 1110 |
| I 135° |
Nivelisanje jedinice
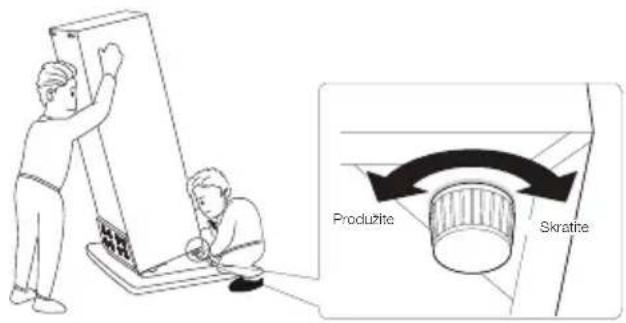
Postavljanje
Ugradite ovaj uređaj na mestu gde temperatura okruženja odgovara klimatskoj klasi navedenoj na natpisnoj pločici uređaja: za rashladne uređaje sa klimatskom klasom:
- produženo umereno: predviđeno je da se ovaj rashladni uređaj koristi na temperaturama okoline između 10 °C i 32 °C; (SN)
- umereno: predviđeno je da se ovaj rashladni uređaj koristi na temperaturama okoline između 16 °C i 32 °C; (N)
- suptropski: predviđeno je da se ovaj rashladni uređaj koristi na temperaturama okoline između 16 °C i 38 °C; (ST)
- tropski: predviđeno je da se ovaj rashladni uređaj koristi na temperaturama okoline između 16 °C i 43 °C; (T)
Mesto
Uređaj treba da se ugradi daleko od izvora toplote kao što su radijatori, bojleri, direktna sunčeva svetlost itd. Uverite se da vazduh može slobodno da cirkuliše oko zadnje strane kućišta. Da biste osigurali najbolje performanse, ako je uređaj postavljen ispod viseće zidne jedinice, minimalno rastojanje između vrha kućišta i zidne jedinice mora biti najmanje 50 mm. Međutim, u idealnom slučaju uređaj ne bi trebalo da bude postavljen ispod visećih zidnih jedinica. Precizno nivelisanje je obezbeđeno jednom ili više podesivih nožica na dnu kućišta.
natural_image
Line drawing of a hand placing a rectangular object on a shelf (no text or symbols)Postavljanje polica za flaše
Da bi se omogućilo skladištenje paketa hrane različitih veličina, police za flaše se mogu postaviti na različitim visinama. Da biste izvršili ova podešavanja, postupite na sledeći način: postepeno povlačite policu za flaše u smeru strelica dok se ne oslobodi, a zatim promenite njen položaj po potrebi.
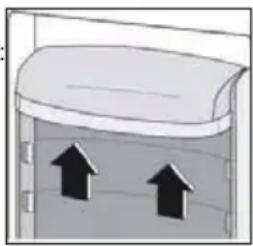
natural_image
Diagram of a container with two upward arrows indicating flow or movement (no text or symbols)Korisni saveti
natural_image
Diagram showing a cutting tool interacting with a circular object, with arrows indicating rotation and direction (no text or symbols)- Nemojte dozvoliti da takve supstance dođu u kontakt sa delovima uređaja.
- Uklonite hranu iz zamrzivača. Čuvajte je na hladnom mestu, dobro pokrivenu.
- Isključite uređaj i izvucite utikač iz mrežnog napajanja, ili isključite prekidač osigurača.
- Očistite uređaj i unutrašnju opremu krpom i mlakom vodom. Nakon čišćenja obrišite čistom vodom i osušite.
- Nakon što se svi delovi osuše, ponovo uključite uređaj.
Odmrzavanje zamrzivača
Odeljak zamrzivača će se postepeno prekrivati ledom. Potrebno je da se on ukloni. Nikada nemojte koristiti oštre metalne predmete za struganje leda sa isparivača jer biste ga mogli oštetiti.
natural_image
Simple line drawing of a rectangular device with a circular button and a minus sign, no text or symbols present.Oprez! Pre nego što pokušate da otklonite problem, isključite napajanje. Samo kvalifikovani električar ili kompetentno lice može da otklanja probleme koji nisu navedeni u ovom priručniku.
Važno! Tokom uobičajene upotrebe čuju se određeni zvuci (kompresor, cirkulisanje rashladnog sredstva).
| Problem Mogući uzrok Rešenje | ||
| Uredaj ne radi | Dugme za regulaciju temperature je podešeno na broj „0“ | Podesite dugme na drugi broj da biste uključili uređaj |
| Mrežni utikač nije uključen ili je labav | Umetnite mrežni utikač | |
| Osigurač je pregoreo ili neispravan | Proverite osigurač, zamenite po potrebi | |
| Utičnica je neispravna | Kvarove na mrežnom napajanju treba da otkloni električar | |
| Hrana je previše topla | Temperatura nije pravilno podešena | Pogledajte odeljak za početno Po-dešavanje temperature |
| Vrata su bila otvorena tokom dužeg perioda | Otvarajte vrata samo koliko je neophodno | |
| Velika količina tople hrane stavljena je u uređaj u poslednja 24 sata | Privremeno podesite regulaciju tem-perature na hladnije | |
| Uređaj je postavljen u blizini izvora toplote. | Pogledajte odeljak za mesto ugradnje | |
| Uređaj prekomerno hladi Podešena temperatura je preniska | Okrenite dugme da biste privremeno podesili regulaciju temperature na toplije | |
| Neuobičajeni zvukovi | Uređaj nije nivelisan | Ponovo podesite nožice |
| Uređaj dodiruje zid ili druge predmete | Pomerite uređaj malo | |
| Komponenta, npr. cev, na zadnjoj strani uređaja dodiruje drugi deo uređaja ili zid | Ako je potrebno, pažljivo savijte komponentu tako da ne smeta | |
| Voda u donjem delu Odvodni otvor za vodu je začepljen | Pogledajte odeljak Čišćenje | |
| Bočni panel je vruć Kondenzator se nalazi unutra panela | To je normalno | |