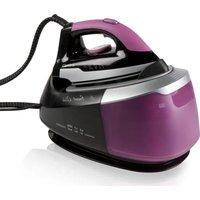
DO7086S - Iron DOMO - Free user manual and instructions
Find the device manual for free DO7086S DOMO in PDF.


| Product type | Steam iron with steam generator |
| Brand | DOMO |
| Model | DO7086S |
| Water tank capacity | 1.7 L |
| Soleplate | Ceramic |
| Temperature setting | Yes, by rotary selector |
| Temperature ranges | Synthetic/silk: 70-120 °C, Wool: 100-160 °C, Cotton: 140-210 °C, Linen: 170-225 °C |
| Steam levels | 3 (low, medium, high) |
| Auto shut-off | Yes, after 10 minutes of inactivity |
| Descaling indicator | Yes |
| Empty tank indicator | Yes, with audible signal |
| Power supply | 220-240 V ~ 50/60 Hz |
| Warranty | 2 years |
| Maintenance | Clean soleplate with damp cloth, descaling with vinegar |
| Safety | Auto shut-off, overheating protection, do not immerse |
| Spare parts | Available on the Domo webshop |
| Included accessories | Iron, steam generator, water tank, thermal insulation pads |
| Recommended use | Demineralized water or 50% tap water / 50% demineralized mixture |
| Cord lock | Yes |
| Functions | Dry and steam ironing |
Frequently Asked Questions - DO7086S DOMO
User questions about DO7086S DOMO
0 question about this device. Answer the ones you know or ask your own.
Ask a new question about this device
Download the instructions for your Iron in PDF format for free! Find your manual DO7086S - DOMO and take your electronic device back in hand. On this page are published all the documents necessary for the use of your device. DO7086S by DOMO.
USER MANUAL DO7086S DOMO
natural_image
Purple and black steam iron with visible brand logo and model number (no text or symbols on the device itself)GARANTIEVOORWAARDEN
CONDITIONS DE GARANTIE
This appliance has a two year warranty period. During this period the manufacturer is responsible for any failures that are the direct result of construction failure. When these failures occur the appliance will be repaired or replaced if necessary. The warranty will not be valid when the damage to the appliance is caused by wrong use, not following the instructions or repairs executed by a third party. The guarantee is issued with the original till receipt. All parts, which are subject to wear, are excluded from the warranty.
If your device breaks down within the 2-year warranty period, you can return the device together with your receipt to the shop where you purchased it.
CONDICIONES DE GARANTÍA
RECYCLAGE-INFORMATIE
natural_image
Symbol of a trash bin crossed with diagonal lines, no text or numbers presentRECYCLING INFORMATIONEN
natural_image
Recycling symbol icon with three chasing arrows forming a triangle (no text or labels)RECYCLING INFORMATION
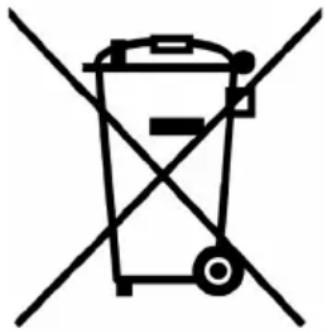
This symbol on the product or on its packaging indicates that this product may not be treated as household waste. Instead it must be brought to the applicable collection point for recycling of electrical and electronic equipment. By ensuring this product is disposed of correctly, you will help prevent potential negative consequences for the environment and human health, which could otherwise be caused by inappropriate waste handling of this product. For more detailed information about recycling of this product, please contact your local city office, your household waste disposal service or the shop where you purchased the product.
The packaging is recyclable. Please treat package ecologically.
natural_image
Symbol of a trash bin crossed out by two diagonal lines (no text or labels)
natural_image
Recycling symbol composed of three chasing arrows forming a triangle (no text or labels)From now on, accessories and parts of Domo appliances can also be ordered online from the Domo webshop*:
http://webshop.domo-elektro.be
You can reach the webshop through the Domo website as well: www.domo-elektro.be. The accessories and parts can also still be obtained at the store where you bought the appliance.
natural_image
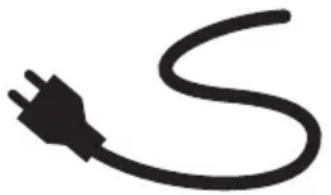
Simple black line drawing of a plug with a curved cable (no text or symbols)If the supply cord is damaged, it must be replaced by the manufacturer, its service agent or a similarly qualified person in order to avoid a hazardous situation.
natural_image
Warning symbol depicting steam rising inside a triangle (no text or numbers)TEMPERATUURSCHIJF
natural_image
Close-up of a blue and white steam iron with 'Smart Glide' branding (no visible text or symbols on the device itself)SELECTEUR DE TEMPERATURE
natural_image
Close-up of a blue and white steam iron with visible branding (no text or symbols on the device itself)natural_image
Warning symbol depicting steam rising inside a triangle (no text or numbers)chemical
Temperature range diagram showing 100°C, 100°C, and 210°C with corresponding dot symbols
BEDIENFELD
natural_image
Close-up of a blue and white electric iron with visible steam handle and branding (no text or symbols on the device itself)This appliance may be used by children from the age of 8 and up, and also by persons with a physical or sensory limitation, as well as mentally limited persons or persons with a lack of experience and knowledge. But only on the condition that these persons have received the necessary instructions on how to use this appliance in a safe way and know the dangers that can occur by using this appliance.
Children cannot be allowed to play with the appliance. Maintenance and cleaning of the appliance may not be done by children, unless they are older than 8 years old and are under supervision. Keep the appliance out of reach of children younger than 8 years old.
This appliance is suitable to be used in a household environment and in similar surroundings such as:
- Kitchen for personnel of shops, offices or other similar professional surroundings
- Farms
- Hotel or motel rooms and other surroundings with a residential character
- Guest rooms or similar
Attention: This appliance cannot be used with an external timer or a separate remote control.
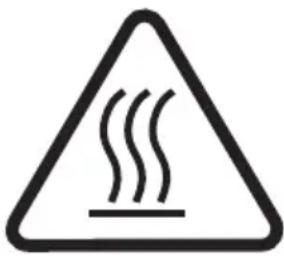
The appliance can become hot during use. Keep the power cord away from hot parts and don't cover the appliance.
- Read all instructions before use.
- Before use, check if the voltage stated on the appliance corresponds with the voltage of the power net at your home.
- Do not let the cord hang on a hot surface or on the edge of a table or counter top.
- Never use the appliance when the cord or plug is damaged, after malfunction or when the appliance itself is damaged. In that case, take the appliance to the nearest qualified service center for check-up and repair.
- Close supervision is necessary when the appliance is used near or by children.
- The use of accessories that are not recommended or sold by the manufacturer can cause fire, electrical shock or injuries.
- Unplug the appliance when it is not in use, before assembling or disassembling any parts and before cleaning the appliance. Put all buttons and knobs into the ‘off’ position and unplug the appliance by grasping the plug. Never unplug by pulling the cord.
- Do not leave a working appliance unattended.
- Never place this appliance near a gas stove or
electrical stove or in a place where it may come into contact with a warm appliance.
- Do not use the appliance outdoors.
- Only use the appliance for its intended use.
- Only use the appliance for domestic use. The manufacturer can not be held responsible for accidents that result from improper use of the appliance or not following the instructions described in this manual.
- All repairs should be carried out by the manufacturer or its aftersales service.
- Make sure that children do not touch the cord or appliance.
- Keep the cord away from sharp edges and hot parts or other heat sources.
- Before use, remove all packaging materials and any promotional stickers.
- Do not use the appliance if the cord, plug or appliance itself is damaged or if the appliance leaks or has been dropped. Have the appliance checked and repaired by a qualified service center or technician to avoid a hazard.
- Straighten the cord and steam hose before use.
- Caution: it is possible to burn yourself on hot metal parts, hot water or hot steam.
- Do not let the cord hang over the edge of a table or over a hot surface.
-
Place the appliance on a flat and stable, horizontal surface.
-
Make sure that the cord or plug do not touch any warm parts.
- Unplug the appliance before filling the tank with water.
• Empty the water tank after use. - Never immerse the appliance in water or any other liquid. In case this does happen, make sure you do not use the appliance anymore.
- Never leave the appliance unattended when it is connected to the power supply or when it sits on the ironing board.
- The use of accessories that are not recommended by the manufacturer may cause injuries or damaging of the appliance.
- Make sure the drain cap at the bottom of the appliance is always closed properly during use.
- Never fill the water tank with hot water, perfumed liquids, vinegar, descaler, starch, fabric softener or other chemicals.
• Always unplug the appliance when it is not in use, for filling the water tank or before cleaning the appliance. - Do not use the appliance for other purposes than it was designed for.
SAVE THESE INSTRUCTIONS
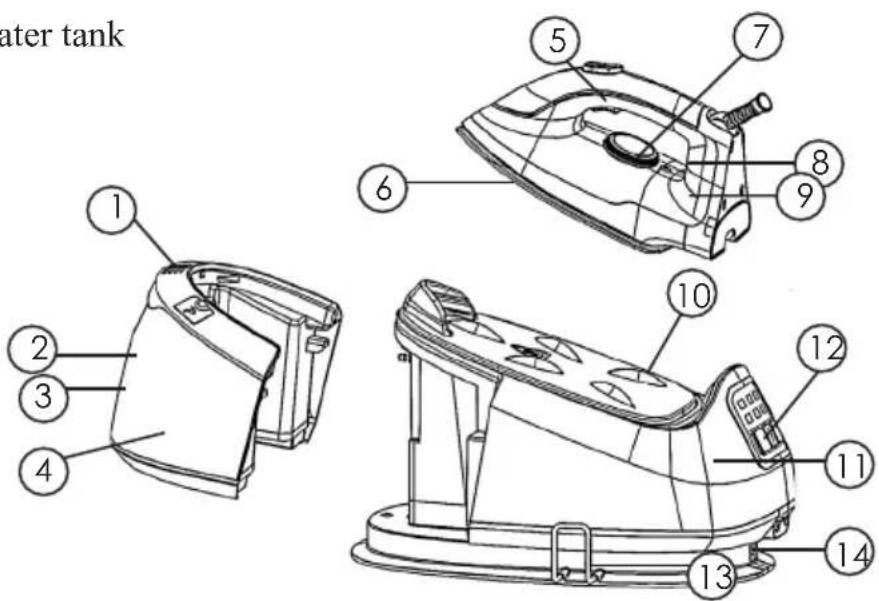
PARTS
- Filling cap
- Trigger for removing the water tank
- Handle
- Water tank
- Steam release button
- Soleplate
- Temperature dial
- Temperature indicator
- Iron
- Thermal insulation pads
- Steam generator
- Control panel
- Cord clamp
- Cord winding groove
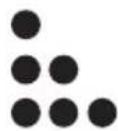
TEMPERATURE DIAL
Set the right temperature for the right fabric with the temperature dial.
For synthetic fabrics/silk: 70<T<120°
For wool: 100<T<160^
For cotton: 140 < T < 210^
For linnen: 170<T<225^ MAX
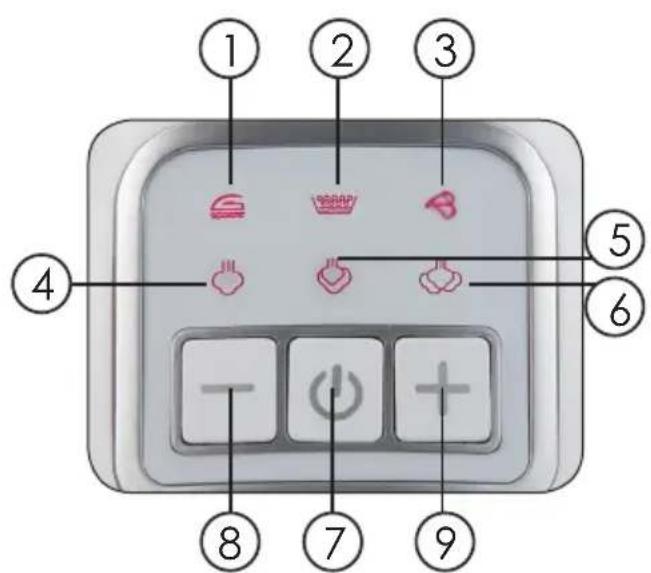
CONTROL PANEL
- On/off indicator
- Descaling indicator
- Empty water tank indicator
- Steam level 1 (low) indicator
- Steam level 2 (medium) indicator
- Steam level 3 (high) indicator
- On/off button
- Decrease steam level
- Increase steam level
Trigger
Grab the water tank by the handle and pull the trigger with 1 finger. You can now remove the water tank from the generator.
Filling cap
Open the filling cap and use the opening to fill the water tank.
On/off button
Plug in the appliance and press the on/off button. The on/off indicator will light up and the lowest steam level indicator will start blinking. The appliance is now switched on. To turn the appliance off again, press the on/off button and hold. The indicators will go out and the appliance is now switched off.
Setting the steam level
The two arrows can be used to set the steam level: low, medium or high. When a certain level has been selected, the corresponding indicator will start blinking and will light up continuously after a short while. You can now produce steam and iron with steam.
Temperature indicator
When the iron is heating up, the temperature indicator will be lit up. When the set temperature has been reached, the light indicator will go out again. During ironing the indicator will alternately light up and go out again, as the iron is being kept at the right temperature.
Steam release button
When you have turned on the appliance and selected the desired steam level, the indicator of the selected steam level will start blinking. When the light indicator lights up continuously, you can start using steam. Press the steam release button on the inside of the handle of the iron to spray a continuous steam out of the soleplate. When you let go of the button, you will iron dry again, without steam.
Empty water tank indicator
When the water tank is empty, the corresponding indicator will light up and there will be a double buzzer sound. The steam generator will stop operating until the water tank is refilled.
Descaling indicator
This light indicator will light up when the steam generator needs to be descaled. When all scale is removed, the light will go out again.
Cord clamp
After use you can easily store the cord and steam hose by using the cord clamp. Pull
out the clamp, lead the steam hose and the cord around the steam generator in the cord winding groove and push in the clamp to lock the cord and steam hose.
Automatic shut-off
The appliance will switch itself off when there has not been sprayed steam out of the soleplate for longer than 10 minutes.
BEFORE THE FIRST USE
- Remove any stickers or protective foil from the ceramic soleplate.
- Heat up the iron until the maximum temperature and iron on a damp cloth during a couple of minutes to remove any possible residues from the soleplate. Iron according to the instructions in the section «Steam ironing».
Caution:
- During the first use it is normal that a specific odeur escapes from the appliance. This odeur will disappear after a while.
- Some particles may come out of the soleplate during the first use. This is normal. The particles are harmless and will disappear after a while.
- When turning on the appliance, the steam generator may produce a pumping sound. This is normal. This sound indicates that water is pumped into the steam generator.
- While the soleplate is heating up, some steam will be released automatically. This is also normal and will last for about 3 seconds.
USING THE STEAM GENERATOR
This steam generator offers 2 options: dry ironing or steam ironing. Follow the instructions below. Also carefully read the ironing tips at the end of this section before using the appliance.
Dry ironing
- Place the iron on the thermal insulation pads of the steam generator.
- Plug in the appliance and press the on/off button.
- Select the desired temperature with the temperature dial, according to the kind of fabric that needs to be ironed. The temperature indicator will light up and the iron will start heating up.
- When the temperature indicator goes out, the selected temperature has been reached. You can now start ironing.
Caution: Never touch the hot soleplate!
Steam ironing
Caution: do not plug in the appliance yet at this point.
- Grab the water tank of the steam generator by the handle and pull the trigger on the inside of the handle to pull the water tank out of the generator. Open the filling cap and fill the water tank with water. It is best to use demineralized water. Make sure that you do not exceed the maximum level (1.7l). Close the filling cap after filling the water tank.
- Place the water tank back into the steam generator.
- Place the iron on the thermal insulation pads of the steam generator.
- Plug in the generator, press the on/off button and the light indicator of the lowest steam level (default) will start blinking. Set the temperature dial to the desired temperature, according to the kind of fabric, and the temperature indicator will light up.
- The water in the water tank will start heating up and after a couple of minutes the temperature indicator will go out. This indicates that the soleplate has reached the set temperature. When the steam level indicator stops blinking and stays lit up, you can start ironing with steam by pressing the steam release button.
- You can choose your desired steam level - low (left), medium (middle) or high (right) - by using the arrows on the control panel. Make sure that there is enough water in the water tank.
Caution:
-
Never touch the hot soleplate!
• Never aim the steam at people! -
After ironing, press and hold the on/off button. The appliance will shut off and all the light indicators will go out. Unplug the appliance. Place the iron on the thermal insulation pads of the generator and let the appliance cool down completely.
Ironing tips
- Always check first if there is a label on the garment with instructions for ironing. If this is the case, then always follow these instructions.
- The iron heats up faster than it cools down. Therefore, always iron the garments that require the lowest temperature first, like synthetic fabrics.
- If a fabric contains several types of fibres, always choose the lowest temperature to iron the combination of these fibres.
- Silk and other shiny fabrics should be ironed inside-out.
- Velvet and other fabrics that easily become shiny should be ironing with slight pressure, in one direction. Always keep the iron moving.

natural_image
Close-up of a blue and white steam iron with visible branding (no text or symbols on the device itself)During ironing you can place the iron on the steam generator.
- Fabrics that are a 100% wool can be ironed with steam. Set the temperature to the maximum and use a dry cloth to place on the fabric.
- Never iron over zippers or other metal objects in a garment. This can damage the soleplate. Always iron around such objects.
Caution: if you iron woollen fabrics, the fabric may become shiny. That is why you should turn the garment inside-out for ironing.
CLEANING AND MAINTENANCE
- Unplug the appliance and let it cool down before cleaning it.
- Wipe residues from the soleplate with a damp cloth or with a non-abrasive (liquid) cleaner.
Caution: Do not use any chemical, steel, wooden or abrasive cleaners to scrape the soleplate.
- Clean the upper part of the iron with a soft, damp cloth.
- Wipe the water drops on the steam generator and the thermal insulation pads with a dry cloth.
- When not using the steam generator for a long time, pour out the water from the water tank and place the iron on the thermal insulation pads to store the appliance.
- Wind the steam hose and cord around the appliance by placing them into the cord winding groove and lock them into place with the cord clamp.
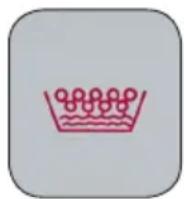
Descaling
When the descaling indicator is lit up, it is time for you to descale the boiler. At this point it is necessary to clean this tank to extend the lifecycle of your steam generator and to avoid scale.
-
Press the on/off button and hold until the appliance switches off.
-
Unplug the appliance.
-
Let the appliance cool down completely. Caution: when you are about to clean the generator, never unscrew the drain cap while the appliance is under pressure. Steam will escape from the appliance and you may burn yourself.
-
Tilt the steam generator so it is upside down and pull out the rubber plug that covers the drain cap (A) at the bottom of the appliance.
-
Unscrew the drain cap (A) of the boiler counterclockwise on the bottom of the generator and pour out the water that is inside.
-
Prepare a mixture of 400ml water and 400ml vinegar and pour it into
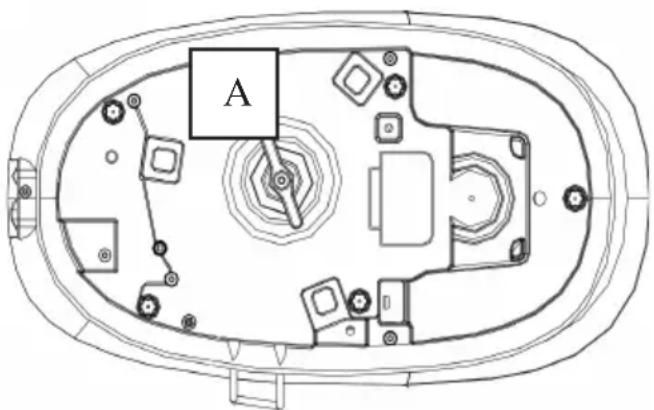
the opening of the boiler.
- Replace the drain cap, by turning clockwise.
- Slightly shake the appliance so the water can spread inside the boiler.
- Place the appliance on a flat surface (upright) and let it heat up. Do not forget to place the pink water tank into the appliance, otherwise it will not heat up.
- When the steam level indicator lights up continuously, the steam generator is warm. At this point, switch off the appliance by pressing the on/off button for a few seconds. Unplug the appliance and let the mixture soak for another 2 hours.
- Pour out the water/vinegar mixture from the boiler (first remove the drain cap again) and rinse twice with clean water to remove the scale and vinegar residues.
- Now pour 100ml clean water into the boiler. Leave this water in the boiler, to avoid the risk of damage to the boiler.
- Replace the drain cap without using too much power.
CAUTION: Only use tap water (or 50% tap water and 50% demineralized water in case of hard water) in your steam generator. Careful: softened water should be absolutely avoided! In case of use of a “softener” and/or perfumed water, brown stains could emerge, which would cause damage to the steam chamber.
IRONING TABLE
| Symbol Fabric Variable steam | ||
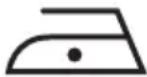 | synthetic fabric/silk | |
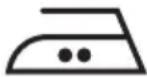 | wool | |
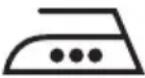 | cotton linnen | |
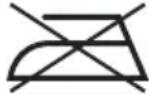 | This symbol means that the article can not be ironed! | |
PRECAUCIONES IMPORTANTES
natural_image
Warning symbol depicting steam rising inside a triangle (no text or numbers)MANDO DE TEMPERATURA
natural_image
Close-up of a blue and white steam iron with visible branding (no text or symbols on the device itself)NASTAVENÍ TEPLOTY ŽEHLIČKY
natural_image
Close-up of a blue and white steam iron with visible branding (no text or symbols on the device itself)Out of dust bags? Need an anti-scale cartridge?
You can now also order our accessories and parts in the
Domo Webshop
Webshop Domo
Domo- Webshop
Domo Webshop
Surf naar:
Rendez-vous sur:
Einfach unter:
Surf to:
webshop.domo-elektro.be
of scan hier:
ou scannez ici:
oder hier scannen:
or scan here:


- GARANTIEVOORWAARDEN
- CONDITIONS DE GARANTIE
- CONDICIONES DE GARANTÍA
- RECYCLAGE-INFORMATIE
- RECYCLING INFORMATIONEN
- RECYCLING INFORMATION
- TEMPERATUURSCHIJF
- SELECTEUR DE TEMPERATURE
- BEDIENFELD
- SAVE THESE INSTRUCTIONS
- PARTS
- TEMPERATURE DIAL
- CONTROL PANEL
- Trigger
- Filling cap
- On/off button
- Setting the steam level
- Temperature indicator
- Steam release button
- Empty water tank indicator
- Descaling indicator
- Cord clamp
- Automatic shut-off
- BEFORE THE FIRST USE
- Caution:
- USING THE STEAM GENERATOR
- Dry ironing
- Steam ironing
- Ironing tips
- CLEANING AND MAINTENANCE
- Descaling
- IRONING TABLE
- PRECAUCIONES IMPORTANTES
- MANDO DE TEMPERATURA
- NASTAVENÍ TEPLOTY ŽEHLIČKY
- webshop.domo-elektro.be
Brand : DOMO
Model : DO7086S
Category : Iron