
Power+ LB6700E - Cordless blower EGO - Free user manual and instructions
Find the device manual for free Power+ LB6700E EGO in PDF.

| Product Type | Cordless Blower |
| Brand | EGO |
| Model | Power+ LB6700E |
| Rated Voltage | 56 V |
| Battery Type | EGO ARC Lithium 56 V (5.0 Ah recommended) |
| Max Air Volume | 1138 m³/h |
| Max Air Speed (without nozzle) | 258 km/h |
| Max Air Speed (with tapered nozzle) | 290 km/h |
| Max Blowing Force | 21 N |
| Weight (without battery) | 2.2 kg |
| Measured Sound Power Level | 100 dB(A) K=1.1 dB(A) |
| Sound Pressure Level at Ear | 91 dB(A) K=3 dB(A) |
| Vibration (total value) | 1.3 m/s² K=1.5 m/s² |
| Protection Index | IPX4 |
| Run Time (with 5.0 Ah battery) | 15 min (Boost), 30 min (high speed), 200 min (low speed) |
| Recommended Operating Temperature | -15 °C to 40 °C |
| Recommended Storage Temperature | -20 °C to 70 °C |
| Key Features | Variable speed trigger, lock dial, Boost mode, tapered nozzle, wide angle nozzle (included) |
| Compatible Accessories | Gutter cleaning kit AGC1000/AGC1001, shoulder strap AP1500, short tube AST1000 |
| Maintenance and Cleaning | Clean with a clean cloth, do not use solvents. Check air intakes. |
| Safety | Wear safety glasses and hearing protection. Read the manual before use. |
| Spare Parts and Repairability | Repairs by an EGO authorized center. Contact egopowerplus.eu. |
| General Information | EGO warranty available online. Do not dispose of with household waste. |
Frequently Asked Questions - Power+ LB6700E EGO
User questions about Power+ LB6700E EGO
0 question about this device. Answer the ones you know or ask your own.
Ask a new question about this device
Download the instructions for your Cordless blower in PDF format for free! Find your manual Power+ LB6700E - EGO and take your electronic device back in hand. On this page are published all the documents necessary for the use of your device. Power+ LB6700E by EGO.
USER MANUAL Power+ LB6700E EGO
natural_image
Technical line drawings of two SGO (Stochastic Engine) wrenches with no visible text or symbolsLB6150E/LB6700E
56 VOLT LITHIUM-ION CORDLESS BLOWER
EN 56 Volt lithium-ion cordless blower 4
natural_image
Technical line drawing of a mechanical component with an arrow indicating direction (no text or symbols present)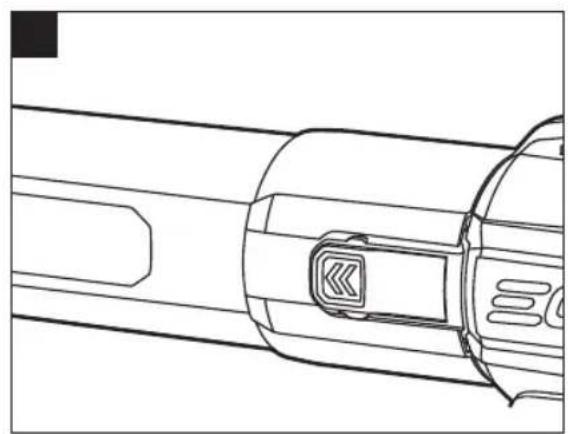
natural_image
Technical line drawing of a mechanical component with no visible text or symbols
EGO Europe GmbH
The Anchorage, 34 Bridge Street Reading, RG1 2LU, United Kingdom
EN READ ALL INSTRUCTIONS!

READ OPREATOR'S MANUAL
NOTICE: These instructions shall also be available in an alternative format, e.g. on a website.
WARNING: To ensure safety and reliability, all repairs and replacements should be performed by a qualified service technician.
SAFETY SYMBOL
The purpose of safety symbols is to attract your attention to possible dangers. The safety symbols and the explanations with them deserve your careful attention and understanding.
The symbol warnings do not, by themselves, eliminate any danger. The instructions and warnings they give are no substitutes for proper accident prevention measures.
WARNING: Be sure to read and understand all safety instructions in this Operator's Manual, including all safety alert symbols such as "DANGER," "WARNING," and "CAUTION" before using this machine. Failure to following all instructions listed below may result in electric shock, fire, and/or serious personal injury.
DAMAGE PREVENTION AND INFORMATION MESSAGES
These inform the user of important information and/or instructions that could lead to equipment or other property damage if they are not followed. Each message is preceded by the word "NOTICE", as in the example below:
NOTICE: Equipment and/or property damage may result if these instructions are not followed.
SAFETY INSTRUCTIONS
This page depicts and describes safety symbols that may appear on this product. Read, understand, and follow all instructions on the machine before attempting to assemble and operate.

Safety Alert

Always wear ear protection when operating this product.

Keep Bystanders Away

Guaranteed sound power level. Noise emission to the environment according to the European community's Directive.

This product is in accordance with applicable UK legislation.
Hz Hertz W Watt
min Minutes m

Always wear safety goggles or safety glasses with side shields and a full face shield when operating this product.

To reduce the risk of injury, user must read the operator's manual.

Waste electrical products should not be disposed of with household waste. Take to an authorized recycler.

Direct Current

This product is in accordance with applicable EC directives.
^3 /h Cubic Meter Per Hour
V Volt A Amperes
km/h Kilometers Per Hour n
... /min Per Minute IPX4 Protection against water jets
SPECIFICATIONS
| Model LB6150E LB6700E | ||
| Voltage | 56V--- | |
| Maximum Air Volume | 1045m^3/h 1138m^3/h | |
| Maximum Air Velocity | 241 km/h (without tapered nozzle) | 258 km/h (without tapered nozzle) |
| 274 km/h (with tapered nozzle) | 290 km/h (with tapered nozzle) | |
| Maximum Blower Force | 18.5 N 21N | |
| Recommended Operating Temperature | -15°C-40°C | |
| Recommended Storage Temperature | -20°C-70°C | |
| Approximate Run Time (LB6150E With EGO 2.5 Ah battery/LB6700E With EGO 5.0Ah battery) | 10 min (Boost mode) | 15 min (Boost mode) |
| 15 min (High speed) | 30 min (High speed) | |
| 100 min (Low speed) | 200 min (Low speed) | |
| Blower Weight (Without battery pack, with tube) | 2.15 kg 2.2kg | |
| Measured sound power level L_WA | 98 dB(A)K=0.9 dB(A) | 100 dB(A)K=1.1 dB(A) |
| Sound pressure level at operator's ear L_PA | 88 dB(A)K=3 dB(A) | 91 dB(A)K=3 dB(A) |
| Guaranteed sound power level L_WA (according to 2000/14/EC) | 99 dB(A) 101 dB(A) | |
| Vibration a_n | 0.68 m/s2K=1.5 m/s2 | 1.3 m/s2K=1.5 m/s2 |
0 No Load Speed
■ The declared vibration total value has been measured in accordance with a standard test method and may be used for comparing one machine with another;
■ The declared vibration total value may also be used in a preliminary assessment of exposure.
NOTICE: The vibration emission during actual use of the machine can differ from the declared value in which the machine is used; In order to protect the operator, user should wear gloves and ear protectors in the actual conditions of use.
PACKING LIST
DESCRIPTION
KNOW YOUR BLOWER (Fig. A)
- Speed/Lock-On Dial
- Boost Button
- Air-Speed Trigger
- Battery-Release Button
- Latch
- Electric Contacts
- Ejection Mechanism
- Air Intake
- Base
- Tube-Release Button
- Blower Tube
- Tapered Nozzle
- Spread Nozzle (only for LB6700E)
WARNING: The safe use of this product requires an understanding of the information on the machine and in this instruction manual as well as knowledge of the project you are attempting.
RECOMMENDED ACCESSORIES
| PART NAME | MODEL NUMBER |
| Gutter Cleaning Attachment | AGC1000 |
| Gutter Cleaning pack and glasses | AGC1001 |
| Shoulder Strap | AP1500 |
| Short tube attachment | AST1000 |
EN ASSEMBLY
WARNING: If any parts are damaged or missing, do not operate this product until the parts are replaced. Use of this product with damaged or missing parts could result in serious personal injury.
WARNING: Do not attempt to modify this product or create accessories not recommended for use with this blower. Any such alteration or modification is misuse and could result in a hazardous condition leading to possible serious personal injury.
WARNING: To prevent accidental starting that could cause serious personal injury, always remove the battery pack from the machine when assembling parts.
APPLICATION
You may use this product for the purposes listed below:
■ Clearing hard surfaces such as driveways and walkways.
- Keeping decks and driveways free from leaves and pine needles.
NOTICE: The tool is to be used only for its prescribed purpose. Any other use is deemed to be a case of misuse.
ASSEMBLING/REMOVING THE BLOWER TUBE
■ To Assemble (Fig. B1 & B2)
Align the groove and push the tube onto the blower housing until the latch snaps into place.
■ To Remove (Fig. B3)
Press and hold the tube-release button to disengage the latch, then pull the tube straight from the blower.
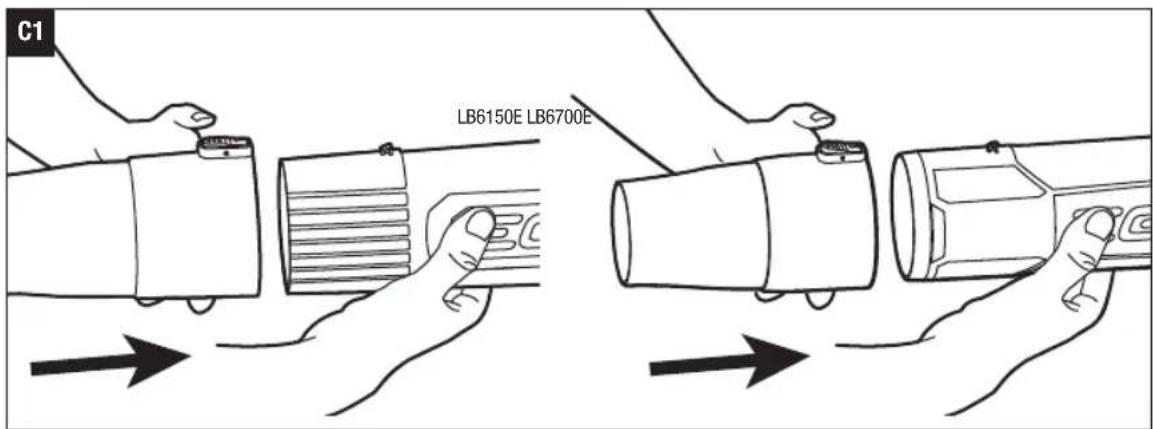
ASSEMBLING/REMOVING THE BLOWER TAPERED NOZZLE
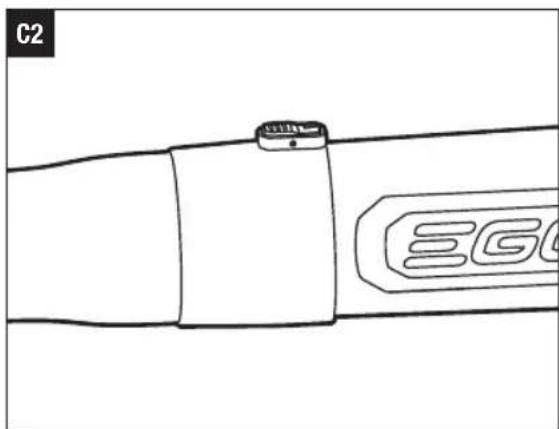
■ To Assemble (Fig. C1 & C2)
Align the groove in the tapered nozzle with the tube knob and push the nozzle onto the tube until it snaps into place.
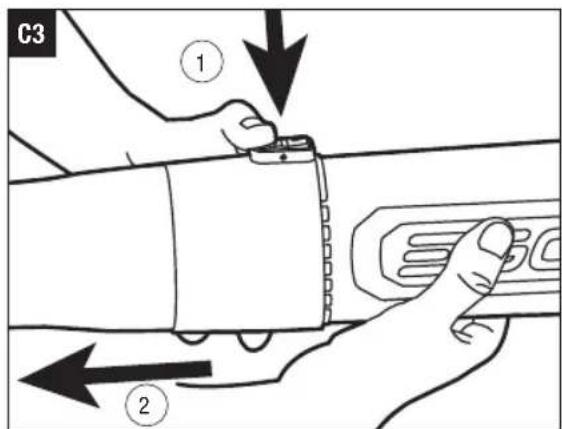
■ To Remove (Fig. C3)
Press and hold the nozzle-release button to disengage the latch, then pull the nozzle straight from the blower tube.
Follow the same sequence to assemble or remove the spread nozzle (only for LB6700E).
OPERATION
WARNING: Before each use, inspect the entire product for damaged, missing, or loose parts, such
as screws, nuts, bolts, caps, etc. Tighten securely all fasteners and caps and do not operate this product until all missing or damaged parts are replaced.
WARNING: Always wear eye protection, along with hearing protection. Failure to do so could result in objects being thrown into your eyes and other possible serious injuries.
WARNING: The operation of any machines can result in foreign objects being thrown into your eyes, which can result in severe eye damage. Before beginning machine operation, always wear safety goggles or safety glasses with side shields and a full face shield when needed. We recommend a Wide Vision Safety Mask for use over eyeglasses or standard safety glasses with side shields.
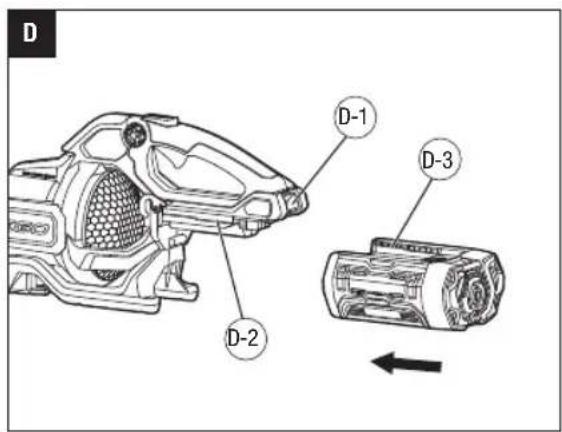
ATTACHING/DETACHING THE BATTERY PACK (FIG. D)
Use only with EGO's battery packs and chargers listed in Fig. A.
FULLY CHARGE BEFORE FIRST USE
To attach
Align the battery ribs with the mounting slots and press the battery pack down until you hear a "click".
| D-1 | Battery-release button | D-2 Mounting Slot |
| D-3 Battery Rib | ||
To detach
Depress the battery-release button and pull the battery pack out.
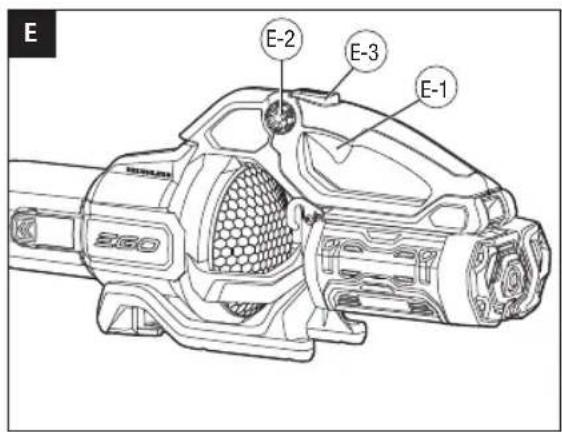
STARTING/STOPPING THE BLOWER (FIG. E)
Air-speed trigger only
- Depress the air-speed trigger to turn on the blower.
- The air speed of the blower is controlled with the variable speed trigger. More pressure on the trigger results in higher blowing speeds; less pressure on the trigger results in lower blowing speeds. Adjust the speed to suit the task at hand.
- Release the air-speed trigger to turn off the blower.
Speed/Lock-on dial only
The blower can be locked at any speed with the speed lock-on dial.
- Turn the speed/lock-on dial clockwise to start the blower. The air speed will increase as the dial is rotated clockwise.
-
To decrease the air speed, turn the speed/lock-on dial counterclockwise.
-
Keep turning the speed/lock-on dial counterclockwise to the off position to stop the blower.
NOTICE: If the speed/lock-on dial is not turned back to the off position before the battery is removed, the blower will not start when a fully charged battery is installed. This is a protection feature to help prevent accidental startup. Depress the air-speed trigger to deactivate the protection and start the blower.
Boost mode
Press the boost button while working to temporarily increase the air speed to the maximum level. The blower will resume the previous speed when the boost button is released.
| E-1 Air-speed Trigger E-2 Speed/Lock-on Dial | |||
| E-3 Boost Button | |||
TIPS FOR USING THE BLOWER
■ To keep from scattering debris, blow around the outer edges of a debris pile. Never blow directly into the center of a pile.
■ To reduce sound levels, limit the number of pieces of power equipment used at any one time.
■ Use rakes and brooms to loosen debris before blowing. In dusty conditions, slightly dampen surfaces if water is available.
■ Conserve water by using power blowers instead of hoses for many lawn and garden applications, including areas such as gutters, screens, patios, grills, porches, and gardens.
■ The edge of the tapered nozzle helps with removing wet leaves and clean out gaps in the sidewalk.
■ Watch out for children, pets, open windows, or freshly washed cars, and blow debris safely away.
■ After using blowers or other equipment, clean up! Dispose of debris properly.
MAINTENANCE
GENERAL MAINTENANCE
Avoid using solvents when cleaning plastic parts. Most plastics are susceptible to damage from various types of commercial solvents and may be damaged by their use. Use of a piece of clean cloth to remove dirt, dust, oil, grease, etc.

WARNING: Do not at any time let brake fluids, inline, petroleum-based products, penetrating oils, come in contact with plastic parts. Chemicals can
damage, weaken or destroy plastic which may result in serious personal injury.
EN
STORAGE
■ Remove the battery pack from the blower.
■ Clean all foreign material from the air intakes of the blower.
■ Store the blower indoors in a place that is inaccessible to children. Keep it away from corrosive agents, such as garden chemicals and de-icing salts.
Protecting the environment
Do not dispose of electrical equipment, used battery and charger into household waste! Take this product to an authorized recycler and make it available for separate collection. Electric tools must be returned to an environmentally compatible recycling facility.
EN TROUBLESHOOTING
| PROBLEM CAUSE SOLUTION | ||
| Blower doesn’t work. | The battery pack is not attached to the blower.No electrical contact between the blower and battery pack.The battery pack is depleted.The battery pack or blower is too hot.The speed/lock-on dial was not turned back to the off position before the battery was removed. | Attach the battery pack to the blower.Remove battery, check contacts and reinstall the battery pack.Charge the battery pack.Cool the battery pack and blower until the temperature drops below 67°C.Depress the air-speed trigger to deactivate the protection and start the blower. |
| The air velocity decreases significantly. | Excessive wearing of motor fan.The air inlet is blocked by debris. | Contact EGO service center for repair.Remove the battery pack, clear the debris. |
WARRANTY
EGO WARRANTY POLICY
Please visit the website egopowerplus.eu for full terms and conditions of the EGO Warranty policy.
LIGAR/DESLIGAR O SOPRADOR (IMAGEM E)
LADDA FULLT INNAN FÖRSTA ANVÄNDNING
Fästa
GENERELT VEDLIKEHOLD
POLITYKA GWARANCYJNA EGO
CITIȚI MANUALUL DE INSTRUCTIUNI
Modul Amplificare (boost)
LUGEGE KASUTUSJUHENDIT
| D-1 | SZJQJQJQJQJQJQJQJQJQJQJQJQJQJQJQJQJQJQJQJQJQJQJQJQJQJQJQJQJQJQJQJQJQJQJQJQJQJQJQJQJQJQJQJQJQJQJQJQJQJQJ | D-2 | JSDSG60 QOM60 |
| D-3 | SZJQJQJQJQJQJQJQJQJQJQJQJQJQJQJQJQJQJQJQJQJQJQJQJQJQJQJQJQJQJQJQJQJQJQJQJQJQJQJQJQJQJQJQJQJQJQJQJQJ |
∂mθbbs
natural_image
Technical line drawing of two 360 power tools with no visible text or symbolsLB6150E/LB6700E
- LB6150E/LB6700E
- VOLT LITHIUM-ION CORDLESS BLOWER
- EN READ ALL INSTRUCTIONS!
- READ OPREATOR'S MANUAL
- SAFETY SYMBOL
- DAMAGE PREVENTION AND INFORMATION MESSAGES
- SAFETY INSTRUCTIONS
- PACKING LIST
- DESCRIPTION
- KNOW YOUR BLOWER (Fig. A)
- EN ASSEMBLY
- APPLICATION
- ASSEMBLING/REMOVING THE BLOWER TUBE
- ASSEMBLING/REMOVING THE BLOWER TAPERED NOZZLE
- OPERATION
- ATTACHING/DETACHING THE BATTERY PACK (FIG. D)
- FULLY CHARGE BEFORE FIRST USE
- To attach
- To detach
- STARTING/STOPPING THE BLOWER (FIG. E)
- Air-speed trigger only
- Speed/Lock-on dial only
- Boost mode
- TIPS FOR USING THE BLOWER
- MAINTENANCE
- GENERAL MAINTENANCE
- STORAGE
- Protecting the environment
- EN TROUBLESHOOTING
- WARRANTY
- EGO WARRANTY POLICY
- LIGAR/DESLIGAR O SOPRADOR (IMAGEM E)
- LADDA FULLT INNAN FÖRSTA ANVÄNDNING
- Fästa
- GENERELT VEDLIKEHOLD
- POLITYKA GWARANCYJNA EGO
- CITIȚI MANUALUL DE INSTRUCTIUNI
- Modul Amplificare (boost)
- LUGEGE KASUTUSJUHENDIT
Brand : EGO
Model : Power+ LB6700E
Category : Cordless blower