
DO-260A - Air Conditioning DOMO - Free user manual and instructions
Find the device manual for free DO-260A DOMO in PDF.

| Brand | DOMO |
| Model | DO-260A |
| Product type | Mobile air conditioner (monoblock) |
| Power supply | 220-240 V, 50 Hz |
| Cooling capacity | Not specified |
| Power consumption | Not specified |
| Dimensions (W x D x H) | Not specified |
| Weight | Not specified |
| Noise level | Not specified |
| Main functions | Air conditioning, dehumidification, fan, auto |
| Programmable temperature range | 15 °C to 31 °C |
| Fan speeds | 3: low, medium, high |
| Programmable timer | Up to 12 hours (on/off) |
| Display | LCD screen with error codes |
| Condensation water tank | Internal, manual or continuous drain (hose) |
| Air exhaust hose length | 0.5 to 1.5 m |
| Suitable window height | 40 to 130 cm |
| Air filter | Washable with warm water (max 40°C), clean every 15 days |
| Warranty | 2 years |
| Maintenance and cleaning | Unplug before cleaning, soft dry cloth. Clean filter regularly. |
| Safety | Do not use a power strip or extension cord. Wait 2 hours after unpacking before plugging in. Wait 3-4 minutes before restarting. Do not place horizontally. |
| Spare parts and repairability | Repair only by an authorized repairer. Parts not specified. |
Frequently Asked Questions - DO-260A DOMO
User questions about DO-260A DOMO
0 question about this device. Answer the ones you know or ask your own.
Ask a new question about this device
Download the instructions for your Air Conditioning in PDF format for free! Find your manual DO-260A - DOMO and take your electronic device back in hand. On this page are published all the documents necessary for the use of your device. DO-260A by DOMO.
USER MANUAL DO-260A DOMO
PRODUCT OF LINEA 2000
GARANTIEVOORWAARDEN
CONDITIONS DE GARANTIE
This appliance has a two year warranty period. During this period the manufacturer is responsible for any failures which are the direct result of material- or construction failure. When these failures occur the appliance will be repaired or replaced if necessary. The warranty won't be valid when the damage to the appliance is caused by wrong use, not following the instructions or repairs executed by a third party. The warranty is only valid when the warranty application was filled in by your dealer at the moment of purchase.
Type nr. Apparaat
N^ de modulo de l'appareil DO-260A
Type nr des Gerätes
Type nr. of appliance
Naam
Nom
Name
Name
Adres
Adresse
Adresse
Address
Aankoopdatum
Date d'achat
Kaufdatum
Date of purchase
LEVERING EN UITPAKKEN
BRANCHEMENT DU FLEXIBLE D'EVACUATION D'AIR
DELIVERY AND UNPACKING
When you take out the unit from the box, please check carefully if there isn't any damage caused by transport. If this is the case, please contact your dealer immediately. Every appliance has been thoroughly check when it left the factory.
IMPORTANT: After unpacking, you need to leaf the appliance upright and not in use. When you don't follow this procedure, you risk of damaging the unit.
When you don't want the hot air to enter the room, you need to guide the hose outside.
SAFETY REGULATIONS
This appliance has been designed for a use with 220V-240V. Don't use a extension cord of any kind.. Always turn off the appliance and remove the plug from the socket before doing any maintenance. Don't every place the appliance horizontally. This can damage the compressor. Only use the appliance upright on a flat surfacePlaats het toestel nooit horizontal. Dit kan de compressor beschaden. When you turn off the appliance, leaf it off for 3 to 4 minutes before you turn it on again. Always let your appliance be repaired by an autorised dealer. The compressor has a delay time of 3 minutes after you turn off the appliance.
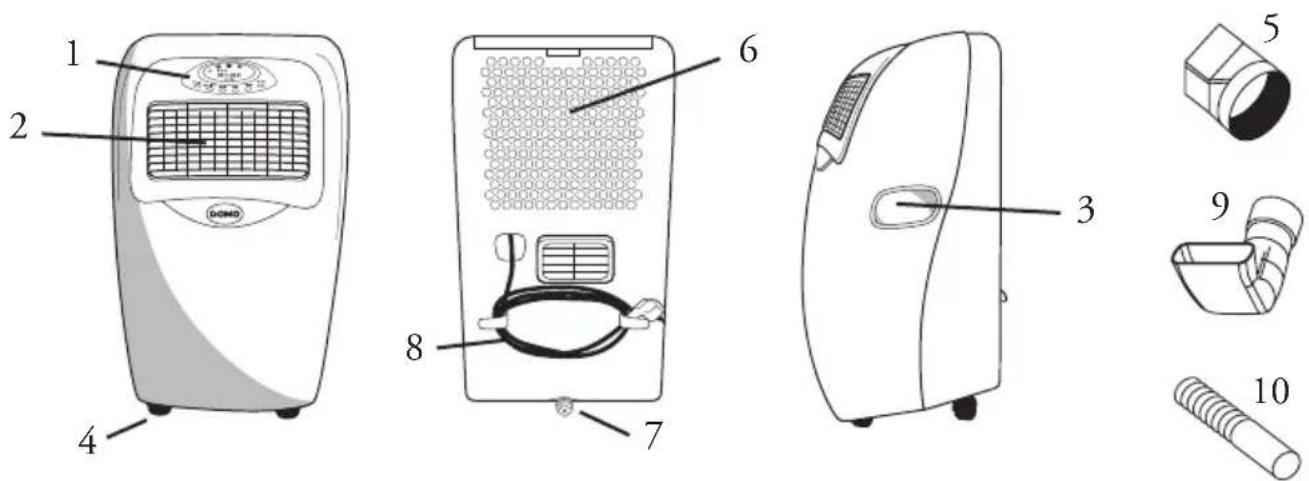
DESCRIPTION OF THE APPLIANCE
1 Control panel - 2 Upper airoutlet - 3 Handle - 4 Wheels - 5 Air inlet
6 Drainage - 7 Cord - 8 Bend plastic connector - 9 Air exhaust connector
10 Air exhaust duct
LCD- DISPLAY
- Temperature setting.
- Auto mode
- Ventilation speed
- Cool mode
- Ventilation mode
- Deshumidification mode
- Timer
- Error code
CONTROL PANEL:
- Temperature switches
- Ventilation speed button
3.Mode button - Timer knob
- On/off switch

For turning on and off of the unit.
Mode button :
There are 4 different modes from which you can choose :
Auto
Cooling
dehumidify
Ventilation
Ventilation speed button :
You can choose three different speeds: slow, medium or high.
Temperature button :
As soon as you turn on the airco a temperature will be displayed (this is mostly different from the room temperature). Use the arrows on the temperature button to lower or raise the temperature. The temperature can vary from 15^ up to 31^ .
For best use of your airco, first determine the temperature and afterwards select the mode. This prevents unnecessary strain on different parts of the airco.
Timer button :
Press the timer button. Use the arrows on the timer button to programm the airconditioner. When the appliance is on, you can programm it to turn it off. When the appliance is off, you can programm it to turn on. (remember to put the on/off button in the on position when you programm the airco to turn on.)
The maximum programmable time is 12 hours.
FUNCTIONS
Cooling function :
- Make sure the exhaust hose is properly instaled. When you want to cool you always have to guide the hose through a window to the outside, to remove the hot air from the room.
- Press the mode button a few time until the cool function is activated. Press the temperature button a few times to select the desired temperature.
- Press the ventilation speed button to select the desired ventilation speed. There are three speeds: slow, medium or fast.
To make the cooling optimal, take note of the following :
When the room is in direct contact with the sun, close the curtains.
Never place the appliance near a heating source.
Dehumidification function :
- Keep doors and windows closed to enlarge the effect of dehumidification.
- Make sure the drip tank is well in place.
- Press the mode button a few times to select the dehumidification function. The speed of dehumidification can not be changed.
- When you only use the appliance to dehumidify you don't need to use the exhaust hose.
Ventilation function :
- Press the mode button a few times to start the ventilation function. On the display is shown a fan symbol.
- Press the ventilation speed button to determine the ventilation speed.
CONNECTING THE EXHAUST HOSE
Place the rectangular piece of the exhaust hose on the air outlet of the appliance.
Place the other end through a nearby window. Attention : the length of the hose must be between 0.5 m and 1.5m
When you place the exhaust hose on the appliance, try to keep the hose horizontally.
The hight of the opening through which you guide the exhaust hose can vary from 40~cm upto 130 cm.
WATER DRAINAGE
When the airconditioner is working in the cool mode or dehumidification mode the condensation water will be drained into the internal drip tank. When the tank is full this will be indicated on the display en a buzzing sound will be heard. On the display is shown the code "E4". After three minutes the appliance will turn off.
Place the water plate underneath the drainage hole. Remove the plug and knop from the drainage.
PERMANENT WATER DRAINAGE
Remove the knob and plug from the drainage hole. Connect the drain tube to the hole.
CLEANING AND MAINTENANCE
Remove the plug from the socket before starting the maintenance.
Don't use any cleaning products. Use a soft dry cloth.
Air filters :
When the filters are covered in dust, the appliance won't function correctly anymore.
Clean the filters every 14 days. Never use the appliance without filters.
To remove dust, use a vacuum cleaner.
When the filters are very dusty, clean them in lukewarm water. The water cannot be warmer than 40^ . Let the filters dry.

- GARANTIEVOORWAARDEN
- CONDITIONS DE GARANTIE
- LEVERING EN UITPAKKEN
- BRANCHEMENT DU FLEXIBLE D'EVACUATION D'AIR
- DELIVERY AND UNPACKING
- SAFETY REGULATIONS
- DESCRIPTION OF THE APPLIANCE
- LCD- DISPLAY
- CONTROL PANEL:
- Mode button :
- Ventilation speed button :
- Temperature button :
- Timer button :
- FUNCTIONS
- Cooling function :
- Dehumidification function :
- Ventilation function :
- CONNECTING THE EXHAUST HOSE
- WATER DRAINAGE
- PERMANENT WATER DRAINAGE
- CLEANING AND MAINTENANCE
- Air filters :
Brand : DOMO
Model : DO-260A
Category : Air Conditioning